1
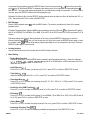
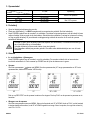
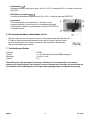
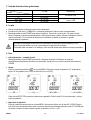
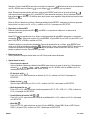
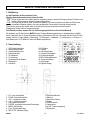
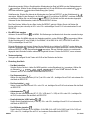
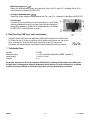
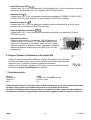
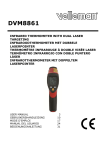
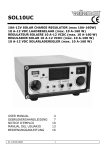
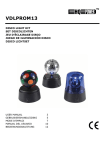
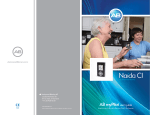
MVR1N
DIGITAL VOICE RECORDER
DIGITALE SPRAAKRECORDER
DICTAPHONE NUMÉRIQUE
DICTÁFONO DIGITAL
DIGITALES DIKTIERGERÄT
REGISTRATORE AUDIO DIGITALE
USER MANUAL
GEBRUIKERSHANDLEIDING
NOTICE D’EMPLOI
MANUAL DEL USUARIO
BEDIENUNGSANLEITUNG
MANUALE UTENTE
MVR1N – DIGITAL VOICE RECORDER
1. Introduction
To all residents of the European Union
Important environmental information about this product
This symbol on the device or the package indicates that disposal of the device after its lifecycle could harm
the environment. Do not dispose of the unit (or batteries) as unsorted municipal waste; it should be taken to a
specialized company for recycling. This device should be returned to your distributor or to a local recycling
service. Respect the local environmental rules.
If in doubt, contact your local waste disposal authorities.
Thank you for choosing Velleman! Please read the manual thoroughly before bringing this device into service. If the
device was damaged in transit, do not install or use it and contact your dealer. Your MVR1N should come with 1 x
recorder, 1 x cable set, 1 x junction box, 1 x headphones, 1 x AAA battery and 1 x CD-ROM with driver and manual.
2. Description
1.
2.
3.
4.
5.
6.
7.
8.
9.
voice-operated recording
cycle mode
battery power indicator
audio directory
short-playing recording mode
long-playing recording mode
total file number
play
record
1.
2.
3.
4.
5.
6.
7.
8.
9.
UP: previous/fast rewind
DOWN: next/fast forward
VOL+: increase volume
VOL-: decrease volume
A-B repeat/delete
POWER: power-on/power/off/time query
MENU: menu/mode
PLAY: play/pause
REC/STOP: record/stop
MVR1N
10. EQ mode
11. operation panel
12. A-B repeat
13. following reading
14. contrast
15. MP3 mode
16. key lock
17. audio mode
18. digital display
10. microphone connection
11. microphone
12. headphones connection
13. display
14. USB interface
15. speaker
16. HOLD: key locking
17. battery cover
-3-
VELLEMAN
3. Recording Time Table
Memory
Format
SP
LP
SP + VOR
LP + VOR
512MB
34h40m
138h40m
34h40m
138h40m
Remarks
No VOR function
VOR function
4. The Battery
• Open the battery compartment on the back of the recorder.
• Install one AAA-type (1 x LR03C included) battery respecting the polarity. Close the battery compartment.
• Hold the POWER button pressed to switch on the recorder. Check the battery status. With less than two bars, the
recorder will stop playing. Use the headphones and decrease the volume at that time, and replace the battery as
soon as possible. At insufficient power, the recorder will switch off and save the recording automatically.
Do not take out the battery during playback, or do not interrupt the connection to the PC when busy.
Remove the battery from the recorder when not in use.
A rechargeable battery may be used. For best results, however, we recommend alkaline batteries only.
5. Operation
• Switching On/Off – Time Checking
Hold the POWER button pressed to switch the recorder on or off. The recorder will automatically switch off after
two minutes of inactivity. To check the time and date, press the POWER button briefly.
• Recording
Enter the recording menu ( ) with the MENU button. Choose the recording mode (LP: long-playing recording or
SP: short-playing recording, both with or without VOR function).
SP recording mode
LP recording mode
SP + VOR recording mode
LP + VOR recording mode
Now, press the REC/STOP button to start recording. Stop the recording using the same button. Press the PLAY
button to pause and to resume the recording.
• Recording Playback
Enter the playback menu with the MENU button. Now, choose the file with UP or DOWN, press PLAY to
start/pause/resume playback, hold UP or DOWN pressed to fast rewind or fast forward, and adjust the volume
with VOL+ or VOL-.
Cycle mode: During playback, press the MENU button to enter the cycle mode (
UP or DOWN: all cycle ( ), single cycle ( ) or no cycle (no icon).
MVR1N
-4-
). Select the cycle mode with
VELLEMAN
Loop mode: During playback, press the REPEAT button to enter the loop mode (
). Select the loop starting
point ( ) with UP and press REPEAT to determine the starting point. Now, determine the loop ending point ( )
with REPEAT. The loop will be played sequentially for four times before exiting the loop mode. To exit the loop at
any time, press the REPEAT button thrice while playing the loop.
Deleting a file: Select a file, hold the REPEAT button pressed, select to delete one file or all the files with VOL- or
VOL+, and confirm with PLAY or abort with REC/STOP.
• MP3 Playback
Enter the MP3 playback menu (
playback mode.
) with the MENU button. The controls are identical to those of the normal
EQ mode: During playback, hold the MENU button pressed to enter the EQ mode ( xx). Select the EQ setting
with UP or DOWN (01 for NORMAL, 02 for DBB, 03 for JAZZ, 04 for DISCO and 05 for CLSS) and press PLAY to
confirm.
Following reading and Contrast: During playback of the loop, press the REPEAT button once to enter the
following reading mode ( ). Now, you can record your own loop. Next, press the REPEAT button again to enter
the contrast mode ( ). The two loops will be played sequentially so you can compare the two loops. Press the
REPEAT button again to exit the mode.
• Locking the Keys
Lock and unlock the keys of the recorder with the HOLD switch at the back.
• Menu Setting
o Setting Mode Selection
Switch on the recorder. Hold the MENU button pressed to enter the setting menu ( ). Select the submenu
(
,
,
,
, ,
,
) using the UP or DOWN button, enter the submenu with PLAY,
abort with REC/STOP.
o Audio Directory (
)
Press VOL+ or VOL- to select your directory (A, B or C), press PLAY to confirm or REC/STOP to abort.
)
o Time Setting (
Adjust the blinking digit with VOL+ or VOL-, press PLAY to confirm or REC/STOP to abort.
o Recording Mode (
)
Press VOL+ or VOL- to select your recording mode (SP, LP, SP + VOR or LP + VOR), press PLAY to confirm
or REC/STOP to abort.
o Sensitivity of the VOR Function (
)
Press VOL+ or VOL- to select the sensitivity level (01 to 05), press PLAY to confirm or REC/STOP to abort.
o EQ Setting ( )
Press VOL+ or VOL- to select the EQ setting (01 for NORMAL, 02 for DBB, 03 for JAZZ, 04 for DISCO and 05
for CLSS), press PLAY to confirm or REC/STOP to abort.
o Replay Mode ( )
Press VOL+ or VOL- to select the replay mode (all, one or no), press PLAY to confirm or REC/STOP to abort.
o Remaining Recording Time (
)
Press VOL+ or VOL- to check the remaining available recording space. Press REC/STOP to exit.
MVR1N
-5-
VELLEMAN
o Junction Box
Connect the junction box to the indoor telephone line (1), the telephone
(using the included cable (3)) and the recorder (using the included cable)
as illustrated. Select the recording mode and press the REC/STOP button
to start recording.
6. Uploading and Downloading a File via USB
Connect the recorder to a free USB port of your PC using the included USB connection cable.
To download or upload files, open the E:\ folder and copy files from and onto the recorder.
Make sure not to disconnect the recorder from the PC while downloading or uploading. All
your files could irrevocably be lost!
7. Technical Specifications
Memory
Power Supply
Dimensions
Total Weight
512MB
1 x 1.5V AAA battery (order code LR03C, incl.)
118 x 29 x 16mm
31g
Use this device with original accessories only. Velleman nv cannot be held responsible in the event of
damage or injury resulted from (incorrect) use of this device. For more info concerning this product, please
visit our website www.velleman.eu. The information in this manual is subject to change without prior notice.
MVR1N
-6-
VELLEMAN
MVR1N – DIGITALE SPRAAKRECORDER
1. Inleiding
Aan alle ingezetenen van de Europese Unie
Belangrijke milieu-informatie betreffende dit product
Dit symbool op het toestel of de verpakking geeft aan dat, als het na zijn levenscyclus wordt weggeworpen,
dit toestel schade kan toebrengen aan het milieu. Gooi dit toestel (en eventuele batterijen) niet bij het
gewone huishoudelijke afval; het moet bij een gespecialiseerd bedrijf terechtkomen voor recyclage. U moet
dit toestel naar uw verdeler of naar een lokaal recyclagepunt brengen. Respecteer de plaatselijke milieuwetgeving.
Hebt u vragen, contacteer dan de plaatselijke autoriteiten inzake verwijdering.
Dank u voor uw aankoop! Lees deze handleiding grondig voor u het toestel in gebruik neemt. Werd het toestel
beschadigd tijdens het transport, installeer het dan niet en raadpleeg uw dealer. De MVR1N wordt geleverd met 1 x
recorder, 1 x kabelset, 1 x aansluitdoos, 1 x oortelefoon, 1 x AAA-batterij en 1 x cd-rom met driver en handleiding.
2. Omschrijving
1.
2.
3.
4.
5.
6.
7.
8.
9.
VOR-opnamefunctie
herhaalmodus
aanduiding batterijniveau
directory
SP-opname
LP-opname
totaal aantal bestanden
weergave
opname
1.
2.
3.
4.
5.
6.
7.
8.
9.
UP: vorige/terugspoelen
DOWN: volgende/ doorspoelen
VOL+: volume verhogen
VOL-: volume verlagen
A-B herhalen/wissen
POWER: inschakelen/uitschakelen/tijdweergave
MENU: menu/modus
PLAY: weergave/pauze
REC/STOP: opname/stop
MVR1N
10. EQ-modus
11. stand
12. A-B lusherhaling
13. volgweergave
14. contrastweergave
15. mp3-weergavemode
16. toetsvergrendeling
17. audiomodus
18. digitale display
10. aansluiting microfoon
11. microfoon
12. aansluiting oortelefoon
13. display
14. usb-aansluiting
15. luidspreker
16. HOLD: toetsvergrendeling
17. batterijvak
-7-
VELLEMAN
3. Opnametabel
Geheugen
Formaat
512 MB
SP
LP
SP + VOR
LP + VOR
Opmerking
34 u 40 min.
138 u 40 min.
34 u 40 min.
138 u 40 min.
Geen VOR-opname
Met VOR-opname
4. De batterij
• Open het batterijvak achteraan de recorder.
• Plaats een AAA-batterij (1 x LR03C meegeleverd) en respecteer de polariteit. Sluit het batterijvak.
• Houd POWER ingedrukt om de recorder in te schakelen. Controleer het spanningsniveau van de batterij: bij twee
vakjes of minder zal de recorder zicht uitschakelen. Gebruik dan de oortelefoons, verlaag het volume en vervang
zo vlug mogelijk de batterij. Bij onvoldoende voedingspanning schakelt de recorder uit en wordt de opname
automatisch bewaard.
Verwijder in geen geval de batterij tijdens het afspelen van een bestand, of verbreek de aansluiting met
de pc niet tijdens het up- of downloaden.
Verwijder de batterij uit de recorder indien u hem niet gebruikt.
Een herlaadbare batterij mag worden gebruikt. We raden echter alkalinebatterijen aan voor de beste
resultaten.
5. Gebruik
• In- en uitschakelen – tijdweergave
Houd POWER ingedrukt om de recorder in en uit te schakelen. De recorder schakelt zich na twee minuten
inactiviteit automatisch uit. Druk eenmaal op POWER om de tijd en de datum weer te geven.
• Opname
Geef het opnamemenu ( ) weer met MENU. Kies de opnamemodus (LP: lange opnamemodus or SP: korte
opnamemodus, beide met of zonder VOR-functie).
SP
LP
SP + VOR
LP + VOR
Druk nu op REC/STOP om de opname te starten of te stoppen. Druk op PLAY om de opname te pauzeren en te
hervatten.
• Weergave van de opname
Geef het weergavemenu weer met MENU. Kies nu het bestand met UP of DOWN, druk op PLAY om het bestand
te starten/pauzeren/hervatten, houd UP of DOWN ingedrukt om terug of door te spoelen, en regel het volume bij
met VOL+ of VOL-.
MVR1N
-8-
VELLEMAN
Herhaalmodus: Druk tijdens het afspelen van een bestand op MENU om het herhaalmenu ( ) weer te geven.
Selecteer de herhaalmodus met UP of DOWN: herhaal alles ( ), herhaal een enkel bestand ( ) of geen
herhaling (geen symbool).
Lusmodus: Druk tijdens het afspelen van een bestand op REPEAT om het lusmenu (
) weer te geven.
Selecteer het beginpunt van de lus ( ) met UP en druk op REPEAT om dit beginpunt te bepalen. Plaats nu het
eindpunt ( ) met REPEAT. De lus wordt vier maal achtereenvolgens afgespeeld. Verlaat de lusmodus door
driemaal op REPEAT te drukken.
Een bestand wissen: Selecteer een bestand, houd REPEAT ingedrukt, kies hoeveel bestanden u wenst te wissen
(een of alle) met VOL- of VOL+, en bevestig met PLAY of breek af met REC/STOP.
• Weergave van een mp3-bestand
Geef het mp3-menu ( ) weer met MENU. De bedieningen zijn identiek aan die voor de normale weergave.
EQ-modus: Houd MENU tijdens het afspelen ingedrukt om EQ-menu ( xx) weer te geven. Selecteer de
instelling met UP of DOWN (01 voor NORMAL, 02 voor DBB, 03 voor JAZZ, 04 voor DISCO en 05 voor CLSS) en
bevestig met PLAY.
Volg- en contrastweergave: Speel een lus af en druk op REPEAT om de volgmodus ( ) weer te geven. Nu kunt
u een eigen lus opnemen. Druk vervolgens opnieuw op REPEAT om de contrastmodus ( ) weer te geven. De
twee lussen worden nu achtereenvolgens afgespeeld zodat u beide lussen met elkaar kunt vergelijken. Druk op
REPEAT om te verlaten.
• Toetsvergrendeling
Vergrendel en ontgrendel de toetsen met HOLD achteraan de recorder.
• Instelling via menu
o Selecteren van het instelmenu
Schakel de recorder in. Houd MENU ingedrukt om het instelmenu ( ) weer te geven. Selecteer een submenu
(
,
,
,
, ,
,
) met UP of DOWN, geef dit submenu weer met PLAY en
verlaat het menu met REC/STOP.
)
o De directory (
Selecteer de directory (A, B of C) met VOL+ of VOL-, bevestig met PLAY en verlaat het menu met
REC/STOP.
o Instellen van het uur (
)
Stel de knipperende digit in met VOL+ of VOL-, bevestig met PLAY en verlaat het menu met REC/STOP.
o Opnamemodus (
)
Selecteer de opnamemodus (SP, LP, SP + VOR of LP + VOR) met VOL+ or VOL-, bevestig met PLAY en
verlaat het menu met REC/STOP.
o Gevoeligheid van de VOR-functie (
)
Regel de gevoeligheid met (01 tot 05), VOL+ of VOL-, bevestig met PLAY en verlaat het menu met
REC/STOP.
o Instellen van de EQ ( )
Regel de EQ (01 voor NORMAL, 02 voor DBB, 03 voor JAZZ, 04 voor DISCO en 05 voor CLSS) bij met VOL+
of VOL-, bevestig met PLAY en verlaat het menu met REC/STOP.
MVR1N
-9-
VELLEMAN
o Herhaalmodus ( )
Selecteer de herhaling (alles, een of geen), met VOL+ of VOL-, bevestig met PLAY en verlaat het menu met
REC/STOP.
o Beschikbare opnameduur (
)
Controleer de beschikbare opnameduur met VOL+ of VOL-. Verlaat het menu met REC/STOP.
o Aansluitdoos
Sluit de aansluitdoos aan de telefoonlijn (1), de telefoon (via de
meegeleverde kabel (3)) en de recorder (via de meegeleverde kabel)
zoals afgebeeld. Selecteer de opnamemodus en druk op REC/STOP om
de opname te starten.
6. Een bestand uploaden en downloaden via usb
Sluit de recorder aan een vrije usb-poort van uw pc via de meegeleverde usb-kabel. Open de
E:\-folder en kopieer de gewenste bestanden van en naar de recorder. Verbreek in geen
geval de verbinding met de pc tijdens het uploaden of het downloaden. Alle bestanden
kunnen onherroepelijk gewist worden!
7. Technische specificaties
Geheugen
Voeding
Afmetingen
Gewicht
512 MB
1 x 1,5 V AAA-batterij (ordercode LR03C, meegelev.)
118 x 29 x 16 mm
31 g
Gebruik dit toestel enkel met originele accessoires. Velleman nv is niet aansprakelijk voor schade of
kwetsuren bij (verkeerd) gebruik van dit toestel. Voor meer informatie over dit product, zie www.velleman.eu.
De informatie in deze handleiding kan te allen tijde worden gewijzigd zonder voorafgaande kennisgeving.
MVR1N
- 10 -
VELLEMAN
MVR1N – DICTAPHONE NUMÉRIQUE
1. Introduction
Aux résidents de l'Union européenne
Des informations environnementales importantes concernant ce produit
Ce symbole sur l'appareil ou l'emballage indique que l’élimination d’un appareil en fin de vie peut polluer
l'environnement. Ne pas jeter un appareil électrique ou électronique (et des piles éventuelles) parmi les
déchets municipaux non sujets au tri sélectif ; une déchèterie traitera l’appareil en question. Renvoyer les
équipements usagés à votre fournisseur ou à un service de recyclage local. Il convient de respecter la
réglementation locale relative à la protection de l’environnement.
En cas de questions, contacter les autorités locales pour élimination.
Nous vous remercions de votre achat ! Lire la présente notice attentivement avant la mise en service de l’appareil. Si
l’appareil a été endommagé pendant le transport, ne pas l’installer et consulter votre revendeur. Le MVR1N est livré
avec 1 x dictaphone, 1 x jeu de câbles, 1 x boîtier de jonction, 1 x oreillettes, 1 x pile R03 et 1 x cédérom avec le pilote
et la notice d’emploi.
2. Description
1.
2.
3.
4.
5.
6.
7.
8.
9.
enregistrement à commande vocale VOR
mode de lecture en boucle
indication du niveau de la pile
répertoire audio
enregistrement court
enregistrement long
nombre de fichiers
lecture
enregistrement
1.
2.
3.
4.
5.
6.
7.
8.
9.
UP : précédent/recul rapide
DOWN : suivant/avance rapide
VOL+ : augmentation du volume
VOL- : diminution du volume
A-B répétition/effacement
POWER : allumage/extinction/affichage de l’heure
MENU : menu/mode
PLAY : lecture/pause
REC/STOP : enregistrement/arrêt
MVR1N
10. mode EQ
11. état
12. lecture de boucle A-B
13. enregistrement second
14. lecture comparative
15. mode MP3
16. verrouillage
17. mode audio
18. afficheur
10. connexion pour le microphone
11. microphone
12. connexion pour les oreillettes
13. afficheur
14. interface USB
15. haut-parleur
16. HOLD : verrouillage des touches
17. compartiment de la pile
- 11 -
VELLEMAN
3. Table de durée des enregistrements
Mémoire
Format
512 Mo
SP
LP
SP + VOR
LP + VOR
Remarque
34 h 40 min
138 h 40 min
34 h 40 min
138 h 40 min
Pas de fonction VOR
Fonction VOR
4. La pile
• Ouvrir le compartiment de la pile à l’arrière du dictaphone.
• Insérer une pile R03 (1 x LR03C incluse) en respectant la polarité. Refermer le compartiment.
• Maintenir enfoncé POWER pour allumer le dictaphone. Vérifier le niveau de la pile. Avec moins de deux briques,
le dictaphone s’éteint automatiquement. Utiliser les oreillettes et diminuer le volume, et remplacer la pile dès que
possible. Avec une tension d’alimentation insuffisante, le dictaphone s’éteint et sauvegarde automatiquement
l’enregistrement.
Ne jamais retirer la pile pendant la lecture ou interrompre la communication entre le dictaphone et le PC.
Retirer la pile du dictaphone lorsqu’il n’est pas employé.
Il est possible d’utiliser un accu. Cependant, nous conseillons d’utiliser une pile alcaline pour les
meilleures performances.
5. Emploi
• Allumage/extinction – affichage de l’heure
Maintenir enfoncé POWER pour allumer ou éteindre le dictaphone. Le dictaphone s’éteint automatiquement
après deux minutes d’inactivité. Afficher l’heure et la date en enfonçant brièvement sur POWER.
• Enregistrement
Accéder au menu d’enregistrement ( ) avec la touche MENU. Sélectionner le mode d’enregistrement (LP :
enregistrement long ou SP : enregistrement court, avec ou sans commande vocale VOR).
SP
LP
SP + VOR
LP + VOR
Enfoncer la touche REC/STOP pour démarrer ou arrêter l’enregistrement. Enfoncer la touche PLAY pour
interrompre et reprendre l’enregistrement.
• Lecture de l’enregistrement
Accéder au menu de lecture avec la touche MENU. Sélectionner un fichier avec la touche UP ou DOWN,
enfoncer la touche PLAY pour démarrer/interrompre/reprendre la lecture, maintenir enfoncé la touche UP ou
DOWN pour reculer ou avancer rapidement, et régler le volume avec VOL+ ou VOL-.
MVR1N
- 12 -
VELLEMAN
Lecture en boucle : Enfoncer la touche MENU pour accéder au menu de lecture en boucle ( ). Sélectionner le
mode de lecture avec UP ou DOWN : tous les fichiers ( ), un seul fichier ( ), pas de lecture en boucle (pas
de symbole).
Boucle : Pendant la lecture d’un fichier, enfoncer la touche REPEAT pour accéder au mode de la boucle (
).
Sélectionner le point de départ ( ) avec UP et enfoncer REPEAT pour déterminer ce point. À présent, déterminer
le point de fin de boucle ( ) avec REPEAT. Le dictaphone lit la boucle quatre fois de suite. Quitter la boucle en
enfonçant la touche REPEAT à trios reprises.
Effacement d’un fichier : Sélectionner un fichier, maintenir enfoncé REPEAT, sélectionner les fichiers à effacer
(tous ou un seul) avec VOL- ou VOL+, en confirmer avec PLAY ou suspendre avec REC/STOP.
• Lecture d’un fichier MP3
Accéder au menu de lecture MP3 (
lecture normale.
) avec MENU. Les commandes sont identiques à celles du menu de
Égalisation : Pendant la lecture d’un fichier, maintenir enfoncé MENU pour accéder au menu d’égalisation
( xx). Sélectionner un paramétrage (01 pour NORMAL, 02 pour DBB, 03 pour JAZZ, 04 pour DISCO et 05
pour CLSS) avec UP ou DOWN et confirmer avec PLAY.
Enregistrement second et lecture comparative : Pendant la lecture d’un fichier, enfoncer REPEAT pour accéder
au mode de l’enregistrement second ( ). Enregistrer votre boucle. Ensuite, renfoncer REPEAT pour accéder au
mode de lecture comparative ( ). Le dictaphone lit les deux boucles l’une après l’autre, ce qui vous permet de
comparer les boucles. Enfoncer REPEAT pour quitter.
• Verrouillage des touches
Activer et désactiver le verrouillage des touches avec HOLD à l’arrière du dictaphone.
• Paramétrage depuis le menu
o Sélection d’un sous-menu
Allumer le dictaphone. Maintenir enfoncé MENU pour accéder au menu de paramétrage ( ). Sélectionner un
,
,
,
, ,
,
) avec UP ou DOWN button, accéder au sous-menu
sous-menu (
avec PLAY, suspendre avec REC/STOP.
o Le répertoire audio (
)
Enfoncer VOL+ ou VOL- pour sélectionner un répertoire (A, B ou C), confirmer avec PLAY et suspendre avec
REC/STOP.
o Paramétrage de l’heure (
)
Régler le digit clignotant avec VOL+ ou VOL-, confirmer avec PLAY et suspendre avec REC/STOP.
o Mode d’enregistrement (
)
Enfoncer VOL+ ou VOL- pour sélectionner le mode d’enregistrement (SP, LP, SP + VOR ou LP + VOR),
confirmer avec PLAY et suspendre avec REC/STOP.
)
o Sensibilité de la fonction VOR (
Enfoncer VOL+ ou VOL- pour sélectionner le niveau de sensibilité (de 01 à 05), confirmer avec PLAY et
suspendre avec REC/STOP.
o Égalisation EQ ( )
Enfoncer VOL+ ou VOL- pour sélectionner un paramétrage (01 pour NORMAL, 02 pour DBB, 03 pour JAZZ,
04 pour DISCO et 05 pour CLSS), confirmer avec PLAY et suspendre avec REC/STOP.
MVR1N
- 13 -
VELLEMAN
o Mode de lecture en boucle ( )
Enfoncer VOL+ ou VOL- pour sélectionner les fichiers à lire en boucle (tous, un seul ou aucun), confirmer
avec PLAY et suspendre avec REC/STOP.
o Espace d’enregistrement disponible (
)
Enfoncer VOL+ ou VOL- pour afficher l’espace d’enregistrement disponible. Enfoncer REC/STOP pour quitter.
o Boîtier de jonction
Raccorder le boîtier à la ligne téléphonique (1), au téléphone (à l’aide du
câble inclus (3)) et au dictaphone (à l’aide du câble inclus) comme
illustré. Sélectionner le mode d’enregistrement et enfoncer REC/STOP
pour démarrer.
6. Téléchargement en aval et en amont d’un fichier
Raccorder le dictaphone à un port USB libre de votre ordinateur à l’aide du câble USB inclus.
Pour télécharger un fichier, ouvrir le dossier E:\ et copier le fichier vers ou de votre
dictaphone. Veiller à ne pas couper la communication entre le dictaphone et l’ordinateur lors
du téléchargement. Les fichiers peuvent irrévocablement être effacés !
7. Spécifications techniques
Mémoire
Alimentation
Dimensions
Poids
512 Mo
1 pile 1,5 V type R03 (réf. LR03C, incl.)
118 x 29 x 16 mm
31 g
N’employer cet appareil qu’avec des accessoires d’origine. SA Velleman ne sera aucunement responsable
de dommages ou lésions survenus à un usage (incorrect) de cet appareil. Pour plus d’information
concernant cet article, visitez notre site web www.velleman.eu. Toutes les informations présentées dans
cette notice peuvent être modifiées sans notification préalable.
MVR1N
- 14 -
VELLEMAN
MVR1N – DICTÁFONO DIGITAL
1. Introducción
A los ciudadanos de la Unión Europea
Importantes informaciones sobre el medio ambiente concerniente a este producto
Este símbolo en este aparato o el embalaje indica que, si tira las muestras inservibles, podrían dañar el
medio ambiente.
No tire este aparato (ni las pilas, si las hubiera) en la basura doméstica; debe ir a una empresa
especializada en reciclaje. Devuelva este aparato a su distribuidor o a la unidad de reciclaje local.
Respete las leyes locales en relación con el medio ambiente.
Si tiene dudas, contacte con las autoridades locales para residuos.
¡Gracias por haber comprado el MVR1N! Lea atentamente las instrucciones del manual antes de usarlo. Si el
aparato ha sufrido algún daño en el transporte no lo instale y póngase en contacto con su distribuidor. Incluye: 1 x
dictáfono, 1 x juego de cables, 1 x caja de conexiones, 1 x auriculares, 1 x pila AAA y 1 x CD-ROM con driver y el
manual del usuario.
2. Descripción
1.
2.
3.
4.
5.
6.
7.
8.
9.
función de grabación activada por voz (VOR)
modo de repetición
indicación del nivel de la pila
directorio audio
grabación corta (SP)
grabación larga (LP)
número de ficheros
reproducción
grabación
1.
2.
3.
4.
5.
6.
7.
8.
9.
UP : anterior/retroceder de manera rápida
DOWN : siguiente/avanzar de manera rápida
VOL+ : subir el volumen
VOL- : bajar el volumen
A-B repetir/borrar
POWER : activación/desactivación/visualización de la hora
MENU : menú/modo
PLAY : reproducción/pausa
REC/STOP : grabar/parar
MVR1N
10. modo EQ
11. estado
12. repetición A-B
13. siguiente grabación
14. reproducción comparativa
15. modo MP3
16. bloqueo
17. modo audio
18. pantalla
- 15 -
10.
11.
12.
13.
14.
15.
16.
17.
conexión para el micrófono
micrófono
conexión para los auriculares
pantalla
interfaz USB
altavoz
HOLD : bloqueo de las teclas
compartimento de pilas
VELLEMAN
3. Lista de duración de las grabaciones
Memoria
Formato
512 MB
SP
LP
SP + VOR
LP + VOR
Observación
34 h 40 min.
138 h 40 min.
34 h 40 min.
138 h 40 min.
Sin función VOR
Función VOR
4. La pila
• Abra el compartimento de pilas de la parte trasera del aparato.
• Introduzca una pila AAA (1 x LR03C incl.) al respectar la polaridad. Vuelva a cerrar el compartimento.
• Mantenga pulsada la tecla POWER para activar el dictáfono. Controle el nivel de la pila. Con menos de dos
barras, el aparato se desactiva automáticamente. Utilice las auriculares y baje el volumen. Reemplace la pila en
cuanto sea posible. Con una tensión de alimentación insuficiente, el aparato se desactiva y guarde
automáticamente la grabación.
No saque la pila durante la reproducción ni interrumpa la comunicación entre el dictáfono y el PC.
Saque la pila del dictáfono si no va a usarlo durante un largo período de tiempo.
Es posible utilizar una batería. Sin embargo, utilice una pila alcalina para obtener los mejores resultados.
5. Uso
• Activar/desactivar – visualizar la hora
Mantenga pulsada la tecla POWER para activar o desactivar el aparato. El dictáfono se desactiva
automáticamente después de dos minutos de inactividad. Visualice la hora y la fecha al pulsar brevemente en
POWER.
• Grabar
Entre en el menú de grabación ( ) con la tecla MENU. Seleccione el modo de grabación (LP: de grabación
larga o SP: de grabación corta, con o sin activación por voz (VOR)).
SP
LP
SP + VOR
LP + VOR
Pulse la tecla REC/STOP para activar o desactivar la grabación. Pulse la tecla PLAY para interrumpir y volver a
activar la grabación.
• Reproducir la grabación
Entre en el menú de reproducción con la tecla MENU. Seleccione un fichero con la tecla UP o DOWN. Pulse la
tecla PLAY para activar/interrumpir/ volver a activar la reproducción. Mantenga pulsada la tecla UP o DOWN para
retroceder o avanzar de manera rápida y ajustar el volumen con VOL+ o VOL-.
MVR1N
- 16 -
VELLEMAN
Repetición: Pulse la tecla MENU para entrar en el menú de repetición ( ). Seleccione el modo de reproducción
con UP o DOWN: todos los ficheros ( ), un solo fichero ( ), no repetición (no hay símbolo).
Bucle: Durante la reproducción de un fichero, pulse la tecla REPEAT para entrar en el modo del bucle (
).
Seleccione el punto inicial ( ) con UP y pulse REPEAT para determinar este punto. Ahora, determine el punto
final del bucle ( ) con REPEAT. El dictáfono lee el bucle cuatro veces seguidas. Salga del bucle al pulsar la tecla
REPEAT tres veces.
Borrar un fichero: Seleccione un fichero. Mantenga pulsada la tecla REPEAT, seleccione los ficheros que quiere
borrar (todos o un solo) con VOL- o VOL+ y confirme con PLAY o interrumpa con REC/STOP.
• Reproducir un fichero MP3
Entre en el menú de reproducción MP3 (
reproducción normal.
) con MENU. Los mandos son idénticos a los del menú de
Modo EQ: Durante la reproducción de un fichero, mantenga pulsada la tecla MENU para entrar en el menú de
ecualización ( xx). Seleccione un ajuste (01 para NORMAL, 02 para DBB, 03 para JAZZ, 04 para DISCO y 05
para CLSS) con UP o DOWN y confirme con PLAY.
Grabación siguiente y reproducción comparativa: Durante la reproducción de un fichero, pulse REPEAT para
entrar en el modo de la grabación siguiente ( ). Grabe el bucle. Luego, vuelva a pulsar REPEAT para entrar en
el modo de reproducción comparativa ( ). El dictáfono reproduce los dos bucles el uno tras otro, lo que
permite comparar los bucles. Pulse REPEAT para salir.
• Bloquear las teclas
Active y desactive el bloqueo de las teclas con HOLD de la parte trasera del aparato.
• Ajustar desde el menú
o Seleccionar un submenú
Active el dictáfono. Mantenga pulsada la tecla MENÚ para entrar en el menú de ajuste ( ). Seleccione un
submenú (
,
,
,
, ,
,
) con UP o DOWN, entre en submenú con PLAY,
interrumpa con REC/STOP.
)
o El directorio audio (
Pulse VOL+ o VOL- para seleccionar un directorio (A, B o C), confirme con PLAY e interrumpa con
REC/STOP.
o Ajustar la hora (
)
Ajuste el dígito intermitente con VOL+ o VOL-, confirme con PLAY e interrumpa con REC/STOP.
o Modo de grabación (
)
Pulse VOL+ o VOL- para seleccionar el modo de grabación (SP, LP, SP + VOR o LP + VOR), confirme con
PLAY e interrumpa con REC/STOP.
o Sensibilidad de la función VOR (
)
Pulse VOL+ o VOL- para seleccionar el nivel de sensibilidad (de 01 a 05), confirme con PLAY e interrumpa
con REC/STOP.
o Modo EQ ( )
Pulse VOL+ o VOL- para seleccionar un ajuste (01 para NORMAL, 02 para DBB, 03 para JAZZ, 04 para
DISCO y 05 para CLSS), confirme con PLAY e interrumpa con REC/STOP.
MVR1N
- 17 -
VELLEMAN
o Modo de repetición ( )
Pulse VOL+ o VOL- para seleccionar los ficheros que quiere reproducir en bucle (todos, un solo o ninguno),
confirme con PLAY e interrumpa con REC/STOP.
o Espacio de grabación disponible (
)
Pulse VOL+ o VOL- para visualizar el espacio de grabación disponible. Pulse REC/STOP para salir.
o Caja de conexión
Conecte la caja a la línea telefónica (1), al teléfono (con el cable incl. (3))
y al dictáfono (con el cable incl.) (Véase la fig.). Seleccione el modo de
grabación y pulse REC/STOP para activar la grabación.
6. Descargar y subir un fichero por USB
Conecte el dictáfono a un puerto USB libre del ordenador con el cable USB incl. Para
descargar o subir un fichero, abra la carpeta E:\ y copie el fichero al o del dictáfono.
Asegúrese de que no corte la comunicación entre el dictáfono y el ordenador mientras está
descargando o subiendo. ¡De esa manera puede borrar los ficheros irrevocablemente!
7. Especificaciones
Memoria
Alimentación
Dimensiones
Peso
512 MB
1 pila AAA de 1,5 V (ref. LR03C, incl.)
118 x 29 x 16mm
31 g
Utilice este aparato sólo con los accesorios originales. Velleman Spain SL no será responsable de daños ni
lesiones causados por un uso (indebido) de este aparato. Para más información sobre este producto, visite
nuestra página web www.velleman.eu. Se pueden modificar las especificaciones y el contenido de este
manual sin previo aviso.
MVR1N
- 18 -
VELLEMAN
MVR1N – DIGITALES DIKTIERGERÄT
1. Einführung
An alle Einwohner der Europäischen Union
Wichtige Umweltinformationen über dieses Produkt
Dieses Symbol auf dem Produkt oder der Verpackung zeigt an, dass die Entsorgung dieses Produktes nach
seinem Lebenszyklus der Umwelt Schaden zufügen kann.
Entsorgen Sie die Einheit (oder verwendeten Batterien) nicht als unsortiertes Hausmüll; die Einheit oder
verwendeten Batterien müssen von einer spezialisierten Firma zwecks Recycling entsorgt werden.
Diese Einheit muss an den Händler oder ein örtliches Recycling-Unternehmen retourniert werden.
Respektieren Sie die örtlichen Umweltvorschriften.
Falls Zweifel bestehen, wenden Sie sich für Entsorgungsrichtlinien an Ihre örtliche Behörde.
Wir bedanken uns für den Kauf des MVR1N! Lesen Sie diese Bedienungsanleitung vor Inbetriebnahme sorgfältig
durch. Überprüfen Sie, ob Transportschäden vorliegen. Sollte dies der Fall sein, verwenden Sie das Gerät nicht und
wenden Sie sich an Ihren Händler. Lieferumfang: 1 x Diktiergerät, 1 x Kabelsatz, 1 x Anschlussbox, 1 x Ohrhörer, 1 x
AAA-Batterie und 1 x CD-ROM mit Treiber und Bedienungsanleitung.
2. Umschreibung
1.
2.
3.
4.
5.
6.
7.
8.
9.
VOR-Aufnahmefunktion
Wiederholungsmodus
Anzeige Batterieniveau
Datenverzeichnis
SP-Aufnahme
LP-Aufnahme
Gesamtanzahl der Dateien
Wiedergabe
Aufnahme
1.
2.
3.
4.
5.
6.
7.
8.
9.
UP: vorig/ zurückspulen
DOWN: nächst/ durchspülen
VOL+: Lautstärke erhöhen
VOL-: Lautstärke verringern
A-B wiederholen/löschen
POWER: einschalten/ausschalten/Zeitanzeige
MENU: Menü/Modus
PLAY: Wiedergabe/Pause
REC/STOP: Aufnahme/Stopp
MVR1N
10. EQ-Modus
11. Zustand
12. A-B Wiederholung
13. Folgende Wiedergabe
14. Kontrastwiedergabe
15. MP3-Wiedergabemodus
16. Tastenverriegelung
17. Audiomodus
18. Digitales Display
10. Anschluss Mikrofon
11. Mikrofon
12. Anschluss Ohrhörer
13. Display
14. USB-Anschluss
15. Lautsprecher
16. HOLD: Tastenverriegelung
17. Batteriefach
- 19 -
VELLEMAN
3. Aufnahmeliste
Speicher
Format
512 MB
SP
LP
SP + VOR
LP + VOR
Bemerkung
34 u 40 min.
138 u 40 min.
34 u 40 min.
138 u 40 min.
Keine VOR-Aufnahme
Mit VOR-Aufnahme
4. Die Batterie
• Öffnen Sie das Batteriefach auf der Rückseite des Gerätes.
• Legen Sie eine AAA-Batterie(1 x LR03C mitgeliefert) ein. Beachten Sie die Polarität. Schließen Sie das
Batteriefach.
• Halten Sie POWER gedrückt, um das Gerät einzuschalten. Überprüfen Sie das Spannungsniveau der Batterie:
Wenn es zwei oder weniger Balken gibt, schaltet das Gerät sich automatisch ab. Verwenden Sie dann den
Ohrhörer, verringern Sie die Lautstärke und führen Si möglichst schnell einen Batteriewechsel durch. Wenn es
nicht genügend Spannung gibt, schaltet das Gerät ab und wird die Aufnahme automatisch gespeichert.
Entfernen Sie auf keinen Fall die Batterie während der Wiedergabe einer Datei, oder unterbrechen Sie
den Anschluss mit dem PC nicht während des Hochladens oder des Herunterladens.
Entfernen Sie die Batterie wenn Sie das Gerät nicht verwenden.
Sie dürfen eine wieder aufladbare Batterie verwenden. Verwenden Sie aber Alkalinebatterien für die
besten Ergebnisse.
5. Anwendung
• Ein- und ausschalten – Zeitanzeige
Halten Sie POWER gedrückt, um das Gerät ein- und auszuschalten. Das Gerät schaltet sich nach zwei Minuten
Inaktivität automatisch aus. Drücken Sie ein Mal POWER, um die Zeit und das Datum anzuzeigen.
• Aufnahme
Aktivieren Sie das Aufnahmemenü ( ) mit MENU. Wählen Sie den Aufnahmemodus (LP: langer
Aufnahmemodus oder SP: kurzer Aufnahmemodus, beide mit oder ohne VOR-Funktion).
SP
LP
SP + VOR
LP + VOR
Drücken Sie nun REC/STOP, um die Aufnahme zu starten oder zu stoppen. Drücken Sie PLAY, um die
Aufnahme zu pausieren und wieder zu starten.
• Anzeige der Aufnahme
Aktivieren Sie das Wiedergabemenü mit MENÜ. Wählen Sie nun die Datei mit UP oder DOWN, Drücken Sie
PLAY, um die Datei zu starten/pausieren/wieder starten. Halten Sie UP oder DOWN gedrückt, um zurück- oder
durchzuspülen und regeln Sie die Lautstärke mit VOL+ oder VOL-.
MVR1N
- 20 -
VELLEMAN
Wiederholungsmodus: Drücken Sie während der Wiedergabe einer Datei auf MENU um das Wiedergabemenü
( ) anzuzeigen. Wählen Sie den Wiederholungsmodus mit UP oder DOWN aus: alles wiederholen ( ), nur
eine Datei wiederholen ( ) oder keine Wiederholung (kein Symbol).
Schleifenmodus: Drücken Sie während der Wiedergabe einer Datei auf REPEAT, um das Schleifenmenü (
)
anzuzeigen. Wählen Sie den Startpunkt der Schleife ( ) mit UP und drücken Sie REPEAT, um diesen Startpunkt
zu bestimmen. Wählen Sie nun den Endpunkt ( ) mit REPEAT. Die Schleife vier Mal nacheinander abgespielt.
Verlassen Sie den Schleifenmodus, indem Sie drei Mal REPEAT drücken.
Eine Datei löschen: Wählen Sie eine Datei, halten Sie REPEAT gedrückt. Wählen Sie wie viel Dateien Sie
löschen möchten (eine oder alle) mit VOL- oder VOL+ und bestätigen Sie mit PLAY oder unterbrechen Sie mit
REC/STOP.
• Eine MP3-Datei anzeigen
Aktivieren Sie das MP3-Menü (
) mit MENU. Die Bedienungen sind identisch mit dieser der normalen Anzeige.
EQ-Modus: Halten Sie MENU während des Abspielens gedrückt, um das EQ-Menü ( xx) anzuzeigen. Wählen
Sie die Einstellung mit UP oder DOWN (01 für NORMAL, 02 für DBB, 03 für JAZZ, 04 für DISCO und 05 für
CLSS) und bestätigen Sie mit PLAY.
Folgende Wiedergabe und Kontrast: Spielen Sie eine Schleife ab und drücken Sie REPEAT, um den Modus der
folgenden Wiedergabe ( ) anzuzeigen. Nun können Sie eine eigene Schleife aufnehmen. Drücken Sie danach
wieder auf REPEAT, um den Kontrastmodus ( ) anzuzeigen. Die zwei Schleifen werden nun nacheinander
abgespielt damit Sie beide Schleifen miteinander vergleichen können. Drücken Sie REPEAT, um zu verlassen.
• Tastenverriegelung
Verriegeln und entriegeln Sie die Tasten mit HOLD auf der Rückseite des Gerätes.
• Einstellung über Menü
o Das Menü einstellen
Schalten Sie das Gerät ein. Halten Sie MENÜ gedrückt, um das Einstellmenü ( ) anzuzeigen. Wählen Sie
,
,
,
, ,
,
) mit UP oder DOWN. Aktivieren Sie das
ein Submenü (
Submenü mit PLAY und verlassen Sie das Menü mit REC/STOP.
o Das Datenverzeichnis (
)
Wählen Sie das Datenverzeichnis (A, B of C) mit VOL+ oder VOL-, bestätigen Sie mit PLAY und verlassen Sie
das Menü mit REC/STOP.
o Die Uhr einstellen (
)
Stellen Sie die blinkende Ziffer mit VOL+ oder VOL- ein, bestätigen Sie mit PLAY und verlassen Sie das Menü
mit REC/STOP.
o Aufnahmemodus (
)
Wählen Sie den Aufnahmemodus (SP, LP, SP + VOR oder LP + VOR) mit VOL+ oder VOL-, bestätigen Sie
mit PLAY und verlassen Sie das Menü mit REC/STOP.
o Empfindlichkeit der VOR-Funktion (
)
Regeln Sie die Empfindlichkeit mit (01 bis 05), VOL+ oder VOL-, bestätigen Sie mit PLAY und verlassen Sie
das Menü mit REC/STOP.
o Den EQ-Modus einstellen ( )
Regeln Sie den EQ-Modus (01 für NORMAL, 02 für DBB, 03 für JAZZ, 04 für DISCO und 05 für CLSS) mit
VOL+ oder VOL-, bestätigen Sie mit PLAY und verlassen Sie das Menü mit REC/STOP.
MVR1N
- 21 -
VELLEMAN
o Wiederholungsmodus ( )
Wählen Sie die Wiederholung (alles, eine oder keine Datei), mit VOL+ oder VOL-, bestätigen Sie mit PLAY
und verlassen Sie das Menü mit REC/STOP.
o Verfügbare Aufnahmedauer (
)
Überprüfen Sie die verfügbare Aufnahmedauer mit VOL+ oder VOL-. Verlassen Sie das Menü mit REC/STOP.
o Anschlussbox
Verbinden Sie die Anschlussbox mit der Telefonleitung (1), dem Telefon
(über das mitgelieferte Kabel (3)) und das Gerät (über das mitgelieferte
Kabel) (Siehe Abbildung). Wählen Sie de Aufnahmemodus und drücken
Sie REC/STOP, um die Aufnahme zu starten.
6. Eine Datei über USB hoch- und herunterladen
Verbinden Sie das Gerät über das mitgelieferte USB-Kabel mit einem freien USB-Port des
PC. Öffnen Sie den E:\-Ordner und kopieren Sie die gewünschten Dateien von und auf das
Gerät. Unterbrechen Sie auf keinen Fall die Verbindung mit dem PC während des
Hochladens oder Herunterladens. Alle Dateien könnten unwiderruflich gelöscht werden!
7. Technische Daten
Speicher
Stromversorgung
Abmessungen
Gewicht
512 MB
1 x 1,5 V AAA-Batterie (Bestell-Nr. LR03C, mitgeliefert)
118 x 29 x 16 mm
31 g
Verwenden Sie dieses Gerät nur mit originellen Zubehörteilen. Velleman NV übernimmt keine Haftung für
Schaden oder Verletzungen bei (falscher) Anwendung dieses Gerätes. Für mehr Informationen zu diesem
Produkt, siehe www.velleman.eu. Alle Änderungen ohne vorherige Ankündigung vorbehalten.
MVR1N
- 22 -
VELLEMAN
MVR1N – REGISTRATORE AUDIO DIGITALE
1. Introduzione
A tutti i residenti dell’Unione Europea
Importanti informazioni ambientali relative a questo prodotto
Questo simbolo riportato sul prodotto o sull’imballaggio, indica che è vietato smaltire il prodotto nell’ambiente
al termine del suo ciclo vitale in quanto può essere nocivo per l’ambiente stesso. Non smaltire il prodotto
(o le pile, se utilizzate) come rifiuto urbano indifferenziato; dovrebbe essere smaltito da un’impresa
specializzata nel riciclaggio.
Per informazioni più dettagliate circa il riciclaggio di questo prodotto, contattare l’ufficio comunale, il
servizio locale di smaltimento rifiuti oppure il negozio presso il quale è stato effettuato l’acquisto.
La ringraziamo per aver scelto Velleman! Si prega di leggere attentamente le informazioni contenute nel presente
manuale prima di utilizzare il dispositivo. Assicurarsi che l’apparecchio non sia stato danneggiato durante il trasporto; in
tale evenienza, contattare il proprio fornitore. La confezione contiene: un registratore MVR1N, un set di cavi, un
adattatore telefonico, auricolari, una batteria AAA e un CD-ROM contenente i driver e il manuale.
2. Descrizione
1.
2.
3.
4.
5.
6.
7.
8.
9.
registrazione ad attivazione vocale (VOR)
modalità ripetizione
indicatore livello batteria
directory audio
modalità di registrazione standard
modalità di registrazione estesa
numero totale dei file
riproduzione (Play)
registrazione(REC)
1.
2.
3.
4.
5.
6.
7.
8.
9.
UP: traccia precedente / riavvolgimento rapido
DOWN: traccia successiva / avanzamento veloce
VOL+: incremento volume
VOL-: decremento volume
ripetizione / cancellazione A-B
POWER: accensione / spegnimento – ora e data
MENU: menu / modalità
PLAY: riproduzione / pausa
REC/STOP: registrazione / stop
MVR1N
10. modalità EQ
11. icona operatività
12.ripetizione A-B
13. registrazione loop
14. comparazione
15. modalità MP3
16. blocco tasti
17. modalità riproduzione
18. contatore digitale
10. presa per microfono esterno
11. microfono
12. presa per auricolari
13. display
14. interfaccia USB
15. speaker
16. HOLD: blocco tasti
17. coperchio vano batteria
- 23 -
VELLEMAN
3. Tabella tempi di registrazione
Memoria
Modalità
SP
LP
SP + VOR
LP + VOR
512MB
34h 40minuti
138h 40minuti
34h 40minuti
138h 40minuti
Note
Funzione VOR non disponibile
Funzione VOR disponibile
4. Batteria
• Aprire il coperchio del vano batteria posto sul pannello posteriore del registratore
• Inserire una batteria formato AAA (LR03C, inclusa) rispettando la polarità indicata. Richiudere il vano batteria.
• Accendere il dispositivo tenendo premuto il tasto POWER. Verificare il livello di carica della batteria. Con meno di
2 tacche il registratore interrompe la riproduzione; utilizzare perciò le cuffie ed abbassare di conseguenza il livello
del volume provvedendo al più presto alla sostituzione della batteria. In caso d’insufficiente livello di carica, il
registratore si spegne automaticamente ed esegue il salvataggio della registrazione.
Non rimuovere la batteria durante una riproduzione e non interrompere il collegamento con il PC
quando il dispositivo mostra la scritta “busy”. Rimuovere la batteria se il registratore non viene utilizzato
per diverso tempo. È consentito l’utilizzo di batterie ricaricabili tuttavia, per ottenere i migliori risultati, si
consiglia l’impiego di batterie alcaline.
5. Funzionamento
• Accensione / spegnimento – Visualizzazione ora e data
Accendere il dispositivo tenendo premuto il tasto POWER. Il registratore si spegne automaticamente dopo circa
due minuti di inattività. Per visualizzare l’ora e la data, premere brevemente il tasto POWER.
• Registrazione
Selezionare il menu registrazione ( ) con il tasto MENU. Scegliere la modalità di registrazione desiderata con il
tasto Vol+ o Vol- (LP, modalità di registrazione estesa o SP, modalità di registrazione standard, entrambe con o
senza funzione VOR).
modalià di registrazione
SP
modalità di registrazione
LP
modalità di registrazione
SP + VOR
modalità di registrazione
LP + VOR
Per avviare la registrazione premere il tasto REC/STOP. Agire sullo stesso tasto per arrestare la registrazione.
Utilizzare il tasto PLAY per mettere in pausa il dispositivo e per riprendere la registrazione.
• Riproduzione di una registrazione
Selezionare il menu riproduzione (VOC) con il tasto MENU. Scegliere il file desiderato utilizzando il tasto UP o
DOWN, quindi premere PLAY per avviare la riproduzione, mettere in pausa o per riprendere la riproduzione.
MVR1N
- 24 -
VELLEMAN
Tenere premuto il tasto UP o DOWN per riavvolgere o avanzare velocemente e il tasto VOL+ o VOL- per regolare
il volume.
Modalità ripetizione: la breve pressione del tasto MENU durante una riproduzione permette di attivare la funzione
“Ripetizione” ( ). Selezionare il tipo di ripetizione utilizzando il tasto UP o DOWN: ripetizione in sequenza di
tutte le registrazioni ( ), riproduzione di una singola registrazione ( ) o ripetizione disabilitata (nessuna
icona).
Modalità ripetizione A-B: durante la riproduzione, premere brevemente il tasto REPEAT per attivare la modalità
). Selezionare il punto d’inizio ( ) con il tasto UP quindi premere il tasto REPEAT per
ripetizione parziale (
confermare. Impostare ora il punto di fine ( ) premendo il tasto REPEAT. La porzione della traccia così
selezionata verrà ripetuta fino a quando non viene premuto nuovamente il tasto REPET.
Nota: in modalità MP3 il loop verrà ripetuto 4 volte, dopodiché la modalità ripetizione verrà disattivata
automaticamente.
Cancellazione di una traccia: selezionare la traccia con il tasto UP o DOWN, tenere premuto il tasto REPEAT per
circa 2 secondi; utilizzare il tasto Vol+ o Vol- per impostare la cancellazione della singola traccia o di tutte le
tracce (ALL). Confermare con il tasto PLAY o annullare con il tasto REC/STOP.
• Riproduzione MP3
Selezionare il menu riproduzione MP3 (
riproduzione normale.
) con il tasto MENU. I comandi sono identici a quelli della modalità di
Modalità EQ: durante la riproduzione di MP3 tenere premuto il tasto MENU per entrare in modalità EQ ( xx).
Utilizzare i tasti UP e DOWN per selezionare l’equalizzazione desiderata (01 NORMAL, 02 DBB, 03 JAZZ, 04
DISCO, 05 CLSS) quindi premere PLAY per confermare.
), premere brevemente il
Confronto tra loop di un brano e Loop registrato: durante la riproduzione di un loop (
tasto REPEAT per entrare nella modalità registrazione loop ( ). Da questo momento il dispositivo esegue la
registrazione del segnale audio captato dal microfono. Premere nuovamente il tasto REPEAT per entrare in
modalità comparazione ( ); i due loop verranno riprodotti in sequenza permettendo all’utente di effettuare una
comparazione. Per uscire dalla modalità premere il tasto REPEAT.
• Blocco dei tasti
Per bloccare o sbloccare i tasti del dispositivo, agire sul selettore a slitta HOLD presente sul pannello posteriore.
• Menu impostazioni
o Selezione della modalità
Accendere il dispositivo. Tenere premuto il tasto MENU per entrare nel munu impostazioni ( ). Selezionare il
,
,
,
, ,
,
) utilizzando il tasto UP o DOWN;
sottomenu desiderato (
premere il tasto PLAY per confermare o REC/STOP per annullare.
o Directory Audio (
)
Premere il tasto VOL+ o VOL- per selezionare la directory desiderata (A, B o C), quindi premere PLAY per
confermare o REC/STOP per annullare.
o Impostazione orologio (
)
Regolare la cifra lampeggiante mediante il tasto VOL+ o VOL- (utilizzate il tasto UP o DOWN per selezionare il
campo successivo). Terminate le impostazioni, premere PLAY per confermare o REC/STOP per annullare.
o Modalità registrazione (
)
Premere il tasto VOL+ o VOL- per selezionare la modalità di registrazione desiderata (SP, LP, SP + VOR o LP
+ VOR), quindi premere PLAY per confermare o REC/STOP per annullare.
MVR1N
- 25 -
VELLEMAN
o Sensibilità funzione VOR (
)
Premere il tasto VOL+ o VOL- per selezionare il livello di sensibilità (da 01 a 05) per l’attivazione vocale della
registrazione, quindi premere PLAY per confermare o REC/STOP per annullare.
o Impostazione EQ ( )
Premere il tasto VOL+ o VOL- per selezionare l’equalizzazione desiderata (01 NORMAL, 02 DBB, 03 JAZZ,
04 DISCO, 05 CLSS), quindi premere PLAY per confermare o REC/STOP per annullare.
o Modalità di ripetizione ( )
Premere il tasto VOL+ o VOL- per selezionare la modalità di ripetizione desiderata (all, one o no), quindi
premere PLAY per confermare o REC/STOP per annullare.
o Tempo di registrazione rimanente (
)
Premere il tasto VOL+ o VOL- per verificare lo spazio ancora disponibile per la registrazione. Premere
REC/STOP per uscire.
o Registrazione telefonica
Collegare la linea telefonica (1) al connettore “LINE” dell’adattatore (4)
(incluso), il telefono al connettore “TEL” (utilizzando il cavetto fornito in
dotazione) e il registratore (2) al connettore “AUDIO OUTPUT” (tramite
l’apposito cavetto jack) come illustrato a fianco. Selezionare la modalità di
registrazione desiderata quindi premere il tasto REC/STOP per avviare
la registrazione.
6. Eseguire l’Upload o il Download di un file tramite USB
Collegare il registratore ad una porta USB libera del proprio PC mediante il cavo USB incluso
nella confezione. Aprire Esplora risorse, cliccare sull’unità Disco rimovibile corrispondente al
registratore (es. E:) ed eseguire il download o l’upload dei file desiderati.
Assicurarsi di non scollegare il registratore dal PC mentre è in corso il trasferimento dei dati
onde evitare di perdere irrimediabilmente tutti i propri file!
7. Specifiche tecniche
Memoria
Alimentazione
Dimensioni
Peso
512MB
1 batteria 1,5V AAA (LR03C, inclusa)
118 x 29 x 16mm
31g
Utilizzare questo dispositivo solo con accessori originali. Velleman nv non può essere ritenuta responsabile
per danni a cose o persone che potrebbero derivare da un errato utilizzo del dispositivo.
Per ulteriori informazioni relative a questo prodotto, vi preghiamo di visitare il nostro sito www.velleman.eu.
Le informazioni contenute in questo manuale possono essere soggette a modifiche senza alcun preavviso.
MVR1N
- 26 -
VELLEMAN