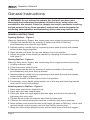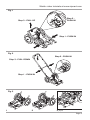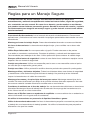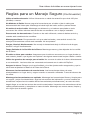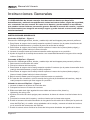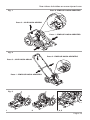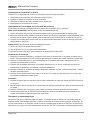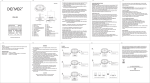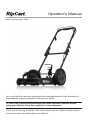
1
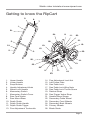
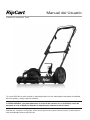
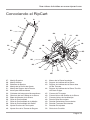
Operator’s Manual
Built by Smartman Tools
Your new RipCart has been engineered and manufactured to a high standard for
dependability, ease of operation, and operator safety.
m CAUTION: Carefully read through this entire operator’s manual before
using your RipCart. Save this manual for future reference.
Thank you for buying a RipCart. Visit www.ripcart.com for video tutorials and the
most up to date information about the RipCart.
Operator’s Manual
Table of Contents
• Getting to the know the RipCart ...................................................................... 2
• Rules for safe operation . .................................................................................. 3
• General Instructions .......................................................................................... 5
Opening the RipCart............................................................................................. 5
Closing the RipCart.............................................................................................. 5
Attaching a saw the RipCart................................................................................. 7
Changing Saw Blade.............................................................................................7
Changing Saw Blade Depth..................................................................................7
Depth Guide
Fine Adjustment
Check Your Surroundings......................................................................................7
Cutting...................................................................................................................7
Transportation and Storage...................................................................................7
•
Operation on the roof......................................................................................... 8
Test Cut..................................................................................................................8
Cut Horizontal Strips.............................................................................................8
Cut Vertical Strips..................................................................................................8
Cut Ridge Cap.......................................................................................................8
Cutting Checkpoints..............................................................................................8
Tearing Off Shingles...............................................................................................8
Cutting Ridge Vent Openings................................................................................8
Total Roof Deck Demolition...................................................................................8
• Accessories . ...................................................................................................... 9
Page 1
Watch video tutorials at www.ripcart.com
Getting to know the RipCart
5.
6.
7.
1.
21.
24.
11.
20.
12.
25.
3.
10.
19.
21.
2.
8.
15.
3.
25.
26.
14.
13.
23.
18.
22.
9.
17.
17.
16.
23.
1.
2.
3.
4.
5.
6.
7.
8.
9.
10.
11.
12.
13.
Upper Handle
Lower Handle
Snap Buttons
Handle Adjustment Knob
Wheel Lock Handle
Momentary Switch
Momentary Switch Cover
Saw Cord Hooks
Saw Mount Base
Depth Guide
Depth Guide Handle
Depth Guide Trigger
Fine Adjustment Turnbuckle
14.
15.
16.
17.
18.
19.
20.
21.
22.
23.
24.
25.
26.
Fine Adjustment Lock Nut
Left Frame Plate
Saw Table Lock
Saw Table Lock Wing Nuts
Saw Table Lock Thumb Screw
Ratchet Strap
Saw Trigger Velcro Strap
Handle Velcro Straps
Secondary Guide Wheel
Secondary Front Wheels
Secondary Back Wheels
Primary Wheels
Blade Guide
Page 2
Operator’s Manual
Rules for Safe Operation
m WARNING: Do not attempt to operate this tool until you have read
thoroughly and understand completely all instructions, safety rules, etc.
contained in this manual. Failure to comply can result in accidents involving
serious personal injury. Save operator’s manual and review frequently for
continuing safe operation, and instructing others who may use this tool.
Know your tool. Read operator’s manual carefully. Learn its applications and
limitation as well as specific potential hazards related to this tool.
Keep work area clean. Cluttered areas invite accidents.
Don’t force tool. It will do the job better and safer and blades will last longer.
Wear Proper Apparel. Do not wear loose clothing or jewelry. They can be caught
in moving parts. Rubber gloves and non-skid footwear are recommended when
working outdoors. Wear protective hair covering to contain long hair.
Always wear safety glasses. Everyday eyeglasses have only impact-resistant
lenses: they are NOT safety glasses.
Protect your lungs. Wear a face mask or dust mask if operation is dusty.
Protect your hearing. Wear hearing protection during extended periods
of operation.
Keep children and visitors away. All visitors should wear safety glasses and
be kept a safe distance from work area. Do not let visitors contact tool or
extension cord.
Keep hands and feet away from cutting area. Keep hands away from blade. Do
not reach underneath work while blade is rotating. Do not attempt to remove cut
material when blade is moving.
Consider work area environment. Do not use power tools in damp or wet
locations. Keep work area well lit. Do not expose tools to rain. Never use in
inclement weather.
Never use the RipCart as a balancing aid or substitute for roof scaffolding on
pitched roofs or otherwise.
Don’t use tool in presence of flammable liquids or gases.
Use right tool. Do not force small tool or attachment to do the job of a heavy-duty
tool. Do not use tool for purpose not intended.
Page 3
Watch video tutorials at www.ripcart.com
Rules for Safe Operation (Continued)
Use proper cord. Use only a 10 to 14 guage extension cord 100 feet or shorter.
Don’t abuse cord. Never carry tool by cord or yank it to disconnect from
receptacle. Keep cord from heat, oil, and sharp edges.
Don’t overreach. Keep proper footing and balance at all times. Do not use while
on a ladder or unstable support.
Disconnect tools. When not in use, before servicing, and when changing blades.
Stay alert. Watch what you are doing and use common sense. Do not operate tool
when you are tired. Do not rush.
Drugs, alcohol, medication. Do not operate tool while under the influence of
drugs, alcohol, or any medication.
Be aware of the saw blade. Keep hands and feet away from saw blade.
Keep the cord out of the way. Make sure cord is located so that it will not be cut,
stepped on, tripped over, or otherwise subjected to damage or stress.
Use Power Cord Management Hooks. Do not plug saw cord directly into
extension cord. The saw must only be plugged into the RipCart power cord.
Secure the saw. Be sure the depth and bevel adjustments are tight and saw is
securely fastened to the Saw Mount Base Plate.
Store idle tools. When not in use tools should be stored in a dry and locked-up
place - out of the reach of children.
Maintain tools with care. Keep tools sharp and clean for better and safer
performance. Follow instructions for lubricating and changing accessories. Inspect
tool cords periodically and if damaged, have repaired by authorized service facility.
Inspect extension cords periodically and replace if damaged. Keep handles dry,
clean, and free from oil and grease.
Page 4
Operator’s Manual
General Instructions
m WARNING: Do not attempt to operate this tool until you have read
thoroughly and understand completely all instructions, safety rules, etc.
contained in this manual. Failure to comply can result in accidents involving
serious personal injury. Save operator’s manual and review frequently for
continuing safe operation, and instructing others who may use this tool.
GENERAL INSTRUCTIONS
Opening RipCart - Figure 1
Warning: Keep arms, fingers, and cords away from hinges to prevent pinching.
1. Release top handle lock by pressing 2 buttons (at front of RipCart)
simultaneously and raise the top handle.
2. Release bottom handle lock by squeezing frame plate (thumb) and release
button (index finger) together.
3. Raise handle until both the top and bottom lock into position.
4. Adjust the angle of the handle as needed by releasing the bottom handle
lock (step 2)
Closing RipCart - Figure 2
Warning: Keep arms, fingers, and cords away from hinges to prevent pinching.
1. Unplug extension cord.
2. Close the power switch cover.
3. Release top handle lock by pressing 2 buttons (middle of the handle)
simultaneously and lower the top handle.
4. Release bottom handle lock by squeezing frame plate (thumb) and release
button (index finger) together.
5. Lower the handle until the bottom locks into position.
6. If necessary, move depth guide handle out of the way and lower top handle
down until it locks into position.
Attaching saw to RipCart - Figure 3
1. Raise base plate to the highest level.
2. Place saw onto saw mount base.
3. Slide saw table lock tight against the saw table and secure into place by
tightening the wing nuts.
4. Tighten thumb screw to keep the saw flush to base plate.
5. Connect the ratchet strap and continue to ratchet until saw is secured.
6. Wrap excess cord around the saw cord hooks (at back of RipCart), velcro cord
around handle, and plug saw cord into the RipCart switch plug.
7. Wrap the velcro strap attached to the ratchet strap around the saw trigger.
Page 5
Watch video tutorials at www.ripcart.com
Fig. 1
Step 2 PUSH IN
Step 3 - PULL UP
Step 1 - PUSH IN
Fig. 2
Step 2 - PUSH IN
Step 3 - PULL DOWN
Step 1 - PUSH IN
Fig. 3
1
2
3, 4, 5
Page 6
Operator’s Manual
Changing Saw Blade
Warning: Be sure saw blade has cooled.
1. Unplug extension cord from the RipCart plug.
2. Raise base plate to the highest level.
3. Place RipCart on side behind a fixed object.
4. Replace saw blade.
Changing Saw Blade Depth
The RipCart controls the depth of the saw blade using 2 features.
Depth Guide (for large adjustments in depth)
1. Release the depth guide lock by squeezing the depth guide handle.
2. Move the handle forward (toward the front of the RipCart) to lower the saw
blade depth or backward (toward the back to raise) to raise the saw blade depth.
3. When the saw blade is at the desired depth release the depth guide handle to
lock it into position.
Fine Adjustment (for minor adjustments in depth)
1. Release the fine adjustment brass lock nut.
2. Rotate the fine adjustment to the desired depth.
3. Tighten the brass lock nut to lock the fine adjustment into place.
Check Your Surroundings
1. Clear the intended path and anything on the ground below. Beware of debris
spray from saw on valuables and pedestrians.
2. Check the roof edge and variations in roof pitch. Be sure not to back off the roof.
3. Check the roof for electrical inlets, electrical lines, stinging insects, chimneys,
skylights, or any other roof protrusions.
4. Check the attic below for people, gas lines, electrical lines, and air
conditioning lines.
5. Check to see if there are built on additions to the roof. If so, the number of
shingles layers may vary.
Cutting
1. Raise the blade off the cutting surface by tilting the RipCart back (toward
the operator).
2. Pull the wheel lock handle toward the main handle to release the wheel locks.
3. Open the power switch cover and turn the saw on by engaging the power switch.
4. Slowly push the RipCart forward and lower the blade into the cutting surface by
tilting the RipCart forward (away from the operator).
Transportation and Storage
Make sure RipCart is closed and the handle has locked into position (see “Closing
RipCart” instructions). Use the saw handle to pick up the RipCart. If no saw is
attached to the RipCart, grab the front cross bar to pick up the RipCart. Store the
RipCart in a dry location above 32º F. Oil handle regularly.
Page 7
Watch video tutorials at www.ripcart.com
CUTTING A SLOPED MULTI-LAYER SHINGLE ROOF
Test Cut
1. Set the depth slightly above the estimated depth required.
2. Make a 3 foot long cut (horizontal to the roof edge).
3. Remove the shingles around the cut to check the depth.
4. The blade should gently scuff the roof deck.
5. Repeat steps 1-4 if necessary.
Cut Horizontal Strips
1. Begin in the middle of the roof and cut toward the outer edges.
2. Continue cuts two feet apart until all horizontal cuts are completed.
Cut Vertical Strips
1. Begin at the top of the roof and cut toward the roof edge.
2. Continue cuts two feet apart until all vertical cuts are completed.
Cut Ridge Cap
1. Check blade depth.
2. Center the saw blade in the middle of the ridge cap and go.
Tip: When possible, cut in the same direction as the shingles overlap.
Cutting Checkpoints
1. Use a tool to clean out debris clogging blade, because the blade may be
very hot.
2. Recheck saw blade depth to ensure it is correct, especially when changing
types of cuts.
3. Don’t push the saw too fast, let the blade do the work.
TEARING OFF SHINGLES
1. Begin tearing at a corner.
2. Tear around the perimeter.
3. Keep square intact.
4. Tear one square at a time along the roof, and keep all of the debris off the roof.
5. Tear the rest of the roof as necessary.
CUTTING RIDGE VENT OPENINGS
1. Set the depth of the saw blade to cut through the roof deck.
2. Align the top wheel (at the front of the cart) with the top of the roof and go.
3. When completed, be sure to reset the depth of the saw blade.
TOTAL ROOF DECK DEMOLITION
Warning: Be sure not to fall between cut sections of rafters.
1. Set the saw blade depth slightly below roof deck.
2. Cut into manageable sections.
Page 8
Operator’s Manual
Accessories
Use accessories that have been tested for use with your with your RipCart.
Visit www.ripcart.com for a list of the most current accessories.
RipBlade 3x (7 1/4”) – No-clog blades last 5 times longer than
the competition while cutting shingles and built-up roofing.
RipBlade 5x (7 1/4”) – No-clog blades last 6 times longer than
the competition while cutting shingles and built-up roofing.
RipBlade 14x (7 1/4”) – Best for cutting wood without nails
RipBlade 24x (7 1/4”) – Best for cutting wood floors and
plywood roof decks.
RipBar – Perfect for prying up cut roofs.
Page 9
Learn more at www.racjack.com
Steep roofs simplified.
The RacJack is a roof jack system that makes starting steep roofs easy without
ladder jacks or scaffolding. Set it up once and leave it up for the entire job.
Start Steep roofs easier
Install drip edge, ice shield and starter rows from the RacJack without harming the
landscape with ladders and scaffolding. The RacJack provides convenient storage
so your materials are at your finger tips and out of your way.
Safer workplace
Install the RacJack at the beginning of the job and have a walkway above the
gutter for the entire job. Fasten the safety rails that adjust to pitch of the roof and
be OSHA compliant.
No ladder jacks, picks or scaffolding
No more maneuvering your pick up over ladder jacks or storing and
installing materials from an isolated pick. No longer reinstall ladder
jacks and picks every morning, just install the RacJack and
leave it up for the entire job.
Learn more at:
www.racjack.com
Still have questions?
Visit www.ripcart.com for video tutorials and the most up to date
information about the RipCart.
Visit us online
www.ripcart.com/support
Send us a message
[email protected]
Call us (9:00 am and 5:00 pm EST)
248.218.0190
SMARTMAN TOOLS
www.smartmantools.com
[email protected]
248.218.0190 - phone
866.651.8364 - fax
© 2010 Smartman Tools LLC. All rights reserved. RipCartTM Patent Pending
Manual del Usuario
Creado por Smartman Tools
Tu nuevo RipCart ha sido creado y manufacturado con los estándares más altos de calidad,
fácil de operar, y seguro para el usuario.
m PRECAUCIÓN: Lea detenidamente el manual del usuario en su totalidad, antes de
empezar a usar el RipCart. Guarde el manual para referencia en el futuro.
Gracias por comprar un RipCart. Visite www.ripcart.com para video tutorial y la información
más actualizada acerca del RipCart.
Manual del Usuario
Tabla de Contenido
• Conociendo el RipCart ...................................................................................... 2
• Reglas de Seguridad para el Manejo ............................................................... 3
• Insrucciones Generales .................................................................................... 5
Abriendo el RipCart.............................................................................................. 5
Cerrando el RipCart.............................................................................................. 5
Uniendo la sierra del RipCart................................................................................ 7
Cambiando la Cuchilla de la Sierra.......................................................................7
Cambiando la Profundidad de la Cuchilla de la Sierra..........................................7
Guía de Profundidad
Ajuste Fino
Verificando Su Entorno..........................................................................................7
Cortando................................................................................................................7
Transporte y Almacenamiento...............................................................................7
•
Manejo en el techo............................................................................................. 8
Prueba de Corte....................................................................................................8
Corte en Tiras Horizontales...................................................................................8
Corte en Tiras Verticales........................................................................................8
Corte de la Tapa del Caballete..............................................................................8
Corte de Puntos de Verificación............................................................................8
Desprendiendo Tablillas.........................................................................................8
Cortando Aberturas de Rejillas..............................................................................8
Demolición Total de la Cubierta del Techo............................................................8
• Accesorios . ........................................................................................................ 9
Página 13
Vea videos tutoriales en www.ripcart.com
Conociendo el RipCart
5.
6.
7.
1.
21.
24.
11.
20.
12.
25.
3.
10.
19.
21.
2.
8.
15.
3.
25.
26.
14.
13.
23.
18.
22.
9.
17.
17.
16.
23.
27.
28.
29.
30.
31.
32.
33.
34.
35.
36.
37.
38.
39.
40.
Manija Superior
Manija Inferior
Botones de Broche
Manija de la Perilla de Ajuste
Manija de Seguro de la Rueda
Interruptor Momentáneo
Cubierta del Interruptor Momentáneo
Ganchos de los Cables de la Sierra
Base de Montar de la Sierra
Guía de Profundidad
Guía de Profundidad de la Manija
Guía de Profundidad del Gatillo
Ajuste Preciso del Torniquete
Ajuste fino de la Tuerca de Seguro
41.
42.
43.
44.
45.
46.
47.
48.
49.
50.
51.
52.
Marco de la Placa Izquierda
Seguro de la Mesa de la Sierra
Seguro de la Mesa de la Sierra alas
de las Tuercas
Seguro de la Mesa de la Sierra Tornillo
del dedo Pulgar
Correa del Trinquete
Correa Velcro del Gatillo de la Sierra
Correas Velcro de las Manijas
Rueda Guía Secundaria
Ruedas Delanteras Secundarias
Ruedas Traseras Secuntarias
Ruedas Principales
Guía de la Cuchilla
Página 14
Manual del Usuario
Reglas para un Manejo Seguro
m PRECAUCION: No intente manejar ésta herramienta hasta que haya leído
detenidamente y entienda completamente todas las instrucciones, reglas de seguridad,
etc. contenidas en este manual. En caso de no hacerlo, puede resultar en accidentes
que pueden causar lesiones personales graves. Guarde el manual del usuario y revíselo
frecuentemente para asegurar un manejo seguro y poder instruir a otros como utilizar
esta herramienta.
Conociendo Su Herramienta. Lea el manual del usuario cuidadosamente. Conozca sus
aplicaciones y limitaciones así como también los peligros potenciales relacionados con esta
herramienta.
Mantenga el area de trabajo limpia. Áreas desordenadas tienenden a causar accidentes.
No force la herramienta. La herramienta trabajará mejor y las cuchillas van a durar más
tiempo.
Utilice Ropa Adecuada. No use ropa suelta o joyería. Pueden atorarse en las partes
que están en constante moviemiento. Guantes de plástico y calzado anti-derrapante son
recomendados para trabajar al aire libre. Utilice protección para contener el cabello largo.
Siempre utilice lentes de seguridad. Lentes de uso diario tienen solamente espejos contra
impacto: No son lentes de seguridad.
Proteja sus pulmones. Utilice una mascarilla para la cara o una mascarilla contra el polvo
en caso de que la operación genere polvo.
Proteja sus oídos. Utilice protección auditiva durante periodos de operación prolongados.
Mantenga niños y visitantes alejados. Todos los visitantes deben usar lentes de seguridad
y mantenerse a una distancia segura del área de trabajo. No permita que los visitantes
toquen la herramienta o el cable de conección.
Mantenga las manos y los pies lejos del area para cortar. Mantenga manos lejos de la
cuchilla. No trate de alcanzar por abajo de la cuchilla mientras ésta este operando. No trate
de remover material cortado mientras la cuchilla este en movimiento.
Considere el ambiente en el área de trabajo. No use herramientas eléctricas en locaciones
húmedas. Mantenga el área de trabajo bien alumbrada. No exponga las herramientas a la
lluvia. Nunca se use en clima inclemente.
Nunca use el RipCart como un ayudante de equilibrio o como sustituto de un andamio en
techos inclinados o en ninguna otra circunstancia.
No utilice la herramienta en presencia de líquidos flamables o gases.
Utilice la herramienta adecuada. No force la herramienta pequeña o accesorios para hacer
el trabajo de una herramienta de trabajo pesado. No utilice la herramienta para propositos
diferentes a los que fue creada.
Página 15
Vea videos tutoriales en www.ripcart.com
Reglas para un Manejo Seguro (Continuación)
Utilice el cable adecuado. Utilice únicamente un cable de extensión que mida 100 pies
(30.48m) o menos.
No Maltrate el Cable. Nunca cargue la herramienta por el cable o jale el cable para
desconectarla del interruptor. Mantenga el cable lejos del calor, aceite o partes filosas.
No estire de más el cable. Mantenga una distancia y un balance apropiado en todo
momento. No utilizar mientras este arriba de una escalera o en un apoyo inestable.
Desconecte las herramientas. Cuando no las esté utilizando, antes de darles servicio y
cuando esté cambiando las cuchillas.
Mantengase Alerta. Ponga atención a lo que esta haciendo y use sentido común. No
maneje la herramienta cuando este cansado. No se apresure.
Drogas, Alcohol, Medicamento. No maneje la herramienta bajo la influencia de drogas,
alcohol o ningún medicamento.
Tenga Cuidado de la Cuchilla de la Sierra. Mantenga manos y pies alejados de la cuchilla
de la Sierra.
El cable no tiene que estorbar. Asegurese que el cable se encuentre en un lugar donde no
sea cortado, pisado, que alguien se tropieze o de alguna manera esté sujeto a daño o estrés.
Utilice los ganchos de manejo para el cable. No conecte el cable de la sierra directamente
a una extensión. La sierra debe ser conectada unicamente en el cable del RipCart.
Asegure la sierra. Cheque que la profundidad y nivel de ajustes estén asegurados y que la
sierra este sujetada a la Base de la Placa de la Sierra.
Almacene las herramientas de marcha lenta. Las herramientas deben de estar
almacenadas en un lugar seco y seguro cuando no se estén utilizando. Fuera del alcance de
los niños.
Mantenga las herramientas con cuidado. Mantenga las herramientas filosas y limpias para
un seguro y mejor funcionamiento. Siga las intrucciones de lubricación y como cambiar los
accesorios. Inspeccione los cables de las herramientas periodicamente y en caso de daño,
hagalo llegar a uno de los centros de servicio autorizados. Inspecione las extensiones de los
cables periodicamente y reemplace en caso de daño. Mantenga sus manos secas, limpias y
sin ningún tipo de aceite o grasa.
Página 16
Manual del Usuario
Instrucciones Generales
m PRECAUCION: No intente manejar ésta herramienta hasta que haya leído
detenidamente y entienda completamente todas las instrucciones, reglas de seguridad,
etc. contenidas en este manual. En caso de no hacerlo, puede resultar en accidentes
que pueden causar lesiones personales graves. Guarde el manual del usuario y revíselo
frecuentemente para asegurar un manejo seguro y poder instruir a otros como utilizar
esta herramienta.
INSTRUCCIONES GENERALES.
Abriendo el RipCart – Figura 1
Precaución: Mantenga brazos, dedos y cables lejos de las bisagras para prevenir pellizcos.
1. Para liberar el seguro de la manija superior apriete 2 botones (en la parte de enfrente del
RipCart) simultáneamente y levante la parte de arriba de la manija.
2. Para liberar el seguro de la manija inferior apriete el marco de la placa (dedo pulgar) y
libere el botón (dedo índice) al mismo tiempo.
3. Levante la manija hasta que ambos botones estén seguros en su posición.
4. Ajuste el ángulo de la manija de acuerdo a su necesidad liberando el seguro de la manija
inferior. (Paso 2)
Cerrando el RipCart – Figura 2
Precaución: Mantanga brazos, dedos y cables lejos de las bisagras para prevenir pellizcos.
1. Desconecte la extensión del cable.
2. Cierre la cubierta del interruptor.
3. Para liberar el seguro de la manija superior apriete 2 botones (en la parte de enmedio de la
manija) simultáneamente y baje la manija superior.
4. Para liberar el seguro de la manija inferior apriete el marco de la placa (dedo pulgar) y
libere el botón (dedo índice) al mismo tiempo.
5. Baje la manija hasta que los seguros inferiores esten en posición.
6. En caso de ser necesario, quite la manija de la guía de profundidad del camino y baje la
manija superior hasta que este segura en posición.
Uniendo la sierra al RipCart – Figura 3
1. Levante la base de la placa al nivel más alto.
2. Coloque la sierra en la base de montura.
3. Slide saw table lock tight against the saw table and secure into place by
tightening the wing nuts.
4. Apriete el tornillo del dedo pulgar para mantener la sierra al mismo nivel de la base de la
placa.
5. Conecte la correra del trinquete y continue hasta que la sierra este segura.
6. Enrolle el exceso del cable alrededor de los ganchos del cable de la sierra (en la parte de
atras del RipCart), el cordón velcro alrededor de la manija y conecte el cable de la sierra
en el enchufe del interruptor del RipCart.
7. Enrolle la correa velcro unida a la correa del trinquente alrededor del gatillo de la sierra.
Página 17
Vea videos tutoriales en www.ripcart.com
Fig. 1
Paso 2 -EMPUJE HACIA ADENTRO
Paso 3 - JALE HACIA ARRIBA
Paso 1 - EMPUJE HACIA ADENTRO
Fig. 2
Paso 2 - EMPUJE HACIA ADENTRO
Paso 3 - JALE HACIA ABAJO
Paso 1 - EMPUJE HACIA ADENTRO
Fig. 3
1
2
3, 4, 5
Página 18
Manual del Usuario
Cambiando la Cuchilla de la Sierra
Precaución: Asegurese de que la cuchilla de la sierra se haya enfriado.
1. Desconecte la extension del interruptor del RipCart.
2. Levante la base de la placa al nivel más alto.
3. Coloque el RipCart de lado detrás de un objeto fijo.
4. Reemplace la cuchilla de la sierra.
Cambiando la Profundidad de la Cuchilla de la Sierra.
El RipCart controla la profundidad de la sierra de la cuchilla de 2 maneras:
Guia de Profundidad (Para Ajustes de Profundidad Mayores)
1. Libere el seguro de guía de profundiad apretando la profundidad de la manija guía.
2. Mueva la manija hacia adelante (hacia el frente del RipCart) para bajar la profundidad de la
cuchilla de la sierra o hacia atrás para aumentar la profundida de la cuchilla de la sierra.
3. Cuando la cuchilla de la sierra esté en la profundidad deseada, libere la manija guía para
asegurarla en posición.
Ajuste Fino (Para Ajustes de Profundidad Menores)
1. Libere la tuerca de ajuste fino de latón.
2. Gire el ajuste Fino a la profundidad deseada.
3. Apriete la tuerca de latón para asegurar el ajuste fino en posición.
Verificando Su Entorno
1. Despeje el camino deseado y cualquier cosa que se encuentre en la parte de abajo en el
suelo. Tenga cuidado con los residuos de spray de la sierra en cosas valiosas y peatones.
2. Cheque la orilla del techo y sus variaciones en la echada del techo. Asegurese de no
caminar hacia atrás en el techo.
3. Cheque las entradas eléctricas, los cables eléctricos en el techo, insectos que piquen,
chimeneas, tragaluces, o cualquier otra protuberancia.
4. Cheque el ático en la parte de abajo, de gente, tuberias de gas, cables eléctricos y cables
de aire acondicionado.
5. Cheque si hay adiciones contruidas en el techo. En caso de que las haya, el número de
las capas de tablillas puede variar.
Cortando
1. Levante la placa de la superficie para cortar volteando la parte de atras del RipCart (hacia
el usuario)
2. Jale el seguro de la manija de la rueda hacia la manija principal para liberar los seguros de
la rueda.
3. Abra la cubierta del interruptor para poder encender la sierra através del interruptor.
4. Lentamente presione el RipCart hacia adelante y baje la cuchilla hacia la superficie de
cortar inclinando el RipCart (lejos del operador).
Transporte y Almacenamiento
Asegurese de que el RipCart esté cerrado y la manija tenga el seguro en posición (vea las
instrucciones “Cerrando el RipCart”) Utilice la manija de la sierra para levantar el RipCart. Si
no hay una sierra en el RipCart, tome la barra cruzada para levantar el RipCart. Almacene el
RipCart en un lugar con una temperatura arriba de 32F (0C). Engrase la manija regularmente.
Página 19
Vea videos tutoriales en www.ripcart.com
CORTANDO UN TECHO INCLINADO CON VARIAS CAPAS
Corte de Prueba
1. Establezca la profundidad ligeramente mayor a la profundidad estimada y requerida.
2. Haga un corte de 3 pies de largo (.91 m) (Horizontal a la orilla del techo)
3. Quite las tablillas alrededor del corte para checar la profundidad.
4. La cuchilla debe raspar suavemente la cubierta del techo.
5. En caso de ser necesario. Repita los pasos 1-4.
Cortando Tiras Horizontales
1. Empieze a la mitad del techo y corte hacia las orillas exteriores.
2. Continue los cortes con 2 pies (.61 m) de separación hasta que los cortes horizontales
estén completos.
Cortando Tiras Verticales
1. Cheque la profundidad de la cuchilla.
2. Centre la cuchilla de la sierra a la mitad de la tapa del caballete y empieze.
Cortando La Tapa del Caballete
1. Cheque la profundidad de la cuchilla.
2. Centre la cuchilla de la sierra a la mitad de la tapa del caballete y empieze.
Consejo: Cuando le sea possible, corte en la misma dirección ya que las tablillas se enciman
una sobre otra.
Cortando Los Puntos De Verificación
1. Utilice una herramienta para poder limpiar los residuos que estén obstruyendo la cuchilla.
Posiblemente la cuchilla este muy caliente.
2. Vuelva a checar la profundad de la cuchilla de la sierra para asegurarse que esté correcta,
especialmente cuando cambie los tipos de corte.
3. No presione la sierra demasiado rápido. Permitale a la cuchilla hacer el trabajo.
ARRANCANDO LAS TABLILLAS
1. Empiece a desprender en una esquina.
2. Desprender alrededor de un perímetro.
3. Mantenga el cuadrado intacto.
4. Desprender cuadrado por cuadrado a lo largo del techo, mantenga todos los residuos
fuera del techo.
5. Desprenda el resto del techo como sea necesario.
CORTANDO LAS ABERTURAS DE LAS REJILLAS
1. Establezca la profundidad de la cuchilla de la sierra para cortar através de la cubierta del
techo.
2. Alinee la rueda superior (en la parte de enfrente del RipCart) con la parte superior del
techo y empieze.
3. Cuando esté completo, asegurese de reiniciar la profundidad de la cuchilla de la sierra.
DEMOLICION TOTAL DE LA CUBIERTA DEL TECHO
Precaución: Asegurese de no caerse entre los cortes de las vigas.
1. Establezca la profundidad de la cuchilla de la sierra ligeramente menor a la cubierta del
techo.
2. Corte en secciones manejables.
Página 20
Manual del Usuario
Accesorios
Utilice accesorios que han sido probados para el uso de su RipCart.
Visite www.ripcart.com para ver la lista de accesorios actuales.
RipBlade 3x (7 1/4” - 17.78 cm)- Cuchillas de anti-atascamiento duran
5 veces más que las de la competencia para cortar tablillas y la
acumulación de partes del techo.
RipBlade 5x (7 1/4” - 17.78 cm) Cuchillas de anti-atascamiento duran
6 veces más que la de la competencia para cortar tablillas y la
acumulación de partes del techo.
RipBlade 14x (7 1/4” - 17.78 cm) La mejor para cortar madera
sin clavos.
RipBlade 24x (7 1/4” - 17.78 cm) La mejor para cortar pisos de
madera y cubiertas de techos de madera comprimida.
RipBar – Perfecta para mejorar los cortes de techo.
Página 21
Watch video tutorials at www.ripcart.com
Simplificación de Techo Inclinados.
El RacJack es un sistema para techos que facilita el inicio de los techos inclinados sin la
necesidad de una escalera o andamio. Coloquelo una vez y dejelo puesto para el resto del
trabajo.
Inicio de los Techos Inclinados De Manera Fácil.
Instale el borde de goteo, el escudo de hielo y las hileras de inicio del RacJack sin dañar
la arquitectura de paisaje con escaleras y andamios. El RacJack provee alamacenamiento
conveniente para que sus materiales estén al alacance de su mano y sin estorbar.
Un lugar de trabajo mas seguro.
Instale el RacJack al inicio del trabajo y obtenga un lugar para caminar arriba del canal
durante todo el trabajo. Abroche los barandales de seguridad que ajustan la echada del
techo y sea OSHA aprobado.
Sin Escaleras, Plataformas o Andamios.
No más maniobrar plataformas en sus escaleras o almacenar e instalar desde
una plataforma aislada. No vuelva a reinstalar los gatos de sus escaleras
cada mañana, solo intale el RackJack y déjelo instalado durante todo el
trabajo.
Conozca más en:
www.racjack.com
Tiene mas preguntas?
Visitenos en www.ripcart.com para ver un video tutorial y la información más
actualizada acerca del RipCart.
Visítenos en línea
www.ripcart.com/support
Mandenos un mensaje
[email protected]
Llamenos: (9:00 am and 5:00 pm tiempo del Este)
248.218.0190
SMARTMAN TOOLS
www.smartmantools.com
[email protected]
248.218.0190 - phone
866.651.8364 - fax
© 2010 Smartman Tools LLC. All rights reserved. RipCartTM Patent Pending