1
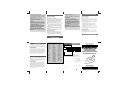
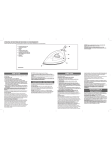
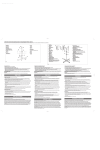
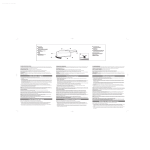
OPERATING INSTRUCTIONS/INSTRUCCIONES DE FUNCIONAMIENTO
PRODUCT MAY VARY SLIGHTLY FROM ILLUSTRATIONS/ESTE PRODUCTO PUEDE VARIAR LIGERAMENTE DE LAS ILUSTRACIONES
1. Surge-of-steam Button
Botón para chorro de vapor
2. Temperature Indicator Light
Luz indicadora de temperatura
3. Pivoting Flexible Power Cord
Cordón giratorio flexible
4. Heel Rest
Parador
5. Full-View Water Window
Ventana para ver la cantidad de agua
6. Full-Range Fabric/Temperature Dial
Dial de temperatura para diferentes clases de telas
7. Soleplate
Base inferior
8. Easy-to-fill Water Tank
Tanque para el agua fácil de llenar
9. Variable Steam Dial
Dial variable para el vapor
WARNING:
Irons are extremely hot; do not leave unattended while plugged in.
Keep children away; this is not a toy.
PRECAUCION:
La plancha calienta extremadamente; no la deje desatendida mientras
está enchufada. Mantenga alejados a los niños; esto no es un juguete.
C
B
1
Steam Vents
Salideros del vapor
I
D
H
E
G
F
TO INSURE THE HIGHEST QUALITY, ALL IRONS ARE WATER-TESTED.
PARA ASEGURAR LA MAS ALTA CALIDAD, TODAS LAS PLANCHAS
HAN SIDO PROBADAS CON AGUA.
FIGURE/FIGURA 1
HOW TO USE
This appliance is for HOUSEHOLD USE ONLY and may be plugged into
any AC electrical outlet (ordinary household current). Do not use any
other type of outlet.
SPECIAL ATTENTION: Your new appliance is designed with a protective
coating around the heating elements. When plugged in and operating for
the first time, there may be a little momentary smoking while this coating
is initially heated. This represents no danger to the user and does not
indicate a defect in the unit. When using for the first time, allow the
appliance to continue heating until the smoke dissipates. This should last
only about 30 seconds.
DETERMINING IRONING TEMPERATURE: Always check the ironing
instructions on the garment label first. Sort the fabrics out according to
the ironing temperature. The iron heats up faster than it cools down.
Therefore, start ironing the articles requiring the lower temperatures,
and then progress to the higher temperatures. If ironing instructions are
missing and you know the fabric, refer to the fabric chart on the iron. If
you are not sure of the fabric, test by ironing a hidden area such as an
inside seam or edge. If the iron drags or the fabric changes color, lower
the temperature and/or use a pressing cloth.
For blended fabrics, you must always use the lower setting. (E.g., a
garment with 60% nylon and 40% wool should be set at the temperature
indicated for nylon.) ALWAYS TEST BY IRONING A HIDDEN AREA.
BEFORE USING: Preheat; move iron over an old cloth several times to
remove any residue from the soleplate.
HOW TO FILL WITH WATER: Make sure iron is unplugged and the
fabric/temperature dial is in the "Off" position. Place iron on the heel rest
and set the variable steam dial on the "Off" setting. Pour water into water
tank (Fig. 2). In areas that have very hard water, use of distilled water is
preferred. Be careful not to overfill. If steam should fail to start when
using, and iron is in ironing position, gently bump the soleplate on the
ironing board once or twice. This helps to start the steam action.
NOTE: Water may drip from steam vents when variable steam dial is
activated if fabric/temperature dial is set below steam area or if the iron
has not been preheated for 1 to 2 minutes. If dripping still occurs after
preheating with fabric/temperature dial already in steam area, move the
fabric/temperature dial to a slightly higher setting (cotton or linen).
STEAM IRONING: Fill with water as described above, plug into electrical
outlet, and set fabric/temperature dial to appropriate setting. In the
steam range, these settings are linen, cotton or wool. The temperature
indicator light will come on, indicating the iron is plugged in and turned
on. The temperature indicator light will turn off when the iron reaches its
operating temperature. Turn the variable steam dial to the amount of
steam desired: Low to Max. For maximum steaming, keep water level
above the minimum refill line.
The temperature indicator light glows when turned on and goes off after
temperature is reached. This will indicate to you that the unit is
operating properly, keeping the iron at its operating temperature. The
temperature indicator light works in both steam and dry ironing
settings.
NOTE: For steam, you must set the fabric/temperature dial to a higher
setting, linen, cotton or wool.
SURGE-OF-STEAM: Press button momentarily for a quick surge of steam.
This works well for tough wrinkles and heavy fabrics. This feature is
also available for dry ironing. To ensure operation, water must be in the
water tank.
FIGURE/FIGURA 2
Always pour out any water left in the iron after each use. Be sure the iron
is unplugged and in the "Off" position. Slowly tilt iron nose down over the
sink, with the steam vents facing away from you. The water will run out
of the reservoir. Take caution when emptying water, as it may be hot.
DRY IRONING: Place variable steam dial in the “Off” position. Set
fabric/temperature dial and begin.
TO TURN IRON OFF: Turn the fabric/temperature dial to the “Off” position
and unplug the iron. Allow iron to cool completely before storing.
WHEN NOT USING, PLACE IRON ON HEEL REST TO AVOID BURNING THE
FABRIC OR DAMAGING OTHER SURFACES.
CARE AND CLEANING
This appliance requires little maintenance. It contains no user serviceable
parts. Do not try to repair it yourself. Refer it to qualified personnel if
servicing is needed.
TO CLEAN: Approximately once a month or so you should clean the iron to
remove any scales or impurities. Fill the water reservoir to 1/2 full. Place
the iron on the heel rest. Plug into an electrical outlet and turn the
fabric/temperature dial to the highest heat setting and the variable steam
dial to the maximum steam position. Allow iron to heat up until the
temperature indicator light goes out. Turn off and remove the plug from
the outlet. Hold the iron horizontally over the sink. Boiling water and
steam will begin to flow from the steam holes in the soleplate. Move the
iron forward and backward to help expel impurities. When steaming
stops, repeat procedure until the reservoir is empty.
TO CLEAN SOLEPLATE: The iron should be fully cooled before soleplate
cleaning begins. Apply a small amount of mild cleaner to a damp cloth.
Gently rub soleplate, then wipe with a moist cloth.
NEVER USE scouring pads or abrasive cleaners on soleplate, as this may
scratch the surface.
BEFORE USING: Preheat; move iron over an old cloth several times to
remove any residue from the soleplate.
TO STORE: Unplug appliance and allow to cool. Pour out any water left in
the iron. STORE IN UPRIGHT POSITION on heel rest. Never store iron
lying on soleplate. Never wrap cord tightly around the appliance. Do not
put any stress on the cord where it enters the unit, as it could cause cord
to fray and break.
COMO USAR
Este artefacto es para USO DOMESTICO SOLAMENTE y puede ser
enchufado en cualquier tomacorriente de corriente alterna (corriente
ordinaria doméstica). No use ningún otro tipo de tomacorriente.
ATENCION ESPECIAL: Su nuevo artefacto ha sido diseñado con un
revestimiento protector sobre los elementos de calentamiento. Cuando
se enchufa y usa por primera vez, puede salir un poco de humo
momentáneamente mientras se calienta este revestimiento. Esto no
representa ningún peligro para el usuario y no indica que la unidad esté
defectuosa. Cuando lo use por primera vez, deje que el artefacto
continúe calentando hasta que se disipe el humo. Esto debe durar sólo
unos 30 segundos.
COMO DETERMINAR LA TEMPERATURA DEL PLANCHADO: Siempre
verifique primero las instrucciones en la etiqueta de la ropa para el
planchado. Separe las telas de acuerdo a la temperatura del planchado.
La plancha calienta más rápido de lo que se enfría. Por lo tanto,
comience planchando las prendas que requieran las temperaturas más
bajas y luego vaya subiendo la temperatura hasta llegar a la más alta.
Si las instrucciones para el planchado se han perdido y usted conoce la
calidad de la tela, remítase a la tabla que se encuentra en la plancha.
Si no está seguro de la calidad de la tela, haga una prueba planchando
un área oculta, tal como dentro de la basta o en un filo. Si la plancha
arruga la tela o la cambia de color, baje la temperatura y/o use un paño
encima de la tela.
Para telas mezcladas, use siempre la posición más baja (por ej.: una
prenda con 60% de nylon y 40% de lana debe ser tratada con la
temperatura indicada para el nylon). SIEMPRE HAGA LA PRUEBA EN UN
AREA OCULTA.
ANTES DE USAR: Caliéntela; pase la plancha sobre un paño viejo varias
veces para remover cualquier residuo de la base inferior.
COMO LLENARLA CON AGUA: Asegúrese de que la plancha esté
desenchufada y el dial de temperatura para diferentes clases de telas
esté en la posición “Apagado” (Off)/(O). Coloque la plancha en su
parador y coloque el dial variable para el vapor en la posición
“Apagado” (“Off”). Vierta agua en el tanque (Fig. 2). En áreas donde el
agua es muy dura, se recomienda el uso de agua destilada. Tenga
cuidado de no sobrellenar el tanque. Si el vaporizador fallara en
comenzar su funcionamiento y la plancha está en la posición de
planchado, suavemente golpee la base inferior en la tabla de planchar
una o dos veces. Esto ayudará al funcionamiento del vaporizador.
NOTA: Agua puede gotear de los salideros del vapor cuando el dial
variable para el vapor es activado, si el dial de temperatura para el tipo
de tela es colocado debajo del área para vapor o si la plancha no ha sido
precalentada por 1 o 2 minutos. Si todavía siguiera goteando después de
precalentarla con el dial de temperatura para el tipo de tela en la
posición para vapor, mueva el dial de temperatura para el tipo de tela a
una posición ligeramente más alta (algodón o lino).
PLANCHADO AL VAPOR: Llene con agua como se describe arriba,
enchúfela en un tomacorriente eléctrico y coloque el dial de temperatura
en la posición apropiada. En la variedad del vapor, estas posiciones son
lino, algodón, lana. La luz indicadora de temperatura se iluminará,
indicando que la plancha está enchufada y encendida. La luz indicadora
de temperatura se apagará cuando la plancha llegue a su temperatura
de funcionamiento. Mueva el dial variable para el vapor a la cantidad de
vapor deseado: Bajo a Máximo. Para un máximo planchado al vapor,
mantenga el nivel del agua por encima de la línea mínima.
La luz indicadora de temperatura se ilumina cuando se enciende la
plancha y se apaga cuando ya alcanzó la temperatura. Esto le indicará
que la unidad está funcionando debidamente, manteniendo la plancha
en su temperatura de funcionamiento. La luz indicadora de temperatura
funciona en ambas posiciones, al vapor y en seco.
NOTA: Para planchar al vapor, usted debe colocar el dial de
temperatura a la posición más alta, lino, algodón o lana.
CHORRO DE VAPOR: Presione el botón momentáneamente para la rápida
salida de un chorro de vapor. Esto funciona perfectamente para unas
arrugas muy marcadas o telas muy gruesas. Este dispositivo es también
disponible para planchar en seco. Para asegurarse este funcionamiento,
debe haber agua en el tanque.
Siempre deseche cualquier residuo de agua en la plancha después de
cada uso. Asegúrese de que la plancha esté desenchufada y en la
posición “Apagado” (Off)/(O). Lentamente incline la plancha sobre el
lavadero, con los salideros del vapor alejados de usted. El agua saldrá
del depósito. Tenga cuidado cuando esté vaciando el agua ya que
puede estar caliente.
PLANCHADO EN SECO: Coloque el dial variable para el vapor en la
posición “Apagado” (Off)/(O). Fije el dial de temperatura y comience a
planchar.
PARA APAGAR LA PLANCHA: Coloque el dial de temperatura en la
posición “Apagado” (Off)/(O) y desenchufe la plancha. Déjela que se
enfríe completamente antes de guardarla.
CUANDO NO ESTE USANDO LA PLANCHA, COLOQUELA EN SU
PARADOR PARA EVITAR QUEMAR LA TELA O DAÑAR ALGUNAS OTRAS
SUPERFICIES.
CUIDADO Y LIMPIEZA
Este artefacto requiere un pequeño mantenimiento. No contiene piezas
que puedan ser reparadas por el usuario. No trate de repararlo usted
mismo. Si necesita reparación remítalo a personas calificadas.
PARA LIMPIAR: Aproximadamente una vez al mes limpie la plancha para
remover las escamas o impurezas. Llene el depósito para el agua hasta
la mitad. Coloque la plancha en su parador. Enchúfela a un tomacorriente
y mueva el dial de la temperatura a la posición más alta y el dial variable
para el vapor a la máxima posición de vapor. Deje que se caliente hasta
que la luz indicadora de temperatura se apague. Apáguela y retire el
enchufe del tomacorriente. Sostenga la plancha horizontalmente sobre el
lavadero. Agua caliente y vapor comenzará a salir por los salideros de
vapor en la base inferior. Mueva la plancha hacia adelante y hacia atrás
para ayudar a expeler las impurezas. Cuando deje de salir el vapor, repita
el procedimiento hasta que el depósito quede vacío.
PARA LIMPIAR LA BASE INFERIOR: La plancha debe estar
completamente fría antes de comenzar a limpiar la base inferior. Aplique
una pequeña cantidad de un limpiador suave en un paño húmedo.
Suavemente frote la base inferior, luego límpiela con un paño húmedo.
NUNCA USE esponjas de alambre o limpiadores abrasivos en la base
inferior, ya que esto podría arañar la superficie.
ANTES DE USAR: Caliéntela; pase la plancha sobre un paño viejo varias
veces para remover cualquier residuo de la base inferior.
PARA GUARDAR: Desenchufe el artefacto y deje que se enfríe. Deseche
cualquier residuo de agua en la plancha. GUARDELA PARADA EN SU
PARADOR. Nunca la guarde descansando en la base inferior. Nunca
enrolle ajustadamente el cordón en la unidad. No ponga presión sobre
el cordón donde entra en la unidad, ya que esto podría ocasionar que el
cordón se desgaste o se rompa.
ENCHUFE POLARIZADO (PARA MODELOS DE 120V)
Este artefacto tiene un enchufe polarizado (una hoja es más ancha que
la otra). Como medida de seguridad, este enchufe sólo debe usarse en
un tomacorriente polarizado en un solo sentido. Si no entrara en el
tomacorriente, invierta el enchufe y trate nuevamente. Si aún así no
entrara, busque la ayuda de un electricista calificado. No intente anular
este distintivo de seguridad.
SUGERENCIAS PARA SEGURIDAD CON EL CORDON
1. Nunca hale o tire del cordón o del artefacto.
2. Para introducir el enchufe, sujételo firmemente y guíelo hacia
el tomacorriente.
3. Para desconectar el artefacto, sujete el enchufe y retírelo del
tomacorriente.
4. Antes de cada uso, inspeccione el cordón por si tiene cortes y/o
raspaduras. Si algo fuera encontrado, esto indica que el artefacto
deberá ser revisado y el cordón deberá ser reemplazado. Por favor,
devuélvalo a nuestro Departamento de Servicio o a un
representante de servicio autorizado.
5. Nunca enrolle el cordón ajustadamente alrededor del artefacto,
ya que esto podría causar una presión excesiva en el cordón
donde éste entra al artefacto y causar desgaste y rotura.
NO HAGA FUNCIONAR EL ARTEFACTO SI EL CORDON MUESTRA
CUALQUIER DAÑO, O SI EL ARTEFACTO FUNCIONA
INTERMITENTEMENTE O DEJA DE FUNCIONAR COMPLETAMENTE.
Si el cordón estuviera dañado, deberá ser reemplazado por el
fabricante o su agente de servicio o por una persona calificada para
evitar un peligro.
INSTRUCCIONES DE SEGURIDAD
Cuando esté usando su plancha, medidas básicas de seguridad deben
seguirse, incluyendo las siguientes:
■ LEA TODAS LAS INSTRUCCIONES.
■ Use la plancha para su uso indicado.
■ Para protegerse contra el riesgo de un choque eléctrico, no sumerja
la plancha en el agua u otros líquidos.
■ La plancha debe estar siempre Apagada (Off)/(O) cuando se enchufa
o se desenchufa. Nunca tire del cordón para desconectarlo del
tomacorriente; en lugar de esto, tome el enchufe y retírelo.
■ No deje que el cordón toque superficies calientes. Deje que la
plancha se enfríe completamente antes de guardarla. Enrolle
el cordón alrededor de la unidad sin ajustar cuando la guarde.
■ Siempre desenchufe la plancha cuando la esté llenando o vaciando
de agua y cuando no la esté usando.
■ No haga funcionar la plancha con un cordón dañado o si la plancha
se ha caído y está dañada. Para evitar el riesgo de un choque
eléctrico, no desarme la plancha; llévela a una persona de servicio
calificada para su revisión y reparación. Un ensamblaje incorrecto
puede resultar en el riesgo de un choque eléctrico cuando sea
usada la plancha.
■ Cuando cualquier aparato está siendo usado por o cerca de un niño,
es necesario supervisar cuidadosamente su manejo. No deje la
plancha desatendida mientras está conectada o en una tabla
de planchar.
■ Pueden ocurrir quemaduras cuando se tocan las partes calientes
del metal. Tenga mucho cuidado cuando coloque la plancha hacia
abajo. Puede haber agua en el depósito.
POLARIZED PLUG (120V MODELS ONLY)
This appliance has a polarized plug (one blade is wider than the other).
As a safety feature, this plug fits in a polarized outlet only one way. If
the plug does not fit into the outlet, reverse the plug, and try again. If it
still does not fit, contact a qualified electrician. Do not attempt to
defeat this safety feature.
LINE CORD SAFETY TIPS
1. Never pull or yank on the cord or the appliance.
2. To insert plug, grasp it firmly and guide it into outlet.
3. To disconnect appliance, grasp plug and remove it from outlet.
4. Before each use, inspect the line cord for cuts and/or abrasion
marks. If any are found, this indicates that the appliance should
be serviced and the line cord replaced. Please return it to our
Service Department or to an authorized service representative.
5. Never wrap the cord tightly around the appliance, as this could
place undue stress on the cord where it enters the appliance and
cause it to fray and break.
DO NOT OPERATE APPLIANCE IF THE LINE CORD SHOWS ANY
DAMAGE, OR IF APPLIANCE WORKS INTERMITTENTLY OR STOPS
WORKING ENTIRELY.
If the supply cord is damaged, it must be replaced by the manufacturer
or its service agent or a similarly qualified person in order to avoid
a hazard.
IMPORTANT SAFEGUARDS
When using your iron, basic safety precautions should always be
followed, including the following:
■ READ ALL INSTRUCTIONS.
■ Use iron for its intended use.
■ To protect against a risk of electric shock, do not immerse the iron
in water or other liquids.
■ The iron should always be turned Off before plugging or unplugging
from outlet. Never yank cord to disconnect from outlet; instead, grasp
plug and pull to disconnect.
■ Do not allow cord to touch hot surfaces. Let iron cool completely
before putting away. Loop cord loosely around iron when storing.
■ Always disconnect iron from electrical outlet when filling with water
or emptying, and when not in use.
■ Do not operate iron with a damaged cord or if the iron has been
dropped or damaged. To avoid the risk of electric shock, do not
disassemble the iron; take it to a qualified serviceman for
examination and repair. Incorrect reassemblycan cause a risk
of electric shock when the iron is used.
■ Close supervision is necessary for any appliance being used by or
near children. Do not leave iron unattended while connected or on
an ironing board.
■ Burns can occur from touching hot metal parts, hot water or steam.
Use caution when you turn a steam iron upside down. There may be
hot water in the reservoir.
SPECIAL INSTRUCTIONS
■ To avoid a circuit overload, do not operate another high-wattage
appliance on the same circuit.
■ If an extension cord is absolutely necessary, a 10-ampere cord
should be used. Cords rated for less amperage may overheat.
Care should be taken to arrange the cord so that it cannot be pulled
or tripped over.
INSTRUCCIONES ESPECIALES
■ Para evitar una sobrecarga en un circuito, no haga funcionar otro
artefacto de alto consumo en el mismo circuito.
■ Si fuera de mucha necesidad usar un cordón de extensión, debe
usarse uno de 10 amperios. Cordones clasificados para menos
amperaje pueden recalentarse. Mucho cuidado se deberá tener en
colocar el cordón para así evitar que sea halado o que alguien
tropieze.
SAVE THESE INSTRUCTIONS
CONSERVE ESTAS
INSTRUCCIONES
NEED HELP?
Service, if necessary, must be performed by Household Products or Authorized
Household Appliance Service Center. The Service Center nearest you can be
found in the yellow pages of your phone book under “Appliances – Small.”
If mailing or shipping your unit, pack it carefully in a sturdy carton with enough
packing material to prevent damage. Include a note describing the problem to our
Service Center and be sure to give your return address. We also suggest that you
insure the package for your protection.
ONE-YEAR WARRANTY
Household Products warrants this product against any defects that are due to
faulty material or workmanship for a one-year period after the original date of
consumer purchase. This warranty does not include damage to the product
resulting from accident or misuse, or repairs performed by non-authorized repair
shops. If the product should become defective within the warranty period, we will
repair it or elect to replace it free of charge. To honor this warranty, the product
with the corresponding registration card is required. This warranty gives you
specific legal rights and you may also have other rights which vary from state to
state or province to province. For answers to any questions, contact your nearest
Household Products or Authorized Household Appliance Service Center.
¿NECESITA AYUDA?
Cualquier servicio de ser necesario, deberá realizarse por un centro de servicio
autorizado o propio de Household Products. Puede encontrar el centro de
servicio más cercano a usted, buscando en las páginas amarillas de la guía
telefónica.
Si envía por correo su unidad, empáquela con cuidado en un cartón resistente con
suficiente material de empaque para evitar cualquier daño. Por favor incluya una
nota para nuestro centro de servicio describiendo el problema. No se olvide de
anotar su dirección y su número telefónico. Para su propia protección le sugerimos
enviar el paquete asegurado.
UN AÑO DE GARANTIA
For the nearest service center, please see the appropriate address below.
Favor consultar la dirección de su servicentro más cercano.
ARGENTINA
Avenida Maipu 3850
1636 Olivos, Buenos Aires
Tel.: 0-800-8-1221
COLOMBIA
Carrera 38 No. 166-64
Santa Fe de Bogota
Tel.: 571-677-7496
COSTA RICA
Calle 20 entre Avenida 1 y 3
San José
Tel.: 506-221-6100
CHILE
Agustinas 2718
Santiago
Tel.: 562-687-1700
ECUADOR
Manuel Larrea 726 y
Bogota
Quito
Tel.: 593-256-8551
EL SALVADOR
27 Calle Poniente y 25 Ave.
Norte No. 1510
San Salvador
Tel.: 503-226-0022
GUATEMALA
6 Ave. 12-27 Zona 9
Ciudad de Guatemala
Tel.: 502-232-5705
MÉXICO
Lázaro Cárdenas #18
Col. Obrera
Delegación Cuatémoc
06800 México, D.F.
Tel.: 91-800-50-833
588-93-77
• VERACRUZ
Prolongación Días Mirón
#4280
(entre Violetas y
Magnolias)
Col. Remes
91920 Veracruz, Ver.
Tel.: (91-29) 21-70-16
• PUEBLA
17 Norte #205
72000 Puebla, Pue
Tel.: (91-22) 46-37-26
• TORREÓN
Blvd. Independencia 95 Pte.
27000 Torreón, Coal
Tel.: (91-17) 16-52-65
• MÉRIDA
Calle 63 #459-A
(entre 50 y 52)
97000 Mérida, Yuc.
Tel.: (91-99) 23-54-90
• COATZACOALCOS
Corregidora #406
96400 Coatzacoalcos, Ver.
Tel.: (91-92) 12-13-80
• GUADALAJARA
Av. Vallarta #4901-A
Col. Prados Vallarta
45020 Zapopan, Jal.
Tel.: (91-36) 73-28-15
• QUERÉTARO
Av. Madero 139, Pte.
76000 Querétaro, Qro.
Tel.: (91-42) 14-16-60
• SAN LUÍS POTOSÍ
Pedro Moreno #100
Col. Centro
78000 San Luís Potosí, S.L.P.
Tel.: (91-48) 14-25-67
• VILLAHERMOSA
Av. Constitución #516-A
86000 Villahermosa,
Tabasco
Tel.: (91-93) 12-51-11
• MONTERREY
Av. Fco. I. Madero Pte.
1820-AA
Zona Centro
64000. Monterrey, N.L.
Tel.: (91-83) 72-14-76
• CULIACÁN
Av. Nicolás Bravo #1063
80000 Culiacén, Sin.
Tel.: (91-57) 12-42-10
PANAMA
Via Brazil y Ave.
Samuel Lewis #31
Ciudad de Panama
Tel.: 507-264-2243
PERU
Calle Omega 225-231
Parque Industrial Caltao 1
Lima
Tel.: 511-451-9505
PUERTO RICO
Calle C#14
Rexco Industrial Park
Caparra Heights Station
San Juan, P.R. 00334
Tel.: 1-800-347-5117
SAVE THIS USE AND CARE BOOK
CONSERVE ESTE INSTRUCTIVO
120V~ 50/60Hz, 1100W
220 - 230V~ 50/60Hz, 1100W
Nombre del Distribuidor:
Dirección:
VARIABLE STEAM IRON
WITH SURGE-OF-STEAM
PLANCHA DE VAPOR VARIABLE
CON EXPULSION DE VAPOR
Ciudad / Estado:
Fecha de Compra:
Modelo:
Firma y Sello del Distribuidor
El consumidor podrá solicitar que se haga efectiva la garantía en cualquiera de
nuestras Sucursales o Centros de Servicio Autorizado en todo el país. En este
instructivo encontrará un listado de centros de servicio autorizado por Household
Products Commercial, S. de R.L. de C.V. en los cuales también podrá encontrar partes,
componentes, consumibles y accesorios para este producto.
Copyright © 2000 Applica Consumer Products, Inc.
Printed in People’s Republic of China
VENEZUELA
Edif. Xerox, Piso 6
Av. Libertador, Urb. Bello
Campo
Caracas
Tel.: 582-267-0590
IMPORTADOR - Household Products Commercial
S. de R.L. de C.V.
Manuel Avila Camacho 191-305,
Los Morales C.P. 11510 México, D.F.
Telf.: 5279 1000
Impreso en la República Popular China
Direitos autorais (c) 2000 Household Products, Inc.
Impresso no Republica Popular China
Household Products garantiza este producto contra cualquier defecto originado
por fallas en los materiales o en la mano de obra por un período de un año a
partir de la fecha original de compra. Esta garantía no incluye daños al producto
ocasionados por accidentes, mal uso, ni como resultado de reparaciones
efectuadas por personas no autorizadas. Si el producto resulta con defectos
dentro del período de garantía, conforme sea necesario, lo repararemos o
reemplazaremos libre de cargo. Para que esta garantía sea válida, debe
presentar el producto con la tarjeta de garantía. Esta garantía le otorga derechos
específicos, y usted podría tener otros que pueden variar en su país. Si tiene
alguna pregunta, comuníquese con una sucursal o centro de servicio más
cercano autorizado por Household Products.
PUB No. 175833-00 RV01
R399/11-30-120E/S
PLEASE READ ALL INSTRUCTIONS
BEFORE USING THIS PRODUCT
POR FAVOR LEA ESTE INSTRUCTIVO
ANTES DE USAR ESTE PRODUCTO
SI-750 (LAT/SPE)
SI-750C
MODELS/MODELOS I200, I330