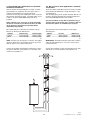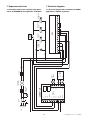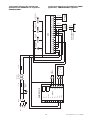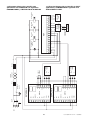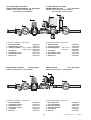
1
Humidificadores de agua atomizada MC / MC atomizing humidifiers
Manual del usuario
User guide
Technology & Evolution
Contents:
Indice:
1.
1.1
1.2
1.3
1.4
Características generales del humidificador MC
Principio de funcionamiento
Armario de control
Boquillas atomizadoras
Kit de montaje
1
1
1
3
4
1.
1.1
1.2
1.3
1.4
General characteristics of the MC humidifier
Operation
Control cabinet
Atomizing nozzles
Nozzles mounting kit
1
1
1
3
4
2.
2.1
2.2
2.3
2.4
Dimensionamiento de un sistema MC
Dimensionamiento de un sistema MC
Requisitos del aire y del agua
Verificación de la capacidad de absorción
Cálculo de la capacidad del compresor
5
5
5
6
7
2.
2.1
2.2
2.3
2.4
Sizing an MC system
Sizing an MC system
Air and water requirements
Checking water absorption in room applications
Sizing the capacity of the compressor
5
5
5
6
7
3. Installation instructions - MCR room system
3.1 Installation instructions - MCR system
3.2 MC system for room applications:
hydraulic connections
3.3 Nozzles mounting kit
7
8
4.
4.1
4.2
4.3
Installation instructions - MCD duct system
Positioning the atomizing manifold
Installation tips
Positioning humidity probes
11
13
16
16
5.
Hydraulic connections
17
Wire control cabinet
17
3.
Instruciones de instalación - sistema de
ambiente MCR
3.1 Instrucciones de instalación - sistema MCR
3.2 Sistema MC para aplicaciones en ambiente:
Conexiones hidráulicas
3.3 Kit de montaje de las boquillas
7
8
10
11
4.
10
11
Instrucciones de instalación - sistema de
conducto MCD
4.1 Posición del colector atomizador
4.2 Normas para la instalación
4.3 Posición de las sondas de humedad
11
13
16
16
5.
Conexiones hidráulicas
17
6.
6.
Cableado del armario de control
17
7. Electrical diagrams
18
7.1 Electrical diagram (60 and 230l/h) for room
applications ON/OFF regulation
18
7.2 Electrical diagram (60 and 230l/h) for room
applications PROPORTIONAL regulation
19
7.3 Electrical diagram (60 and 230l/h) for duct
applications PROPORTIONAL regulation and high
humidity limit
20
7. Esquemas eléctricos
7.1 Esquema eléctrico (60 y 230 l/h) para aplicaciones
de AMBIENTE con regulación Todo/Nada
7.2 Esquema eléctrico (60 y 230 l/h) para aplicaciones
de AMBIENTE con regulación Proporcional
7.3 Esquema eléctrico (60 y 230 l/h) para
aplicaciones de CONDUCTO con regulación
Proporcional y límite alto de humedad
18
18
19
20
8.
Setting the main parameters
21
9
9.1
9.2
9.3
Startup procedure
Before starting the MC system
Starting the system
Setting the main parameters
22
22
22
23
8.
Configuración de los parámetros principales
21
9.
9.1
9.2
9.3
Procedimiento de arranque
Antes de arrancar el sistema MC
Arranque del sistema
Ajuste de los parámetros principales
22
22
22
23
10. Programación de los parámetros fundamentales
del controlador CR72
25
10.1 Parámetros de configuración seleccionables
25
10.2 Tabla de parámetros operativos
25
11. Información adicional
26
11.1 Lógica de funcionamiento del armario Todo/Nada
para aplicaciones de ambiente
26
11.2 Lógica de funcionamiento del armario
Proporcional para aplicaciones de ambiente
26
11.3 Lógica de regulación para aplicaciones de conducto 26
11.4 Ajuste del paso Todo/Nada
27
11.5 Ajuste de la zona proporcional
27
11.6 Ajuste del límite alto y bajo de humedad
28
11.7 Ajuste de los límites para el punto de consigna 28
11.8 Cómo ajustar los parámetros
28
12. Mantenimiento
12.1 Instrucciones de mantenimiento
29
29
13. Piezas de recambio
13.1 Armario MC, máx. 60 l/h
13.2 Armario MC, máx. 230 l/h
14. Resolución de problemas
29
30
32
34
15. Características técnicas
40
10. Programming the main parameters of the
CR72 controller
10.1 Selectable configuration parameters
10.2 Table of operational parameters
25
25
25
11. Further information
11.1 Functioning logic of the ON/OFF cabinet for
room applications
11.2 Functioning logic of the proportional cabinet
for room applications
11.3 Regulation logic for duct applications
11.4 Setting the ON/OFF step
11.5 Setting the proportional zone
11.6 Setting the high and low humidity limit
11.7 Setting set point limits
11.8 How to set parameters
26
26
26
27
27
28
28
28
12. Maintenance
12.1 Maintenance instructions
29
29
13. Spare parts
13.1 MC Cabinet, 60l/h
13.2 MC Cabinet, 230l/h
29
30
32
14. Troubleshooting
37
15. Technical specifications
40
26
Cod. +030221742 rel. 2.2 – 16.06.2005
Cod. +030221742 rel. 2.2 – 16.06.2005
1. Características generales del
humidificador MC
1. General characteristics of the MC
humidifier
1.1 Principio de funcionamiento
1.1 Operation
Los humidificadores atomizadores MC son sistemas
eficaces especialmente diseñados para controlar grandes
áreas en las que es necesaria una gran cantidad de
humedad con un consumo bajo de energía. El agua y el
aire comprimido, calibrados en la capacidad y presión
correctas son transportados hasta las boquillas atomizadoras por dos líneas separadas. Gracias a su estructura
especial, las boquillas atomizadoras generan una nebulización de gotas finísimas (5-8 micrones) utilizando la
energía ambiental: un litro de agua atomizada, en efecto,
sustrae cerca de 590 kcal del aire. De esta manera el
humidificador atomizador produce un doble efecto: humidificación y refrigeración (proceso adiabático), muy útil en
una amplia gama de aplicaciones. Las boquillas atomizadoras están equipadas con un sistema mecánico de autolimpieza que asegura una limpieza perfecta y regular de
las boquillas del agua y del aire y evita la formación de
depósitos calcáreos. Cada boquilla atomizadora está provista de un pequeño pistón que limpia las boquillas cada
vez que el armario de control para el humidificador. El
sistema MC produce una atomización de agua óptima y,
gracias al diseño y a la estructura de las boquillas, garantiza un corte total del agua, eliminando de este modo el
eterno problema de goteo de agua cuando se apaga la
unidad. El armario de control electrónico mantiene la
humedad ambiente en el valor deseado y muestra constantemente la humedad relativa en el ambiente. El sistema MC se compone de: armario de control electrónico
con alimentación de agua y aire comprimido, boquillas
atomizadoras y kit de montaje de las boquillas.
CAREL's MC atomizing humidifiers are efficient systems
specifically designed to control large areas where a great
quantity of humidity is required with low energy consumption.
Water and compressed air, calibrated at right capacity and
pressure are piped by two separate lines up to the atomizing nozzles.
Thanks to their special structures, the atomizing nozzles
generate a very fine droplet spray (5-8 micron) by using
the energy of the ambient: one litre of atomized water, in
fact, subtracts about 590Kcal from the air.
In this way the atomizing humidifier gives a double effect:
humidification and cooling (adiabatic process) that proves
to be extremely useful in a wide range of applications.
The atomizing nozzles are equipped with an automatic
self-cleaning mechanical system that ensures the perfect
and regular cleaning of water and air nozzles and avoids
the formation of any possible calcareous deposit.
Each atomizing nozzle comes complete with a small
piston that cleans the nozzles any time the control cabinet
stops.
The MC system provides the best water atomization and,
thanks to the design and structure of the nozzles, ensures
a total shut-off of water, thus removing the old problem of
dripping water when the unit is OFF.
The electronic control cabinet keeps the ambient humidity
at the desired value and constantly displays the relative
humidity of the room. The MC system is composed of:
electronic control cabinet with compressed air and water
supply, atomizing nozzles, nozzles mounting kit.
1.2 Armario de control
1.2 Control cabinet
El armario está disponible en dos tamaños, con alimentación de agua de hasta 60 l/h ó de hasta 230 l/h., en dos
versiones para la utilización de agua normal o desmineralizada (agresiva) y en tres modelos, dependiendo de la
aplicación:
There are two cabinet sizes available, to supply water up
to 60l/h or up to 230l/h.
They come in two versions for normal or demineralized
(aggressive) water and in three models, depending on
your application:
– aplicación en conducto (o unidades de tratamiento de
aire) con regulación proporcional y límite alto de
humedad;
– aplicaciones directamente en ambiente, con regulación
proporcional;
– aplicaciones directamente en ambiente, con regulación
Todo/Nada;
– duct applications (air handling units) with proportional
regulation and high humidity limit;
– room applications, proportional regulation;
– room applications, ON/OFF regulation.
Please find the summary here below:
Por favor, busque el resumen a continuación:
Armario 60 l/h
Cabinet 60 l/h
Armario 230 l/h
Cabinet 230 l/h
Tipo de agua
Type of water
Uso/Regulación
Use/Regulation
MCRDNW0001
MCRDNW0000
Normal
Normal
ambiente, regulación Todo/Nada
room appl., reg. Todo/Nada
MCRPNW0001
MCRPNW0000
Normal
Normal
ambiente, regulación PROP.
room appl., PROP. reg.
MCDPNW0001
MCDPNW0000
Normal
conducto, regulación PROP. y límite alto humedad
Normal
Desmineralizada
Aggressive
Desmineralizada
Aggressive
Desmineralizada
Aggressive
duct, PROP. reg.+ high humidity limit
ambiente, regulación Todo/Nada
room appl., ON/OFF reg.
ambiente, regulación PROP.
room appl., PROP. reg.
conducto, regulación PROP. y límite alto humedad
duct, PROP. reg.+ high humidity limit
MCRDAW1001
MCRDAW1000
MCRPAW1001
MCRPAW1000
MCDPAW1001
MCDPAW1000
1
Cod. +030221742 rel. 2.2 – 16.06.2005
Cabinet
The cabinet comprises the electrical control panel and all
the hydraulic components. The electrical control panel
contains the CR72 regulator(s) and the AD4 logic card.
The hydraulic components include air and water lines with
their relative pressure regulators, electrovalves and manometers. The ON/OFF switch, a white light (line) and a
green one (humidification on) are on the front door of the
panel; two plexiglass windows let you check all the LED
indicators of the system so as to keep under control the
entire installation (protection degree IP55).
Armario
El armario está compuesto por un panel eléctrico de alimentación y regulación y de una parte hidráulica. El panel
eléctrico contiene el(los) regulador(es) CR72 y la tarjeta
lógica AD4. La parte hidráulica está compuesta por una
línea de aire y otra línea de agua con sus correspondientes reguladores de presión, electroválvulas y manómetros.
En la puerta delantera del panel están situados el
interruptor de Apagado/Encendido, la luz blanca de línea
(line) y la verde de humidificación en curso y dos ventanas de plexiglas para poder ver todos los indicadores
LED del sistema y mantener bajo control toda la instalación (grado de protección IP55).
External dimensions of the Cabinet
Cabinet up to 60 l/h: width (a) 515 mm x height (b)
580 mm x depth (c) 165 mm
Dimensiones externas del armario
Armario hasta 60 l/h: anchura (a) 515 mm x altura (b)
580 mm x profundidad (c) 165 mm
Cabinet up to 230 l/h: width (a) 550 mm x height (b)
630 mm x depth (c) 165 mm
Armario hasta 230 l/h: anchura (a) 550 mm x altura (b)
630 mm x profundidad (c) 165 mm
Montaje en pared
El armario va fijado a la pared (viene completo con tres
tornillos) sobre una superficie de apoyo suficientemente
sólida. Deje el suficiente espacio libre a ambos lados,
para las conexiones de aire y de agua. Las conexiones
eléctricas se realizan normalmente por el lado izquierdo
del armario. La puerta de frente abre hacia la izquierda.
Armario de 60 l/h:
Armario de 230 l/h:
Wall mounting
The cabinet should be wall mounted (it comes complete
with three screws) and placed over a solid structure.
Leave enough clearance on both sides for air and water
connections. Electrical connections are usually made
through the top left side of the cabinet. The door opens
from the front and swings to the left.
Cabinet up to 60l/h: e: 455 mm - d: 385 mm
Cabinet up to 230l/h: e: 480 mm - d: 440 mm
e: 455 mm - d: 385 mm
e: 480 mm - d: 440 mm
a
d
b
b
e
Nº 3 taladros ¯6
No.3 holes ¯6
c
a
=
=
Fig. 2
Fig. 1
2
Cod. +030221742 rel. 2.2 – 16.06.2005
1.3 Boquillas atomizadoras
1.3 Atomizing nozzles
Las boquillas atomizadoras son de acero inoxidable AISI
316 y están disponibles en 5 modelos diferentes, para
distintos caudales de agua pero con el mismo peso y
tamaño. En la etiqueta de cada boquilla se indica el modelo
y la capacidad de la misma.
Modelo
Código
Capacidad
A
MCAA200000
2,7 l/h
The atomizing nozzles are made of AISI 316 stainless
steel and are available in 5 different models, for different
water flows but with the same size and weight. The label
on each nozzle indicates model and capacity of the nozzle.
MCAB200000
4,0 l/h
C
MCAC200000
5,4 l/h
D
MCAD200000
6,8 l/h
E
MCAE200000
10 l/h
Code
MCAA200000
MCAB200000
MCAC200000
MCAD200000
MCAE200000
Capacity
2.7l/h
4.0l/h
5.4l/h
6.8l/h
10l/h
32
B
Model
A
B
C
D
E
73
Fig. 4
Fig. 3
Each atomizing nozzle has an input port for air (indicated
with Air) and one for water.
The structure and design of the nozzles ensure excellent
atomization of the water in the ambient air as well as the
complete shut-off of water when the cabinet stops, thus
removing the old problem of dripping water.
Besides, the automatic and regular self-cleaning cycle of
the nozzles helps get rid of any calcareous deposit.
Cada boquilla atomizadora tiene dos puertos de entrada
para el aire (indicados con Air) y uno para el agua.
La estructura y el diseño de las boquillas garantizan una
perfecta nebulización del agua en el ambiente asi como el
corte total del agua cuando el armario para el humidificador, eliminando de este modo el eterno problema del
goteo de agua. Además, el ciclo de autolimpieza regular
de las boquillas evita que se acumulen depósitos
calcáreos.
3
Cod. +030221742 rel. 2.2 – 16.06.2005
1.4 Kit de montaje
1.4 Nozzles mounting kit
El kit de montaje se compone de una serie de herramientas que simplificarán y facilitarán el procedimiento de
montaje de las boquillas atomizadoras de las líneas de
aire y de agua.
The mounting kit comprises a series of tools that will
simplify and make it extremely easy for the End-User to
assemble the atomizing nozzles on the air and water
lines.
El kit se puede utilizar con agua normal o con agua
desmineralizada (agresiva).
The kit can be used either with normal or aggressive
water.
MCK1 para el montaje de las boquillas tanto en aplicaciones de ambiente como de conducto.
MCK1 is the nozzle mounting kit available for both room
and duct applications.
Fig. 5
Kit MCK1
MCK1 Kit
1
2
3
4
5
6
7
8
9
10
1
2
3
4
5
6
7
8
9
10
boquilla atomizadora
racor curva 90° HH 1/4”
bobina H43 MH 1/4”
machón 1/4”
válvula 2 vías MH 1/4”
válvula 2 vías PVSF 1/4”
racor 180° M 1/4”
tubo de nylon B TFN Ø 6/8 mm
racor 90° HH 1/4” Ø 6/8 mm
manguito HH 1/4”
4
atomizing nozzle
90° 1/4" FF pipe fitting
H43 1/4" MF spacer
1/4" nipple
1/4" MF 2-way valve
1/4" PVSF 2-way valve
180° 1/4" M pipe connection
B TFN pipe Ø 6/8mm
90° connection FF 1/4" Ø 6/8mm
1/4" FF pipe coupling
Cod. +030221742 rel. 2.2 – 16.06.2005
2. Dimensionamiento de un sistema MC
2. Sizing an MC system
2.1 Dimensionamiento de un sistema MC
2.1 Sizing an MC system
En el dimensionamiento de un sistema MC se tienen que
tener en cuenta varios factores: los caudales de aire, la
velocidad del flujo, la presencia de baterías de refrigeración, las dimensiones del ambiente en el que se va a
montar el humidificador. Se recomienda evaluar todos los
datos meticulosamente, siguiendo nuestras directrices.
When sizing an MC system it is necessary to consider
several factors: air flows, flow speed, presence of cooling
coils, dimensions of the room where the humidifier will be
mounted. We strongly recommend you to evaluate all data
carefully, following our guidelines.
2.2 Requisitos del aire y del agua
2.2 Air and water requirements
Para calcular correctamente los requisitos del ambiente
que se va a humidificar, tenga en cuenta los siguientes
factores:
In order to correctly size the requirements of the room to
be humidified, consider the following factors:
– Volume of the room (m3)
– Actual conditions of the room: temperature (°C) and
relative humidity (% rH)
– Desired conditions in the room: temperature (°C) and
relative humidity (% rH)
– Characteristics of the materials in the room (quantity,
hygroscopic factor, number of people)
– Time required by the unit to get a steady working state
– External air flows (air inleakage, occasional opening of
windows or doors)
– Quantity of external air (m3/h)
– External project conditions: temperature (°C)
and humidity (% rH)
– Condensation on the cooling coil
– Volumen del local (m3)
– Condiciones actuales del local: temperatura (°C) y
humedad relativa (% H.R.)
– Condiciones deseadas en el local: temperatura (°C) y
humedad relativa (% H.R.)
– Características de los materiales del local (cantidad,
factor higroscópico, número de personas)
– Tiempo necesario para que la unidad alcance un estado
de funcionamiento constante
– Emisiones de aire exterior (infiltraciones, apertura ocasional de ventanas o puertas)
– Cantidad del aire exterior (m3/h)
– Condiciones exteriores de proyecto: temperatura (°C) y
humedad (% H.R.)
– Condensación de la batería de refrigeración
Finally, use the psychrometric diagram to draw the Δx of
the room so as to be able to correctly size the
requirements of the entire system.
Then, calculate the water capacity (kg/h) with the following
formula:
Finalmente, utilice el diagrama psicrométrico para dibujar
el Δx (humedad absoluta g/kg) del ambiente de modo que
se puedan calcular correctamente los requisitos de todo el
sistema. Después, calcule la capacidad de agua (kg/h)
con la fórmula siguiente:
Q= V x 1.2 x (x2 - x1) / 1000 = kg/h +Y
where:
Q=V x 1,2 x (x2 - x1 ) / 1000 = kg/h + Y
Q=
water quantity required in the room (kg/h)
(if specific weight at 4°C corresponds to 1kg/m3,
then kg/h will correspond to l/h)
V=
air volume (*)
1.2 = air specific weight kg/m3 (21°C and 1013mbar)
x1 = absolute humidity of the air to be humidified (g/kg)
x2 = absolute humidity required in the room (g/kg)
Y=
this parameter will refer to any other factor listed
above not included in the formula but equally
important to correctly size the system in relation to
your specific application requirements.
donde:
Q=
cantidad de agua necesaria en el ambiente (kg/h)
(suponiendo que el peso específico a 4 °C se corresponde con 1kg/m3, los kg/h se corresponderán
con l/h)
V=
volumen de aire (*)
1,2 = peso específico del aire kg/m3 (21 °C
y 1013 mbar)
x1 = humedad absoluta del aire a humidificar (g/kg)
x2 = humedad absoluta requerida en el ambiente (g/kg)
Y=
este parámetro se referirá a cualquier otro factor
enumerado anteriormente que no está incluído en
la fórmula pero que hay que considerar en base al
tipo de aplicación.
(*) For rooms with recirculating air only: V = m3 of the
room (see note)
For rooms with external air: V = external air flow into
the room (m3/h)
(*) Para ambientes con recirculación de aire sólo: V = m3
del local (ver nota)
Para ambientes con aire exterior: V = caudal de aire
exterior dentro del ambiente (m3/h)
NOTE: Once the relative humidity value has been reached, the humidification system will keep the desired
humidity level minimizing, at the same time, energy costs.
When great steam quantities are required, it is important
to consider whether to reach steady working conditions
immediately or in a longer time so as to reduce costs.
NOTA: Una vez alcanzado el valor de humedad relativa,
el sistema de humidificación mantendrá el nivel de humedad deseado minimizando, al mismo tiempo, los costes
de energía. Cuando se requieran grandes cantidades de
vapor, es importante valorar la necesidad de alcanzar las
condiciones de funcionamiento constante inmediatamente
o en un espacio de tiempo más largo.
5
Cod. +030221742 rel. 2.2 – 16.06.2005
2.3 Verificación de la absorción en ambiente
2.3 Checking water absorption in room applications
Una vez calculada la capacidad necesaria del sistema MC
(l/h, es decir, gramos de agua/kg de aire seco), compruebe si el aire del ambiente puede absorber agua atomizada. Utilice el diagrama psicrométrico del siguiente modo:
– sitúe el punto A1 correspondiente a las condiciones del
aire que se va humidificar;
– sitúe el punto B1 correspondiente al valor de humedad
absoluta (g de agua/kg de aire seco);
– sume al punto B1 el valor de humedad Δx que desea
generar para llegar al punto C1 que corresponde al
valor final de la humedad absoluta;
– reste el punto de encuentro D1 entre la línea paralela
del punto C1 y la línea isentálpica que contiene el punto
A1. Si este valor se extiende más allá de la curva de
saturación, significa que hay demasiada humedad. En
este caso es necesario precalentar el aire del ambiente
o reducir la cantidad de agua.
Recuerde que la evaporación del agua provoca una bajada de la temperatura ambiente (ΔT: proceso adiabático).
After having calculated the necessary capacity of the MC
system (l/h, that is grams of water/kg of dry air), check
whether the air in the room is capable of absorbing the
atomized water. Use the psychrometric diagram, as follows:
– locate point A1 corresponding to the conditions of the
air to be humidified;
– locate point B1 corresponding to the absolute humidity
value (g of water/kg of dry air);
– add the humidity value (Δx) you want to generate to B1
so as to get point C1 which corresponds to the final
figure of absolute humidity;
– infer the meeting point D1 between the parallel of point
C1 and the isoenthalpic line containing point A1. If this
value ranges beyond the saturation curve, there is too
much humidity. In this case it is necessary to pre-heat
the air of the room or reduce the amount of water.
Remember that water evaporation makes the room temperature go down (ΔT, adiabatic process).
Aplicaciones en conductos:
En las aplicaciones con unidades de aire en las que hay
presente una notable cantidad aire renovado (exterior y
frío), es necesario precalentar el aire para asegurar la
total absorción del agua atomizada. El caso más crítico se
produce cuando el aire que se ha de humidificar dentro
del conducto es totalmente exterior (condiciones invernales). Utilice el diagrama psicrométrico para determinar el
índice de precalentamiento en el conducto:
– localice el punto A correspondiente a las condiciones
del aire que se va a humidificar (ej. 0 °C y 80% H.R.);
– localice el punto C correspondiente a la temperatura y
humedad que desea obtener mediante el proceso de
humidificación (ej. 20 °C y 50% H.R.);
– cuando precaliente el aire, siga el punto A hasta cruzar
la diagonal isentálpica que viene del punto C, obteniendo de este modo el punto B.
El punto B indica la temperatura de precalentamiento que
debe tener el aire antes de introducir el agua atomizada
en el conducto (T = 30,5 °C): la línea isentálpica del punto
B al punto C indica la transformación adiabática necesaria
para alcanzar las condiciones de humedad y temperatura
deseadas.
Duct applications:
In air handling unit applications where big volumes of
external and cold air is involved in the humidification process, it is necessary to pre-heat the air so as to ensure
the total absorption of the atomized water. The most critical condition occurs when the air to be humidified inside
the duct is totally external (winter conditions).
Use the psychrometric diagram to determine the pre-heating rate in the duct:
– locate point A corresponding to the conditions of the air
to be humidified (eg. 0° and 80% rH);
– locate point C corresponding to the temperature and
humidity you want to obtain through the humidification
process (eg. 20° and 50% rH.);
– as you pre-heat the air, follow point A until you cross
the isoenthalpic diagonal coming from point C, thus
obtaining point B.
Point B indicates the pre-heating temperature the air must
have before water is atomized in the duct (T = 30,5°C):
the isoenthalpic line from point B to point C indicates the
adiabatic changes necessary to reach temperatue and
humidity design conditions.
Diagrama psicrométrico; temperatura normal, presión
barométrica 760 mm Hg, al nivel del mar.
Psychrometric diagram; normal temperatures
barometric pressure 760mm Hg, at the sea level.
1,00
5
3
2
25
0,9
0,8
0,7
0,6
1
0,5
0,25
1,5
0,5
24
0,3
R
TE
0,25
0,2
0,1
0,75
Y
Rt
A
W
R
0,5
F
Δh
ΔX
g
A
22
TE
MP
ER
WE
AT
TB
UR
UL
B T A BU
LB
EM
OH
PE
RA
UM
TU
RE EDO
(C)
(C)
)
E
TI
LA
WET BULB TEMPERATURE (C)
30%
5
75
A
0,8
50
0,8
25
00
0
A1
0,8
0 ,8
1
20%
B
10%
5
10
15
20
25
6
30
35
TEMPERATURA BULBO HUMEDO (C)
40%
4
0
DR
DA
ME
HU
A
TIV
LA
E
/R
00
50%
C
25
%
VE
0,9
60
D1
10
5
2
%
O)
70
0,9
%
90
%
80
7
6
3
15
EC
EN
23
25
(C
N
IÓ )
EN
C C
14
)/
A E(
O
R
R
C
TU TU
13
SE
SA RA
E
E
IR
12
D PE
A
20
A
E
R TEM
D
11
g
TU
A ION
l/k
a
R T
10
c
PE A
(k
M UR
h
9
TE AT
IA
S
LP
15
8
TA
TH
24
18
17
16
25
40
HUMEDAD ESPECIFICA (X) (g DE AGUA POR kg DE AIRE SECO)
SPECIFIC HUMIDITY (X) (g OF WATER PER kg OF DRY AIR)
h
26
20
ES
AIR
DE
IR)
3 /kg
YA
O (m F DR
IFIC 3 /kg O
EC
(m
SP
NE
ME
LU
ME
LU
VO
VO
IFIC
EC
SP
Y
H
LP
27
21
19
O
/k
al
c
(k
D
28
22
)
1
29
30
23
0
0,4
21
20
19
18
17
16
15
14
13
12
11
10
C1
9
8
7
6
B1
5
4
3
2
1
45
Cod. +030221742 rel. 2.2 – 16.06.2005
2.4 Cálculo de la capacidad del compresor
2.4 Sizing the capacity of the compressor
El dimensionamiento del compresor requiere mucha atención puesto que el consumo de aire depende de la potencialidad de la instalación, NO de la capacidad máxima del
armario. Por ello es necesario considerar el número de
boquillas atomizadoras asi como su capacidad.
Sizing the compressor requires great attention since air
consumption depends on the potentiality of the installation, NOT on the max. capacity of the cabinet. It is therefore necessary to consider the number of the atomizing
nozzles as well as their capacity.
El caudal de agua de cada boquilla puede tener los
siguientes valores:
The water flow for each nozzle can have the following
values:
MCAA2
2,7 l/h
MCAB2
4,0 l/h
MCAC2
5,4 l/h
MCAD2
6,8 l/h
MCAE2
10l/h
El consumo de aire de las boquillas es:
- 0,41 m3/h, a la presión de trabajo = 2,1 bar/litro de agua;
- 1,27 Nm3/h, a la presión atmosférica por litro de agua
- 0,75 CFM, a la presión atmosférica, por litro de agua.
La tabla siguiente muestra el consumo específico de cada
boquilla en m3/h normales y CFM (pies cúbicos por
minuto), referido a la presión atmosférica:
Nm3/h
CFM
MCAA2
3,43
2
MCAB2
5,08
3
MCAC2
6,86
4
MCAD2
8,64
5
MCAA2
MCAB2
MCAC2
MCAD2
MCAE2
Air consumption for the nozzles is:
- 0.41m3/h, at working pressure = 2.1bar, per litre of water;
- 1.27Nm3/h, at atmospheric pressure, per litre of water;
- 0.75CFM, at atmospheric pressure, per litre of water.
The table below shows consumption of each single nozzle
in Normal cubic meters/h and CFM (Cubic Feet per
Minute of Free Air Delivered), referred to the atmospheric
pressure:
MCAE2
12,7
7,5
MCAA2
Nm3/h 3,43
CFM
2
Ejemplo:
Sistema de 18 boquillas tipo MCAC2 con armario hasta
230 l/h.
Cboquilla
n° =
MCAB2
5,08
3
MCAC2
6,86
4
MCAD2
8,64
5
MCAE2
12,7
7,5
Example:
System comprising 18 nozzles type MCAC2 with cabinet
up to 230l/h.
V = Cboquilla x n° = 6,86x18 = 123,5 Nmc/h = 2058 l/m
(referido a los datos del compresor)
donde:
V=
2.7l/h
4.0l/h
5.4l/h
6.8l/h
10l/h
V = Cnozzle x no. = 6.86x18 = 123.5Nmc/h = 2058l/m
(referred to the compressor's data)
where:
V=
volumen de aire succionado por el compresor o
inmerso en el ambiente (Nmc/h)
= consumo de aire de cada boquilla (Nmc/h)
número de boquillas
air volume sucked by the compressor or let into
the room (Nmc/h)
Cnozzle = single nozzle air consumption (Nmc/h)
no. =
number of nozzles
NOTA: Con el fin de asegurar el aire adecuado en cada
condición, le recomendamos utilizar un factor incremental
del 10%.
NOTE: In order to ensure the right air flow in any condition, we recommend you to use a 10% increasing factor.
3. Installation instructions - MCR room
system
3. Instrucciones de Instalación - sistema
de ambiente MCR
To set up an MCR system for room applications, carry out
two parallel lines (water and air) from the control cabinet
to the atomizing nozzles.
The cabinet air/water outputs for the 60l/h system are 1/4"
F, and 1/2" F for systems up to 230l/h.
Pipes to the atomizing nozzles must be made of copper or
PVC. DO NOT USE GALVANIZED PIPES since they
might release impurities that might clog or damage the
nozzles. If the system is supplied with demineralized
water it is necessary to use PVC pipes only.
Should you use demineralized (aggressive) water we
recommend using Teflon or liquid Teflon to glue the fitting
so as to prevent leaks.
Alternatively, use polypropylene pipes so as to make it
fast and easier to fit them with the dedicated soldering
equipment.
Para configurar un sistema MCR para aplicaciones de
ambiente, realice dos líneas paralelas (de agua y de aire)
desde el armario de control hasta las boquillas atomizadoras. Las salidas de aire/agua del armario para el modelo
de 60 l/h son de 1/4” F, y 1/2” F para los modelos de
hasta 230 l/h.
Los tubos que van a las boquillas atomizadoras tienen
que ser de cobre o PCV. NO UTILICE TUBOS GALVANIZADOS ya que podrían soltar impurezas que obstruirían
o estropearían las boquillas. Si el sistema está alimentado
con agua desmineralizada, sólo se deben utilizar tubos de
PVC. Si utiliza agua desmineralizada (agresiva), para evitar fugas recomendamos utilizar Teflón o Teflón líquido
para pegar las juntas.
Como alternativa, utilice tubos de polipropileno que pueden
unirse de forma más fácil y rápida con el equipo adecuado
de soldadura.
7
Cod. +030221742 rel. 2.2 – 16.06.2005
--RILSAN PA11
PA11 O 6 8 x 6 DIN 74324 AIM 29 --
--RILSAN PA11
PA11 O 6 8 x 6 DIN 74324 AIM 29 --
Assemble the atomizing nozzles as indicated above (par.
1.4). Please note that the air line supports all the atomizing nozzles. Always position the water line below the atomizing nozzles so as to make it easier to empty and dry
them as the system is turned OFF.
--RILSAN PA11
PA11 O 6 8 x 6 DIN 74324 AIM 29 --
3.1 Installation instructions - MCR system
Una las boquillas atomizadoras como se ha indicado anteriormente (párrafo 1.4). Por favor, observe que la línea de
aire soporta todas las boquillas atomizadoras. Sitúe siempre la línea de agua por debajo de las boquillas atomizadoras con el fin de facilitar su vaciado y secado cuando
se apague el sistema.
--RILSAN PA11
PA11 O 6 8 x 6 DIN 74324 AIM 29 --
3.1 Instrucciones de instalación - sistema MCR
sonda de humedad
humidity probe
línea de aire
air line
línea de agua
water line
Fig. 6
Por favor, respete las siguientes normas cuando instale
un sistema MCR:
Please observe the following rules when installing an
MCR system:
1 Las boquillas no deben pulverizar sobre ningún
obstáculo físico en el que se podría condensar y gotear
rocío. Las boquillas pueden estar en ángulo hacia arriba, hacia abajo o hacia los lados siempre que el cono
de pulverización visible no entre en contacto con ningún
obstáculo. En la tabla 1 se indica la longitud y el diámetro máx. del cono en relación a la humedad ambiente.
1 The nozzles must not spray onto any phisycal obstacles
where the mist might condense and drip.The nozzles
can be angled up, down or sideways so long as the
visible spray cone does not make contact with any
obstruction. Table 1 below indicates the length and the
max. diameter of the cone related to the ambient humidity.
Capac. boquilla
Nozzle capacity
2,7l/h
4,0l/h
5,4l/h
6,8l/h
10l/h
Altura de instal. mín
Min. installed height
cualquiera / any
cualquiera / any
4,6m
6,1m
9,4m
Diámetro máx cono
Max. cone diameter
0,75m
0,75m
0,90m
1,20m
1,50m
Distancia cono visible
Visible cone distance
<50% HR
3,00m
3,35m
3,65m
4,00m
4,60m
Distancia cono visible
Visible cone distance
>50% HR
4,55m
4,90m
5,20m
6,10m
7,00m
Tab. 1
Las boquillas no deben entrar en contacto con la pulverización procedente de otras boquillas. Recomendamos
montar las boquillas lo más alto posible. Pero, al instalarlas se tiene que tener mucho cuidado de que no se produzca rocío en el techo.
The nozzles must not make contact with the spray from
another nozzles. We recommend mounting the nozzles at
the highest possible position. However, care must be
taken to install them so that the mist does not spray onto
the ceiling.
2 Las líneas de aire y de agua no deben presentar
variaciones de altura.
3 Coloque una válvula de bola al final de las líneas (útil
para limpiarlas cuando se arranca la unidad).
4 Monte el armario de control lo más cerca posible de las
líneas superiores. Si las líneas superiores son muy largas (<50 m) es aconsejable situar el armario en medio
con el fin de equilibrar las presiones.
5 Todas las boquillas atomizadoras deberán distribuirse
de modo que cubran uniformemente toda la zona.
2 There should not be bends in the air and water lines.
3 Place a ball valve at the end of the lines (useful to clean
them when the unit is started).
4 Mount the control cabinet as near as possible the upper
lines. Should the upper lines be very long (>50m) it is
advisable to place the cabinet half way so as to
balance their pressures.
5 All the atomizing nozzles should be positioned at regular
distances so as to ensure uniform spray patterns over
the entire area.
8
Cod. +030221742 rel. 2.2 – 16.06.2005
It is important to balance the position of the cabinet with
respect to the number and position of the nozzles.
Es importante que el armario de control esté en una posición equilibrada respecto a la distribución de las boquillas.
Luz/Light
Luz/
Light
no
si/yes
si/
yes
Fig. 7
6 If possible, place the humidity sensor in the middle of
the room to be humidified but pay attention that it does
not come into contact with treated air flows or atomized
water from the nozzles. Do not mount the humidity
sensor on a perimetrical wall because the external
temperature might affect the value measured by the
probe.
6 Si es posible, sitúe el sensor de humedad en el centro
del ambiente que se va a humidificar, pero preste atención a que no entre en contacto con caudales de aire
tratados o con agua atomizada procedente de las
boquillas. No monte la sonda de humedad en una
pared al exterior ya que la temperatura exterior podría
afectar en el valor medido por la sonda.
no
si/yes
si/
yes
Fig. 8
Should the length of the connection cable between
sensor and terminal block be particularly long (>10m),
we recommend using shielded cables. Avoid placing the
cables of the sensor near other cables (electric motors,
contactors, high tension cables etc.).
7 It is recommended to install on the water line before the
cabinet an expansion tank of some litres of capacity, to
avoid phenomenum of water hammering very harmful
for the system.
Si la longitud del cable de conexión entre la sonda y el
bloque de terminales es considerable (>10 m), se recomienda utilizar cables apantallados. Evite situar los
cables de la sonda cerca de otros cables (motores eléctricos, contactores, cables de alta tensión etc.)
7 Es recomendable instalar en la línea de agua, antes del
armario, un tanque de expansión de algunos litros de
capacidad, para evitar golpes de ariete peligrosos para
la instalación.
9
Cod. +030221742 rel. 2.2 – 16.06.2005
3.2 Sistema MC para aplicaciones en ambiente:
conexiones hidráulicas
3.2 MC system for room applications: hydraulic
connections
Situe el armario del sistema MCR en un lugar accesible
para facilitar a los operadores la lectura de los datos o
realizar el mantenimiento sin ninguna dificultad.
La tubería de descarga del sistema debe estar conectada
directamente al drenaje de agua, cuya altura debe ser por
lo menos de 50 mm POR DEBAJO del nivel de las
boquillas.
Place the cabinet of the MCR system in a well accessible
place allowing the Operators to easily read data or carry
out maintenance.
The discharge piping of the system should be directly connected to the water drainage whose height should be at
least 50mm BELOW the level of the nozzles.
Use dry air without oil only. We recommend using a
5-micron filter for the air line and a 10-micron filter for
the water line (filters are available upon request).
Utilice sólo aire seco, sin aceite. Se aconseja utilizar
un filtro de 5 micrones para la línea de aire y un filtro
de 10 micrones para la línea de agua (hay filtros
disponibles bajo pedido).
The table below shows the diameters of the supply
air/water pipes.
En la tabla siguiente se muestran los diámetros de las
tuberías de aire/agua de alimentación:
Armario
230 l/h
60 l/h
Línea de aire
22 mm (1/2"G)
14 mm (1/4"G)
Cabinet
230l/h
60l/h
Línea de agua
22 mm (1/2"G)
14 mm (1/4"G)
Tab. 2
Air Line
22mm (1/2"G)
14mm (1/4"G)
Water Line
22mm (1/2"G)
14mm (1/4"G)
Tab. 2
NOTA: Si la línea de aire supera los 5 metros de longitud,
ajuste las dimensiones de la tubería de modo que la pérdida de carga no sea superior a 0,2 bares.
IMPORTANT: should the air line be longer than 5 meters,
adjust the piping dimensions so that loss of pressure is
not above 0.2 bar.
Coloque las boquillas atomizadoras respetando los datos
de proyecto indicados en el párrafo 3.1 y móntelas como
se indica en el párrafo 1.4
Position the atomizing nozzles observing the project data
indicated in 3.1 and mount them as indicated in 1.4.
Fig. 9
10
Cod. +030221742 rel. 2.2 – 16.06.2005
3.3 Kit de montaje de las boquillas
3.3 Nozzle mounting kit
El montaje de las boquillas es una operación muy rápida
y sencilla gracias al kit de montaje para aplicaciones en
ambiente. CAREL proporciona un kit de montaje de
boqui-llas estándar que se puede utilizar tanto para agua
normal como para agua agresiva. En la figura siguiente
se indica cómo montar el kit.
Mounting the nozzles is a very fast and simple operation
thanks to the nozzles mounting kit for room applications.
CAREL provides standard nozzles mounting kit that can
be used for both normal and aggressive water. The figure
below shows how to mount the kit.
Fig. 10
– All the atomizing nozzles must be installed at the same
elevation to avoid differences in water/air pressures
resulting in different spray patterns.
– The mounting kit allows you to angle vertically the
nozzle so as to place it in the best position and get
optimum atomization.
– Place a ball valve at the end of the two lines for
cleaning them the first time the system is started.
– There should not be any bends in the water piping that
might trap water in the line.
– Do not mix up the water/air inputs on the atomizing
nozzles; the air side of the atomizing nozzles is always
labelled "AIR".
– Todas las boquillas atomizadoras se deben instalar a la
misma altura para evitar diferencias de presión de
agua/aire Todas las cabezas atomizadoras deben ser
instaladas a la misma altura porque si no crean presiones distintas y por consiguiente, chorros distintos.
– El kit de montaje le permite girar la boquilla verticalmente de modo que se coloque en la posición más adecuada y se consiga una atomización óptima.
– Al final de cada línea es aconsejable disponer de una
válvula de bola en condiciones accesibles para la limpieza (purga) de la línea necesaria antes de la primera
puesta en marcha.
– No debe haber dobleces en la tubería de agua que pueden formar “bolsas” que atrapen el agua en la tubería.
– No mezcle las dos entradas de agua/aire de las boquillas atomizadoras; en el lado del aire siempre están
indicadas por una etiqueta que dice: “AIR”.
4. Installation instructions - MCD duct
system
4. Instrucciones de instalación - sistema
de conducto MCD
Duct application cabinets come complete with two regulators necessary to control both return and supply air. By
modulating the capacity of the atomizing manifold, it is
possible to provide the maximum steam production
without reaching saturation within the duct. The atomizing
manifold (Fig. 11) comprises an air and a water line; the
Los armarios para aplicación en conducto están provistas
de dos reguladores necesarios para controlar el aire de
retorno y el aire de alimentación. Mediante la modulación de
la capacidad del colector atomizador, es posible obtener la
máxima producción sin que se llegue a la saturación dentro
del conducto. El colector atomizador (Fig. 11) está
11
Cod. +030221742 rel. 2.2 – 16.06.2005
Conducto/Vista frontal
duct front view
--RILSAN PA11 O 6 8 x 6 DIN 74324 AIM 29 --
--RILSAN PA11 O 6 8 x 6 DIN 74324 AIM 29 --
--RILSAN PA11 O 6 8 x 6 DIN 74324 AIM 29 --
--RILSAN PA11 O 6 8 x 6 DIN 74324 AIM 29 --
flujo de aire
air flow
línea de agua / water line
línea de aire / air line
water line is lower than the air line. Place a ball valve at
the end of each line.
Connect the discharge piping of the cabinet directly to the
water drainage. The water line will be completely emptied
any time the system is turned off or at any cleaning cycle.
To avoid any dripping effect, do not place the discharge
pipes higher than the nozzles. If the manifold is below the
cabinet, place a Normally Open electrovalve on the
manifold provided with the nozzles. Power the Normally
Open electrovalve of the manifold (24 Vac) by a parallel
connection to the N.O. electrovalve of the cabinet (A.W.:
code 1309885AXX; N.W. : code 1309870AXX).
compuesto por una línea de aire y otra de agua; la línea de
agua está por debajo de la línea de aire. Coloque una válvula
de bola al final de cada línea.
Conecte directamente la tubería de descarga del armario
al drenaje de agua. La línea se vaciará completamente
cada vez que se apague el sistema o con cada ciclo de
limpieza. Para evitar cualquier efecto de goteo, no situe
los tubos de descarga por encima de las boquillas. Si el
colector está debajo del armario, coloque una electroválvula Normalmente Abierta en el colector suministrado con
las boquillas. alimente la electroválvula del colector (24
Vca) por una conexión paralela a la electroválvula N.A.
del armario (A.W.: cód. 1309881AXX; N.W.: cód.
1309870AXX). El colector debería estar hecho en tubo de
cobre o de plástico (PVC). NO UTILICE TUBOS
GALVANIZADOS, ya que podrían soltar impurezas que
obstruirían o estropearían las boquillas. Si utiliza agua
desmineralizada (agresiva), use sólo tubos de plástico. En
este caso recomendamos utilizar Teflón o Teflón líquido.
Como alternativa, puede utilizar tubos de polipropileno
con el fin de unirlos de forma más fácil y rápida con el
equipo de soldadura especial.
The manifold should be made of copper or plastic (PVC)
piping. DO NOT USE GALVANIZED PIPES because they
might release impurities that might clog or damage the
nozzles. If you are using demineralized (aggressive)
water, use plastic piping only. In this case we recommend
using Teflon or liquid Teflon. Alternatively, use polypropylene pipes so as to make it fast and easier to fit them with
the dedicated soldering equipment.
Use dried air without oil only. We recommend using a
5-micron filter for the air line and a 10-micron filter for
the water line (filters are available upon request).
Use solo aire seco sin aceite. Recomendamos utilizar
un filtro de 5 micrones para la línea de aire y un filtro
de 10 micrones para la línea de agua (los filtros están
Armario
230 l/h
60 l/h
Línea de aire
22 mm (1/2"G)
14 mm (1/4"G)
Fig. 11
Cabinet
230l/h
60l/h
Línea de agua
22 mm (1/2"G)
14 mm (1/4"G)
Air Line
22mm (1/2"G)
14mm (1/4"G)
Water Line
22mm (1/2"G)
14mm (1/4"G)
disponibles bajo pedido). La siguiente tabla muestra
los diámetros de las tuberías de aire/agua
The table below shows the diameters of the supply
air/water pipes.
NOTA: Si la línea de aire es particularmente larga, le
recomendamos aumentar los diámetros de los tubos: los
armarios de hasta 60l/h requerirán tubos con un diámetro
de 1/2” y las cabinas de hasta 230l/h requerirán tubos
con un diámetro de 3/4”.
NOTE: should the air line be particularly long, we recommend to increase the diameters of the pipes: cabinets up
to 60l/h will require 1/2" dia. pipes, cabinets up to 230l/h
will require 3/4" dia. pipes.
Cabinets controlling outdoor installations must be placed
in a protected area as well as manifolds and supply pipes.
These components, in fact, must not undergo temperatures below 0°C. To avoid any problem, we recommend
keeping the supply pipes running from the cabinet to the
manifold inside the return air duct.
Los armarios que controlen instalaciones exteriores, así
como los colectores y tubos de alimentación deberán
situarse en un área protegida. Estos componentes, de
hecho, no deben alcanzar temperaturas inferiores a 0 °C.
Para evitar cualquier problema, le recomendamos tirar los
tubos de alimentación desde el armario al colector, dentro
del conducto de aire de retorno.
12
Cod. +030221742 rel. 2.2 – 16.06.2005
4.1 Posición del colector atomizador
4.1 Positioning the atomizing manifold
En la figura 12 se representa en que posición se puede
colocar el colector atomizador.
Fig. 12 below shows how you can position the atomizing
manifold.
Fig. 12
Pos.
1
PROS
– Fácil acceso.
2
– Fácil absorción del agua.
3
– El aire precalentado absorbe con
facilidad el agua.
– La batería de refrigeración sirve
como tanque de condensado.
– Ruta libre.
4
5-6
– Posible instalación del sistema de
atomización en el caso de que
no haya otro espacio disponible.
CONTRAS
– Posibles turbulencias de aire y/o el contacto con aire más frío
podrían provocar condensación.
– Los filtros de pueden mojar.
– El aire frío no facilita la absorción del agua atomizada.
– La batería de calor puede recubrirse de cal.
– En general, no hay un tanque de condensado para emergencias.
– El aire frío no facilita la absorción del agua atomizada.
– Si el humidificador y la batería de frío funcionan a la vez,
habrá excesiva condensación de agua.
–
–
–
–
–
El ventilador podría mojarse.
El aire frío no facilita la absorción del agua atomizada.
La velocidad del aire es elevada.
Requiere grandes caminos para evaporar.
Posibilidad de goteo en el conducto.
En general la posición n° 3 es considerada la mejor solución.
Tab. 3
Pos.
1
2
3
4
5-6
PROS
– Easy access
CONS
– Possible air turbolence and/or contact with colder air might cause
condensation.
– Filters can get wet.
– Cold air prevents good absorption of the atomized water.
– Easy water absorption.
– Heating coil can get limed.
– Generally, there is no condensate tank for emergencies.
– Cool air prevents good absorption of the atomized water.
– Pre-heated air absorbs water easily. – If the humidifier and the cooling coil work simultaneously, there will
– The cooling coil is used as a
be excessive water condensation.
condensate tank.
– Free path.
– The fan might get wet.
– Cool air prevents good absorption of the atomized water.
– Possible installation of the atomizing – High air speed.
system in case no other room
– Requires long paths to evaporate.
is available.
– Possible dripping water in the duct.
No. 3 is usually considered to be the best solution.
Tab. 3
Se aconseja instalar el armario de control de un sistema
MCD cerca del colector.
It is advisable to install the control cabinet of an MCD
system near the manifold.
Factores importantes a tener en consideración
cuando se instale el colector:
1. la distancia de los cabezales a las superficies del
conducto;
2. el camino libre que permite la total evaporación del
agua atomizada.
Important points to be considered when installing the
manifold:
1. distance between the nozzles and the surfaces of the
duct;
2. free path allowing full evaporation of the atomized water.
13
Cod. +030221742 rel. 2.2 – 16.06.2005
1 Table no. 4 below shows the H
distance necessary to ensure complete
evaporation of the atomized water. This
distance is extremely important because
it prevents the atomized water from wetting the duct; Fig. 13 shows the most
common way to install the manifold.
1 La tabla 4 muestra la distancia H
necesaria para garantizar la evaporación
total del agua atomizada. Esta distancia
es muy importante porque evita que el
Flujo de aire
agua atomizada moje el conducto; la
/ air flow
figura 13 muestra el modo más común
de instalar el colector.
Fig. 13
Max. 'H' distance (in mm) reached by the atomized
water
Distancia máxima “H” en mm que alcanza el agua
atomizada
Velocidad del aire m/s 2,7 l/h
Air speed m/s
2,0
660
3,0
610
4,0
559
5,0
508
6,0
457
7,5
406
10,0
356
4,0 l/h
5,4 l/h
6,8 l/h
10l/h
737
686
610
559
508
432
381
914
838
737
660
559
483
406
1219
1092
965
838
711
584
432
1792
1605
1419
1232
1045
859
635
Tab. 4
If the available height is not sufficient, position the
manifold as shown in Fig.14. This type of
position is generally appreciated when it
is necessary to humidify small dimension
ducts.
In this case, however, you might have
more sensible condensation losses at
the drop separator.
Si la altura existente no es suficiente, coloque el colector
como se muestra en la figura 14. Este
tipo de instalación pemite humidificar
conductos de dimensiones pequeñas.
En este caso, sin embargo, podrían
Flujo de aire
haber más perdida de condensación
/ air flow
en el separador de gotas.
Fig. 14
Never mount the nozzles in countercurrent position.
If, according to the table above, the height of the duct is
not sufficient, it is also possible to install
the manifold outside the duct and position the nozzles inside the duct, as
shown in Fig. 15. In this way you can
save about 20cm.
No monte nunca las boquillas a contracorriente. Si, en
base a la tabla 4, la altura del conducto no es suficiente,
una solución puede ser instalar el colector fuera del conducto y colocar las
boquillas dentro del conducto, como se
muestra en la figura 15. De este modo
Flujo de aire
se pueden recuperar unos 20 cm.
/ air flow
Fig. 15
2. The free path is the space required by the atomized
water to be completely absorbed into the air. In order to
avoid dripping effects inside the duct, the atomized
water should not meet any obstacle (sensors, stiffening
bars, partitions, etc.) as far as the free path. This might
be a critical factor especially if, at the end of the manifold,
there is neither a cooling coil nor a drop separator. The
length of the free path depends on air temperature,
relative humidity, air speed and capacity of the nozzles.
However, the free path depends on the relative humidity
of the air after having being treated, on the speed of the
air flow and on the way the nozzles have beeen
positioned.
2. El camino libre es el espacio requerido por el agua
atomizada para ser absorbida completamente en el
aire. Para evitar los efectos del goteo dentro del conducto, el agua atomizada no debe encontrarse con
ningún obstáculo (sondas, barras de refuerzo, tabiques,
etc.) en el camino libre. Esto podría ser un factor crítico
especialmente si, al final del colector, no hay una
batería de frío ni un separador de condensado. La
longitud del camino libre depende de la temperatura del
aire, de la humedad relativa, de la velocidad del aire y
de la capacidad de las boquillas. No obstante, el
camino libre depende de la humedad relativa del aire
después de ser tratado, de la velocidad del flujo de aire
y de la manera en que están puestas las boquillas.
14
Cod. +030221742 rel. 2.2 – 16.06.2005
The formula below allows you to calculate the length of
the free path (FP) for a 90% system efficiency.
La fórmula siguiente le permite calcular la longitud del
camino libre (FP) para una eficacia del sistema del 90%:
PL= V
(
K1 + K2 x
)
PL= V
100
= metros
100 -%U.R.
(
K1 + K2 x
)
100
= metres
100 -%rH
Where:
Donde:
V=
velocidad del aire en m/seg
V=
air speed m/s
% U.R. =
valor de la humedad relativa después del
proceso de humidificación
% rH =
relative humidity after the humidification
process
K1 = 0.15 = refers to the time necessary for the atomized
water to spray.
0.15 is valid for atomizing nozzles positioned
at 90° in respect of the air flow with speed
up to 2m/s.
K1 decreases down to 30% when the nozzles
are bent max. -20° counterflow.
If the nozzles are bent in the direction of the
flow, K1 can increase up to 100%.
K1= 0,15 = se refiere al tiempo necesario para que
se pulverice el agua atomizada.
0,15 es válido para las boquillas
atomizadoras situadas a 90° respecto al
flujo de aire con velocidad hasta 2 m/seg.
K1 disminuye por debajo del 30%
cuando las boquillas están inclinadas
un máximo de -20° contracorriente.
Si las boquillas están inclinadas en la
dirección del flujo, K1 puede aumentar hasta
el 100%.
K2 = 0.18 = Constant value which takes into consideration
the efficiency of the system.
K2 is valid when the atomized water sprays
uniformly over at least 80% of the duct
section and when installation instructions
described on cap. 2 have been carefully
carried out.
K2= 0,18 = Valor constante que tiene en cuenta el
rendimiento del sistema. Valor válido con una
disposición homogénea de la pulverización
hasta por lo menos el 80% de la sección
del conducto y cuando se han seguido
las instrucciones de instalación descritas en
el capítulo 4.
Ejemplo:
Example:
Velocidad del aire (V) = 2 m/s
Humedad relativa al final del tratamiento = 60%
K1 = 0,15
K2 = 0,18
Air speed (V) = 2m/s
End-Treatment Relative Humidity = 60%
K1 = 0.15
K2 = 0.18
Consecuentemente, el camino libre es igual a:
Consequently, the free path is equal to:
Si la longitud resultante de la fórmula anterior no está
PL= 2
(
0,15 + 0,18 x
100
100 – 60
)
PL= 2
= 1,2 m
(
0.15 + 0.18 x
100
100 – 60
)
= 1.2m
If the length resulting from the formula above is not available inside the duct, it will be necessary to place a drop
separator at the end of the manifold.
disponible dentro del conducto, será necesario colocar un
separador de gotas al final del colector.
15
Cod. +030221742 rel. 2.2 – 16.06.2005
4.2 Normas para la instalación
4.2 Installation tips
1 La distancia mínima entre dos boquillas atomizadoras
nunca debe ser inferior a 100 mm. Esta es también la
distancia mínima admisible entre las boquillas situadas en
los extremos y en la pared lateral del conducto.
1 The minimum distance between two atomizing nozzles
must never be less than 100mm. This is also the min.
allowable distance between the nozzles placed on the
edges and on the lateral side of the duct.
2 Para calcular la distancia entre las boquillas, divida la
anchura del conducto por el número de boquillas más
una. Si la distancia resultante es inferior a 100 mm, se
tiene que utilizar más de un colector o, si es posible,
aumentar la capacidad de las boquillas.
2 To calculate the distance between the nozzles, divide
the width of the duct by the number of nozzles plus one.
If the resulting distance is less than 100mm it is
necessary to use more than one manifold or, if possible,
to increase the capacity of the nozzles.
3 Si la altura del conducto (D) es mayor que:
D = 2 x H + 100 mm
(donde H es la distancia máx. en mm alacanzada por el
agua atomizada desde la parte superior del conducto consulte la tabla 4), a continuación sitúe el colector en
el centro del conducto y alterne las boquillas hacia
arriba y hacia abajo.
3 If the height of the duct (D) is more than:
D = 2 x H + 100mm
(H is the max. distance in mm reached by the atomized
water from the top of the duct - see table 4 above), then
position the manifold in the middle of the duct and
alternate the nozzles upwards and downwards.
4 The minimum height of the duct allowing you to install
the manifold with a 90° jet inside the manifold is:
M = H + 180mm
If this dimension is not available, it is necessary to
install the nozzles outside the duct and orientate the
nozzles inside the duct (see Fig. 15).
4 La altura mínima del conducto para poder instalar el
colector de distribución con chorro a 90° en el interior
del mismo, es igual a:
M = H + 180 mm
Si esta dimensión no está disponible, es necesario
instalar las boquillas fuera del conducto y orientarlas
hacia el interior del conducto (Fig. 15).
5 To ensure full evaporation of the atomized water, the
spray pattern must not be sprayed onto any obstacles
(stiffening bars, etc.) (see free path [FP] above)
5 Para garantizar la evaporización total del agua atomiza
da, esta no debe atomizarse sobre ningún obstáculo
(barras de refuerzo, paredes). Vea el párrafo anterior
Camino libre.
6 If the manifold is installed in a system complete with
cooling coil, it is necessary to set an interblock device
so as to stop the humidifier when the cooling coil is
active. This is meant to avoid any humidity condensa
tion inside the duct when the air temperature goes
down.
6 Si se instala el colector en un sistema completo con
batería de frío, es necesario establecer un dispositivo de
enclavamiento para parar el humidificador cuando esté
activa la batería de frío. Esto se hace para evitar la condensación de la humedad dentro del conducto cuando
baja la temperatura del aire.
7 DO NOT mount the nozzles in the direction opposite the
air flow.
7 NO monte las boquillas en la dirección opuesta al flujo
del aire.
4.3 Posición de las sondas de humedad
4.3 Positioning humidity probes
El armario de control está provisto de dos reguladores de
humedad cuya señal viene de dos sondas diferentes:
The control cabinet includes two humidity regulators
whose signal comes from two different probes:
Sonda de la humedad ambiente, se debe instaladr dentro del conducto del aire de retorno. También se puede
instalar esta sonda en el ambiente en el que se desea
controlar el nivel de humedad. Mantenga la sonda en una
zona protegida, alejada de corrientes de aire caliente o
frío y de paredes exteriores.
Ambient humidity probe, to be positioned inside the
return air duct. Alternatively, you can place this probe in
the room where you want to control the humidity level.
Keep the probe in a protected area, far from hot or cold
air flows and far from perimetrical walls.
High humidity limit probe, to be placed at the end of the
atomizing manifold paying attention, however, that it doesn't get wet by the atomized water (the best position is
past the cooling coil, past the condensate separator or
near a fan).
Sonda de límite alto de humedad, se debe instalar al
final del colector atomizador prestando atención, sin
embargo, a que no se moje con el agua atomizada (la
mejor posición es detrás del separador de condensado o
cerca de un ventilador).
16
Cod. +030221742 rel. 2.2 – 16.06.2005
5. Conexiones hidráulicas
5. Hydraulic connections
Antes de realizar las conexiones hidráulicas, asegúrese
de que el cuadro eléctrico no está alimentado.
Before carrying out the hydraulic connections, be sure that
the control panel is not powered.
Armario de 60 l/h / 60l/h Cabinet
Conexiones de entrada (a la izquierda del armario)
Input connections (left of the cabinet)
Aire / Air
1/4" G F
Agua / Water
1/4" G F
Conexiones de salida (a la derecha del armario)
Output connections (right of the cabinet)
Aire / Air
1/4" G F
Agua / Water
1/4" G F
Drenaje: unión rápida para tubo de plástico TCF 8/10 / Drainage: rapid fitting for plastic pipe TCF 8/10
Tab. 5
Armario de 230 l/h / 230l/h Cabinet
Conexiones de entrada (a la izquierda del armario)
Input connections (left of the cabinet)
Aire / Air
1/2" G F
Agua / Water
1/2" G F
Conexiones de salida (a la derecha del armario)
Output connections (right of the cabinet)
Aire / Air
1/2" G F
Agua / Water
1/2" G F
Drenaje: unión rápida para tubo de plástico TCF 8/10 / Drainage: rapid fitting for plastic pipe TCF 8/10
Tab. 5
6. Cableado del armario de control
6. Wire control cabinet
El armario de control va alimentado a 220 Vca (Pot. 65
VA).
Hay un fusible de 1,5 A en el transformador principal y un
fusible de 3,15 A en el transformador secundario.
Power the control cabinet by 220Vac (65VA).
There is a 1.5A fuse on the transformer primary and a
3.15A fuse on the transformer secondary.
SONDA EN RETORNO SONDA DE LÍMITE
TIERRA
Fig. 16
NOTE: If you use a shielded cable for the probe, connect
it to terminal 2.
NOTA: Si se utiliza un cable apantallado para la sonda,
conéctelo al terminal 2.
Fuente de alimentación:
Neutro:
Tierra:
Marcha/Paro Remoto
Power source:
Neutral:
Ground:
Remote ON/OFF
terminal L - línea 220 Vca
terminal N
terminal PE
terminales 1 y 2
terminal L – line 220Vac
terminal N
terminal PE
terminal 1 and 2
- Sonda de humedad de ambiente o sonda de aire de
retorno para conductos
terminal 3
Referencia - M
Señal - H
terminal 4
terminal 5
Alimentación - + V
- Ambient humidity probe or return air probe for ducts
terminal 3
Reference - M
Signal - H
terminal 4
Power source - +V
terminal 5
- Sonda de límite alto de humedad (armario para conducto)
terminal 6
Referencia - M
Señal - H
terminal 7
Alimentación -+V
terminal 8
- High humidity limit probe (duct cabinet)
terminal 6
Reference - M
Signal - H
terminal 7
Power source - +V
terminal 8
NOTA: para el Marcha/Paro remoto utilice un contacto
libre de tensión. Cuando el contacto está cerrado, se
activa el proceso de humidificación.
NOTE: for remote ON/OFF use a voltage-free contact.
When the contact is closed, the humidification process if
ON.
17
Cod. +030221742 rel. 2.2 – 16.06.2005
LINE
PE
N
L
18
24
100
12
9
ON/OFF
+V
220Vac
M
A.Out
Ref
B
CR72
D.in
24Vac
0Vac
NC1
NO1
C1
UNUSED
NC2
NO2
C2
AMBIENT AIR
POWER ON
WHITE
F1 1A
5
4
3
2
1
5
4
3
2
1
POT. 65VA
220-240/24 V
+V
Hout
M
PROBE
HUMIDITY
REMOTO
ON/OFF
F2 3.15A
100
24
100
10
12
G0 +24 +12
24 100
G
Y1
SYSTEM ON
GREEN
9
Y2
11
10
24
11
WATER VALVE
N.C
OC G0 TF1 TF2
WATER VALVE
N.O
15
G0 YM NO1 COM1 NO2 COM2 IC G0
AD4
AIR VALVE
N.C
PRESSURE
SWITCH
7. Esquemas eléctricos
7. Electrical diagrams
7.1 Esquema eléctrico (60 y 230 l/h) para aplicaciones de AMBIENTE con regulación Todo/Nada
7.1 Electrical diagram (60 and 230l/h) for ROOM
applications, ON/OFF regulation
Cod. +030221742 rel. 2.2 – 16.06.2005
LINE
PE
N
L
ON/OFF
19
M
B
+V
0Vac
24Vac
220Vac
Ref
A.Out
CR72
NC1
NO1
C1
UNUSED
NC2
NO2
D.in
AMBIENT AIR
C2
POWER ON
WHITE
F1 1A
POT. 65VA
5
4
3
2
2
9
1
1
220-240/24 V
+V
Hout
M
PROBE
HUMIDITY
REMOTO
ON/OFF
F2 3.15A
100
24
Y1
SYSTEM ON
GREEN
G0 +24 +12
24 100
G
100
10
9
Y2
24
11
Como alternativa
Alternatively
10
G
R
E
E
N
W
H
I
T
E
R
E
D
B
L
E
U
IC
PRESSURE
TRANSDUCER
+24
5 0V
+24
PRESSURE
TRANSDUCER
B
R
O
W
N
G0
B
L
A
C
K
MODULATING
VALVE
B
L
U
TF2
WATER VALVE
N.C.
OC G0 TF1
WATER VALVE
N.O.
G0 YM NO1 COM1 NO2 COM2 IC
AD4
AIR VALVE
N.C.
11
7.2 Esquema eléctrico (60 y 230 l/h) para
aplicaciones de AMBIENTE con regulación
PROPORCIONAL
7.2 Electrical diagram (60 and 230l/h) for ROOM
applications, PROPORTIONAL regulation
Cod. +030221742 rel. 2.2 – 16.06.2005
LINE
PE
N
L
ON/OFF
20
12
HUMIDITY
100
G
12
Y1
9
Y2
SYSTEM ON
GREEN
G0 +24 +12
24 100
10
10
24
11
B
R
O
W
N
S
G
R
E
E
N
0V
G0
W
H
I
T
E
M
B
+V
0Vac
24Vac
220Vac
Ref
A.Out
CR72
NC1
NO1
C1
UNUSED
8
7
+V
Hout
PROBE
Como alternativa
Alternatively
R
E
D
IC
B
L
E
U
PRESSURE
TRANSDUCER
+24
B
L
A
C
K
MODULATING
VALVE
B
L
U
TF2
WATER VALVE
N.C
OC G0 TF1
WATER VALVE
N.O
G0 YM NO1 COM1 NO2 COM2 IC
AD4
AIR VALVE
N.C
11
PRESSURE
TRANSDUCER
M
PROBE
HUMIDITY
100
24
+24
6
+V
Hout
M
REMOTO
ON/OFF
F2 3.15A
NC2
D.in
5
4
3
2
2
9
1
1
220-240/24 V
POT. 65VA
NO2
C2
SUPPLY AIR
B
+V
M
A.Out
Ref
24Vac
CR72
D.in
220Vac
0Vac
NC1
NO1
C1
UNUSED
NC2
NO2
C2
RETURN AIR
WHITE
POWER ON
F1 1A
7.3 Esquema eléctrico (60 y 230 l/h) para
aplicaciones de CONDUCTO con regulación
PROPORCIONAL y LÍMITE ALTO DE HUMEDAD
7.3 Electrical diagram (60 and 230 l/h) for DUCT
applications, PROPORTIONAL regulation and
HIGH HUMIDITY LIMIT
Cod. +030221742 rel. 2.2 – 16.06.2005
8. Setting the main parameters
8. Configuración de los parámetros
principales
In order to get optimum performance from your system, it
is necessary to set some parameters and values relative
to the atomizing nozzles, air/water lines and electronic
regulators.
Para obtener un rendimiento óptimo del sistema, es
necesario establecer algunos parámetros y valores
relativos a las boquillas atomizadoras, las líneas de
aire/agua y a los reguladores electrónicos.
Boquillas
El tornillo de la parte posterior de la boquilla le permite
regular la cantidad de agua atomizada. Este valor
normalmente viene establecido de fábrica en 2,1 bar para
aire, 0,35 bar para agua y se refiere a las capacidades de
proyecto de 2,7; 4,0; 5,4; 6,8 ó 10 l/h. Cuando los modelos
de pulverización no tienen la misma intensidad, se puede
actuar sobre el tornillo posterior y ajustarlo con el fin de
conseguir una atomización homogénea.
Atomizing nozzles
The screw on the back part of the nozzle allows you to
regulate the quantity of atomized water. This value is
usually factory-set: 2.1bar for air, 0.35bar for water and it
refers to project capacities of 2.7, 4.0, 5.4, 6.8 or 10 l/h.
When spray patterns do not have the same intensity, you
can act on the back screw and adjust it so as to get
homogeneous atomization.
Líneas de aire y de agua
La presión del aire y del agua se deben ajustar a los
siguientes valores:
Entrada de aire: 5-10 bar
Salida de aire: 2,1 bar
Entrada de agua: 2-4 bar
Salida de agua: 0,35 bar si la boquilla y el armario de
control están situados a la misma altura;
(0,35+Hx0,1) bar si las boquillas y el
armario de control están a distintos
niveles; H indica la altura en metros,
entre las boquillas y el armario de control.
Air and water lines
Air and water pressure should be set at the following
values:
Air input:
5-10bar
Air output:
2.1bar
Water input:
2-10bar
Water output:
0.35bar if nozzles and control cabinet
are placed at the same elevation;
(0.35+0.1xH) bar if nozzles and control
cabinet are placed on different levels; H
indicates the height in meters between
nozzles and control cabinet.
El sistema de humidificación MC modulante es capaz de
regular automáticamente la producción del agua
atomizada mediante el ajuste de la presión de salida de la
boqui-lla, desde un valor mínimo de 1,2 bar a un valor
máximo de 2,1 bar, evitando de este modo el desperdicio
de agua y electricidad.
The modulating MC system is capable of automatically
regulating the production of atomized water by adjusting
the output nozzle pressure, from a minimum value of
1.2bar up to a maximum value of 2.1bar, thus avoiding
waste of water and electricity.
Reguladores electrónicos
El armario de control puede estar equipado con 1 o 2
reguladores de humedad cuyos parámetros normalmente
vienen configurados de fábrica según los valores requeridos más frecuentemente. El usuario final, sin embargo,
puede modificarlos fácilmente. El display siempre muestra
el valor de la humedad del ambiente/conducto.
Electronic regulators
The control cabinet can be equipped with 1 or 2 humidity
regulators whose parameters are usually factory-set
according to the most commonly required values. The
End-User, however, can easily modify them. The display
always shows the room/duct humidity value.
MCRD - MCRP (cabinet for room applications)
set point:
50% rH
Differential:
5% rH
MCRD - MCRP (armario para aplicaciones de ambiente)
Punto de consigna:
50% H.R.
Diferencial:
5% H.R.
MCDP (armario para aplicaciones de conducto)
P. consig. aire de retorno: 50% H.R.
Dif. aire de retorno:
5% H.R.
P. consig. aire impulsión: 80% H.R.
Dif. aire de impulsión:
5% H.R.
MCDP (cabinet for duct applications)
Return air set point:
50% rH
Return air differential: 5% rH
Supply air set point:
80% rH
Supply air differential: 5% rH
NOTE: To set the values of the working parameters see
sections below.
NOTA: Para establecer los valores de los parámetros de
funcionamiento, consulte las secciones siguientes.
21
Cod. +030221742 rel. 2.2 – 16.06.2005
9. Procedimiento de arranque
9. Startup procedure
9.1 Antes de arrancar el sistema MC
9.1 Before starting the MC system
Lista de comprobaciones para la instalación:
Installation checklist:
1
2
las conexiones eléctricas están realizadas correctamente;
las sondas, los sensores de flujo o humidostatos están
conectados correctamente;
3 la cantidad de aire disponible es suficiente para
suministrar la capacidad de agua necesaria a la
presión adecuada;
4 el sistema hidráulico es capaz de suministrar agua a
la presión deseada;
5 los filtros correspondientes están situados en la
boquilla del armario;
6 los tubos de descarga están conectados correctamente;
7 la unidad de tratamiento de aire (o el conducto de
aire) están completamente operativos;
8 todas las líneas de aire y de agua están terminadas
con una válvula de purga;
9 los separadores de gotas, si los hay, están conecta
dos al sistema del tanque de condensado;
10 todas las líneas de aire y de agua están conectadas
correctamente. Ponga atención en no mezclarlas;
11 los tubos de agua están más abajo que las boquillas
atomizadoras;
12 las entrada de agua/aire de las boquillas atomizadoras
están conectadas correctamente (ponga atención en
no mezclarlas).
1 electric connections should be correctly carried out;
2 probes, flow sensors or humidistats should be properly
connected;
3 the quantity of air available should be sufficient to supply
the necessary water capacity at the right pressure;
4 the hydraulic system should be capable of supplying
water at the desired pressure;
5 appropriate filters should be placed at the nozzle of
the cabinet;
6 discharge pipes should be properly connected;
7 the air handling unit (or air duct) should be completely
operational;
8 all air and water lines are terminated with a blowoff
valve;
9 drop separators, if any, should be connected to a
condensate tank system;
10 all air and water lines should be properly connected.
Pay attention not to mix them up;
11 water piping should be lower than the atomizing nozzles;
12 water/air inputs at the atomizing nozzles should be
properly connected (pay attention not to mix them up).
9.2 Arranque del sistema
9.2 Starting the system
Limpieza de las líneas de agua y de aire
Es muy importante que la suciedad presente en la línea
recientemente instalada no entre en las boquillas
atomizadoras. Para quitarla, purgue las líneas
completamente, siguiendo estas instrucciones:
1 Cierre las válvulas de las boquillas atomizadoras y
abra las válvulas de purga del final de las líneas;
2 Verifique que los tres potenciómetros situados en la
tarjeta lógica AD4 están situados del siguiente modo
(ver página 24):
T1=medio (30 min.)
T2=medio (20 seg.)
T3=mínimo (20 seg.)
3 Ponga en On el interruptor general;
4 El display muestra el valor de la humedad medido por
la sonda;
5 Verifique que el punto de consigna* predeterminado
coincide con el valor deseado;
6 Durante el ciclo de limpieza compruebe que sale aire y
agua de las líneas. Si no hay agua, aumente la presión
de la salida del armario mediante el regulador de presión;
* Vea Selección del punto de consigna, en párrafo 9.3.
Cleaning water and air lines
The dirt into the newly set lines must not get into the
atomizing nozzles. In order to remove it, bleed the lines
completely, observing the following instructions:
1 Close the valves at the atomizing nozzles and open the
blowoff valves at the end of the lines;
2 Check that the three potentiometers placed on the logic
card AD4 are positioned as follows (see page 24):
T1 = medium (30 min.)
T2 = medium (20 sec.)
T3 = minimum (20 sec.)
3 Turn ON the general switch;
4 The display shows the humidity value measured by the
probe;
5 Be sure that the default set point* corresponds to the
desired value;
6 During the cleaning cycle check that both air and water
come out of the lines. If there is no water, increase the
pressure at the cabinet output by means of the pressure
regulator.
* See set point selection, 9.3 below.
NOTE: to ensure optimum performance the set point
should be at least 5 points higher than the value measured by the probe.
NOTA: Para garantizar un rendimiento óptimo, el punto
de consigna debería ser por lo menos 5 puntos superior
al valor medido por la sonda.
Adjusting the cabinet
After cleaning water and air lines, open all the valves on
the atomizing nozzles and close the valves placed at the
end of the lines. Now check the pressure values. Turn ON
the cabinet and verify the set point: it should be at least 5
points higher than the value measured by the probe.
– Warning: pay attention when adjusting the cabinet
since the control panel is open and powered.
– Set air line pressure: set the outlet pressure at 2.1bar
Ajuste del armario
Terminada la limpieza de las líneas de agua y de aire, abra
todas las válvulas de las boquillas atomizadoras y cierre las
válvulas situadas al final de las líneas. Ahora compruebe los
valores de la presión. Encienda el armario y verifique el
punto de consigna: debería ser por lo menos 5 puntos
superior al valor medido por la sonda.
– Aviso: ponga atención al ajustar el armario, ya que el
cuadro eléctrico está abierto y tiene tensión.
22
Cod. +030221742 rel. 2.2 – 16.06.2005
by means of the manual regulator (inlet pressure should
be 5-10bar).
– Ajuste de la presión de la línea de aire: ajuste la
presión de salida en 2,1 bar mediante el regulador
manual (la presión de entrada debe estar comprendida
entre 5 y 10 bar).
NOTE: models based on proportional regulation will set
the outlet pressure automatically. Consequently, the
manual regulator will work as a safety device and will not
allow you to increase the pressure over 2-2.1bar.
NOTA: en los modelos basados en regulación proporcional
la presión de salida se ajustará automáticamente. Por
tanto, el regulador manual funcionará como dispositivo de
seguridad y no le permitirá aumentar la presión por
encima de 2- 2,1 bar.
– Set water line pressure: set the outlet pressure at
0.35bar by means of the manual regulator. If the water
line is higher than the cabinet, calculate the following:
0.35bar + (Hx0.1). H indicates the height difference
between water line and cabinet in meters.
pH2O = 0.35 + [H (m) x 0.1] bar
* In duct cabinets it is necessary to set the set point value
also on the second regulator.
– When a complete cycle is over check that the water is
discharged through the N.O. discharge electrovalve;
check also that the time (T3) set on the AD4 card
necessary to empty the lines is sufficient to dry up the
nozzles (the atomizing effect should disappear before
the air line closes).
– Check that all hydraulic connections are complete and
tested for leaks.
– Finally, set the values of the humidity set points.
– Check that during the OFF routine (T2) the delivery air
line pressure value goes down to 0 and that the pin of
the atomizing nozzles cleans their orifice.
– Ajuste de la presión de la línea de agua: ajuste la
presión de salida a 0,35 bar mediante el regulador manual.
Si la línea de agua está puesta más arriba que el armario,
calcule lo siguiente: 0,35bar + (Hx0,1). H indica la diferencia
de altura en metros entre la línea de agua y el armario.
pH2O = 0,35 +[H (m) x 0,1] bar
*En los armarios de la versión de conducto es necesario
ajustar el valor de consigna también en el segundo regulador.
– Cuando se termine un ciclo completo, compruebe que
se ha descargado el agua mediante la electroválvula de
descarga N.A.; compruebe también que el tiempo
establecido en la tarjeta AD4, necesario para vaciar las
líneas es suficiente para secar las boquillas (el efecto
atomizador debería desaparecer antes de que se cierre
la línea de aire).
– Compruebe que todas las conexiones hidráulicas estan
completas y sin fugas.
– Finalmente, establezca los valores de los puntos de
consigna de humedad.
– Verifique que durante la rutina de Parada (T2), el valor
de la presión de la línea de aire de impulsión baja por
debajo de 0 y que el alfiler de las boquillas limpia el orificio.
9.3 Ajuste de los parámetros principales
9.3 Setting the main parameters
El controlador utilizado en el sistema MC es el regulador
universal CR72; en los sistemas de aplicación en conducto,
normalmente se añade un segundo regulador CR72 para
controlar el límite alto de humedad. El armario trae ajustados los parámetros de fábrica para facilitar el arranque. El
usuario final sólo tendrá que ajustar el valor de humedad
que desee y, en las aplicaciones de conducto, la humedad
máx. de entrada (humedad límite). Con cada armario de
control se suministrará un manual completo sobre el
sistema MC y sobre el regulador CR72.
The controller used in the MC system is the universal
regulator CR72. A second CR72 regulator is usually
added in duct application systems to control the high
humidity limit. The cabinet is supplied with factory-set
parameters so as to make it easier to start it. The EndUser will only have to set the desired humidity value and,
in duct applications, the inlet max. humidity (limit humidity). A comprehensive manual on the MC system and on
the CR72 regulator will be supplied with every control
cabinet.
ON1 = ON2
B
25
50
75
100 %
Y
SET 1
3
2
1
Fig. 17
1 Pulse SEL durante 1 seg. La indicación B parpadeará.
Selecting the set point
1 Press SEL for about 1 second. Indication B will blink.
2 Pulse
/
para seleccionar el valor de humedad que desee.
3 Pulse SEL para confirmar el valor seleccionado. Si no pulsa
SEL en 60 segundos, se perderá el valor seleccionado.
/
to select the desired humidity value.
2 Press
3 Press SEL to confirm the selected value. If you do not
press SEL within 60 sec.s, the selected value will be lost.
Selección del punto de consigna
23
Cod. +030221742 rel. 2.2 – 16.06.2005
NOTA: Dependiendo de la versión elegida, el sistema
tendrá una lógica de funcionamiento Todo/Nada o
MODULANTE, con un diferencial de 5 puntos.
NOTE: Depending on the version chosen, the system will
have an ON/OFF or a MODULATING functioning logic,
with a 5-point differential.
Ejemplo de funcionamiento:
Armario Todo/Nada Armario MODULANTE
p. consigna = 50%
p. consigna = 50%
On = <45%
máx. On = <45%
Off = >50%
Off = >50%
Modulación entre 45 y 50% H.R.*
* Los dos reguladores utilizados en las aplicaciones de
conducto tienen la misma lógica de funcionamiento.
Si la aplicación requiere 2 diferenciales distintos, por
favor, mire los parámetros P01 (versión Todo/Nada) y P07
(versión PROPORCIONAL) en el capítulo 11.8.
Example:
ON/OFF cabinet
set point = 50%
ON = <45%
OFF = >50%
Indicaciones y alarmas
En el caso de que se dén condiciones anormales, el
CR72 mostrará los siguientes mensajes:
HIA
parpadea cuando el valor de la humedad es
superior al punto de consigna de humedad alto
(p. consigna + P15).
LOA
Parpadea cuando el valor de la humedad es
inferior al punto de consigna de humedad bajo
(punto de consigna - P14).
SEA
Parpadea cuando la sonda mide valores fuera de
rango.
ALA
Parpadea cuando el circuito Todo/Nada está abierto.
EEE
Parpadea si se detecta un error en el circuito CR72.
Indications and Alarms
In case of OFF-normal conditions, the CR72 will display
the following messages:
HIA
blinks when the humidity value is higher than the
high humidity set point (set point + P15).
LOA
blinks when the humidity value is lower than the
low humidity set point (set point - P14).
SEA
blinks when the probe measures out-of-range
values.
ALA
blinks when the remote ON/OFF circuit is open.
EEE
blinks if an error in the CR72 circuit is detected.
Ajuste de la tarjeta AD4
Dentro del armario de la tarjeta AD4 hay tres LEDs para
la señalización: DL1- tarjeta con tensión, DL2 - línea de
aire activa, DL3 - línea de agua activa. Y también, tres
potenciómetros, T1 - T2 - T3, para la gestión del ciclo de
limpieza, en tres parámetro diferentes:
T1 - Tiempo de funcionamiento
Fija el tiempo máximo de funcionamiento del aparato con
demanda de humedad (de 1 a 60 minutos).
T3 - Ciclo de secado
Durante el ciclo de limpieza se puede utilizar aire comprimido
sólo (línea de agua Off) con el fin de limpiar las boquillas.
La función de secado es ajustable de 20 a 90 seg.
Adjusting the AD4 card
On the AD4 board inside the cabinet are present three
LED’s for signal: DL1 - board in tension, DL2 - air line
actived, DL3 - water line actived. And also, three potentiometers, T1, T2, T3, for the management of the cleaning
cycle, in three different parametres:
T1 - Functioning time
Maximum ON time on a call for humidity (1 to 60minutes).
T3 - Drying up cycle
During the cleaning cycle it will be possible to use compressed air only (water line OFF) so as to dry up the
nozzles. The drying up function can be adjusted from 20
to 90seconds.
NOTA: una vez establecido, el ciclo de secado se repetirá
cada vez que el sistema se pare después de haber
alcanzado las condiciones de humedad establecidas.
NOTE: once set up, the drying cycle will be repeated any
time the system stops after having reached the set humidity conditions.
T2 - Rutina de apagado
Es el intervalo de tiempo durante el cual se mantiene
apagado el sistema. Durante este tiempo el alfiler de las
boquillas atomizadoras limpia la pequeña abertura de la
boquilla y elimina los posibles depósitos calcáreos. Es
ajustable entre 1 y 60 segundos.
ATENCIÓN: no toque la tarjeta. Antes de ajustar los potenciómetros, elimine la carga estática del destornillador.
T2 - OFF routine
It is the time-interval during which the system remains
OFF. During this time the pin of the atomizing nozzle
cleans the small opening of the nozzle and removes any
calcareous deposit. Adjustable from 1 to 60seconds.
WARNING: do not touch the board. Before adjusting the
potentiometers, remove the static charge from the
screwdriver.
MODULATING cabinet
set point = 50%
max. ON = <45%
OFF = >50%
Modulation between 45 and 50% rH*
* The two regulators used in duct applications have the
same functioning logic. If your application requires 2 different differentials, please see parameters P01 (ON/OFF
version) and P07 (PROPORTIONAL version) below.
However, we suggest that you should not decrease too
much the values indicated above.
T3
DL2 DL3
T2
T1
.......
.......
DL1 LED verde encendido - tajeta con tensión
Green LED ON - board in tension
DL2 LED rojo encendido - linea de aire activa
Red LED ON - air line activated
DL3 LED rojo encendido - linea de agua activa
Red LED ON - water line activated
DL1
Fig. 18
24
Cod. +030221742 rel. 2.2 – 16.06.2005
10. Programación de los parámetros
principales del controlador CR72
10. Programming the main parameters
of the CR72 controller
En el manual del controlador CR72 (suministrado con el
armario de control) se puede encontrar toda la información concerniente al aparato, así como una lista completa
de todos los parámetros de configuración. En las tablas
siguientes se muestran los parámetros del armario de
control modificados adecuadamente con respecto a la
configuración estándar (valores predeterminados).
In the manual of the CR72 controller (supplied with the
control cabinet) you will find all the technical information
concerning your instrument as well as a comprehensive
list of all configuration parameters. The tables below show
the control cabinet parameters appropriately modified with
respect to the standard configuration (Default values).
10.1 Parámetros de configuración seleccionables
10.1 Selectable configuration parameters
Para entrar en la máscara de configuración, siga las
indicaciones del párrafo 11.8.
To enter the configuration mask follow the indications
described below (Par. 11.8).
Parametro
Parameter
C02
C05
C22
C23
C26
Descripción
Description
Valor predeterminado Valor a ajustar
Default value
Value to be set
Lógica de funcionamiento salida 1
Functioning logic output 1
Unidad de medida
Measurement Unit
Límite inferior de la salida analógica
Lower limit of analogue output
Límite superior de la salida analógica
Higher limit of analogue output
Entrada digital como alarma
Digital input as alarm
D
R
°C
0
% U.R.
% rH
50
100
- 100
0
3
Tab. 6
10.2 Tabla de parámetros operativos
10.2 Table of operational parameters
Para entrar en la máscara de configuración, siga las indicaciones del párrafo 11.8.
To enter the configuration mask follow the indications
described below (Par. 11.8).
Parámetro
Parameter
P01
P07
P12
P13
P14
P15
P23
P24
Descripción
Description
Valor predeterminado Valor a ajustar
Default value
Value to be set
Diferencial de la salida 1
Differential of output 1
Banda proporcional para la salida analógica
Proportional band of analogue output
Límite inferior para los p. de consigna
set points lower limit
Límite superior para los p. de consigna
set points higher limit
Límite inferior de alarma para la variable controlada
Alarm lower limit of the controlled variable
Límite superior de alarma para la variable controlada
Alarm higher limit of the controlled variable
Tiempo de retardo en el arranque
Time-delay at start up
Tiempo de retardo antes de la rutina de apagado
Time-delay before OFF routine
2%
5%
2%
5%
-100
0.0
100
100.0
10
90
10
40
2
10
2
10
Tab. 7
Procedimiento de RESETEO
Si tiene que resetear la configuración del aparato ajustada
en fábrica, siga estos pasos:
RESET procedure
Should you need to reset the factory-set configuration of
the instrument, follow these steps:
1 Apague el aparato.
2 Pulse PRG y SEL al mismo tiempo, a continuación
encienda la unidad.
3 Cuando aparezca en el display “DEF”, suelte las teclas
y espere hasta que desaparezca el mensaje. Los parámetros quedarán guardados.
1 Turn OFF the instrument.
2 Press PRG and SEL simultaneously, then turn
ON the unit.
3 When the message “DEF” appears on the display,
release the keys and wait until the message disappears.
The parameters will then be stored.
25
Cod. +030221742 rel. 2.2 – 16.06.2005
11. Información adicional
11. Further information
11.1 Lógica de funcionamiento del armario
Todo/Nada para aplicaciones de ambiente
11.1 Functioning logic of the ON/OFF cabinet for
room applications
El sistema MCRD contiene un regulador que funciona
como humidostato. Cuando el valor medido de la humedad del ambiente es inferior que el valor deseado (punto
de consigna), el regulador envía una señal a la tarjeta
interna AD4 (ver Fig. 18) que da instrucciones a las líneas
de agua y de aire de que se abran (mediante las correspondientes electroválvulas NC). La presión de aire es
controlada mediante el regulador de presión manual situado en la boquilla de la línea. Al final de la línea hay un
presostato de seguridad: si la presión desciende por
debajo de 1,2 bar (presión mín. admitida en las boquillas)
la línea del agua se desactivará. La tarjeta AD4 tiene tres
potenciómetros para el ajuste de los parámetros del ciclo
de limpieza: Tiempo de funcionamiento máximo, ciclo de
secado y tiempo máximo de apagado. Cada vez que el
sistema alcance el valor de humedad deseado o cuando
se termine el tiempo de funcionamiento seleccionado
mediante la tarjeta AD4, se iniciará automáticamente un
ciclo de limpieza. Cuando el armario esté apagado o
durante el ciclo de limpieza, la válvula NA permanecerá
abierta, permitiendo de este modo que se vacien las
líneas.
The MCRD system includes a CR72 regulator that works
as a humidostat. When the humidity value measured in
the room is lower than the desired value (set point), the
regulator sends a signal to the internal AD4 card (see
Fig.18) that will immediately instruct the water and air
lines to open (through their relative N.C.electrovalves). Air
pressure is controlled by means of the relative manual
pressure regulator placed at the nozzle of the line. At the
end of the line there is a safety pressure switch: should
the pressure go below 1.2bar (min. allowable pressure to
the nozzles) the water line will be deactivated. The AD4
card has three potentiometers allowing you to set the
parameers of the cleaning cycle: max. ON time, drying up
cycle and max. OFF routine. A cleaning cycle will automatically start any time the system reaches the desired humidity value or in relation to the ON time selected through
the AD4 card. When the cabinet is OFF or during a cleaning cycle, the N.O. valve will remain open, thus allowing
the lines to empty.
11.2 Lógica de funcionamiento del armario
PROPORCIONAL para aplicaciones de ambiente
11.2 Functioning logic of the PROPORTIONAL
cabinet for room applications
El sistema MCRP controla directamente la línea de aire para
modular la presión de salida (lógica de modulación). La
modulación se produce dentro de una zona proporcional
(P07) con respecto al punto de consigna seleccionado. La
zona proporcional está a la izquierda del punto de consigna
(modo de funcionamiento inverso). La presión de salida será
mas baja cerca del punto de consigna y mas alta en el lado
opuesto de la banda (ver Fig.20). Además del regulador de
presión manual (que funciona aquí como equipo de seguridad), hay una válvula modulante y una sonda de presión
situadas al final de la línea de aire. En base a los valores
medidos por la sonda, el punto de consigna seleccionado y la
zona proporcional, el CR72 enviará una señal analógica a la
tarjeta AD4. Entonces, la tarjeta AD4 activará las electroválvulas de las líneas de agua/aire y dará instrucciones a la válvula
modulante de que consiga las presiones de aire de salida
proporcionales a la señal analógica. La sonda de presión
mantendrá bajo control la presión de salida y en el caso de
que salga fuera del rango, la válvula AD4 modificará convenientemente la apertura de la válvula (retroalimentación). La
presión de salida deberá estar entre 1,2 bar, cerca del punto
de consigna y 2,1 bar en condiciones de funcionamiento
máximo. Cuando la humedad supera el punto de consigna, el
armario se para.
The MCRP system controls the air line directly so as to
modulate the output pressure (modulation logic).
Modulation occurs within a proportional zone (P07) with
respect to the selected set point. The proportional zone is
on the left of the set point (reverse functioning mode). The
output pressure will be lower near the set point and higher
on the opposite side of the band (see Fig.20). In addition
to the manual pressure regulator (working here as a
safety device), there is a modulating valve and a pressure
probe positioned at the end of the air line. On the basis of
the values measured by the probe, the selected set point
and the proportional zone, the CR72 will send an analogue signal to the AD4 card. The AD4 card will then activate the electrovalves of the water/air lines and will instruct
the modulating valve so as to get outlet air pressures proportional to the analogue signal. The pressure probe will
keep under control the outlet pressure and in case it is
out-of-range, the AD4 valve will properly modify the
opening of the valve (feedback). The outlet air pressure
should range between 1.2bar near the set point and
2.1bar under maximum working conditions. When
humidity exceeds the set point, the cabinet will stop.
11.3 Lógica de regulación para aplicaciones de
conducto
11.3 Regulation logic for duct applications
The MCDP system works with two CR72 controllers. The
first one controls the values measured by the inlet probe
relative to the room humidity, the second one controls the
outlet probe dedicated to the measurement of the high
humidity limit. The two regulators have the same functioning logic described above. The AD4 valve controls the
modulating valve on the basis of the signals from the
regulators. Priority is given to the lower signal (the lower
signal determines the modulation and, when one of the
two set points is reached, makes the system stop).
El sistema MCDP funciona con dos controladores CR72. El
primero controla los valores medidos por la sonda de
entrada de la humedad ambiente y el segundo controla la
sonda de salida dedicada a la medición del límite alto de
humedad. Los dos reguladores tienen la misma lógica de
funcionamiento descrita anteriormente. La válvula AD4
controla la válvula modulante en base a las señales de los
reguladores, dando prioridad a la señal más baja (la señal
más baja determina la modulación y, cuando uno de los
dos puntos de consigna se alcanza, hace que se pare el
sistema)..
26
Cod. +030221742 rel. 2.2 – 16.06.2005
11.4 Ajuste del paso Todo/Nada
11.4 Setting the ON/OFF step
El armario Todo/Nada para aplicaciones de ambiente está
equipado con un regulador CR72 que controla una salida
digital de relé. Consecuentemente, la salida del CR72
activará la tarjeta AD4 en base al valor medido por la
sonda, el punto de consigna y el diferencial seleccionado
(ver Fig. 19).
Los parámetros principales para esta aplicación son:
C01: lógica de funcionamiento con un punto de consigna (C01).
C02: control de humedad (C02) mediante una lógica de
funcionamiento inversa.
P01: valor absoluto de la zona diferencial (valor predeterminado: 5). Indica el umbral de humedad que
determina el estado Todo o Nada.
NOTA: Para visualizar y establecer los valores de los
parámetros, lea el párrafo 11.8.
The ON/OFF cabinet for room applications is equipped
with a CR72 regulator that controls a relay digital output.
Consequently, the output of the CR72 will activate the
AD4 card on the basis of the value measured by the
probe, the selected set point and differential (see Fig. 19).
Main parameters for this application:
C01: functioning logic with one set point.
C02: control of humidity (C02) through a reverse
functioning logic (R).
P01: absolute value of the differential zone (default 5).
Indicates the humidity threshold that determines
the ON or OFF status.
NOTE: To display and set the values of the parameters,
see 11.8 below.
ON
100%
OFF
100%
SET
Zona diferencial (P01)
Absolute value
of the differential zone (P01)
Fig. 19
11.5 Ajuste de la zona proporcional
11.5 Setting the proportional zone
El armario proporcional recibe una señal modulante del
controlador CR72 para obtener la presión de aire de
salida. El CR72 controla la salida analógica con respecto
al valor medido por las sondas, el punto de consigna y el
diferencial seleccionados (ver Fig. 20). En el gráfico
siguiente se muestra la lógica de funcionamiento.
The proportional cabinet receives a modulating signal
from the CR72 controller so as to modulate the output air
pressure. The CR72 controls the analogue output with
respect to the value measured by the probes, the selected
set point and differential (see Fig. 20). The graph belows
shows the funtioning logic.
NOTA: Cuando se utilizan dos reguladores - como en el
caso de los armarios de conducto - su lógica de funcionamiento es la misma. La tarjeta AD4 recibe las señales de
dos reguladores, dando prioridad a la señal más baja (la
señal más baja determina la modulación y, si ese es el
caso, para el sistema).
NOTE: When using two regulators - as in case of duct
cabinets – their functioning logic is the same. The AD4
card receives the signals from the two regulators. Priority
is given to the lower signal (the lower signal determines
the modulation and, if that be the case, stops the system).
Los parámetros principales para esta aplicación son:
C01: Lógica de funcionamiento con un punto de
consigna (C01).
C22: Indica el índice en porcentaje dentro de la zona del
diferencial (P07) en el que el valor mínimo de la
salida analógica es 0 Vcc.
C23: Indica el índice en porcentaje dentro de la zona del
diferencial (P07) en el que el valor máximo de la
salida analógica es 10 Vcc.
P07: Valor absoluto de la zona del diferencial (zona
proporcional).
Nota: Para visualizar y ajustar los parámetros lea el
párrafo 11.8.
Nota: el aumento del valor del punto de consigna hace que
se apague el humidificador incluso si la señal de la salida
analógica no ha alcanzado su valor mínimo. El humidificador, en efecto, no se apagará a 0 bar sino por encima de
1,1 bar. Cuando C22=+50 y C23=-100, el humidificador
se para en cuanto se alcanza el punto de consigna.
Main parameters for this application:
C01 functioning logic with one set point.
C22 indicates the percentage rate within the differential
zone (P07) at which the minimum value of the
analogue output is 0Vdc.
C23 indicates the percentage rate within the differential
zone (P07) at which the maximum value of the
analogue output is 10Vdc.
P07 absolute value of the differential zone (proportional
zone).
NOTE: To display and set the parameters see 11.8 below.
NB: increasing the set point value causes the humidifier
to turn OFF even if the analogue output signal hasn't reached its minimum value. The humidifier, in fact, will not
turn off at 0bar but over 1.1bar. When C22= +50 and
C23= -100, then the humidifier stops as soon as the set
point is reached.
27
Cod. +030221742 rel. 2.2 – 16.06.2005
P.MAX
MODULACIÓN / MODULATING
STOP
10 V
100%
50%
-100%
-50%
0%
Banda proporcional / Proportional band (P07)
SET
Presión aire / Air pressure
Inicio Modulación / Modulating start
2,1 bar
1,2 bar
+50%
Fig. 20
Fin Modulación / Modulating end (C22)
11.6 Ajuste del límite alto y bajo de humedad
11.6 Setting the high and low humidity limit
El display del controlador CR72 mostrará los códigos de
alarma de los niveles de humedad alto (HIA) y bajo (LOA).
Para ajustarlos actúe sobre los parámetros siguientes:
P14: Es el valor negativo máximo con respecto al punto
de consigna que puede alcanzar la humedad
(valor absoluto) sin que se active una alarma LOA.
P15: Es el valor positivo máximo con respecto al punto
de consigna que puede alcanzar la humedad
(valor absoluto) sin que se active una alarma HIA.
NOTA: Para visualizar y ajustar los parámetros, lea el
párrafo 11.8.
The display of the CR72 controller will show you the alarm
codes of the high (HIA) and low (LOA) humidity levels.
To set them act on the following parameters:
P14: it is the max. negative value with respect to the setpoint that humidity (absolute value) can reach
without causing a LOA alarm.
P15: it is the max. positive value with respect to the setpoint that humidity (absolute value) can reach
without causing a HIA alarm.
NOTE: To display and set the parameters, see 11.8
below.
11.7 Ajuste de los límites para los puntos de
consigna
11.7 Setting set point limits
In order to limit the potential range of the set points, it is
useful to set their higher and lower values by means of
the following parameters:
P12: minimum selectable set point
P13: maximum selectable set point
NOTE: To display and set the parameters, see 11.8
below.
Con el fin de limitar el rango potencial de los puntos de
consigna, es útil ajustar los valores superior e inferior
mediante los parámetros siguientes:
P12: punto de consigna mínimo seleccionable
P13: punto de consigna máximo seleccionable
NOTA: Para visualizar y ajustar los parámetros, lea el
párrafo 11.8.
11.8 Cómo ajustar los parámetros
11.8 How to set parameters
Ajuste de los parámetros “C”
1 Activación: Pulse simultáneamente PRG y SEL
durante unos 5 segundos. El display muestra: C00
(zona A), que corresponde a la contraseña, 888 (zona
Setting configuration parameters “C"
1 Startup: press PRG and SEL simultaneously for about
5 seconds. The display shows C00 (A zone) corresponding to the password, 888 (B zone) and Cod (C zone).
B) y la sigla Cod (zona C). Pulse
/
para
seleccionar la contraseña 842, después pulse SEL para
entrar en el procedimiento de configuración.
2 Establezca los valores: para pasar de un parámetro al
siguiente, pulse SEL. Para modificar el valor actual del
Press
/
to select the password 842, then
press SEL to enter the configuration procedure.
2 Set the values: press SEL to pass from a parameter to
the next one. Press
/
to modify the current
value of the displayed parameter.
3 Exit the procedure: press PRG to exit the configuration
procedure and save the newly set values.
valor visualizado, pulse
/
.
3 Salida del procedimiento: para salir del procedimiento
de configuración y guardar las modificaciones
realizadas a los valores, pulse PRG.
A
B
SET 1
C
3
1
2
28
Fig. 21
Cod. +030221742 rel. 2.2 – 16.06.2005
If no keys are pressed within 60 seconds, the procedure
ends automatically and the new values will be lost.
Setting working parameters "P"
1. Start-up: press SEL for at least 5 seconds. The display
shows P00 (A zone), the current value of the displayed param.
(B zone) and Lcd (C zone) identifying the current param..
2. Set the values: press SEL to pass from a parameter to
El procedimiento se autodesactiva tras 60 segundos de
inactividad, sin guardar los cambios efectuados.
Ajuste de los parámetros de funcionamiento “P”
1. Activación: pulse SEL durante 5 segundos por lo
menos. En el display aparece P00 (zona A), el valor
actual del parámetro visualizado B y la sigla Lcd (zona C),
que identifica al parámetro actual.
2. Establecimiento de los valores: para pasar de un
parámetro al siguiente, pulse SEL. Para modificar el valor
the next one. Press
/
to modify the current value
of the displayed parameter.
3. Exit the procedure: press PRG to exit the procedure
and save the newly set values.
If no keys are pressed within 60 seconds, the procedure
ends automatically and the new values will be lost.
actual, pulse
/
.
3. Salir del procedimiento: para salir del procedimiento y
guardar los cambios efectuados, pulse PRG.
El procedimiento se autodesactiva tras 60 segundos de
inactividad, sin guardar los cambios.
A
25
50
75
100 %
Y
B
C
3
1
Fig. 22
2
12. Mantenimiento
12. Maintenance
12.1 Instrucciones de mantenimiento
12.1 Maintenance instructions
Aunque el sistema MC no requiere mantenimiento especial, es aconsejable comprobarlo, por lo menos, una vez
al año o antes del arranque del sistema después de las
paradas estacionales. Si se utiliza agua rica en sales o
impurezas, se recomienda comprobar el sistema regularmente.
Componentes a comprobar periódicamente:
Compresor: siga las recomendaciones del fabricante.
Boquillas atomizadoras: desmonte y limpie las boquillas
una vez al año.
Línea de aire y de agua: púrguelas una vez al año para
eliminar los posibles sedimentos, aceite o suciedad.
Reguladores de presión y válvulas solenoides: ábralos
y límpielos una vez al año.
Reguladores CR72 y sondas de humedad: una vez al
año se deben recalibrar las sondas. El parámetro P04
también se puede utilizar en el CR72 para calibrar el valor
mostrado. No utilice aire comprimido ni disolventes para
limpiar el sensor de la sonda.
Although the MC system requires very little maintenance,
it is advisable to check it at least once a year or before restarting the system after a seasonal shutoff. If you are
using water rich in salts or impurities, it is recommended
to check the system regularly.
Components to be periodically checked:
Compressor: follow the Manufacturer's recommendations.
Atomizing nozzles: remove and clean the nozzles once
a year.
Air and water lines: blow them out once a year to get rid
of any deposit, oil or dirt that might have collected.
Pressure regulators and solenoid valves: open and
clean them once a year.
CR72 regulators and humidity probes: once a year the
probes should be recalibrated. Parameter P04 may also
be used on the CR72 to calibrate the displayed value. Do
not use compressed air or any solvent to clean the sensor
of the probe.
13. Spare parts
13. Piezas de recambio
The electrical control panel comprises the following components (for all cabinet models):
El cuadro de control eléctrico comprende los siguientes
componentes (para todos los modelos de armario):
Transformador / Transformer
Lógica de la tarjeta AD4 / Logic card AD4
Regulador de humedad (dos regul. en aplic. de conducto)
Humidity regulator (two regulators in duct applications)
Salida analógica opcional (excepto en modelos Todo/Nada)
Optional analogue output (except ON/OFF models)
29
código / code
código / code
código / code
09C150A023
98C150C012
CR72140000
código / code
CR72SER000
Cod. +030221742 rel. 2.2 – 16.06.2005
13.1 Armario MC, máx. 60 l/h
13.1 MC Cabinet, max. 60l/h
LÍNEA DE AIRE PROPORCIONAL cód. 98C150P013
Armario: MCRPAW1001...MCDPNW0001
MCDPAW1001...MCRPNW0001
PROPORTIONAL AIR LINE
code 98C150P013
Cabinet: MCRPAW1001 to MCDPNW0001
MCDPAW1001 to MCRPNW0001
4
3
2
1
5
6
7
1/2"
1
3
C
2
It includes the following components:
Contiene los siguientes componentes:
1
2
3
4
5
6
7
electroválvula NC
regulador de presión
válvula modulante – servo comando
– cuerpo válvula
transductor
manómetro 0-4 bar
manómetro 0-12 bar
filtro FF 1/4”
1 NC electrovalve
2 pressure regulator
3 modulating valve – servo control
– valve body
4 transducer
5 manometer 0-4 bar
6 manometer 0-12 bar
7 filter FF 1/4"
1309860Axx
1309831Axx
1309810Axx
1309736Axx
1309850Axx
1309718Axx
1309717Axx
1309742Axx
1309860Axx
1309831AXX
1309810Axx
1309736Axx
1309850Axx
1309718Axx
1309717Axx
1309742Axx
ON/OFF AIR LINE
code 98C150P014
Cabinet: MCRDAW1001 to MCRDNW0001
LÍNEA DE AIRE Todo/Nada
cód. 98C150P014
Armario: MCRDAW1001...MCRDNW0001
5
1
2
3
4
6
C
It includes the following components:
Contiene los siguientes componentes:
1
2
3
4
5
6
electroválvula NC
regulador de presión
manómetro 0-4 bar
manómetro 0-12 bar
presostato
filtro 1/4”
1
2
3
4
5
6
1309860Axx
1309831Axx
1309718Axx
1309717Axx
1309900Axx
1309742Axx
30
N.C. electrovalve
pressure regulator
manometer 0-4bar
manometer 0-12bar
pressurestat
filter 1/4"
1309860Axx
1309831AXX
1309718Axx
1309717Axx
1309900Axx
1309742Axx
Cod. +030221742 rel. 2.2 – 16.06.2005
WATER LINE (NW)
code 98C150P015
Cabinet: MCDPNW0001 to MCRDNW0001
MCRPNW0001
LÍNEA DE AGUA (NW)
cód. 98C150P015
Armario: MCDPNW0001...MCRDNW0001
MCRPNW0001
2
1
5
4
3
6
C
It includes the following components:
Contiene los siguientes componentes:
1
2
3
4
5
6
electroválvula de carga NC
regulador de presión
manómetro 0-2,5 bar
manómetro 0-12 bar
electroválvula de descarga NA
filtro 1/4”
1
2
3
4
5
6
1309857Axx
1309833Axx
1309719Axx
1309717Axx
1309870Axx
1309742Axx
N.C. charge electrovalve
pressurestat
manometer 0-2.5bar
manometer 0-12bar
N.O. discharge electrovalve
filter 1/4"
1309857Axx
1309833AXX
1309719Axx
1309717Axx
1309870Axx
1309742Axx
WATER LINE (AW)
code 98C150P016
Cabinet: MCDPAW1001 to MCRDAW1001
MCRPAW1001
LÍNEA DE AGUA (AW)
cód. 98C150P016
Armario: MCDPAW1001...MCRDAW1001
MCRPAW1001
2
1
3
4
6
5
ED:
100%
VA
A 14 Hold 23 Inrush
V 24 Hz 50
TYPE
It includes the following components:
Contiene los siguientes componentes:
1
2
3
4
5
6
electroválvula de carga NC
regulador de presión
manómetro 0-2,5 bar
manómetro 0-10 bar
electroválvula de descarga NA
filtro 3/8”
1
2
3
4
5
6
1309884Axx
1309844Axx
1309721Axx
1309720Axx
1309885Axx
1309970Axx
31
N.C. charge electrovalve
pressure regulator
manometer 0-2.5bar
manometer 0-10bar
N.O. discharge electrovalve
filter 3/8"
1309884Axx
1309844Axx
1309721Axx
1309720Axx
1309885Axx
1309970Axx
Cod. +030221742 rel. 2.2 – 16.06.2005
13.2 Armario MC, máx. 230 l/h
13.2 MC Cabinet, max. 230l/h
LÍNEA DE AIRE PROPORCIONAL cód. 98C150P017
Armario: MCDPAW1000...MCDPNW0000
MCRPAW1000...MCRPNW0000
PROPORTIONAL AIR LINE
code 98C150P017
Cabinet: MCDPAW1000 to MCDPNW0000
MCRPAW1000 to MCRPNW0000
4
2
3
1
5
6
7
1/2"
1
3
C
2
It includes the following components:
Contiene los siguientes componentes:
1
2
3
4
5
6
7
electroválvula de carga
regulador de presión
válvula modulante – servo control
– cuerpo válvula
transductor
manómetro 0-4 bar
manómetro 0-12 bar
filtro 1/2”
1 charge electrovalve
2 pressure regulator
3 modulating valve – servo control
– valve body
4 transducer
5 manometer 0-4bar
6 manometer 0-12bar
7 filter 1/2"
1309860Axx
1309832Axx
1309810Axx
1309735Axx
1309850Axx
1309718Axx
1309717Axx
1309740Axx
1309860Axx
1309832AXX
1309810Axx
1309735Axx
1309850Axx
1309718Axx
1309717Axx
1309740Axx
ON/OFF AIR LINE
code 98C150P018
Cabinet: MCRDAW1000 to MCRDNW0000
LINEA DE AIRE Todo/Nada
cod. 98C150P018
Armario: MCRDAW1000...MCRDNW0000
5
2
1
3
4
6
C
It includes the following components:
Contiene los siguientes componentes:
1
2
3
4
5
6
electroválvula de carga NC
regulador de presión
manómetro 0-4 bar
manómetro 0-12 bar
presostato
filtro 1/2”
1
2
3
4
5
6
1309860Axx
1309832Axx
1309718Axx
1309717Axx
1309900Axx
1309740Axx
32
N.C. charge electrovalve
pressure regulator
manometer 0-4bar
manometer 0-12bar
pressurestat
filter 1/2"
1309860Axx
1309832AXX
1309718Axx
1309717Axx
1309900Axx
1309740Axx
Cod. +030221742 rel. 2.2 – 16.06.2005
WATER LINE (NW)
code 98C150P019
Cabinet: MCDPNW0000 to MCRDNW0000
MCRPNW1000
LÍNEA DE AGUA (NW)
cod. 98C150P019
Armario: MCDPNW0000...MCRDNW0000
MCRPNW0000
2
1
5
4
3
6
C
It includes the following components:
Contiene los siguientes componentes:
1
2
3
4
5
6
electroválvula de carga NC
regulador de presión
manómetro 0-2,5 bar
manómetro 0-12 bar
electroválvula descarga NA
filtro 1/2”
1
2
3
4
5
6
1309860Axx
1309834Axx
1309719Axx
1309717Axx
1309870Axx
1309740Axx
N.C. charge electrovalve
pressure regulator
manometer 0-2.5bar
manometer 0-12bar
N.O. discharge electrovalve
filter 1/2"
1309860Axx
1309834AXX
1309719Axx
1309717Axx
1309870Axx
1309740Axx
WATER LINE (AW)
code 98C150P020
Cabinet: MCDPAW1000 to MCRDAW1000
MCRPAW1000
LÍNEA DE AGUA (AW)
cod. 98C150P020
Armario: MCDPAW1000...MCRDAW1000
MCRPAW1000
2
1
3
4
6
5
ED:
100%
VA
A 14 Hold 23 Inrush
V 24 Hz 50
TYPE
It includes the following components:
Contiene los siguientes componentes:
1
2
3
4
5
6
electroválvula NC
regulador de presión
manómetro 0-2,5 bar
manómetro 0-12 bar
electroválvula de descarga NA
filtro 1/2”
1
2
3
4
5
6
1309880Axx
1309845Axx
1309721Axx
1309720Axx
1309885Axx
1309971Axx
33
N.C. electrovalve
pressure regulator
manometer 0-2.5bar
manometer 0-12bar
N.O. discharge electrovalve
filter 1/2"
1309880Axx
1309845Axx
1309721Axx
1309720Axx
1309885Axx
1309971Axx
Cod. +030221742 rel. 2.2 – 16.06.2005
14. Resolución de problemas
Línea
Problema
Causa
Soluciones
1
El humidificador está
alimentado y encendido
pero no funciona
C1: No llega corriente
al armario
C2: Fusibles fundidos
S1: Verif. que hay tensión entre termin. L y N (220 Vca)
S2: Compruebe los fusibles del transformador
2
La unidad está encendida C1: El valor medido por la
pero no empieza a funcionar
sonda es superior al
punto de consigna
C2: Lógica de regulación
errónea
C3: El regulador no funciona
Nota: Modelo proporcional,
una sola regulación o
las dos
3
El display muestra “SEA”
y el humidificador no
arranca
C1: Sonda no conectada o en
cortocircuito
C2: Sonda con señal fuera de
rango
C3: Sonda no adecuada para
el aparato
No hay comando Marcha/Paro
remoto: el contacto entre los
terminales 1 y 2 está abierto
S1: Verif. el valor del p. consigna y diferencial en base
al valor indicado por la sonda
S2: Verifique que los parámetros de lógica son correctos
(versión Todo/Nada: ver C01 y C02, versión
proporcional: ver C22 y C23). Procedimiento
indicado en el manual, página 25.
S3: Verifique que la tensión a los terminales 5 y 6 (G0)
de la tarjeta AD4 es superior a 5 Vcc.
Nota: Modelos proporc, sólo uno o dos reguladores.
S1: Verifique que la sonda está conectada a los
terminales del armario
S2: Encienda el humidificador MC y compruebe que:
a) la aliment. +24 Vcc entre los terminales
3 y 5 (6 y 8 en mod. para conducto) es correcta;
b) la señal de sonda entre los term. 3 y 4 (6 y 7 en
modelos para conducto), está comprendida
entre 0 y 1 Vcc;
c) el sensor no está húmedo.
S3: Verifique que la señal de salida de la sonda sea
adecuada para la señal del CR72
(0 ÷ 1 Vcc)
4
El display muestra “ALA”
y el humidificador no
arranca
5
Saturación de agua con
El ventilador se ha parado sin
abundantes gotas debido que la sonda de “límite”
a la rutina de Paro del ven--interviniera para garantizar
tilador, mientras la sonda
la parada del humidificador
de “límite” no detiene el
humidificador.
Comande el Marcha/Paro remoto (terminales 1 y 2) con
un interruptor de flujo o con un interrruptor de presión
diferencial: ésta es la única manera de evitar esta
situación.
6
La presión del aire de
salida no llega a 2,1 bar
S1: Verifique la capacidad del compresor en relación
al consumo global del aparato
S2: Ajuste otra vez el reductor de presión (pág. 21)
S3: Verifique de nuevo el p. consig. y diferencial
selecc. respecto a valores de la sonda (pág. 27/28)
S4: a) La salida del comando a la tarjeta AD4, T1 e T2
comanda la tensión 0-20 V corte de fase. Con
0 Vcc entre T1 y T2 la válvula permanece cerrada.
Con 20 Vcc la válvula está abierta. Si desea
comprobar la integridad de la válvula, saque el
actuador (esto fuerza a la válvula a cerrarse)
presionando el cuerpo cilindro/muelle se abrirá
manualmente la válvula.
b) Con presión de 2,1 bar entre los terminales Ic y
G0, la señal debe ser 3,25 Vcc, en caso contrario la señal de la sonda está fuera de rango.
c) Desconecte el cable al terminal Ic, la señal
entre terminales T1 y T2 debe llegar a 20 Vcc.
C1: El compresor no es capaz
de suministrar el aire
requerido (presión de
entrada siempre < 5 bar)
C2: Ajuste del reductor
de presión no adecuado
C3: Sólo versión proporc.:
el valor medido por la
sonda se acerca al p. de
consigna (modulación en
curso)
C4: Problemas en el sistema
de aire de realimentación:
a) el actuador no puede
abrir la válvula
b) señal salida sonda
demasiado alta en
relac. al valor pres. real
c) el comando de la tarjeta
AD4 al actuador no es
correcto
34
a) Verifique la continuidad entre los teminales 1 y
2; contacto abierto indica diferencia de tensión
b) Verifique las conexiones en la entrada D.IN y
REF del CR72
Cod. +030221742 rel. 2.2 – 16.06.2005
7
Variaciones de presión de
aire en la salida del
armario
El sistema de humidificaicón
tiene pocas boquillas atomizadoras y/o no hay suficiente
espacio entre ellas
8
Presión de aire insuficiente para llevar agua
C1: La presión de aire de
S1: Verifique la presión en la entrada y en la salida del
salida es demasiado baja
aire y controle el regulador de presión de aire.
C2: Sólo versión Todo/Nada:
S2: Gire el tornillo del extremo del presostato con el
el interrup. de presión
fin de habilitar el procedimiento de ajuste.
mecánico del final de la
línea de aire no acepta
valores de presión superiores a 1,3bar (el LED “agua”
de la tarjeta AD4 está
encendido.
C3: Sólo versión proporcional
S3: Verifique que la tensión en los terminales Ic y G0
sonda de presión desconecdel AD4 sea mayor que 1 Vcc.
tada del AD4 o averiada.
9
Hay aire, pero no hay
agua, o su presión es
demasiado baja. Sin embargo, el LED “agua” del
AD4 está encendido
C1: La electroválvula de agua
no está activada (8)
C2: El regulador de presión
está ajustado al mínimo.
C3: El regulador de presión
está atascado. El agua
no fluye.
C4: Electroválvula atascada.
C5: La electroválvula NA de
salida siempre está abierta
pierde agua en descarga.
10
11
Cierre ligeramente la línea de aire de la salida del
armario mediante la válvula de bola. La presión a las
boquillas no debería ser inferior a 2,1 bar.
S1: vea el punto 8: además verifique que llegan 24 Vca
S2: Vea lo que se indica en el manual, pág. 21
S3: Desmonte el reductor de presión y limpie las
impurezas sólidas (no es necesario quitarlo de la
línea de agua)
S4: Desmonte la electroválvula y controle si hay
impurezas sólidas.
S5: Verifique si está alimentada o si está atascada.
No llega agua a las
boquillas
Las boquillas atomizadoras se Aumente la presión como se indica en la pág. 22/23.
han instalado a notable altura
y no ha tenido en cuenta la
pérdida de carga al ajustar
la presión del agua
La presión es demasiado
alta y no es posible
controlarla.
C1: Hay impurezas que comprometen el funcionam.
del regulador de presión
C2: La salida de la linea del
agua está cerrada
S1: Vea el punto 9, S3
S2: Carga/abra la línea del agua
12
Baja absorción de agua
en el conducto: la
zona de entrada de agua
está húmeda
C1: Velocidad en conducto
elevada en relación a la
distancia entre la boquilla,
la batería de frío (o separador de gotas) y en relación a la temperatura y
humedad del aire tratado.
C2: Las boquillas están mal
posicionadas y los conos
del agua nebulizada se
cruzan entre sí o golpean
y se condensan en la pared opuesta del conducto
S1: Verifique los datos de la unidad en relación a los
requisitos (cap. 4). Verifique el dimensionamiento
de la instalación utilizando el diagrama psicrométrico los datos de base; se puede reducir la capacidad de la boquilla actuando sobre el tornillo trasero
Si es posible, reduzca la velocidad de los ventiladores y aumente o introduzca un precalentamiento.
S2: Optimice el posicionamiento de las boquillas
atomizadoras para optimizar la salida.
13
Efecto “lluvia” en aplicaciones de ambiente
a) se siente humedad
b) el suelo está húmedo
No hay condiciones óptimas
de temp. y hum. para asegurar la absorción (posición incorrecta de las boquillas).
Cierre la línea de agua (gire el tornillo trasero de la boquilla), luego ajuste de nuevo la atomización de la
boquilla.
14
Las boquillas gotean
cuando la unidad está
parada
C1: La boquilla aloja agua de
la línea superior.
C2: El ciclo de secado es
demasiado corto
S1: Es aconsejable bajar la línea de agua (por debajo
de la boquilla atomizadora).
S2: Incremente el intervalo de tiempo del ciclo de limpieza (potenciómetro P3) hasta que pare el goteo.
El efecto “niebla” debe desaparecer.
35
Cod. +030221742 rel. 2.2 – 16.06.2005
17
Flujo de agua irregular
en la boquilla, dificil de
regular mediante el tornillo de ajuste.
C1: Hay suciedad
proveniente de la línea
de aire o de agua.
C2: Presión del agua y
del aire fuera de
rango.
C3: Presencia de aceite en
la línea de aire.
C4: Boquilla bloqueada debido a la selec. incorrecta
del ciclo de limpieza.
S1: Saque y limpie las boquillas atomizadoras; si es
necesario limpie la línea.
18
La boquilla produce
emisiones de agua sin
aire
La conexión de entrada de
aire/agua está invertida
Invierta la conexión a las boquillas.
19
La presión del aire de
entrada disminuye. Como
consecuencia la presión
de salida también disminuye.
La presión del aire de
alimentación es insuficiente.
Verifique la capacidad del compresor en relación al
consumo del aparato.
20
La humedad ambiente se
estabiliza a valores por
debajo del p. consigna.
La capacidad del aparato
no es suficiente en relación
a los requisitos del ambiente.
Ajuste las boquillas de nuevo (máx apertura; ver puntos
12 y 13; si esto no fuera suficiente, será necesario
aumentar el número de boquillas atomizadoras
en relación a la capacidad máx. del armario y del
compresor y con respecto a las condiciones del aire
a tratar en el conducto.
21
El armario da orden
C1: Entradas/salidas invertidas S1: Verifique que la E/S de las líneas de agua y de
a la electroválvula de abrir
aire están conectadas correctamente.
pero no hay ni agua ni
C2: Presiones de alimentaS2: Verif. las indicac. de los manómetros de entrada
circulación de aire.
ción insuficientes
C3: Las electroválvulas de
S3: Compruebe la condición de las electroválvulas.
la línea están obstruídas
S2: Verifique los valores de la presión a la salida del
armario. Si la línea agua-aire es muy larga, mida la
la presión directamente en las boquillas atomiz.
S3: Verifique las condiciones del filtro/separador del
compresor.
S4: Establezca el apagado del ciclo de limpieza correctamente (ver pág. 24). Durante el tiempo de
Parada, la presión debe alcanzar 0 bar y el alfiler
de la boquilla debe limpiar el orificio.
Leyenda: C= causa - S= solución
36
Cod. +030221742 rel. 2.2 – 16.06.2005
14. Troubleshooting
Line
Problem
Cause
Solutions
1
The humidifier has been
powered and switched ON
but does not work.
C1: Cabinet not powered.
C2: Blown fuses.
S1: Check tension between terminals L and N (220Vac).
S2: Check the fuses on the transformer.
2
The unit is ON but does
not start working.
C1: The value measured by
the probe is higher than
the set point.
C2: Wrong regulation logic.
S1: Check set point and differential with the value
indicated by the probe.
C3: The regulator does
not work (faulty regulator).
NB: Proportional model,
just one or both regulators.
S2: Check the regulation logic parameters.
(ON/OFF version: see C01 and C02;
Proportional version: see C22 and C23).
See Operation Guide page 25.
S3: Check that power supply to terminals 5 and 6 (G0)
on the AD4 card is over 5Vdc.
NB: Proportional models, just one or both regulators.
3
The display shows “SEA”
and the humidifier does
not start.
C1: Disconnected or
S1: Be sure that the probe is connected to the
short-circuited probe.
terminals of the cabinet.
C2: Out-of-range signal probe. S2: Turn ON the MC humidifier and check that:
a) power supply between terminals 3 and 5
(6 and 8 in duct models) is correct (+24Vdc);
b) the probe signal between terminals 3 and 4
(6 and 7 in duct models) ranges between 0
and 1Vdc;
c) the sensor is not wet.
C3: Probe not suitable for
S3: Be sure that the output probe signal is suitable
the instrument.
for the signal of your CR72 (0-1VDC).
4
The display shows “ALA”
and the humidifier does
not start.
There is no remote ON/OFF
command: the contact between
terminals 1 and 2 is open.
5
Water saturation with
plenty of drops due to
the OFF routine of the fan.
The 'limit' probe does
not stop the humidifier.
The fan has stopped before
the “limit” probe intervened
to force the humidifier into
an OFF routine.
Command the remote ON/OFF (terminals 1 and 2)
by means of a flow switch or a differential pressure
switch: this is the only way to avoid this problem.
6
The output air pressure
does not reach 2.1bar.
C1: The compressor is not
capable of supplying the
required air (inlet
pressure always <5bar).
C2: Incorrect setting of the
pressure reducer.
C3: Proportional version only:
the value measured by
the probe/s is approaching
the set point (modulation
in progress).
C4: Troubles on the feedback
air system:
a) the actuator is not capable
of opening the valve;
S1: Check the capacity of the compressor in relation
to the overall consumption of the installation.
b) the probe output signal is
too high with respect to
the actual pressure value;
c) the command of the AD4
card towards the actuator
is incorrect.
37
a) Check continuity between terminals 1 and 2:
an open contact indicates a power difference.
b) Check the connections at input D.IN and REF
of your CR72.
S2: Set again the pressure reducer (see page 21).
S3: Check again the selected set point and differential in
relation to the probe values (see page 27/28)
S4: a) the command output towards the AD4 card, T1
and T2 commands 0-20V phase cut. With 0Vdc
between T1 and T2 the valve remains comple
tely closed. With 20Vdc the valve is completely
open.
If you want to check the integrity of the valve,
remove the actuator (this forces the valve to close)
then press the cylinder/spring body.
b) With pressure = 2.1bar between terminals Ic and
G0 the signal must be 3.25Vdc, otherwise the probe
signal is out-of-range.
c) Disconnect the cable to terminal Ic: the signal
between terminals T1 and T2 must reach 20Vdc.
If not, there are troubles on the AD4 card.
Cod. +030221742 rel. 2.2 – 16.06.2005
7
Air pressure variations
at the cabinet output.
The humidification system
has few atomizing heads
and/or there is not enough
space between them.
Close gently the air line at the cabinet outlet by means
of the ball valve. Pressure to the heads should not
be set below 2.1bar.
8
Air pressure insufficient
to carry the water flow.
C1: The output air pressure
is too low.
C2: ON/OFF version only:
the mechanic pressure
switch at the end of the
air line does not accept
pressure values higher
than 1.3bar (the “water”
LED indicator on the AD4
card is ON).
C3: Proportional version only:
disconnected or faulty
pressure probe.
S1: Check the value of the inlet and outlet air pressure
and the air pressure regulator.
S2: Turn the screw on the pressure switch so as to
enable the setting procedure.
S3: Check that tension between terminals Ic and G0 on
the AD4 card is >1Vdc.
9
The air flow is present
but there is no water flow
or its pressure is too low
although the 'water' LED
indicator on the AD4 is ON.
C1: Electrovalve on the water S1: See point 8. Check that power to the line is 24Vac.
line not powered (see point 8).
C2: Pressure regulator set at min. S2: See page 21 above.
C3: Clogged pressure regulator S3: Clean the pressure reducer (it is not necessary
(the water does not flow).
to remove it from the water line).
C4: Clogged electrovalve.
S4: Remove the electrovalve and clean it.
C5: The output N.O. valve
S5: Be sure that the valve is not clogged and that the
remains always open:
line is powered.
outlet water loss.
10
No water to the nozzles.
The atomizing nozzles have
Increase pressure (see pages 22/23).
been placed at considerable
height and you have not taken
into account the pressure
drop when setting water
pressure.
11
The pressure is too high
and difficult to control.
C1: Impurities compromising
the normal activity of the
pressure regulator.
C2: The output water line
is closed.
S1: See point 9, solution S3.
S2: Charge/Open the water line.
12
Low water absorption in
the duct: the water inlet
zone is wet.
C1: Water speed too high with S1: Check the unit's data in relation to the application
respect to the distance
requirements (see section 4 above). Look at the
among the nozzles, the
psychrometric diagram to be sure that your installation
cold coil (or drop separator)
has been correctly rated. You can reduce capacity
and in relation to the
of each single atomizing nozzle by adjusting the screw
temperature and humidity
on the back part of the nozzle. If possible, reduce the
of the treated air.
speed of the fans and increase or set a pre-heating cycle.
C2: Incorrect nozzles position. S2: Replace the atomizing nozzles so as to optimize
The atomized water cones
the outcome.
cross each other or they hit
and condense on the opposite
surface of the duct.
13
'Rain' effect in ambient
applications.
a) People feel wet all around;
b) The floor gets wet.
There are no optimum temper. Close the water line (turn the screw on the back part
and humidity conditions to ensure of the nozzle), then adjust again the nozzle spray patt.s.
a good absorption of the
atomized water (due to the
incorrect position and/or
setting of the nozzles).
14
The nozzles drip while
the unit is OFF.
C1: The nozzle always houses
some water coming from
the higher water line.
C2: The drying cycle is too
short.
38
S1: It is advisable to lower the water line (place it below
the atomizing nozzle).
S2: Increase the time-interval of the cleaning cycle
(potentiometer P3) until the drops stop (the "mist"
effect must disappear).
Cod. +030221742 rel. 2.2 – 16.06.2005
15
Outlet water loss during
normal functioning.
C1: Water loss from the N.O.
valve due to impurities or
defects.
S1: Remove and clean the N.O. electrovalve.
16
Continuous outlet water
loss when the cabinet is
OFF.
C1: Water loss from the N.C.
valve (at the cabinet head).
S1: Remove and clean the N.C. electrovalve.
17
Irregular water flow on
nozzle, difficult to regulate
by means of the dedicated
adjustment screw.
C1: Nozzle clogged with dust
or impurities coming from
the air or water line.
C2: Out-of-range air and
water pressures.
S1: Remove and clean the atomizing nozzles; if
necessary clean the line.
C3: Oil in the air line.
C4: Nozzle blocked due to
incorrect cleaning cycle
selection.
S2: Check the values of the pressure at the cabinet output.
If the water/air line is very long, measure the
pressure at the atomizing nozzles.
S3: Check the conditions of the filter/oil separator of the
compressor.
S4: Set the OFF cleaning cycle correctly (see page 24).
During the OFF routine, pressure must reach 0bar
and the pin inside the nozzle must clean the orifice.
18
The nozzles produce
water jets without air.
Inverted water/air input
connection.
Invert the line/water connection to the heads.
19
The inlet water pressure
rapidly decreases. As a
consequence also the
output pressure decreases.
Insufficient delivery air
pressure.
Check the capacity of the compressor in relation to the
consumption of the entire installation.
20
Ambient humidity far
below the set point.
The capacity of the entire
installation has been
underrated in relation to
the ambient requirements.
Adjust the nozzles again (set max. opening; see points
12 and 13 above). If this solution doesn't prove satisfactory,
it is necessary to add further atomizing nozzles in relation
to the max. capacity of the cabinet and compressor and
with respect to the conditions of the air to be treated in
the duct.
21
The cabinet instructs the
electrovalves to open but
there is neither water
nor air circulation.
C1: Inputs/outputs mixed up.
S1: Check that the I/O of the water and air lines are
correctly connected.
S2: Check the indications of the input pressure gauges.
C2: Insufficient delivery
pressures.
C3: The electrovalves of the
lines are clogged.
S3: Check the condition of the electrovalves.
Keys: C=cause, S=solution
39
Cod. +030221742 rel. 2.2 – 16.06.2005
15. Características técnicas / 15. Technical specifications
El sistema Mc está compuestos por tres piezas: Armario, kit de montaje de las boquillas y boquillas atomizadoras. El
tamaño de las boquillas depende de la capacidad de la instalación.
The MC system comprises three main parts: Cabinet, Nozzles Mounting Kit and Atomizing nozzles. The size of the
nozzles depends on the capacity of the installation.
ARMARIO
Capacidad / Capacity
Conducto / Duct applications
60l/h
230l/h
Reg. proporcional / Proportional reg. MCDPNW0001
MCDPAW1001
TODO/NADA / ON/OFF
Ambiente / Room applications
60l/h
230l/h
MCDPNW0000
MCDPAW1000
MCRPNW0001
MCRPAW1001
MCRDNW0001
MCRDAW1001
MCRDNW0000
MCRDAW1000
MCRPNW0000
MCRPAW1000
5-10bar
Presión de alimentación de aire
Air pressure
Pressión de alimentación de H2O
Water pressure
Alimentación eléctrica
Power supply
Sección de cable de aliment. y tipo
Power cable cross section and model
Capacidad del fusible / Fuse current capacity
Longitud máx del cable de aliment.
Max length of supply cable
2-4bar
220-240Vca / 1Ph / 50-60Hz / 65VA
1,5 mm2 - H07VK
1A
50 m
-20T70°C...-4T158°F – H.R./rH <80%
Temperatura de almacenaje
Storage temperature
Condiciones límite de funcionamiento
Limit working conditions
Grado de protección / Protection index
1T60°C...34T140°F – H.R./rH <80%
IP 55
Peso / Weight
27kg
29kg
26,5kg
28,5kg
KIT DE MONTAJE DE LAS BOQUILLAS / NOZZLES MOUNTING KIT
Ambiente y conducto
MCK1AW0000
Room and duct applications
BOQUILLAS ATOMIZADORAS / ATOMIZING NOZZLES
Capacidad l/h / Capacity l/h
2.7
4
Tipo / Model
MCAA20000
Consumo de aire / Air consumption
m3/h normales referido a pres. atm.,T=20°C
Normal m3/h referred to atm. press.,T=20°C
Presión de trabajo del aire
Working air pressure
Presión de trabajo del agua
Working water pressure
SONDAS / PROBES
Aplicación / Application
Proporcional / Proportional reg.
TODO/NADA / ON/OFF
3,43
5,4
MCAB200000
MCAC200000
5,08
6,86
6,8
10
MCAD200000
8,64
MCAE20000
12,7
2,1 bar
0,35 + (H x 0,1) bar
H en metros / metres
Conducto / Duct application
ASDH100000 ASDH200000
FILTROS / FILTERS
Filtro de agua de 5”/ Water filter 5"
Cartucho filtro de agua
Cartridge water filter
Filtro de aire de 1/2” partic. sólidas
Air filter 1/2" solid part.
Filtro anti-aceite para aire 3/8”
Antioil air filter 3/8"
Ambiente / Room application
ASWH100000 ASPC230000 ASPC110000
MCFILWAT05
MCC05PP005
MCFILAIR01
MCFILOIL01
40
Cod. +030221742 rel. 2.2 – 16.06.2005
16. Características del agua de
alimentación del MC
16. Characteristics of the supply water
to the MC
Las características de construcción y funcionales del
sistema MC permiten la utilización de agua potable sin
tratar. No obstante, la cantidad y la calidad de los
minerales disueltos en el agua afectan a la frecuencia de
las operaciones rutinarias de mantenimiento (principalmente
las concernientes a la limpieza de las boquillas) y a la
cantidad de polvo mineral dejada por las gotas de agua
cuando ésta se evapora completamente. Para un
funcionamiento óptimo, utilice agua desmineralizada
procedente de un sistema de osmosis inversa. No utilice
agua ablandada, ya que el ablandamiento no reduce el
contenido de minerales disueltos en el agua.
The constructional and functional characteristics of the
MC system allow the use of untreated drinking water.
Nonetheless, the quantity and quality of the minerals
dissolved in the water affect the frequency of the routine
maintenance operations (mainly involving the periodical
cleaning of the nozzles) and the amount of dust released
by the droplets of water when these have completely
evaporated. For best operation, use demineralised water
from a reverse osmosis system. Do not use softened
water, as this does not reduce the content of minerals
dissolved in the water.
De cualquier modo, se sugiere seguir las especificaciones
de la norma UNI 8884 “Características y tratamiento del
agua en los circuitos de refrigeración y humidificación”,
según la cual el humidificador debe ser alimentado con
agua que, además de ser potable (directiva 98/83/CE),
debe estar dentro de los límites siguientes:
- conductividad <100 μS/cm;
- dureza total < 5°HF (50 ppm CaCO3);
- 6,5 < pH <8,5;
- contenido de cloruros <20 mg/l;
- contenido de sílice <5 mg/l.
At any rate, it is suggested to follow the specifications of
the UNI 8884 standard, “Characteristics and treatment of
the water in cooling and humidification circuits”, according
to which the humidifier must be supplied with water that,
as well as being drinkable (EC directive 98/83), must
remain within the following limits:
- conductivity <100 μS/cm;
- total hardness <5°fH (50 ppm CaCO3);
- 6.5 < pH < 8.5;
- chloride content <20 mg/l;
- silica content <5 mg/l.
Si la conductividad del agua es inferior a 30 μS/cm, es
recomendable utilizar el armario MC en la versión para
agua agresiva.
If the conductivity of the water is less than 30 μS/cm, it is
recommended to use the MC cabinet in the version for
aggressive water.
CAREL se reserva el derecho de modificar las
características de sus productos sin previo aviso.
CAREL reserves the right to alter the features of its
products without prior notice.
INFORMACIÓN PARA LOS USUARIOS PARA EL CORRECTO TRATAMIENTO DE LOS RESIDUOS DE APARATOS
ELÉCTRICOS Y ELECTRÓNICOS (RAEE)
Con referencia a la Directiva 2002/96/CE del Parlamento Europeo y del Consejo del 27 de enero 2003 y a las relativas
normativas nacionales de actuación, Les informamos que:
1. existe la obligación de no eliminar los RAEE como residuos urbanos y de realizar, para dichos residuos, una
recolección separada;
2. para la eliminación se deben utilizar los sistemas de recolección públicos o privados previstos por las leyes locales.
Además resulta posible devolver al distribuidor el equipo al final de su vida útil en caso de adquisición de un equipo
nuevo.
3. este equipo puede contener sustancias peligrosas: una utilización impropia o una eliminación no correcta podría tener
efectos negativos en la salud humana y en el medioambiente;
4. el símbolo
que se encuentra en el producto o en el paquete y en la hoja de instrucciones indica que el mismo
equipo se ha introducido en el mercado después del 13 de agosto 2005 y que debe ser objeto de recolección separada;
5. en caso de eliminación abusiva de los residuos eléctricos y electrónicos, se prevén las sanciones establecidas por las
vigentes normativas locales en materia de eliminación.
INFORMATION FOR USERS ON THE CORRECT HANDLING OF WASTE ELECTRICAL AND ELECTRONIC EQUIPMENT (WEEE)
In reference to European Community directive 2002/96/EC issued on 27 January 2003 and the related national legislation,
please note that:
1. WEEE cannot be disposed of as municipal waste and such waste must be collected and disposed of separately;
2. the public or private waste collection systems defined by local legislation must be used. In addition, the equipment can
be returned to the distributor at the end of its working life when buying new equipment.
3. the equipment may contain hazardous substances: the improper use or incorrect disposal of such may have negative
effects on human health and on the environment;
4. the symbol
shown on the product or on the packaging and on the instruction sheet indicates that the equipment
has been introduced onto the market after 13 August 2005 and that it must be disposed of separately;
5. in the event of illegal disposal of electrical and electronic waste, the penalties are specified by local waste disposal
legislation.
Cod. +030221742 rel. 2.2 – 16.06.2005
notas:
Cod. +030221742 rel. 2.2 – 16.06.2005
Technology & Evolution
CAREL srl
Via dell’Industria, 11 - 35020 Brugine - Padova (Italy)
Tel. (+39) 049.9716611 Fax (+39) 049.9716600
http://www.carel.com – e-mail: [email protected]
Cod. +030221742 rel. 2.2 – 16.06.2005
Agencia: