1
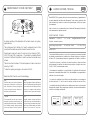
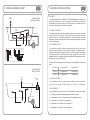
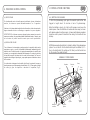
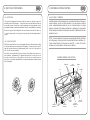
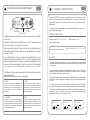
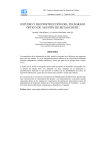
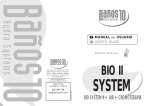
E
GB
MANUAL DEL USUARIO
USER’S GUIDE
Bañeras / Bathtubs
EN 60335-2-60
EN 61000-3-2:1995/A14:2000
EN 61000-3-3:95
EN 55014-1:94
EN 55014-2:97
Ctra. Viver- Pto. Burriana, Km. 58’4
(tramo Vila-real - Onda) - P. O. Box 27
12200 ONDA (Castellón) España
Tels.: 964 62 63 00 - 964 62 69 40
Fax: 964 62 60 09
http://www.banos10.com
e-mail: [email protected]
902 36 07 08
[email protected]
P-IMP-MAN-029 EsGb 0206-6L
SERVICIO DE
ASISTENCIA TÉCNICA
CONTROL
SYSTEM
CONTROL+CROMOTERAPIA
GB
CHROMOTHERAPY SYSTEM FUNCTIONS*
E
1. ESPECIFICACIONES TÉCNICAS
Desde BAÑOS 10 le queremos dar la más sincera enhorabuena y el agradecimiento
por haber adquirido una bañera de hidromasaje. Todos nuestros productos han
sido fabricados bajo estrictos controles de seguridad para certificar su óptimo
funcionamiento.
Para un correcto uso y mantenimiento de su bañera de hidromasaje le invitamos
a leer atentamente el presente manual.
RED
YELLOW
GREEN
BLUE
AUTO
ESPECIFICACIONES TÉCNICAS
Alimentación:
A system consisting of the illumination of four basic colours: red, yellow,
green and blue.
The system panel has 5 buttons, 4 of which correspond to each of the
colours and the middle one which activates the auto function.
.
220/230 V
50 ~ 60 Hz.
Manguera flexible 3x1.5 mm2
Potencia / corriente consumo:
Bomba de agua según modelo
700 W / 850W / 1500 W
3 A / 3.8 A / 6.6 A
IMPORTANTE:
Pressing each colour will cause it to light up with an intensity of 25%,
50%, 75% and 100%, respectively. It is possible to combine different
colours with different intensities in order to achieve the desired colour
scheme.
- No encastrar la bañera en obra, en cuyo caso los gastos que ocasione la necesidad
de retirada por mantenimiento o reparación no estarán cubiertos por la Garantía
de Baños 10. Recomendamos siempre el equipamiento de faldón en la bañera.
The auto function activates a 15”second sequence for each colour at an
intensity of 100%.
- Para facilitar el acceso y ventilación a la parte de motores y cajas del sistema
de hidromasaje de la bañera, ésta debe estar provista de un registro de acceso
(30x30 / 30x40) si está montada en obra.
.
To stop the system, press again on the sensor that is lit.
Beneficial effects from the use of chromotherapy:
RED
GREEN
Stimulates and excites nerves and releases a
large amount of adrenaline, revitalising the
body. Beneficial in activating the digestive
system and against nervous depression,
melancholy and neurasthenia.
Creates a high degree of harmony and balance,
tones up the heart and blood by reducing blood
pressure, and favours the building of muscles
and tissues. An analgesic colour that helps
to soothe all sorts of pains and neuralgias.
YELLOW
BLUE
This buoyant and vital colour acts as an antidepressant, generating muscular energy by
stimulating certain motor nerves, and favouring
skin. Stimulates creativity, enhances learning
neurons and helps to ward off insomnia.
Astringent, antibiotic, antiseptic, an effective
remedy to lower fever, and anti-inflammatory.
It is a psychological rejuvenator and relaxant.
Helps in cases of asthma, obesity and cellulitis.
Lowers blood pressure, refreshes.
* System optional.
- Para mantener la seguridad en su cuarto de baño, la instalación eléctrica deberá
disponer de un interruptor diferencial de 30 mA. de sensibilidad y un magnetotérmico
adecuado al consumo del equipo.
- La conexión de la bañera a la red eléctrica se deberá realizar con una manguera
de cable bipolar de 1.5 mm2 de sección mínima, dotada de toma de tierra.
- La instalación eléctrica de la bañera ha de realizarse en acuerdo con la normativa
de baja tensión vigente. Debe comprobar que la tensión y frecuencia de alimentación
coincide con el equipo suministrado.
CONEXIÓN ELÉCTRICA
220/230 V.
50 Hz.
CONEXIÓN ELÉCTRICA
220/230 V.
60 Hz.
CONEXIÓN ELÉCTRICA
110/115 V.
60 Hz.
Colores cables
Colores cables
Colores cables
AZUL
AZUL
AZUL
AMARILLO-VERDE
MARRÓN
AMARILLO-VERDE
MARRÓN
AMARILLO-VERDE
MARRÓN
2. INSTALACIÓN
7. CLEANING THE JET TOP
- Todos los elementos metálicos de la bañera deben conectarse a la instalación
equipotencial. El motor y la bañera disponen de esta conexión.
.
- Las cajas eléctricas están dotadas de un índice de protección elevado, que las
dotan de aislamiento eléctrico y estanqueidad. Se recomienda no realizar ningún
tipo de manipulación sobre ellas. En caso de avería póngase en contacto con
nuestro servicio de asistencia técnica (S.A.T.).
Detail
PUESTA EN MARCHA:
- Es indispensable que todo el peso de la bañera sea soportado por los pies de
regulación y no por el borde de la misma.
- Montar el desagüe y rebosadero teniendo la precaución de intercalar un elemento
elástico entre el sifón y la instalación para compensar posibles moviminetos.
Verificar la estanqueidad del conjunto.
-Comprobar que los pies regulables en altura están bien asentados.
- Comprobar que la tensión y frecuencia de la alimentación eléctrica coinciden con
la del equipo suministrado.
- Asegúrese de que la conexión que va desde el pulsador hasta la caja electrónica
no haya sido desconectado durante el transporte y/o manipulación de la bañera.
- Una vez comprobados los puntos anteriores, proceder al llenado de la bañera.
Comprobar la estanquiedad de todas las uniones y juntas del circuito hidraúlico.
IMPORTANTE: la bañera se deberá llenar siempre de modo que el agua sobrepase
en 2-3 cms el nivel del jet más elevado.
- El sistema va equipado con un sistema de detección de insuficiencia de nivel de
agua, así como de obstrucción de la boca de aspiración. Para el correcto
funcionamiento de estas funciones, y de su sistema de hidromasaje, se debe
configurar el equipo a las características hidraúlicas y eléctricas de la vivienda
mediante la siguiente operación:
Debe conectar la red eléctrica al mismo tiempo que presiona el pulsador ON/OFF
de su bañera, manteniéndolo pulsado hasta que la bomba hidraúlica arranque. Una
vez en marcha, puede soltar el botón y pasado 1 minuto la bomba se apagará
quedando su sistema configurado en todas sus funciones.
Un segundo metódo de realizar esta configuración consiste en: teniendo la
bañera alimentada pero en estado OFF, mantenga pulsado el sensor ON/OFF y a
los 15 segundos aprox. el sistema se pondrá en marcha durante 1 minuto,
programándose convenientemente en todas sus funciones.
A: BACK of JET
B: FRICTION WASHER
C: BALL and SOCKET JOINT
D: NOZZLE
E: NUT
F: SCUTCHEON
G: CONIC KEY
a: Water inlet
b: Air inlet
c: Water+Air mix outlet
To clean the JET TOP, first of all you have to remove the scutcheon (F),
if necessary, use a large flatback screwdriver and carefully level it off,
applying pressure in various points. Remove the nut (E), turning it to the
left using the conic key (G) that is provided in the bathtub package.
The ball and socket joint (C) and the nozzle (D) can be taking apart turning
the nozzle to the left until the close flange (shown in detail), then we can
lift the close flange up turning the nozzle until the end, remove any residue
and clean the relevant parts using only liquid soap and water.
NOTE: When replacing, the friction washer (B) must be placed with the
groove towards the inside back (A) tighten the nut (E) on the ball and socket
joint (C) checking that the jet can be directed manually without using an
excessive force.
Baños 10 S. L. reserves the right to modify any parts or components of its systems
without prior notice
3. FUNCIONES SISTEMA CONTROL
6. TECHNICAL REFERENCE SHEET
Air
regulators
Control System
Hydraulic Scheme
Air
system
(i) LLENADO
- La bañeras equipadas con CONTROL SYSTEM deberán llenarse de modo que el
nivel de agua supere en 2-3 cms el nivel del jet más elevado de su bañera. Es
importante que al iniciar el llenado, lo haga con agua fría o templada con fin de
evitar restos de sedimentos calcáreos en su bañera.
(ii). PUESTA EN MARCHA
Water system
Pump
JETS
- La puesta en marcha del sistema se realiza mediante una pulsación corta sobre
el mando ON/OFF de su bañera. De este modo el sistema estará funcionando
durante 15 minutos. Transcurrido ese tiempo, el sistema se detiene de manera
automática, teniendo que realizar una nueva pulsación para disfrutar de una nueva
sesión de hidromasaje.
(iii). FUNCIONES PULSOS
- Con el motor en marcha, podremos seleccionar una de las tres funciones de
PULSOS que posee el sistema. Con una pulsación larga de 1,5 segundos (aprox.),
la bomba iniciará el primer programa de pulsos, una nueva pulsación larga iniciaría
el segundo programa y una tercera pulsación larga, pondría en acción el último
programa de pulsos. La siguiente pulsación larga volvería al funcionamineto contínuo,
de manera que se reiniciaría el bucle.
Drain
pipe
Automatic
overflow
La duración de los pulsos varía según el programa y queda reflejado en la siguiente
tabla:
Control System
Electric Scheme
Push
button
Electrical
wire
PULSOS1
4 segundos ON
-
4 segundos OFF
PULSOS2
8 segundos ON
-
4 segundos OFF
PULSOS3
12 segundos ON
-
4 segundos OFF
(iv). PARO DEL SISTEMA
- Con el sistema en marcha, ya sea en modo continuo o pulsos, una pulsación
corta sobre el mando ON/OFF parará su sesión de hidromasaje.
(v). LED INDICATIVO
Electronic
set
Junto al pulsador hay un led que indica en cada momento el estado del sistema.
1. Led simpre encendido: bomba apagada pero sistema conectado.
Pump
JETS
2. Led parpadeando ciclica y constantemente: funcionamiento continuo.
3. Led apagado con 1 destello corto: programa 1.
4. Led apagado con 2 destellos cortos: programa 2.
5. Led apagado con 3 destellos cortos: programa 3.
4. FUNCIONES SISTEMA CONTROL
5. CONTROL SYSTEM FUNCTIONS
(vi) PROTECCIONES
(viii) EMPTIED AND CLEANING
Si su bañera está vacía o el nivel de agua es insuficiente, al poner la bomba en
marcha, el sistema se parará automáticamente a los 5 segundos.
To finish the hydromassage, push again the neumatic push button. We
Suggest a length about 15 minutes or less of hydromassage.
Asimismo, si el sistema detecta algún tipo de obturación en la boca de aspiración,
alguna anomalía electrica o sobrecarga, se parará a los pocos segundos.
IMPORTANTE: Si el sistema se para por alguna de estas razones tres veces de
manera consecutiva, éste se parará quedando inhabilitado durante 1 minuto, para
así solucionar la posible causa de avería que se está produciendo.
When the bathtub is empty, dry it with a soft sponge or wash, even the
metalic pieces. Clean the bathtub with water and some soap, but never
with abrasive products neither scourers. A cleaner with deliming properties
should be used to prevent the bathtub from losing its shine due to lime
build-up.
(vii) REGULACIÓN DE AIRE
Con el sistema en funcionamiento, puede proceder a la regulación de la mezcla
agua/aire a su gusto, y con ello la intensidad del hidromasaje, mediante el giro del
mando de aire. Girando el mando a la izquierda aumentaremos el caudal de aire
entrante, y por consiguiente la intensidad del hidromasaje. Por contra, el giro hacia
la derecha provocará la disminución del caudal de aire entrante. No fuerce el
regulador cuando llegue al tope de giro, ya que puede provacar el deterioro o rotura
de los mismos.
NOTE: Before emptying the bathtub, it is better to disinfect the hydromassage
system. You can use for this the disinfectant liquid from Baños 10, S.L.
Pour in the disinfectant (10 capfuls per 100 litres), and let the bath run
for 10 minutes. Then drain the bath.
GENERAL SYSTEM SCHEME
A continuación orientaremos las boquillas (jets) hacia las partes del cuerpo en
donde queremos que el hidromasaje sea más intenso (Fig.1). Para regular el caudal
de cada jet, girar las boquillas a derechas o izquierdas (Fig.2).
Fig. 1
Regulator
Electronic
set
Pump
Push
button
Jet
Fig. 2
Air
system
Automatic
overflow
Hydraulic
system
Suction
system
4. HOW THE SYSTEM WORKS
5. FUNCIONES SISTEMA CONTROL
(vi). PROTECTIONS
(viii) VACIADO Y LIMPIEZA
The system is equipped with a lower water level sensor, as well as a sensor for
detecting suction inlet blockage. Towards this end, once the bathtub is filled up
as per the previous instructions, a simple operation must be performed in order
to program the home’s electrical characteristics, which is accomplished by connecting
the power supply while holding down the on/off sensor until the unit starts up.
Acabada la sesión de hidromasaje iniciar el vaciado de la bañera. Enjuague y
seque la bañera, incluso las partes metálicas, con una gamuza o esponja
suave, inmediatamente después de su uso. Limpiar siempre con agua
jabonosa, evitando utilizar productos abrasivos o estropajos. Se recomienda
utilizar siempre un limpiador anticalcáreo para evitar la pérdida de brillo por
depósitos de cal.
In case the water level is not enough, the system will start and stopped after 5
secons.
(vii). PULSATING MODES
With the System Switched on, we will regulate the mix of water and air according
to the personal preferences turning the Air Regulator. Turning to the left, we will
open the air (more intensity of hydromassage); while, if we turn to the right, we
will close the air (less intensity).
NOTA: Antes de efectuar el vaciado es aconsejable desinfectar el sistema
de hidromasaje, utilizar para ello el líquido desinfectante de Baños 10.
Verter el desinfectante (10 tapones por cada 100 l.) y tener 10 minutos
la bañera en funcionamiento. Luego vaciar la bañera.
After this, we will orientate the jets to the parts of the body where we want a
more intensive hydromassage. To regulate the water flow of each jet, we can
turn the jet on the left or on the right, flow of each jet, we can turn the jet on
the left or on the right, independently of the general regulation obtained turning
the Air Regulator.
ESQUEMA GENERAL DEL SISTEMA
Regulador
Caja
electrónica
Bomba
Jet
Pulsador
Sistema
de aire
Desagüe
automático
Sistema
hidráulico
Soporte
regulador en
altura
Boca de
aspiración
3. HOW THE BATHTUB BUTTON WORKS
6. REFERENCIAS TÉCNICAS
Esquema hidráulico
del sistema Control
Reguladores
de aire
(i). FILLING THE BATHTUB
- The bathtubs with hydromassage CONTROL SYSTEM, must be filled until the
level of the water exceeds 2 or 3 cm the level of the jets. It is important to start
the filling of the bathtub with lukewarm water, to avoid the formation of calcareous
sediments in your bathtub.
Recorrido del aire
(ii). START
Recorrido del agua
Bomba
- The unit can be started up by pressing the button half a second. The motor will
run for roughly 15 minutes. Once this has elapsed, the motor will automatically
shut off; should the userto prolong his session, the button must be pressed again.
(iii). PULSATING MODES
JETS
- Once the motor is running, we can select the desired pulsation mode. Pressing
and holding down the button for 1.5 seconds will initiate the first pulsation mode;
pressing the button again and holding it down for 1.5 seconds will initiate the
second pulsation mode; pressing the button a third time will initiate the third mode.
Pressing the button a fourth time will restore the unit to continuous mode.
Desagüe
automático
Rebosadero
Esquema eléctrico
del sistema Control
1st pulsation mode
4 seconds ON
-
4 seconds OFF
2nd pulsation mode
8 seconds ON
-
4 seconds OFF
3rd pulsation mode
12 seconds ON
-
4 seconds OFF
(iv). STOP
Within the process, at any time, the motor can be stopped with a short, halfsecond
press of the button.
Terminal
eléctrico
Pulsador
(v). LED
Next to the button there is a LED that informs us what function the bathtub is
performing at all times, as follows:
Caja
electrónica
Bomba
JETS
1. LED always lit: indicates that the bath is in the configuration program.
2. LED blinks steadily in a cyclical pattern: indicates that the bathtub is running
in continuous mode.
3. LED off with one short rhythmical flash:1st program.
4. LED off with two short flashes: 2nd pulsating program.
5. LED off with three short flashes: 3rd program.
6. Led off. pump stopped.
2. INSTALLATION GUIDE
7. LIMPIEZA DEL JET TOP
- All metallic elements belonging to the bath must be connected to the installation
with the same power. The motor and bath are provided with this type of connection.
- The electrical boxes are provided with high protection index, IP55, which give
them electrical insulation and watertightness. It is recommended not to manipulate
them. In case of damage, get in touch with our technical assistance service (S.A.T.).
Detalle
START
- The bathtub´s weight must be stood by the feet, but never by the bathtub´s
border.
- When all the steps described before are made, you have to install the automatic
drain pipe and overflow. Take care with the assembly; check the watertight set.
- Now, you must check that the adjustable feet are properly settled.- You should check that the tension and frequency supply coincides with the
one for the system provided.
- During the bathtub’s installation, you must make sure that the electrical wire that
is connected between the push button and the motor, remains connected. If not,
please switch it on again.
- Once the installation and verifications are finished, fill the bathtub until the water
level exceeds the jets diameter 2 or 3 cm, or the level water indicator placed on
the control display turns on. Then, you can start the bath, checking the watertight
in hole junction hydromassage system when the bathtub is running, until you are
sure that it works perfectly.
- The system is equipped with a lower water level sensor, as well as a sensor for
detecting suction inlet blockage. Towards this end, once the bathtub is filled up
as per the previous instructions, a simple operation must be performed in order
to program the home’s electrical characteristics, which is accomplished by connecting
the power supply while holding down the on/off sensor until the unit starts up.
- Once the unit is running, release the sensor, at which point the unit will enter
into a self-programming mode which will last roughly 5 minutes. Once this time
has elapsed, all of the functions of the unit will be fully programmed and it will
go into standby mode.
There is a second method for programming the bathtub, Just hold the button pressed
for 15 sec. and the pump will start for 1 minute aprox. Once this time has elapsed,
the bath will be configured in all its functions.
A: CUERPO de JET
B: ARANDELA de FRICCIÓN
C: RÓTULA
D: DIFUSOR
E: ARANDELA de SUJECIÓN
F: EMBELLECEDOR
G: LLAVE CÓNICA
a: Entrada de agua
b: Entrada de aire
c: Salida mezcla agua+aire
Para la limpieza del JET TOP primero se quita el embellecedor (F) haciendo
palanca por varios puntos, empujando suavemente mediante un
destornillador de punta plana; después se saca la arandela de sujeción
(E), girándola hacia la izquierda mediante una llave cónica (G) que se
facilita con la bañera, se puede ejercer un mayor esfuerzo para girar,
si se introduce el destornillador por los orificios de la llave.
El conjunto rótula (C) difusor (D) puede ser desmontado girando el
difusor hacia la izquierda hasta el tope (detalle), entonces se levanta
el tope para poder seguir girando el difusor. La limpieza se debe hacer
solo con agua y jabón líquido, de esta forma se pueden eliminar los
posibles residuos de aceites o sales que han ido acumulándose.
NOTA: Durante el montaje, la arandela de fricción (B) se ha de situar con
la ranura en la parte más interior del cuerpo de jet (A). El conjunto rótula/
difusor se aprieta girando hacia la derecha la arandela de sujeción (E),
comprobando que el difusor puede ser girado manualmente sin un excesivo
esfuerzo.
Baños 10 S. L. se reserva el derecho de alterar o modificar cualquier elemento
o componente de sus sistemas sin previo aviso.
E
FUNCIONES SISTEMA CROMOTERAPIA*
GB
1. TECHNICAL SPECIFICATIONS
On behalf of BAÑOS 10 we wish to congratulate you in a most sincere way and
thank you for having acquired a hydromassage bath. All our products have been
manufactured under a strict security supervision in order to guarantee their best
performance.
ROJO
AMARILLO
VERDE
AUTOMATICO
AZUL
Sistema compuesto por iluminación de cuatro colores básicos: rojo, amarillo,
verde y azul.
El panel del sistema tiene 5 pulsadores de los que 4 corresponden a cada
uno de los colores y el central a la función auto.
Mediante pulsación rápida (0’5 seg.) se ilumina el color seleccionado con
intensidad de 100%. La función auto pone en funcionamiento los 4 colores,
a la vez, al 100%.
Con pulsación larga (1’5 seg.) se ilumina con intensidad de 25% y si se
mantiene pulsado se incrementa 50%, 75% y 100% respectivamente,
pudiendo combinar distintos colores con distintas intensidades a fin de
conseguir el color que se desee. La función auto pone en funcionamiento
una secuencia de 15”segundos de cada color al 100%.
.
Para detener el sistema, pulsar nuevamente de forma rápida, sobre el sensor
que esté iluminado.
Efectos beneficiosos del uso de la cromoterapia:
EL ROJO
EL VERDE
Estimula y excita los nervios, gran liberador de
adrenalina revitalizando el organismo.
Beneficioso para activar el aparato digestivo y
contra depresión nerviosa, melancolía y
neurastenia.
Crea una gran armonía y equilíbrio, tonifica el
corazón y la sangre reduciendo la presión sanguínea, favorece la construcción de músculos y
tejidos. Color analgésico para calmar todo tipo
de dolores y neuralgias.
EL AMARILLO
EL AZUL
Antidepresivo, pues se trata de un color alegre y
vital, genera energía muscular con el estímulo de
algunos nervios motores, favorece la piel. Estimula
la creatividad, mejora las neuronas del aprendizaje
y ayuda a no tener insomnio.
Astringente, antibiótico, antiséptico, remedio
eficaz para bajar la fiebre, desinflamatorio. Es un
regenerador psicológico, relajante. Ayuda en el
asma, el exceso de peso, la celulitis. Baja la tensión
sanguinea, refrescante.
* Sistema opcional.
For a correct usage and maintenance of the hydromassage bath, we invite you
to read this guide carefully.
TECHNICAL SPECIFICATIONS
Electrical supply: 230 V
50 ~ 60 Hz.
Flexible wire 3x1.5 mm2
Power / current usage:
Water pump according to model
700 W / 850W / 1200 W
3 A / 3.7 A / 5.2 A
IMPORTANT:
- Our products should not be built in; in the event that they are, the costs derived
from extracting them for maintenance or repairs shall not be covered by the Baños
10 guarantee.
- In the event that the bathtub is embedded with masonry work, a 30x40 cm
ventilated access-cover should be included next to the motor, in order to facilitate
the cooling and maintenance on the system.
- The electrical terminal must be connected to a magnetothermal cutout (compatible
with the unit’s power rating) and a differential cutout with a minimum sensibility
of 30 mA.
- The bath connection to the electrical outlet must be done by means of a bipolar
hose cable with a minimum 1.5 mm2 diameter, provided with electrical grounding.
- The electrical installation for the bath must be done according to the low-tension
regulations in force. You should check that the tension and frequency supply
coincides with the one for the system provided..
ELECTRICAL CONNECTION
ELECTRICAL CONNECTION
ELECTRICAL CONNECTION
220/230 V.
220/230 V.
110/115 V.
50 Hz.
60 Hz.
60 Hz.
Wire colours
Wire colours
Wire colours
BLUE
BLUE
BLUE
YELLOW-GREEN
BROWN
YELLOW-GREEN
BROWN
YELLOW-GREEN
BROWN