1
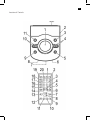
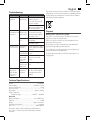
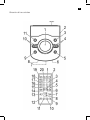
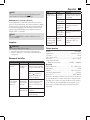
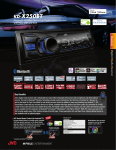
 BLUETOOTH SOUND SYSTEM SY‐X250BT 2
English
Contents
.
Location of Controls ..........................................................Page
.
3
Instruction Manual..............................................................Page
.
4
Technical. Specifications ....................................................Page 9
Disposal................................................................................Page
.
9
.
.
.
.
.
.
.
.
.
.
.
.
.
.
.
.
.
.
.
.
.
.
.
.
.
.
.
.
.
.
.
.
.
3
Location of Controls
4
English
Instruction Manual
Thank you for purchasing the Sytech SY-X250BT Bluetooth
tower speaker system. We are sure this product will satisfy
your needs. Welcome to Sytech!
Symbols in these Instructions for Use
WARNING:
Warns of dangers for your health and indicates potential
risks of injury.
CAUTION:
Indicates potential dangers for the device or other objects.
NOTE:
Highlights tips and information for you.
General Safety Guidelines
Before using this device, carefully read this user manual and
keep it together with the Warranty Certificate, cashier receipt
and if possible, the original package inclusive its interior packing. If you hand on the device to any third person, include the
user manual as well.
• To avoid the risk of fire or electric shock, you should not
expose the device to rain or humidity. Do not use the
device near water (e.g. bathroom, swimming pool, humid
cellars).
• Do not use the unit in extremely hot, cold, dusty, or damp
places.
• The unit is designed solely for private use and its intended purpose. This unit is not designed for commercial
use.
• Make sure that the power cable is not bent, pinched, or
comes into contact with heat sources.
• Make sure that the power cable is not a tripping hazard.
• Never touch the mains plug or the cord with wet hands.
• Always connect the unit to a properly installed plug
socket. Be sure the device voltage corresponds to the
grid voltage.
• The mains plug must always be easily accessible.
• Always install batteries in the correct direction.
• Avoid covering the device’s vent openings.
• Never cover the vent holes with objects, such as magazines, tablecloths, curtains etc.
• This appliance shall not be exposed to dripping or
splashing water and that no object filled with liquids such
as vases shall be placed on apparatus.
• Open sources of fire, such as e.g. burning candles may
not be placed onto the unit.
• Never open the device’s case. Improper repairs can cause
severe danger to the user. If the device or particularly the
power cord is damaged, don’t use the device any further
and have it repaired by a qualified specialist. Check the
power cord regularly for damages.
• To avoid any danger, a damaged power cord must be
replaced only by the producer, its customer service or a
similarly qualified person with an equal cord.
• If the device won’t be used over an extended period of
time, disconnect the power cord and remove the batteries.
These symbols may be found on the device and shall indicate
the following:
The lightning symbol warns the user of dangerously high voltages inside the case.
The exclamation mark symbol points to important instruction or maintenance remarks in the
accompanying guidelines.
Children and disabled persons
• For the safety of your children, keep any packing parts
(plastic bags, cartilage, Styrofoam etc.) out of their reach.
WARNING!
Don’t let small children play with foils for danger of
suffocation!
• This device is not intended for use by persons (including children) with reduced physical, sensory or mental
capabilities, or lack of experience and/or knowledge
unless they have been given supervision or instructions
concerning the use of the device by a person responsible
for their safety.
• Supervise children to ensure they do not play with the
device.
Location of Controls
1 VOLUME control (Volume/control lamp)
2 USB port
3
PLAY/PAUSE button (play/pause)
4
NEXT/ PREV buttons (next/previous track)
5
STANDBY button (On/Standby)
6 IR receiver for remote control
7Display
8 Standby indicator lamp
9
SOURCE button (select source)
10 F.FWD/ F.RWD buttons (scan forward/back)
11 STOP button (Stop)
Back Side (not shown)
RESET button (reset)
AUDIO R/L jacks (2x RCA)
Wire antenna
Mains connection jack
POWER ON/OFF Mains switch
English
Remote Control
1 REPEAT (repeat) button
MUTE button
2
3 Number buttons
4 10+ button
5 “F” button
CH+/ CH- buttons (next/previous track / select
6
preset radio stations)
7 button (Stop)
8 VOL+/VOL- buttons (volume)
9 TONE button
10 SEARCH button
11 MO/ST button (Mono/Stereo)
12SAVE button
13
(play/pause) button
14 TU+/ TU- buttons (scan forward/back)
15 FM button (radio)
16 AUDIO button
17 BLUETOOTH button
18 USB button
19 STANDBY button (On/Off)
20 RANDOM button (random playback)
Special Safety Precautions for this device
WARNING:
Avoid hearing loss due to extreme volume.
CAUTION:
• Do not subject the speakers to extreme heat, cold or
humidity.
• Do not operate the device on maximum volume. This
can cause damage.
• Do not touch the speaker membranes with fingers or
objects. This will cause damage to the membranes.
First Use of the Device/Introduction
NOTE:
Some buttons can be found both on the device and on the
remote control. Identical buttons perform the same function.
• Select a proper place for the device. A dry, level and slip
proof surface is suitable.
• Make sure the device is vented sufficiently!
• Remove the protective film from the device, if present.
Mount Pedestal
• Carefully place the left hand side of the speaker box onto
a table.
5
NOTE:
Place a blanket under the speaker to avoid scratching
the surface.
• Mount the bottom plate with four screws at the bottom
of the speaker box.
• Now stand the speaker box on the floor again.
Power supply
• Connect the mains cable to the connector jack socket on
the back of the device.
• Insert the grid plug into a properly installed three prong
socket with 230 V, 50 Hz.
• Make sure the grid voltage corresponds to the figures on
the rating plate.
NOTE:
Disconnect from mains power supply during longer periods
of non-use.
Insert/Replace Battery in Remote Control
NOTE:
The lithium cell in the battery compartment of the remote
control may have been safeguarded for transport with a
piece of foil. This extends the life of the battery. Please
remove this foil before the first use to make the remote
control ready for operation.
• Open the battery compartment on the underside of the
remote.
• Replace the cell by a battery of the same type (CR 2025).
Check that the polarity is correct (see battery compartment).
• Close the battery compartment.
If the remote is not in use for a lengthy period of time, please
remove the battery to prevent the battery acid from “leaking”.
WARNING:
• Do not expose the batteries to intense heat, such as
sunlight, fire or similar. Danger of explosion!
• Keep batteries out of the reach of children. They are
not toys.
• Do not force batteries open.
• Avoid contact with metallic objects. (Rings, nails, screws
etc.) Danger of short circuits!
• Short circuits may overheat or even ignite batteries.
This may lead to combustion.
• When transporting the batteries, cover the terminals for
your safety with an adhesive strip.
• If a battery leaks, do not rub the fluid into the eyes or
the skin. If acid comes into contact with the eyes, rinse
with purified water and seek medical advice if symptoms persist.
6
English
CAUTION:
Batteries must not be disposed of in the garbage. Please
bring used batteries to competent collection centers or
back to the dealer.
Restoring the factory defaults
Any errors during operation can be remedied by pushing the
reset button.
• By using a wire or similar, press the reset button (RESET)
on the back of the device to reset the electronics. The
settings made by you will be lost in the process.
General Operation
Switch device on/off
• Turn the device on by setting the mains switch POWER
on the back to the “ON” position
• With the STANDBY button (5/19), you can switch the
unit between standby and operating mode. In standby,
the pilot lamp (8 on the device) lights red.
• To turn off the device, set the mains switch POWER on
the back to the “OFF” position. To disconnect the unit
completely from the mains, pull the mains plug from the
socket.
NOTE: In BLUETOOTH, USB and AUDIO mode
After approx. 15 minutes without a signal, the device automatically switches to standby.
Volume
By pressing the VOL+/VOL- buttons (8 on the remote control)
you can adjust the desired volume.
To adjust the volume on the device, turn the VOLUME control
(1).
Infrared Remote Control
For wireless control within a distance of 5 m. If the distance
decreases you should change the batteries. For proper
operation mind a clear view between the remote control and
the sensor on the device.
Sound Settings
Press the TONE button (9 on the remote control) to adjust
the settings for the treble (tr), the basses (bS) and the overall
volume (VOL) in turn. You can normally adjust the settings
with the VOL+/VOL- buttons, or the VOLUME control.
NOTE:
• If necessary, change the EQ setting in your playback
unit to create the best sound.
• The settings for treble and bass will be reset to “00”
each time you switch off the device.
MUTE (2 on the remote control)
For immediate muting of the volume. Press
to cancel the function
MUTE again
NOTE:
When activating the function, the message “VL – OFF”
will briefly be shown on the display. The activated function
cannot be permanently shown on the display for technical
reasons.
Radio mode
1. Fully uncoil the wire antenna.
SOURCE button (9) , until “FM”
2. Repeatedly press the
is shown on the display. The indicator lamp (1) will light
up red. Alternatively, you can also press the FM button
(15 on the remote control).
3. Automatically search for radio stations:
Press the SEARCH button (10 on the remote control).
The unit scans the complete frequency band for stations.
The radio stations found are stored in ascending order of
frequency. The sequence cannot be altered later. Preset
radio stations are overwritten.
Manual scan for radio stations:
Briefly press the / buttons (10/14), until you have
found the radio station which you are looking for. If you
keep one of the buttons pressed, the device will scan to
the next radio station.
Direct frequency entry:
If you know the frequency of the radio station you can
enter it as follows.
• Press the “F” button (5 on the remote control). The
indicator “- - - : - -“. will appear on the display. Enter
the frequency with the number buttons (3) of the
remote control.
4. If the reception is too weak and there is interference on
the received station, try to improve the reception by
altering the position and uncoiling or coiling the antenna.
For FM stations, you can use the MO/ST button (11 on
the remote control) to switch between mono and stereo
reception. We recommend that you switch to mono in
case of bad reception.
NOTE:
The activated stereo function is shown in the display
through the symbol “ “ .
Manually storing stations
1. Use the / respectively the number buttons to select
the preset location at which you want to store the radio
station.
2. Search for the desired radio station as described above
under point 3, “Manually scan for radio station”.
3. Press the SAVE button (12 on the remote control) to
preset the radio station.
4. Repeat the above steps to save up to 60 FM radio stations.
English
7
Select the preset radio station
You have two options to select the preset radio stations.
Due to the different device manufacturers, models, and
software versions, a full functionality cannot be guaranteed.
• The preset radio stations can be selected by repeatedly
pressing the / button (4/6).
• Enter the desired preset location with the number buttons (3 on the remote control). With preset locations
above 9, first press the 10+ button (4 on the remote control). Each time you push the 10+ button you will increase
the entry by 10 more preset locations.
• Logging on devices (Pairing)
Before you listen to music via the unit, you must pair the
devices.
Playing back music files
You have three options to play back your own music files with
the unit: hardwired, wireless via Bluetooth, or via the USB
port.
By cable
1. Connect the external device with a cinch cable (2x RCA)
to the AUDIO R/L jacks on the back of the speaker. If
required, use a suitable adapter (not included).
2. Repeatedly press the
SOURCE button (9) until “AUDIO” is shown on the display. The operating indicator
light (1) will light up red. Alternately, you can also press
the AUDIO button (16 on the remote control).
3. Start the playback of your audio source. Listen to the
sound playback via the speaker. You can adjust the
volume with the VOL+/VOL- button (8 on the remote
control) or the VOLUME control (1).
4. For the further procedure, please refer to the user manual
of the external audio source.
NOTE:
If possible, adjust the volume of the external unit to a comfortable level.
Cordless via Bluetooth
Bluetooth involves a technology for wireless radio connection of devices over a short distance. Devices with Bluetooth
standard are transmitting between 2.402 and 2.480 GHz in
the ISM band (Industrial, Scientific and Medical). Interference
can be caused for example by WLAN-networks, DAB radios,
cordless phones, or microwave ovens which work on the
same frequency band.
This device offers you the possibility to use a Bluetoothenabled device. The functional radius is limited to approx.
10 metres depending on the surroundings and the unit used.
If your playing device supports the A2DP profile (Advanced
Audio Distribution Profile) and has a music-player function,
then you can also wirelessly transfer music to the device. The
A2DP profile involves a multi-vendor Bluetooth profile. By
streaming, stereo-audio signals are wirelessly transferred between the playing device (source) and the receiving device.
To remotely control the source, the playback device has to
support the AVRCP profile (Audio Video Remote Control
Profile).
1. Ensure, that the Bluetooth function is activated in
your player (e.g. mobile phone). For this, refer to the
operation manual of your player.
2. Press the
SOURCE button (9) repeatedly, until
“– bt –“ is shown on the display. Alternatively, you
can also press the BLUETOOTH button (17 on the
remote control). The operating indicator lamp (1)
will flash rapidly to show that the device is in pairing
mode.
3. Chose the Bluetooth menu in your player and register
the device in your player. For this, refer to the operation manual of your player. The device “SY-X250BT”
will show in your player as a selection.
NOTE:
Only one playback unit can be connected to the
speaker. If the speaker is already connected to
another playback unit, the speaker will not appear
in the BT selection menu.
4. Now enter the password “0000” in your player,
depending on the device manufacturers, model, and
software version.
If pairing was done successfully, a beep will be heard and
the indicator lamp will slowly flash blue. If the connection for
the audio playback has been completely established, then
a beep will sound again and the indicator lamp will light up
blue.
For operation, please refer to the section “Description of the
controls”.
If possible, adjust the volume of the external unit to a comfortable level
NOTE:
• Depending on the device manufacturer, you need to
perform the registration (PAIRING) again to connect the
devices.
• In case of problems during repairing of a playback
device, deactivate the WiFi-/ and mobile data function
in your playback device.
• The Bluetooth compatibility cannot be ensured for
devices (e.g. mobile phones) getting released in the
future.
• To ensure an optimal connection, make sure that the
battery of your player is completely charged.
• Some of the mobile phone brands have an energysaving mode. Deactivate the energy-saving mode as
it can otherwise result in problems during the data
transfer through Bluetooth.
8
English
NOTE:
• To be able to transfer audio data, Bluetooth needs to
stay activated in your player Observe the operation
manual of your player.
• If a mobile phone on which you are playing music receives a call, the music will be interrupted. The sound is
played back by the speaker depending on the mobile
phone. To transfer the conversation to your mobile
telephone, please refer to the popup on the mobile
phone display. After you have terminated the phone
call, the devices will be connected to each other again.
You may have to restart playback.
USB port (2)
This device has been developed in line with the latest technical advances in the USB field. The wide range of different
USB storage devices of all types which are currently on the
market, unfortunately do not allow us to guarantee full compatibility with all USB storage devices. For this reason, in rare
cases there may be problems in playing back files from USB
storage devices. This is not a malfunction of the device.
1. Press the
SOURCE button (9) repeatedly until “LOAd”
is shown on the display. The indicator lamp (1) will light
up red. Alternatively, you can also press the USB button
(18 on the remote control).
2. Connect a USB storage device directly into the port. After
a few seconds, the display “– USb –“ will appear. Playback then begins. “ “, MP3, the current track and the
elapsed playing time of the current track will be shown in
the display.
For operation, please refer to the section “Description of the
controls”.
NOTE:
• Always directly connect a USB storage medium to the
USB port to prevent any malfunctions.
• The USB port is not designed for charging external
devices.
CAUTION:
Before removing the USB storage device, switch the device
to another mode using the
SOURCE button (9).
Description of the controls
(3/13)
You can pause and continue music playback. Press again to
continue playback.
(4/6)
Press 1 x =
Press 2 x =
Press 3 x =
Restart of the song from the beginning. (Only
in Bluetooth mode)
Skip to the previous song.
Skip to the song before the previous song.
NOTE:
The number of the current title is displayed briefly.
(4/6)
Press to skip to the next song and the following songs.
NOTE:
The number of the current title is displayed briefly.
/ (10 /14) (Only in USB mode)
Press 1 x =
A music scan is started.
Press 2 x =
The scan is stopped and normal playback
is continued.
REPEAT (1 on the remote control) (Only in USB mode)
Activates the Repeat function.
Press 1 x =
The current title is played back repeatedly. The symbol “ “ is shown.
Press 2 xn =
All the tracks are continually played back.
“ will be shown.
The message “ALL
NOTE:
If the function is activated function, the individual tracks can
be selected with the / (4/6) buttons.
RANDOM (20 on the remote control)
Activates random playback. All titles are played back in a random sequence. The message “rANd”, the current title and
the elapsed play time are alternately shown on the display.
To deactivate the function again, press the RANDOM button
again. The message “OFF” will be briefly shown on the
display.
NOTE:
The “RANDOM” function cannot be combined with the
“REPEAT” function.
Cleaning
CAUTION:
Do not submerge the device in water.
• Before cleaning disconnect from mains power supply.
• Clean the device with a soft damp cloth without detergents.
English
Troubleshooting
Fault
Unit cannot be
operated.
Cause
Solution
Unit crashes Disconnect from the
and “hangs”. mains for around
5 seconds. Then switch
the unit on again.
Perform a factory reset.
see page 6 “Restoring
the factory defaults”
No audio signal Speaker is not Check whether a connecvia the Bluetooth paired to the tion exists. If necessary,
connection
audio source. pair the speaker again to
the audio source.
Volume too
Increase the volume on
low
the speaker
Increase the volume on
the audio source.
Speaker cannot Pairing does Check whether the audio
be connected not work
source supports the A2DP
protocol.
Audio source Switch on the audio
is switched off source
Bluetooth is Switch on the Bluetooth
switched off function in the audio
at the audio source.
source.
Bluetooth
Use a different playback
version is not unit.
supported.
Music tracks
Random
Press the RANDOM butare played
playback is
ton. The “OFF” display
back via USB
activated.
is briefly shown on the
in the wrong
display.
sequence.
Technical Specificationsn
Model:............................................................................. SY-X250BT
Power supply:.......................................................220-240 V~ 50 Hz
Power Consumption:................................................................60 W
Protection class:.................................................................................II
Net weight:...............................................................approx. 7.20 kg
Radio component
Frequency range:..................................... FM 87.5 ~ 108 MHz
Bluetooth
Bluetooth support:.............................................. V2.1 + EDR / V1.1
.
Capacity:..................................................................
................ 32 GB
.
Range:..................................................................approx.
10 metres
. frequency:......................................................2.4 GHz
Transmission
Protocols: ....................................................................A2DP, AVRCP
The right to make technical and design modifications in
the course of continuous product development remains
reserved.
9
This device has been tested according to all relevant current
CE guidelines, such as electromagnetic compatibility and low
voltage directives, and has been constructed in accordance
with the latest safety regulations.
Disposal
Meaning of the “Wheelie Bin” Symbol
Take care of our environment, do not dispose of electrical
applicances via the household waste.
Dispose of obsolete or defective electrical appliances via
municipal collection points.
Please help to avoid potential environmental and health
impacts through improper waste disposal.
You contribute to recycling and other forms of utilization of
old electric and electronic appliances.
Your municipality provides you with information about collecting points
Manufacturer: Satyatrade S. L.
Address: Pol. Ind. La Raya. C/ Guadalquivir, 2.
Camarma de Esteruelas, 28816 Madrid
Tel: 902 430 967
Fax: 91 8864285
NIF: B83254763
Manufacturing Country: China
Sytech® SY-X250BT
Description: Bluetooth Speaker
Sytech declares under their responsibility that the above indicated product fully
complies with the following directives:
Directive: 2004/108/EC EMC. (Electromagnetic Compatibility Directive)
EN55013:2001+A1:2003+A2:2006
EN61000-3-2:2006+A1:2009+A2:2009
EN61000-3-3:2008
EN55020:2007+A11:2011
Directive Low Voltage LVD.
EN60065:2002+A1:2006+A2:2010+A11:2008+A12:2011
Directive ERM (Electromagnetic compatibility and Radio spectrum matters)
ETSI EN 300 328 V1.7.1 (2006-10)
ETSI EN 301 489-1 V1.9.2 (2011-09)
ETSI EN 301 489-17 V2.1.1 (2009-05)
ETSI EN 62479 (2010)
RoHS standard: 2011/65/EU. Restriction of hazardous substance.
Firmado: Ajeet Nebhwani Utamchandani
Administrador único
ALTAVOZ TORRE BLUETOOTH SY‐X250BT 2
Español
Contenidos
.
3
Ubicación de los controles ............................................Página
. ................................................Página 4
Instrucciones de servicio
.
5
Datos técnicos .................................................................Página
. .......................................................................Página 6
Eliminación
.
.
.
.
.
.
.
.
.
.
.
.
.
.
.
.
.
.
.
.
.
.
.
.
.
.
.
.
.
.
.
.
.
.
3
Ubicación de los controles
4
Español
Instrucciones de servicio
• No abra nunca el chasis del dispositivo. Una reparación
inadecuada puede provocar graves riesgos para el
Bienvenidos
usuario. Si el dispositivo, o especialmente el cable de
Gracias por comprar el Sistema de altavoz Bluetooth
alimentación, está dañado, no siga usando el dispoSY-X250BT. Estamos seguros de que este producto
sitivo y hágalo reparar por un especialista cualificado.
Compruebe regularmente si hay daños en el cable de
va a satisfacer sus necesidades. Bienvenido a Sytech!
alimentación.
Símbolos en este manual del usuario
• Para evitar peligros, un cable de alimentación dañado
sólo debe ser reemplazado por el fabricante, su servicio
AVISO:
de atención al cliente o una persona similarmente cualifiAdvierte de riesgos para su salud, e indica riesgo potencial
cada por un cable equivalente.
de heridas.
• Si el dispositivo no va a usarse durante un periodo prolongado de tiempo, desconecte el cable de alimentación
ATENCIÓN:
y saque las baterías.
Indica peligros potenciales para el dispositivo u otros objetos.
NOTA:
Indica recomendaciones e información para usted.
Normas generales de seguridad
Antes de usar este dispositivo, lea cuidadosamente este
manual del usuario y consérvelo junto con el certificado de
garantía, el recibo de compra y, si es posible, el embalaje
original, incluyendo el embalaje interno. Si entrega el dispositivo a terceros, incluya también el manual del usuario.
• Para reducir el riesgo de incendio o electrocución, no
exponga este dispositivo a la lluvia o la humedad. No use
el dispositivo cerca del agua (por ejemplo, en el baño, la
piscina o en sótanos húmedos).
• No use la unidad en lugares con extremos de calor, frío,
polvo o humedad.
• Esta unidad está destinada exclusivamente a su uso
privado y la aplicación específica para la que ha sido
diseñada. Esta unidad no ha sido diseñada para fines
comerciales.
• Asegúrese de que el cable de alimentación no esté doblado, enganchado ni en contacto con fuentes de calor.
• Asegúrese de que el cable de alimentación no represente riesgo de tropiezos.
• No toque nunca el enchufe ni el cable con las manos
mojadas.
• Conecte el dispositivo siempre a una toma de corriente
correctamente instalada. Asegúrese de que la tensión del
dispositivo se corresponda con la tensión de la red.
• El enchufe debe estar siempre accesible.
• Instale siempre las baterías en la dirección correcta.
• Evite tapar las ranuras de ventilación del dispositivo.
• No cubra nunca las ranuras de ventilación con objetos
como revistas, manteles, cortinas, etc.
• No exponga la unidad a goteo ni salpicaduras de agua,
ni coloque objetos llenos de agua, como jarrones, sobre
la unidad.
• Las fuentes de llama abierta, como las velas encendidas,
no deben colocarse sobre la unidad.
Estos símbolos pueden encontrarse en caso dado en el
aparato, y son para indicar lo siguiente:
El símbolo del rayo advierte al usuario de tensiones elevadas peligrosas en el interior del chasis.
El símbolo de exclamación indica instrucciones u
observaciones de mantenimiento importantes en
las orientaciones adjuntas.
Niños y personas discapacitadas
• Para la seguridad de sus hijos, mantenga las piezas de
embalaje (bolsas de plástico, cartones, porexpan, etc.)
fuera de su alcance.
¡AVISO!
No deje que los niños pequeños jueguen con los
plásticos, debido al riesgo de asfixia.
• Este dispositivo no está pensado para ser usado por
personas (incluyendo niños) con capacidades físicas, sensoriales o mentales reducidas, o con falta de experiencia
y/o conocimientos, a menos que tengan supervisión
o sean instruidas sobre el uso del dispositivo por una persona responsable por su seguridad.
• Vigile a los niños para garantizar que no jueguen con el
dispositivo.
Ubicación de los controless
1 Control VOLUME (volumen/testigo de control)
2 Puerto USB
3Botón
PLAY/PAUSE (reproducir/pausa)
4Botones NEXT/ PREV (pista siguiente/anterior)
5
Botón STANDBY (encendido/espera)
6 Receptor IR para el mando a distancia
7Display
8 Testigo indicador de espera
9Botón
SOURCE (selección de fuente)
10Botones F.FWD/ F.RWD (explorar adelante/atrás)
11Botón STOP (detener)
Español
5
Parte trasera (no se Muestra)
Botón RESET (reinicio)
Tomas de AUDIO R/L (2xRCA)
Antena de cable
Toma de conexión de corriente
Interruptor de corriente POWER ON/OFF
• Seleccione un lugar adecuado para el dispositivo. Elija
una superficie seca, plana y no deslizante.
• Asegúrese de que el dispositivo esté suficientemente
ventilado.
• Retire la película protectora del dispositivo si está adherida.
Mando a distancia
1 Botón REPEAT (repetir)
2Botón MUTE
3 Botones numéricos
4 Botón 10+
5 Botón “F”
6Botones CH+/ CH- (pista siguiente/anterior / seleccionar emisoras preestablecidas)
7Botón (Detener)
8 Botones VOL+/VOL- (volumen)
9 Botón TONE
10 Botón SEARCH
11 Botón MO/ST (mono/estéreo)
12 Botón SAVE
(Reproducir/Pausa)
13Botón
14Botones TU+/ TU- (explorar adelante/atrás)
15 Botón FM (radio)
16 Botón AUDIO
17 Botón BLUETOOTH
18 Botón USB
19Botón STANDBY (encender/apagar)
20 Botón RANDOM (reproducción aleatoria)
Montaje del pedestal
• Coloque cuidadosamente el lado izquierdo de la caja de
altavoz en una mesa.
Precauciones de seguridad específicas
para este dispositivo
Colocación y sustitución de las pilas del mando a distancia
AVISO:
Evite las pérdidas de audición provocadas por un volumen
demasiado alto.
ATENCIÓN:
• No someta los altavoces a condiciones extremas de
calor, frío o humedad.
• No utilice los altavoces con el volumen al máximo.
Podría provocar daños.
• No toque las membranas de los altavoces con los
dedos ni con ningún objeto. Provocaría daños en las
membranas.
Primer uso del dispositivo/Introducción
NOTA:
Algunos botones pueden encontrarse tanto en el dispositivo como en el mando a distancia. Los botones idénticos
realizan la misma función.
NOTA:
Coloque el altavoz sobre una manta o similar para
evitar que se arañe la superficie.
• Monte la placa de soporte con los cuatro tornillos en la
parte inferior del altavoz.
• Ahora incorpore de nuevo la caja de altavoz.
Alimentación
• Conecte el cable de alimentación a la toma del conector
de la parte trasera del dispositivo.
• Introduzca el enchufe de corriente en una toma adecuada de 230 V, 50 Hz.
• Asegúrese de que la tensión de la corriente coincida con
los valores de la etiqueta identificadora.
NOTA:
Desenchufe el dispositivo de la toma de corriente durante
largos periodos de inactividad.
NOTA:
La batería de litio del compartimiento de batería del
mando puede haberse protegido para el transporte con
una película adhesiva. Así aumenta la vida útil de la batería.
Retire la película antes del primer uso para tener el mando
a distancia listo para el uso.
• Abra el compartimento de la batería, situado en la parte
inferior del control remoto.
• Sustituya la batería con otra del mismo tipo (CR 2025).
Compruebe que la polaridad es la correcta (vea las
marcas en el compartimento para pilas).
• Cierre el compartimento de la batería.
Si el control remoto va a estar en desuso durante un largo
periodo de tiempo, extraiga la batería para evitar que se
produzcan fugas de ácido de la misma.
6
•
•
•
•
•
•
•
Español
AVISO:
No exponga las baterías a calor intenso, como la luz
del sol, el fuego o similares. ¡Peligro de explosión!
Mantenga las baterías fuera del alcance de los niños.
no son juguetes.
No intente abrir las baterías.
Evite el contacto con objetos metálicos (anillos, clavos,
tornillos, etc.). ¡Podría provocar un cortocircuito!
Los cortocircuitos pueden provocar un sobrecalentamiento de las baterías, e incluso prenderles fuego.
Pueden derivar en la combustión de las baterías.
Por motivos de seguridad, cubra los terminales de las
baterías con una cinta adhesiva para su transporte.
Si se producen fugas en una batería, no permita que el
fluido entre en contacto con los ojos o con la piel. Si el
ácido entra en contacto con los ojos, lávelos con agua
depurada y consulte con un médico si no desaparecen
los síntomas.
ATENCIÓN:
Las baterías no se deben desechar en la basura. Lleve las
baterías usadas a centros de recolección específicos o
devuélvalas al vendedor.
Restablecer valores de fábrica
Cualquier error durante el funcionamiento puede solucionarse pulsando el botón de reinicio.
• Con un alambre o similar, pulse el botón de reinicio
(RESET) de la parte posterior del dispositivo para reiniciar
su electrónica. Las configuraciones que haya realizado se
perderán con este procedimiento.
Funcionamiento general
Encender/apagar el dispositivo
• Encienda el dispositivo poniendo el interruptor de
corriente POWER de la parte posterior en posición “ON”.
• Con la tecla STANDBY (5/19) puede cambiar la unidad
entre los modos de espera y operativo. En espera el testigo (8 en el dispositivo) se enciende en rojo.
• Para apagar el dispositivo, ponga el interruptor de corriente POWER de la parte posterior en posición “OFF”.
Para desconectar la unidad por completo de la corriente,
desconecte el enchufe de la toma.
NOTA: En modo BLUETOOTH, USB y AUDIO
Pasados alrededor de 15 minutos sin señal, el dispositivo
pasará automáticamente a modo espera.
Volumen
Pulsando los botones VOL+/VOL- (8 en el mando a distancia)
puede ajustar el volumen deseado.
Para ajustar el volumen en el dispositivo, gire el mando
VOLUME (1).
Mando a distancia infrarrojo
Para control inalámbrico a una distancia de menos de 5 m. Si
la distancia disminuye, debería cambiar las baterías. Para un
uso adecuado, tenga siempre una clara línea de visión entre
el mando a distancia y el sensor del dispositivo.
Ajustes de sonido
Pulse el botón TONE (9 en el mando a distancia) para ajustar
la configuración de agudos (tr), graves (bS) y el volumen general (VOL) consecutivamente. Puede ajustar la configuración
con los botones VOL+/VOL- o el control VOLUME.
NOTA :
• Si es necesario, cambie la configuración EQ en la
unidad de reproducción para crear el mejor sonido
posible.
• La configuración de agudos y graves se restablecerá en
“00” cada vez que apague el dispositivo.
MUTE (2 en el mando a distancia)
Para silenciar de inmediato el volumen. Pulse
nuevo para cancelar esta función.
MUTE de
NOTA:
Al activar la función, aparece brevemente el mensaje
“VL – OFF“ en pantalla. La función activa no puede mostrarse permanentemente en pantalla por motivos técnicos.
Modo radio
1. Desenrolle por completo la antena de cable.
2. Pulse el botón
SOURCE (9) repetidamente hasta que
se muestre “FM” en pantalla. El testigo (1) se encenderá
en rojo. Alternativamente puede pulsar el botón FM (15
en el mando a distancia).
3. Búsqueda automática de emisoras:
Pulse el botón SEARCH (10 en el mando a distancia). La
unidad buscará emisoras en toda la banda de frecuencia. Las emisoras de radio encontradas se guardarán en
orden de frecuencia ascendente. La secuencia no puede
modificarse más adelante. Las emisoras preestablecidas
se sobrescribirán.
Búsqueda manual de emisoras:
Pulse brevemente los botones / (10/14) hasta encontrar la emisora que esté buscando. Si mantiene pulsando
uno de los botones, el dispositivo buscará la siguiente
emisora.
Introducción directa de frecuencia:
Si conoce la frecuencia de la emisora puede introducirla
del modo siguiente.
• Pulse el botón “F” (5 en el mando a distancia). Se
mostrará en pantalla el indicador “- - - : - -“. Introduzca la frecuencia con los botones numéricos (3) del
mando a distancia.
Español
4. Si la recepción es muy débil y la emisora tiene interferencias, pruebe a mejorar la recepción cambiando la
posición de la antena y enrollándola o desenrollándola.
Para emisoras FM, puede usar el botón MO/ST (11 en el
mando a distancia) para cambiar entre recepción mono
y estéreo. Recomendamos que cambie a mono en caso
de mala recepción.
NOTA :
La función de estéreo activa se muestra en pantalla con
el símbolo “ “.
Guardado manual de emisoras
1. Use / o los botones numéricos para seleccionar la ubicación de memoria en la que quiera guardar la emisora.
2. Busque la emisora deseada como se describe en el
apartado 3 “Búsqueda manual de emisoras”.
3. Pulse el botón SAVE (12 en el mando a distancia) para
guardar la emisora
4. Repita este procedimiento para memorizar otras
emisoras ( hasta 60 emisoras FM).
Seleccionar una emisora memorizada
Dispone de dos opciones para seleccionar las emisoras
memorizadas.
• Las emisoras memorizadas pueden seleccionarse pulsando repetidamente el botón / (4/6).
• Introduzca la ubicación de memoria deseada con los
botones numéricos (3 en el mando a distancia). Con
ubicaciones superiores a 9, pulse primero el botón 10+
(4 en el mando a distancia). Cada vez que pulse el botón
10+ aumentará el número en 10 posiciones más.
Reproducir archivos de música
Dispone de tres opciones para reproducir sus propios
archivos de música con la unidad: por cable, inalámbrico por
Bluetooth, o mediante el puerto USB.
Con cable
1. Conecte el dispositivo externo con un cable de cincha
(2x RCA) a las tomas AUDIO R/L de la parte posterior
del altavoz. Si fuera necesario, emplee un adaptador
apropiado (no incluido con el producto).
2. Pulse el botón
SOURCE (9) repetidamente hasta que
se muestre “AUDIO” en pantalla. El testigo (1) se encen derá en rojo. Alternativamente puede pulsar el botón
AUDIO (16 en el mando a distancia).
3. Inicie la reproducción en la fuente de audio. Escuche la
reproducción por el altavoz. Puede ajustar el volumen
con el botón VOL+/VOL- (8 en el mando a distancia) o el
control VOLUME (1).
4. Para otras operaciones, consulte el manual del usuario
de la fuente de audio externa.
7
NOTA:
Ponga el volumen del dispositivo externo a un nivel cómodo en la medida de lo posible.
Inalámbrico por Bluetooth
Bluetooth es una tecnología de conexión de radio inalámbrica de dispositivos en distancias cortas. Los dispositivos con el
estándar Bluetooth transmiten entre 2,402 y 2,480 GHz eb la
banda ISM (Industrial, Scientific y Medical). Pueden producirse interferencias causadas por redes WLAN, radios DAB,
teléfonos inalámbricos u hornos microondas que funcionen
en la misma banda de frecuencia.
Este dispositivo le ofrece la posibilidad de usar un dispositivo
con Bluetooth habilitado. El radio de operación está limitado
a aproximadamente 10 metros, dependiendo del entorno y
de la unidad utilizada.
Si su dispositivo de reproducción soporta el perfil A2DP
(Advanced Audio Distribution Profil) y tiene función de reproductor de música, también puede transferir música de forma
inalámbrica al dispositivo. El perfil A2DP implica un perfil
Bluetooth multimarca. Al transmitir, se transfieren señales de
audio estéreo inalámbricas entre el dispositivo reproductor
(fuente) y el dispositivo receptor. Para poder controlar la fuente a distancia, el dispositivo de reproducción debe soportar
el perfil AVRCP (Audio Video Remote Control Profile).
Debido a los diversos fabricantes de dispositivos, modelos
y versiones de software, no puede garantizarse una total
funcionalidad.
• Registro en dispositivos (Emparejamiento)
Antes de escuchar música a través de la unidad, deberá
emparejar los dispositivo.
1. Asegúrese de que la función Bluetooth esté activada
en su reproductor (p.ej. teléfono móvil). Para hacerlo,
consulte el manual de su reproductor.
2. Pulse el botón
SOURCE (9) repetidamente hasta
que se muestre “– bt –“ aen pantalla. Alternativamente puede pulsar el botón BLUETOOTH (17 en
el mando a distancia). Tras encenderlo, el testigo (1)
parpadeará rápidamente para mostrar que el dispositivo está en modo emparejamiento.
3. Elija el menú Bluetooth de su reproductor y registre
el dispositivo. Para hacerlo, consulte el manual de su
reproductor. El dispositivo “SY-X250BT” se mostrará en
el reproductor como selección.
NOTA:
Solamente puede conectarse una unidad de reproducción al altavoz. Si éste ya está conectado a otra
unidad de reproducción, el altavoz no aparecerá en
el menú de selección BT.
8
Español
4. Introduzca la clave “0000” en su reproductor, según
el fabricante del dispositivo, el modelo y la versión de
software.
Si se ha logrado el emparejamiento con éxito, se escuchará
un pitido y el testigo parpadeará lentamente en azul. Si la
conexión para la reproducción de audio se ha realizado por
completo, se emitirá un pitido y el testigo se encenderá en
azul.
Para el uso, consulte la sección “Descripción de los controles”.
Ponga el volumen del dispositivo externo a un nivel cómodo
en la medida de lo posible.
NOTA:
• Según el fabricante del dispositivo, deberá realizar el
registro (PAIRING) de nuevo para conectar los dispositivos.
• En caso de problemas durante la reparación de un dispositivo de reproducción, desactive la función de WiFi/ y datos móviles en el dispositivo de reproducción.
• La compatibilidad Bluetooth no puede garantizarse
para dispositivos (como teléfonos móviles) futuros.
• Para garantizar una conexión óptima, asegúrese de
que la batería del reproductor esté totalmente cargada.
• Algunas marcas de teléfonos móviles tienen un modo
de ahorro de energía. Desactive el modo de ahorro
de energía, podría resultar en problemas durante la
transferencia de datos por Bluetooth.
• Para poder transferir datos de audio, el Bluetooth debe
estar activado en su reproductor. Consulte el manual
del reproductor.
• Si el teléfono móvil en el que está reproduciendo
música recibe una llamada, la música se interrumpirá.
El sonido se reproduce en el altavoz según el teléfono
móvil. Para transferir la conversación a su teléfono
móvil, consulte el mensaje de la pantalla del teléfono.
Cuando haya terminado la llamada, los dispositivos
volverán a conectarse entre si. Puede que tenga que
volver a iniciar la reproducción.
Puerto USB (2)
Este dispositivo se ha desarrollado según los últimos avances
técnicos en USB. La amplia variedad de dispositivos de almacenamiento USB de todo tipo que existen actualmente en el
mercado, por degracia, no nos permiten garantizar una total
compatibilidad con todos los dispositivos de almacenamiento SUB. Por este motivo, en casos particulares se pueden
producir problemas al reproducir archivos de dispositivos de
almacenamiento USB. No es una avería del dispositivo.
1. Pulse el botón
SOURCE (9) repetidamente hasta que
se muestre “LOAd” en pantalla. El testigo (1) se encenderá en rojo. Alternativamente puede pulsar el botón
USB (18 en el mando a distancia).
2. Conecte un dispositivo de almacenamiento USB. Pasados unos segundos aparecerá la indicación “– USb –“.
A continuación comenzará la reproducción. Se mostrará
“ “, MP3, la pista actual y el tiempo de reproducción
transcurrido de la pista en pantalla.
Para el funcionamiento, consulte la sección “Descripción de
los controles”.
NOTA:
• Conecte siempre un medio de almacenamiento USB
directamente al puerto USB para evitar averías.
• El puerto USB no está diseñado para cargar dispositivos externos.
ATENCIÓN:
Antes de extraer el dispositivo de almacenamiento USB,
pase el dispositivo a otro modo usando el botón
SOURCE (9).
Descripción de los controles
(3/13)
Puede pausar y continuar la reproducción de música. Pulsar
de nuevo para continuar la reproducción.
(4/6)
Pulsar 1 vez =
Pulsar 2 veces =
Pulsar 3 veces =
Reiniciar la canción desde el principio.
(Solo en modo bluetooth)
Saltar a la canción anterior.
Saltar a la canción anterior a la previa, etc.
NOTA:
Se mostrará brevemente el número del título actual.
(4/6)
Pulse para saltar a la canción siguiente y las demás.
NOTA:
Se mostrará brevemente el número del título actual.
/ (10/14) (solo en modo USB)
Pulsar 1 vez =
Comienza una exploración de la música.
Pulsar 2 veces = Se detiene la exploración y prosigue la
reproducción normal.
REPEAT (1 en el mando a distancia) (solo en modo USB)
Activa la función de repetición.
Pulsar 1 vez =
Se reproduce repetidamente el título
actual. Se muestra el símbolo “ “.
Pulsar 2 veces = Se reproducen repetidamente todas las
pistas. Se muestra el mensaje “ALL
“.
Español
NOTA:
Si la función está activa, las pistas individuales pueden
seleccionarse con los botones / (4/6) .
RANDOM (20 en el mando a distancia)
Activa la reproducción aleatoria. Se reproducen todos los
títulos en secuencia aleatoria. Se mostrará el mensaje “rANd”,
el título actual y el tiempo de reproducción transcurrido de
forma alterna en pantalla. Para desactivar la función vuelva
a pulsar el botón RANDOM. Se mostrará brevemente el
mensaje “OFF” en pantalla.
NOTA:
La función “RANDOM” no puede combinarse con la
función “REPEAT”.
Limpieza
ATENCIÓN:
No sumerja el dispositivo en agua.
• Antes de limpiar, desconéctelo de la alimentación.
• Limpie el dispositivo con un trapo suave húmedo sin
detergentes.
Búsqueda de fallos
Fallo
La unidad no
funciona.
Sin señal
audio durante
la conexión
Bluetooth
Causa
La unidad
retumba y se
“cuelga”.
Solución
Desconéctela de la red
durante unos 5 segundos.
Luego enciéndala de nuevo.
Realice un reinicio de
fábrica. consulte la
página 6 “Restablecer
valores de fábrica”
Compruebe que exista la
Altavoz no
emparejado conexión. Si es necesario,
con la fuente vuelva a emparejar el
de audio.
altavoz con la fuente de
audio.
Volumen de- Aumente el volumen en
masiado bajo el altavoz
Aumente el volumen en la
fuente de audio.
Fallo
El altavoz no
puede conectarse
Causa
El emparejamiento no
funciona
Fuente de audio apagada.
Bluetooth
apagado en
la fuente de
audio.
Versión de
Bluetooth no
soportada.
Las pistas de
Reproducción
música se repro- aleatoria
ducen por USB activada.
en la secuencia
incorrecta.
9
Solución
Compruebe que la fuente
de audio soporte el protocolo A2DP.
Active la fuente de audio.
Active la función Bluetooth de la fuente de
audio.
Use otra unidad de reproducción.
Pulse el botón RANDOM.
Se mostrará brevemente
el mensaje “OFF” en
pantalla.
Datos técnicos
Modelo:............................................................................SY-X250BT
Alimentación:.......................................................220-240 V~ 50 Hz
Consumo:....................................................................................60 W
Clase de protección:.........................................................................II
Peso neto:................................................................... aprox. 7,20 kg
Componente de radio
Rango de frecuencia::............................. FM 87,5 ~ 108 MHz
Bluetooth
Soporte Bluetooth:............................................ V2.1 + EDR / V1.1
. .............................................................................. 32GB
Capacidad:
.
Alcance:.................................................................
aprox. 10 metros
Frecuencia .de transmisión: ................................................2,4 GHz
Protocolos:..................................................................A2DP, AVRCP
El derecho de realizar modificaciones técnicas y de diseño en
el curso del desarrollo continuo del producto está reservado.
Este dispositivo cumple con todas las directrices CE actuales,
como la directriz de compatibilidad electromagnética y de
bajo voltaje, y está fabricada según las últimas normas de
seguridad.
10
Español
Eliminación
Significado del símbolo “cubo de basura”
Cuide del medio ambiente, no deseche aparatos eléctricos
con los residuos domésticos.
Deseche los aparatos eléctricos obsoletos o defectuosos en
los puntos de recolección municipales.
Ayude a evitar potenciales impactos medioambientales y en
la salud por una eliminación de residuos inadecuada.
Contribuye al reciclaje y otros modos de uso de aparatos
eléctricos y electrónicos viejos.
Su municipalidad le proporcionará información sobre los
puntos de recolección.
Nombre del fabricante: Satyatrade S. L.
Dirección: Pol. Ind. La Raya. C/ Guadalquivir, 2.
Camarma de Esteruelas, 28816 Madrid
Tel: 902 430 967
Fax: 91 8864285
NIF: B83254763
País de origen: China
Sytech® SY-X250BT
Descripción: Altavoz Bluetooth
Sytech declara bajo su responsabilidad que el producto indicado cumple los
requisitos de las siguientes directivas:
Directiva: 2004/108/EC EMC. (Electromagnetic Compatibility Directive)
EN55013:2001+A1:2003+A2:2006
EN61000-3-2:2006+A1:2009+A2:2009
EN61000-3-3:2008
EN55020:2007+A11:2011
Directiva Low Voltage LVD.
EN60065:2002+A1:2006+A2:2010+A11:2008+A12:2011
Directiva ERM (Electromagnetic compatibility and Radio spectrum matters)
ETSI EN 300 328 V1.7.1 (2006-10)
ETSI EN 301 489-1 V1.9.2 (2011-09)
ETSI EN 301 489-17 V2.1.1 (2009-05)
ETSI EN 62479 (2010)
RoHS standard: 2011/65/EU. Prevención de sustancias peligrosas.
Firmado: Ajeet Nebhwani Utamchandani
Administrador único