1
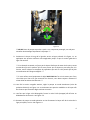
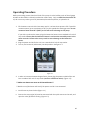
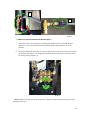
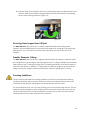
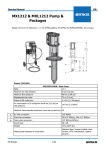
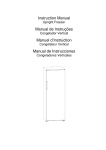
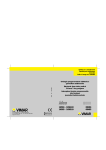
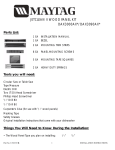
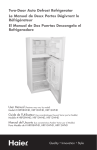
Experts en équipements de lavage à haute pression
Experts in high pressure cleaning equipment
Manuel de l’opérateur
Operator's Manual
1-866-641-6633
www.multipressionlc.com
Table des matières Table of Contents MISE EN GARDE ............................................................................................................................... 3 Température de l’eau ...................................................................................................................... 3 MISE EN MARCHE ............................................................................................................................ 4 Entretien pour un boyau plus de 100 pieds ................................................................................ 7 Plus petit diamètre du boyau ...................................................................................................... 8 Conditions de gel ........................................................................................................................ 8 WARNING ........................................................................................................................................ 9 Water Temperature ......................................................................................................................... 9 Operating Procedure ..................................................................................................................... 10 Servicing Lines Longer than 100 feet ......................................................................................... 13 Smaller Diameter Tubing ........................................................................................................... 13 Freezing Conditions ................................................................................................................... 13 2 Multi‐DGL‐Pro® MISEENGARDE
Une installation adéquate doit être faite en tout temps et aucune modification ne doit être faite sur votre équipement de dégel Multi DGL Pro afin d’éliminer tous les risques de dommages ou blessures corporelles. Veuillez vous assurer d’avoir les bons fusibles dans votre panneau de distribution. Températuredel’eau
Étant donné que votre équipement de dégel Multi DGL Pro® peut opérer à des températures allant jusqu’à 50°C (122°F), il est requis de prendre les précautions nécessaires lors de l’utilisation de celui‐ci ou pour les déplacements si le réservoir n’a pas été vidé. Figure 1.1 3 MISEENMARCHE
Vous assurez en tout temps que le niveau d’huile de la pompe est prêt pour l’usage, et n’utiliser que de l’huile Multi Pression, Grade 40. Ne jamais utiliser d’autre type d’huile tel que; automobile/transmission/freins ou hydraulique. 1‐ Remplir le réservoir d’eau de votre équipement de dégel Multi DGL Pro® avec de l’eau propre jusqu’à ce qu’il soit au moins trois quarts (3/4) plein. En autant que les éléments à l’intérieur du réservoir sont recouverts d’eau. NE PAS remplir le réservoir au complet car la glace dégelée retourne au réservoir et peut faire déborder le réservoir. Si possible, utiliser de l’eau tiède ou chaude (maximum 21°C / 70°F) pour réduire le temps de chauffage. ** NE PAS utiliser de l’eau plus chaude que 600C (1400F) car cela peut entraîner des dommages à la pompe. ** 2‐ Brancher le câble d’alimentation #1 (moteur et élément #1) dans une prise de courant de type 120 VAC, 15 ampères. 3‐ Placer l’interrupteur de l’élément #1 (1000 watts) en position marche (ON). Voir figure 1.2. Figure 1.2
4‐ Pour augmenter l’efficacité du réchauffement de l’eau dans le réservoir ainsi que le maintien de celle‐ci à la température d’opération, brancher le deuxième câble d’alimentation dans une deuxième prise de courant de type 120 VAC, 15 ampères sur un circuit différent pour ensuite placer l’interrupteur de l’élément #2 (1500 watts) en position marche (ON). Voir figure 1.2. ** Assurez‐vous que l’eau recouvre les 2 éléments ** 4 ** Prendre note qu’aucun des deux éléments ne pourra fonctionner si le câble d’alimentation #1 du moteur n’est pas branché. 5‐ Installer le boyau dans le tuyau à dégeler tel que présenté à la figure 1.1. ** Assurez‐vous que la buse de dégel est en place sur le boyau ** 6‐ Raccorder le boyau de retour (A) au réservoir de votre équipement de dégel Multi DGL Pro® et ouvrir la valve à billes (soupape) (B). Voir figure 1.3. A B Figure 1.3
7‐ Mettre l’interrupteur du moteur en position marche (ON). Voir figure 1.2. L’eau devrait prendre de 15 à 30 secondes avant de sortir. 8‐ Placer la pompe en position « pulse » pour aider le boyau à avancer tel qu’indiquer à la figure 1.4. 5 9‐
10‐
11‐
12‐
Figure 1.4 ** NE PAS laisser la pompe en position « pulse » sur une période prolongée, car cela peut entraîner des dommages importants à la pompe. ** Positionner le boyau le long de la ligne de service tel que présenté à la figure 1.1. en appliquant une pression uniforme sans exagération jusqu’à ce que la section gelée de la ligne soit atteinte. ** Si un obstacle est atteint, ne forcer pas le boyau. Plutôt que de tenter de le retirer, tentez une dernière fois de le pousser afin de vous assurer que le boyau ne peut aller plus loin. Ensuite, retirer le boyau en marquant la profondeur que celui‐ci a été poussé afin de faire une estimation de la longueur dégelée. ** ** Si vous utilisez votre équipement de dégel Multi DGL Pro® en circuit ouvert pour l’eau, c’est‐à‐dire que l’eau n’est pas retournée au réservoir, vous devez toujours maintenir le niveau d’eau au‐dessus des éléments. ** Une fois la section congelée atteinte, régler la pompe en mode écoulement (valve de pulsation dévissée) voir figure 1.4. en maintenant une pression modérée sur le boyau afin de s’assurer que la buse de dégel continue son action. Une fois que la ligne a été décongelée, fermer la valve à bille (soupape) afin d’éviter un débordement du réservoir. Voir figure 1.3. Remettre la pompe en mode pulsation et tirer fermement le boyau afin de le retirer de la ligne principale / service. Voir figure 1.4. 6 13‐ Une fois le boyau retiré, mettre tous les interrupteurs en position arrêt (OFF). 14‐ Compléter les débranchements de votre équipement de dégel Multi DGL Pro®, retirer la buse de dégel pour ensuite rembobiner le boyau sur le dévidoir. 15‐ Faire le raccordement de la ligne principale / service et ouvrir le robinet. 16‐ Vidanger l’eau du réservoir en ouvrant la valve sous le réservoir (voir figure 1.5). Figure 1.5
7 Entretienpourunboyauplusde100pieds
Tous nos équipements Multi‐DGL‐Pro® sont vendus avec un boyau de 200 pieds. Par contre, afin d’optimiser le processus, il est important de travailler avec la longueur de boyau le plus près possible de votre réalité. C’est‐à‐dire, si tous vos tuyaux ne sont pas plus longs que 120 pieds, couper votre boyau à 125 pieds. Pluspetitdiamètreduboyau
L’équipement de dégel Multi DGL Pro® est fourni avec un boyau d’un diamètre de 5/16"(MPDGL516). Dans les situations où le boyau s’avère trop gros pour se déplacer à travers votre ligne, un boyau d’un diamètre de ¼" est disponible en magasin. Toutefois, il faut tenir compte qu’un boyau de ¼" de diamètre, son effet de pulsation est quelque peu réduite comme c’est la sortie de l'eau pour dégeler la section gelée. En outre, le boyau de ¼" nécessite une buse différente. Contactez‐nous pour plus amples information pour l’utilisation d’un boyau de ¼" de diamètre. Conditionsdegel
L'appareil doit être protégé contre les conditions de congélation. Si votre équipement de dégel risque d'être exposé à des conditions de gel, il faut bien drainer la pompe, le réservoir d'eau, et toutes les lignes. La plupart de l'eau peut être retiré de la pompe en actionnant brièvement votre équipement de dégel Multi DGL Pro® avec le réservoir vide. Pour une protection complète, on peut exécuter une plomberie non toxique ou RV antigel à travers votre équipement de dégel Multi DGL Pro®. Cela peut être fait en déconnectant l'accouplement d'aspiration qui relie la conduite d'aspiration au réservoir. 8 Multi‐DGL‐Pro® WARNING
Make sure adequate installation has been made at all time, in addition that do not be modify your equipment for any consideration in order to prevent any injury. Also make sure to have the proper fuse into your electrical board. WaterTemperature
The Multi‐DGL‐Pro® can operate at temperature as high as 50°C (122°F), so you must handle the equipment properly, especially if the tank have not been drain. Figure 1.1
9 OperatingProcedure
Before proceeding ensure that the oil level of the pump is to the halfway mark of the oil gauge window as described in Lubrication subsection under setup. Only use Multi Pression Grade 40 oil, do not use any other type of oil (automotive/transmission/brake, or hydraulics oil. 1. Fill the water reservoir with clean water until it is at least three quarters full. If possible use warm water (up to a maximum of 70°F) as this speeds the thawing process. Do not use water hotter than 60°C (140°F) as this will result in damage to the pump. If you wish to preheat the water, plug the immersion heater into a standard 115 volt 15 amp outlet. Ensure that the immersion heater is and remains covered by water in the water reservoir. Failure to do so may result in severe damage to the immersion heater. 2. Plug the power cord #1 for the unit into a standard 115 volt 15 amp outlet. 3. Turn on, the heater #1 (1000 watts) into ON position. See figure 1.2 Figure 1.2
4. In order to increase the water degree faster, please plug the power cord #2 of the unit into a standard 115 volt 15 amp outlet (must use a different outlet). (Figure 1.2) ** Make sure heaters are cover at all time with water** ** Neither one of the heater will work if the power cord #1 is not connected. 5. Install hoses as picture below (Figure 1.1) 6. Connect the return pipe (A) must be connected with the quick connect to the tank, and open the valve (B) before starting. (Figure 1.3) 10 A B Figure 1.3
** Make sure your are connected to the main pipe.** 7. Test if the unit is primed properly by moving the ON/OFF switch to the ON position (Figure 1.2.). If no water comes out of the probe tip after approximately 15 to 30 seconds. 8. Unwind all tubing off of the reel. To improve the pulsing action of the unit lay the tubing on the floor such that it is as straight as possible and not in little coils. Use the jet valve for pulsing action. (Figure 1.4) Figure 1.4
** Do not keep it too long into the pulse position, if keep too long into that position, you could damage the pump.** 11 9. Disconnect the service line at the street side of the water meter and connect the probe head to the service line. Open the ball valve on the probe head as this allows back into the water reservoir and be reused. Start the probe tip and tubing into the probe head and couple the quick coupler plug on the probe tubing to the quick coupler socket on the probe head. (Figure 1.1) Feed the tubing down the service line by applying a gentle even pressure until the frozen section of the line has been reached. Frozen sections of a line will often have the feel of a gradual increase in resistance, not a sudden stop. If an obstruction is reached do not force the tubing. Instead pull the tubing back and try to move it forward again. One can tell if the obstruction reached is the curb stop by estimating the distance from the water meter to the curb stop and comparing this with how much tubing has been inserted into the line. Note: Always ensure that there is sufficient water in the water reservoir for the pump to operate properly, especially as you are thawing and water from the reservoir is being pumped into the service line. If necessary, add water to the water reservoir. 10. Once the frozen section is reached, set the mode adjustment knob on the pump for flow mode. Maintain a moderate pressure on the tubing to ensure that the probe tip remains at the frozen section while it is being thawed. If, however, the frozen section of the line cannot be reached even after extending the 100 feet of tubing to its full length, then refer to the subsection Servicing Lines Longer than 100 Feet. Thawing times vary depending on the size of the frozen section, distance from the unit, etc. (Figure 1.4) 11. Once the line has been thawed, shut the ball valve on the probe head off to prevent over filling of the water reservoir. (Figure 1.3) 12. Set the mode adjustment knob on the pump for pulse mode. Pull firmly back on the tubing, with the unit still turned on, to remove it from the service line. As tubing is removed from the service line do not rewind it on the reel yet (as this reduces the pulsing action which in turn increases the resistance in removing the tubing). (Figure 1.4) 13. Once all the tubing has been removed from the service line, turn the unit off by moving the ON/OFF switch to the OFF position. 14. Open the ball valve on the probe head to bleed off the remaining water in the service line into the water reservoir. 15. Uncouple the quick coupler on the probe head. Remove the probe tip and tubing from the probe head and rewind the tubing onto the reel. Disconnect the probe head from the service line and reconnect the service line to the water meter. 12 16. Drain the water from the water reservoir by removing the cap on the bottom back of the reservoir. Refer to the section Freezing Conditions for more information on protecting the unit from freezing conditions. (Figure 1.5) Figure 1.5
ServicingLinesLongerthan100feet
The Multi DGL Pro® pulse jet de‐icer is normally supplied with 200 feet of tubing. Note, however, that one should always try with the shortest lenght first in order give you the greater pulsing action. So, if you mainly work with 120 ft pipe, please cut your hose at 125 ft, for example. SmallerDiameterTubing
The Multi DGL Pro® pulse jet de‐icer is supplied standard with 5/16” tubing. In situations where this tubing proves to be too large to move through the line, ¼” tubing is available. One should be aware that with the ¼” tubing the pulsing effect is reduced somewhat as is the water output to thaw the frozen section. In addition, ¼” tubing requires a different probe tip on the end of the tubing. Contact your supplier should you have further questions regarding the ¼” tubing. FreezingConditions The unit must be protected from freezing conditions. If the unit is to be exposed to freezing conditions, the pump, water reservoir, and all lines must be well drained. Most water can be removed from the pump by operating the unit briefly with the reservoir empty. For full protection one can run a non‐toxic plumbing or RV anti‐freeze through the unit. This can be done by disconnecting the suction coupling which connects the suction line to the reservoir. The end of the suction line can then be placed in a container of non‐toxic anti‐freeze and the unit operated until anti‐freeze comes out of the probe tip. 13 MULTI-DGL-PRO
Fiche technique pour équipement de dégel/ Technical Data Sheet- De-Icer
No de pièce/Part Number
(#97198)
Multi-DGL- Pro
Pression (en lbs/po2)/Pressure (lb/sq2)
300 PSI
Volume (en gal/min)/Volume
2.0 GPM
Tension nécessaire/Current
2x 120 VAC
Moteur/Puissance/Electrical Motor
Pompe/Pump
Type d’entraînement/Drive
Élément chauffant #1/Heater
Élément chauffant #2/Heater
Thermostat/Thermostat
½ HP- TEFC- 120 VAC, 60 Hz
AR 1500 PSI/ 3GPM
Courroie/Belt Drive
1000 Watts, 120 VAC, 60 Hz
1500 Watts, 120 VAC, 60 Hz
o
Contrôle de la température des (2) éléments chauffants-120 F
o
Control both heaters at a 120 F
Boyau /Hose
Polyéthylène, 200 pieds/Polythylene , 200 ft
Buse/Nozzle
1x Buse de dégel inclus 5/16 (MP-DGL516)/1x 5/16 de-icer nozzle
included
Chariot en acier/Steel cart
Réservoir/Tank
Dimension/Dimension
Peinture poudré/Powder Painting
Acier Inoxydable/Stainless Steel -26.5L (7 US GAL)
21" x 41" x 24"
** Ces spécifications sont sujettes à modifications sans préavis et peuvent variées selon certaines conditions./ Changes
may occur without notice
©2015 Tous droits réservés / All rights reserved
Notes
Notes