1
Libretto uso e manutenzione
Operating and maintenance
instruction
Guide à l'usage et à l'entretien
0005
0B
90716584
Orologio programmatore elettronico
giornaliero/settimanale
Electronic time-delay switch
24 hour/7 day program
Interrupteur horaire programmable
électronique
journalier/hebdomadaire
8000
16584 - 16584.B
16585 - 16585.B
Via IV Novembre, 32 - 36063 Marostica VI
Tel. +39.0424.488.100 - Fax +39.0424.488.188
http://www.vimar.it
Numero Verde
800-862307
08484
08485
90716584 11-05-2000 14:19 Pagina 1
Descrizione
Grado di protezione IP41 con apparecchio installato ad incasso
in pareti verticali lisce con relativo supporto, placca ed
eventuali copriforo.
Va utilizzato in luoghi asciutti e non polverosi ad una
temperatura compresa tra -5 °C e +40 °C.
Sono adatti a comandare qualsiasi circuito elettrico con
caratteristiche nominali fino a 250 V~ 16 A cos f= 1, secondo
una sequenza di inserimenti (ON) e disinserzioni (OFF)
programmata. La programmazione si sviluppa sia a livello
giornaliero sia a livello settimanale (vedi “Caratterisitche”).
Sono pertanto particolarmente utili per impianti di
riscaldamento e condizionamento di qualsiasi tipo, impianti di
irrigazione, impianti di illuminazione, insegne luminose, ecc.
La versione 1 CANALE (16584 - 16584.B - 08484) presenta un relé
di uscita con contatto in commutazione senza potenziale, di
portata 16 A 250 V~ cos f= 1.
La versione 2 CANALI (16585 - 16585.B - 08485) presenta due relé
di uscita con contatti ON-OFF indipendenti, senza potenziale,
di portata 16 A 250 V~ cos f= 1.
1
90716584 11-05-2000 14:19 Pagina 2
Caratteristiche
• Morsetti a piastrina dentata e vite con testa croce/taglio,
imperdibili, per il serraggio di due conduttori fino
a 4 mm2 ciascuno
• Comandi a pulsante
• Tensione di alimentazione da 110 V~ a 240 V~ 50-60 Hz
morsetti L1 - L2
• Assorbimento 2 VA circa
• Protezione contro le sovratensioni di rete incorporata
• Precisione dell'orologio: 15 s al mese a 25 °C
• Precisione dell'intervento: 1 s
• Temperatura di esercizio: da -10 °C a +55 °C
• Classe di isolamento: II
• Visualizzazione dati a mezzo display a cristalli liquidi di
dimensione 37x21 mm.
Dati visualizzati:
• giorno/ore/minuti
• indicazione ora legale
• posizione contatti (“I” e “0”)
• indicazione posizione permanente (“P”) del
contatto (o dei contatti)
• programma completo inserito in giorni/ore/minuti
con rispettiva posizione dei contatti
• indicazione dei giorni di ferie nei quali il programma
è disinserito
• indicazione della memoria ancora disponibile
dopo una programmazione impostata
2
90716584 11-05-2000 14:19 Pagina 3
• Programma: giornaliero/settimanale con possibilità di
formazione di blocchi di giorni.
Programmazione possibile anche in assenza di
alimentazione (funzione CALL)
• Capacità di programma: 30 manovre (15 ON +15 OFF) per un
massimo di 210 interventi settimanali
• Tempo minimo tra un intervento e il successivo: 1 min
• Possibilità di inserimento manuale di comandi diversi da quelli
programmati:
• variazione manuale della posizione del contatto
(il successivo intervento programmato ristabilisce
automaticamente il programma)
• settaggio permanente della posizione del contatto
indicata dalla lettera “P” sul display (il programma
viene ristabilito al successivo comando manuale)
• Contatti di uscita: 16 A 250 V~ cos f= 1
8 A 250 V~ cos f= 0,7
16584 - 08484: contatto a due vie (commutazione) senza
potenziale morsetti 4-5-6 secondo lo schema
riportato sul pezzo
16585 - 08485: due contatti a programmazione indipendente,
a una via (interruzione) senza potenziale morsetti
4-5 e 6-7 secondo lo schema riportato sul pezzo
• Riserva di carica per il mantenimento della memoria anche
in assenza di alimentazione: 10 anni a mezzo batteria al litio
incorporata
• Led verde: indica quando acceso che l'orologio
programmatore è alimentato (collegato alla rete)
3
90716584 11-05-2000 14:19 Pagina 4
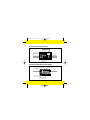
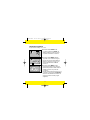
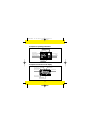
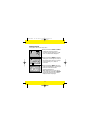
Descrizione dei tasti di comando
Comando manovra manuale
Scelta funzioni
Led alimentazione rete
A
Power
Cancellazione totale
memoria
Impostazione ora legale
I TIME PROG. S
0
B P I
±1h
0 1 2 3 4 5 6 7
A
C
P
B
Mode Select
Selettore
ore/minuti/giorni
Adjust Enter
Conferma e verifica
programmi impostati
Regolazione valori
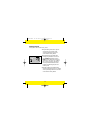
Descrizione delle indicazioni sul display
Indicazione ora
Indicazione programma
Contatto ON (chiuso)
Contatto permanente
I TIME PROG. S
0
I
P
0 1 2 3 4 5 6 7
P
Contatto OFF (aperto)
Indicazione del giorno
o di blocchi di giorni
4
Indicazione ora legale
90716584 11-05-2000 14:19 Pagina 5
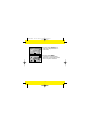
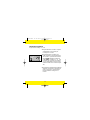
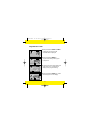
Programmazione e messa in servizio
(es. mercoledi, ore 12:58, ora legale)
1. Premere il tasto C per eliminare
eventuali dati presenti in memoria
0
0 1
2. Premere il tasto MODE per
l'impostazione dell'ora e del giorno
attuale: sul display appare la scritta
TIME
TIME
1
TIME
S
3. Premere il tasto ±1h per
l'impostazione dell'ora legale:
comparirà il simbolo “S”, che indica
“ora legale”
1
TIME
S
4. Premere il tasto SELECT: inizia a
lampeggiare l'indicatore delle ore
1
5
90716584 11-05-2000 14:19 Pagina 6
TIME
S
1
TIME
S
5. Premere il tasto ADJUST finchè
l'indicatore delle ore arriva a 12;
tenendo premuto il tasto oltre
1 s aumenta la velocità di
visualizzazione
6. Premere il tasto SELECT: inizia a
lampeggiare l'indicatore dei minuti
1
TIME
S
1
TIME
S
7. Premere il tasto ADJUST finchè
l'indicatore dei minuti arriva a 58;
tenendo premuto il tasto oltre
1 s aumenta la velocità di
visualizzazione
8. Premere il tasto SELECT: inizia a
lampeggiare l'indicatore dei giorni
1
6
90716584 11-05-2000 14:19 Pagina 7
TIME
S
9. Premere il tasto ADJUST finchè
l'indicatore dei giorni arriva a 3
(mercoledì)
3
S
0
0
10. Premere il tasto ENTER: si
confermano i valori impostati,
ottenendo così la messa in servizio
all'ora e al giorno desiderati
3
7
90716584 11-05-2000 14:19 Pagina 8
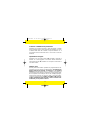
Inserimento programma
Programmazione orologio ad 1 canale
I
0
PROG.
I
PROG.
1
PROG.
0
1
1. Premere il tasto MODE finchè
compare l'indicazione PROG. sul
display; il display mostra anche la
capacità di memoria e i simboli
2. Premere il tasto ENTER: il display
apparirà come mostrato in figura,
pronto per ricevere l'impostazione
dell'ora e del giorno (o blocco di
giorni) dell'intervento di ON sul
canale A
3. Premere il tasto SELECT: inizia a
lampeggiare l'indicatore delle ore;
ripetere le operazioni della messa in
servizio dal punto 5 al punto 10
compreso.
Mentre si sta regolando il giorno, se si
continua a premere il tasto ADJUST si
ottiene la visualizzazione dei blocchi
di giorni (vedere schema pagina
seguente)
8
90716584 11-05-2000 14:19 Pagina 9
BLOCCHI DI GIORNI
Il comando inserito avviene:
1
Lunedi
1 2 3 4 5 6 7
Ogni giorno della settimana
2
Martedi
1 2 3 4 5 6
Dal lunedi al sabato
3
Mercoledi
1 2 3 4 5
Dal lunedi al venerdi
4
Giovedi
1 2 3 4
Dal lunedi al giovedi
5
Venerdi
5 6 7
6
Sabato
6 7
7
Domenica
1
S
I
Solo sabato e domenica
4. Premere ENTER: si confermano così i
valori appena impostati e si passa
alla programmazione del successivo
intervento. Per impostare altri
interventi ripetere le operazioni dal
punto 4 al punto 10 compreso della
messa in servizio
PROG.
I
Dal venerdi alla domenica
5. Premere il tasto MODE per ritornare
alla visualizzazione dell'ora attuale
3
9
90716584 11-05-2000 14:19 Pagina 10
Inserimento programma
Programmazione orologio a 2 canali
1. Programmazione canale A: si ripete
esattamente la procedura per
l'orologio ad 1 canale
PROG.
I
0
2. Programmazione canale B: una
volta terminata la programmazione
del canale A, si preme nuovamente
il tasto MODE: il display mostrerà la
scritta PROG., i simboli “I” e “0” del
contatto del canale B e la memoria
ancora disponibile (il numero totale
di interventi dei due canali è sempre
30)
3. Programmare gli interventi desiderati
ripetendo le operazioni descritte dal
punto 2 al punto 5 compresi della
programmazione orologio ad 1
canale
10
90716584 11-05-2000 14:19 Pagina 11
Verifica programma
1. Premere il tasto MODE finchè
compare l'indicazione PROG.; a
questo punto il display mostra la
quantità di memoria ancora
disponibile
I
0
PROG.
I
PROG.
2. Premendo sul tasto ENTER si
visualizzano, uno dopo l'altro, tutti
gli interventi programmati
PROG.
3. In questo modo l'orologio
programmatore indica il termine
del programma inserito
3
I
1
S
0
0
4. Premere il tasto MODE: ricompare
l'indicazione dell'ora attuale
3
11
90716584 11-05-2000 14:19 Pagina 12
Cambio o cancellazione valori impostati
PROG.
I
3
PROG.
I
1. Premere il tasto MODE finchè
compare l'indicazione PROG., quindi
premere ENTER finchè compare
l'intervento che si vuole modificare
o cancellare
2. Se si vogliono modificare i valori,
premere i tasti SELECT e quindi
ADJUST, fino ad ottenere nuovi valori
2
PROG.
I
3. Se si vuole cancellare l'impostazione,
premere SELECT e quindi ADJUST,
finchè l'indicazione dell'ora diventa
“--”
3
PROG.
0
4. Premere ENTER per confermare
i nuovi valori impostati o le
cancellazioni effettuate
3
12
90716584 11-05-2000 14:19 Pagina 13
S
I
0
5. Premere MODE per ritornare alla
visualizzazione dell'ora attuale
3
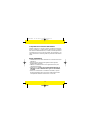
Impostazione programma ferie
1. Premere il tasto MODE finchè
compare la funzione "ferie" Ho
(Holiday)
2. Premere il tasto SELECT: inizia a
lampeggiare l'indicatore dei giorni
13
90716584 11-05-2000 14:19 Pagina 14
3. Premere il tasto ADJUST: impostare il
numero di giorni di ferie (da 00 a 99);
tenendo premuto il tasto per oltre
1 s, aumenta la velocità di
visualizzazione
S
I
0
4. Premere il tasto ENTER: si conferma
il valore impostato ed
automaticamente ricompare
l'indicazione dell'ora attuale
3
Comando contatti manovra manuale
Tenendo premuto il comando manuale, il relativo contatto sarà
forzato a commutare, anche se tale commutazione non è
prevista dal programma.
Il programma si ristabilisce automaticamente al primo
intervento automatico successivo alla manovra manuale.
14
90716584 11-05-2000 14:19 Pagina 15
Comando contatti manovra permanente
Premendo il comando manuale, lo stato del relativo contatto
viene mantenuto tale in modo permanente. Sul display, accanto
al simbolo dello stato del contatto, compare il simbolo “P”. Il
programma rimane disinserito fino al successivo comando
manuale.
Impostazione ora legale
Premendo con una punta il tasto ±1h, sul display comparirà il
simbolo “S” e verrà aggiunta 1 ora all'ora attuale. Premendo
nuovamente il tasto ±1h, il simbolo “S” scompare e viene tolta 1
ora all'ora attuale.
Funzione CALL
Questa particolare funzione permette la programmazione dell'orologio anche in assenza di alimentazione. Per attivare tale
funzione basta tenere premuto, per almeno 2 s, uno qualsiasi
dei tasti (ad esclusione del tasto “C”). Il display si accende e si
può impostare l'ora attuale, il programma e il programma ferie.
Se non si preme alcun tasto per circa un min, il display si spegne,
mantenendo tuttavia in memoria tutti i valori impostati.
L'orologio programmatore contiene una batteria al litio che permette il mantenimento della memoria, anche in assenza di alimentazione, per un periodo di 10 anni.
15
90716584 11-05-2000 14:19 Pagina 16
Comportamento in assenza di alimentazione
Il display si spegne e, per tutto il tempo di assenza di alimentazione, il contatto (o i contatti) rimane (rimangono) in posizione
OFF. Al ritorno dell'alimentazione, il contatto (i contatti) si posiziona
(si posizionano) secondo quanto previsto dal programma, che
viene mantenuto in memoria grazie alla presenza della batteria
al litio.
Regole di installazione
• L’installazione deve essere effettuata in conformità alle norme
CEI vigenti
• Prima di operare sull’impianto togliere tensione agendo
sull’interruttore generale
• Utilizzare conduttori isolati di colore giallo/verde solo per il
collegamento di terra
• Verificare che la sezione dei conduttori di alimentazione sia
adeguata al carico alimentato ed in ogni caso non inferiore
a 1,5 mm2
• Serrare accuratamente i conduttori nei morsetti, in quanto
serraggi imperfetti possono provocare surriscaldamenti fino
a temperature sufficienti ad innescare un incendio
16
90716584 11-05-2000 14:19 Pagina 17
Descrption
Protection degree IP41 with equipment flush installed on smooth
vertical walls, with the relevant mounting frame, cover plate
and possible blank modules.
The equipment must be used only in dry, undusty locations at a
room temperature between -5 °C and +40 °C.
Suitable for the control of any electric circuit rating up to 250 V~
16 A cos f= 1, in accordance with a programmed switching
sequence (ON/OFF). The switching program is developed both
as a 24/hour program and as a 7/day program (see ‘Features’).
These equipments are thus particularly suitable for heating and
air conditioning installations of any kind, sprinkling systems, lighting installations, electric signs, etc.
16584 - 16584.B - 08484, with 1 OUTPUT CHANNEL, has one outgoing relay with change-over contact without potential, rating
16 A 250 V~ cos f= 1.
16585 - 16585.B - 08485, with 2 OUTPUT CHANNELS, has two outgoing relays with ON-OFF independent contacts without potential,
rating 16 A 250 V~ cos f= 1.
17
90716584 11-05-2000 14:19 Pagina 18
Features
• Captive terminals with pressure plate and combined Phillips
slotted-head screw, for 2 conductors each up to 4 mm2
• Push button operating means
• Supply voltage from 110 V~ to 240 V~ 50-60 Hz terminals L1 - L2
• About 2 VA absorption
• Transient voltage suppressor included
• Precision of the time-delay switch: 15 s monthly at 25 °C
• Intervention precision: 1 s
• Operating temperature: from -10 °C to +55 °C
• Insulation class: II
• Liquid crystals display, 37x21 mm dimensions.
Data display:
• day/hours/minutes
• daylight saving time indication
• contacts position (“I” = on and “0” = off)
• permanent position indication (“P”) of the contact
(or contacts)
• complete program set in days/hours/minutes with
relevant contacts position
• indication of holidays when the program is
disconnected
• indication of memory still available after program
setting
18
90716584 11-05-2000 14:19 Pagina 19
• Program: dayly/weekly with possibility of programming for
groups of days.
Possibility of programming even in absence of
power supply (function CALL)
• Programming capacity: 30 switching sequences (15 ON +15 OFF)
for max 210 operations a week
• 1 minute min setting and delay time
• Possibility of manual selection of operations different from the
programmed ones:
• manual change of the contact position (the next
programmed switching resets automatically the
program)
• permanent setting of the contact position indicated
by “P” on the display (the program is reset at the next
manual change)
• Output contacts: 16 A 250 V~ cos f= 1
8 A 250 V~ cos f= 0.7
16584 - 08484: Change-over contact without potential terminals
4-5-6 according to the diagram on the
equipment
16585 - 08485: Two contacts with independent programming,
1P ON-OFF contacts without potential terminals
4-5 and 6-7 according to the diagram on the
equipment
• Power reserve to keep the memory even in absence of power
supply: 10 years through included lithium battery
• Green LED: when lighted it indicates that the time-delay
switch is feeded (connected to the mains)
19
90716584 11-05-2000 14:19 Pagina 20
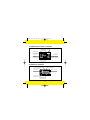
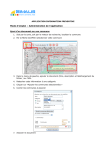
Description of operating push buttons
Manual operation push button
Functions choice
Power supply LED
A
Power
I TIME PROG. S
0
B P I
±1h
0 1 2 3 4 5 6 7
C
Memory total erasure
Daylight saving time setting
A
P
B
Mode Select
Hours/minutes/days
selector
Adjust Enter
Confirmation and control
of selected programs
Values adjustment
Description of indications on the display
Time display
Program indication
ON contact (closed)
Permanent contact
I TIME PROG. S
0
I
P
0 1 2 3 4 5 6 7
P
OFF contact (open)
Day display or display
of groups of days
20
Daylight saving time
90716584 11-05-2000 14:19 Pagina 21
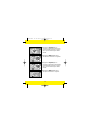
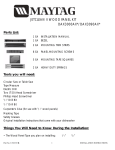
Programming and operating instruction
(e.g. wednesday, 12:58, daylight saving time)
1. Press push button C to erase previous
memory settings
0
0 1
2. Press push button MODE to set the
present time and day: TIME will be
displayed
TIME
1
TIME
S
3. Press the push button ±1h to set the
daylight saving time: “S” will appear
on the display to indicate the
daylight saving time setting
1
TIME
S
4. Press push button SELECT: the
hours indicator will start flashing
1
21
90716584 11-05-2000 14:19 Pagina 22
TIME
S
1
TIME
S
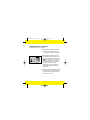
5. Press push button ADJUST until
the hours indicator is set on 12;
keeping the push button pressed
for more than 1 s the visualization
speed increases
6. Press push button SELECT: the minute
indicator will start flashing
1
TIME
S
1
TIME
S
7. Press push button ADJUST until the
minutes indicator is set on 58;
keeping the push button pressed
for more than 1 s the visualization
speed increases
8. Press push button SELECT: the days
indicator will start flashing
1
22
90716584 11-05-2000 14:19 Pagina 23
TIME
S
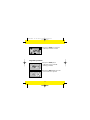
9. Press push button ADJUST until the
days indicator shows 3 (Wednesday)
3
S
0
0
10. Press push button ENTER: the setting
of the values is confirmed and
operation will start at the selected
time and day
3
23
90716584 11-05-2000 14:19 Pagina 24
Entering program
Setting of the 1 channel time-delay switch
I
0
PROG.
I
PROG.
1
PROG.
0
1
1. Press push button MODE until PROG.
is displayed; also the memory
capacity and the symbols “I” (ON)
and “O” (OFF) will be displayed
2. Press push button ENTER: the display
will appear as in the figure, ready to
receive the time and day (or group
of days) setting of “I” (ON) on
channel A
3. Press push button SELECT: the hours
indicator starts flashing; repeat steps
from 5 to 10 included of the
operating instructions.
While setting the day of the week,
if you keep the push button ADJUST
pressed the groups of days will be
displayed (see next page)
24
90716584 11-05-2000 14:19 Pagina 25
GROUPS OF DAYS
The operation is set for:
1
Monday
1 2 3 4 5 6 7
Every day of the week
2
Tuesday
1 2 3 4 5 6
From Monday to Saturday
3
Wednesday
1 2 3 4 5
From Monday to Friday
4
Thursday
1 2 3 4
From Monday to Thursday
5
Friday
6
Saturday
7
Sunday
5 6 7
6 7
1
S
I
Only Saturday and Sunday
4. Press push button ENTER: the values
settings will be confirmed and the
next setting can be programmed
repeating steps from 4 to 10
included of the operating
instructions
PROG.
I
From Friday to Sunday
5. Press push button MODE to visualize
again the present time
3
25
90716584 11-05-2000 14:19 Pagina 26
Entering program
Setting of the 2 channels time-delay switch
1. Programming channel A: repeat
exactly the procedure of the
operating instructions for the 1
channel time-delay switch
PROG.
I
0
2. Programming channel B: after
having programmed channel A
press MODE push button again:
PROG. will be displayed as well as
symbols “I” (On) and “O” (OFF) of
the contact and the channel B
memory still available (the total
number of switching sequences
is always 30)
3. Set the desired programmations
repeating steps from 2 to 5 included
of the operating instructions for the 1
channel time-delay switch
26
90716584 11-05-2000 14:19 Pagina 27
Programmation control
I
0
PROG.
1. Press push button MODE until PROG.
is displayed; the memory still
available will be displayed
I
PROG.
2. Press push button ENTER: all
programmed settings will appear
in sequence
PROG.
3. In this way the time-delay switch will
indicate to have completed the
display of the program setting
3
I
1
S
0
0
4. Press push button MODE: the current
time will appear on the display
3
27
90716584 11-05-2000 14:19 Pagina 28
Change or erasure of the programmed settings
PROG.
I
1. Press push button MODE until PROG.
is displayed, then press ENTER until
the function you want to change or
cancel appears
3
PROG.
I
2. If values have to be changed, press
push buttons SELECT and then
ADJUST, until you obtain the new
values
2
PROG.
I
3. To erase a programmed setting press
push buttons SELECT and then ADJUST until the hours indication
becomes “--”
3
PROG.
0
4. Press push button ENTER to confirm
newly set values or cancellations
3
28
90716584 11-05-2000 14:20 Pagina 29
S
I
0
5. Press push button MODE to return to
the display of the current time
3
Setting of a holiday program
1. Press push button MODE until the
function Ho (Holiday) is displayed
2. Press push button SELECT: the days
indicator starts flashing
29
90716584 11-05-2000 14:20 Pagina 30
3. Press push button ADJUST: set the
number of days of holidays (from 00
to 99); keeping the push button
pressed for more than 1 s the
visualization speed increases
S
I
0
4. Press push button ENTER: the set
value is confirmed and automatically
the current time will be displayed
3
Non permanent manual operation
Keeping the push button for manual operation pressed, the
relevant contact will change-over, even if this operation is not
in the program setting.
The program will automatically be reset at the first automatic
switching sequence after the manual operation.
30
90716584 11-05-2000 14:20 Pagina 31
Permanent manual operation
Pressing the push button for manual operation, the state of the
relevant contact is permanently maintained unchanged.
On the display, near the symbol for the state of the contact, the
symbol “P” appears. The program is disconnected until the next
manual operation.
Daylight saving time setting
Pressing push button ±1h with a pointed object, the symbol “S”
will be displayed and 1 hour time will be added to the current
time. Pressing the ±1h push button again, the symbol “S” disappears and 1 hour time will be removed from the current time.
CALL function
This particular function allows to program the time-delay switch
even in absence of supply. To activate this function keep any
push button (except push button “C”) pressed for at least 2 s.
The display will light up and it will be possible to set the current
time, the program and the holiday program. If no push button is
pressed for about 1 min, the display will switch off, storing in its
memory all selected values anyway.
The time-delay switch incorporates a lithium battery that
allows to keep the memory, even in absence of supply, for
a period of 10 years.
31
90716584 11-05-2000 14:20 Pagina 32
Performance in absence of supply
The display will switch off and, for the whole period with no
power supply, the contact (or contacts) will remain in position
OFF. When the power is restored, the contact (or contacts) will
be set according to the program that has been kept in the
memory thanks to the lithium battery.
Installation rules
• The installation must be done according to in force Italian CEI
specifications (or equivalent rules for buildings electrical
installations)
• Disconnect the mains acting on the main switch before
operating on the system
• Use the yellow/green insulated conductors only for the
connection to the earthing circuit
• Verify if the supply conductors cross-sectional area is
sufficient for the feeded load, in any case it must never be
less than 1.5 mm2
• Clamp fully, with care, the conductors in the terminals.
Faulty clampings can cause temperature rises high enough for
a fire risk
32
90716584 11-05-2000 14:20 Pagina 33
Description
Degré de protection IP41 avec appareil installé à encastrement
sur parois verticales lisses, avec support de montage, plaque de
recouvrement et éventuels obturateurs respectifs.
L’appareil doit être utilisé dans des locaux secs et non
poussiéreux à une temperature ambiance entre -5 °C et +40 °C.
Destinés à la commande de circuits électriques de caractéristiques assignées jusqu'à 250 V~ 16 A cos f= 1, selon une sequénce
programmée de branchements (ON) et débranchements (OFF).
La programmation peut être journalière ou hebdomadaire (voir
“Caractéristiques”).
Ils sont donc particulièrement utiles pour les installations de
chauffage et de climatisation de tout genre, pour installations
d'arrosage et d'éclairage, pour enseignes lumineuses etc.
Appareil à 1 SORTIE (16584 - 16584.B - 08484) avec un relais en
sortie à un contact inverseur sans potentiel, de caractéristiques
assignées 16 A 250 V~ cos f= 1.
Appareil à 2 SORTIES (16585 - 16585.B - 08485) avec deux relais
en sortie à contacts ON-OFF indépendants, sans potentiel, de
caractéristiques assignées 16 A 250 V~ cos f= 1.
33
90716584 11-05-2000 14:20 Pagina 34
Caractéristiques
• Bornes imperdables avec plaquette dentée et vis avec tête à
empreinte mixte, pour deux conducteurs chacun jusqu' a
4 mm2
• Réglage par boutons-poussoirs
• Tension d’alimentation de 110 V~ à 240 V~ 50-60 Hz
bornes L1 - L2
• Absorption environ 2 VA
• Protection incorporée contre les surtensions du réseau
• Précision de l'horloge: 15 s par mois à 25 °C
• Précision de commutation: 1 s
• Température de fonctionnement: de -10 °C à +55 °C
• Classe d' isolation: II
• Affichage par cristaux liquides, dimensions 37x21 mm.
Capacité d'affichage:
• jour/heures/minutes
• indication de l'heure d'été
• position des contacts (“I” (on) et “0” (off))
• indication de position permanente (“P”) du (des)
contact (contacts)
• programme complet sélectionné en
jours/heures/minutes avec indication de la position
des contacts
• indication des jours fériés pendant lesquels le
programme est débranché
• indication de la mémoire encore disponible après
avoir sélectionné un programme
34
90716584 11-05-2000 14:20 Pagina 35
• Programme: journalier/hebdomadaire avec possibilité de
programmer par groupes de jours.
Programmation possible même si l'alimentation
sur la ligne est coupée (fonction CALL)
• Capacité de programme: 30 manoeuvres (15 ON + 15 OFF)
pour un maximum de 210
opérations par semaine
• Commutation minimum: 1 min
• Possibilité de sélection manuelle d’opérations différentes de
celles programmées:
• variation manuelle de la position du contact (retour
automatique au programme à la successive
commutation programmée)
• réglage permanent de la position du contact
indiquée par “P” sur l'affichage (retour au
programme à la successive commutation
manuelle)
• Contacts de sortie: 16 A 250 V~ cos f= 1
8 A 250 V~ cos f= 0,7
16584 - 08484: contact inverseur sans potentiel bornes 4-5-6
selon le schéma sur l'appareil
16585 - 08485: deux contacts à programmation indépendante,
1P ON-OFF sans potentiel bornes 4-5 et 6-7 selon
le schéma sur l'appareil
• Réserve de marche pour le maintien de la mémoire même
si l'alimentation est coupée: 10 ans par batterie au lithium
incorporée
• LED verte: si allumée elle indique que l'inter horaire
programmateur est sous tension (connecté au réseau
d'alimentation)
35
90716584 11-05-2000 14:20 Pagina 36
Description des touches de commande
Touche de commande manuelle
Choix des fonctions
Led d'alimentation
au réseau
A
Power
I TIME PROG. S
0
B P I
±1h
0 1 2 3 4 5 6 7
Annullation totale
de la mémoire
C
Programmation
heure d'été
A
P
B
Mode Select
Sélecteur
heures/minutes/jours
Adjust Enter
Confirmation et vérification
des programmes réglés
Réglage des valeurs
Description de l’affichage
Indication heure
Indication programme
Contact ON ("I" fermé)
Contact permanent
I TIME PROG. S
0
I
P
0 1 2 3 4 5 6 7
P
Contact OFF ("0" ouvert)
Indication du jour ou
des groupes de jours
36
Indication heure d'été
90716584 11-05-2000 14:20 Pagina 37
Programmation et mise en marche
(ex. mercredi, 12:58, heure d’été)
1. Appuyer sur C pour effacer la
mémoire
0
0 1
2. Appuyer sur MODE pour régler
l'heure et le jour actuels: TIME sera
affiché
TIME
1
TIME
S
3. Appuyer sur la touche ±1h pour
sélectionner l'heure d'été: le
symbole “S”, qui indique l'heure
d'été, sera affiché
1
TIME
S
4. Appuyer sur SELECT: l'indicateur
des heures commence à clignoter
1
37
90716584 11-05-2000 14:20 Pagina 38
TIME
S
1
TIME
S
5. Appuyer sur ADJUST jusqu'au
moment où l'indicateur des heures
est sur 12; laisser enfoncé pour plus
de 1 s pour un affichage à vitesse
élevée
6. Appuyer sur SELECT: l'indicateur
des minutes commence à clignoter
1
TIME
S
1
TIME
S
7. Appuyer sur ADJUST jusqu'au
moment où l'indicateur des minutes
est sur 58; laisser enfoncé pour plus
de 1 s pour un affichage à vitesse
élevée
8. Appuyer sur SELECT: l'indicateur
des jours commence à clignoter
1
38
90716584 11-05-2000 14:20 Pagina 39
TIME
S
9. Appuyer sur ADJUST jusqu'au
moment où l'indicateur des jours
indique 3 (mercredi)
3
S
0
0
10. Appuyer sur ENTER: les valeurs
réglées sont confirmées.
On obtiendra ainsi la mise en
marche à l'heure et au jour préfixés
3
39
90716584 11-05-2000 14:20 Pagina 40
Enregistrement d’un programme
Programmation inter horaire 1 sortie
I
0
PROG.
I
PROG.
1
PROG.
0
1
1. Appuyer sur MODE jusqu'au moment
où PROG. est affiché; l'affichage
montre aussi la capacité de
mémoire et les symboles “I” (ON) et
“O” (OFF)
2. Appuyer sur ENTER: l'affichage sera
comme indiqué à la figure à côté,
prêt à recevoir la sélection de
l'heure et du jour (ou groupe de
jours) de l'action de “I” (ON) sur la
sortie A
3. Appuyer sur SELECT: l'indicateur des
heures commence à clignoter;
répéter les étapes de la mise en
marche de 5 à 10 inclus.
Tandis que l'on régle le jour, en
maintenant appuyé sur ADJUST on
obtiendra l'affichage des groupes
de jours (voir à la page suivante)
40
90716584 11-05-2000 14:20 Pagina 41
GROUPES DE JOURS
L'opération est sélectionée pour:
1
Lundi
1 2 3 4 5 6 7
Chaque jour de la semaine
2
Mardi
1 2 3 4 5 6
Du lundi au samedi
3
Mercredi
1 2 3 4 5
Du lundi au vendredi
4
Jeudi
1 2 3 4
Du lundi au jeudi
5
Vendredi
6
Samedi
7
Dimanche
1
S
I
Du vendredi au dimanche
6 7
Le samedi et le dimanche
4. Appuyer sur ENTER: les valeurs
enregistrées sont confirmées et on
peut programmer une nouvelle
opération. Pour enregistrements
ultérieurs répéter les opérations de
la mise en marche de 4 à 10 inclus
PROG.
I
5 6 7
5. Appuyer sur MODE pour retourner à
l'affichage de l'heure actuelle
3
41
90716584 11-05-2000 14:20 Pagina 42
Enregistrement d’un programme
Programmation inter horaire 2 sorties
1. Programmation sortie A: répéter
exactement la programmation
comme pour l'inter horaire 1 sortie
PROG.
I
0
2. Programmation sortie B: une fois
terminée la programmation de la
sortie A, appuyer de nouveau sur
MODE: on obtiendra l'affichage de
PROG., des symboles “I”(ON) et
“O”(OFF) du contact de la sortie
B et de la mémoire encore
disponible (le numéro total des
opérations des deux sorties est
toujours 30)
3. Sélectionner les opérations désirées
en répétant les opérations de la
programmation de l'inter horaire 1
sortie de 2 à 5 inclus
42
90716584 11-05-2000 14:20 Pagina 43
Verification de programmation
I
0
PROG.
I
PROG.
1. Appuyer sur MODE jusqu'au moment
où PROG. est affiché; on obtiendra
l'affichage de la mémoire encore
disponible
2. En appuyant sur ENTER l'affichage
défile toutes les programmations
sélectionnées
3
3. L'inter horaire montrera l'affichage à
côté pour indiquer d'avoir terminé le
défilement des programmations
sélectionnées
PROG.
I
1
S
0
0
4. Appuyer sur MODE: on reviendra à
l'affichage de l'heure actuelle
3
43
90716584 11-05-2000 14:20 Pagina 44
Changement ou effacement des valeurs sélectionnées
PROG.
I
3
PROG.
I
1. Appuyer sur MODE jusqu'à
l'affichage de PROG., ensuite
appuyer sur ENTER jusqu'à obtenir
l'affichage de la fonction à changer
ou à effacer
2. Si des valeurs sont à changer,
appuyer sur SELECT et aprés sur
ADJUST jusqu'à obtenir les valeurs
désirées
2
PROG.
I
3. Si l'on veut effacer une sélection
appuyer sur SELECT et après sur
ADJUST jusqu'au moment où
l'affichage de l'heure devient “--”
3
PROG.
0
4. Appuyer sur ENTER pour confirmer les
nouvelles valeurs ou les effacements
définis
3
44
90716584 11-05-2000 14:20 Pagina 45
S
I
0
5. Appuyer sur MODE pour returner à
l'affichage de l'heure actuelle
3
Programme jours fériés
1. Appuyer sur MODE jusqu'à
l'affichage de la fonction Ho
(Holiday, jours fériés)
2. Appuyer sur SELECT: l'indicateur des
jours commence à clignoter
45
90716584 11-05-2000 14:20 Pagina 46
3. Appuyer sur ADJUST: sélectionner le
numéro de jours fériés (de 00 à 99);
laisser enfoncé pour plus de 1 s pour
un affichage à vitesse élevée
S
I
0
4. Appuyer sur ENTER: la valeur
sélectionnée est confirmée et l'on
revient à l'affichage de l'heure
actuelle
3
Commande manuelle temporaire
En maintenant pressé la touche pour la commande manuelle,
son contact est obligé à commuter même si cette opération
n'est pas prévue par le programme.
Le programme est automatiquement rétabli à la première
manoeuvre automatique qui suit la commande manuelle.
46
90716584 11-05-2000 14:20 Pagina 47
Commande manuelle permanente
En appuyant sur la commande manuelle, son contact est
maintenu en permanence dans l'état dans lequel il se trouve.
A côté du symbole de l'état du contact, le symbole “P” sera
affiché.
Selection de l’heure d’été
Appuyant avec un objet pointu sur la touche ±1h, le symbole
“S” sera affiché et 1 heure est ajoutée à l'heure actuelle.
Appuyant de nouveau sur la touche ±1h le symbole “S”disparaît
et 1 heure est enlevée de l'heure actuelle.
Fonction CALL
Cette fonction permet la programmation de l'inter horaire
même si l'alimentation est coupée. Pour activer cette fonction il
faut tenir pressée une touche quelconque (excepté la touche
“C”) pour au moins 2 s. L'affichage s'allume et il est possible de
sélectionner l'heure actuelle, la programmation et le programme
jours fériés. Si aucune touche n'est pressée pour 1 min environ,
l'affichage s'éteint, gardant dans sa mémoire les valeurs selectionnées. L'inter horaire a une batterie au lithium qui permet de
maintenir la mémoire, même si l'alimentation est coupée, pour
une période de 10 ans.
47
90716584 11-05-2000 14:20 Pagina 48
Fonctionnement sans alimentation
L'affichage s'éteint et, pendant que l'alimentation est coupée,
le contact (ou les contacts) reste (restent) en position OFF.
Dès que l'alimentation est rétablie, le contact (ou les contacts)
se place (se placent) comme prévu par le programme gardé
dans la mémoire par la batterie au lithium.
Règles d’installation
• L’installation doit être effectuée selon les normes Italiennes
CEI en vigueur (ou normes équivalentes pour les installations
électriques dans les bâtimentes)
• Couper l’alimentation en agissant sur l’interrupteur général
avant d’intervenir sur l’installation
• Utiliser les câbles isolés de couleur jaune/verte seulement pour
la connexion au circuit de terre
• Vérifier si la section des conducteurs d’alimentation est
suffisante pour la charge alimentée, elle ne doit quand même
jamais être inférieure à 1,5 mm2
• Serrer les conducteurs dans les bornes avec soin. Un mauvais
serrage peut provoquer un échauffement excessif avec risque
d’incendie
48
Libretto uso e manutenzione
Operating and maintenance
instruction
Guide à l'usage et à l'entretien
0005
0B
90716584
Orologio programmatore elettronico
giornaliero/settimanale
Electronic time-delay switch
24 hour/7 day program
Interrupteur horaire programmable
électronique
journalier/hebdomadaire
8000
16584 - 16584.B
16585 - 16585.B
Viale Vicenza, 14 - 36063 Marostica VI
Tel. +39.0424.488.600 - Fax +39.0424.488.188
http://www.vimar.it
Numero Verde
800-862307
08484
08485