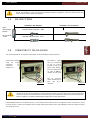
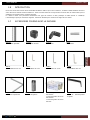
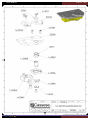
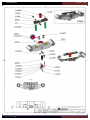
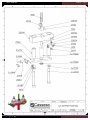
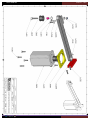
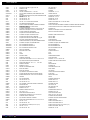
1
Version 1
02/2015
USER & PARTS MANUAL
Version 1
USER MANUAL
MACH 1 CART
INDEX
I.
USER MANUAL / ENGLISH ............................................................................................ 4
1
1.A
1.B
1.C
1.D
1.E
1.F
2
2.A.
2.A
2.B
2.C
3
3.A
3.B
3.C
3.D
3.E
3.F
3.G
3.H
3.I
3.J
3.K
4
5
5.A
5.B
PRESENTATION .................................................................................................................................................. 5
WORK TABLE ..................................................................................................................................................................5
INTRODUCTION ..............................................................................................................................................................7
ACCESSORIES SUPPLIED WITH THE MACHINE ................................................................................................................7
TECHNICAL SPECIFICATIONS OF MACH 1 CART ..............................................................................................................8
OPTIONS .........................................................................................................................................................................8
GUARANTEE ...................................................................................................................................................................8
SETUP ................................................................................................................................................................ 9
UNPACKING THE MACHINE ............................................................................................................................................9
AIR LINE FITTINGS ........................................................................................................................................................10
CONNECTING TO THE AIR SOURCE ...............................................................................................................................10
CONNECTING TO THE ELECTRICAL SOURCE .................................................................................................................11
ADJUSTMENTS ................................................................................................................................................. 12
DESCRIPTION OF THE DISPLAY: ....................................................................................................................................12
SELECTING A MEMORY ALLOCATION (FAVORITE) ........................................................................................................12
SPECIFIC USE OF THE SPACER BARS .............................................................................................................................13
ADJUSTMENT OF THE SLIDING TABLE ..........................................................................................................................13
PROPER ADJUSTMENT OF MAGNETIC ADJUSTABLE ROD CLAMP ................................................................................14
SELECTING THE WEDGES POSITIONS ...........................................................................................................................15
THREE ESSENTIAL RULES ..............................................................................................................................................15
ADJUSTING THE JOINING ANGLE ..................................................................................................................................15
MEANS OF JOINING ......................................................................................................................................................16
LOADING OF CARTRIDGE WEDGES ..............................................................................................................................17
CHANGING WEDGES SIZE .............................................................................................................................................17
PROGRAMMING THE MACHINE ....................................................................................................................... 18
MAINTENANCE ................................................................................................................................................ 20
SAFETY INSTRUCTIONS .................................................................................................................................................20
MAINTENANCE PLAN ...................................................................................................................................................20
5.B.a
5.B.b
5.B.c
5.C
5.D
5.E
5.F
5.G
5.H
5.I
5.J
Daily maintenance: ..................................................................................................................................................................... 20
Regular maintenance: ................................................................................................................................................................. 20
Every 6 months: .......................................................................................................................................................................... 21
REMOVING THE DISTRIBUTOR HEAD ...........................................................................................................................21
LUBRICATING THE DISTRIBUTOR HEAD ........................................................................................................................22
UNJAMMING THE MACHINE ........................................................................................................................................22
RESETTING THE MAINTENANCE ALARM ......................................................................................................................23
REMOVING THE SIDE PANEL ........................................................................................................................................23
LUBRICATING THE HORIZONTAL COLUMNS .................................................................................................................24
TESTING THE SAFETIES OF THE MACHINE ....................................................................................................................24
TROUBLE SHOOTING ....................................................................................................................................................25
II. MANUEL D’UTILISATION / FRANCAIS ......................................................................... 27
2
USER MANUAL
1
1.A
1.B
1.C
1.D
1.E
1.F
2
2.A
2.B
2.C
2.D
3
3.A
3.B
3.C
3.D
3.E
3.F
3.G
3.H
3.I
3.J
3.K
4
5
5.A
5.B
PRESENTATION ................................................................................................................................................ 28
TABLE D’ASSEMBLAGE .................................................................................................................................................28
INTRODUCTION ............................................................................................................................................................30
ACCESSOIRES FOURNIS AVEC LA MACHINE ..................................................................................................................30
SPECIFICATIONS TECHNIQUES ......................................................................................................................................31
OPTIONS .......................................................................................................................................................................31
GARANTIE .....................................................................................................................................................................31
MISE EN ROUTE ................................................................................................................................................ 32
DEBALLAGE DE LA MACHINE ........................................................................................................................................32
RACCORDS ....................................................................................................................................................................33
RACCORDEMENT A L’AIR COMPRIMÉ ..........................................................................................................................33
RACCORDEMENT ELECTRIQUE DE LA MACHINE ..........................................................................................................34
REGLAGES ........................................................................................................................................................ 35
DESCRIPTION DE L’ECRAN LCD .....................................................................................................................................35
SELECTION D’UN ESPACE MEMOIRE (FAVORIT) ...........................................................................................................35
UTILISATION DU JEU DE BARRETTES ............................................................................................................................36
REGLAGE DE LA TABLE COULISSANTE ..........................................................................................................................36
REGLAGE DU PRESSEUR VERTICAL ..............................................................................................................................37
SELECTION DES POSITIONS D’AGRAFAGE ....................................................................................................................38
TROIS REGLES ESSENTIELLES POUR L’ASSEMBLAGE .....................................................................................................38
REGLAGE DE L’ANGLE D’ASSEMBLAGE.........................................................................................................................38
MOYEN D’ASSEMBLAGE ...............................................................................................................................................39
CHARGEMENT DES AGRAFES .......................................................................................................................................40
CHANGER DE TAILLE D’AGRAFES..................................................................................................................................40
PROGRAMMATION .......................................................................................................................................... 41
MAINTENANCE ................................................................................................................................................ 43
INSTRUCTIONS RELATIVES A LA SECURITE ...................................................................................................................43
PROGRAMME DE MAINTENANCE ................................................................................................................................43
5.B.a
5.B.b
5.B.c
5.C
5.D
5.E
5.F
5.G
5.H
5.I
5.J
MACH 1 CART
Maintenance quotidienne: ......................................................................................................................................................... 43
Maintenance préventive: ........................................................................................................................................................... 43
Tous les six mois: ........................................................................................................................................................................ 44
DEMONTAGE DE LA TETE DE DISTRIBUTION ................................................................................................................44
LUBRICATION DE LA TETE DE DISTRIBUTION ...............................................................................................................45
DEBLOCAGE DE LA MACHINE .......................................................................................................................................45
EFFACEMENT DE L’ALARME MAINTENANCE ................................................................................................................46
DEMONTAGE DES PANNEAUX LATERAUX ....................................................................................................................46
LUBRIFICATION DES COLONNES HORIZONTALES .......................................................................................................47
VERIFICATION DES SECURITES DE LA MACHINE ...........................................................................................................47
GUIDE DE DEPANNAGE .................................................................................................................................................49
III. EXPLODED VIEWS/ VUE ECLATEES ............................................................................. 51
IV. SPARE PARTS LIST / NOMENCLATURE ........................................................................ 64
V. ELECTRICAL SCHEMATICS / SCHEMAS ELECTRIQUES .................................................. 71
VI. CE CERTIFICATE / DECLARATION DE CONFORMITE ..................................................... 75
3
USER MANUAL
MACH 1 CART
I. USER MANUAL / ENGLISH
Your safety is our priority
This symbol on the machine reminds the
operator to wear acoustic protections before
operating this joiner.
This symbol on the machine reminds the
operator to read this manual before operating
this joiner.
This symbol in the manual is to mention safety
instructions.
This symbol in the manual is to mention some
tricks that can help you saving time or improve
your production.
This symbol in the manual is to mention
needed tools to perform a procedure.
PRIOR TO PERFORM ANY MAINTENANCE, MACHINE MUST BE LOCKED AND UNPLUGGED FROM POWER SOURCES
(AIR AND ELECTRICITY), REFER TO CHAPTER I.5.A SAFETY INSTRUCTIONS (PAGE 20). DO NOT OPERATE THE
MACHINE IF COVERS OR PROTECTIONS ARE MISSING.
4
USER MANUAL
MACH 1 CART
1 PRESENTATION
1.A
WORK TABLE
3
2
4
7
5
6
8
9
1
10
Rebate clamp
1
Keyboard
2
Magnetic adjustable rod clamp assembly
3
Crossbar
4
Sliding table handle
5
Sliding table
6
1st back fence
7
Angle adjusting screw
8
2nd back fence
9
Wedge distributor
10
Air pressure gauge
11
Air valve
12
11
12
5
USER MANUAL
MACH 1 CART
13
15
14
16
Loading button
13
Pre-clamp button
14
Stapling button
15
Emergency/stop & start button
16
6
USER MANUAL
1.B
MACH 1 CART
INTRODUCTION
Thanks for having purchased the MACH 1 CART underpinner and for your trust in Cassese® products. The MACH 1 CART
benefits from Cassese’s experience since 1976 in designing and manufacturing highest quality underpinners, for which we are
world-famous.
The MACH 1 CART will allow you to join, wooden, plastic and MDF profiles (patent n° 7522814). Joining operation is carried out
by using Genuine Cassese® Cartridge Wedges, specially designed to perform perfect and tight frames’ corners.
1.C
ACCESSORIES SUPPLIED WITH THE MACHINE
Z26999:
1 x Magnetic adjustable rod
clamp
Z24703:
1 x Chevron holder
Z21524:
1 x Chevron rubber
Z506:
1 x Wedge driver blade for
using CASSESE® Genuine
Cartridge Wedges
Z1879:
1 x Allen Key 2.5 mm
Z1882:
1 x Allen Key 3 mm
Z1884:
1 x Allen Key 4 mm
Z1885:
1 x Allen Key 5 mm
1 box of 7 mm Softwood
1 box of 10mm Hardwood
1 box of 10mm Softwood
Z535:
Wedge removal tool
Z3078:
Spacer bars
Z1896:
1 x Grease Tube
7
USER MANUAL
Z1791:
Green round clamp
1.D
MACH 1 CART
Z18065:
Round clamp holder
Z1783:
Yellow round clamp
TECHNICAL SPECIFICATIONS OF MACH 1 CART
Minimum moulding width:
Maximum moulding width :
5mm (3/16”) / Minimum moulding height : 7 mm (1/4”)
150 mm ( 5 29/32“) / Maximum moulding height : 100 mm ( 4 13/32” )
Maximum stroke between first and last wedge (at 45°) : 190 mm (7 31/64”)
3 wedge types :
Softwood, Hardwood & MDF. Use only Cassese® Genuine Cartridge Wedges.
Cassese® Genuine Cartridge Wedges sizes: 5, 7, 10, 12 and 15 mm.
93 kg .
Width 668mm (2ft 219/64’’) x Depth 589mm (1ft 113/16”) x Height 1171mm (3ft
Machine gross weight :
Dimensions :
107/64’’).
Power supply:
110/220V, 50/60 Hz, single-phase, Consumption : 500W.
Air Supply :
compressed air 6-7 bars
Average consumption per cycle : 2 Nl at 6 bars (we consider one cycle is a corner with 2 positions and 1 wedge per position)
1.E
OPTIONS
Z25147:
Stainless steel shelf for
wedges and accessories
Barcode reader (Contact
the customer service)
Barcode reader (Contact the
1.F
GUARANTEE
One year guarantee for parts and labor against manufacturing defects. Wearing parts* and those damaged as a
result of non-appliance with the instructions of the present manual are excluded from the guarantee.
*Chevron rubbers, round clamps and wedge driver blades are considered as wearing parts.
8
USER MANUAL
MACH 1 CART
2 SETUP
2.A. UNPACKING THE MACHINE
Bubble level
Phillips screw driver
Cutter
Flat span N.13 & N.17
Allen key N.5
Cut both plastic strips
in order to free the
box and lift up the
wood cover with the
help of a second
person.
Using
the
13mm
span, remove the 4
bolts to free the
machine from the
crate.
They
are
located under the
pallet.
Figure 2-1
Figure 2-2
After unpacking the
machine, install and
set the 4 feet to level
the machine. Make
sure the 4 feet are
touching the floor,
machine must be
steady.
The keyboard is hold
in place with 3
screws.
2 are located on top
of the keyboards, use
5mm Allen key to
remove them if you
wish to change the
position
of
the
screen.
.
Figure 2-4
Figure 2-3
One is located under
the keyboard. Use
Phillips screw driver if
you wish to change
the position of the
screen.
The keyboard then
can be installed on
the other side of the
machine.
Figure 2-5
Figure 2-7
When levelling the machine, if the machine is installed against a working table, make sure a long frame will
not be risen up by the table, because this would cause bad joining. Working table and machine should be
levelled together.
9
USER MANUAL
MACH 1 CART
When installing the machine, make sure the floor will be flat and strong enough to support its weight. It
should be installed in a dry environment providing temperate temperature. The floor should be flat and
clean. Select a location with proper lighting.
2.A
AIR LINE FITTINGS
Customer’s air connection
Included in the machine
Quick
release(Q/R)
Female
Standard hose connector - Z556
Air Connector
- Z749
Q/R US male connector - Z701
Quick
release(Q/R)
Female
2.B
CONNECTING TO THE AIR SOURCE
Air Connector
- Z749
The machine should be connected to a pneumatic circuit providing 6 to 8 bars pressure.
Connect the machine
using
the
quick
connectors
as
mentioned
in
chapter I.2.A
The MACH 1 CART
must be connected
to the air source
located on the front
panel of the drawer.
Turn the compressed
air valve to ON by
rotating its red knob
.
Figure 2-8
The air pressure
gauge should show 6
bars
(85
p.s.i.)
minimum.
Figure 2-9
The red knob in Figure 2-9 must be used to secure the machine during maintenance or to prevent non
desired use. A lock can be applied to it in stop position so nobody can turn it back to ON. This will exhaust air
from the machine circuit and disconnect it from air supply, but it WILL NOT switch off electrical components.
Refer to chapter I.5.A SAFETY INSTRUCTIONS (page 20) for further instructions.
If the indicated pressure is not 6 bars (85 p.s.i.), check the pressure at the air source (compressor). Then, if pressure is correct
at the air source, it means the regulator of the machine needs fine tuning. Perform the following procedure to adjust it (Figure
2-10 and Figure 2-11)
10
USER MANUAL
MACH 1 CART
Allen key N.3
Pull up the air
pressure regulator
knob and turn it
(clockwise = more
pressure) until the
needle of the air
pressure
gauge
reaches
6
bars
(85p.s.i.).
Unscrew
both
screws
of
the
drawer panel with a
3mm Allen key.
Then
open
the
drawer to have
access to the air
pressure regulator
knob.
Figure 2-10
Figure 2-11
2.C
CONNECTING TO THE ELECTRICAL SOURCE
Connect
the
electrical plug of the
MACH 1 CART to a
grounded 220/110V
single-phase outlet.
Switch
on
the
MACH1 CART, by
rotating
the
emergency STOP &
START BUTTON
Figure 2-12
Figure 2-13
Prior to perform any maintenance always unplug the machine from the wall socket, if the red button is pushed it will still
leave some alive wires inside the machine. Refer to chapterI.5.A SAFETY INSTRUCTIONS(page 20) for satety
instructions.
The machine should be connected to a protected electrical supply according to the laws in your country (surge and earth
protection). Please have a professional electrician checking your installation in case of doubt.
11
USER MANUAL
MACH 1 CART
3 ADJUSTMENTS
3.A
DESCRIPTION OF THE DISPLAY:
Position in mm
P-Number of the
position
Number
favorite
Q-Quantity
wedges
positon N.1
3.B
of
for
of
the
Parameters P and Q for
position 2 to 5
SELECTING A MEMORY ALLOCATION (FAVORITE)
Prior to perform any
programming,unlock
the table handle and
slide back the table
to
its
maximum
opened position.
The selection of the
favorite will cause the
wedge distributor to
move
so
it
is
important to make
sure it will not hit the
sliding table.
Figure 3-2
The machine is able
to store
up to 9
favorites (profiles) in
its
memory.
We
advise to use F1 for
current jobs that
don’t need to be
memorized and F2 to
F9 for jobs that will
be recalled later
(profiles that are
joined very often).
Figure 3-1
Press the button
FAVORITES
RECALL
several
times
until
the
machine displays the
parameters of the
favorite you wish to
modify.
Figure 3-3
12
USER MANUAL
3.C
MACH 1 CART
SPECIFIC USE OF THE SPACER BARS
When joining small
mouldings
(lower
than the height of
the back fences), it
is necessary to use
the set of spacer
bars supplied with
the machine.
This is an example of a
bad setting, the spacer
bar not being used will
cause the top clamp to
touch the fences and
not
to
hold
the
moulding correctly. The
moulding will jump up
during stapling.
SPACERS
Figure 3-4
The spacer bars are
made of two steel
bars linked with a
screw locked by a
nut. The nut side is
the bottom side of
the spacer bars
Figure 3-5
Here the spacer
bars are upside
down. The nut is
visible on the top,
which is not correct.
Figure 3-7
Figure 3-6
3.D
ADJUSTMENT OF THE SLIDING TABLE
The sliding table (see
page 5) needs to be
adjusted to be able to
set
the
various
stapling positions.
Unscrew the sliding
table handle.
Put the spacer bars
against the sliding
table if needed (see
previous chapter).
To do this, switch on
the Pre-Clamp button.
Figure 3-9
Figure 3-8
With
the
preclampling button still
in ON position, press
CLEAR button to
clear
what
was
already
in
the
memory
of
the
machine
for
the
selected favorite.
Shift the sliding table
in order to tighten
both mouldings with
the rebate clamp
(see page 5).
Then tighten the
sliding table handle .
Figure 3-10
Figure 3-11
13
USER MANUAL
MACH 1 CART
Switch back off the
Pre-Clamp button in
order to release the
mouldings
and
remove
the
moulding that was
against the back
fence.
Figure 3-12
3.E
PROPER ADJUSTMENT OF MAGNETIC ADJUSTABLE ROD CLAMP
A
magnetic
adjustable
rod
clamp comes with
your machine as a
standard feature.
It fits the crossbar
thanks
to
the
locking ring and
can be set at 1 to
7 positions.
Figure 3-13
Pull the black knob
to be able to adjust
the space between
the vertical clamp
and the top of the
moulding. You must
have 50mm (2”) max
between the clamp
and the top of the
moulding.
Figure 3-14
When adjusting the vertical rod clamp, closer it is from the top of the moulding, and faster will
be the machine. The machine will not damage the moulding, even if the distance is very close.
If the distance is superior to 50mm, the wedge will not penetrate fully inside the wood.
Pay
attention
to
properly position the
magnetic
chevron
clamp: the sides of
the chevron must be
parallel
to
back
fences 1 and 2.
Example
setting
chevron.
Figure 3-15
of
of
bad
the
Figure 3-16
14
USER MANUAL
MACH 1 CART
Now
with
quickchange
magnetic
clamps, it is easy to
change from chevron
to a round clamp.
Simply pull down the
Z24703 to change of
clamp support.
Figure 3-17
3.F
SELECTING THE WEDGES POSITIONS
The MACH 1 CART is designed to join mouldings in 1 to 9 positions. You can stack up to 9 wedges in each position. The
selection depends on the width and thickness of the moulding to join.
3.G
THREE ESSENTIAL RULES
1- A MINIMUM 2 mm clearance (less than 1/8”) above the wedges shall be
respected.
2- Same size wedges can be stacked up in order to avoid having to change the
wedge size when joining mouldings with different thickness.
3- The wedge positions should be lined up to the highest points of the moulding.
Figure 3-18
When selecting the position of the top clamp, always pay attention to its contact surface with
the moulding. Select positions that will provide steady seating.
3.H
If the
opened
outside
ADJUSTING THE JOINING ANGLE
Tighten
the
adjusting screw to
correct the defect of
the mouldings.
corner is
towards
Check the quality of
the
angle
by
clamping the corner
against the back
fences again.
Figure 3-19
Figure 3-20
15
USER MANUAL
If the
opened
inside.
MACH 1 CART
Loosen
the
adjusting screw to
correct the defect of
the mouldings.
corner is
towards
Check the quality of
the
angle
by
clamping the corner
against the back
fences again.
Figure 3-21
Figure 3-22
If you get this result : it means your cutting angle is less than 45°.
Your cutting machine needs to be set to the right 45° angle (check your cutting
machine’s user manual to make this adjustment).
Figure 3-23
3.I
MEANS OF JOINING
Thanks to the color code, you can recognize and select easily the type of wedges to
be used. Please note that hard wood Vnails will have a yellow pusher to help
identifying them. A white pusher will indicate soft wood wedges.
See color chart bellow for identification.
Cassese wedges can also be supplied in MDF type dedicated to MDF or very hard
wood use. They are identified by a red pusher ine the cartridge.Please contact your
local agent to try them.
Figure 3-24
It is recommended to use the proper type of wedges for joining, always using hard wood
wedges in all your frame will result in poor tightening of the corner when the wood is soft. A
first approach consists in trying to scratch the wood with your nails, if you can scratch it
easily, then a soft wood wedge should do the job perfectly and you will get the best tightening.
16
USER MANUAL
MACH 1 CART
3.J
LOADING OF CARTRIDGE WEDGES
Load the cartridge
and turn back the
loading button to off.
To load the machine,
rotate the loading
button in the load
position.
The wedge pusher
will move back to
allow
you
to
introduce
the
cartridge.
Figure 3-25
Figure 3-26
When the machine detects the cartridge is empty while stapling, it will display the message
“reload wedges” and the pusher will retract automatically to allow you loading a new
cartridge. Press Pedal and stapling button to finish the corner.
3.K
CHANGING WEDGES SIZE
Repeat procedure of Figure 3-25, then remove the cartridge and insert another cartridge of a different color. Thanks to the
cartridge system, no need to adjust anything or change any head.
Then turn back OFF the loading button.
17
USER MANUAL
4
MACH 1 CART
PROGRAMMING THE MACHINE
After performing the adjustments of chapter 3 (ADJUSTMENTS). Perform the following procedure:
Put on the table only
one
chop
of
moulding against the
fence.
This will allow easy
visualization
of
stapling positions
Figure 4-1
Use the arrows to
get
the
wedge
distributor moving to
the desired position.
Touch
the
button
POSITION
NUMBER
several
times
to
achieve the position
you wish to program.
Number one is the first
position that will be
executed, number 5 will
be the last one.
The MACH 1 CART can
start from the back or
from the front of the
moulding.
Figure 4-2
Touch several times
the button WEDGE
QUANTITY until the
desired
value
is
displayed.
Figure 4-3
Touch
the
button
POSITION NUMBER to
program the second
position (if required).
The black back ground
digid
shows
the
selected position.
Figure 4-4
Repeat
same
procedure
from
Figure 4-3.
In this example, we
have
programmed
favorite 1 (F1):
1 wedge in position1
and 2 wedges in
postions 2 at 11mm
(measured from the
rebate).
Figure 4-5
Figure 4-6
18
USER MANUAL
MACH 1 CART
Once the parameters are set you can then configure the execution. Select the
mode you would like to use for stapling. Press AUTO/ MANU the green LED
will show what mode is engaged.
MANUAL MODE : this mode will require two actions to get the corner done.
Pressing the pedal will engage the front clamps to keep both mouldings
together. You can then check the joining before launching the stapling with
the stapling button. Manual mode will be selected by default at each power up
of the machine.
AUTO MODE: this is the quickest mode, the machine will engage the front
clamps and staple immediately when the pedal is pressed.
Figure 4-7
As a safety, releasing the pedal will stop the machine immediately.
19
USER MANUAL
MACH 1 CART
5 MAINTENANCE
5.A
SAFETY INSTRUCTIONS
The MACH 1 CART is using two types of power sources: electric and pneumatic. It is essential for your safety
to make sure that both of them are disconnected prior to make any maintenance. Please refer to instructions
below prior to perform any maintenance.
Unplug the machine
from the electrical
supply
Figure 5-2
Rotate red button in
EXH position.
Unplug the machine
from
pneumatic
source.
Install a locker to
ensure nobody will
turn back on the
machine while you
will be performing
the maintenance.
Figure 5-1
If using compressed air to clean some parts, wear safety glasses. It is even recommended to use a vacuum
to clean the machine rather than compressed air that will spray dust everywhere.
All maintenance and control operations must be carried out by skilled maintenance staff.
5.B
MAINTENANCE PLAN
5.B.a
Daily maintenance:
It is recommended once a day to clean the table surface with a clean cloth and make sure there is no debris in the distributor
head. If some glue is remaining in the distribution block, then perform procedure 5.C REMOVING THE DISTRIBUTOR HEAD
(page 21) and 5.D LUBRICATING THE DISTRIBUTOR HEAD (page 22). It is important to avoid glue from drying in the distribution
head as it could prevent the cartridge from going in the distribution block correctly.
5.B.b
Regular maintenance:
Every 50 000 inserted wedges, the machine will ask for a maintenance a warning screen will come up asking you to lubricate
the distribution head. Refer to following chapter to perform this maintenance:
5.A SAFETY INSTRUCTIONS (page: 20)
5.C REMOVING THE DISTRIBUTOR HEAD (page 21)
5.D LUBRICATING THE DISTRIBUTOR HEAD (page 22)
5.F RESETTING THE MAINTENANCE ALARM (page 23)
20
USER MANUAL
MACH 1 CART
5.B.c
Every 6 months:
Every 6 months a maintenance should be performed to ensure proper function of the machine, perform the following procedure
to do it:
5.A
5.C
5.D
5.F
5.G
5.H
5.I
SAFETY INSTRUCTIONS (page 20)
REMOVING THE DISTRIBUTOR HEAD (page 21)
LUBRICATING THE DISTRIBUTOR HEAD (page 22)
RESETTING THE MAINTENANCE ALARM (page 23)
REMOVING THE SIDE PANEL (page 23)
LUBRICATING THE HORIZONTAL COLUMNS (page 24)
TESTING THE SAFETIES OF THE MACHINE (page 24)
5.C
REMOVING THE DISTRIBUTOR HEAD
Periodically, remove the distributor head to clean and lubricate it. First, remove the strip of wedges. To do so, follow this
procedure :
Allen key N. 2,5
Rotate the loading
button in the LOAD
position.
Remove
the
cartridge.
Then,
for
your
safety,
perform
procedure
I.5.A
SAFETY
INSTRUCTIONS (page
20)
The wedge pusher
will move back to
allow you removing
the cartridge.
Figure 5-4
Figure 5-3
With the 2.5mm
Allen Key, unscrew
the locking screw
half a turn.
Pull
out
the
distributor head of
the machine.
Figure 5-5
Figure 5-6
21
USER MANUAL
5.D
MACH 1 CART
LUBRICATING THE DISTRIBUTOR HEAD
Allen key N.5
Lubricant spray, for example WD40.
Grease tube, Cassese reference Z1896
Remove
all
the
screws
of
the
distributor head.
Separate
the
distributor
plates
and
clean
them
using a clean cloth
and lubricant spray.
Figure 5-8
Figure 5-7
Insert the equivalent
of a nut of grease in
the bottom of the
distributor head.
Figure 5-9
5.E
UNJAMMING THE MACHINE
Wedge removal tool Z535
Use the tool to try to
push down the wedge
in the distribution
head. The tool needs
to be inserted only of
about 5mm in the
distribution
head,
then remove the tool
and try to remove the
cartridge.
Sometime a wedge
or a driver blade can
stuck in top position.
Figure 5-10
Figure 5-11
22
USER MANUAL
MACH 1 CART
If you can’t push down the protruding Wedge/driver blade, then put your hands on
top of the vertical column and give a shock down. An audible “clack” sound should
confirm the hammer is unlocked.
Try to apply procedure I.5.C REMOVING THE DISTRIBUTOR HEAD (page 21) to
remove the distributor and be able to remove the jammed hammer. If the
distributor head can’t be removed, apply again a shock down and try to remove the
distributor.
Figure 5-12
Never push with your finger on a protruding wedge, they are very sharpened!!!
5.F
RESETTING THE MAINTENANCE ALARM
Then switch back on the
machine. When
the
machine ask to press a
button, press the clear
button.
When the machine
requires lubrication
of the distributor
head, this message
is displayed briefly at
power up.
In that case, switch
off the machine and
perform
the
lubrication of the
distribution block.
Figure 5-13
5.G
As soon as the alarm
message is displayed,
press again the clear
button. The clear button
must be pressed while
the alarm message is
displayed. If you were
too late, then switch
back off the machine
and try again the
procedure.
Figure 5-14
REMOVING THE SIDE PANEL
Allen Key N.3
In order to have an access to mechanical parts, it is imperative to remove the side
panel of the opposite side to the screen.
With the 3mm Allen Key, unscrew the 4 locking screws.
Then remove the side panel.
Figure 5-15
23
USER MANUAL
5.H
MACH 1 CART
LUBRICATING THE HORIZONTAL COLUMNS
Allen Key N.3
Clean cloth with lubricant spray such as WD40
Engine car oil
Refer to chapter I.5.A SAFETY INSTRUCTIONS(page 20) for safety instructions.
Remove the side panel as explained in the chapter I.5.G REMOVING THE SIDE PANEL
(page 23).
Clean with clean cloth the 2 horizontal columns and apply some engine car oil on
them.
Figure 5-16
5.I
TESTING THE SAFETIES OF THE MACHINE
Make sure the machine will switch ON/OFF when using the red button.
This button should remain in pushed position (OFF) until you rotate it to release it.
If not, contact your local agent to replace the button assembly.
Figure 5-17
Set the machine in manual mode.
Unlock the handle of the sliding table and move the table far away from the clamps. Do
not put your hands on the table.
Remove mouldings from the table and try to press the pedal.
The machine shouldn’t try to shoot the wedges and the message “ALARM: READJUST
TABLE” should be displayed. If the message is not displayed, then contact your local
agent for repair.
Figure 5-18
24
USER MANUAL
MACH 1 CART
Take two pieces of moulding and adjust the table as explained in chapter I.3.D
ADJUSTMENT OF THE SLIDING TABLE (page13) . Make sure also that the machine is in
manual mode.
Press the pedal, the clamps must hold the moulding until you release the pedal. If the
clamps stays on when the pedal is released, contact your local agent to check the pedal
assembly.
If the message “ALARM: READJUST TABLE” is coming on, repeat procedure I.3.D
ADJUSTMENT OF THE SLIDING TABLE (page13) and try again this test.
Figure 5-19
Switch ON the machine and switch off the air.
The message “ALARM: AIR PRESSURE” should come on indicating pressure is not
correct, if not contact your local agent for diagnostic.
Figure 5-20
Make sure that machine is complete and that no part was removed, all side panels must be closed and all
screws in place. In case of missing item, use exploded views to order the missing part. Missing side panel
will expose moving part which is dangerous for operators.
5.J
TROUBLE SHOOTING
if your machine is not working properly, please refer to FAQ bellow, if the solution of your trouble is not in this secton, please
contact your local distributor or contact us on our web site: www.cassese.com.
Nothing lights up, the screen is off even when the emergency button is released:
> Check, for example by connecting another appliance, that the electrical outlet on which is plugged the machine is not
defective.
The machine displays the message «alarm air pressure» and will not staple.
> Adjust the air pressure of the compressor or the machine, see chapter 2.B CONNECTING TO THE AIR SOURCE (page 10).
The machine displays the message «wedge block service required».
> Refer to the chapter 5.B MAINTENANCE PLAN (page 20).
The machine displays the message «alarm: pedal and pre-clamp».
> The pre-clamping button is still in the «ON» position during an attempt at joining by pressing the pedal. Turn it to «OFF»
before pushing the pedal.
25
USER MANUAL
MACH 1 CART
When pushing the pedal, the machine blocks the mouldings with the clamps, but then releases them and does
not shoot the wedge. The message «alarm:readjust table» is displayed.
> The table has moved back (handle not tightened enough) and proper clamping of the mouldings is
not possible. Repeat the pre-clamping procedure, see chapter I.3.D ADJUSTMENT OF THE SLIDING TABLE (page 13).
> The pre-clamping procedure was not performed correctly. Try again, following the instructions in
chapter I.3.D ADJUSTMENT OF THE SLIDING TABLE (page 13).
The machine appears to be inserting the wedges normally, but the wedges are not completely inserted.
> The hammer is broken. Perform the procedure described in chapter 5.C REMOVING THE DISTRIBUTOR HEAD (page 21).
> The moulding is too low or too narrow. Therefore, the vertical clamp cannot block it correctly against the stops. Use the «set
of spacer bars» to join the moulding (see chapter 3.C SPECIFIC USE OF THE SPACER BARS page 13).
> Air pressure is too low. Adjust the air pressure of the compressor or the machine, see chapter 2.B CONNECTING TO THE AIR
SOURCE (page 10).
> The moulding is not properly clamped to the table during the stapling process. Check the stapling position for stability of the
vertical clamp and that the moulding is properly braced against the table. If you are using the machine near a table supporting
the frame, make sure the mouldings remains levelled. If this is not the case, adjust the furniture or the machine so they are the
same height (the machine has adjustable feet).
> The pedal was released too quickly. Try stapling again, keeping the pedal down until the cycle is completely finished.
The machine blocks, with the vertical presser against the moulding, then releases the pressure and displays
the messages «alarm: eot not reached».
> Means the sensor detecting the end of travel of the hammer pushing the wedges couldn’t be activated, the wedge might not
be inserted fully in the moulding.
> Air pressure is too low. Adjust the air pressure of the compressor or the machine. DO NOT exceed 8 bars, see chapter 2.B
CONNECTING TO THE AIR SOURCE (page 10).
> The wood is too hard. You can increase pressure, but DO NOT exceed 8 bars. Use «hardwood» wedges.
> Try to use lower size of wedges or decrease the number of wedges at the blocking position (if stacking).
> The hammer is twisted or blocked. Perform the procedure described in chapter 5.C REMOVING THE DISTRIBUTOR HEAD
(page 21).
> The distance between the top clamp and moulding is too high. Adjust the height of the presser support with
the pin. It should be less than 5 centimetres.
The machine blocks, with the vertical presser against the moulding, then releases the pressure and displays
the message «alarm: pedal released».
> The pedal was released too quickly. Try stapling again, keeping the pedal down until the cycle is completely finished.
The machine blocks and displays the message «alarm: SOT wedge».
>The sensor that informs the machine that the hammer is in the down position (Start Of Travel sensor) sends information that
the hammer has not returned down. Perform the procedure in chapter 5.C REMOVING THE DISTRIBUTOR HEAD (page 21).
The wedge breaks in the wood.
>The wood is too hard. Use special «hardwood» wedges.
>The backs are stained.
The distributor is full of grease.
>Perform the procedure described in chapter 5.C REMOVING THE DISTRIBUTOR HEAD (page 21) and remove any excess
grease. Do some staplings in scrap mouldings to purge any excess. Then wipe off the top of the distribution head.
Handling the mouldings is difficult.
The horizontal clamps are too tight against the mouldings. Repeat the pre-clamping procedure described in chapter I.3.D
ADJUSTMENT OF THE SLIDING TABLE (page 13).
The corners are crooked.
>Make sure to place the first moulding against stop as Figure 4-1.
26
USER MANUAL
MACH 1 CART
II. MANUEL D’UTILISATION / FRANCAIS
VERSION ORIGINALE
Votre sécurité est notre priorité
Ce marquage sur la machine vous
recommande le port de protections auditives.
Ce marquage sur la machine vous
recommande de lire le manuel avant toute
utilisation.
Cette icône dans le manuel met l’accent sur
un point important relatif à la sécurité.
Cette icône dans le manuel vous signale une
astuce susceptible de vous faire gagner du
temps ou d’améliorer votre production.
Cette icône dans le manuel vous permet de
connaître la liste des outils nécessaires pour
effectuer une procédure.
AVANT TOUTE MAINTENANCE SUR CETTE MACHINE, DEBRANCHER ET VERROUILLER L’ALIMENTATION
ELECTRIQUE ET PNEUMATIQUE. NE PAS UTILISER LA MACHINE SI UN COUVERCLE OU UNE PROTECTION EST
ABSENT. SE REPORTER AU CHAPITRE II.5.A INSTRUCTIONS RELATIVES A LA SECURITE (PAGE 43) POUR GARANTIR
VOTRE SECURITE.
AVANT TOUTE MAINTENANCE SUR CETTE MACHINE, VEILLEZ A LA DEBRANCHER DE L’ALIMENTATION
ELECTRIQUE ET PNEUMATIQUE. N’UTILISEZ PAS LA MACHINE SI UN COUVERCLE OU UNE PROTECTION EST
ABSENT.
27
USER MANUAL
MACH 1 CART
1 PRESENTATION
1.A
TABLE D’ASSEMBLAGE
3
4
2
5
7
6
8
9
1
10
Griffes
1
Clavier
2
Presseur règlable
3
Potence
Manette de verrouillage de la table
coulissante
Table coulissante
4
1ere butée
7
Vis d’ajustage de l’angle d’assemblage
8
2nd butée
9
5
6
Distributeur
10
Manomètre
11
Sectionneur d’alimentation en air
12
11
12
28
USER MANUAL
MACH 1 CART
13
15
14
16
Bouton de chargement des
agrafes
13
Bouton de pre-serrage
14
Bouton d’agrafage
15
Bouton d’arrêt machine
16
29
USER MANUAL
1.B
MACH 1 CART
INTRODUCTION
Nous vous remercions d’avoir choisi l’assembleuse MACH 1 CART et pour votre confiance ; La MACH 1 CART bénéficie de tout le
savoir faire de la Société Cassese. Etablie en 1976 La société Cassese est aujourd’hui reconnue dans le monde entier pour la
qualité de ses produits et leur caractère innovant.
La MACH 1 CART vous permettra d’assembler tout type de moulure en bois, plastique ou MDF (brevet n° 7522814).
L’assemblage s’opère par l’insertion d’agrafes Cassese® étudiées pour resserrer les angles de vos cadres.
1.C
ACCESSOIRES FOURNIS AVEC LA MACHINE
Z26999:
1 x Presseur ajustable
Z24703:
1 x Support chevron
Z21524:
1 x Chevron
Z1879:
1 x Clef Allen de 2.5 mm
Z1882:
1 x Clef Allen de 3 mm
Z1884:
1 x Clef Allen de 4 mm
Z1885:
1 x Clef Allen de 5 mm
1 boite d’agrafes de 7 mm
bois tendre
1 boite d’agrafes de 10mm
bois tendre
1 boite d’agrafes de 10mm
bois dur.
Z535:
Outil de
d‘agrafe.
Z3078:
Barettes d’espacement
Z1896:
1 x Tube de graisse
Z506:
1 x Marteau
désenrayement
30
USER MANUAL
MACH 1 CART
Z1791:
Elastomère vert cylindrique
(bois tendres)
1.D
Z18065:
Support pour élastomères
ronds.
Z1783:
Elastomère
jaune
cylindrique (bois durs)
SPECIFICATIONS TECHNIQUES
Largeur moulure minimum:
Largeur moulure maximum:
5mm (3/16”) / hauteur minimum : 7 mm (1/4”)
150 mm ( 5 29/32“) / Hauteur maximum : 100 mm ( 4 13/32” )
Course maximum entre position d’agrafage (à 45°) : 190 mm (7 31/64”)
3 types d’agrafes :
Bois tendre, bois dur & MDF. N’utilisez que des agrafes originales Cassese®.
Tailles des agrafes Cassese® en chargeur: 5, 7, 10, 12 and 15 mm.
93 kg.
Largeur 668mm (2ft 219/64’’) x Longueur 589mm (1ft 113/16”) x Hauteur 1171mm
Poids machine:
Dimensions :
(3ft 107/64’’).
Alimentation électrique:
Alimentation pneumatique :
Consommation moyenne/cycle :
1.E
110/220V, 50/60 Hz, monophasée, Consommation : 500W.
Air comprimé à 6-7 bars
2 Nl à 6 bars (uncycle= un coin avec deux positions contenant une agragfe chacun)
OPTIONS
Z25147:
Support accessoire en inox
Lecteur code à barres
(contactez votre revendeur
Cassese).
Z25147:
1.F
GARANTIE
La présente machine est garantie un an, pieces et main d‘oeuvre comprises. Les pieces d’usure*
endommagées suite au non respect des consignes du present manuel sont exclues du manuel.
et celles
*Distributeur d’agrafes, chevron , presseurs élastomères et marteau sont considérés comme des pièces d’usure.
31
USER MANUAL
MACH 1 CART
2 MISE EN ROUTE
2.A
DEBALLAGE DE LA MACHINE
Niveau à bulle
Tournevis crussiforme
Cutter
Clef plate N.13 & N.17
Clef Allen N.5
Couper
les
deux
bandes de transport
afin de libérer le
couvercle
de
la
caisse. Avec l’aide
d’une
seconde
personne, levez le
couvercle.
A l’aide de la clef
Allen N.5, otez les 4
vis pour libérer la
machine de la palette
de la caisse, les vis
sont visibles sous la
palette.
Figure 2-2
Figure 2-1
Une Fois la machine
déballée, l‘installer et
règler ses 4 pieds. La
machine doit être de
niveau et les 4 pieds
doivent toucher le sol
afin que la machine
soit stable.
Le
clavier
maintenu en
par 3 vis.
est
place
2 sont situées audessus du clavier
(clef Allen N.5).
Figure 2-4
Figure 2-3
Le clavier peut être
installé des deux
cotés du bâti de la
machine
en
démontant ces 3 vis.
Une troisième vis est
située sous l’écran
(vis crussiforme).
Figure 2-5
Figure 2-6
Lors de la mise à niveau de la machine, si celle-ci est installée contre une table assurez vous que le cadre ne
sera soulevé par la dite table. La table et la machine doivent être de niveau.
32
USER MANUAL
MACH 1 CART
Lors de l’installation de la machine, assurez vous que le sol est plan et pourra supporter le poids de la
machine. La machine doit être installée dans un endroit sec et tempéré. Choisir un endroit où l’éclairage
sera suffisant pour assurer une utilisation confortable du matériel.
2.B
RACCORDS
inclus dans la machine
Connecteur
rapide
femelle
-
Alimentation fournie par le client
Connecteur standard - Z556
Z749
Connecteur rapide male type USA - Z701
2.C
RACCORDEMENT A L’AIR COMPRIMÉ
La machine doit être connectée à une source d’air comprimé fournissant entre 6 et 8bars.
Connecter
la
machine en utilisant
les
connecteurs
comme
spécifié
chapitre
II.2.B
RACCORDS
(page
33).
La MACH 1 CART doit
être raccordée au
niveau du panneau
du tiroir infèrieur.
Tourner le bouton
rouge pour alimenter
la machine en air
comprimé.
Le
manomètre
doit
montrer 6 bars (85
p.s.i.) minimum.
Figure 2-8
Figure 2-9
Le bouton rouge Figure 2-9 doit être utilisé pour mettre la machine en sécurité lors de la maintenance ou
pour empêcher son utilisation. Un cadenas doit être utilisé pour le bloquer en position OFF, référez-vous au
chapitre II.5.A INSTRUCTIONS RELATIVES A LA SECURITE (page 43) pour de plus amples instructions.
Si la pression indiquée sur la machine n’est pas correcte (6 bars soit 85 p.s.i.), vérifier la pression à la source (compresseur) et
l’ajuster, si la pression est correcte à la source, appliquer la procédure Figure 2-10 Figure 2-11 pour l’ajuster.
33
USER MANUAL
MACH 1 CART
Clef Allen N.3
Soulever le bouton
de
réglage
du
régulateur puis le
tourner
pour
adjuster la pression
à 6 bars (85p.s.i.).
Pour augmenter la
pression tourner le
bouton dans le sens
horaire.
Dévisser ces deux
vis du tiroir de la
machine à l’aide de
la clef Allen de
3mm.
Ouvrir le tiroir pour
avoir
accès
au
régulateur
de
pression d’air.
Figure 2-10
2.D
Figure 2-11
RACCORDEMENT ELECTRIQUE DE LA MACHINE
Allumer la MACH 1
CART, en tournant le
bouton
STOP
&
START BUTTON
Connecter la prise
électrique
de
la
MACH 1 CART à une
prise d’alimentation
220V
ou110V
monophasée. Vérifier
que la prise est bien
raccordée à la terre.
Figure 2-12
Figure 2-13
Avant d’entreprendre toute maintenance, référez-vous au chapitre II.5.A INSTRUCTIONS RELATIVES A LA SECURITE (page
43) pour de plus amples instructions. Tourner le bouton Figure 2-13 ne suffit pas à garantir la sécurité lors de la
maintenance, certains cables restant sous tension et l’air étant toujours présent la machine. La prise à laquelle est
raccordée la machine doit disposer d’une protection des biens et des personnes conformément à la réglementation en
vigeur dans votre pays.
34
USER MANUAL
MACH 1 CART
3 REGLAGES
3.A
P-Numéro
position
DESCRIPTION DE L’ECRAN LCD
de
Position en mm
la
Numéro du favori
Q-Quantité
d’agrafes pour la
positon N.1
3.B
Parametres P et Q pour les
positions 2 et 5
SELECTION D’UN ESPACE MEMOIRE (FAVORIT)
Avant de proceder à
une
nouvelle
programmation,
déserrer la manette
de
la
table
coulissante et ouvrir
la table au maximum.
La selection d’un
favori va générer un
movement de la tête
de distribution, il faut
donc s’assurer qu’elle
ne percutera pas la
table coulissante.
Figure 3-1
La machine peut
mémoriser jusqu’à 9
profils (favoris). Il
vous est conseillé
d’utiliser le favori F1
pour vos moulures
dont
vous
ne
souhaitez
pas
mémoriser les profils
puis d’utiliser les
favori F2 à F9 pour
les profils qui sont
assemblés souvent.
Figure 3-2
Appuyer
sur
le
bouton FAVORITES
RECALL
plusieurs
foit jusqu’à ce que le
favori requis soit
affiché.
Figure 3-3
35
USER MANUAL
3.C
MACH 1 CART
UTILISATION DU JEU DE BARRETTES
Lorsque
l’on
assemble
des
moulures don’t la
hauteur
est
infèrieure
aux
butées, il est parfois
nécessaire d’utiliser
les barrettes.
SPACERS
Figure 3-4
Les barrettes sont
constituées
de
deux barres qui
sont jointes par
une vis et un
écrou, l’écrou doit
être
positionné
vers le bas.
Exemple de mauvaise
utilisation, sans les
barrettes, le presseur
va alors toucher les
butées. La moulure ne
sera
alors
pas
correctement
maintenue et risque
de
sauter
durant
l’assemblage.
Figure 3-5
Ici les barrettes
sont positionnées à
l’envers; l’écrou est
visible sur le dessus
de celles-ci.
Figure 3-6
3.D
REGLAGE DE LA TABLE COULISSANTE
La table coulissante
doit être ajustée pour
pouvoir définir les
positions d’agrafage.
Figure 3-7
Desserrer la manette
de serrage de la
table.
Insérer le jeu de
barrettes contre les
butées de la table
coulissante si besoin
(voir
chapitre
précédent).
Tourner le bouton de
pre-serrage
en
position ON.
Figure 3-8
Figure 3-9
Toujours avec le
bouton pre-serrage
sur ON, appuyer sur
le bouton CLEAR
pour
effacer
les
positions
en
mémoire.
Glisser la table et
l’amener en contact
avec les moulures et
les griffes.
Serrer fermement la
poignée de blocage
de la table pour
l’immobiliser.
Figure 3-10
Figure 3-11
36
USER MANUAL
MACH 1 CART
Tourner le bouton de
pré-serrage sur OFF
et oter les moulures
de la table.
Figure 3-12
3.E
REGLAGE DU PRESSEUR VERTICAL
Le
presseur
vertical doit être
ajusté à l’aide du
doigt indexable, il
dispose
de
7
positions.
Figure 3-13
Tirer sur le bouton
noir afin d’ajuster la
distance entre la
partie la plus haute
de la moulure et le
presseur.
Cette
distance doit être la
plus courte possible
et
ne
jamais
dépasser 5cm.
Figure 3-14
Plus courte sera la distance entre le presseur et la moulure et plus rapide sera la machine. La
machine n’endommagera pas la moulure, même si cette distance est réduite. Si la distance
entre le dessus de la moulure et le presseur est supérieure à 5cm, l’agrafe ne pourra pas être
correctement enfoncée.
Prendre garde à la
position du presseur,
le chevron doit être
parallèle aux butées.
Exemple
mauvaise
installation.
Figure 3-15
de
Figure 3-16
37
USER MANUAL
MACH 1 CART
Grâce au nouveau
système aimanté, il
est facile de changer
de type de presseur,
tirer la pièce Z24703
vers
le
bas
le
remplacer.
Figure 3-17
3.F
SELECTION DES POSITIONS D’AGRAFAGE
La MACH 1 CART permet l’assemblage en utilisant de 1 à 9 positions d’agrafage. Vous pouvez empiler au maximum 9 agrafes
par position. La selection des positions doit être adaptée à la hauteur et à la largeur de la moulure.
3.G
TROIS REGLES ESSENTIELLES POUR L’ASSEMBLAGE
1- Un MINIMUM de 2 mm d’espace (moins de 1/8 de pouce) doit être respecté audessus des agrafes.
2- Des agrafes de même hauteur peuvent être empilées afin d’assembler des
moulures de hauteurs différentes.
3- Les agrafes doivent être alignées avec les points les plus hauts des moulures.
Figure 3-18
Lors du choix de la position prendre garde à la surface d’appui du presseur, celle-ci doit être
stable.
3.H
REGLAGE DE L’ANGLE D’ASSEMBLAGE
Serrer la
contre.
Si le coin est ouvert
coté extèrieur au
cadre.
vis
ci-
Vérifier à nouveau la
qualité de l’angle
d’assemblage,
recommencer
si
nécessaire.
Figure 3-19
Figure 3-20
38
USER MANUAL
MACH 1 CART
Desserrer la vis cicontre.
Si le coin est ouvert
côté intérieur du
cadre.
Vérifier à nouveau la
qualité de l’angle
d’assemblage,
recommencer
si
nécessaire.
Figure 3-21
Figure 3-22
Si vous obtenez ce résultat en fin d’assemblage, l’angle d’assemblage n’est pas à
45°.
Votre scie est probablement déréglée, se réferer à son manuel d’instructions afin de
remédier au problème.
Figure 3-23
3.I
MOYEN D’ASSEMBLAGE
Grâce au code de couleur, il est facile d’identifier les agrafes nécessaires à
l’assemblage. Un poussoir jaune permet de repérer des agrafes pour les bois durs,
tandis qu’un poussoir blanc indiquera des agrafes pour bois normal.
Des agrafes spéciales pour le MDF (ou les bois très durs) sont également disponibles,
elles sont identifiées par un poussoir rouge dans le chargeur. Contactez votre
distributeur Cassese pour les obtenir.
Figure 3-24
39
USER MANUAL
MACH 1 CART
Il est recommandé d’utiliser les agrafes adaptées au bois à assembler, l’utilisation d’agrafes
bois dur dans un bois tendre engendrera un moindre rapprochement des moulures. Une
première indication consiste à tenter de griffer le dessous de la moulure avec les ongles, si
c’est impossible, on utilisera alors les agrafes bois dur, sinon on utilisera des agrafes bois
normal.
3.J
CHARGEMENT DES AGRAFES
Pour recharger
machine tourner
bouton
chargement
position LOAD .
la
le
de
en
Introduire
le
chargeur et tourner
le bouton en position
RUN.
Le pousse agrafe va
alors reculer pour
vous permettre le
chargement.
Figure 3-25
Figure 3-26
Lorsque la machine détecte la fin d’un chargeur, elle va afficher le message “reload wedges”,
le pousse agrafe va alors reculer pour vous permettre d’en introduire un nouveau. Appuyer sur
la pédale et le bouton d’agrafage pour finir l’assemblage.
3.K
CHANGER DE TAILLE D’AGRAFES
Répéter la procedure Figure
réglage n’est nécessaire.
3-25, introduisez alors un chargeur de la taille voulue, grâce au système de chargeur, aucun
Tourner ensuite le bouton de chargement en position RUN.
40
USER MANUAL
MACH 1 CART
4 PROGRAMMATION
Après avoir procédé aux réglages de la machine II.3 REGLAGES suivez la procedure suivante afin de programmer le favori pour
assembler votre moulure:
Poser
une
seule
moulure sur la table
comme ci-contre.
Ceci permettra une
bonne visualization
de la position de
l’agrafage.
Figure 4-1
Utiliser les flèches
pour déplacer la tête
de distribution à
l’endroit voulu.
Appuyer sur le bouton
POSITION
NUMBER
plusieurs fois afin de
sélectionner la position
à programmer.
La position N.1 sera la
première exécutée, la
position N.5 la dernière.
La MACH 1CART peut
indifféremment
commencer
par
l’intèrieur ou l’extèrieur
du cadre.
Figure 4-2
Appuyer
plusieurs
fois sur le bouton
WEDGE QUANTITY
afin d’afficher le
nombre
d’agrafes
nécessaire.
Figure 4-3
Appuyer sur le bouton
POSITION
NUMBER
pour programmer la
position suivante (si
nécessaire) le fond noir
vous indique la position
sélectionnée.
Figure 4-4
Répéter la procedure
depuis la Figure 4-3.
Dans cet exemple le
favori N.1 (F1) a été
programmé:
1 agrafe en position1
et 2 agrafes en
position 2 à 11mm
(mesurée depuis la
feuillure).
Figure 4-5
Figure 4-6
41
USER MANUAL
MACH 1 CART
Une fois tous les paramètres sélectionnés, vous pouvez alors configurer le
mode d’exécution. Appuyer sur AUTO/ MANU, la LED verte vous indique le
mode sélectionné:
MANUAL MODE : ce mode va nécessiter deux actions pour lancer l’agrafage.
Un appui sur la pedale va déclencher le serrage des moulures, ensuite, l’appui
sur le bouton d’agrafage va lancer la séquence d’agrafage. Il est donc possible
de vérifier la qualité de l’assemblage avant de lancer l’agrafage. Le mode
manuel est sélectionné par défaut à chaque allumage de la machine.
AUTO MODE: c’est le mode le plus rapide, la machine va automatiquement
lancer le serrage puis l’agrafe du coin sur un simple appui de la pédale. Il est
cependant nécessaire de garder la pédale enfoncée pendant tout le cycle
d’agrafage.
Figure 4-7
Par sécurité, tout relâchement de la pédale stoppe la sequence d’assemblage.
42
USER MANUAL
MACH 1 CART
5 MAINTENANCE
5.A
INSTRUCTIONS RELATIVES A LA SECURITE
La Mach 1 cart utilise deux sources d’alimentation: électrique et pneumatique. Il est essentiel de s’assurer
qu’elle est bien déconnectée de ces deux alimentations avant d’effectuer toute maintenance. Suivre les
instructions ci-dessous afin de garantir votre sécurité.
Débrancher
machine
l’alimentation
électrique.
la
de
Figure 5-1
Tourner le bouton
rouge en position
EXH.
Débrancher
la
machine du circuit
pneumatique.
Installer un cadenas
sur la vanne afin
d’interdir la remise
sous pression du
circuit pendant tout
le temps de la
maintenance.
Figure 5-2
Si vous utilisez de l’air comprimé pour nettoyer des pièces, portez des lunettes de protection. Il vous est
même recommandé de préférer l’utilisation de l’aspirateur, moins nocif car il ne soulèvera pas la
poussière.La maintenance doit être accomplie par du personnel formé et compétent
5.B
PROGRAMME DE MAINTENANCE
5.B.a
Maintenance quotidienne:
Il est recommandé de nettoyer chaque jour les tables de la machine avec un chiffon doux et de s’assurer qu’il n’y a pas de
débris ni de colle dans la tête de distribution. Si besoin suivre les procédures II.5.C
DEMONTAGE DE LA TETE DE
DISTRIBUTION page 44 et II.5.D LUBRICATION DE LA TETE DE DISTRIBUTION page 45 afin de nettoyer la tête de
distribution de la machine. Il est important de ne pas laisser de la colle sêcher dans la tête car celle-ci va empêcher le bon
positionnement du chargeur d’agrafes.
5.B.b
Maintenance préventive:
Toutes les 50 000 agrafes, la machine va afficher un message de maintenance, il convient alors de procéder aux opérations
suivantes
II.5.A
INSTRUCTIONS RELATIVES A LA SECURITE (page 43)
II.5.C DEMONTAGE DE LA TETE DE DISTRIBUTION (page 44)
II.5.D LUBRICATION DE LA TETE DE DISTRIBUTION (page 45)
II.5.F EFFACEMENT DE L’ALARME MAINTENANCE (page 46)
43
USER MANUAL
5.B.c
MACH 1 CART
Tous les six mois:
Tous les six mois, une maintenance plus approfondie doit être effectuée, procédez aux opérations suivantes afin de garantir un
bon fonctionnement de la machine
II.5.A
INSTRUCTIONS RELATIVES A LA SECURITE (page 43)
II.5.C DEMONTAGE DE LA TETE DE DISTRIBUTION (page 44)
II.5.D LUBRICATION DE LA TETE DE DISTRIBUTION (page 45)
II.5.F EFFACEMENT DE L’ALARME MAINTENANCE (page 46)
II.5.G DEMONTAGE DES PANNEAUX LATERAUX (page 46)
II.5.H LUBRIFICATION DES COLONNES HORIZONTALES (page 47)
II.5.I VERIFICATION DES SECURITES DE LA MACHINE (page 47)
5.C
DEMONTAGE DE LA TETE DE DISTRIBUTION
Démonter régulièrement la tête de distribution de la machine afin de procéder à son entretien. Suivre la procédure qui suit :
Clef Allen N.2,5
Tourner le bouton de
chargement
des
agrafes en position
de chargement.
Oter le chargeur
Le pousse agrafe va
reculer pour vous
permettre de retirer
le chargeur présent.
Figure 5-4
Figure 5-3
Tirer sur la tête afin
de l’extraire de la
machine.
A l’aide la clef Allen
de 2.5mm dévisser
la vis de retenu de la
tête de ½ tours.
Figure 5-5
Figure 5-6
44
USER MANUAL
5.D
MACH 1 CART
LUBRICATION DE LA TETE DE DISTRIBUTION
Clef Allen N.5
Tube de graisse, référence Cassese:Z1896
Spray lubrifiant type WD40.
Oter toutes les vis de
la
tête
de
distribution.
Figure 5-7
Séparer les plaques
de la tête et les
nettoyer à l’aide
d’un chiffron ainsi
que
d’un
spray
lubrifiant.
Ceci
fait,
réassembler la tête,
les deux plus petites
vis sont destinées au
petit guide carré qui
est à l’intèrieur de la
tête.
Figure 5-8
Insérer l’équivalent
d’une noisette de
graisse.
Figure 5-9
5.E
DEBLOCAGE DE LA MACHINE
Outils ôte agrafe référence Cassese : Z535
Utiliser l’outils fourni
dans
la
boîte
d’accessoires afin de
dégager cette agrafe.
L’introduire de 6mm
dans la tête de
distribution
puis
retirer l’outil. Il doit
alors être possible de
dégager le chargeur
d’agrafes.
Une agrafe peut
parfois
rester
coincée en position
haute dans la tête.
Figure 5-10
Figure 5-11
45
USER MANUAL
MACH 1 CART
S’il n’est pas possible de pousser l’agrafe vers le bas, celle-ci est sans doute tordue
ou coincée. Poser vos deux mains à plat sur la potence et donner un choc vers le bas.
Un claquement doit se faire entendre indiquant que le marteau est maintenant
déccroché.
Suivre la procédure II.5.C DEMONTAGE DE LA TETE DE DISTRIBUTION (page
44)
Afin de démonter le bloc de distribution et débloquer la machine. Si le bloc ne peut
être extrait, tenter à nouveau de mettre un choc vers le bas sur la potence pour
débloquer le marteau.
Figure 5-12
Ne poussez jamais sur une agrafes avec les doigts, elles sont très affutées!!!
5.F
EFFACEMENT DE L’ALARME MAINTENANCE
Lorsqu’une
lubrification
du
distributeur
d’agrafes
est
requise, la machine
affiche le message
ci-contre brièvement
lors de son allumage.
Dans
ce
cas,
éteindre la machine
et procéder à la
lubrification
du
distributeur.
5.G
Figure 5-13
Ensuite,
allumer
la
machine, lorsque celleci affiche
« press a
button
or
press
pedal »,appuyer sur le
bouton CLEAR.
Dès que le message
« wedges block service
required »
apparait,
appuyer à nouveau sur
CLEAR.
Le
bouton
CLEAR
doit
être
appuyé
pendant
l’affichage
de
ce
message. Si vous avez
trop attendu, eteindre
la
machine
et
recommencer
Figure 5-14
DEMONTAGE DES PANNEAUX LATERAUX
Clef Alen N.3
Afin d’avoir accès aux parties mécaniques de la machine, il est impératif de démonter
au moins un panneau latéral de la machine. Il sera plus facile de démonter le panneau
opposé à celui où est installé l’écran.
Avec la clef Allen de 3mm démonter les 4 vis du panneau.
Oter le panneau.
Figure 5-15
46
USER MANUAL
5.H
MACH 1 CART
LUBRIFICATION DES COLONNES HORIZONTALES
Clef Allen N.3
Chiffon ainsi qu’un lubrifiant type WD40
Huile moteur
Pour votre sécurité suivre Les recommandations II.5.A INSTRUCTIONS RELATIVES A
LA SECURITE (page 43).
Oter un panneau latéral comme indiqué dans la procédure II.5.G
DEMONTAGE DES
PANNEAUX LATERAUX (page 46)
Vaporiser du spray lubrifiant sur les colonnes puis les nettoyer à l’aide d’un chiffon.
Appliquer ensuite de l’huile sur ces deux colonnes.
Figure 5-16
5.I
VERIFICATION DES SECURITES DE LA MACHINE
S’assurer que la machine s’éteint et s’allume quand on tourne le bouton rouge de la
machine.
Le bouton rouge doit rester enfoncé lorsqu’on le pousse. Il ne doit se relâcher que si on
le tourne.
Sinon, contacter votre distributeur Cassese pour le remplacer.
Figure 5-17
Passer la machine en mode manuel.
Déverrouiller la manette de la table coulissante et glisser la table le plus loin possible
des griffes.
Oter les moulures de la table et appuyer sur la pédale. Ne mettez pas vos mains sur
la table.
La machine ne doit pas tirer des agrafes et le message “ALARM: READJUST THE TABLE”
doit s’afficher. Si le message ne s’affiche pas, contacter votre distributeur Cassese pour
qu’il contrôle la sécurité d’agrafage.
Figure 5-18
47
USER MANUAL
MACH 1 CART
Prendre 2 moulures et adjuster la table comme dans le chapitre II.3.D REGLAGE DE LA
TABLE COULISSANTE (page 36). S’assurer que la machine est en mode manuel.
Appuyer sur la pedale, les griffes doivent maintenir les moulures jusqu’à ce que vous
relachiez la pédale. Si les griffes restent engagées lorsque vous relâchez la pédale,
veuillez la faire contrôler .
Si le message “ALARM: READJUST TABLE” apparait, réajuster la table en suivant la
procedure II.3.D REGLAGE DE LA TABLE COULISSANTE (page 36) et procéder à nouveau
à ce test.
Figure 5-19
Allumer la machine et debrancher l’air de celle-ci.
Le message “ALARM: AIR PRESSURE” doit apparaitre sur l’écran, si ce n’est pas le cas,
contacter votre revendeur Cassese.
Figure 5-20
Assurez-vous que la machine est complète, tous les panneaux latéraux doivent être en place et leurs vis
verrouillées. En cas de pièce manquante, utiliser les vues éclatées afin de vous les fournir. Des panneaux
manquants vont exposer l’opérateur à des pièces en mouvement ce qui est dangereux.
48
USER MANUAL
5.J
MACH 1 CART
GUIDE DE DEPANNAGE
Si votre machine ne semble pas fonctionner correctement, se reporter à la rubrique ci-dessous. Si le problème ne peut être
corrigé, contacter votre distributeur Cassese ou vous rendre sur le site: www.cassese.com.
Rien ne s’allume, l’écran reste éteint lorsque l’on libère l’arrêt d’urgence :
>Vérifier, par exemple en branchant un autre appareil à la place de la machine, que l’alimentation de la prise sur laquelle elle
est branchée n’est pas en défaut.
La machine affiche le message « ALARM : AIR PRESSURE » et refuse d’agrafer :
>Régler la pression d’air du compresseur ou de la machine. Voir chapitre II.2.C RACCORDEMENT A L’AIR COMPRIMÉ (page 33).
La machine affiche le message « WEDGE BLOCK SERVICE REQUIRED » :
>Reportez vous au chapitre II.5.F EFFACEMENT DE L’ALARME MAINTENANCE (page 46).
La machine affiche le message « ALARM : PEDAL AND PRECLAMP » :
>Le bouton de pré-serrage est resté sur la positon « ON » durant une tentative d’agrafage par appui sur la pédale, le remettre
sur « OFF » avant d’appuyer sur la pédale.
Lors de l’appui sur la pédale, la machine bloque les moulures à l’aide des griffes puis les relâche et ne tire pas
l’agrafe. Elle affiche le message « ALARM :READJUST TABLE »:
>La table a reculé (poignée pas assez serrée) et ne permet plus un bon serrage des moulures, refaites la procédure de préserrage, chapitre II.3.D REGLAGE DE LA TABLE COULISSANTE (page 36).
>La procédure de réglage de la table coulissante n’a pas été suivie correctement, se reporter au chapitre II.3.D REGLAGE DE
LA TABLE COULISSANTE (page 36).
La machine semble tirer les agrafes normalement mais les agrafes ne sont pas complètement enfoncées :
>Le marteau est cassé, suivre les instructions des chapitres :
II.5.A
INSTRUCTIONS RELATIVES A LA SECURITE (page 43)
II.5.C DEMONTAGE DE LA TETE DE DISTRIBUTION (page 44)
II.5.D LUBRICATION DE LA TETE DE DISTRIBUTION (page 45)
Lorsque le distributeur est démonté, contrôler le marteau qui ne doit être ni ébréché ni tordu.
>La moulure est trop basse et trop étroite, le presseur vertical ne la tient donc pas correctement car il touche les butées.
Utiliser « le jeu de barrettes » pour agrafer cette moulure. (voir chapitre II.3.C UTILISATION DU JEU DE BARRETTES page 36).
>La pression d’air est insuffisante, régler la pression du compresseur ou de la machine si besoin. Voir chapitre II.2.C
RACCORDEMENT A L’AIR COMPRIMÉ (page 33).
>La moulure n’est pas bien plaquée sur la table durant l’agrafage, vérifier que la position d’agrafage offre une bonne stabilité
au presseur vertical et que la moulure était correctement appliquée contre la table.
>En cas d’utilisation d’une table de soutien du cadre, vérifier que celle-ci ne soulève pas les moulures, dans ce cas, régler les
niveaux de votre mobilier et de la machine (les pieds sous le bâti de la machine sont ajustables).
>La pédale a été relâchée trop tôt. Refaire l’agrafage en maintenant la pédale jusqu’à ce que le cycle se termine de lui-même.
La machine se bloque, presseur vertical en appui sur la moulure, finit par relâcher la pression puis affiche le
message « ALARM : EOT NOT REACHED » :
>La pression d’air est insuffisante, régler la pression du compresseur ou de la machine si besoin, ne pas dépasser les huit bars.
>Le bois est trop dur, vous pouvez tenter d’augmenter la pression, ne pas dépasser huit bars.
>Utiliser des agrafes « bois dur ».
>Essayer d’utiliser des agrafes moins hautes ou de baisser le nombre d’agrafes sur la position bloquante (dans le cas d’un
empilage).
>Le marteau est tordu et coincé, suivres les instructions des chapitres :
II.5.A
INSTRUCTIONS RELATIVES A LA SECURITE (page 43)
II.5.C DEMONTAGE DE LA TETE DE DISTRIBUTION (page 44)
II.5.D LUBRICATION DE LA TETE DE DISTRIBUTION (page 45)
Lorsque le distributeur est démonté, contrôler le marteau qui ne doit être ni ébréché ni tordu.
49
USER MANUAL
MACH 1 CART
>La distance entre le presseur et la moulure est trop importante, ajuster la hauteur du support presseur réglable à l’aide de la
goupille, elle doit être inférieure à 5 centimètres.
La machine se bloque et affiche le message « ALARM : PEDAL RELEASED » :
>La pédale a été relâchée pendant le cycle d’agrafage, veiller à bien conserver la pédale enfoncée jusqu’à ce que le presseur
vertical remonte de lui-même.
L’agrafe se déchire dans le bois :
>Le bois est trop dur, utiliser des agrafes bois dur.
Les dos sont tachés:
>Le distributeur est plein de graisse, appliquer la procédure « maintenance du bloc H », lors de cette maintenance, veiller à
ôter tout excès de graisse, faire quelques agrafages dans des chutes si besoin afin d’évacuer l’excédent puis essuyer le dessus
de la tête de distribution.
La manipulation des moulures est difficile :
>Le presseur horizontal (les griffes) est trop serré contre les moulures, refaire la procédure de pré-serrage du chapitre II.3.D
REGLAGE DE LA TABLE COULISSANTE (page 36).
Les angles sont décalés:
>Veiller à bien engager la première moulure contre la 1ere butée N°7, voir (page 28).
>Vérifier que la pression des griffes est suffisante, utiliser le régulateur « clamp pressure » pour l’ajuster.
50
USER MANUAL
MACH 1 CART
III. EXPLODED VIEWS/ VUE ECLATEES
51
USER MANUAL
MACH 1 CART
52
USER MANUAL
MACH 1 CART
53
USER MANUAL
MACH 1 CART
54
USER MANUAL
MACH 1 CART
55
USER MANUAL
MACH 1 CART
56
USER MANUAL
MACH 1 CART
57
USER MANUAL
MACH 1 CART
58
USER MANUAL
MACH 1 CART
59
USER MANUAL
MACH 1 CART
60
USER MANUAL
MACH 1 CART
61
USER MANUAL
MACH 1 CART
62
USER MANUAL
MACH 1 CART
63
USER MANUAL
MACH 1 CART
IV. SPARE PARTS LIST / NOMENCLATURE
REF
Z1606
Z1608
Z1685
Z17062
Z1776
Z18450
Z1336
Z1353
Z1378
Z1412
Z1524
Z15710
Z1608
Z1671
Z16771
Z17
Z1710
Z17397
Z17414
Z22103
Z22391
Z23700
Z23945
Z24861
Z25064
Z25394
Z25395
Z25396
Z26515
Z266
Z330
Z486
Z621
Z6545
Z732
Z739
Z9791
Z19240
Z14096
Z15906
Z21492
Z19653
Z22763
Z140
Z18453
Z22761
Z22762
Z481
Z5343
Z5417
Z5838
Z5840
Z5842
Z5846
Z5847
Z5953
Z5954
Z657
QTY
1
1
2
2
4
1
1
4
1
1
1
1
1
1
2
1
2
1
1
3
1
2
1
1
1
1
1
2
1
2
3
2
1
1
1
1
2
1
1
1
1
1
1
1
1
1
1
2
1
1
1
1
1
1
1
1
1
4
U
U
U
U
U
U
U
U
U
U
U
U
U
U
U
U
U
U
U
U
U
m
U
U
U
U
U
U
U
U
U
U
U
U
U
U
U
U
U
U
U
U
U
U
U
U
U
U
U
U
U
U
U
U
U
U
U
U
DESIGNATION
RONDELLE M5
RONDELLE M6
RONDELLE EVENTAIL D.8
BOUCHON PLASTIQUE NOIR POUR TROU D: 10
EMBASE A VISSER
S/E BARREAU DE GRIFFES ESCAMOTABLES Ø 40
ECROU H M6
DOUILLE A BILLES KH 20 X 28 X 30
ECROU HM M6
ECROU NYLSTOP M4
ROULEMENT A BILLES 8 X 22 X 7 608 2RS
VIS BHC A EMBASE ULF 6 X 10
RONDELLE M6
RONDELLE GROWER D: 6
DOUILLE A BILLES SM 16 X 28 X 37 G UU
RESSORT DE GRIFFE
ROULEMENT A BILLES 4 X 12 X 4 604 ZZ
ENTRETOISE POLYURETHANE D: 6.2 X D: 14.5 X EP: 3
BUTEE POM D: 14 LG: 34 M6
VIS BHC A EMBASE ULF 5 X 12 10.9
ENTRETOISE ACIER D: 8.2 X D: 15 X EP: 5.1
TISSU PTFE ADHESIVE 30MX20 EP: 35/100 (ROULEAU DE
30M)
BARREAU DE GRIFFES ESCAMOTABLES FONDERIE USINE
Ø 40 POM SPEEDY 16/90 (A DROITE)
ECROU
PLAQUE SUPPORT DE GRIFFES
VIS RAPIDE SPEEDY P= 90 Ø16 LG: 51 PAS A DROITE
BIELLE DE GRIFFE ESCAMOTABLE (VOIR COMMENTAIRES
)COLONNE D: 16 LG: 60 USINEE
VIS BHC A EMBASE ULF 4 X 20 10.9
DROIT 4M5
VIS CHC M6-12 - 8.8
VIS CHC TETE BASSE M5-10 - 8.8
VIS DE REGLAGE GRIFFE
VIS CHC M6-55 - 8.8
VIS HC 6 X 6
VIS HC M6-35 - 8.8
RESSORT COMP D: 1.7 DE:16.5 - LO:40 6 SP
VERIN D.80 C.100 RALLONGE +11 MM (VOIR
COMMENTAIRE)
RESSORT
COMP D: 3,6 DE: 49,5 LO: 185 9,5 SP
RONDELLE NORD LOCK D: 12
JOINT METALOPLASTIQUE MPF 24 X 32 X 2.5
AMPLI FIBRE OPTIQUE
S/E GRIFFES ASSEMBLEUSE
RONDELLE DE GRIFFE PIVOTANTE
SUPPORT DE GRIFFES
GRIFFE COURTE COULISSANTE
GRIFFE COURTE PIVOTANTE AFFLEURANTE
VIS CHC TETE BASSE M4-10 - 8.8
RONDELLE DE GRIFFES PIVOTANTES AFFLEURANTES
ENTRETOISE ACIER D: 12.2 D : 17 EP : 1.1
AXE DE GRIFFE
LEVIER DE GRIFFES
ENTRETOISE ACIER D: 12 X D: 16 X EP: 5.5
LARDON DE GRIFFE
GOUPILLE CYL 8X14
RLT À 2 RANGÉE DE BILLES À CONTACT OBLIQUE 12 X 21
X7
PALIER
DE GRIFFE
VIS FHC M5-10 - 8.8
DESCRIPTION
WASHER
WASHER M 6
RONDELLE EVENTAIL D.8
BLACK CAP
BASE
CLAMPING PISTON ASSEMBLY
NUT
LINEAR BEARING KH 20 X 28 X 30
FLAT NUT D. 6
NUT NYLSTOP M4
BALL BEARING 8 X 22 X 7 608 2RS
BUTTON HEAD SCREW ULF 6 X 10
WASHER M 6
WASHER GROWER D: 6
LINEAR BEARING 16 X 28 X 37 G UU
CLAW SPRING
BALL BEARING 4 X 12 X 4 604 ZZ
SPACER
RETRACTABLE JAWS PLASTIC FINGER
SCREW BHC 5 x 12
SPACER
ADHESIVE TAPE 30Mx20 EP: 35/100
CLAMP SUPPORT ALUMINUM CAST
QUICK DRIVING NUT
CLAMP SUPPORT
QUICK SCREW
QUICK DRIVING NUT (SEE COMMENTS)
SHAFT D: 16 LG: 60
SCREW ULF 4 X 20
STRAIGHT CONNECTION 4 M 5
SCREW CHC 6 X 12
SCREW CHC 5 X 10 FLAT HEAD
CLAMP ADJUSTEMENT SCREW
SCREW CHC 6 X 55
SCREW HC 6 X 6
SCREW HC 6 X 35
SPRING
CYLINDER D.80 C.100
SPRING
WASHER NORD LOCK D:12
O-RING
OPTICAL FIBER SENSOR AMPLIFIER
SUB ASSY CLAMP
WASHER FOR PIVOTING CLAMP
CLAMP SUPPORT
SLIDING CLAMP
ROTATING CLAMP
SCREW CHC 4 X 10 FLAT HEAD
WASHER OF PIVOTING REBATE CLAMP
WASHER UNDER PIVOTING REBATE CLAMP
AXE DE GRIFFE
CLAMP LEVER
CLAMP AXLE INSERT & BALL BEARING
INSERT
PIN CYL 8 X 14 DIN 6325
BALL BEARING CONIC CONTACT 12 x 21 x 7 3801 2RS
CLAMP GUIDING
SCREW FHC 5 X 10
64
USER MANUAL
Z22887
Z23384
Z12560
Z1394
Z14072
Z1417
Z14719
Z15290
Z1587
Z1599
Z1604
Z1810
Z19948
Z22104
Z26150
Z26206
Z26224
Z2756
Z299
Z312
Z506
Z649
Z7063
Z7351
Z949
Z23390
Z1314
Z14722
Z1588
Z1599
Z1604
Z18387
Z19051
Z19054
Z19064
Z22856
Z22857
Z266
Z302
Z314
Z334
Z557
Z706
Z23392
Z25160
Z1422
Z1524
Z1606
Z1612
Z1788
Z24460
Z25199
Z25608
Z25609
Z25985
Z26043
Z26191
Z316
Z333
Z455
Z493
Z705
Z25540
1
1
2
1
1
1
1
1
1
2
2
1
1
1
1
1
1
1
2
1
1
2
2
2
1
1
1
2
4
1
1
1
1
1
1
1
1
1
1
2
4
2
1
1
1
1
1
2
1
1
1
1
1
1
1
1
1
2
6
1
2
1
1
U
U
U
U
U
U
U
U
U
U
U
U
U
U
U
U
U
U
U
U
U
U
U
U
U
U
U
U
U
U
U
U
U
U
U
U
U
U
U
U
U
U
U
U
U
U
U
U
U
U
U
U
U
U
U
U
U
U
U
U
U
U
U
MACH 1 CART
SUPPORT FIBRE OPTIQUE
S/E SUPPORT MARTEAU
PALIER LISSE D: 20 D: 28 L:30
POUSSOIR A TETON (mini cde 5 pcs)
RESSORT COMP D: 0,7 DE: 8.3 LO: 27 7,5 SP
ECROU NYLSTOP M6
BUTOIR D'AGRAFAGE
PLAQUE SUPPORT CAPTEUR
RONDELLE Z D5
RONDELLE M10
RONDELLE M4
SERRE CABLE CV-8 D. 8
AXE DE SUPPORT MARTEAU
VIS HC 8 X 30
S/E SUPPORT MARTEAU ET POUSSOIR ASSEMBLE
BARREAU INFERIEUR
EQUERRE DE DETECTION AGRAFAGE
VIS BHC M6-20 - 10.9
VIS CHC M4-10 - 8.8
VIS CHC 5 X 8
MARTEAU COURT (mini cde 5 pcs)
VIS FHC 4 X 8
COLONNE D: 20 LG: 61
VIS CHC 10 X 90
VIS TETE CARREE SPE. 6 X 20 (VOIR COMMENTAIRE)
S/E SUPPORT CHARGEUR PNEUMATIQUE
COUDE 4M5
VIS STF M 4 X 6 NYLON
RONDELLE Z6
RONDELLE M10
RONDELLE M4
VERIN DOUBLE EFFET MAGNETIQUE D.10 C.150 (VOIR
COMMENTAIRES)
SUPPORT
CHARGEUR USINE VERIN PNEU
TOLE SUPPORT VERIN POUSSE AGRAFES
S/E COULISSEAU VERIN EMC D 6
SUPPORT FIBRE OPTIQUE
ENTRETOISE ACIER D: 4.1 X D: 6 X EP: 7
DROIT 4M5
VIS CHC M4-16 - 8.8
VIS CHC M5-10 - 8.8
VIS CHC M6-25 - 8.8
VIS FHC 3 X 6
VIS HC 3 X 10
S/E FIBRES OPTIQUES
S/E MOTORISATION POSITION AGRAFES
ECROU NYLSTOP M8
ROULEMENT A BILLES 8 X 22 X 7 608 2RS
RONDELLE M5
RONDELLE M8
CIRCLIPS INT D: 22
POULIE RECEPTRICE 20 AT5-0/20-2
COURROIE 16 AT 5 LG 750
SUPPORT MOTEUR
PLAQUE SUPPORT MOTEUR
TENDEUR
ENTRETOISE ACIER D: 8.2 X D: 12 X EP: 13
POULIE MOTRICE 20 AT5-0/20-2 ALESAGE Ø 12 (voir
commentaire)
VIS
CHC M5-16 - 8.8
VIS CHC M6-20 - 8.8
VIS CHC M8-35 - 8.8
VIS CHC 6 X 16 TETE BASSE
VIS HC M3-3 - 8.8
S/E PUPITRE DE COMMANDE MACH1CART & UNI
STRUT
WEDGE DRIVER BLADE SUPPORT ASSY
PLASTIC BEARING SLEAVES
Wedge driver blade retaining screw (mini order 5 pcs)
SPRING COMP D: 0,7 DE: 8.3 LO: 27 7,5 SP
NUT NYLSTOP 6
STOP BAR
SUPPORT PLATE
WASHER Z D5
WASHER M D: 10
WASHER M 4
CLAMPING RING D.8
HAMMER SUPPORT AXIS
HEAD SET SCREW 8X30
HAMMER SUPPORT ASSY
ACCOSTER BOTTOM BAR
EQUERRE DE DETECTION AGRAFAGE
SCREW BHC 6 X 20
SCREW CHC 4 X 10
SOCKET CAP SCREW M5 X 8
Short wedge driver blade (mini order 5 pcs)
SCREW FHC 4 X 8
COLUMN D: 20 L: 61
SCREW CHC 10 x 90
SCREW SQUARE HEAD SPE. 6 x 20
SUB ASSY CARTRIDGE SUPPORT
ELBOW 4 M 5
NYLON SETSCREW M4X6
WASHER Z6
WASHER M D: 10
WASHER M 4
RODLESS MAGNETIC CYLINDER DOUBLE EFFECT (SEE COMMENTS)
MACHINED CARTRIDGE SUPPORT EMC PISTON
PISTON SUPPORTING PLATE
SLIDER ASSY EMC PISTON
STRUT
STRUT
STRAIGHT CONNECTION 4 M 5
SCREW CHC 4 X 16
SOCKET CAP SCREW M5 X 10
SCREW CHC 6 X 25
SCREW FHC 3 X 6
SCREW HC 3 X 10
SUB ASSY OPTICAL FIBER
SUB ASSY STAPLING POSITION MOTOR
NUT NYLSTOP D. 8
BALL BEARING 8 X 22 X 7 608 2RS
WASHER
WASHER M 8
CIRCLIPS INT D: 22
PULLEY
TRANSMISSION BELT
MOTOR SUPPORT
MOTOR SUPPORT PLATE
TENSIONER
SPACER d 8.2 X D 12 X H 13
MOTOR PULLEY
SCREW CHC 5 X 16
SCREW CHC 6 X 20
SCREW CHC 8 X 35
SCREW CHC 6 X 16 FLAT HEAD
SCREW HC 3 X 3
SUB ASSY MACH1 CONTROL PANEL
65
USER MANUAL
Z1044
Z11403
Z1326
Z1409
Z1412
Z1490
Z1602
Z1612
Z1671
Z1694
Z21528
Z22545
Z25215
Z25542
Z25599
Z25789
Z25874
Z26069
Z26071
Z26198
Z26360
Z26382
Z26573
Z26837
Z26995
Z286
Z330
Z4771
Z6609
Z7965
Z8768
Z8769
Z25613
Z25876
Z25877
Z25975
Z1402
Z1599
Z1612
Z19979
Z19980
Z21439
Z457
Z8797
Z25990
Z10055
Z10056
Z10373
Z11100
Z11712
Z1284
Z13041
Z1352
Z1396
Z1412
Z1414
Z1487
Z1499
Z15002
Z1523
Z1536
Z1541
Z1544
3
1
8
4
2
2
8
4
4
1
1
4
2
1
1
2
1
1
1
1
1
4
1
1
1
4
1
2
2
2
2
2
1
1
1
1
2
2
2
2
1
2
2
2
1
1
2
2
1
1
1
2
6
1
4
9
1
1
2
1
1
4
1
U
U
U
U
U
U
U
U
U
U
U
U
m
U
U
U
U
U
U
U
U
U
U
U
U
U
U
U
U
U
U
U
U
U
U
U
U
U
U
U
U
U
U
U
U
m
U
U
m
U
U
U
U
U
U
U
m
U
U
U
m
U
m
MACH 1 CART
VIS AUTOTARAUDEUSE 4 X 13 ZINGUEE
BOUTON ARU VERROUILLABLE
ECROU H M 3
ECROU NYLSTOP M 3
ECROU NYLSTOP M4
BOUTON TOURNANT 2 POSIT. FIXES (VOIR
COMMENTAIRES)
RONDELLE M D: 3
RONDELLE M8
RONDELLE GROWER D: 6
S/E BOUTON DE COMMANDE NOIR + NO
ALIMENTATION 24V
ENTRETOISE HEXAGONALE M/F M 3 x M 3 EP 12
BANDE EPDM COLLE 1 FACE 10 X 5
TOLE PUPITRE DE COMMANDE
RAIL OMEGA LG: 270
VIS BHC A EMBASE ULF 5 X 16 ZINGUEE 10.9
BOITIER PUPITRE
CABLE I/O LG 300 POUR BLOC BORNES A RESSORT +
FUSIBLE
CABLE RS232 LG 250 POUR CARTE D'ACCEUIL ARDUINO
MEGABORNES A RESSORT + FUSIBLE
BLOC
CLAVIER AVEC CIRCUIT INTEGRE
ENTRETOISE PLASTIQUE D: 3.1 X D: 6 X EP: 12
S/E CARTE D'ACCEUIL ARDUINO MEGA + AFFICHEUR
EQUERRE
RAIL OMEGA LG: 158
VIS CHC M3-6 - 8.8
VIS CHC M6-12 - 8.8
VIS CHC 8 X 20 TETE BASSE ZINGUEE
ECROU CARRE A LANGUETTE M 8
VIS CHC TETE BASSE M4-8 - 8.8
CONTACT ELEC. BLOC NO
CONTACT ÉLEC. BLOC NF
LESTE BETON
EQUERRE ARRIERE
TOLE SECURITE POTENCE
S/E MAINTIEN CADRE
ECROU NYLSTOP M 10
RONDELLE M10
RONDELLE M8
PLAQUE SUPPORT CADRE
EQUERRE SUPPORT CADRE
RONDELLE PLASTIQUE D 40 X 8.2 EP 20
VIS CHC 8 X 45
VIS FHC 10 X 50
S/E TIROIR COMPOSANTS MACH1 UNI&CART
GAINE ROBOTIQUE D:23 NOIR
RACCORD 90° D:23
ECROU GMM-21
TUBE P.U 2,5 X 4 ROUGE (LE M)
PURGE EN LIGNE D: 6
FICHE 10/16A 2P+T
DROIT 10 1/4
COUDE 4 1/8 ORIENTABLE
COUDE 6 1/8 ORIENTABLE
ECROU NYLSTOP M4
ECROU NYLSTOP M 5 zingué blanc 8.8
CABLE 1 X 0.75 NOIR
COUDE 6 1/4
SILENCIEUX 1/4 LAITON + FIL ACIER
COUDE 8 1/4
TUBE P.U 2,5 X 4 BLEU (LE M)
COUDE 10 1/4
TUBE RILSAN 8 X 10 BLEU (LE M)
AUTO TAPING SCREW 4 X 13
BOUTON ARU VERROUILLABLE
NUT
NUT NYLSTOP 3
NUT NYLSTOP M4
BUTTON ZB2 BD2
WASHER M 3
WASHER M 8
WASHER GROWER D: 6
SUB ASSY PUSH BUTTON
ALIMENTATION 24V
HEXAGONAL SPACER
SEALING ADHESIV TAPE
TOLE PUPITRE DE COMMANDE
SUPPORTING RAIL
SOCKET BUTTON HEAD SCREW M5 x 16 WITH FLANGE
BOITIER PUPITRE
I/O CABLE
RS232 CABLE
CONNECTION BOARD + FUSE
KEYBOARD WITH PCB
STRUT
SUB ASSY ARDUINO PCB
T SUPPORT
RAIL
SCREW CHC 3 X 6
SCREW CHC 6 X 12
SOCKET CAP SCREW M8 X 20 FLAT HEAD
SQUARE NUT WITH SPRING PLATE M 8
SCREW CHC 4 x 8 FLAT HEAD
ELECTRIC CONTACT NO
ELECTRIC CONTACT NC
CONCRETE BALLAST
COVER PLATE
COVER PLATE
FRAME SUPPORT ARMS
NUT NYLSTOP 10
WASHER M D: 10
WASHER M 8
FRAME SUPPORT PLATE
SUPPORT
PLASTIC SPACER D 40 X 8.2 EP 20
SCREW CHC 8 X 45
SCREW FHC 10 x 50
TROLLEY SUB ASSY
WIRE PROTECTING BLACK TUBE D:23
RACCORD 90° D:23
ECROU GMM-21
PU ROLL TYPE 4 x 2.5 RED
IN LINE EXAUST D.6
PLUG 10/16A 2PHASE+GR.
STRAIGHT CONNECTOR 10 1/4
ELBOW 4 1/8
ELBOW 6 1/8
NUT NYLSTOP M4
NUT NYLSTOP 5
CABLE 1 X 0.75 BLACK
ELBOW 6 1/4
MUFFLER
ELBOW 8 1/4
PU ROLL TYPE 4 x 2.5 BLUE
ELBOW 10 1/4
TUBE RILSAN 8 x 10 BLUE (BY METER)
66
USER MANUAL
Z1547
Z1550
Z1555
Z1556
Z1587
Z1605
Z1606
Z1619
Z1644
Z1645
Z1662
Z1664
Z1690
Z16914
Z1697
Z1700
Z17009
Z17010
Z17011
Z1778
Z1793
Z1801
Z1821
Z18403
Z1849
Z1853
Z1915
Z19281
Z19282
Z19902
Z21218
Z21731
Z22103
Z22303
Z22866
Z23029
Z23756
Z24913
Z24940
Z24941
Z25028
Z25286
Z25594
Z25599
Z25615
Z25789
Z25931
Z25932
Z25986
Z25995
Z26107
Z26187
Z26207
Z26208
Z26381
Z26403
Z26570
Z26572
Z26591
Z26596
Z26875
Z298
Z306
1
2
3
4
2
1
2
3
1
1
1
3
1
6
1
1
1
1
4
2
1
2
1
1
4
2
3
1
4
1
1
2
4
1
3
7
2
1
1
1
2
1
1
1
1
6
4
2
2
2
2
2
2
2
1
2
1
1
1
1
1
2
2
m
m
m
U
U
m
U
U
U
U
U
U
U
m
m
U
U
U
U
U
U
U
U
U
U
U
U
U
U
U
m
U
U
U
U
U
U
U
m
m
m
m
U
U
U
U
U
U
U
U
m
m
U
U
m
U
U
U
U
U
U
U
U
MACH 1 CART
CABLE 1 X 0.75 VERT JAUNE (LE M)
CABLE 2 X 0.75 ( LE M)
CABLE 2 X 1.5 ( LE M)
DIODE 1N4001
RONDELLE Z D5
TUBE RILSAN 5 X 8 BLEU (LE M)
RONDELLE M5
MANCHON F 1/4
CAPUCHON PRESSOSTAT
PRESSOSTAT
PEDALE ELECTRIQUE
MAMELON M 1/4 CON
REDUCTION M 1/4 M 1/8 CYL
CABLE BLINDE 4 X 0.75 (LE M)
BITUBE PU 2,5 X 4 BLEU/NOIR (LE M)
REDUCTION M 1/4 F 1/8 CYL
EMBASE PNEUMATIQUE 5 POSTES EMC
PLAQUE D'OBTURATION EMC
ELECTRODISTRIBUTEUR SERIE 70 5/2 MONOS. 24V DC
ECROU DE PRESSE ETOUPE N°13
COUDE M 1/4 CON F 1/4 CYL
PRESSE ETOUPE N°13
CROIX F 1/4 CYL
MICROREGULATEUR
BOUCHON 1/8
BOUCHON 1/4
DÉTECTEUR DE PROXIMITÉ NPN,NO (VOIR
COMMENTAIRES)
CONNECTEUR
MOLEX 4 PTS FEMELLE
CONTACT A SERTIR MOLEX
DISTRIBUTEUR 4V210-08 24V DC
TUBE P.U 6 X 8 BLEU (LE M)
ENTRETOISE PLASTIQUE D: 5.2 X D: 10 X LONG 25
VIS BHC A EMBASE ULF 5 X 12 10.9
CONNECTEUR MOLEX 6PTS
RESISTANCE 1.2KOHMS 1/4W
BORNE DE PASSAGE POUR 4 CONDUCTEURS
BORNE DE PROTECTION 4 CONDUCTEURS
MOTEUR PAS A PAS HIGHTORQUE ARBRE Ø 12
SY853P127
CABLE
1 x 0,34 BLANC ( LE M)
CABLE 1 x 0.34 MARRON ( LE M)
CABLE 1 x 0,34 ROUGE ( LE M)
CABLE 1 x 0,34 BLEU ( LE M)
DRIVER ZM-3H2080 PAS A PAS 3 PHASES 110-220V
RAIL OMEGA LG: 270
COFFRET COMPOSANTS
VIS BHC A EMBASE ULF 5 X 16 ZINGUEE 10.9
FIXATION PANNEAU
BUTTE D' ARRET
RAIL TELESCOPIQUE 3 ELEMENTS COURSE 300
PLAT FIXATION RAIL
CABLE 20 X 0.25 (LE M)
CABLE 1 x 0,34 NOIR
PRESSE ETOUPE N°21
ECROU DE PRESSE ETOUPE N°21
CABLE 1 X 0.75 ROUGE ( LE M)
DEFLECTEUR
FILTRE REGULATEUR 1/4 AW20-F02
EQUERRE DE FIXATION FILTRE REGULATEUR 1/4 AW20F02-A
MICROSWITCH
A GALET D453-V1RA
LIMITEUR DE DEBIT FIXE Ø 0.5
VANNE CADENASSABLE 1/4
VIS CHC M4-8 - 8.8
VIS CHC M4-40 - 8.8
CABLE 1 X 0.75 YELLOW/GREEN
CABLE 2X0.75MM2 (BY METER)
CABLE 2 x 1.5
DIODE 1N4001
WASHER Z D5
TUBE RILSAN 5 x 8 BLUE (BY METER)
WASHER
COUPLING SLEEVE F 1/4
COVER OF MANOCONTACT
MANOCONTACT
ELECTRICAL PEDAL
NIPPLE 1/4
REDUCTION M 1/4 M 1/8 CYL
CABLE 4X0.75
TUBE PU 2,5 X 4 BLUE/BLACK (BY METER)
REDUCTION M 1/4 F 1/8 CYL
MANIFOLD 100M5F
COVER FOR 100M5F
SOLENOID VALVE 4V110-06 24DC
NUT FOR STUFFING BOX N°13
ELBOW 1/4 MF
STUFFING BOX N°13
CROSS CONNECTOR F 1/4 CYL
AIR REGULATOR
CAP 1/8
CAP 1/4
INDUCTIVE SENSOR NPN NO
CONNECTEUR MOLEX 4 PTS FEMELLE
CONTACT A SERTIR MOLEX
SOLENOID VALVE V210-08 24V DC
PU ROLL TYPE 6 x 8 BLUE
SPACER 5.2 x 10 x 25
SCREW BHC 5 x 12
CONNECTEUR MOLEX 6PTS
RESISTOR 1.2 KOHMS
4 CONDUCTORS TERMINAL
4 CONDUCTORS PROTECTION
MOTOR W/O GEARS FOR ULTRAS
WIRE END SECTION 0.34 WHITE
WIRE END SECTION 0.34
WIRE END SECTION 0.34 RED
WIRE END SECTION 0.34 BLUE
DRIVER ZM-3H2080 PAS A PAS 3 PHASES 110-220V
SUPPORTING RAIL
ELECTRIC CABINET FRAME
SOCKET BUTTON HEAD SCREW M5 x 16 WITH FLANGE
PANNEL SUPPORT
STOP
RAIL
PLAT FIXATION RAIL
CABLE 20 X 0.25
WIRE END SECTION 0.34 BLACK
STUFFING BOX N°21
NUT FOR STUFFING BOX N°21
CABLE 1 x 0.75 RED
DEFLECTOR
AIR CONDITIONNER
SQUARE SUPPORT
MICROSWITCH
FLOW REDUCER
VALVE 1/4
SOCKET CAP SCREW M4 X 8
SCREW CHC 4 X 40
67
USER MANUAL
Z311
Z348
Z352
Z4450
Z4451
Z4452
Z469
Z4715
Z6219
Z651
Z675
Z7833
Z7834
Z8075
Z922
Z928
Z947
Z9744
Z26228
Z26251
Z1097
Z1709
Z19855
Z26316
Z26725
Z12062
Z1270
Z12724
Z1311
Z1331
Z13331
Z1414
Z16028
Z1606
Z1608
Z18374
Z18451
Z18473
Z18474
Z20005
Z22355
Z22521
Z23351
Z23440
Z24156
Z25988
Z26223
Z26687
Z26724
Z290
Z319
Z331
Z336
Z4460
Z4771
Z5849
Z5850
Z6320
Z863
Z8761
Z97
Z9924
Z26770
3
3
1
2
5
19
1
4
1
4
1
1
1
1
1
1
1
4
1
1
1
1
1
4
1
2
4
2
1
2
2
2
1
1
1
1
1
1
1
1
1
1
1
1
2
1
1
1
1
2
1
1
2
2
2
2
3
9
1
1
1
1
1
m
m
U
U
U
U
U
U
m
U
U
U
U
U
U
U
U
U
m
U
U
U
U
U
U
U
U
U
U
U
U
U
U
U
U
U
U
U
U
U
U
U
U
U
U
U
U
U
U
U
U
U
U
U
U
U
U
U
U
U
U
U
U
MACH 1 CART
CABLE 1 X 0.75 BLEU ( LE M)
CABLE 3 X 1.5 ( LE M)
PURGE RAPIDE 1/8
BUTEE D'ARRET SANS VIS
CONTACT DE PONTAGE HORIZONTAL
BORNE DE PASSAGE POUR 2 CONDUCTEURS
DROIT 4 1/8
ETIQUETTE DE REPERAGE +24V/-24V BORNE WAGO
CABLE 2 X 0.34 BLINDE (LE M)
VIS FHC 4 X 16
EMBOUT MALE RAPIDE M 1/4
ETIQUETTE DE REPERAGE 11 A 20 BORNE WAGO
ETIQUETTE DE REPERAGE 1 A 10 BORNE WAGO
SELECTEUR DE CIRCUIT 1/4
ECROU DE PRESSE ETOUPE N°16
DROIT 4 1/4
MANOMETRE + ETRIER M. 1/8
COSSE A SERTIR PLATE FIL 0.5 A 1.25
BANDE EPDM COLLE 1 FACE 15 X 15
S/E VALVE D'ECHAPP. RAPIDE 1/2 EQUIPEE (VOIR
COMMENTAIRES)
DROIT
8 1/4
REDUCTION M 1/2 F 1/4
S/E VALVE D'ECHAPP. RAPIDE 1/2 EQUIPEE (VOIR
COMMENTAIRES)
VIS H 8 X 50
ENSEMBLE MECANIQUE COMMUNE CART
ENTRETOISE ACIER D: 10.1 X D: 25 X EP: 3
VIS HC M6-8 POINTEAU - 8.8
DOUILLE A BILLES DOUBLE SM 20 X 32 X 80
VIS STF M 6 X 10 NYLON
ECROU H M 5
DOUILLE A BILLES SM 30 X 45 X 64 G UU
ECROU NYLSTOP M 5 zingué blanc 8.8
BUTEE ELASTIQUE D: 15 X 10 M5 POLYURETHANE
RONDELLE M5
RONDELLE M6
BARREAU AV FONDERIE USINE
SUPPORT VERIN DE SERRAGE
PLAQUE PRINCIPALE GAUCHE USINEE (VOIR
COMMENTAIRES)
PLAQUE
PRINCIPALE DROITE USINEE (VOIR
COMMENTAIRES)
S/E
VERIN PRE SERRAGE DE GRIFFES
ANNEAU D'ARRET A ARCBOUTEMENT Ø 8
SUPPORT DETECTEUR
PORTE BAGUE D' ETANCHEITE
S/E BUTEE AGRAFAGE
VIS CHC 8 X 45 TETE BASSE ZINGUEE 10.9
BARREAU AR USINE
PINCE A COURROIE AT5
BRIDE DE COURROIE
BARREAU D'AGRAFAGE FONDERIE USINE MACH4CART
VIS CHC M3-16 - 8.8
VIS CHC M5-30 - 8.8
VIS CHC M6-16 - 8.8
VIS CHC M6-30 - 8.8
VIS HC 4 X 6 POINTEAU
VIS CHC 8 X 20 TETE BASSE ZINGUEE
COLONNE D: 20 LG: 414
VIS CHC 10 X 16 TETE BASSE
VIS BHC A EMBASE ULF 6 X 16
BILLE D.8
BAGUE D'ETANCHEITE SD 30 X 40 X 4
VIS POINTEAU
COLLIER SERRE CABLE D: 4.8
S/E BATI MACH CART
CABLE 1 x 0.75 BLUE
CABLE 3 x 1.5
QUICK EXHAUST VALVE 1/8
STOP WITHOUT SCREW
HORIZONTAL CONNECTNG PLUG
2 CONDUCTORS TERMINAL
MALE TUBE CONNECTOR 4 1/8
LABEL +24V/-24V WAGO
CABLE 2 x 0.34
SCREW FHC 4 X 16
1/4 MALE CONNECTION
ETIQUETTE DE REPERAGE 11 A 20 BORNE WAGO
ETIQUETTE DE REPERAGE 1 A 10 BORNE WAGO
SELECTOR 1/4
NUT FOR STUFFING BOX N°16
MALE TUBE CONNECTOR 4 1/4
MANOMETER M 1/8 + STIRRUP
WIRE END 0.5 A 1.25
SEALING ADHESIV TAPE
QUICK EXHAUST VALVE
STRAIGHT CONNECTION 8 1/4
REDUCTION M 1/2 F 1/4
QUICK EXHAUST VALVE
SCREW H 8 X 50
SUB ASSY CARTRIDGE VERSION
IRON SPACER D: 10.1 x D: 25 x EP: 3
SCREW HC 6 X 8 POINTEAU
BUSHING 20 X 32 X 80
SCREW STF M 6 X 10 NYLON
NUT
LINEAR BEARING 30 X 45 X 64
NUT NYLSTOP 5
RUBBER END FOR TOP (vertical) CLAMPS
WASHER
WASHER M 6
ALUMINUM CAST BLOCK
CLAMPING PISTON SUPPORT
MAIN LEFT TABLE
MAIN RIGHT TABLE
SUB ASSY PRE CLAMPING PISTON
LOCKING WASHER
SENSOR SUPPORT
SEALING PROTECTION
SUB ASSY
SCREW CHC 8 X 45
CAST COLUMN SUPPORT
BELT CLAMP
BELT LOCKING PLATE
MACHINED DISTRIBUTOR SUPPORTING BAR FOR SQUARE HAMMER
SCREW CHC 3 X 16
SOCKET CAP SCREW M5 X 30
SOCKET CAP SCREW M6 X 16
SCREW CHC 6 X 30
SCREW HC 4 X 6 POINT END
SOCKET CAP SCREW M8 X 20 FLAT HEAD
SHAFT D: 20 LG: 414
SCREW CHC 10 X 16 FLAT HEAD
SCREW BHC WITH BASE ULF 6 X 16
BALL D.8
AIRTIGHT RING SD 30x40x4
SCREW POINT END
CABLE CLAMPING RING D: 4.8
FRAMING SUB ASSY
68
USER MANUAL
Z1414
Z1585
Z1606
Z22103
Z25740EB1
Z26771
Z2755
Z307
Z335
Z4771
Z26800
Z12064
Z19332
Z22438
Z26804
Z26805
Z26822
Z26826
Z26918
Z26983
Z27035
Z2798
Z9162
30307NCOI
30310NCOI
31310BDCO
Z26809
Z1478
Z26953
Z26954
Z26957
Z26864
Z26877
Z26887
Z102
Z103
Z1589
Z1733
Z19578
Z19579
Z19932
Z21613
Z26676
Z26886
Z3490
Z653
Z667
Z26980
Z1363
Z1398
Z14472
Z18444
Z19222
Z21499
Z23354
Z23361
Z26990
Z26993
Z312
Z317
Z817
Z288
Z290
1
8
1
12
1
1
2
8
6
1
1
1
1
1
1
1
1
1
1
1
1
1
1
1
1
1
1
1
1
1
1
1
1
1
1
1
1
1
1
1
1
1
2
1
1
1
2
1
1
1
1
1
2
1
1
1
1
1
2
1
1
2
4
U
U
U
U
U
U
U
U
U
U
U
U
U
U
U
U
U
U
U
U
U
m
U
U
U
U
U
U
U
U
U
U
U
U
U
U
U
U
U
U
U
U
U
U
U
U
U
U
U
U
U
U
U
U
U
U
U
U
U
U
U
U
U
MACH 1 CART
ECROU NYLSTOP M 5 zingué blanc 8.8
RONDELLE Z D4
RONDELLE M5
VIS BHC A EMBASE ULF 5 X 12 10.9
S/E BATI MACH EBAUCHE (VOIR NOMENCLATURE
DETAIL)
S/E PANNEAUX ROUGES CART (VOIR NOMENCLATURE
DETAIL)
VIS CHC M4-35 - 8.8
VIS CHC M4-45 - 8.8
VIS FHC M4-12 - 8.8
VIS CHC 8 X 20 TETE BASSE ZINGUEE
S/E EMBALLAGE MACH1CART
PALETTE CS55M-CS199MXL-CS299MXL2-CS4008XLMF10-MF20-MF40.
EMBALLAGE 700 X 655 X 1250 INTER.
CLOCHE+COUVERCLE
PLANCHE
AGGLOMEREE 650 mm x 695 mm EP: 22
MANUEL TECHNIQUE ET D'UTILIS. MACH1CART
PLAQUE D'IDENTITE MACH1CART
ETIQUETTE ATTENTION ALIMENTATION ...
PLANCHE D'ETIQUETTES MACH1 CART
ETIQUETTE SECURITE LIRE LE MANUEL
ETIQUETTE SECURITE TENSION REF 307 Lg/ 25
S/E BOITE ACCESSOIRES MACH1CART
PAPIER ANTIROUILLE (LE KG) VOIR COMMENTAIRES
PLANCHE D'ETIQUETTES ASSEMBLEUSES
BTE 6 CHARGEURS COINS N° 7
BTE 6 CHARGEURS COINS N°10
BTE 6 CHARGEURS COINS N°10 BD
DOIGT D' INDEXAGE
BOUTON ETOILE F: M 4
AXE
CORPS
RESSORT COMP
CAME DE DETECTION
ENTRETOISE PLASTIQUE D: 5.2 X D: 10 X EP: 20
S/E PLAQUE BUTEE EQUIPEE SIMPLIFIEE
ENTRETOISE ACIER D: 4.1 X D: 7 X EP: 15.1
RONDELLE REPERE
RONDELLE Z D: 12
GOUPILLE CYLINDRIQUE 6X20
BUTEE DE DROITE
BUTEE DE GAUCHE
S/E MANETTE DE BLOCAGE DE TABLE
PLAQUE BUTEE INJECTION ALU USINEE PEINTE
BANDE ADHESIVE PA6 25.4 X 0.25 LG:220MM
LARDON
S/E VIS ANGULAIRE
VIS FHC M4-25 - 8.8
VIS FHC M6-12 - 8.8
S/E COLONNE + SUPPORTS VERIN ET PRESSEUR
ECROU HM M20
ECROU NYLSTOP M 20
RONDELLE Z D: 20
RONDELLE NORD LOCK D: 20
VIS HC 20 X 70
BOUCHON POUR ECROU M.20
COLONNE DE POTENCE D: 30 / D: 16 LG: 415
SUPPORT VERIN D' AGRFAGE
S/E SUPPORT PRESSEUR + AIMANT
ENTRETOISE ELASTOMERE 70 35 X 50 X EP: 15
VIS CHC 5 X 8
VIS CHC M5-20 - 8.8
S/E AGRAFAGE ET GUIDE (mini cde 2 pcs)
VIS CHC 3 X 10
VIS CHC M3-16 - 8.8
NUT NYLSTOP 5
WASHER Z D4
WASHER
SCREW BHC 5 x 12
FRAME SUB ASSY
SUB ASSY RED PANELS
SCREW CHC 4 X 35
SCREW CHC 4 X 45
SCREW FHC 4 X 12
SOCKET CAP SCREW M8 X 20 FLAT HEAD
PACKING SUB ASSY
PALET FOR CS55M-CS199MXL-CS299MXL2-CS4008XL-MF10-MF20-MF40.
CAISSE EXPAK OSB 700 x 655 x 1050 INTER CEINTURE+COUVERCLE
WOOD PLATE
MANUEL TECHNIQUE ET D'UTILIS. MACH1CART
IDENTITY PLATE MACH1CART
BOARD OF LABELS MACH1 CART
SAFETY LABEL
SAFETY LABEL
ACCESSORY BOX
RUST PROTECTION PAPER
PLANCHE D'ETIQUETTES ASSEMBLEUSES
BOX 6 CARTRIDGES #7
BOX 6 CARTRIDGES #10
BOX 6 CARTRIDGES #10 HW
LOCATING PIN
STAR BUTTON M 4 F
AXIS
BODY
COMPRESSION SPRING
DETECTION CAM
SPACER D: 5.2 X D: 10X EP: 20
SLIDING TABLE WITH FIXED FENCES
STRUT
MARK WASHER
WASHER Z 12
CYLINDRICAL PIN 6 X 20
RIGHT FENCE
LEFT FENCE
FENCES TABLE LOCKING HANDLE
STOP PLATE
PROTECTING TAPE
GUIDE
SUB ASSY ANGULAR SC
SCREW FHC 4 X 25
SCREW FHC 6 X 12
COLUMN SUB ASSY
FLAT NUT D.20
NUT NYLSTOP D.20
WASHER D.20
WASHER NORD LOCK D:20
SCREW HC 20 X 70
CAP PLUG FOR NUT M20
SHAFT D: 30 / D: 16 LG: 415
STAPLING PISTON SUPPORT
SUB ASSY VERTICAL CLAMP SUPPORT
RUBBER SPACER
SOCKET CAP SCREW M5 X 8
SOCKET CAP SCREW M5 X 20
Wedge distributor block (mini order 2 pcs)
SOCKET CAP SCREW M3 X 10
SCREW CHC 3 X 16
69
USER MANUAL
Z6555
Z758
Z759
Z8352
Z8800
1
1
1
1
4
U
U
U
U
U
MACH 1 CART
PLAQUE
CONTRE PLAQUE
GUIDE FIXE VOIR Z 10379
VIS FHC 5 X 40
RONDELLE LL8
PLATE
HAMMER GUIDE PLATE
FIXED GUIDE (SEE Z10379)
SCREW FHC 5 x 40
WASHER LL D: 8
70
USER MANUAL
V. ELECTRICAL
ELECTRIQUES
MACH 1 CART
SCHEMATICS
/
SCHEMAS
71
USER MANUAL
MACH 1 CART
72
USER MANUAL
MACH 1 CART
73
USER MANUAL
MACH 1 CART
74
USER MANUAL
VI. CE
CERTIFICATE /
CONFORMITE
MACH 1 CART
DECLARATION
DE
75
USER MANUAL
MACH 1 CART
76