1
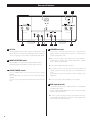
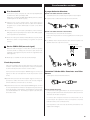
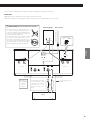
D01049720B A-03 Power Amplifier OWNER’S MANUAL.................... 3 MANUEL DU PROPRIÉTAIRE..... 11 BEDIENUNGSANLEITUNG........ 19 CAUTION: TO REDUCE THE RISK OF ELECTRIC SHOCK, DO NOT REMOVE COVER (OR BACK). NO USER-SERVICEABLE PARTS INSIDE. REFER SERVICING TO QUALIFIED SERVICE PERSONNEL. The lightning flash with arrowhead symbol, within an equilateral triangle, is intended to alert the user to the presence of uninsulated ”dangerous voltage˝ within the product's enclosure that may be of sufficient magnitude to constitute a risk of electric shock to persons. The exclamation point within an equilateral triangle is intended to alert the user to the presence of important operating and maintenance (servicing) instructions in the literature accompanying the appliance. IMPORTANT SAFETY INSTRUCTIONS 1) 2) 3) 4) 5) 6) 7) Read these instructions. Keep these instructions. Heed all warnings. Follow all instructions. Do not use this apparatus near water. Clean only with dry cloth. Do not block any ventilation openings. Install in accordance with the manufacturer's instructions. 8) Do not install near any heat sources such as radiators, heat registers, stoves, or other apparatus (including amplifiers) that produce heat. 9) Do not defeat the safety purpose of the polarized or groundingtype plug. A polarized plug has two blades with one wider than the other. A grounding type plug has two blades and a third grounding prong. The wide blade or the third prong are provided for your safety. If the provided plug does not fit into your outlet, consult an electrician for replacement of the obsolete outlet. 10) Protect the power cord from being walked on or pinched particularly at plugs, convenience receptacles, and the point where they exit from the apparatus. 11) Only use attachments/accessories specified by the manufacturer. 12) Use only with the cart, stand, tripod, bracket, or table specified by the manufacturer, or sold with the apparatus. When a cart is used, use caution when moving the cart/apparatus combination to avoid injury from tip-over. 13) Unplug this apparatus during lightning storms or when unused for long periods of time. 14) Refer all servicing to qualified service personnel. Servicing is required when the apparatus has been damaged in any way, such as power-supply cord or plug is damaged, liquid has been spilled or objects have fallen into the apparatus, the apparatus has been exposed to rain or moisture, does not operate normally, or has been dropped. << Do not expose this apparatus to drips or splashes. << Do not place any objects filled with liquids, such as vases, on the apparatus. << Do not install this apparatus in a confined space such as a book case or similar unit. << The apparatus draws nominal non-operating power from the AC outlet with its POWER or STANDBY/ON switch not in the ON position. 2 << The apparatus should be located close enough to the AC outlet so that you can easily grasp the power cord plug at any time. << An apparatus with Class I construction shall be connected to an AC outlet with a protective grounding connection. << The appliance coupler is used as the disconnect device, the disconnect device shall remain readily operable. << If the product uses batteries (including a battery pack or installed batteries), they should not be exposed to sunshine, fire or excessive heat. << Caution should be taken when using earphones or headphones with the product because excessive sound pressure (volume) from earphones or headphones can cause hearing loss. WARNING: TO PREVENT FIRE OR SHOCK HAZARD, DO NOT EXPOSE THIS APPLIANCE TO RAIN OR MOISTURE. CAUTION < DO NOT REMOVE THE EXTERNAL CASES OR CABINETS TO EXPOSE THE ELECTRONICS. NO USER SERVICEABLE PARTS ARE INSIDE! < IF YOU ARE EXPERIENCING PROBLEMS WITH THIS PRODUCT, CONTACT TEAC FOR A SERVICE REFERRAL. DO NOT USE THE PRODUCT UNTIL IT HAS BEEN REPAIRED. For U.S.A. This equipment has been tested and found to comply with the limits for a Class B digital device, pursuant to Part 15 of the FCC Rules. These limits are designed to provide reasonable protection against harmful interference in a residential installation. This equipment generates, uses, and can radiate radio frequency energy and, if not installed and used in accordance with the i n s t r u c t i o n s, m a y c a u s e h a r m f u l i n t e r fe re n c e t o r a d i o communications. However, there is no guarantee that interference will not occur in a particular installation. If this equipment does cause harmful interference to radio or television reception, which can be determined by turning the equipment off and on, the user is encouraged to try to correct the interference by one or more of the following measures: • Reorient or relocate the equipment and/or the receiving antenna. • Increase the separation between the equipment and receiver. • Connect the equipment into an outlet on a circuit different from that to which the receiver is connected. • Consult the dealer or an experienced radio/TV technician for help. CAUTION Changes or modifications to this equipments not expressly approved by TEAC CORPORATION for compliance will void the user's warranty. CAUTION Regarding Placement To maintain proper ventilation, be sure to leave a space around the unit (from the largest outer dimensions including projections) equal to, or greater than, shown below. Left and Right Panels: 20 cm (8˝) Rear Panel: 10 cm (4˝) Top Panel: 5 cm (2˝) Contents Features Thank you for choosing Esoteric. Read this manual carefully to get the best performance from this unit. Pure class A amplification and triple separate transformer Contents. . . . . . . . . . . . . . . . . . . . . . . . . . . . . . . . . . . . . . . . . . . . . . . . . . . . . . . . . . . . 3 Pure class A amplification is employed and it ensures high signal linearity. I nheriting the design concept of A-80, three separated transformers are mounted on the unit: two on the power section of the current amplification stage for the left and right channels; one on that of the voltage amplification stage. Features. . . . . . . . . . . . . . . . . . . . . . . . . . . . . . . . . . . . . . . . . . . . . . . . . . . . . . . . . . . . . 3 Before use. . . . . . . . . . . . . . . . . . . . . . . . . . . . . . . . . . . . . . . . . . . . . . . . . . . . . . . . . . . 4 Front panel features. . . . . . . . . . . . . . . . . . . . . . . . . . . . . . . . . . . . . . . . . . . . . . . . . 5 Rear panel features. . . . . . . . . . . . . . . . . . . . . . . . . . . . . . . . . . . . . . . . . . . . . . . . . . 6 Speaker connection. . . . . . . . . . . . . . . . . . . . . . . . . . . . . . . . . . . . . . . . . . . . . . . . . 7 Connection example. . . . . . . . . . . . . . . . . . . . . . . . . . . . . . . . . . . . . . . . . . . . . . . . 8 Troubleshooting. . . . . . . . . . . . . . . . . . . . . . . . . . . . . . . . . . . . . . . . . . . . . . . . . . . . 10 Specifications. . . . . . . . . . . . . . . . . . . . . . . . . . . . . . . . . . . . . . . . . . . . . . . . . . . . . . . 10 Information for Users on Collection and Disposal of Old Equipment and used Batteries T hese s ymb ols on the produc t s, pack aging, and/or accompanying documents mean that used electrical and electronic products and batteries should not be mixed with general household waste. For proper treatment, recovery and recycling of old products and used batteries, please take them to applicable collection points, in accordance with your national legislation and the Directives 2002/96/EC and 2006/66/EC. The speaker terminals are WBT-0710 Copper (Cu), which use a very high purity of material from the WBT nextgen series. BTL connection BTL (Bridged Transformer Less) connection, using two bridgeconnected amplifiers, enables to get output, about four times as large as that in the single use, and it is not necessary to use transformers. The unit can be used as a monaural amplifier by changing the OUTPUT MODE switch on the rear panel to “BTL”, which makes a BTL connection with the left and right channels. ENGLISH For European Customers WBT's speaker terminals 2 system inputs This A-03 is equipped with 2 input system terminals, 1 XLR and 1 RCA, which can be selected with the switch on the rear panel. By disposing of these products and batteries correctly, you will help to save valuable resources and prevent any potential negative effects on human health and the environment which could otherwise arise from inappropriate waste handling. For more information about collection and recycling of old products and batteries, please contact your local municipality, your waste disposal service or the point of sale where you purchased the items. Information on Disposal in other Countries outside the European Union These symbols are only valid in the European Union. If you wish to discard these items, please contact your local authorities or dealer and ask for the correct method of disposal. Note for the battery symbol (bottom right two symbol examples): This symbol might be used in combination with a chemical symbol. In this case it complies with the requirement set by the Directive for the chemical involved. 3 Before use What's in the box Please confirm that the following accessories are in the box you open it. Power cord x 1 Felt pads x 4 Power plug support bracket x 1 Screw for the power plug support bracket x 2 Owner's manual x 1 Warranty card x 1 Placement of the unit High-quality hardened tool steel is used for the pin-point feet, securely attached to the bottom of the unit. Although the outer feet may appear loose, the weight of the unit causes them to become firm and secure. The design effectively damps and reduces vibration. Pin-point foot Read this before operation < Place the unit in a stable location near the audio system that you will use. < Do NOT place any objects on this unit. Do NOT cover this unit with a cloth. Do NOT place this unit on a thick-carpet. < As the unit may become warm during operation, always leave sufficient space around the unit for ventilation. The ventilation holes should not be covered. Make sure there is at least 20 cm (8˝) of space above and at least 5 cm (2˝) of space on each side of the unit. < Do NOT place anything such as a CD, CD-R, cassette tape etc. on top of the unit. < The voltage supplied to the unit should match the voltage as printed on the rear panel. If you are in any doubt regarding this matter, consult an electrician. Steel foot Cover foot < When removing the power plug from the wall outlet, always pull directly on the plug, never yank on the cord. < Keep this manual in a safe place for future reference. < This unit is a class A power amplifier and emits more heat than other types of amplifiers. Install it separately with taking 20 cm or more space from walls and do not use a rack for installation. When you need to install the unit in a rack, use one which has ventlations and take care of temperature of the unit. < Do not install the unit upside-down or one of the sides down. 4 Cover foot retaining screws < Be careful to avoid injury when moving the unit due to its weight. Get someone to help you if necessary. < To protect the supporting furniture surface, you may stick the felt pads supplied with the unit to the bottom of the metal feet. On the power plug support bracket The power plug support bracket is supplied for ensuring the connection of a heavy power cord such as ESOTERIC Power Cable 7N-PC9100 MEXCEL and 7N-PC7100 by supporting their plug. AC Inlet < Choose the installation location of your unit carefully. Avoid placing it in direct sunlight or close to a source of heat. Also avoid locations subject to vibrations and excessive dust, heat, cold or moisture. < Do not open the amplifier cabinet as this might result in damage to the circuitry or electrical shock. If a foreign object should get into the unit, contact your dealer or service company as soon as possible and do not use the unit until the foreign object has been removed. Bottom plate of the unit Power cord Support bracket Screw (supplied) Attach the bracket and adjust its position according to the size of the plug of the power cable, and fix it firmly with the supplied screws. Maintenance If the surface of the unit gets dirty, wipe with a soft cloth or use diluted neutral cleaning liquid. Be sure to remove any fluid completely. Do not use thinner, benzine (naphtha) or alcohol as they may damage the surface of the unit. Front panel features A WARM-UP switch B B POWER Use this switch to turn on/off the WARM-UP mode. When the WARM-UP mode is on, the power amplifier circuits is warmed up in low power consumption and the power of the unit speedily becomes stable. Use this switch to turn the unit on and off. The ring around the switch flashes in blue and no sound comes out for a few seconds after turning on the power. Wait until the flashing stops. The WARM-UP mode is effective only when the unit is turned on. The ring around the POWER switch lights in green when you turn on the WARM-UP mode. No sound comes out while warming up the unit. < When the protection circuit is in operation, the ring around the POWER switch flashes in blue and no sound comes out. Pressing the WARM-UP switch while warming up the unit turns off the WARM-UP mode. The ring around the POWER switch will flash in blue for a few seconds. No sound comes out while it is flashing. When the flashing stops, the power is turned on and sound will start to come out. For enjoying better sound It is recommended to use the WARM-UP mode for more than 30 minutes before playing back music. Using WARM-UP mode assists stable drive of internal circuits and brings out the performance of this unit fully. ENGLISH A < Follow the steps below when you turns on the audio system including this unit to protect the speakers. 1 Turn the volume of the preamplifier to the minimum. 2 Turn on the sound source components. 3 Turn on the preamplifier. 4 Turn on this unit. Follow the steps below when you turns off the system. 1 Turn the volume of the preamplifier to the minimum. 2 Turns off this unit. 3 Turns off the preamplifier. 4 Turns off the sound source components. < Because the unit is equipped with a high capacity transformer and capacitor, sound may occur from the power transformer when you turn on the unit. This is normal. < Once the unit is turned off, wait for at least 2 seconds to turn it again. 5 Rear panel features A B IN C INPUT SELECTOR RCA XLR OUTPUT MODE BTL BTL STEREO BTL SPEAKER SPEAKER R L SIGNAL GND INPUTS BTL CLASS 2 WIRING CLASS 2 WIRING XLR R RCA XLR L R D F E G A AC inlet Use the supplied Esoteric power cord. Use of other power cords may result in fire or electric shock. Unplug the power cord when you are not going to use the unit for an extended period of time. B INPUT SELECTOR switch Use this switch to change the input between RCA and XLR. Do NOT change the input while the power of this unit is on. C OUTPUT MODE switch Choose “STEREO” when you use this unit as a stereo power amplifier. Choose “BTL” when you use this unit as a monaural power amplifier. You cannot connect the speakers for the both mode at the same time. RCA L F E D D SPEAKER terminals Connect the – terminal of the unit to the – terminal of the speaker and the + terminal of the unit to the + terminal of the speaker using speaker cords. < When you choose “BTL” as the output mode, connect the BTL + terminal to the + terminal of the speaker and the BTL – terminal to the – terminal of the speaker. < Connect 4Ω or higher impedance speakers. < The metal portions of the two separate wires (Positive and negative), should not touch each other or an electrical short can occur. Shorted wires can create a fire hazard or induce a failure in your equipment. < Do not connect two or more amplifiers to one speaker. E RCA input terminals Connect the terminals to the output terminals on a preamplifier using RCA audio cables. Slide the INPUT SELECTOR switch on the rear panel to “RCA” when you use the terminals. < Be sure to insert each plug securely. To prevent hum and noise, avoid bundling the signal interconnection cables together with the AC power cord or speaker cables. 6 Speaker connection F XLR input terminal Connect the terminals to the output terminals on a preamplifier using XLR balanced cables. Slide the INPUT SELECTOR switch on the rear panel to “XLR” when you use the terminals. About the speaker terminal When your speaker cable is bare wire: Twist the strands of the stripped wires tightly together. < The thickness of wires should be less than 4 mm (1/8˝). < Be sure to insert each plug securely. To prevent hum and noise, avoid bundling the signal interconnection cables together with the AC power cord or speaker cables. < If you are using balanced connectors, push in the XLR plug until the lever clicks. To remove the XLR plug, hold the lever and pull out the plug. G SIGNAL GND connection Use a commercially available jacketed cable (PVC-covered cord or others) to connect the signal ground terminal on the unit to the signal ground of other components. < The inside diameter of spades should be 6 mm or more and outside diameter of spades should be 13.5 mm or less. ENGLISH < The pin assignment of the XLR input terminal is #2 HOT. Use the corresponding cables for correct polarity. When your speaker cable has spades: Loosen the terminal and insert the spade into the terminal. Then turn the terminal clockwise to tighten it. 13.5 mm or less 6 mm or more < Note that this is NOT an electrical safety ground (earth). Protection circuits This unit is equipped with an output short-circuit protection circuit, an overcurrent protection circuit and a direct current protection circuit. The ring around the POWER switch flashes in blue or flashes in blue and violet when the protection circuit is operating. < The speaker cables may short out when the ring around the POWER switch flashes in blue. Turn off the unit and check your speaker connections. < The temperature inside the unit may be too high when the ring around the POWER switch flashes in blue and violet. Turn off the unit and wait for the temperature to decrease (10 to 20 minutes suggested), or place this unit in a well-ventilated area. Connection using speaker cables with banana plugs Tighten the terminal and insert a banana plug. For European customers: In accordance with European safety regulations, it is not possible to connect banana plugs into the speaker terminals on European models. The holes into which banana plugs are inserted have been covered with black caps. Connect the speakers using spades or bare wires. If the black caps become separated from the terminals, return them to their original position. 7 Connection example This is an example when using this unit as a stereo power amplifier. CAUTION: < Switch off the power to all equipment before making connections. < Read the instructions of each component you intend to use with this unit. Right speaker Wall socket Left speaker Power cord OUTPUT MODE BTL IN STEREO INPUT SELECTOR XLR RCA OUTPUT MODE BTL BTL STEREO BTL SPEAKER SPEAKER R L SIGNAL GND INPUTS BTL CLASS 2 WIRING CLASS 2 WIRING XLR R RCA XLR L RCA R L A-03 1. COMMON 2. HOT (+) 3. COLD (−) R L PREOUT Preamplifier 8 RCA audio cable XLR audio cable XLR pin assignment: Connect a pair of these cables. This is an example when using this unit as a monaural power amplifier for the left channel. CAUTION: < Switch off the power to all equipment before making connections. < Read the instructions of each component you intend to use with this unit. QCAUTION for speaker connections Left speaker Wall socket Sparks may develop, causing failures, electric shock or burns if the bare wires or the spade terminal at the end of the speaker cables come in contact with other metallic parts or the unit's enclosure. OUTPUT MODE BTL IN STEREO ENGLISH Power cord A loose cable connection may cause the bare wires or the spade terminal to come in contact with other metallic parts or the unit's enclosure. Make sure of a secure connection. INPUT SELECTOR RCA XLR OUTPUT MODE BTL BTL STEREO BTL SPEAKER SPEAKER R L SIGNAL GND INPUTS BTL CLASS 2 WIRING CLASS 2 WIRING XLR R RCA XLR L RCA R L A-03 R RCA audio cable 1. COMMON 2. HOT (+) 3. COLD (−) Connec t to the r ight channel when using this unit as the right channel power amplifier. XLR audio cable XLR pin assignment: Connect one of these cables. L PREOUT Preamplifier 9 Troubleshooting Specifications If you experience any problem with this unit, please take the time to look through this chart and see if you can solve the problem yourself before calling your dealer. General Power supply Europe model. . . . . . . . . . . . . . . . . . . . . . . . . . . . . . . . . . . AC 230 V, 50 Hz U.S.A./Canada model. . . . . . . . . . . . . . . . . . . . . . . . . . . . AC 120 V, 60 Hz Korea model. . . . . . . . . . . . . . . . . . . . . . . . . . . . . . . . . . . . AC 220 V, 60 Hz Power consumption. . . . . . . . . . . . . . . . . . . . . . . . . . . . . . . . . . . . . . . . . 400 W External dimensions (W x H x D) 445 x 220 x 430 mm (17 1/2˝ x 8 5/8˝ x 17˝) Weight. . . . . . . . . . . . . . . . . . . . . . . . . . . . . . . . . . . . . . . . . . . . . . . . 38 kg (84 lb) Allowable operating temperature +10 °C to +30 °C (+50 °F to +86 °F) Allowable operating humidity 5 % to 85 % (no dew condensation) Allowable storage temperature. . . . –20 °C to +55 °C (–4 °F to 12 °F) No power eCheck the connection to the AC power supply. Check and make sure the AC source is not a switched outlet and that if it is, the power is turned on. eInsert the power cord into the AC inlet of this unit. There is no sound or only a very low-level sound is heard. ePress the POWER switch to turn on the unit. Press the WARM-UP switch to turn off the WARM-UP mode if the unit is in warming up. eCheck the operation of the preamplifier. When turning on the preamplifier, turn off this unit first. eMake sure a signal is output from a preamplifier etc. eCheck if the preamplifier, speakers and source components are secure connected. eSelect input setting of the preamplifier correctly. eSelect input setting of this unit correctly. eAdjust the preamplifier volume. eThe ring around the POWER switch flashes in blue or flashes in blue and violet when the protection circuit is operating. Turn off the unit immediately if this indicator is red and solve the cause of problem. eThe speaker cord may be shorted out. Check your speaker connections. Unstable sound. eSpeaker polarity (+/_) is reversed. Check all speakers for correct polarity. If normal operation cannot be obtained, unplug the power cord from the outlet, wait about 60 seconds and plug it again. This resets the internal circuit which can be disturbed during electrical storms, power interruptions, etc. Amplifier Section Rated output power. . . . . . . . . . . . . . STEREO: 50 W + 50 W (1 kHz, 8 Ω) 100 W + 100 W (1 kHz, 4 Ω) BTL: 200 W (1 kHz, 8 Ω) 330 W (1 kHz, 4 Ω) Maximum useful output power. . . . STEREO: 77 W + 77 W (1 kHz, 8 Ω) 127 W + 127 W (1 kHz, 4 Ω) BTL: 270 W (1 kHz, 8 Ω) 400 W (1 kHz, 4 Ω) Frequency response. . . . . . . . . . . . . . . . . . . . . . . . . . . . . . . . . . . 5 Hz to 100 kHz (1 W, 8 Ω, +0/–1.2 dB) Signal-to-noise ratio. . . . . . . . . . . . . . . . . . . . . . . . . . . . . more than 117 dB Total harmonic distortion. . . . . . . . . . . 0.009 % (1 kHz, rated output, 8 Ω) Minimum allowable speaker impedance. . . . . . . . . . . . . . . STEREO: 4 Ω BTL: 4 Ω Warranted range for Class A amplification 50 W + 50 W (1 kHz, 8 Ω) Input sensitivity (rated output) RCA (STEREO): 0.76 Vrms/50 W (8 Ω) XLR (STEREO): 1.56 Vrms/50 W (8 Ω) RCA (BTL): 1.62 Vrms/200 W (8 Ω) XLR (BTL): 2.35 Vrms/200 W (8 Ω) Input impedance. . . . . . . . . . . . . . . . . . . . . . . . . . . . . . . . 50 W + 50 W (8 Ω) RCA: 150 kΩ XLR: 320 kΩ Gain. . . . . . . . . . . . . . . . . . . . . . . . . . . . . . . . . . . . . . . . . RCA (STEREO): 28.4 dB Accessories Power cord x 1 Felt pads x 4 Power plug support bracket x 1 Screw for the power plug support bracket x 2 Owner's manual x 1 Warranty card x 1 < Design and specifications are subject to change without notice. < Weight and dimensions are approximate. < Illustrations may differ slightly from production models. 10 Sommaire Caractéristiques Nous vous remercions pour l'achat d'un appareil Esoteric. Lire ce manuel avec attention pour obtenir les meilleures performances possibles de cet appareil. Amplification de Pure classe A et trois transformateurs séparés. Sommaire. . . . . . . . . . . . . . . . . . . . . . . . . . . . . . . . . . . . . . . . . . . . . . . . . . . . . . . . . . 11 Caractéristiques . . . . . . . . . . . . . . . . . . . . . . . . . . . . . . . . . . . . . . . . . . . . . . . . . . . . 11 Avant utilisation. . . . . . . . . . . . . . . . . . . . . . . . . . . . . . . . . . . . . . . . . . . . . . . . . . . . 12 Fonctions de la face avant. . . . . . . . . . . . . . . . . . . . . . . . . . . . . . . . . . . . . . . . . . 13 Fonctions de la face arriére . . . . . . . . . . . . . . . . . . . . . . . . . . . . . . . . . . . . . . . . . 14 Branchement des enceintes. . . . . . . . . . . . . . . . . . . . . . . . . . . . . . . . . . . . . . . . 15 Exemple de branchement. . . . . . . . . . . . . . . . . . . . . . . . . . . . . . . . . . . . . . . . . . 16 Guide de dépannage. . . . . . . . . . . . . . . . . . . . . . . . . . . . . . . . . . . . . . . . . . . . . . . 18 Caractéristiques . . . . . . . . . . . . . . . . . . . . . . . . . . . . . . . . . . . . . . . . . . . . . . . . . . . . 18 Pour les consommateurs européens Information pour les utilisateurs sur la collecte et l’enlèvement des équipements et piles usagés En jetant correctement ces produits et piles, vous aiderez à sauvegarder des ressources précieuses et éviterez tout effet potentiellement négatif sur la santé humaine et sur l'environnement qui pourrait sinon découler d’une gestion inappropriée des déchets. Pour plus d'informations sur la collecte et le recyclage de vos anciens appareils et batteries, veuillez contacter votre mairie, le service de traitement des ordures ou le magasin dans lequel vous avez acheté ces articles. Informations sur la mise au rebut dans d’autres pays extérieurs à l’Union européenne Ces symboles ne sont valables qu’en Union Européenne . Si vous désirez jeter ces articles, veuillez contacter l'administration locale ou votre revendeur et leur demander la méthode correcte d’enlèvement. Note à propos du symbole (les deux exemples en bas à droite) : Ce symbole peut être utilisé en combinaison avec un symbole chimique. Dans ce cas, il indique une conformité avec les impératifs définis par la directive sur le produit chimique en question. Borniers d'enceinte WBT Les borniers d'enceinte sont des WBT-0710 en cuivre (Cu) qui utilisent un matériau de très haute puret issu de la gamme nextgen WBT. Connexion BTL La connexion BTL (Bridged Transformer Less), qui utilise deux amplificateurs raccordés en pont, permet d'obtenir une sortie environ quatre fois plus large que lors de l'utilisation d'un seul, et il n'est pas nécessaire d'utiliser des transformateurs. Cet appareil peut être utilisé comme amplificateur monaural en changeant le commutateur OUTPUT MODE sur le panneau arrière sur “BTL”, ce qui fait une connexion BTL avec les canaux gauche et droit. FRANÇAIS Les symboles suivants sur les produits, emballages et/ou documents d’accompagnement signifient que les produits électriques et électroniques usagés ainsi que les piles usagées ne doivent pas être mélangés avec les déchets domestiques ordinaires . Pour un traitement, une récupération et un recyclage corrects des produits anciens et des piles usagées, veuillez les rapporter au point de collecte approprié, conformément à votre législation nationale et aux directives 2002/96/EC et 2006/66/EC. Une amplification de Pure classe A est utilisée et assure une linéarité élevée du signal. Héritier de la conception du A-80, trois transformateurs séparés sont montés sur l'appareil: deux sur la section d'alimentation de l'étage d'amplification de courant pour les canaux gauche et droit; un sur l'étage d'amplification de tension. 2 entrées système Le A-03 est équipé de deux prises d'entrée système, 1 prise XLR et une pr ise R CA, qui peuvent être sélec tionnées avec le commutateur sur le panneau arrière. ATTENTION < N ' e x p o s e z p a s c e t a p p a re i l a u r u i s s e l l e m e n t n i a u x éclaboussures. < Ne placez aucun objet contenant du liquide, tel qu'un vase, sur l'appareil. < N'installez pas cet appareil dans un espace confin comme une bibliothèque ou similaire. < L'appareil tire un courant de veille nominal de la prise secteur quand son interrupteur POWER est en position d'arrêt. < L'appareil doit être plac assez près de la prise de courant pour que vous puissiez tout moment attraper facilement la fiche du cordon d'alimentation. < Un appareil de Classe ! doit être branch une prise de terre. < Les batteries (ou le pack de batteries ou les batteries chargées) ne devront pas être exposées la chaleur excessive telle que le soleil, le feu ou analogues. < Une pression acoustique excessive d'écouteurs ou d'un casque peut provoquer une perte d'audition. 11 Avant utilisation Contenu de l'emballage Veuillez vérifier que les accessoires suivants se trouvent bien dans l'emballage que vous venez d'ouvrir. Cordon d'alimentation x 1 Feutrine x 4 Support de fiche d'alimentation x 1 Vis pour le support de fiche d'alimentation x 2 Manuel du propriétaire x 1 Carte de garantie x 1 Installation de l'appareil De l'acier trempé de grande qualité est utilisé pour les pieds à pointeau, attachés solidement sur le dessous de l'appareil. Bien que les pieds extérieurs puissent sembler desserrés, le poids de l'appareil les rend fermes et sûrs. La conception amortit et réduit efficacement la vibration. Pied d'ajustement précis Lisez ceci avant utilisation < Placez l'appareil dans un endroit stable près du système audio à utiliser. < NE placez aucun objet sur l'appareil. NE recouvrez pas cet appareil avec un tissu. NE placez pas cet appareil sur un tapis épais. < Comme l'appareil peut devenir chaud durant son fonctionnement, laissez toujours suffisamment d'espace autour de lui pour la ventilation. Les orifices de ventilation ne doivent pas être obstrués. Vérifiez qu'il y ait au moins 20 cm d'espace au-dessus et 5 cm d'espace de chaque côté de l'appareil. < Ne Placez RIEN comme CD, CD-R, cassette, sur l'appareil. < La tension électrique fournie l'appareil doit correspondre à celle imprimée sur sa face arriére. En cas de doute à ce sujet, consultez un électricien. < Choisissez soigneusement l'emplacement d'installation de votre appareil. Evitez de le placer en exposition directe au soleil ou près d'une source de chaleur. Evitez aussi les lieux soumis des vibrations et des conditions excessives en termes de poussiére, chaleur, froid ou humidit. Pied métallique Pied de protection < C o n s e r v e z c e m a n u e l e n l i e u s û r p o u r v o u s y r é fé r e r ultérieurement. < Cet appareil est un amplificateur de puissance de classe A et émet plus de chaleur que les autres types d'amplificateur. Installez-le séparément en gardant un espace de 20 cm minimum avec les murs et les enceintes, et n'utilisez pas de bâti pour l'installation. Si vous avez besoin d'installer l'appareil dans un bâti, utilisez en un avec suffisamment de ventilation et faite attention à la température de l'appareil. < N'installez pas l'appareil à l'envers ou sur un de ses côtés. 12 Vis de retenue de pied de protection < Faites attention de ne pas vous blesser lors du déplacement de l'appareil, en raison de son poids. Faites-vous aider si nécessaire. < Pour protéger la surface meuble de soutien, vous pouvez coller les coussinets en feutre fournis avec l'appareil la base des pieds métalliques. À propos du support de fiche d'alimentation Le support de fiche d'alimentation est fourni pour permettre la connexion d'un cordon d'alimentation lourd tel qu'un câble d'alimentation ESOTERIC 7N-PC9100 MEXCEL et 7N-PC7100 et peut recevoir leurs fiches. Embase secteur Cordon d'alimentation Support < N'ouvrez pas l'appareil car cela pourrait endommager les circuits ou causer un choc électrique. Si un objet étranger a pénétr dans l'appareil, contactez votre revendeur ou un centre d'assistance technique. < Quand vous débranchez le cordon d'alimentation de la prise secteur, tirez toujours directement sur la fiche, jamais sur le cordon. Plaque inférieure de l'appareil Vis (fournies) Attachez le support et ajustez sa position en fonction de la taille de la fiche du cordon d'alimentation, puis fixez-le solidement avec les vis fournies. Maintenance Si la surface de l'appareil est sale, essuyez-la avec un chiffon doux ou utilisez un liquide de nettoyage neutre dilu Veillez essuyer entiérement toute trace de liquide. N'utilisez pas de diluant, benzine ou d'alcool car cela pourrait endommager la surface de l'appareil. Fonctions de la face avant A A Commutateur WARM-UP Le mode WARM-UP fonctionne uniquement quand l'appareil est sous tension. L'anneau autour de l'interrupteur POWER s'allume en vert quand vous mettez en service le mode WARM-UP. Aucun son ne sort pendant l'échauffement de l'appareil. App u ye r s u r l e c o m m u t a te u r WA R M - U P p e n d a nt que l'échauffement est en cours, met le mode WARM-UP hors service. L'anneau autour de l'interrupteur POWER clignote en bleu pendant plusieurs secondes. Aucun son ne sort pendant le clignotement. Quand le clignotement s'arrête, l'appareil est mis sous tension et le son commence à être sorti. Pour obtenir un meilleur son Il est recommandé d'utiliser le mode WARM-UP pendant plus de 30 minutes avant la lecture d'une musique. Utiliser le mode WARM-UP aide à commander stablement les circuits internes et d'obtenir les per formances maximales de l'appareil. B POWER Utilisez cet interrupteur pour mettre l'unit sous et hors tension. L'anneau autour de l'interrupteur clignote en bleu et aucun son ne sort pendant quelques secondes après la mise sous tension. Attendez que le clignotement s'arrête. FRANÇAIS Utilisez ce commutateur pour mettre en/hors service le mode WARM-UP. Quand le mode WARM-UP est en ser vice, le circuit de l'amplificateur de puissance est chauffé à faible consommation et l'alimentation de l'appareil devient stable rapidement. B < Quand le circuit de protection est en service, l'anneau autour de l'interrupteur clignote en bleu et aucun son ne sort. < Suivez les étapes ci-dessous pour mettre sous tension un système audio comprenant cet appareil et protéger les enceintes. 1 Réglez le volume du préamplificateur sur le minimum. 2 Mettez sous tension les composants de source sonore. 3 Mettez sous tension les préamplificateurs. 4 Mettez sous tension cet appareil. Suivez les étapes ci-dessous pour mettre le système hors tension. 1 Réglez le volume du préamplificateur sur le minimum. 2 Mettez hors tension cet appareil. 3 Mettez hors tension les préamplificateurs. 4 Mettez hors tension les composants de source sonore. < Comme l'unit est équipée d'un transformateur et d'un condensateur haute capacit du son peut être produit par le transformateur d'alimentation quand vous mettez en service l'unit C'est normal. < Une fois l'unit éteinte, attendez au moins deux secondes avant de la rallumer. 13 Fonctions de la face arriére A B IN C INPUT SELECTOR RCA XLR OUTPUT MODE BTL BTL STEREO BTL SPEAKER SPEAKER R L SIGNAL GND INPUTS BTL CLASS 2 WIRING CLASS 2 WIRING XLR R RCA XLR L R D F E G A Embase secteur Utilisez le cordon d'alimentation Esoteric fourni. L'emploi d'autres cordons d'alimentation peut entraîner un incendie ou un choc électrique. Débranchez le cordon d'alimentation si vous ne devez pas utiliser l'unit durant une période prolongée. B Commutateur INPUT SELECTOR Utilisez ce commutateur pour changer l'entrée entre RCA et XLR. NE changez PAS l'entrée pendant que l'appareil est sous tension. C Commutateur OUTPUT MODE Choisissez “STEREO” quand vous utilisez cet appareil comme un amplificateur de puissance stéréo. Choisissez ”BTL” quand vous utilisez cet appareil comme un amplificateur de puissance monaural. Vous ne pouvez pas connecter les enceintes pour les deux modes en même temps. RCA L F E D D Prises SPEAKER (enceinte) Connectez la prise – de l'appareil à la prise – de l'enceinte et la prise + de l'appareil à la prise + de l'enceinte en utilisant les cordons d'enceinte. < Quand vous choisissez “BTL” comme mode de sortie, connectez la prise BTL + à la prise + de l'enceinte et la prise BTL – à la prise – de l'enceinte. < Connectez des enceintes d'une impédance de 4Ω ou plus. < Les portions métalliques des deux conducteurs séparés (positif et négatif ) ne doivent pas se toucher sous peine de produire un court-circuit électrique. Les câbles en court-circuit peuvent créer des risques d'incendie ou entraîner une panne de votre équipement < Ne connectez pas plusieurs amplificateurs une même enceinte. E Prises d'entrée RCA Connectez les prises aux prises de sortie d'un préamplificateur en utilisant des câbles audio Cinch (RCA). Déplacez le commutateur INPUT SELECTOR du panneau à arrière sur “RCA” quand vous utilisez les prises. < Veillez à bien insérer chaque fiche. Pour empêcher les ronflements et bruits, évitez de réunir les câbles de modulation de signal avec le cordon d'alimentation secteur ou les câbles d'enceinte. 14 Branchement des enceintes F Prise d'entrée XLR Connectez les prises aux prises de sortie d'un préamplificateur en utilisant des câbles symétriques XLR. Déplacez le commutateur INPUT SELECTOR du panneau à arrière sur “XLR” quand vous utilisez les prises. A propos du bornier d'enceinte Quand votre câble d'enceinte est fils nus: Torsadez les brins des conducteurs pour qu'ils ne fassent qu'un. < L'épaisseur des conducteurs doit être de moins de 4 mm. < Veillez à bien insérer chaque fiche. Pour empêcher les ronflements et bruits, évitez de réunir les câbles de modulation de signal avec le cordon d'alimentation secteur ou les câbles d'enceinte. < Si vous utilisez des connecteurs symétriques, enfoncez la fiche XLR jusqu' ce que loquet clique. Pour retirer la fiche XLR, appuyez sur son petit levier et retirez la fiche. < La broche 2 de la prise d'entrée XLR est affectée au point chaud. Utilisez les câbles correspondants pour garder une polarit correcte. G Bornier SIGNAL GND (masse du signal) Quand votre câble d'enceinte a des fourches: Desserrez la prise et insérez la broche dedans. Puis tournez la prise dans le sens des aiguilles d'une montre pour la serrer. < Le diamètre interne des fourches doit être de 6 mm ou plus et le diamètre externe de 13,5 mm ou moins. 13,5 mm ou moins 6 mm ou plus FRANÇAIS Utilisez un câble enveloppé en vente dans le commerce (cordon recouvert de PVC ou autre) pour connecter la prise de terre de signalisation de l'appareil à la prise de terre de signalisation des autres appareils. < Notez que ce n'est PAS une terre de sécurit électrique. Circuits de protection Cette unit est équipée d'un circuit de protection contre les courtcircuits en sortie, d'un circuit de protection contre les surintensités et d'un circuit de protection contre le courant continu. L'anneau autour de l'interrupteur POWER clignote en bleu ou clignote en bleu et violet quand le circuit de protection est en service. Connexion l'aide de câbles d'enceintes avec fiches banane Serrez la prise et insérez une fiche banane. < Quand l'anneau autour de l'interrupteur clignote en bleu, il se peut que les câbles d'enceinte soient court-circuités. Eteignez l'unit et vérifiez les connexions de vos enceintes. < Quand l'anneau autour de l'interrupteur POWER clignote en bleu et violet, la température à l'intérieur de l'appareil est peut-être trop élevée. Eteignez-la et attendez que la température redescende (il est conseill d'attendre 10 - 20 minutes) ou placez cette unit dans un lieu bien ventil. Pour les clients européens: Conformément aux réglementations de sécurit européennes, il n'est pas possible de brancher des fiches banane dans les borniers d'enceinte des modèles européens. Les orifices dans lesquels s'insérent les fiches banane ont ét recouverts par des capuchons noirs. Connectez les enceintes l'aide de fourches ou de conducteurs nus. Si les capuchons noirs sont sortis des borniers, réinsérez-les leur emplacement d'origine. 15 Exemple de branchement Voici un exemple d'utilisation de cet appareil comme amplificateur de puissance stéréo. ATTENTION: < Eteignez tous vos équipements avant de faire des branchements. < Lisez les instructions accompagnant chaque composant que vous désirez utiliser avec cette unit. Enceinte droite Prise secteur Enceinte gauche Cordon d’alimentation OUTPUT MODE BTL IN STEREO INPUT SELECTOR XLR RCA OUTPUT MODE BTL BTL STEREO BTL SPEAKER SPEAKER R L SIGNAL GND INPUTS BTL CLASS 2 WIRING CLASS 2 WIRING XLR R RCA XLR L RCA R L A-03 1. COMMON 2. HOT (+) 3. COLD (−) R L PREOUT Préamplificateur 16 Câble audio RCA Câble audio XLR Brochage du connecteur XLR Branchez une paire de ces câbles. Voici un exemple d'utilisation de cet appareil comme amplificateur de puissance monaural. ATTENTION: < Eteignez tous vos équipements avant de faire des branchements. < Lisez les instructions accompagnant chaque composant que vous désirez utiliser avec cette unit. Q PRÉCAUTIONS pour le connexion des enceintes Enceinte gauche Prise secteur Cordon d’alimentation Si un câble est mal connecté, des fils à nu ou des cosses ouvertes peuvent entrer en contact avec d'autres parties métalliques du boîtier de l'appareil. Assurez-vous que la connexion est faite solidement. Des étincelles peuvent se produire, causant d e s d y s fo n c t i o n n e m e n t s , d e s c h o c s électriques ou des brûlures si des fils à nu ou des cosses ouvertes à l'extrémité des câbles d'enceinte entrent en contact avec d'autres parties métalliques du boîtier de l'appareil. OUTPUT MODE BTL FRANÇAIS IN STEREO INPUT SELECTOR RCA XLR OUTPUT MODE BTL BTL STEREO BTL SPEAKER SPEAKER R L SIGNAL GND INPUTS BTL CLASS 2 WIRING CLASS 2 WIRING XLR R RCA XLR L RCA R L A-03 R Câble audio RCA 1. COMMON 2. HOT (+) 3. COLD (−) Connectez le canal droit lors de l'utilisation de cet appareil comme amplificateur de puissance du canal droit. Câble audio XLR Brochage du connecteur XLR Connectez un de ces câbles. L PREOUT Préamplificateur 17 Guide de dépannage Caractéristiques Si vous rencontrez des problèmes avec cette unit veuillez prendre le temps de lire ce tableau et de voir si vous pouvez solutionner le problème vous-même avant de faire appel votre revendeur. Générales Alimentation électrique Modèle Europe. . . . . . . . . . . . . . . . . . . . . . . . . . . . . . . . . . CA 230 V, 50 Hz Modèle U.S.A./Canada. . . . . . . . . . . . . . . . . . . . . . . . . . . CA 120 V, 60 Hz Modèle Corée. . . . . . . . . . . . . . . . . . . . . . . . . . . . . . . . . . . CA 220 V, 60 Hz Consommation électrique. . . . . . . . . . . . . . . . . . . . . . . . . . . . . . . . . . . 400 W Dimensions externes (L x H x P). . . . . . . . . . . . . . . 445 x 220 x 430 mm Poids. . . . . . . . . . . . . . . . . . . . . . . . . . . . . . . . . . . . . . . . . . . . . . . . . . . . . . . . . 38 kg Température de fonctionnement autorisée. . . . . . . . . +10 °C à +30 °C Humidité de fonctionnement autorisée 5 % to 85 % (sans condensation d'humidité) Allowable storage temperature. . . . . . . . . . . . . . . . . . . . . –20 °C à +55 °C Pas d'alimentation eVérifiez le branchement l'alimentation secteur. Vérifiez que la source d'alimentation n'a pas de commutateur et que si elle en a un, il permet le passage du courant. eInsérez le cordon d'alimentation dans l'embase secteur de cette unit. Il n'y a pas de son ou un son de très bas niveau est entendu. ePressez l'interrupteur POWER pour allumer l'unit. Appuyez sur le commutateur WARM-UP pour mettre hors service le mode WARM-UP si l'appareil est en cours d'échauffement. eVérifiez le fonctionnement du préamplificateur. Quand vous allumez le préamplificateur, éteignez d'abord cette unit. eVérifiez qu'un signal sort du préamplificateur etc. eVérifiez que le préamplificateur, les enceintes et les composants sources sont bien branchés. eSélectionnez correctement l'entrée du préamplificateur. eSélectionnez correctement l'entrée de cette unit. eRéglez le volume du préamplificateur. eL'anneau autour de l'interrupteur POWER clignote en bleu ou clignote en bleu et violet quand le circuit de protection est en service. Eteignez immédiatement l'unit si cet indicateur est rouge et résolvez la cause du problème. eLe cordon d'enceinte peut être en court-circuit. Vérifiez vos branchements d'enceinte. Son instable eLa polarit (+/_) d'enceinte est inversée. Vérifiez la bonne polarit de toutes les enceintes. Si un fonctionnement normal ne peut pas être obtenu, débranchez le cordon d'alimentation de la prise secteur, attendez environ 60 secondes et rebranchez-le. Cela réinitialise le circuit interne qui peut avoir ét perturb durant des orages électriques, des coupures de courant etc. Section amplificateur Puissance de sortie nominale. . . . . . STEREO: 50 W + 50 W (1 kHz, 8 Ω) 100 W + 100 W (1 kHz, 4 Ω) BTL: 200 W (1 kHz, 8 Ω) 330 W (1 kHz, 4 Ω) Puissance de sortie maximale utilisable STEREO: 77 W + 77 W (1 kHz, 8 Ω) 127 W + 127 W (1 kHz, 4 Ω) BTL: 270 W (1 kHz, 8 Ω) 400 W (1 kHz, 4 Ω) Réponse en fréquence. . . . . . . . . . . . . . . . . . . . . . . . . . . . . . . . . 5 Hz à 100 kHz (1 W, 8 Ω, +0/–1,2 dB) Rapport signal/bruit. . . . . . . . . . . . . . . . . . . . . . . . . . . . . . . . plus de 117 dB Distorsion harmonique totale. . . . . . . 0,009 % (1 kHz, sortie nominale, 8 Ω) Impédance d'enceinte minimum autorisée. . . . . . . . . . . . STEREO: 4 Ω BTL: 4 Ω Plage garantie pour l'amplification de Classe A 50 W + 50 W (1 kHz, 8 Ω) Sensibilité d'entrée (sortie nominale) RCA (STEREO): 0,76 Vrms/50 W (8 Ω) XLR (STEREO): 1,56 Vrms/50 W (8 Ω) RCA (BTL): 1,62 Vrms/200 W (8 Ω) XLR (BTL): 2,35 Vrms/200 W (8 Ω) Impédance d'entrée. . . . . . . . . . . . . . . . . . . . . . . . . . . . . 50 W + 50 W (8 Ω) RCA: 150 kΩ XLR: 320 kΩ Gain. . . . . . . . . . . . . . . . . . . . . . . . . . . . . . . . . . . . . . . . . RCA (STEREO): 28,4 dB Accessoires Cordon d'alimentation x 1 Feutrine x 4 Support de fiche d'alimentation x 1 Vis pour le support de fiche d'alimentation x 2 Manuel du propriétaire x 1 Carte de garantie x 1 < Design et caractéristiques sont sujets changements sans préavis. < Les poids et dimensions sont approximatifs. < Les illustrations peuvent légérement différer des modèles de production. 18 Inhalt Ausstattungsmerkmale Vielen Dank für den Kauf dieses Esoteric-Geräts. Bitte lesen Sie diese Anleitung sorgfältig durch, um die Leistungs-fähigkeit dieses Geräts optimal nutzen zu können. Reine Klasse-A-Verstärkung und dreifach separate Trafos Inhalt. . . . . . . . . . . . . . . . . . . . . . . . . . . . . . . . . . . . . . . . . . . . . . . . . . . . . . . . . . . . . . . Ausstattungsmerkmale. . . . . . . . . . . . . . . . . . . . . . . . . . . . . . . . . . . . . . . . . . . . . Vor dem Betrieb. . . . . . . . . . . . . . . . . . . . . . . . . . . . . . . . . . . . . . . . . . . . . . . . . . . . Ausstattungsmerkmale auf der Gerätevorderseite. . . . . . . . . . . . . . . . . . . Ausstattungsmerkmale auf der Geräterückseite. . . . . . . . . . . . . . . . . . . . . Anschließen der Lautsprechersysteme. . . . . . . . . . . . . . . . . . . . . . . . . . . . . . Anschlussbeispiel. . . . . . . . . . . . . . . . . . . . . . . . . . . . . . . . . . . . . . . . . . . . . . . . . . . Hilfe bei der Beseitigung von Fehlfunktionen . . . . . . . . . . . . . . . . . . . . . . . Technische Daten . . . . . . . . . . . . . . . . . . . . . . . . . . . . . . . . . . . . . . . . . . . . . . . . . . 19 19 20 21 22 23 24 26 26 Hinweise für Kunden in Europa Entsorgung alter elektrischer oder elektronischer Geräte sowie verbrauchter Batterien Eine korrekte Entsorgung ihrer alten elektrischen oder elektronischen Geräte trägt in hohem Maß der Vermeidung möglicher negativer Konsequenzen für die Umwelt und damit auch für Ihre eigene sowie die Gesundheit Anderer bei. Weiterführende Informationen bezüglich der Entsorgung Ihrer alten elektrischen oder elektronischen Geräte sowie verbrauchter Batterien erhalten Sie auf Anfrage bei ihrem zuständigen Stadtbüro, der Abfallentsorgungsgesellschaft oder dem Händler, bei dem Sie das Gerät ursprünglich erworben haben. Hinweise zur Entsorgung in Ländern außerhalb der Europäischen Union Diese Symbole sind ausschließlich in Mitgliedsländern der Europäischen Union wirksam. Bei Fragen zur Entsorgung in anderen Ländern wenden Sie sich bitte an die zuständigen, lokalen Behörden oder Ihren Fachhändler. Hinweis zum Batteriesymbol (unten rechts): Dieses Symbol wird möglicherweise zusammen mit der Bezeich nung eines chemischen Elements verwendet. Dies weist darauf hin, dass die entsprechende Richtlinie zur Entsorgung der genannten Chemikalie anzuwenden ist. WBT Lautsprecheranschlüsse e Lautsprecheranschlüsse sind als WBT-0710 Kupfer (Cu) ausgeführt. Anschlusskomponenten der WBT nextgen Serie zeichnen sich durch sehr hohe Materialreinheit aus. BTL-Anschluss BTL (Bridged Transformer Less) Anschluss mit zwei über Brücke verbundenen Verstärkern, erlaubt es einen viermal größeren Ausgang wie bei einzelner Verwendung, ohne dass Einsatz von Trafos erforderlich ist. Das Gerät kann als Mono-Verstärker verwendet werden, indem der Modus mit dem Schalter OUTPUT MODE an der Rückseite auf “BTL” umgeschaltet wird, wodurch eine BTL-Verbindung mit dem linken und rechten Kanal hergestellt wird. 2 Systemeingänge Dieser A-03 hat 2 Eingangssystemanschlüsse, 1 XLR und 1 Cinch, die über den Schalter an der Rückseite ausgewählt werden können. ACHTUNG DEUTSCH Sofern Geräte, deren Verpackung oder Batterien mit dem Symbol einer durchgekreuzten Abfalltonne gekennzeichnet sind oder in der jeweiligen Dokumentation darauf hingewiesen wird, bedeutet dies, dass deren Entsorgung gemäß der RICHTLINIEN 2002/96/EG sowie 2006/66/EG des EUROPÄISCHEN PARLAMENTS UND DES RATES bezüglich Elektro- und Elektronik-Altgeräte geregelt ist. Sämtliche elektrischen und elektronischen Geräte sowie verbrauchte Batterien müssen demgemäß, getrennt vom Restmüll, den von der jeweils zuständigen städtischen, Landes- oder Bundesbehörde dazu bestimmten, gesonderten Wertstoff sammlungen zugeführt werden. Reine Klasse-A-Verstärkung wird eingesetzt und sichert hohe Signal-Linearität. In Fortsetzung des Designkonzepts des A-80 sind drei separate Trafos im Gerät eingebaut: zwei in der Leistungssektion der Stromverstärkungsstufe für die linken und rechten Kanäle; einer in der Spannungsverstärkungsstufe. < Vermeiden Sie Aufstellungsorte, an denen diese Komponente Tropf- oder Spritzwasser ausgesetzt ist. < Platzieren Sie keine mit Flüssigkeiten gefüllten Objekte, wie etwa Vasen, auf der Komponente. < Installieren Sie diese Komponente nicht in geschlossenen M öbeln, wie et wa einem Bücherschrank oder einem geschlossenen Regalsystem. < Auch im Bereitschaftsmodus - der POWER-Schalter befindet sich in der Stellung „Standby” - bezieht diese Komponente einen geringen Ruhestrom aus dem Stromnetz. < Platzieren Sie diese Komponente so, dass die Wandsteckdose, an der Sie das Gerät angeschlossen haben, jederzeit leicht zugänglich ist. < Achten Sie darauf, dass die Wandsteckdose, an der Sie die Komponente anschließen, geerdet ist (Schutzkontaktsteckdose). < Die Batterien (das Akkupack oder die eingesetzten Batterien) dürfen nicht übermäßiger Hitze ausgesetzt sein, etwa im prallen Sonnenschein, in einem Feuer und dergleichen. < Ein zu hoher Schalldruck vom Ohr- oder Kopfhörer kann zu Hörverlust führen. 19 Vor dem Betrieb Was ist im Karton Überprüfen Sie bitte beim Öffnen des Kartons das mitgelieferte Zubehör auf Vollständigkeit. Netzkabel x 1 Filzkissen x 4 Netzstecker-Haltebügel x 1 Schraube für den Netzstecker-Haltebügel x 2 Bedienungsanleitung x 1 Garantiekarte x 1 Aufstellung des Geräts Für die sicher am Boden des Geräts angebrachten Präzisionsfüße wurde gehärteter hochwertiger Stahl verwendet. Obwohl die äußeren Füße als lose erscheinen können, macht das Gewicht des Geräts sie fest und sicher. Durch das Design werden Vibrationen wirksam gedämpft und verringert. Präzisionsfuß Bitte vor der Inbetriebnahme lesen < Stellen Sie das Gerät an einem sicheren Ort in der Nähe der Audioanlage auf, die Sie verwenden werden. Stahlfuß < Stellen Sie KEINE Gegenstände auf das Gerät. Bedecken Sie dieses Gerät NICHT mit einem Tuch. Stellen Sie dieses Gerät NICHT auf einem dicken Teppich auf. < Lassen Sie, da das Gerät während des Betriebs warm werden kann, stets ausreichend Raum um das Gerät herum zur Belüftung frei. Die Belüftungslöcher sollten nicht bedeckt werden. Stellen Sie sicher, dass mindestens 20 cm Raum über und mindestens 5 cm Raum zu beiden Seiten des Geräts vorhanden ist. < Legen Sie NICHTS - z.B. keine CDs, CD-Rs, Kassettentonbänder - auf das Gerät. < Die Spannung, mit der das Gerät gespeist wird, muss mit der Spannung übereinstimmen, wie sie auf der Rückseite aufgedruckt ist. Wenden Sie sich an einen Elektriker, falls Sie sich diesbezüglich nicht sicher sind. Abdeckungsfuß < Z i e h e n S i e b e i m A b z i e h e n d e s N e t z s t e c k e r s v o n d e r Wandsteckdose immer direkt am Stecker; zerren Sie niemals am Kabel. < Bewahren Sie diese Anleitung an sicherer Stelle zum späteren Nachschlagen auf. < Dieses Gerät ist ein Endverstärker der Klasse A und gibt mehr Hitze ab als andere Verstärkertypen. Stellen Sie ihn separat mit mindestens 20 cm Abstand zu Wänden und Lautsprechern auf, und vermeiden Sie Aufstellung in einem Regal. Wenn das Gerät in einem Regal aufgestellt werden muss, verwenden Sie ein Regal mit Ventilationsöffnungen und achten Sie auf die Temperatur des Geräts. < Stellen Sie das Gerät nicht umgekippt oder seitlich auf. 20 Befestigungsschrauben des Abdeckungsfußes < Gehen Sie aufgrund des Gewichts vorsichtig vor, um Verletzungen zu vermeiden, wenn Sie das Gerät transportieren. Bitten Sie, falls erforderlich, jemanden um Hilfe. < Zum Schutz der Oberfläche des Möbelstücks, auf dem das Gerät aufgestellt wird, können Sie die mit dem Gerät mitgelieferten Filzkissen an der Unterseite der Metallfüße befestigen. Am Netzstecker-Haltebügel Der Netzstecker-Haltebügel ist mitgeliefert, um den Anschluss schwerer Netzkabel wie des ESOTERIC-Netzkabels 7N-PC9100 MEXCEL und 7N-PC7100 durch Abstützen des Netzsteckers zu erlauben. < Wählen Sie den Aufstellungsort für Ihr Gerät sorgfältig. Stellen Sie es nicht in direktem Sonnenlicht oder in der Nähe einer Wärmequelle auf. Vermeiden Sie auch Orte mit Vibrationen und viel Staub, sehr hohen oder niedrigen Temperaturen oder Feuchtigkeit. < Öffnen Sie nicht das Gehäuse, da dies zu Schäden an den Schaltkreisen oder elektrischen Schlägen führen könnte. Wenn ein Fremdkörper in das Gerät geraten sollte, wenden Sie sich an Ihren Fachhändler oder an Ihre Servicefirma. Bodenplatte des Geräts Netzanschluss Netzkabel Haltebügel Schraube (mitgeliefert) Bringen Sie den Bügel an und justieren Sie seine Position entsprechen der Steckergröße des Netzkabels, und befestigen Sie ihn mit den mitgelieferten Schrauben. Wartung Wischen Sie, falls die Geräteoberfläche verschmutzt ist, mit einem weichen Lappen oder ver wenden Sie verdünnte neutrale Reinigungsflüssigkeit. Achten Sie darauf, jede Flüssigkeit vollständig zu entfernen. Verwenden Sie keine Lösungsmittel, kein Leichtbenzin und keinen Alkohol, da diese die Oberfläche des Geräts beschädigen können. Ausstattungsmerkmale auf der Gerätevorderseite A A Aufwärmschalter (WARM-UP) Verwenden Sie diesen Schalter, um den WARM-UP-Modus des Geräts ein- oder auszuschalten. Wenn der WARM-UP-Modus eingeschaltet ist, werden die S c h a l t k r e i s e d e s E n d s t u fe n v e r s t ä r k e r s m i t n i e d r i g e r Leistungsaufnahme aufgewärmt, und die Leistung des Geräts stabilisiert sich schnell. Durch Drück en des WARM -UP-S chalters während des Warmlaufens wird der WARM-UP-Modus ausgeschaltet. Der Ring um den Netzschalter (POWER) blinkt einige Sekunden lang in Blau. Während er blinkt, kommt kein Ton. Wenn das Blinken aufhört, ist das Gerät eingeschaltet, und der Ton kommt. Für besseren Klanggenuss Wir empfehlen, den WARM-UP-Modus für mehr als 30 Minuten einzusetzen, bevor Musik abgespielt wird. Die Verwendung des WARM-UP-Modus hilft bei der Stabilierung der Funktion der internen Schaltkreise und ermöglicht optimale Leistung dieses Geräts. B POWER Verwenden Sie zum Ein- und Ausschalten der Anlage diesen Schalter. Einige Sekunden nach dem Einschalten der Stromversorgung blinkt der Ring um den Schalter in Blau und es kommt kein Ton. Warten Sie, bis das Blinken aufhört. < Wenn die Schutzschaltung aktiv ist, blinkt der Ring um den Schalter in Blau, und es wird kein Ton ausgegeben. < Führen Sie die untenstehenden Schritte aus, wenn Sie die Audioanlage einschließlich dieses Geräts einschalten, um die Lautsprecher zu schützen. 1 Stellen Sie die Lautstärke der Vorverstärker auf Minimum. 2 Schalten Sie die Tonquellenkomponenten ein. 3 Schalten Sie die Vorverstärker ein. 4 Schalten Sie dieses Gerät ein. DEUTSCH Der WARM-UP-Modus ist nur wirksam, wenn das Gerät eingeschaltet ist. Der Ring um den Netzschalter (POWER) leuchtet in Grün, wenn der WARM-UP-Modus eingeschaltet ist. Während das Gerät warmläuft, kommt kein Ton. B Führen Sie die untenstehenden Schritte aus, wenn Sie die Anlage ausschalten. 1 Stellen Sie die Lautstärke der Vorverstärker auf Minimum. 2 Schaltet dieses Gerät aus. 3 Schaltet die Vorverstärker aus. 4 Schaltet die Tonquellenkomponenten aus. < Da die A-03 einen Hochleistungstransformator und –kondensator besitzt, ist das Einschalten hörbar. Dies ist normal und keine Fehlfunktion. < Sobald die A-03 ausgeschaltet wurde, warten Sie mindestens zwei Sekunden, bevor Sie die Endstufe wieder einschalten. 21 Ausstattungsmerkmale auf der Geräterückseite A B IN C INPUT SELECTOR RCA XLR OUTPUT MODE BTL BTL STEREO BTL SPEAKER SPEAKER R L SIGNAL GND INPUTS BTL CLASS 2 WIRING CLASS 2 WIRING XLR R RCA XLR L R D F E G A Netzanschluss Verwenden Sie das mitgelieferte Esoteric-Netzkabel. Die Verwendung anderer Netzkabel kann zu Brand oder Stromschlag führen. Trennen Sie den Netzstecker vom Stromnetz, wenn Sie die Endstufe über einen längeren Zeitraum nicht betreiben. B Eingangswahlschalter (INPUT SELECTOR) Mit diesem Schalter können Sie den Eingang zwischen RCA und XLR umschalten. Schalten Sie den Eingang NICHT um, wenn das Gerät mit Strom versorgt wird. C Ausgangsmodusschalter (OUTPUT MODE) Wä h l e n S i e “ S T E R E O ”, we n n S i e d a s G e r ä t a l s S te re o Endstufenverstärker verwenden wollen. Wählen Sie “BTL”, wenn Sie das Gerät als normalen MonoEndstufenverstärker verwenden wollen. Sie können nicht die Lautsprecher für beide Modi gleichzeitig anschließen. RCA L F E D D SPEAKER – Lautsprecheranschlüsse Verbinden Sie den Anschluss – des Geräts mit dem Anschluss – am Lautsprecher und den Anschluss + des Geräts mit dem Anschluss + des Lautsprechers mit den Lautsprecherkabeln. < Wenn Sie “BTL” als Ausgangsmodus wählen, verbinden Sie den Anschluss BTL + mit dem Anschluss + am Lautsprecher und den Anschluss BTL – mit dem Anschluss – am Lautsprecher. < Schließen Sie Lautsprecher mit 4 Ω Impedanz oder mehr an. < Einzelne Adern der beiden Kabel (positiver und negativer Leiter) dürfen sich nicht berühren, da dies ansonsten zu einem elektrischen Kurzschluss führt. Leitungskurzschluss kann zu Brand oder Fehlfunktonen bis hin zu Schäden an Ihrem System führen. < Betreiben Sie niemals ein Lautsprechersystem an zwei oder mehr Endstufen gleichzeitig. E Cinch-Eingänge Verbinden Sie diese Buchsen mittels RCA (Cinch)-Audiokabeln mit den Ausgangsbuchsen an einem Vorverstärker. Schieben Sie den Schalter INPUT SELECTOR an der Rückseite auf “RCA”, wenn Sie diese Anschlüsse verwenden. < Achten Sie darauf, dass sämtliche Stecker korrekt angeschlossen werden. Achten Sie zur Vermeidung von Brummen und Rauschen darauf, dass Audiosignal-Verbindungskabel nicht parallel zu Netz- oder Lautsprecherkabeln verlegt sind. 22 Anschließen der Lautsprechersysteme F XLR-Eingänge Verbinden Sie diese Buchsen mittels symmetrischen XLR-Kabeln mit den Ausgangsbuchsen an einem Vorverstärker. Schieben Sie den Schalter INPUT SELECTOR an der Rückseite auf “XLR”, wenn Sie diese Anschlüsse verwenden. < Achten Sie darauf, dass sämtliche Stecker korrekt angeschlossen werden. Achten Sie zur Vermeidung von Brummen und Rauschen darauf, dass Audiosignal-Verbindungskabel nicht parallel zu Netz- oder Lautsprecherkabeln verlegt sind. < Bei Verwendung der symmetrischen Anschlüsse, stecken Sie den XLR-Stecker behutsam soweit in die entsprechende Buchse, bis er einrastet. Betätigen Sie zum Lösen von XLR-Verbindungen den buchsenseitigen Hebel, und ziehen Sie den Stecker vorsichtig heraus. < Die Belegung der XLR-Eingänge ist: Pin 2 HOT (Signal). Verwenden Sie geeignete Kabel mit entsprechender Polarität. G SIGNAL GND – Masseverbindung Verwenden Sie ein im Handel erhältliches ummanteltes Kabel (PVC-Ummantelung o.ä.) zur Verbindung des Signalerdungsanschlusses des Geräts mit dem Signalerdungsanschluss anderer Komponenten. Die Lautsprecheranschlüsse Bei Verwendung von Litzenkabel: Verdrillen Sie die einzelnen Adern der abisolierten Kabelenden. < Der Durchmesser der zu verwendenden Kabel sollte weniger als 4 mm betragen. Wenn Ihr Lautsprecherkabel mit Kabelschuhen versehen ist: Lösen Sie die Klemme und führen Sie den Gabelschuh in die Klemme ein. Drehen Sie dann die K lemme im Uhrzeigersinn, um sie festzuziehen. < Der Innendurchmesser der Kabelschuhe sollte 6 mm oder mehr und der Außendurchmesser nicht mehr als 13,5 mm betragen. 13,5 mm oder weniger 6 mm oder mehr < Diese Verbindung stellt KEINE elektrische Sicherheitserdung dar. Schutzschaltungen DEUTSCH Die A-03 besitzt Schutzschaltungen gegen Kurzschluss der Leistungsausgänge, Stromüberlast sowie Gleichspannung. Der Ring um den Netzschalter (POWER) blinkt in Blau oder blinkt in Blau und Violett, wenn die Schutzschaltung aktiv ist. < Die Lautsprecherkabel können kurzschließen, wenn der Ring um den Netzschalter (POWER) in Blau blinkt. Schalten Sie die A-03 aus, und überprüfen Sie die Lautsprecherk abel auf korrekten Anschluss. < Tie Temperatur im Inneren des Geräts kann zu hoch werden, wenn der Ring um den Netzschalter (POWER) in Blau und Violett blinkt. Schalten Sie die A-03 aus, und warten Sie, bis die Endstufe sich wieder abgekühlt hat (empfehlenswert sind 10 bis 20 Minuten) oder stellen Sie die Endstufe an einem gut belüfteten Ort auf. Anschließen von Lautsprecherkabeln, die mit Bananensteckern versehen sind Ziehen Sie die Klemme fest und stecken Sie einen Bananenstecker ein. Für Kunden in Europa: G emäß europäischer Sicher heitsbestimmungen ist die Ver wendung von Bananensteckern zum Anschließen von Lautsprechersystemen nicht gestattet. Daher sind bei Europamodellen die Lautsprecheranschlussbuchsen mit schwar zen K appen verschlossen. Verwenden Sie zum Anschließen Lautsprecherkabel mit abisolierten Kabelenden oder solche, die mit Kabelschuhen versehen sind. Sollten sich die schwarzen Kappen aus den Buchsen lösen, setzen Sie diese bitte wieder ein. 23 Anschlussbeispiel Dies ist ein Beispiel der Verwendung des Geräts als Stereo-Endstufenverstärker. ACHTUNG: < Schalten Sie alle Komponenten Ihres Systems aus, bevor Sie Anschlüsse vornehmen. < Lesen Sie die Dokumentationen aller Komponenten, die Sie zusammen mit der A-03 verwenden möchten, aufmerksam durch. Rechtes Lautsprechersystem Wandsteckdose Linkes Lautsprechersystem Netzkabel OUTPUT MODE BTL IN STEREO INPUT SELECTOR XLR RCA OUTPUT MODE BTL BTL STEREO BTL SPEAKER SPEAKER R L SIGNAL GND INPUTS BTL CLASS 2 WIRING CLASS 2 WIRING XLR R RCA XLR L RCA R L A-03 1. COMMON 2. HOT (+) 3. COLD (−) R L PREOUT Vorverstärker 24 Cinch-Audiokabel XLR audio cable XLR-PinBelegung Schließen Sie ein Paar dieser Kabel an. Dies ist ein Beispiel der Verwendung des Geräts als Mono-Endstufenverstärker für den linken Kanal. ACHTUNG: < Schalten Sie alle Komponenten Ihres Systems aus, bevor Sie Anschlüsse vornehmen. < Lesen Sie die Dokumentationen aller Komponenten, die Sie zusammen mit der A-03 verwenden möchten, aufmerksam durch. QVORSICHTSMASSREGEL für die Linkes Lautsprechersystem Wandsteckdose Lautsprecherverbindungen Netzkabel Eine lockere Kabelverbindung kann bewirken, dass die blanken Drähte des Gabelschuhs andere Metallteile am Gehäuse des Geräts b e r ü h re n . S t e l l e n S i e s i c h e r, d a s s d i e Verbindung fest ist. Wenn die blanken Drähte des Gabelschuhs am Ende der Lautsprecherkabel andere Metallteile oder das Gehäuse des Geräts berühren, können Funken entstehen, Fehlfunktionen auftreten, elektrische Schläge auftreten oder Verbrennungen hervorgerufen werden. OUTPUT MODE BTL IN STEREO INPUT SELECTOR RCA XLR OUTPUT MODE BTL BTL STEREO BTL SPEAKER SPEAKER R L SIGNAL GND DEUTSCH INPUTS BTL CLASS 2 WIRING CLASS 2 WIRING XLR R RCA XLR L RCA R L A-03 R Cinch-Audiokabel 1. COMMON 2. HOT (+) 3. COLD (−) Ver binden Sie den rechten Kanal bei Verwendung des Geräts als Verstärker für den rechten Kanal. XLR-Audiokabel XLR-PinBelegung Schließen Sie eines dieser Kabel an. L PREOUT Vorverstärker 25 Hilfe bei der Beseitigung von Fehlfunktionen Technische Daten Falls beim Betreiben der A-03 Fehlfunktionen auftreten sollten, versuchen Sie bitte, diese, anhand der folgenden Beschreibungen, selbst zu lösen, bevor Sie sich an Ihren Händler oder ein autorisiertes Servicecenter wenden. Allgemein Netzteil Europamodell. . . . . . . . . . . . . . . . . . . . . . . . . . . . . . . . . . . AC 230 V, 50 Hz U.S.A./Kanadamodell. . . . . . . . . . . . . . . . . . . . . . . . . . . . AC 120 V, 60 Hz Koreamodell. . . . . . . . . . . . . . . . . . . . . . . . . . . . . . . . . . . . AC 220 V, 60 Hz Leistungsaufnahme. . . . . . . . . . . . . . . . . . . . . . . . . . . . . . . . . . . . . . . . . 400 W Abmessungen (B x H x T). . . . . . . . . . . . . . . . . . . . . . 445 x 220 x 430 mm Gewicht. . . . . . . . . . . . . . . . . . . . . . . . . . . . . . . . . . . . . . . . . . . . . . . . . . . . . . 38 kg Zulässige Betriebstemperatu. . . . . . . . . . . . . . . . . . . . . +10 °C bis +30 °C Zulässige Betriebsluftfeuchtigkeit 5 % bis 85 % (keine Kondensationsbildung) Zulässige Lagertemperatur. . . . . . . . . . . . . . . . . . . . . . . –20 °C bis +55 °C Keine Netzspannung eerprüfen Sie die Verbindung zwischen Netzanschluss und Endstufe. Vergewissern Sie sich, dass die Steckdose, an der die A-03 betrieben wird, nicht geschaltet ist. Falls dies doch der Fall sein sollte, schalten Sie sie ein. eStecken Sie das mitgelieferte Netzkabel in den Netzanschluss der Endstufe. Keine oder nur sehr leise Tonwiedergabe. eBetätigen Sie den POWER-Schalter, um die A-03 einzuschalten. Drücken Sie den WARM-UP-Schalter zum Ausschalten des WARM-UP-Modus, wenn das Gerät warmläuft. ee r p r ü fe n S i e d e n a n g e s c h l o s s e n e n Vo r ve r s t ä r k e r a u f einwandfreie Funktion. Schalten Sie den A-03 stets aus, bevor Sie den Vorverstärker einschalten. eVergewissern Sie sich, dass der angeschlossene Vorverstärker und die ihn speisende Signalquelle ein Audiosignal ausgeben. eerprüfen Sie die Verbindungen zu den Lautsprechersystemen, dem Vor verstärker sowie allen daran angeschlossenen Wiedergabekomponenten auf korrekten Anschluss. eWählen Sie am Vorstärker den richtigen Eingang aus. eWählen Sie an der Endstufe den richtigen Eingang aus. eStellen Sie am Vorverstärker den Wiedergabepegel ein. eDer Ring um den Netzschalter (POWER) blinkt in Blau oder blinkt in Blau und Violett, wenn die Schutzschaltung aktiv ist. Schalten Sie die A-03 unverzüglich aus, wenn die Anzeige rot leuchtet oder blinkt, und beheben Sie die Ursache des Problems. eDas Lautsprecherkabel könnte einen Kurzschluss haben. erprüfen Sie Lautsprecherkabel und –anschlüsse. Zu wenig Bass – keine klare Ortung im Stereo-Klangbild. eerprüfen Sie, ob alle Lautsprechersysteme mit korrekter Polarotät (+/_) angeschlossen sind. Falls das Ausführen der jeweils zutreffenden Problemlösung nicht zum gewünschten Erfolg führen sollte, haben Sie die Möglichkeit, die A-03 zurück zu setzen (Reset). Trennen Sie hierzu das Netzkabel der Endstufe für ungefähr 60 Sekunden vom Stromnetz. Verstärkerteil Nenn-Ausgangsleistung. . . . . . . . . . STEREO: 50 W + 50 W (1 kHz, 8 Ω) 100 W + 100 W (1 kHz, 4 Ω) BTL: 200 W (1 kHz, 8 Ω) 330 W (1 kHz, 4 Ω) Maximale Nutzausgangsleistung STEREO: 77 W + 77 W (1 kHz, 8 Ω) 127 W + 127 W (1 kHz, 4 Ω) BTL: 270 W (1 kHz, 8 Ω) 400 W (1 kHz, 4 Ω) Frequenzgang. . . . . . . . . . . . . . . . . . . . . . . . . . . . . . . . . . . . . . . . 5 Hz bis 100 kHz (1 W, 8 Ω, +0/–1,2 dB) Rauschabstand. . . . . . . . . . . . . . . . . . . . . . . . . . . . . . . . . . . . mehr als 117 dB Verzerrung (THD). . . . . . . . . . . . . . . 0,009 % (1 kHz, Nennausgang, 8 Ω) Minimal zulässige Lautsprecherimpedanz . . . . . . . . . . . . . STEREO: 4 Ω BTL: 4 Ω Garantierter Bereich für Klasse-A-Verstärkung 50 W + 50 W (1 kHz, 8 Ω) Eingangsempfindlichkeit (Nennausgang) RCA (STEREO): 0,76 Vrms/50 W (8 Ω) XLR (STEREO): 1,56 Vrms/50 W (8 Ω) RCA (BTL): 1,62 Vrms/200 W (8 Ω) XLR (BTL): 2,35 Vrms/200 W (8 Ω) Eingangsimpedanz. . . . . . . . . . . . . . . . . . . . . . . . . . . . . . 50 W + 50 W (8 Ω) RCA: 150 kΩ XLR: 320 kΩ Gain. . . . . . . . . . . . . . . . . . . . . . . . . . . . . . . . . . . . . . . . . RCA (STEREO): 28,4 dB Zubehör Netzkabel x 1 Filzkissen x 4 Netzstecker-Haltebügel x 1 Schraube für den Netzstecker-Haltebügel x 2 Bedienungsanleitung x 1 Garantiekarte x 1 < Änderungen in Ausführung und technischen Werten sind ohne vorherige Ankündigung möglich. < Angaben zu Gewicht und Abmessungen sind Näherungswerte. < Illustrationen können geringfügig vom Serienmodell abweichen. 26 China RoHS < The information in the following table is only applicable to products for sale in the People’s Republic of China. < The products sold in the European area are manufactured in accordance with the European RoHS Directive. < Les informations contenues dans le tableau suivant sont applicables uniquement aux produits en vente en République populaire de Chine. < Les produits vendus en Europe sont fabriqués conformément avec la directive européenne RoHS. < Die Informationen in der folgenden Tabelle gelten nur für Produkte, die in der Volksrepublik China zum Verkauf angeboten werden. < Die im europäischen Raum vertriebenen Produkte werden unter Beachtung der Europäischen RoHS-Richtlinie hergestellt. TEAC CORPORATION 1-47 Ochiai, Tama-shi, Tokyo 206-8530, Japan Fax: (042) 356-9240 e-mail: [email protected] TEAC AMERICA, INC. 7733 Telegraph Road, Montebello, California 90640 Phone: (323) 726-0303 TEAC CANADA LTD. 5939 Wallace Street, Mississauga, Ontario L4Z 1Z8, Canada Phone: (905) 890-8008 TEAC MEXICO, S.A. De C.V Rio Churubusco 364, Colonia Del Carmen, Delegación Coyoacàn, CP 04100, México DF, México Phone: (5255)5010-6000 TEAC UK LIMITED Suites 19 & 20, Building 6, Croxley Green Business Park, Hatters Lane, Watford, Hertfordshire, WD18 8TE, U.K. Phone: (0845) 130-2511 TEAC EUROPE GmbH Bahnstrasse 12, 65205 Wiesbaden-Erbenheim, Germany Phone: 0611-71580 This appliance has a serial number located on the rear panel. Please record the model number and serial number and retain them for your records. Model number Serial number 0810. MA-1399B