Transcript
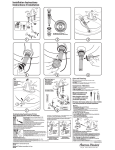
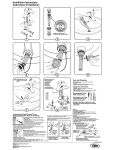
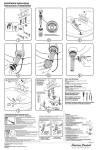
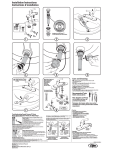
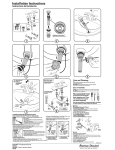
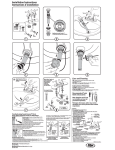
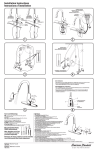
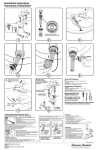
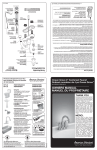
Installation Instructions Instructions d’installation Install Handle Escutcheon kit if provided loose. Installez le kit d'Écusson de Poignée si fourni desserré. Seal Joint d’étanchéité A Seal Joint d’étanchéité Off Fermé Off Fermé 1 Hot Chaud UNSCREW BEFORE Cold Froid INSTALLING Remove Enlever B ! Blue Stripe Bande Bleue C Remove prior to mounting spout Retirer avant le montage bec verseur Red Stripe Band Rouge B 2 3 5 6 Slot Must be in this Position La Feate doit être dans cette Position 4 B Check Operation of Pop-up Vérifier le Fonctionnement du Drain A 7 9 8 Care and Cleaning: Do: Simply rinse the product clean with clear water, dry with a soft cotton flannel cloth. Do Not: Clean the product with soaps, acid, polish, abrasives, harsh cleaners, or a cloth with a coarse surface. Instructions d'Entretien: À FAIRE: simplement rincer le robinet avec de l'eau propre. sécher avec un chiffon doux en coton. Cold Froid À NE PAS FAIRE: nettoyer avec des savons, de l'acide, des produits à polir, des détergents abrasifs ou un chiffon à gros grains. Make Water Supply and Waste Connections Raccordement à l'Alimentation d'Eau et à l'Evacuation Des Eaux Usées On Note: Supplies and P-Trap not included and must be purchased separately. Remarque: des tuyaux, siphon en p ou des arrondies (non inclus) peuvent être achetés séparément. Ouvert Service If Faucet Drips Proceed As Follows: Hot Chaud t5VSO)"/%-&4JO0''QPTJUJPO t*GTQPVUESJQTPQFSBUF)"/%-&4TFWFSBMUJNFTGSPN0''UP0/QPTJUJPO %POPUGPSDF)"/%-&4UIFZUVSOPOMZ t"&3"503NBZBDDVNVMBUFEJSUDBVTJOHEJTUPSUFEBOESFEVDFEXBUFSnPX 3FNPWF"&3"503BOESJOTFDMFBO On Ouvert Troubleshooting Speed Connect® Drain Drain Speed Connect® Guide de dépannage If sink does not hold water even though Stopper is in the “down” position: t%JTDPOOFDUUIF$BCMFGSPNUIF%SBJOCZVOUISFBEJOHUIF $BCMF$POOFDUPS t6TFBTNBMMTDSFXESJWFSUPSPUBUFUIF$BNJOUIFDMPDLXJTF EJSFDUJPOBTGBSBTJUXJMMHP t1VTI%08/POUIF-JGU,OPCUPNBLFTVSFJUJTGVMMZEPXO t3FBUUBDIUIF$BCMFUPUIF%SBJO#PEZ$POOFDUJPO Si l'évier ne retient pas l'eau même lorsque la butée est en position « abaissée » : t%ÏUBDIFSMFDÉCMFEVESBJOFOWJTTBOUMFDPOOFDUFVSEFDÉCMF t6UJMJTFSVOQFUJUUPVSOFWJTQPVSUPVSOFSMBDBNFEBOTMFTFOTIPSBJSFKVTRVhËTPONBYJNVN t1PVTTFSTVSMFMFWJFSQPVSWÏSJmFSRVhJMFTUCJFOFOGPODÏ t'JYFSMFDÉCMFBVSBDDPSEFNFOUEVDPSQTEFESBJO Stopper Removal Procedure: t%JTDPOOFDUUIF$BCMFGSPNUIF%SBJOCZVOUISFBEJOHUIF$BCMF $POOFDUPS6TFmOHFSTPSTNBMMTDSFXESJWFSVOEFSFJUIFSTJEFPG UIF$BN$BQUPQSZJUPVUGSPNUIF%SBJO t3FNPWFUIF$BNCZQVMMJOHJUTUSBJHIUPVUXIJMFXJHHMJOHHFOUMZ UPMPPTFOUIF3VCCFS4FBM t5IF4UPQQFSDBOOPXCFSFNPWFECZMJGUJOHJUPVUPGUIF%SBJO Procédure de Dépose de Butée t%ÏUBDIFSMFDÉCMFEVESBJOFOWJTTBOUMFDPOOFDUFVSEFDÉCMF1BSVOEFTDÙUÏTVUJMJTFS MFTEPJHUTPVVOQFUJUUPVSOFWJTQPVSTPSUJSMFDBQVDIPOEFDBNFEVESBJO t5JSFSUPVUESPJUTVSMBDBNFQPVSMhFOMFWFSFOMBTFDPVBOUMÏHÒSFNFOUQPVSMJCÏSFSMFKPJOUFODBPVUDIPVD t -B CVUÏF QFVU ÐUSF FOMFWÏF FO MB TPVMFWBOU EV ESBJO San Sebastian™ 8" Widespread Faucet 9259.801 Series San Sebastian™ 8 po Robinet de lavabo á l'entraxe 9259.801 Séries If you are experiencing loose or binding Handles: 10 From under the sink unscrew the attachment nut that holds the valve in place. From the top of the sink, pull up the handle and base, confirm that the black rubber gasket is in place under the decorative ring at the bottom of the handle base. Then hand tighten the decorative ring clockwise until it stops, making sure that the gasket stays in place. To align the handle move it to the off position, hold it in place, then firmly tighten the attachment nut under the sink. To Change Handle Direction: 5IF4UPQQFSDBOCFJOTUBMMFEUXPXBZTi-PDLFEw.PEF4UPQQFSDBOOPU CFSFNPWFE PSi6OMPDLw.PEF4UPQQFSJTSFNPWBCMF t3FNPWF*/%&9#6550/1 )"/%-&4$3&82 BOE)"/%-&3 t3FNPWF3&5"*/*/(03*/(4 t-JGUBOEUVSO45018"4)&35 t3FQMBDF3&5"*/*/(03*/(4 3FQMBDF)"/%-& -BCVUÏFQFVUÐUSFJOTUBMMÏFEFEFVYNBOJÒSFTFOQPTJUJPOjWFSSPVJMMÏFx MBCVUÏFOFQFVUQBTÐUSFFOMFWÏF PVFOQPTJUJPOjEÏWFSSPVJMMÏFx MBCVUÏFQFVUÐUSFFOMFWÏF 90° 4 5 1 2 3 Entretien Logo Logo Logo Logo Si le robinet goutte, procéder comme suit: 180˚ Loop Toward Rear of Sink Boucle Vers L’arrière de L'évier Locked Mode (Vandal Proof) Position verrouillée (à l'épreuve du vandalisme) Aerator Aérateur 90° Loop Toward Front of Sink Boucle Vers L’avant de L'évier Unlocked Mode Position déverrouillée t.FUUSFMBQPJHOÏFTVSMBQPTJUJPOGFSNÏF t4JMFSPCJOFUHPVUUFBDUJPOOFSMFTQPJHOÏFTËQMVTJFVSTSFQSJTFTFOBMUFSOBOU MFTQPTJUJPOTGFSNÏFFUPVWFSUF/FQBTGPSDFSMFTQPJHOÏFTOFUPVSOFOURVhB¡ t-BQPVTTJÒSFQFVUTBDDVNVMFSEBOTMF#3*4&+&5"²3"5&63DBVTBOUBJOTJVOEÏCJU EFBVSÏEVJUFUJODPOTUBOU%ÏWJTTFSFUSFUJSFSMF#3*4&+&5"²3"5&63FUMFSJODFS Si vous connaissez desserré ou attachez des Poignées : De l'évier dévissent la noix d'attachement qui tient la valve dans l'endroit. Du haut de l'évier, le coup en haut la poignée et la base, confirment que le joint noir de caoutchouc est dans l'endroit sous l'anneau décoratif au fond de la base de poignée. Alors la main serre l'anneau décoratif dans le sens des aiguilles d'une montre jusqu'à ce qu'il s'arrête, en s'assurant que le joint reste dans l'endroit. Mettre en ligne la poignée le déplacent au de la position, le tiennent dans l'endroit, serrent alors fermement la noix d'attachement sous l'évier. Pour changer la direction de poignée: t&OMFWF[MF#0650/%*/%&91 MB7*4EFMB10*(/²&2 FUMB10*(/²&3 t&OMFWF[MB-03*/(EF3&5&/6&4 t4PVMFWF[FUUPVSOF[MB%0/%&--&%"33&55 t*OTUBMMF[ËOPVWFBVMB-03*/(EF3&5&/6&4 *OTUBMMF[ËOPVWFBVMB10*(/²&3 M965138_FR_EZ_RÉV. 1.3