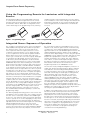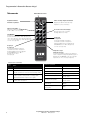
1
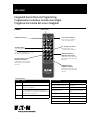
Integrated Sensor Remote Programming
ADJUSTING LIGHTING WITH HANDHELD
(HHPRG-MS) OR (ISHH-01) OR (ISHH-02)
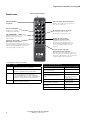
Manual On/Off
••
With lighting in the On position.
••
Point handheld remote at Integrated Sensor.
••
Press the Relay On/Off button to toggle the lighting
(LED blinks 2 times rapidly).
Manual Raise/ Lower
••
With lighting in the On position.
••
Point handheld remote at Integrated Sensor.
••
••
Adjust light level using the Raise/Lower buttons to
the desired Light Level. (LED blinks 2 times rapidly)
The lighting will remain at this light level until the
occupancy sensor times out and is re-triggered.
••
With lighting in the On position.
••
Point handheld remote at Integrated Sensor.
••
••
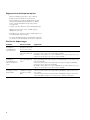
It is recommended that the user saves their settings in the
following order to streamline the process.
••
Sensitivity Level
••
Time Out Value
When adjusting multiple fixtures, adjust all fixtures to the
desired light level first then set the following.
••
Daytime Occupied
••
Energy Saver Scene
••
Daytime Unoccupied Levels
••
Twilight Occupied/Unoccupied Levels
••
Nighttime occupied/Unoccupied Levels
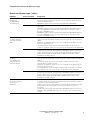
Set Sensitivity Level
••
••
Select Scene
••
Programming Order for a Multiple Fixtures in a Room
Press the MIN, 50, 75, MAX, ES, Occ, or UnOcc
buttons (LED blinks 2 times rapidly)
••
••
The lighting will remain at this light level until the
occupancy sensor times out and is re-triggered.
••
••
PROGRAMMING WITH HANDHELD (HHPRG-MS) OR (ISHH-01)
••
••
••
Daylight levels in any space are dependent on local
conditions and may be effected by shades, window
size and amount of natural light.
The best time to adjust daylight levels is when
there is little natural light entering the space. This
could be done at night or by closing the shades.
Press the “HI” button to put the Occupancy Sensor
into the High (full) coverage sensitivity mode
With lighting in the On position.
Press the “5”,”10”,”15”,”20” button to select the proper
time out value for the Occupancy Sensor
If the Time out value is greater than 10 minutes, after
10 minutes of no occupancy the Occupancy Sensor
will trigger the Energy Saver Scene. The lighting will
remain at the scene light level for the remainder of
the time out value and then turn Off.
If the Time out value is 10 minutes or less, the
occupancy sensor will turn off the lighting after 10
minutes of no occupancy.
Set Daytime Occupied Light Level
••
••
Programming Order for a Single Fixture
It is recommended that the user saves their settings in
the following order to streamline the process.
Press the “LO” button to put the Occupancy Sensor
into the Low (50%) sensitivity mode
Set Sensor Time Out Value
The lighting will ramp to the selected scene light level.
When to adjust programming in your fixtures
With lighting in the On position.
With lighting in the On position.
Point handheld remote at Integrated Sensor. Adjust
light level using On/Off, Raise/Lower buttons to the
desired Daytime Occupied Light Level.
••
When light level has reached desired level
Press the “SET” button (LED blinks 3 times rapidly)
••
Sensitivity Level
••
••
Time Out Value
••
••
Daytime Occupied
••
Energy Saver Scene
••
Daytime Unoccupied Levels
••
Twilight Occupied/Unoccupied Levels
••
Nighttime occupied/Unoccupied Levels
••
Then press the “DO” button (LED blinks 5 seconds
continuously)
The desired light level is now stored as the Daytime
Occupied Light Level
Integrated Sensor Remote Programming
ADF142501 www.eaton.com
3