1
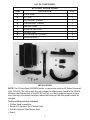
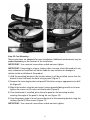
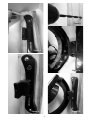
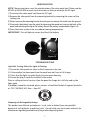
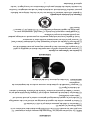
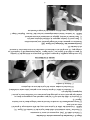
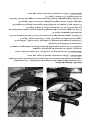
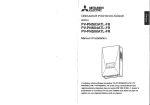
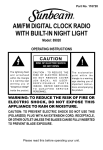
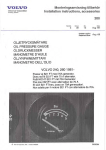
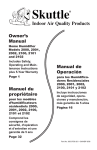
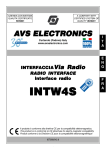
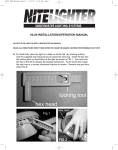
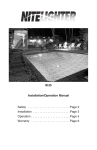
INSTRUCTION/OPERATION MANUAL FOR
SMARTPOOL EZ LIGHT SOLAR PANEL
MODEL: EZ3WPV
KEEP THESE INSTRUCTIONS
TABLE OF CONTENTS
Important Safety Instructions ..........................................................................1
List of Components and Specifications............................................................2
Installation ...................................................................................................2-6
Operation ........................................................................................................6
Winterization...................................................................................................7
Troubleshooting...............................................................................................7
Warranty……………...........................................................……………….8
IMPORTANT SAFETY INSTRUCTIONS
READ AND FOLLOW ALL INSTRUCTIONS
! WARNING: To reduce the risk of injury, do not permit children to use this product unless they are closely supervised at all times.
! WARNING: Any modifications to this product will void the warranty.
! WARNING: Do not allow children to use, touch, or play near or around the unit’s power pack.
! WARNING: Do not use if unit is damaged in any way.
! WARNING: If combining with an existing battery operated EZ Light, make sure the battery is removed before installing the unit or
! WARNING: performing any other maintenance.
! WARNING: To protect against risk of electrical shock, do not perform maintenance while standing in water or in pool.
! WARNING: Improper installation may result in damage or harm to property or persons. Read all instructions prior to installing this
product.
! WARNING: Do not operate machinery, such as lawn mowers, around the cord of the solar panel as there is risk of shock or may
cause damage to the unit.
! WARNING: Ensure the cord to the panel does not hang across a traffic area as this could create a choking hazard.
! WARNING: Ensure the cord to the panel does not create a tripping hazard, especially around the pool area. Do not rest the cord
on a pool deck or pool surround.
! WARNING: The ground stake is pointed and could cause punctures, be sure to use care when handling this component.
! CAUTION:
If the light or solar panel is not working as it should or has been dropped or damaged in any way, contact SmartPool
LLC Technical Support before using at (732) 730-9880.
! IMPORTANT: This product contains a Lithum-Ion battery. Recycle the battery properly by following local and state disposal laws. Do
not short circuit or dispose of battery in fire.
LIST OF COMPONENTS
EZ LIGHT SOLAR PANEL
ITEM
A
B
C
D
E
F
G
H
I
DESCRIPTION
SOLAR PANEL
20' CORD
POST MOUNT SCREWS
STAKE MOUNT SCREWS
GROUND STAKE
MOUNTING BRACKET
LOCKING CLIP
BLUE MOUNTING SCREWS
RADIAL BRACKET
QTY
1
1
2
2
1
1
1
6
1
F
A
G
E
H
B
I
C
D
INSTALLATION
NOTE: The EZ Solar Panel (EZ3WPV) works in conjunction with an EZ Battery Powered
Light (EZ2420). The solar panel does not charge the 6Vdc battery found in the EZ2420.
However, the 6Vdc battery of the EZ2420 will act as a back-up power source if there
are a few days of inclement weather, where the battery of the solar panel cannot be
charged.
Tools and Materials (Not Included)
• Phillips Head Screwdriver
• Power Drill-Optional (Post Mount Only)
• Drill Bit-Optional (Post Mount Only)
• Pencil
2
Guidelines for Installation
The solar panel should be placed in a location that allows for direct sun exposure through
the peak hours of the day (approximately 10am to 4pm). Having the panel facing the sun
during peak hours will generate the best results while using the pool light. One full day of
charge will provide enough energy for 2 lighting cycles or 4 hours of operation.
NOTE: Results may vary depending on weather conditions and geographical location.
• Locate an area that will allow for maximum sun exposure.
• Ensure the positioning of the panel does not interfere with access to the pool or pool
equipment (EX: filter system) and does not inhibit general traffic around the pool.
• Ensure the location is away from pool activity
• Make sure there is enough cable to reach and make the connection with the EZ Light.
• Choose the best mounting method for your set up: ground stake or post mount (see
corresponding instructions below).
Step 1: Mounting the Solar Panel to the Radial Bracket
1) Insert the radial bracket into the back of the solar panel so that the screw mounts
align (Figure 1).
NOTE: The numbers on the radial bracket should be facing away from the cord connection.
2) Connect the radial bracket to the solar panel using (4) blue screws (Figure 2).
IMPORTANT: Use a manual screw driver and do not over tighten.
Figure 1
Figure 2
Step 2A: Ground Stake Mounting
WARNING: The ground stake is pointed and could cause punctures; be sure to use
care when handling this component.
1) Connect the stake to the mounting bracket using the stake mount screws provided
(Figure 3).
2) Using the mounting bracket as a handle, screw the stake into the ground by applying
slight downward force and rotating the handle clockwise until the stake is firmly in
place (Figure 4).
IMPORTANT: Ensure the stake is level for a secure installation of the panel.
3) Place the solar panel on the mounting bracket, ensuring the angle of the panel is
facing the sun (Figure 5).
4) Once the proper angle is found, secure the panel to the mounting bracket using the
locking clip and (2) blue screws (Figure 6).
IMPORTANT: Use a manual screw driver and do not over tighten.
3
Figure 4
Figure 3
Figure 6
Figure 5
Step 2B: Post Mounting
These instructions are adequate for most installation. Additional reinforcement may be
needed depending on the location of the installation.
IMPORTANT: Use a manual screw driver and do not over tighten.
IMPORTANT: If mounting to a fence, shed or other structure; check that product’s war
ranty statement as SmartPool will not be liable for any violations or damages in
relation to the installation of this product.
1) Hold the mounting bracket in the location where it will be installed, ensure that the
bracket is level and mark the holes using a pencil (Figure 7).
2) Remove the mounting bracket and pre-drill the holes using an appropriate size drill
bit (Figure 8).
3) Mount the bracket using the post mount screws provided being careful not to over
tighten the screws as this may crack the bracket (Figure 9).
4) Once the bracket is installed, place the solar panel on the mounting bracket,
ensuring the angle of the panel is facing the sun (Figure 10).
5) Once the proper angle is found, secure the panel to the mounting bracket using the
locking clip and (2) blue screws (Figure 11).
IMPORTANT: Use a manual screw driver and do not over tighten.
4
Figure 8
Figure 7
Figure 10
Figure 11
Figure 9
5
Step 3: Connecting the Solar Panel to the Light
1) Connect the 20’ cord to the panel and tighten the connection.
2) Plug the other end of the cord into the socket of the EZ Light (Figure 12).
NOTE: The end of the cord and socket are keyed so that the plug only fits one way.
3) Hand-tighten the fitting by rotating the collar in a clockwise direction (Figure 13).
4) Secure the cord so that it is not hanging or resting in an area that could harm an
individual or interfere with pool/outdoor equipment.
A. Zip-tie the cord to the stake or post
B. Wrap the cord around the stake or post
C. Bury the cord.
Figure 12
Figure 13
OPERATION
On a full charge, the EZ Solar Panel will run the EZ Light for a total of 4 hours or 2 light
cycles. Operation of the EZ Light does not change, please see below or view
instructions in the EZ Light manual.
Light Function (Figure 14)
Allow the panel to charge for a full day.
1) To turn the light ON, press and release the switch once.
2) To turn the light OFF, press and hold the switch.
NOTE: The light will automatically shut off after 2 hours. Repeat step 1 in this section
if more time is required.
Figure 14
6
WINTERIZATION
NOTE: These instructions cover the winterization of the solar panel only. Please see the
EZ2420 or EZ2420NR manuals for instructions on how to winterize the EZ Light.
1) Disconnect the solar panel cord from the EZ Light.
2) Remove the solar panel from the mounting bracket by removing the screws of the
locking clip.
3) Either unscrew the mounting bracket from the post or remove the stake from the ground.
4) Disconnect the battery from the panel by loosening the round seal ring on the back of the
panel and releasing the clip to the battery. Reseal the battery compartment (figure 15).
5) Store the entire system in an area above freezing temperatures.
IMPORTANT: This will help to sustain the life of the battery.
Figure 15
TROUBLESHOOTING
Light Not Turning ON or the Light is Flashing
1) Ensure the solar panel has clear and full exposure to the sun.
2) If the weather has been poor then the panel may not have a full charge.
3) Check that the light is pushed firmly into the return housing.
4) Ensure the plug is correctly installed in the socket.
Prior to calling technical service, allow the panel to charge for a full day and try the
light again.
If problems cannot be resolved, please contact a SmartPool Technical Support Specialist
at: 732-730-9880, M-F, 9am – 5pm EST
Disposing of Rechargeable Battery
This product uses lithium-ion batteries. Local, state or federal laws may prohibit
disposal of such batteries in ordinary trash. Consult with your local waste authority for
information regarding available recycling and/or disposal options.
7
1 YEAR LIMITED WARRANTY
One year limited warranty from date of original purchase for manufacturing defects under normal and reasonable use, and subject to
the maintenance requirements and installation guidelines set forth in the product instruction manual.
This warranty applies only while using this product in the United States and Canada. Customers outside the continental United States will
be responsible for inbound and outbound freight on all claims. Those within the continental US will be responsible for shipping charges
to a repair center, if there is not one within driving distance. SmartPool will cover freight back to the customers within the continental
US for approved warranty claims.
THIS WARRANTY IS SUBJECT TO THE TERMS, LIMITATIONS AND EXCLUSIONS DESCRIBED BELOW, AND THERE ARE NO OTHER
WARRANTIES OR REPRESENTATIONS, EITHER EXPRESS OR IMPLIED, WHETHER OF MERCHANTABILITY, FITNESS FOR A PARTICULAR
PURPOSE, OR OTHER, MADE BY THE MANUFACTURER, OTHER THAN THOSE SPECIFICALLY SET FORTH IN THIS WRITTEN WARRANTY
What is Covered: SmartPool LLC warrants its electronic product to be free from defects in material and workmanship when leaving the factory.
What is not Covered: Any type of damage to the product due to improper installation, maintenance, or failure to provide necessary and
reasonable maintenance; any damage or injury caused by misuse and/or unreasonable use of the product; batteries (if applicable);
damage due to or related to improper draining, winterizing, storage or Acts of God; SmartPool LLC will not honor any claims for damage
to any products in transit unless damage to the shipping container is noted at the time of delivery on the transfer company’s delivery bill.
THE WARRANTY OBLIGATIONS OF SMARTPOOL LLC ARE LIMITED TO REPAIR OR REPLACEMENT OF THE PRODUCT OR OF ANY DEFECTIVE
COMPONENT, AT THE OPTION OF SMARTPOOL. UNDER NO CIRCUMSTANCES WILL SMARTPOOL LLC BE LIABLE OR RESPONSIBLE FOR ANY
CONSEQUENTIAL OR INCIDENTAL DAMAGES, AND/OR CHARGES FOR LABOR. SMARTPOOL SHALL NOT BE LIABLE OR RESPONSIBLE
UNDER ANY CIRCUMSTANCES OR ANY AMOUNT FOR ANY CONSEQUENTIAL OR INCIDENTAL DAMAGES, OR FOR ANY INJURIES OR
DAMAGES TO PERSON OR PROPERTY USING OR USED IN CONNECTION WITH THE PRODUCT, OR FOR ANY OTHER LOSS OF PROFITS OR
OTHER COSTS OR EXPENSES OF ANY KIND OR CHARACTER. IF SMARTPOOL LLC DETERMINES THAT EITHER REPAIR OR REPLACEMENT OF
THE PRODUCT IS NECESSARY, SMARTPOOL MAY EITHER REPAIR THE PRODUCT AT A NOMINAL CHARGE TO THE OWNER OR REPLACE THE
PRODUCT. THE OWNER BEARS THE SOLE RESPONSIBILITY FOR PRE-PAID RETURN OF THE PRODUCT TO SMARTPOOL, AND ALL REPAIRED
OR REPLACED PRODUCTS WILL BE RETURNED AT THE OWNER’S EXPENSE ON NON-WARRANTY RELATED RETURNS.
NO PERSON, FIRM, OR CORPORATION IS AUTHORIZED TO MAKE REPRESENTATIONS OR INCUR ANY OBLIGATIONS IN THE NAME OF OR
ON BEHALF OF SMARTPOOL LLC, EXCEPT AS STATED HEREIN. THE REMEDIES SET FORTH IN THIS WARRANTY ARE EXPRESSLY
UNDERSTOOD TO BE THE EXCLUSIVE REMEDIES AVAILABLE TO THE OWNER, AND THIS WARRANTY CONTAINS THE FULL AND COMPLETE
AGREEMENT BETWEEN SMARTPOOL LLC AND THE OWNER. THIS WARRANTY SETS FORTH THE ONLY OBLIGATIONS OF SMARTPOOL LLC,
WITH REGARD TO THIS PRODUCT, AND THERE ARE NO WARRANTIES WHICH EXTEND BEYOND THE DESCRIPTION ON THE FACE HEREOF.
The representations set forth herein are the only representations made by SmartPool LLC, with respect to the product, and this warranty
does not constitute either a performance or satisfaction guarantee. It is the responsibility of the product owner to regularly test and
check the product for proper function and safety.
This warranty gives the original owner specific legal rights. You may have other rights depending on where you live.
Call 1-732-730-9880 to initiate a claim.
8
GARANTIE 1 AN LIMITÉE
Garantie limitée de 1 an à partir de la date initiale d'achat, contre les vices de fabrication, dans des conditions d'utilisation normale et
raisonnable, et sous réserve de l'observation des consignes d'entretien et d'installation qui figurent dans le mode d'emploi du produit.
Cette garantie s'applique uniquement lors de l'utilisation de ce produit aux États-Unis et au Canada. Les clients à l'extérieur de la zone
continentale des États-Unis seront responsables des coûts de transport entrants et sortants sur toutes les demandes de garantie. Les
personnes qui se trouvent à l'intérieur de la zone continentale des États-Unis seront responsables des frais d'expédition vers un centre
de réparation, si aucun ne se trouve à proximité. SmartPool couvrira les frais de transport de retour vers les clients à l'intérieur de la
zone continentale des États-Unis pour les demandes de garantie approuvées.
LA PRÉSENTE GARANTIE EST ASSUJETTIE AUX MODALITÉS, LIMITATIONS ET EXCLUSIONS DÉCRITES CI-DESSOUS. IL N'EXISTE AUCUNE
AUTRE
GARANTIE OU ALLÉGATION, EXPRESSE OU TACITE, QU'IL S'AGISSE DE QUALITÉ MARCHANDE, D'APTITUDE À UN USAGE QUELCONQUE
OU AUTRE
CONCÉDÉE PAR LE FABRICANT AUTRE QUE CELLES EXPRESSÉMENT EXPOSÉES DANS LA PRÉSENTE GARANTIE ÉCRITE.
Ce qui est garanti : SmartPool LLC garantit son produit électronique contre tout vice de matériau ou de fabrication à la sortie dudit produit de
l'usine.
Ce qui n'est pas garanti : Tout dégât subi par le produit en raison d'une mauvaise installation, d'un mauvais entretien ou de l'omission
d'assurer l'entretien raisonnablement nécessaire du produit ; toute blessure ou tout dommage matériel provoqué par un usage déraisonnable
ou par l'abus du produit ; les batteries ou les piles (le cas échéant) ; les dégâts dus ou liés à un mauvais drainage, hivernage ou stockage, ou à
une calamité naturelle ; SmartPool LLC rejettera toute réclamation pour les avaries subies par un produit en cours de transport, sauf si les
dégâts du contenant d'expédition sont notés sur le bordereau de livraison du transporteur au moment de la livraison.
LES OBLIGATIONS DE GARANTIE DE SMARTPOOL LLC SE LIMITENT À LA RÉPARATION OU AU REMPLACEMENT DU PRODUIT OU DE TOUS
COMPOSANT DÉFECTUEUX, AU GRÉ DE SMARTPOOL LLC. SMARTPOOL LLC DÉCLINE TOUTE RESPONSABILITÉ QUANT AUX DOMMAGES
CONSÉCUTIFS OU INDIRECTS ET AUX FRAIS DE MAIN-D'OEUVRE. EN AUCUN CAS OU POUR QUELQUE MONTANT QUE CE SOIT, SMARTPOOL LLC
NE SAURA ÊTRE TENU RESPONSABLE DE DOMMAGES INDIRECTS OU CONSÉCUTIFS, OU DE PRÉJUDICES OU BLESSURES SURVENUS À DES
PERSONNES UTILISANT L’ARTICLE, OU À DES BIENS UTILISÉS EN RAPPORT AVEC CELUI-CI, OU ENCORE D’AUCUNE PERTE DE PROFIT OU DE TOUT
COÛT OU DÉPENSES DE QUELQUE SORTE OU NATURE QUE CE SOIT. SI SMARTPOOL LLC JUGE QUE LA RÉPARATION OU LE REMPLACEMENT D'UN
PRODUIT EST NÉCESSAIRE, SMARTPOOL LLC PEUT RÉPARER LE PRODUIT EN IMPUTANT DES FRAIS NOMINAUX AU PROPRIÉTAIRE OU REMPLACER
LE PRODUIT SELON LE BARÈME DES FRAIS DE REMPLACEMENT DÉCRIT CI-DESSUS. SMARTPOOL LLC SE RÉSERVE LE DROIT DE FOURNIR DES
PIÈCES OU DES PRODUITS REMIS À NEUF. LE PROPRIÉTAIRE ASSUME L'ENTIÈRE RESPONSABILITÉ DU RETOUR PRÉ-AFFRANCHI DU PRODUIT À
SMARTPOOL LLC; TOUS LES PRODUITS RÉPARÉS OU DE REMPLACEMENT SONT RETOURNÉS AUX FRAIS DU PROPRIÉTAIRE.
AUCUNE PERSONNE MORALE OU PHYSIQUE, OU SOCIÉTÉ N’EST AUTORISÉE À FAIRE DES ALLÉGATIONS OU À CONTRACTER DES OBLIGATIONS AU
NOM DE SMARTPOOL LLC, HORMIS LES PRÉSENTES. LES RECOURS ÉNONCÉS DANS LA PRÉSENTE GARANTIE SONT EXPRESSÉMENT RECONNUS
COMME ÉTANT LES RECOURS EXCLUSIFS DONT DISPOSE LE PROPRIÉTAIRE ET LA PRÉSENTE GARANTIE ÉNONCE L'ENTENTE PLEINE ET ENTIÈRE
INTERVENANT ENTRE SMARTPOOL LLC ET LE PROPRIÉTAIRE. LA PRÉSENTE GARANTIE ÉNONCE LES SEULES OBLIGATIONS DE SMARTPOOL LLC
QUANT À CE PRODUIT; IL N’EXISTE AUCUNE AUTRE GARANTIE S’ÉTENDANT AU-DELÀ DE LA DESCRIPTION FIGURANT AUX PRÉSENTES.
Les déclarations qui figurent aux présentes sont les seules faites par SmartPool LLC quant au produit et la présente garantie n'est ni une
garantie de bonne exécution, ni une garantie de satisfaction. C'est au propriétaire du produit qu'incombe la responsabilité d'effectuer les
vérifications et les contrôles réguliers requis pour assurer le bon fonctionnement et la sécurité du produit.
La présente garantie donne au premier propriétaire des droits juridiques précis. Vous pouvez jouir d'autres droits selon l'endroit où vous vivez.
Contactez 1-732-730-9880 pour toutes réclamations.
8
HIVERNAGE
NOTE: Ces instructions portent sur l’hivernage du panneau solaire uniquement. S'il
vous plaît voir les manuels EZ2420 ou EZ2420NR pour obtenir des instructions sur la
façon d'hiverner la Lumière EZ.
1) Débranchez le câble du panneau solaire qui le relit à la lumière EZ.
2) Retirez le panneau solaire du support de montage en retirant les vis de verrouillage.
3) Soit dévisser le support de montage du poteau ou sortez la prise de terre du sol
(selon votre installation).
4) Débranchez la batterie du panneau en dévissant la bague d'étanchéité ronde qui se
trouve à l'endos du panneau et enlever l’attache de la batterie. Refermer le couvert
de la batterie (figure 15).
5) Conserver l'ensemble du système dans une zone au-dessus des températures de
congélation.
IMPORTANT: Cela aidera à préserver la vie de la batterie.
Figure 15
DÉPANNAGE
La lumière ne s’allume pas ou clignote
1) S'assurer que le panneau solaire a une exposition directe et complète au soleil.
2) Si le temps a été mauvais alors le panneau ne pourra pas avoir bénéficié d’une
charge complète.
3) Vérifiez que la lumière est enfoncé fermement dans le refoulement (retour d’eau).
4) S'assurer que la fiche est correctement installée dans le connecteur.
Avant d'appeler le service technique, permettez au panneau de se recharger pendant
une journée entière et essayer le rallumer.
Si les problèmes ne peuvent être résolus, s'il vous plaît communiquer avec un
spécialiste du support technique SmartPool au: 732-730-9880, M-F, 9 heures-17
heures HNE
Disposez de la batterie rechargeable
Ce produit utilise des batteries au lithium-ion. Les lois locales, étatiques ou fédérales
peuvent interdire l’élimination de ces batteries dans les ordures ménagères. Consultez
les autorités locales des déchets pour plus d’informations sur le recyclage et / ou des
options d'élimination.
7
Etape 3: Connection du panneau solaire à la lumière
1) Reliez le câble 20’ (6m) au panneau et serrer la connexion.
2) Branchez l'autre extrémité du cäble dans la prise de la Lumière EZ (Figure 12).
NOTE: L'extrémité du cäble et la prise sont conçu de telle manière que la prise fait
dans un seul sens.
3) Serrez manuellement le raccord en faisant tourner la bague dans le sens horaire
(figure 13).
4) Sécurisez le cäble de sorte qu'il n'est pas suspendu ou ne repose pas dans un
endroit qui pourrait nuire au passage des personnes ou d'interférer avec la piscine /
équipement de plein air.
A. Attacher le câble à la prise de terre ou au poteau (selon votre installation).
B. Enroulez le cordon autour de la prise de terre ou du poteau.
C. Enterrer le cordon.
Figure 12
Figure 13
MODE D’OPÉRATION
Sur une charge complète, le panneau solaire EZ procurera un éclairage de la Lumière
EZ pour un total de 4 heures ou 2 cycles légers. Le fonctionnement de la Lumière EZ ne
change pas, s'il vous plaît voir ci-dessous ou consulter les instructions dans le manuel
de la lumière EZ.
Fonctionnement de l’éclairage (voir figure 14)1)
Permettez au panneau de se recharger pendant une journée entière.
1) Pour ouvrir la lumière, appuyez et relâchez le bouton une fois.
2) Pour fermer la lumière, appuyer et maintenez le bouton enfoncé.
NOTE: La lumière s'éteint automatiquement au bout de 2 heures. Répétez l'étape 1
de cette section si vous désirez augmenter le temps d’ouverture.
Figure 14
6
Figure 8
Figure 7
Figure 10
Figure 9
Figure 11
5
Figure 3
Figure 5
Figure 4
Figure 6
Etape 2B: Montage du Poteau
Ces instructions sont valables pour la plupart des installations . Un renforcement
supplémentaire peut être nécessaire en fonction de la localisation de votre installation.
IMPORTANT: Utilisez un tournevis manuel et ne pas trop serrer .
IMPORTANT: En cas de montage sur une clôture , une remise ou toutes autres
structures ; vérifier la couverture de garantie de ce produit
SmartPool LLC ne sera pas responsable de toute violation ou dommages en rapport à
une mauvaise installation de ce produit .
1) Maintenir le support de montage à l'endroit où il sera installé , vérifiez que le
support est de niveau et marquer les trous à l'aide d'un crayon ( Figure 7).
2) Retirez le support de montage et pré- percer les trous à l'aide d'une perceuse et du
foret de taille appropriée (figure 8).
3) Fixer le support avec les vis de montage du poteau fourni en faisant attention de ne
pas trop serrer les vis car cela pourrait casser le support (Figure 9).
4) Une fois que le support est installée, placer le panneau solaire sur le support de
montage, veiller à ce que l'angle du panneau soit face au soleil ( figure 10).
5) Une fois l'angle approprié trouvé, fixer le panneau au support en utilisant l’attache
de verrouillage et (2) vis bleues ( Figure 11).
IMPORTANT: Utilisez un tournevis manuel et ne pas trop serrer
4
Directives pour l’installation
Le panneau solaire doit être placé dans un endroit qui permet une exposition directe au
soleil pendant les heures d’ensoleillement maximales de la journée (environ 10 hrs am-16
hrs pm). En installant le panneau face au soleil
pendant les heures d’ensoleillement, cela pourra générer de meilleurs résultats tout en
utilisant la lumière de la piscine. Une journée complète de charge fournira assez d'énergie
pour 2 cycles d'éclairage ou 4 heures de fonctionnement.
NOTE: Les résultats peuvent varier selon les conditions météorologiques et la situation
géographique.
• Choississez un endroit qui offrira un maximum d’ensoleillement.
• Assurez-vous que le positionnement du panneau n'interfère pas avec l’accès à la
piscine ou aux équipements (EX: système de filtration) et n’entrave pas la circulation
générale autour de la piscine.
• Assurez-vous que l’emplacement du panneau soit à distance des activités piscine.
• Assurez-vous qu'il y est assez de câble pour atteindre et faire le lien avec la Lumière EZ.
• Choisir la meilleure méthode de montage pour votre installation: piquet de terre ou
montage sur poteau (voir les instructions correspondantes ci-dessous).
Etape 1: Installation du support orientable sur le panneau solaire
1) Insérez le support orientable à l'arrière du panneau solaire de sorte que les
montures de vis soit aligné (Figure 1).
NOTE: Les chiffres sur le support doivent être opposée à la connexion du câble.
2) Connecter le support sur le panneau solaire en utilisant (4) vis bleu (Figure 2)
IMPORTANT: Utilisez un tournevis manuel et ne pas trop serrer
Figure 1
Figure 2
Etape 2A: Montage du piquet de terre
AVERTISSEMENT: Le piquet de terre est pointu et pourrait causer des perforations ou
des blessures; Soyez prudent lors de la manipulation de cette composante.
1) Fixez le piquet au support de fixation avec les vis de montage prévus à cet effet (Figure 3).
2) En utilisant le support de montage comme une poignée, vissez le piquet dans le sol
en appliquant une légère pression vers le bas et en tournant la poignée dans le sens horaire
jusqu'à ce que le piquet soit bien en place (Figure 4).
IMPORTANT: S'assurer que le piquet soit bien de niveau afin d’avoir une installation
sécurisée du panneau.
3) Placez le panneau solaire sur le support de montage, s'assurer que l'angle du
panneau soit face au soleil (figure 5).
4) Une fois l'angle approprié trouvé, fixer le panneau au support en utilisant l’attache
de verrouillage et (2) vis bleu (figure 6)
IMPORTANT: Utilisez un tournevis manuel et ne pas trop serrer.
3
ITEM
A
B
C
D
E
F
G
H
I
LISTES DES COMPOSANTS
EZ LIGHT PANNEAU SOLAIRE
DESCRIPTION
PANNEAU SOLAIRE
6 M CABLE
VIS DE MONTAGE DU POTEAU
VIS DE MONTAGE DU PIQUET
PIQUET DE SOL
SUPPORT DE MONTAGE
ATTACHE DE VERROUILLAGE
VIS DE MONTAGE BLEU
SUPPORT ORIENTABLE
QTÉE
1
1
2
2
1
1
1
6
1
F
A
E
G
H
B
I
C
D
INSTALLATION
NOTE: Le EZ panneau solaire (EZ3WPV) fonctionne conjointement avec la batterie EZ
Light (EZ2420). Le panneau solaire ne recharge pas la batterie 6V trouvé dans la
EZ2420. Toutefois, la batterie 6V de la EZ2420 agira comme une source d'alimentation
de secours en cas de quelques jours de mauvais temps lorsque la batterie du panneau
solaire ne peut pas être chargée.
Outils et matériel (non inclu)
• Tournevis
• Perceuse électrique (au montage du poteau)
• Foret de perceuse (au montage du poteau)
• Crayon
2
MANUEL D’INSTALLATION ET D’OPÉRATION
POUR PANNEAU SOLAIRE EZ LIGHT DE SMARTPOOL
Modèle : EZ3WPV
Table des matières
Instructions importantes de sécurité ...............................................................1
Liste des composants et spécifications ............................................................2
Installation ...................................................................................................2-6
Mode d’opération............................................................................................6
Hivernage........................................................................................................7
Diagnostic des anomalies (dépannage)...........................................................7
Garantie ..........................................................................................................8
INSTRUCTIONS IMPORTANTES DE SÉCURITÉ
LIRE ET SUIVRE TOUTES LES INSTRUCTIONS
Avertissement: Une mauvaise installation peut entraîner des dommages aux biens ou aux personnes. Lisez toutes les instructions avant d'installer ce
!
Avertissement: Pour éviter tout risque de choc électrique, ne pas effectuer l'entretien les pieds dans l'eau ou dans la piscine.
!
Avertissement: Assurez-vous que la batterie est retirée avant l'ouverture de l'unité ou lors de l'exécution de tout autre entretien.
!
Avertissement: Ne pas utiliser si l'appareil est endommagé de quelque manière que ce soit.
!
Avertissement: Ne pas laisser les enfants utiliser, toucher, ou jouer à proximité ou autour de l'unité de bloc d'alimentation.
!
Avertissement: Toutes modifications au produit annule la garantie.
!
Avertissement: Pour réduire le risque de blessure, ne pas laisser les enfants utiliser ce produit sauf sous surveillance en tout temps.
!
produit.
!
Avertissement: Ne pas faire fonctionner les machines, comme les tondeuses à gazon, autour du cordon du panneau solaire car il y a risque
d'électrocution ou peut causer des dommages à l'appareil.
!
Avertissement: Vérifiez que le cordon du panneau ne soit pas pas suspendu dans une zone de circulation, car cela pourrait créer un risque
d’étranglement au passage des personnes.
!
Avertissement: Vérifiez que le cordon du panneau ne crée pas un danger de chute,surtout autour de la piscine. Ne placez pas le cordon sur une
terrasse de la piscine ou sur quelquonque surface entourant la piscine.
Avertissement: Si la lumière ou le panneau solaire ne fonctionnent pas comme il se doit ou a été échappé ou endommagé, contactez SmartPool LLC
!
Avertissement: Le piquet de terre est pointu, n'oubliez pas de prendre des précautions lors de la manipulation de cette pièce composante.
!
support technique avant tout utilisation au (732) 730-9880.
Avertissement: Attention au court-circuit et ne jamais disposer des batteries dans le feu.
!
Avertissement: Ce produit contient une batterie Lithum-Ion. Recyclez correctement la batterie en suivant les lois locales en vigueur et de l'Etat.
!