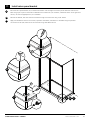
1
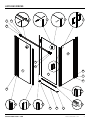
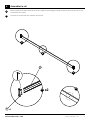
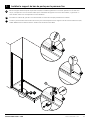
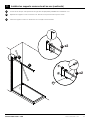
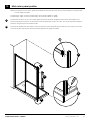
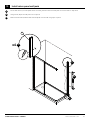
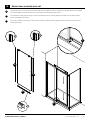
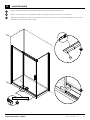
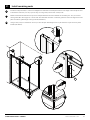
PORTE DE DOUCHE FLOW - MANUEL D’INSTALLATION
COIN (2W)
CE MANUEL EST APPLICABLE POUR TOUTE LA SÉRIE DE PORTES FLOW EN COIN DE 42” ET 60”
FLOW48-2W ET FLOW60-2W
CAML-TOMLIN
145 Northfield Drive West
Waterloo, ON
Canada N2L 5J3
t: 866.884.5290
f: 519.746.3114
www.camltomlin.com
NOTES IMPORTANTES
Merci d’avoir acheté la FLOW de CAML-TOMLIN
Avant de commencer, nous vous demandons de bien remplir le bas de la page. Ceci sera gardé pour votre
garantie.
Assurez-vous de bien lire le manuel d'instruction avant de commencer votre installation.
Veuillez s’il-vous-plaît vous assurer que votre base de douche est à niveau et bien fixée contre les montants
du mur de 2x4.
Assurez-vous de renforcir le seuil de votre base à l’aide de bois à l’endroit ou la base rencontre votre tuile,
c’est l’emplacement ou votre porte de douche s’installe au mur.
Si vous fabriquer une base de douche sur mesure, contactez CAML-TOMLIN (1-866-884-5290) pour connaître
les spécifications recommandées afin de vous assurer que la porte et votre base soient compatibles.
Assurez-vous d’appliquer du 100% silicone là où la tuile rencontre la base.
Prenez-note que cette installation nécessite 2 personnes. Des lunettes et des souliers de sécurité se doivent
d’être utilisés durant toute l’installation.
Des gants de sureté sont également nécessaires pour faciliter la manipulation des panneaux de verres.
Assurez-vous que les coins des panneaux de verre sont continuellement protégés durant l’installation (vous
pouvez vous servir des boîtes de carton fournies lors de votre achat). Prenez-note que tous les panneaux de
verre sont tempérés. Manipulez avec soins en tout temps afin d’éviter d’encocher ou de faire éclater les
panneaux.
NE JAMAIS installer un panneau de verre craqué, encoché ou ayant subit toute autre forme de
dommage.
Veuillez effectuer une inspection complète de vos panneaux de verre avant l’installation. Si votre verre est
endommagé, veuillez contacter CAML-TOMLIN (1-866-884-5290). Le verre est désormais désuet
lorsqu’endommagé.
INFORMATION DE PRODUIT:
# DE SERIE:
DATE D’ACHAT:
ACHETÉ CHEZ:
INSTALLATION FLOW - COIN
www.camltomlin.com
1
LISTE DES PIÈCES
5
7
6
4
8
9
29
26
29
27
1
28
2
3
17
3
13
17
16
15
14
10
INSTALLATION FLOW - COIN
12
11
www.camltomlin.com
2
LISTE DES PIÈCES
1
Panneau fixe
x1
15
Bande de protection
x1
2
Panneau de porte
x1
16
Joint d’étanchéité : vertical pour panneau fixe
x1
3
Montant mural
x2
17
Joint d’étanchéité : Montant Mural
x1
4
Rail
x1
18
Ancrages muraux : Petit
x3
5
Supports d’assemblage mural
x1
19
Ancrages muraux : Large
x4
6
Pièces d’assemblage au panneau fixe
x1
20
Vis : Montant mural :
7
Roues : Assemblage de roue
x2
21
Vis : (courte) support de rail sans extension
x2
8
Arrets de porte
x2
22
Vis : (longue) support de rail avec extension
x4
9
Poignée : Assemblage
x1
23
Vis : Support de base de porte
x4
longue x3 - Courte x3
10
Support de bas de porte : Panneau Fixe
x1 G x1 D
24
Montant d’extension 1/2”
x1
11
Support de bas de porte : Panneau de retour x1 G x1 D
25
Extension pour support de rail 1/2”
x2
12
Seuil de porte
x1
13
Joint d’étanchéité : Fermeture avec coussin
x1
14
Joint d’étanchéité : Bas de porte
x1
OUTILS NECESSAIRE
1
Soulier de protection
12
Tourne-vis
2
Lunette de protection
13
Couteau
3
Gant de travail
14
Scie a fer
4
Crayon
15
Marteau en caoutchouc
5
Niveau
16
Silicone 100%
6
Perceuse
INSTALLATION FLOW - COIN
www.camltomlin.com
3
1.
Installez les 2 roues des trous supérieurs du panneau de porte
A
Placez votre panneau de porte (2), contre le mur, à l’intérieur de la douche (ceci facilitera l’installation après les prochaines
étapes). Assurez-vous que les trous de la poignée soient préalablement positionnés du bon coté (à gauche pour une
ouverture à gauche, à droite pour une ouverture à droite). Vérifiez si le panneau est bien sécurisé.
B
À l’aide d’une clef Allen, installez les 2 roues du haut (8) sur le panneau de porte faisant face à l’extérieur. Le baril de la roue
est excentrique, vous devez donc positionner les roues à leur plus bas niveau.
B
B
x2
2
7
INSTALLATION FLOW - COIN
www.camltomlin.com
4
2.
Installez le montant mural
A
Du côté ou votre panneau fixe sera installé, tracez une ligne a 1‘’ de la bordure de votre base tel que démontré ici-bas.
B
Placez le montant mural (3) contre le mur et centré avec la ligne préalablement tracée sur la base. À l’aide d’un niveau,
ajustez le montant mural jusqu’à ce qu’il soit absolut.
C
À l’aide d’un crayon, marquez 3 trous sur le mur (localisés à l’intérieur du montant mural).
1/2”
A
C
B
3
A
INSTALLATION FLOW - COIN
C
x4
www.camltomlin.com
5
3.
Installez le montant mural (continuité)
A
À l’aide d’une mèche à céramique de ¼ ‘’, percez les 3 trous dans le mur sur les marques préalablement dessinées.
B
Insérez les ancrages muraux en plastique (17) dans les trous, et assembler le montant mural en utilisant les vis fournit (20).
Option : Le montant d’expension peut être utilisé si votre ouverture est plus grande que la norme.
A
x4
1/4”
A
B
18
A
B
x4
20
INSTALLATION FLOW - COIN
www.camltomlin.com
6
4.
Installez le panneau fixe
A
Avec précaution et tel qu’illustré, glisser le panneau fixe (1) dans l’ouverture du montant mural. Assurez-vous que le
panneau est parallèle à la bordure de la base.
ATTENTION: Puisque le panneau fixe est assis près de la bordure de la base, prenez les précautions nécessaires afin
d’éviter qu’il soit poussé durant le processus jusqu’à ce qu’il soit complètement installé.
A
A
1
INSTALLATION FLOW - COIN
www.camltomlin.com
7
5.
Assemblez le rail
A
Glissez entièrement à chaque extrémité du rail les 2 supports d’assemblage mural (6) et sécurisez-les en serrant les vis avec
une clef Allen (voir ici-bas).
B
Le côté fini du rail doit être vers l’extérieur de la douche.
A
B
4
A
A
5
x2
B
x2
INSTALLATION FLOW - COIN
www.camltomlin.com
8
6.
Ajustez l’assemblage du rail pour l’ouvertu
A
Faite un montage ‘’à sec’’ des pièces d’assemblage du rail jusqu’à approximativement la hauteur et l’emplacement ou il
sera installé. Tenez le rail en place et ajustez le panneau fixe en le glissant délicatement vers l’intérieur ou vers l’extérieur
vers l’extérieur du montant mural jusqu’ à ce que le trou dans le panneau soit en ligne avec le trou du rail. Mesurer
l‘espacement (s’il y en a un) entre le mur et le support du rail et prenez-en note. L’espacement ne devrait pas excéder 1.0”.
B
À l’aide d’une clef Allen, relâcher les 2 supports du rail et glissez-les vers l’extérieur afin d’éliminer l’espacement.
A
B
A
B
INSTALLATION FLOW - COIN
www.camltomlin.com
9
7.
Installez le support de bas de porte pour le panneau fixe
A
Placez le support de bas de porte du panneau fixe (10) sur la base et glissez-le sur le côté du panneau fixe. À l’aide d’un
crayon, marquez les 2 trous sur la base. Notez que 2 ensembles de supports sont inclus dans la boîte, un gauche et un
droit. Veuillez utiliser celui correspondant à votre installation.
B
À l’aide d’une mèche 1/8’’, percez 2 trous dans la base au centre des marques précédemment tracées.
C
Coulez un peu de scellant silicone dans les 2 trous pour ensuite repositionner le support et le sécurisé à l’aide de 2 vis (23).
CAML-TOMLIN recommande d’utilisé un scellant clair fait de silicone à 100%.
10
A
1/8”
B
25
A
B
C
C
INSTALLATION FLOW - COIN
www.camltomlin.com
10
8.
Assemblez le rail au panneau fixe
A
Placez le rail derrière le panneau fixe de façon à ce que les 2 trous soient en ligne. Attachez le rail au panneau fixe en
utilisant les pièces d’assemblage au panneau fixe du rail (6) tel qu’illustré ici-bas. Assurez-vous que le rail est sécurisé en
serrant le boulon à l’aide d’une clef Allen.
A
A
6
INSTALLATION FLOW - COIN
www.camltomlin.com
11
9.
Mettez votre assemblage du rail à niveau
A
Sur le haut du rail, placez votre niveau et ajustez ce dernier jusqu’à ce qu’il soit parfaitement horizontal. Cette étape vous
assurera que le panneau de porte ne cherchera pas à fermer ou ouvrir de par lui-même.
B
Tracez les troues de chaque support mural à l’aide d’un crayon.
B
B
x2
A
INSTALLATION FLOW - COIN
www.camltomlin.com
12
10. Installez les supports muraux du rail au mur
A
Advancez un peu vos supports muraux et securisez-les
B
Tourner le rail de façon à vous donner accès aux supports muraux. Resserrez le rail afin de conserver l’assemblage en place.
C
Percez les marques a l’aide d’une mèche 5/16”
D
Insserez les ancrages (large) muraux dans les trous
A
A C
x2
D
C
B
A C
x2
D
3/8”
D
x2
19
INSTALLATION FLOW - COIN
www.camltomlin.com
13
11.
Installez les supports muraux du rail au mur (continuité)
A
Tournez le rail de façon à le repositionné en ligne avec les plaquettes préalablement installées au mur.
B
Replacez les supports muraux contre les murs. Assurez-vous que le rail est toujours à niveau
C
Vissez les supports muraux en utilisant les vis mural (22) et serrez les bien.
B
x2
B C
A
C
x2
21
INSTALLATION FLOW - COIN
www.camltomlin.com
14
12.
Mark return panel position
NOTE: The centre line of your return panel should ideally fall anywhere from the centre of the threshold to no less than 0.5”
from the edge of the base.
The opening on a 48“ unit (from finished wall to return panel) is 45.00” to 47.50“.
The opening on a 60“ unit (from finished wall to return panel) is 56.75” to 59.25“.
A
To locate the centre line of your return panel, place the second wall jamb up against the end of the rail and adjust until
plumb using a level as shown. If the centre line of the wall jamb does not fall in this area, you may be required to lengthen
the rail by using the wall mount extension (26).
B
Once you are satisfied with the location, mark the centre line of the wall jamb onto the base, and carry the line to the wall
on the return panel side. Ensure that this line stays parallel to the edge of the base.
26
A
A
A
B
B
FLOW INSTALLATION - CORNER
www.camltomlin.com
15
13.
Install return panel wall jamb
A
On the side where your fixed panel will be mounted, place and centre the wall jamb on the line drawn in step 12 B.
B
Using a level, adjust the wall jamb until it is plumb.
C
Mark the three holes (located inside the wall jamb) onto the wall using a pen or pencil.
3
x4
C
C
B
A
FLOW INSTALLATION - CORNER
www.camltomlin.com
16
14.
Install return panel wall jamb (continued)
A
Using a 1/4” drill bit, drill four holes into your wall through the centre marks drawn earlier. Use a bit appropriate to your wall
finish.
B
Insert the plastic wall anchors (18) into the holes and mount the wall jamb and wall jamb extension. using the provided
screws (20).
x4
A
1/4”
A
B
26
18
A
B
x4
20
FLOW INSTALLATION - CORNER
www.camltomlin.com
17
15.
Install return panel
A
Carefully slide the return panel (26) into the wall jamb as shown. Ensure that the panel is parallel to the edge of the base.
B
Adjust the return panel by sliding it in or out of the wall jamb until the hole in the panel lines up exactly with the hole in the
rail.
CAUTION: Since the panel sits close to the edge of the base, use extreme caution to ensure that the panel stays in place
and does not get knocked off of the base until it is firmly fastened.
A
A
26
FLOW INSTALLATION - CORNER
www.camltomlin.com
18
16.
A
Fix rail end to return panel
Fix the end of the rail to the fixed panel with the second wall mount and the wall mount end cap (27). Tighten the screw
securely using an Allen key and install the cap.
A
A
FLOW INSTALLATION - CORNER
27
www.camltomlin.com
19
17.
Install return panel bracket
A
Place the return panel bracket (11) on the base and slide it over the edge of the return panel. Mark the hole onto the
base using a pen or pencil. Note that two brackets are included with your hardware, a left-hand version and a right-hand
version; use the one appropriate to your installation.
B
Remove the bracket, and drill a hole into the base through the centre mark using a 1/8” drill bit.
C
Apply a small bead of silicone into the hole, reposition the bracket, and fasten it to the base using the provided
countersunk screw (25). Caml-Tomlin recommends using clear 100% silicone.
A
11
1/8”
B
25
C
FLOW INSTALLATION - CORNER
A
B
C
www.camltomlin.com
20
18.
Mount door assembly onto rail
A
Using a hack saw, cut the door bumper and bumper seal to length and install onto glass. The bumper seal with the angled
lip must be applied to the handle side of the door panel with the flange facing inward.
B
Cut the bottom water guard to length so that it fits between the two vertical gaskets and install onto the bottom edge.
Ensure the flange faces inward.
C
Lift the door assembly on to the rail. As you lower the door, guide the bottom edge of the door panel into the slot of the
fixed panel bracket.
13
15
C
A
A
B
C
14
FLOW INSTALLATION - CORNER
www.camltomlin.com
21
19.
Complete door assembly
A
Mount the two safety pins (8) below the rail (see Step 1B).
B
Mount the handle (9) to the door panel so that the set screws are located on the inside of the shower door.
A
A
A
B
B
FLOW INSTALLATION - CORNER
www.camltomlin.com
22
20.
Install threshold
A
Measure the distance between the fixed panel bracket and catching bracket and take note.
B
Add 1/4” to the dimension from step 20A; the total is the length to which you should cut your threshold.
C
Slide the cut threshold into the slot of one bracket and then into the other. You may use a few small beads of silicone on the
underside of the threshold to hold it in place.
B
12
A
C
______ + 0.25” = ______
A
FLOW INSTALLATION - CORNER
www.camltomlin.com
23
21.
Install remaining seals
A
Install the wall jamb seal (17). Insert the wedged end in between the fixed panel and the outer edge of the wall jamb. Start
at the bottom and work your way up to the top, trimming off any excess with a utility knife.
B
Measure the distance between the top of the fixed panel bracket and the underside of the safety pins. Cut your vertical
water guard (16) to be roughly 1/4” shorter than the measured dimension. Install the guard over the front edge of the fixed
panel so that the guard flange is facing inwards (see below).
C
Using a utility knife, trim the bottom end of your door bumper seal flange so that it just clears the top of the return panel
bracket (see below).
17
A
A
B
A
B
16
C
FLOW INSTALLATION - CORNER
C
www.camltomlin.com
24
22.
Install remaining seals
A
Put the cover caps onto the wheels. A bit of silicone is necessary for the inside covers.
B
Apply silicone along all outside edges of your unit, as shown below. Do not silicone on the inside of your unit. Caml-Tomlin
recommends using clear 100% silicone.
Please allow 24 hours for the silicone to properly dry before using your unit.
Enjoy your new FLOW shower door!
A
A
A
B
FLOW INSTALLATION - CORNER
24 h
www.camltomlin.com
25
WARRANTY
LIMITED WARRANTY
If defects should occur despite our careful manufacture and strict quality control, please observe the following guarantee conditions: Please supply a copy of your purchase
order and invoice number when reporting damage. These are prerequisites of the guarantee.
The guarantee claim does not lengthen the duration of the guarantee, which is always valid from the purchase date. In case of defect or faulty product operation, please
refer exclusively to your bathroom dealer.
CAML-TOMLIN IS NOT LIABLE
For damages due to improper installation.
For damages due to improper use
For damages due to the performance of unauthorized modifications or faulty repairs.
SCOPE OF GUARANTEE
CAML-TOMLIN covers defects in fabrication and materials; but does not cover the following:
transport damage, ordering errors, installation damage, operating and care errors, damage due to use of cosmetics & colouring liquids, differences in colours, surface
imperfections necessary for manufacture, and parts subject to wear and tear.
CAML-TOMLIN reserves the right of repair or replacement. Installation and dismantling costs, including those by third parties, shall be accepted only when previously agreed
in writing. Please return any shipments post unpaid to your supplier. Guarantee arrangements may follow after subsequent inspection by our quality control department.
5-YEAR GUARANTEE
On shower door and hardware while a 2 year warranty applies to the protective repellent film. CAML-TOMLIN warrants acrylic units (shower base) to be free from defects in
workmanship and materials under normal use and service for a period of five (5) years from the initial date of purchase by the owner/end-user, contractor or builder from an
authorized dealer.
SAFETY
TEMPERED GLASS (10 MM). In the FLOW Shower Doors, special heat-treated safety glass is used, which is more impact, shock and temperature-resistant. If the glass
breaks, glass granules form, reducing the danger of injury considerably.
IMPORTANT
Persons who are greatly limited in their freedom of movement should be supervised at all times by a qualified individual.
CARE & MAINTENANCE
IN ORDER FOR YOUR FLOW SHOWER DOORS TO KEEP ITS ATTRACTIVE LOOKS FOR MANY YEARS, PLEASE OBSERVE THE FOLLOWING CARE:
Rinse glass with clean water after showering. Remove water droplets with a squeegee or a soft cloth. For hygienic and easy cleaning of your Matrix product, we recommend
biologically degradable cleansers. Regular care prevents stubborn stains and ensures a clean and hygienic surface for many years. Important: Do not under any
circumstances use lime solvents or abrasive or corrosive cleansers. Otherwise the surfaces of the glass and hardware could be damaged. Use only cleansers specifically
designed for chrome on chrome-plated parts.
LIMITATION
CAML-TOMLIN is not liable for incidental or consequential damage, loss of time, inconvenience, incidental expenses, labour, material charges or any other costs related to
application of this warranty as it pertains to removal or replacement of defective merchandise.
This warranty shall not apply following incorrect operating procedures, breakage or damages caused by normal wear and tear, fault, carelessness, abuse, misuse, misapplication, improper maintenance, alteration or modification of the unit, as well as chemical or natural corrosion, accident, fire, flood, act of God or any other casualty. This warranty
shall not apply to stain or malfunction caused by ferrous water, hard water or salty water.
The owner/end-user of the product covered by this warranty is entirely responsible for its proper installation. This warranty is void if unit is not tested prior to final enclosure
as per the installation instructions. CAML-TOMLIN neither installs nor supervises the installation, nor hires a contractor for this purpose, and consequently cannot be held
responsible for any defect, breakage or damage caused thereby or resulting thereof, either directly or indirectly. The owner/ end-user must provide access to the components
of the product as described in the installation guide, so that CAML-TOMLIN can execute the warranty specified herein. If such access is not available, all expenses to provide
said access will be the responsibility of the owner/end-user.
This warranty does not apply to products or equipment not installed or operated in accordance with instructions supplied by CAML-TOMLIN and all applicable rules,
regulations and legislation pertaining to such installations.
CAML-TOMLIN reserves the right to discontinue products at any time or change specifications and/or design without notice and without incurring obligation.
CAML-TOMLIN’s shower doors are guaranteed to fit with CAML-TOMLIN’s acrylic products but not necessarily with any other acrylic manufacturer’s product or custom tile
applications.
EXCEPT AS OTHERWISE PROVIDED ABOVE, CAML-TOMLIN MAKES NO WARRANTIES, EXPRESS OR IMPLIED, INCLUDING WARRANTIES OF MERCHANTABILITY AND
FITNESS FOR A PARTICULAR PURPOSE OR COMPLIANCE WITH ANY CODE. In any case, CAML-TOMLIN cannot be liable for any amount over and above the purchase
price paid for the product by the owner/end-user, contractor or builder. This warranty gives the owner/end-user specific legal rights. The owner/end-user may also have other
rights which vary from one state and/or province to another.
In addition to the above conditions and limitations, the warranty period for products installed for commercial applications or used in commercial ventures is of one (1) year
from the initial date of purchase by the owner/end-user, contractor or builder from an authorized dealer. CAML-TOMLIN is not responsible for loss of use or profit under any
circumstances. If the product is sold by CAML-TOMLIN as a display, CAML-TOMLIN standard warranty applies.
FLOW INSTALLATION - CORNER
www.camltomlin.com
26