1
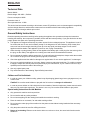
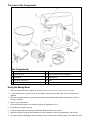
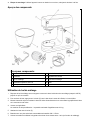
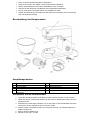
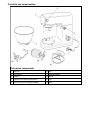
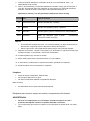
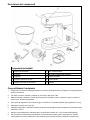
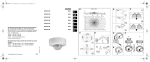
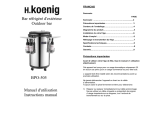
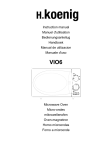
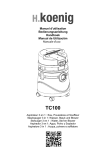
Stand Mixer Multifunction Robot Pétrin Multifonction Robot Mixer Multifunktion Robot Keukenmachine Multifunctioneel Robot BatidoraMultifunción Robot Impastatrice Multifunzione KM60s Instruction manual Manuel d'Utilisation Benutzerhandbuch Gebruiksaanwijzing Manual de Usuario Manuale d’uso ENGLISH Technical Data Model: KM60s Rated voltage: 220-240V~, 50/60Hz Power consumption: 600W Protection class: II Short operation time: 10 Min. This device has been tested according to all relevant current CE guidelines, such as electromagnetic compatibility and low voltage directives, and has been constructed in accordance with the latest safety regulations. Subject to technical changes without prior notice! General Safety Instructions Read the operating instructions carefully before putting the appliance into operation and keep the instructions including the warranty, the receipt and, if possible, the box with the internal packing. If you give this device to other people, please also pass on the operating instructions. The appliance is designed exclusively for private use and for the envisaged purpose. This appliance is not fit for commercial use. Do not use it outdoors (except if it is designed to be used outdoors). Keep it away from sources of heat, direct sunlight, humidity (never dip it into any liquid) and sharp edges. Do not use the appliance with wet hands. If the appliance is humid or wet, unplug it immediately. When cleaning or putting it away, switch off the appliance and always pull out the plug from the socket (pull on the plug, not the cable) if the appliance is not being used and remove the attached accessories. Do not operate the machine without supervision. If you should leave the workplace, always switch the machine off or remove the plug from the socket (pull the plug itself, not the lead). Check the appliance and the cable for damage on a regular basis. Do not use the appliance if it is damaged. Do not try to repair the appliance on your own. Always contact an authorized technician. To avoid the exposure to danger, always have a faulty cable be replaced only by the manufacturer, by our customer service or by a qualified person and with a cable of the same type. Use only original spare parts. Pay careful attention to the following “Special Safety Instructions”. Children and Frail Individuals In order to ensure your children‘s safety, please keep all packaging (plastic bags, boxes, polystyrene etc.) out of their reach. Caution! Do not allow small children to play with the foil as there is a danger of suffocation! In order to protect children or frail individuals from the hazards of electrical equipment, please ensure that this device is only used under supervision. This device is not a toy. Do not allow small children to play with it. Special safety Instructions for this Machine Only operate this machine under supervision. Do not interfere with any safety switches. Do not insert anything into the rotating hooks while the machine is working. Place the machine on a smooth, fl at and stable working surface. Do not insert the mains plug of the machine into the power socket without having installed all the necessary accessories. Only the pusher should be used for refilling the mincer. Danger of overloading! Please use the device either as a mincer or mixer, but never both functions at the same time. Overview of the Components Main Components: 1 Drive shaft 6 Power Cord 2 Helix drive cover 7 Pulse operation and level regulator 3 Mixing bowl 8a Kneading hook 4 Top Cover with Screw 8b Whisk 5 Lever for raising and lowering the arm 8c Stirrer Using the Mixing Bowl 1. Place the mixing dish into its holding device and turn the dish in the direction of LOCK until it locks into place. 2. In order to lift the arm, press the lever (5) downwards in the direction of the arrow. The arm will now move upwards. 3. Mount the required utensil by inserting the top into the drive shaft and locking the cotter pin in the shaft by turning to the right. 4. Now fill in your ingredients. Do not overfill the machine - the maximum quantity of ingredients is 2 kg. 5. Lower the arm using the lever (5). 6. Insert the mains plug into a properly installed 230 V/50 Hz safety power socket. 7. Switch the machine using the level regulator to a speed between 1 and 6 (corresponding to the mixture). 8. For pulse operation (kneading at short intervals), turn the switch to the “PULSE” position. The switch has to be held in this position according to the desired interval length. When the switch is released it returns automatically to the “0” position. Adjusting the Levels and Using the Hook for not more than 2 kg of Mixture Levels Use Type of Mixture 1-2 Kneading hook Heavy mixtures(e.g. bread or short pastry) 3-4 Stirrer Medium-heavy mixtures(e.g. crepes or sponge mixture) 5-6 Whisk Light mixtures (e.g. cream, egg white, blancmange) Pulse Whisk Interval (e.g. for mixing under sponge, egg white) NOTE: Short operation time: With heavy mixtures, do not operate the machine for more than ten minutes, and then allow it to cool down for a further ten minutes. Use the splash guard to protect against liquid mixtures. 9. After kneading/stirring turn the switch (7) back to the “0” position as soon as the mixture has formed a ball. Then remove the mains plug. 10. Press the lever (5) downwards and the arm will be raised. 11. The mixture can now be released with the help of a spatula and removed from the mixing bowl. 12. The mixing bowl can now be removed by turning to the left. 13. Clean the parts as described under “Cleaning” . Suggested Recipes Sponge Mixture (Basic Recipe), Level 3-4 Ingredients: 250grams soft butter or margarine, 250grams sugar, 1 packet vanilla sugar or 1 bag Citro-Back, 1 pinch of salt, 4 eggs, 500grams wheat fl our, 1 packet baking powder, approx. 1/8 litre milk. Preparation: Transfer the wheat fl our and the remaining ingredients to the mixing bowl, stir with the stirrer for 30 seconds on level 1, then for approximately 3 minutes on level 3. Grease a tin or cover with baking paper. Fill in the mixture and bake. Before the cake is removed from the oven, test to see if it is done. With a sharp wooden stick pierce the centre of the cake. If no mixture sticks to it, the cake is cooked. Turn the cake on to a cake grid and allow to cool. Traditional Oven Insertion height: 2 Heating: electric oven, top and bottom heat 175-200° Celsius; gas oven: level 2-3 Baking time: 50-60 minutes Depending on taste, this recipe can be changed, for example with 100g raisins or 100g nuts or 100g grated chocolate. In fact, the possibilities are endless. Linseed Bread Rolls, Level 1-2 Ingredients: 500-550g wheat fl our, 50g linseed, 3/8 litre water, 1 cube of yeast (40g), 100g low-fat curds, well drained, 1 tsp salt. For coating: 2 tbsp of water. Preparation: Soak the linseed in 1/8 litre of lukewarm water. Transfer the remaining lukewarm water (1/4 litre) into the mixing bowl, crumble in the yeast, add the curds and mix with the kneading hook on level 2. The yeast must be completely dissolved. Put the flour with the soaked linseed and the salt into the mixing bowl. Knead thoroughly on level 1, then switch to level 2 and continue kneading for 3-5 minutes. Cover the mixture and allow to rise in a warm place for 45-60 minutes. Knead thoroughly once more, remove from the bowl and form sixteen rolls. Cover the baking tin with wet baking paper. Place the rolls on this and allow to rise for 15 minutes. Coat with lukewarm water and bake. Traditional Oven: Insertion height: 2 Heating: electric oven: top and bottom heat 200-220°C (preheated for 5 minutes),gas oven level 2-3 Baking time: 30-40 minutes Chocolate Cream, Level 5-6 Ingredients: 200ml sweet cream, 150g semi-bitter chocolate coating, 3 eggs, 50-60g sugar, 1 pinch of salt, 1 packet of vanilla sugar, 1 tablespoon cognac or rum, chocolate flakes. Preparation: Beat the cream in the mixing bowl with the whisk until stiff. Remove from the bowl and place somewhere to cool. Melt the chocolate coating in accordance with the instructions on the packet or in the microwave at 600W for 3 minutes. In the meantime, beat the eggs, sugar, vanilla sugar, cognac or rum and salt in the mixing bowl with the whisk on level 3 to form a foam. Add the melted chocolate and stir in evenly on level 5-6. Leave a little of the cream for decoration. Add the remaining cream to the creamy mixture and stir in briefl y using the pulse function. Decorate the chocolate cream and serve well cooled. Cleaning Before cleaning remove the mains lead from the socket. Never immerse the housing with motor in water! Do not use any sharp or abrasive detergents. Motor Housing Only a damp rinsing cloth should be used to clean the outside of the housing. Mixing Bowl, Mixing Equipment and Components of the Mincer CAUTION: The components are not suitable for cleaning in a dishwasher. If exposed to heat or caustic cleaners they might become misshapen or discolored. Components that have come into contact with food can be cleaned in soapy water. WARNING: The blade of the mincer is very sharp! Danger of injury! Allow the parts to dry thoroughly before reassembling the device. Please apply a small quantity of vegetable oil likely to the screens after they have dried. ENVIRONMENT CAUTION: Do not dispose of this product as it has with other household products. There is a separation of this waste product into communities, you will need to inform your local authorities about the places where you can return this product. In fact, electrical and electronic products contain hazardous substances that have harmful effects on the environment or human health and should be recycled. The symbol here indicates that electrical and electronic equipment should be chosen carefully, a wheeled waste container is marked with a cross. Manufactured and imported: Adeva SAS 8 rue Marc Seguin 77290 Mitry-Mory FRANCE www.hkoenig.com - [email protected] - Tel 01 64 67 00 01 FRANCAIS Données techniques Modèle : KM60s Tension nominale : 220-240V, 50/60Hz Puissance maximale : 1000W Classe de protection : II Afin de prolonger la durée de vie de l’appareil, nous vous conseillons des utilisations par tranches de : 10 min maxi Cet appareil a été testé selon toutes les directives CE actuelles applicables, comme les directives de compatibilité électromagnétiques et les directives basses tensions, et a été construit en conformité avec les dernières législations de sécurité en date. Sujet à changements techniques sans préavis ! Instructions générales de sécurité Lisez ce manuel d'instructions avec attention avant d'utiliser l'appareil, et conservez ces instructions, y compris la garantie, le reçu et, si possible, la boîte avec l'emballage intérieur. Si vous donnez l'appareil à quelqu'un d'autre, transmettez aussi les instructions d'utilisation. L'appareil est conçu exclusivement pour un usage privé et pour le but envisagé. Cet appareil ne convient pas à un usage commercial. Ne l'utilisez pas à l'extérieur (sauf s'il est conçu pour ça). Tenez-le loin des sources de chaleur, de l'éclairage direct du soleil, de l'humidité (ne le plongez jamais dans un liquide) et des angles aigus. N'utilisez pas l'appareil avec les mains mouillées. Si l'appareil est humide ou mouillé, débranchez-le immédiatement. Quand vous le nettoyez ou le rangez durablement, éteignez l'appareil et débranchez-le (tirez sur la prise, pas sur le cordon) si l'appareil ne doit pas être utilisé et enlevez les accessoires qui lui sont rattachés. Ne faites pas fonctionner l'appareil sans surveillance. Si vous devez quitter l'espace de travail, éteignez toujours la machine ou débranchez-le (tirez sur la prise, pas sur le cordon). Vérifiez régulièrement que l'appareil et le câble ne sont pas endommagés. N'utilisez pas l'appareil s'il est endommagé. N'essayez pas de réparer l'appareil vous-même. Contactez toujours un technicien habilité. Pour éviter de vous exposer à un éventuel danger, ne faites remplacer un câble endommagé que par le fabricant, par notre service après-vente ou par une personne qualifiée, et avec un câble du même type. Si le cordon d'alimentation est endommagé, il doit être remplacé auprès d'un Service après-vente afin d'éviter tout danger. N'utilisez que des pièces de rechange d'origine. Faites particulièrement attention aux "Instructions spéciales de sécurité" qui suivent. Enfants et personnes vulnérables Pour garantir la sécurité de vos enfants, conservez tous les emballages (sacs en plastique, boîtes, polystyrène, etc.) hors d'atteinte. Attention ! Ne laissez pas les jeunes enfants jouer avec le sac : il y a un risque de suffocation ! Cet appareil n’est pas prévu pour être utilisé par des personnes (y compris les enfants) dont les capacités physiques, sensorielles ou mentales sont réduites, ou des personnes dénuées d’expérience ou de connaissance, sauf si elles ont pu bénéficier, par l’intermédiaire d’une personne responsable de leur sécurité, d’une surveillance ou d’instructions préalables concernant l’utilisation de l’appareil. Il convient de surveiller les enfants pour s’assurer qu’ils ne jouent pas avec l’appareil. N'utilisez cette machine que sous surveillance. Ne manipulez aucun interrupteur de sécurité. Ne rien insérer dans les crochets tournants quand la machine fonctionne. Disposez la machine sur une surface de travail lisse, plane et stable. Ne branchez pas la machine sur le secteur sans avoir installé tous les accessoires nécessaires. Seul le poussoir doit servir à remplir le hachoir. Risque de surcharge ! Utilisez l'appareil comme un hachoir ou un mixer, mais jamais les deux à la fois. Aperçu des composants Principaux composants : 1 Bras 6 Câble d'alimentation 2 Protection 7 Régulateur de vitesse 3 Bol de mélange 8a Crochet de malaxage 4 Protection supérieure avec vis 8b Fouet 5 Levier pour lever et abaisser le bras 8c Batteur Utilisation du bol de mélange 1. Disposez le bol de mélange sur son support et tournez-le dans la direction de verrouillage (marquée LOCK) jusqu'à ce qu'il se verrouille. 2. Pour soulever le bras, appuyez sur le levier (5) vers le bas dans le sens de la flèche. Le bras s'élève. 3. Montez l'ustensile requis en insérant le haut sur l'arbre d'entraînement et en verrouillant la goupille dans l'arbre en le tournant vers la droite. 4. Versez vos ingrédients. La machine ne doit pas déborder – la quantité maximale d'ingrédients est de 2 kg. 5. Abaissez le bras avec le levier (5). 6. Branchez sur une prise sécurisée convenablement installée 230 V / 50 Hz. 7. Activez la machine en utilisant le régulateur de niveau à une vitesse entre 1 et 6 (en fonction du mélange). 8. Pour un fonctionnement par impulsions (malaxage sur de courts intervalles), tournez l'interrupteur en position “PULSE”. L'interrupteur doit être maintenu dans cette position en fonction de l'intervalle de temps désiré. Quand on le relâche, l'interrupteur retourne automatiquement en position “0”. Réglage des niveaux et utilisation du crochet pour moins de 2 kg de mélange Niveaux Utilisation Type de mélange 1-2 Crochet de malaxage Mélanges lourds (ex. pain ou pâtisserie) 3-4 Batteur Mélanges mi-lourds (ex. crêpes ou biscuits) 5-6 Fouet Mélanges légers (ex. crème, blancs d'œufs, blanc-manger) Pulse Fouet Battage par intervalles (ex. pour mélanger de consistance inférieure à l'éponge, blanc d'œuf) NOTE : Durée de fonctionnement brève : Avec des mélanges lourds, ne faites pas fonctionner la machine plus de dix minutes, puis laissez-la refroidir dix minutes. Utilisez la protection anti-éclaboussures pour vous protéger des mélanges liquides. 9. Après le malaxage/mélangeage, ramenez l'interrupteur (7) en position “0” dès que le mélange a formé une boule. Puis débranchez l'appareil. 10. Abaissez le levier (5) : le bras se lève. 11. Maintenant, vous pouvez déverser le mélange hors du bol de mélange à l'aide d'une spatule. 12. Puis vous pouvez enlever le bol de mélange en le tournant vers la gauche. 13. Nettoyez les pièces comme décrit au chapitre “Nettoyage”. Nettoyage Avant de nettoyer l'appareil, débranchez-le. Ne plongez jamais l’appareil dans l'eau ! N'utilisez aucun outil pointu ni aucun détergent abrasif. Carter du moteur On ne doit utiliser qu'un linge humide pour nettoyer l'extérieur du carter. Bol de mélange, équipement de mélange et composants du hachoir ATTENTION : Les composants ne conviennent pas au nettoyage au lave-vaisselle. S'ils sont exposés à la chaleur ou à des produits nettoyants caustiques, ils risquent de se déformer ou de se décolorer. Les composants qui sont entrés en contact avec la nourriture peuvent se laver dans l'eau savonneuse. DANGER : La lame du hachoir est très acérée ! Risque de blessures ! Laissez les pièces bien sécher avant de remonter l'appareil. Appliquez une petite quantité d'huile végétale sur les tamis quand ils ont séché. Suggestions de recettes Biscuit (recette de base), niveau 3-4 Ingrédients : 250 g de beurre doux ou de margarine, 250 g de sucre, 1 paquet de sucre vanillé ou 1 sac de citro-back, 1 pincée de sel, 4 œufs, 500g de farine de blé, 1 paquet de levure chimique, env. 12,5 cl de lait Préparation : Versez la farine de blé et les autres ingrédients dans le bol de mélange, agitez avec le fouet pendant 30 secondes au niveau 1 puis, pendant environ 3 minutes, au niveau 3. Beurrez un moule ou couvrez-le avec du papier sulfurisé. Versez le mélange et cuisez-le. Avant d'enlever le gâteau du four, testez pour voir s'il est terminé : avec un bout de bois, percez le milieu du gâteau. Si le mélange ne colle pas, le gâteau est cuit. Placez le gâteau sur une grille à pâtisserie et laissez-le refroidir. Four traditionnel : Hauteur d'insertion : 2 Cuisson : four électrique : chauffage haut et bas 175-200°C ; four à gaz : thermostat 2-3 Durée de cuisson : 50-60 minutes Selon les goûts, vous pouvez modifier cette recette, par exemple en y ajoutant 100 g de raisins, 100 g de noix ou 100 g de chocolat en poudre. En fait, les possibilités sont infinies. Petits pains aux graines de lin, niveau 1-2 Ingrédients : 500-550 g de farine de blé, 50 g de graines de lin, 37,5 cl d'eau, 1 cube de levure (40 g), 100 g de lait écrémé caillé bien égoutté, 1 cuillérée à café de sel. Pour le glaçage : 2 cuillérées à café d'eau Préparation : Trempez les graines de lin dans 12,5 cl d'eau tiède. Transférez le reste de l'eau tiède (0,25 l) dans le bol de mélange, saupoudrez-y la levure, ajoutez le lait caillé et mélangez avec le crochet de malaxage au niveau 2. La levure doit complètement se dissoudre. Versez la farine avec les graines de lin humides et le sel dans le bol de mélange. Malaxez longuement au niveau 1, puis passez au 2 et continuez à malaxer pendant 3-5 minutes. Couvrez le mélange et laissez-le lever dans un endroit chaud pendant 45-60 minutes. Malaxez à nouveau longuement, enlevez du bol et formez seize rouleaux. Couvrez le moule avec du papier sulfurisé humide. Placez les rouleaux dessus et laissez-les lever pendant 15 minutes. Couvrez-les d'eau tiède et passez à la cuisson. Four traditionnel : Hauteur d'insertion : 2 Cuisson : four électrique : chauffage haut et bas 200-220°C (préchauffage 5 minutes), four à gaz : thermostat 2-3 Durée de cuisson : 30-40 minutes Crème au chocolat, niveau 5-6 Ingrédients : 200 ml de crème douce, 150 g de glaçage au chocolat mi-amer, 3 œufs, 50-60 g de sucre, 1 pincée de sel, 1 paquet de sucre vanillé, 1 cuillérée à café de cognac ou de rhum, chocolat en flocons Préparation : Battez la crème dans le bol de mélange avec le fouet jusqu'à obtenir une consistance dure. Enlevez-la du bol et disposez-la dans un endroit où refroidir. Faites fondre le glaçage au chocolat en suivant les instructions sur le paquet ou dans un four à micro-ondes à 600 W pendant 3 minutes. Dans le même temps, battez les œufs, le sucre, le sucre vanillé, le cognac ou le rhum, et le sel dans le bol de mélange avec le fouet au niveau 3 pour obtenir une mousse. Ajoutez le chocolat fondu et agitez de façon régulière au niveau 5-6. Gardez un peu de crème pour la décoration. Ajoutez le reste de la crème au mélange crémeux et agitez brièvement en utilisant la fonction Pulse. Décorez la crème au chocolat et servez-la fraîche. Énvironnement Fabriqué pour et importé par : Adeva SAS 8 rue Marc Seguin 77290 Mitry-Mory FRANCE www.hkoenig.com - [email protected] - Tél. 01 64 67 00 01 DEUTSCH Technische Daten Modell: KM60s Nennspannung: 220-240V 50/60Hz Maximal leistung: 1000W Schutzklasse: II Um die Lebensdauer des Geräts zu verlängern, ist es Verwendungen von maximal 10 Minuten empfohlen. Dieses Gerät wurde in Übereinstimmung mit allen geltenden EU-Richtlinien in Kraft, wurde getestet, wie von EMV und Niederspannungsrichtlinie gerichtet und wurde in Übereinstimmung mit den neuesten Sicherheits-Gesetzgebung bis heute gemacht. Änderungen ohne vorherige Ankündigung ändern. Allgemeine Sicherheitshinweise Lesen Sie die Gebrauchsanweisung sorgfältig, bevor Sie das Gerät, und halten, einschließlich der Garantieschein, Kassenbon und, wenn möglich, deren Verpackung. Wenn Sie das Gerät an eine andere Person geben, geben sie auch mit dieser Anleitung. Das Gerät ist ausschließlich für den privaten Gebrauch und zu den vorgesehenen Zwecken konzipiert. Dieses Gerät eignet sich nicht für den kommerziellen Einsatz. Nicht im Freien verwenden (es sei denn, das ist für konzipiert, dass). Fernhalten von Wärmequellen, direkter Sonneneinstrahlung, Feuchtigkeit (nicht in Flüssigkeiten tauchen) und spitzen Winkeln. Verwenden Sie nicht das Gerät mit nassen Händen. Wenn das Gerät feucht oder nass werden, trennen Sie es sofort. Bei der Reinigung oder Aufbewahrung über einen längeren Zeitraum, ausschalten und von (Stecker ziehen, nicht am Kabel) wenn das Gerät nicht zu benutzen ist und entfernen Sie alle Zubehörteile befestigt. Verwenden Sie nicht das Gerät nicht unbeaufsichtigt. Wenn Sie Arbeitsbereich verlassen haben, immer das Gerät ausschalten und ziehen (ziehen Sie am Stecker und nicht am Kabel). Regelmäßig kontrollieren, ob das Gerät und das Kabel nicht beschädigt sind. Nicht verwenden, wenn beschädigt ist. Versuchen Sie nicht, das Gerät selbst zu reparieren. Kontaktieren Sie einen qualifizierten Techniker. Um die Exposition gegenüber möglichen Gefahren zu vermeiden, dann ersetzen Sie einfach das beschädigte Kabel Hersteller, unserem Kundendienst oder von einer qualifizierten Person, und ein Kabel des gleichen Typs. Wenn das Netzkabel beschädigt ist, muss es von einem Post-Sale-Service ersetzt werden, um Gefährdungen zu vermeiden. Verwenden Sie nur Original-Ersatzteile. Achten Sie besonders auf "Spezielle Sicherheitshinweise." Kinder und gefährdete Personen Um die Sicherheit ihrer Kinder zu gewährleisten, halten Sie das gesamte Verpackungsmaterial (Plastiktüten, Kartons, Styropor, usw.). Außer Reichweite. Achtung! Lassen Sie Kinder nicht mit dem Beutel spielen: es gibt Erstickungsgefahr! Dieses Gerät ist nicht für die Verwendung durch Personen (einschließlich Kinder) mit eingeschränkten physischen, sensorischen oder geistigen Fähigkeiten konzipiert. Oder Mangel an Erfahrung oder Wissen, sofern sie nicht über die Verwendung des Gerätes wurden durch eine verantwortliche Person für ihre Sicherheit angewiesen. Sollten Kinder zu überwachen, um sicherzustellen, dass sie nicht mit dem Gerät spielen. Kontrollieren Sie stets das Gerät während des Gebrauchs. Nicht mit einem Sicherheitsschalter manipulieren. Stecken Sie nichts in den Zapfen, während das Gerät in Betrieb ist. Stellen Sie das Gerät auf eine ebene Arbeitsfläche, flach und stabil. Stecken Sie das Gerät ohne Installation alle notwendigen Zubehörteile. Nur die Taste sollte verwendet werden, um die Blätter zu füllen. Gefahr der Überlastung! Verwenden Sie das Gerät zum Schneiden oder Vermischung, aber nie beides gleichzeitig. Beschreibung der Komponenten Hauptkomponenten 1 2 3 4 5 Antriebswelle Schutz Rührschüssel Überlegener Schutz mit Schraube Hebel zum Anheben und Absenken des Auslegers 6 7 8a 8b 8c Schnur Tempomat Haken Mischung Mischer Mixer Verwenden Sie die Rührschüssel 1. Legen Sie die Rührschüssel an der Basis und das Lenkrad (LOCK), bis sie einrastet. 2. Heben des Armes, Drücken des Hebels (5) nach unten in Richtung des Pfeils. Der Arm angehoben wird. 3. Einsetzen der notwendigen Utensilien, um an der Spitze in der Antriebswelle montieren und sichern Sie den Stecker auf der Achse nach rechts. 4. Gießen Zutaten. Die Maschine darf nicht vergossen werden - die maximale Menge an Zutaten beträgt 2 kg. 5. Senken Sie den Hebelarm (5). 6. Stecker in eine 230 V / 50 Hz 7. Überprüfen Sie die Maschine mit dem Niveau-Controller mit einer Rate von 1 bis 6 (je nach Version). 8. Für Puls-Betrieb (schlägt in kurzen Abständen), drehen Sie den Schalter auf "PULSE". Der Schalter muss in dieser Position für den gewünschten Zeitraum beibehalten werden. Beim Loslassen der Schalter automatisch wieder auf "0". 9. Einstellen der Pegel und Verwendung von Haken Mischungen von weniger als 2 kg. Levels Verwenden Art der Mischung 1-2 Haken Mischung Schwerer Mischungen (Brot oder Nudeln) 3-4 Mixer Semi-schwere Mischungen (Pfannkuchen oder Kekse) 5-6 Mischer Mischlicht (Sahne, Ei, Mandeln und Sahne) Pulse Mischer Schütteln Sie ein und aus (zu mischen Konsistenzen niedriger als die Eiweiß) HINWEIS: Der Betrieb von kurzer Dauer: Mischungen mit schweren, nicht länger als 10 Minuten benutzen, dann lassen Sie zehn Minuten lang kühlen. Verwenden Sie den Spritzschutz gegen flüssige Mischungen zu schützen. 1. Nach dem Mischen stellen Sie den Schalter (7) auf "0", wenn die Mischung hat eine Kugel geformt. Als nächstes trennen Sie das Gerät. 2. Heben Sie den Hebel (5): der Arm gehoben wird. 3. Jetzt können Sie die Mischung aus der Schüssel gießen mit einem Spatel. 4. Kann dann entfernen Sie den Mischbehälter, Drehen nach links. 5. Teile reinigen, wie unter "Reinigung" beschrieben. Reinigung Bevor Sie das Gerät reinigen, ziehen Sie es. Tauchen Sie nicht das Gerät in Wasser. Verwenden Sie keine spitzen Werkzeuge oder Scheuermittel. Motorblock Sie sollten nur ein feuchtes Tuch zur Reinigung verwenden. Mischbehälter, Misch-Geräte und Komponenten des Cutters. WARNUNG: Nicht waschen Teile in der Spülmaschine. Wenn sie Hitze oder ätzenden Reiniger können verformen oder verfärben ausgesetzt. Die Komponenten, die mit Lebensmitteln in Berührung kommen können mit Wasser und Seife gewaschen werden. GEFAHR: Die Klinge ist sehr stark Verletzungsgefahr Lassen Sie die Teile vollständig trocknen, bevor der Montage des Geräts. Tragen Sie eine kleine Menge Pflanzenöl auf dem Bildschirm, wenn sie trocken. Rezeptvorschläge Kekse (Rezept), Level 3-4 Zutaten: 250 g ungesalzene Butter oder Margarine, 250 g Zucker, 1 Päckchen Vanillezucker oder 1 Beutel Citro-back, eine Prise Salz, 4 Eier, 500 g Mehl, 1 Päckchen Backpulver, ca. . 12,5 ml Milch. Vorbereitung: Das Mehl und anderen Zutaten in eine Schüssel geben, mit dem Mixer für 30 Sekunden auf Stufe 1 dann für ca. 3 Minuten, mit Level 3. Butter eine Form. Gießen Sie die Mischung und kochen. Vor dem Entfernen der Mischung aus dem Ofen, versuchen zu sehen, wenn es fertig ist, bohren Sie ein Stück Holz mit der Mitte des Kuchens. Wenn die Mischung nicht klebt, ist die Vorbereitung bereit. Lassen Sie den Kuchen abkühlen. Backofen: Höhe Insertion: 2 Kochen: Elektro-Backofen: Ober-/Unterhitze 175-200 ° C, Gas-Ofen: Thermostat 2-3 Backzeit: 50-60 Minuten Sie können dieses Rezept ganz nach Ihrem Geschmack zu modifizieren, zum Beispiel durch Zugabe von 100 g getrocknete oder 100 g Nüssen oder Kakao-Pulver, die Möglichkeiten sind endlos. Brötchen mit gemahlener Leinsamen, Level 1-2 Zutaten: 500-550 g Weizenmehl, 50 g Leinsamen, 37,5 ml Wasser, einen Würfel Hefe (40 g), 100 g Magermilch Quark, 1 Teelöffel Salz. Für die Glasur: 2 Esslöffel Wasser. Vorbereitung: Einweichen Leinsamen in 125 ml warmem Wasser. Übertragen Sie die verbleibenden warmen Wasser (0,25 l) in die Schüssel, streuen die Hefe, fügen Sie den Quark mischen und mit dem Haken-Mix auf der Ebene 2. Die Hefe sollte vollständig gelöst werden. Das Mehl mit Leinsamen feuchte und Salz in Schüssel geben. Kneten Sie für eine gute Zeit auf Stufe 1, dann auf Stufe 2 gehen und weiterhin Kneten für 3-5 Minuten. Zugedeckt an einem warmen Ort für 45-60 Minuten. Kneten Sie erneut, entfernen Sie den Behälter und machen 16 Rollen. Decken Sie die Pfanne mit Backpapier nass. Legen Sie die Brötchen und lassen Sie sie 15 Minuten lang wachsen. Mit warmem Wasser bedecken und weiter kochen. Backofen: Einbautiefe: 2 Kochen: Elektro-Backofen: Ober-und Unterhitze 200-220 ° C (vorheizen 5 Minuten), Gas-Ofen: Thermostat 2-3 Backzeit: 30-40 Minuten Schokoladencreme, Stufe 5-6 Zutaten: 200 ml Sahne, 150 g dunkle Schokolade, 3 Eier, 50-60 g Zucker, eine Prise Salz, 1 Päckchen Vanillezucker, 1 Esslöffel Weinbrand oder Rum, Schokolade Flocken. Vorbereitung: Die Sahne in einer Schüssel mit Mixer bis die Mischung stimmt. Aus der Pfanne nehmen und in einen kühlen Ort aufbewahren. Schmelzen Sie die Schokolade nach Packungsanweisung oder in der Mikrowelle bei 600 W für 3 Minuten. Unterdessen schlagen Eier, Zucker, Vanillezucker mit dem Weinbrand oder Rum und Salz in Schüssel Stufe 3 für Schaum. Fügen Sie die geschmolzene Schokolade rühren und regelmäßig in Level 5-6. Halten Sie ein wenig Creme für die Dekoration. Fügen Sie die restliche Sahne auf die Mischung und rühren Sie kurz mit PulseFunktion. Garnieren Sie mit Schokoladencreme und servieren frisch Umwelt ACHTUNG: Werfen Sie nicht dieses Produkt, wie es mit anderen Haushaltsprodukten hat. Es gibt eine Mülltrennungs von diesem Produkt in Gemeinden, Sie müssen Ihre lokalen Behörden über die Orte, wo man dieses Produkt zurückgeben können zu informieren. In der Tat enthalten elektrische und elektronische Produkte gefährliche Stoffe, die schädliche Auswirkungen auf die Umwelt oder die menschliche Gesundheit haben und sollte recycelt werden. Das Symbol hier darauf hinweisen, dass elektrische oder elektronische Geräte sollten sorgfältig ausgewählt werden, ist ein fahrbarer Abfallbehälter mit einem Kreuz markiert. Hergestellt und importiert: Adeva SAS 8 rue Marc Seguin 77290 Mitry-Mory FRANCE www.hkoenig.com - [email protected] - Tel. 01 64 67 00 01 NEDERLANDS Model : KM60s Nominale spanning : 220-240V, 50/60Hz Maximaal vermogen : 1000W Beschermingsklasse : II Om de levensduur van het apparaat te verlengen, raden wij aan het apparaat in stappen van 10 minuten max te gebruiken. Dit apparaat is volgens alle huidige richtlijnen van toepassing van de CE getest, zoals voorgeschreven door de compatibiliteit richtlijnen van elektromagnetische laagspanning, en werd in overeenstemming met de nieuwste zekerheidswetgeving gebouwt. Technische verandering worden zonder voorafgaande kennisgeving uitgevoerd! Algemene Veiligheidsinstructies Lees deze handleiding voordat u het apparaat voor het eerst gaat gebruiken en bewaar deze instructies, inklusiefe de garantie, de kassabon en indien mogelijk de doos. Als u het apparaat aan iemander anders geeft, zorg ervoor dat de gebruiksaanwijzing aanwezig is. Het apparaat is uitsluitend voor prive.gebruik bedoeld. Dit apparaat is nit geschikt voor commercieel gebruik. Gebruik het niet buitens huis (tenzij het daarvoor is ontworpen). Houd het uit de buurt van hitte, direct zonlicht, vocht (nooit in water of andere vloeistof onderdompelen) en scherpe hoeken. Gebruik het apparaat niet met natte handen. Als het apparaat vochtig of nat is, trek de stekker onmiddelijk uit het stopcontact. Wanneer je het apparaat schoon gaat maken of voor langere tijd op gaat slaan, schakel het uit en verwijder de stekker (niet aan het kabel trekken) als u het niet gaat gebruiken en verwijder de accessoires die eraan verbonden zijn. Zet het apparaat niet aan als het niet onder toezicht wordt gehouden. Als je de werkruimte moet verlaten, schakel het apparaat uit en verwijder de stekker (trek aan de stekker, niet het kabel). Controleer het apparaat en het kabel regelmatig voor schade. Gebruik het apparaat niet als deze of het kabel beschadigd is. Probeer niet het apparaat zelf te repareren. Neem contact op met een gekwalificeerde technicus. Om gevaar te voorkomen, moet het kabel door de fabrikant, onze klanten service of door een bevoegd persoon met hetzelfde type van kabel worden vervangen. Als het kabel beschadigd is, moet het door de klantenservice vervangen worden om gevaar te vermijden. Gebruik alleen originele reserveonderdelen. Let vooral op de « speciale veiligheidsinstructies » die hieronder worden beschreven. Kinderen en kwetsbare mensen Om de veiligheid van uw kinderen te waarborgen, houd alle verpakkingen (plastic zakken, dozen, polystyreen, enz.) buiten bereik. AttentiE ! Laat kinderen niet met plastic zakken spelen:verstikkingsgevaar ! Dit apparaat is niet bestemd voor personen met verminderde lichamelijk of psychische capaciteiten of gebrek aan ervaring of kennis (met inbegrip van kinderen), behalve als van hun wordt gevraagd om het apparaat op het oog te houden of ze de instructies betreffend het apparaat hebben gekregen door een verantwoordelijke persoon. Kinderen moeten weten dat dit apparaat geen speeltuig is. Kinderen moeten onder toezicht worden gehouden en u moet ervoor zorgen dat zij niet met het apparaat gaan spelen. Gebruik dit apparaat alleen onder toezicht. Raak de veiligheids schakelaar niet aan. Steek nooit iets in de beugels terwijl de machine aan is. Plaats het apparaat op een glad, stabiel werkvlak. Sluit het apparaat niet aan zonder alle benodigde accessoires te hebben geinstalleerd. De drukknop wordt alleen gebruikt om het hakmes te vullen. Risico van overbelasting! Gebruik het apparaat als hakmachine of blender maar nooit beide tegelijk. Overzicht van componenten Principaux composants : 1 Andrijf As 6 Kabel 2 Bescherming 7 Snelheids regelaar 3 Mengkom 8a Hakmes 4 Superieure bescherming met schroef 8b Gesel 5 Lever om de arm te verhogen/verlagen 8c Batteur Aanwending van de mengbeker 1. Plaats de mengkom in de ondersteuning en draai deze na rechts totdat deze vergrendeld is (gemarkeert als LOCK). 2. Om de arm op te tillen drukt u de hendel (5) in de richting van de pijl. De arm gaat opheffen. 3. Monteer het vereiste toebehoor op de bovenkant van de aandrijfas en draai deze na rechts om te blokkeren. 4. Plaats uw ingrediënten in de beker. Het apparaat mag niet tot boven aangevult worden - de maximale hoeveelheid van ingrediënten is 2 kg. 5. Verlag de arm met de hendel (5). 6. Sluit de stekker aan op een veilige, goed geïnstalleerde stekdoos van 230 V / 50 Hz. 7. Het apparaat kan met behulp van de snelheidsregelaar een snelheiden tussen 1 en 6 bereiken (afhankelijk van het mengsel). 8. Voor het mixen in korte intervallen zet u de schakelaar op « PULSE ». De schakelaar dient ervoor het gewenste tijdsinterval te volgen. Als u de schakelaar los laat, keert deze automatisch terug op « 0 ». Niveau regelaar voor het gebruik van de hakmachine, voor minder dan 2 kg in mengsel Niveau Aanwending Type van mengsel 1-2 Hakmes Zware mengsels (bijvoorbeeld brood of gebak) 3-4 Batteur Medium mengsels (bijv. Pannenkoeken of koekjes) 5-6 Gesel Lichte mengsels (bijv. Room, eiwit, enz.) Pulse Gesel Mix in intervallen (bijv. Voor het mengen van eidotter en eiwit) NOTA : Korte bedrijfstijd: Bedien het apparaat niet meer dan tien minuten als u zware mengsels gebruikt. Laat het apparaat tien minuten afkoelen. Gebruik het spatscherm om u eigen tegen spatters van vloeibare mengsels te beschermen. 9. Na het haken/mengen, schuif de schakelaar (7) op « 0 », zodra het mengsel een bal heeft gevormd. Verwijder dan het stekker uit het apparaat. 10. Duw de hendel (5) : de arm wordt verhoogd. 11. Nu kunt u het mengsel met behulp van een spatel uit de kom gieten. 12. U kunt dan de mengkom verwijderen door naar links te draaien. 13. Reinig alle onderdelen zoals beschreven in « Reiniging » Reiniging Verwijder de stekker voordat u het apparaat schoonmaakt. Dompel het apparaat nooit onder water! Gebruik geen scherpe voorwerpen of aggressieve schoonmaakmiddelen. Aandrijving van de motor Gebruik een vochtige doek om de buitenkant van de behuizing schoon te maken. Mengkom, materialen voor het mengen en componenten van de hakmachine ATTENTIE : De componenten zijn niet geschikt voor de vaatwasmachine. Bij blootstelling aan hitte of bijtende reingingsmiddelen, kunnen ze kromtrekken of verkleuren. Componenten die met voedsel in aanraking zijn gekomen, kunnen met in warm water gewassen worden. GEVAAR : Het hakmes is zeer scherp! Risico van verwondingen! Breng een kleine hoeveelheid plantaardige olie op het scherm aan als ze gedroogd zijn. Recept suggesties Biscuit (recept), niveau 3-4 Ingrediënten : 250g ongezouten boter of margarine, 250g suiker, 1 pakje vanillesuiker, een snufje zout, 4 eieren, 500g bloem, 1 pakje bakpoeder, ca. 12,5 ml melk. Voorbereiding : Giet de bloem en de rest van de ingrediënten in de kom, en roer deze gedurende 30 seconden op niveau 1, dan voor ongeveer 2 minuten op niveau 3. Vet een vorm in of bedek het met bakpapier. Giet het mengsel in de vorm en bak het. Voordat u de biscuit uit de oven haalt, kunt u testen of het klaar is: boor het midden van de biscuit met een stuk hout. Als het mengsel niet blijgt plakken, is de biscuit klaar. Plaats de biscuit op een rooster en laat deze afkoelen. Oven: Hoogte: 2 Bakken : elektrische oven : opwarmen op 175-200°C ; gas oven : thermostaat 2-3 Baktijd : 50-60 minuten U kunt het recept volgens uw smaal wijzigen. U kunt bijvoorbeeld 100g rozijnen. 100G noten of chocolade poeder toevoegen. In feite zijn de mogelijkheden eindeloos. Broodjes met lijnzaad, niveau 1-2 Ingrediënten : 500-550g bloem, 50g lijnzaad, 37,5 ml water, 1 blokje gist (40g), 100g melk creme, 1 theelepel zout. Voor het glazur: 2 theelepes water. Voorbereiding : Week de zaden in 125 ml warm water. Giet de rest van het water (0,25 l) in de mengkom, samen met het gist en de creme en kneedhak het mengsel op niveau 2. De gist moet volledig worden opgelost.Giet de bloem en de vochtige lijnzaadjes met het zout in de mengkom. Kneedhak een tijdje en ga dan over op niveau 2 en blijf gedurende 3-5 minuten kneden. Bedek het mengsel het laate her op een warme plaats gedurende 45-60 minuten gaaren. Verwijder de schaal, kneed op lengte en vorm zestien rollen. Dek de pan af met vochtig bakpapier. Leg de broodjes erop en laat ze gedurende 15 minuten rijzen. Bedek deze met war water en laat ze bakken. Oven : Hoogte : 2 Bakken : elektrische oven : opwarmen op 200-220°C (voorverwarmen), gas oven : thermostaat 2-3 Baktijd : 30-40 minuten Chocolade creme, niveau 5-6 Ingrediënten : 200ml zoete room, 150g pure chocolate glazuur, 3 eieren, 50-60g suiker, een snufje zout, 1 pakje vanillesuiker, 1 theelepel cognac of run, chocolate schilfers. Voorbereiding : Klop room in een mengkom met een garde tot dat het mengsel consistent wordt. Haal het uit de kom en plaats deze op een koele plaats. Smelt de chocolade glazuur volgende de instructies op de verpakking of in een magnetron gedurende 3 minuten. Klop ondertussen eieren, suiker, vanillesuiker, cognac of rum, en zout met een garde in de mengkom op niveau 3, tot het mengsel tot schuim wordt. Voed ge gesmolten chocolate bij en roer regelmatig op 5-6. Houde voor de decoratie een beetje room over. Voeg de resterende room creme bij het mengsel en roer kort met Pulse. Versier de chocolade creme met room en serveer het fris. Milieu U hoeft dit apparaat niet met huishoudelijk afval verwijderen. Gemeenten bieden een inzameling systeem voor dit soort producten. Neem contact op met u gemeente om meer over de lokaties te leren. Elektrische en elektronische apparaaten kunnen schadelijke stoffen bevatten die schadelijk zijn voor mensen en het milieu en moeten worden recycled. Dit symbool geeft aan dat het een elektrisch of elektronisch voorwerp is en daarom weggeworpen moet worden in de vuilnisbak met een kruis. Geproduceerd en ingevoerd door : Adeva SAS 8 rue Marc Seguin 77290 Mitry-Mory FRANKRIJK www.hkoenig.com - [email protected] - Tél. 01 64 67 00 01 ESPANOL Datos técnicos Modelo: KM60s Tensión nominal: 220-240V 50/60Hz Potencia máxima: 1000W Clase de protección: II Para prolongar la vida útil del dispositivo, se recomienda usos de 10 minutos como máximo. Este dispositivo ha sido probado de acuerdo con todas las directivas comunitarias vigentes aplicables, según las indicaciones de compatibilidad electromagnética y las directivas de baja tensión y fue hecho cumpliendo la legislación de seguridad más reciente a la fecha. Sujeto a cambios sin previo aviso. Instrucciones generales de seguridad Lea atentamente las instrucciones antes de usar el dispositivo, y consérvelas, incluyendo la garantía, el recibo y, si es posible, la caja de embalaje. Si usted da el dispositivo a otra persona, déselo también con estas instrucciones. La unidad está diseñada exclusivamente para uso privado y para los fines previstos. Este dispositivo no es adecuado para uso comercial. No lo use fuera (a no ser que se haya diseñado para eso). Manténgalo alejado de fuentes de calor, de la luz directa del sol, de la humedad (no lo sumerja en líquidos) y de ángulos agudos. No utilice el dispositivo con las manos mojadas. Si el dispositivo está húmedo o mojado, desenchúfelo inmediatamente. Al limpiarlo o almacenarlo por un largo periodo, apagarlo y desenchufarlo (jale del enchufe, no del cable) si el dispositivo no se va a usar y quite los accesorios incorporados. No utilice el dispositivo sin vigilancia. Si tiene que dejar el espacio de trabajo, siempre apague el dispositivo y desenchúfelo (jale del enchufe, no del cable). Compruebe regularmente que el dispositivo y el cable no estén dañados. No lo utilice si está dañado. No intente reparar la unidad usted mismo. Póngase en contacto con un técnico calificado. Para evitar exponerse a un posible peligro, sólo haga reemplazar un cable dañado por el fabricante, nuestro servicio al cliente o por una persona calificada, y por un cable del mismo tipo. Si el cable de alimentación está dañado, debe ser sustituido por un servicio post-venta con el fin de evitar todo peligro. Utilice sólo piezas de repuesto originales. Preste especial atención a "las instrucciones especiales de seguridad". Niños y personas vulnerables Para garantizar la seguridad de sus hijos, mantener el embalaje (bolsas de plástico, cajas, poliestireno, etc.) Fuera de su alcance. ¡Atención! No deje que los niños jueguen con la bolsa: ¡hay riesgo de asfixia! Este dispositivo no está diseñado para ser utilizado por personas (incluidos niños) con capacidades físicas, sensoriales o mentales reducidas, o con falta de experiencia o conocimiento, a menos que se les haya dado instrucciones relativas al uso del dispositivo por una persona responsable de su seguridad. Se debe supervisar a los niños para asegurarse de que no jueguen con el dispositivo. Siempre vigile el dispositivo mientras está en uso. No manipule ningún interruptor de seguridad. No introduzca nada en los soportes giratorios mientras el dispositivo esté en uso. Coloque el dispositivo sobre una superficie de trabajo lisa, plana y estable. No enchufe el dispositivo sin haber instalado todos los accesorios necesarios. Sólo el pulsador se debe usar para llenar el recipiente. ¡Riesgo de sobrecarga! Use el dispositivo para cortar o mezclar, pero nunca para ambas funciones a la vez. Descripción de los componentes Componentes principales 1 2 3 4 5 Eje de accionamiento Protección Recipiente de mezcla Protección superior con tornillo Palanca para subir y bajar el brazo 6 7 8a 8b 8c Cable de alimentación Regulador de velocidad Gancho de mezcla Batidor Mezclador Uso del Recipiente de mezcla 1. Coloque el recipiente de mezcla en la base y gírelo en la dirección de bloqueo (LOCK) hasta que encaje. 2. Para levantar el brazo, presionar la palanca (5) hacia abajo en la dirección de la flecha. El brazo se eleva. 3. Montar el utensilio necesario insertándolo en la parte superior en el eje de accionamiento y asegurando la clavija en el eje girando hacia la derecha. 4. Verter los ingredientes. El contenido del dispositivo no se debe derramar – la cantidad máxima de ingredientes es de 2 kg. 5. Baje el brazo con la palanca (5). 6. Enchufe a una toma de 230 V / 50 Hz. 7. Active la máquina utilizando el controlador de nivel a una velocidad de entre 1 y 6 (dependiendo de la mezcla). 8. Para un funcionamiento por impulsos (batiendo a intervalos cortos), gire el interruptor a "PULSE". El interruptor debe ser mantenido en esa posición por el intervalo de tiempo deseado. Cuando se suelta, el interruptor vuelve automáticamente a "0". Ajuste de los niveles y uso del gancho para mezclas de menos de 2 kg Niveles Uso Tipo de mezcla 1-2 Gancho de mezcla Mezclas pesadas (pan o pastas) 3-4 Batidora Mezclas semi-pesadas (crepes o galletas) 5-6 Mezclador Mezclas ligeras (cremas, clara de huevos, manjar blanco) Pulse Mezclador Batido por intervalos (para mezclar inferiores a la clara de huevo) consistencias NOTA: Funcionamiento de duración breve: con mezclas pesadas, no utilice durante más de diez minutos, luego deje enfriar el dispositivo durante diez minutos. Utilice la protección contra salpicaduras para proteger contra mezclas líquidas. 9. Después de la mezcla, coloque el interruptor (7) en la posición"0" cuando la mezcla haya formado una bola. A continuación, desconecte el dispositivo. 10. Levante la palanca (5): el brazo se levanta. 11. Ahora usted puede verter la mezcla del tazón con una espátula. 12. A continuación, puede quitar el recipiente de mezcla, girándolo a la izquierda. 13. Limpie las piezas como se describe en "Limpieza". Limpieza Antes de limpiar el dispositivo, desenchúfelo. No sumerja el dispositivo en agua. No utilice herramientas afiladas ni limpiadores abrasivos. Base del motor Se debe utilizar sólo un paño húmedo para limpiarla. Recipiente para mezcla, equipo de mezcla y componentes del cortador ADVERTENCIA: No lavar los componentes en el lavavajillas. Cuando se exponen al calor o productos de limpieza cáusticos se pueden deformar o decolorar. Los componentes que entran en contacto con los alimentos se pueden lavar con agua y jabón. PELIGRO: La hoja del cortador es muy fuerte Hay riesgo de lesiones Deje que las partes se sequen completamente antes de volver a montar la unidad. Aplicar una pequeña cantidad de aceite vegetal en el tamiz cuando se seque. Sugerencias de recetas Galletas (receta), nivel 3-4 Ingredientes: 250 g de mantequilla sin sal o margarina, 250 g de azúcar, 1 paquete de azúcar sabor a vainilla o 1 bolsa de citro-back, una pizca de sal, 4 huevos, 500 g de harina, 1 sobre de levadura en polvo, aprox. 12,5 ml de leche. Preparación: Vierta la harina de trigo y otros ingredientes en el recipiente, revuelva con el mezclador durante 30 segundos en el nivel 1 a continuación, durante unos 3 minutos con el nivel 3. Unte con mantequilla un molde. Vierta la mezcla y cocine. Antes de sacar la mezcla del horno, pruebe para ver si está lista: perfore con un trozo de madera el centro de la torta. Si la mezcla no se pega, la preparación está lista. Deje que el pastel se enfríe. Horno tradicional: Altura inserción: 2 Cocción: horno eléctrico: parte superior e inferior de calentamiento 175-200 ° C; horno a gas: termostato 2-3 Tiempo de horneado: 50-60 minutos Puede modificar esta receta de acuerdo a su gusto, por ejemplo, añadiendo 100 g de pasas ó 100 g de frutos secos o chocolate en polvo, las posibilidades son infinitas. Rollos de pan con granos de lino, el nivel 1-2 Ingredientes: 500-550 g de harina de trigo, 50 g de semillas de lino, 37,5 ml de agua, 1 cubo de levadura (40 g), 100 g de leche desnatada cuajada, 1 cucharadita de sal. Para el glaseado: 2 cucharaditas de agua. Preparación: Remoje las semillas de lino en 125 ml de agua tibia. Transferir el resto del agua tibia (0,25 l) al recipiente, espolvorear la levadura, añadir la leche cuajada y mezclar con el gancho de mezcla en el nivel 2. La levadura se debe disolver completamente. Vierta la harina con las semillas de lino húmedo y la sal en el recipiente de mezcla. Amase por buen tiempo en el nivel 1, luego pase al nivel 2 y siga amasando durante 3-5 minutos. Cubra la mezcla y déjela crecer en un lugar cálido durante 45-60 minutos. Amasar de nuevo, retire del recipiente y haga 16 rollos. Cubra la cacerola con papel encerado húmedo. Coloque los rollos y déjelos crecer durante 15 minutos. Añada agua tibia y continúe con la cocción. Horno tradicional: Altura de inserción: 2 Cocción: horno eléctrico: calentamiento superior e inferior 200-220 ° C (precalentamiento de 5 minutos), horno a gas: termostato 2-3 Tiempo de horneado: 30-40 minutos Crema de chocolate, nivel 5-6 Ingredientes: 200 ml de crema dulce, 150 g de chocolate amargo, 3 huevos, 50-60 g de azúcar, una pizca de sal, 1 paquete de azúcar sabor a vainilla, 1 cucharada de brandy o ron, copos de chocolate. Preparación: Batir la crema en el recipiente con el mezclador hasta obtener una mezcla consistente. Retírela del recipiente y colóquela en un lugar fresco. Derrita la crema de chocolate siguiendo las instrucciones del envase o en un horno microondas a 600 W durante 3 minutos. Mientras tanto, bata los huevos, el azúcar, el azúcar con sabor a vainilla, el coñac o ron y la sal en el recipiente de mezcla en el nivel 3 para obtener espuma. Añada el chocolate derretido y revuelva con regularidad en el nivel 5-6. Guarde un poco de crema para la decoración. Agregue la crema restante a la mezcla anterior y agite brevemente con la función Pulse. Decore con crema de chocolate y sirva fresco. Medio ambiente ADVERTENCIA: No se deshaga de este producto como lo hace con otros productos del hogar. Existe un sistema selectivo de colecta de este producto puesto en marcha por las comunidades, debe de informarse en su ayuntamiento acerca de los lugares en los que puede depositar este producto. De hecho, los productos eléctricos y electrónicos pueden contener substancias peligrosas que tienen efectos nefastos para el medio ambiente o para la salud humana y deben ser reciclados. El símbolo aquí presente indica que los equipos eléctricos o electrónicos deben de ser cuidadosamente seleccionados, representa un recipiente de basura con ruedas marcado con una X. Fabricado e importado por: Adeva SAS 8 rue Marc Seguin 77290 Mitry-Mory FRANCE www.hkoenig.com - [email protected] - Tel. 01 64 67 00 01 ITALIANO Dati tecnici Modello: KM60s Tensione nominale: 220-240V, 50/60Hz Consumo elettrico: 600W Potenza massimale: 1000W Classe di protezione : II Per prolungare la durata del robot, si consiglia utilizzarlo a intervalli di 10 minuti. Questo apparecchio è stato testato secondo tutte le attuali direttive comunitarie (CE) applicabili, come la compatibilità elettromagnetica e la direttiva sulla bassa tensione, ed è stato costruito nel rispetto delle normative di sicurezza più recenti. Soggetto a modifiche tecniche senza preavviso! Istruzioni generali sulla sicurezza Leggere attentamente questo manuale prima di utilizzare il dispositivo e conservare queste istruzioni, comprese la garanzia, la ricevuta e, se possibile, anche la scatola e l’imballaggio interno della confezione. Se si dovesse cedere il robot a terzi, consegnare anche questo manuale. Il robot è progettato esclusivamente per uso privato e per lo scopo previsto e non è adatto per scopi commerciale. Non utilizzare all'aperto. Tenere lontano da: fonti di calore, luce diretta del sole, umidità (non immergere mai in nessun liquido) e spigoli. Non utilizzare l'apparecchio con le mani bagnate. Se il robot è umido o bagnato, staccare immediatamente la spina. Durante la pulizia o quando si conserva il robot per un lungo periodo, spegnere e staccare la spina (staccare direttamente dalla spina e non dal cavo) e smontare gli accessori installati. Non lasciare l'apparecchio incustodito quando è in funzione. Se si deve lasciare l'area di lavoro, spegnere sempre la macchina e staccare la spina (staccare direttamente dalla spina e non dal cavo). Controllare regolarmente che sia il robot, sia il cavo, non siano danneggiati. Non utilizzare l'apparecchio quando è danneggiato. Non tentare di riparare l'apparecchio personalmente. Sempre rivolgersi a un tecnico qualificato. Per evitare di esporsi a possibili pericoli, far sostituire il cavo danneggiato con uno dello stesso tipo, solo dal produttore, dal nostro servizio clienti o da un tecnico qualificato. Utilizzare solo ricambi originali. Prestare particolare attenzione alle istruzioni di sicurezza sotto riportate. Bambini e persone vulnerabili Per garantire la sicurezza ai bambini, conservare tutti gli imballaggi (sacchetti di plastica, scatole, polistirolo, ecc.) lontano dalla loro portata. Attenzione! Mai lasciare che i bambini giochino con l’imballaggio: si rischia il soffocamento! Questo dispositivo non è destinato all'uso da parte di persone con capacità fisiche, mentali o sensoriali ridotte, o da persone con scarsa conoscenza (inclusi i bambini), salvo che una persona responsabile della loro sicurezza non abbia fornito loro le dovute indicazioni. Sorvegliare sempre i bambini in prossimità dell’apparecchio per accertarsi che non giochino. Si raccomanda di sorvegliare i bambini per assicurarsi che non giochino con l'apparecchio. Utilizzare sempre la macchina sotto controllo. Non interferire con gli interruttori di sicurezza. Non inserire nulla nelle fruste in rotazione, mentre la macchina è in esecuzione. Collocare la macchina su una superficie di lavoro liscia, piana e stabile. Non inserire la spina nella presa elettrica senza aver precedentemente installato tutti gli accessori necessari. Servirsi sempre del pestello quando si utilizza il tritatutto. Rischio di surriscaldamento! Utilizzare il robot come tritatutto o come mixer, ma mai contemporaneamente. Descrizione dei componenti Componenti principali: 1 Supporto per accessori 6 Cavo di alimentazione 2 Protezione 7 Manopola di controllo della velocità 3 Recipiente 8a Frusta per impasto 4 Protezione superiore con vite 8b Frusta multiuso 5 Pulsante di elevazione del braccio 8c Sbattitore Come utilizzare il recipiente 1. Posizionare il contenitore nell’apposito settore e ruotarlo in direzione del blocco (segnato con il segno BLOCK) finché non si blocca. 2. Per alzare il braccio, premere il pulsante (5). Il braccio si alza verso l’alto. 3. Montare l'utensile necessario, inserire la parte superiore dell'albero motore e bloccare il perno nell'asse, in senso orario. Versare gli ingredienti. 4. Ora inserire gli ingredienti. Non riempire troppo il contenitore; la quantità massima degli ingredienti è di 2 kg. 5. Abbassare il braccio con il tasto (5). 6. Collegare il dispositivo, verificando sempre che la tensione dell’apparecchio corrisponda a quella della vostra casa 230 V / 50 Hz. 7. Attivare il robot utilizzando la manopola per il controllo della velocità da 1 a 6 (in funzione dell’impasto). 8. Per la funzione a intermittenza (miscelazione a brevi intervalli di tempo), girare l'interruttore su "PULSE". L'interruttore deve essere mantenuto in tale posizione per l’intervallo di tempo desiderato. Quando viene rilasciato, l'interruttore ritorna automaticamente su "0". Le fruste sono regolate per impastare un quantitativo complessivo degli ingredienti di max 2kg Livelli Utilizzo Tipo di impasto 1-3 Frusta per impasto Impasti pesanti (es.: pane, pasta per dolci) 3-4 Sbattitore Impasti medio - pesanti (es.: crepes o biscotti) 5-6 Frusta multiuso Impasti leggeri (es.: crema, albume d’uovo) Intermittenza Frusta multiuso Piccole miscele NOTE: Tempo di funzionamento corto: con impasti pesanti, non utilizzare la macchina per più di dieci minuti consecutivi. Lasciar raffreddare per una decina di minuti prima di riutilizzare l’apparecchio. Utilizzare il paraschizzi per proteggersi da miscele liquide. 1. Dopo l'uso girare la manopola di controllo della velocità (7) posizionandola su "0" non appena l’imposto prende la forma di una palla. Poi togliere la spina. 2. Premere il tasto (5) per alzare il braccio. 3. L’impasto può essere rimosso dal recipiente con l’aiuto di una spatola. 4. Quindi rimuovere il contenitore ruotandolo verso sinistra. 5. Pulire i componenti come descritto sotto nella sezione "Pulizia e Manutenzione". Pulizia Prima di pulire l'apparecchio, assicurarsi di staccare la spina. Non immergere in acqua! Non utilizzare prodotti abrasivi per la pulizia. Struttura del robot Pulire solo con un panno morbido e umido. Recipiente, accessori per impastare e componenti del tritatutto ATTENZIONE: I componenti non sono adatti per la pulizia in lavastoviglie. Quando sono esposti al calore o a detergenti caustici, possono deformarsi o scolorire. I componenti che entrano in contatto con gli alimenti possono essere lavati in acqua e sapone. PERICOLO: La lama del tritatutto è estremamente tagliente! Rischio di lesioni! Assicurarsi che tutti i componenti siano completamente asciutti prima di rimontarli nell’apparecchio. Applicare una piccola quantità di olio vegetale sui componenti setaccio quando sono secchi. Alcune ricette Biscotti (ricetta di base), livello 3-4 Ingredienti: 250 g di burro o margarina, 250 g di zucchero, 1 bustina di zucchero vanigliato o 1 sacchetto di Citro-back, un pizzico di sale, 4 uova, 500g di farina, 1 bustina di lievito in polvere, ca. 12,5 ml di latte. Preparazione: Versate la farina e gli altri ingredienti nel recipiente, mescolare con una frusta per 30 secondi a livello 1 e poi, per circa 3 minuti, a velocità 3. Imburrare uno stampo o coprire con carta da forno. Versare l’impasto e far cuocere. Prima di rimuovere dal forno, fare un piccolo test per vedere se è cotto a sufficienza: con uno stecchino, forare il centro. Se l’impasto non si attacca allo stecchino significa che la cottura è terminata. Sfornare e lasciar raffreddare. Forno tradizionale: Altezza di inserimento: 2 Cottura: forno elettrico: superiore e inferiore riscaldamento 175-200 ° C, forno a gas: termostato 2-3 Tempo di cottura: 50-60 minuti Secondo i gusti, è possibile modificare questa ricetta, per esempio aggiungendo 100 g di uvetta, oppure 100 g di noci, cioccolato in polvere. In realtà, le possibilità sono infinite. Panini ai semi di lino, livello 1-2 Ingredienti: 500-550 g di farina, 50 g di semi di lino, 37,5 ml di acqua, 1 cubetto di lievito (40 g), 100 g di latte scremato 1 cucchiaino di sale. Per la glassa: 2 cucchiaini di acqua Preparazione: Mettere a bagno i semi di lino in 125ml di acqua tiepida. Trasferire la restante acqua tiepida (0,25 l) nel recipiente, cospargere il lievito, aggiungere il latte e mescolare con il gancio impastatore a livello 2 di velocità. Il lievito deve essere sciolto completamente. Versare la farina umida con semi di lino e sale nel recipiente. Impastare a lungo a velocità 1 e poi passare a 2 e continuare a impastare per 3-5 minuti. Coprire l'impasto e lasciare lievitare in un luogo caldo per 45-60 minuti. Impastare di nuovo a lungo, togliere l’impasto dalla ciotola e formare sedici rotoli. Coprire la padella con carta da forno bagnata. Posizionare i rotoli sopra e lasciar lievitare per 15 minuti. Coprire con acqua calda e continuare la cottura. Forno tradizionale: Altezza di inserimento: 2 Cottura: forno elettrico: superiore e inferiore riscaldamento 200-220 ° C (preriscaldare per 5 minuti), forno a gas: termostato 2-3 Tempo di cottura: 30-40 minuti Crema al cioccolato, livello 5-6 Ingredienti: 200 ml di panna dolce, 150 g di glassa al cioccolato fondente, 3 uova, 50-60 g di zucchero, un pizzico di sale, 1 bustina di zucchero vanigliato, 1 cucchiaino di brandy o rum, scaglie di cioccolato. Preparazione: Sbattere la crema nel recipiente di miscelazione con la frusta fino a quando l’impasto prende consistenza. Togliere l’impasto dalla ciotola e metterla in luogo fresco. Sciogliere la glassa al cioccolato seguendo le istruzioni riportate sulla confezione o in un forno a microonde a 600 W per 3 minuti. Nel frattempo, sbattere uova, zucchero, zucchero vanigliato, brandy o rum e il sale nel recipiente di miscelazione con la frusta a velocità 3 per ottenere una mousse. Aggiungere il cioccolato fuso e mescolare regolarmente a velocità 5-6. Conservare un po' di crema di cioccolato per la decorazione. Aggiungere la crema di cioccolato restante e mescolare brevemente utilizzando la funzione a intermittenza. Decorare con crema di cioccolato e servire fresco. AMBIENTE ATTENZIONE: Non gettare questo apparecchio tra i rifiuti domestici. Per questo tipo di prodotti è fornito dai comuni un sistema di raccolta e ritiro in zona ed è quindi un dovere informarsi per conoscere il giusto smistamento del rifiuto. Infatti, i prodotti elettrici ed elettronici possono contenere sostanze pericolose che hanno effetti dannosi sull’ambiente o sulla nostra salute e quindi devono essere riciclati. Il simbolo al lato indica che le apparecchiature elettriche ed elettroniche fanno parte di una raccolta selettiva e differenziata (rappresentata da un bidone su due ruote sbarrato da una X). Fabbricato e importato da: Adeva SAS 8 rue Marc Seguin 77290 Mitry-Mory FRANCIA www.hkoenig.com - [email protected] - Tel. 01 64 67 00 01