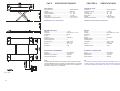
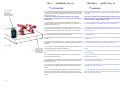
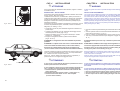
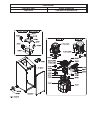
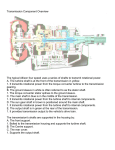
1
I
263
GB
F
D
E
SOLLEVATORE PER AUTOVETTURE
CAR LIFT
ELÉVATEURS POUR AUTOMOBILES
ELEKTROHYDRAULISCHE SCHERENHEBEBÜHNE
ELEVADOR PARA AUTOMÓVILES
Manuale di istruzioni per l’uso e la manutenzione del
Instructions and maintenance manual for
Manuel d’instructions pour l’utilisation et l’entretien du:
Bedienungs- und Wartungsanleitung für
Manual de instrucciones para uso y mantenimiento de los
SOLLEVATORE PER AUTOVETTURE
SCISSORS VEHICLES LIFT
ELÉVATEURS POUR AUTOMOBILES
ELEKTROHYDRAULISCHE SCHERENHEBEBÜHNE
ELEVADOR PARA AUTOMÓVILES
Modello - Model - Modell - Modèle - Modelos
263
Matricola N° - Serial N° - Matrikelnummer - N° de série - Matrícula n°
Anno di costruzione - Year of manufacture - Baujahr - Année de fabrication - Año de fabricación
COSTRUTTORE: - MANUFACTURER: - HERSTELLER: - CONSTRUCTEUR: - FABRICANTE:
WERTHER INTERNATIONAL S.p.A.
Via F. BRUNELLESCHI, 12
42100 CADE’ (RE) - ITALY
Telefono ++ / +522 / 9431 (r.a.) - Telefax ++ / +522 / 941997
WEB http://www.wertherint.com - E-mail [email protected]
1a Emissione 25/09/2006- - 1st Edition - 12th 25/09/2006
1a Édition - 25/09/2006 - 1. Ausgabe - 25/09/2006 - 1ª Edición – 25/09/2006
CENTRO DI ASSISTENZA AUTORIZZATO:
AUTHORISED SERVICE CENTRE:
SERVICE APRÈS-VENTE AGRÉÉ:
KUNDENDIENSTCENTER
CENTRO DE ASISTENCIA AUTORIZADO:
Rev.4 ..........................................18/06/2007
1
Indice
2
Contents
Imballaggio, trasporto e stoccaggio
Pag.4
Packing, transport and storage
Page 4
Introduzione
Pag.6
Introduction
Page 6
Cap.1 Descrizione della macchina
Pag.8
Chapter 1 Description of the machine
Page 8
Cap.2 Specifiche tecniche
Pag.10
Chapter 2 Technical specifications
Page 10
Cap.3 Sicurezza
Pag.18
Chapter 3 Safety
Page 18
Cap.4 Installazione
Pag.22
Chapter 4 Installation
Page 22
Cap.5 Funzionamento ed uso
Pag.24
Chapter 5 Operating principles and use Page 24
Cap.6 Manutenzione
Pag.26
Chapter 6 Maintenance
Page 26
Cap. 7 Inconvenienti e rimedi
Pag.28
Chapter 7 Troubleshooting
Page 28
Indice
Index
Tables des matières
Emballage, transport et stockage
page 5
Verpackung, Transport und Lagerung
Seite 5
Embalaje, transporte y almacenamiento Pag.5
Introduction
page 7
Einleitung
Seite 7
Introducción
Pag.7
Chap.1Description de l’appareil
page 9
Kapitel 1 Beschreibung der
Scherenhebebühne
Cap.1 Descripción de la máquina
Pag.9
Seite 9
Chap.2Caractéristiques techniques
page 11
Kapitel 2 Technische Spezifikation
Seite 11
Cap.2 Especificaciones técnicas
Pag.11
Chap.3Sécurité
page 19
Kapitel 3 Sicherheit
Seite 19
Cap.3 Seguridad
Pag.19
Chap.4Installation
page 23
Kapitel 4 Installation
Seite 23
Cap.4 Instalación
Pag.23
Chap.5 Fonctionnement et utilisation page 25
Kapitel 5 Betrieb und Anwendung
Seite 25
Cap.5 Funcionamiento y uso
Pag.25
Chap.6Entretien
page 27
Kapitel 6 Wartung
Seite 27
Cap.6 Mantenimiento
Pag.27
Chap.7
page 29
Kapitel 7 Fehlersuche
Seite 29
Cap. 7 Problemas y soluciones
Pag.29
Pannes et remèdes
3
IMBALLAGGIO, TRASPORTO E
STOCCAGGIO.
Fig.1 - Abb.1
PACKING, TRANSPORT AND STORAGE
LE OPERAZIONI DI IMBALLAGGIO,
SOLLEVAMENTO, MOVIMENTAZIONE, TRASPORTO
E DISIMBALLO DEVONO ESSERE AFFIDATE
ESCLUSIVAMENTE A PERSONALE CHE SIA
ESPERTO IN TALI OPERAZIONI E CHE CONOSCA
BENE IL SOLLEVATORE ED IL PRESENTE MANUALE
ALL PACKING, LIFTING, HANDLING, TRANSPORT
AND UNPACKING OPERATIONS ARE TO BE
PERFORMED EXCLUSIVELY BY EXPERT
PERSONNEL WITH KNOWLEDGE OF THE LIFT AND
THE CONTENTS OF THIS MANUAL
IMBALLAGGIO
Il sollevatore viene spedito montato, appoggiato su di un pianale in legno e avvolto in un unico pacco confezionato con una lastra di materiale termoretraibile e sigillato con due regge metalliche.
Il peso totale del pacco è di circa 500 Kg.
PACKING
The lift is shipped assembled, resting on a wooden platform and
shrink-wrapped in a single pack and sealed with two metal straps.
The total weight of the pack is approximately 500 kg.
Fig.1 Movimentazione con carrello elevatore
Fig.1
SOLLEVAMENTO E MOVIMENTAZIONE
I pianali in legno possono essere sollevati sia con carrelli elevatori
(Fig.1) che con gru o carriponte (Fig.2). Nel caso di movimentazione
con gru o carriponte, i pacchi devono essere sempre imbracati con minimo 2 fasce.
LIFTING AND HANDLING
The wooden platforms can be lifted either with a fork-lift truck (Fig. 1) or
with a crane or an overhead travelling crane (Fig. 2). In the case of handling with a crane or overhead travelling crane, the packs must always
be loaded with at least 2 band.
Fig.2
Fig.2
Sollevamento mediante imbracatura
Handling with fork-lift truck
Lifting by slinging
NB. I mezzi scelti devono essere idonei al sollevamento e allo spostamento in sicurezza, tenendo conto di dimensioni, peso, baricentro, sporgenze e parti delicate da non danneggiare.
NB. The chosen means must be suitable for lifting and moving in
safety, taking into account dimensions, weight, centre of gravity,
protrusions and fragile parts not to be damaged.
STOCCAGGIO
Gli imballi devono sempre essere conservati in luoghi coperti e protetti
a temperature comprese fra -10°C e +40°C e non devono essere esposti ai raggi diretti del sole.
STORAGE
The packs must always be kept in a covered and sheltered place at a
temperature between -10°C and +40°C and must not be exposed to direct sunlight.
IMPILAMENTO DEI PACCHI
Il tipo di imballo previsto prevede la possibilità di impilare in magazzino
fino a 2 pacchi uno sull’altro, purchè vengano correttamente disposti ed
assicurati contro la caduta.
I pacchi possono essere impilati solamente a condizione che non siano
appoggiati direttamente uno sull’altro ma che vi siano poste nel mezzo
delle traversine in legno come indicato in fig.3
Nei cassoni dei camion o nei containers si possono impilare fino a 2
pacchi, purchè vengano reggiate bene e assicurate contro la caduta.
STACKING THE PACKS
This type of packing makes it possible to stack up to 2 packs one on top
of another in a store, provided they are correctly arranged and secured
against falling.
The packs may be stacked only provided they are not resting one directly on another, but wooden crosspieces are inserted as shown in Fig.
3.
Up to 2 packs can be stacked in the bodies of lorries or in containers,
provided they are well strapped down and secured against falling.
Fig.3
Fig.3
Fig.2 - Abb.2
Fig.3 - Abb.3
4
Impilamento dei sollevatori
Stacking lifts
EMBALLAGE, TRANSPORT ET
STOCKAGE
TRANSPORT, VERPACKUNG UND
LAGERUNG
EMBALAJE, TRANSPORTE Y
ALMACENAMIENTO
LES OPÉRATIONS D’EMBALLAGE, DE
MANUTENTION, DE TRANSPORT ET DE
DÉBALLAGE DOIVENT ÊTRE CONFIÉES A UN
PERSONNEL EXPÉRIMENTÉ DANS CE GENRE
D’OPÉRATIONS, CONNAISSANT BIEN L’ÉLÉVATEUR
ET LE PRÉSENT MANUEL
ALLE VERPACKUNGS-, HEBE-, TRANSPORT UND
AUSPACK- ARBEITEN SIND NUR VON
AUSGEBILDETEM FACHPERSONAL, DAS
KENNTNISSE DES LIFTS UND DER
BEDIENUNGSANWEISUNG BESITZT,
DURCHZUFÜHREN.
LAS OPERACIONES DE EMBALAJE, ELEVACIÓN,
DESPLAZAMIENTO, TRANSPORTE Y DESEMBALAJE
DEBEN SER CONFIADAS EXCLUSIVAMENTE A
PERSONAL QUE SEA EXPERTO EN ESTAS
OPERACIONES Y QUE CONOZCA BIEN EL
ELEVADOR Y ESTE MANUAL
EMBALLAGE
L’élévateur est expédié monté, enveloppé en un seul colis sous film
thermorétractable, posé sur une palette en bois et cerclé au moyen de
deux feuillards métalliques.
Le poids total du colis est d’environ 500 kg.
VERPACKUNG
Die Scherenhebebühne wird auf einer Palette verpackt angeliefert. Sie
ist mittels einer Schrumpffolie und Zwei Metallbändern auf der Holzpalette befestigt.
Das Gesamtgewicht beträgt inklusive der Verpackung cirka 500kg.
EMBALAJE
El elevador se envía montado, apoyado en una plataforma de madera y
envuelto en un único paquete que está embalado con una lámina de
material termoretráctil y sellado con dos flejes metálicos. El peso total
del paquete es de aproximadamente 500 Kg.
Fig.1
Abb. 1 Anheben mit Gabelstapler
Fig.1 Desplazamiento con carretilla elevadora
MANUTENTION
Les palettes peuvent être déplacées soit à l’aide d’un chariot élévateur
(fig. 1) , soit avec une grue ou un pont roulant (fig. 2). Dans ces derniers cas, les palettes devront toujours être sanglées au minimum par
deux élingues.
ANBEBEN UND BEWEGEN
Die Holzpalette kann mit Hilfe eines Gabelstaplers (Abb.1) oder mit einem Kran Abb.2 angehoben und bewegt werden.
Für den Fall das die Holzpalette mit einem Kran bewegt wird, muss die
Palette immer mit mindestens zwei Tragegurten angehoben werden.
ELEVAMIENTO Y DESPLAZAMIENTO
Las plataformas de madera puede elevarse tanto con carretillas
elevadoras (Fig.1) como con grúas o grúas-puente (Fig. 2). En el caso
de desplazamiento con grúas o grúas puente, los paquetes deben estar
atados con eslingas con un mínimo de 2 fajas.
Fig.2
Abb. 2
Fig.2
Manutention par chariot élévateur
Manutention au moyen d’élingues
Anheben mit Kran
Elevación con eslinga
NB. Les moyens utilisés devront permettre de garantir une manutention en toute sécurité, en tenant compte des dimensions, du poids, du centre de gravité, des parties en saillie et des éléments fragiles à ne pas détériorer.
Achtung: Die gewählten Hubmittel müssen für den Hub und die
Bewegung unter Berücksichtigung der Sicherheitsbestimmungen
geeignet und zugelassen sein.
Zusätzlich sind den Abmessungen, dem Gewicht, dem Schwerpunkt den überstehenden Teilen und empfindlichen Teilen große
Aufmerksamkeit zu schenken.
NOTA IMPORTANTE: Los medios elegidos deben ser adecuados
para la elevación y el desplazamiento en condiciones de seguridad, teniendo en cuenta las dimensiones, peso, baricentro, salientes y partes delicadas que no se deben dañar.
STOCKAGE
Les colis devront toujours être conservés dans des endroits couverts et
protégés, à des températures comprises entre -10°C et +40°C et à l’abri
du rayonnement direct du soleil.
LAGERUNG
Die Verpackten Güter müssen immer in überdachten Räumen bei einer
zwischen –10°C und +40°C gelagert werden. Die Güter dürfen nicht direktem Sonnenlicht ausgesetzt werden.
ALMACENAMIENTO
Los embalajes deben conservarse en lugares cubiertos y protegidos, a
una temperatura comprendida entre los -10°C y +40°C y no deben
exponerse a los rayos directos del sol.
GERBAGE DES COLIS
Le type d’emballage utilisé permet d’empiler, dans les magasins, jusqu’à 2 élévateurs l’un sur l’autre, pourvu qu’ils soient correctement positionnés et assurés contre tout risque de chute.
Les colis ne peuvent être gerbés qu’à l’unique condition de ne pas être
posés directement les uns sur les autres, mais que soient intercalées
des traverses en bois comme le montre la fig. 3.
Dans les camions ou les containers, il est possible d’empiler jusqu’à 2
élévateurs, pourvu qu’ils soient sanglés et assurés contre tout risque de
chute.
STAPELN DER PALETTEN
Die Paletten sind so ausgelegt, das bis zu zwei Paletten übereinander
gestapelt werden können. In diesem Fall sind die Kisten mit Gurten gegen Umstürzen zu sichern. Abb.3
Auf LKW oder in Containern können ebenfalls bis zu zwei Kisten aufeinander gestellt werden. Auch in diesem Fall sind die Kisten mit Gurten gegen Umstürzen zu sichern.
APILADO DE LOS PAQUETES
El tipo de embalaje previsto prevé la posibilidad de apilar en almacén
hasta 2 paquetes uno sobre otro, siempre que se pongan
correctamente y se aseguren contra la caída.
Los paquetes pueden apilarse solamente a condición que no se
apoyen directamente uno sobre otro, sino que se ponga en medio
viguetas de madera como se indica en la Fig. 3.
En las cajas del camión o en los contenedores se pueden apilar hasta
2 paquetes, siempre que se aseguren bien con flejes y se aseguren
contra la caída
Fig.3
Abb. 3
Fig.3
Gerbage des élévateurs
Stapeln der Lifte
Apilado de los elevadores
5
APERTURA DEGLI IMBALLI
All’arrivo verificare che la macchina non abbia subito danni durante il
trasporto e che ci siano tutti i pezzi indicati nella lista di spedizione.
Le gabbie devono essere aperte adottando tutte le precauzioni per evitare danni alle e ai pezzi della macchina .
OPENING THE CRATES
When the crates arrive, check that the machine has not been damaged
during transport and that all parts listed are present.
The crates must be opened using all possible precautionary measures
to avoid damaging the machine or its parts.
ELIMINAZIONE DELL’IMBALLO.
Il legno del pallet può essere riutilizzato o riciclato.
DISPOSAL OF CRATES
The wood of the pallet may be re-used or recycled.
INTRODUZIONE
IATTENZIONE
6
INTRODUCTION
I
CAUTION
Questo manuale è stato scritto per il personale di officina addetto
all’uso del sollevatore (operatore) e per il tecnico addetto alla manutenzione ordinaria (manutentore) pertanto, prima di effettuare
qualsiasi operazione sul sollevatore e/o sul suo imballaggio, occorre leggere attentamente tutto il manuale, poichè esso contiene
informazioni importanti per:
This manual has been written for the workshop personnel assigned to using the lift (operator) and for the engineer assigned to
routine maintenance (maintenance engineer). Therefore, before doing anything with the lift and/or its packing, it is necessary to read
the entire manual carefully, as it contains important information
for:
· LA SICUREZZA DELLE PERSONE addette all’uso ed alla manutenzione ordinaria,
· LA SICUREZZA DEL SOLLEVATORE,
· LA SICUREZZA DEI VEICOLI sollevati.
· THE SAFETY OF THE PERSONS assigned to its use and routine
maintenance.
· THE SAFETY OF THE LIFT.
· THE SAFETY OF THE LIFTED VEHICLES.
CONSERVAZIONE DEL MANUALE
Il manuale è parte integrante del sollevatore e deve sempre accompagnarlo, anche in caso di vendita.
Esso deve sempre essere conservato in vicinanza del sollevatore, in luogo facilmente accessibile.
L’operatore ed il manutentore devono poterlo reperire e consultare rapidamente in qualsiasi momento.
CONSERVATION OF THE MANUAL
The manual is an integral part of the lift and must always accompany it, also in the case of sale.
It must always be kept close to the lift, in an easily accessible place.
The operator and the maintenance engineer must be able to find it and
refer to it rapidly at any time.
SI RACCOMANDA, IN PARTICOLARE, UNA LETTURA ATTENTA E
RIPETUTA DEL CAPITOLO 3, CHE CONTIENE IMPORTANTI
INFORMAZIONI E AVVISI RELATIVI ALLA SICUREZZA.
IN PARTICULAR, IT IS RECOMMENDED TO READ CHAPTER 3
CAREFULLY AND REPEATEDLY AS IT CONTAINS IMPORTANT
INFORMATION AND NOTICES RELATIVE TO SAFETY.
I sollevatori sono stati progettati e costruiti rispettando quanto segue:
The lifts have been designed and manufactured in conformity with the
following:
LEGGI
Direttive europee: 73/23 CEE - 89/336 CEE e 98/37/CE
LAWS
European directives: 89/392 EEC; 91/368 EEC, 93/44 EEC, 93/68 EEC
NORME TECNICHE
Norne europee : EN 291 /1992, EN 292 / 1992
Norme italiane : UNI 9854
TECHNICAL STANDARDS
European standards: EN 291/1992, EN 292/1992
Italian standards: UNI 9854
OUVERTURE DES COLIS
A la réception, vérifier que l’appareil n’ait subit aucun dommage en
cours de transport et que tous les éléments indiqués sur le bordereau
de colisage soient bien présents. Les colis devront être ouverts en prenant toutes les précautions nécessaires afin d’éviter tout dommage aux
personnes et à l’élévateur .
ÖFFNEN DER VERPACKUNG
Bei der Ankunft der Kisten ist zu kontrollieren, dass diese keine
Transportschäden aufweist und das alle in den Versandunterlagen
aufgeführten Teile vorhanden sind.
Bitte beachten Sie, das die Kisten vorsichtig geöffnet werden, um Personenschäden und Beschädigungen an den Maschinenteilen zu vermeiden.(aufpassen das keine Teile auf den Boden fallen)
APERTURA DE LOS EMBALAJES
Al llegar comprobar que la máquina no haya sufrido daños durante el
transporte y que estén incluidas todas las piezas indicadas en la lista
de envío.
Las jaulas deben abrirse adoptando todas las precauciones necesarias
para evitar daños a personas y a piezas de la máquina.
ÉLIMINATION DE L’EMBALLAGE
Le bois de le pallet peut être réutilisé ou recyclé.
Entsorgung des Verpackungsmaterials
Das Palettenholz und die Pappe können wiederverwendet werden. Sie
sind recycelfähig
ELIMINACIÓN DEL EMBALAJE
La madera de la plataforma puede reutilizarse o reciclarse.
INTRODUCTION
I ATTENTION
EINLEITUNG
I
ACHTUNG
INTRODUCCIÓN
I
ATENCIÓN
Ce manuel a été rédigé pour le personnel d’atelier affecté à
l’utilisation de l’élévateur (opérateur) et pour l’agent chargé de
l’entretien courant (agent d’entretien), toutefois avant d’effectuer
quelque opération que ce soit sur l’élévateur et/ou sur son emballage, il est nécessaire de lire attentivement tout ce manuel, celui-ci
contenant des informations importantes pour:
Dieses Handbuch wurde für das mit der Bedienung der Scherenhebebühne beauftragte Werkstattpersonal (Bediener) und für den
mit der Wartung beauftragten Techniker Verfasst. Daher ist vor jedem Eingriff an der Scherenhebebühne oder an dem Verpackungsmaterial aufmerksam dieses Handbuch zu lesen, denn dieses enthält wichtige Informationen für:
Este manual se ha escrito para el personal del taller encargado del
uso del elevador (operador) y para el técnico encargado del mantenimiento ordinario (encargado de mantenimiento); por lo tanto, antes de efectuar cualquier operación en el elevador y/o en el embalaje, es necesario leer atentamente todo el manual, ya que éste
contiene informaciones importantes para:
· LA SÉCURITÉ DES PERSONNES affectées à l’utilisation et à
l’entretien ordinaire,
· LA SÉCURITÉ DE L’ÉLÉVATEUR
· LA SÉCURITÉ DES VÉHICULES soulevés.
· die Sicherheit der mit der BEDIENUNG UND DER WARTUNG beauftragten Personen
· DIE SICHERHEIT DER Scherenhebebühne
· Die Sicherheit de zu hebenden Fahrzeuges
· LA SEGURIDAD DE LAS PERSONAS encargadas del uso y mantenimiento ordinario.
· LA SEGURIDAD DEL ELEVADOR,
· LA SEGURIDAD DE LOS VEHÍCULOS elevados.
CONSERVATION DU MANUEL
Ce manuel fait intégralement partie de l’élévateur et doit toujours
l’accompagner, même en cas de revente.
Il devra toujours être conservé à proximité de l’élévateur, dans un endroit facilement accessible.
A tout moment, l’opérateur et l’agent d’entretien devront pouvoir le
consulter rapidement.
AUFBEWAHRUNG DES HANDBUCHES
Das Handbuch stellt ein Teil der Scherenhebebühne dar und muss
diese immer begleiten auch wenn die Scherenhebebühne verkauft
wird
Das Handbuch muss immer an einem leicht zugänglichen Ort in der
Nähe der Scherenhebebühne aufbewahrt werden
Der Bediener und die mit der Wartung beauftragte Person müssen das
Handbuch jederzeit zur Verfügung haben
CONSERVACIÓN DEL MANUAL
El manual es parte integrante del elevador y debe acompañarlo
siempre, incluso en caso de venta.
Éste debe conservarse siempre cerca del elevador, en un lugar
fácilmente accesible.
El operador y el encargado de mantenimiento deben poder localizarlo y
consultarlo rápidamente en cualquier momento.
EN PARTICULIER, IL EST RECOMMANDÉ UNE LECTURE
ATTENTIVE ET RÉPÉTÉE DU CHAPITRE 3 QUI CONTIENT DES
INFORMATIONS ET DES CONSIGNES IMPORTANTES POUR LA
SÉCURITÉ.
INSBESONDERE WIRD EMPFOHLEN. DAS KAPITEL 3 WIEDERHOLT ZU LESEN. DENN DIESES KAPITEL ENTHÄLT WICHTIGE INFORMATIONEN UND HINWEISE BEZÜGLICH DER SICHERHEIT
SE RECOMIENDA, EN ESPECIAL, UNA LECTURA ATENTA Y
REPETIDA DEL CAPÍTULO 3, QUE CONTIENE IMPORTANTES
INFORMACIONES Y AVISOS RELATIVOS A LA SEGURIDAD.
Les élévateurs ont été conçus et construits en respectant les dispositions suivantes:
Die Scherenhebebühne wurde konstruiert und hergestellt unter Beachtung der folgenden Vorschriften:
Los elevadores han sido diseñados y fabricados respetando las
siguientes normas:
LOIS
Directives européennes: 73/23 CEE - 89/336 CEE et 98/37/CE.
GESETZE
Europäische Richtlinien: 73/23 CEE - 89/336 CEE - 98/37/CE
LEYES
Directivas europeas: 73/23 CEE - 89/336 CEE y 98/37/CE
NORMES TECHNIQUES
Norme européenne: EN 291/1992, EN 292/1992
Norme italienne: UNI 9854
TECHNISCHER STANDARD
Europäischer Standard: EN 291 / 1992, EN 292 / 1992
Italien Standard: UNI 9854
NORMAS TÉCNICAS
Normas europeas: EN 291 /1992, EN 292 / 1992
Normas italianas: UNI 9854
7
CAP.1.
2
4
1
5
Fig.4 - Abb.4
8
DESCRIZIONE DELLA
MACCHINA
CHAP. 1 DESCRIPTION OF THE
MACHINE
Il sollevatore elettroidraulico è fisso, cioè ancorato al suolo ed è progettato e costruito per il sollevamento e lo stazionamento in quota di autoveicoli.
Il funzionamento è di tipo elettroidraulico.
Il sollevatore è composto, principalmente dalle seguenti parti:
· gruppo struttura fissa ( basamento )
· gruppi mobili (leve+piani di sollevamento )
· gruppi di sollevamento (cilindri idraulici e centralina);
· quadro comando
· sicurezze.
In figura 4 sono indicate le varie parti che compongono il sollevatore.
The electro-hydraulic lift, is a fixed installation; this means that it is anchored to the ground and designed and built for lifting and positioning
automobiles at a certain height off the ground.
The lift is driven by an electro-hydraulic operating system.
The lift consists of the following main parts:
· fixed structure (base);
· mobile units (levers+lifting platforms);
· lift units (hydraulic cylinders and hydraulic unit);
· control box;
· safety devices.
Figure 4 illustrates the various parts making up the lift.
GRUPPO STRUTTURA FISSA
E’ costituito da un basamento (1) costruito in lamiera di acciaio saldata,
con fori per il fissaggio al suolo mediante tasselli ad espansione (vedere cap.4 “installazione”). All’interno del basamento si trovano i fori per
l’attacco dei bracci di sollevamento.
FIXED FRAMEWORK UNIT
It is composed of a base (1) made of welded steel plates, with holes for
fixing to the ground by means of expanding plugs (see chap. 4 “installation”). Inside the base there are holes for the attachment of the lifting
arms.
GRUPPO MOBILE
E’ costituito da due piattaforme e da bracci in piatto saldato (2), collegati alle estremità mediante alberi ed ancorati al basamento tramite supporti in materiale plastico.
Il sistema di sicurezza è costituito da un doppio circuito oleodinamico
che aziona due coppie di cilindri. Ogni circuito è sufficiente al sostenimento del carico.
MOBILE UNIT
It is composed of two platforms and levers of welded steel plates (2),
connected at the ends by means of shafts and connected to the base
by means of special plastic supports. A security system (3), connected
to the towing arm, and driven by means of hydraulic cylinder, is automatically inserted during the whole lifting phase and locks the lift during
parking at a height.
GRUPPO DI SOLLEVAMENTO
É costituito da 4 cilindri idraulici (4) collegati mediante tubi rigidi e flessi bili ad una centralina idraulica.
Il gruppo di sollevamento è comandato per mezzo di un quadro elettrico
di comando (5) posto su un carrello contenente la centralina.
LIFTING UNIT
It is composed of two hydraulic cylinders (4) connected by rigid and flexibles tubes.
The lifting unit is controlled by an electric panel (5) placed on a carriage
containing the hydraulic unit.
SICUREZZE
Le sicurezze sono costituite da :
· doppio circuito oleodinamico separato
· n°2 elettrovalvole di sicurezza
· una valvola idraulica di massima pressione
· una valvola strozzatrice compensatrice che regola la discesa
· microinterruttore che azionato automaticamente in fase di discesa ha
la funzione di salvapiedi.
SAFETY DEVICES
The safety devices are composed of:
· double, hydraulic circuit
· two safety solenoid valves
· overload safety valve
· flow control valve adjusts descent speed
· automatically activated microswitch stops descent travel thus acting
as foot guard
CHAPITRE 1 DESCRIPTION DE LA
MACHINE
KAPITEL 1 BESCHREIBUNG DER
SCHERENHEBEBÜHNE
CAP.1.
DESCRIPCIÓN DE LA
MÁQUINA
L’élévateur hydro-éléctrique est une installation fixe; c’est a dire qu’elle
est ancrée au sol, ainsi elle a été conçue pour élever des voitures à
une certaine hauteur du sol.
L’élévateur est conduit par un système hydro-électrique.
L’élévateur comprend les principales pièces suivantes :
· La structure fixe (base)
· Les unités mobiles (leviers et plates-formes)
· Les unités de soulevement (cylindres et unité centrale hydraulique)
· Boitier de controle
· Pièces de sécurité
La figure 4 illustre les différentes pièces composant l’élévateur.
Die Elektrohydraulische Scherenhebebühne besteht aus einer kompakten Stahlkonstruktion die fest mit dem Boden verbunden ist. Sie wurde
konstruiert und hergestellt für den Zweck, jegliche Art von Autos oder
Lieferwagen bis zu einem Gesamtgewicht von 2500 kg, auf eine bestimmte Höhe, vom Boden, anzuheben.
Die Scherenhebebühne besteht aus den folgenden Baugruppen:
· Grundrahmen (feste Struktur)
· Schere, Aufnahmeplattform(bewegliche Struktur)
· Hebekomponenten(Hydraulikeinheit, Zylinder ,Pumpe, Ventile.
· Schaltschrank
· Sicherheitseinrichtungen.
Siehe hierzu auch Abb. 4
El elevador electrohidráulico es fijo, esto es, está anclado al suelo y se
ha diseñado y construido para la elevación y el estacionamiento a una
determinada altura de automóviles.
El funcionamiento es de tipo electrohidráulico.
El elevador está compuesto, principalmente de las siguientes partes:
· grupo estructura fija (base)
· grupos móviles (palancas + planos de elevación)
· grupos de elevación (cilindros hidráulicos y centralita);
· cuadro de mando
· dispositivos de seguridad.
En la figura 4 se indican las diferentes partes que componen el
elevador.
UNITE FIXE
Elle est composée d’un chassis, construit en tole d’acier soudée et
munie de trous permettant la fixation au sol à l’aide de boulons à expansion (voir chap.4 “installation”).
A l’intérieur du chassis se trouvent les fixations des bras de soulevement, du vérin pneumatique et des systèmes de sécurité.
FESTE STRUKTUR EINHEIT
Bestehend aus dem Grundrahmen(1), hergestellt aus profiliertem Stahlblech mit verstärkten Befestigungslöchern Aufnahme der Befestigungsdübel. Siehe hierzu auch Kapitel 4 Installation.
Im inneren des Grundrahmen befinden sich außerdem die Aufnahmen
für die Scherenarme.
GRUPO ESTRUCTURA FIJA
Está formado por una base (1) fabricada en chapa de acero soldada, con
agujeros para la fijación en el suelo mediante tornillos de expansión (ver
capítulo 4 “instalación”). En el interior de la base se encuentran los agujeros
para la conexión de los brazos de elevación
UNITE MOBILE
Elle est composée de 2 plates-formes et leviers en acier soudé (2),
fixés aux extrémités par un axe et à la base par des supports spéciaux
en plastique. Un système de sécurité (3), fixé au bras moteur, fonctionne grace au cylindre hydraulique, il se met en marche automatiquement pendant toute la phase de montée et bloque l’élévateur lorsqu’il
est immobile en position haute.
BEWEGLICHE STRUKTUR EINHEIT
Bestehend aus zwei Aufnahmeplattformen(2) und den Scherenarmen.
Die Aufnahmeplattform ist aus rohrförmigen Stahlteilen hergestellt, die
durch vertikale Stangen verbunden sind und mittels Stahlbolzen an den
festen Punkten und mittels Rollen an den beweglichen Teilen befestigt
sind.
Eine Sicherheitssystem(3) verbunden mit dem Hydraulikzylinder rastet
automatisch ein wenn der Hydraulikzylinder während der Hebephase
angehalten wird und blockiert die Schere in der jeweiligen Halteposition.
GRUPO MÓVIL
Está formado por dos plataformas y por brazos en platos solTUERCAs
(2), conectados a los extremos mediante ejes y anclados a la base con
soportes de material plástico.
Un sistema de seguridad (3), conectado al brazo de remolque y
accionado mediante cilindros hidráulicos se introduce automáticamente
durante toda la fase de subida y bloquea el elevador cuando está
situado a una determinada altura.
UNITE DE SOULEVEMENT
Elle est composée de 2 cylindres hydrauliques (4), fixés par des cables
rigides et flexibles.
L’unité de soulevement est controlée par un boitier électrique, placé sur
un chariot comprenant l’unité hydraulique.
HUBEEINHEIT
Besteht aus zwei beweglichen Hydraulikzylindern(4) die über flexible
Schlauchleitungen mit dem Hydrauliksystem verbunden sind.
Die Hebeeinrichtung wird kontrolliert und gesteuert über ein Steuerpult
welches oberhalb der Hydraulikpumpeneinheit in einem Fahrbaren Gestell angeordnet ist.
GRUPO DE ELEVACIÓN
Está formado por 2 cilindros hidráulicos (4) conectados mediante tubos
rígidos y flexibles a una centralita hidráulica.
El grupo de elevación está controlado por medio de un cuadro eléctrico
de mando (5) colocado en un carro que contiene la centralita
SÉCURITÉS
Les pièces de sécurité sont les suivantes :
· double circuit hydraulique séparé
· deux elctrovannes de sécurité
· soupape de surpression
· soupape d’étranglement règle la vitesse de descente
· micro activé automatiquement arrête le pont avant de la dernière partie de descente
SICHERHEITSVORRICHTUNGEN
Die Sicherheitsvorrichtung besteht aus folgenden Baugruppen:
· zweifacher, getrennter Hydraulikkreis
· in jedem Kreis je ein Elektroventil
· Ueberdruck-Sicherheitsventil
· Flussregler regelt Senkgeschwindigkeit
· Autom. Angesteuerter Mikroschalter bewirkt Eurostop als Fussschutz
DISPOSITIVOS DE SEGURIDAD
Los dispositivos de seguridad están formados por:
· doble circuito oleodinámico separado
· n°2 electrovalvulas de seguridad
· una válvula hidráulica de máxima presión
· una válvula estranguladora compensadora que regula la bajada
· microinterruptor que accionado automaticamente durante la bajada
tiene la función de salvapiés
9
CAP.2
Fig.5 - Abb.5
10
SPECIFICHE TECNICHE
CHAPTER 2
SPECIFICATIONS
DATI TECNICI:
Funzionamento ..................................................elettro-idraulico
Portata ................................................................3000 Kg
Tempo di salita ...................................................30 sec.
Tempo di discesa................................................35 sec.
Rumorosità..........................................................< 74 db
Peso totale ..........................................................circa 500 Kg
Temperatura di funzionamento ...........................-10°C / +40°C
TECHNICAL DATA:
Operation...................................................electro-hydraulic
Carrying Capacity......................................3000 kg
Lift time......................................................30 sec.
Lowering time ............................................35 sec.
Noisy level .................................................< 74 db
Weight .......................................................500 kg. approx.
Working temperature.................................-10°C / +40°C
Ambiente di lavoro: locale chiuso
Installation requirements: enclosed area.
MOTORE ELETTRICO
Potenza .....................................................1.1 Kw
Tensione....................................................230-400 V trif. +/- 5%
Frequenza .................................................50 Hz
N° poli........................................................2
Velocità .....................................................2760 giri/1’
Forma costruttiva.......................................Classe isolamento .....................................F
Assorbimento: ...........................................230V: 5,8A
..................................................................400V: 3,4A
Servizio .....................................................S2 5min
Protezione .................................................IP54
MOTOR
Power ........................................................1.1 Kw
Voltage ......................................................230-400V th.-ph +/-5%
Frequency .................................................50 Hz
Poles .........................................................4
Speed ........................................................2760 rpm
Building shape...........................................Isulation class............................................F
Absorption: ................................................230V: 12,8A
..................................................................400V: 7,4A
Service ...................................................... S2 5 Min
Insulation class.......................................... IP54
CENTRALINA OLEODINAMICA:
Pompa .......................................................ad ingranaggi
Cilindrata ...................................................1,6 cm3/g
Valvola di max. tarata a .............................150 bar
Pressione di massima................................250 bar
HYDRAULIC CONTROL UNIT:
Type ..........................................................Gear pump
Displacement ............................................1,6 cm3/g
Relief valve:...............................................150 bar
Peak pressure ...........................................250 bar
OLIO
Il serbatoio dell’olio contiene oilio idraulico a base minerale secondo
normativa ISO/DIN 6743/4 con grado di contaminazione non superiore
alla classe 18/15 secondo normativa ISO 4406 come IP HYDRO OIL
32; SHELL TELLUS T 37 o equivalenti.
OIL
The hydraulic oil tank is filled with mineral oil to ISO/DIN 6743/4, contamination category no higher tahn class 18/15 according to ISO 4406,
such as IP HYDRO OIL 32; SHELL TELLUS T 37 or an equivalent oil.
CHAP. 2 CARACTÉRISTIQUES
TECHNIQUES
KAPITEL 2
TECHNISCHE DATEN
CAP.2
ESPECIFICACIONES
TÉCNICAS
DONNÉES TECHNIQUES
Fonctionnement.........................................électro-hydraulique
Capacité..............................................................3000 kg
Temps de montée ...............................................30 s.
Temps de descente ............................................35 s.
Niveau sonore.....................................................< 74 dB
Poids ...................................................................environ 500 kg
Température de fonctionnement.........................-10°C / +50°C
TECHNISCHE DATEN:
Arbeitsweise .............................................elektro- hydraulisch
Tragfähigkeit .......................................................3000 kg
Hubzeit ...............................................................30 sek
Senkzeit ..............................................................35 sek
Geräuschpegel....................................................74dB (A) 1 m
Gesamtgewicht ...................................................circa 500 kg
Umgebungstemperatur ......................................-10° C / +50° C
DATOS TÉCNICOS:
Funcionamiento.........................................electro-hidráulico
Capacidad .................................................3000 kg
Tiempo de subida......................................30 sec.
Tiempo de bajada......................................35 sec.
Ruido .........................................................< 74 db
Peso total ..................................................500 kg. approx.
Temperatura de funcionamiento ...............-10°C / +40°C
Environnement de travail: local fermé
Aufstellungin einem geschlossenen Raum
Ambiente de trabajo: local cerrado
MOTEUR ÉLECTRIQUE
Puissance ...........................................................1.1 Kw
Tension ...............................................................230/400V tri. +/- 5%
Fréquence...........................................................50 Hz
Nombre de pôles.................................................4
Vitesse de rotation ..............................................2760 tr/mn
Forme constructive .............................................Classe d’isolation ................................................F
Intensité absorbée ..............................................230V: 12,8A
............................................................................400V: 7,4A
Service ...................................................... S2 5 Min.
Protection .................................................. IP54
ELEKTROMOTOR
Elektromotor Leistung .........................................1.1 Kw
Spannung............................................................230-400V 3PH +/-5%
Frequenz.............................................................50 Hz
Polanzahl ............................................................4
Drehzahl..............................................................2760 UpM
Bauform ..............................................................Isolationsklasse ..................................................F
Strom Verbrauch .....................................230V: 12,8 A
..................................................................400V: 7,4 A
Betriebskat. ............................................... S2 5 Min.
Schutzklasse ............................................. IP54
MOTOR ELÉCTRICO
Potenciar ...................................................1.1 Kw
Tensión......................................................230-400V th.-ph +/-5%
Frecuencia.................................................50 Hz
Nº polos.....................................................4
Velocidad ..................................................2760 rpm
Forma de fabricación.................................Clase aislamiento ......................................F
Absorción: .................................................230V: 12,8A
..................................................................400V: 7,4A
Servicio .....................................................S2 5min
Proteción ...................................................IP54
POMPE
Pompe....................................................... à engrenages
Cylindrée.............................................................1,6 cm3/g
Soupape de surpression tarée à.........................150 bar
Pression de pointe ..............................................250 bar
HYDRAULISCHES ANTRIEBSAGGREGAT:
Pumpe.......................................................mit Zahnrädern
Hubraum....................................................1,6 cm3/g
Überströmventil .........................................150 bar
Spitzendruck .............................................250 bar
CENTRALITA OLEODINÁMICA:
Bomba................................................................. de engranajes
Cilindrada:...........................................................1,6 cm3/g
Válvula de alivio: .................................................150 bares
Presión máxima: .................................................250 bares
HUILE
Le réservoir contient de l’huile hydraulique à base minérale conforme à
la norme ISO/DIN 6743/4 avec un degré de contamination non supérieur à la classe 18/15 selon la norme ISO 4406, par exemple IP
HYDRO OIL 32, SHELL TELLUS T37 ou équivalent.
Öl
Der Öltank enthält hydraulisches Öl auf Mineralbasis gemäß der Norm
ISO/DIN 6743/4 mit einem Verseuchungsgrad nicht höher als Klasse
18/15, gemäß der ISO-Norm 4406.
Wie zum Beispiel bei den Ölen:IP Hydro Öl 32,Shell Tellus T 37 oder
ähnliches
ACEITE
El depósito del aceite contiene aceite hidráulico de base mineral según
la normativa ISO/DIN 6743/4 con grado de contaminación no superior a
la clase 18/15 según la normativa ISO 4406 como IP HYDRO OIL 32;
SHELL TELLUS T 37 o equivalentesl.
11
SCHEMA IMPIANTO
IDRAULICO
HYDRAULIC SYSTEM DIAGRAM
SCHÉMA DU CIRCUIT
HYDRAULIQUE
2
1
4
HYDRAULISCHER SCHALTPLAN ESQUEMA INSTALACION HIDRAULICA
3
15
13
15
10
15
5
14
Fig.6 - Abb.6
1
2
3
4
5
6
7
8
9
10
11
12
13
14
15
12
Pistone P1-PT1
Pistone P2-PT1
Pistone P1-PT2
Pistone P2-PT2
Elettrovalvola NC discesa
Valvola controllo discesa
Valvola di massima
Pompa 3 litri
Motore trifase 1.1 Kw
Elettrovalvola NC P1
Filtro di aspirazione
Serbatoio olio
Elettrovalvola NC P2
Valvola di ritegno
Apertura manuale valvole
7
6
9
8
11
12
Piston P2-PT1
Piston P1-PT1
Piston P1-PT2
Piston P2-PT2
Lowering Solenoid valve NC
Lowering control valve
Full force valve
3 litres pump
3-phase motor 1.1 Kw
Solenoid valve NC P1
Suction filter
Oil tank
Solenoid valve NC P2
Non return valve
Manual opening of valves
Vérin P2-PT1
Vérin P1-PT1
Vérin P1-PT2
Vérin P2-PT2
Électrovanne NC de descente
Soupape de régulation de descente
Soupape de surpression
Pompe 3 litres
Moteur triphasé 1.1 Kw
Électrovanne NC P1
Crépine d’aspiration
Huile reservoir
Électrovanne NC P1
Soupape anti-retour
Ouverture manuelle des soupapes
Zylinder P2-PT1
Zylinder P1-PT1
Zylinder P1-PT2
Zylinder P2-PT2
Absenk Elektromagnetventil NC
Absenk - Kontrolventil
Überdruckventil
Pumpe 3l
Elektromotor 3 Phasen 1.1 Kw
Elektromagnetventil NC P1
Ansaugfilter
Ölbehälter tank
Elektromagnetventil NC P2
Ruckschlagventil
Manuelle Oeffnung der Ventile
Pistón P2-PT1
Pistón P1-PT1
Pistón P1-PT2
Pistón P2-PT2
Electroválvula NC de descenso
Válvula control descenso
Válvula de máxima
Bomba de 3 litros
Motor trifásico 1.1 Kw
Electroválvula NC P1
Filtro de aspiración
Deposito Aceite
Electroválvula NC P2
Vàlvula de no retorno
Abertura manual válvulas
COLLEGAMENTO IMPIANTO
IDRAULICO
HYDRAULIC DIAGRAM CONNECTION
BRANCHEMENTS
HYDRAULIQUES
HYDRAULISCHER SCHALTPLAN CONEXION INSTALACION HIDRAULICA
Fig.7 - Abb.7
13
SCHEMA ELETTRICO 400V
TRIFASE
400V TREEPHASE
ELECTRIC DIAGRAM
SCHÉMA ÉLECTRIQUE
TRIPHASÉ 400V
400V ELEKTRISCHER
SCHALTPLAN
ESQUEMA ELÉCTRICO
400 V TRIFÁSICO
Fig.8 - Abb.8
LIMITE QUADRO
CONTROL PANEL LIMIT
LIMIT BOITIER
SCHALTPULT
LÍMITE CUADRO
NERO
BLACK
NOIR
SCHWARZ
NEGRO
MARRONE
BROWN
MARRON
BRAUN
MARRÓN
GRIGIO
GREY
GRIS
GRAU
GRIS
GIALLO/VERDE
YELLOW/GREEN
JAUNE/VERT
GRÜNGELB
AMARILLO / VERDE
BLU
BLUE
BLEU
BLAU
AZUL
MORSETTO
TERMINAL
BORNIER
KABELKLEMME
BORNE
COMANDO DISCESA
SWITCH DESCENT
BOUTON DE DESCENTE
DRUCKKNOPF SENCHEN
MANDO BAJADA
14
SCHEMA ELETTRICO 230V
MONOFASE
230V SINGLEPHASE
ELECTRIC DIAGRAM
SCHÉMA ÉLECTRIQUE
MONOPHASÉ 230V
230V EINPHASE
ELEKTRISCHER SCHALTPLAN
ESQUEMA ELÉCTRICO
230V MONOFÁSICO
Fig.9 - Abb.9
LIMITE QUADRO
CONTROL PANEL LIMIT
LIMIT BOITIER
SCHALTPULT
LÍMITE CUADRO
MARRONE
BROWN
MARRON
BRAUN
MARRÓN
BLU
BLUE
BLEU
BLAU
AZUL
GIALLO/VERDE
YELLOW/GREEN
JAUNE/VERT
GRÜNGELB
AMARILLO / VERDE
MORSETTO
TERMINAL
BORNIER
KABELKLEMME
BORNE
COMANDO DISCESA
SWITCH DESCENT
BOUTON DE DESCENTE
DRUCKKNOPF SENCHEN
MANDO BAJADA
15
REF.
DESCRIZIONE
DESCRIPTION
DESCRIPTION
BESCHREIBUNG
DENOMINACION
MODELLO/BRAND
FU
PORTA FUSIBILE
(NON FORNITO)
FUSE CARRIER
(NOT SUPPLIED)
PORTE-FUSIBLE
(PAS LIVRÉ)
HAUPTSICHERUNG
(NICHT IM LIEFERUMFANG)
PORTA FUSIBLE
(NO SUMINISTRADO)
3x10A RIT. - 400V
FU1
PORTAFUSIBILE
5X20 4A RIT
FUSE CARRIER
5X20 4A RIT
PORTE-FUSIBLE
5X20 4A RIT
HAUPTSICHERUNG
5X20 4A RIT
PORTA FUSIBLE
5X20 4A RIT
WIPV6114ARIT
KM1
MINI CONTATTORE
4KW 24VAC
CONTACTOR
4KW 24VAC
TÉLÉRUPTEUR
4KW 24VAC
SCHUETZ
4KW 24VAC
CONTACTOR
4KW 24VAC
WILS0501E
TC1
TRASFORMATORE
50VA 0/24
TRANSFORMER
50VA 0/24
TRANSFORMATEUR
50VA 0/24
TRANSFORMATOR
50VA 0/24
TRANSFORMADOR
50VA 0/24
WI50VA24
SBS
PULSANTE COMANDO
SALITA
LIFT BUTTON
BOUTON MONTÉE
DRUCKKNOPF HUB
PULSADOR DE SUBIDA
WIP2-4XNO
SBD
PULSANTE COMANDO
DISCESA
DESCENT BUTTON
BOUTON DE DESCENTE
DRUCKKNOPF SENCHEN
PULSADOR COMANDO
BAJADA
WIP2-4XNO
SBP
PULSANTE DI
PARCHEGGIO
PARKING BUTTON
BOUTON STATIONNEMENT
DRUCKKNOPF
HALTEPOSITION
PULSADOR
ESTACIONAMIENTO
WIPPRN5-1XNO
SQP
FINECORSA
SALVAPIEDI
LIMIT SWITCH
ENTRETOISE
ENDSCHALTERTIEB
FINAL DE CARRERA
-
POWER CONNECTION
ALIMENTATION
HAUPTANSCHLUSS
TOMA DE LÍNEA
CEE 3PH 16A - 400V
CEE MF-PH 16A - 230V
BUZER 24VAC
BUZER 24VAC
BUZER 24VAC
BUZER 24VAC
WIHA24VAC
SOLENOID VALVE
ÉLECTROVANNE
ELEKTROMAGNETVENTIL
ELECTROVÁLVULA
24V 50HZ
24V 50HZ
XS1Y PRESA DI LINEA
HA1
BUZER 24VAC
ELETTROVALVOLA
YVD
DISCESA
YV1
ELETTROVALVOLA 1
SOLENOID VALVE
ÉLECTROVANNE
ELEKTROMAGNETVENTIL
ELECTROVÁLVULA
YV2
ELETTROVALVOLA 2
SOLENOID VALVE
ÉLECTROVANNE
ELEKTROMAGNETVENTIL
ELECTROVÁLVULA
24V 50HZ
MOTOR ELÉCTRICO
1.1KW
1.5KW
M1
MOTORE ELETTRICO
ELECTRICAL MOTOR
Fig.10 - Abb.10
16
MOTEUR ÉLÉCTRIQUE
ELEKTROMOTOR
BLU-BLUE
BLEU
BLAU
AZUL
GRIGIO-GREY
GRIS
GRAU
GRIS
MARRONE-BROWN
MARRON
BRAUN
MARRÓN
NERO-BLACK
NOIR
SCHWARZ
NEGRO
400V
230V
400V
230V
I ATTENZIONE
Il costruttore fornisce il ponte con motore trifase,
predisposto per il funzionamento a 400V.
I WARNING
The manufacturer supply the lift rack with a
three-phase motor set to 400v.
Fig.11 - Abb.11
Rotazione A
Rotation A
Rotation A
Drehrichtung A
Rotaciòn A
Rotazione B
Rotation B
Rotation B
Drehrichtung B
Rotaciòn B
I ATTENTION
Le constructeur fourni l’élévateur avec moteur
triphasé,prédisposé pour un fonctionnement à 400V.
I ACHTUNG
Der Hersteller liefert die Bühne mit Drehstrommotor
für 400V-Betrieb.
I CUIDADO
El fabricante suministra el elevador con motor
trifàsico ajustado a 400V.
Fig.12 - Abb.12
Collegamenti motore monofase.
Single-phase motor connections
Raccordements moteur monophasè.
Anschlub Einphasenmotor.
Conexiones motor monofàsico.
17
CAP. 3
SICUREZZE (Fig. 13)
I ATTENZIONE
Zona di sicurezza
Safety zone
Zone à risque
Sicherheitsbereich
Zona de seguridad
5,5
m
t
3,5 mt
CHAPTER 3
SAFETY (Fig. 13)
I WARNING
E’ estremamente importante leggere questo capitolo con attenzione ed
in ogni sua parte perchè contiene importanti informazioni sui rischi che
l’ operarore, e chiunque altro possano correre in caso di un uso errato
del ponte sollevatore.
IL MANCATO RISPETTO DI QUESTE NORME, PUO’ RECARE
GRAVI DANNI ALLE PERSONE, AL SOLLEVATORE ED AI VEICOLI
SOLLEVATI.
Read this chapter carefully and completely since important information
for the safety of the operator or others in case of improper use of the lift
is included.
1 - E’ importante che in fase di salita o di discesa del sollevatore, l’
operatore agisca soltanto dalla zona di postazione di comando a lui riservata indicata in figura 13.
1 - During lifting or lowering operations, the car lift must be operated
only from the operator’s control site, as shown in the picture 13.
2 - E’ vietato a chiunque sostare o transitare entro la zona a rischio
mentre il sollevatore è azionato, e comunque, quando il veicolo è già
sollevato è ammessa la presenza solo a personale in fase di lavoro.
2 - Stopping or passing within the danger area when the lift is working
or already lifted is strictly forbidden. Working personnel only is allowed
to stay near the lift.
3 - L’ operatore è obbligato, durante le fasi di salita/discesa del sollevatore, ad assicurarsi che l’ area a rischio sia deserta.
3 - The operator must make sure the danger area is empty before lifting
or lowering the lift.
4 - Non utilizzare la macchina senza le protezioni o con le protezioni disattivate.
4 - Never use the machine without protection or when the safety devices are out.
5 - Per sollevare un autoveicolo usare i tamponi in gomma in dotazione,
rispettando i corretti punti di appoggio consigliati dal costruttore dell’ autoveicolo.
5- Always use the rubber pads when lifting a vehicle, observing the proper support points specified by the vehicle’s manufacturer.
6 - Per evitare il rischio di caduta dell’ autoveicolo provvedere al corretto posizionamento dello stesso sul sollevatore.
6 - To prevent the vehicle from falling make sure it is properly placed on
the lift.
7 - E’ vietato salire sul veicolo e/o metterlo in moto con il sollevatore alzato.
7 - Getting on the vehicle and/or starting the engine during lifting is
strictly forbidden.
8 - E’ vietato lasciare oggetti e/o ostacoli sotto il veicolo durante la
fase di discesa del sollevatore.
8 - Never leave objects and/or obstructions under the vehicle dur
ing the lowering phase.
9 - Tenere pulita la zona sotto e nei pressi del sollevatore, nonchè quella delle pedane al fine di evitare pericolosi scivolamenti ad opera del
personale in genere.
9 - Keep the area under/next to the lift clear and remove possible oil
spots to avoid the risk of slipping.
10 - E’ vietato usare: getti d’ acqua-vapore-vernici-solventi nella zona
del sollevatore ed in particolare nelle vicinanze della centralina di comando.
10 - Never use water steam varnish solvent jets in the car lift area, and
particularly next to the control box.
11 - E’ rischiosa una illuminazione non idonea. Verificare che tutte le
zone del sollevatore siano ben illuminate ed in maniera uniforme, in
conformità a quanto previsto dalla normativa vigente nel luogo di installazione.
11 - Proper lighting is extremely important. Make sure all areas to the
car lift are well and uniformly lightened, according to the laws of the country where the lift is installed.
FAILURE TO COMPLY WITH THESE REGULATIONS CAN CAUSE
SERIOUS INJURY TO PERSONS, AND IRREPERABLE DAMAGE TO
THE LIFT AND THE VEHICLE BEIN LIFTED.
Fig.13 - Abb.13
Zona operatore
Operator’s area
Zone de commande
Bedienerposten
Zona operador
18
CHAP. 3 SÉCURITÉS (fig. 13)
I ATTENTION
KAPITEL 3 – SICHERHEIT (ABB. 13)
I !!!WARNUNG!!!
Il est extrêmement important de lire attentivement et intégralement ce
chapitre qui contient des informations importantes sur les risques que
l’opérateur ainsi que toute autre personne peuvent encourir en cas
d’utilisation incorrecte de l’élévateur.
LE NON RESPECT DE CETTE CONSIGNE PEUT PROVOQUER DE
GRAVES DOMMAGES AUX PERSONNES, A L’ÉLÉVATEUR ET AUX
VÉHICULES SOULEVÉS.
Lesen Sie dieses Kapitel sehr sorgfältig und vollständig, da es wichtige
Informationen für die Sicherheit des Bedieners oder anderer für den
Fall von unrichtiger Anwendung des Liftes enthält.
Sollte es unterlassen werden, diese Regeln zu befolgen, können
ernsthafte Verletzungen von Personen und irreparable
Beschädigungen der Scherenhebebühne und der damit
gehobenen Fahrzeuge hervorgerufen werden.
1. Il est important qu’au cours de la montée ou de la descente de l’élévateur, l’opérateur n’agisse seulement que depuis la position de commande qui lui est réservée et qui est mentionnée sur la figure ci-dessus
13.
1. Der Hebe- oder Absenkbetriebs hat nur von der Seite des Bedieners aus zu erfolgen ( wie in der Abb.13 dargestellt ).
2. Il est interdit à quiconque de stationner ou de passer dans la zone à
risque lorsque l’élévateur est en mouvement, et lorsque le véhicule est
soulevé, l’accès sous l’élévateur n’est autorisé qu’au personnel ayant à
intervenir sur le véhicule.
3. L’opérateur a obligation de s’assurer que la zone à risque soit déserte avant de mettre l’élévateur en mouvement.
4. Ne jamais utiliser l’élévateur sans les protections ou avec des protections désactivées.
5. Pour soulever un véhicule, utiliser les tampons en caoutchouc fournis
avec l’élévateur, en respectant les points d’appui prévus par le constructeur du véhicule.
6. Pour éviter tout risque de chute du véhicule, porter une attention particulière au bon positionnement de celui-ci sur l’élévateur.
7. Il est interdit de monter dans le véhicule et/ou de le mettre en marche
quand l’élévateur est en hauteur.
8. Il est interdit de laisser des objets ou des obstacles sous l’élévateur
pendant la phase de descente.
9. Tenir toujours propre la zone sous et autour de l’élévateur, ainsi que
la surface des plates-formes, afin d’éviter tout risque de glissement
dangereux pour le personnel.
10. Il est interdit d’utiliser: jets d’eau, vapeur, peinture, et solvants dans
la zone de l’élévateur et en particulier à proximité du pupitre de commande.
11. Un éclairage insuffisant est une source de danger. Vérifier que toutes les zones de l’élévateur soient suffisamment éclairées, de manière
uniforme et en conformité avec les normes en vigueur dans la localité
où l’élévateur est installé.
CAPITULO 3 – SEGURIDAD (Fig. 13)
I¡ATENCION!
Es imprescindible leer este capítulo porque contiene importantes
informaciones sobre los riesgos que el operador puede correr en caso
de uso errado del elevador.
EL INCUMPLIMIENTO DE ESTAS NORMAS PUEDE OCASIONAR
GRAVES DAÑOS A LAS PERSONAS, AL OPERADOR Y A LOS
VEHÍCULOS.
1 - Es importante que en fase de subida o de bajada del elevador el
operador actúe solamente desde la posición de mando a él reservada,
indicada en la figura 13.
2. Halten oder Passieren in der Gefahrenzone während oder nach dem
Betriebs des Liftes ist streng verboten. Es ist nur dem Bedienungspersonal erlaubt, unter dem Lift zu stehen.
2 - Se prohíbe parar o transitar en la zona de riesgo mientras el
elevador está accionado y, en cualquier caso, cuando el vehículo ya
está elevado se admite solamente la presencia de personal en fase de
trabajo.
3. Der Bediener hat sicherzustellen, dass die Gefahrenzone vor dem
Hebe- oder Absenkvorgang leer ist.
3 - El operador está obligado, durante las fases de subida / bajada del
elevador, a asegurarse de que el área de riesgo está vacía.
4. Benutzen Sie die Maschine niemals ohne die vorgesehenen Schutzvorrichtungen oder mit ausgeschalteten Sicherheitseinrichtungen.
4 -No utilizar la máquina sin las protecciones o con las protecciones
desactivadas.
5. Benutzen Sie beim Heben eines Fahrzeuges stets Gummiunterlagen, unter Beachtung der richtigen Aufnahmepunkte, wie sie vom Fahrzeughersteller angegeben wurden.
5- Para elevar el vehículo usar los tampones de goma incluidos,
respetando los puntos de apoyo correctos aconsejados por el
fabricante del vehículo.
6. Versichern Sie sich, dass das Fahrzeug Auf der Scherenhebebühne
richtig angeordnet ist, um ein herunterfallen zu vermeiden.
6 - Para evitar el riesgo de caída del vehículo colocar correctamente el
mismo en el elevador.
7. Es ist streng verboten, während des Hebevorgangs an das Fahrzeug
zu gehen und /oder den Motor zu starten.
7 - Se prohíbe subir al vehículo y/o ponerlo en funcionamiento con el
elevador subido.
8. Lassen Sie während des Absenkens niemals Teile oder Objekte unter dem Fahrzeug oder der Scherenhebebühne liegen.
8 -Se prohíbe dejar objetos y/o obstáculos debajo del vehículo durante
la fase de bajada del elevador.
9. Halten Sie die den Platz unter oder in der Nähe des Lifts sauber und
entfernen Sie mögliche Ölflecken, um eine Rutschgefahr zu vermeiden.
9 - Mantener limpia la zona situada debajo y alrededor del elevador, así
como la de las plataformas para evitar peligrosos resbalones en la obra
del personal en general.
10. Verwenden Sie niemals Wasserdampf , Lack lösende Sprays oder
ähnliches in der unmittelbaren Nähe der Scherenhebebühne und insbesondere nicht am Schaltschrank.
10 - Se prohíbe usar: chorros de agua-vapor-pintura-disolventes en la
zona del elevador y en especial en las cercanías de la centralita de
mando.
11. Richtige Beleuchtung ist sehr wichtig. Versichern Sie sich, dass alle
Bereiche zum Lift gut und gleichmäßig beleuchtet sind, und zwar gemäß den Gesetzen des Landes, in dem der Lift installiert ist.
11 - Es arriesgado que la iluminación no sea la adecuada. Comprobar
que todas las zonas del elevador estén bien iluminadas y de manera
uniforme, conforme a cuanto previsto por la normativa vigente en el
lugar de instalación.
19
20
12 - E’ vietata la presenza e l’ arrampicatura sulle pedane, di per
sone sia durante il sollevamento che a veicolo sollevato.
12 - Climbing on the platforms when lifting the vehicle or when the
same has been already lifted is trictly forbidden
13 - E’ vietato ogni uso diverso del sollevatore da quello per cui è stato
progettato, la non osservanza di questa norma può causare incidenti
anche gravi alle persone che stanno lavorando e a quelle nelle immediate vicinanze.
13 - Any use of the car lift other than what herein specified can cause
serious accidents to the operator as well as to the people in close proximity.
14 - E’ assolutamente vietata la manipolazione dei dispositivi di sicurez za.
14 - The handling of safety devices is strictly forbidden.
15 - E’ assolutamente vietato superare la portata massima del sollevatore che è di 3000 Kg..
15 - Never exceed the maximum carrying capacity of 3000 kg when
using the car lifts.
DISPOSITIVI DI SICUREZZA
SAFETY DEVICES
SISTEMA A UOMO PRESENTE:
Il sollevatore è dotato di un sistema operativo del tipo “ uomo presente
“. Le operazioni di salita o di discesa, comandate da pulsanti, sono immediatamente interrotte al rilascio di quest’ ultimi.
DEAD MAN’S CONTROL:
The car lift is equipped with a “dead man” control system. Lowering and
lifting operations can be immediately stopped by releasing push button
controls.
DISPOSITIVO SALVAPIEDI
THE FOOTGUARDS
VALVOLA COMPENSATA CHE REGOLA LA DISCESA
A COMPENSATED THROTTLE VALVE WHICH ADJUSTS
LOWERING
ELETTROVALVOLE DI SICUREZZA - DOPPIO CIRCUITO
SAFETY SOLENOIDE VALVE DEVICE- DOUBLE CIRCUIT
VALVOLA DI MASSIMA PRESSIONE
Situata sulla centralina, inteviene in caso di sovraccarico del sollevatore.
MAX PRESSURE VALVE
Placed on the hydraulic power unit, operate in case of excess weight
on the lift.
12. Il est interdit à quiconque de monter ou de stationner sur les plates-formes lorsque l’élévateur est en mouvement ou stationné en hauteur.
12. Klettern auf die Aufnahmeplattform, wenn der Lift in Bewegung ist
oder bereits angehoben wurde, ist streng verboten.
12 -Se prohíbe que alguna persona se ponga encima o se suba a las
plataformas, tanto durante la elevación como una vez elevado el
vehículo.
13. Toute utilisation autre que celle pour laquelle l’élévateur a été conçu
est formellement interdite. La non observation de cette consigne peut
provoquer des accidents graves aux personnes travaillant sur l’élévateur ou à proximité immédiate de celui-ci.
13. Jeder andere Einsatz der Scherenhebebühne als der hier angegebene kann ernsthafte Unfälle für den Bediener als auch für die sich in
der Nähe befindlichen Personen verursachen.
13 - Se prohíbe cualquier uso diferente del elevador a aquel para el
que ha sido proyectado, la falta de observación de esta norma puede
causar accidentes incluso graves a las personas que están trabajando
y las que estén cerca.
14. Il est rigoureusement interdit de neutraliser les dispositifs de sécurité.
14. Das Ausschalten oder Beseitigen der Sicherheitsvorrichtungen ist
streng verboten.
14 - Se prohíbe tajantemente la manipulación de los dispositivos de
seguridad.
15. Il est rigoureusement interdit de dépasser la charge maximale de
l’élévateur, qui est de 3000 kg.
15. Übersteigen Sie niemals die max. Tragfähigkeit von 3000 kg beim
Einsatz der Scherenhebebühne.
15 - Se prohíbe tajantemente superar la capacidad máxima del
elevador que es de 3000 Kg.
DISPOSITIFS DE SÉCURITÉ
SICHERHEIT - EINRICHTUNGEN
SAFETY DEVICES
SYSTÈME “HOMME MORT”
L’élévateur est équipé de commandes de type “homme mort”. Les opérations de montée et de descente, commandées par des boutons poussoirs sont immédiatement interrompues lorsque ceux-ci sont relâchés.
TOTMANNKNOPF-SCHALTUNG
Die Scherenhebebühne ist mit einer Totmannknopf-Schaltung ausgerüstet.Während des Absenk- und Hebebetriebes kann durch einen
druckknopfgesteuerten Auslöser die Bewegung sofort unterbrochen
werden.
SISTEMA CON HOMBRE PRESENTE:
El elevador está dotado de un sistema operativo del tipo “hombre
presente”. Las operaciones de subida o bajada, controladas por
pulsadores, se interrumpen inmediatamente cuando se sueltan éstos
LES CHASSE-PIEDS
FUßABWEISER
DISPOSITIVO SALVA-PIES
UN LIMITEUR DE DÉBIT AUTO-RÉGULÉ QUI CONTRÔLE LA
DESCENTE
SICHERHEITSVENTIL ZUM AUTOMATISCHEN STOP WÄHREND
DES ABSENKENS.
VÁLVULA COMPENSADA QUE REGULA LA BAJADA
ELECTROVANNE SÉCURITÉ
ELEKTROMAGNETVENTIL SICHERHEITSSPERRKLINKEN
ELECTROVALVULA DE SEGURIDAD
SOUPAPE DE SURPRESSION
Une charge excessive de l’élévateur provoque l’intervention de la soupape de surpression.
ÜBERLASTVENTIL
Schaltet das Hydraulikaggregat ab bei Überbelastung der Hebebühne.
VÁLVULA DE MÁXIMA PRESIÓN
Situada en la centralita, interviene en caso de sobrecarga del elevador
21
CAP. 4
INSTALLAZIONE
I ATTENZIONE
Fig.14 - Abb.14
I WARNING
Unpack the goods and check for possible damage before installing the
car lift.
REQUISITI PER L’ INSTALLAZIONE
Il sollevatore deve essere installato rispettando le distanze di sicurezza
da muri, colonne, altre macchine etc.
La distanza minima dai muri, considerando lo spazio per lavorare comodamente deve essere almeno di 1000 mm. Bisogna poi considerare
gli spazi per la postazione di comando, per le vie di fuga in caso di
emergenza. Il locale deve essere preventivamente predisposto per l’
alimentazione elettrica.
Il sollevatore può essere piazzato su qualsiasi tipo di pavimento, purchè
lo stesso sia perfettamente piano, orizzontale, nonchè di resistenza
adeguata ( min. 250 Kg. x cm2.).
INSTALLATION REQUIREMENTS
The car lift must be installed according to the specified safety distances
from walls, columns, other equipments, etc. The minimum distance
from walls must be 1000 mm at least, taking into consideration the necessary space to work easily. Further space for the control site and for
possible runways in case of emergency is also necessary. The room
must be previously arranged for the power supply.The car lift can be
placed on any floor, as long as it is perfectly level and sufficiently resistant (250 Kg X sq.cm. Min).
· Posizionare il ponte nel punto desiderato seguendo le indicazioni riportate sopra .
· Collegare i tubi idraulici A e B ed i tubi Rilsan di drenaggio E sulla
centralina posta sul carrello (pag.13 fig.7).
· Riempire il serbatoio con circa 4 Kg di olio idraulico tipo “ ESSO
NUTO H 32 “ o equivalente.
· Eseguire il collegamento elettrico (vedere schema elettrico
pag.14-15-16-17)
· Place the car lift as required following the instructions above indicated.
· Connect hydraulic hoses A and B and the Rilsan-Drainhose E to the
power pack on the trolley (p. 13, fig. 7).
· Pour 4 lt. hydraulic oil type ESSO NUTO H32 or similar into the tank.
· Then carry out electrical connection (see. diagrams on pages 14, 15,
16, 17)
ATTENZIONE ! Il collegamento deve essere effettuato da personale
qualificato
ATTENTION ! Skilled personnel only is allowed to perform this
operation.
ATTENZIONE ! L’impianto di rete deve essere in conformità alle Norme
e deve essere dotato dei fusibili relativi ( vedere schema elettrico )
ATTENTION !The installation must comply with the regulations in force
and must be equipped with relevant fuses (see electrical intsllation).
Assicurarsi che il motore abbia il giusto senso di rotazione fig.14
( in caso contrario invertire le fasi sulla linea di alimentazione elettrica ).
Check the motor for the proper direction of rotation (failing this,
exchange the phases on the feeding line fig.14).
Tenendo la pedana in posizione di sollevamento massimo forare il pavimento con punta elicoidale diametro 15 mm. per una profondità di 70
mm. usando come dima i fori posti sulla base .
Pulire i fori , inserire i tasselli ( tipo Fischer GM 10 o equivalenti ) e
quindi serrare con una coppia di serraggio di 20 Nm.
Keeping the platform in the highest position, drill the floor with an helical
bit having a diam. of 15 mm for a depth of 70 mm, using the holes
made on the base as a template.
Clean the holes, insert the anchor bolts (type Fischer GM 10 or equivalent) and then tighten with a torque wrench of 20 Nm.
In caso di uso in luogo definito dell’officina la pedana deve essere
fissata al pavimento come da istruzioni .
In caso di utilizzo in diversi posti con movimentazione mediante carrello , la pedana può essere utilizzata con le seguenti limitazioni :
· Posizionamento su pavimento orizzontale e di resistenza adeguata ( 250 Kg /m2 )
· Entrata macchina lato opposto cilindro ( vedere figura 15 )
· Posizionamento della vettura con uso delle rampette
( escluse vetture utilitarie )
22
INSTALLATION
Prima di procedere all’ installazione del sollevatore, togliere l’ imballo e
controllare la merce.
IATTENZIONE !
Fig.15 - Abb.15
CHAPTER 4
IATTENTION!
In case of using the platform in a definite place of the workshop, it
must be fixed to the floor according to instructions contained in
this manual.
In case of moving the platform to different places by means of the
trolley, the lift can be used according to the following restrictions:
· Place it on horizontal floor having proper resistance (250 kg/m²)
· Drive the vehicle on the cylinder opposite side (see fig.16 )
· Use the ramps to lift the vehicle (utility passenger cars excluded)
CHAPITRE 4
INSTALLATION
I ATTENTION
KAPITEL 4 INSTALLATION
I !!! A C H T U N G !!!
CAP. 4
INSTALACIÓN
I ATENCIÓN
Avant de procéder à l’installation, vérifier que le matériel n’est pas endommagé.
Packen Sie die Teile vor der Installation des Auto – Lifts aus und kontrollieren Sie, ob Beschädigungen vorhanden sind.
Antes de efectuar la instalación del elevador, quitar el embalaje y
controlar la mercancía.
PROCEDURE D’INSTALLATION
L’élévateur doit etre installé en respectant les distances de sécurité par
rapport aux murs, aux colonnes, aux autres équipements, etc…La distance minimum par rapport aux murs doit etre d’au moins 1000mm, et
doit prendre en considération la distance minimum nécessaire pour travailler. De l’espace supplémentaire pour permettre de manoeuvrer en
cas d’incident, doit aussi etre prèvu. Le local doit pouvoir fournir l’électricité et les ressources nécessaires pour le bon fonctionnement de
l’élévateur. L’élévateur peut etre placé sur n’importe quel sol pourvu
qu’il soit suffisamment plat et résistant (250 Kg x cm carré minimum).
VORAUSSETZUNGEN FÜR DIE INSTALLATION
REQUISITOS PARA LA INSTALACIÓN
El elevador debe instalarse respetando las distancias de seguridad de
paredes, columnas, otras máquinas, etc.
La distancia mínima desde las paredes, considerando el espacio para
trabajar cómodamente, debe ser de al menos 1000 mm. Es necesario
también considerar los espacios para los lugares de mando, para las vías de
fuga en caso de emergencia. El local debe estar preparado para la
alimentación eléctrica.
El elevador debe estar colocado en cualquier tipo de suelo, siempre que sea
perfectamente plano, horizontal, y que tenga una resistencia adecuada (min.
250 Kg. x cm2.).
· Placez l’élévateur selon les indications çi-dessus.
· Raccorder les tuyaux hydrauliques A et B tuyau de drainage E en Rilsan
au pupitre de commande sur chariot (p. 13, fig. 7). Verser 4 l.
· D’huile hydraulique type ESSO NUTO H32 ou similaire dans le réservoir.
Enfin effectuer
· La connection électrique (voir diagrammes aux pages 14-15-16-17.
ATTENTION ! L’installation doit etre effectué par du personnel qualifié uniquement.
ATTENTION ! L’installation doit correspondre aux normes en vigueur et
doit etre équipée des fusibles correspondants (voir installation électrique).
S’assurer que le moteur tourne dans le sens correct indiqué à la fig. 14
(dans le cas contraire, inverser deux fils de l’alimentation électrique).
En gardant la plate-forme sur la position la plus haute, forrez le sol sur
un diamètre de 15mm et dans une profondeur de 70mm, en passant à
travers des trous prévus sur la base.
Nettoyez les trous, insérez les vis de fixation (type Fisher GM 10 ou
équivalent) et les serrer à un couple de 20Nm.
IATTENTION!
Die Scherenhebebühne muss gemäß den angegebenen Sicherheits- Abständen von
Wänden, Säulen und anderen Einrichtungen usw. aufgestellt werden. Der Minimalabstand von der Wand muss mindestens 1000 mm unter Berücksichtigung des für die Arbeit notwendigen Abstandes betragen. Für die Bedienungsseite und für Laufbahnen in
Notfällen ist ebenfalls weiterer Abstand erforderlich. Der entsprechende Raum muss
vorher für die Stromzuführung und die pneumatische Leitungen eingerichtet sein. Die
Höhe dieses Raumes muss mindestens 5000 mm betragen. Der Autolift kann auf jede
Bodenart installiert werden, vorausgesetzt, dass der Untergrund eben und genügend
resistent ist ( 250 kg x sq.cm.min.)
· Installieren Sie die Scherenhebebühne an der vorgesehenen Stelle und beachten
Sie hierbei die erwähnten Richtlinien.
· Hydraulikschläuche (A und B) und Rilsan-Draionagerohr (E) an die Steuerung auf
dem Trolley (s. Seite 13, Abb. 7) anschliessen. 4
· Liter Hydrauliköl ESSO NUTO H32 oder ein ähnliches Produkt in den Tank einfüllen.
· Dann die Elektroanschlüsse gem Schematas auf Seiten 14 – 15 – 16 – 17
durchführen.
ACHTUNG ! Die nachfolgenden Arbeiten dürfen nur von ausgebildeten. Personal vorgenommen werden.
ACHTUNG ! Der elektrische Anschluss muss den EG Richtlinien
entsprechen und es sind die vorgesehenen
Überprüfen Sie die korrekte Drehrichtung des Motor.
(bei falscher Drehrichtung wechseln der Phasen in der Zuführung
Abb.14)
Fahren Sie die Hebebühne in ihre berste Position und verwenden Sie den Grundrahmen als Schablone zum Bohren der Befestigungsbohrungen. Bohren Sie (
Verwendung eines 15 mm Bohrers) ein 70 mm tiefes Loch. Reinigen Sie die Löcher und setzen Sie die Dübelschranben (FISCHER GM 10-oder gleichwertig) mit
leichten Hammerschlägen ein.
Vergewissern Sie sich vor dem Anziehen der Schrauben, dass die vertikale Achse
des Liftes lotrecht zum Boden steht. Jetzt ziehen Sie die Schrauben mit einem
Drehmoment - Schlüssel mit 20 Nm an.
I ACHTUNG!
En cas d’utilisation dans un lieu défini du garage, la plate-forme
doit être fixée au sol selon les instructions.
Bei Verwendung an einem festen Ort in der Werkstatt ist die Hebebühne wie in der Anweisung angegeben am Boden zu befestigen.
En cas d’utilisation dans différents lieux avec déplacement au
moyen du chariot, la plate-forne pet être utilisée avec les limitations suivantes:
· Positionnement sur sol horizontal et d’une résistance adéquate
(250 Kg/m²)
· Accès voiture du côté opposé au vérin (voir figure 16 )
· Positionnement de la voiture avec utilisation des rampes ( sauf
pour les voitures de petite taille)
Bei Verwendung an verschiedenen Orten mit Beförderung mittels Wagen ist die Hebebühne unter den folgenden Einschränkungen verwendbar:
· Positionierung auf horizontalem Boden mit geeigneter
Tragfähigkeit (250 kg /m2)
· Auffahren des PKW an der dem Zylinder gegenüberliegenden
Seite (siehe Abbildung 16 )
· Positionierung des PKW unter Verwendung der kleinen Rampen
(mit Ausnahme von Kleinwagen).
· Colocar el puente en el punto deseado siguiendo las indicaciones
antes indicadas.
· Conectar los tubos hidráulicos A y B y los tubos Rilsan de desagüe
E sobre la centralita posicionada sobre el carro (pág.13 fig.7).
· Llenar el tanque con más o menos 4 Kg de aceite hidráulico tipo “
ESSO NUTO H 32 “ o equivalente.
· Efectuar la conección eléctrica (según el esquema eléctrico
pág.14-15-16-17)
¡ATENCIÓN! La conexión debe ser efectuada por personal cualificado
¡ATENCIÓN! La instalación de red debe ser conforme a las Normas y
debe estar dotada de los relativos fusibles (ver esquema eléctrico)
Asegúrese de que el motor gira en la dirección adecuada, de no ser
así, intercambie las fases en la línea de alinetación de corriente eléctrica (fig.14)
Manteniendo la plataforma en posición de elevación máxima, agujerear el
pavimento con una punta helicoidal con un diámetro de 15 mm. y con una
profundidad de 70 mm usando como plantilla los agujeros colocados en la
base. Limpiar los agujeros, introducir los tornillos (tipo Fischer GM 10 o
equivalentes) y después ajustar con un par de torsión de 20 Nm.
I¡ATENCIÓN!
En caso de uso en un lugar definido del taller la plataforma debe fijarse
al pavimento como indican las instrucciones.
En caso de utilización de diferentes puestos con desplazamiento en
carretilla, la plataforma puede utilizarse respetando las siguientes
limitaciones:
Colocación en pavimento horizontal y de resistencia adecuada (250 Kg /
cm2)
Entrada coche lado opuesto cilindro ( ver figura 16 )
Colocación del coche con uso de las rampas (excluidos vehículos utilitarios)
23
CAP. 5
P1
P2
P3
FUNZIONAMENTO
CHAPTER 5
OPERATION
I comandi del sollevatore sono situati sulla centralina di comando, dove
trovano alloggiamento: il gruppo motore-pompa idraulica,
e gli attacchi per l’allacciamento alla rete elettrica ed idraulica.
I comandi sulla consolle sono rappresentati in fig.16:
Car lift controls are located in the control box, where the motor-hydraulic pump unit and the connections to the electric and hydraulic system
are also located.
Controls on the board are the following fig.16:
PULSANTE DI SALITA ( P1 )
Tipo “uomo presente“, funziona sotto tensione a 24 V e, se premuto,
aziona il motore elettrico ed i meccanismi che attuano il sollevamento.
LIFT BUTTON ( P1 )
Non-detented button that must be held pressed (deadman device), operating at 24 V; operates the electric motor and mechanisms.
PULSANTE DI DISCESA ( P2 )
Tipo “uomo presente“, funziona sotto tensione a 24 V e,se premuto,
azione il motore elettrico ed i meccanismi che attuano la discesa.
DESCEND BUTTON ( P2 )
Non-detented type (see above), operating at 24 V; operates the electric
motor and mechanisms.
PULSANTE AUTORIZZAZIONE ULTIMO TRATTO DISCESA (P3)
Tipo “ uomo presente“ funziona sotto tensione a 24V, e se premuto
contemporaneamente al pulsante DISCESA permette al sollevatore di
abbassarsi completamente.
PUSH BUTTON FOR AUTHORIZATION LAST STRETCH OF
DOWNTRAVEL ( P3 )
“dead man control”, 24V operated, when pressed together with DESCENT
button it allows to get over the safety stretch (last stretch) of the downtravel
and to lower the lift completely
SEQUENZA DI FUNZIONAMENTO
Prima di salire/scendere dal sollevatore, assicurarsi che le pedane siano alla minima altezza.
Salire con l’ autovettura sul sollevatore a “ passo d’ uomo “, posizionando la
stessa come indicato in fig. 17.
Posizionare gli appositi tamponi in gomma sulla pedana del sollevatore in
corrispondenza dei punti di presa consigliati dal costruttore dell’ autovettura.
Le rampe di salita possono avere la funzione di prolunga purchè si abbia la
certezza di averle agganciate correttamente prima di sollevare il carico.
Spegnere il motore e innestare il freno di stazionamento dopo aver posizionato l’ auotovettura sul ponte sollevatore e ricordarsi di disinserire la leva del
cambio posizionandola sul “ folle “.
OPERATION SEQUENCE
Make sure the platforms are at the minimum height before lifting/lowering the car lift.
Get on the vehicle and crawl on the car lift; be sure the vehicle is properly
positionated (see fig.17).
Place the proper rubber pads on the platform so that they are in line with the
lifting points specified by the manufacturer.
The on-ramps can be used as extensions if these are properly hooked before lifting the vehicle.
Switch off the motor and engage the parking brake after placing the vehicle
on the car lift; furthermore disengage the shift lever and move it to the “neutral” position.
In fase di salita/discesa, il sollevatore deve essere costantemente osservato
insieme al suo carico.
Carefully check the car lift and its load during lifting/lowering operations.
Premere il pulsante ‘SALITA’ no. P1 in fig. 16 e tenerlo premuto finche il ponte raggiunge l’altezza desiderata.
Press the ‘UP’-button Nr. 1 (fig.16) until the lift has reached the required height.
Per abbassare Il carico, premere il pulsante ‘DISCESA’ no. P2 (fig.16).
In order to bring the lift down to the floor, press the ‘DOWN’-button nr. 5 (fig.
16).
Fig.16 - Abb.16
Fig.17 - Abb.17
Per compiere la discesa completa tenere premuto
contemporaneamente i pulsanti “P2" e ”P3"
24
To lower completely the platforms press buttons
“P2" and ”P3" at the same time
CHAPITRE 5
OPERATION
KAPITEL 5 BEDIENUNG
CAP. 5
FUNCIONAMIENTO
Les commandes de l’élévateur sont situées sur le boitier de controle, ou
se trouve aussi le moteur et la pompe hydraulique, ainsi que les
connections vers les systèmes électrique et hydraulique.
Die Bedienungselemente für die Hebebühne sind im Schaltpult untergebracht.In diesem Schaltpult befindet sich auch die Hydraulikpumpe, die
hydraulischen Steuerelemente und der elektrische Hauptanschluss.
(Abb.16)
Los mandos del elevador están situados en la centralita de mando,
donde están: el grupo motor bomba hidráulica,
y las conexiones para la conexión a la red eléctrica e hidráulica.
Los mandos en la consola están representados en la Fig.16:
BOUTON DE MONTÉE ( P1 )
De type “homme mort”, fonctionne sous 24V, son action provoque la
mise en route du moteur électrique et des mécanismes qui entraînent la
montée.
AUFSTIEGSTASTE ( P1 )
Diese Taste erfordert die Anwesenheit des Bedieners und funktioniert
mit 24V. Wenn die Taste gedrückt wird, wird der Elektro-Motor und die
Mechanismen eingeschaltet, die den Aufstieg des Schlittens steuern.
PULSADOR DE SUBIDA ( P1 )
Tipo “hombre muerto”, funciona bajo tensión a 24V y, cuando está
pulsado, acciona el motor eléctrico y los mecanismos que actúan la
elevación.
BOUTON DE DESCENTE ( P2 )
De type “homme mort”, fonctionne sous 24V, son action provoque la
mise en route du moteur électrique et des mécanismes qui entraînent la
descente.
ABSTIEGSTASTE ( P2 )
Diese Taste erfordert die Anwesenheit des Bedieners und funktioniert
mit 24V. Wenn die Taste gedrückt wird, wird der Elektro-Motor und die
Mechanismen eingeschaltet, die den Abstieg des Schlittens steuern.
PULSADOR DE BAJADA ( P2 )
Tipo “hombre muerto), funciona bajo tensión a 24V y, cuando está
pulsando, acciona el motor eléctrico y los mecanismos que actúan la
bajada.
POUSSOIR AUTORIZATION DERNIER SEGMENT ( P3 )
De type “homme mort”, il fonctionne sous 24V, et quand in est pressé
en même temps que le poussoir de descente, son action permet à l’élévateur de s’abaisser complètement.
DRUCKSCHALTER “ABSENKEN UNTERHALB DER
BEGRENZUNG“ ( P3 )
Totmann Steuerung 24 Volt, wird dieser Druckschalter zusammen mit
dem Absenkdruckschalter betätigt, ist es möglich, die Plattformen bis in
die Endlage zu fahren.
Dies ist wichtig für die Installation und Wartung der Scherenhebebühne.
BOTON DE AUTORIZACION DE DESCENSO FINAL DEL
ELEVADOR ( P3 )
Del tipo “hombre presente”, funciona bajo tensión de 24V; si
presionado conjuntamente con el botón de descenso ° permite la
bajada del último tramo.
SÉQUENCE DE FONCTIONNEMENT
ARBEITSABLAUF
Avant de faire monter ou descendre le véhicule, s’assurer que les plates-formes soient totalement abaissées. Monter le véhicule sur l’élévateur en roulant “au pas” et s’assurer qu’il soit parfaitement positionné
comme indiqué à la fig.17. Placer les tampons en caoutchouc sur les
plates-formes de l’élévateur à l’aplomb des emplacement prévus par le
constructeur du véhicule.
Vor dem Heben der Scherenhebebühne müssen sich die Aufnahmeplattformen in der untersten Position befinden. Gehen Sie zum Fahrzeug und vergewissern Sie sich, daß das Fahrzeug mittig steht und
sich die Vorder- und Hinterräder in der richtigen Position befinden.(Abb.17) Legen Sie jetzt die Gummiklötze auf die Aufnahmeplattform, und stellen sicher, das sich diese mit den vom Hersteller angegebenen Anhebepunkten in einer Linie sind. (siehe Abb. Unten) Die Auffahrrampen können als Fahrschienen-Verlängerung verwendet werden,
wenn sie korrect eingeklinkt werden.
SECUENCIA DE FUNCIONAMIENTO
Les rampes d’accès peuvent être utilisées comme rallonges à condition
de s’assurer de leur parfait accrochage en position horizontale avant de
soulever la charge. Après avoir positionné le véhicule au dessus de l’élévateur, arrêter le moteur et tirer le frein de stationnement. Ne pas oublier de placer le levier de vitesses au point mort.
En phase de montée et de descente, l’élévateur et sa charge doivent
être constamment surveillés.
Poussez le bouton de montée no. 1 (fig.16) pour lever le pont jusqu’à
l’hauteur souhaitée.
Pour déscendre le pont élévateur, pousser le bouton ‘DESCENTE’ no.
5 (fig.69).
Pour effectuer la descente complète, presser en
même temps les poussoir “P2" et ”P3"
Schalten Sie den Motor ab und betätigen Sie die Handbremse, nachdem das Fahrzeug sich auf der Plattform befindet.
Der Schalthebel der Gangschaltung muß außerdem in die Position
“NEUTRAL” gestellt werden.
Beobachten Sie stets Das Verhalten des Fahrzeugs während einer Auf
/ Ab Bewegung,
Druecken Sie den ‘AUF’-Knopf Nr. 1 (Abb. 16) zum Heben der Hebebuehne, bis diese die gewuenschte Heoehe erreicht hat.
Um die Hebebuehne abzusenken, ‘AB’-Taste Nr. 5 (Abb.16) druecken.
Beim Druecken dieser Taste steigt die Buehne autom. ein Paar cm, um
die mechanische autom.
Antes de la subida/descenso del elevador, asegúrese que las
plataformas estén a la mínima altura.
Colocar el vehículo sobre el elevador lenta y correctamente (fig.17 )
Para alzar el vehículo use los tacos de goma, respetando los puntos de
apoyo indicados por el fabricante del vehículo.
Las rampas de entrada pueden ser utilizadas como extensiones si
están bien enganchadas antes de alzar el vehículo.
Apagar el motor del vehículo, engranar el freno y mover la palanca del
cambio hasta la posición neutra.
Durante la subida y el descenso del elevador, controle siempre tanto el
elevador como el vehículo que está encima.
Oprimir el pulsante “SALIDA” N° 1 en figura 16 y tenerlo oprimido hasta
que el puente alcance la altura deseada.
Para bajar la carga, oprimir el pulsante “DECENSO” N°5 (figura 16).
Para completar el descenso, mantenga pulsados al
mismo tiempo el boton "P2" y el boton "P3".
Um die Aufnahmeplattformen bis in die unterste Position
abzusenken, drücken Sie die Schalter „P2“ und „P3“
25
CAP. 6
MANUTENZIONE
I ATTENZIONE
MAINTENANCE
I WARNING
La manutenzione deve essere affidata esclusivamente a personale
esperto o preventivamente autorizzato. Durante la manutenzione
del sollevatore, è necessario adottare tutti i provvedimenti utili per
evitare l’avviamento accidentale del sollevatore. L’interruttore generale deve essere bloccato in posizione “zero” mediante lucchetto. La chiave del lucchetto deve essere presa in consegna dal manutentore per tutta la durata dell’intervento. Ovviamente, bisogna
rispettare tutte le indicazioni e gli obblighi riportati nel Cap. 3
“SICUREZZA”.
Maintenance must be performed exclusively by expert personnel
with thorough knowledge of lift ope-ration. During lift maintenance, take all necessary precautions to prevent accidental engagement of the lift. The main switch on the panel must be locked to
position “0” with a lockout. The key to the lockout will be in the custody of the maintenance fitter for the duration of servicing. All the
instructions specified in Chapter 3 “SAFETY” must always be followed.
MANUTENZIONE PERIODICA
PERIODICAL MAINTENANCE
Per mantenere il sollevatore in piena efficienza, è necessario attenersi
alle tempistiche di manutenzione indicate.
To maintain the lift in good working order, the following indications must
be observed.
IL MANCATO RISPETTO DI QUANTO SOPRA ESONERA IL
COSTRUTTORE DA QUALUNQUE RE SPONSABILITA’ AGLI
EFFETTI DELLA GARANZIA.
FAILURE TO RESPECT THESE RECOMMENDATIONS WILL
EXEMPT THE MANUFACTURER FROM ALL RESPONSIBILITIES
ENTAILED IN THE GUARANTEE.
1 - Il sollevatore dev’essere pulito almeno una volta al mese, non usando aggressivi chimici e pistola ad acqua ad alta pressione.
2 - Controllare periodicamente lo stato degli apparati di sicurezza.
3 - Lubrificare, periodicamente, con grasso le guide di scorimento.
4 - Controllare annualmente lo stato dei tubi flessibili ad alta pressione.
5 - Cambiare l’olio dell’impianto almeno ogni 5 anni.
1 - Car lift must be cleaned once a month, at least, without using chemical agents and high pressure washing guns.
2 - Check safety devices for proper conditions periodically.
3 - Grease slideways periodically.
4 - Check flexible tubes for proper conditions yearly.
5 - Change hydraulic system oil at 5 years intervals, at least.
I ATTENZIONE
26
CHAPTER 6
I WARNING
L’OLIO PER FRENI, SE NON VIENE SUBITO RIMOSSO RISCHIA DI
ROVINARE IRRIMEDIABILMENTE LA VERNICIATURA.
ALWAYS DISPOSE OF USED BRAKE OIL TO PREVENT POSSIBLE
DAMAGE TO THE FINISHING.
SMALTIMENTO OLIO ESAUSTO
L’olio esausto che viene estratto dalla centralina e dall’impianto durante
il cambio olio, dev’essere trattato come prodotto inquinante, pertanto
dovrà essere smaltito secondo le prescrizioni della legislazione vigente
nel paese in cui è stato installato il ponte sollevatore.
USED OIL DISPOSAL
Used oil is a a highly polluting product. Always dispose of used oil as
specified by the effective law of the country where the car lift is installed.
CHAP. 6 ENTRETIEN
KAPITEL 6
I ATTENTION
I !!!
WARTUNG
ACHTUNG !!!
CAP. 6
MANTENIMIENTO
IATENCIÓN
La maintenance doit être confiée exclusivement à un personnel
compétent et agréé. Pendant les travaux d’entretien il est important de prendre toutes les dispositions utiles pour éviter la mise en
marche accidentelle de l’élévateur. L’interrupteur général doit être
bloqué sur la position “0" au moyen d’un cadenas La clé de ce cadenas doit être conservée par l’agent d’entretien pendant toute la
durée de l’intervention. Il est impératif, en outre, de respecter toutes les consignes et obligations mentionnées au chapitre 3
”SÉCURITÉ".
Wartungs- Arbeiten sind nur durch Fachpersonal durchzuführen,
die mit dem Betrieb des Lifts bestens vertraut sind. Während der
Wartung sind alle Vorsichtsmaßnahmen zu treffen, um Unfälle zu
vermeiden. Der Hauptschalter an der Schalttafel ist in “0" - Position zu setzen und zu schließen. Der Schlüssel zum Schließen
wird normalerweise durch die Person, die Wartungsarbeiten
durchführt, für die Dauer der Arbeiten aufbewahrt. Alle in Kapitel 3
aufgeführten Instruktionen für die SICHERHEIT sind immer zu befolgen.
El mantenimiento debe ser confiado exclusivamente a personal experto o que haya sido autorizado. Durante el mantenimiento del elevador,
es necesario adoptar todos los procedimientos útiles para evitar la puesta en marcha accidental del elevador. El interruptor general debe
estar bloqueado en posición “cero” con canTUERCA. La llave del
canTUERCA debe estar en posesión del encargado de mantenimiento
durante toda la intervención. Obviamente, es necesario respetar todas
las indicaciones y las obligaciones indicadas en el Cap. 3
“SEGURIDAD”.
ENTRETIEN PÉRIODIQUE
Pour maintenir l’élévateur en parfaite condition, il est important de respecter les périodicités d’intervention indiquées dans ce manuel.
PERIODISCHE WARTUNG
Um die Scherenhebebühne immer betriebsbereit zu halten, sind die folgenden Indikationen zu befolgen.
MANTENIMIENTO PERIÓDICO
Para mantener el elevador en plena eficacia, es necesaria respetar los
intervalos de mantenimiento indicados.
LE NON RESPECT DE CETTE CONSIGNE DÉGAGE LE
CONSTRUCTEUR DE TOUTE RESPONSABILITÉ, NOTAMMENT VIS
A VIS DE LA GARANTIE.
SOLLTE ES UNTERLASSEN WERDEN, DIESE EMPFEHLUNG ZU
RESPEKTIEREN, WIRD DER HERSTELLER VON ALLER
VERANTWORTUNG, DIE IN DER GARANTIE FESTGELEGT IST,
BEFREIT.
1 - Die Scherenhebebühne muss mindestens ein Mal pro Monat gereinigt werden, und zwar ohne chemische Reinigungsmittel und Hochdruckreiniger.
2 - Die Sicherheits- Einrichtungen sind in gewissen Abständen auf richtige Funktion zu überprüfen.
3 - Die Rollen - Gleitwege müssen regelmäßig gefettet werden
4 - Die flexiblen Schläuche sind jährlich zu überprüfen
5 - Das Hydraulik - System ist in Intervallen von 5 Jahren auszuwechseln
LA FALTA DE RESPETO DE CUANTO ANTES INDICADO EXIME AL
FABRICANTE DE CUALQUIER RESPONSABILIDAD EN RELACIÓN
A LA GARANTÍA.
1. L’élévateur doit être nettoyé au moins une fois par mois, sans utiliser
de détergent chimique ni de nettoyeur haute pression.
2. Contrôler périodiquement l’état des organes de sécurité.
3. Graisser périodiquement les rails de roulement des galets.
4. Contrôler une fois par an l’état des flexibles hydrauliques haute pression.
5. Changer l’huile de la centrale hydraulique tous les 5 ans.
I ATTENTION
I WARNUNG
1- El elevador debe limpiarse al menos una vez cada mes, sin usar
productos químicos agresivos o pistolas de agua de alta presión.
2- Controlar periódicamente el estado de los aparatos de seguridad.
3 – Lubricar, periódicamente, con grasa las guías de deslizamiento.
4- Controlar anualmente el estado de los tubos flexibles de alta presión.
5 – Cambiar el aceite de la instalación al menos cada 5 años.
I ATENCIÓN
LES TACHES DE LIQUIDE DE FREIN, SI ELLES NE SONT PAS
NETTOYÉES IMMéDIATEMENT, RISQUENT DE DÉTÉRIORER
IRRÉMÉDIABLEMENT LA PEINTURE.
BESEITIGEN SIE STETS GEBRAUCHTES BREMSÖL, UM
MÖGLICHE BESCHÄDIGUNGEN DER OBERFLÄCHEN ZU
VERMEIDEN.
EL ACEITE PARA FRENOS, SI NO SE ELIMINA RÁPIDAMENTE,
PUEDE DAÑAR IRREMEDIABLEMENTE LA PINTURA.
ÉLIMINATION DE L’HUILE USAGÉE
L’huile usagée provenant de la vidange de la centrale hydraulique doit
être considérée comme produit polluant et doit, par conséquent, être
éliminée conformément à la législation en vigueur dans le pays où est
installé l’élévateur.
ENTSORGUNG VON GEBRAUCHTEM ÖL
Gebrauchtes Öl ist ein sehr verschmutzendes Produkt. Entsorgen Sie
das gebrauchte Öl nach den Richtlinien und Gesetzen des Landes, in
dem die Scherenhebebühne betrieben wird.
ELIMINACIÓN ACEITE USADO
El aceite usado extraído de la centralita y de la instalación durante el cambio
de aceite debe tratarse como producto contaminante, por lo tanto deberá
eliminarse según las prescripciones de la legislación vigente en el país en el
que se ha instalado el puente elevador.
27
CAP. 7
INCONVENIENTI E RIMEDI
TROUBLESHOOTING
GUIDA ALLA RICERCA DEI GUASTI.
TROUBLES SEARCHING GUIDE
la ricerca dei guasti e gli eventuali interventi di riparazione richiedono il
rispetto di TUTTE LE PRECAUZIONI DI SICUREZZA indicate al capitolo 6 “Manutenzione” ed al capitolo 3 “Sicurezza”.
The trouble searching and the possible repair intervention need the observance of ALL THE SAFETY PRECAUTIONS shown in the chapter 6
“MAINTENANCE” and in the chapter 3 “SAFETY”.
INCONVENIENTE
Nessun funzionamento.
É possibile solo la manovra di salita e non
quella di discesa.
La discesa avviene
molto lentamente.
Il motore funziona regolarmente ma non si
verifica il sollevamento.
TABELLA 1
CAUSA
RIMEDIO
Guasto all’impianto Chiamare servizio assistenza
elettrico.
Guasto all’elettroval- Controllare l’eventuale mancanza
vola di discesa
di alimentazione all’elettrovalvola.
fig.18
Guasto all’impianto
elettrico
La valvola di controllo discesa non funziona regolarmente.
Elettrovalvola di discesa bloccata nella
posizione di apertura.
Chiamare servizio assistenza
Richiedere intervento tecnico per
sostituire la stessa
Richiedere intervento tecnico per
sostituire la stessa
Possibile mancanza Ripristinare il livello dell’olio.
di olio.
Controllare esatta rotazione indiIl motore gira al con- cato dalla freccia fig.14 in tal
caso invertire le fasi.
trario.
Il motore funziona re- Elettrovalvola di di- Richiedere intervento tecnico per
golarmente ma la velo- scesa parzialmente sostituire la stessa
cità di salita è estreaperta.
mamente lenta.
Filtro di aspirazione Pulire il filtro o rivolgersi al serviparzialmente intasa- zio di assistenza.
to (fig. 6)
Non si riesce a sollevare la portata nominale.
Pompa danneggiata. Sostituire gruppo pompa.
Staratura della val- Richiedere intervento tecnico per
vola di pressione
registrare o sostituire la stessa.
massima (fig. 6).
Pompa danneggiata. Sostituire gruppo pompa.
28
CHAPTER 7
TROUBLES
Lift does not
operate.
Lifting operation
only is possible, lowering cannot be
performed.
TABLE 1
POSSIBLE
REASON
Failure in the electric
system.
Damaged lowering
electro-valve. (Fig.18)
SOLUTION
Call assistance
Check the feeding to the electro-valve.
Failure in the electric
system
Call assistance
Lowering operation Lowering control valve Contact service department.
is too slow.
does not work properly.
Engine works regu- Lowering electro-valve To replace the valve
larly, but lifting ope- locked in opening posirations cannot be
tion.
performed.
Refill with oil to the specified leNo oil in the tank.
vel.
Motor rotates in the
wrong way.
Engine works regu- Partially opened lowelarly, but lifting spe- ring electro-valve.
ed is extremely
slow.
Partially clogged suction filter (see fig. 6)
Check motor for proper direction
of rotation (fig.14). Exchange the
phases, if necessary.
Contact service department to replace the valve.
Clean the filter or contact service
department.
Worn pump.
Nominal capacity
cannot be lifted.
Replace the pump.
Maximum pressure val- Contact service department.
ve misadjustment (see
fig. 6).
Worn pump.
Replace the pump.
CHAP. 7 PANNES ET REMÈDES
KAPITEL 7 FEHLER UND ABHILFE
GUIDE POUR LA RECHERCHE DES PANNES
FÜHRER ZUR FEHLERFINDUNG
La recherche des pannes et les éventuelles opérations de réparation
nécessitent le respect de TOUTES LES PRÉCAUTIONS DE
SÉCURITÉ indiquées au chapitre 6 “ENTRETIEN” et au chapitre 3
“SÉCURITÉ”.
Die Fehlerfindung und die eventuelle Abfindung erfordert DAS
EINHALTEN ALLER SICHERHEITSVORKEHRUNGEN, wie in Kap. 6
“Wartung” und Kap.3 “Sicherheit” beschrieben.
ANOMALI
TABLEAU 1
REMÈDE
CAUSE
Aucun fonctionnement
Panne au circuit élec- Contrôler le bon état des brantrique
chements et des composants
électriques.
Il n’est possible d’ef- Électrovanne de deContrôler l’alimentation électrique
fectuer que la mano- scente défectueuse
de l’électrovanne.
euvre de montée, l’é- (fig. 18).
lévateur refusant de
Contacter le Service Après Vente.
descendre.
Descente très lente
Soupape de contrôle Si après contrôle de la soupape de
de descente défectue- régulation de descente, le problèuse
me persiste, contacter le Service
Après Vente pour effectuer le remplacement de la soupape.
Le moteur fonctionne Électrovanne de de- Si après contrôle de l’électrovanne
normalement mais
scente bloquée en po- de descente, le problème persiste,
contacter le Service Après Vente
l’élévateur ne monte sition ouverte.
pour effectuer le remplacement de
pas.
l’électrovanne.
Manque d’huile.
Refaire le niveau d’huile.
Contrôler le sens de rotation du
Le moteur tourne
dans le mauvais sens. moteur (fig. 14) et en cas d’erreur,
inverser deux phases de l’alimentation électrique.
Si après contrôle de l’électrovanne
Le moteur fonctionne Électrovanne de dede descente, le problème persiste,
normalement mais
scente partiellement
contacter le Service Après Vente
l’élévateur monte
ouverte.
pour effectuer le remplacement de
très lentement
l’électrovanne.
L’élévateur ne réussit pas à soulever la
charge nominale
Crépine d’aspiration
partiellement colmatée
(fig. 6).
Nettoyer la crépine ou contacter le
Service Après Vente.
Pompe endommagée.
Mauvais fonctionnement de la soupape de
surpression (fig. 6).
Remplacer le groupe pompe.
Si après contrôle de la soupape de
surpression, le problème persiste,
contacter le Service Après Vente
pour effectuer le tarage ou le remplacement de la soupape.
Pompe endommagée.
Fehler
Hebebühne arbeitet
nicht
Hebebühne arbeitet
nur in einer Richtung. Absenken ist
nicht möglich.
Absenkbewegung zu
langsam
Hydraulikpumpe arbeitet, Hebe-bühne
kann nicht angehoben werden.
Abhilfe
Störung n der Elektrik Überprüfen der Elektrischen Anschlüsse und Komponenten,
Sicherungen prüfen.
Absenkmagnetventil
Überprüfen des Magnetventils
defekt (Abb.18)
auf Durchfluß.
Kein Öl im Tank
Hydraulikpumpe arbeitet, die Hubgeschwindigkeit ist
sehr Langsam.
GUIA DE DETECCION DE FALLAS
Fehlersuchtabelle N° 1
Mögliche Ursache
Störung n der Elektrik
Absenkkontrollventil
überprüfen
Absenk Elektromagnetventil, ist nicht geschlossen.
Wartungsdienst rufen
Kundendienst verständigen
Ventil von Hand in Normal Stellung bringen.
Öl bis zur Markierung auf- füllen.
Drehrichtung prüfen, Wenn nötig
Pumpe läuft in der
verkehrten Drehrich- Phasen tauschen (abb.14).
tung
Kundendienst verständigen
Absenk Elektromagnetventil
Schließt nicht korrekt.
Ansaugfilter verstopft. Filter reinigen, Wartungspersonal
verständigen.
(abb.6)
Pumpe wird heiß
Pumpe austauschenKundendienst verständigen
Filter reinigen, Wartungspersonal
verständigen.
Max. Tragfähigkeit
wird nicht erreicht.
Überdruckventil hat
fehl Funktion (abb.6).
Pumpe wird heiß
CAPITULO 7
DETECCION DE
FALLAS Y REMEDIOS
Pumpe austauschen
Kundendienst verständigen.
Pumpe austauschen
La detección de fallas y la eventual reparación de las mismas necesitan
TODAS LAS PRECAUCIONES DE SEGURIDAD indicadas en el capítulo 6 – Mantenimiento y 3 – Seguridad
FALLA
El elevador no funciona
El elevador sube
pero no baja
TABLA 1
CAUSA
Falla en la instalación
eléctrica
Falla en la electroválvula de descenso fig.
18
REMEDIOS
Controlar la conexión y los componentes eléctricos
Controlar si falta la ali- mentación
en la electroválvula
Solicitar el servicio de asistencia
Daño en la instalación
eléctrica
Si después de controlada la válEl descenso es muy La electroválvula de
vula de descenso, el problema silento
control descenso no
funciona bien
gue sin solucionar, solicitar el
servicio de asistencia para reemplazar la misma
El motor funciona
Electroválvula de de- Si después de controlada la válpero las plataformas scenso bloqueada en vula de descenso, el problema sigue sin solucionar, solicitar el
no suben
la posición abierta
servicio de asistencia para reemplazar la misma
Posible falta de aceite Echar aceite
El motor gira al revés
El motor funciona
Electroválvula de depero el elevador es scenso parcialmente
muy lento en la subi- abierta
da
Filtro de aspiración
parcialmente atascado fig.6
Bomba dañada
No se puede alzar
La válvula de presión
un vehículo de capa- máxima no funciona
cidad nominal norbien fig. 6
mal
Bomba dañada
Controlar la rotación del motor y
cambiar las fases (fig.14).
Si después de controlada la válvula de descenso, el problema sigue sin solucionar, solicitar el
servicio de asistencia para reemplazar la misma
Limpiar el filtro o llamar el servicio de asistencia
Reemplazar la bomba
Si después de controlada la válvula de descenso, el problema sigue sin solucionar, solicitar el
servicio de asistencia para reemplazar la misma
Reemplazar la bomba
Remplacer le groupe pompe
29
INCONVENIENTE
Il sollevatore non
scende.
TABELLA 2
CAUSA
Mancanza di energia
elettrica
B
A
C
Fig.18 - Abb.18
30
RIMEDIO
Operare nel seguente modo:
aprire le 2 elettrovalvole di sicurezza (A-B) e la valvola di discesa (C)
(fig.18).
Agire sulle 2 elettrovalvole di sicurezza svitando l’apposito pomello.
Agire sulla valvola di discesa manuale svitando l’apposito pomello
le pedane inizieranno la discesa.
TROUBLES
The lift doesn’t go
down.
TABLE 2
POSSIBLE
REASON
Lack of electrical
energy.
SOLUTION
Act as follows: open booth safety
solenoid valves (A and B) and the
descent valve (C) (fig. 18) unscrewing their knob.
Unscrew also the knob of the manual descent valve: the platforms
will now descend slowly.
After reacheng the ground, screw
in the knobs of all valves.
A discesa ultimata ripristinare i
relativi pomelli delle elettrovalvole.
Lowering valve does
not open
Call assistance
Valvola di discesa non
si apre
Chiamare servizio assistenza
Electric failure
Call assistance
Guasto elettrico
Chiamare servizio assistenza
ANOMALI
L’élévateur ne descend pas
TABLEAU 2
CAUSE
REMÈDE
Absence d’alimentation Procéder comme suit: dévisser
électrique
les molettes des electrovannes
de sécurité (A et B) et de descente (C) (fi. 18). Dévisser aussi
la molette de la vanne manuelle
de descente ; maintenant les
rampes descendront lentement.
Après avoir atteint le niveau du
sol, revisswer les molettes.
Fehler
Hebebühne läßt
sich nicht Absenken
Fehlersuchtabelle N° 2
Mögliche
Ursache
Appeler le service après vente
El elevador no baja
TABLA 2
CAUSA
Falta corriente eléctrica
Störung in der Elektrik Folgendermassen vorgehen: beide Sicherheits-Elektroventile (A und B) und
das Senkventil (C) (Abb. 18) durch Drehen der entsprechenden Drehknöpfe
am Ventilkörper öffnen. Dann den
Drehknopf des manuellen Senkventils
öffnen (die Fahrschienen werden nun
langsam absenken.
Nach Erreichen der Null-Stellung,
alle Drehknöpfe der Ventile wieder
schliessen.
La soupape de descen- Appeler le service après vente
te ne s’ouvre pas
Panne électrique
Abhilfe
FALLA
Una vez ultimada la bajada habrá
que restablecer los correspondientes pomos de las electroválvulas.
Senkventil öffnet nicht Kundendiensteinsatz anfordern
Fehler in der Elektrik
Kundendienst anfordern
REMEDIOS
Actuar de la manera siguiente:abrir las 2 electroválvulas de
seguridad (A-B) y la valvúla de
bajada (C) (fig.18).
Actuar sobre las 2 electroválvulas de seguridad destornillando el
expreso pomo.
Actuar sobre la válvula de bajada
manual destornillando el expreso
pomo las plataformas empezaran
la bajada..
La válvula de descenso
no se abre
Llamar el servicio de asistencia
Fallo eléctrico
Llamar el servicio de asistencia
31
ESPLOSO SOLLEVATORE
EXPLODED VIEW OF THE LIFT
EXPLOSIONSZEICHNUNG HEBEBÜNNE
VUE ÉCLATÉE - ÉLÉVATEUR
DESPIECE ELEVADOR
CENTRALINA
CONTROL UNIT
SCHALTGEHÄUSE
CENTRALE
CENTRALITA HIDRÁULICA
Part Code
Descrizione
Description
Beschreibung
Description
Denominacion
A0231
DADO ALTO M10 6S UNI 5587 ZB
NUT M10
MUTTER M10
ECROU HAUT M10 6S UNI 5587 ZB
TUERCA ALTA M10 ZINCADA
A0400
SEEGER E20 UNI 7435
SNAP RING E20 UNI 7435
SEEGER-RING E20 UNI 7435
CIRCLIPS E 20 UNI 7435
SEEGER E20 UNI 7435
A0444
SEEGER E25 UNI 7435
SEEGER E25 UNI 7435
SEEGER E25 UNI 7435
ANNEAU ÉLASTIQUE ØE 25
ARO ELÁSTICO ØE 25
A4070
RACCORDO “L” GIREVOLE M 1/8X6
ROTATING “L” CONNECTION M 1/8X6
“L”-ANSCHLUSS M 1/8X6
RACCORD EN “L” M 1/8X6
UNIÓN “L” MACHO G 1/8" - TUBO Ø6
B0013
RONDELLA Ø30X60 UNI 6592
WASHER Ø30X60 UNI 6592
UNTERLEGSSCHEIBE Ø30X60 UNI
6592
RONDELLE Ø30X60 UNI 6592
ARANDELA Ø30X60 UNI 6592
B0035
DADO M6 UNI 5587
NUT M6 UNI 5587
MUTTER M6 UNI 5587
ÉCROU M6 UNI 5587
TUERCA ALTA M6 ZINCADA
B1206
DISTANZIALE H3 PIAT.L966 ZB
SPACER
DISTANZSTUECK
ENTRETOISE
DISTANCIADOR
B2537
BUZER 24VAC
BUZER 24VAC
BUZER 24VAC
BUZER 24VAC
BUZER 24VAC
B3106
BOCCOLA AUTOLUBR.30X34X30
SELF-LUBRIFICATING BUSHING
Ø30X34X30
SELBSTSCHMIERENDE BUCHSE D
30X34X30
DOUILLE AUTOLUBRIFIANTE
Ø30X34X30
CASQUILLO AUTOLUBRIC. DIAM.
30X34X30
VITE FORATA 1/4
SCREW 1/4
SCHRAUBE 1/4"
BOUCHON RENIFLARD 1/4"
TORNILLO CON ORIFICIO 1/4"
ECROU FREIN M8 UNI 7474
TUERCA AUTOBLOCANTE M8 UNI
7474
B5053
Sugg
*
B5088
DADO BLOK M8 UNI 7474
NUT M8 UNI 7474
MUTTER BLOCK. M8 UNI 7474
B5395
B5406
KIT FISSAGGIO SERBATOI IN PVC
TANK FASTENING KIT
TANK-BEFESTIGUNGSSET
ENSEMBLE FIXATIONS RESERVOIR
JUEGO SUJECION DEPOSITO
COLLETTORE KE2000 80-250BAR
MANIFOLD
KOLLEKTOR
COLLECTEUR
COLECTOR
B5429
TAPPO DIN 908 1/4+RONDELL.RAME
PLUG
DECKEL
BOUCHON
TAPÓN
B5434
TAPPO TC4 X VALV.3/4"-16UNF
PLUG
DECKEL
BOUCHON
TAPÓN
B6537
TRASFORMATORE 0-220-380 0-24V
50VA +/-10%
TRANSFORMER 0-230-400 0-24V 50VA
TRANSFORMATOR 0-220-380 0-24V
50VA +/-10%
TRANSFORMATEUR 0-220-380 0-24V
50VA +/-10%
TRANSFORMADOR 0-220-380 0-24V
50VA +/-10%
C0051
TUBO RILSAN Ø4/6
RYLSAN HOSEØ4/6
SCHLAUCH 6X4
TUYAU RILSAN D.6X4
TUBO RILSAN Ø6X4
C0100
RONDELLA Ø8,4X17 UNI 6592
WASHER Ø8,4X17 UNI 6592
SCHEIBE Ø8,4X17 UNI 6592
RONDELLE Ø8,4X17 UNI 6592
ARANDELA Ø8 ZINCADA
C0158
RUOTA GOMMATA D 125 FORO 15
RUBBER WHEEL D 125 HOLE 15
GUMMI RAD D 125, BOHRUNG 15
ROUE CAOUTCHOUC D125 TROU 15
RUEDA DE GOMA D 125 AGUJERO 15
C0159
ANELLO SEEGER E15 UNI 7435
SEEGER E15 UNI 7435
SEEGER-RING E15 UNI 7435
BAGUE EXTÉRIEUR Ø15
ARO ELÁSTICO ØE 15 UNI 7435
C0617
RONDELLA Ø6,4X12,5 UNI 6592
WASHER Ø6,4X12,5 UNI 6592
SCHEIBE Ø6,4X12,5 UNI 6592
RONDELLE Ø6,4X12,5 UNI 6592
ARANDELA Ø6,4X12,5 UNI6592
C0630
RONDELLA IN RAME Ø14X20
COPPER WASHER Ø14X20
MUTTER M10 UNI 5588
ECROU M10 UNI 5588
TUERCA
C0894
RONDELLA P 25X44 UNI 6592 ZB
WASHER P 25X44 UNI 6592 ZB
SCHEIBE 25X44 UNI 6592 ZB
RONDELLE P 25X44 UNI 6592 ZB
ARANDELA P 25X44 UNI 6592 ZB
G120182
RONDELLA GROVER D 10 GAMMA
WASHER D10
SCHEIBE D10
RONDELLE D10
ARANDELA D10
R0068
SEEGER E30 UNI 7435
SNAP RING E30 UNI 7435
SEEGER E30 UNI 7435
ANNEAU DE FIXAGE E30 UNI 7435
SEEGER E30 UNI 7435
R0158
DADO MEDIO M 8 6S UNI 5588 ZB
NUT M8
MUTTER M8
ECROU M8
TUERCA M8 UNI 5588
*
R0712
*
SUPPORTO SUPERIORE BRACCIO
CERNIERA
ARM HINGE UPPER SUPPORT
HALTER OBERE UNTERSTUETZUNG
SUPPORT SUPERIEUR BRAS
CHARNIERE
SOPORTE SUPERIOR BRAZO
CREMALLERA
R0713
*
PATTINO INFERIORE BRACCIO
CERNIERA
HINGE ARM LOWER SLIDE PAD
AUFHAENGUNG UNTERER GLEITER
PATIN INFERIEUR BRAS CHARNIERE
PATÍN INFERIOR BRAZO
CREMALLERA
R0714
*
SUPPORTO COMPLETO BRACCIO
CERNIERA
HINGE ARM COMPLETE SUPPORT
LAGERBOCK UNTERER TRAVERSE
SUPPORT COMPLET BRAS
CHARNIERE
SOPORTE COMPLETO BRAZO
CREMALLERA
R0717
PERNO ATTACCO CILINDRO
CYLINDER ATTACHMENT PIN
ZYLINDER HALTEBOLZEN
AXE FIXATION VERIN
PERNO CONEXIÓN CILINDRO
R0742
DADO ALTO M16
HIGH NUT M16
MUTTER M16
ECROU HAUT M16
TUERCA ALTA M16
R0751
VITE TCEI 90° M8X80
SCREW TCEI 90° M8X80
SCHRAUBE TCEI 90° M8X80
VIS TCEI 90° M8X80
TORNILLO TCEI 90° M8X80
R0755
VITE TCEI 90° M8X90
SCREW TCEI 90° M8X90
SCHRAUBE TCEI 90° M8X80
VIS TCEI 90° M8X90
TORNILLO TCEI 90° M8X90
R0763
RACCORDO RAPIDO “Y” D6
QUICK “Y” CONNECTION D6
FITTING “Y” D6
RACCORD EN “Y” D6
CONEXION “Y” D6
R0821
VITE FORATA DOPPIA 1/4
HOLED SCREW
SCHRAUBE
BOUCHON RENIFLARD
TORNILLO CON ORIFICIO
R0848
RULLO RAMPA BASCULANTE
BALANCE RAMP ROLLER
FFUEHRUNGSBUCHSE
ROULEAU RAMPE BASCULANTE
RODILLO RAMPA BASCULANTE
PORTAFUSIBILE 5X20 4A RIT
FUSE CARRIER 5X20 4A RIT
SCHMELZSICHERUNGHALTER 5X20
4A RIT
PORTE-FUSIBLE 5X20 4A RIT
PORTAFUSIBLES 5X20 4A RIT
R0854
R0855
TELERUTTORE AEG 4KW 24AC
CONTACTOR AEG 4KW 24AC
FERNSCHALTER AEG 4KW 24AC
TÉLÉRUPTEUR AEG 4KW 24AC
CONTACTO AEG 4KW 24AC
R1183XX
*
RAMPA BASCULANTE
RAMP
RAMPE
RAMPE
RAMPA
R1185XX
PUNTONE X RAMPA
STRUT
STREBE
POUSSARD
POSTE
R1186
PERNO X RAMPA ZB
PIN
STIFT
AXE
PERNO
R1189
MANIGLIA RAMPA
HANDLE
HANDGRIFF
POIGNEE
ASA
R1194
SEEGER E11 UNI 7435
SEEGER RING E11 UNI 7435
SEEGER E11 UNI 7435
BAGUE E11 UNI 7435
SEEGER E11 UNI 7435
R1195
VITE TE M10X100 PF UNI 5737 ZB
SCREW TE M10X100 PF UNI 5737 ZB
SECHSKANTSCHRAUBE M10X100 PF
UNI 5737 ZB
VIS TH M10X100 PF UNI 5737 ZB
TORNILLO M10X100 PF UNI 5737 ZB
R1196XX
KIT RAMPA BASCULANTE
KIT BALANCE RAMP
AUFFAHR RAMPE
KIT RAMPE BASCULANTE
KT RAMPA BASCULANTE IZQ.
R1198
DISTANZIALE INTERNO LEVE
LEVER SPACER
DISTANZSTUECK
ENTRETOISE BRAS DE LEVAGE
DISTANCIADOR
VIS STHC M6X16 UNI 5933
TORNILLO TSPEI M6X16
R1203
VITE TSCE90ØM6X16 UNI 5933 ZB
SCREW TSPEI M6X160 UNI5933
SECHSSCHRAUBE MIT
INNENSECHSKANT M6X16 UNI 5933
R1205
VITE TCCE M16X55 UNI5931
SCREW TCCE M16X55 UNI 5931
SCHRAUBE TCCE M16X55 UNI 5931
VIS TCCE M16X55 UNI 5931
TORNILLO TCCE M16X55 UNI 5931
R1236
GIUNTO TRASC.POMPA CEN.262
CONNECTING PUMP
GELENK PUMPE
ACCOUPLEMENT DE POMPE
ACOPLAMIENTO BOMBA
R1239
BLOCCHETTO DISTANZ.CEN.262
BLOCK
BLOCK
CORPS
BLOQUE
R1312
CILINDRO IDRAULICO
HYDRAULIC CYLINDER
HYDRAULIKZYLINDER
VÉRIN HYDRAULIQUE
CILINDRO IDRÁULICA
R1315
PERNO ATTACCO BRACCIO
ARM ATTACHMENT PIN
HALTEBOLZEN
AXE FIXATION BRAS
PERNO CONEXIÓN BRAZO
R1319
PULSANTE+4CONT.NO
PUSH BUTTON
DRUCKKNOPF
BOUTON
PULSADOR
R1322
*
VITE TCCE M8X105 UNI 5931 ZB
SCREW TCCE M8X105 UNI 5931 ZB
SCHRAUBE TCCE M8X105 UNI 5931 ZB
VIS TCCE M8X105 UNI 5931 ZB
TORNILLO TCCE M8X105 UNI 5931 ZB
R1323
CENTRALINA 400/50T
HYDR.POWER UNIT 400/50T
HYDRAULIK GERAET 400/50T
CENTRALE HYDRAULIQUE 400/50T
CENTRALITA OLEODINÁMICA 400/50T
R1324
CENTRALINA 230/50M
HYDR.POWER UNIT 230/50M
HYDRAULIK GERAET 230/50M
CENTRALE HYDRAULIQUE 230/50M
CENTRALITA OLEODINÁMICA
230/50M
R1326
TAPPO SERBATOIO
TANK PLUG
TANKVERSCHLUß
BOUCHON DE RÉSERVOIR
TAPON DEPOSITO
R1327XX
ARMADIETTO CENTRALINA
CABINET
SCHRANK
ARMOIRE
CAJÓN
R1328XX
SPORTELLO ANTERIORE
ARMADIETTO
FRONT COVER
VORDERTUERE
ELEKTRO-STEUERKASTEN
PANNEAU ANTÉRIEUR
PUERTA DELANTERA ARMARIO
R1330
TUBO 3/16 1/4FDGIR-1/4ORI(1)
HOSE 3/16
SCHLAUCH 3/16
TUYAU 3/16
TUBO 3/16
R1331
TUBO 3/16 1/4FDGIR-1/4ORI(2)
HOSE 3/16
SCHLAUCH 3/16
TUYAU 3/16
TUBO 3/16
R1332
TUBO 3/16 1/4FDGIR-1/4ORI(3)
HOSE 3/16
SCHLAUCH 3/16
TUYAU 3/16
TUBO 3/16
R1333
TUBO 3/16 1/4FDGIR-1/4ORI(4)
HOSE 3/16
SCHLAUCH 3/16
TUYAU 3/16
TUBO 3/16
R1339
COLLETTORE KE2000 80-250BAR MN
MANIFOLD
KOLLEKTOR
COLLECTEUR
COLECTOR
R1340
POMPA 1,6CC
PUMP
PUMPE
POMPE
BOMBA
R1341
TUBO ASPIRAZIONE CENTRALINA
SUCTION PIPE
ANSAUGROHR
TUBE ASPIRATION
TUBO ASPIRACION
FILTRO ASPIR.3/8" CENTTRALINA
AIR FILTER
ANSAUGFILTER
FILTRE ASPIRATION
FILTRO DE ASPIRACION
VALVOLA STF14P 5L/MIN
VALVE
VENTIL
SOUPAPE
VÁLVULA
ELETTRO VALVOLA NC-EM
ELECTRO-VALVE
ELEKTROVENTIL
ELECTROVANNE
ELECTROVÁLVULA
R1345
SERBATOIO PVC 5L CENTRALINA
OIL TANK 5L.
ÖLBEHÄLTER LT5
RESERVOIR HUILE LT5
DEPÓSITO ACEITE 5 L.
R1346
*
MOTORE KW1,1 230-400/50T
CENTRALINA
ELECTRIC MOTOR KW1,1 230-400/50T
ELEKTRO-MOTOR KW1,1 230-400/50T
MOTEUR ÉLECTRIQUE KW1,1
230-400/50T
MOTOR ELÉCTRICO KW1,1
230-400/50T
R1347
*
MOTORE KW1,5 230/50M
CENTTRALINA
ELECTRIC MOTOR KW1,5 230/50M
ELEKTRO-MOTOR KW1,5 230/50M
MOTEUR ÉLECTRIQUE KW1,5 230/50M
MOTOR ELÉCTRICO KW1,5 230/50M
TRASCINAMENTO POMPA
CENTRALINA
CONNECTING PUMP
GELENK PUMPE
ACCOUPLEMENT DE POMPE
ACOPLAMIENTO BOMBA
R1342
*
R1343
R1344
R1348
*
R1349
BLOCCHETTO ELECCTRO VALVOLA
ELECTROVALVE BLOCK
BLOCK ELEKTROVENTIL
BLOC ÉLECTROVANNES
BLOQUE DE ELECTROVÁLVULAS
R1350
SOLENOIDE 24VCA 50HZ 18W
SOLENOID
SOLENOID
SOLÉNOÏDE
SOLENOIDE
R1351
CONNETTORE TRASP.LED 24VDC
CONNECTOR FOR SOLENOID VALVE
24VDC
ANSCHLUSS FUER MAGNETVENTIL
24VDC
CONNECTEUR POUR
ELECTROVANNE24VDC
CONECTOR+RECTIFICADOR 24VDC
R1352
SCATOLA QUADRO COMANDO
CONTROL PANEL BOX
SCHALTPULT
BOITE TABLEAU DE COMMANDE
CAJA CUADRO MANDOS
R1353
PORTAOGGETTI QUADRO
CARRY OBJECT
TÜR GEGENSTAND
PORTE OBJET
LLEVE EL OBJETO
R1361XX
PEDANA SUP.263/07 DX
UPPER PLATFORM
AUFNAHMEPLATTFORM
PLATE-FORME SUPERIEURE
PLATAFORMA SUPERIOR
R1362XX
PEDANA SUP.263/07 SX
UPPER PLATFORM
AUFNAHMEPLATTFORM
PLATE-FORME SUPERIEURE
PLATAFORMA SUPERIOR
R1363XX
BASE 263/07 DX
BASE
GRUNDLAGE
CHÂSSIS
BASE
R1364XX
BASE 263/07 SX
BASE
GRUNDLAGE
CHÂSSIS
BASE
R1365XX
LEVA INTERNA 263/07
INSIDE LEVER
HEBEL
LEVIER INTERNE
PALANCA
R1366XX
LEVA INTERNA CIL.263/07
INSIDE LEVER
HEBEL
LEVIER INTERNE
PALANCA
R1367
PATTINO SUP.263/07
UPPER SLIDE PAD
OBERER GLEITER
PATIN SUPERIEUR
PATÍN SUPERIOR
R1368
SUPPOR.INF.LEVA CILIND.263/07
SUPPORT
HALTER
SUPPORT
SOPORTE
R1369
STAFFA ANTIRIBALTAM.263/07 ZG
ANCHORAGE
BÜGEL
CHAPE
BRIDA
R1370
PERNO ATTAC.CIL.263/07 ZG
PIN
STIFT
AXE
PERNO
R1371
PERNO SNODO LEVE 263/07 ZG
UPPER ARM HINGE PIN
STIFT
AXE ARTICULATION LEVIER
PERNO
R1372
CILINDRO IDR.263/07 9005
CYLINDER
ZYLINDER
VÉRIN
CILINDRO
R1373
QUADRO/T 400/50
ELECTRIC BOX
KASTEN DREHSTROM
COFFRET ÉLECTRIQUE
CUADRO ELÉCTRICO
R1374
QUADRO/M 230/50-60
ELECTRIC BOX
KASTEN EINPHASE
COFFRET ÉLECTRIQUE
CUADRO ELÉCTRICO
R1378
PULSANTE PARCHEGGIO 263
PUSH BUTTON
DRUCKKNOPF
BOUTON
PULSADOR
Z_RICAMBI
* = RICAMBI CONSIGLIATI
* = RECOMMENDED SPARE PARTS
* = EMPFOHLENE E-TEILE
* = PIECES DE RECHANGE
CONSEILLEES
* = REPUESTOS ACONSEJAIOS
Dichiarazione di conformità - Declaration of Conformity
Konformitätserklärung - Déclaration de conformité
Declaración de conformidad - Overensstemmelseserklæring
Samsverserklæring - Överensstämmande intyg
EG-Conformiteitsverklaring
WERTHER INTERNATIONAL S.p.A.
Via F.Brunelleschi, 12 42100 CADE’ (Reggio Emilia) Italy
Tel.++/+522/9431 (r.a.) Fax ++/+522/941997
con la presente dichiariamo che il ponte sollevatore modello
déclare par la presente que le pont elevateur modèle
hereby we declare that the lift model
hiermit erklären wir, daß Die Hebebühne Modell
por la presente declara, que l’elevador modelo
Vi erklærer hermed, at autoløfter model
Vi erklærer herved, at løftebuk model
Vi förklarer härmed att billyft model
verklaren hiermee, dat
263
I
è stato costruito in conformità alle normative 73/23 CEE - 89/336 CEE e 98/37/CE
F
a été construite en conformité avec les normes 73/23 CEE - 89/336 CEE et 98/37/CE
GB
was manufactured in conformity with the normes 73/23 CEE - 89/336 CEE and 98/37/CE
D
in Übereinstimmung mit den Richtlinien 73/23 CEE - 89/336 CEE und 98/37/CE
E
ha sido fabricado según las disposiciones 73/23 CEE - 89/336 CEE y 98/37/CE
DK
er fremstillet i overensstemmelse med bestemmelserne i 73/23 EØF - 89/336 EØF - 98/37/EØF
N
ble produsert i samsvar med direktivene 73/23 CEE - 89/336 CEE - 98/37/CE
S
är framställt i överensstämelse med bestämelser i RÅDETS DIREKTIV 73/23 EG - 89/336 EG - 98/37/EG
NL
waarop deze verklaring betrekking heeft, voldoet aan de voorschriften van richtlijn 73/23/EEG
en 89/336 EEG en 98/37 EEG en de daaropvolgende veranderingen en aanvullingen.
Ente certificatore - Organisme cetrificateur
Certification institute - Prüfsinstitut
Registrazione Nr. - Enregistrement N°
Registered No. - Registrier Nr.
CE0044 TÜV
Cadè, 18/06/2007
04-205-07 345539-001
Vice president Iori Werter