1
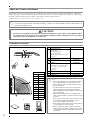
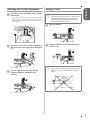
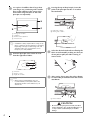
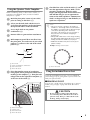
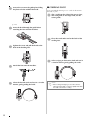
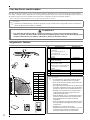
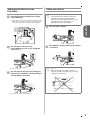
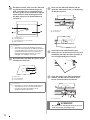
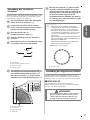
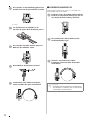
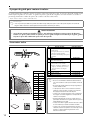
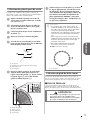
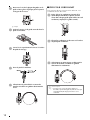
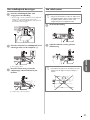
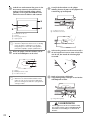
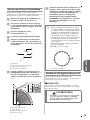
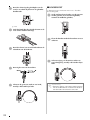
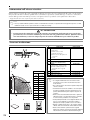
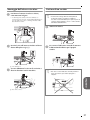
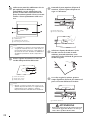
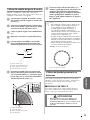
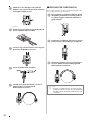
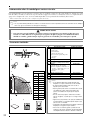
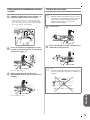
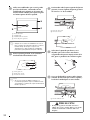
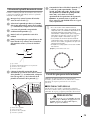
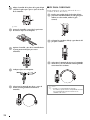
About the Circular Attachment .................................................................................................
Included Accessories ................................................................................................................
Attaching the Circular Attachment ............................................................................................
Sewing a Circle.........................................................................................................................
Using the Quarter Circle Template ...........................................................................................
Using the Included Presser Feet ................................................................................................
2
2
3
3
5
5
Über den Einsatz zum Kreisnähen ............................................................................................ 8
Mitgeliefertes Zubehör.............................................................................................................. 8
Anbringen des Einsatzes zum Kreisnähen ................................................................................. 9
Nähen eines Kreises.................................................................................................................. 9
Anwendung der Viertelkreis-Schablone .................................................................................. 11
Anwendung der mitgelieferten Nähfüße ................................................................................. 11
À propos du guide pour couture circulaire..............................................................................
Accessoires inclus...................................................................................................................
Fixation du guide pour couture circulaire ...............................................................................
Couture d'un cercle ................................................................................................................
Utilisation du gabarit quart de cercle ......................................................................................
Utilisation du pied-de-biche fourni .........................................................................................
14
14
15
15
17
17
Over het cirkelhulpstuk ..........................................................................................................
Bijgeleverde accessoires .........................................................................................................
Het cirkelhulpstuk bevestigen .................................................................................................
Een cirkel naaien ....................................................................................................................
Werken met de kwartcirkelsjabloon........................................................................................
Werken met de bijgeleverde persvoet .....................................................................................
20
20
21
21
23
23
Informazioni sull'attacco circolare..........................................................................................
Accessori in dotazione............................................................................................................
Montaggio dell'attacco circolare.............................................................................................
Cucitura di un cerchio ............................................................................................................
Utilizzo del modello del quarto di cerchio .............................................................................
Utilizzo dei piedini premistoffa in dotazione ..........................................................................
26
26
27
27
29
29
Información sobre la unidad para costura circular ..................................................................
Accesorios incluidos...............................................................................................................
Colocación de la unidad para costura circular........................................................................
Costura de un círculo .............................................................................................................
Utilización de la plantilla de cuarto de círculo .......................................................................
Uso de los pies prensatela incluidos .......................................................................................
32
32
33
33
35
35
ESPAÑOL
CONTENIDO
ITALIANO
SOMMARIO
NEDERLANDS
INHOUDSOPGAVE
FRANÇAIS
TABLE DES MATIÈRES
DEUTSCH
INHALT
ENGLISH
CONTENTS
1
Contents
About the Circular Attachment
This device can sew circular patterns that graduate out at 5mm intervals, ranging from 30mm to 130mm in
radius* when the center needle position is selected. The device is set to the left of the needle on your sewing
machine. Utility and decorative stitches can both be sewn using this device.
* Radius= Distance from center of circle to any point on the circle.
Note
• You cannot use any decorative stitch with side feeding, or stitches over 7.0 mm in width. Use fabrics with a thickness of
less than 4mm (approx. 3/16”).
CAUTION
• Special care is required for the pivot pin; Neglectful treatment may cause injury. Young children should
be supervised to ensure that they do not play with the attachment. When attachment is not in use, always
keep the pivot pin in the indicator to avoid its loss.
Included Accessories
No.
1
1
Part Name
Circular Attachment
a
b
c
d
e
2
3
Conversion Chart
4
5
6
Part Code
-
Indicator
Handle/Flips Up
Release button
Setting position for pivot pin
Scale
2
Pivot Pin
XE6016-001
3
Attachment Screw
(2pcs. one is extra)
XE6022-001
4
Template
XE6024-001
f Radius of circle in mm
g Angular lines listed in degrees
starting at 0 with 5 degree
intervals
h Center
5
Instruction Manual
6
Braiding Foot
SA141/F021N
This Manual
7
Cording Foot
SA110/F013N
mm (f)
inch
130
5 3/16
120
4 3/4
Note
110
4 3/8
100
4
• We recommend that you use the extension table on
your sewing machine for smooth fabric control.
• Do not raise the extension table when the circular
devise is attached.
• The pivot pin may be released if you hold up the
fabric while attached to the circular attachment.
When holding up the fabric gently press down on the
top of the pivot pin.
• When sewing smaller circles or using fabric with a
grain or uneven textures, a perfect circle may not be
achieved.
• Some of presser feet such as the side cutter cannot
be used with this attachment, always test your
accessory feet with the attachment.
90
3 1/2
80
3 3/16
70
2 3/4
60
2 3/8
50
2
40
3/2
30
13/16
7
• When using this attachment test the sewing speed
of your machine for the best results.
• When sewing larger pieces of fabric or garments,
make sure that your fabric or garment does not get
caught on the machine creating drag or distortion of
your design.
2
a
Sewing a Circle
Place the circular attachment at left as shown
in the figure.
Note
• Thread the machine needle before setting the pivot
pin into the circular attachment. Threading lever
may hit the pivot pin and damage the pin or the
machines threading mechanism.
→ The two tabs on the underside of the attachment will
drop down into corresponding holes in the needle
plate, so that the attachment lays flat on the bed of
your machine.
40
b
a
Raise the handle.
b
Slide the indicator to match the desired size
of your circle.
ENGLISH
Attaching the Circular Attachment
30
Insert the screw on the circular attachment in
the screw hole at the right of the needle plate
(a).
a Attachment Screw
Securely tighten the screw with the discc
shaped screwdriver included in your
machine.
Note
• Do not slide the indicator by holding onto the pivot
pin, doing so may cause the pivot pin to bend or
break.
a Disc-shaped screwdriver
3
c
Use a piece of stabilizer that is larger than
your design area, reinforcing with a smaller
piece of the stabilizer at the center of the
circle when using fine fabric or the same
pivot pin area repeatedly.
e
Pressing the top of the pivot pin, insert the
point of the pivot pin into the “Y” mark on
the attachment.
a Right side of Fabric
b Wrong side of Fabric
a
b
c
d
Wrong side of Fabric
Stabilizer
Reinforcement Stabilizer
Pivot Pin area
Note
• A stabilizer is always required when sewing on any
fabric or garment to prevent stretching or puckering.
Depending on the type of fabric being sewn, will
determine wether you use permanent, iron on,
temporary or a sticky stabilizer.
d
f
Select the desired stitch and sew allowing the
fabric to feed smoothly, making sure that you
do not push or pull your fabric causing an
uneven circle.
g
After sewing, always press the release button
to remove the pin and fabric from the circular
attachment.
Insert the pivot pin at the center of circle
from the right side of fabric.
a Pivot Pin
b Center of circle
c Right side of Fabric
Note
• When sewing a small diameter circle, we
recommend that you first pin the fabric to the
attachment and then set the indicator to your
desired size.
a Release button
CAUTION
• Do not leave the pivot pin inserted in your fabric
and not attached to the circular attachment. To do
so may result in accidental injury or machine
damage.
4
When combining utility or decorative stitches, or
repeating an individual stitch, use the included
template as a guide.
a
Mark the pivot point (center of your circle)
prior to sewing on the fabric (a).
b
Select your desired stitch and the size of a
circle using the markings on the attachment,
then place the fabric on the attachment.
c
Sew a single stitch or one pattern
combination (b).
d
Remove fabric or garment from attachment.
e
With temporary pencil draw two lines from
the pivot point, one at the start of your stitch
pattern (c) and one at the end of the stitch
pattern (d).
a
b
c
d
f
Pivot Point
Single stitch/Pattern combination
Start of the stitch
End of the stitch
Place the template on top of your design,
lining up the center pivot point and the center
marking on the template (a). Then place the
0 degree line on the right side of template (b)
at the start of the stitch (c).
g
Check the line at the end of the stitch (d) and
note the approximate degrees. With a circle
measuring 360 degrees divide the stitch
length (your degree/stitch measurement) into
360 and that will give you an approximate
count on the stitch repetitions. SAMPLE: Your
stitch is 16 degrees long so: 360 divided by 16
equals 22.5 repetitions.
ENGLISH
Using the Quarter Circle Template
Note
• This is not an exact count due to the number of
variables i.e. stitch length, fabric used, thread and
the stabilizer. You may be able to adjust the length
of the stitch, depending on the stitch used,
increasing or decreasing to get a closer match so
that your circle closes without overlapping or
shortage (a).
• Always stitch a trial version of the design checking
the stitch length, width and the direction of sewing,
making sure that it is suitable for your project.
• Additional calculations may be necessary if your
pattern overlaps.
Example: Shortage of the Pattern
a End of the stitch
Using the Included Presser Feet
Using the included presser feet, you can embellish
your sewing projects, giving them a professional look
with your personal flair.
■ BRAIDING FOOT
You can use a wide variety of braiding up to 5mm in
width, using straight, zigzag and select decorative
stitches.
CAUTION
• Do not use this foot when sewing with densely
woven braiding that is difficult for the needle to
penetrate easily. Doing so could result in needle
breakage, damage and/or injury.
a
b
c
d
Center on template
0 degree line
Start of the stitch
End of the stitch
5
a
Loosen the screw on the guide plate sliding
the plate to fit the width of the braid.
■ CORDING FOOT
You can embellish using 1 to 3 cords of decorative
threads or yarn.
a
Slip a cord from the right of the presser foot,
into each guide (to use single cord, use the
center guide).
b
Place the cords under and to the back of the
cording foot.
c
Select a zigzag or decorative stitch and sew in
a circular manner gently guiding the cords.
a Plate
b
c
6
Insert the braid through the guide before
attaching the foot onto the machine.
Tighten the screw and pull the braid to the
back of the braiding foot.
d
Attach the foot onto the machine.
e
Select the desired stitch and sew in a circular
manner gently guiding the braid.
Note
• When sewing with zigzag or decorative stitches,
adjust the stitch width, so that it is slightly wider than
the width of the braid or cording.
Über den Einsatz zum Kreisnähen ............................................................................................. 8
Mitgeliefertes Zubehör............................................................................................................... 8
Anbringen des Einsatzes zum Kreisnähen .................................................................................. 9
Nähen eines Kreises................................................................................................................... 9
Anwendung der Viertelkreis-Schablone ................................................................................... 11
Anwendung der mitgelieferten Nähfüße .................................................................................. 11
DEUTSCH
INHALT
7
Inhalt
Über den Einsatz zum Kreisnähen
Mit diesem Einsatz können von einer gewählten mittleren Nadelposition aus Kreismuster mit einem Radius*
von 30 bis 130 mm und in Schritten von 5 mm genäht werden. Der Einsatz wird an der Nähmaschine links von
der Nadel eingesetzt. Dieses Zubehör kann für Nutz- und Dekorstichen verwendet werden.
* Radius = Abstand vom Mittelpunkt des Kreises zu jedem möglichen Punkt auf dem Kreis.
Hinweis
• Dekorstiche mit Seitentransport oder Stiche, die breiter sind als 7,0 mm, können nicht genäht werden. Verwenden Sie
Stoffe, die dünner sind als 4 mm (ca. 3/16 Zoll).
VORSICHT
• Der Ankerstift erfordert besondere Sorgfalt. Der fahrlässige Umgang kann zu Verletzungen führen.
Achten Sie darauf, dass kleine Kinder nicht mit diesem Zubehör spielen. Wenn der Einsatz nicht gebraucht
wird, den Ankerstift stets im Indikator aufbewahren, damit Sie ihn nicht verlieren.
Mitgeliefertes Zubehör
Nr.
1
1
Teilebezeichnung
Einsatz zum Kreisnähen
a
b
c
d
e
2
3
Umrechnungstabelle
4
5
6
Bestellnummer
-
Indikator
Verschluss/klappt hoch
Freigabeknopf
Einstellposition für Ankerstift
Skala
2
Ankerstift
XE6016-001
3
Einsatzschraube
(2 Stck., eine Ersatz)
XE6022-001
4
Schablone
XE6024-001
5
Gebrauchsanleitung
6
Spitzenfuß
SA141/F021N
7
Kordeleinnähfuß
SA110/F013N
f Kreisradius in mm
g Winkellinien in Grad, beginnend
mit 0 und in 5-Grad-Schritten
h Mitte
Diese Gebrauchsanleitung
mm (f)
Zoll
130
5 3/16
Hinweis
120
4 3/4
110
4 3/8
100
4
• Es wird empfohlen, zur leichteren Stoffkontrolle den
Ausziehtisch an der Nähmaschine zu verwenden.
• Wenn der Einsatz zum Kreisnähen eingesetzt ist, den
Ausziehtisch nicht anheben.
90
3 1/2
80
3 3/16
70
2 3/4
60
2 3/8
50
2
40
3/2
30
13/16
7
• Der Ankerstift kann durch Anheben des am Einsatz zum
Kreisnähen angebrachten Stoffes gelöst werden. Beim
Anheben des Stoffes leicht auf den Ankerstift drücken.
• Beim Nähen von kleineren Kreisen oder mit grobem,
ungleichmäßigem Stoff kann möglicherweise kein
präziser Kreis erzielt werden.
• Einige der Nähfüße, wie z. B. der Kantenabschneider,
können mit diesem Zubehör nicht verwendet werden.
Zubehörnähfüße immer zuerst mit dem Einsatz
ausprobieren.
• Wenn dieser Einsatz verwendet wird, sollten Sie testen,
mit welcher Nähgeschwindigkeit die besten Resultate
rezielt werden.
• Beim Nähen von größeren Stoffen oder
Kleidungsstücken, müssen Sie sicherstellen, dass sich
der Stoff nicht in der Maschine verfängt und das
Stickmuster dadurch verzieht oder verzerrt wird.
8
Anbringen des Einsatzes zum
Kreisnähen
Nähen eines Kreises
Hinweis
Den Einsatz zum Kreisnähen links einlegen
a
(siehe Abbildung).
• Zuerst die Maschine einfädeln und dann den
Ankerstift in den Einsatz zum Kreisnähen
hineinsetzen. Der Einfädelhebel könnte an den
Ankerstift stoßen und den Stift oder den
Einfädelmechanismus beschädigen.
→ Damit der Einsatz flach im Nähmaschinenbett liegt,
fallen die beiden Laschen auf der Einsatzunterseite
in die entsprechenden Öffnungen der Stichplatte.
b
b
Den Indikator auf die gewünschte Kreisgröße
verschieben.
30
Die Schraube am Einsatz in die
Gewindebohrung rechts an der Stichplatte
einsetzen (a).
a Einsatzschraube
c
Den Verschluss anheben.
Die Schraube mit dem im Lieferumfang der
Nähmaschine enthaltenen scheibenförmigen
Schraubendreher festziehen.
DEUTSCH
40
a
Hinweis
• Beim Verschieben des Indikators nicht den
Ankerstift festhalten; der Stift könnte sich dabei
verbiegen oder abbrechen.
a Scheibenförmiger Schraubendreher
9
c
Bei dünnen Stoffen, oder wenn der Ankerstift
im gleichen Bereich wiederholt eingesetzt
wird, verwenden Sie ein Unterlegmaterial,
das etwas größer als das Stickmuster und mit
einem kleineren Stück Unterlegmaterial in
der Mitte des Kreises im Ankerstiftbereich
verstärkt ist.
e
Oben auf den Ankerstift drücken und die
Spitze des Ankerstiftes in die „Y“-Markierung
am Einsatz einsetzen.
a Stoffvorderseite
b Stoffrückseite
a
b
c
d
Stoffrückseite
Unterlegmaterial
Unterlegmaterial zur Verstärkung
Ankerstiftbereich
Hinweis
• Zum Nähen von Stoff oder Kleidungsstücken ist
immer ein Unterlegmaterial erforderlich, um Dehnen
oder Faltenbildung zu vermeiden. Je nach Art des
genähten Stoffes können Sie ein permanentes,
kurzzeitiges Unterlegmaterial oder eines zum
Aufbügeln oder Aufkleben verwenden.
d
f
Gewünschten Stich wählen und dann nähen.
Sicherstellen, dass der Stoff weich transportiert wird,
und Drücken und Ziehen des Stoffes vermeiden, da
sonst ein ungleichmäßiger Kreis entsteht.
g
Nach dem Nähen stets den Freigabeknopf
drücken, um den Stift und Stoff aus dem
Einsatz zum Kreisnähen zu entfernen.
Den Ankerstift in der Mitte des Kreises auf die
Stoffoberseite einsetzen.
a Ankerstift
b Kreismittelpunkt
c Stoffvorderseite
Hinweis
• Zum Nähen von Kreisen mit kleinem Durchmesser
wird empfohlen, zuerst den Stoff am Einsatz zu
befestigen und dann den Indikator auf die
gewünschte Größe einzustellen.
a Freigabeknopf
VORSICHT
• Den Ankerstift aus dem Material entfernen. Ansonsten
könnte die Maschine beschädigt werden.
10
Anwendung der ViertelkreisSchablone
g
Wenn Sie Nutz- oder Dekorstiche kombinieren oder
einen Einzelstich wiederholen, verwenden Sie die
mitgelieferte Schablone als Führung.
a
Vor dem Nähen des Stoffes den Ankerpunkt
(Mitte des Kreises) markieren (a).
b
Gewünschten Stich wählen und die Größe des
Kreises mit den Markierungen am Einsatz einstellen,
und dann den Stoff auf den Einsatz legen.
c
Einen Einzelstich oder ein
Kombinationsmuster nähen (b).
d
Stoff oder Kleidungsstück aus dem Einsatz
entfernen.
e
Mit Kreidestift zwei Linien vom Ankerpunkt ziehen,
eine am Beginn und eine am Ende der Naht.
Die Linie am Nahtende (d) prüfen und die
ungefähre Gradzahl ermitteln. Da ein Kreis
aus 360 Grad besteht, teilen Sie 360 durch die
Nahtlänge (Ihre Grad/Naht-Messung) und Sie
erhalten einen Näherungswert für die
Stichwiederholungen. BEISPIEL: Ihre Naht ist
16 Grad lang, also: 360 geteilt durch 16 ergibt
22,5 Wiederholungen.
Hinweis
DEUTSCH
• Aufgrund der vielen Variablen, wie Stichlänge,
verwendeter Stoff, Garn und Unterlegmaterial, ist
dieser Wert nicht genau. Je nach verwendetem
Stich können Sie die Naht evtl. durch Vergrößern
oder Verkleinern der Stichlänge so anpassen, dass
der Kreis ohne Überlappen oder Lücken besser
schließt (a).
• Nähen Sie immer eine Probenaht des Designs und
prüfen Sie Stichlänge, -breite und Nährichtung auf
Eignung für Ihr Nähprojekt.
• Falls das Muster überlappt, sind möglicherweise
weitere Berechnungen erforderlich.
Beispiel: Muster abgeschnitten
a
b
c
d
f
Ankerpunkt
Einzelstich/Kombinationsmuster
Beginn der Naht
Ende der Naht
Die Schablone auf das Design legen und den
Ankermittelpunkt und die Mittemarkierung an
der Schablone miteinander ausrichten (a).
Dann die 0-Grad-Linie (b) auf der rechten
Schablonenseite an den Nahtanfang legen (c).
a Ende der Naht
Anwendung der mitgelieferten Nähfüße
Mit den mitgelieferten Nähfüßen können Sie Ihre
Nähprojekte verzieren und ihnen eine professionelle
Wirkung sowie eine ganz persönliche Note verleihen.
■ SPITZENFUSS
Mit Geradstichen, Zickzack- und einigen
Dekorstichen können Sie eine Vielfalt von Spitzen
bis zu 5 mm Breite verwenden.
VORSICHT
•
a
b
c
d
Diesen Nähfuß nicht zum Nähen von dicht gewobenen
Spitzen verwenden, bei denen die Nadel nur schwer
eindringen kann. Die Nadel könnte abbrechen oder
beschädigt werden und Verletzungen verursachen.
Mitte der Schablone
0-Grad-Linie
Beginn der Naht
Nahtende
11
a
Die Schraube an der Fußführungsplatte lösen
und die Platte auf die Spitzenbreite einstellen.
■ KORDELEINNHÄHFUSS
Verzierungen können Sie mit 1 bis 3 Kordeln aus
Dekorfaden oder Garn nähen.
a
Kordel von rechts in den Nähfuß einführen und jede
Kordel in die entsprechende Führung legen (bei nur
einer Kordel die mittlere Führung verwenden).
b
Die Kordeln unter und zur Rückseite des
Kordeleinnähfußes legen.
c
Zickzack- oder Dekorstich wählen,
kreisförmig nähen und dabei die Kordeln
leicht führen.
a Platte
b
c
Vor dem Einsetzen des Nähfußes in die
Maschine die Spitze durch die Führung ziehen.
Die Schraube festziehen und die Spitze zur
Rückseite des Nähfußes ziehen.
d
Den Nähfuß in die Maschine einsetzen.
e
Gewünschten Stich wählen, kreisförmig
nähen und dabei die Spitze leicht führen.
Hinweis
• Beim Nähen mit einem Zickzack- oder Dekorstich
die Stichbreite so einstellen, dass sie etwas breiter
als die Spitze oder die Kordel ist.
12
À propos du guide pour couture circulaire............................................................................... 14
Accessoires inclus.................................................................................................................... 14
Fixation du guide pour couture circulaire ................................................................................ 15
Couture d'un cercle ................................................................................................................. 15
Utilisation du gabarit quart de cercle ....................................................................................... 17
Utilisation du pied-de-biche fourni .......................................................................................... 17
FRANÇAIS
TABLE DES MATIÈRES
13
Table des matières
À propos du guide pour couture circulaire
Ce guide permet de coudre des motifs circulaires à des intervalles de 5 mm, en rayons* allant de 30 mm à 130
mm lorsque l'aiguille est au centre. Le guide est placé à gauche de l'aiguille sur votre machine à coudre. Il
permet également de coudre des points de couture courants et décoratifs.
* Rayon : distance entre le centre et le bord du cercle.
Remarque
• Vous ne pouvez pas utiliser les points décoratifs lorsque le fil passe par le côté ni des points de plus de 7,0 mm de
largeur. Utilisez des tissus dont l'épaisseur mesure moins de 4 mm (env. 3/16”).
ATTENTION
• Accordez une attention particulière au pivot ; une utilisation négligente peut provoquer des blessures.
Veillez à ce que les jeunes enfants ne jouent pas avec le guide. Lorsque vous n'utilisez pas le guide, gardez
toujours le pivot dans l'indicateur pour éviter de le perdre.
Accessoires inclus
N°
1
1
Nom de la pièce
Guide pour couture circulaire
a
b
c
d
e
2
3
Tableau de conversion
5
14
6
-
Indicateur
Poignée/Inversion vers le haut
Bouton de dégagement
Position d'insertion pour le pivot
Échelle
2
Pivot
XE6016-001
3
Vis de fixation
(2 pcs, une de réserve)
XE6022-001
Gabarit
XE6024-001
4
4
Code de la pièce
f Rayon du cercle en mm
g Lignes angulaires indiquées en
degrés, commençant à 0 avec
des intervalles de 5 degrés
h Centre
5
Manuel d'instructions
6
Pied de tressage
SA141/F021N
Ce manuel
7
Pied pour cordonnet
SA110/F013N
mm (f)
pouces
130
5 3/16
120
4 3/4
Remarque
110
4 3/8
100
4
90
3 1/2
80
3 3/16
• Nous vous recommandons d'utiliser la table d'extension
avec votre machine à coudre pour un meilleur contrôle du
tissu.
• Ne relevez pas la table d'extension lorsque le guide pour
couture circulaire est fixé.
70
2 3/4
60
2 3/8
50
2
40
3/2
30
13/16
7
• Le pivot peut se retirer si vous soulevez le tissu fixé au
guide pour couture circulaire. Lorsque vous soulevez le
tissu, appuyez doucement sur la tête du pivot.
• Lorsque vous cousez de plus petits cercles ou utilisez du
tissu à grain ou à texture irrégulière, il est impossible de
réaliser un cercle parfait.
• Certains pieds-de-biche, tels que le couteau raseur, ne
peuvent pas être utilisés avec ce guide. Testez toujours vos
pieds auxiliaires avec le guide.
• Lorsque vous utilisez ce guide, testez la vitesse de couture
de votre machine pour obtenir les meilleurs résultats.
• Lorsque vous cousez de plus grandes pièces de tissu ou
vêtements, assurez-vous qu'ils ne s'accrochent pas à votre
machine, ce qui provoquerait un glissement ou une
distorsion de votre motif.
Fixation du guide pour couture
circulaire
Couture d'un cercle
Remarque
Placez le guide pour couture circulaire à
a
gauche comme illustré ci-dessous.
→ Les deux taquets en dessous du guide vont s'insérer
dans les emplacements correspondants dans la
plaque d'aiguille, de sorte que le guide repose à plat
sur le plateau de votre machine.
40
• Enfilez l'aiguille de la machine avant de placer le
pivot dans le guide pour couture circulaire. Le levier
d'enfilage risque de toucher le pivot et
d'endommager ce dernier ou le dispositif d'enfilage
de la machine.
a
Soulevez la poignée.
b
Faites glisser l'indicateur pour atteindre la
taille de cercle de votre choix.
30
FRANÇAIS
Insérez la vis sur le guide pour couture
b
circulaire dans l'emplacement prévu à cet
effet à droite de la plaque d'aiguille (a).
Remarque
a Vis de fixation
c
• Ne faites pas glisser l'indicateur en appuyant sur le
pivot car cela pourrait le tordre ou le casser.
Serrez fermement la vis à l'aide du tournevis
en forme de disque fourni avec votre
machine.
a Tournevis en forme de disque
15
c
Utilisez un renfort plus large que le motif,
avec un tissu fin. Renforcez le centre du
cercle avec une pièce de renfort si vous
utilisez le même centre de façon répétée.
a
b
c
d
e
Insérez la pointe du pivot dans l'emplacement
désigné par « Y » sur le guide en appuyant
dessus.
a Endroit du tissu
b Envers du tissu
Envers du tissu
Renfort
Renfort
Zone du pivot
Remarque
• Utilisez toujours un renfort lorsque vous cousez sur
un tissu ou un vêtement pour éviter de l'étirer ou de
faire des plis. Selon le type de tissu à coudre,
choisissez un renfort permanent, thermocollant,
temporaire ou adhésif.
d
Insérez le pivot au centre du cercle sur
l'endroit du tissu.
f
Sélectionnez le point désiré et cousez en
permettant au tissu d'être librement entraîné.
Si vous poussez ou tirez sur le tissu, votre
cercle sera irrégulier.
g
Lorsque vous avez terminé de coudre,
appuyez toujours sur le bouton de
dégagement pour enlever le pivot et le tissu
du guide pour couture circulaire.
a Pivot
b Centre du cercle
c Endroit du tissu
Remarque
• Lorsque vous cousez un cercle de petit diamètre,
nous vous recommandons de fixer d'abord le tissu
au guide et de placer ensuite l'indicateur à la taille
désirée.
a Bouton de dégagement
ATTENTION
• Ne laissez pas le pivot inséré dans le tissu et non
fixé au guide couture circulaire. Cela pourait causer
une blessure ou endommager la machine.
16
Utilisation du gabarit quart de cercle
Lorsque vous combinez des points courants ou
décoratifs ou que vous répétez un point individuel,
utilisez le gabarit fourni comme guide.
Repérez d'abord le point pivot (centre de
votre cercle) avant de commencer à coudre
sur votre tissu (a).
b
Sélectionnez le point désiré et la taille du
cercle en utilisant les repères sur le guide ;
placez-y ensuite le tissu.
c
Cousez un point unique ou une combinaison
de motifs (b).
d
Retirez le tissu ou le vêtement du guide.
e
A l'aide d'un crayon effaçable, tracez deux
lignes à partir du point pivot, une au début du
motif de point, l'autre à la fin.
Vérifiez la ligne à la fin du point (d) et notez
les degrés approximatifs. À l'aide d'un cercle
de 360 degrés, divisez la longueur du point
(votre degré/mesure du point) par 360, ce qui
vous donnera un nombre de répétitions de
points approximatif. EXEMPLE : votre point
est long de 16 degrés, donc : 360 divisé par 16
est égal à 22,5 répétitions.
Remarque
• Il ne s'agit pas d'un compte exact en raison du
nombre de variables, p. ex. la longueur du point, le
tissu utilisé, le fil et le renfort. Selon le point utilisé,
vous pouvez ajuster la longueur du point,
l'agrandissant ou le réduisant pour réussir à fermer
votre cercle sans chevauchement ou insuffisance
(a).
• Cousez toujours une version d'essai du motif en
vérifiant la longueur et la largeur du point ainsi que
la direction de couture pour vous assurer qu'il
convienne à votre projet.
• Des calculs supplémentaires peuvent être
nécessaires si votre motif se chevauche.
Exemple: insuffisance du motif
a
b
c
d
f
Point pivot
Combinaison de motif de points/point unique
Début du point
Fin du point
Placez le gabarit au-dessus de votre motif,
alignant ainsi le point pivot central et le
repère central du gabarit (a). Placez ensuite
la ligne 0 degré (b) sur le côté droit du
gabarit au début du point (c).
FRANÇAIS
a
g
a Fin du point
Utilisation du pied-de-biche fourni
L'utilisation du pied-de-biche fourni vous permet de
décorer vos projets de couture en leur donnant un aspect
professionnel agrémenté de votre touche personnelle.
■ PIED DE TRESSAGE
Vous pouvez utiliser une grande variété de tresses
mesurant jusqu'à 5 mm de largeur à l'aide des points
droits, des points zigzag et de certains points décoratifs.
ATTENTION
• N'utilisez pas ce pied lorsque vous cousez avec des
tresses tissées denses que l'aiguille pénètre
difficilement. Sinon, vous pourriez casser l'aiguille,
provoquer des dommages et/ou des blessures.
a
b
c
d
Centre du gabarit
Ligne 0 degré
Début du point
Fin du point
17
a
Desserrez la vis de la plaque du guide sur le
pied et faites glisser la plaque pour l'ajuster à
la largeur de la tresse.
■ PIED POUR CORDONNET
Vous pouvez décorer votre motif en utilisant 1 à 3
cordonnets de fils décoratifs.
a
Faites glisser les cordonnets à partir de la
droite du pied-de-biche et placez chacun
d'eux dans chaque guide (pour utiliser un seul
cordonnet, employez le guide central).
b
Placez les cordonnets en dessous et à l'arrière
du pied pour cordonnet.
c
Sélectionnez un point zigzag ou décoratif et
cousez de manière circulaire en guidant
doucement les cordonnets.
a Plaque
b
c
18
Insérez la tresse via le guide avant de fixer le
pied à la machine.
Serrez la vis et positionnez la tresse à l'arrière
du pied de tressage.
d
Fixez le pied à la machine.
e
Sélectionnez le point désiré et cousez de
manière circulaire en guidant doucement la
tresse.
Remarque
• Lorsque vous cousez des points zigzag ou
décoratifs, ajustez la largeur du point de sorte qu'il
soit légèrement plus large que la tresse ou le
cordonnet.
Over het cirkelhulpstuk ........................................................................................................... 20
Bijgeleverde accessoires .......................................................................................................... 20
Het cirkelhulpstuk bevestigen .................................................................................................. 21
Een cirkel naaien ..................................................................................................................... 21
Werken met de kwartcirkelsjabloon......................................................................................... 23
Werken met de bijgeleverde persvoet ...................................................................................... 23
NEDERLANDS
INHOUDSOPGAVE
19
Inhoudsopgave
Over het cirkelhulpstuk
Met dit hulpstuk kunt u cirkels naaien met een straal* van 30 mm tot 130 mm in stappen van 5 mm, wanneer
de middelste naaldstand is geselecteerd. Het hulpstuk wordt links van de naald op uw naaimachine
geïnstalleerd. Met dit hulpstuk kunt u naaisteken en decoratieve steken naaien.
* Straal = Afstand van het midden van de cirkel naar de rand van de cirkel.
Opmerking
• U kunt geen decoratieve steken met zijwaartse invoer of steken van meer dan 7,0 mm breed naaien. Gebruik stof van
minder dan 4 mm (ca. 3/16 inch) dik.
VOORZICHTIG
• Wees met name voorzichtig met de spilpen. Nonchalance kan leiden tot letsel. Houd jonge kinderen
onder toezicht en zorg dat ze niet met het hulpstuk kunnen spelen. Zorg dat de spilpen niet zoekraakt en
bewaar hem altijd in de indicator wanneer het hulpstuk niet in gebruik is.
Bijgeleverde accessoires
Nr.
1
1
Onderdeel
Cirkelhulpstuk
a
b
c
d
e
2
3
Omrekentabel
4
5
6
Onderdeelcode
-
Indicator
Hendel/klapt omhoog
Ontgrendelingsknop
Installatiepositie voor spilpen
Schaal
2
Spilpen
XE6016-001
3
Bevestigingsschroef
(2 stuks, een is reserve)
XE6022-001
4
Sjabloon
XE6024-001
f Straal van cirkel in mm
g Hoeklijnen beginnend bij 0
graden met intervallen van 5
graden
h Middelpunt
5
Handleiding
6
Bandvoet
Deze handleiding
SA141/F021N
7
Koordvoet
SA110/F013N
mm (f)
inch
130
5 3/16
120
4 3/4
Opmerking
110
4 3/8
100
4
90
3 1/2
• Wij adviseren u de verlengtafel van uw naaimachine te
gebruiken, zodat u de stof soepel kunt doorvoeren.
• Zet de verlengtafel niet omhoog wanneer het cirkelhulpstuk
bevestigd is.
80
3 3/16
70
2 3/4
60
2 3/8
50
2
40
3/2
30
13/16
7
• U kunt de spilpen ontgrendelen als u de stof die is bevestigd
aan het cirkelhulpstuk omhoog houdt. Terwijl u de stof
omhoog houdt, drukt u zachtjes boven op de spilpen.
• Wanneer u kleinere cirkels naait of stof met een vleug of
ongelijkmatige structuur gebruikt, is een volmaakte cirkel
misschien niet mogelijk.
• Sommige persvoeten, zoals de zijsnijder, kunnen niet
worden gebruikt in combinatie met dit hulpstuk. Test altijd
eerst uw accessoirevoeten met dit hulpstuk.
• Voor het beste resultaat is het aan te bevelen de
naaisnelheid van uw machine uit te proberen als u dit
hulpstuk gebruikt.
• Wanneer u grotere stukken stof of kledingstukken naait,
zorg dan dat deze niet vastraken in de machine. Anders kan
de stof gaan trekken of kan uw ontwerp vervormd raken.
20
Het cirkelhulpstuk bevestigen
a
Een cirkel naaien
Plaats het cirkelhulpstuk links zoals
aangegeven in de afbeelding.
Opmerking
• Rijg de machinenaald in voordat u de spilpen in het
cirkelhulpstuk plaatst. Anders raakt de inrijghendel
mogelijk de spilpen, waardoor de pen of het
inrijgmechanisme beschadigd kan raken.
→ De twee lipjes aan de onderkant van het hulpstuk
zakken in de overeenkomstige gaten in de
steekplaat, zodat het hulpstuk plat op de tafel van
uw machine komt te liggen.
40
b
Zet de hendel omhoog.
b
Schuif de indicator naar de gewenste
cirkelomvang.
30
Plaats de schroef in het cirkelhulpstuk, in het
schroefgat rechts van de steekplaat (a).
Draai de schroef stevig vast met de
schijfvormige schroevendraaier bij uw
machine.
Opmerking
• Houd bij het verschuiven van de indicator nooit de
spilpen vast. De spilpen zou kunnen buigen of
breken.
NEDERLANDS
a Bevestigingsschroef
c
a
a Schijfvormige schroevendraaier
21
c
Gebruik een stuk steunstof dat groter is dan
het ontwerp. Wanneer u met dunne stof
werkt of steeds hetzelfde spilpen gebied
gebruikt, verstevig dan het midden van de
cirkel extra met een kleiner stuk steunstof.
e
Terwijl u de bovenkant van de spilpen
indrukt, plaatst u de punt van de spilpen in de
Y-markering op het hulpstuk.
a Voorkant van de stof
b Achterkant van de stof
a
b
c
d
Achterkant van de stof
Steunstof
Verstevigingssteunstof
Spilpengebied
Opmerking
• Steunstof is altijd vereist wanneer u stof of kleding
naait, om rekken of oprimpelen te voorkomen.
Naargelang het soort stof dat u naait gebruikt u
permanente, tijdelijke, opstrijk- of plaksteunstof.
d
Plaats de spilpen vanaf de voorkant van de
stof in het middelpunt van de cirkel.
f
Selecteer de gewenste steek en naai terwijl u
de stof soepel laat invoeren. Duw of trek niet
aan de stof; dan wordt de cirkel mogelijk
vervormd.
g
Druk na het naaien altijd op de
ontgrendelingsknop om de pin en stof uit het
cirkelhulpstuk te halen.
a Spilpen
b Middelpunt van de cirkel
c Voorkant van de stof
Opmerking
• Wanneer u een cirkel met kleine diameter naait,
raden we u aan de stof eerst aan het hulpstuk te
pinnen en vervolgens de indicator op de gewenste
omvang te zetten.
a Ontgrendelingsknop
VOORZICHTIG
• Laat de spilpen niet in uw stof vastzitten terwijl
deze niet bevestigd is aan het cirkelhulpstuk. Dit
kan leiden tot verwondingen of schade aan de
machine.
22
Werken met de kwartcirkelsjabloon
Wanneer u naaisteken of decoratieve steken
combineert of een individuele steek herhaalt, kunt u
de bijgeleverde sjabloon als geleider gebruiken.
a
Markeer het draaipunt (het middelpunt van
de cirkel) voordat u de stof naait (a).
b
Selecteer de gewenste steek en de omvang
van de cirkel met behulp van de markeringen
op het hulpstuk. Plaats vervolgens de stof op
het hulpstuk.
c
Naai één steekpatroon of een
combinatiepatroon (b).
d
Haal de stof of het kledingstuk uit het hulpstuk.
e
Teken met een uitwisbare stift twee lijnen
vanuit het draaipunt; één aan het begin van
het steekpatroon en één aan het eind van het
steekpatroon.
g
Controleer op welke lijn het steekpatroon (d)
eindigt en noteer ongeveer het aantal graden.
Aangezien een cirkel 360 graden bevat, deelt
u vervolgens 360 door de steeklengte (uw
steekmeting in graden). Zo krijgt u bij
benadering het aantal steekherhalingen.
VOORBEELD: uw steekpatroon is 16 graden
lang, dus: 360 gedeeld door 16 is 22,5
herhalingen.
Opmerking
• Deze berekening is niet helemaal precies, gezien
een aantal variabelen, zoals steeklengte, gebruikte
stof, draad en steunstof. U kunt de lengte van het
steekpatroon mogelijk aanpassen naargelang de
gebruikte steek, om te proberen de cirkel precies
rond te krijgen zonder overlapping of tekort (a).
• Stik altijd een proefversie van het ontwerp waarbij u
de steeklengte, de breedte en de naairichting
controleert. Zo kunt u zien of het ontwerp geschikt is
voor uw project.
• Extra berekeningen zijn mogelijk noodzakelijk in
geval van overlapping.
Voorbeeld: patroon onvolledig
f
Draaipunt
Eén steekpatroon/Patrooncombinatie
Begin van het steekpatroon
Eind van het steekpatroon
Plaats de sjabloon op uw ontwerp met de
middelpuntmarkering op het draaipunt (a).
Plaats de nul-gradenlijn (b) rechts op de
sjabloon aan het begin van het steekpatroon
(c).
a Eind van het steekpatroon
NEDERLANDS
a
b
c
d
Werken met de bijgeleverde persvoet
Met de bijgeleverde persvoet kunt u uw
naaiprojecten verfraaien, zodat ze er professioneel
uitzien, met een persoonlijk tintje.
■ BANDVOET
U kunt allerlei soorten band gebruiken tot 5 mm
breed, met rechte steken, zigzagsteken en sommige
decoratieve steken.
VOORZICHTIG
• Gebruik deze voet niet wanneer u naait met dicht
geweven band waar de naald niet gemakkelijk
doorheen dringt. De naald kan dan breken, met
mogelijk schade of letsel tot gevolg.
a
b
c
d
Middelpunt op sjabloon
Nul-gradenlijn
Begin van het steekpatroon
Eind van de steek
23
a
Draai de schroef op de geleideplaat van de
voet los en schuif de plaat naar de gebruikte
bandbreedte.
■ KOORDVOET
U kunt uw project verfraaien met 1 tot 3 koorden
decoratief garen.
a
Steek een koord vanaf rechts van de persvoet
in elke geleider (als u één koord gebruikt,
neemt u de middelste geleider).
b
Plaats de koorden onder de koordvoet en naar
achteren.
c
Selecteer zigzag- of decoratieve steken en
naai cirkelgewijs, waarbij u de koorden losjes
leidt.
a Plaat
b
c
24
Steek het band door de geleider alvorens u de
voet aan de machine bevestigt.
Draai de schroef vast en trek het band naar de
achterkant van de bandvoet.
d
Bevestig de voet aan de machine.
e
Selecteer de gewenste steek en naai rond,
waarbij u het band losjes leidt.
Opmerking
• Wanneer u zigzag- of decoratieve steken naait, pas
dan de steekbreedte aan, zodat deze iets breder is
dan de breedte van het band of de koorden.
Informazioni sull'attacco circolare........................................................................................... 26
Accessori in dotazione............................................................................................................. 26
Montaggio dell'attacco circolare.............................................................................................. 27
Cucitura di un cerchio ............................................................................................................. 27
Utilizzo del modello del quarto di cerchio .............................................................................. 29
Utilizzo dei piedini premistoffa in dotazione ........................................................................... 29
ITALIANO
SOMMARIO
25
Sommario
Informazioni sull'attacco circolare
Questo attacco consente di cucire seguendo un disegno circolare, che varia ad intervalli di 5 mm, con un raggio*
che passa da 30 mm a 130 mm, quando viene selezionata la posizione centrale dell'ago. L'attacco è collocato a
sinistra dell'ago sulla macchina per cucire. Con questo attacco è possibile cucire punti utili o decorativi.
* Raggio=Distanza dal centro a qualsiasi punto della circonferenza.
Nota
• Non è possibile utilizzare punti decorativi con l'alimentazione laterale, né punti aventi una larghezza superiore a 7 mm.
Utilizzare tessuti con uno spessore inferiore a 4 mm (circa 3/16”).
ATTENZIONE
• Prestare particolare attenzione al perno di rotazione; un trattamento negligente può provocare lesioni
personali. Occorre controllare i bambini per accertarsi che non giochino con l'attacco. Quando l'attacco
non viene utilizzato, conservare sempre il perno di rotazione nell'indicatore per evitarne la perdita.
Accessori in dotazione
N.
1
1
Nome parte
Attacco circolare
Codice parte
-
a
b
c
d
Indicatore
Manico/Verso l'alto
Pulsante di rilascio
Collocazione del perno di
rotazione
e Scala
2
3
2
Perno di rotazione
XE6016-001
3
Vite dell'attacco
(2 pezzi, uno supplementare)
XE6022-001
Modello
XE6024-001
4
Tabella di conversione
4
5
26
6
f Raggio del cerchio in mm
g Linee radiali riportate con
intervalli da 0 a 5 gradi
h Centro
5
Manuale d'istruzioni
6
Piedino per trecce
Questo manuale
SA141/F021N
7
Piedino per cordoncini
SA110/F013N
mm (f)
in.
130
5 3/16
120
4 3/4
Nota
110
4 3/8
100
4
90
3 1/2
80
3 3/16
• Si consiglia di utilizzare il tavolo di estensione sulla
macchina per cucire, al fine di controllare il tessuto in
modo uniforme.
• Non sollevare il tavolo di estensione quando il dispositivo
circolare è inserito.
70
2 3/4
60
2 3/8
50
2
40
3/2
30
13/16
7
• Sollevando il tessuto fissato sull'attacco circolare il perno
di rotazione potrebbe sganciarsi. Sollevando il tessuto,
premere delicatamente la parte superiore del perno di
rotazione.
• Nella cucitura di cerchi di dimensioni ridotte o quando si
utilizza del tessuto con una trama irregolare o granulare,
il cerchio ottenuto potrebbe non essere perfetto.
• Alcuni piedini premistoffa come la taglierina laterale non
possono essere utilizzati con questo tipo di attacco,
quindi provare sempre i piedini accessori con l'attacco.
• Quando si utilizza questo attacco, per ottenere risultati
ottimali, verificare la velocità di cucitura della macchina.
• Nella cucitura di ricami o pezzi di tessuto di grandi
dimensioni, verificare che questi non rimangano impigliati
nella macchina, trascinando e deformando il disegno.
Montaggio dell'attacco circolare
a
Cucitura di un cerchio
Posizionare l'attacco circolare a sinistra,
come mostrato in figura.
Nota
• Inserire il filo nell'ago della macchina prima di
posizionare il perno di rotazione nell'attacco
circolare. La leva di infilatura può colpire il perno di
rotazione, danneggiando lo stesso o il meccanismo
di infilatura della macchina.
→ Le due linguette sul lato inferiore dell'attacco
vengono inserite nei fori corrispondenti della placca
ago, in modo che l'attacco rimanga livellato sulla
base della macchina.
40
b
a
Sollevare il manico.
b
Far scorrere l'indicatore in modo da ottenere
la dimensione desiderata per il proprio
cerchio.
30
Inserire la vite sull'attacco circolare nel foro a
destra della placca ago (a).
a Vite dell'attacco
c
Serrare saldamente la vite con il cacciavite a
disco in dotazione con la macchina.
Nota
• Non fare scorrere l'indicatore tenendo premuto il
perno di rotazione, per evitare di piegarlo o
romperlo.
ITALIANO
a Cacciavite a disco
27
c
Utilizzare un materiale stabilizzatore che sia
più ampio dell'area del disegno,
rinforzandolo con uno stabilizzatore più
piccolo al centro del cerchio nell'area del
perno di rotazione quando si lavora su tessuti
sottili o si lavora ripetutamente sulla stessa
area.
e
Premendo la parte superiore del perno di
rotazione, inserire la punta del perno nel
segno "Y" sull'attacco.
a Diritto del tessuto
b Rovescio del tessuto
a
b
c
d
Rovescio del tessuto
Stabilizzatore
Stabilizzatore di rinforzo
Area del perno di rotazione
Nota
• Lo stabilizzatore è sempre necessario quando viene
eseguita la cucitura di un tessuto o di un ricamo, in
modo da prevenirne l'estensione o l'arricciamento. Il
tipo di tessuto da cucire, determina lo stabilizzatore
da utilizzare: permanente, da stiro, temporaneo o
adesivo.
d
f
Selezionare il punto desiderato e cucire
facendo avanzare il tessuto in modo
uniforme, prestando attenzione a non
spingerlo o tirarlo rischiando di generare un
cerchio irregolare.
g
Una volta eseguita la cucitura, premere
sempre il pulsante di rilascio per rimuovere il
perno e il tessuto dall'attacco circolare.
Inserire il perno di rotazione al centro del
cerchio dalla parte diritta del tessuto.
a Perno di rotazione
b Centro del cerchio
c Diritto del tessuto
Nota
• Quando si esegue la cucitura di un cerchio con un
diametro di piccole dimensioni, si consiglia di fissare
prima di tutto il tessuto sull'attacco, quindi di
impostare l'indicatore sulla dimensione desiderata.
a Pulsante di rilascio
ATTENZIONE
• Non lasciare inserito il perno di rotazione nel tessuto
e non lasciarlo agganciato all'attacco circolare per
evitare danni o problemi alla macchina.
28
Utilizzo del modello del quarto di cerchio
Quando si combinano i punti utili o decorativi,
oppure quando si ripete un singolo punto, utilizzare
il modello in dotazione come guida.
a
Contrassegnare il punto di rotazione (centro
del cerchio) prima di eseguire la cucitura del
tessuto (a).
b
Selezionare il punto desiderato e la dimensione
di un cerchio usando i segni sull'attacco, quindi
posizionare il tessuto sull'attacco stesso.
c
Cucire un punto singolo o una combinazione
(b).
d
Rimuovere il tessuto o il ricamo dall'attacco.
e
Con una matita cancellabile tracciare due
linee partendo dal punto di rotazione, una
all'inizio del punto di cucitura e una alla fine.
g
Osservare la linea alla fine del punto (d) e
annotare i gradi approssimati. Per ottenere un
conteggio approssimativo delle ripetizioni,
dividere 360 (gradi) per l'ampiezza del punto
(misura grado/punto). ESEMPIO: il punto è
lungo 16 gradi, quindi: 360 diviso 16 uguale a
22,5 ripetizioni.
Nota
• Non si tratta del conteggio esatto, in quanto vi sono
alcune variabili, ovvero la lunghezza del punto, il
tessuto utilizzato, il filo e lo stabilizzatore. È
possibile regolare la lunghezza del punto, a
seconda del tipo utilizzato, aumentandola o
diminuendola per ottenere una corrispondenza più
esatta, in modo da chiudere il cerchio evitando
sovrapposizioni o eliminazioni (a).
• Eseguire sempre la cucitura di una versione di prova
del disegno, verificando la lunghezza e la larghezza
del punto, la direzione della cucitura e accertandosi
che sia adatto per il proprio progetto.
• Quando i disegni si sovrappongono potrebbe essere
necessario effettuare calcoli ulteriori.
Esempio: rimozione del disegno
a
b
c
d
f
Punto di rotazione
Punto singolo/Combinazione
Inizio del punto di cucitura
Fine del punto di cucitura
Utilizzo dei piedini premistoffa in
dotazione
Con i piedini premistoffa in dotazione è possibile
abbellire i propri progetti di cucitura, offrendo loro
un aspetto professionale unito al proprio stile
personale.
■ PIEDINO PER TRECCE
ITALIANO
Posizionare il modello nella parte superiore del
disegno, allineando il punto di rotazione centrale
con il centro del modello (a). Posizionare quindi
la linea di 0 gradi (b) sul lato destro del modello
all'inizio del punto di cucitura (c).
a Fine del punto di cucitura
È possibile adoperare un'ampia gamma di trecce,
fino a una larghezza di 5 mm, utilizzando punti
diritti, a zig-zag o alcuni punti decorativi.
ATTENZIONE
• Questo piedino non deve essere utilizzato per
cucire una treccia a trama fitta, difficilmente
inseribile mediante un ago. In caso contrario, vi è il
rischio di rottura dell'ago, di danni e/o lesioni
personali.
a
b
c
d
Centro sul modello
Linea di 0 gradi
Inizio del punto di cucitura
Fine del punto
29
a
Allentare la vite sulla placca di guida del
piedino e fare scorrere la placca per adattarla
alla larghezza della treccia.
■ PIEDINO PER CORDONCINI
È possibile eseguire la decorazione utilizzando da 1
a 3 cordoncini con fili decorativi.
a
Fare scivolare un cordoncino dal lato destro
del piedino premistoffa in ciascuna guida (in
caso di un singolo cordoncino utilizzare la
guida centrale).
b
Posizionare i cordoncini al di sotto e verso la
parte posteriore del piedino per cordoncini.
c
Selezionare il punto a zig-zag o decorativo e
cucire in modo circolare accompagnando
delicatamente i cordoncini.
a Placca
b
c
30
Inserire la treccia attraverso la guida prima di
fissare il piedino sulla macchina.
Serrare la vite e tirare la treccia verso la parte
posteriore del piedino per trecce.
d
Fissare il piedino sulla macchina.
e
Selezionare il punto desiderato e cucire in
modo circolare accompagnando
delicatamente la treccia.
Nota
• Cucendo con punti a zig-zag o decorativi, regolare
la larghezza del punto, in modo che sia leggermente
più ampia rispetto alla larghezza della treccia o del
cordoncino.
Información sobre la unidad para costura circular ................................................................... 32
Accesorios incluidos................................................................................................................ 32
Colocación de la unidad para costura circular......................................................................... 33
Costura de un círculo .............................................................................................................. 33
Utilización de la plantilla de cuarto de círculo ........................................................................ 35
Uso de los pies prensatela incluidos ........................................................................................ 35
ESPAÑOL
CONTENIDO
31
Contenido
Información sobre la unidad para costura circular
Esta unidad puede coser en patrones circulares que se gradúan a intervalos de 5 mm, desde los 30 mm a los 130
mm de radio*, cuando se selecciona la posición de la aguja en el centro. La unidad se coloca a la izquierda de la
aguja en la máquina de coser. Con esta unidad pueden coserse puntadas de utilidad y decorativas.
* Radio = Distancia del centro del circulo a cualquier otro punto del circulo.
Nota
• No es posible utilizar puntadas decorativas con arrastre hacia los lados ni puntadas de más de 7,0 mm de ancho. Emplee
telas cuyo grosor sea inferior a 4 mm (aprox. 3/16 pulg.).
PRECAUCIÓN
• Hay que tener especial cuidado con el perno giratorio; la negligencia en su manejo podría provocar
lesiones. Los niños deberán ser vigilados para asegurarse de que no juegan con la unidad. Cuando la
unidad no se utilice, guarde siempre el perno giratorio en el indicador para evitar que se pierda.
Accesorios incluidos
1
Nº
Nombre de la pieza
1
Unidad para costura circular
Código de la pieza
-
a
b
c
d
Indicador
Asa/Abatible
Botón de liberación
Posición de ajuste del perno
giratorio
e Regla
2
3
Tabla de conversión
4
5
32
6
2
Perno giratorio
XE6016-001
3
Tornillo de montaje
(2 tornillos, se incluye uno de más)
XE6022-001
4
Plantilla
XE6024-001
f Radio del círculo en mm
g Líneas angulares indicadas en
grados, comenzando en 0 con
intervalos de 5 grados
h Centro
5
Manual de instrucciones
mm (f)
pulgada
6
Pie para cinturillas
SA141/F021N
130
5 3/16
7
Pie para cordones
SA110/F013N
120
4 3/4
110
4 3/8
100
4
90
3 1/2
80
3 3/16
70
2 3/4
60
2 3/8
50
2
40
3/2
30
13/16
7
Este manual
Nota
• Se recomienda la utilización de la tabla extensible de la
máquina de coser para controlar la tela con más suavidad.
• No levante la tabla extensible cuando esté colocado el
dispositivo para costura circular.
• El perno giratorio puede soltarse si se levanta la tela colocada
en la unidad para costura circular. Para levantar la tela,
presione con suavidad sobre la parte superior del perno
giratorio.
• Al coser círculos más pequeños o utilizar tela con texturas
rugosas o irregulares, es posible que no se consiga un círculo
perfecto.
• Algunos de los pies prensatela, como el pie para cuchilla lateral,
no pueden utilizarse con esta unidad; pruebe siempre los pies
para accesorios con la unidad.
• Cuando utilice esta unidad, pruebe la velocidad de costura de la
máquina para conseguir los mejores resultados.
• A la hora de coser telas más grandes o prendas de vestir,
asegúrese de que la tela o la prenda no quedan enganchadas
en la máquina creando así arrastre o distorsión en el diseño.
Colocación de la unidad para costura
circular
Costura de un círculo
Nota
Coloque la unidad para costura circular a la
a
izquierda, según se muestra en la figura.
→ Las dos patillas de la parte inferior de la unidad
encajarán en los orificios correspondientes de la
placa de la aguja, de forma que la unidad quedará
plana sobre la base de la máquina.
40
• Enhebre la aguja de la máquina antes de colocar el
perno giratorio en la unidad para costura circular. La
palanca del enhebrador puede golpear el perno
giratorio y dañar el perno o el mecanismo
enhebrador de la máquina.
a
Levante el asa.
b
Deslice el indicador para que coincida con el
tamaño de círculo que desee.
30
Inserte el tornillo de la unidad para costura
b
circular en el orificio que hay a la derecha de
la placa de la aguja (a).
Nota
a Tornillo de montaje
c
Apriete con firmeza el tornillo con el
destornillador de disco que se incluye con la
máquina.
ESPAÑOL
a Destornillador de disco
• No deslice el indicador agarrando el perno giratorio;
si lo hace, podría hacer que el perno se doblara o se
rompiera.
33
c
Utilice un estabilizador que sea más grande
qu el área de diseño , reforzando con un
estabilizador más pequeño en el centro del
círculo cuando cambias por la pieza original
o el mismo perno del área repetida.
e
Presionando sobre la parte superior del perno
giratorio, inserte el punto del perno giratorio
en la marca “Y” de la unidad.
a Derecho de la tela
b Revés de la tela
a
b
c
d
Revés de la tela
Estabilizador
Estabilizador de refuerzo
Zona del perno giratorio
Nota
• Siempre es necesario un estabilizador al coser en
telas o prendas de vestir para evitar que se estiren o
frunzan. El tipo de tela que se vaya a coser
determinará si se debe emplear un estabilizador
permanente, para planchar, temporal o adhesivo.
d
f
Seleccione la puntada que desee y cosa
dejando que la tela avance suavemente
asegurándose de que no empuja ni tira de la
tela, pues se produciría un círculo irregular.
g
Una vez finalizada la costura, pulse siempre
el botón de liberación para retirar el perno y
la tela de la unidad para costura circular.
Inserte el perno giratorio en el centro del
círculo desde el derecho de la tela.
a Perno giratorio
b Centro del círculo
c Derecho de la tela
Nota
• Al coser un círculo de diámetro pequeño, se
recomienda que primero sujete con alfileres la tela
en la unidad y, a continuación, ajuste el indicador al
tamaño que desee.
a Botón de liberación
PRECAUCIÓN
• No deje el eje giratorio insertado en la tela o
adjunto al accesorio circular. Al hacer esto, puede
resultar en una herida accidental o daño a la
maquina.
34
Utilización de la plantilla de cuarto de círculo
Cuando combine puntadas de utilidad o decorativas
o repita una puntada individual, utilice la plantilla
incluida a modo de guía.
a
Marque el eje central (centro del círculo)
antes de coser la tela (a).
b
Seleccione la puntada que desee y el tamaño
del círculo utilizando las marcas de la unidad
y, a continuación, coloque la tela en la unidad.
Cosa una sola puntada o un patrón de
c
combinación de puntadas (b).
d
Retire la tela o la prenda de vestir de la
unidad.
e
Dibuje, con un lápiz que se pueda borrar, dos
líneas desde el eje central, una al comienzo
del patrón de costura y la otra al final del
mismo.
g
Compruebe la línea al final de la puntada (d)
y anote los grados aproximados. Con un
círculo que mida 360 grados, divida el largo
de la puntada (la medida de grado/puntada)
entre 360 y eso le dará un recuento
aproximado de las repeticiones de la puntada.
EJEMPLO: su puntada tiene 16 grados de
largo, entonces: 360 dividido entre 16 es igual
a 22,5 repeticiones.
Nota
• No es un recuento exacto debido a diversas
variables; por ejemplo, el largo de la puntada, la tela
empleada, el hilo y el estabilizador. Dependiendo de
la puntada empleada, podrá ajustar su largo
aumentándolo o disminuyéndolo para conseguir un
ajuste mejor de forma que el círculo se cierre sin
que quede solapado o demasiado corto (a).
• Cosa siempre una versión de prueba del diseño
comprobando el largo y el ancho de la puntada y la
dirección de la costura, asegurándose de que sean
apropiados para la labor.
• Si el patrón se solapa, puede ser necesario realizar
más cálculos.
Ejemplo: patrón demasiado corto
a
b
c
d
f
Eje central
Puntada individual/Combinación de puntadas
Comienzo de la puntada
Fin de la puntada
Coloque la plantilla encima del diseño,
alineando el eje central con la marca central
de la plantilla (a). A continuación, coloque la
línea de 0 grados (b) de la derecha de la
plantilla al comienzo de la puntada (c).
a Fin de la puntada
Uso de los pies prensatela incluidos
Mediante la utilización de los pies prensatela
incluidos, podrá embellecer sus labores de costura
dándolas un aspecto profesional con su estilo
personal.
■ PIE PARA CINTURILLAS
Puede utilizar una amplia variedad de cinturillas
hasta de 5 mm de ancho, utilizando puntadas rectas,
puntadas de zig-zag y algunas puntadas decorativas.
• No utilice este pie al coser con cinturillas de tejido
denso en las que es difícil que la aguja penetre con
facilidad. Si lo hace, la aguja podría romperse,
dañarse y/o provocar lesiones.
a
b
c
d
ESPAÑOL
PRECAUCIÓN
Centro de la plantilla
Línea de 0 grados
Comienzo de la puntada
Final de la puntada
35
a
Afloje el tornillo de la placa de la guía del pie
y deslice la placa para que se ajuste al ancho
de la cinturilla.
■ PIE PARA CORDONES
Puede embellecer sus labores utilizando de 1 a 3
cordones de hilos decorativos.
a
Deslice un cordón desde la derecha del pie
prensatela introduciéndolo en cada guía (para
utilizar un solo cordón, utilice la guía
central).
b
Coloque los cordones debajo y por detrás del
pie para cordones.
c
Seleccione la puntada de zig-zag o la puntada
decorativa y cosa de manera circular guiando
suavemente los cordones.
a Placa
b
c
36
Inserte la cinturilla a través de la guía antes
de colocar el pie en la máquina.
Apriete el tornillo y tire de la cinturilla hacia
la parte posterior del pie para coser
cinturillas.
d
Coloque el pie en la máquina.
e
Seleccione la puntada que desee y cosa de
forma circular guiando suavemente la
cinturilla.
Nota
• Cuando se cosan puntadas de zig-zag o
decorativas, ajuste el ancho de la puntada de forma
que sea ligeramente superior al ancho de la
cinturilla o del cordón.
XE3529-001
Printed in Taiwan