1
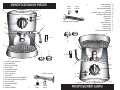
Model AEM-646A
Instruction Manual
Cappu-Latté
Machine à Expresso
™
Cappu-Latté
Espresso System
™
Manuel d'instructions
Modelo: AEM-646A
Nous vous félicitons d'avoir choisi cet article.
Votre expresso
Cappu-Latte agrémentera votre vie quotidienne
d'une façon très agréable. Vous pouvez maintenant savourer le goût unique de
l'expresso gourmet dans votre cuisine. Cet appareil élégant et de qualité
supérieure vous fabriquera des expressos délicieux en quelques minutes, autant
que vous le désirez.
Veuillez lire attentivement toutes les instructions suivantes avant d'utiliser
l'appareil pour la première fois.
© 2005 Aroma Housewares Company All rights reserved.
Aroma Housewares Co.
6469 Flanders Drive
San Diego, CA 92121
U.S.A.
1-800-276-6286
www.aromaco.com
Published By:
Publié par :
Aroma Housewares Co.
6469 Flanders Drive
San Diego, CA 92121
É.-U.
1-800-276-6286
www.aromaco.com
©2005 Aroma Housewares Company. Tous droits réservés.
Please read the following instructions carefully before your first use.
Your
Cappu-Latte Espresso System will make a fine addition to
your home. Now you can enjoy the great taste of gourmet espresso in the
comfort of your own kitchen. This elegant, high-quality unit will provide great
tasting espresso coffee in just minutes time after time.
Congratulations!
7.
6.
5.
4.
1.
2.
3.
Basic safety precautions should always be followed when using electrical appliances,
including the following:
IMPORTANT SAFEGUARDS
1
Read all instructions before use.
Do not touch hot surfaces. Use handles or knobs.
To protect against electrical shock, do not immerse cord, plug or espresso maker
in water or any other liquid.
Close supervision is necessary when this appliance is used by or near children.
This appliance is not intented to be used by children.
Unplug from outlet when not in use and before cleaning. Allow to completely cool
before putting on or taking off any parts and before cleaning.
Do not operate this appliance with a damaged cord, plug or after the appliance
malfunctions or has been damaged in any manner. Return appliance to the
nearest authorized service facility for examination, repair or adjustment.
The use of accessory attachments not recommended by the appliance
manufacturer may cause injuries.
Do not use outdoors.
Do not let cord hang over edge of table or counter, or touch hot surfaces.
Do not place on or near a hot gas or electrical burner or in a heated oven.
To disconnect, press the Power button, then remove plug from wall outlet.
Do not use appliance for anything other than its intended use.
Scalding may occur if the lid is removed during the brewing process.
Cet appareil est conçu uniquement pour
être utilisé àl’intêrieur
8.
9.
10.
11.
12.
13.
CONSERVEZ CES INSTRUCTIONS
SAVE THESE INSTRUCTIONS
1. Veuillez lire toutes les instructions avant d'utiliser l'appareil.
2. Ne touchez pas les surfaces chaudes. Utilisez les poignées ou les boutons.
3. N'ouvrez pas le couvercle tandis que la cafetière prépare la boisson car l'eau
bouillante pourrait éclabousser et provoquer des brûlures.
4. Ne mettez jamais la cafetière en marche sans eau dans le percolateur car cela
pourrait brûler le produit et provoquer des dommages permanents.
5. En remplissant d'eau, ne dépassez jamais la ligne d'eau maximale du percolateur.
6. Pour vous protéger contre les incendies, les chocs électriques et les blessures, ne
plongez pas le cordon, la fiche ou l'appareil lui-même dans l'eau ou dans tout autre
liquide.
7. Cet appareil n'est pas conçu pour les enfants. Il faut une supervision étroite lorsque
le percolateur est utilisé près des enfants.
8. Débranchez-le de la prise avant de le nettoyer et lorsque vous ne l'utilisez pas.
9. Laissez refroidir le percolateur entièrement avant d'ajouter ou de retirer des pièces
et avant tout nettoyage.
10. N'utilisez pas cet appareil électroménager avec un cordon ou une fiche
endommagé(e) ou après toute défaillance, s'il a été échappé ou s'il est endommagé
de quelque façon que ce soit. Retournez l'appareil à une installation de service
autorisé pour son examen, sa réparation ou pour tout ajustement
électrique/mécanique.
11. Ne l'utilisez pas à l'extérieur.
12. Ne laissez pas le cordon pendre sur le bord d'une table ou d'un comptoir.
13. Ne laissez pas le cordon toucher des surfaces chaudes.
Product for Household Use Only.
Il faut toujours respecter les précautions de base en utilisation des appareils
électriques, y compris ce qui suit:
1
PRÉCAUTIONS IMPORTANTES
INSTRUCTIONS DE CORDON COURTS
1. Un cordon d'alimentation court est fourni pour réduire les risques de trébucher ou de
s'emmêler avec un cordon plus long.
2. Des rallonges plus longues sont disponibles et peuvent être utiliser mais de manière
prudente.
3. Si une rallonge plus longue est utilisée :
a. La valeur nominale électrique indiquée sur la rallonge doit être au moins aussi
élevée que celle de l'appareil.
b. Le cordon plus long doit être arrangé pour ne pas s'enrouler sur le dessus du
comptoir ou sur le dessus de table ou des enfants pourraient le tirer ou trébucher
accidentellement.
2
This appliance is for household use only.
FICHE POLARISÉE
Cet appareil a une fiche polarisée (une lame est plus large que l'autre); suivez les
instructions plus bas :
Pour réduire le risque de choc électrique, cette fiche ne peut entrer dans une prise
polarisée que d'une seule manière. Si la fiche n'entre pas complètement dans la
prise, inversez la fiche. Si ceci ne fonctionne toujours pas, contactez un électricien
qualifié.N'essayez pas de modifier la fiche de quelque façon que ce soit.
NE PAS LAISSER PENDRE LA CORDE!
This appliance has a polarized plug (one blade is wider than the other); follow the
instructions below:
To reduce the risk of electric shock, this plug is intended to fit into a polarized outlet
only one way. If plug does not fully fit into the outlet, reverse the plug. If it still does
not fit, contact a qualified electrician. Do not attempt to modify the plug in any way.
POLARIZED PLUG
Tenir hors de la
por tee des
enfants
Cet appareil est conçu uniquement pour être
utilisé àl’intêrieur
2
1. A short power-supply cord is provided to reduce risk resulting from becoming
entangled in or tripping over a longer cord.
2. Longer extension cords are available and may be used if care is exercised.
3. If a longer extension cord is used:
a. The marked electrical rating of the extension cord should be at least as great as the
electrical rating of the appliance.
b. The longer cord should be arranged so that it will not drape over counter or tabletop
where it can be pulled by children or tripped over unintentionally.
c. If the appliance is of the grounded type, the extension cord should be a grounding-type3-wire cord
SHORT CORD INSTRUCTIONS
3
Steam
Setting
Espresso
Setting
2
Power
3
Measuring scoop & tamper
Preheat
Power
13
Ready
4
12
Removable water reservoir
Power switch
Preheat switch
Steam nozzle
Froth attachment
2-cup filter
1-cup filter
Filter handle
Slip resistant rubber feet
Drip tray with overflow protection
Filter lock
Espresso brewing head
Operation dial
Preheating plate
1
14
11
1.
2.
3.
4.
5.
6.
7.
8.
9.
10.
11.
12.
13.
14.
IDENTIFICATION DE PIÈCES
9
5
7
6
8
10
10
8
6
7
5
11
9
13
4
Power
Ready
Preheat
Power
2
1
Steam
Setting
PARTS IDENTIFICATION
3
Espresso
Setting
14
Cuillère à mesurée
3
Réservoir d'eau amovible
Interrupteur M/A
Bouton de chauffage
Buse vapeur
Accessoire mousse
Filtre deux tasses
Filtre une tasse
Porte-filtre
Pieds de caoutchouc anti-dérapants
Bac récolte-gouttes avec trop-plein
Verrou du filtre
Elément percolateur
Sélecteur
Plateau chauffant
12
1.
2.
3.
4.
5.
6.
7.
8.
9.
10.
11.
12.
13.
14.
4
PREPARING FOR USE
Soulevez le couvercle
du réservoir d'eau pour
l'ouvrir
Vous pouvez remplir le
réservoir d'eau froide
sans le déplacer. Sinon
Retirez le réservoir
d'eau
Ou
Remplissage du réservoir d'eau:
¾ N'utilisez pas de détergents abrasifs ou de tampons à récurer.
¾ Ne plongez jamais l'expresso, le fil électrique ou la prise dans l'eau.
Pre-rincage de votre Cappu-Latté Machine à Expresso:
7. Retirez le réservoir d'eau, lavez-le soigneusement avec de l'eau tiède savonneuse et
remplissez-le d'eau froide. Remettez le réservoir en place et branchez l'appareil.
8. Placez un filtre sur le porte-filtre et positionnez le porte-filtre sur l'élément percolateur.
Verrouillez le porte-filtre mais ne serrez pas trop.
9. Placez un grand récipient sous l'élement percolateur.
10. Le voyant "Prêt" s'allume quand l'eau est à la bonne température. Mettez le sélecteur en
position expresso en tournant dans le sens des aiguilles d'une montre et laissez l'eau circuler
dans l'appareil.
**Vous devrez peut-être remettre le sélecteur en position "O" (arrêt) en milieu de cycle
pour vider le grand récipient.
Avant la mise en service:
1. Lisez toutes les instructions et les précautions d'emploi.
2. Retirez tous les emballages; assurez-vous que tous les articles vous ont été livrés en bon état.
3. Ouvrez le couvercle du réservoir d'eau et sortez la mesurette qui s'y trouve.
4. Lavez tous les accessoires avec une éponge ou un chiffon imbibé d'eau tiède savonneuse.
5. Rincez soigneusement pour éliminer complètement le savon.
6. Essuyez l'extérieur de l'appareil avec un chiffon humide.
Before First Use:
1. Read all the instructions and important safeguards.
2. Remove all packaging materials; make sure all your items are received in good condition.
3. Lift water reservoir lid and remove the measuring spoon from the water reservoir.
4. Wash all the accessories with warm soapy water using a sponge or dishcloth.
5. Rinse thoroughly to remove soapy residue.
6. Wipe body clean with a damp cloth.
Pre-Rinsing the Cappu-Latte Espresso System:
1. Remove the water reservoir, wash thoroughly with warm soap and water, and fill it up
with cold water. Return the reservoir and plug the unit into an outlet.
2. Place a filter in the filter handle and position the filter handle on the espresso brewing
head. Lock the filter handle in place, but do not over tighten. Lining up the arrows on
the filter handle that correspond with the arrows on the brewing head, will make
locking the filter handle easier.
3. Place a large container beneath the brewing head.
4. Once the ready light illuminates the water has been heated to the correct
temperature. Turn the operation dial clockwise to the espresso function and allow all
the water to run through the unit.
** It may be necessary to turn the operation dial back to the “O” off position
mid-cycle to empty the large container.
¾ Do not use abrasive cleaners or scouring pads.
¾ Do not immerse the espresso maker, cord or plug in water at any time.
Filling The Water Reservoir and Pre-Rinsing your Espresso Maker:
Or
Lift up to open the lid of
the water reservoir
MODE D'EMPLOI
While it is in place, fill
the water reservoir with
cold water
Remove water reservoir
4
PREPARING FOR USE
Position the filter handle
on the espresso
brewing head
Select either the 1-cup
or the 2-cup filter
Replace the full
water reservoir
Fill with fresh cold water
Begin preheating by
shifting the Preheat switch
to the espresso setting.
The “Ready” light will
illuminate when the water
is the correct termperature
Verrouillez l'élément le
porte-filtre en le
tournant vers la droite
Commencez la chauffe
en mettant le bouton de
chauffe en position
"expresso"
Lock the filter handle
into place by turning it
to the right--use the
arrows on the
corresponding parts to
help them easily fit
Quand le voyant lumineux
"Prêt" s'allume, tournez le
sélecteur dans le sens des
aiguilles d'une montre pour
déclencher la fonction
expresso
Insérez le porte-filtre
dans l'élément
percolateur
Once the ready light turns on, turn the
operation dial clockwise to activate the
espresso function. Make sure all the
water runs through the machine.
Remettez le réservoir
en place
Place your large
container beneath the
espresso brewing head
5
Posez une tasse à
expresso sous l'élément
percolateur
Choisissez entre le filtre
une tasse et le filtre
deux tasses
Préparation de l'expresso Cappu-Latte:
Remplissez-le d'eau
froide du robinet
MODE D'EMPLOI
5
Commencez par
enlever le marc de café
6
Glissez l'accessoire
mousse sur la buse
vapeur
Tournez le sélecteur dans
le sens inverse des
aiguilles d'une montre pour
faire mousser le lait
Mousser le Lait: (Instructions détaillées sur la page 12)
Réchauffez les tasses à
expresso en les posant
à l'envers sur le plateau
chauffant
Mettez le bouton de chauffe
en position expresso.
Versez le café de votre
choix dans le filtre à
café
Retirez le café en trop
en essuyant le bord du
filtre
Insérez le porte-filter
dans l'expresso et
verrouillez-le en
tournant le porte-filtre
vers la droite
Quand le voyant lumineux
"Prêt" s'allume, tournez le
sélecteur dans le sens des
aiguilles d'une montre
jusqu'à la position
"expresso" pour déclencher
la fonction expresso
À l'aide du pressemouture inclus, tassez
le café dans le filtre
Préparation d'expresso gourmet:
MODE D'EMPLOI
HOW TO USE
Preparing Gourmet Espresso:
Make sure the operation dial is turned to the “O” off position and the Power switch is in
the off position. Then, insert the plug into the proper outlet.
Preheat your espresso cups by placing them
upside down on the preheating plate. Shift
the preheat switch to the espresso setting. To
begin the preheating process, shift the Power
switch to the On position. The red “Power”
light will illumintate
Use the included tamper to
pack the coffee into the
filter. Do not apply too
much pressure
Place your choice of coffee in
the coffee filter. A fine to
medium grind is recommended
Insert the filter handle
into the espresso
machine and lock it in
place by turning the
filter handle to the right
Remove excess coffee
grounds by wiping the
edge of the filter
Once the “Ready” light turns on,
turn the operation dial clockwise
to the espresso setting to begin
brewing espresso
6
HOW TO USE
7
Important notes for preparing gourmet espresso:
1. Do not overfill the filter with coffee, and always wipe around the edges of the filter to
remove excess coffee grounds. Do not tamp the coffee with excessive force. Lightly
flatten the grinds with a small amount of pressure.
2. When the water has reached the ideal temperature for brewing espresso, the
“Ready” light will illuminate. For best results, do not start the brewing process before
this has occured.
3. Once the brewing process has begun, the machine will begin to make a pumping
noise. This is the espresso brewing process and is completely normal. Once the
cup(s) are filled to the desired level, return the operation dial to the “O” off position.
4. When removing the used coffee grounds, allow the unit to completely cool before
removing the filter handle. Remove the filter handle by turning it to the left until the
arrows on the brewing head line up with the arrows on the filter handle. Push the
filter lock towards the edge of the filter, flip upside down over a trash bin and gently
tap out the used coffee.
Warning:
After each use of your Cappu-Latte Espresso System, it is recommended that you
flush the machine to remove and wash out any old or used coffee grinds stuck in the
espresso machine, and also to help ensure the correct water temperature for the
next espresso shot. With the filter handle already removed from the espresso
machine, turn the operation dial clockwise to the espresso function and allow the
water to run through the machine until there is a consistent flow of water.
¾ Do not leave the filter handle locked in position for extended periods of time or
when the machine is not in use. This may damage the brewing head rubber
seals.
7
8
HOW TO USE
Frothing the Milk: (Detailed directions & tips on page 12)
Retirez soigneusement
la grille du bac récoltegouttes
Retirez le récoltegouttes et lavez-le avec
de l'eau savonneuse
Nettoyage et entretien de l'appareil:
Remplissez la machine
d’eau et mettez le boutton
de chauffe sur la position
de vapeur. Retirez
l'accessoire mousse
Tournez le sélecteur dans le
sens inverse des aiguilles
d'une montre pour produire
de l'eau chaude
Production d'eau chaude:
MODE D'EMPLOI
Slide the froth attachment
onto the steam nozzle froth
without the attachment if
you like
Turn the operation dial
counter-clockwise to the
steam function to froth the
milk
Hot Water Dispensing:
Fill the machine with
water and shift the
Preheat switch to the
espresso setting. Remove
the froth attachment
Turn the operation dial
counter-clockwise to the
steam function to
dispense hot water
Removing & Cleaning the Drip Tray (detailed cleaning on page 11):
Carefully remove the
top cover of the drip
tray
Remove drip tray and
wash with soap and
water
8
ESPRESSO TIPS
9
Now you are ready to enjoy the wonderful process of making gourmet espresso at
home. Your new Cappu-Latte Espresso System coupled with a little practice and
experience will have you making coffeehouse espresso in no time at all. Here are a few
suggestions to help you along the way:
• One single shot of espresso should be no more than 1.5oz of coffee.
• Before running your brewing cycle, be sure that your espresso is tamped (packed down) evenly.
• Do not use coffee grinds that are too coarse. A fine to medium grind of coffee is
recommended.
• For optimum results, use cold milk and a stainless steel container when steaming. Do not
overheat the milk when frothing. The perfect temperature is right when the container
becomes too hot to continue to hold.
• If too much water is run through the coffee grounds, the espresso will likely come out thin
and have a bitter taste.
• In the event your espresso pours too slowly from the machine, use less pressure when
tamping the coffee grinds or try using a coarser blend.
• Fresher coffee beans or grounds will yield better taste. Always buy the freshest coffee
available and store in an air-tight container in a cool, dry, dark place.
• Whole coffee beans will stay fresher longer than ground coffee. When grinding your own
coffee, never grind more than you will use for immediate brewing. The coffee will lose its
flavor quickly once it’s ground.
• Proper maintenance of your espresso maker will result in better tasting espresso. Keep it
cleaned and thoroughly rinsed. Run water through the brewing head and flush the steam
nozzle with fresh water after each use.
Dans de rares occasions, un café moulu trop fin peut bloquer l'appareil. Si cela se
produit, rincez l'élément percolateur à grande eau et utilisez du café plus gros.
Attention:
• Un bon entretien de l'appareil donnera une meilleure saveur à l'expresso. Nettoyez-le et
rincez-le régulièrement. Rincez l'élement percolateur à grande eau et vidangez la buse
vapeur à l'eau fraîche après chaque utilisation.
• Les grains de café restent frais plus longtemps que le café moulu. Ne moulez pas plus de
café que nécessaire. Le café perd rapidement son arôme une fois moulu.
• Du café frais, en grains ou moulu, donne une meilleure saveur. Achetez toujours le café le
plus frais possible et gardez-le dans un récipient étanche à l'abri de la chaleur, de
l'humidité et de la lumière.
• Si l'expresso coule trop lentement dans les tasses, employez moins de pression en
serrant les morcellements de café ou utilisez une plus grosse moulure.
• Si vous mettez trop d'eau, l'expresso sera certainement clair et amer.
• Pour un résultat optimal utilisez du lait froid et un récipient en inox pour la vapeur. Ne
surchauffez pas le lait pour la mousse. La température est parfaite quand le récipient est
tout juste trop chaud pour le tenir en main.
Warning:
In rare instances using cofffee grounds that are too small may cause the coffee flow to
reduce to a slow drip, or the machine to stop working altogether. If this occurs, run fresh
water through the brewing head and use a coarser coffee grind.
• Le café ne doit pas être moulu trop gros. Nous recommandons du café moulu fin ou moyen.
• Avant de commencer la percolation, tassez bien le café pour qu'il soit réparti uniformément.
• Ne dépassez jamais 37 ml de café pour une tasse d'expresso.
Maintenant vous êtes prêts à connaître les joies de la préparation d'un expresso
gourmet chez vous. Avec votre nouvel expresso Cappu-Latte et un peu de pratique vous
pourrez préparer des expressos dignes d'un professionnel en un rien de temps.
Quelques conseils pratiques:
9
QUELQUES CONSEILS
POUR FAIRE MOUSSER LE LAIT
10
Le parfait cappuccino commence par de la mousse de lait à la texture parfaite. Voici les
étapes de la préparation de la mousse parfaite:
1. Tout d'abord, glissez l'accessoire mousse sur la buse vapeur. La buse vapeur peut aussi
être utilisée sans l'accessoire mousse selon votre préférence.
2. Versez du lait frais et froid dans un récipient en inox; ne le remplissez qu'à moitié.
Astuce: SPréparez seulement la quantité de lait qui correspond à la quantité d'expresso.
Le lait augmente de volume quand la mousse se forme.
3. Activez la fonction vapeur avant de préparer la mousse de lait pour éliminer les
condensats. Pour cela, écartez la buse vapeur vers le côté de l'appareil, placez un verre
vide ou un chiffon sous la buse vapeur puis tournez le sélecteur dans le sens inverse des
aiguilles d'une montre pour activer la fonction vapeur. Laissez agir 3 à 5 secondes.
4. Plongez la buse vapeur dans le récipient d'inox de sorte que l'extrémité de la buse soit
juste sous la surface du lait. Pendant la formation de mousse, posez la main sur le
récipient pour vérifier la température.
5. Positionnez le récipient d'inox de sorte que l'extrémité de la buse vapeur soit proche d'une
paroi. Le lait circulera et la mousse sera de meilleure qualité. Le lait va monter dans le
récipient à mesure qu'il chauffe. Suivez le niveau du lait en abaissant le récipient afin que
l'extrémité de la buse vapeur soit toujours juste sous la surface.
6. ALorsque le lait aura doublé de volume, vous pourrez laisser la buse vapeur plus bas sous
la surface. Le lait aura ainsi une texture parfaite.
7. Quand le récipient d'inox est trop chaud pour le tenir en main, le lait a atteint la
température idéale, et la fonction vapeur peut être arrêtée. Mettez le sélecteur en position
"O" (arrêt) et retirez le récipient.
8. Pour un résultat optimal, versez la mousse de lait dans l'expresso gourmet le plus tôt possible.
8. For best results, pour the frothed milk into your gourmet espresso as soon as possible.
7. Once your stainless steel container becomes too hot to comfortably hold, the milk has
reached the ideal temperature and the frothing process can stop. Simply turn the operation
dial to the “O” off position and remove your container.
6. After the milk has doubled its original volume the steam nozzle can be lowered further
below the surface. This action will give the milk the perfect texture.
5. Position your stainless steel container so that the head of the steam nozzle is near one
side. This will cause the milk to circulate and give you better results as you froth. The milk
in the container will rise as it is heated. Follow the level of the milk by lowering your
container so that the steam nozzle head is always just below the surface.
4. Insert the steam nozzle into your stainless steel container so that the head of the nozzle is
just below the surface fo the milk. Place your hand on the side of the conatiner during the
frothing process to feel for temperature.
3. Activate the steam function before frothing the milk to remove any condensed water. To do
this, swing the steam nozzle to the side of the machine, and place an empty glass or cloth
under the steam nozzle and turn the operation dial counter-clockwise to activate the steam
function. Operate for 3-5 seconds.
Hint: Steam an amount of milk that is appropriate for the amount of espresso you are
preparing. The volume of milk will increase during the frothing process.
2. Fill a stainless steel container with fresh, cold milk no more than half way.
1. Begin by sliding the froth attachment onto the steam nozzle. The steam nozzle may be
used without the froth attachment if preferred.
The perfect cappuccino begins with milk frothed to the perfect texture. The following
are some steps to help you master creating the perfect froth:
10
MILK FROTHING STEPS
11
NETTOYAGE ET ENTRETIEN
ATTENTION NE LAVEZ PAS LES ACCESSOIRES DE L'EXPRESSO AU LAVEVAISSELLE
Warning: Use caution when operating the steam nozzle. Steam is very hot and can scald.
Nettoyage de la buse vapeur et de l'accessoire mousse:
Nettoyez ces pièces immédiatement après une utilisation pour prévenir des dommages.
Essuyez la buse vapeur en inox avec un chiffon propre humide, et placez l'accessoire
mousse sous le robinet d'eau chaude jusqu'à ce que tout le lait ait été éliminé. Ensuite,
tournez le sélecteur dans le sens inverse des aiguilles d'une montre jusqu'à la position
vapeur et retirez les résidus de lait de la buse vapeur.
Cleaning the drip tray:
Remove the drip tray and its cover after each use to empty. If the red overflow indicator
appears through the cover, empty the drip tray immediately. Using non-abrasive
cleaners, wash the drip tray and cover in warm, soapy water, rinse and dry. It is normal
for the inside of the drip tray to be stained by coffee oils.
Un entretien correct et régulier prolongera la vie de votre expresso Cappu-Latte et
donnera un arôme inégalé à l'expresso. Les huiles de café et d'autres dépôts
s'accumulent avec le temps; vous devrez les éliminer et nettoyer l'appareil pour obtenir
un expresso à l'arôme optimal.
Nous recommandons un nettoyage complet de la buse vapeur une fois par mois pour
assurer sa longévité. Pour cela, plongez l'extrémité de la buse vapeur dans un récipient
plein d'eau. L'eau doit recouvrir l'extrémité de la buse vapeur. Faites circuler la vapeur
dans la buse pendant 30 secondes puis laissez tremper une nuit. Le lendemain matin,
enlevez la buse vapeur et mettez une épingle dans la buse vapeur. (Pour enlever la
buse vapeur, utilisez la cuillère a mesuré comme outil. Sur la manche de la cuillère, il y a
des ouverture specialement faite pour devisser la buse vapeur.) Retirez l'épingle, puis
allumez l'appareil et faites à nouveau circuler la vapeur dans la buse pendant 30
secondes.
On a monthly basis we recommend a thorough cleaning of the steam nozzle to ensure
longevity. For a thorough cleaning, insert the head of the steam nozzle into a container
of water. Make sure that the water level is over the head of the steam nozzle. Run
steam through the nozzle for 30 seconds and let it soak overnight. After the nozzle has
soaked, remove the steam nozzle head and stick a pin up the steam nozzle. (To remove
the nozzle head, use the measuring scoop as a tool. There are fittings on the scoop that
fit on the steam nozzle head and act as a wrench to make removing the head simple).
Remove pin, then turn the unit on and run steam through the nozzle again for 30
seconds.
Attention: Manipulez la buse vapeur avec précaution. La vapeur est brûlante, elle peut ébouillanter.
Cleaning the steam nozzle and froth attachment:
Clean these parts immediately after each use to avoid damage. Wipe the stainless steel
steam nozzle with a clean, damp cloth and simply place the froth attachment under
warm running water until all excess milk has been removed. After this step, turn the
operation dial counter-clockwise to the steam setting and clear any leftover milk out of
the steam nozzle.
Regular and proper maintenance of your Cappu-Latte Espresso System will ensure a
long-lasting life, and the best tasting espresso. Coffee oils and deposits build up over
time and need to be flushed out and cleaned for optimum espresso taste.
Nettoyage du bac récolte-gouttes:
Après chaque utilisation, retirez le bac récolte-gouttes et la grille pour les vider. Si vous
voyez à travers la grille le voyant rouge de trop-plein allumé, videz le bac récoltegouttes immédiatement. Nettoyez le le bac récolte-gouttes et la grille avec de l'eau tiède
savonneuse (sans produits abrasifs), rincez-les et séchez-les. Les taches d'huile de café
à l'intérieur du bac récolte-gouttes sont tout à fait normales.
WARNING: NEVER WASH YOUR ESPRESSO MACHINE ACCESSORIES IN THE
DISHWASHER
CARE AND CLEANING
11
NETTOYAGE ET ENTRETIEN
12
Nettoyage de l'élément percolateur et des filtres de l'expresso:
Rincez le filtres et le porte-filtre à l'eau tiède après chaque utilisation. Toutes les 15 à 20
utilisations, lavez In rare instances using cofffee grounds that are too small may cause the
coffee flow to reduce to a slow drip, or the machine to stop working altogether. If this occurs,
run water through the brewing head with fresh water, and use a coarser coffee grind l'eau
tiède savonneuse avec un détergent doux. Pour nettoyer l'élément percolateur, rincez-le
à grande eau et essuyez la tête et le pourtour intérieur avec un chiffon humide. Pour
assurer la longévité du filtre et du porte-filtre, faites fonctionner l'appareil avec le filtre en
place et de l'eau seulement, (pas de café) à la fin de chaque utilisation. Si les trous du
filtre sont bouchés par du marc de café, nettoyez-le avec une brosse à soies fines.
Cleaning the espresso preheating plate and exterior:
Wipe the preheating plate and espresso maker exterior with a damp cloth and wipe dry.
Do not use abrasive cleaners or metal scouring pads as they can scratch the surfaces.
Entretien des joints de caoutchouc:
Le joint de caoutchouc est situé sur le fond de l'élément percolateur. Il assure
l'étanchéité de lle porte-filtre pendant le fonctionnement de l'expresso. Quand le joint
vieillit, il perd son élasticité et doit être remplacé. Nous recommandons de changer ce
joint tous les 8 à 12 mois. Certains signes indiquent que le joint doit être remplacé : le
porte-filtre a du jeu lorsque vous le tournez vers la droite, de la vapeur s'échappe de
l'élément percolateur pendant qu'il fonctionne, etc.
For information on obtaining replacement rubber seals, please call the Aroma Customer
Service Center at 1-800-276-6286.
Pour obtenir des replacement de joints de caoutchouc, contactez le department de
service à la clientèle au 1-800-276-6286.
Caring for the rubber seals:
The rubber seal is located on the bottom of the brewing head. It creates a seal against
the filter handle when making espresso. As time passes this seal loses its elasticity and
needs to be replaced. We recommend replacing this seal every 8-12 months.
Indications that the seal needs replacing include the following: the filter handle feels
loose when rotated to the right or steam escapes from around the espresso brewing
head during use.
Nettoyage du plateau chauffant et de l'extérieur de l'expresso:
Essuyez le plateau chauffant et l'extérieur de l'expresso avec un chiffon humide, puis
séchez avec un chiffon sec. N'utilisez pas de produits abrasifs ou de tampons à récurer
qui pourraient rayer les surfaces.
Cleaning the espresso brewing head and filters:
Rinse the filters and filter head using warm water after each use. Every 10-15 uses,
wash in warm soapy water using a mild detergent. To clean the espresso brewing head,
flush water through and wipe the head and the inside rim with a damp cloth. To help
ensure the longevity of the filters and filter handle, run the machine with the filters in
place using only water, no coffee, at the end of each espresso making session. If the
filter holes become clogged with coffee grinds, remove them by using a fine bristled
brush.
12
CARE AND CLEANING
13
NETTOYAGE ET ENTRETIEN
Détartrage de l'expresso Cappu-Latte:
Nous recommandons de détartrer l'expresso Cappu-Latte tous les 2-3 mois en fonction
de la dureté de l'eau et de la fréquence d'utilisation. Vous trouverez un grand nombre de
produits de détartrage d'expresso dans le commerce. Vous pouvez aussi utiliser du
vinaigre blanc. Cependant, le vinaigre peut donner un goût particulier aux premières
tasses d'expresso suivant le détartrage.
1. Retirez le réservoir à eau et le bac récolte-gouttes de l'appareil et mettez-les de
côté. Retirez le porte-filtre, rincez-le soigneusement sous le robinet et mettez-le de
côté.
2. Retirez l'accessoire mousse et remplissez le réservoir à eau de produit détartrant.
6. Afterwards, turn the machine off by shifting the Power switch to the off position. Shift
the Preheat button back to the espresso position.
3. Prenez deux grands récipients. Placez le premier sous l'élément percolateur, le
deuxième sous la buse vapeur.
4. Branchez l'appareil, mettez le bouton de chauffe en position "expresso" et mettez
l'appareil sous tension. Faites circuler 1/3 du produit environ dans l'appareil.
5. Once the liquid has been run through, shift the Preheat switch to the steam setting
and run the solution through the steam nozzle for approximately 2 minutes.
5. Quand le produit a circulé dans l'appareil, mettez le bouton de chauffe en position
"Vapeur" et laissez le produit circuler dans la buse vapeur pendant 2 minutes environ.
4. Plug the unit in, shift the Preheat switch to the espresso setting and turn the power
on. Run roughly 1/3 of the liquid through the machine.
3. Use two large containers and place one beneath the brewing head, and the other
beneath the steam nozzle.
6. Éteignez l'appareil en mettant le commutateur M/A en position "O" (arrêt). Remettez
le bouton de chauffe en position "expresso".
2. Remove the froth attachment and fill the water reservoir with your descaling solution.
1. Remove the water reservoir and drip tray from the unit and set aside. Remove the
filter handle and rinse it thoroughly under running water and set it aside.
We recommend that you descale your Cappu-Latte Espresso System every 2-3 months
depending on the hardness of your water and frequency of use. You may purchase a
variety of espresso maker descaling solutions in the market or you can use distilled
white vinegar. Keep in mind that vinegar might produce a lingering taste for the first few
batches of espresso after the descaling process.
Descaling your Cappu-Latte Espresso System:
CARE AND CLEANING
13
NETTOYAGE ET ENTRETIEN
14
Descaling your Cappu-Latte Espresso System continued:
7. Laissez l'appareil hors tension pendant 15 minutes pour permettre au détartrant d'agir.
8. Au bout de 15 minutes, remettez l'appareil sous tension et faites circuler la moitié du
détartrant restant dans l'appareil. Quand le produit est passé dans l'appareil, activez la
fonction vapeur et laissez l'appareil produire de la vapeur pendant 3 à 5 minutes.
9. Activez à nouveau la fonction expresso et faites circuler le reste du détartrant dans
l'appareil. Retirez les récipients placés sous l'élément percolateur et la buse vapeur,
videz-les et remettez-les en place.
10. Lavez et rincez soigneusement le réservoir d'eau pour éliminer complètement le
détartrant. Ensuite, faites fonctionner l'appareil 2 fois de suite avec le réservoir plein.
Remplissez le réservoir et faites fonctionner la buse vapeur pendant 5 minutes. L'eau qui
a circulé dans l'appareil doit être propre et limpide.
11. Remettez le bac récolte-gouttes et l'accessoire mousse en place.
12. You are now ready to brew gourmet espresso again.
12. L'appareil est prêt à confectionner de l'expresso gourmet.
11. Return the drip tray and froth attachment to their positions.
10. Thoroughly wash and rinse the water reservoir to remove all traces of the descaling
solution. Once this is done, run 2 full cycles with the water reservoir completely full. Refill
the water reservoir and run the steam nozzle for 5 minutes. Water run through the
machine should be clean and clear after this process.
9. Activate the espresso function again and allow the rest of the solution in the
reservoir to run through the machine. Remove the containers placed under the
brewing head and steam nozzle, empty and replace.
8. After the 15 mintues, turn the unit back on and run half of the remaining descaling
solution through the machine. After the solution has passed through, activate the
steam function and allow the unit to steam for 3-5 minutes.
7. Leave the machine turned off for 15 minutes to allow the descaling solution to take affect.
Descaling your Cappu-Latte Espresso System continued:
14
CARE AND CLEANING
RECIPES
15
Gourmet Espresso Recipes:
Hot Espresso Recipes:
Classic Espresso - The original espresso recipe. A single shot of espresso served in a
preheated espresso cup. Double your pleasure with a double shot or Espresso Doppio
served in a preheated cappuccino cup.
Espresso Con Panna - A single or double shot of espresso topped with whipped cream.
Espresso Macchiato - A single shot of espresso topped with 1-2 tbsp of frothed milk.
Espresso Romano - A single shot of espresso garnished with a fresh lemon peel.
Caffee Americano - Espresso diluted with fresh hot water to drip coffee strength.
Spicy Viennese Espresso - Mix together a double shot of espresso, 1/2 tsp of
cinnamon, 4 ground cloves and 1/2 tsp of allspice. Top the mixture off with whip cream.
Classic Cappuccino - Commonly consists of 1/3 part espresso to 2/3 part frothed milk
in a 5-ounce cappuccino cup, and topped off with foam from the frothed milk. If
preferred, the cappuccino can be garnished with a light sprinkle of ground chocolate,
cocoa powder, cinnamon, nutmeg or vanilla powder.
Caffe Latte - Referred to by the French as Cafe au Lait (Cafay-oh-lay) and the Spanish
as Cafe con Leche. A double-shot of espresso (about 3 ounces) mixed with 5oz of
steamed milk. Typically little or no foam is added to the top. Serve in a large, bowlshaped heavy cup.
Mocha Cappucinno - Mix together 1/3 part espresso to 2/3 part steamed milk after
dissolving chocolate syrup or cocoa with the milk to taste.
15
RECETAS
16
RECIPES
Gourmet Espresso Recipes Continued...
Cold Espresso Recipes:
Iced Cappuccino - Fill a 12oz glass with ice and add 5oz of milk. Mix in 2oz of
espresso and enjoy. Mix the 2oz of espresso with one ounce of chocolate syrup prior to
adding to the steamed milk for a delicious Iced Mochaccino.
Iced Espresso Latte - Serves 4. Recipe includes the following ingredients: 2 cups
espresso coffee, 2 tbsp brown sugar, 1.5 cups fat free milk, 2 tbsp almond syrup (or
hazlenut), ice cubes, 1 cup whipped cream and 1 tsp ground espresso beans. Combine
espresso, brown sugar, milk and syrup in a pitcher, stir until ingredients are well mixed
and refrigerate until cold. Fill 4 glasses with ice cubes and pour the mixture over the ice.
Add whip cream to each glass and sprinkle with ground espresso beans.
Amaretto Iced Smoothie - A delicious espresso smoothie with an added kick. Take 1/2oz
Amaretto, a 1/2oz Kahlua,™ 6oz chilled espresso, and 1 scoop of chocolate ice cream and mix
in a blender on low until smooth. Top with whipped cream and serve immediately.
Yogurtccino - A refreshing blend for the health-conscious espresso lover. This recipe
calls for 3oz chilled espresso, 3/4 cup of non-fat frozen yogurt, 1/2 cup of ice and 1.5tbs
of sugar. To prepare, blend all ingredients in a blender on the low setting until smooth.
Serve immediately in a tall glass.
Orange Truffle Mocha - Fill a tall glass halfway with ice. Whisk together a single shot
of espresso, 1oz orange juice, 1oz caramel syrup, 1tbs cocoa powder and pour directly
over the ice. Fill the rest of the glass with cold milk, stir lightly and serve.
RECETAS
16
17
GARANTIE LIMITÉE
La société Aroma Housewares garantit que ce produit sera libre de défauts de matériau
et de fabrication pendant une année de la date d'achat vérifiable dans la région
continentale des États-Unis.
Au cours de la période de cette garantie, Aroma Housewares réparera ou remplacera
sans frais, à sa discrétion, les pièces défectueuses, pourvu que le produit soit retourné,
frais de transport pré-payés avec preuve d'achat et 8 USD pour les frais d'envoi et de
manutention à l'ordre de la société Aroma Housewares Company. Avant de retourner un
article, vous devez appeler au numéro sans frais plus bas pour obtenir un numéro
d'autorisation de retour. Allouez de 2 à 4 semaines pour le retour.
This warranty does not cover improper installation, misuse, abuse or neglect on the
part of the owner. Warranty is also invalid in any case that the product is taken
apart or serviced by an unauthorized service station.
AROMA HOUSEWARES COMPANY
6469 Flanders Drive
San Diego, California 92121, É.-U.
1-800-276-6286
L-V, 8h30 - 17h00, heure du Pacifique
Site Internet : www.aromaco.com
This warranty gives you specific legal rights which may vary from state to state and
does not cover areas outside the United States.
Cette garantie vous donne des droits juridiques précis qui peuvent varier d'un état à
l'autre et ne couvre pas les régions à l'extérieur des États-Unis.
AROMA HOUSEWARES COMPANY
6469 Flanders Drive
San Diego, California 92121
1-800-276-6286
M-F, 8:30 AM - 5:00 PM, Pacific Time
Website: www.aromaco.com
Cette garantie ne couvre pas la mauvaise installation, utilisation, tout abus ou négligence
de la part du propriétaire. Cette garantie n'est pas valide si le produit est démonté ou
réparé par un service qui n'est pas autorisé à le faire.
Within this warranty period, Aroma Housewares Company will repair or replace, at
its option, defective parts at no charge, provided the product is returned, freight
prepaid with proof of purchase and U.S. $8.00 for shipping and handling charges
payable to Aroma Housewares Company. Before returning an item, please call the
toll free number below for return authorization number. Allow 2-4 weeks for return
shipping.
Aroma Housewares Company warrants this product free from defects in material
and workmanship for one year from provable date of purchase in the continental
United States.
LIMITED WARRANTY
17