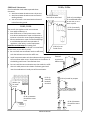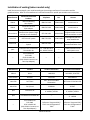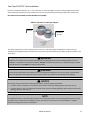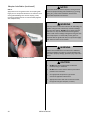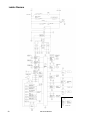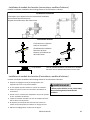
1
Direct Vent Tankless Water Heater Installation and Operation Manual FOR INDOOR APPLICATIONS ONLY RU80i .................... REU-KB2530FFUD-US RU98i .................... REU-KB3237FFUD-US FOR OUTDOOR APPLICATIONS ONLY RU80e ................... REU-KB2530WD-US RU98e ................... REU-KB3237WD-US ANS Z21.10.3 ● CSA 4.3 READ ALL OF THE INSTRUCTIONS THOROUGHLY BEFORE INSTALLING OR OPERATING THIS WATER HEATER. This manual provides information on the installation, operation, and maintenance of the water heater. For proper operation and safety, it is important to follow the instructions and adhere to the safety precautions. A licensed professional must install the water heater according to the exact instructions on pages 4-32. The consumer must read the entire manual to properly operate the water heater and to have regular maintenance performed. WARNING If the information in these instructions is not followed exactly, a fire or explosion may result causing property damage, personal injury or death. — Do not store or use gasoline or other flammable vapors and liquids in the vicinity of this or any other appliance. — WHAT TO DO IF YOU SMELL GAS Do not try to light any appliance. Do not touch any electrical switch; do not use any phone in your building. Immediately call your gas supplier from a neighbor’s phone. Follow the gas supplier’s instructions. If you cannot reach your gas supplier, call the fire department. — Installation and service must be performed by a licensed professional. Table of Contents Table of Contents ..................................................... 2 Safety Behaviors and Practices for the Consumer and Installer ............................................ 3 Installation Instructions (for the licensed professional) ............................. 4 Prepare for Installation ...................................... 5 Determine Installation Location ........................ 6 Checklist to Determine Installation Location ... 12 Mount to Wall .................................................. 12 Remove the Front Panel .................................. 12 Installation of Venting (indoor models only) ... 13 Twin Pipe PVC/CPVC Vent Installation........ 17-36 Condensate (indoor models only).................... 37 Checklist for Venting and Condensate (indoor models only) ........................................ 37 Installation of Plumbing ................................... 38 Checklist for Plumbing ..................................... 41 Installation of Gas Supply ................................ 41 Connect Electricity ........................................... 43 Adjust for High Altitude ................................... 43 Adjust for Vent Length (indoor models only) .. 43 Checklist for Gas and Electricity ....................... 43 Installation of Temperature Controller ............ 44 Final Checklist................................................... 46 Technical Data ........................................................ 47 Specifications ................................................... 47 Dimensions....................................................... 48 Pressure Drop and Water Flow Curves ............ 49 Ladder Diagram ................................................ 50 Recirculation Mode .......................................... 51 Operation Instructions ....................................... 53 Consumer Operation Guidelines for the Safe Operation of your Water Heater .................... 54 How to Use the Temperature Controller ............... 55 How to Set the Temperature.................................. 56 Diagnostic Codes .................................................... 58 Required Maintenance ........................................... 61 Flushing the Heat Exchanger............................ 63 Manual Draining of the Water Heater ............. 64 State Regulations .................................................... 65 Replacement Parts ................................................. 66 Consumer Warranty ............................................... 68 French Version ........................................................ 70 NOTICE: Rinnai sometimes shares customer contact information with businesses that we believe provide products or services that may be useful to you. By providing this information, you agree that we can share your contact information for this purpose. If you prefer not to have your information shared with these businesses, please contact customer service and ask not to have your information shared. We will however, continue to contact you with information relevant to the product(s) you registered and/ or you account with us. If you have any questions or feel that the manual is incomplete contact Rinnai at 1-800-621-9419. Important Safety Information Safety Definitions This is the safety alert symbol. This symbol alerts you to potential hazards that can kill or hurt you and others. 2 DANGER Indicates an imminently hazardous situation which, if not avoided, will result in death or serious injury. WARNING Indicates a potentially hazardous situation which, if not avoided, could result in death or serious injury. CAUTION Indicates a potentially hazardous situation which, if not avoided, could result in minor or moderate injury. It may also be used to alert against unsafe practices. KB Series Manual Safety Behaviors and Practices for the Consumer and Installer WARNING Before operating, smell all around the appliance area for gas. Be sure to smell next to the floor because some gas is heavier than air and will settle on the floor. Keep the area around the appliance clear and free from combustible materials, gasoline, and other flammable vapors and liquids. Combustible construction refers to adjacent walls and ceiling and should not be confused with combustible or flammable products and materials. Combustible and/or flammable products and materials should never be stored in the vicinity of this or any gas appliance. Always check the water temperature before Use only your hand to push in or turn the gas control knob. Never use tools. If the knob will not push in or turn by hand, do not try to repair it; call a licensed professional. Force or attempted repair may result in a fire or explosion. Do not use this appliance if any part has been under water. Immediately call a licensed professional to inspect the appliance and to replace any part of the control system and any gas control which has been under water. Do not use substitute materials. Use only parts certified with the appliance. Should overheating occur or the gas supply fail to shut off, turn off the manual gas control valve to the appliance. entering a shower or bath. To protect yourself from harm, before performing maintenance: Turn off the electrical power supply by unplugging the power cord or by turning off the electricity at the circuit breaker. (The temperature controller does not control the electrical power.) Turn off the gas at the manual gas valve, usually located immediately below the water heater. Turn off the incoming water supply. This can be done at the isolation valve immediately below the water heater or by turning off the water supply to the building. Do not adjust the DIP switch unless specifically instructed to do so. Do not use an extension cord or an adapter plug with this appliance. Any alteration to the appliance or its controls can be dangerous and will void the warranty. CAUTION BURN HAZARD. Hot exhaust and vent may cause serious burns. Keep away from the water heater unit. Keep small children and animals away from unit. Hot water outlet pipes leaving the unit can be hot to touch. In residential applications, insulation must be used for hot water pipes below 36” due to burn risk to children. California law requires this notice to be provided: California Proposition 65 lists chemical substances known to the state to cause cancer, birth defects, death, serious illness or other reproductive harm. This product may contain such substances, be their origin from fuel combustion (gas, oil) or components of the product itself. KB Series Manual 3 Installation Instructions Installer Qualifications General Instructions A licensed professional must install the appliance, inspect it, and leak test it before use. The warranty will be voided due to improper installation. DO NOT The installer should have skills such as: gas sizing connecting gas lines, water lines, valves, electricity, knowledge of applicable national, state, and local codes. installing venting through a wall or roof If you lack these skills contact a licensed professional. Do not install the RU80i or the RU98i outdoors. Do not install the RU80e or the RU98e indoors. Do not install the appliance in an area where water leakage of the unit or connections will result in damage to the area adjacent to the appliance or to lower floors of the structure. When such locations cannot be avoided, it is recommended that a suitable drain pan, adequately drained, be installed under the appliance. The pan must not restrict combustion air flow. Do not obstruct the flow of combustion and ventilation air. Combustion air shall not be supplied from occupied spaces. Type of installation For installation in residential and commercial applications. Certified for installation in manufactured (mobile) homes. Do not use this appliance in an application such as a pool or spa heater that uses chemically treated water . (This appliance is suitable for filling large or whirlpool spa tubs with potable water.) Do not use substitute parts that are not authorized for this appliance. Installation Steps MUST DO Prepare for Installation ...................................... 5 Determine Installation Location......................... 6 Checklist to Determine Installation Location ... 11 Mount to Wall .................................................. 11 Remove the Front Panel .................................. 11 Installation of Venting (indoor models only) ... 12 Condensate (indoor models only) .................... 15 Checklist for Venting and Condensate (indoor models only) ........................................ 15 Installation of Plumbing ................................... 16 Checklist for Plumbing ..................................... 19 Installation of Gas Supply................................. 19 Connect Electricity ........................................... 21 Adjust for High Altitude ................................... 21 Adjust for Vent Length (indoor models only) .. 21 Checklist for Gas and Electricity ....................... 21 Installation of Temperature Controller ............ 22 Final Checklist................................................... 24 4 The installation must conform with local codes or, in the absence of local codes, with the National Fuel Gas Code, ANSI Z223.1/NFPA 54, or the Natural Gas and Propane Installation Code, CSA B149.1. If installed in a manufactured home, the installation must conform with the Manufactured Home Construction and Safety Standard, Title 24 CFR, Part 3280 and/or CAN/SCA Z240 MH Series, Mobile Homes. The appliance, when installed, must be electrically grounded in accordance with local codes or, in the absence of local codes, with the National Electrical Code, ANSI/NFPA 70, or the Canadian Electrical Code, CSA C22.1. The appliance and its appliance main gas valve must be disconnected from the gas supply piping system during any pressure testing of that system at test pressures in excess of 1/2 psi (3.5 kPa) (13.84 in W.C.). KB Series Manual Prepare for installation The appliance must be isolated from the gas supply piping system by closing its individual manual shutoff valve during any pressure testing of the gas supply piping system at test pressures equal to or less than 1/2 psi (3.5 kPa) (13.84 in W.C.). You must follow the installation instructions and Parts included Tankless water heater Color coded cold (blue) and hot (red) isolation valves Pressure relief valve those in Care and Maintenance for adequate combustion air intake and exhaust. MC-91-2 temperature controller (integrated into INFORMATION indoor models; provided with outdoor models) If a water heater is installed in a closed water supply system, such as one having a backflow preventer in the cold water supply line, means shall be provided to control thermal expansion. Contact the water supplier or local plumbing inspector on how to control thermal expansion. Should overheating occur or the gas supply fail to shut off, turn off the manual gas control valve to the appliance. Keep the air intake location free of chemicals such as chlorine or bleach that produce fumes. These fumes can damage components and reduce the life of your appliance. Tools needed Pipe wrenches (2) Gloves Adjustable pliers Safety glasses Screwdrivers (2) Level Wire cutters Tools that might be needed Hammer drill with concrete bits Saw Core drill with diamond head Torch set Threading machine with Copper tubing cutter heads and oiler Steel pipe cutter Materials needed Soap solution Approved venting Teflon tape (recommended) or pipe compound Materials that may be needed Heat tape Pipe insulation Electrical wire and conduit per local code Concrete wall anchors Optional pipe cover Optional temperature controller KB Series Manual 5/8” ID PVC flexible tubing 2 conductor 22 AWG wire for controller Single gang electrical box Wire nuts Unions and drain valves 5 Determine Installation Location You must ensure that clearances will be met and that the vent length will be within required limits. Consider the installation environment, water quality, and need for freeze protection. Requirements for the gas line, water lines, electrical connection, and condensate disposal can be found in their respective installation sections of this manual. Water Quality Consideration of care for your water heater should include evaluation of water quality. Water that contains chemicals exceeding the levels below affect and damage the heat exchanger. Replacement of the heat exchanger due to water quality damage is not covered by the warranty. Environment Air surrounding the water heater, venting, and vent termination(s) is used for combustion and must be free of any compounds that cause corrosion of internal components. These include corrosive compounds that are found in aerosol sprays, detergents, bleaches, cleaning solvents, oil based paints/ varnishes, and refrigerants. The air in beauty shops, dry cleaning stores, photo processing labs, and storage areas for pool supplies often contains these compounds. Therefore it is recommended that outdoor models be used for these locations where possible. Total Hardness Up to 200 mg / L Aluminum * Up to 0.2 mg / L Chlorides * Up to 250 mg / L The water heater, venting, and vent termination(s) should not be installed in any areas where the air may contain these corrosive compounds. If it is necessary for a water heater to be located in areas which may contain corrosive compounds, the following instructions are strongly recommended. Copper * Up to 1.0 mg / L IMPORTANT CONSIDERATIONS FOR: Iron * Up to 0.3 mg / L Manganese * Up to 0.05 mg / L Indoor/Internal Water Heaters DO NOT Install in areas where air for combustion can be contaminated with chemicals. Before installation, consider where air has the ability to travel within the building to the water heater. Where possible, install the water heater in a sealed closet so that it is protected from the potential of contaminated indoor air. Chemicals that are corrosive in nature should not be stored or used near the water heater. Outdoor/External Water Heaters and Vent Terminations of Indoor/Internal Water Heaters Install the water heater as far away as possible from exhaust vent hoods. Install as far away as possible from air inlet vents. Corrosive fumes may be released through these vents when air is not being brought in through them. Chemicals that are corrosive in nature should not be stored or used near the water heater or vent termination. Damage and repair due to corrosive compounds in the air is not covered by warranty. Maximum Level pH * 6.5 to 8.5 TDS (Total Dissolved Solids) * Zinc * Up to 500 mg / L Up to 5 mg / L * Source: Part 143 National Secondary Drinking Water Regulations If you install this water heater in an area that is known to have hard water or that causes scale buildup the water must be treated and/or the heat exchanger flushed regularly. When scale build-up in the heat exchanger begins to affect the performance of the water heater, a diagnostic code “LC#” will display. Flush the heat exchanger to prevent damage to it. Scale build up is caused by hard water set at a high temperature. Rinnai offers Southeastern Filtration’s Scale Cutter Water Conditioning System” that offers superior lime scale prevention and corrosion control by feeding a blend of control compounds into the cold water supply. 6 Part Number Description 103000038 Southeastern Filtratrion ScaleCutter System 3/4” Feed 103000039 ScaleCutter Refill KB Series Manual Direct Vent Terminal Clearances (Indoor Units) For indoor models, you must install a vent termination to bring in combustion air and expel exhaust. TERMINATION INSIDE CORNERDETAIL G Clearance in Ref. A also applies to anticipated snow line H A SNOW I B D M FIXED CLOSED B K OPERABLE E C B B J FIXED CLOSED B A OPERABLE L X AIR SUPPLY INLET V VENT TERMINAL AREA WHERE TERMINAL IS NOT PERMITTTED F B Ref Description Canadian Installations US Installations A Clearance above grade, veranda, porch, deck, or balcony 12 inches (30 cm) 12 inches (30 cm) B Clearance to window or door that may be opened 36 inches (91 cm) 12 inches (30 cm) C Clearance to permanently closed window * * D Vertical clearance to ventilated soffit, located above the terminal within a horizontal distance of 2 feet (61 cm) from the center line of the terminal * * E Clearance to unventilated soffit * * F Clearance to outside corner * * G Clearance to inside corner * * 3 feet (91 cm) within a height 15 feet (4.5 m) above the meter/regulator assembly * H Clearance to each side of center line extended above meter/ regulator assembly I Clearance to service regulator vent outlet 36 inches (91 cm) * J Clearance to nonmechanical air supply inlet to building or the combustion air inlet to any other appliance 36 inches (91 cm) 12 inches (30 cm) K Clearance to a mechanical air supply inlet 6 feet (1.83 m) 3 feet (91 cm) above if within 10 feet (3 m) horizontally L Clearance above paved sidewalk or paved driveway located on public property 7 feet (2.13 m) * M Clearance under veranda, porch, deck, or balcony 12 inches (30 cm) * [1] A vent shall not terminate directly above a sidewalk or paved driveway that is located between two single family dwellings and serves both dwellings. [2] Permitted only if veranda, porch, deck, or balcony is fully open on a minimum of two sides beneath the floor. For clearances not specified in ANSI Z223.1/NFPA 54, clearances are in accordance with local installation codes and the requirements of the gas supplier. Clearance to opposite wall is 24 inches (60 cm). KB Series Manual 7 Other Than Direct Vent Terminal Clearances (Outdoor Units) INSIDE CORNERDETAIL G H A I B D B K OPERABLE E C B B FIXED CLOSED J B A OPERABLE L F Ref X AIR SUPPLY INLET V VENT TERMINAL AREA WHERE TERMINAL IS NOT PERMITTTED B A M FIXED CLOSED Description Clearance above grade, veranda, porch, deck, or balcony Canadian Installations US Installations 12 inches (30 cm) 12 inches (30 cm) 6 in (15 cm) for appliances ≤ 10,000 Btuh (3 kW), 12 in (30 cm) for appliances > 10,000 4 ft (1.2 m) below or to side of opening; Btuh (3 kW) and ≤ 100,000 Btuh (30 kW), 36 in 1 ft (300 mm) above opening (91 cm) for appliances >100,000 Btuh (30 kW) B Clearance to window or door that may be opened C Clearance to permanently closed window * * D Vertical clearance to ventilated soffit, located above the terminal within a horizontal distance of 2 feet (61 cm) from the center line of the terminal * * E Clearance to unventilated soffit * * F Clearance to outside corner * * G Clearance to inside corner * * H Clearance to each side of center line extended above meter/regulator assembly 3 feet (91 cm) within a height 15 feet (4.5 m) above the meter/regulator assembly * I Clearance to service regulator vent outlet 36 inches (91 cm) * J Clearance to nonmechanical air supply inlet to building or the combustion air inlet to any other appliance K Clearance to a mechanical air supply inlet L Clearance above paved sidewalk or paved driveway located on public M Clearance under veranda, porch, deck, or balcony 6 in (15 cm) for appliances ≤ 10,000 Btuh (3 kW), 12 in (30 cm) for appliances > 10,000 4 ft (1.2 m) below or to side of opening; Btuh (3 kW) and ≤ 100,000 Btuh (30 kW), 36 in 1 ft (300 mm) above opening (91 cm) for appliances >100,000 Btuh (30 kW) [1] A vent shall not terminate directly above a sidewalk or paved driveway that is located between two single family dwellings and serves both dwellings. [2] Permitted only if veranda, porch, deck, or balcony is fully open on a minimum of two sides beneath the floor. 8 6 feet (1.83 m) 3 feet (91 cm) above if within 10 feet (3 m) horizontally 7 feet (2.13 m) * 12 inches (30 cm) * For clearances not specified in ANSI Z223.1/NFPA 54, clearances are in accordance with local installation codes and the requirements of the gas supplier. Clearance to opposite wall is 24 inches (60 cm). KB Series Manual Additional clearances RU80e, RU98e Check on whether local codes supersede these clearances. Avoid termination locations near a dryer vent. Avoid termination locations near commercial cooking exhaust. You must install a vent termination at least 12 inches from the ground. (50 mm) between terminals at same level 36" 12" 2" RU80i, RU98i (1.52 m) vertically between terminals The vent for this appliance shall not terminate Over public walkways; or Near soffit vents or crawl space vents or other area where condensate or vapor could create a nuisance or hazard or cause property damage; or Where condensate or vapor could cause damage or could be detrimental to the operation of regulators, relief valves, or other equipment. Important considerations for locating vent termination under a soffit (ventilated or unventilated or eave vent; or to a deck or porch) Do not install vent termination under a soffit vent 60" (0.30 m) to an inside corner such that exhaust can enter the soffit vent Install vent termination such that exhaust and rising moisture will not collect under eaves. Discoloration to the exterior of the building could occur if installed too close. Do not install the vent termination too close under the soffit where it could present recirculation of exhaust gases back into the combustion air intake part of the termination. V 60" (0.30 m ) to an inside corner 36" (0.91 m) to ventilated or unventilated soffit or eve vent; or to a deck or porch (1.52 m) between terminals at different levels 60" V V (1.52 m) vertically between terminals (0.61 m) to wall or parapet 24" V V 12" V V 12" (0.30 m) between terminals at same level 12" V INSIDE CORNER KB Series Manual V (0.30 m) between terminals at same level 9 Unit clearances Freeze Protection Make sure that in case of freezing weather that the water heater and its water lines are protected to prevent freezing. Damage due to freezing is not covered by the warranty. to top Loss of freeze protection may result in water damage from a burst heat exchanger or water lines. to front With electrical power supplied, the water heater will not freeze when the outside air temperature is as cold as –22°F (-30°C) for indoor models or is as cold as –4°F (-20°C) for outdoor models, when protected from direct wind exposure. Because of the “wind-chill” effect, any wind or circulation of the air on the unit will reduce its ability to freeze protect. to side to floor/ground Indoor models: RU80i, RU98i to Combustibles inches (mm) to NonCombustibles inches (mm) The unit may be drained manually. However, it is highly recommended that: drain down solenoid valves are installed that will Top of Heater 6 * (152) 2 *(51) Back of Heater 0 (zero) 0 (zero) Front of Heater 6 (152) 6 (152) automatically drain the unit if power is lost. These are available in a kit, 104000059. (The condensate trap drain plug and water drain plug are not affected by the auto drain down solenoid valves and will have to be manually opened.) Sides of Heater 2 (51) 1/2 (13) a surge protector with terminals is installed which Ground/Bottom 12 (305) 12 (305) Vent 0 (zero) 0 (zero) allows the solenoid valves to operate if the unit is disabled due to a diagnostic code. This is available as 104000057. * 0 inches from vent components and condensate drain line. The clearance for servicing is 24 inches in front of the water heater. For closet installation, clearance is 6 inches (152 mm from the front. Outdoor models: RU80e, RU98e to Combustibles inches (mm) to NonCombustibles inches (mm) Top of Heater 12 (305) 2 (51) Back of Heater 0 (zero) 0 (zero) Front (panel) 24 (610) 0 (zero) Front (exhaust) 24 (610) 24 (610) Sides of Heater 6 (152) 1/8 (3.2) Ground/Bottom 12 (305) 2 (51) In addition, the solenoid valves should be connected electrically to a surge protector with terminals. This allows the solenoid valves to operate if the water heater is disabled due to a diagnostic code. The freeze protection features will not prevent the external piping from freezing. It is recommended that hot and cold water pipes are insulated. Pipe cover enclosures may be packed with insulation for added freeze protection. It is recommended that the condensate trap drain line be insulated. A frozen condensate trap drain line results in diagnostic code 25. In the event of a power failure at temperatures below freezing the water heater should be drained of all water to prevent freezing damage. In addition, drain the condensate trap and drain line. The clearance for servicing is 24 inches in front of the water heater. 10 KB Series Manual Maximum vent length Maximum vent length with concentric venting 1.Determine the number of 90 degree elbows in the vent system. (Two 45 degree elbows count as one 90 degree elbow.) 2.Refer to the table to find the maximum vent length based on the number of elbows. Natural Gas Units Only Ubbink Concentric (90° elbow is equivalent to 6 feet; 45° elbow is equivalent to 3 feet.) Maximum Equivalent Vent Length 65 ft (19.8 m) Maximum Vent Length in feet # of 90° Elbows (meters) 0 65 (19.8)1 1 59 (18.0)2 2 53 (16.2)3 3 47 (14.3)4 4 41 (12.5)4 5 35 (10.7)4 6 29 (08.8)4 Propane Units Only Example: If you have one elbow then your maximum vent length is 35 feet (10.7 m). If your actual length is greater than 15 ft (4.6 m) then move switch no. 1 (SW1) to OFF. NOTICE If you have a longer vent length (see above), switch No. 1 is required to be in the OFF position. This ensures the water heater will run properly. Blocked flue diagnostic codes and shutdowns may result if switch No. 1 is not in the correct position. Maximum vent length for Centrotherm 2 Pipe InnoFlue Vent System (single wall SW, 3 inch diameter) Vent length using short radius elbow (Intake is the short UV protected 90° elbow) Number of 90° Short Radius Elbows Maximum Straight Vent Length 0 41 ft (12.50 m) 18 ft (5.49 m) move switch #1 to OFF 1 26 ft (7.93 m) 3 ft (0.91 m) move switch #1 to OFF 2 11 ft (3.35 m) move switch #1 to OFF for any length Ubbink Concentric (90° elbow is equivalent to 6 feet; 45° elbow is equivalent to 3 feet.) Maximum Equivalent Vent Length 41 ft (12.5 m) # of 90° Elbows 0 1 2 3 4 5 6 Maximum Vent Length in feet (meters) 41 (12.5)1 35 (10.7)2 29 (8.8)3 23 (7.0)4 17 (5.2)4 11 (3.4)4 5 (1.5)4 Switch #1 in the tan DIP switches If length is greater Vent length using long radius elbow (Intake is the long UV protected 90° elbow) Number of 90° Long Radius Elbows Maximum Straight Vent Length 0 41 ft (12.50 m) 21 ft (6.40 m) move switch #1 to OFF 3.Adjust switch No. 1 in the SW1 DIP switch (tan switches) if required by the applicable note. 1 35 ft (10.67 m) If the length is greater than 21 ft (6.4 m) then move switch No. 1 (SW1) to OFF. 15 ft (4.57 m) move switch #1 to OFF 2 29 ft (8.84 m) If the length is greater than 15 ft (4.6 m) then move switch No. 1 (SW1) to OFF. 9 ft (2.74 m) move switch #1 to OFF 3 23 ft (7.01m) If the length is greater than 9 ft (2.7 m) then move switch No. 1 (SW1) to OFF. 3 ft (0.91 m) move switch #1 to OFF 4 17 ft (5.18 m) Move switch No. 1 (SW1) to OFF. 5 11 ft (3.35 m) 6 5 ft (1.52 m) KB Series Manual Switch #1 in the tan DIP switches If length is greater move switch #1 to OFF for any length 11 Checklist to Determine Installation Location Mount to Wall □ The water heater is not exposed to corrosive compounds in the air. □ The water heater location complies with the wall installation brackets clearances. □ For indoor models, the planned venting will not exceed the maximum length for the number of elbows used. □ The planned venting termination/air intake location meets the clearances. □ The water supply does not contain chemicals or exceed total hardness that will damage the heat exchanger. □ A standard 3 prong 120 VAC, 60 Hz properly grounded wall outlet (for indoor models) or other 120 VAC, 60 Hz source is available. □ The installation must conform with local codes or, in the absence of local codes, with the National Fuel Gas Code, ANSI Z223.1/NFPA 54, or the Natural Gas and Propane Installation Code, CSA B149.1. If installed in a manufactured home, the installation must conform with the Manufactured Home Construction and Safety Standard, Title 24 CFR, Part 3280 and/or CAN/SCA Z240 MH Series, Mobile Homes. 1. Identify the installation location and confirm that the installation will meet all required clearances. 2. Securely attach the water heater to the wall using any of the holes in the wall installation brackets which are at the top and bottom of the water heater. Ensure that the attachment strength is sufficient to support the weight. Refer to the weight of the water heater in the Specifications section. Use a leveling tool to ensure that the water heater is level. Proper operation requires that the water heater be level. NOTE: The water heater should be installed in an upright position. Do not install upside down or on its side. □ Leave the entire manual taped to the water heater (indoor models), temperature controller (outdoor models), or give the entire manual directly to the consumer. Remove the Front Panel Slide the plastic trim pieces on each side of the water heater to expose the screws. Remove the 4 screws and pull off the front panel. 12 KB Series Manual Installation of venting (indoor models only) Install the correct venting for your model according to the venting manufacturer’s instructions and the guidelines below. Refer to the manufacturer’s technical literature for specific part numbers and instructions. Manufacturer Listed and Tested Vent Products Telephone Fax Contact Ubbink Rolux Condensing Vent System 800-621-9419 678-829-1666 www.rinnai.us Ubbink Concentric to Twin Pipe Adaptor 800-621-9419 678-829-1666 www.rinnai.us Centrotherm InnoFlue Vent System (single wall SW, 3 inch diameter) 877-434-3432 518-618-3166 [email protected] www.centrotherm.us.com Heat-Fab Saf-T Vent SC system 800-772-0739 413-863-4803 [email protected], www.heatfab.com Metal-Fab Corr/Guard Vent/Air Intake System 800-835-2830 316-943-2717 [email protected], www.metal-fabinc.com Ipex Concentric Kit / Low Profile Termination Kit U.S. - 800-463-9572 CA. - 866-473-9462 — www.ipexamerica.com www.ipexinc.com — PVC schedule 40 PVC-DWV CPVC schedule 40 (with Ubbink Concentric to Twin Pipe Adaptor) — — — Manufacturer Product Vertical Termination Horizontal Termination Ubbink Rolux 184162PP 223176PP, 223177PP Centrotherm InnoFlue ICRT3539 ISELL0387UV Heat-Fab Saf-T Vent Saf-T Vent CI Plus Wall Termination Saf-T Vent CI Plus Rain Cap Metal-Fab Corr/Guard 3CGRVDK 3CGRVT Ipex Concentric Kit 3”- 196006 /197009 4”-196021 /197021 3”- 196006 /197009 4”-196021 /197021 Ipex Low Profile Termination Kit — 3”- 196985 4”- 196986 — PVC schedule 40 PVC-DWV CPVC schedule 40 (with Ubbink Concentric to Twin Pipe Adaptor) Reference “Approved PVC/ CPVC Vent Configurations” Table Reference “Approved PVC/ CPVC Vent Configurations” Table KB Series Manual 13 Venting Guidelines DO NOT Do not use cellular core PVC/CPVC, Radel, ABS, or galvanized material to vent this appliance. Do not combine vent components from different manufacturers. Vent diameter must not be reduced. Do not connect the venting system with an existing vent or chimney. Do not common vent with the vent pipe of any other manufacturer’s water heater or appliance. Rinnai water heaters can only be common vented using a Rinnai certified common vent system. NOTICE If it becomes necessary to access an enclosed vent system for service or repairs, Rinnai is not responsible for any costs or difficulties in accessing the vent system. The warranty does not cover obtaining access to a vent system in an enclosed environment. MUST DO This water heater is a direct vent water heater and therefore is certified and listed with the vent system. You must use vent components that are certified and listed with the water heater model. The vent system must vent directly to the outside of the building and use outside air for combustion. Avoid dips or sags in horizontal vent runs by installing supports per the vent manufacturer’s instructions. Support horizontal vent runs every four feet and all vertical vent runs every six feet or in accordance with local codes. Venting should be as direct as possible with a minimum number of pipe fittings. Vent connections must be firmly pressed together so that the gaskets form an air tight seal. The vent piece connected to the water heater must be secured with one self-tapping screw. INFORMATION 14 Refer to the instructions of the vent system manufacturer for component assembly instructions. If the vent system is to be enclosed, it is suggested that the design of the enclosure shall permit inspection of the vent system. The design of such enclosure shall be deemed acceptable by the installer or the local inspector. KB Series Manual Flue Installation with Concentric Venting (indoor models only) Install the venting termination according to the diagrams and instructions below. Horizontal Termination Slope the venting toward the appliance according to the vent manufacturers installation instructions. Dispose of condensate per local codes. Vertical Termination Slope the venting toward the appliance according to the vent manufacturers installation instructions. Dispose of condensate per local codes. Securing Screw Secure the first vent component to the water heater with one self-tapping screw at the hole. KB Series Manual 15 Flue Installation with Centrotherm Venting (indoor models only) Install the venting termination according to the diagrams and instructions below. Comply with the exhaust clearances found in the Rinnai Operation and Installation Manual. Only one appliance can be attached to the vent system. Install the system in according to the Centrotherm installation instructions. Use the 3”/5” concentric to twin pipe adaptor and 3” diameter venting. The vent termination and air intake must be in the same pressure zone. Do not exceed maximum straight vent length with number of elbows as shown in the tables on the next page. Maintain the clearances shown in the figures below. WARNING DO NOT use cellular core PVC, CPVC, Radel, ABS or Galvanized ducts as venting materials. Vertical Termination Horizontal Termination 5” Vent 11” Optional Intake 16 KB Series Manual Twin Pipe PVC/CPVC Vent Installation Rinnai has certified the Ubbink 3”/5” to 3”/3” Concentric to Twin Pipe Adaptor and other venting equipment to be used with the optional PVC/CPVC twin pipe venting system for use with the following condensing water heater models only: REU-KB3237FFUD-US (RU98i) and REU-KB2530FFUD-US (RU80i). Ubbink® Concentric to Twin Pipe Adaptor Exhaust Combustion Air Inlet The newly certified vent system is comprised of a Concentric to Twin Pipe Adaptor (adaptable to 3 and 4 inch sizes), PVC/CPVC pipes, fittings and either the IPEX System Concentric Vent Kit Assembly (System 636), snorkel termination or tee termination. WARNING Installations must comply with local requirements and with the National Fuel Gas Code, ANSI Z223.1/NFPA 54 for U.S. installations or CSA B149.1 for Canadian installations. DO NOT use cellular core PVC, CPVC, or Radel based pipe materials for the exhaust vent. Vents MUST be of solid core pipes ONLY. WARNING Use only the materials listed in this section for vent, air intake pipe and fittings (See vent and air piping materials table). Failure to comply with this warning could result in severe personal injury, death or substantial property damage. NOTICE PVC venting cannot be used if the condensing water heater, under the following conditions: The water heater is installed in a recirculation system and the thermostat setting is greater than 150 F (65.5 C). The water heater is used in a combination domestic water and space heating application which requires a thermostat setting greater than 150 F (65.5 C). NOTE The Ubbink Concentric to Twin Pipe Adaptor (above) is ULC S636 approved and is listed by the applicable agencies having jurisdiction and is certified for use throughout the U.S. and Canada. The Concentric to Twin Pipe Adaptor is supplied exclusively through Rinnai and/or its distributors. KB Series Manual 17 DANGER Tankless Water Heaters must be vented and furnished with intake air and exhaust vent using piping and methods described in this section. Each water heater must have its own intake and vent. DO NOT common vent with any other appliance using this method. Inspect finished vent and intake air piping thoroughly to ensure all are airtight and comply with the instructions provided and with all requirements of applicable codes. Failure to provide a properly installed vent and air system will cause severe personal injury or death. WARNING Combustion Air Intake - The combustion air intake termination fitting must be installed with the clearances and geometry relative to the exhaust (vent) depicted in this section to ensure that flue products do not enter the combustion air intake. Ensure that the intake air will not contain any of the contaminants as outlined in the “Determine Installation Location” section. Contaminated intake air will damage the water heater, resulting in possible severe personal injury, death, or substantial property damage. Exhaust - The exhaust (vent) termination fitting must be installed with the clearances and geometry relative to the combustion air pipe as depicted in this section to ensure that flue products do not enter the combustion air intake NOTICE If the vent and/or combustion air intake piping configurations covered in this manual cannot be applied to a specific installation, contact Rinnai’s Application Engineer group for assistance. Other configurations may be available. WARNING Installations must comply with local requirements and with the National Fuel Gas Code, ANSI Z223.1/NFPA 54 for U.S. installations or CSA B149.1 for Canadian installations. DO NOT use cellular core PVC, CPVC, or Radel based pipe materials for the exhaust vent. Vents MUST be of solid core pipes ONLY. WARNING Use only the materials listed in this manual for vent, combustion air intake pipe and fittings (See “Vent and Air Piping” table) . Failure to comply with this warning could result in severe personal injury, death or substantial property damage. WARNING If used, a masonry chimney can ONLY be used as a PIPE CHASE for the exhaust and combustion air intake pipes. The exhaust and air piping must be installed as instructed in this manual. The chimney must be used only for Rinnai Water Heater(s) vent chase. NO OTHER appliance or fireplace can be connected to the chimney. Exhaust and air piping materials must comply with this instruction. The chimney must be fitted with a sealed access opening to facilitate interior inspection. The chimney chase (and liner, if installed) to be inspected annually for any degradation. Failure to comply could result in severe personal injury, death, or substantial property damage. 18 KB Series Manual Twin Pipe PVC/CPVC Vent Installation Requirments: All PVC/CPVC IPEX Concentric Vent Kit (CVK) Assemblies are certified to ULC S636. Where ULC S636 compliance is required, use only System 636 pipe, fittings and cement at terminal connection. DO NOT use PVC/CPVC on Non-Condensing Units. DO NOT operate unit until venting is completely installed and all solvents and glues have bonded. All PVC/CPVC exhaust vent material used in Canada must be S636 certified. If the preferred venting option is a twin pipe PVC/CPVC configuration, the Rinnai approved twin pipe adaptor must be used. DO NOT terminate the venting over a public walkway or over an area where condensate or vapor can create a nuisance / hazard or where condensate can be detrimental to the operation of equipment such as regulators or relief valves Water Heater flue gases must be piped from the appliance to the outside, Installer MUST adhere to the instructions provided herein and the most recent Water Heater Manual and all applicable codes. For further details on listed PVC/CPVC venting material (table below) refer to the installation manual of the PVC/CPVC manufacturer. Exhaust and combustion air must terminate through the same sidewall or roof as the terminations must be in the same pressure zone and face same direction. Vent pipe must terminate either through the sidewall or through the roof, exhaust/vent termination and/or intake air openings shall adhere to clearances as set forth in the Direct Vent Termination Clearances diagram. Each Condensing Tankless Water Heater requires a IMPORTANT CONSIDERATIONS FOR LOCATION: Locate the vent outlet where flue gases will not harm surrounding plants and/or cooling equipment. separate vent system. If common venting is required, refer to Rinnai Common Vent Installation Manual (latest revision) for instructions on optional venting method as well as to verify which tankless models may be common vented. Avoid locating vent where prevailing winds could affect the performance of the water heater or cause recirculation of the flue gases. Item Vent or combustion air intake pipe & Fittings PVC pipe cement & primer Termination Vent Screens Use only PVC/CPVC 3” and 4” Venting. Vent and Air Piping Materials Standard for Installation in North America Material United States Canada Thermoplastic Piping Materials PVC schedule 40 ANSI/ASTM D1785 Thermoplastic vent pipe must be PVC-DWV ANSI/ASTM D2665 certified to ULC S636. CPVC schedule 40 ANSI/ASTM F441 Intake pipe may be of any material listed PVC ANSI/ASTM D2564 (left). CPVC ANSI/ASTM F493 IPEX bird screens (purchase separately) 3" Vent screen: IPEX part # 196051; 4" Vent screen: part #: 196052 Polyethylene (Screens are friction fitted inside termination fitting bells.) NOTE The listed vent, vent fittings, termination, cleaner and glue are all certified as part of the condensing tankless water heater vent system. DANGER Failure to correctly install vent and combustion air intake pipes of the water heater to atmosphere as outlined in this venting section will result in death from asphyxiation (from carbon monoxide), fire or explosion. NEVER operate the water heater without proper venting (vent and combustion air intake). Always inspect the vent terminal unit, combustion air intake pipe, and the entire vent system affixed to the water heater for proper installation at equipment commissioning and at least annually thereafter. KB Series Manual 19 IMPORTANT CONSIDERATIONS FOR LOCATION (continued): OPTION 1: For PVC/CPVC vent systems reduce the maximum allowable length for each elbow and termination type as follows : Calculation of equivalent piping lengths for venting system: Choose the vent type and fill out the calculation sheet below. When determining equivalent combustion air and vent length, add 5 feet for each 90° elbow, 2.5 feet for each 45° elbow. Exhaust and Combustion Air Intake Pipe Diameters and Max Lengths: Example of calculation (assume 3” diameter pipes for natural gas unit): Twin pipe (parallel) with snorkel terminal Combustion air pipe length: 40 ft straight pipe with 3 x 90° elbows Exhaust pipe length: 40 ft straight pipe with 3 x 90° elbows (include all interior and exterior elbows) Snorkel Termination: 10 equivalent feet (reference Approved PVC/CPVC Termination Components table) For PVC/CPVC vent systems reduce the maximum allowable length for each elbow and termination type as follows: 2.5 feet for every 45° elbow. 5 feet for every 90° elbow. Termination (refer Approved Vent Component table of this section) Vent and combustion air intake pipe diameters to be as specified in maximum equivalent vent length tables of this document. Calculation: Equivalent Combustion air pipe length: [40+(3 X 5)+10] = 65 ft Equivalent Vent Length: [40+(3 X 5)+10] = 65 ft Total = 65 ft. for both exhaust and combustion air pipes, which is the maximum allowable vent length for 3” PVC/CPVC on a natural gas unit. If longer lengths are required, go to the 4” diameter pipe configuration which is certified for up to 100 equivalent feet. Do not exceed vent and combustion air intake pipe MAXIMUM lengths (Lengths are specific to models and fuel type). Determining Total System Equivalent Length There are two options for determining the vent lengths/ components necessary for the installation. ATTENTION Option 1: The installer can use the vent length calculation sheet (below), filling in the quantity of the vent components in order to calculate the total equivalent vent lengths. Maximum equivalent vent lengths are specific to the fuel type of the water heater. It is imperative when performing vent calculations, the following be taken in consideration: Option 2: The installer can use the maximum vent lengths tables on the next pages to determine the amount of straight pipe that can be used with a specific termination type and quantity of elbows. Equivalent Vent Length Calculation Sheet 1) 2) 3) 4) 5) 6) 7) 8) 9) 10) Fitting / Termination Type 90 elbow 45 elbow IPEX Low Profile Termination IPEX 4" Concentric Termination IPEX 3" Concentric Termination 3" Tee Termination 4" Tee Termination 3" Snorkel Termination 4" Snorkel Termination Length of Straight Section in feet Number of fittings 3 1 NA x x x x x x x x x Equivalent Vent Length 5 2.5 5 20 20 5 5 10 10 40 = = = = = = = = = = Total Equivalent Length 15 0 0 0 0 0 0 10 0 40 (A blank copy of the Equivalent Vent Length Calculation Sheet is located at the end of this section) Ensure switch #1 in the bank of eight tan dip switches is in OFF position if vent length is greater than 21ft (6.4m). 65 Total (add up lines 1 through 20 KB Series Manual OPTION 2: Maximum Equivalent Vent Length Tables: Determine the number of 90 degree elbows in the vent system. (two 45 degree elbows count as one 90 degree elbow.) Refer to the tables below to find the maximum vent length based on the number of elbows and termination style. Natural Gas Units Total Equivalent Vent Length (Intake/outlet) for Twin Pipe 3" PVC/CPVC Maximum Vent Length Termination Type IPEX Concentric Vent Kit 65 Feet Snorkel Termination Termination Equivalent Length in feet (meters) (Already factored into the straight pipe lengths below) 20 (6.1) 10 (3.0) # of 90° Elbows (each: 5 equivalent feet) 0 1 2 3 4 5 6 Side Wall Tee Termination Low Profile Termination 5 (1.5) 5 (1.5) Max. straight pipe vent length in feet (meters) 45 (13.7) ** 40 (12.2) ** 35 (10.7) ** 30 (9.1) ** 25 (7.6) ** 20 (6.1) ** 15 (4.6) ** 55 (16.8) ** 50 (15.2) ** 45 (13.7) ** 40 (12.2) ** 35 (10.7) ** 30 (9.1) ** 25 (7.6) ** 60 (18.3) ** 55 (16.8) ** 50 (15.2) ** 45 (13.7) ** 40 (12.2) ** 35 (10.7) ** 30 (9.1) ** 60 (18.3) ** 55 (16.8) ** 50 (15.2) ** 45 (13.7) ** 40 (12.2) ** 35 (10.7) ** 30 (9.1) ** Natural Gas Units Total Equivalent Vent Length (Intake/outlet) for Twin Pipe 4" PVC/CPVC Termination Type IPEX Concentric Vent Kit 100 Feet Snorkel Termination Termination Equivalent Length in feet (meters) (Already factored into the straight pipe lengths below) 20 (6.1) 10 (3.0) Maximum Vent Length # of 90° Elbows (each: 5 equivalent feet) 0 1 2 3 4 5 6 Side Wall Tee Termination Low Profile Termination 5 (1.5) 5 (1.5) Max. straight pipe vent length in feet (meters) 80 (24.4) ** 75 (22.9) ** 70 (21.3) ** 65 (19.8) ** 60 (18.3) ** 55 (16.8) ** 50 (15.2) ** 90 (27.4) ** 85 (25.9) ** 80 (24.4) ** 75 (22.9) ** 70 (21.3) ** 65 (19.8) ** 60 (18.3) ** 95 (29.0) ** 90 (27.4) ** 85 (25.9) ** 80 (24.4) ** 75 (22.9) ** 70 (21.3) ** 65 (19.8) ** 95 (29.0) ** 90 (27.4) ** 85 (25.9) ** 80 (24.4) ** 75 (22.9) ** 70 (21.3) ** 65 (19.8) ** **Dip switch one (bank of eight - TAN COLORED) off for lenths greater than or equal to 21 feet ATTENTION Maximum vent lengths are specific to the fuel type of the tankless water heater. It is imperative when performing equivalent vent length calculations, that the gas type be taken into consideration. KB Series Manual 21 Maximum Equivalent Vent Length Tables (continued): Propane Units Total Equivalent Vent Length (Intake/outlet) for Twin Pipe 3" PVC/CPVC Termination Type IPEX Concentric Vent Kit 41 Feet Snorkel Termination Termination Equivalent Length in feet (meters) (Already factored into the straight pipe lengths below) 20 (6.1) 10 (3.0) Maximum Vent Length # of 90° Elbows (each: 5 equivalent feet) Side Wall Tee Termination Low Profile Termination 5 (1.5) 5 (1.5) Max. straight pipe vent length in feet (meters) 0 1 2 3 4 5 6 21 (6.4) ** 16 (4.9) ** 11 (3.4) ** 6 (1.8) ** - 31 (9.4) ** 26 (7.9) ** 21 (6.4) ** 16 (4.9) ** 11 (3.4) ** 6 (1.8) ** - 36 (11.0) ** 31 (9.4) ** 26 (7.9) ** 21 (6.4) ** 16 (4.9) ** 11 (3.4) ** 6 (1.8) ** 36 (11.0) ** 31 (9.4) ** 26 (7.9) ** 21 (6.4) ** 16 (4.9) ** 11 (3.4) ** 6 (1.8) ** Propane Units Total Equivalent Vent Length (Intake/outlet) for Twin Pipe 4" PVC/CPVC Maximum Vent Length Termination Type IPEX Concentric Vent Kit 65 Feet Snorkel Termination Termination Equivalent Length in feet (meters) (Already factored into the straight pipe lengths below) 20 (6.1) 10 (3.0) # of 90° Elbows (each: 5 equivalent feet) 0 1 2 3 4 5 6 Side Wall Tee Low Profile Termination Termination 5 (1.5) 5 (1.5) Max. straight pipe vent length in feet (meters) 45 (13.7) ** 40 (12.2) ** 35 (10.7) ** 30 (9.1) ** 25 (7.6) ** 20 (6.1) ** 15 (4.6) ** 55 (16.8) ** 50 (15.2) ** 45 (13.7) ** 40 (12.2) ** 35 (10.7) ** 30 (9.1) ** 25 (7.6) ** 60 (18.3) ** 55 (16.8) ** 50 (15.2) ** 45 (13.7) ** 40 (12.2) ** 35 (10.7) ** 30 (9.1) ** 60 (18.3) ** 55 (16.8) ** 50 (15.2) ** 45 (13.7) ** 40 (12.2) ** 35 (10.7) ** 30 (9.1) ** **Dip switch one (bank of eight - TAN COLORED) off for lenths greater than or equal to 21 feet ATTENTION Maximum vent lengths are specific to the fuel type of the tankless water heater. It is imperative when performing equivalent vent length calculations, that the gas type be taken into consideration. 22 KB Series Manual Adaptor Installation NOTICE For installation in Canada, field-supplied PVC/CPVC used for combustion venting must comply with CAN/CGA B149.1 (latest edition) and be certified to Type BH Gas Venting Systems, ULC-S636. Components of any certified system CANNOT be substituted with any other vent system(s) or unlisted pipes and/or fittings. All listed components, primers and glues are part of the certified vent system and therefore MUST be from a single manufacturer. When installing the Ubbink adaptor with the twin pipe PVC/CPVC system: Install the system in according to Ubbink/Rolux, and Rinnai Installation Instructions. Use the 3”/5” Concentric to Twin pipe Adaptor with 3” or 4” diameter PVC/CPVC venting only. It is the responsibility of the installer to follow all national codes, standards and local ordinances, in addition to instructions laid out in this manual for vent/intake clearances and other safety requirements. If venting conflicts arise between this manual and the respective OEM’s manual, the manufactures’ installation instruction will take precedence providing they meet the intent of all national codes, standards and local ordinances having jurisdiction. Follow this manual together with applicable codes, standards and/or ordinances for installation of the intake/vent pipe(s) and all other applicable water heater installation procedures. WARNING attempt to install or repair damaged components. If a gasket is damaged, these are available through Rinnai and its distributors. Do not use gaskets from another manufacturer. STEP 3: Adaptor vent pipe MUST be securely fastened to structure, at the eccentric increaser or as close as possible thereafter . Straps to be field supplied. Use straps, clamps or other fasteners that will not score or damage pipes and be acceptable by local codes. Securing Strap Eccentric Increaser Wall support for Eccentric Increaser STEP 4: Use PVC to Polypropylene Eccentric Increaser (supplied with the adaptor) to transition from PP to PVC 3”; additional PVC/CPVC bushing, or other type of reducing fittings is required to transition to 4” pipe. Current codes prohibit the application of external insulation on plastic vent pipe together with the use of cellular core PVC, CPVC, and Radel as venting materials. PVC/CPVC Twin Pipe Adaptor Installation Instructions: STEP 1: Measure the total venting distance required to reach the outside wall or roof. Determine the diameter of venting components to be used based on required vent length (refer to maximum equivalent vent length tables of this section). STEP 2: Before installing the concentric to twin pipe adaptor, inspect each vent component for damage making sure the gaskets for each component are undamaged. Do not KB Series Manual 3/5 Concentric to Twin Pipe Adaptor 23 Adaptor Installation (continued) NOTICE STEP 5: Apply lubricant to the gasket surface and coupling with finger prior to component attachment To make the union of the gasketed fittings into the PVC coupling easier, Centrocerin gasket lubricant is recommended (supplied with adaptor in box). For further details on listed PVC/CPVC venting material table and proper handling and installation (e.g. priming, gluing etc.), refer to the installation manual of the respective PVC/CPVC manufacturer. WARNING Use only water or Centrocerin lubricant for lubricating the gaskets and pipe ends to allow easy insertion of fittings onto the vent adaptor. DO NOT use any other brand of lubricant as it may cause deterioration of the gaskets, which could result in leakage of dangerous flue gases into the occupied space. If disassembly of vent pipes are required after the gasket has dried, wet joints thoroughly with water to loosen the connection. WARNING Follow vent manufacturer’s instructions for additional venting installation instructions, to avoid situations that can lead to property damage, personal injury, and/or loss of life. Applying Lubricant to Gasket CAUTION 24 DO NOT use solvent cement that has become curdled, lumpy, or thickened. DO NOT thin solvent cement. Observe precautions printed on the containers. Use appropriate temperature-type solvent cement for applications below 32°F. Appropriate solvent and cleaner must be used for the type of vent pipe used (PVC, or CPVC). KB Series Manual Installation of PVC/CPVC Vent and Intake Air Piping: Adaptor Installation Configurations: Note the correct position of combustion air inlet and gas flue outlet, as these are NOT interchangeable. For the correct position and design of the twin pipe gas flue outlet and combustion air inlet refer to the installation instructions supplied with the appliance. Required Parts For 3” PVC/CPVC Assembly Configuration The adaptor as supplied requires no additional parts to be used with standard 3” 3rd party solid core PVC/ CPVC pipes; refer to figure below for required parts for 3” PVC/CPVC assembly configuration. Required Parts For 4” PVC/CPVC Assembly Configuration Conversely, the concentric to twin pipe adaptor require 2 additional (4”x 3” Flush – Schedule 40 PVC) bushing to be used with 4” PVC/CPVC assembly configuration (refer to figure below). WARNING Failure to correctly assemble the components according to these instructions may result in property damage, serious injury, or death. KB Series Manual 25 Certified PVC/CPVC Vent Termination Options Vent Termination Configurations There are three configurations for vent terminations that can be used: 1.Concentric Termination (IPEX Concentric Vent Kit) Allows for only one penetration through a wall or roof. 2.Snorkel Termination -Allows for easier clearance above grade when having to terminate through lower point WARNING Danger of fire or bodily injury – Solvent cements and primers are highly flammable. Provide adequate ventilation and do not assemble near heat source or open flame. Do not smoke. Avoid skin or eye contact. Observe all cautions and warnings on material containers. 3.Side Wall Tee Termination Termination Installation Exhaust and combustion air piping must be securely fastened to structure every 4 feet, to ensure dimensions shown in Figures throughout this document are maintained. DO NOT strap vertical vent too tightly as the strapping must permit the vent to move in the event of expansion and contraction. Straps are field supplied. Use straps, clamps or equivalent that will not score or damage the pipe. Expansion and contraction should be addressed between appliance and termination point. All penetrations must be sealed according to local building codes. Caulking for side wall terminations and flashing for roof penetrations are typical. Use only PVC/ CPVC compatible sealing material, contact PVC/CPVC manufacturer for a complete list. Wall Termination IPEX Concentric Vent Kit (CVK) Installation For installations with multiple terminations, maintain appropriate clearances between terminals. (Reference Ipex Concentric Vent Kit Clearance diagram) The pipe length of the concentric vent kit can be shortened; providing that the cutting and cementing procedures adhere to the System 636 guidelines; reference Ipex installation instructions for further information. Pipe lengths and/or fittings CANNOT be added to the socket of the rain cap in order to divert exhaust gas. WARNING Moisture in the flue gas will condense as it leaves the vent terminal. In cold weather this condensate can freeze on the exterior wall, under the eaves, and on surrounding objects. Some discoloration to the exterior of the building is to be expected. However, improper location or installation can result in severe damage to the structure or exterior finish of the building. 26 KB Series Manual Roof Termination Certified PVC/CPVC Vent Termination Options (continued) IPEX Concentric Vent Kit Assembly (System 636): MECHANICALLY FASTENED RAIN CAP: 1. Once the proper location has been determined, cut a hole in the roof or wall large enough to accommodate the outer pipe. The size of the hole can vary greatly depending on the roof pitch. The Rain Cap must be installed with the supplied Stainless Steel screw and lock nut, and in accordance with the instructions and diagram below. 2. As per the procedures outlined, solvent cement the inner pipe to the concentric Wye fitting. 3. Solvent cement the outer pipe to the concentric Wye fitting. 4. Slide the assembly through the roof or wall penetration. (Install flashing as required) 5. To permanently affix the rain cap, it should be solvent cemented to the inner pipe. For installations where removal of the cap may be required for service or cleaning the cap, it can be fastened mechanically (see instructions). For either installation method, the outer pipe is only a friction fit with the cap. 1. Locate the drill location dimple on the outside of the rain cap. 2. At this location, drill through the cap and the inner pipe wall. Ensure that the path of the hole is perpendicular to the inner pipe NOT the outside of the cap. For the 3” kit, drill a 3/16” hole, for the 4” kit, drill a 1/4” hole. Clean any resulting debris. 3. Insert the screw and tighten, DO NOT OVER TIGHTEN. Twin Pipe to Concentric Termination Physical Data KB Series Manual 27 IPEX CONCENCTRIC VENT KIT (CVK) CLEARANCES: ACCEPTABLE VENTING CLEARANCES FOR IPEX CONCENCTRIC VENT KIT (CVK) TERMINATION 24” MIN Two or More Vent Terminals on same level Soffit Ceiling CVK Reference “General Clearance Requirements” section of this guide for important considerations for locating vent termination under a soffit (ventilated or unventilated), eave, or deck/porch. 60” MIN 12” Above anticipated snow level or grade Vertical between Terminals NOTE Vent spacing depicted above are specific to IPEX PVC/CPVC- FGV Concentric Vent Kit ONLY; for required spacing for all other termination types. 28 KB Series Manual Table 8: Approved PVC/CPVC Vent Configurations Rinnai 3" or 4" PVC/CPVC Concentric Side Wall Termination Configuration Rinnai 3" or 4" PVC/CPVC Concentric Vertical Termination Configuration Rinnai 3" or 4" PVC/CPVC Snorkel Termination Configuration Rinnai 3" or 4" PVC/CPVC Standard upside down "U" Vertical Termination Configuration Rinnai 3" or 4" PVC/CPVC Tee Side Wall Termination Configuration Rinnai 3" or 4" PVC/CPVC Tee Vertical Termination Configuration Rinnai 3" or 4" PVC/CPVC Low Profile Termination Configuration VENTING INSTALLATION SEQUENCE 1. Install the water heater. 2. Determine the termination method—sidewall or vertical, concentric or separate pipes, etc. 3. Determine proper location for wall or roof penetration for each termination. 4. Install termination assembly as described in this manual. 5. Install air and vent piping from water heater to termination. 6. Slope horizontal exhaust run towards the water heater 1/4 per foot. DO NOT slope combustion air pipe towards unit. Be sure to dispose of condensate per local codes. 7. Install pipe supports and brackets every 4 feet allowing for movement from expansion or as per local code requirements. KB Series Manual 29 Certified PVC/CPVC Vent Termination Options (continued) Kit Contents 3” and 4” Low Profile Vent Termination Kits The following information should be used in conjunction with the IPEX System 636 Installation Guide: Termination kits are to be tested and certified for use with the brand of pipe-fitting-cement system that is to be utilized in the application. The IPEX Low Profile termination is fully certified for use with IPEX product only. System 636 PVC Low Profile Vent kits are rated to 65°C maximum and are made from certified compound. All termination kits must be located and installed in accordance with these instructions, local building code, and CSA B149.1 Natural Gas and Propane Installation Code. Qty Item Description 1 Base (Two Holes) 1 Cap (One Hole) 8 Stainless Steel Screws 4 Plastic Anchors To Water Heater Intake Air Connection From Water Heater Vent Pipe Connection 12” min to overhang Orientations Installation: 1. 2. Vent / Air Termination Once location is determined, cut 2 appropriately sized holes in the wall to accommodate the pipe. (Reference the Low Profile Termination Kit-Dimensions table below) 12” min Grade or Snow Line Slide intake and exhaust pipes through the holes. Secure (using solvent cement) both pipes to the base of the vent termination kit. (Be sure to follow guidelines for solvent cementing as described in the System 696 Installation Guide) 3. Use the supplied screws and anchors to secure the base to the wall. (a drilled 3/16” hole, 1-3/16” deep will be needed for the anchors.) Use the base as a template to locate the anchor hole. 4. Using the supplied screws, secure the Cap to the Base. 5. Upon securing the vent termination and pipes, seal the wall penetrations (from the interior) using a PVC compatible sealant material. NOTE Air Piping Vent Base Vent Piping Vent Cap 12” Min Between Edge of Air Inlet and Adjacent Vent Outlet Vent All exhaust vents and air inlets must terminate at the same height to avoid severe personal injury, death, or substantial property damage. Air Low Profile Termination Kits-Dimensions Item # Description Pipe Outside Hole Spacing Diameter 196985 3” Flush Mount 3.5” 5.6” 196986 4” Flush Mount 4.5” 5.6” 30 KB Series Manual Vent / Air Termination Certified PVC/CPVC Vent Termination Options (continued) Twin Pipe (PVC/CPVC) Terminations PVC/CPVC Sidewall (Tee and Snorkel) Terminations: Locate the vent and intake air termination using the following guidelines: 1. 2. 3. 4. The total length of the vent or intake air piping must not exceed the limits given in maximum equivalent vent length tables. The equivalent length for 90° elbows and termination associated with the respective vent and intake air piping arrangement MUST be subtracted from total length listed in maximum equivalent vent tables. Specific to Side Wall Tee Termination, the vent and intake air piping must terminate at the outside surface of the outer wall, minimum 1” between wall, tee, and elbow socket ends. Refer to ’Vent Termination Clearances” table for recommended exhaust/combustion terminal position. NOTE 12” min 12” above anticipated snow level or grade NOTICE Slope horizontal exhaust piping downward toward the water heater a minimum of 1/4 inch per foot. DO NOT slope combustion air piping down towards water heater. Dispose of condensate per local codes. 12” min 1” min. between wall & socket end Combustion Air Sidewall Vent and Combustion Air Piping with Tee Termination Exhaust Vent Wall 12” min The information and figures depicting method of terminating the vent and combustion air intake pipes are directly related to PVC/CPVC vent systems. When utilizing other than PVC/CPVC vent system there may be some variations. Consult the respective vent manufacturer or the water heater manual for recommendations and clarifications. Combustion Air 12” min The intake air pipe must terminate using a 90° elbow pointed away from the vent termination. Both vent and air intake pipe terminations must be installed 12” (30.5 cm) minimum above grade or highest anticipated snow level and as shown in figures to the right. NOTICE Exhaust Vent Exhaust Vent Termination must be installed 12” (30.5 cm), above the highest anticipated snow level. If the vent is terminated on a sidewall which is subject to high winds it is recommended to terminate the vent using a tee. A tee provides the best protection against wind. 5. 12” min Combustion Air 12” above anticipated snow level or grade 12” min Sidewall Vent and Combustion Air Piping with Snorkel Termination KB Series Manual 31 Certified PVC/CPVC Vent Termination Options (continued) NOTE Vent Termination All figures shown in this section is in reference to flat roofs. For heights of venting passing through a pitched roof, refer to NFPA 54/ANSI Z223.1-09 (table and figure 12.7.2) and/or CSA B149.1-10 (figure 8.1) Combustion air termination 12” above anticipated snow level or grade 12” min above air intake opening PVC/CPVC Roof (Tee and upside down “U”) Terminations: Locate the vent and intake air termination using the following guidelines: 1. 2. 12” min The total length of the vent or intake air piping must not exceed the limits given in maximum equivalent vent length tables. The equivalent length for 90° elbows and termination associated with the respective vent and intake air piping arrangement MUST be subtracted from total length listed in maximum equivalent vent length tables. For roof terminations installed as shown in figure to the right,, the intake air piping must terminate using a tee or combination of elbows. The termination must be installed 12” (30.5 cm), above roof or the highest anticipated snow level. 3. The vent must terminate vertically with a coupling to facilitate the bird screen and must be located 12” (30.5 cm) minimum above the combustion air inlet. 4. The vent and intake air terminations must be located a radial distance of 12” minimum (30.5 cm) from outer wall of vent termination to outer wall of combustion air intake termination. Vertical Termination of U-Vent and Combustion Air Pipe Multiple Water Heater Installation – Through the Roof Locate the vent and intake air termination using the following guidelines: 1. For installations with multiple Tankless Water Heaters, refer to Figure 16 for proper exhaust and combustion air piping placement. 2. Roof penetration of the vent and intake air piping should be such that the combustion air intake is a minimum 12” (30.5 cm) from the adjacent vent pipe of the other water heater. For installations in the U.S. refer to Figure 16. For installations in Canada, refer to clearances required by CAN/CSA B149.1. Exhaust Vent Termination 12” min Vent Termination Combustion air termination Combustion air termination 12” min above air intake opening 12” above anticipated snow level or grade 12” min above air intake opening 12” above anticipated snow level or grade 12” min 12” min Vertical Termination of Tee-Vent and Combustion Air Pipe 32 Vertical Termination of Multiple Water Heaters KB Series Manual Certified PVC/CPVC Vent Termination Options (continued) NOTE To prevent possibility of condensate freeze-up, do not install vent kits one above the other. Once the vent terminal location has been determined, make holes through the exterior wall to accommodate the vent pipes. Vent pipes must exit exterior wall horizontally only. Pitched Roof Termination Clearances: 3. Apply a thin coat of cement evenly in the socket. Quickly apply a heavy coat of cement to the pipe and insert pipe into fitting with a slight twisting motion until it bottoms out. 4. Hold the pipe fitting for 30 seconds to prevent the tapered socket from pushing the pipe out of the fitting. 5. Wipe all excess cement from the joint with a rag. Allow 15 minutes before handling. Cure time will vary according to fit, temperature, and Humidity Exhaust Vent Combustion Air 12” min 12” above roof or anticipated 12” min Vertical Termination of U-Vent and Combustion Air Pipe on a Pitched Roof NOTE DO NOT use lubricant between two PVC/CPVC components. Refer to cement manufacturer instruction for specific instructions and handling. Basic Instructions for Cementing Joints: 1. Cut pipe end square; smooth out jagged edges and burrs. Chamfer end of pipe; then clean fitting socket and pipe joint area of all dirt, grease, or moisture. 2. After checking pipe and socket for proper fit, wipe socket and pipe with cleaner-primer. Apply a liberal coat of primer to inside surface of socket and outside of pipe. KB Series Manual 33 Parts Information Ubbink® Concentric to Twin Pipe Adaptor Lubricant can be applied on the seals, only use the Ubbink approved lubricant that is supplied in this package Exhaust Vent Combustion Air ULc 636 Gas Vent-BH Class IIC-110°C/230°F (where applicable) 4004535 Physical Data in inches (mm) Part # 187585PP Nominal Diameter 3”/5” (80/125) Overall Height Effective Height Offset 9.9” (251) 8.6” (218) 4.8” (121) Types of Acceptable PVC/CPVC Elbows for Venting System ACCEPTABLE ACCEPTABLE NOT ACCEPTABLE 90° Elbows, Female Unthreaded Socket Ends: (Long Turn) Long Sweep 90° Elbows, Female Unthreaded Socket Ends: (1/4 Bend) Short Sweep 90° Elbows, Female Unthreaded Socket Ends: Close Turn WARNING Improper installation of vent system and components, or failure to follow all installation instructions, can result in property damage or serious injury. 34 KB Series Manual Parts Information (continued) Vent Components and Assigned Equivalent Lengths: The following fittings and accessories (by others) are certified for use with the abovementioned condensing products: OEM IPEX (Purchased separately ) IPEX (Purchased separately ) OEM # or Cert. Approved PVC/CPVC Termination Components Product Diagram Description Equivalent Lengths (Ft.) 196006 /197009 (3 Inch) 196021 /197021 (4 Inch) (System 636) 196985 (3 Inch) 196986 (4 Inch) (System 636) PVC/CPVC- FGV Concentric Vent Kit w/ vent screen 20 Low Profile Termination Kit 5 Field Supplied PVC/CPVC Sch. 40 Fittings or Approved Equal Comply with CAN/CGA B149.1 & ULC-S636 3” and 4” SCH 40 (Solid Core) PVC/ CPVC TEE w/ vent screen 5 Field Supplied PVC/CPVC Sch. 40 Fittings or Approved Equal Comply with CAN/CGA B149.1 & ULCS636 3” and 4” SCH 40 (Solid Core) PVC/ CPVC 90° EL w/ vent screen 5 Field Supplied PVC/CPVC Sch. 40 Fittings or Approved Equal Comply with CAN/CGA B149.1 & ULCS636 3” and 4” SCH 40 (Solid Core) PVC/ CPVC 45° EL w/ vent screen 2.5 IPEX (Purchased separately ) 196051 (3 Inch) 196052 (4 Inch) Field Supplied PVC/CPVC Sch. 40 Fittings or Approved Equal Comply with CAN/CGA B149.1 & ULCS636 Friction fit vent screen (3” and 4”) 3” and 4” SCH 40 (Solid Core) PVC/ CPVC Snorkel vent w/ vent screen 0 10 Vent screens are not ULC S636 Certified. Friction fit vent screens inside termination fitting is to avoid debris and/or small animals from entering vent. Primer shall be used when installing System 636® and other PVC/CPVC products at temperatures below 32 OF (0 OC). Primer is required in some jurisdictions regardless of temperature, verify with your local authority having jurisdiction. Use only System 636 cements and primers; substituting other cements and primers will void IPEX’s certification and warranty; (see OEM’s literature). For Schedule 40 PVC/CPVC any glue and primer approved by your local authority having jurisdiction may be substituted. KB Series Manual 35 PVC/CPVC Equivalent Vent Length Calculation Sheet Equivalent Vent Length Calculation Sheet 1) 2) 3) 4) 5) 6) 7) 8) 9) 10) Fitting / Termination Type 90 elbow 45 elbow IPEX Low Profile Termination IPEX 4" Concentric Termination IPEX 3" Concentric Termination 3" Tee Termination 4" Tee Termination 3" Snorkel Termination 4" Snorkel Termination Length of Straight Section in feet Number of fittings x x x x x x x x x NA Equivalent Vent Length 5 2.5 5 20 20 5 5 10 10 40 Total (add up lines 1 through 10) Total Equivalent Length = = = = = = = = = = Note: Ensure switch #1 in the tan bank of dip switches is in OFF position if vent length is greater than 21ft (6.4m). 36 KB Series Manual Condensate (indoor models only) Condensate formation can occur in high efficiency direct vent appliances. Without proper drainage condensate will damage the heat exchanger. INFORMATION Water heaters have an integrated condensate collector. Regions of cold climate will create more To prevent condensate damage follow these instructions. condensate in the vent system. The condensate collector should be used in cold climates. DO NOT Do not connect the condensate drain pipe directly to the rain sewer. Do not connect the condensate drain line with an air conditioning evaporator coil drain. MUST DO The condensate drain pipe should be as short as possible and have a downward pitch. If the condensate drain gets blocked, an diagnostic code will display on the controller. If this occurs, the condensate drain must be cleaned. The condensate trap will automatically prime (self- Use only vent that is approved and identified as acceptable for your particular model. Slope the venting toward the appliance according to the vent manufacturers installation instructions. All condensate must drain and be disposed of according to local codes. Use only corrosion resistant materials for the condensate drain lines such as PVC pipe or plastic hose. The condensate drain pipe (along its entire length) must be at least the same diameter as the drain line, (1/2 inch NPT). The end of the condensate drain pipe should be open to the atmosphere. The end should not be under water or other substances. To minimize freezing of the condensate, run the condensate drain line through an interior wall or between insulation and an interior wall. prime) during operation of the unit as condensate forms. Condensate draining from the unit indicates that the trap is full and that there is no blockage in the condensate drain. It is not necessary to add water to the condensate trap. A condensate neutralizer kit, 804000074, is available from Rinnai. The kit allows condensate to flow through neutralizing media that raises the pH of the condensate to a level that will help prevent corrosion of the drain and public sewer system. Checklist for Venting and Condensate (indoor models only) □ Verify proper clearances around the vents and air intakes. □ Ensure you have used the correct venting products for the model installed and that you have completely followed the venting manufacturer’s installation instructions and these installation instructions. □ Verify that the vent system does not exceed the maximum length for the number of elbows used. KB Series Manual 37 Installation of Plumbing Pressure Relief Valve Requirements INFORMATION Install the pressure relief valve according to these instructions. If a relief valve discharges periodically, this may be An approved pressure relief valve is required by the American National Standard (ANSI Z21.10.3) for all water heating systems, and shall be accessible for servicing. DO NOT Do not plug the relief valve and do not install any reducing fittings or other restrictions in the relief line. The relief line should allow for complete drainage of the valve and the line. Do not place any other type valve or shut off device between the relief valve and the water heater. MUST DO The relief valve must comply with the standard for Relief Valves and Automatic Gas Shutoff Devices for Hot Water Supply Systems ANSI Z21.22 and /or the standard Temperature, Pressure, Temperature and Pressure Relief Valves and Vacuum Relief Valves, CAN1-4.4. The relief valve must be rated up to 150 psi and to at least the maximum BTU/hr of the appliance. The discharge from the pressure relief valve should be piped to the ground or into a drain system to prevent exposure or possible burn hazards to humans or other plant or animal life. Follow local codes. Water discharged from the relief valve could cause severe burns instantly, scalds, or death. The pressure relief valve must be manually due to thermal expansion in a closed water supply system. Contact the water supplier or local plumbing inspector on how to correct this situation. Do not plug the relief valve. The American National Standard (ANSI Z21.10.3) does not require a combination temperature and pressure relief valve for this appliance. However, local codes may require a combination temperature and pressure relief valve. Isolation Valves Isolation valves are included with this water heater. Rinnai strongly recommends the installation of isolation valves on the cold and hot water lines because they provide the ability to isolate the water heater from the structure’s plumbing and allow quick access to flush the heat exchanger. Flushing the heat exchanger regularly is required as part of the proper maintenance for this water heater. Piping Requirements A manual water control valve must be placed in the water inlet connection to the water heater before it is connected to the water line. Unions may be used on both the hot and cold water lines for future servicing and disconnection of the unit. DO NOT Do not introduce toxic chemicals such as those used for boiler water treatment to the potable water used for space heating. MUST DO operated once a year to check for correct operation. The piping (including soldering materials) and The relief valve should be added to the hot water outlet line and near the hot water outlet according to the manufacturer’s instructions. DO NOT place any other type valve or shut off device between the relief valve and the water heater. components connected to this appliance must be approved for use in potable water systems. Purge the water line to remove all debris and air. Debris will damage the water heater. If the appliance will be used as a potable water source, it must not be connected to a system that was previously used with a nonpotable water heating appliance. Ensure that the water filter on the water heater is clean and installed. 38 KB Series Manual Isolation Valves and Pressure Relief Valve The isolation valves provide the ability to isolate the water heater from the structure’s plumbing and allow quick access to flush the heat exchanger. Check with local codes to determine if a pressure and temperature relief valve is required. The included valves meet American National Standard (ANSI Z21.10.3) / Canadian Standard (CSA 4.3) and are ANSI/NSF 61 approved for potable water. Isolation Valves Installation Instructions: 1. 2. Wrap the ends of the threaded water inlet & outlet on the tankless water heater, as well as the threaded end of the approved pressure relief valve with a minimum of 5 wraps of Teflon® tape. Screw the pressure relief valve into the 3/4” threads opposite the wing handle on the HOT water service valve. (RED drain handle) (see Pressure Relief Valve Section for proper installation requirements) 3. Loosen the 3/4” union nut on the HOT water valve and connect to the HOT water outlet on the tankless water heater. If nut is removed, ensure that you realign the tailpiece accurately to the valve and that the black washer is positioned such that the raised metal edge of the valve is inside the washer. 4. Align the direction of the HOT water drain to the desired position. 5. Tighten the union assembly to the HOT water valve using approximately 15 foot lbs of torque. 6. Repeat steps 3-5 for the COLD water valve. (BLUE drain handle) for connection to the COLD water inlet on the tankless water heater. 7. Connect the INLET on the COLD water valve to the MAIN SOURCE of the water supply. 8. Connect the OUTLET on the HOT water valve to the HOT WATER plumbing system. 9. Ensure that both drain valve lever handles are in the closed position (perpendicular to the drain portion of the body). A C D B A Pressure Relief Valve (PRV) B PRV Discharge Outlet C Hot Ball Valve Drain Handle D Cold Ball Valve Drain Handle Pressure Relief Valve Installation Instructions: The PRV must be connected by the threaded connection opposite the wing handle on the hot water valve (designated by the RED drain handle) or the threaded connection on the side of the relocation fitting above the hot water valve. Installation must maintain a ¾” port size with no shut off valve or line restriction in-between the appliance and the PRV. The discharge line from the PRV should pitch downward and terminate 6” above drains where discharge will be clearly visible. The discharge end of the line shall be plain (unthreaded) and a minimum of ¾” in diameter. The discharge line material must be suitable for water at least 180° Fahrenheit and can be no more than 30 feet in length and contain no more than 4 elbows or bends. No valve of any type may be installed in the discharge line of the pressure relief valve. Pressure Relief Valve Maintenance: For proper care of this approved pressure relief valve, it is recommended that the valve is manually operated once a year. In doing so, it will be necessary totake precautions with regard to the discharge of potentially scalding hot water under pressure. Ensure discharge has a place to flow. Contact with your body or other property may cause damage or harm. Please note that only the PRV in this package is certified by CSA International as an approved item. KB Series Manual 39 Piping Diagram for Basic Installation Water drain plug Gas connection Hot water outlet Condensate trap drain plug Cold water inlet Condensate drain line The condensate drain pipe (along its entire length) must be at least the same diameter as the drain line, (1/2 inch NPT). Refer to the Condensate section in the venting instructions 40 KB Series Manual Installation of Gas Supply Connect Water Heater to Water Supply Water connections to the tankless water heater should follow all state and local plumbing codes. If this is a standard installation, refer to the Piping Diagram for Basic Installation. 1. Plumb water supply to the tankless water heater on the 3/4” MNPT connection at the bottom of the unit marked “Water Inlet”, which is the cold water supply. 2. Plumb the building hot water supply to the 3/4” MSPT connection marked “Water Outlet”, which is the hot water supply. If a pipe cover will be installed, make sure water lines to the water heater fit. WARNING 1. If you are not knowledgeable or qualified to install gas lines or connections, then contact a licensed professional to install the gas supply. 2. Turn off 120v power supply. 3. Turn off the gas. 4. Gas is flammable. Do not smoke or provide other ignition sources while working with gas. 5. Do not turn on the water heater or gas until all fumes are gone. General Instructions MUST DO A manual gas control valve must be placed in the gas supply line to the water heater. A union can be used on the connection above the shut off valve for the future servicing or disconnection of the unit. Checklist for Plumbing □ Purge the water line of all debris and air by closing the hot isolation valve and opening the cold isolation valve and its drain. Debris will damage the water heater. Use a bucket or hose if necessary. □ Ensure that hot and cold water lines are not crossed to the unit and are leak free. Check the type of gas and the gas inlet pressure before connecting the water heater. If the water heater is not of the gas type that the building is supplied with, DO NOT connect the water heater. Contact the dealer for the proper unit to match the gas type. Check the gas supply pressure immediately □ Ensure that a pressure relief valve is installed with a rating that exceeds the BTU input of the water heater model. Refer to the rating plate on the side of the water heater for BTU input. □ Clean the inlet water filter by closing the cold and hot water inlet isolation (shut-off) valves. Put a bucket under the filter at the bottom of the water heater to catch any water that is contained inside the unit. Unscrew the water filter. Rinse the filter to remove any debris. Install the filter and open the isolation valves. □ Check for proper water pressure to the water heater. Minimum water pressure is 50 psi. Rinnai recommends 60-80 psi for maximum performance. upstream at a location provided by the gas company. Supplied gas pressure must be within the limits shown in the Specifications section with all gas appliances operating. Before placing the appliance in operation all joints including the heater must be checked for gas tightness by means of leak detector solution, soap and water, or an equivalent nonflammable solution, as applicable. (Since some leak test solutions, including soap and water, may cause corrosion or stress cracking, the piping shall be rinsed with water after testing, unless it has been determined that the leak test solution is noncorrosive.) Use approved connectors to connect the unit to the gas line. Purge the gas line of any debris before connection to the water heater. KB Series Manual 41 Any compound used on the threaded joint of the gas piping shall be a type which resists the action of liquefied petroleum gas (propane / LPG). The gas supply line shall be gas tight, sized, and so installed as to provide a supply of gas sufficient to meet the maximum demand of the heater and all other gas consuming appliances at the location without loss of pressure. Schedule 40 Metallic Pipe Inlet Pressure: less than 2 psi (55 inches W.C.) Pressure Drop: 0.3 inches W.C. Specific Gravity: 0.60 cubic feet per hour Length INFORMATION Refer to an approved pipe sizing chart if in doubt about the size of the gas line. Size the gas pipe The gas supply must be capable of handling the entire gas load at the location. Gas line sizing is based on gas type, the pressure drop in the system, the gas pressure supplied, and gas line type. For gas pipe sizing in the United States, refer to the National Fuel Gas Code, NFPA 54. The below information is provided as an example. The appropriate table from the applicable code must be used. 1. For some tables, you will need to determine the cubic feet per hour of gas required by dividing the gas input by the heating value of the gas (available from the local gas company). The gas input needs to include all gas products at the location and the maximum BTU usage at full load when all gas products are in use. 2. Use the table for your gas type and pipe type to Cubic Feet per Hour = (CFH) Pipe Sizing Table - Natural Gas Gas Input of all gas products (BTU / HR) 3/4 1 1 1/4 1 1/2 10 273 514 1060 1580 20 188 353 726 1090 30 151 284 583 873 40 129 243 499 747 50 114 215 442 662 60 104 195 400 600 70 95 179 368 552 80 89 167 343 514 90 83 157 322 482 100 79 148 304 455 Pipe Sizing Table - Propane Gas Schedule 40 Metallic Pipe Inlet Pressure: 11.0 inches W.C. Pressure Drop: 0.5 inches W.C. Specific Gravity: 1.50 Capacity in Thousands of BTU per Hour Heating Value of Gas (BTU / FT 3 ) find the pipe size required. The pipe size must be able to provide the required cubic feet per hour of gas or the required BTU/hour. Pipe Size (inches) Length Pipe Size (inches) 1/2 3/4 1 1 1/4 10 291 608 1150 2350 Example: 20 200 418 787 1620 The heating value of natural gas for your location is 1000 BTU/FT3. The gas input of the RU98i is 199,000 BTU/HR. Additional appliances at the location require 65,000 BTU/hr. Therefore the cubic feet per hour = (199,000 + 65,000) / 1000 = 264 FT3/HR. If the pipe length is 10 feet then the 3/4 inch pipe size is capable of supplying 264 FT3/HR of natural gas. 30 160 336 632 1300 40 137 287 541 1110 50 122 255 480 985 60 110 231 434 892 80 101 212 400 821 100 94 197 372 763 42 KB Series Manual Connect Electricity Adjust for High Altitude WARNING Do not use an extension cord or an adapter plug with this appliance. The water heater must be electrically grounded in accordance with local codes and ordinances or, in the absence of local codes, in accordance with the National Electrical Code, ANSI/NFPA No. 70. On the SW1 DIP switch (tan switches), set switches 2 and 3 to the values shown in table below for your altitude. The default setting for the appliance is 02000 ft (0-610 m) with switches No. 2 and No. 3 in the OFF position. When the DIP switch is adjusted, it is not necessary to adjust the gas pressure setting for high altitude. Indoor water heaters are equipped with a threeprong (grounding) plug for your protection against shock hazard and should be plugged directly into a properly grounded three-prong receptacle. Do not cut or remove the grounding terminal from this plug. Do not rely on the gas or water piping to ground the water heater. A screw is provided in the junction box for the grounding connection. Altitude SW1 Switch No. 2 SW1 Switch No. 3 0-2000 ft (0-610 m) OFF OFF 2001-5200 ft (610-1585 m) OFF ON 5201-7700 ft (1585-2347 m) ON OFF 7701-10200 ft (2347-3109 m) ON ON The water heater requires 120 VAC, 60 Hz power from a properly grounded circuit. If using the 5 foot long power cord, plug it into a standard 3 prong 120 VAC, 60 Hz properly grounded wall outlet. Adjust for Vent Length (indoor models only) On outdoor models, a disconnect switch must be provided and installed for the incoming 120 VAC power. It should be a type that is suitable for outdoor use. Check the National Electrical Code, ANSI/NFPA 70 and your local codes for a proper switch type to use in your area. Adjust switch No. 1 in the SW1 DIP switch (tan switches) if required. Refer to the section “Maximum vent length”. The wiring diagram is located on the Technical Sheet attached to the inside of the front cover. Checklist for Gas and Electricity 120V Wiring Blue or Black wire: hot leg Brown or White Wire: neutral □ A manual gas control valve is placed in the gas line to the water heater. □ □ Check the gas lines and connections for leaks. □ Confirm that the water heater is rated for the gas type supplied. □ Confirm that the electricity is supplied from 120 VAC, 60 Hz power source and is in a properly grounded circuit. □ An extension cord or an adapter plug has not been used with the water heater. Confirm that the gas inlet pressure is within limits. KB Series Manual 43 Installation of Temperature Controller WARNING Configurations Turn the power off. Do not attempt to connect the temperature controllers with the power on. Although the controller is a low voltage device, there is 120 volt potential next to the temperature controller connections inside the unit. Do not connect the temperature controller to the 120VAC terminals provided for the optional solenoid drain valves. A maximum of 4 temperature controllers can be installed for a water heater or bank of water heaters. This includes the controller built into an indoor water heater. Controllers can only be wired in parallel. Controllers cannot be wired in series. Rinnai Water Heater Maximum 4 Controllers Indoor models have their controller built into the front panel. Additional controllers can be installed. Wire controllers in parallel Controller Location The controller should be out of reach of small children. Avoid locations where the controller may become hot (near the oven or radiant heater). Avoid locations in direct sunlight. The digital display may be difficult to read in direct sunlight. Avoid locations where the temperature controller could be splashed with liquids. Do not install in locations where it can be adjusted by the public. The 4 temperature controllers can consist of multiple MC-91-2 or MCC-91-2 but only one BC-100V and only one MC-100V. The clock function on the BC-100V will only be available if an MC-100V is also connected. If 4 MC-91’s are installed, simultaneously press the Priority and On/Off buttons on the fourth controller until a beep sounds. Cable Lengths and Sizes The cable for the temperature controller should be a non-polarized two-core cable with a minimum gauge of 22 AWG. The maximum cable length from each controller to the water heater depends on the total number of wired controllers connected to the water heater. Number of Wired Controllers Maximum Cable Length for each Controller to Water Heater 1 328 ft (100 m) 2 164 ft (50 m) 3 or 4 * 65 ft (20 m) * Only 3 additional controllers can be wired to the indoor water heater. 44 KB Series Manual Mounting the controller 1. Make three holes in the wall as shown. Outline of Remote securing screw 1-21/32" wiring hole 3-5/16" securing screw 2. Run the cable between the controller and the water heater or the controller and another controller. 3. Remove the face plate from the temperature controller using a screwdriver. 4. Connect the cable to the temperature controller. 5. Mount the controller to the wall using the holes drilled in step 1. 6. Disconnect the power from the water heater. 7. Remove the plastic cover from the PCB and electrical connections. 8. Thread the cable through the access hole at the base of the unit and connect the wires to the controller terminals on the right hand side bottom of the PCB. 9. Secure the controller cable using the clamp provided. 10. Replace plastic cover over PCB and then replace the cover of the water heater. KB Series Manual 45 Final Checklist □ □ The water heater is not subject to corrosive compounds in the air. The water supply does not contain chemicals or exceeds total hardness that will damage the heat exchanger. □ □ Clearances from the water heater unit are met. □ For indoor models, ensure you have used the correct venting products for the model installed and that you have completely followed the venting manufacturer’s installation instructions and these installation instructions. Clearances from the vent termination / air intake are met. □ For indoor models, verify that the vent system does not exceed the maximum length for the number of elbows used. □ For indoor models, verify that switch No. 1 in the SW1 DIP switch (tan switches) has been adjusted for vent length if necessary. Refer to the section on Maximum Vent Length. □ Purge the water line of all debris and air by closing the hot isolation valve and opening the cold isolation valve and its drain. Debris will damage the water heater. Use a bucket or hose if necessary. □ Ensure that hot and cold water lines are not crossed to the unit and are leak free. □ A manual gas control valve has been placed in the gas line to the water heater. □ Ensure that a pressure relief valve is installed with a rating that exceeds the BTU input of the water heater model. Refer to the rating plate on the side of the water heater for BTU input. □ Clean the inlet water filter by closing the cold and hot water inlet isolation (shut-off) valves. Put a bucket under the filter at the bottom of the water heater to catch any water that is contained inside the unit. Unscrew the water filter. Rinse the filter to remove any debris. Install the filter and open the isolation valves. 46 □ □ □ Check the gas lines and connections for leaks. □ Confirm that the electricity is supplied from a 120 VAC, 60 Hz power source, is in a properly grounded circuit, and turned on. □ Verify the temperature controller is functioning properly. □ Verify that switches No. 2 and No. 3 in the SW1 DIP switch (tan switches) is set correctly for your altitude. □ Verify the system is functioning correctly by connecting your manometer to the gas pressure test port on the water heater. Operate all gas appliances in the home or facility at high fire. The inlet gas pressure at the water heater must not drop below that listed on the rating plate. □ If the water heater is not needed for immediate use, then drain the water from the heat exchanger. □ □ Install the front panel. □ Explain to the customer the operation of the water heater, safety guidelines, maintenance, and warranty. □ The installation must conform with local codes or, in the absence of local codes, with the National Fuel Gas Code, ANSI Z223.1/NFPA 54, or the Natural Gas and Propane Installation Code, CSA B149.1. If installed in a manufactured home, the installation must conform with the Manufactured Home Construction and Safety Standard, Title 24 CFR, Part 3280 and/or CAN/SCA Z240 MH Series, Mobile Homes. □ Inform the consumer if the isolation valves are not installed or if a water softening system is not installed. □ Leave the entire manual taped to the water heater (indoor models), temperature controller (outdoor models), or give the entire manual directly to the consumer. Confirm that the gas inlet pressure is within limits. Confirm that the water heater is rated for the gas type supplied. Explain to the customer the importance of not blocking the vent termination or air intake. KB Series Manual Technical Data Specifications RU80i RU98i Minimum Gas Consumption Btu/h Maximum Gas Consumption Btu/h Hot water capacity (Min - Max) * RU80e RU98e 15,200 152,000 199,000 152,000 199,000 0.26 - 8.0 GPM (1.0 - 30 L/min) 0.26 - 9.8 GPM (1.0 - 37 L/min) 0.26- 8.0 GPM (1.0 - 30 L/min) 0.26 - 9.8 GPM (1.0 - 37 L/min) Temperature Setting (no controller) 120° F (49° C) or 140° F (60° C) Maximum Temp Setting (residential) Selectable at 120° F (49° C) or at 140° F (60° C) Maximum Temp Setting (MCC-91-2 controller) 185° F (85° C) Minimum Temperature Setting 98° F (37° C) Weight 70.5 lb (32 kg) Energy Factor 0.96 Noise level 41 dB Normal 42 W Anti-frost Protection Max Current 64 W 41 W 63 W 2W 146 W 168 W Without recirculation pump: 4 A With recirculation pump: 8 A (exact value depends on the pump) Fuse 10 A By-Pass Control Gas Supply Pressure 0.95 52 dB Standby Electrical Data 0.96 0.95 Electronic Natural Gas 4.0 - 10.5 inch W.C. Propane 8.0 - 13.5 inch W.C. Type of Appliance Condensing, Tankless, Temperature controlled continuous flow gas hot water system Connections Gas Supply: 3/4" MNPT, Cold Water Inlet: 3/4" MNPT, Hot Water Outlet: 3/4" MNPT Ignition System Electric Connections Water Temperature Control Water Supply Pressure Direct Electronic Ignition Appliance: AC 120 Volts, 60Hz. Temperature Controller: DC 12 Volts (Digital) Simulation Feedforward and Feedback Minimum Water Pressure: 50 PSI (Recommended 60-80 PSI for maximum performance) Maximum Water Supply Pressure 150 PSI Remote Control Cable Non-Polarized Two Core Cable (Minimum 22 AWG) Energy Star Qualified Yes Certified for installation in manufactured (mobile) homes Yes Complies with South Coast Air Quality Management District 14 ng/J or 20 ppm NOx emission levels Yes * Minimum flow may vary slightly depending on the temperature setting and the inlet water temperature. Minimum activation flow is 0.4 GPM (1.5 L/min). Our products are continually being updated and improved; therefore, specifications are subject to change without prior notice. The maximum inlet gas pressure must not exceed the value specified by the manufacturer. The minimum value listed is for the purpose of input adjustment. KB Series Manual 47 Dimensions Inches (millimeters) RU80i, RU98i ø 5.4 (137) All Models 10.1 (257.7) 2.0 (52) 25.7 (654) 28.5 (723.3) 29.8 (757) 20.6 (523.3) C J B D I H G E F 2.9 (74.6) K 8.7 (222) 2.8 (70.1) A RU80e, RU98e 0.4 (10.1) 10.1 (257.5) 0.6 (15) 10.0 (253.8) 8.7 (222) 28.4 (721.6) 25.7 (654) 0.6 (15) 2.0 (50) 18.5 (470) DIMENSION Inches (mm) A (GAS) 1.6 (40.2) A (COLD) 2.0 (50.2) A (HOT) 1.6 (41.2) A (CONDENSATE OUTLET) 0.9 (22.4) B 5.0 (127.2) C 1.9 (47.8) D 0.52 (13.3) E 2.2 (56.3) F 2.3 (58.3) G 5.0 (127.2) H 2.0 (50) I 3.0 (76) J 7.1 (179) K 18.3 (466) A * This is the minimum dimension from the wall. The wall bracket is adjustable to allow an additional 1.57 inches (40 mm). 48 KB Series Manual Pressure Drop Curve RU80 45 RU98 100 90 35 80 30 70 60 25 50 20 40 15 30 10 Pressure Loss (ft head) Pressure Loss (psi) 40 20 5 10 0 0 0 1 2 3 4 5 6 7 8 9 10 11 Water Flow (gpm) NOTICE The chart below only applies to incoming water temperatures of 70°F (21°C) or less. For incoming water temperatures greater than 70°F (21°C) please contact Rinnai. Outlet Flow Data Water Flow (gpm) RU98 RU80 delta T - Temperature Rise (°F) KB Series Manual 49 Ladder Diagram FF MODEL ONLY 50 KB Series Manual Recirculation Mode The Rinnai water heater has the ability to control a recirculation pump. Two modes are available, Economy and Comfort, which recirculate the water in the plumbing system to provide hot water more quickly when a tap is opened. Recirculation mode is for residential installations only. Recirculation mode cannot be used with the Bath Fill controller (BC-100V), an air handler, or with multiple Rinnai water heaters. The maximum Rinnai temperature setting while in recirculation mode is 140°F (60°C). recommendations. 4. Adjust the dip switch by moving the 4th switch in the whie set of switches (SW2) to ON. For Economy mode, set the 8th switch in the white set of switches (SW2) to OFF (default). For Comfort mode, set the 8th switch in the white set of switches (SW2) to ON. Settings for SW2 (bank of white switches) Switch 4 Switch 8 Pump Requirements Economy Mode ON OFF Voltage: 120V, 60 Hz Amperage: less than 2 amps NOTE: The Rinnai PC board will be damaged if amperage exceeds 2 Amps. In-rush current: Less than 2.5 Amps. Check valve: An integral flow check (IFC) valve is required. See plumbing diagram. Comfort Mode ON ON 5. Connect power to the water heater. Press the Power button on the controller. The pump and water heater will turn on to raise the recirculation loop temperature. Pump Size The pump should be sized for 2.5 GPM at the pressure loss through the tankless water heater and the supply and return plumbing in the recirculation loop. For more information on sizing the pump refer to the Rinnai Circ-Logic™ Guide or the section “Pump Sizing for Circulation” in the Rinnai Hot Water System Design Manual. Installation 1. Turn off the electrical power supply by unplugging the power cord or by turning off the electricity at the circuit breaker. 2. Install the recirculation pump on the return line according to the pump manufacturer installation instructions. Install a check valve in the return line as shown in the Plumbing Diagram if one is not integrated into the pump. NOTE: DO NOT install the Rinnai Scale Control system within the recirculation loop. 3. The wire harness for the recirculation pump is bundled with the wire harness from the PC board. The connector has a black and white wire with the label “Cut wire to connect to pump”. To connect to the pump, cut the connector, splice the wires, and add 4 Amp fuse to the hot wire (black) of the pump. Connect the ground wire from the pump to a screw at the base of the water cabinet . Refer to the Pump Electrical Connection Diagram. Follow Electrical Code and pump manufacturers KB Series Manual Plumbing Diagram Cut connector and splice wires. 4 Amp Fuse PC Board BL W Pump Electrical Connection 51 Recirculation Mode Sequence of Operation DIP switches (SW2 - white switches, #4, #8) should be set correctly for recirculation and mode. The Rinnai water heater should be turned on. Pump recirculation begins when the water heater is turned on. The Rinnai inlet and outlet thermistors measure the water temperature. Typical Pump ON Intervals* Rinnai (minutes) Temperature Setting Economy Comfort °F Mode Mode 140 31 15 135 31 15 130 31 15 125 31 15 120 31 15 115 35 18 110 42 21 The cycle will restart at the approximate time interval in the table based on the temperature thermistor readings. 108 45 22 106 49 24 Economy Mode 104 54 27 102 60 30 The water heater produces hot water at the temperature setting. If the inlet thermistor detects abnormal temperature then diagnostic code 51 is generated and the pump will turn off. When the return water temperature reaches approximately 15°F (8.3°C) below the temperature setting, the water heater and pump will turn off. The Economy mode operates as follows: Less energy consumed due to fewer pump cycles 100 68 34 Assumes plumbing is insulated (minimal pipe heat loss) 98 79 39 Pump cycles on every 31 to 79 minutes (see table). Comfort Mode The Comfort mode operates as follows: Higher energy consumption due to more pump cycles Assumes plumbing is not insulated resulting in higher pipe heat loss Pump cycles on every 15 to 39 minutes (see table). 52 * The pump will cycle on at these calculated intervals which are based on the temperature setting, insulation, and estimated heat loss in the system. The values for your installation may vary. The optional MC195T-US controller provides a timer function to control the on/off periods of the recirculation pump. KB Series Manual Direct Vent Tankless Water Heater Operation Instructions FOR INDOOR APPLICATIONS ONLY RU80i .................... REU-KB2530FFUD-US RU98i .................... REU-KB3237FFUD-US FOR OUTDOOR APPLICATIONS ONLY RU80e ................... REU-KB2530WD-US RU98e ................... REU-KB3237WD-US Important Facts about your Water Heater Thank you for purchasing a Rinnai Tankless Water Heater. For proper operation and safety, it is important to follow the instructions and adhere to all safety precautions. Read all of the instructions and the warranty thoroughly before operating this water heater. Keep this manual in a safe place. NOTICE: Rinnai sometimes shares customer contact information with businesses that we believe provide products or services that may be useful to you. By providing this information, you agree that we can share your contact information for this purpose. If you prefer not to have your information shared with these businesses, please contact customer service and ask not to have your information shared. We will however, continue to contact you with information relevant to the product(s) you registered and/or you account with us. WARNING If the information in these instructions is not followed exactly, a fire or explosion may result causing property damage, personal injury or death. — Do not store or use gasoline or other flammable vapors and liquids in the vicinity of this or any other appliance. — WHAT TO DO IF YOU SMELL GAS Leave the premises. Do not try to light any appliance. Do not touch any electrical switch; do not use any phone in your building. Immediately call your gas supplier from a neighbor’s phone. Follow the gas supplier’s instructions. If you cannot reach your gas supplier, call the fire department. — Installation and service must be performed by a licensed professional. KB Series Manual 53 Consumer Operation Guidelines for the Safe Operation of your Water Heater FOR YOUR SAFETY READ BEFORE OPERATING WARNING If you do not follow these instructions exactly, a fire or explosion may result causing property damage, personal injury or loss of life. A. This appliance does not have a pilot. It is equipped with an ignition device which automatically lights the burner. Do not try to light the burner by hand. B. BEFORE OPERATING smell all around the appliance area for gas. Be sure to smell next to the floor because some gas is heavier than air and will settle on the floor. WHAT TO DO IF YOU SMELL GAS Do not try to light any appliance. Do not touch any electric switch; do not use any phone in your building. Immediately call your gas supplier from a neighbor’s phone. Follow the gas supplier’s instructions. If you cannot reach your gas supplier, call the fire department. C. Use only your hand to push in or turn the gas control knob. Never use tools. If the knob will not push in or turn by hand, do not try to repair it, call a licensed professional. Force or attempted repair may result in a fire or explosion. D. Do not use this appliance if any part has been under water. Immediately call a licensed professional to inspect the appliance and to replace any part of the control system and any gas control which has been under water. OPERATING INSTRUCTIONS 1. STOP! Read the safety information above. 2. Set the thermostat to lowest setting. 3. Turn off all electric power to the appliance using the ON/OFF button. 4. This appliance is equipped with an ignition device which automatically lights the burner. Do not try to light the burner by hand. 5. Locate the manual gas valve on the side of the heater. Turn the manual valve clockwise to the full OFF position. Manual Valve CLOSE OPEN 6. Wait five (5) minutes to clear out any gas. Then smell for gas, including near the floor. If you smell gas, STOP! Follow “B” in the safety information above. If you don’t smell gas, go to the next step. 7. Turn the manual gas valve counterclockwise to the full ON position. 8. Turn on all electric power to the appliance using the ON/OFF button. 9. Set the thermostat to desired setting. 10. Open a hot water tap. If the appliance will not operate, follow the instructions “To Turn Off Gas To Appliance” and call your licensed professional or gas supplier. See manual for additional information. TO TURN OFF GAS TO APPLIANCE 1. Turn off all electric power to the appliance using the ON/OFF button. 2. Set the thermostat to lowest setting. 54 3. Locate the manual gas valve on the side of the heater. Turn the manual valve clockwise to the full OFF position. KB Series Manual How to use the Temperature Controller Dimensions (inches): 3.5 W x 4.75 H x 0.75 D The MC-91-2 controller is the standard temperature controller that is supplied with the water heater. On indoor models it is integrated into the front panel. The MCC-91-2 controller is for commercial and hydronic applications requiring higher temperatures. When the MCC-91-2 controller is connected, these higher temperatures are available on all controller models in the system. Refer to the section on temperature ranges. In Use Indicator Priority Indicator Temperature Display Priority Button Temperature Selection DO NOT repeatedly operate the water heater and then use a hot water tap while the controller is turned off. Operating the water heater in this way to alternately produce hot water may cause water to condense on the outside of internal parts and accumulate in the water heater cabinet. MC-91-2US ON/OFF Button WARNING Before operating, smell all around the appliance area for gas. Be sure to smell next to the floor because some gas is heavier than air and will settle on the floor. Keep the area around the appliance clear and free from combustible materials, gasoline, and other flammable vapors and liquids. Always check the water temperature before entering a shower or bath. Do not use this appliance if any part has been under water. Immediately call a licensed professional to inspect the appliance and to replace any part of the control system and any gas control which has been under water. If you install this water heater in an area that is known to have hard water or that causes scale build-up the water must be treated and/or the heat exchanger flushed regularly. Rinnai provides a “Scale Control System” that offers superior lime scale prevention and corrosion control by feeding a blend of control compounds into the water supply. Damage and repair due to corrosive compounds in the air is not covered by warranty. Keep the air intake location free of chemicals such as chlorine or bleach that produce fumes. These fumes can damage components and reduce the life of your appliance. Damage and repair due to scale in the heat exchanger is not covered by warranty. Should overheating occur or the gas supply fail to shut off, turn off the manual gas control valve to the appliance. Do not adjust the DIP switch unless specifically instructed to do so. Do not use an extension cord or an adapter plug with this appliance. Any alteration to the appliance or its controls can be dangerous and will void the warranty. KB Series Manual 55 How to Set the Temperature This water heater requires a minimum flow rate to operate. This rate can be found on the specification page in this manual. In some cases when you are not getting hot water or if the water alternates between hot and cold, it is due to the water flow being below or close to the minimum flow rate. Increasing the flow rate should resolve these problems in these cases. If you are experiencing issues with higher temperature settings, then reduce the temperature setting. Selecting a temperature closer to that which is actually used at the faucet will increase the amount of hot water being delivered to the faucet, due to less cold water mixing at the fixture. DANGER Hot water can be dangerous, especially for infants or children, the elderly, or infirm. There is hot water scald potential if the thermostat is set too high. Water temperatures over 125° F (52° C) can cause severe burns or scalding resulting in death. Hot water can cause first degree burns with exposure for as little as: 3 seconds at 140° F (60° C) 20 seconds at 130° F (54° C) 8 minutes at 120° F (49° C) Test the temperature of the water before placing a child in the bath or shower. Do not leave a child or an infirm person in the bath unsupervised. 1. If the water heater is off, press the Power button to turn on. 2. If the Priority light is off, then press the “Priority button” on the temperature controller. The orange Priority light will glow indicating that this controller is controlling the temperature and that the water heater is ready to supply hot water. (The priority can only be changed while no hot water is running.) 3. Press the up or down buttons to obtain the desired temperature setting. All hot water sources are able to provide water at this temperature setting until it is changed again at this or another temperature controller. 56 NOTICE While any hot water is being provided, the temperature setting can only be adjusted between 98° F and 110° F. NOTICE Check local codes for the maximum water temperature setting allowed when used in nursing homes, schools, day care centers, and all other public applications. NOTICE If a newly installed unit with a controller has not been powered for at least 6 hours then the temperature will return to the default setting of 104° F (40° C) if power is interrupted. NOTICE There may be a variation between the temperature displayed on the temperature controller and the temperature at the tap due to weather conditions or the length of pipe to the water heater. KB Series Manual Temperatures Available with a Controller The water heater can deliver water at only one temperature setting at a time. The available temperatures are provided below. A temperature lower than 98° F (37° C) can be obtained at the tap by mixing with cold water. To change the temperature scale from Celsius to Fahrenheit or vice versa, press and hold the “On/Off” button for 5 seconds while the water heater is OFF. Temperature Settings Available Fahrenheit °F 98 100 102 104 106 108 110 115 120 125 130 135 140 150 160 185 * * * * ** ** ** Celsius °C 37 38 52 39 40 41 42 43 46 49 54 57 60 66 71 85 * Temperature settings from 125-140 °F (52-60 °C) are available by setting switch 6 to ON in the SW1 tan switches. These models have a default maximum temperature of 120° F (49° C) and an option (switch 6) to increase the maximum temperature to 140 °F (60 °C). ** These settings require the MCC-91-2 controller. When the MCC-91-2 controller is connected, these higher temperatures are available on all controller models in the system. Use of an MCC-91-2 controller in a residential dwelling will reduce the warranty coverage to that of a commercial warranty application. WARNING DO NOT adjust the other switches unless specifically instructed to do so. These temperatures are suggestions only: Kitchen 120 °F (49° C) Shower 98 - 110 °F (37 - 43 °C) Bath Fill 102 - 110 °F (39 - 43 °C) Alternate Temperature Settings A different range of temperature settings is available by setting switches 2 and 3 of the SW2 dip switch (white) to ON. The table below shows the settings available with the MC-91-2 and MCC-91-2 controller. WARNING MC-91-1, MCC-91-1, MC-100V-1, and BC-100V-1 controllers are not compatible with Alternate Temperature Settings. Alternate Temperature Settings are for commercial applications only. DO NOT use the MC-91-1, MCC-91-1, MC-100V-1, or BC-100V-1 controllers when dip switches 2 and 3 (white) are in the ON position. Alternate Temperature Settings Available Fahrenheit °F Celsius °C 110 115 120 125 130 135 140 145 150 155 160 165 170 175 180 185 43 46 49 52 54 57 60 63 66 68 71 74 77 79 82 85 MC-91-2 MCC-91-2 KB Series Manual 57 Temperature Options Without a Temperature Controller The default temperature setting for this appliance installed without a temperature controller is 120° F (49° C). If desired, the temperature setting can be changed to 140° F (60° C) by adjustment of a switch. In the SW1 tan switches, set switch 5 to ON to obtain 140° F water temperature setting. Set switch 5 to OFF (default) to obtain 120° F water temperature setting. If a temperature controller is installed, then switch 5 has no effect on temperature settings. Setting Controller to Mute On the MC-91-2 to eliminate the beeps when keys are pressed or to turn the beeps back on, press and hold both the up and down buttons until a beep is heard (approximately 5 seconds). Locking the Controller The MC-91-2 controller can be locked by pressing the Priority button and the up button together for 5 seconds. A beep will sound confirming that the controller is locked. The display will alternately show “LOC”, the temperature setting, and a diagnostic code if one has been activated. All of the controllers in the system are also locked. To unlock the controller press the Priority button and the up button together for 5 seconds. Diagnostic Codes This water heater is designed to display diagnostic codes. If there is a potential operation concern refer to the code and remedy on the next page. To Display Diagnostic Information To display the most recent diagnostic information code press and hold the “On/Off” button for 2 seconds on the MC-91-2 controller. While holding the “On/Off” button press the up button. The last 9 diagnostic codes will flash one after the other. To exit this mode press the “On/Off” and up button as before. To enter or exit the maintenance monitor information mode, press and hold the down button for 2 seconds and without releasing it press the ON/OFF button. To obtain the water flow rate: press the up or down buttons until “01” displays. The water flow rate will then appear. For example “58” means 5.8 gal/min. To obtain the outgoing water temperature press the up or down buttons until “02” displays. The temperature will appear in degrees Fahrenheit. 58 No. Data Unit 01 Water flow rate 0.1 gal/min 02 Outgoing water temperature Degrees Fahrenheit KB Series Manual Diagnostic Codes and Remedies WARNING Some of the checks below should be done by a licensed professional. Consumers should never attempt any action that they are not qualified to perform. Code Definition 03 Power interruption during Bath Fill (Water will not flow when power returns). Bypass servo Air Supply or Exhaust Blockage 05 10 Remedy Turn off all hot water taps. Press ON/OFF twice. licensed professional only 11 No Ignition (heater not turning on) licensed professional only 12 No Flame licensed professional only 14 Thermal Fuse has activated licensed professional only 16 Over Temperature Warning (safety shutdown because unit is too hot) Contact a licensed professional. Check that nothing is blocking the flue inlet or exhaust. Check all vent components for proper connections. Ensure approved venting materials are being used. Ensure vent length is within limits. Verify dip switches are set properly. Check fan for blockage. Burner Sensor (see code 31) Check that the gas is turned on at the water heater, gas meter, or cylinder. If the system is propane, make sure that gas is in the tank. Ensure appliance is properly grounded. Ensure gas type and pressure is correct. Ensure gas line, meter, and/or regulator is sized properly. Bleed all air from gas lines. Verify dip switches are set properly. Ensure igniter is operational. Check igniter wiring harness for damage. Check gas solenoid valves for open or short circuits. Remove burner cover and ensure all burners are properly seated. Remove burner plate and inspect burner surface for condensation or debris. Check the ground wire for the PC board. Check that the gas is turned on at the water heater, gas meter, or cylinder. Check for obstructions in the flue outlet. If the system is propane, make sure that gas is in the tank. Ensure gas line, meter, and/or regulator is sized properly. Ensure gas type and pressure is correct. Bleed all air from gas lines. Ensure proper venting material was installed. Ensure condensation collar was installed properly. Ensure vent length is within limits. Verify dip switches are set properly. Check power supply for loose connections. Check power supply for proper voltage and voltage drops. Ensure flame rod wire is connected. Check flame rod for carbon build-up. Disconnect and reconnect all wiring harnesses on unit and PC board. Check for DC shorts at components. Check gas solenoid valves for open or short circuits. Remove burner plate and inspect burner surface for condensation or debris. Check for restrictions in air flow around unit and vent terminal. Check gas type of unit and ensure it matches gas type being used. Check for low water flow in a circulating system causing short-cycling. Ensure dip switches are set to the proper position. Check for foreign materials in combustion chamber and/or exhaust piping. Check heat exchanger for cracks and/or separations. Check heat exchanger surface for hot spots which indicate blockage due to scale build-up. Refer to instructions in manual for flushing heat exchanger. Hard water must be treated to prevent scale build up or damage to the heat exchanger. Measure resistance of safety circuit. Ensure high fire and low fire manifold pressure is correct. Check for improper conversion of product. Check for restrictions in air flow around unit and vent terminal. licensed professional only Check for low water flow in a circulating system causing short-cycling. Check for foreign materials in combustion chamber and/or exhaust piping. Check for blockage in the heat exchanger. KB Series Manual 59 Code Definition 19 Electrical Grounding 25 Condensate Trap is full 31 Burner Sensor 32 33 41 51 52 Remedy licensed professional only Check condensate trap and drain line for blockage. Replace condensate trap. Measure resistance of sensor. Replace sensor. Outgoing Water Temperature Sensor Heat Exchanger Outgoing Temperature Sensor Outside Temperature Sensor Inlet Water Temperature Sensor Modulating Solenoid Valve Signal 57 Burner 58 Secondary heat exchanger Check all components for electrical short. Check sensor wiring for damage. Measure resistance of sensor. Clean sensor of scale build-up. Replace sensor. Check modulating gas solenoid valve wiring harness for loose or damaged terminals. Measure resistance of valve coil. Contact a licensed professional. licensed professional only There is scale build up in the secondary heat exchanger and it needs to be flushed to prevent damage. Refer to the flushing instructions in the manual. Hard water must be treated to prevent scale build up or damage to the heat exchanger. Ensure fan will turn freely. Check wiring harness to motor for damaged and/or loose connections. Measure resistance of motor winding. The water flow control valve has failed to close during the bath fill function. Immediately turn off the water and discontinue the bath fill function. Contact a licensed professional to service the appliance. Check PC board DIP switches for correct position. Check the connection harness at the connection on the PC board. Replace PC board. Replace the PC Board. Verify flame rod is touching flame when unit fires. Check all wiring to flame rod. Remove flame rod and check for carbon build-up; clean with sand paper. Check inside burner chamber for any foreign material blocking flame at flame rod. Measure micro amp output of sensor circuit with flame present. Replace flame rod. 61 Combustion Fan 65 Water Flow Control 70 PC Board 71 Solenoid Valve Circuit 72 Flame Sensing Device 73 Burner Sensor Circuit Check sensor wiring and PC board to be sure that they have not been damaged. Replace sensor. 79 Water Leakage Detected Turn off water supply and contact licensed professional. LC # (LC0, LC1, LC2,…) Scale Build-up in Heat Exchanger (when checking maintenance code history, “00” is substituted for “LC”) LC0~LC9 indicates that there is scale build up in the heat exchanger and that the heat exchanger needs to be flushed to prevent damage. Refer to the flushing instructions in the manual. Hard water must be treated to prevent scale build up or damage to the heat exchanger. To operate the water heater temporarily until the heat exchanger can be flushed, push the On/ Off button on the temperature controller 5 times. Repeated LC codes will eventually lockout the water heater. Please call Rinnai technical department. FF Maintenance has been performed Indicates a licensed professional performed maintenance or corrected an issue. Nothing happens when water flow is activated. Clean inlet water supply filter. On new installations ensure hot and cold water lines are not reversed. Verify you have at least the minimum flow rate required to fire unit. Check for cold to hot cross over. Isolate circulating system if present. Turn off cold water to the unit, open pressure relief valve; if water continues to flow, there is bleed over in your plumbing. Verify turbine spins freely. Measure the resistance of the water flow control sensor. If the display is blank and clicking is coming from the unit, disconnect the water flow servo motor (GY, BR, O, W, P, BL, R). If the display comes on replace the water flow servo motor. No code 60 licensed professional only KB Series Manual Required Maintenance The appliance must be inspected annually by a licensed professional. Repairs and maintenance should be performed by a licensed professional. The licensed professional must verify proper operation after servicing. WARNING To protect yourself from harm, before performing maintenance: Turn off the electrical power supply by unplugging the power cord or by turning off the electricity at the circuit breaker. (The temperature controller does not control the electrical power.) Turn off the gas at the manual gas valve, usually located immediately below the water heater. Turn off the incoming water supply. This can be done at the isolation valve immediately below the water heater or by turning off the water supply to the building. WARNING Keep the appliance area clear and free from combustible materials, gasoline, and other flammable vapors and liquids. The following maintenance items are required for the proper operation of your water heater. The appliance must be inspected annually by a licensed professional. Repairs and maintenance should be performed by a licensed professional. The licensed professional must verify proper operation after servicing. Motors Cleaning Temperature Controller It is imperative that control compartments, burners, and circulating air passageways of the appliance be kept clean. Use a soft damp cloth to clean the temperature controller. Do not use solvents. Clean as follows: If you receive diagnostic code “LC#” (LC1, LC2,…), refer to the procedure, Flushing the Heat Exchanger. Refer to the section on Water Quality to see if your water needs to be treated or conditioned. (When checking maintenance code history, “00” is substituted for “LC#”.) 1. Turn off and disconnect electrical power. Allow to cool. 2. Close the water shut off valves. Remove and clean the water inlet filter. 3. Remove the front panel by removing 4 screws. 4. Use pressurized air to remove dust from the main burner, heat exchanger, and fan blades. Do not use a wet cloth or spray cleaners on the burner. Do not use volatile substances such as benzene and thinners. They may ignite or fade the paint. Motors are permanently lubricated and do not need periodic lubrication. However you must keep fan and motor free of dust and dirt by cleaning annually. Lime / Scale Build-up Snow Accumulation Keep the area around flue terminal free of snow and ice. The appliance will not function properly if the intake air or exhaust is impeded (blocked or partially blocked) by obstructions. 5. Use soft dry cloth to wipe cabinet. Clean the water filter Vent System Clean the inlet water filter by closing the cold and hot water inlet isolation (shut-off) valves. Put a bucket under the filter at the bottom of the water heater to catch any water that is contained inside the unit. Unscrew the water filter. Rinse the filter to remove any debris. Install the filter and open the isolation valves. The vent system should be inspected at least annually for blockages or damage. If the vent is blocked contact a licensed professional. KB Series Manual 61 WARNING Freeze Protection Testing the pressure relief valve should only be performed by a licensed professional. Scalding hot water may be released under pressure. Pressure Relief Valve: Winterizing Operate the valve manually once a year. In doing so, it will be necessary to take precautions with regard to the discharge of potentially scalding hot water under pressure. Ensure discharge has a place to flow. Contact with your body or other property may cause damage or harm. Verify proper operation after servicing. The burner must flame evenly over the entire surface when operating correctly. The flame must burn with a clear, blue, stable flame. See the parts breakdown of the burner for the location of the view ports. The flame pattern should be as shown in the figures below. FRONT VIEW FLAME ROD These recommendations are intended to suggest practices which are effective for winterizing the water heater. They should be used as a guide only. No liability is assumed for any issues resulting from the use of this information. GAS Visual Inspection of Flame SATISFACTORY Make sure that in case of freezing weather that the water heater and its water lines are adequately protected to prevent freezing. Damage due to freezing is not covered by the warranty. Refer to the section on Freeze Protection. Shut off the gas to the water heater. It is generally preferable to shut off the gas service to the entire location if gas is not going to be used. WATER Shut off the cold water supply to the water heater. It is generally preferable to shut off the water to the entire location if water is not going to be used. Drain the water heater by opening the drain valves on the cold water line and hot water line. Open several hot water taps and remove the filter assembly at the water inlet in order to allow room for expansion in case there is water in the lines that freeze. ELECTRIC BLUE FLAME UNSATISFACTORY FRONT VIEW FLAME ROD Disconnect the power supply by either unplugging the electrical cord or by turning off the circuit breaker to the water heater to prevent potential damage from irregular power surges or interruptions. VENT TERMINATION Place a cover over the vent termination (intake and exhaust) if it can be safely accessed. The cover should be easy to apply and remove. This will prevent debris, leaves, and small animals from entering the venting and water heater which could cause air flow issues upon return to service. YELLOW FLAME 62 KB Series Manual Flushing the heat exchanger An LC0~LC9 or “00” or 58 diagnostic code indicates the unit is beginning to lime up and must be flushed. Failure to flush the appliance will cause damage to the heat exchanger. Damage caused by lime build-up is not covered by the unit’s warranty. Rinnai strongly recommends installation of isolation valves to allow for flushing of the heat exchanger. KEY 1. Disconnect electrical power to the water heater. 2. Close the shutoff valves on both the hot water and cold water lines (V3 and V4). 3. Connect pump outlet hose (H1) to the cold water line at service valve (V2). 4. Connect drain hose (H3) to service valve (V1). 5. Pour 4 gallons of undiluted virgin, food grade, white vinegar into pail. 6. Place the drain hose (H3) and the hose (H2) to the pump inlet into the cleaning solution. 7. Open both service valves (V1 and V2) on the hot water and cold water lines. 8. Operate the pump and allow the vinegar to circulate through the water heater for at least 1 hour at a rate of 4 gallons per minute (15.1 liters per minute). 9. Turn off the pump. 10. Rinse the vinegar from the water heater as follows: a. Remove the free end of the drain hose (H3) from the pail. Place in sink or outside to drain. b. Close service valve, (V2), and open shutoff valve, (V4). Do not open shutoff valve, (V3). c. Allow water to flow through the water heater for 5 minutes. d. Close shutoff valve (V4). When unit has finished draining remove the in-line filter at the cold water inlet and clean out any residue. Place filter back into unit and open valve (V4). e. Close service valve, (V1), and open shutoff valve, (V3). Pressure Regulator 3/4" Ball Valve Circulating Pump 3/4" Union Check Valve Boiler Drain Valve Pressure Relief Valve S Solenoid Valve Rinnai Water Heater In - line Filter V2 V1 H3 V4 V3 11. Disconnect all hose 12. Restore electrical power to the water heater. Ho t Water Lin e C old Wate r Line Gas Sup p ly H2 Following flush procedure call technical assistance (1-800-6219419) for PCB reset information. H1 Circulating Pump KB Series Manual 63 Manual draining of the water heater WARNING To avoid burns, wait until the equipment cools down before draining the water. The water in the appliance will remain hot after it is turned off. If the water heater is not going to be used during a period of possible freezing weather, it is recommended that the water inside the water heater be drained. To manually drain the water: 1. Shut off cold water supply and gas supply. 2. Turn off the temperature controller. Water drain plug 3. Disconnect the power to the water heater. 4. Place a container to catch the water. Open hot water tap or open hot water drain plug at the hot water outlet. 5. Remove water filter to drain the cold water. 6. Unscrew the water drain plug from the drain line next to the hot water outlet. 7. Remove the condensate trap drain plug and allow to drain. To resume normal operation: 1. Confirm that all water drain plugs are removed, that the gas supply is turned off, and that all taps are closed. Hot water 2. Insert the condensate trap drain plug. outlet 3. Screw in the water drain plugs. 4. Screw in the water filter in the cold water inlet. 5. Open the cold water supply. 6. Open a tap and confirm that water flows, and then close. 7. Turn on the power. 8. After confirming that the temperature controller is off, turn on the gas supply. 9. Turn on the temperature controller. Cold water inlet Gas connection Condensate trap drain plug Condensate drain line Running a low volume of water through the water heater to prevent freezing If the temperature exceeds the ability of the water heater to freeze protect itself, or if power is lost, the following steps may prevent the water heater and external piping from freezing. (Units connected with EZ Connect (2 unit link) should be drained to prevent freezing if not in use.) ON! 1. Turn the water heater off. 2. Close the gas supply valve. 3. Turn on a hot water tap to flow water about 0.1 gal/min or where the stream is about 0.2 inches thick. When the water heater or external piping has frozen 1. Do not operate the water heater if it or the external piping is frozen. 2. Close the gas and water valves and turn off the power. 3. Wait until the water thaws. Check by opening the water supply valve. 4. Check the water heater and the piping for leaks. 64 KB Series Manual HOT COLD 0.1 gal/min or about 0.2 inch thick State Regulations NOTICE BEFORE INSTALLATION This direct-vent appliance must be installed by a licensed professional. If you are not properly trained, you must not install this unit. IMPORTANT: In the State of Massachusetts (248 CMR 4.00 & 5.00) For all side wall horizontally vented gas fueled equipment installed in every dwelling, building or structure used in whole or in part for residential purposes, including those owned or operated by the Commonwealth and where the side wall exhaust vent termination is less than seven (7) feet above finished grade in the area of the venting, including but not limited to decks and porches, the following requirements shall be satisfied: 1. INSTALLATION OF CARBON MONOXIDE DETECTORS. At the time of installation of the side wall horizontal vented gas fueled equipment, the installing plumber or gasfitter shall observe that a hard wired carbon monoxide detector with an alarm and battery back-up is installed on the floor level where the gas equipment is to be installed. In addition, the installing plumber or gasfitter shall observe that a battery operated or hard wired carbon monoxide detector with an alarm is installed on each additional level of the dwelling, building or structure served by the side wall horizontal vented gas fueled equipment. It shall be the responsibility of the property owner to secure the services of qualified licensed professionals for the installation of hard wired carbon monoxide detectors a. In the event that the side wall horizontally vented gas fueled equipment is installed in a crawl space or an attic, the hard wired carbon monoxide detector with alarm and battery back-up may be installed on the next adjacent floor level. b. In the event that the requirements of this subdivision can not be met at the time of completion of installation, the owner shall have a period of thirty (30) days to comply with the above requirements; provided, however, that during said thirty (30) day period, a battery operated carbon monoxide detector with an alarm shall be installed. 2. APPROVED CARBON MONOXIDE DETECTORS. Each carbon monoxide detector as required in accordance with the above provisions shall comply with NFPA 720 and be ANSI/UL 2034 listed and IAS certified. 3. SIGNAGE. A metal or plastic identification plate shall be permanently mounted to the exterior of the building at a minimum height of eight (8) feet above grade directly in line with the exhaust vent terminal for the horizontally vented gas fueled heating appliance or equipment. The sign shall read, in print size no less than one-half (1/2) inch in size, "GAS VENT DIRECTLY BELOW. KEEP CLEAR OF ALL OBSTRUCTIONS". 4. INSPECTION. The state or local gas inspector of the side wall horizontally vented gas fueled equipment shall not approve the installation unless, upon inspection, the inspector observes carbon monoxide detectors and signage installed in accordance with the provisions of 248 CMR 5.08(2)(a)1 through 4. KB Series Manual 65 Replacement Parts The Technical Sheet which is located inside the front cover of the water heater contains a complete illustrated parts list. Gas Control Assembly Electrode / Flame Rod Heat Exchanger Secondary Heat Exchanger Tech Sheet Item No. Gas Control Assembly Electrode / Flame Rod Kit 100 116, 117 Fan Assembly / Motor 125 Heat Exchanger 143 Secondary Heat Exchanger 160 Water Flow Servo & Sensor 401 Bypass-Servo Assembly 403 Water Filter Assy 412 PC Board 700 Anti Frost Unit 701 Ignitor 706 Thermal Fuse Harness 725 66 Water Flow Servo & Sensor Fan Assembly / Motor Bypass-Servo Assembly Water Filter Assy PC Board Anti Frost Unit Ignitor Thermal Fuse Harness KB Series Manual EXTEND THE LABOR COVERAGE UNDER YOUR LIMITED WARRANTY* Ultra Series RU80, RU98 REGISTRATION REQUIRED* Rinnai is providing the opportunity to extend your Rinnai Standard Limited Warranty on labor only on Ultra Series models RU80 and RU98 if you register within 30 days of purchase of your unit. Products not registered will still be covered under the Rinnai standard product limited warranty as provided in the Operating Instruction manual which comes with this product. Warranty information is also available on Rinnai's web site at www.rinnai.us. RESIDENTIAL APPLICATIONS: The limited warranty period on the labor coverage for models RU80 and RU98 Tankless Water Heaters installed in a residential application is extended for an additional 48 months (a total of 60 months labor coverage from date of purchase), when used in a residential hot water application, if the product is registered within 30 days of purchase at www.rinnai.us/ product-registration or by calling 1-866-RINNAI-1 (746-6241), except registration is not required in California and Quebec. ADDITIONAL CONDITIONS OF EXTENDING THE LABOR COVERAGE UNDER THE LIMITED WARRANTY: 1. The labor coverage does NOT extend if the RU80 and RU98 Tankless Water Heater is used for structure heating or in a closed loop application. 2. If the product is installed on a circulation system, the circulation system must be controlled through an aquastat / thermostat, or timer, or an on-demand system, or the limited warranty will not be extended. COMMERCIAL APPLICATIONS: The limited warranty period on the labor coverage for models RU80 and RU98 Tankless Water Heaters installed in a commercial application is extended for an additional 12 months (a total of 24 months labor coverage from date of purchase), when used in a commercial hot water application, if the product is registered within 30 days of purchase at www.rinnai.us/product-registration or by calling 1-866-RINNAI-1 (746-6241), except registration is not required in California and Quebec. ADDITIONAL CONDITIONS OF EXTENDING THE LABOR COVERAGE UNDER THE LIMITED WARRANTY: * 1. The labor coverage does NOT extend if the RU80 and RU98 Tankless Water Heater is used for structure heating or in a closed loop application. 2. If the product is installed on a circulation system, the circulation system must be controlled through an aquastat / thermostat, or timer, or an on-demand system, or the limited warranty will not be extended. Only applicable if product is registered within 30 days of purchase and the other conditions are met. Note to California and Quebec Residents, and residents of other jurisdictions that prohibit warranty benefits conditioned on registration, registration is not required to obtain longer warranty periods and failure to register does not diminish your warranty rights. www.rinnai.us/warranty KB Series Manual 67 Limited Warranty for Ultra Series RU80, RU98 What is covered? The Rinnai Standard Limited Warranty covers any defects in materials or workmanship when the product is installed and operated according to Rinnai written installation instructions, subject to the terms within this Limited Warranty document. This Limited Warranty applies only to products that are installed correctly. Improper installation may void this Limited Warranty. Rinnai strongly suggests that you use a licensed professional who has attended a Rinnai installation training class before installing this water heater. This Limited Warranty coverage as set out in the table below extends to the original purchaser and subsequent owners, but only while the product remains at the site of the original installation. This Limited Warranty only extends to the first / original installation of the product and terminates if the product is moved or reinstalled at a new location. How long does warranty coverage last? Period of Coverage (from date of purchase) Item Residential Applications If used for both residential water heating and space heating purposes Commercial Applications Heat Exchanger 12 years [1] [2] [3] 10 years [1] [3] 5 years [1] [2] All Other Parts and Components 5 years [1] 5 years [1] 5 years [1] Reasonable Labor 1 year [4] 1 year [4] 1 year [4] [1] Period of coverage is reduced to 3 years from date of purchase when used as a recirculating water heater within a hot water recirculation loop, where the water heater is in series with a recirculation system and all recirculating water flows through the water heater, and where an aquastat / thermostat, timer, or an on-demand recirculation system is not incorporated. [2] The Rinnai Limited Warranty for a heat exchanger used in a recirculation system which is controlled through an aquastat / thermostat, or timer, or an on-demand system is 12 years for residential applications and 5 years for commercial applications. [3] Period of coverage is reduced to 5 years from date of purchase if the Rinnai water heater temperature setting exceeds 160° F (71° C). [4] Labor coverage is extended to 5 years in residential applications and to 2 years in commercial applications if the product is registered within 30 days (except registration is not required in California and Quebec) and/or if the other conditions above in the Residential Applications and Commercial Applications sections are satisfied. NOTE: The integrated controller on indoor models has a 1 year warranty on parts. What will Rinnai do? Rinnai will repair or replace the covered product or any part or component that is defective in materials or workmanship as set forth in the above table. Rinnai will pay reasonable labor charges associated with the repair or replacement of any such part or component during the term of the labor warranty period. All repair parts must be genuine Rinnai parts. All repairs or replacements must be performed by a licensed professional that is properly trained, state qualified or licensed to do the type of repair. Replacement of the product may be authorized by Rinnai only at its sole discretion. Rinnai does not authorize any person or company to assume for it any obligation or liability in connection with the replacement of the product. If Rinnai determines that repair of a product is not possible, Rinnai may replace the product with a comparable product at Rinnai’s sole discretion. If a component or product returned to Rinnai is found to be free of defects in material or workmanship, or damaged by improper installation or damaged during return shipping, the warranty claim for product, parts and labor may be denied. 68 KB Series Manual How do I get service? You must contact a licensed professional for the repair of a product under this Limited Warranty. For the name of a licensed professional please contact your place of purchase, visit the Rinnai website (www.rinnai.us), call Rinnai at 1800-621-9419 or write to Rinnai at 103 International Drive, Peachtree City, Georgia 30269. Proof of purchase is required to obtain warranty service. You may show proof of purchase with a dated sales receipt, or by registering within 30 days of purchasing the product. To register your tankless water heater, please visit www.rinnai.us. For those without internet access, please call 1-866-RINNAI1 (746-6241). Receipt of Registration by Rinnai will constitute proof-of-purchase for this product. Registration of product installed in new home construction may be verified with a copy of the closing papers provided by the initial home buyer. However, Registration is not necessary in order to validate this Limited Warranty. What is not covered? This Limited Warranty does not cover any failures or operating difficulties due to the following: accident, abuse, or misuse water quality alteration of the product or any component part Improper maintenance (such as but not limited to scale build-up, freeze damage, or vent blockage) misapplication of this product improper installation product being installed in a corrosive environment condensate damage improper venting incorrect gas type incorrect gas or water pressure incorrect sizing any other cause not due to defects in materials or workmanship problems or damage due to fires, flooding, electrical surges, freezing or any acts of God. force majeure absence of a drain pan under the appliance There is no warranty coverage on product installed in a closed loop application, commonly associated with space heating only applications. Use of an MCC-91-2 controller in a residential dwelling will reduce the warranty coverage to that of a commercial warranty application except when an MCC-91-2 is used with a hydronic air handler for temperatures no higher than 160°F (71°C). This Limited Warranty does not apply to any product whose serial number or manufacture date has been defaced. This Limited Warranty does not cover any product used in an application that uses chemically treated water such as a pool or spa heater. Limitation on Warranties No one is authorized to make any other warranties on behalf of Rinnai America Corporation. Except as expressly provided herein, there are no other warranties, expressed or implied, including, but not limited to warranties of merchantability or fitness for a particular purpose, which extend beyond the description of the warranty herein. Any implied warranties of merchantability and fitness arising under state law are limited in duration to the period of coverage provided by this Limited Warranty, unless the period provided by state law is less. Some states do not allow limitations on how long an implied Limited Warranty lasts, so the above limitation may not apply to you. Rinnai shall not be liable for indirect, incidental, special, consequential or other similar damages that may arise, including lost profits, damage to person or property, loss of use, inconvenience, or liability arising from improper installation, service or use. Some states do not allow the exclusion or limitation of incidental or consequential damages, so the above limitation may not apply to you. This Limited Warranty gives you specific legal rights, and you may also have other rights which vary from state to state. www.rinnai.us/warranty KB Series Manual 69 Chauffe-eau d’intérieur sans réservoir à ventilation directe Manuel d'installation et POUR LES APPLICATIONS INTÉRIEURES SEULEMENT d'utilisation RU80i ........... REU-KB2530FFUD-US RU98i ........... REU-KB3237FFUD-US POUR LES APPLICATIONS EXTÉRIEUR SEULEMENT RU80e .......... REU-KB2530WD-US RU98e .......... REU-KB3237WD-US ANS Z21.10.3 ● CSA 4.3 LIRE TOUTES LES INSTRUCTIONS SOIGNEUSEMENT AVANT D’INSTALLER OU D’EXPLOITATION DE CETTE CHAUFFE-EAU. Ce manuel fournit des informations sur l'installation, l'exploitation et l'entretien du chauffe-eau. Pour la sécurité et le bon fonctionnement, il est important de suivre les instructions et de respecter les mesures de sécurité. Un professionnel autorisé doit installer le chauffe-eau conformément aux instructions exactes de sur pages 4-32. Le consommateur doit lire le manuel complet de fonctionner correctement le chauffe-eau et d'avoir effectué un entretien régulier. AVERTISSEMENT Assurez-vous de bien suivre les instructions données dans cette notice pour réduire au minimum le risque d'incendie ou d'explosion ou pour éviter tout dommage matériel, toute blessure ou la mort. — Ne pas entreposer ni utiliser d'essence ou ni d'autres vapeurs ou liquides inflammables à proximité de cet appareil ou de tout autre appareil. — QUE FAIRE SI VOUS SENTEZ UNE ODEUR DE GAZ Ne pas tenter d'allumer d'appareil. Ne touchez à aucun interrupteur ; ne pas vous servir des téléphones se trouvant dans le bâtiment. Appelez immédiatement votre fournisseur de gaz depuis un voisin. Suivez les instructions du fournisseur. Si vous ne pouvez rejoindre le fournisseur, appelez le service des incendies. — L'installation et l'entretien doivent être assurés par un installateur ou un service d'entretien qualifié ou par le fournisseur de gaz. 70 KB Series Manual Table des matières Table des matières.................................................. 49 Les pratiques et les comportements de sécurité pour les consommateurs et les installateurs .................. 50 Installation d’instructions (pour le professionnel autorisé) ......................... 51 Préparez-vous à l'installation ........................ 52 Déterminez l'endroit d’installation................ 53 Liste de verification pour déterminez l'endroit d’installation ................................... 58 Bâti à murer ................................................... 58 Enlevez le panneau avant .............................. 58 Installation de la mise à l'air libre ................. 59 Condensat...................................................... 62 Liste de verification pour l'évacuation et de condesat ................................................... 62 Installation de la tuyauterie .......................... 63 Liste de verification pour tuyauterie ............. 66 Installation de la fourniture de gaz ............... 66 Reliez l'électricité........................................... 68 Ajustez à l'haute altitude ............................... 68 Ajuster pour longueur de ventilation............. 68 Liste de vérification pour gaz et électricité .... 68 Installation de le contrôleur de température 69 Liste de vérification finale .............................. 70 Diagramme en escalier........................................... 71 Manuel d'utilisation........................................... 72 Directives d'opérations du consommateur pour le fonctionnement sécuritaire de votre chauffe-eau ...................................................... 73 Comment utiliser le contrôleur de température................................................ 74 Comment définir la temperature .................... 75 Entretien requis ............................................... 77 Flushing l'échangeur de chaleur ............... 79 Drainage Manuel du chauffe-eau.............. 80 Garantie du consommateur ................................... 81 AVIS: Rinnai partage parfois des informations de contact client avec des entreprises que nous croyons offrent des produits ou des services qui peuvent vous être utiles. En fournissant ces renseignements, vous acceptez que nous pouvons partager vos coordonnées à cette fin. Si vous préférez ne pas avoir vos informations partagées avec ces entreprises, veuillez contacter le service clientèle et demandez ne pas d'avoir votre information partagée. Nous allons cependant continuer à vous contacter avec les informations pertinentes pour le produit vous inscrit ou vous rendre compte avec nous. Si vous avez des questions ou se sentent que le manuel est incomplète, veuillez communiquer avec Rinnai au 1-800-621-9419. L'information de sûreté importante Définitions de sécurité Ceci est un symbole relatif à la sécurité. Il vous prévient de dangers potentiels qui peuvent blesser ou tuer, vousmême et les autres. DANGER AVERTISSEMENT ATTENTION Indication d’une situation imminente dangereuse, qui, si elle n’est pas évitée, peut entraîner des blessures graves voire mortelles. Indication d’une situation potentiellement dangereuse, qui, si elle n’est pas évitée, peut entraîner des blessures graves voire mortelles Indication d’une situation potentiellement dangereuse, qui si elle n’est pas évitée peut entraîner des blessures légères ou moyennes. On peur également l’utiliser pour signaler des pratiques non sûres. KB Series Manual 71 Les pratiques et les comportements de sécurité pour les consommateurs et les installateurs AVERTISSEMENT Avant d'exploitation, une odeur tout autour de la Utilisez seulement votre main pour pousser ou tourner le bouton de contrôle des gaz. Ne jamais utiliser des outils. Si le bouton ne sera pas pousser ou tourner à la main, n'essayez pas de la réparer. Appelez un technicien qualifié. Force ou une tentative de réparation peut entraîner un incendie ou d'explosion. zone de l'appliance pour le gaz. Veillez à odeur à côté de la parole, parce que certains gaz est plus lourd que l'air et va s'installer sur le plancher. Garder la zone autour de l'appliance claire et exempt de matières combustibles, l'essence et autres vapeurs inflammables et des liquides. Construction combustible fait référence au plafond et les murs adjacents et ne doit pas être confondue avec les matériaux et produits inflammables ou inflammables. Matériaux et produits inflammables et/ou inflammables doit jamais être stocké dans les environs de cela ou tout appareil de gaz. N'utilisez pas cette appliance si une partie a été sous l'eau. Appeler immédiatement un technicien qualifié d'inspecter l'appliance et de remplacer une partie du système de contrôle et n'importe quel contrôle de gaz qui a été sous l'eau. Ne pas utiliser les matériaux de substitution. Utilisez uniquement des pièces certifiés avec l'appareil. Toujours vérifier la température de l'eau avant d'entrer dans une salle de bains ou douche. Pour vous protéger contre les préjudices, avant d'effectuer la maintenance : Coupez l'alimentation électrique en débranchant le cordon d'alimentation ou en désactivant l'électricité au disjoncteur. (Le contrôleur de température ne contrôle pas la puissance électrique). Coupez le gaz à la soupape de gaz manuelle, généralement situé immédiatement sous le chauffe-eau. Coupez l'alimentation en eau entrante. Cela peut se faire à la vanne d'isolement immédiatement au-dessous du chauffe-eau. En cas de surchauffe, ou si la coupure du gaz ne se fait pas, fermez l'arrivée de gaz au niveau de la vanne de contrôle manuelle alimentant l'appareil. Ajuster pas le commutateur DIP sauf si expressément demandé de le faire. N'utilisent pas une rallonge ou un adaptateur brancher avec cet appareil. Toute modification de l'appareil ou de ses contrôles peut être dangereuse et permettra d'annuler la garantie. ATTENTION RISQUE DE BRÛLURE. Vent et les gaz Les tuyaux d'eau chaude outlet laissant l'unité d'échappement peuvent provoquer des graves burns. Garder le retour de l'unité de chauffage de l'eau. Garder les petits enfants et les animaux loin de l'unité. peuvent être chauds au toucher. Dans les applications résidentielles, isolation doit être utilisée pour les tuyaux d'eau chaude sous 36 "en raison de burn risque pour les enfants. Droit californien exige le présent avis doivent être fournis : Californie Proposition 65 énumère les substances chimiques connues à l'état de causer le cancer, malformations congénitales, décès, maladie grave ou autres dommages reproduction. Ce produit peut contenir ces substances, être à l'origine de la combustion de carburant (gaz, pétrole) ou des composants du produit lui-même. 72 KB Series Manual Installation d’instructions Qualifications d'installateur Instructions générales Un professionnel agréé doit installer l'appareil, inspecter et fuite de le tester avant des utiliser. La garantie sera être annulée en raison de la mauvaise installation. Le programme d'installation doit posséder des compétences telles que : classement par taille de gaz reliant les conduites de gaz, de conduites d'eau, de vannes, de l'électricité connaissance du national applicable, les États et les codes locauxinstalling l'évacuation par un mur ou un toit Si vous n'ont pas ces compétences contact un professionnel agréé. NE FAITES PAS Type d’installation Pour installation dans des residendial et des applications commerciales. Certifié pour l'installation dans les foyers (mobiles) fabriqués. Étapes d'installation Préparez-vous à l'installation ......................... 52 Déterminez l'endroit d’installation ................ 53 Liste de verification pour déterminez l'endroit d’installation .................................... 58 Bâti à murer.................................................... 58 Enlevez le panneau avant............................... 58 Installation de la mise à l'air libre .................. 59 Condensat ...................................................... 62 Liste de verification pour l'évacuation et de condesat .................................................... 62 Installation de la tuyauterie ........................... 63 Liste de verification pour tuyauterie .............. 66 Installation de la fourniture de gaz ................ 66 Reliez l'électricité ........................................... 68 Ajustez à l'haute altitude................................ 68 Ajuster pour longueur de ventilation ............. 68 Liste de vérification pour gaz et électricité .... 68 Installation de le contrôleur de température 69 Liste de vérification finale .............................. 70 Le RU80i et RU98i n'est pas prévu pour une installation à l'extérieur. Le RU80e et RU98e n'est pas prévu pour une installation à l'intérieur. N'installez pas l'appareil dans une région où les fuites d'eau de l'unité ou les connexions se traduira par dommages à la zone adjacente à l'appliance ou d'abaisser les planchers de la structure. Lorsque ces lieux ne peuvent être évitées, il est recommandé qu'un pan de drain approprié, bien drainé, être installé sous l'appareil. Le pan ne doit pas restreindre débit d'air de combustion. Ne pas obstruer le débit d'air de combustion et de ventilation. Air de combustion ne doit pas être fourni des espaces occupés. N'utilisez pas cette appliance dans une application comme un appareil de chauffage piscine ou spa qui utilise chimiquement l'eau traitée. (Cette appliance est appropriée pour la grand de remplissage ou de baignoires spa de whirlpool avec de l'eau potable). Pas utilisé des pièces de remplacement qui ne sont pas autorisés pour cette appliance. DOIT FAIRE L'installation doit être en conformité avec les normes locales, et en leur absence avec la norme américaine sur le gaz combustible, ANSI Z223.1/ NFPA 54, ou la norme canadienne sur les installations au gaz naturel et propane, CSA B149.1. Cet appareil doit être installé selon la Manufactured Home Construction and Safety Standard, Title 24 CFR, Part 3280 ou la norme CAN/ CSA-Z240 MM M86, Maisons mobiles. L'appareil, quand il est installé, doit être électriquement relié à la terre en conformité avec la norme américaine électrique, ANSI/NFPA 70, ou la norme canadienne électrique, CSA C22.1. KB Series Manual 73 Préparez-vous à l'installation L'appareil et sa vanne de gaz doivent être débranchés de la conduite d'alimentation en gaz durant les essais du système en pression dépassant 1/2 psi (3.5 kPa ou 13,84 pouces de hauteur de colonne d'eau). L'appareil doit être isolé du système de conduite d'alimentation en gaz en fermant sa vanne individuelle de coupure durant les essais du système en pression inférieurs ou égaux à 1/2 psi (3.5 kPa ou 13,84 pouces de hauteur de colonne d'eau). Vous devez suivre les instructions d'installation et ceux dans les soins et l'entretien d'admission d'air de combustion adéquate et des gaz d'échappement. L’INFORMATION Pièces incluses Chauffe-eau sans Réservoir Couleur froide codé (bleu) et chaud (rouge) vannes d'isolement Valve de dégagement de pression Contrôleur de température de MC-91-2 (intégrées dans les modèles de l'intérieurs ; fourni avec les modèles de plein air) Outils requis Clés à tube(2) Gants Pinces réglables Verres de sûreté Tournevis (2) Niveau Coupe-fil Si un chauffe-eau est installé dans un système fermé d'alimentation en eau, ayant par exemple un dispositif anti-refoulement dans la conduite d'alimentation en eau froide, il faut fournir les moyens de contrôler l'expansion thermique. Contactez le fournisseur d'eau ou un inspecteur en plomberie local sur la façon de gérer cette situation. En cas de surchauffe, ou si la coupure du gaz ne se fait pas, fermez l'arrivée de gaz au niveau de la vanne de contrôle manuelle alimentant l'appareil. Gardez la zone d'aspiration d'air exempte de Outils qui pourraient être nécessaires Foret de marteau avec le peu concretSaw Filetage de la machine tuyauterie Les matériaux ont eu besoin Mise à l'air libre approuvée Bande de teflon (recommandé) ou composé de pipe Matériaux qui peuvent être nécessaires Bande de la chaleur Isolation de pipe Fil électrique et conduit par code local Ancres de mur en béton Couverture facultative de pipe Contrôleur de température facultative 74 Coupeur de cuivre de avec les chefs et le Coupeur de pipe en graisseur Core drill with acier diamond head Solution de savon produits chimiques comme chlore ou agent de blanchiment qui produisent des fumées. Ces fumées pourraient endommager des composants et réduire la durée de service de votre appareil. Ensemble de torche KB Series Manual 5/8” ID Tuyauterie flexible de PVC 2 fil d'A.W.G. du conducteur 22 pour le contrôleur Boîte électrique de troupe simple Écrous de fil Syndicats et soupapes de vidange Déterminez l'endroit d’installation Environnement Vous devez vous assurer que les habilitations seront satisfaites et que le cloaque sera dans les limites requises. Tenir compte de l'environnement d'installation, qualité de l'eau et nécessité d'une protection de gel. On trouvera des exigences pour la conduite de gaz, conduites d'eau, connexion électrique et d'élimination de condensat dans leurs sections respectives d'installation de ce manuel. Air entourant le chauffe eau, l'évacuation et l'évent termination(s) est utilisé pour la combustion et doit être libre de tout composés qui causent la corrosion des composants internes. Ces comprennent des composés corrosifs qui sont trouvent dans les aérosols, les détergents, les agents de blanchiment, les solvants de nettoyage, huile de base peintures et vernis et fluides frigorigènes. L'air de beauté boutiques, magasins de nettoyage à sec, laboratoires de traitement de photos et aires de stockage des fournitures pool contient souvent ces composés. Par conséquent, il est recommandé que les modèles extérieurs soient utilisés pour ces endroits lorsque c'est possible. Le chauffe-eau, l'évacuation et l'évent termination(s) ne doit pas être installé dans toutes les zones où l'air de combustion peut contenir ces composés corrosifs. Si cela est nécessaire pour un chauffe-eau à être situés dans des zones qui peuvent contenir des composés corrosifs, les instructions suivantes sont fortement recommandées. Considérations importantes pour: Chauffe-eau d'intérieur FAIRE pas les installer dans les zones où air de combustion peut être contaminé par des substances chimiques. Avant l'installation, examiner où air a la capacité de voyager dans l'immeuble pour le chauffage de l'eau. Lorsque c'est possible, installez le chauffe-eau dans un placard scellé afin qu'elle est protégée contre le potentiel de l'air intérieur contaminé. Substances chimiques qui sont corrosifs dans la nature ne doivent pas stockées ou utilisées près de chauffe-eau. Chauffe-eau extérieurs et Évacuation des terminaisons de chauffe-eau internes Installez le chauffe-eau aussi loin que possible des hottes de ventilation d'échappement. Installez aussi loin que possible des bouches d'air inlet. Fumées corrosives peuvent être libérées par le biais de ces évents lorsque l'air n'est pas apportée grâce à eux. Substances chimiques qui sont corrosifs dans la nature ne devraient pas stockées ou utilisées près de la cessation de chauffage ou de vent de l'eau. Dommages et réparation en raison de composés corrosifs dans l'air n'est pas couvert par la garantie. Qualité de l'eau Examen de diligence pour votre chauffe-eau devrait inclure l'évaluation de la qualité de l'eau L'eau qui contient des substances chimiques dépassant les niveaux inférieurs affectent et endommager l'échangeur de chaleur. Remplacement de l'échangeur de chaleur en raison de dommages de qualité de l'eau n'est pas couvert par la garantie. Niveau maximum Dureté totale Jusqu'à 200 mg/L Aluminium* Jusqu'à 0,2 mg/L Chlorures* Jusqu'à 250 mg/L Cuivre* Jusqu'à 1,0 mg/L Fer* Jusqu'à 0,3 mg/L Manganèse* Jusqu'à 0,05 mg/L pH * 6,5 à 8,5 Matières dissoutes totales (MDT)* Zinc * Jusqu'à 500 mg/L Jusqu'à 5 mg/L * Source : Partie 143 réglementations nationales d'eau potable secondaire Si vous installez ce chauffage de l'eau dans une région qui est connu pour avoir de l'eau dure ou qui provoque l'échelle accumulation de l'eau doit être traitée et/ou l'échangeur de chaleur vidées régulièrement. Lorsque l'accumulation d'échelle dans l'échangeur de chaleur commence à affecter les performances du chauffe-eau, un code de diagnostic « LC# » s'affichera. Vider l'échangeur de chaleur pour prévenir les dommages à elle. Échelle build up est causée par l'eau dure définie à haute température. Un kit de traitement de l'eau est disponible depuis Rinnai. Ce kit fournit un contrôle de la prévention et à la corrosion calcaire supérieur par un mélange de composés de contrôle d'alimentation dans l'approvisionnement en eau. 103000022 103000023 103000024 Installé sur la ligne d'eau froide fournissant 1 chauffe-eau uniquement Toute maison ou Light Commercial fournissant 1 chauffe -eau Ensemble fournissant Accueil chauffe-eau 2 ou 1 chauffe-eau en éclairage Commercial Cartouche 103000025 Cartouche 103000026 Cartouche 103000026 KB Series Manual 75 Espacements pour terminaison de cheminée (ANS Z21.10.3, CSA 4.3) Vous devez installer une fin de vent à apporter dans l'air de combustion et d'expulser des gaz d'échappement. DÉTAIL D'ANGLE INSIDE NERDETAIL CORINTÉRIEUR TERMINATION Terminaison G Clearance inen Dédouanement Réf A s'applique Ref. A also également à la applies to ligne anticipé de anticipated neige. snow line H A SNOW NEIGE I B D B K OUVRABLE OPERABLE E C B B FERMETURE FIXED PERMANENTE CLOSED J B A OPERABLE OUVRABLE L F X ENTÉE D'ALIMENTATION EN AIR V TERMINAISON DE VENTILATION ZONE OÙ LA TERMINAISON N'EST PAS PERMISE B Réf. M FIXED FERMETURE CLOSED PERMANENTE Description Installations au Canada Installations aux USA A Espace au dessus de niveau du sol, véranda, porche, plate-forme ou balcon 12" (30 cm) 12" (30 cm) B Écartement par rapport à fenêtre ou porte qui peut s'ouvrir 36" (91 cm) 12" (30 cm) C Écartement par rapport à fenêtre toujours fermée * * D Espacement vertical par rapport à combles ventilés, situés au-dessus de la terminaison à une distance horizontale de 2 ' (61 cm) de la ligne centrale de terminaison * * E Espacement vertical par rapport à combles non ventilés * * F Écartement par rapport à un angle extérieur * * G Écartement par rapport à un angle intérieur * * H Espacement par rapport à chaque côté d'une ligne centrale prolongée audessus de l'ensemble de compteur/régulateur 3 pieds (91 cm) avec une hauteur de 15 pieds (4,5 m) au-dessus de l'ensemble de régulation * I Écartement par rapport à la sortie de ventilation du régulateur de service 36 " (91 cm) * J Écartement par rapport à entrée d'alimentation d'air non mécanique dans le bâtiment ou entrée d'air de combustion vers tout autre appareil 36 " (91 cm) 12" (30 cm) K Écartement par rapport à entrée d'alimentation d'air mécanique 6' (1,83 m) 3' (91 cm) au dessus si à 10' (3 m) horizontalement L Espacement au dessus d' un trottoir ou passage pavé situé dans le domaine public 7' (2,13 m) * M Espacement sous véranda, porche, plate-forme ou balcon 12" (30 cm) * Une ventilation ne doit pas se terminer directement au-dessus d'un trottoir ou passage pavé situé entre deux habitations familiales et les desservant toutes les deux. Permis uniquement si véranda, porche, plate-forme ou balcon est entièrement ouvert au moins sur deux côtés en dessous du plancher. * Pour les espacements non spécifiés dans ANSI Z223.1/NFPA 54 ou CSA B149.1, il faut appliquer les valeurs conformes aux normes locales d'installation et aux exigences du fournisseur de gaz.. L'espacement par rapport au mur opposé est de 24" (60 cm) pour Canada et USA. 76 KB Series Manual Dégagements additionnels RU80e, RU98e Vérifier si les codes locaux remplacent ces habilitations. Éviter les endroits de résiliation près d'un évent sécheur. Évitez les endroits de résiliation près d'échappement cuisson commercial. (50 mm) entre terminaux au même niveau RU80i, RU98i: Vous devez installer une résiliation de vent au moins 12 pouces du sol Au fil des allées publiques ; ou Près des évents de sous-face ou bouches d'aération vide sanitaire ou autre zone où condensat ou la vapeur peut créer une nuisance ou un risque ou causer des dommages à la propriété ; ou Où condensat ou la vapeur pourrait causer des dommages ou puisse nuire au fonctionnement des organismes de réglementation, de soupapes ou d'autres équipements. 60" (1.52 m) verticalement entre les bornes l'intérieur coin Des considérations importantes pour la localisation d'évent résiliation sous un soffite (ventilés ou unventilated ou vent de débord ; ou à un pont ou un porche 2" (0.30 m ) à l'intérieur coin La cheminée pour cet appareil ne prend pas fin 36" 12" RU80i, RU98i (0.91 m) à évent soffite ou eve ventilé ou non aérée ; ou à un pont ou un porche N'installez pas de cessation de vent sous un évent soffite telle que les gaz d'échappement peut entrer dans l'évent soffite. Installez évent résiliation tel que la hausse de l'humidité et de gaz d'échappement ne recueillera pas sous combles. Décoloration à l'extérieur du bâtiment pourrait se produire si installé trop près. (1.52 m) entre terminaux à différents niveaux V 60" V N'installez pas la résiliation de vent trop près sous l'embrasure où il pouvait présenter la recirculation des gaz d'échappement dans la partie d'apport en air combustion de la résiliation. V 60" (0.30 m ) à l'intérieur coin 36" (1.52 m) verticalement entre les bornes (0.61 m) au mur ou parapet 24" V V 12" V V 12" (0.30 m) entre terminaux au même niveau 12" V l'intérieur INSIDE CORNER coin KB Series Manual V (0.30 m) entre terminaux au même niveau 77 Dégagements d'unité to top Vers le haut to top Vers le haut Sur côté tolefront Sur côté tolefront Vers l'avant to side Vers l'avant to side to Vers floor/ground le sol to Vers floor/ground le sol Modèles d'intérieur: RU80i, RU98i Jusqu'à matières combustibles inches (mm) Modèles extérieurs: RU80e, RU98e Jusqu'à matières noncombustibles Jusqu'à matières combustibles inches (mm) inches (mm) Jusqu'à matières noncombustibles inches (mm) Dessus du chauffe-eau 6 * (152) 2 *(51) Dessus du chauffe-eau 12 (305) 2 (51) Arrière du chauffe-eau 0 (zero) 0 (zero) Arrière du chauffe-eau 0 (zero) 0 (zero) Avant du chauffe-eau 6 (152) 6 (152) 24 (610) 0 (zero) Côtés du chauffe-eau 2 (51) Avant du chauffe-eau (panneau) Avant du chauffe-eau (échappement) 24 (610) 24 (610) Côtés du chauffe-eau 6 (152) 1/8 (3.2) Par rapport au plancher/sol 12 (305) 2 (51) 1/2 (13) Par rapport au plancher/sol 12 (305) 12 (305) Ventilation 0 (zero) 0 (zero) * 0 pouces des composants de ventilation et de la canalisation de vidange condensat. L'espacement pour des interventions doit faire 24 pouces (610 mm) sur l'avant du chauffe-eau. Pour installation en placard : espacement de 6 pouces (152 mm) à l'avant. 78 L'espacement pour des interventions doit faire 24 pouces (610 mm) sur l'avant du chauffe-eau. KB Series Manual Longueur maximale pour la ventilation concentriques 1. Déterminez le nombre de coudes à 90° dans le système de ventilation (deux coudes à 45° comptent pour un coude à 90°. Sur les modèles R98 chaque pied de conduite semi flexible utilisée dans la longueur d'inspiration d'air équivaut à un coude à 90°). 2. Référez-vous au tableau pour trouver la longueur de ventilation maximum sur la base du nombre de coudes. Unités de propane seulement Nombre de coudes à 90° AVIS Longueur maximale pour la ventilation concentriques 0 41 ft (12.5 m) 1 35 ft (10.7 m) 2 29 ft (8.8 m) 3 23 ft (7.0 m) 4 17 ft (5.2 m) 5 11 ft (3.4 m) 6 5 ft (1.5 m) microcommutateur N° 1 (SW1) en position OFF. Si la longueur fait plus de 9' (2,7 m) passez le microcommutateur N° 1 (SW1) en position OFF. Passez le microcommutateur N° 1 (SW1) en position OFF. Exemple : Si vous avez un coude ensuite votre longueur maximale est 35 pieds (10,7 m). Si votre longueur réelle est supérieure à 15 pi (4,6 m) puis déplacez commutateur no 1 (SW1) off. Si vous avez une longueur de ventilation plus grande, le microcommutateur N° 1 doit être mis en position OFF. Cela assure que le chauffe-eau fonctionne correctement. Des codes d'erreur de conduit de cheminée obstruée et des coupures peuvent arriver si ce microcommutateur N° 1 n'est pas en position correcte. Protection de gel Assurez-vous que dans le cas de congélation météo que le chauffe-eau et ses lignes de l'eau sont protégés pour éviter le gel. Dommages causés à la congélation n'est pas couvert par la garantie. Perte de gel protection peut entraîner des dégâts d'eau d'un échangeur de chaleur de rafale ou des conduites d'eau. Unités de gaz naturel seulement Longueur maximale pour Nombre de coudes à 90° la ventilation concentriques 0 65 (19.8) 1 59 (18.0) 2 53 (16.2) 3 47 (14.3) 4 41 (12.5) 5 35 (10.7) L'unité peut être drainée manuellement. Toutefois, il est fortement recommandé que : 6 29 (08.8) Égoutter down solénoïde soupapes sont installés 3. Suivez les recommandations de la note applicable. SW1 (fauve) Si la longueur fait plus de 21' (6,4 m) passez le microcommutateur N° 1 (SW1) en position OFF. Si la longueur fait plus de 15' (4,6 m) passez le Avec l'énergie électrique fournie, le chauffe-eau gèleront pas lorsque la température de l'air extérieur est froide comme –22°F (-30 ° c) pour les modèles de l'intérieurs ou est froid comme –4°F (-20 ° c) pour les modèles en plein air, lorsque le protégé du vent directe. En raison de l'effet de « éolien », tout vent ou la circulation de l'air sur l'unité réduira sa capacité de geler les protéger. qui s'écoulera automatiquement l'unité si de puissance est perdue. Celles-ci sont disponibles dans un kit, 104000059. un parasurtenseur avec terminaux est installé qui permet les électrovannes à fonctionner si l'unité est désactivée en raison d'un code de diagnostic. Ceci est disponible comme 104000057. KB Series Manual 79 En outre, les électrovannes devraient être connectés électriquement à un parasurtenseur avec terminaux. Cela permet les électrovannes à exploiter si le chauffe-eau est désactivé en raison d'un code de diagnostic. Les fonctionnalités de protection de gel n'empêchera pas la tuyauterie externe du point de congélation. Il est recommandé que les conduites d'eau chaudes et froides sont isolés. Boîtiers de couverture de tuyaux peuvent être emballés avec isolation pour la protection de l'ajout de gel. En cas de panne de courant à des températures de congélation de l'eau réchauffeur devrait être drainé de l'eau pour prévenir les dommages au gel. Le condensat piège drain plug et le bouchon de vidange de l'eau ne sont pas affectés par le drain auto down électrovannes et devront être ouverts manuellement. 80 KB Series Manual Liste de vérification pour déterminer l'endroit d’installation Bâti à murer □ Le chauffage de l'eau n'est pas corrosifs composés dans l'air. □ L'emplacement de chauffage de l'eau est parenthèses d'installation de mur conforme avec les dégagements. □ (Modèles d'intérieur) La ventilation prévue ne dépassera pas la longueur maximale pour le nombre de coudes utilisé. □ L'emplacement d'apport résiliation/air ventilation prévues réunit les dégagements. □ L'approvisionnement en eau ne contient pas de produits chimiques ou dépasse la dureté totale qui nuira à l'échangeur de chaleur. □ Un standard 3 prong 120 Vca, 60 Hz correctement fondée sur une prise murale (modèles d'intérieur) ou autres 120 Vca, 60 Hz source est disponible. □ L'installation doit être en conformité avec les normes locales, et en leur absence avec la norme américaine sur le gaz combustible, ANSI Z223.1/ NFPA 54, ou la norme canadienne sur les installations au gaz naturel et propane, CSA B149.1. Cet appareil doit être installé selon la Manufactured Home Construction and Safety Standard, Title 24 CFR, Part 3280 ou la norme CAN/CSA-Z240 MM M86, Maisons mobiles. □ Quitter l'ensemble du Manuel de ruban pour le chauffe-eau ou donner le Manuel directement au consommateur. 1. Identifiez l'emplacement d'installation et confirmez que là les espacements requis seront respectés. 2. Fixez bien le chauffe-eau au mur en utilisant n'importe lesquels des trous des supports d'installation murale placés en haut et en bas du chauffe-eau. Assurez-vous que la résistance des fixations est suffisante pour supporter le poids de l'appareil. Reportez-vous au poids des modèles de chauffe-eau dans la section des spécifications. Utilisez un outil de mise à niveau pour s'assurer que le chauffe-eau est de niveau. Bon fonctionnement exige que le chauffe-eau niveau. NOTE : Le chauffe-eau doit être installé en position verticale. N'installez pas la tête en bas ou sur le côté. Enlevez le panneau avant Glisser les morceaux de garnitures plastique de chaque côté du chauffe-eau à exposer les vis. Retirez les 4 vis y attacher le panneau pour le chauffage de l'eau. KB Series Manual 81 Installation de la mise à l'air libre (modèles d'intérieur) Installez la ventilation correcte pour votre modèle, en suivant les instructions du fabricant de ventilation. Reportez-vous à la documentation technique du fabricant pour les numéros de pièce spécifiques et des instructions. Constructeur Produits de ventilation listés et testés Téléphone Fax Contact Ubbink Rolux Condensing Vent System 888-835-9320 678-829-1666 www.rinnai.us Centrotherm InnoFlue Vent System (single wall SW, 3 inch diameter) 877-434-3432 518-618-3166 [email protected] www.centrotherm.us.com Heat-Fab Saf-T Vent SC system 800-772-0739 413-863-4803 [email protected], www.heatfab.com Metal-Fab Corr/Guard Vent/Air Intake 800-835-2830 316-943-2717 [email protected], www.metal- Constructeur Produit Terminaison Vertical Terminaison horizontale Ubbink Rolux 184162PP 223176PP, 223177PP Centrotherm InnoFlue ICRT3539 ISELL0387UV Heat-Fab Saf-T Vent Saf-T Vent CI Plus Wall Termination Saf-T Vent CI Plus Rain Cap Metal-Fab Corr/Guard 3CGRVDK 3CGRVT Directives de mise à l'air libre NE FAITES PAS N'utilisez pas de vent cette appliance en cellulaire en PVC, CPVC, Radel, ABS ou matériau galvanisé. Ne se combinent pas évent composants provenant de différents fabricants. Diamètre de vent ne doit pas être réduite Ne pas connecter le système de ventilation avec un vent existant ou de la cheminée. Ne vent pas commun avec le tuyau d'évacuation de tout autre fabricant chauffe-eau ou appareil. Rinnai chauffe-eau peuvent uniquement être communs ventilé à l'aide d'un Rinnai certifiée système commun d'évacuation. DOIT FAIRE Cette chauffe-eau est un chauffe-eau à évent direct et par conséquent est certifié et listé avec le système d'évacuation. Vous devez utiliser des composants de vent qui sont certifiés et répertoriés avec le modèle de chauffage de l'eau. Le système d'évacuation doit évacuer directement à l'extérieur de l'édifice et utiliser l'air extérieur pour la combustion. Éviter les trempettes ou courbure dans vent horizontal s'exécute en installant des supports par le vent du fabricant. 82 Vent horizontal de soutien s'exécute tous les quatre pieds et tous les évents verticale s'exécute chaque six pieds ou conformément aux codes locaux. Ventilation devrait être aussi directe que possible avec un nombre minimal de raccords de tuyauterie. Évent connexions doivent être fermement pressées ensemble afin que les joints d'étanchéité forment un joint étanche à l'air. La pièce de vent reliée à l'appareil de chauffage de l'eau doit être sécurisée avec une vis autotaraudeuses. L’INFORMATION Reportez-vous aux instructions du fabricant de système de vent pour les instructions d'assembly de composant. Si le système d'évacuation est d'être enfermé, il est suggéré que la conception de l'enceinte doit permettre d'inspection du système de ventilation. La conception de cette enceinte est réputée acceptable par le programme d'installation ou de l'inspecteur local. AVIS S'il devient nécessaire d'accéder à un système d'évacuation fermée pour le service ou les réparations, Rinnai n'est pas responsable des frais ou des difficultés à accéder au système de ventilation. La garantie ne couvre pas obtenir accès à un système de ventilation en milieu fermé. KB Series Manual Installation de conduit de cheminée (concentrique, modèles d'intérieur) Installez la résiliation ventilation selon les diagrammes et les instructions ci-dessous. Terminaison horizontale L'évacuation vers l'appareil selon les instructions d'installation de ventilation fabricants de pente. Disposer de condensat par des codes locaux. Terminaison verticale L'évacuation vers l'appareil selon les instructions d'installation de ventilation fabricants de pente. Disposer de condensat par des codes locaux. Vis de fixation Fixez la pièce de ventilation connectée sur le chauffeeau avec une vis autotaraudeuse dans le trou situé. Installation de conduit de cheminée (Centrotherm, modèles d'intérieur) Installez la résiliation ventilation selon les diagrammes et les instructions ci-dessous. Respecter les dégagements de gaz d'échappement dans AVERTISSEMENT l'opération Rinnai et le manuel d'Installation. Un seul appareil peut être attaché au système de ventilation. Installer le système en selon les instructions d'installation de Centrotherm. Utilisez le 3”/5” concentriques d'adaptateur de tuyau de jumelles N'utilisez pas de cellulaire en PVC, CPVC, Radel, ABS ou conduits galvanisé matériaux de ventilation. et de 3 "ventilation de diamètre. L'apport de cessation d'emploi et de l'air de ventilation doit être dans la même zone de pression. Ne dépassez pas cloaque droites maximale avec nombre de coudes comme indiqué dans les tableaux sur la page suivante. Maintenir les dégagements montrés dans les figures. KB Series Manual 83 Installation de conduit de cheminée (Centrotherm, modèles d'intérieur) Installez la résiliation ventilation selon les diagrammes et les instructions ci-dessous. Longueur maximale de Vent à l'aide de coude court rayon Longueur maximale de Vent à l'aide de coude de long rayon (Apport est court coude UV protégées 90°) (Apport est long coude UV protégées 90 °) Nombre de Longueur Déplacer le 90 ° court maximale des commutateur # 1 dans rayon évents droites les commutateurs DIP Nombre de Déplacer le Longueur 90 ° Long commutateur # 1 dans maximale des rayon les commutateurs DIP évents droites coudes tan à au LOIN / OFF 0 41 ft (12.50 m) 18 ft (5.49 m) 0 41 ft (12.50 m) 21 ft (6.40 m) 1 26 ft (7.93 m) 3 ft (0.91 m) 1 35 ft (10.67 m) 15 ft (4.57 m) 2 29 ft (8.84 m) 9 ft (2.74 m) 11 ft (3.35 m) déplacez le commutateur #1 à AU LOIN pour n'importe 3 23 ft (7.01m) 3 ft (0.91 m) 4 17 ft (5.18 m) 5 11 ft (3.35 m) 6 5 ft (1.52 m) déplacez le commutateur #1 à AU LOIN pour n'importe quelle longueur 2 Prise d'air de combustion Terminaison verticale Prise d'air de combustion 12” Minimum audessus de niveau prévu de neige Échappement Échappement 12” Minimum au-dessus de niveau prévu de neige Terminaison horizontale 5” ÉchappePassage 11” Facultati f Prise Prise d'air de combustion Prise 84 KB Series Manual Condensat (modèles d'intérieur) La formation de condensat peut arriver même sur les appareils à ventilation directe de haute performance. Pour éviter que le condensat n'endommage, suivez ces instructions : NE FAITES PAS Ne permettent pas de condensat d'entrer dans le chauffe-eau.Ne permettent pas de condensat d'entrer dans le chauffe-eau. Ne branchez pas le tuyau de cerveaux condensat directement à l'égout de pluie. Ne branchez pas la ligne de cerveaux condensat avec une climatisation Evaporateur bobine des cerveaux. DOIT FAIRE Utiliser uniquement le vent qui est approuvé et identifié comme acceptable pour votre modèle particulier. Pente la ventilation vers l'appliance selon les L’INFORMATION Un collecteur de condensat intégré. Dans les régions à climat froid il se produira plus de condensat dans le système de ventilation. Un collecteur de condensat est recommandé climats. Le tuyau de vidange de condensat devrait être le plus court possible et avoir un terrain à la baisse. Si le drain de condensat obtient bloqué, un code d'erreur s'affichera sur le contrôleur. Si cela se produit, le drain de condensat doit être nettoyé. Le piège de condensat sera premier automatiquement (self-prime) pendant le fonctionnement de l'unité comme des formes de condensat. Condensat de drainage de l'unité indique que le piège est complet et qu'il n'y a aucun blocage dans le drain de condensat. Il n'est pas nécessaire d'ajouter de l'eau du piège de condensat. Une trousse de neutralisant de condensat, instructions d'installation du fabricant évent. Rejetez le condensat en respectant les normes locales. Utilisation de matériaux seulement résistant à la corrosion pour le condensat drainent lignes telles que les tuyaux en PVC ou en plastique. 804000074, est disponible chez Rinnai. La trousse permet de condensat de circuler à travers les médias neutralisants qui déclenche le pH du condensat à un niveau qui aidera à prévenir la corrosion du drain et d'égouts publics. Le tuyau de cerveaux condensat (sur toute sa longueur) doit être au moins le même diamètre que la ligne de cerveaux (1/2 inch NPT). La fin de la conduite de cerveaux condensat doit être ouverte à l'atmosphère. La fin ne devrait pas être sous l'eau ou d'autres substances. Pour minimiser la congélation du condensat, Liste de vérification pour l'évacuation et de condensate (Modèles d'intérieur) □ Vérifiez les habilitations appropriées autour des évents et les prises d'air. exécutez la ligne de cerveaux de condensat à travers un mur intérieur ou entre l'isolation et un mur intérieur. □ S'assurer que vous avez utilisé les produits de ventilation correctes pour le modèle installé et que vous avez complètement suivi les instructions d'installation du fabricant de ventilation et ces instructions d'installation. □ Vérifiez que le système d'évacuation ne dépasse pas la longueur maximale pour le nombre de coudes utilisé. KB Series Manual 85 Installation de la tuyauterie L’INFORMATION Installez la soupape conformément à ces instructions. Si une soupape de sûreté déverse périodiquement, cela peut venir d'une expansion thermique dans un système d'eau fermé. Contactez votre fournisseur d'eau ou votre inspecteur de plomberie local pour voir comment régler cette situation. Mais ne bouchez pas la soupape. Une soupape de sûreté est nécessaire, d'un type approuvé par les normes américaines (ANSI Z21.10.3) et canadiennes (CSA 4.3) pour tous les systèmes de chauffage par eau. La norme nationale américaine (ANSI Z21.10.3) ou Soupape de sûreté canadienne (CSA 4.3) n'exigent d'utiliser une soupape de sûreté combinée à pression et à température pour cet appareil. Cependant des normes locales peuvent le demander. NE FAITES PAS Ne bouchez pas la soupape de sûreté, et n'installez aucun raccord réducteur ou autre restriction dans la conduite de déversement. Elle doit permettre un drainage complet de la soupape et de la conduite. Ne pas placer toute autre soupape de type ou fermer dispositif entre la soupape et le chauffe-eau. DOIT FAIRE La soupape de sûreté doit être compatible avec les normes ANSI Z21.22 (soupapes de sûreté et dispositifs de coupure automatique de gaz pour systèmes de fourniture d'eau chaude) et/ou CAN1-4.4 (soupapes de sûreté combinées à pression et à température et soupapes casse-vide). La soupape de sûreté doit être homologuée pour 150 PSI (1034 kPa) et au moins la valeur maximum de BTU/H de l'appareil. Le déversement venant de la soupape de sûreté doit être amené par tuyau au sol ou dans un système de drainage pour éviter une exposition avec possibilité de brûlure pour humains, végétaux ou animaux. Conformez-vous aux normes locales. L'eau chaude sortant de la soupape de sûreté peut causer des brûlures sévères et des échaudages pouvant même provoquer la mort. La soupape de sûreté doit être actionnée manuellement au moins une fois par an pour vérifier qu'elle est toujours fonctionnelle. La soupape de sûreté doit être insérée dans la conduite de sortie d'eau chaude en suivant les instructions du fabricant. N'intercalez PAS n'importe quel autre type de vanne ou dispositif de coupure entre la soupape de sûreté et le chauffe-eau. Vannes d'isolement Vannes d'isolement sont inclus dans cette chauffe-eau. Rinnai recommande fortement l'installation de vannes d'isolement sur les lignes de l'eau chaude et froide. Parce qu'ils permettent d'isoler le chauffe-eau de la structure de la plomberie et permettre un accès rapide à vider l'échangeur de chaleur. Flushing l'échangeur de chaleur est régulièrement nécessaire dans le cadre de l'entretien pour ce chauffe-eau. Conditions sifflantes NE FAITES PAS N'introduisent pas de produits chimiques toxiques tels que ceux utilisés pour le traitement de l'eau de chaudière à l'eau potable utilisée pour le chauffage de l'espace. DOIT FAIRE Une vanne manuelle de coupure d'eau doit intercalée sur la conduite en amont sur l'arrivée d'eau au chauffe-eau. Des raccords union peuvent s'utiliser sur les conduites d'eau froide et d'eau chaude pour faciliter les interventions ultérieures avec déconnexion de l'unité. La tuyauterie (incluant les matériaux de soudage) et les composants connectés à cet appareil doivent être approuvés pour une utilisation sur des systèmes à eau potable. Purgez la conduite d'eau pour en éliminer les débris et l'air. Des débris entrant dans le chauffe-eau pourraient l'endommager. Si l'appareil doit être utilisé comme source d'eau potable, il ne doit pas être connecté à un appareil utilisé auparavant comme chauffage et fourniture d’eau non potable. Le filtre d’eau du chauffage dout être propre et installé. 86 KB Series Manual Installez Valve à Bille / Valve de dégagement de pression Les soupapes d'isolement offrent la possibilité d'isoler le chauffe-eau de la structure plomberie et de permettre un accès rapide à vider l'échangeur de chaleur. Vérifiez auprès des codes locaux pour déterminer si une soupape de pression et de température est nécessaire. Les valves inclus rencontrer American National Standard (ANSI Z21.10.3)-norme canadienne (ASC 4.3) et sont ANSI/ NSF 65 approuvé pour l'eau potable. A C D B Instructions d’Installation: A Valve de dégagement de pression (VDP) 1. Enveloppez les bouts filetés des prises d’eau et sorties d’eau du chauffe-eau sans réservoir, ainsi que le bout fileté de la valve de détente approuvée avec un minimum de 5 enrobages de bande Teflon®. 2. Vissez la valve de dégagement de pression dans les bouts filetés ¾’’ à l’opposé du levier pour clapet de retenue sur la valve de service à eau CHAUDE. (Levier de drainage ROUGE). 3. Désserrez l’écrou union de ¾’’ sur la valve à eau CHAUDE et raccordez le à la sortie d’eau CHAUDE sur le chauffe-eau sans réservoir. Si l’écrou est enlevé, assurez-vous de réaligner l’about correctement avec la valve et que la rondelle noire soit positionnée de façon à ce que le l’arête de métal de la valve soit à l’intérieur de la rondelle. 4. Alignez la direction du purgeur d’eau CHAUDE à la position désirée. 5. Resserrez l’assemblage union de la valve à eau CHAUDE en utilisant approximativement 15 piedlivres de torsion. 6. Répétez les étapes 3-5 pour la valve à eau FROIDE. (Levier de drainage BLEU) pour la connexion de la prise d’eau FROIDE sur le chauffeeau sans réservoir. 7. Raccordez l’ENTRÉE de la valve à eau FROIDE à la source d’alimentation en eau PRINCIPALE. 8. Raccordez la SORTIE de la valve à eau CHAUDE à l’EAU CHAUDE du système de plomberie. 9. Assurez-vous que les deux leviers de drainage soient en position fermée, (perpendiculaires à la portion drainage du corps). B Orifice de Refoulement pour VDP C Levier de Drainage pour Valve à Bille Eau Chaude D Levier de Drainage pour Valve à Bille Eau Froide Valve de dégagement de pression Instructions d’Installation: La VDP doit être raccordée par la connexion filetée opposée à la valve pour clapet de retenue sur la valve d’eau chaude (désignée par le levier de drainage ROUGE) ou par la connexion filetée du côté de l’accessoire de relocalisation au dessus de la valve à eau chaude. L’installation doit maintenir un diamètre de passage de ¾’’ sans aucune valve de sectionnement ou restriction de ligne entre l’appareil et la VDP. La conduite de refoulement depuis la VDP devrait être en pente descendante et se terminer à 6’’ au dessus des drains où le refoulement sera visible. Le bout de refoulement de la ligne devrait être non-fileté et avoir un diamètre minimum de ¾’’. La matériel de la ligne de refoulement doit être adapté pour une température d’eau de 180° Fahrenheit et ne doit pas dépasser 30 pieds de longueur ni contenir plus de 4 coudes ou flexions transversales. Aucune valve d’aucune sorte ne doit être installée dans la ligne de refoulement de la valve de dégagement de pression. KB Series Manual 87 Tuyauterie recommandée pour installation de base Bonde d’eau Eau chaude Gaz Eau froide Bonde de piège Canalisation condensat condensate Le tuyau de vidange de condensat (le long de sa longueur) doit être au moins le même diamètre que la ligne de drain, (1/2 pouce TNP). Reportez-vous à la section de condensat dans les instructions de ventilation. Connexion de gaz en 3/4 po (19 mm) Canalisation condensat Vidange condensat Alimentation en gaz Conduite de sortie d'eau chaude Conduite d'alimentation en eau froide Appareils du bâtiment Légende Vanne à tournant sphérique 3/4 po (19 mm) Raccord union 3/4 po (19 mm) Régulateur de pression Clapet anti-retour Vanne de purge de chaudière Soupape de décharge Pompe de circulation Électrovanne 88 KB Series Manual Ceci n'est pas un schéma technique, son but n'est que de vous guider, et il ne tient pas lieu de dessin industriel professionnel pour un projet. Ce schéma n'a pas l'ambition de décrire un système au complet. C'est la responsabilité du concepteur ou de l'ingénieur de déterminer les composants nécessaires et la configuration pour le système spécifique à installer. Ce schéma n'implique aucune conformité avec les exigences des normes de construction locales. C'est la responsabilité du concepteur ou de l'ingénieur de s'assurer que l'installation sera en conformité avec toutes les normes locales de construction applicables. Consultez les autorités compétentes dans ce domaine avant l'installation. Installation de la fourniture de gaz Se connecter chauffe-eau à l'approvisionnement en eau Les connexions de l'eau pour le chauffe-eau devraient suivre tous état et codes de plomberie local. S'il s'agit d'une installation standard, consultez le diagramme de tuyauterie pour Installation de base. 1. Sonder l'approvisionnement en eau pour le chauffe-eau sur la connexion de MNPT 3/4 "au bas de l'unité marqué « Prise d'eau », qui est l'approvisionnement en eau froide. 2. Aplomb l'approvisionnement en eau chaude building à la connexion de MSPT 3/4 "marqué « Sortie de l'eau », qui est l'approvisionnement en eau chaude. Si une reprise des pipe sera installée, faire assurer conduites d'eau pour le chauffe-eau à s'adapter. Liste de vérification pour tuyauterie □ La ligne d'eau tous les débris et l'air de la purge en fermant la vanne d'isolement chaud et en ouverture de la vanne d'isolement froid et ses drain. Débris endommagera le chauffeeau. Utiliser un seau ou tuyau si nécessaire. □ S'assurer que les canalisations d'eau chaudes et froides ne sont pas traversées à l'unité et sont libre de fuite. □ Veiller à ce qu'une soupape est installée avec une cote qui dépasse l'entrée de BTU du modèle de chauffage de l'eau. Se référer à la plaque de cotation sur le côté de la chauffe eau pour l'entrée de BTU. □ Nettoyez le filtre à eau inlet en fermant les soupapes d'isolement (fermeture) entrée froide et d'eau chaude. Mettre un seau sous le filtre au bas du chauffe-eau à attraper toute l'eau qui est contenue à l'intérieur de l'unité. Dévissez le filtre à eau. Rincer le filtre à supprimer tous les débris. Installez le filtre et ouvrir les vannes d'isolement. □ Vérifiez la pression appropriée de l'eau pour le chauffage de l'eau. Pression d'eau minimum est de 50 psi. Rinnai recommande de 60-80 psi pour des performances optimales. AVERTISSEMENT 1. Si vous n'êtes pas bien informés ou qualifié pour installer les conduites de gaz ou de connexions, puis contacter un technicien qualifié pour installer l'approvisionnement en gaz. 2. Coupez les 120 v alimentation. 3. Coupez le gaz. 4. Le gaz est inflammable. Ne pas fumer ou fournir d'autres sources d'ignition tout en travaillant avec des gaz. 5. Tourner pas sur le chauffe-eau ou gaz jusqu'à ce que tous les vapeurs ont disparu. Instructions générales DOIT FAIRE Une vanne manuelle de coupure de gaz doit être placée sur la conduite d'alimentation en gaz en amont du chauffe-eau. Un raccord union peut être utilisé sur la connexion au-dessus de la vanne de coupure pour pouvoir ultérieurement intervenir sur l'unité en la déconnectant. Vérifiez le type de gaz d'arrivée et sa pression avant de raccorder le chauffe-eau. Si l'appareil a besoin d'un gaz qui n'est pas celui disponible localement, NE branchez PAS le chauffe-eau. Contactez votre revendeur pour obtenir le bon modèle correspondant à votre type de gaz. Vérifiez la pression du gaz d'alimentation immédiatement en amont à l'arrivée de la régie fournissant le gaz. La pression d'arrivée du gaz doit être dans la fourchette de limites montrée dans la section de spécifications. Avant de mettre l'appareil en service, tous les joints, y compris sur le chauffe-eau, doivent avoir leur étanchéité vérifiée, au moyen d'une solution de détection de fuites à l'eau savonneuse, ou une solution ininflammable équivalente éventuellement (comme certaines solutions pour détection de fuites de gaz, incluant l'eau savonneuse, peuvent causer corrosion ou fissuration par contrainte, la tuyauterie doit être rincée avec de l'eau après le test, sauf si vous avez pu déterminer que la solution de détection utilisée n'était pas corrosive). Utilisez toujours des connecteurs approuvés pour raccorder l'unité sur la conduite de gaz. Purgez toujours la conduite de gaz de tous débris éventuels avant son branchement sur le chauffe-eau; KB Series Manual 89 Tout composé utilisé sur la jonction filetée du tuyau de gaz doit être d'un type qui résiste à l'action du gaz propane ou naturel. La conduite d'alimentation en gaz doit être étanche au gaz, du bon calibre et installée d'une façon permettant de fournir assez de gaz pour satisfaire la demande maximale du chauffe-eau et de tous les autres appareils fonctionnant au gaz du lieu sans qu'il y ait de chute de pression. L’INFORMATION Reportez-vous à un tableau de calibrage approuvé de tuyauterie de gaz si vous avez un doute sur la taille de votre conduite. Taille du tuyau de gaz Cubic Feet per Hour = (CFH) Gas Input of all gas products (BTU / HR) Heating Value of Gas (BTU / FT 3 ) L'approvisionnement en gaz doit être capable de gérer la charge entière gaz à l'emplacement. Dimensionnement de ligne de gaz est basé sur le type de gaz, la pression de tomber dans le système, la pression du gaz fourni et type de ligne à gaz. Pour le dimensionnement de pipe gaz aux États-Unis, se référer au Code National de gaz combustible, NFPA 54. Pour le dimensionnement de tuyau de gaz au Canada, se référer au gaz naturel et Code d'Installation de Propane peut / CSA B149.1. Les informations ci-dessous est fournie à titre d'exemple. Le tableau approprié à partir du code applicable doit être utilisé. 1. Pour certains tableaux, vous devrez déterminer les pieds cubes à l'heure du gaz en divisant le gaz d'entrée par le pouvoir calorifique du gaz (disponible sur le site de la compagnie de gaz locaux). Le gaz d'entrée doit inclure tous les produits de gaz à l'emplacement et l'utilisation de BTU maximum à pleine charge lorsque tous les produits de gaz sont utilisés. 2. Utilisez la table pour votre type de gaz et le type de tuyaux pour trouver la taille du tuyau requise. Taille du tuyau doit être en mesure de fournir le nécessaire pieds cubes par heure de gaz ou le besoin de BTU/heure. Exemple: Le pouvoir calorifique du gaz naturel pour votre emplacement est 1 000 BTU/pi3. L'entrée de gaz de la RU98 est 199 000 BTU/HR. Appareils supplémentaires à l'emplacement exigent de 65 000 BTU/hr. Par conséquent, les pieds cubes par heure = (199 000 + 65 000) / 1000 = 264 pi3/H. Si la longueur de la conduite est de 10 pieds puis taille du tuyau de 3/4 de pouce est capable de fournir 264 pi3/H de gaz naturel. 90 Table - gaz naturel Tuyau métallique annexe 40 La pression Inlet : moins de 2 psi (55 pouces W.C.) Chute de pression : 0,3 pouces W.C. Densité : 0.60 pieds cubes par heure Longueur Taille de pipe (inches) 3/4 1 1 1/4 1 1/2 10 273 514 1060 1580 20 188 353 726 1090 30 151 284 583 873 40 129 243 499 747 50 114 215 442 662 60 104 195 400 600 70 95 179 368 552 80 89 167 343 514 90 83 157 322 482 100 79 148 304 455 Table - gaz propane Tuyau métallique annexe 40 Inlet pression : 11.0 pouces W.C. Chute de pression : 0.5 pouces W.C. Densité: 1.50 Capacité en milliers de BTU par heure Longueur Taille de pipe (inches) 1/2 3/4 1 1 1/4 10 291 608 1150 2350 20 200 418 787 1620 30 160 336 632 1300 40 137 287 541 1110 50 122 255 480 985 60 110 231 434 892 80 101 212 400 821 100 94 197 372 763 KB Series Manual Reliez l'électricité Ajustez à l'haute altitude Définissez les valeurs indiquées dans le tableau cidessous pour votre altitude commutateurs 2 et 3 (SW1, commutateurs fauve). Le paramètre par défaut pour l'appliance est 0-2000 ft (0-610 m) avec les commutateurs no 2 et 3 dans la position OFF. AVERTISSEMENT N'utilisent pas une rallonge ou un adaptateur brancher avec cet appareil. Le chauffage de l'eau doit être électriquement fondée conformément aux ordonnances et codes locaux ou, en l'absence de codes locaux, en conformité avec le Code électrique de la Nation, ANSI/NFPA no 70 ou le Code électrique canadien, CSA C22.1. Lorsque le commutateur DIP est ajusté, il n'est pas nécessaire de régler le paramètre de pression de gaz à haute altitude. Altitude SW1 No. 2 SW1 No. 3 0-2000 ft (0-610 m) d’arrêt d’arrêt 2001-5200 ft (610-1585 m) d’arrêt marche 5201-7700 ft (1585-2347 m) marche d’arrêt 7701-10200 ft (2347-3109 m) marche marche Modèles d'intérieur est équipé d'un bouchon de trois volets (échouement) pour votre protection contre les chocs et devrait être branché directement dans un récipient de trois volets bien rodé. Ne pas réduire ou supprimer l'échouement terminal de ce plug. Le chauffe-eau exige 120 Vca, 60 Hz puissance d'un circuit bien rodé. f à l'aide de la 6 pieds de long cordon d'alimentation, plug dans un standard 3 prong 120 Vca, 60 Hz correctement fondée sur une prise murale. Le diagramme de câblage est situé sur la fiche technique attaché à l'intérieur de la page couverture. Le chauffage de l'eau doit être électriquement fondée conformément aux codes locaux, ou en l'absence de codes locaux avec le Code National de l'électricité, ANSI/NFPA 70 ou le CSA C22.1, Code canadien de l'électricité. 120V CÂBLAGE BORNES DE RACCORDEMENT CHAUD: BLEU OU NOIR Ajuster pour longueur de ventilation (modèles d'intérieur seulement) Ajuster le commutateur no 1 du commutateur SW1 DIP (fauve) si nécessaire. Reportez-vous à la section « Longueur maximum de ventilation ». Liste de vérification pour gaz et électricité □ Une vanne manuelle de gaz est placée dans la ligne de gaz pour le chauffage de l'eau. □ Vérifiez les conduites de gaz et les connexions des fuites. □ Confirmer que la pression du gaz inlet est dans les limites. □ Confirmer que le chauffe-eau est coté pour le type de gaz fourni. □ Confirmer que l'électricité est fournie de 120 Vca, source d'énergie de 60 Hz et qu'il est dans un circuit bien rodé. □ Une rallonge ou un adaptateur Plug-and-n'a pas été utilisé avec le chauffe-eau. NEUTRE : BRUN OU BLANC VIS DE PRISE DE TERRE CÂBLE DE CONTRÔLEUR BRIDE COMMUTATEUR KB Series Manual 91 Installation de le contrôleur de température Montage du contrôleur 1. Faire trois trous dans le mur, comme le montre. AVERTISSEMENT Outline of Remote Désactiver le pouvoir. Ne pas tenter de connecter les contrôleurs de température avec le pouvoir. Bien que le contrôleur est un dispositif de basse tension, il y a 120 volts potentiels à côté les connexions de contrôleur de température à l'intérieur de l'unité. Ne se connectent pas le contrôleur de température aux bornes 120VAC fournis pour les électrovannes de drain facultatif. Modèles de l'intérieurs ont leur contrôleur intégré dans le panneau avant. Les contrôleurs supplémentaires peuvent être installés. securing screw VIS TROU DE CÂBLAGE 1-21/32" wiring hole 3-5/16" VIS securing screw 2. Exécutez le câble entre le contrôleur et le chauffeeau ou le contrôleur et un autre contrôleur 3. Enlever la plaque du contrôleur de température à l'aide d'un tournevis. 4. Branchez le câble pour le contrôleur de température. Endroit de contrôleurs Le contrôleur doit être hors de portée des enfants en bas âge 5. Monter le contrôleur à la paroi en utilisant les trous percés à l'étape 1. Évitez les endroits où le contrôleur peut devenir chaud (près du four ou de l'appareil de chauffage radiant). 6. Coupez l'alimentation de l'appareil de chauffage de l'eau. Évitez les endroits dans la lumière directe du soleil. L'affichage numérique peut être difficile à lire dans la lumière directe du soleil. Évitez les endroits où le contrôleur de température pourrait être éclaboussé avec des liquides La longueur de câble et tailles Le câble pour le contrôleur de température devrait être un câble de deux cœurs non polarisée avec une jauge minimum de 22 AWG. La longueur maximale de câble de chaque contrôleur pour le chauffage de l'eau dépend le nombre total de contrôleurs filaires connecté à l'appareil de chauffage de l'eau. Nombre de contrôleurs Longueur de câble maximale pour chaque contrôleur de chauffe-eau 1 328 ft (100 m) 2 164 ft (50 m) 3 or 4* 65 ft (20 m) * Seulement 3 contrôleurs supplémentaires peuvent être branchés à l'intérieur de chauffe-eau. 92 7. Retirer le couvercle en plastique du PCB et connexions électriques. 8. Le câble dans le trou de l'accès à la base de l'unité de thread et se connecter les fils pour les terminaux de contrôleur sur le bas côté de main droite de BPC 9. Sécuriser le câble de contrôleur à l'aide de la pince fournie. 10. Remplacer la couverture en plastique sur le PCB et remplacer la couverture du chauffe-eau. BORNES DE RACCORDEMENT CÂBLE DE CONTRÔLEUR BRIDE KB Series Manual Liste de vérification finale □ □ □ □ □ □ □ □ Le chauffage de l'eau n'est pas corrosifs composés dans l'air. L'approvisionnement en eau ne contient pas de produits chimiques ou dépasse la dureté totale qui nuira à l'échangeur de chaleur. Autorisations de l'unité de chauffage de l'eau sont remplies. Autorisations de la cessation de l'évent / apport d'air sont remplies. (Modèles d'intérieur) S'assurer que vous avez utilisé les produits de ventilation correctes pour le modèle installé et que vous avez complètement suivi les instructions d'installation du fabricant de ventilation et ces instructions d'installation. (Modèles d'intérieur) Vérifiez que le système d'évacuation ne dépasse pas la longueur maximale pour le nombre de coudes utilisé. (Modèles d'intérieur) Vérifier que le commutateur no 1 du commutateur DIP SW1 (fauve) a été ajusté pour cloaque si nécessaire. Reportez-vous à la section sur la longueur maximale de Vent. La ligne d'eau tous les débris et l'air de la purge en fermant la vanne d'isolement chaud et en ouverture de la vanne d'isolement froid et ses drain. Débris endommagera le chauffeeau. Utiliser un seau ou tuyau si nécessaire. □ S'assurer que les canalisations d'eau chaudes et froides ne sont pas traversées à l'unité et sont libre de fuite. □ Une vanne manuelle de gaz a été placée dans la ligne de gaz pour le chauffage de l'eau. □ Veiller à ce qu'une soupape est installée avec une cote qui dépasse l'entrée de BTU du modèle de chauffage de l'eau. Se référer à la plaque de cotation sur le côté de la chauffe eau pour l'entrée de BTU. □ Nettoyez le filtre à eau inlet en fermant les soupapes d'isolement (fermeture) entrée froide et d'eau chaude. Mettre un seau sous le filtre au bas du chauffe-eau à attraper toute l'eau qui est contenue à l'intérieur de l'unité. Dévissez le filtre à eau. Rincer le filtre à supprimer tous les débris. Installez le filtre et ouvrir les vannes d'isolement. □ Vérifiez les conduites de gaz et les connexions des fuites. □ Confirmer que la pression du gaz inlet est dans les limites. □ Confirmer que le chauffe-eau est coté pour le type de gaz fourni. □ Confirmer que l'électricité est fournie d'un acc 120, source d'énergie de 60 Hz, est dans un circuit bien rodé et allumé. □ Vérifier que le contrôleur de température fonctionne correctement. □ Vérifiez que les commutateurs no 2 et 3 du commutateur DIP SW1 (fauve) est défini correctement pour votre altitude. □ Vérifier que le système fonctionne correctement en vous connectant à votre manomètre vers le port de test de pression gaz sur le chauffe-eau. Exploiter tous les appareils à gaz dans la maison ou l'installation à feu élevé. La pression du gaz inlet à l'appareil de chauffage de l'eau ne doit pas descendre au-dessous de celle figurant sur la plaque de cotation. □ Si le chauffage de l'eau n'est pas nécessaire pour une utilisation immédiate, puis drainez l'eau provenant de l'échangeur de chaleur. □ Installez le panneau avant. □ Expliquer au client l'importance de blocage ne pas l'apport de cessation d'emploi ou de l'air de ventilation. □ Expliquer au client le fonctionnement du chauffeeau, les directives de sécurité, maintenance et garantie. □ L'installation doit être en conformité avec les normes locales, et en leur absence avec la norme américaine sur le gaz combustible, ANSI Z223.1/ NFPA 54, ou la norme canadienne sur les installations au gaz naturel et propane, CSA B149.1. Cet appareil doit être installé selon la Manufactured Home Construction and Safety Standard, Title 24 CFR, Part 3280 ou la norme CAN/CSA-Z240 MM M86, Maisons mobiles. □ Informer le consommateur si les vannes d'isolement ne sont pas installés ou si un système d'adoucissement de l'eau n'est pas installés. □ Quitter l'ensemble du Manuel de ruban pour le chauffe-eau ou donner le Manuel directement au consommateur. KB Series Manual 93 Diagramme en escalier NEUTRE PHASE POMPE RELAIS 3 FUSIBLE 10 A ANTI-FOUDRE CONTACT DE DÉTECTION DE GEL RELAIS 2 ANTI-FOUDRE RELAIS 1 ALLUMAGE TERRE ALIMENTATION D'ÉNERGIE DE COMMUTATION 170 V CC 12,6 V 40 V CC 5 V CC 0-50 V CC DÉTECTEUR D'ÉCOULEMENT CIRCUIT DÉTECTEUR D'ÉCOULEMENT DISPOSITIF DE CONTRÔLE D'ÉCOULEMENT CIRCUIT D'ALIMENTATION D'ÉLECTROVANNE À MODULATION CIRCUIT DISPOSITIF DE CONTRÔLE D'ÉCOULEMENT VEBTILATEUR DE COMBUSTION UNITÉ CENTRALE DE TRAITE -MENT DISPOSITIF DE CONTRÔLE DÉCOULEMENT DE DÉRIVATION CIRCUIT DE CONTRÔLE D'ÉCOULEMENT DE DÉRIVATION ÉLECTROVANNE À MODULATION CIRCUIT DE COMMANDE DE VENTILATEUR VENTILATEUR RELAIS 3 RELAIS 2 FUS THER. RELAIS 1 OHS 2 INTERRUPTEUR DE SURCHAUFFE CIRCUIT DE COMMANDE DE RELAIS CIRCUIT DE COMMANDE D'ÉLECTROVANNE CIRCUIT DE DÉTECTION DE FLAMME ÉLECTRODE DE FLAMME CIRCUIT D'UNITÉ D'OPÉRATION OHS 1 THERMISTANCE DE SORTIE D'EAU 1 CIRCUIT DE CONTRÔLEUR À DISTANCE THERMISTANCE DE SORTIE D'EAU 2 THERMISTANCE D'ÉCHAGEUR THERMIQUE THERMISTANCE D'ADMISSION THERMISTANCE DE PROTECTION DE GEL 1 CONTRÔLEUR À DISTANCE UNITÉ D'OPÉRATION MODÈLE D'INTÉRIEUR UNIQUEMENT CIRCUIT DE THERMISTANCE NIVEAU D'EAU DÉTECTANT LE CIRCUIT NIVEAU D'EAU DÉTECTANT LE CIRCUIT THERMISTANCE DE PROTECTION DE GEL 2 MODÈLE D'INTÉRIEUR UNIQUEMENT MODÈLE D'INTÉRIEUR UNIQUEMENT 94 KB Series Manual Chauffe-eau d’intérieur sans réservoir à ventilation directe Instructions d'utilisation POUR LES APPLICATIONS INTÉRIEURES SEULEMENT RU80i ........... REU-KB2530FFUD-US RU98i ........... REU-KB3237FFUD-US POUR LES APPLICATIONS EXTÉRIEUR SEULEMENT RU80e .......... REU-KB2530WD-US RU98e .......... REU-KB3237WD-US Faits importants sur votre chauffe-eau Je vous remercie pour l'achat d'un chauffe-eau sans réservoir Rinnai. Pour le bon fonctionnement et la sécurité, il est important de suivre les instructions et de respecter les mesures de sécurité. Toutes les instructions et la garantie lire attentivement avant d'exploitation cette chauffe-eau. Gardez ce manuel en lieu sûr. AVIS: Rinnai partage parfois des informations de contact client avec des entreprises que nous croyons offrent des produits ou des services qui peuvent vous être utiles. En fournissant ces renseignements, vous acceptez que nous pouvons partager vos coordonnées à cette fin. Si vous préférez ne pas avoir vos informations partagées avec ces entreprises, veuillez contacter le service clientèle et demandez ne pas d'avoir votre information partagée. Nous allons cependant continuer à vous contacter avec les informations pertinentes pour le produit vous inscrit ou vous rendre compte avec nous. AVERTISSEMENT Assurez-vous de bien suivre les instructions données dans cette notice pour réduire au minimum le risque d'incendie ou d'explosion ou pour éviter tout dommage matériel, toute blessure ou la mort. — Ne pas entreposer ni utiliser d'essence ou ni d'autres vapeurs ou liquides inflammables à proximité de cet appareil ou de tout autre appareil. QUE FAIRE SI VOUS SENTEZ UNE ODEUR DE GAZ Laissez les lieux. Ne pas tenter d'allumer d'appareil. Ne touchez à aucun interrupteur ; ne pas vous servir des téléphones se trouvant dans le bâtiment. Appelez immédiatement votre fournisseur de gaz depuis un voisin. Suivez les instructions du fournisseur. Si vous ne pouvez rejoindre le fournisseur, appelez le service des incendies. — L'installation et l'entretien doivent être assurés par un installateur ou un service d'entretien qualifié ou par le fournisseur de gaz. KB Series Manual 95 Directives d'opérations du consommateur pour le fonctionnement sécuritaire de votre chauffe-eau À LIRE AVANT LA MISE EN SERVICE POUR VOTRE SÉCURITÉ AVERTISSEMENT A. B. Si vous ne suivez pas exactement ces instructions, il peut en résulter un départ d'incendie ou une explosion, causant dégâts matériels, blessures corporelles ou même mort. Si vous ne pouvez rejoindre le fournisseur, appelez le Cet appareil ne comporte pas de veilleuse. Il est muni d’un dispositif d’allumage qui allume automatiquement le brûleur. Ne tentez pas d’allumer la veilleuse manuellement. AVANT DE FAIRE FONCTIONNER, reniflez tout autour de l’appareil pour déceler une odeur de gaz. Reniflez près du plancher, car certains gaz sont plus lourds que l’air et peuvent s’accumuler au niveau du sol. service des incendies. C. Ne poussez ou tournez la manette d’admission du gaz qu’à la main ; ne jamais utiliser d’outil. Si la manette reste coincée, ne pas tenter de la réparer ; appelez un technicien qualifié. Le fait de forcer la manette ou de la réparer peut déclencher une explosion ou un incendie. D. N’utilisez pas cet appareil s’il a été plongé dans l’eau, même partiellement. Faites inspecter l’appareil par un technicien qualifié et remplacez toute partie du système de contrôle et toute commande qui ont été plongés dans l’eau. QUE FAIRE SI VOUS SENTEZ UNE ODEUR DE GAZ : Ne pas tenter d’allumer d’appareil. Ne touchez à aucun interrupteur ; ne pas vous servir des téléphones se trouvant dans le bâtiment. Appelez immédiatement votre fournisseur de gaz depuis un voisin. Suivez les instructions du fournisseur. INSTRUCTIONS DE MISE EN MARCHE 1. ARRÊTEZ ! Lisez les instructions de sécurité sur la portion supérieure (à gauche) de cette étiquette. 2. Réglez le thermostat sur la consigne la plus basse. 3. Coupez l'alimentation électrique de l'appareil en utilisant son bouton M/A. 4. L'appareil est équipé d'un dispositif d'allumage qui allume automatiquement le brûleur. Ne tentez pas d’allumer la veilleuse manuellement. 5. Repérez la vanne de gaz manuelle sur le côté du chauffe-eau. Fermez-la en la tournant à fond dans le sens horaire (position OFF). Manual Valve Vanne manuelle CLOSE OUVERTE OPEN FERMÉE 6. Attendre cinq (5) minutes pour laisser échapper tout le gaz. Reniflez tout autour de l’appareil, y compris près du plancher, pour déceler une odeur de gaz. Si vous sentez une odeur de gaz, ARRÊTEZ ! Passez à l’étape B des instructions de sécurité sur la portion supérieure (à gauche) de cette étiquette. S’il n’y a pas d’odeur de gaz, passez à l’étape suivante. 7. Ouvrez l'arrivée de gaz en tournant la vanne manuelle de gaz en sens antihoraire (position ON). 8. Rétablissez l'alimentation électrique de l'appareil avec son bouton M/A. 9. Passez le thermostat sur le réglage de consigne souhaité. 10. Ouvrez un robinet d'eau chaude du circuit. Si l'appareil ne démarre pas, suivez les instructions ci-dessous relatives à la coupure du gaz vers l'appareil et appelez un technicien de service ou votre fournisseur de gaz. Reportez-vous au manuel pour plus d'informations. COMMENT COUPER L’ADMISSION DE GAZ DE L’APPAREIL 1. Coupez l'alimentation électrique de l'appareil en utilisant son bouton M/A. 2. Réglez le thermostat sur la consigne la plus basse. 96 3. Repérez la vanne de gaz manuelle sur le côté du chauffe-eau. Fermez-la en la tournant à fond dans le sens horaire (position OFF). KB Series Manual Comment utiliser le contrôleur de température Dimensions (pouces): 3.5 W x 4.75 H x 0.75 D Le contrôleur de MC-91-2 est le contrôleur de température standard qui est fourni avec l'appareil de chauffage de l'eau. Sur les modèles de l'intérieurs, elle est intégrée dans le panneau avant. Le contrôleur de MCC-91-2 est pour des applications commerciales et hydroniques nécessitant des températures plus élevées. Lorsque le contrôleur de MCC-91-2 est connecté, ces températures plus élevées sont disponibles sur tous les modèles de contrôleur dans le système. Reportez-vous à la section sur les plages de température. Exploiter le chauffe-eau pas à plusieurs reprises et utilisez un robinet d'eau chaude tandis que le contrôleur est désactivé. Le chauffe-eau de cette façon de produire alternativement l'eau chaude de fonctionnement peut causer l'eau de condenser à l'extérieur des pièces internes et s'accumulent dans le chauffe-eau du cabinet. INDICATEUR In Use Indicator EN SERVICE INDICATEUR Priority PRIORITAIRE Indicator Temperature TEMPÉRATURE Display DE L'EAU BOUTON Priority Button PRIORITAIRE Temperature CHOIX DE LA Selection TEMPÉRATURE MC-91-2US ALLUMEZ-VOUS / ON/OFF ÉTEIGNEZ Button Mise du contrôleur en sourdine Le MC-91-2 pour éliminer les bips lorsque les touches ou de transformer les signaux sonores arrière sur, la presse et de tenir les deux la place et boutons jusqu'à ce qu'un bip est entendu (environ 5 secondes). Verrouillage du contrôleur Le contrôleur de MC-91-2 peut être verrouillé en pressant le bouton de la priorité et le bouton haut ensemble pendant 5 secondes. Un bip retentira confirmant que le contrôleur est verrouillé. L'affichage montrera alternativement « LOC », le réglage de la température et un code de diagnostic si on a été activé. Tous les contrôleurs du système sont également verrouillées. Pour déverrouiller le contrôleur appuyez le bouton de la priorité et le bouton haut ensemble pendant 5 secondes. Options de température sans contrôleur à distance Le réglage de température de consigne par défaut pour cet appareil sans un contrôleur à distance est de 120° F (49 °C). On peut, si on le souhaite, la passer sur 140° F (60 °C) en modifiant la position d'un seul microcommutateur DIP. À la commutateur DIP SW1 (commutateurs fauve) à positions multiples, le micro-commutateur 5 donne un réglage à 120°F (49 °C) s'il est sur OFF (valeur automatique) mais à 140°F (60 °C) s'il est sur ON. Si un contrôleur de température est installé, alors le contact 5 n'a aucun effet sur des arrangements de température. KB Series Manual 97 Comment définir la température Cette chauffe eau nécessite un débit minimum à exploiter. Ce taux se trouvent sur la page de spécification dans ce manuel. Dans certains cas lorsque vous n'obtenez pas l'eau chaude ou si l'eau alterne entre le chaud et le froid, c'est en raison du débit de l'eau étant ci-dessous ou à proximité du débit minimum. Accroître le débit devrait résoudre ces problèmes dans ces cas. Cette chauffe eau nécessite un débit minimum à exploiter. Ce taux se trouvent sur la page de spécification dans ce manuel. Dans certains cas lorsque vous n'obtenez pas l'eau chaude ou si l'eau alterne entre le chaud et le froid, c'est en raison du débit de l'eau étant ci-dessous ou à proximité du débit minimum. Accroître le débit devrait résoudre ces problèmes dans ces cas. L'eau chaude peut être dangereuse, en particulier pour les enfants, les personnes âgées et les infirmes. Il y a un risque d'échaudage si la consigne du thermostat est réglée trop haut. DANGER Des températures dépassant 125° F (52 °C) peuvent causer de sévères brûlures ou un échaudage, pouvant entraîner la mort. Chaud L'eau chaude peut causer des brûlures au premier degré suite à des expositions aussi limités que : 3 secondes à 140° F (60 °C) 20 secondes à 130° F (54 °C) Brûlure 8 minutes à 120° F (49 °C) Testez la température de l'eau avant de placer un enfant sous la douche ou dans le bain. Ne laissez pas un enfant ou une personne infirme dans une baignoire sans surveillance. 1. Si le chauffe-eau est désactivée, appuyez sur le bouton d'alimentation pour activer la. 2. Si la lumière de priorité est désactivée, appuyez sur le bouton de priorité du contrôleur à distance. Le voyant orange de priorité va s'allumer pour montrer que c'est ce contrôleur qui règle la température de consigne et que le chauffe-eau est prêt à fournir de l'eau chaude. La préséance d'un contrôleur sur les autres ne peut se modifier que s'il n'y a pas d'eau chaude qui coule. 3. Appuyer sur les boutons pour obtenir la valeur de température de consigne voulue. L’eau chaude est fournie à tous les points de distribution à cette température sauf un changement désiré au point d’origine ou à n’importe quelle commande. 98 AVIS La température peut être ajustée entre 98° F (37 °C) et 110° F (43 °C) même en cas de tirage d’eau. AVIS Vérifiez vos normes locales concernant la température maximale de l'eau permise pour une utilisation dans maisons de soins, écoles, garderies, et pour toutes les autres applications publiques. AVIS Si une unité nouvellement installée avec un contrôleur à distance n'a pas été activée pendant au moins 6 heures, alors sa température de consigne reviendra à la valeur par défaut de 104° F (40 °C) s'il y a une interruption du secteur. AVIS Il peut y avoir une différence entre la température de consigne affichée sur le contrôleur à distance et la température réelle au robinet, du fait des conditions d'environnement, ou de la longueur de tuyauterie depuis le chauffe-eau. KB Series Manual Plages de température avec un contrôleur de température Le chauffe-eau peut fournir l'eau à un seul réglage de la température à la fois. Les températures disponibles sont fournis ci-dessous. Une température inférieure à 98° F (37 ° C) peut être obtenue dans l'eau du robinet en mélange à l'eau froide. Pour modifier l'échelle de température de Celsius à Fahrenheit ou vice versa, appuyez et tenir le bouton « On/Off » pendant 5 secondes, tandis que le chauffe-eau est désactivée. Plages de température disponible Fahrenheit °F 98 100 102 104 106 108 110 115 120 125 130 135 140 150 160 185 * * * * ** ** ** Celsius °C 37 38 52 40 41 42 43 46 49 54 57 60 66 71 85 Ajuster pas les autres commutateurs sauf si expressément demandé de le faire. AVERTISSEMENT 39 Les réglages de température de 125-140 °F (52-60 ° C) sont disponibles par paramètre commutateur 6 on dans la Banque SW1 de fauve commutateurs. Ces modèles ont une température maximale par défaut de 120° F (49° C) et une option (commutateur 6) pour augmenter la température maximale de 140 °F (60 ° C). ** Ces paramètres requièrent le contrôleur de MCC-91-2. Lorsque le contrôleur de MCC-91-2 est connecté, ces températures plus élevées sont disponibles sur tous les modèles de contrôleur dans le système. Utilisation d'un contrôleur de MCC-91-2 dans un logement résidentiel réduira la couverture de la garantie à celle d'une demande de garantie commerciale. Ces températures sont des suggestions seulement : Cuisine 120 °F (49° C) Douche 98 - 110 °F (37 - 43 °C) Suffisance de Bath 102 - 110 °F (39 - 43 °C) Arrangements de température alternatifs Une autre plage de réglages de température est disponible par les commutateurs de paramètre 2 et 3 de l'interrupteur dip SW2 (blanc) à ON. Le tableau ci-dessous indique les paramètres disponibles avec le MC-91-2 et le contrôleur MCC-91-2. AVERTISSEMENT Contrôleurs de MC-91-1, MCC-91-1, MC-100V-1 et BC-100V-1 ne sont pas compatibles avec les réglages de température remplaçant. Les paramètres de température remplaçant sont pour des applications commerciales seulement. N'utilisez pas les contrôleurs de MC-91-1, MCC-91-1, MC-100V-1 ou BC-100V-1 lorsque les commutateurs dip 2 et 3 (blanc) sont en position. Alternatifs - Plages de température disponible Fahrenheit °F Celsius °C 110 115 120 125 130 135 140 145 150 155 160 165 170 175 180 185 43 46 49 52 54 57 60 63 66 68 71 74 77 79 82 85 MC-91-2 MCC-91-2 KB Series Manual 99 Entretien requis L'appareil doit être inspecté chaque année par un technicien qualifié. Réparations et entretien doivent être effectuées par un technicien qualifié. Le technicien de service doit vérifier le bon fonctionnement après entretien. AVERTISSEMENT Pour vous protéger contre les préjudices, avant d'effectuer la maintenance : Coupez l'alimentation électrique en débranchant le cordon d'alimentation ou en désactivant l'électricité au disjoncteur. (Le contrôleur de température ne contrôle pas la puissance électrique). Coupez le gaz à la soupape de gaz manuelle, généralement situé immédiatement sous le chauffe-eau. Coupez l'alimentation en eau entrante. Cela peut se faire à la vanne d'isolement immédiatement au-dessous du chauffe-eau. AVERTISSEMENT Garder la zone appliance claire et exempte de matières combustibles, l'essence et autres vapeurs inflammables et des liquides. AVERTISSEMENT Test de la soupape ne doit être effectuée par un technicien qualifié. L'eau chaude à ébouillanter peut-être être libéré sous pression. Les articles suivants de la maintenance sont nécessaires au bon fonctionnement de votre chauffe-eau. Nettoyage Moteurs Il est impératif de contrôler compartiments, brûleurs et passages pour la circulation de l'air sur l'appareil à nettoyer. Les moteurs sont lubrifiés à vie et ne demandent pas de lubrification périodique. Cependant, vous devez garder fan et moteur libre de la poussière et la saleté par le nettoyage de chaque année. Procédez au nettoyage comme ceci : 1. Coupez et débranchez l'alimentation électrique. Laissez refroidir le chauffe-eau. 2. Fermez l'eau fermer les robinets. Démontez et nettoyez le filtre d'arrivée d'eau. 3. Démontez le panneau frontal en enlevant ses 4 vis. 4. Utilisez de l'air comprimé pour dépoussiérer brûleur principal, échangeur thermique et pales de ventilateur. N'utilisez pas de chiffon mouillé ou de nettoyants à pulvériser sur le brûleur. N'utilisez pas de substances volatiles comme benzène ou diluants. Ils pourraient s'enflammer ou décolorer la peinture. 5. Utilisez un chiffon doux sec pour essuyer le boîtier. Système de ventilation Les conduites de prise d'air et d'évacuation doivent être inspectées au moins tous les ans pour y détecter des blocages ou dommages éventuels. Contactez un professionnel autorisé. 100 Contrôleur à distance Utilisez un chiffon humide pour nettoyer les contrôleurs à distance. N'employez pas de solvants. Accumulation de calcaire et de tartre Si vous recevez le code d'erreur « LC#», (LC1, LC2,…), reportez-vous à la procédure de rinçage de l'échangeur thermique. Voyez aussi la section sur la qualité de l'eau pour savoir si votre eau a besoin d'un traitement ou conditionnement en amont. (Lors de la vérification de l'historique des anomalies pour l'entretien, le code « 00 » aura remplacé « LC# ».) Accumulation de neige Maintenez la zone autour de la terminaison de cheminée libre de toute neige et glace. Cet appareil ne peut pas bien fonctionner si ses bouches d'aspiration et d'évacuation d'air sont entravées (blocage total ou même partiel) par des obstacles quelconques. KB Series Manual Nettoyez le filtre à eau Protection de gel Nettoyez le filtre à eau inlet en fermant les soupapes d'isolement (fermeture) entrée froide et d'eau chaude. Mettre un seau sous le filtre au bas du chauffe-eau à attraper toute l'eau qui est contenue à l'intérieur de l'unité. Dévissez le filtre à eau. Rincer le filtre à supprimer tous les débris. Installez le filtre et ouvrir les vannes d'isolement. Assurez-vous que dans le cas de congélation météo que le chauffe-eau et ses lignes de l'eau sont adéquatement protégés pour éviter le gel. Dommages causés à la congélation n'est pas couvert par la garantie. Reportez-vous à la section sur la Protection de geler. Valve de décompression Exploiter la valve manuellement une fois par an. Ce faisant, il sera nécessaire de prendre des précautions avec ce qui a trait à l'exécution de potentiellement ébouillanter eau chaude sous pression. Assurer la décharge a une place à l'écoulement. Contact avec votre corps ou autres biens peuvent causer des dommages ou un préjudice. Inspection visuelle de flamme Le brûleur doit être allumé de façon régulière sur toute sa surface quand il fonctionne correctement. La flamme doit être claire, bleutée et stable. Reportezvous à la décomposition par pièces du brûleur pour l'emplacement des hublots d'inspection. La configuration de flamme est illustrée ci-dessous : CORRECT Déstéarinisation Ces recommandations visent à suggérer des pratiques qui sont efficaces pour l'apposition du chauffe-eau. Ils devraient être utilisés comme un guide uniquement. Aucune responsabilité ne suppose pour toute questions découlant de l'utilisation de cette information. GAZ Couper le gaz pour le chauffage de l'eau. Il est généralement préférable de couper le service de gaz à l'emplacement de toute si gaz ne va donc pas être utilisé. L'EAU Couper l'approvisionnement en eau froide pour le chauffage de l'eau. Il est généralement préférable de couper l'eau à l'emplacement de tout, si l'eau ne va donc pas être utilisé. Vidanger le chauffe-eau en ouvrant les soupapes de vidange sur la ligne d'eau froide et la ligne d'eau chaude. VUE DE FACE FLAMME BLEUE ÉLECTRODE DE DÉTECTION Open d'eau chaude plusieurs robinets et supprimer l'assembly de filtre à l'entrée de l'eau afin de permettre la salle pour l'expansion dans le cas où il y a l'eau dans les lignes qui gèlent. ÉLECTRIQUE Déconnectez l'alimentation en soit en débranchant le cordon électrique ou en désactivant le disjoncteur du chauffe-eau à prévenir les dommages potentiels de surtensions irréguliers ou d'interruptions. INCORRECT VUE DE FACE ARRÊT DE PASSAGE FLAMME JAUNE ÉLECTRODE DE DÉTECTION Placez une couverture sur la cessation du vent (admission et échappement) si on peut y accéder en toute sécurité. La couverture devrait être facile à appliquer et à enlever. Cela empêchera les débris, les feuilles et les petits animaux de pénétrer dans le réchauffeur d'évacuation et de l'eau qui pourrait causer des problèmes de flux d'air à retour au service. KB Series Manual 101 Flushing l'échangeur de chaleur Un « LC » ou « 00 » code de diagnostic indique l'unité commence à chaux et doit être vidangée. Échec de vider l'appliance va causer des dommages à l'échangeur de chaleur. Dommages causés par l'accumulation de chaux ne sont pas couvert par la garantie de l'unité. Rinnai recommande fortement l'installation de vannes d'isolement pour permettre de chasse de l'échangeur de chaleur. KEY 1. Déconnectez l'électricité pour le chauffage de l'eau. 2. Fermer les robinets d'arrêt sur l'eau chaude et les conduites d'eau froides (V3 et V4). 3. Se connecter le tuyau de sortie pompe (H1) à la ligne d'eau froide au robinet de service (V2). 3/4" Union POMPE DE CIRCULATION Circulating Pump Check Valve CLAPET DE NON-RETOUR SOUPAPE VIDANGE DE Boiler DE Drain Valve CHAUDIÈRE Pressure Relief Valve SOUPAPE PRESSION 4. Se connecter drain tuyau (H3) à valve de service (V1). 5. Verser 4 litres de qualité non dilué d'alimentaire vierge, vinaigre blanc dans le seau. 6. Placez le tuyau de drain (H3) et le tuyau (H2) à l'entrée de la pompe dans la solution de nettoyage. 7. Ouvrez les deux valves de service (V1 et V2) sur l'eau chaude et de conduites d'eau froides. 8. Faire fonctionner la pompe et permettre à le vinaigre de nettoyage à circuler à travers le chauffage de l'eau pendant au moins 1 heure à un taux de 4 litres par minute (15,1 litres par minute). 9. Désactiver la pompe. 10. Rincer le vinaigre de nettoyage de l'appareil de chauffage de l'eau comme suit : a. Retirer le seau de l'extrémité libre du drain flexible (H3). b. Fermez la soupape de service, (V2) et de la vanne de fermeture ouvert, (V4). N'ouvrez pas la vanne de fermeture, (V3). c. Permettre à l'eau s'écouler le chauffe-eau pendant 5 minutes. d. Fermer la vanne de fermeture (V4). Lorsque l'unité a terminé drainant enlever le filtre en ligne à l'entrée de l'eau froide et V1 nettoyer tout résidu. Filtre de place en unité et ouvrir la valve (V4). e. Fermer la vanne de service, (V1) et le clapet d'arrêt ouvert, (V3). 11. Déconnectez tous les tuyaux. 12. Restaurer la puissance électrique de l'appareil de chauffage de l'eau. Après l'appel de procédure encastre assistance technique (1-800-621-9419) pour les PCB réinitialise information. 102 RÉGULATEUR DE PRESS Pressure Regulator SOUPAPE 3/4" Ball Valve H3 Solenoid Valve VANNE ÉLECTROMAGNÉTIQUE Rinnai Water Heater In - line Filter V2 V4 V3 Ho t Water Lin e C old Wate r Line H2 H1 POMPE DE CIRCULATION Circulating Pump KB Series Manual S Gas Sup p ly Drainage Manuel du chauffe-eau AVERTISSEMENT Pour éviter de burns, attendre jusqu'à ce que l'équipement se refroidit avant le drainage de l'eau. L'eau de l'appliance restera chaud après qu'il est éteint. Si le chauffe-eau ne va être utilisée pendant une période de temps au gel possible, il est recommandé que l'eau à l'intérieur du chauffe-eau être drainé. Manuellement drainer l'eau : 1. Couper l'approvisionnement en eau froide et d'approvisionnement en gaz. 2. Désactiver le contrôleur de température. 3. Coupez l'alimentation de l'appareil de chauffage de l'eau. 4. Placez un conteneur pour attraper l'eau. Supprimer les capuchons de drain sur les deux vannes d'isolement et ouvrez les deux valves au-dessus des caps (poignées de valve bleu et rouge). -OR-ouvert de l'eau chaude drain plug à la sortie de l'eau chaude. 5. Supprimer le filtre à eau pour drainer l'eau froide. Pour reprendre un fonctionnement normal : 1. Confirmer que toutes les bouchons de drain de l'eau sont Eau chaude supprimés, que l'approvisionnement en gaz est désactivé, et que tous les robinets sont fermées. 2. Vis dans le filtre à eau dans l'entrée de l'eau froide. 3. Remplacez les capuchons de drain et fermer les deux vannes d'isolement. -OR-vis dans le bouchon de vidange de l'eau chaude. 4. Ouvrez l'approvisionnement en eau froide. 5. Ouvrir un robinet et de confirmer que l'eau s'écoule et puis fermez. 6. Allumez le pouvoir. 7. Après avoir confirmé que le contrôleur de température est, tourner sur l'approvisionnement en gaz. 8. Tourner sur le contrôleur de température. Eau froide Gaz Bonde d’eau Bonde de piège Canalisation condensat condensate Traversant un faible volume d'eau le chauffe-eau pour éviter le gel Si la température dépasse la capacité du chauffe-eau à geler se protéger, ou si la puissance est perdue, les étapes suivantes peuvent empêcher le chauffe-eau et tuyauteries externes de congélation. (Unités connectées avec EZ Connect (lien unité 2) devraient être drainées pour prévenir le gel si ne s'en servent.) 1. Désactiver le chauffe-eau. 2. Fermez le robinet d'approvisionnement en gaz. 3. Tourner un robinet d'eau chaude à l'eau de flux sur 0,1 gal/min ou lorsque le flux est environ 0,2 pouces d'épaisseur. ON! COLD HOT 0,1 gal/min ou environ 0,2 cm d'épaisseur Quand le chauffe-eau ou des tuyauteries externes a gelé 1. 2. 3. 4. Ne fonctionnent pas le chauffe-eau si elle ou la tuyauterie externe est gelée. Fermer les robinets de gaz et d'eau et coupez le courant. Attendez que l'eau dégèle. Vérifier en ouvrant le robinet d'eau. Vérifiez le chauffe-eau et la tuyauterie des fuites. KB Series Manual 103 PROLONGER LE TRAVAIL DE COUVERTURE EN VERTU DE VOTRE GARANTIE LIMITÉE* Ultra Series RU80, RU98 ENREGISTREMENT REQUIS* Rinnai offre la possibilité de prolonger votre garantie limitée Standard de Rinnai sur le travail uniquement sur les modèles de la série de Ultra RU80 et RU98 si vous enregistrer dans les 30 jours de l'achat de votre unité. Produits non homologués seront toujours couverts par le Rinnai produit standard garantie limitée, comme le prévoit le manuel d'instructions de fonctionnement qui est livré avec ce produit. De garantie est également disponible sur le site web de Rinnai à www.rinnai.us. APPLICATIONS RÉSIDENTIELLES: La période de garantie limitée sur la couverture du travail pour les modèles RU80 et RU98 chauffe-eau installé dans une application résidentielle est prolongée de 48 mois (un total de 60 mois de travail couverture à compter de la date d'achat), lorsqu'il est utilisé dans une application résidentielle de l'eau chaude, si le produit est enregistré dans les 30 jours de l'achat à www.rinnai.us/product-registration ou en téléphonant au 1-866-RINNAI-1 (746-6241), sauf l'enregistrement n'est pas nécessaire en Californie et au Québec. CONDITIONS SUPPLÉMENTAIRES DE L'EXTENSION DE LA COUVERTURE DU TRAVAIL EN VERTU DE LA GARANTIE LIMITÉ: 1. La couverture du travail ne s'étend pas si RU80 et RU98 les chauffe-eau sans réservoi est utilisé pour la structure de chauffage ou dans une application en boucle fermée. 2. Si le produit est installé sur un système de circulation, le système de circulation doit être contrôlé par un système à la demande, ou de la garantie limitée ne sera pas prolongée. APPLICATIONS COMMERCIALES: La période de garantie limitée sur la couverture du travail pour les modèles RU80 et RU98 chauffe-eau installé dans une application commerciale est prolongée de 12 mois (24 mois au total labor couverture à compter de la date d'achat), lorsqu'il est utilisé dans une application commerciale de l'eau chaude, si le produit est enregistré dans les 30 jours de l'achat à www.rinnai.us/product-registration ou en téléphonant au 1-866-RINNAI-1 (746-6241), sauf l'enregistrement n'est pas nécessaire en Californie et au Québec. CONDITIONS SUPPLÉMENTAIRES DE L'EXTENSION DE LA COUVERTURE DU TRAVAIL EN VERTU DE LA GARANTIE LIMITÉ: * 1. La couverture du travail ne s'étend pas si RU80 et RU98 les chauffe-eau sans réservoi est utilisé pour la structure de chauffage ou dans une application en boucle fermée. 2. Si le produit est installé sur un système de circulation, le système de circulation doit être contrôlé par un système à la demande, ou de la garantie limitée ne sera pas prolongée. Applicable uniquement si le produit est enregistré dans les 30 jours de l'achat et les autres conditions sont remplies. Note de la Californie et les résidents du Québec et les résidents d'autres pays qui interdisent les prestations de garantie conditionnées à une inscription, inscription n'est pas nécessaire d'obtenir de plus longues périodes de garantie et l'omission d'enregistrer ne diminue en rien vos droits de garantie. www.Rinnai.US/Warranty 104 KB Series Manual Garantie limitée pour Luxury Series RU80, RU98 Qu'est-ce qui est couvert ? La garantie limitée Standard Rinnai couvre tout défaut de matériaux ou de fabrication lorsque le produit est installé et exploité selon Rinnai écrit des instructions d'installation, soumise aux termes de ce document de garantie limitée. Cette garantie limitée s'applique uniquement aux produits qui sont installés correctement. Installation incorrecte peut annuler la présente garantie limitée. Rinnai suggère fortement que vous utilisez un professionnel agréé qui a assisté à une classe de formation Rinnai installation avant d'installer ce chauffe-eau. Cette garantie limitée énoncée dans le tableau ci-dessous s'étend à l'acheteur original et les propriétaires subséquents, mais seulement alors que le produit reste sur le site de l'installation d'origine. Cette garantie limitée seulement s'étend à l'installation tout d'abord et originale du produit et prend fin si le produit est déplacé ou réinstallé dans un nouveau lieu. Combien de temps dure la couverture ? Période de couverture (à partir de la date d'achat) Élément Applications domestiques Si utilisé pour le chauffage de l'eau résidentiel et de fins de chauffage Applications commerciales Échangeur thermique 12 ans [1] [2] [3] 10 ans [1] [3] 5 ans [1] [2] Autre pièces et composants 5 ans [1] 5 ans [1] 5 ans [1] Main d'œuvre dans la limite du raisonnable 1 an [4] 1 an [4] 1 an [4] [1] Période de couverture est réduite à 3 ans à compter de la date de l'achat, lorsqu'il est utilisé comme un chauffe eau recirculant dans une boucle de recirculation de l'eau chaude, où le chauffe-eau est en série avec un système de recirculation et tous de recirculation de l'eau s'écoule dans le chauffe-eau et où un aquastat et thermostat, minuterie ou un système de recirculation à la demande n'est pas incorporé. [2] La garantie limitée Rinnai pour un échangeur de chaleur utilisé dans un système de recirculation, qui est contrôlé par un aquastat et thermostat, minuterie ou un système à la demande est de 12 ans pour les applications résidentielles et 5 ans pour les applications commerciales. [3] Période de couverture est réduite à 5 ans à compter de la date d'achat, si le paramètre de température chauffe eau Rinnai dépasse 160° F (71° C). [4] Couverture du travail est étendue à 5 ans dans les applications résidentielles et de 2 ans dans des applications commerciales si le produit est enregistré dans les 30 jours (sauf si l'inscription n'est pas requise en Californie et au Québec) ou si les conditions ci-dessus dans les sections Applications résidentielles et des Applications commerciales sont remplies. AVIS: Le contrôleur intégré sur les modèles de l'intérieurs a une garantie de 1 an sur les pièces. Que fait Rinnai pour exercer la garantie ? Rinnai sera réparer ou remplacer le produit couvert ou toute partie ou le composant défectueux de matériaux ou de fabrication comme énoncés dans le tableau ci-dessus. Rinnai devra payer les frais raisonnables de travail associées à la réparation ou le remplacement d'une telle partie ou composante pendant la durée de la période de garantie du travail. Toutes les pièces de réparation doivent être authentiques Rinnai parties. Toutes les réparations ou remplacements doivent être effectués par un professionnel autorisé qui est correctement formé, État qualifié ou agréé pour faire le type de réparation. Remplacement du produit peut être autorisée par Rinnai uniquement à sa seule discrétion. Rinnai n'autorise pas une personne ou une société d'assumer pour elle, toute obligation ou responsabilité en relation avec le remplacement du produit. Rinnai détermine la réparation d'un produit n'est pas possible, Rinnai peut remplacer le produit par un produit comparable à la seule discrétion de Rinnai. Si un composant ou un produit retourné à Rinnai est trouvé pour être exempts de défauts de matériau ou de fabrication, ou endommagé par une mauvaise installation ou endommagés pendant le transport retour, peut se voir refuser la demande de garantie pour les produits, pièces et main-d'œuvre. KB Series Manual 105 Comment obtenir le service au titre de la garantie ? Vous devez communiquer avec un fournisseur de service autorisé ou professionnels qualifiés et agréés État pour la réparation d'un produit en vertu de cette garantie. Pour trouver les coordonnées d'un tel fournisseur local, veuillez contacter votre point d'achat, ou allez sur le site Web de Rinnai (www.rinnai.us). Vous pouvez aussi téléphoner au 1-888835-9320 ou écrire à: 103 International Drive, Peachtree City, Georgia 30269, USA. Preuve d'achat est requis pour obtenir le service de garantie. Vous peut présenter une preuve d'achat avec un reçu daté de vente, ou en s'inscrivant dans les 30 jours de l'achat du produit. Pour inscrire votre chauffe-eau, veuillez visiter www.rinnai.us. Pour les personnes sans accès à internet, veuillez appeler le 1-866-RINNAI1 (746-6241). Réception de l'enregistrement par Rinnai constituera proof-of-purchase pour ce produit. Enregistrement de produit installé dans la nouvelle construction peut être vérifié avec une copie des documents fermeture fournie par l'acheteur initial de maison. Cependant, l'enregistrement n'est pas nécessaire afin de valider cette garantie limitée. Qu'est-ce qui n'est pas couvert ? Cette garantie ne couvre pas routes pannes ou difficultés de fonctionnement découlant de : accident, abus, mauvais usage qualité de l'eau altération du produit ou de toute partie de la composante entretien inadéquat (comme sans y être limité accumulation de tartre, dommages dus au gel, blocage de mauvaise application de ce produit ventilation) installation incorrecte classement par taille incorrect produit étant installé dans un environnement tout autre cause non due aux défauts dans les matériaux corrosive ou l'exécution dommages dus à la condensation problèmes ou dommages dus aux feux, à l'inondation, mauvaise ventilation aux montées subites électriques, à la congélation ou à type de gaz incorrect toutes forces majeure pression incorrecte de l'eau our de gaz force majeure absence de bac de drainage sous l'appareil Il n'y a aucune garantie sur les produits installés dans une boucle fermée aplication, communément associée aux seules les applications de chauffage. Utilisation d'un contrôleur de MCC-91-2 dans un logement résidentiel réduira la couverture de la garantie à celle d'une demande de garantie commerciale sauf quand un MCC-91-2 est utilisé avec un gestionnaire d'air à eau chaude pour des températures pas plus élevés que 160° F (71° C). Cette garantie ne s'applique pas pour tout produit sur lequel numéro de série ou date de fabrication auraient été effacés. Cette garantie ne couvre pas tout produit utilisé dans une application qui gère de l'eau traitée chimiquement, comme le chauffage de piscine ou de spa. Limitation sur les garanties Personne n'est autorisé à apporter toute autre garantie au nom de Rinnai pour ce produit. Sauf pour ce qui est expressément communiqué ici, il n'y a aucune autre garantie, explicite ou implicite, y compris sans y être limité les garanties de valeur marchande ou d'adéquation à une finalité particulière, qui s'étendrait au-delà de la description de garantie fournie ici. Toutes garanties implicites de valeur marchande et d'adéquation à une finalité spécifique autorisées par la législation locale seront de toutes façons limitées en durée à la période de couverture offerte par cette garantie limitée, sauf si la période légale locale d'application est plus courte. Certains états ne permettent pas de limitations sur le temps que durent les garanties implicites, de ce fait la limitation qui précède peut ne pas être applicable à votre cas. De plus Rinnai n'est pas responsable de tous dommages spéciaux, accessoires, indirects ou consécutifs qui peuvent survenir, y compris les dommages aux personnes et aux biens, la perte d'usage, les désagréments ou les conséquences de mauvaise qualité d'installation,entretien ou utilisation. Certains états ne permettent pas l'exclusion ou la limitation des dommages annexes ou consécutifs, de ce fait la limitation qui précède peut ne pas être applicable à votre cas. Cette garantie vous donne des droits légaux spécifiques, et vous pouvez également avoir d'autres droits qui peuvent varier d'un état à l'autre. www.rinnai.us/warranty 106 KB Series Manual U306-0661(07) 100000241(07)