
1
1238100000 Transclinic 4i+
1238110000 Transclinic 7i+
1238120000 Transclinic 8i+
1238130000 Transclinic 14i+
ES
Manual de instrucciones IT
Manuale d’istruzioni 15
FR
Manuel d’instructions 27
PT
Manual de instruções 39
EN
Instruction manual 51
DE
Bedienungsanleitung 63
3
2
ES
Manual de instrucciones 1. 2. 3. 4. 5. 6. 7. 8.
9.
10.
11.
12.
13.
14.
15.
Histórico de revisiones
Empleo reglamentario
Personal especializado
Corrección de la documentación técnica
Norma CE
Declaración de conformidad
Reciclaje según WEEE
Uso
Especificaciones
Diagrama de conexionado
Conexión
Configuración Instalación eléctrica
Comportamiento de temperatura Instrucciones de seguridad y advertencias
4
4
4
5
5
5
5
6
6
7
8
9
11
13
13
Edición de mayo de 2011
3
ES
1. Histórico de revisiones
Versión
Fecha
Modificación
02
05/11
2ª edición
2. Empleo reglamentario
AVISO
El aparato ha sido concebido exclusivamente para las aplicaciones
descritas en las instrucciones. Un empleo diferente al indicado no
está permitido y puede dar lugar a accidentes o a la destrucción del
aparato. Un empleo tal tiene como consecuencia la extinción inmediata de la garantía y la nulidad de todos los derechos del usuario
frente al fabricante. Durante el manejo y el montaje de aparatos ESD
hay que tener en cuenta las medidas de protección.
ADVERTENCIA: Zona de peligro
El empleo del producto seleccionado al margen de las especificaciones o sin tener en cuenta las indicaciones de manejo y de advertencia puede dar lugar a disfunciones graves, como consecuencia de las
cuales pueden producirse también daños personales y materiales.
3. Personal especializado
Estas instrucciones están dirigidas a profesionales debidamente formados que
conocen bien las prescripciones y normas vigentes del campo de aplicación
correspondiente.
4. Corrección de la documentación técnica
Estas instrucciones de manejo han sido preparadas con gran cuidado y meticulosidad. No asumimos garantía alguna o responsabilidad por la corrección y
completitud de los datos, figuras y dibujos, a no ser que esté prescrita por la
legislación vigente. Rigen las condiciones generales de venta de Weidmüller en
la versión válida en cada caso. Sujeto a modificaciones.
4
ES
5. Norma CE
El producto satisface las directivas de la Unión Europea (UE) y está por ello en
conformidad con la CE.
6. Declaración de conformidad
El producto cumple la directiva de baja tensión 2006/95/CE, la directiva de
compatibilidad electromagnética 2004/108/CE y la directiva de seguridad del
producto 01/95/CE (DIN EN 61010-1)
7. Reciclaje según WEEE
Con la adquisición de nuestro producto dispone usted de la posibilidad de
devolvérselo a Weidmüller una vez que haya transcurrido su ciclo de vida
La WEEE (directiva comunitaria 2002/ 96 CE) regula la recogida y el
reciclaje de aparatos eléctricos usados. Los fabricantes de aparatos
eléctricos están obligados a partir de 13.8.2005 a recoger y a reciclar
gratis todos los aparatos vendidos a partir de esa misma fecha. Ya no
se permite eliminar los aparatos eléctricos por los cauces „normales“ de
eliminación de desechos. Los aparatos eléctricos y electrónicos tienen que
reciclarse y eliminarse por separado. Todos los aparatos sujetos a esta directiva
están caracterizados con este logotipo:
¿Qué podemos hacer por usted?
Weidmüller le ofrece la posibilidad de que nos entregue sin costos su aparato
usado. Weidmüller reciclará y eliminará el aparato profesionalmente en conformidad con la legislación actual.
¿Qué ha de hacer usted?
Después de que su aparato haya llegado al final de su vida útil, enviéselo por
correo (dentro de una caja) a la filial de Weidmüller que le asesora: nosotros nos
hacemos entonces cargo de todas las medidas de reciclaje y de eliminación.
El proceso es para usted libre de costos y de molestias.
5
ES
8. Uso
Los Transclinic son equipos para la monitorización remota de tensión y corriente, captan los valores provenientes de los strings del campo fotovoltaico.
Los valores medidos son accesibles a través de un “host” vía MODBUS.
9. Especificaciones
Especificaciones técnicas según tabla:
Máximo número de
strings
Transclinic 7i+
Transclinic 8i+
Transclinic 14i+
4
7
8
14
Máxima corriente
por string
30 A DC
20 A DC
30 A DC
20 A DC
Rango de medida
3..30 A DC
3..20 A DC
3..30 A DC
3..20 A DC
Máxima Tensión
1000 V DC
1000 V DC
1000 V DC
1000 V DC
Tensión de
alimentación
19 - 36 V DC
19 - 36 V DC
19 - 36 V DC
19 - 36 V DC
Rango de
temperatura
-20 ... +70 °C
-20 ... +70 °C
-20 ... +70 °C
-20 ... +70 °C
Comunicación
MODBUS RS485
RTU
MODBUS RS485
RTU
MODBUS RS485
RTU
MODBUS RS485
RTU
Entrada analógica
0 ... +10 V o 0 ... 20 mA
0 ... +10 V o 0 ... 20 mA
0 ... +10 V o 0 ... 20 mA
0 ... +10 V o 0 ... 20 mA
Número de entradas analógicas
2
2
2
2
0 ... 5 V low,
15 ... 24 V high
0 ... 5 V low,
15 ... 24 V high
0 ... 5 V low,
15 ... 24 V high
0 ... 5 V low,
15 ... 24 V high
Entrada digital
Número de
entradas digitales
Salida digital
Número de salidas
digitales
1
1
1
1
max 30 V DC/AC
50 mA
max 30 V DC/AC
50 mA
max 30 V DC/AC
50 mA
max 30 V DC/AC
50 mA
1
1
1
1
Consumo de
potencia
< 1500 mW
< 1500 mW
< 1500 mW
< 1500 mW
Dimensiones
225 x 109.5 x 92.2
265 x 109.5 x 92.2
295 x 109.5 x 92.2
370 x 109.5 x 92.2
± 1%
± 1%
± 1%
± 1%
Máximo error de
lectura
6
Transclinic 4i+
ES
10. Diagrama de conexionado
PV PANEL
Placa de potencia
S2
X4
S3
+
+
–
S4
Input DC–
S5
X2
S6
X1
S7
Output DC–
S8
S1
TRANSCLINIC XI+
g
485+
Modbus RS485 RTU
X7
Power Supply 18...36 VDC
X6
Analoge input
X5
Analoge input
X8
Digital input
X4
Digital output
GND
485
485+
485–
g
Modbus RS485 RTU
X3
Modbus
X1
485–
GND
485
24 V
0V
Placa CPU
VIN
IIN
GND
VIN
IIN
GND
IN1+
+
SW2
INVERTER
IN2–
–
IN2+
SW1
IN1–
7
ES
11. Conexión
La conexión/desconexión eléctrica sólo debe ser realizada por personal técnico
cualificado, donde deben asegurarse los siguientes puntos:
Antes de la instalación/desinstalación del equipo hay que asegurarse de que no
exista tensión en ningún punto de la carcasa.
n Debe usarse un destornillador con el ancho de pala adecuado.
n Los cables de conexión deben fijarse firmemente y sin carga de tracción.
Alimentación. 24 V DC con una fuente de alimentación conmutada y con
aislamiento galvánico, en el conector X7, según esquema. Debe utilizarse un
fusible externo: Weidmüller WSI4 (1886580000), 5x20mm, de acción lenta.
Comunicación. Cableado de la línea Modbus en los conectores X1 y X3.
Entradas digitales opto-acopladas. Conector X8, entradas activas a niveles
entre 15 V DC y 24 V DC. Se aconseja utilizar F.A. conmutada y con aislamiento
galvánico.
Medida intensidades de entrada. Conectar el polo negativo de la conexión en
serie de los paneles fotovoltaicos a los bornes X1 (en todas las versiones) y X4
(existente sólo en TRANSCLINIC 8i+ y 14i+). En caso de disponer de entrada X4,
se recomienda balancear las cargas entre las dos entradas de forma uniforme.
Salida común medida intensidades. Las conexiones comunes de las
corrientes de salida se conectan a la(s) barra(s) conductora(s) en la placa de
circuitos. Al conectar la conexión común de los polos negativos, asegúrese del
correcto par de apriete de cada uno de los espárragos, independientemente de
si hay un cable conectado o no. Cablear siempre las pletinas de salida cuyos
bornes de entrada estén conectados.
Medida de tensión. Conectar el polo positivo de la cadena de paneles al
conector X2. Si únicamente se quiere medir la tensión de la serie de paneles,
sin conectar una entrada o salida de corriente, conectar el polo negativo al
conector X2. En cualquier otro caso, el polo negativo de la medición de tensión
en X2 ya está conectado con el polo negativo de la cadena de paneles, por lo
que no debe conectarse.
8
ES
12. Configuración
Mediante los interruptores SW1 y SW2 se configuran los siguientes parámetros.
SW1
Dirección de MODBUS según la tabla siguiente.
SW1.8
OFF
SW1.7
OFF
SW1.6
OFF
SW1.5
OFF
SW1.4
OFF
SW1.3
OFF
SW1.2
OFF
SW1.1
ON
ID
1
OFF
OFF
OFF
OFF
OFF
OFF
OFF
OFF
OFF
OFF
OFF
ON
ON
OFF
OFF
OFF
2
4
OFF
OFF
OFF
OFF
ON
OFF
OFF
OFF
8
OFF
OFF
OFF
OFF
OFF
ON
OFF
ON
OFF
ON
OFF
OFF
OFF
OFF
OFF
OFF
OFF
OFF
OFF
OFF
OFF
OFF
OFF
OFF
16
32
64
ON
OFF
OFF
OFF
OFF
OFF
OFF
OFF
128
9
ES
SW2
Velocidad de transmisión de datos.
Protección contra escritura de la memoria interna y bit de paridad.
SW2.1
ON
OFF
Velocidad TX/RX
9600 bps
19200 bps
SW2.2
ON
Estado de memoria
Memoria protegida
OFF
Memoria no protegida
SW2.3
ON
OFF
SW2.4
10
Paridad
EVEN
NONE
sólo para uso interno
ES
13. Instalación eléctrica
La instalación eléctrica debe realizarse por personal técnico cualificado, conforme a la normativa general de electrotecnia y cumpliendo con la normativa
vigente. Asimismo deben cumplirse las normas específicas regionales. Estas
abarcan, en particular, la correcta ejecución técnica:
Para la protección frente a electrocuciones, los equipos deben ir instalados en
envolventes o cuadros eléctricos que cumplan los siguientes requisitos:
n Durante el manejo y el montaje de aparatos ESD hay que tener en cuenta las
medidas de protección.
n Regleta de montaje TS35
n La temperatura de instalación debe ser 10...40° C.
n Disponer de un dispositivo de conmutación o desconexión para desconectar
los circuitos de alimentación y altas tensiones.
n El negativo del conector X2 está conectado eléctricamente al común de
los negativos, en la pletina de corriente, por lo que el no conexionado de este
no afecta a la medida. Bajo ningún concepto debe conectarse a ningún otro
negativo del equipo. El conexionado del negativo de cualquiera de los Strings
a este punto (negativo de X2), dañaría el equipo.
n El correcto dimensionado del cableado y demás dispositivos.
n Se aconseja el uso de cable apantallado para las comunicaciones. Cable de
bus recomendado: cable Lapp UNITRONIC BUS LD 2x2x0,22 (ref.: 2170204).
n Los cables de conexión se asientan firmemente y son de la sección
adecuada.
11
ES
n Sección embornable y par de apriete de los diferentes conectores:
X1, X4 Conexiones de string para medir la corriente (Entrada CC en
placa de potencia)
n C
on terminales de cable de 0,5 a 10 mm2 o sin terminal de cable
de 0,5 a 16 mm2.
n Par de apriete 1.2-1.5 Nm.
n Longitud de aislamiento / medida de hoja: 12 mm / 1,0 x 5,5
X2 (en placa de potencia):
n C
on terminales de cable de 0,5 a 10 mm² o sin terminal de cable
de 0,5 a 16 mm².
n Par de apriete 1.2-1.5 Nm.
n Longitud de aislamiento / medida de hoja: 12 mm / 1,0 x 5,5
X1, X3, X5, X6, X7, X8 (en placa CPU):
n C
on terminales de cable de 0,2 a 2,5 mm² o sin terminal de cable
de 0,2 a 4 mm².
n Par de apriete 0.4-0.5 Nm.
n Longitud de aislamiento / medida de hoja: 7 mm / 0,6 x 3,5
Barra conductora (Salida CC – en placa de potencia):
n Cable con empalmador de cable colectivo M6.
Se recomienda el artículo 4R6 de la empresa Klauke (25 mm²).
n Par de apriete 4-4.5 Nm.
n En los aparatos Transclinic 8i+ y 14i+ debe conectarse en ambas barras
conductoras el mismo número de strings de paneles fotovoltaicos para medir
la corriente. Debe conectarse como mínimo un string de panel fotovoltaicos
por barra conductora.
n El emplazamiento final del equipo debe asegurar el aislamiento y la protec-
ción contra el fuego, así como una resistencia mecánica suficiente según la
norma UNE-EN 60439-1.
12
ES
Protección contra la sobretensión:
La protección contra la sobretensión de Transclinic xi+ debe garantizarse mediante
una instalación adicional de una protección contra la sobretensión externa. Deben
usarse cables con la misma sección transversal para conectar a tierra la conexión.
Para los strings debe usarse el artículo Weidmüller 8882350001.
Para la comunicación RS485 debe usarse el artículo Weidmüller 8924270000
(zócalo) y 8924670000 (pieza insertada).
Para el suministro de corriente debe usarse el artículo Weidmüller 8860360000.
No se permite ninguna corriente de fuga contra potencial de tierra.
14. Comportamiento de temperatura
El módulo está diseñado para poder trabajar dentro de un rango de temperatura extendido de -20 °C a +70 °C.
15. Instrucciones de seguridad y advertencias
Este equipo está previsto exclusivamente para las aplicaciones descritas en el
manual de operación. Está catalogado como categoría I y por tanto no deberá
utilizarse para la medida en otras categorías.
Cualquier otro uso se considera como un uso indebido, que podría llegara a
causar accidentes y daños irreversibles pudiendo llegar a la destrucción del
propio equipo.
El uso indebido provocará la anulación inmediata de cualquier tipo de reclamación de garantía por parte del usuario frente al fabricante.
13
14
IT
Manuale d’istruzioni 1. 2. 3. 4. 5. 6. 7. 8.
9.
10.
11.
12.
13.
14.
15.
Cronologica delle revisioni
Utilizzo conforme alla finalità d’uso Personale tecnico
Correttezza della documentazione tecnica
Marcatura CE
Dichiarazione di conformità
Riciclaggio secondo WEEE
Uso
Specifiche tecniche
Schema elettrico
Collegamenti
Configurazione Impianto elettrico
Comportamento termico Istruzioni di sicurezza e avvertenze
16
16
16
16
17
17
17
18
18
19
20
21
23
25
25
Edizione maggio 2011
15
IT
1. Cronologica delle revisioni
Versione
Data
Modifiche
02
05/11
2a edizione
2. Utilizzo conforme alla finalità d’uso
AVVISO
L’apparecchio è progettato esclusiva-mente per le applicazioni
descritte nelle presenti istruzioni per l’uso. Un impiego diverso è
da considerarsi inammissibile e potrebbe provocare incidenti o la
distruzione dell’apparecchio. Tali utilizzi comportano l’immediato
annullamento dei diritti di garanzia da parte dell’utente nei confronti
del produttore. Durante l’utilizzo e il montaggio degli apparecchi,
prestare attenzione alle misure di sicurezza ESD prescritte.
AVVERTENZA: Punto pericoloso
Un utilizzo del prodotto che non rientri nelle specifiche prescritte
ovvero la mancata osservanza delle istruzioni e degli avvertimenti
potrebbero causare malfunzionamenti con la conseguente possibilità di danni a persone e cose.
3. Personale tecnico
Le presenti istruzioni per l’uso sono destinate a tecnici specializzati che abbiano
acquisito familiarità con le norme e le disposizioni in vigore nel settore in cui
operano.
4. Correttezza della documentazione tecnica
Le presenti istruzioni per l‘uso sono state redatte con estrema cura. Si declina
ogni responsabilità per la correttezza e la completezza di dati, figure e disegni,
a meno che questo non sia previsto per legge. Sono valide le condizioni di
acquisto generali di Weidmüller nella versione di volta in volta applicabile. Con
riserva di modifiche.
16
IT
5. Marcatura CE
Il prodotto soddisfa le direttive dell’Unione Europea (UE), risultando pertanto
conforme alla norma CE.
6. Dichiarazione di conformità
Il prodotto soddisfa le direttive sulla bassa tensione 2006/95/CE, la direttiva
EMC 2004/108/CE e la direttiva sulla sicurezza dei prodotti 01/95/CE (DIN EN 61010-1).
7. Riciclaggio secondo WEEE
Con l’acquisto di questo prodotto, Lei avrà la possibilità di riconsegnare l’apparecchio a Weidmüller alla fine del suo ciclo di vita.
La WEEE (direttiva europea 2002/96 CE) regola la restituzione e il
riciclaggio degli apparecchi elettrici. I produttori di apparecchi elettrici
sono obbligati, a partire dal 13.8.2005, a ritirare e riciclare gratuitamente gli apparecchi elettrici acquistati dopo tale data. Pertanto gli
apparecchi elettrici non devono più essere smaltiti tra i rifiuti „normali“. Gli
apparecchi elettrici devono essere riciclati e smaltiti separatamente. Tutti gli
apparecchi che rientrano in questa direttiva sono contrassegnati con questo
logo.
Che cosa possiamo fare per lei?
Weidmüller le offre pertanto una possibilità di restituzione gratuita del Suo vecchio apparecchio. Weidmüller si farà carico del corretto riciclaggio e smaltimento del Suo apparecchio secondo quanto previsto dalla normativa corrente.
Che cosa deve fare lei?
Una volta che l’apparecchio ha completato il proprio ciclo di vita, lo invii semplicemente tramite corriere (in una scatola) all’affiliata Weidmüller di riferimento.
Provvederemo noi ad adottare le appropriate misure di riciclaggio e smaltimento.
Senza costi né complicazioni da parte Sua.
17
IT
8. Uso
I Transclinic sono dei dispositivi che consentono di monitorare a distanza la
tensione e la corrente, rilevando i valori provenienti dalle stringhe di un campo
fotovoltaico. I valori misurati sono accessibili tramite un host via MODBUS.
9. Specifiche tecniche
Specifiche tecniche secondo la tabella:
Nº massimo di
stringhe
Corrente massima
per stringa
Intervallo di
misurazione
Tensione massima
Tensione di
alimentazione
Range di
temperatura
Comunicazione
Ingresso analogico
Numero di ingressi
analogici
Ingresso digitale
Numero di ingressi
digitali
Uscita digitale
Numero di uscite
digitali
Potenza assorbita
Ingombro
Errore di misura
max.
18
Transclinic 4i+
Transclinic 7i+
Transclinic 8i+
Transclinic 14i+
4
7
8
14
30 A DC
20 A DC
30 A DC
20 A DC
3..30 A DC
3..20 A DC
3..30 A DC
3..20 A DC
1000 V DC
1000 V DC
1000 V DC
1000 V DC
19 - 36 V DC
19 - 36 V DC
19 - 36 V DC
19 - 36 V DC
-20 ... +70 °C
-20 ... +70 °C
-20 ... +70 °C
-20 ... +70 °C
MODBUS RS485
RTU
MODBUS RS485
RTU
MODBUS RS485
RTU
MODBUS RS485
RTU
0 ... +10 V o 0 ... 20 mA
0 ... +10 V o 0 ... 20 mA
0 ... +10 V o 0 ... 20 mA
0 ... +10 V o 0 ... 20 mA
2
2
2
2
0 ... 5 V low, 15 ... 24 V high
0 ... 5 V low,
15 ... 24 V high
0 ... 5 V low,
15 ... 24 V high
0 ... 5 V low,
15 ... 24 V high
1
1
1
1
max 30 V DC/AC
50 mA
max 30 V DC/AC
50 mA
max 30 V DC/AC
50 mA
max 30 V DC/AC
50 mA
1
1
1
1
< 1500 mW
< 1500 mW
< 1500 mW
< 1500 mW
225 x 109.5 x 92.2
265 x 109.5 x 92.2
295 x 109.5 x 92.2
370 x 109.5 x 92.2
± 1%
± 1%
± 1%
± 1%
IT
10. Schema elettrico
PV PANEL
Scheda di potenza
S2
X4
S3
+
+
–
S4
Input DC–
S5
X2
S6
X1
S7
Output DC–
S8
S1
TRANSCLINIC XI+
g
485+
Modbus RS485 RTU
X7
Power Supply 18...36 VDC
X6
Analoge input
X5
Analoge input
X8
Digital input
X4
Digital output
GND
485
485+
485–
g
Modbus RS485 RTU
X3
Modbus
X1
485–
GND
485
24 V
0V
Scheda CPU
VIN
IIN
GND
VIN
IIN
GND
IN1+
+
SW2
INVERTER
IN2–
–
IN2+
SW1
IN1–
19
IT
11. Collegamenti
Il collegamento/scollegamento elettrico può essere effettuato solo da personale
tecnico qualificato, garantendo sempre i seguenti punti:
Prima dell’installazione/disinstallazione dell’impianto, assicurarsi che tutti i punti
della custodia siano privi di tensione.
n Utilizzare un cacciavite con una lama di dimensioni adeguate.
n I cavi di collegamento devono essere fissati al punto fisso e al punto mobile.
Alimentazione. 24 V DC con alimentatore commutato e isolamento galvanico,
nel connettore X7, secondo lo schema. Utilizzare un fusibile esterno: Weidmüller
WSI4 (1886580000), 5x20mm, lento.
Comunicazione. Cablaggio della linea Modbus nei connettori X1 e X3.
Ingressi digitali optoaccoppiati. Connettore X8, ingressi attivi a livelli compresi tra 15 V DC e 24 V DC. Si consiglia di utilizzare un alimentatore switching con
isolamento galvanico.
Misurazione delle correnti di ingresso. Collegare il polo negativo del
collegamento in serie dei pannelli fotovoltaici ai morsetti X1 (in tutti i modelli) e
X4 (presente solo in TRANSCLINIC 8i+ e 14i+). Se l’ingresso X4 è disponibile, si
consiglia di ripartire uniformemente i carichi tra i due ingressi.
Uscita comune per la misurazione di correnti. Collegare i cavi comuni delle
correnti di uscita alle barre di corrente sul circuito stampato. In caso di allacciamento del collegamento comune dei poli negativi, verificare la corretta coppia
di serraggio di ogni singolo perno, indipendentemente se il cavo è collegato
o meno. Cablare sempre le barre di corrente di uscita che hanno i morsetti di
ingresso collegati.
Misurazione della tensione. Collegare il polo positivo della stringa fotovoltaica al collegamento X2. Per misurare la tensione della stringa fotovoltaica
senza collegare un ingresso o un’uscita elettrica, collegare il polo negativo al
collegamento X2. In tutti gli altri casi, collegare il polo negativo della misurazione
della tensione di X2 al polo negativo della stringa fotovoltaica, senza collegare
quest’ultima.
20
IT
12. Configurazione
Gli switch SW1 e SW2 consentono di configurare i seguenti parametri.
SW1
Indirizzo del MODBUS, secondo la tabella seguente.
SW1.8
OFF
SW1.7
OFF
SW1.6
OFF
SW1.5
OFF
SW1.4
OFF
SW1.3
OFF
SW1.2
OFF
SW1.1
ON
ID
1
OFF
OFF
OFF
OFF
OFF
OFF
OFF
OFF
OFF
OFF
OFF
ON
ON
OFF
OFF
OFF
2
4
OFF
OFF
OFF
OFF
ON
OFF
OFF
OFF
8
OFF
OFF
OFF
OFF
OFF
ON
OFF
ON
OFF
ON
OFF
OFF
OFF
OFF
OFF
OFF
OFF
OFF
OFF
OFF
OFF
OFF
OFF
OFF
16
32
64
ON
OFF
OFF
OFF
OFF
OFF
OFF
OFF
128
21
IT
SW2
Velocità di trasmissione dei dati.
Protezione contro la scrittura della memoria interna e bit di controllo di parità.
SW2.1
ON
OFF
Velocità TX/RX
9600 bps
19200 bps
SW2.2
ON
Stato della memoria
Memoria protetta
OFF
Memoria non protetta
SW2.3
ON
Parità
EVEN
OFF
NONE
SW2.4
22
Solo per uso interno
IT
13. Impianto elettrico
L’impianto elettrico deve essere eseguito da personale tecnico qualificato, ai sensi delle norme generali in materia di elettrotecnica e in conformità alla
normativa vigente. Inoltre occorre attenersi alle norme specifiche regionali, che descrivono in particolare la corretta esecuzione tecnica:
Per poter garantire una protezione contro i contatti accidentali, è necessario
installare i dispositivi in apposite custodie o quadri elettrici che soddisfino i
seguenti requisiti:
n Durante l’utilizzo e il montaggio degli apparecchi, prestare attenzione alle misure di sicurezza ESD prescritte.
n Guida TS35
n La temperatura di installazione è di 10...40° C.
n Siano muniti di un dispositivo di commutazione o disinnesto per scollegare i
circuiti di alimentazione e le alte tensioni.
n Il negativo del connettore X2 è collegato elettricamente al comune dei
negativi nella barra di corrente. Di conseguenza, il collegamento di questo
cavo non incide sulla misurazione. In nessun caso collegarlo ad altri negativi
del dispositivo. Collegando il negativo di qualsiasi stringa a questo punto
(negativo di X2) si potrebbe danneggiare il dispositivo.
n Un corretto dimensionamento del cablaggio e degli altri dispositivi.
n Per le comunicazioni si consiglia di utilizzare un cavo schermato. Cavi bus
consigliati: cavi Lapp UNITRONIC BUS LD 2x2x0,22 (Art.: 2170204).
n I cavi di collegamento siano stati posati correttamente e la loro sezione sia
adeguata.
23
IT
n Rispettare campo di sezione e coppia di serraggio dei diversi connettori:
X1, X4 Collegamenti della stringa alla misurazione di correnti (Input
DC sulla scheda di potenza):
n Con terminali da 0,5 a 10 mm² o senza terminali da 0,5 a 16 mm².
n Coppia di serraggio 1,2-1.5 Nm.
n Lunghezza di isolamento/Dimensioni lama: 12 mm / 1,0 x 5,5
X2 (sulla scheda di potenza):
n Con terminali da 0,5 a 10 mm² o senza terminali da 0,5 a 16 mm².
n Coppia di serraggio 1,2-1.5 Nm.
n Lunghezza di isolamento/Dimensioni lama: 12 mm / 1,0 x 5,5
X1, X3, X5, X6, X7, X8 (sulla scheda CPU):
n Con terminali da 0,2 a 2,5 mm² o senza terminali da 0,2 a 4 mm².
n Coppia di serraggio 0,4-0.5 Nm.
n Lunghezza di isolamento/Dimensioni lama: 7 mm / 0,6 x 3,5
Barra di corrente (Output DC sulla scheda di potenza):
n Cavo con terminali ad anello M6.
Si consiglia l‘articolo 4R6 della ditta Klauke (25 mm²).
n Coppia di serraggio 4-4.5 Nm.
n Nel caso dei dispositivi Transclinic 8i+ e 14i+, è necessario collegare sulle due
barre di corrente lo stesso numero di stringhe fotovoltaiche per la misurazio
ne di correnti. È necessario collegare almeno una stringa fotovoltaica per ogni barra di corrente.
n L’ubicazione finale del dispositivo deve offrire una protezione antincendio nonché una certa resistenza meccanica, ai sensi della norma UNE-EN 60439-1.
24
IT
Protezione contro le sovratensioni:
La protezione contro le sovratensioni di Transclinic xi+ deve essere garantita
tramite l’installazione supplementare di una protezione contro le sovratensioni
esterna. In questo caso utilizzare cavi con la stessa sezione per stabilire un
collegamento a massa.
Per le stringhe, utilizzare l‘articolo 8882350001 di Weidmüller.
Per la comunicazione RS485, utilizzare l’articolo Weidmüller 8924270000 (zoccolo) e 8924670000 (inserto).
Per l’alimentazione di tensione, utilizzare l‘articolo 8860360000 di Weidmüller.
Non è consentita alcuna corrente di dispersione contro il potenziale di terra.
14. Comportamento termico
Il modulo è stato concepito per il funzionamento in un ampio campo di
temperature, da -20 °C a +70 °C.
15. Istruzioni di sicurezza e avvertenze
Questo dispositivo è stato concepito esclusivamente per gli utilizzi descritti nel
manuale operativo. Essendo classificato come dispositivo di
Classe I, non può essere utilizzato per effettuare misurazioni in altre categorie.
Qualsiasi altro uso è considerato illecito, in quanto potrebbe provocare incidenti
e danni irreversibili che porterebbero alla la distruzione del dispositivo stesso.
In caso di utilizzi non ammessi dal manuale, l’utente non ha alcun diritto di
pretendere dal produttore prestazioni in garanzia.
25
26
FR
Manuel d’instructions 1. 2. 3. 4. 5. 6. 7. 8.
9.
10.
11.
12.
13.
14.
17.
Révision
Conformité d’utilisation
Personnel qualifié
Conformité de la documentation technique
Marquage CE
Déclaration de conformité
Recyclage selon DEEE
Utilisation
Caractéristiques
Schéma de câblage
Connexion
Configuration Installation électrique
Température de fonctionnement
Instructions de sécurité et avertissements
28
28
28
28
29
29
29
30
30
31
32
33
35
37
37
Édition du mai 2011
27
FR
1. Révision
Version
Date
Modification
02
05/11
2ème édition
2. Conformité d’utilisation
AVIS
L’équipement n’est destiné qu’aux applications décrites dans le
mode d’emploi. Toute autre utilisation est interdite et peut conduire à
des accidents ou à la destruction de l’appareil. Ce type d’utilisation
annule tout recours en garantie de l’utilisateur vis-à-vis du fabricant.
Lors de la manipulation et du montage des appareils à décharge
électrostatique, tenir compte des mesures de protection.
AVERTISSEMENT ! Danger
L’utilisation du produit sélectionné en dehors de la spécification ainsi
que le non-respect des instructions d’utilisation et des avertissements peut provoquer de graves dysfonctionnements pouvant
conduire à des dommages corporels ou matériels.
3. Personnel qualifié
Le présent mode d’emploi est destiné à un personnel qualifié formé aux directives en vigueur ainsi qu’aux normes du domaine d’application.
4. Conformité de la documentation technique
Nous n‘assumons aucune responsabilité ni garantie quant à l‘exactitude et à
l‘intégralité des données, figures et dessins, pour autant qu‘elle ne soit prescrite
légalement. Les conditions générales de vente de Weidmüller sont applicables
dans leur version respective. Sous réserve de modifications.
28
FR
5. Marquage CE
Le produit répond aux directives de la communauté européenne (EU) et est
donc conforme CE.
6. Déclaration de conformité
Ce produit respecte la directive basse tension 2006/95/CE, la directive CEM
2004/108/CE et la directive sur la sécurité produit 01/95/CE (NF EN 61010-1).
7. Recyclage selon DEEE
En achetant notre produit, vous avez la possibilité de rendre l’appareil à Weidmüller au terme de son cycle de vie.
La directive DEEE (directive UE 2002/96 CE) règlemente la récupération
et le recyclage des appareils électriques anciens. Les fabricants
d’appareils électriques sont tenus depuis le 13/08/2005 de reprendre
gratuitement les appareils électriques vendus après cette date et de les
recycler. Les appareils électriques ne doivent alors plus être mis aux déchets
« normaux ». Les appareils électriques doivent être recyclés et mis aux déchets
séparément. Tous les appareils con-cernés par cette directive portent ce logo.
Que pouvons-nous faire pour vous ?
Weidmüller vous offre donc une possibilité neutre en terme de coûts de nous retourner votre ancien appareil. Weidmüller recyclera et mettra alors aux déchets
votre appareil conformément à la législation en vigueur.
Que devez-vous faire ?
Lorsque votre appareil est en fin de vie, mettez-le dans un carton et envoyez-le
à la filiale Weidmüller qui s’occupe de vous. Nous nous chargerons en-suite de
toutes les procédures de recyclage et de mise aux déchets.
Ce service ne vous occasionnera aucun frais ni aucun inconvénient.
29
FR
8. Utilisation
Les appareils Transclinic sont conçus pour surveiller à distance la tension et le courant.
Ils saisissent les valeurs qui proviennent des chaînes du champ photovoltaïque, ainsi
que l’état de 2 signaux tout ou rien issus du parafoudre (état de fonctionnement) du
cofret DC et/ou d’un signal au choix de l’utilisateur (ouverture de porte, alarme de vol...).
Les valeurs moyennes sont accessibles par l’intermédiaire d’un “serveur” via MODBUS.
9. Caractéristiques
Caractéristiques techniques conformément au tableau:
Nombre maximum
de chaînes
Courant maximum
par chaîne
Plage de mesure
Transclinic 4i+
Transclinic 7i+
Transclinic 8i+
Transclinic 14i+
4
7
8
14
30 A DC
20 A DC
30 A DC
20 A DC
3..30 A DC
3..20 A DC
3..30 A DC
3..20 A DC
Tension maximale
1000 V DC
1000 V DC
1000 V DC
1000 V DC
Tension d‘alimentation
19 - 36 V DC
19 - 36 V DC
19 - 36 V DC
19 - 36 V DC
Température de
fonctionnement
-20 ... +70 °C
-20 ... +70 °C
-20 ... +70 °C
-20 ... +70 °C
Communication
MODBUS RS485
RTU
MODBUS RS485
RTU
MODBUS RS485
RTU
MODBUS RS485
RTU
Entrée analogique
0 ... +10 V ou 0 ... 20 mA
0 ... +10 V ou 0 ... 20 mA
0 ... +10 V ou 0 ... 20 mA
0 ... +10 V ou 0 ... 20 mA
Nombre d‘entrées
analogiques
2
2
2
2
Entrée numérique
0 ... 5 V low, 15 ... 24 V high
0 ... 5 V low,
15 ... 24 V high
0 ... 5 V low,
15 ... 24 V high
0 ... 5 V low,
15 ... 24 V high
Nombre d‘entrées
numériques
1
1
1
1
Sortie numérique
max 30 V DC/AC
50 mA
max 30 V DC/AC
50 mA
max 30 V DC/AC
50 mA
max 30 V DC/AC
50 mA
Nombre de sorties
numériques
1
1
1
1
Puissance
consommée
< 1500 mW
< 1500 mW
< 1500 mW
< 1500 mW
Dimensions
225 x 109.5 x 92.2
265 x 109.5 x 92.2
295 x 109.5 x 92.2
370 x 109.5 x 92.2
± 1%
± 1%
± 1%
± 1%
Erreur de mesure
maximum
30
FR
10. Schéma de câblage
PV PANEL
Platine puissance
S2
X4
S3
+
+
–
S4
Input DC–
S5
X2
S6
X1
S7
Output DC–
S8
S1
TRANSCLINIC XI+
g
485+
Modbus RS485 RTU
X7
Power Supply 18...36 VDC
X6
Analoge input
X5
Analoge input
X8
Digital input
X4
Digital output
GND
485
485+
485–
g
Modbus RS485 RTU
X3
Modbus
X1
485–
GND
485
24 V
0V
Platine UC
VIN
IIN
GND
VIN
IIN
GND
IN1+
+
SW2
INVERTER
IN2–
–
IN2+
SW1
IN1–
31
FR
11. Connexion
La connexion/déconnexion électrique doit être effectuée par un technicien
qualifié, en garantissant les points suivants:
Avant installation / désinstallation du système, veiller à ce qu’aucune tension ne
soit appliquée sur aucun point du boîtier.
n Utiliser un tournevis dont la lame est appropriée.
n Les câbles de raccordement doivent être posés en fixe et sans traction.
Alimentation. 24 V DC issue d’une alimentation à découpage, sur le connecteur X7, conformément au schéma. Prévoir une protection externe : Weidmüller
WSI4 (1886580000), 5x20 mm, retardé.
Communication. Câblage de la ligne Modbus sur les connecteurs X1 et X3.
Entrées numériques à couplage optique. Connecteur X8, entrées actives
pour des niveaux compris entre 15 V DC et 24 V DC. Il est conseillé d’utiliser
une source d’alimentation à découpage avec isolation galvanique.
Mesure des intensités en entrée. Raccorder le pôle moins du circuit série
des panneaux PV sur les bornes X1 (pour toutes versions) et X4 (existe seulement sur TRANSCLINIC 8i+ y 14i+). Si l’entrée X4 est disponible, il est recommandé de répartir les charges de façon homogène entre les deux entrées.
Sortie commune, mesure des intensités. Raccorder les connexions communes des sorties courant sur la(les) barrette(s) conductrices située(s) sur la
platine. Lors du raccordement de la connexion commune du pôle moins, veiller
à respecter le couple de serrage correct de chacun des boulons, qu’un câble
soit raccordé ou non. Toujours câbler les plaques de sortie dont les bornes
d’entrée sont connectées.
Mesure de tension. Connecter le pôle plus de la chaîne PV sur la borne X2.
Si l’on souhaite uniquement mesurer la tension de la chaîne PV sans raccorder
une entrée ou une sortie courant, alors raccorder le pôle moins sur la borne X2.
Dans tout autre cas, le pôle moins de la mesure de tension sur X2 est déjà relié
sur le pôle moins de la chaîne PV, c’est pourquoi celui-ci n’est pas à raccorder.
32
FR
12. Configuration
Les contacts SW1 et SW2 permettent de configurer les paramètres suivants.
SW1
Adresse MODBUS selon le tableau suivant.
SW1.8
OFF
SW1.7
OFF
SW1.6
OFF
SW1.5
OFF
SW1.4
OFF
SW1.3
OFF
SW1.2
OFF
SW1.1
ON
ID
1
OFF
OFF
OFF
OFF
OFF
OFF
OFF
OFF
OFF
OFF
OFF
ON
ON
OFF
OFF
OFF
2
4
OFF
OFF
OFF
OFF
ON
OFF
OFF
OFF
8
OFF
OFF
OFF
OFF
OFF
ON
OFF
ON
OFF
ON
OFF
OFF
OFF
OFF
OFF
OFF
OFF
OFF
OFF
OFF
OFF
OFF
OFF
OFF
16
32
64
ON
OFF
OFF
OFF
OFF
OFF
OFF
OFF
128
33
FR
SW2
Vitesse de transmission des données.
Protection à l’écriture dans la mémoire interne et bit de parité.
SW2.1
ON
OFF
SW2.2
ON
OFF
Vitesse TX/RX
9600 bps
19200 bps
État de mémoire
Mémoire protégée
Mémoire non protégée
SW2.3
ON
Parité
EVEN
OFF
NONE
SW2.4
34
Usage interne uniquement
FR
13. Installation électrique
L’installation électrique doit être effectuée par un technicien qualifié, conformément aux réglementations générales d’électrotechnique et aux réglementations
en vigueur. Les normes doivent également être respectées. Cela englobe, en
outre, l’exécution technique correcte:
Pour éviter les électrocutions, les appareils doivent être installés dans des boîtiers ou dans des tableaux électriques conformes aux exigences suivantes:
n Lors de la manipulation et du montage des appareils à décharge électrosta-
tique, tenir compte des mesures de protection.
n Rail support TS35
n La température d’installation est de 10 à 40 °C.
n Prévoir un dispositif de commutation ou de déconnexion pour débrancher les
circuits d’alimentation et les hautes tensions.
n La borne négative du connecteur X2 est reliée électriquement au pôle négatif
commun, sur la plaque de courant, c’est pourquoi cette connexion ne
modifie pas la mesure. En aucun cas elle ne devra être connectée à une
autre borne négative de l’appareil. La connexion de la borne négative de n’importe quelle chaîne sur ce point (borne négative de X2) risquerait d’endommager l’appareil.
n Le dimensionnement correct du câblage et des autres dispositifs.
n Il est conseillé d’utiliser un câble blindé pour les communications. Câble bus
recommandé : câble Lapp UNITRONIC BUS LD 2x2x0,22 (réf. : 2170204)
n Les câbles de connexion sont solidement fixés et ont une section appropriée.
35
FR
n Section compatible avec les bornes et le couple de serrage des différents
connecteurs:
X1, X4 Connexions en chaînes pour mesure d’intensité (Entrée DCsur platine puissance):
n Avec embouts de 0,5 à 10 mm² ou sans embouts de 0,5 à 16 mm².
n Couple de serrage 1,2-1.5 Nm.
n Longueur dénudée / taille de lame : 12 mm / 1,0 x 5,5
X2 (sur platine puissance) :
n Avec embouts de 0,5 à 10 mm² ou sans embouts de 0,5 à 16 mm².
n Couple de serrage 1,2-1.5 Nm.
n Longueur dénudée / taille de lame : 12 mm / 1,0 x 5,5
X1, X3, X5, X6, X7, X8 (sur platine UC) :
n Avec embouts de 0,2 à 2,5 mm² ou sans embouts de 0,2 à 4 mm².
n Couple de serrage 0,4-0.5 Nm.
n Longueur dénudée / taille de lame : 7 mm / 0,6 x 3,5
Barette conductrice (Sortie DC- sur platine puissance) :
n Câble avec cosse à œillet M6.
Article 4R6 recommandé par la Sté. Klauke (25 mm²).
n Couple de serrage 4-4.5 Nm.
n Sur les appareils Transclinic 8i+ et 14i+ il faut raccorder sur les deux barrettes conductrices un nombre identique de chaînes PV pour la mesure d’intensité. Il faut au moins une chaîne PV raccordée par barrette conductrice.
n L’emplacement définitif de l’appareil doit, conformément à la norme UNE EN 60439, être ignifugé et disposer d’une résistance mécanique suffisante.
36
FR
Limiteur de surtension :
La protection du Transclinic xi contre les surtensions doit être assurée par installation supplémentaire d’un limiteur externe de surtension. Utiliser à cet effet des
câbles de section identique afin de réaliser la connexion à la terre.
Pour les chaînes, se servir de l’article Weidmüller 8882350001.
Pour la communication RS485, utiliser l’article Weidmüller 8924270000 (embase) et 8924670000 (insert).
Pour l’alimentation en tension, se servir des articles Weidmüller 8860360000.
Aucun courant de fuite vers le potentiel terre n’est admissible.
14. Température de fonctionnement
Le module est conçu pour fonctionner dans une plage de températures allont
de -20 °C à +70 °C.
15. Instructions de sécurité et avertissements
Cet appareil est exclusivement prévu pour les applications décrites dans le
Manuel de fonctionnement. Il est de catégorie I et ne doit donc pas être utilisé
pour la mesure dans d’autres catégories.
Toute autre utilisation sera considérée comme un emploi abusif, qui pourrait
provoquer des accidents et des dégâts irréversibles, y compris la destruction
de l’appareil.
Toute utilisation non conforme entraîne d’extinction des recours en garantie
envers le constructeur.
37
38
PT
Manual de instruções 1. 2. 3. 4. 5. 6. 7. 8.
9.
10.
11.
12.
13.
14.
15.
Histórico da revisão
Utilização adequada Pessoal especializado
Exactidão da documentação técnica
Marca CE
Declaração de conformidade
Reciclar segundo o REEE
Utilização
Especificações Diagrama da ligação
Ligação
Configuração Instalação eléctrica
Comportamento de temperatura Instruções de segurança e advertências
40
40
40
40
41
41
41
42
42
43
44
45
47
49
49
Edição de maio de 2011
39
PT
1. Histórico da revisão
Versão
Data
Modificações
02
05/11
2. edição
2. Utilização adequada
AVISO
O aparelho é indicado apenas para as utilizações descritas nas
instruções de serviço. Qualquer outra utilização é considerada inadmissível e pode causar acidentes ou destruição do aparelho. Esse
tipo de utilização faz caducar imediatamente quaisquer pretensões
de garantia ou responsabilidade do utilizador perante o fabricante.
Ao manejar e montar os instrumentos, respeitar as medidas de
proteção da ESD.
ATENÇÃO: Pontos de perigo
Uma utilização do produto seleccionado fora da especificação ou a
inobservância das instruções de serviço e advertências pode causar
mau funcionamento com graves consequências, resultantes em
danos a pessoas e bens.
3. Pessoal especializado
As presentes instruções de serviço destinam-se a pessoal especializado com
formação, que conhece as determinações vigentes e as normas aplicáveis à
respectiva área.
4. Exactidão da documentação técnica
As presentes instruções de serviço foram elaboradas com o máximo cuidado.
Não assumimos qualquer responsabilidade nem garantia pela correcção e integridade dos dados, ilustrações e desenhos, a não ser que tal seja legalmente
determinado. Aplicam-se as condições gerais de aquisição da Weidmüller na
versão respectivamente válida. Reservado o direito a alterações.
40
PT
5. Marca CE
O produto satisfaz as directivas da União Europeia e está, por isso, em conformidade com a marca CE.
6. Declaração de conformidade
O produto cumpre as diretivas relativas a tensão baixa 2006/95/CE, a diretiva
de CEM 2004/108/CE e a diretiva relativa a Segurança geral dos produtos
01/95/CE (DIN EN 61010-1).
7. Reciclar segundo o REEE
Ex.mo cliente Weidmüller, ao adquirir o nosso produto, tem a possibilidade de
mandar gratuitamente o aparelho, no final do seu ciclo de vida, de volta para a
Weidmüller.
O REEE (Directiva UE 2002/96/CE) regulamenta a recolha e a
reciclagem de electrodomésticos velhos. Os fabricantes de aparelhos
eléctricos são obrigados, a partir de 13.08.2005, a recolher e a reciclar
gratuitamente os aparelhos adquiridos a partir dessa data. Os
aparelhos eléctricos deixarão, portanto, de ser levados para os fluxos “normais”
de resíduos. Os aparelhos eléctricos devem ser reciclados e eliminados
separadamente. Todos os aparelhos abrangidos por esta directiva têm aposto
o seguinte logotipo:
O que podemos fazer por si?
A Weidmüller oferece-lhe uma possibilidade neutra, a nível de custos, de nos
entregar o seu aparelho. A Weidmüller tratará, então, de reciclar e de eliminar
adequadamente o seu aparelho, cumprindo os requisitos actuais da lei.
O que você tem de fazer?
Depois de o seu aparelho ter completado a sua vida útil, queira, por favor,
enviá-lo na embalagem, por correio expresso, para a filial Weidmüller que lhe
dá cobertura; nós assumiremos todas as despesas inerentes às medidas de
reciclagem e eliminação.
Para si, não haverá lugar a qualquer despesa nem a transtornos.
41
PT
8. Utilização
Os Transclinic são equipamentos para a monitorização remota de tensão e corrente,
que captam os valores provenientes dos strings do campo fotovoltaico.
É possível aceder aos valores medidos através de um anfitrião (“host”), via MODBUS.
9. Especificações
Especificações técnicas segundo a tabela:
Transclinic 4i+
Transclinic 7i+
Transclinic 8i+
N.º máx. de strings
4
7
8
14
Corrente máxima
por string
30 A DC
20 A DC
30 A DC
20 A DC
3..30 A DC
3..20 A DC
3..30 A DC
3..20 A DC
Intervalo de
medição
Tensão Máxima
Transclinic 14i+
1000 V DC
1000 V DC
1000 V DC
1000 V DC
Tensão de alimentação
19 - 36 V DC
19 - 36 V DC
19 - 36 V DC
19 - 36 V DC
Intervalo de
temperaturas
-20 ... +70 °C
-20 ... +70 °C
-20 ... +70 °C
-20 ... +70 °C
Comunicação
MODBUS RS485
RTU
MODBUS RS485
RTU
MODBUS RS485
RTU
MODBUS RS485
RTU
0 ... +10 V ou 0 ... 20 mA
0 ... +10 V ou 0 ... 20 mA
0 ... +10 V ou 0 ... 20 mA
0 ... +10 V ou 0 ... 20 mA
Entrada analógica
N.º de entradas
analógicas
2
2
2
2
Entrada digital
0 ... 5 V low, 15 ... 24 V high
0 ... 5 V low,
15 ... 24 V high
0 ... 5 V low,
15 ... 24 V high
0 ... 5 V low,
15 ... 24 V high
N.º de entradas
digitales
1
1
1
1
max 30 V DC/AC
50 mA
max 30 V DC/AC
50 mA
max 30 V DC/AC
50 mA
max 30 V DC/AC
50 mA
Salida digital
N.º de salidas
digitales
Potência
absorvida
Dimensões
Erro máximo de
medição
42
1
1
1
1
< 1500 mW
< 1500 mW
< 1500 mW
< 1500 mW
225 x 109.5 x 92.2
265 x 109.5 x 92.2
295 x 109.5 x 92.2
370 x 109.5 x 92.2
± 1%
± 1%
± 1%
± 1%
PT
10. Diagrama da ligação
PV PANEL
Platina de potência
S2
X4
S3
+
+
–
S4
Input DC–
S5
X2
S6
X1
S7
Output DC–
S8
S1
TRANSCLINIC XI+
g
485+
Modbus RS485 RTU
X7
Power Supply 18...36 VDC
X6
Analoge input
X5
Analoge input
X8
Digital input
X4
Digital output
GND
485
485+
485–
g
Modbus RS485 RTU
X3
Modbus
X1
485–
GND
485
24 V
0V
Platina do CPU
VIN
IIN
GND
VIN
IIN
GND
IN1+
+
SW2
INVERTER
IN2–
–
IN2+
SW1
IN1–
43
PT
11. Ligação
A conexão/desconexão eléctrica só deve ser realizada por pessoal técnico
qualificado, devendo assegurar-se os seguintes pontos:
Antes da instalação / desinstalação do equipamento, confira se não existe
tensão em nenhum ponto da caixa.
n Use uma chave de parafusos com tamanho adequado da lâmina.
n Os cabos de ligação devem ser assentes firmes e sem tensão.
Alimentação. 24 V DC com uma F.A. comutada e com isolamento galvânico,
no conector X7, conforme o esquema. É preciso usar um fusível externo: Weidmüller WSI4 (1886580000), 5x20mm, de ação retardada.
Comunicação. Cablagem da linha Modbus nos conectores X1 e X3.
Entradas digitais com acoplagem óptica. Conector X8, entradas activas a
níveis entre 15 V DC e 24 V DC. Recomenda-se a utilização de F.A. comutada e
com isolamento galvânico.
Medição das intensidades de entrada. Conectar o polo negativo da ligação
em série dos módulos PV aos bornes X1 (em versões antigas) e X4 (existente
apenas no TRANSCLINIC 8i+ e 14i+). Se a entrada X4 estiver disponível, é
recomendado que se distribuam as cargas uniformemente entre ambas as
entradas.
Saída comum de medição de intensidades. Os circuitos comuns das
correntes de saída ligam-se ao(s) trilho(s) de contato sobre o circuito impresso.
Ao conectar toda a ligação dos polos negativos, atenção ao torque de aperto
correto de cada cavilha, quer esteja ligado um cabo ou não. Ligar sempre a
cabos eléctricos as platinas de saída cujos bornes de entrada estejam ligados.
Medição da tensão. Conecte o polo positivo do string PV na ligação X2. Se
pretender apenas medir a tensão do string PV, sem conectar uma entrada ou
uma saída de corrente, então ligue o polo negativo à ligação X2. Para todas as
outras situações, o polo negativo da medição de tensão no X2 está já ligado ao
polo negativo do string PV, razão pela qual este não precisa de ser ligado.
44
PT
12. Configuração
Através dos interruptores SW1 e SW2, configuram-se os seguintes parâmetros.
SW1
Direção de MODBUS, segundo a seguinte tabela.
SW1.8
OFF
SW1.7
OFF
SW1.6
OFF
SW1.5
OFF
SW1.4
OFF
SW1.3
OFF
SW1.2
OFF
SW1.1
ON
ID
1
OFF
OFF
OFF
OFF
OFF
OFF
OFF
OFF
OFF
OFF
OFF
ON
ON
OFF
OFF
OFF
2
4
OFF
OFF
OFF
OFF
ON
OFF
OFF
OFF
8
OFF
OFF
OFF
OFF
OFF
ON
OFF
ON
OFF
ON
OFF
OFF
OFF
OFF
OFF
OFF
OFF
OFF
OFF
OFF
OFF
OFF
OFF
OFF
16
32
64
ON
OFF
OFF
OFF
OFF
OFF
OFF
OFF
128
45
PT
SW2
Velocidade de transmissão de dados.
Protecção contra escrita da memória interna e bit de paridade.
SW2.1
ON
OFF
SW2.2
ON
OFF
SW2.3
ON
OFF
SW2.4
46
Velocidade TX/RX
9600 bps
19200 bps
Estado da memória
Memória protegida
Memória não protegida
Paridade
EVEN
NONE
apenas para utilização interna
PT
13. Instalação eléctrica
A instalação eléctrica deve ser efectuada por pessoal técnico qualificado,
conforme as normas gerais de electrotecnia e cumprindo as normas em vigor.
Devem ainda cumprir-se as normas regionais específicas. Estas abrangem, em
particular, a correcta execução técnica:
Para a protecção contra electrocussão, os equipamentos devem ser instalados
em espaços ou quadros eléctricos que cumpram os seguintes requisitos:
n Ao manejar e montar os instrumentos, respeitar as medidas de proteção da
ESD.
n Trilho de sustentação TS35
n A temperatura de instalação é de 10...40° C.
n Dispor de um dispositivo de comutação ou desconexão para desligar os
circuitos de alimentação e as altas tensões.
n O negativo do conector X2 está ligado electricamente ao circuito comum dos
negativos, na platina de corrente, pelo que a sua não ligação não afecta a
medição. Em caso algum se deve ligar a qualquer outro negativo do
equipamento. A ligação do negativo de qualquer dos Strings a este ponto
(negativo de X2), provocaria danos no equipamento.
n As dimensões correctas da cablagem e demais dispositivos.
n Recomenda-se a utilização de cabo blindado para as comunicações. Cabo
bus recomendado: Cabo Lapp UNITRONIC BUS LD 2x2x0,22 (Art.: 2170204).
n Os cabos de ligação deven ser bem apartados e são da secção adequada.
47
PT
n Secção com bornes e binário de aperto dos diferentes conectores:
X1, X4 Conexão de strings para medição da corrente (Input DC na
platina de potência):
n C
om invólucros de condutores de 0,5 até 10 mm², ou sem
invólucros de condutores de 0,5 até 16 mm².
n Binário de aperto 1,2-1.5 Nm.
n Comprimento a descarnar / medida das lâminas: 12 mm / 1,0 x 5,5
X2 (na platina de potência):
n C
om invólucros de condutores de 0,5 até 10 mm², ou sem
invólucros de condutores de 0,5 até 16 mm².
n Binário de aperto 1,2-1.5 Nm.
n Comprimento a descarnar / medida das lâminas: 12 mm / 1,0 x 5,5
X1, X3, X5, X6, X7, X8 (na platina do CPU):
n C
om invólucros de condutores de 0,2 até 2,5 mm², ou sem
invólucros de condutores de 0,2 até 4 mm².
n Binário de aperto 0,4-0.5 Nm.
n Comprimento a descarnar / medida das lâminas: 7 mm / 0,6 x 3,5
Trilho de contato (Output DC na platina de potência):
n Cabo com união circular de cabos M6.
Recomendação artigo 4R6 da empresa Klauke (25 mm²).
n Binário de aperto 4-4.5 Nm.
n Nos equipamentos Transclinic 8i+ e 14i+, em ambos os trilhos de contato tem
que ser conectada a mesma quantidade de strings PV para medição da corrente. Pelo menos tem que ser conectado um string PV por trilho de contato.
n A localização final do equipamento deve assegurar o isolamento e a proteção
contra incêndio, bem como uma resistência mecânica suficiente segundo a norma UNE-EN 60439-1.
48
PT
Proteção contra sobretensão:
A proteção contra sobretensão da Transclinic xi+ tem que ser garantida através
de uma instalação adicional de uma proteção contra sobretensão externa. Para
isso, devem ser usados cabos com a mesma seção e deve ser estabelecida a
ligação à terra.
Para os strings, utilize o artigo 8882350001 da Weidmüller.
Para a comunicação RS485, utilize os artigos 8924270000 (base) e 8924670000
(inserção) da Weidmüller.
Para a alimentação de tensão, utilize o artigo 8860360000 da Weidmüller.
Não é permitida uma corrente de fuga contra potencial de terra.
14. Comportamento de temperatura
O módulo foi concebido para poder funcionar dentro de um intervalo de
temperaturas alargado de -20 °C a +70 °C.
15. Instruções de segurança e advertências
Este equipamento destina-se exclusivamente às aplicações descritas no manual de funcionamento. Está classificado como categoria I e, portanto, não deverá
ser utilizado para medição noutras categorias.
Qualquer outra utilização considera-se como indevida e que pode vir a provocar
acidentes e danos irreversíveis, podendo chegar à destruição do próprio
equipamento.
Uma utilização não adequada faz caducar a garantia do fabricante.
49
50
EN
Instruction Manual 1. 2. 3. 4. 5. 6. 7. 8.
9.
10.
11.
12.
13.
14.
15.
Revisions
Approved use Qualified personnel
Accuracy of the technical documentation
CE Mark
Declaration of Conformity
Recycling in accordance with WEEE
Use
Specifications
Connection diagram
Connection Configuration Electrical installation
Temperature behaviour Safety instructions and notices
52
52
52
52
53
53
53
54
54
55
56
57
59
61
61
2011-05
51
EN
1. Revisions
Version
Date
Modification
02
05/11
Second edition
2. Approved use
NOTICE
This device is intended for use in applications as described in the
operating instructions only. Any other form of usage is not permitted
and can lead to accidents or destruction of the device. Using the
device in non-approved applications will lead immediately to the expiry of all guarantee and warranty claims on the part of the operator
against the manufacturer. Take the necessary precautions regarding
electrostatic discharge while handling and mounting the device.
WARNING: Danger
Using the selected device for purposes other than those specified
or failure to observe the operating instructions and warning notes
can lead to serious malfunctions that may result in personal injury or
damage to property.
3. Qualified personnel
This operating instruction has been written for trained and qualified personnel
who are familiar with the valid regulations and standards applicable to the field
of application.
4. Accuracy of the technical documentation
This operating instruction has been written with due care and attention.
However, unless otherwise required by law we do not guarantee that the data,
images and drawings are accurate or complete nor do we accept liability for
their contents. Weidmüller’s general terms and conditions of sale apply in their
respective valid form. Subject to alteration without notice.
52
EN
5. CE Mark
This product fulfils the guidelines issued by the European Union (EU) and is
therefore entitled to carry the CE mark.
6. Declaration of Conformity
The product fulfils both the Low Voltage Directive 72/23/EEC and the EMC
Directive 89/336/EEC.
7. Recycling in accordance with WEEE
Purchasing our product gives you the opportunity, free of charge, to return the
device to Weidmüller at the end of its lifecycle.
The EU Directive 2002/ 96 EC (WEEE) regulates the return and
recycling of waste electrical and electronics equipment. Manufacturers
of electrical equipment are obliged as of 13/08/05 to take back and
recycle free of charge electrical equipment sold after that date. After
that date, electrical equipment must not be disposed through the ‘normal waste
disposal channels’. Electrical equipment must then be disposed of and recycled
separately. All devices that fall under the directive must feature this logo.
What we can do for you?
Weidmüller offers you the possibility of returning your old device to us at no
extra charge. Weidmüller will then professionally recycle and dispose of your
device in accordance with the applicable laws.
What do you have to do?
Once your device has reached the end of its service life, simply return it by
parcel service (in the box) to the Weidmüller subsidiary responsible for customer
care - we will then initiate the necessary recycling and disposal measures.
You will incur no costs or suffer any inconvenience.
53
EN
8. Use
Transclinics are equipment for remotely monitoring voltage and current and
capturing values from photovoltaic field strings.
The values measured are accessible through a “host” via MODBUS.
9. Specifications
Technical specifications according to the table:
Maximum no.
of strings
Maximum current
per string
Measurement
range
Transclinic 4i+
Transclinic 7i+
Transclinic 8i+
Transclinic 14i+
4
7
8
14
30 A DC
20 A DC
30 A DC
20 A DC
3..30 A DC
3..20 A DC
3..30 A DC
3..20 A DC
Maximum voltage
1000 V DC
1000 V DC
1000 V DC
1000 V DC
Supply of modules
19 - 36 V DC
19 - 36 V DC
19 - 36 V DC
19 - 36 V DC
Temperature
range
-20 ... +70 °C
-20 ... +70 °C
-20 ... +70 °C
-20 ... +70 °C
Communication
MODBUS RS485
RTU
MODBUS RS485
RTU
MODBUS RS485
RTU
MODBUS RS485
RTU
Analogue input
0 ... +10 V or 0 ... 20 mA
0 ... +10 V or 0 ... 20 mA
0 ... +10 V or 0 ... 20 mA
0 ... +10 V or 0 ... 20 mA
Number of
analogue inputs
2
2
2
2
0 ... 5 V low, 15 ... 24 V high
0 ... 5 V low,
15 ... 24 V high
0 ... 5 V low,
15 ... 24 V high
0 ... 5 V low,
15 ... 24 V high
Digital inputs
Number of digital
inputs
Digital output
Number of digital
outputs
Power
consumption
Dimensions
Maximum measurement error
54
1
1
1
1
max 30 V DC/AC
50 mA
max 30 V DC/AC
50 mA
max 30 V DC/AC
50 mA
max 30 V DC/AC
50 mA
1
1
1
1
< 1500 mW
< 1500 mW
< 1500 mW
< 1500 mW
225 x 109.5 x 92.2
265 x 109.5 x 92.2
295 x 109.5 x 92.2
370 x 109.5 x 92.2
± 1%
± 1%
± 1%
± 1%
EN
10. Connection diagram
PV PANEL
Power board
S2
X4
S3
+
+
–
S4
Input DC–
S5
X2
S6
X1
S7
Output DC–
S8
S1
TRANSCLINIC XI+
g
485+
Modbus RS485 RTU
X7
Power Supply 18...36 VDC
X6
Analoge input
X5
Analoge input
X8
Digital input
X4
Digital output
GND
485
485+
485–
g
Modbus RS485 RTU
X3
Modbus
X1
485–
GND
485
24 V
0V
CPU board
VIN
IIN
GND
VIN
IIN
GND
IN1+
+
SW2
INVERTER
IN2–
–
IN2+
SW1
IN1–
55
EN
11. Connection
Electrical connection/disconnection may only be made by qualified technical
personnel, and the following points must be assured:
Be sure that there is no voltage applied to any part of the housing before installing or removing the equipment.
n Always use a screwdriver with the correct blade size.
n The connecting cable must be routed so that it is firmly positioned and fitted
with a strain relief mechanism.
Power supply. 24 V DC with a switched power supply and galvanised insulation, in the X7 connector, according to the diagram. This product fulfils the Low
Voltage Directive 2006/95/EC, the EMC Directive 2004/108/EC and the Product
Safety Directive 01/95/EC (DIN EN 61010-1).
Communication. Wiring of the Modbus line in connectors X1 and X3.
Opto-coupled Digital inputs. X8 Connector, inputs active at levels between
15 V DC and 24 V DC. It is advisable to use switched power supplies with
galvanised insulation.
Input intensities measurement. Connect the minus pole from the series
circuit of the PV modules to the X1 terminals (for all versions) and to X4 (only
available with the TRANSCLINIC 8i+ and 14i+). If Input X4 is available, we
recommend distributing the load between the two inputs equally.
Intensities measurement common output. Connect the shared connection
for the output currents to the busbar(s) on the circuit board. When connecting
the common negative poles, be sure to use the proper torque on each stud, regardless of whether a cable is connected or not. Always wire the output platens
whose input terminals are connected.
Voltage measurement. Connect the positive pole from the PV string to the X2
connection. If you only need to measure voltage from the PV string without connecting any current input or output, then connect the negative pole to the X2
connection. For all other cases, the negative pole of the voltage measurement at
X2 is already connected with the negative pole of the PV string; so no additional
connection is required.
56
EN
12. Configuration
Use the SW1 and SW2 switches to configure the following parameters.
SW1
The following table specifies the MODBUS addresses.
SW1.8
OFF
SW1.7
OFF
SW1.6
OFF
SW1.5
OFF
SW1.4
OFF
SW1.3
OFF
SW1.2
OFF
SW1.1
ON
ID
1
OFF
OFF
OFF
OFF
OFF
OFF
OFF
OFF
OFF
OFF
OFF
ON
ON
OFF
OFF
OFF
2
4
OFF
OFF
OFF
OFF
ON
OFF
OFF
OFF
8
OFF
OFF
OFF
OFF
OFF
ON
OFF
ON
OFF
ON
OFF
OFF
OFF
OFF
OFF
OFF
OFF
OFF
OFF
OFF
OFF
OFF
OFF
OFF
16
32
64
ON
OFF
OFF
OFF
OFF
OFF
OFF
OFF
128
57
EN
SW2
Data transmission speed.
Protection against writing the internal memory and parity bit.
SW2.1
ON
OFF
SW2.2
ON
OFF
TX/RX Speed
9600 bps
19200 bps
Memory status
Memory protected
Memory not protected
SW2.3
ON
Parity
EVEN
OFF
NONE
SW2.4
58
Only for internal use
EN
13. Electrical installation
Electrical installation must be carried out by qualified technical personnel in
compliance with general electrical engineering regulations and current
legislation. Specific regional standards must also be complied with. These
cover, specifically, the correct technical execution:
For protection against electrocution, the equipment must be installed in housings or electrical panels that comply with the following requirements:
n Take the necessary precautions regarding electrostatic discharge while han-
dling and mounting the device.
n TS35 DIN rail
n The installation temperature range is 10 to 40 ° C.
n There must be a switch or disconnection device to disconnect power supply
circuits and high voltages.
n The negative of the X2 connector is electrically connected to the common
negatives on the current platen, which is why its non-connection does not
affect the measurement. Under no circumstances must it be connected to
any other negative of the equipment. Connection of the negative of any of the
strings to this point (X2 negative), may damage the equipment.
n Correct sizing of the wiring and other devices.
n We recommend the use of shielded cable for communications. Recommend-
ed bus cable: Lapp cable UNITRONIC BUS LD 2x2x0,22 (Article: 2170204).
n Fasten the connection cables firmly and ensure they are from the correct
section.
59
EN
n Terminal capacity section and tightening torque for the different connectors:
X1, X4 String connections for measuring current (Input DC to power
board):
n With ferrules: from 0.5 to 10 mm²; or without ferrules from
0.5 to 16 mm².
n Tightening torque 1.2-1.5 Nm
n Stripping length / blade size: 12 mm / 1,0 x 5,5
X2 (on power board):
n With ferrules: from 0.5 to 10 mm²; or without ferrules from
0.5 to 16 mm².
n Tightening torque 1.2-1.5 Nm
n Stripping length / blade size: 12 mm / 1,0 x 5,5
X1, X3, X5, X6, X7, X8 (on CPU board):
n With ferrules: from 0.2 to 2,5 mm²; or without ferrules from
0.2 to 4 mm².
n Tightening torque 0.4-0.5 Nm
n Stripping length / blade size: 7 mm / 0,6 x 3,5
Busbar (Output DC to power board):
n Cable with M6 ring cable connector.
We recommend article 4R6 from Klauke GmbH (25 mm²)
n Tightening torque between 4-4.5 Nm
n For the Transclinic 8i+ and 14i+, the same number of PV strings (for measur-
ing current) must be connected to both busbars. At least one PV string must
be connected per busbar.
n The final location of the device must provide sufficient fire protection in com-
pliance with the UNE-EN 60439-1 standard. It must also provide sufficient
mechanical support.
60
EN
Surge protection:
Surge protection for the Transclinic xi+ must be ensured using an additional installation with an external surge voltage protection mechanism. Use cables with
the same cross-sections when establishing the connection to the earth.
Use Weidmüller article number 8882350001 for the strings.
Use Weidmüller article number 8924270000 (the base) and article number
8924670000 (the insert) for the RS485 communications.
Use Weidmüller article number 8860360000 for the power supply.
No leakage current relative to the earthing potential is permitted.
14. Temperature behaviour
This module is designed to be able to work within a temperature range of -20 °C to +70 °C.
16. Safety instructions and notices
This equipment is intended exclusively for the applications described in the
operating manual. It is catalogued as category I and must therefore not be used
for measurements in any other category.
Any other use is considered improper use, which may result in accidents and
irreversible damages, even leading to the destruction of the equipment itself.
Improper or unintended usage will lead to the expiration of all warranty claims
against Weidmüller.
61
62
DE
Bedienungsanleitung 1. 2. 3. 4. 5. 6. 7. 8.
9.
10.
11.
12.
13.
14.
15.
Revisionsverlauf
Bestimmungsgemäßer Gebrauch Fachpersonal
Richtigkeit technische Dokumentation
CE-Kenzeichnung
Konformitätserklärung
Recycling nach WEEE
Gebrauch
Angaben
Anschlussplan
Anschluss
Konfiguration
Elektroinstallation
Temperaturverhalten Sicherheitsvorschriften und –hinweise
64
64
64
64
65
65
65
66
66
67
68
69
71
73
73
Ausgabe: Mai 2011
63
DE
1. Revisionsverlauf
Version
Datum
Änderung
02
05/11
2. Ausgabe
2. Bestimmungsgemäßer Gebrauch
ACHTUNG
Das Gerät ist nur für die in der Bedienungsanleitung beschriebenen
Anwendungen bestimmt. Eine andere Verwendung ist unzulässig
und kann zu Unfällen oder Zerstörung des Gerätes führen. Diese
Anwendungen führen zu einem sofortigen Erlöschen jeglicher
Garantie- und Gewährleistungsansprüche des Bedieners gegenüber
dem Hersteller. Bei Handhabung und Montage der Geräte ESD
Schutzmaßnahmen berücksichtigen.
WARNUNG: Gefahrenstelle
Ein Einsatz des ausgewählten Produktes außerhalb der Spezifikation
oder Missachtung der Bedienhinweise und Warnhinweise kann zu
folgenschweren Fehlfunktionen derart führen, dass Personen bzw.
Sachschaden entstehen kann.
3. Fachpersonal
Diese Bedienungsanleitung wendet sich an ausgebildetes Fachpersonal, das
sich mit den geltenden Bestimmungen und Normen des Verwendungsbereichs
auskennt.
4. Richtigkeit technische Dokumentation
Diese Bedienungsanleitung wurde mit großer Sorgfalt erstellt. Für die Richtigkeit
und Vollständigkeit der Daten, Abbildungen und Zeichnungen wird keine Gewähr oder Haftung übernommen, soweit diese nicht gesetzlich vorgeschrieben
ist. Es gelten die Allgemeinen Verkaufsbedingungen von Weidmüller in ihrem
jeweils gültigen Stand. Änderungen vorbehalten.
64
DE
5. CE-Kenzeichnung
Das Produkt entspricht den Richtlinien der Europäischen Gemeinschaft (EU) und
ist somit CE konform.
6. Konformitätserklärung
Das Produkt erfüllt die Niederspannungsrichtlinien 2006/95/CE, die EMV
Richtlinie 2004/108/CE und die Produktsicherheitsrichtlinie 01/95/EG (DIN EN
61010-1).
7. Recycling nach WEEE
Sehr geehrter Weidmüller-Kunde, mit dem Erwerb unseres Produktes haben
Sie die Möglichkeit, das Gerät nach Ende seines Lebenszyklus an Weidmüller
zurückzugeben.
Die WEEE (EU-Richtlinie 2002/96 EG) regelt die Rücknahme und das
Recycling von Elektroaltgeräten. Hersteller von Elektrogeräten sind ab
dem 13.8.2005 dazu verpflichtet, Elektrogeräte, die nach diesem
Datum verkauft werden, kostenfrei zurückzunehmen und zu recyceln.
Elektrogeräte dürfen dann nicht mehr in die „normalen“ Abfallströme eingebracht werden. Elektrogeräte sind separat zu recyceln und zu entsorgen.
Alle Geräte, die unter diese Richtlinie fallen, sind mit diesem Logo gekennzeichnet.
Was können wir für Sie tun?
Weidmüller bietet Ihnen darum eine kostenneutrale Möglichkeit Ihr altes Gerät
an uns abzugeben. Weidmüller wird dann Ihr Gerät, nach der aktuellen Gesetzeslage, fachgerecht recyceln und entsorgen.
Was müssen Sie tun?
Nachdem Ihr Gerät sein Lebensende erreicht hat, senden Sie es einfach per
Parcelservice (im Karton) an das Weidmüller Tochterunternehmen, welches Sie
betreut, wir übernehmen dann alle anfallenden Recycling- und Entsorgungsmaßnahmen.
Ihnen entstehen dadurch keine Kosten und Unannehmlichkeiten.
65
DE
8. Gebrauch
Die Transclinic sind Geräte zur Fernüberwachung von Spannung und Strom; sie
erfassen die von den Strings des Solarfeldes stammenden Werte.
Die gemessenen Werte können über einen Host mittels MODBUS abgerufen werden.
9. Angaben
Technische Angaben gemäß Tabelle:
Maximale Anzahl
an Strings
Maximalstrom
pro String
Messbereich
Maximalspannung
Transclinic 4i+
Transclinic 7i+
Transclinic 8i+
Transclinic 14i+
4
7
8
14
30 A DC
20 A DC
30 A DC
20 A DC
3..30 A DC
3..20 A DC
3..30 A DC
3..20 A DC
1000 V DC
1000 V DC
1000 V DC
1000 V DC
Versorgungsspannung
19 - 36 V DC
19 - 36 V DC
19 - 36 V DC
19 - 36 V DC
Temperaturbereich
-20 ... +70 °C
-20 ... +70 °C
-20 ... +70 °C
-20 ... +70 °C
Kommunikation
MODBUS RS485
RTU
MODBUS RS485
RTU
MODBUS RS485
RTU
MODBUS RS485
RTU
Analogeingang
0 ... +10 V oder 0 ... 20 mA
0 ... +10 V oder 0 ... 20 mA
0 ... +10 V oder 0 ... 20 mA
0 ... +10 V oder 0 ... 20 mA
Anzahl
Analogeingänge
2
2
2
2
0 ... 5 V low, 15 ... 24 V high
0 ... 5 V low,
15 ... 24 V high
0 ... 5 V low,
15 ... 24 V high
0 ... 5 V low,
15 ... 24 V high
Digitaleingang
Anzahl
Digitaleingänge
1
1
1
1
Digitalausgang
max 30 V DC/AC
50 mA
max 30 V DC/AC
50 mA
max 30 V DC/AC
50 mA
max 30 V DC/AC
50 mA
Anzahl
Digitalausgänge
1
1
1
1
Leistungsaufnahme
Abmessungen
Maximaler
Messfehler
66
< 1500 mW
< 1500 mW
< 1500 mW
< 1500 mW
225 x 109.5 x 92.2
265 x 109.5 x 92.2
295 x 109.5 x 92.2
370 x 109.5 x 92.2
± 1%
± 1%
± 1%
± 1%
DE
10. Anschlussplan
PV PANEL
Leistungsplatine
S2
X4
S3
+
+
–
S4
Input DC–
S5
X2
S6
X1
S7
Output DC–
S8
S1
TRANSCLINIC XI+
g
485+
Modbus RS485 RTU
X7
Power Supply 18...36 VDC
X6
Analoge input
X5
Analoge input
X8
Digital input
X4
Digital output
GND
485
485+
485–
g
Modbus RS485 RTU
X3
Modbus
X1
485–
GND
485
24 V
0V
CPU-Platine
VIN
IIN
GND
VIN
IIN
GND
IN1+
+
SW2
INVERTER
IN2–
–
IN2+
SW1
IN1–
67
DE
11. Anschluss
Der elektrische Anschluss bzw. die Abschaltung darf nur von ausgebildetem Fachpersonal durchgeführt werden, wobei folgende Punkte zu beachten sind:
Vor Installation / Deinstallation der Anlage ist darauf zu achten, dass keinerlei Spannung an irgendeinem Punkt des Gehäuses anliegt.
n Es ist ein Schraubendreher mit geeigneter Klingengröße zu verwenden.
n Die Anschlusskabel sind fest und zugentlastet zu verlegen.
Versorgung. 24 V DC mit einem galvanisch getrennten Schaltnetzteil (z.B. Weidmüller PRO-M) am Anschluss X7 gemäß Anschlussdiagramm. Eine externe Sicherung ist
einzusetzen: Weidmüller WSI4 (1886580000), 5x20 mm, träge.
Kommunikation. Verkabelung der Modbus-Linie an den Anschlüssen X1 und X3.
Optoelektronische Digital-Eingänge. Anschluss X8, aktive Eingänge mit einer
Spannung von 15 V DC bis 24 V DC. Es wird empfohlen ein galvanisch getrenntes
Schaltnetzteil zu verwenden.
Messung der Eingangsströme. Den Minuspol der Reihenschaltung der PV-
Module an die Klemmen X1 (bei allen Ausführungen) und X4 (nur bei TRANSCLINIC
8i+ und 14i+ vorhanden) anschließen. Sollte der Eingang X4 zur Verfügung stehen,
wird empfohlen, die Lasten zwischen den beiden Eingängen gleichmäßig auf zu teilen.
Gemeinsamer Ausgang Strommessung. Die gemeinsamen Anschlüsse der
Ausgangsströme an die Stromschiene(n) auf der Leiterplatte anschließen. Beim
Anschließen des gemeinsamen Anschlusses der Minuspole ist auf das richtige Anzugsdrehmoment jedes einzelnen Bolzens zu achten, egal ob ein Kabel angeschlossen ist oder nicht. Immer die Ausgangsplatinen verkabeln, deren Eingangsklemmen
angeschlossen sind.
Spannungsmessung. Den Pluspol des PV-Strings an den Anschluss X2 anschließen. Wenn man lediglich die Spannung des PV-Strings messen möchte, ohne einen
Stromeingang oder -ausgang anzuschließen, dann den Minuspol an den Anschluss
X2 anschließen. Für jeden anderen Fall ist der Minuspol der Spannungsmessung
bei X2 bereits mit dem Minuspol des PV-Strings verbunden, weshalb dieser nicht
anzuschließen ist.
68
DE
12. Konfiguration
Mithilfe der Schalter SW1 und SW2 werden folgende Parameter konfiguriert.
SW1
MODBUS-Adresse gemäß folgender Tabelle.
SW1.8
OFF
SW1.7
OFF
SW1.6
OFF
SW1.5
OFF
SW1.4
OFF
SW1.3
OFF
SW1.2
OFF
SW1.1
ON
ID
1
OFF
OFF
OFF
OFF
OFF
OFF
OFF
OFF
OFF
OFF
OFF
ON
ON
OFF
OFF
OFF
2
4
OFF
OFF
OFF
OFF
ON
OFF
OFF
OFF
8
OFF
OFF
OFF
OFF
OFF
ON
OFF
ON
OFF
ON
OFF
OFF
OFF
OFF
OFF
OFF
OFF
OFF
OFF
OFF
OFF
OFF
OFF
OFF
16
32
64
ON
OFF
OFF
OFF
OFF
OFF
OFF
OFF
128
69
DE
SW2
Geschwindigkeit der Datenübertragung.
Schreibschutz des Zentralspeichers und Paritätsbit.
SW2.1
ON
OFF
SW2.2
ON
OFF
Geschwindigkeit TX/RX
9600 bps
19200 bps
Speicherzustand
Speicher geschützt
Speicher nicht geschützt
SW2.3
ON
Parität
EVEN
OFF
NONE
SW2.4
70
nur zur internen Verwendung
DE
13. Elektroinstallation
Die Elektroinstallation ist von ausgebildetem Fachpersonal gemäß den allgemeinen elektrotechnischen Bestimmungen und unter Berücksichtigung der jeweils
gültigen Gesetzgebung durchzuführen. Desweiteren sind die speziellen Landesnormen zu beachten. Diese umfassen insbesondere die korrekte
technische Ausführung:
Zum Schutz gegen Stromschläge sind die Geräte in Gehäusen oder
Schaltschränken zu installieren, die nachfolgende Anforderungen erfüllen:
n Bei Handhabung und Montage der Geräte ESD Schutzmaßnahmen berück-
sichtigen.
n Tragschiene TS35
n Die Installationstemperatur beträgt 10...40° C.
n Vorhandensein einer Schalt- bzw. Abschalteinrichtung zum Trennen der
Versorgungs- und Hochspannungskreise.
n Der Minuspol des Anschlusses X2 ist elektrisch mit dem gemeinsamen
Anschluss der Minuspole an der Stromplatine verbunden, weshalb dieser,
sollte er nicht angeschlossen werden, keinen Einfluss hat auf die Messung.
Unter keinen Umständen darf er an einen anderen Minuspol am Gerät
angeschlossen werden. Der Anschluss des Minuspols eines beliebigen
Strings an diesen Punkt (Minuspol von X2) wirkt sich schädigend auf das
Gerät aus.
n Die richtige Bemessung der Kabel und sonstigen Einrichtungen.
n Es wird die Verwendung abgeschirmter Kabel für die Kommunikationsverbin-
dungen empfohlen. Empfohlene Buskabel: Lapp Kabel UNITRONIC BUS LD
2x2x0,22 (Art.: 2170204)
n Die Anschlusskabel sind fest zu verlegen und müssen den richtigen
Querschnitt aufweisen.
71
DE
n Leitungsquerschnitte und Anzugsmomente für die verschiedenen Klemmen:
1, X4 Stringanschlüsse zur Strommessung (Input DC- auf LeistungsX
platine)
nMit Aderendhülsen von 0,5 bis 10 mm² oder ohne Aderendhülsen
von 0,5 bis 16 mm².
n
Anzugsdrehmoment 1.2-1.5 Nm.
n
Abisolierlänge / Klingenmaß: 12 mm / 1,0 x 5,5
X2 (auf Leistungsplatine):
nMit Aderendhülsen von 0,5 bis 10 mm² oder ohne Aderendhülsen
von 0,5 bis 16 mm².
nAnzugsdrehmoment 1.2-1.5 Nm.
Abisolierlänge / Klingenmaß 12 mm / 1,0 x 5,5
n
X1, X3, X5, X6, X7, X8 (auf CPU-Platine):
nMit Aderendhülsen von 0,2 bis 2,5 mm² oder ohne
Aderendhülsen von 0,2 bis 4 mm².
nAnzugsdrehmoment 0.4-0.5 Nm.
Abisolierlänge / Klingenmaß 7 mm / 0,6 x 3,5
n
Stromschiene (Output DC- auf Leistungsplatine):
nKabel mit M6 Ringkabelverbinder.
Empfehlung: Artikel 4R6 von Fa. Klauke (25 mm²)
nAnzugsdrehmoment 4-4.5 Nm.
n Bei den Geräten Transclinic 8i+ und 14i+ müssen an beide Stromschienen eine gleiche Anzahl PV-Strings zur Strommessung angeschlossen werden. Es muss mindestens ein PV-String pro Stromschiene angeschlossen sein.
n Der endgültige Standort des Gerätes muss entsprechend der Norm
UNE-EN 60439-1 feuergeschützt sein sowie eine ausreichende mechanische Festigkeit aufweisen.
72
DE
Überspannungsschutz:
Der Überspannungsschutz von Transclinic xi+ muss über eine zusätzliche Installation eines externen Überspannungsschutzes gewährleistet werden. Hierbei sind Kabel gleichen Querschnitts zu verwenden um die Verbindung zur Erde herzustellen.
Für die Strings den Weidmüller Artikel 8882350001 verwenden.
Für die RS485 Kommunikation die Weidmüller Artikel 8924270000 (Sockel) und
8924670000 (Einsatz) verwenden.
Für die Spannungsversorgung die Weidmüller Artikel 8860360000 verwenden.
Es ist kein Leckstrom gegen Erdpotential zulässig.
14. Temperaturverhalten
Das Modul ist für den Betrieb innerhalb folgenden Temperaturbereiches
ausgelegt: -20 °C bis +70 °C.
15. Sicherheitsvorschriften und -hinweise
Dieses Gerät ist ausschließlich für die im Betriebshandbuch angegebenen
Anwendungen ausgelegt. Es ist als Klasse I eingestuft und darf somit nicht für
Messungen in anderen Kategorien verwendet werden.
Jegliche entgegen dem bestimmungsgemäßen Einsatz durchgeführte
Anwendung ist nicht erlaubt. Die Folge könnten Unfälle und irreversible
Schäden sein, die zur Zerstörung des Gerätes führen.
Nicht bestimmungsgemäßer Gebrauch führt zum Erlöschen von Garantieansprüchen gegen den Hersteller.
73
CONFIGURATION PARAMETERS for CURRENT, VOLTAGE,
TEMPERATURE, ANALOG INPUTS & DIGITAL OUTPUT
REGISTER ID
REGISTR. # DESCRIPTION
REGISTER1
40001
Spare 1
REGISTER2
40002
Module Configuration
REGISTER3
40003
STR01 - Current OFFSET Correction REGISTER4
40004
STR02 - Current OFFSET Correction REGISTER5
40005
STR03 - Current OFFSET Correction REGISTER6
40006
STR04 - Current OFFSET Correction REGISTER7
40007
STR05 - Current OFFSET Correction REGISTER8
40008
STR06 - Current OFFSET Correction REGISTER9
40009
STR07 - Current OFFSET Correction REGISTER10
40010
STR08 - Current OFFSET Correction REGISTER11
40011
STR09 - Current OFFSET Correction REGISTER12
40012
STR10 - Current OFFSET Correction REGISTER13
40013
STR11 - Current OFFSET Correction REGISTER14
40014
STR12 - Current OFFSET Correction REGISTER15
40015
STR13 - Current OFFSET Correction REGISTER16
40016
STR14 - Current OFFSET Correction REGISTER17
40017
V1 - Voltage OFFSET Correction REGISTER18
40018
VOID
REGISTER19
40019
T - Temperature OFFSET Correction REGISTER20
40020
STR01 - Current GAIN Correction REGISTER21
40021
STR02 - Current GAIN Correction REGISTER22
40022
STR03 - Current GAIN Correction REGISTER23
40023
STR04 - Current GAIN Correction REGISTER24
40024
STR05 - Current GAIN Correction REGISTER25
40025
STR06 - Current GAIN Correction REGISTER26
40026
STR07 - Current GAIN Correction REGISTER27
40027
STR08 - Current GAIN Correction 74
MIN
MAX
0
65535
UNITS
DATA
R/W
ModBus
FUNCTIONS
1
5
(See description)
UNSIG.INTEGER
R/W
3,6
-1024
1024
mA (See desc.)
SIGN. INTEGER
R/W
3,6
-1024
1024
mA (See desc.)
SIGN. INTEGER
R/W
3,6
-1024
1024
mA (See desc.)
SIGN. INTEGER
R/W
3,6
-1024
1024
mA (See desc.)
SIGN. INTEGER
R/W
3,6
-1024
1024
mA (See desc.)
SIGN. INTEGER
R/W
3,6
-1024
1024
mA (See desc.)
SIGN. INTEGER
R/W
3,6
-1024
1024
mA (See desc.)
SIGN. INTEGER
R/W
3,6
-1024
1024
mA (See desc.)
SIGN. INTEGER
R/W
3,6
-1024
1024
mA (See desc.)
SIGN. INTEGER
R/W
3,6
-1024
1024
mA (See desc.)
SIGN. INTEGER
R/W
3,6
-1024
1024
mA (See desc.)
SIGN. INTEGER
R/W
3,6
-1024
1024
mA (See desc.)
SIGN. INTEGER
R/W
3,6
-1024
1024
mA (See desc.)
SIGN. INTEGER
R/W
3,6
-1024
1024
mA (See desc.)
SIGN. INTEGER
R/W
3,6
-1024
1024
V (See desc.)
SIGN. INTEGER
R/W
3,6
SIGN. INTEGER
R/W
3,6
-1024
1024
ºC (See desc.)
SIGN. INTEGER
R/W
3,6
-1024
1024
1/1024 β
SIGN. INTEGER
R/W
3,6
-1024
1024
1/1024 β
SIGN. INTEGER
R/W
3,6
-1024
1024
1/1024 β
SIGN. INTEGER
R/W
3,6
-1024
1024
1/1024 β
SIGN. INTEGER
R/W
3,6
-1024
1024
1/1024 β
SIGN. INTEGER
R/W
3,6
-1024
1024
1/1024 β
SIGN. INTEGER
R/W
3,6
-1024
1024
1/1024 β
SIGN. INTEGER
R/W
3,6
-1024
1024
1/1024 β
SIGN. INTEGER
R/W
3,6
75
REGISTER ID
REGISTR. # DESCRIPTION
REGISTER28
40028
STR09 - Current GAIN Correction REGISTER29
40029
STR10 - Current GAIN Correction REGISTER30
40030
STR11 - Current GAIN Correction REGISTER31
40031
STR12 - Current GAIN Correction REGISTER32
40032
STR13 - Current GAIN Correction REGISTER33
40033
STR14 - Current GAIN Correction REGISTER34
40034
V1 - Voltage GAIN Correction REGISTER35
40035
VOID
REGISTER36
40036
T - Temperature GAIN Correction REGISTER37
40037
Digital Output
REGISTER38
40038
Analog 1 - OFFSET Correction
REGISTER39
40039
Analog 1 - GAIN Correction
REGISTER40
40040
Spare 2
REGISTER41
40041
Analog 2 - OFFSET Correction
REGISTER42
40042
Analog 2 - GAIN Correction
REGISTER403
40043
Spare 3
76
MIN
MAX
UNITS
DATA
R/W
ModBus
FUNCTIONS
-1024
1024
1/1024 β
SIGN. INTEGER
R/W
3,6
-1024
1024
1/1024 β
SIGN. INTEGER
R/W
3,6
-1024
1024
1/1024 β
SIGN. INTEGER
R/W
3,6
-1024
1024
1/1024 β
SIGN. INTEGER
R/W
3,6
-1024
1024
1/1024 β
SIGN. INTEGER
R/W
3,6
-1024
1024
1/1024 β
SIGN. INTEGER
R/W
3,6
-1024
1024
1/1024 β
SIGN. INTEGER
R/W
3,6
SIGN. INTEGER
R/W
3,6
3,6
-1024
1024
0
1
SIGN. INTEGER
R/W
UNSIG. INTEGER
R/W
-1024
1024
3,6
mA (See desc.)
SIGN. INTEGER
R/W
3,6
-1204
1024
0
65535
1/1024 β
SIGN. INTEGER
R/W
3,6
-1204
-1204
1024
mA (See desc.)
SIGN. INTEGER
R/W
3,6
1024
1/1024 β
SIGN. INTEGER
R/W
0
65535
3,6
1/1024 β
77
READINGS OF INSTANT RMS VALUES OF CURRENT, VOLTAGE,
TEMPERATURE, ANALOG INPUTS & DIGITAL INPUTS
REGISTER ID
REGISTR. # DESCRIPTION
INPUTS1
30001
Inputs INS1
0
INST_CUR_STR01
30002
Current STR01
0
INST_CUR_STR02
30003
Current STR02
0
INST_CUR_STR03
30004
Current STR03
0
INST_CUR_STR04
30005
Current STR04
0
INST_CUR_STR05
30006
Current STR05
0
INST_CUR_STR06
30007
Current STR06
0
INST_CUR_STR07
30008
Current STR07
0
INST_CUR_STR08
30009
Current STR08
0
INST_CUR_STR09
30010
Current STR09
0
INST_CUR_STR10
30011
Current STR10
0
INST_CUR_STR11
30012
Current STR11
0
INST_CUR_STR12
30013
Current STR12
0
INST_CUR_STR13
30014
Current STR13
0
INST_CUR_STR14
30015
Current STR14
0
INST_V1
30016
Voltage V1
0
INST_V2
30017
VOID
INST_TEMPER
30018
Temperature T1
RMS_CUR_STR01
30019
RMS CurrentSTR01
0
RMS_CUR_STR02
30020
RMS CurrentSTR02
0
RMS_CUR_STR03
30021
RMS CurrentSTR03
0
RMS_CUR_STR04
30022
RMS CurrentSTR04
0
RMS_CUR_STR05
30023
RMS CurrentSTR05
0
RMS_CUR_STR06
30024
RMS CurrentSTR06
0
RMS_CUR_STR07
30025
RMS CurrentSTR07
0
RMS_CUR_STR08
30026
RMS CurrentSTR08
0
RMS_CUR_STR09
30027
RMS CurrentSTR09
0
78
MIN
-200
MAX
UNITS
DATA
R/W
Mudbugs
FUNCTIONS
3
(See description)
UNSIG. INTEGER
R
4
65535
mA
UNSIG. INTEGER
R
4
65535
mA
UNSIG. INTEGER
R
4
65535
mA
UNSIG. INTEGER
R
4
65535
mA
UNSIG. INTEGER
R
4
65535
mA
UNSIG. INTEGER
R
4
65535
mA
UNSIG. INTEGER
R
4
65535
mA
UNSIG. INTEGER
R
4
65535
mA
UNSIG. INTEGER
R
4
65535
mA
UNSIG. INTEGER
R
4
65535
mA
UNSIG. INTEGER
R
4
65535
mA
UNSIG. INTEGER
R
4
65535
mA
UNSIG. INTEGER
R
4
65535
mA
UNSIG. INTEGER
R
4
65535
mA
UNSIG. INTEGER
R
4
65535
V
UNSIG. INTEGER
R
4
UNSIG. INTEGER
R
4
800
ºC x 10
SIGN. INTEGER
R
4
65535
mA
UNSIG. INTEGER
R
4
65535
mA
UNSIG. INTEGER
R
4
65535
mA
UNSIG. INTEGER
R
4
65535
mA
UNSIG. INTEGER
R
4
65535
mA
UNSIG. INTEGER
R
4
65535
mA
UNSIG. INTEGER
R
4
65535
mA
UNSIG. INTEGER
R
4
65535
mA
UNSIG. INTEGER
R
4
65535
mA
UNSIG. INTEGER
R
4
79
REGISTER ID
REGISTR. # DESCRIPTION
RMS_CUR_STR10
30028
RMS CurrentSTR10
0
RMS_CUR_STR11
30029
RMS CurrentSTR11
0
RMS_CUR_STR12
30030
RMS CurrentSTR12
0
RMS_CUR_STR13
30031
RMS CurrentSTR13
0
RMS_CUR_STR14
30032
CurrentSTR14
0
RMS_V1
30033
RMS Voltage V1
0
RMS_V2
30034
VOID
RMS_TEMPER
30035
RMS Temperature T1
VERS_HARD
30036
Hardware Version
0
VERS_SOFT
30037
Software Version
0
INST_ANALOG1
30038
Analog 1 Instantaneous Value
0
RMS_ANALOG1
30039
Analog 1 RMS Value
0
INST_ANALOG2
30040
Analog 2 Instantaneous Value
0
RMS_ANALOG2
30036
Analog 2 RMS Value
0
80
MIN
-200
MAX
UNITS
DATA
R/W
Mudbugs
FUNCTIONS
65535
mA
UNSIG. INTEGER
R
4
65535
mA
UNSIG. INTEGER
R
4
65535
mA
UNSIG. INTEGER
R
4
65535
mA
UNSIG. INTEGER
R
4
65535
mA
UNSIG. INTEGER
R
4
65535
V
UNSIG. INTEGER
R
4
UNSIG. INTEGER
R
4
800
ºC x 10
SIGN. INTEGER
R
4
9999
(See description)
UNSIG. INTEGER
R
4
9999
(See description)
UNSIG. INTEGER
R
4
1000
% (See description)
UNSIG. INTEGER
R
4
1000
% (See description)
UNSIG. INTEGER
R
4
1000
% (See description)
UNSIG. INTEGER
R
4
1000
(See description)
UNSIG. INTEGER
R
4
81
REGISTER INFORMATION OF TABLE: CONFIGURATION PARAMETERS
for CURRENT , VOLTAGE, TEMPERATURE , ANALOG INPUTS & DIGITAL
OUTPUT
REGISTER 40002:
MAXIMUM CURRENT OF EACH STRING
Register
VALUE
For MODULE
Type:
1
2
4
5
CPU + 4xi
CPU + 8xi
CPU + 7xi
CPU + 14xi
REGISTER 40003 to 40016:
REGISTER 40020 to 40036:
REGISTER 40017:
REGISTER 40034:
REGISTER 40019:
REGISTER 40036: REGISTER 40037: 01
02
03
04
05
30A
30A
30A
30A
--
06
--
30A
30A
30A
30A
30A
30A
20A
20A
20A
20A
20A
20A
20A
20A
20A
20A
20A
20A
Current OFFSET Correction of every STRING
(STR1 to STR14).
Current GAIN Correction of every STRING
(STR1 to STR14).
Voltage OFFSET Correction of V1.
Voltage GAIN Correction of V1.
Temperature OFFSET Correction of T1.
Temperature GAIN Correction of T1.
Digital Output Command: 0-> turn off ,
1--> turn on
REGISTER 40038 and 40041: Value OFFSET Correction of every Analog input
(Analog1 and Analog2).
REGISTER 40039 and 40042: Value GAIN Correction of every Analog input
(Analog1 and Analog2).
82
MAXIMUM CURRENT OF EACH STRING
07
08
09
10
11
12
13
--
--
--
--
--
--
--
14
--
--
--
30A
30A
--
--
--
--
--
--
--
--
20A
--
--
--
--
--
--
--
--
--
20A
20A
20A
20A
20A
20A
20A
20A
20A
20A
83
REGISTER INFORMATION OF TABLE: READINGS OF INSTANT RMS
VALUES OF CURRENT , VOLTAGE, TEMPERATURE , ANALOG INPUTS &
DIGITAL INPUTS.
REGISTER 30001: REGISTER 30002 to 30015:
REGISTER 30019 to 30032:
REGISTER 30016:
REGISTER 30033:
REGISTER 30018:
REGISTER 30036:
REGISTER 30037:
Digital Inputs Status: IN1 and IN2
Instantaneous Current of every STRING (STR1
to STR14).
RMS Current of every STRING (STR1 to
STR14).
Instantaneous Voltage of V1.
RMS Voltage of V1.
Instantaneous Temperature of T1.
REGISTER 30035: RMS Temperature of T1.
REGISTER 30038 and 30040: Instantaneous Value of Analog Inputs
(Analog1 and Analog2). % of the MAXIMUM Value (20 mA or 10V)
REGISTER 30039 and 30041: RMS Value of Analog Inputs
(Analog1 and Analog2). % of the MAXIMUM Value (20 mA or 10V)
84
HARDWARE Version
SOFTWARE Version
“Version:
00.01 to 99.99”


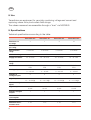
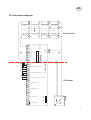

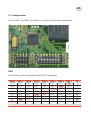


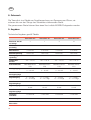
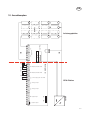


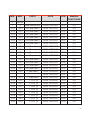
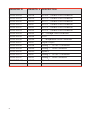


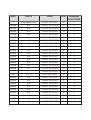
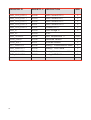
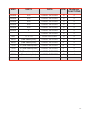
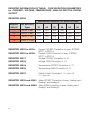
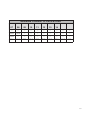
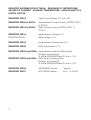
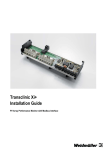


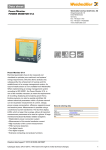


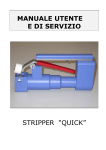
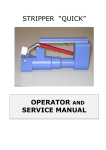


![Fronius String Control 125/25 [42,0410,1268]](http://vs1.manualzilla.com/store/data/006374199_1-8f1f21f20f580b642976bc9720b0b1fe-150x150.png)