1
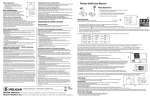
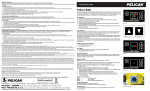
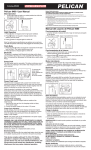
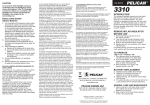
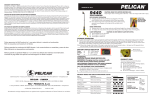
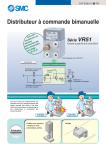
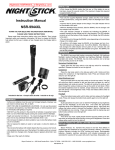
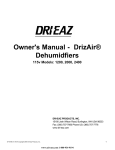
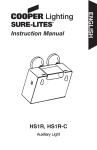
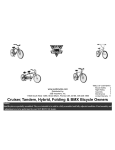
Catalog #9440
Pelican 9440 Remote Area Lighting System at BrightGuy.com
Battery Safety Information
WARNING: HANDLE AND STORE BATTERIES PROPERLY TO AVOID INJURY OR
DAMAGE. BATTERIES CAN BE DANGEROUS!
Most battery issues arise from improper handling of batteries, and particularly from the use of damaged or counterfeit batteries. Please review the information below to avoid serious injury and/or damage to your property.
Rechargeable Batteries
1. H
azardous location safety approvals for explosive environments are only valid for the Pelican battery
pack that is supplied with the light.
2. F
or replacement battery packs only use the approved Pelican battery pack for the model of the light
that you are using. The use of other battery packs will invalidate the safety approval.
3. L
ights should only be charged in a non-hazardous location.
4. L
ights should only be charged using the Pelican charger base that is supplied with the light.
5. L
ights should be charged and operated between the temperatures shown:
Charge Temperature: 0°C to 45°C (32°F to 113°F)
Operating Temperature: -20°C to 60°C (-4°F to 140°F)
6. Do not charge with alkaline batteries installed in the light. Attempting this can cause internal gas or heat
generation resulting in venting, explosion or possibly fire.
7. D
eep discharge of the rechargeable battery may cause batteries to vent potentially
dangerous gasses and electrolytes.
Always dispose of all batteries properly at an approved battery recycling center.
Información sobre seguridad de las pilas
AVISO: MANIPULAR Y GUARDAR LAS PILAS CON PRECAUCIÓN PARA EVITAR
DAÑOS LAS PILAS PUEDEN SER PELIGROSAS.
La mayoría de los problemas relacionados con las pilas surgen al utilizarlas incorrectamente y, sobre todo,
al emplear pilas falsas o en mal estado. Consultar la información siguiente para evitar daños personales o
en el producto.
Pilas recargables
1. L
os certificados de seguridad para zonas peligrosas en entornos explosivos solo se aplican al paquete
de pilas Pelican que se suministra con la linterna.
2. Para cambiar los paquetes de pilas utilizar únicamente las pilas Pelican homologadas para el modelo de
linterna correspondiente. El uso de otros paquetes de pilas anulará el certificado de seguridad.
3. No cargar la linterna en zonas peligrosas.
4. C
argar la linterna únicamente en la base de cargador Pelican que se suministra con la linterna.
5. L
as linternas deben cargarse y utilizarse en el rango de temperaturas que aparece:
Temperatura de carga: 0°C to 45°C (32°F to 113°F)
Temperatura de funcionamiento: -20°C to 60°C (-4°F to 140°F)
6.
o cargar la linterna con las pilas alcalinas dentro; podría generarse gas o calor en el interior,
N
que podría emanar y provocar una explosión o un incendio.
7. S
i las pilas recargables se descargan demasiado rápido pueden originarse fugas de gases
peligrosos y electrolitos.
Desechar las pilas en un centro de reciclado homologado.
Informations relatives à la sécurité des piles
AVERTISSEMENT : MANIPULER ET RANGER CORRECTEMENT LES PILES,
AFIN D’ÉVITER TOUT RISQUE DE LÉSION CORPORELLE OU DE DOMMAGE
MATÉRIEL LES PILES PEUVENT ÊTRE DANGEREUSES !
La plupart des problèmes liés aux piles sont dus à une manipulation incorrecte, particulier à
l’utilisation de piles endommagées ou contrefaites. Lire attentivement les informations ci-dessous, afin
d’éviter tout risque de lésion corporelle et/ou de dommage matériel de vos produits.
Piles rechargeables
1. L
es agréments de sécurité de sites dangereux pour les environnements explosifs sont valables
uniquement pour le bloc-piles Pelican fourni avec le système d’éclairage.
2. P
our remplacer le bloc-piles, utiliser uniquement un bloc-piles Pelican homologué pour le modèle
du système d’éclairage utilisé. L’utilisation d’autres piles risque d’invalider l’agrément de sécurité.
3. Le système d’éclairage doit être rechargé uniquement dans un site non dangereux.
4. L
e système d’éclairage doit être rechargé uniquement à l’aide de la base-chargeur Pelican fournie
avec le système d’éclairage.
5. L
es torches doivent être chargées et utilisées dans la plage des températures:
Température de charge: 0°C to 45°C (32°F to 113°F)
Température d’utilisation: -20°C to 60°C (-4°F to 140°F)
6. N
e pas recharger lorsque des piles alcalines sont installées dans le système d’éclairage. Dans le
cas contraire, cela pourrait entraîner une production interne de gaz ou de chaleur, provoquant un
dégazage, une explosion ou éventuellement un incendie.
7. U
n déchargement important des piles rechargeables peut provoquer un dégazage
potentiellement dangereux et une fuite de l’électrolyte.
Toujours mettre au rebut toutes les piles correctement dans un centre de recyclage
des piles agréé.
REMOTE AREA LIGHTING SYSTEM
USER MANUAL
CAUTION: PLEASE READ BEFORE USE.
WARNING: Keep fingers clear of moving parts at all times - failure to comply could result in injury.
Deployment operation
1. T
o deploy, release the red latch then lift he outer collar of he light head upwards
until all three legs release. (A)
2. Once all three legs are released, push the outer collar downwards until all three legs touch the ground.
3. O
nce all three legs have touched the ground, while supporting the outer collar, lift the switch
housing upwards until the red latch clicks into place. (B)
1. R
elease each of the cam clamps and raise the light head until the desired
height is reached. Then re-clamp to hold in place.
2. Rotate he light head to he desired posi ion.
Note: If the product is used in wet conditions, water may be captured at the base of the mast pole.
Turn upside down in order to drain.
Light operation
CAUTION: DO NOT DIRECT LIGHT INTO EYES.
1. Press switch once for full power
2. Press again for medium power
3. Press again for low power
4. Press again to switch off
The 9440 RALS features he ability to be used con inuously while connected to the charger.
The 9440 will default to the medium power level.
The full power level is not available while connected to he charger.
To select low power, press the switch once more. Press again to switch off.
The 9440 RALS is equipped with Bluetooth® capability and you are able to operate it via the Pelican RALS app.
To download the RALS app, visit the app store/play store and search for ‘Pelican RALS’.
Once installed the app icon should appear on your screen.
Some states and countries do not allow limitations on how long an implied warranty lasts or the exclusion or limita ion of incidental or consequen ial damages, so he above limitation or exclusion may not
apply to you. This warranty gives you specific legal rights, and you may have other rights which vary from state to state and country to country.
In Australia: The benefits provided to you under his warranty are in addition to your rights and remedies as a consumer under the Compe i ion and Consumer Act 2010 (C h). Nothing in his warranty
limits he rights or obligations of a party under provisions of the Competition and Consumer Act 2010 (Cth) in rela ion to the supply to consumers of goods which cannot be limited, modified or excluded.
If applicable, our goods come wi h guarantees that cannot be excluded under he Australian Consumer Law. You are enti led to a replacement or refund for a major failure and compensa ion for any other
reasonably foreseeable loss or damage. You are also entitled to have he goods repaired or replaced if he goods fail to be of acceptable quality and he failure does not amount to a major failure. If you
are not a consumer under the Compe i ion and Consumer Act 2010 (C h), then your rights may be limited. To make a warranty claim, he purchaser must contact Pelican Products Australia, Suite 2.33,
West Wing, Pla inum Bldg., Erina NSW 2250, Tel: +612 4367 7022. Any warranty claims shall be made by the purchaser as soon as practicable. The purchaser must obtain a return authorization number
from Pelican Customer Service prior to returning any product, and is responsible for paying for all warranty freight costs. If Pelican determines that any returned product is not defective, within he terms of
this warranty, the purchaser shall pay Pelican all costs of handling, return freight and repairs at Pelican’s prevailing rates. In he event that Pelican determines that any returned product is defec ive, within
the terms of this warranty, Pelican shall pay the purchaser all reasonable costs of the purchaser in making claim under this warranty.
CON LA GARANTÍA LIMITADA DE EXCELENCIA DE POR VIDA DE PELICAN
Pelican Products, Inc., ofrece una garantía de por vida en sus linternas contra roturas o defectos de fabricación. Esta garantía no cubre la lámpara ni las pilas. Las reclamaciones de garantía
de cualquier clase se considerarán nulas en caso de que el producto haya sufrido alteraciones, daños o modificaciones físicas de cualquier tipo, se haya hecho un uso incorrecto, abusivo o
negligente o haya sufrido accidentes. La garantía de por vida no cubre las maletas rotomoldeadas, los productos del RALS ni la parte de tejido de las mochilas.
GARANTIE D’EXCELLENCE À VIE LIMITÉE DE PELICAN
Pelican Products, Inc. garantit à vie ses torches contre la casse et les défauts de fabrica ion. Cette garantie ne couvre pas l’ampoule ou les piles. Toute demande de prise en charge sous garan ie,
de quelque nature que ce soit, sera refusée si le produit a été transformé, endommagé ou physiquement modifié d’une façon ou d’une autre, ou encore sujet à un traitement abusif, une mauvaise
utilisa ion, une négligence ou un accident. Pour une version complète et détaillée de la garantie, voir http://www.pelican.com/warranty.
La garan ie à vie ne couvre pas les valises rotomoulées, les produits RALS et la par ie en issu des sacs à dos.
009443-5472-001
5-14242
REV A AP/15
All trademarks and logos displayed herein are registered and unregistered trademarks of Pelican Products, Inc. and others.
Bluetooth is a registered trademark of Bluetooth Sig Inc
The Bluetooth® is active by default so once you open the app your 9440 RALS should appear under the
‘Found’ heading as per the following example: 9440B_000001 (the last six digits are your unique
Bluetooth® identification number). By clicking on this identification number the app should connect to the
9440 RALS and the identification number should now appear under the ‘Connected’ heading in the app
screen. You can connect to multiple Bluetooth® compatible RALS but only operate one at a time.
To switch on either press the ‘on/off’ toggle on the app screen or slide
the intensity slider towards the right until you reach your desired light intensity.
The app will remain connected until you either close the app or go out of range*.
You can override the app control by operating the 9440 RALS switch if desired.
*Range varies depending upon the environment in which the RALS is being used.
Storage operation
1. C
ollapse the mast by releasing the cam clamps one at a ime while suppor ing the weight of he light head.
2. P
osition he light head upwards then pull the red latch until he base of the product slides down to the floor.
3. L
ift the outer collar upwards until level with the light head. Then pull all three legs in using both hands and lift
hem over their locking fork at the base while holding the latch in the release position (as per diagram on main body).
Note: Please look closely at the bottom of the legs to understand how they are locked in place - the legs must lift
upwards before they can locate. The latch must be released for the legs to move upwards.
Battery status indication
Green Yellow Red =
=
=
100 - 65% capacity
65 - 30% capacity
30 - 0% capacity Charging
¶
CAUTION: PLEASE READ BEFORE USE.
USE APPROVED CHARGER ONLY.
ONLY USE CHARGER IN DRY ENVIRONMENT.
1. The charging socket is located at the base of the light.
Remove the dust cap and plug the charger in until it clicks.
2. Plug the charger into the electrical outlet.
3. The battery charge level is iden ified at the battery level indicator next to the power switch.
While charging, the indicator will flash red, yellow, green (depending on he battery level) and will change
to solid green once he charge is complete.
4. To remove, press the latch on the charger plug and pull.
Product care
To ensure maximum product life please observe the following points:
1. Keep moving parts free of foreign objects.
2. Do not stand on product.
3. Avoid use on extreme gradients.
4. Ensure charging dust cap is replaced after charging.
5. Do not use if damaged - contact dealer.
Battery conditioning
10221-184th Street • Edmonton, Alberta T5S 2J4 Canada • Tel.: 780.481.6076 • 780.481.9586 • www.pelican.ca
A
Mast operation
Bluetooth® Operation
REMOTE AREA LIGHTING SYSTEMS
PELICAN 1 YEAR LIMITED WARRANTY FOR RALS PRODUCTS
Pelican Products, Inc. (“Pelican”) warrants to the original purchaser its Remote Area Lighting Systems (RALS) and all other products manufactured by RALS against defects in materials and workmanship
under normal use, service, and maintenance for a period of twelve mon hs from the date of purchase. This warranty applies only to he original purchaser and is not transferable.
TO THE EXTENT PERMITTED BY LAW: (A) THIS WARRANTY IS IN LIEU OF ALL WARRANTIES, EXPRESS OR MPLIED, INCLUDING, BUT NOT LIMITED TO, THE IMPLIED WARRANTIES
OF MERCHANTABILITY AND FITNESS FOR A PARTICULAR PURPOSE; AND (B) ALL OTHER MPLIED WARRANTIES AND ANY LIABILITY NOT BASED UPON CONTRACT ARE HEREBY
DISCLA MED AND EXCLUDED.
TO THE EXTENT PERMITTED BY LAW, IN NO EVENT SHALL PELICAN BE LIABLE FOR ANY INDIRECT, PUNITIVE, INCIDENTAL OR CONSEQUENTIAL DAMAGES, OR SPECIAL DAMAGES,
REGARDLESS OF WHETHER A CLAIM FOR SUCH DAMAGES IS BASED ON WARRANTY, CONTRACT, NEGLIGENCE OR OTHERWISE. To he extent permitted by law, in no event shall Pelican’s
liability to he purchaser for damages hereunder exceed he purchase price of the product in respect of which damages are claimed.
With valid dated proof of purchase, Pelican will either repair or replace ay defective part, at our sole op ion. TO THE EXTENT PERMITTED BY LAW, THE REMEDIES HEREBY PROVIDED SHALL BE
THE SOLE AND EXCLUSIVE REMEDIES OF THE ORIGINAL PURCHASER. Any repaired or replacement part or unit is covered only for he unexpired portion of he warranty on the original product
purchased.
To make a warranty claim, the purchaser must contact Pelican Products, Inc. at 23215 Early Avenue, Torrance, CA 90505 or [email protected], or by calling 1-800-473-5422, extension 5.
Any warranty claims shall be made by the purchaser as soon as prac icable and in no event more than twelve mon hs from he date of purchase. The purchaser must provide valid dated proof of
purchase and obtain a return authoriza ion number from Pelican Customer Service prior to returning any product, and is responsible for paying for all warranty freight costs. If Pelican determines
that any returned product is not defec ive, within the terms of this warranty, the purchaser shall pay Pelican all costs of handling, return freight and repairs at Pelican’s prevailing rates.
All warranty claims of any nature are barred if the product has been altered or in any way physically changed, or subjected to abuse, misuse, negligence or accident.
© PELICAN PRODUCTS 2015
9440
PELICAN
™
It is important that the new battery in this product is given an initial conditioning. The charger should be left connected to the
product after the Green indicator on he charger is permanently on. In his state the battery receives a trickle charge and should be
left connected for 18-24 hours. There will be improvement to the light dura ion if this is repeated for the first 8-10 charge cycles.
B
9440
9440
REMOTE AREA LIGHTING SYSTEM
MANUAL DE USUARIO
MANUEL D’INSTRUCTIONS
ATTENTION : À LIRE AVANT TOUTE UTILISATION.
AVERTISSEMENT : Tenir en permanence les doigts éloignés des pièces mobiles –
ATENCIÓN: LEER LAS INSTRUCCIONES ANTES DE USAR LA LINTERNA.
ADVERTENCIA: No tocar las piezas móviles para evitar lesiones.
Montaje
1. Para desplegar la linterna, soltar el seguro rojo y levantar el collar exterior para soltar las tres patas. (A)
2. Una vez liberadas las patas, bajar el collar exterior hasta que toquen el suelo.
3. C
uando estén en el suelo, aguantar el collar exterior y levantar la carcasa del interruptor
hasta que el seguro rojo encaje en su sitio. (B)
le non-respect de cette consigne pourrait entraîner de sérieuses blessures.
Opération de déploiement
1. P
our déployer le système, tirer sur le loquet rouge puis faire glisser le collier externe vers le
haut jusqu’à ce que les trois pieds se libèrent. (A)
2. U
ne fois que les trois pieds ont été libérés, faire glisser le collier externe vers le bas jusqu’à ce
que les trois pieds touchent le sol.
3. U
ne fois que les trois pieds ont touché le sol, tout en maintenant le collier externe, faire glisser le
boîtier du commutateur vers le haut jusqu’à ce que le loquet rouge s’enclenche en émettant un clic. (B)
A
Funcionamiento del mástil
1. Soltar los seguros y levantar el cabezal de la linterna a la altura deseada. Volver a fijar los seguros.
2. Rotar el cabezal en la dirección deseada.
1. L
ibérer chacune des fixa ions de l’arbre et lever la tête de l’éclairage jusqu’à atteindre la hauteur souhaitée.
Ensuite, refermer les fixations pour maintenir le mât en place.
2. Faire pivoter la tête de l’éclairage dans la direction souhaitée.
Funcionamiento de la linterna
PRECAUCIÓN: NO DIRIGIR LA LUZ DIRECTAMENTE A LOS OJOS.
Pulsar el interruptor una vez para obtener la máxima intensidad.
Pulsar de nuevo para obtener una intensidad media.
Pulsar de nuevo para obtener la intensidad mínima.
Pulsar de nuevo para apagar la unidad.
El modelo 9440 RALS puede usarse mientras se está cargando. Por defecto funcionará con
intensidad media. El nivel de máxima potencia no está disponible mientras se está cargando.
Para bajar la potencia al mínimo, volver a pulsar el interruptor. Pulsar de nuevo para apagar la linterna.
Funcionamiento del Bluetooth®
El modelo 9440 RALS puede controlarse por Bluetooth® desde la aplicación RALS de Pelican.
Para descargar la aplicación RALS, entra en la App Store o la Play Store y busca
o “Pelican RALS”. Una vez instalada aparecerá el icono en la pantalla.
El Bluetooth® viene activado por defecto, por lo que al abrir la aplicación, la linterna 9440 RALS debe aparecer bajo el
título “Found” (encontrados), tal como aparece aquí: 9440B_000001 (los seis últimos dígitos corresponden al número
de identificación del Bluetooth®). Al seleccionar este número de identificación la aplicación se conecta a 9440 RALS
y acto seguido el mismo número aparece bajo el título “Connected” (conectado). Se pueden sincronizar varias linternas
RALS, pero solo puede funcionar una a la vez.
Para encender la linterna puedes pulsar el botón de encendido/apagado de
la aplicación o bien deslizar la barra de intensidad hacia la derecha hasta
alcanzar el nivel deseado. La aplicación seguirá conectada a menos que la cierres
o te salgas del rango de alcance*. Puedes desactivar el control desde la aplicación
activando el panel de control de la linterna 9440 RALS.
* El rango varía según el entorno en el que se esté utilizando el sistema RALS.
Cómo guardar la linterna
1.
2.
3.
Cerrar el mástil liberando los seguros uno a uno y sosteniendo a la vez el cabezal de la linterna.
E
l cabezal de la linterna debe mirar hacia arriba. A continuación presionar el seguro rojo hasta que la base del
producto toque el suelo.
L
evantar el collar exterior hasta la altura del cabezal. A con inuación introducir las tres patas con las dos manos y
levantarlas por encima de la horquilla de bloqueo de la base, manteniendo a la vez el seguro abierto (según se
muestra en el diagrama de la carcasa).
Observación: Fíjese detenidamente en la parte inferior de las patas para entender
cómo se bloquean. Las patas deben levantarse para poder colocarlas.
Es preciso soltar el seguro para poder subir las patas.
Indicador de estado de la batería
Verde: 100% Amarillo: 65 Rojo: 30 65% de su capacidad
30% de su capacidad 0% de su capacidad ¶
Carga
ATENCIÓN: LEER LAS INSTRUCCIONES ANTES DE USAR LA LINTERNA.
USAR ÚNICAMENTE UN CARGADOR HOMOLOGADO.
NO USAR EL CARGADOR EN ENTORNOS HÚMEDOS.
1. La toma del cargador se encuentra en la base de la linterna. Sacar la cubierta protectora y enchufar el cargador hasta oír un clic.
2. Enchufar el cargador a la corriente.
3. E
l nivel de carga de la batería aparece en el indicador que está junto al interruptor. Mientras se está cargando,
el indicador parpadeará en rojo, amarillo o verde (según el nivel de la batería) y una vez cargado, se mantendrá en verde.
4. Para sacar el cargador, presionar el seguro y extraer.
Mantenimiento del producto
Para garantizar la máxima duración, hay que tener en cuenta lo siguiente:
1. No introducir objetos extraños entre las piezas móviles.
2. No subirse encima del producto.
3. Evitar el uso en pendientes muy pronunciadas.
4. No olvidar volver a colocar en su sitio la cubierta protectora tras la operación de carga.
5. No u ilizar si se observan daños y contactar con el proveedor.
Acondicionar la batería
Es importante acondicionar la nueva batería del producto para obtener el máximo rendimiento. El producto debe quedarse
enchufado al cargador cuando la luz verde esté fija. En este estado la batería recibe una carga de mantenimiento y debe dejarse
enchufada de 18 a 24 horas. Si se repite este proceso durante los primeros 8 a 10 ciclos de carga aumentará la duración del haz de luz
A
Fonctionnement du mât
Observación: en caso de usar el producto en entornos húmedos, puede acumularse agua en la base del mástil. Dar la vuelta a la linterna para evacuarla.
1.
2.
3.
4.
REMOTE AREA LIGHTING SYSTEM
Remarque : Si le produit est utilisé dans un environnement humide, de l’eau peut s’accumuler à la base
du mât. Le retourner pour évacuer celle-ci.
Fonctionnement de l’éclairage
B
ATTENTION : NE PAS POINTER LA LUMIÈRE VERS LES YEUX.
1. Appuyer une fois sur le commutateur pour une puissance d’éclairage maximale.
2. Appuyer à nouveau pour une puissance d’éclairage moyenne.
3. Appuyer à nouveau pour une puissance d’éclairage faible.
4. Appuyer à nouveau pour éteindre.
Le système d’éclairage pour zones d’accès difficile 9440 RALS peut être utilisé en continu lorsqu’il est connecté au chargeur.
Par défaut, le système d’éclairage 9440 sera sur la posi ionL’éclairage à puissance maximale n’est pas disponible lorsque le
système est connecté au chargeur. Pour sélec ionner l’éclairage faible, appuyer une nouvelle fois sur le commutateur.
Appuyer à nouveau pour éteindre.
Fonctionnement Bluetooth®
Le système d’éclairage 9440 RALS est équipé d’une fonction Bluetooth® qui vous permet de contrôler
son fonctionnement via l’applica ion Pelican RALS.
Pour télécharger l’application RALS, se rendre sur l’App Store/Play Store et rechercher
Pelican RALS. Une fois installée, l’icône de l’application doit apparaître à l’écran.
Le Bluetooth® est actif par défaut, et donc, à l’ouverture de l’application, votre 9440 devrait apparaître sous l’intitulé “Found”
(Trouvé) comme dans l’exemple suivant : 9440B_000001 (les six derniers chiffres sont votre numéro d’identification
Bluetooth® unique). En cliquant sur ce numéro d’identification, l’application se connectera au système 9440 RALS
et le numéro d’identification devrait alors apparaître sous l’en-tête “Connected “(Connecté) sur l’écran de l’application.
Vous pouvez vous connecter à autant de systèmes d’éclairage RALS compatibles Bluetooth® que vous le souhaitez
mais ne pouvez en contrôler qu’un seul à la fois.
Pour allumer le système d’éclairage, vous pouvez soit presser le commutateur
“marche/arrêt “ sur l’écran de l’application, soit faire glisser le curseur
d’intensité vers la droite jusqu’à atteindre l’intensité lumineuse souhaitée.
L’application reste connectée jusqu’à sa fermeture ou jusqu’à ce qu’elle soit
hors de portée*. Il est possible de contourner la commande de l’application
au moyen du commutateur de la 9440 RALS, si souhaité.
* La portée varie selon l’environnement dans lequel le système RALS est utilisé.
Stockage
1. Replier le mât en détachant les fixations de l’arbre une par une tout en veillant à soutenir le poids de la tête d’éclairage.
2. Pointer la tête d’éclairage vers le haut, puis tirer sur le loquet rouge jusqu’à ce que la base du produit glisse jusqu’au sol.
3. F
aire glisser le collier externe vers le haut, jusqu’au niveau de la tête d’éclairage. Puis irer sur les trois pieds avec les
deux mains et les faire glisser au-dessus du niveau de leur fourche de verrouillage sur la base tout en maintenant le
loquet dans sa position de dégagement (voir le diagramme sur le corps principal).
Remarque : Bien observer le bas des pieds pour comprendre comment ceux-ci sont
maintenus en place – il faut remonter les pieds vers le haut avant qu’ils puissent prendre
position. Le loquet doit être soulevé pour que les pieds puissent être remontés.
Indication d’état de la batterie
Vert
Jaune Rouge =
=
=
100 - 65 % de sa capacité
65 - 30 % de sa capacité
30 - 0 % de sa capacité
En cours de chargement
¶
ATTENTION : À LIRE AVANT TOUTE UTILISATION.
UTILISER UNIQUEMENT UN CHARGEUR HOMOLOGUÉ.
UTILISER LE CHARGEUR UNIQUEMENT DANS UN ENVIRONNEMENT SEC.
1. L
a prise de chargement est située à la base de l’éclairage.
Retirer le cache anti-poussières et enfoncer le chargeur jusqu’à entendre un clic.
2. Brancher le chargeur dans la prise électrique.
3. L
e niveau de charge de la batterie est indiqué sur le voyant indicateur situé à côté de l’interrupteur.
Durant la charge, le voyant clignotera en rouge, jaune ou vert (en fonc ion du niveau de la batterie)
et restera vert (sans clignoter) une fois la charge complète.
4. Pour retirer le chargeur, appuyer sur le loquet situé sur la prise du chargeur et tirer.
Entretien du produit
Pour assurer au produit une durée de vie maximale, veuillez respecter les consignes suivantes :
1. Maintenir les pièces mobiles éloignées de tout objet étranger.
2. Ne pas se tenir debout sur le produit.
3. Éviter une utilisation sur des pentes extrêmes.
4. Remettre le cache an i-poussière en place une fois le chargement effectué.
5. Ne pas u iliser en cas de dommage – contacter le distributeur.
Entretien de la batterie
Il est important que la batterie neuve de ce produit reçoive un entretien initial. Une fois le témoin vert du chargeur allumé en permanence, le
chargeur doit rester connecté au produit. À ce stade, la batterie reçoit une charge d’entretien et doit rester connectée de 18 à 24 heures.
Si cette opération est répétée au cours des 8 à 10 premiers cycles de charge, l’éclairage bénéficiera d’une plus longue autonomie.
B