1
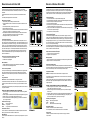
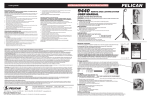
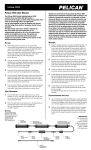
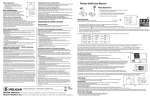
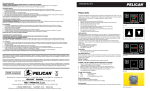
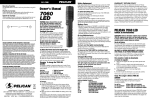
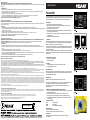
Battery Safety Information
WARNING: HANDLE AND STORE BATTERIES PROPERLY TO AVOID INJURY OR DAMAGE BATTERIES CAN BE DANGEROUS!
Most battery issues arise from improper handling of batteries, and particularly from the use of damaged or counterfeit batteries. Please review the information below to avoid serious injury and/or damage to
your property.
Rechargeable Batteries
1. H
azardous location safety approvals for explosive environments are only valid for the Pelican battery pack that is supplied with the light.
2. F
or replacement battery packs only use the approved Pelican battery pack for the model of the light that you are using. The use of other battery packs will invalidate the safety approval.
3. Lights should only be charged in a non-hazardous location.
4. Lights should only be charged using the Pelican charger base that is supplied with the light.
5. D
o not charge with alkaline batteries installed in the light. Attempting this can cause internal gas or heat generation resulting in venting, explosion or possibly fire.
6. Deep discharge of the rechargeable battery may cause batteries to vent potentially dangerous gasses and electrolytes.
Always dispose of all batteries properly at an approved battery recycling center.
Información sobre seguridad de las pilas
AVISO: MANIPULAR Y GUARDAR LAS PILAS CON PRECAUCIÓN PARA EVITAR DAÑOS LAS PILAS PUEDEN SER PELIGROSAS.
La mayoría de los problemas relacionados con las pilas surgen al utilizarlas incorrectamente y, sobre todo, al emplear pilas falsas o en mal estado. Consultar la información siguiente para evitar
daños personales o en el producto.
Pilas recargables
1. L
os certificados de seguridad para zonas peligrosas en entornos explosivos solo se aplican al paquete de pilas Pelican que se suministra con la linterna.
2. Para cambiar los paquetes de pilas utilizar únicamente las pilas Pelican homologadas para el modelo de linterna correspondiente. El uso de otros paquetes de pilas anulará el certificado de seguridad.
3. No cargar la linterna en zonas peligrosas.
4. C
argar la linterna únicamente en la base de cargador Pelican que se suministra con la linterna.
5. N
o cargar la linterna con las pilas alcalinas dentro; podría generarse gas o calor en el interior, que podría emanar y provocar una explosión o un incendio.
6. S
i las pilas recargables se descargan demasiado rápido pueden originarse fugas de gases peligrosos y electrolitos.
Desechar las pilas en un centro de reciclado homologado.
Informations relatives à la sécurité des piles
AVERTISSEMENT : MANIPULER ET RANGER CORRECTEMENT LES PILES, AFIN D’ÉVITER TOUT RISQUE DE LÉSION CORPORELLE OU DE DOMMAGE MATÉRIEL LES PILES
PEUVENT ÊTRE DANGEREUSES ! La plupart des problèmes liés aux piles sont dus à une manipulation incorrecte, en particulier à l’utilisation de piles endommagées ou contrefaites.
Lire attentivement les informations ci-dessous, afin d’éviter tout risque de lésion corporelle et/ou de dommage matériel de vos produits.
Piles rechargeables
1. L
es agréments de sécurité de sites dangereux pour les environnements explosifs sont valables uniquement pour le bloc-piles Pelican fourni avec le système d’éclairage.
2. P
our remplacer le bloc-piles, utiliser uniquement un bloc-piles Pelican homologué pour le modèle du système d’éclairage utilisé. L’utilisation d’autres piles risque d’invalider l’agrément de
sécurité.
3. Le système d’éclairage doit être rechargé uniquement dans un site non dangereux.
4. Le système d’éclairage doit être rechargé uniquement à l’aide de la base-chargeur Pelican fournie avec le système d’éclairage.
5. N
e pas recharger lorsque des piles alcalines sont installées dans le système d’éclairage. Dans le cas contraire, cela pourrait entraîner une production interne de gaz ou de chaleur, provoquant
un dégazage, une explosion ou éventuellement un incendie.
6. Un déchargement important des piles rechargeables peut provoquer un dégazage potentiellement dangereux et une fuite de l’électrolyte.
Toujours mettre au rebut toutes les piles correctement dans un centre de recyclage des piles agréé
PELICAN LIMITED LIFETIME GUARANTEE OF EXCELLENCE
Pelican Products, Inc. guarantees its lights for a lifetime against breakage or defects in workmanship. This guarantee does not cover the lamp or batteries.
Pelican will either repair or replace any defective product, at our sole option. TO THE EXTENT PERMITTED BY LAW, THE REMEDIES HEREBY PROVIDED SHALL BE THE EXCLUSIVE AND SOLE REMEDY OF THE PURCHASER.
TO THE EXTENT PERMITTED BY LAW: (A) THIS WARRANTY IS IN LIEU OF ALL WARRANTIES, EXPRESS OR IMPLIED, INCLUDING, BUT NOT LIMITED TO, THE IMPLIED WARRANTIES OF MERCHANTABILITY AND FITNESS FOR
A PARTICULAR PURPOSE; AND (B) ALL OTHER IMPLIED WARRANTIES AND ANY LIABILITY NOT BASED UPON CONTRACT ARE HEREBY DISCLAIMED AND EXCLUDED.
TO THE EXTENT PERMITTED BY LAW, IN NO EVENT SHALL PELICAN BE LIABLE FOR ANY INDIRECT, PUNITIVE, INCIDENTAL OR CONSEQUENTIAL DAMAGES, OR SPECIAL DAMAGES, REGARDLESS OF WHETHER A CLAIM
FOR SUCH DAMAGES IS BASED ON WARRANTY, CONTRACT, NEGLIGENCE OR OTHERWISE. To the extent permitted by law, in no event shall Pelican’s liability to the purchaser for damages hereunder exceed the purchase price of the
product in respect of which damages are claimed.
To make a warranty claim, the purchaser must contact Pelican Products, Inc. at 23215 Early Avenue, Torrance, CA 90505 or [email protected], or by calling 1-800-473-5422, extension 5.
Any warranty claims shall be made by the purchaser as soon as practicable. The purchaser must obtain a return authorization number from Pelican Customer Service prior to returning any product, and is responsible for paying for all warranty
freight costs. If Pelican determines that any returned product is not defective, within the terms of this warranty, the purchaser shall pay Pelican all costs of handling, return freight and repairs at Pelican’s prevailing rates.
All warranty claims of any nature are barred if the flashlight has been altered, damaged or in any way physically changed, or subjected to abuse, misuse, negligence or accident.
Some states and countries do not allow limitations on how long an implied warranty lasts or the exclusion or limitation of incidental or consequential damages, so the above limitation or exclusion may not apply to you. This warranty gives you specific legal rights, and you may have other rights which vary from state to state and country to country.
In Australia: The benefits provided to you under this warranty are in addition to your rights and remedies as a consumer under the Competition and Consumer Act 2010 (Cth). Nothing in this warranty limits the rights or obligations of a party
under provisions of the Competition and Consumer Act 2010 (Cth) in relation to the supply to consumers of goods which cannot be limited, modified or excluded. If applicable, our goods come with guarantees that cannot be excluded under the
Australian Consumer Law. You are entitled to a replacement or refund for a major failure and compensation for any other reasonably foreseeable loss or damage. You are also entitled to have the goods repaired or replaced if the goods fail to
be of acceptable quality and the failure does not amount to a major failure. If you are not a consumer under the Competition and Consumer Act 2010 (Cth), then your rights may be limited. To make a warranty claim, the purchaser must contact
Pelican Products Australia, Suite 2.33, West Wing, Platinum Bldg., Erina NSW 2250, Tel: +612 4367 7022. Any warranty claims shall be made by the purchaser as soon as practicable. The purchaser must obtain a return authorization number
from Pelican Customer Service prior to returning any product, and is responsible for paying for all warranty freight costs. If Pelican determines that any returned product is not defective, within the terms of this warranty, the purchaser shall pay
Pelican all costs of handling, return freight and repairs at Pelican’s prevailing rates. In the event that Pelican determines that any returned product is defective, within the terms of this warranty, Pelican shall pay the purchaser all reasonable costs
of the purchaser in making claim under this warranty.
Lifetime Guarantee does not cover Roto Molded cases, AALG products or fabric portion of backpacks. Refer to www.pelican.com/warranty for full details.
CON LA GARANTÍA LIMITADA DE EXCELENCIA DE POR VIDA DE PELICAN
Pelican Products, Inc., ofrece una garantía de por vida en sus linternas contra roturas o defectos de fabricación. Esta garantía no cubre la lámpara ni las pilas. Las reclamaciones de garantía de cualquier clase se considerarán nulas en caso
de que el producto haya sufrido alteraciones, daños o modificaciones físicas de cualquier tipo, se haya hecho un uso incorrecto, abusivo o negligente o haya sufrido accidentes. La garantía de por vida no cubre las maletas rotomoldeadas, los
productos del AALG ni la parte de tejido de las mochilas.
GARANTIE D’EXCELLENCE À VIE LIMITÉE DE PELICAN
Pelican Products, Inc. garantit à vie ses torches contre la casse et les défauts de fabrication. Cette garantie ne couvre pas l’ampoule ou les piles. Toute demande de prise en charge sous garantie,
de quelque nature que ce soit, sera refusée si le produit a été transformé, endommagé ou physiquement modifié d’une façon ou d’une autre, ou encore sujet à un traitement abusif, une mauvaise
utilisation, une négligence ou un accident. Pour une version complète et détaillée de la garantie, voir http://www.pelican.com/warranty.
La garantie à vie ne couvre pas les valises rotomoulées, les produits AALG et la partie en tissu des sacs à dos.
RoHS compliant
CATALOG No. 9460
Pelican 9460
The Pelican 9460 Remote Area Lighting System contains two LED light heads, two masts, a 12V
sealed lead acid batteries and a battery charger. Both light heads connected provide a maximum
output of 6000 lumens over a 7 hour period. The masts will extend to a height of 6 feet.
Mast Operation
1. Open the case and remove each mast and LED head.
2. Attach the LED head to the mast by screwing the light head pivot into the mast insert.
3. Close the case lid and stand the case upright.
4. Insert the masts into the pole mounts.
5. Insert the light head plugs into the green sockets on the sides of the product and twist the
green locking collar to secure the plug.
6. P
ull open the lever on the mast locking clamp and lift the LED head upwards then snap the
lever back into place.
7. To collapse the mast reverse the procedure.
Light operation
After the light heads have been connected you can now turn them on. Press the power button
once, this will default the burn time to 7 hours regardless of the power level of the battery, the
condition of the battery will be indicated on the display (fig 1).
To increase the burn time press button 1 (Fig 2) This will automatically decrease the light output
performance). The maximum burn time is 40 hours providing combined approx. 1100 lumens
output from each light head.
To decrease the burn time press button 2 (fig 3), (this will automatically increase the light output
performance). When the battery is fully charged the light heads will offer a maximum light output
of 6000 lumens.
Power switch operation sequence
1. Press keypad once to switch on.
2. Press again to switch off.
Flash Mode
1. Press and hold keypad for 3 seconds then the LED head will flash.
2. Press keypad again to switch off.
Low Battery Warning
Before the product turns off, the LED Head will flash for 3 seconds, every ten minutes to let the
user know that the battery voltage is low. The warning period starts 30 minutes before there is
insufficient voltage to power the light.
Battery Charging
Warning – Do not operate the 9460 RALS with the charger connected.
It is advisable to condition batteries every 3 months. Failure to do so will decrease battery life.
Leaving the product unused for long periods of time will decrease battery life.
Withdrawal of the charger from the product prior to a ‘READY’ indication will result in
inadequate charge.
HAZARD – DO NOT CHARGE THE 9460 WITH THE LID CLOSED
1. U
sing the charger supplied inside the case, insert the charger plug into the charging socket
situated next to the IC display.
2. Attach the charger to the AC supply until the LED on the charger turns green.
3. W
hilst charging the IC display will display the condition of the battery status. (fig 4)
4. If the display shows a battery fail symbol (fig 5) this means the product will not operate
until it is recharged.
Charge Cycle Indication
Red
=
Fast Charge Mode.
Yellow = 90% Charged.
Green =
Fully Charged Maintenance Mode.
Battery Replacement
Contact your dealer for a replacement battery.
To replace, follow the instructions included with the new battery.
© PELICAN PRODUCTS 2013 5-5565 REV D AU/13 9463-311-000 All trademarks and logos displayed herein are registered and unregistered trademarks of Pelican Products, Inc. and others.
Environmental
The sealed lead acid battery should be sent to a recycling center or returned to the
point of purchase.
Manual del usuario de Pelican 9460
Manuel de l’utilisateur Pelican 9460
El sistema de iluminación para áreas remotas Pelican 9460 incluye dos cabezales de
iluminación mediante LED, dos mástiles, una batería de plomo-ácido de 12 V y un cargador
de baterías.
Ambos cabezales luminosos ofrecen una potencia máxima de 6.000 lúmenes durante 7
horas.
Los mástiles pueden alargarse hasta 2 metros de altura.
Le système d’éclairage pour zones difficiles d’accès Pelican 9460 est doté de deux têtes
d’éclairage LED, deux mâts, une batterie au plomb acide de 12 V et un chargeur de batterie.
Ensemble, les têtes d’éclairage connectées fournissent un rendement maximal de 6 000 lumens
durant une période de 7 heures. Les mâts se déploient jusqu’à une hauteur de 2 mètres.
Manipulación de los mástiles
1. Abre la maleta y extrae los mástiles y los cabezales de LED.
2. Acopla cada cabezal de LED en un mástil enroscando el pivote del cabezal en la ranura
del mástil.
3. Cierra la tapa de la maleta y colócala en posición vertical.
4. Inserta los mástiles en los soportes.
5. Inserta los conectores de los cabezales luminosos en las tomas verdes de los laterales de
la unidad y gira el anillo de bloqueo verde para fijar el conector.
6. Abre la palanca situada sobre la abrazadera de bloqueo del mástil tirando de ella hacia
arriba y sube el cabezal de LED; a continuación, baja de nuevo la palanca.
7. Para plegar los mástiles, sigue el procedimiento inverso.
Funcionamiento de la linterna
Una vez hayas conectado los cabezales, puedes encender la unidad. Al pulsar una vez el
botón de encendido, la autonomía quedará fijada en 7 horas independientemente del nivel de
carga de la batería, que se mostrará en el visor (fig. 1). Para incrementar la autonomía, pulsa
el botón 1 (fig. 2), lo que automáticamente reducirá el rendimiento lumínico de la unidad. La
autonomía máxima es de 40 horas, periodo durante el cual cada cabezal de iluminación proporcionará en total un flujo de 1.100 lúmenes aproximadamente. Para reducir la autonomía,
pulsa el botón 2 (fig. 3), lo que automáticamente aumentará el rendimiento lumínico de la
unidad. Cuando la batería esté a plena carga, los cabezales podrán proporcionar un flujo
máximo de 6.000 lúmenes.
Secuencia de funcionamiento del interruptor de encendido
1. Pulsa la tecla una vez para encender la unidad.
2. Púlsala de nuevo para apagarla.
Modo intermitente
1. Mantén pulsada la tecla durante 3 segundos; el cabezal de LED parpadeará.
2. Pulsa de nuevo la tecla para apagar la unidad.
Aviso de nivel bajo de bacteria
Antes de que la unidad se apague, el cabezal de LED parpadeará durante 3 segundos cada
diez minutos para avisar al usuario de que la tensión de la batería es baja. El periodo de
advertencia se inicia 30 minutos antes de que la tensión sea insuficiente para alimentar la
unidad.
Carga de la bacteria
Advertencia: no utilices la unidad 9460 RALS con el cargador conectado.
Se recomienda revisar las pilas cada 3 meses; de lo contrario puede acortarse su vida útil.
No dejar el producto sin utilizar durante mucho tiempo, ya que puede acortarse la vida de la
batería.
No desenchufar el cargador antes de que el producto indique que está listo; de lo contrario no
se cargará correctamente.
PELIGRO: NO CARGUES LA UNIDAD 9460 CON LA TAPA CERRADA
1. Enchufa el cargador, que se encuentra dentro de la maleta, en la toma de carga situada
cerca del visor IC.
2. Conecta el cargador a la alimentación de CA hasta que el LED del cargador se ponga verde.
3. Durante la carga, el visor IC mostrará el estado de la batería. (fig. 4)
4. S
i el visor muestra el símbolo de batería agotada (fig. 5), la unidad no funcionará hasta
que no recargues la batería.
Indicación del ciclo de carga
Rojo = Modo de carga rápida.
Amarillo = Carga al 90%.
Verde = Carga completa, modo de mantenimiento.
Sustitución de la bacteria
Ponte en contacto con tu distribuidor para obtener una batería de repuesto. Para cambiar la
batería, sigue las instrucciones incluidas con la batería nueva.
Medio ambiente
La batería de plomo sellada debe llevarse a un punto de reciclaje o entregarse en el punto de
compra.
9460 RALS
Fonctionnement du mât
1. Ouvrez la valise et sortez-en chaque mât et tête d’éclairage LED.
2. Fixez la tête d’éclairage LED au mât en vissant le pivot de la tête d’éclairage dans l’insert du mât.
3. Refermez la valise puis remettez la en position droite.
4. Insérez les mâts dans les supports.
5. Insérez la fiche du chargeur dans les prises vertes situées sur les côtés du produit et tournez
la bague de verrouillage verte pour verrouiller la fiche.
6. Tirez sur le levier du bras de verrouillage du mât et levez la tête LED vers le haut, puis renfoncez le levier à son emplacement d’origine.
7. Pour replier le mât, inversez la procédure.
Fonctionnement de l’éclairage
Une fois les têtes d’éclairage connectées, vous pouvez les allumer. Appuyez une fois sur le
bouton, l’autonomie par défaut sera établie à 7 heures sans tenir compte du niveau de puissance
de la batterie ; l’état de la batterie sera indiqué sur l’afficheur (fig 1). Pour augmenter l’autonomie
d’éclairage, appuyez sur le bouton 1 (Fig. 2). Le rendement lumineux diminuera automatiquement. L’autonomie maximale en fonctionnement est de 40 heures avec un rendement lumineux
d’environ 1 100 lumens par tête d’éclairage.
Pour réduire l’autonomie d’éclairage, appuyez sur le bouton 2 (Fig. 3) (le rendement lumineux
diminuera automatiquement). Lorsque la batterie est complètement chargée les têtes d’éclairage
offrent un rendement maximal de 6 000 lumens.
Séquence de fonctionnement de l’interrupteur
1. Appuyez une fois sur la touche pour allumer.
2. Appuyez à nouveau pour éteindre.
Mode clignotement
1. Appuyez et maintenez la touche enfoncée pendant 3 secondes pour faire clignoter la tête LED.
2. Appuyez à nouveau sur la touche pour éteindre.
Avertissement de batterie faible
Avant l’extinction de la batterie, la tête LED clignote pendant 3 secondes toutes les dix minutes
afin d’informer l’utilisateur que la tension de la batterie est faible. La période d’avertissement commence 30 minutes avant que la tension soit insuffisante pour allumer la lampe.
Chargement de la batterie
Attention - Ne faites pas fonctionner le 9460 RALS avec le chargeur connecté.
Il est conseillé de recharger les batteries tous les 3 mois. Dans le cas contraire, cela réduira la
durée de vie des batteries.
Laisser le produit inutilisé pendant de longues périodes réduira la durée de vie des batteries.
Débrancher le chargeur du produit avant l’apparition de l’indication « READY » entraînera une
charge inappropriée.
DANGER – NE PAS CHARGER LE 9460 AVEC LE COUVERCLE FERMÉ
1. U
tilisez le chargeur fourni dans la valise ; insérez la prise du chargeur dans la base du
chargeur située près de l’afficheur à circuit intégré.
2. C
onnectez le chargeur à la source d’alimentation jusqu’à ce que la LED sur le chargeur
devienne verte.
3. Pendant le chargement, l’afficheur à circuit intégré indique l’état du statut de la batterie. (Fig. 4)
4. L
orsque l’afficheur indique un symbole de défaut de batterie (Fig. 5), cela signifie que le
produit ne pourra pas fonctionner jusqu’à ce qu’il soit rechargé.
Indication cycle de chargement
Rouge = Mode de chargement rapide.
Jaune = Chargé à 90%.
Vert = Mode de maintenance totalement chargé.
Remplacement des piles
Contactez votre distributeur pour toute batterie de rechange.
Pour le remplacement, suivez les instructions fournies avec la nouvelle batterie.
Environnement
La batterie au plomb acide devra être envoyée à un centre de recyclage ou retournée
au point d’achat.
9460 RALS