1
yy
ÀÀ
;;
@@
;;
yy
@@
ÀÀ
@@
ÀÀ
;;
@@yy
ÀÀ
;;
yy
@@
ÀÀ
;;
yy
;;
yy
@@
ÀÀ
;;
yy
ÀÀ
@@
ÀÀ
;;
@@
@@yy
ÀÀ
;;
yy
@@
ÀÀ
;;
yy
2
yy
ÀÀ
;;
@@
ÀÀ
;;
yy
@@
ÀÀ
;;
@@
@@yy
ÀÀ
;;
yy
@@
ÀÀ
;;
yy
@@
ÀÀ
;;
yy
@@
ÀÀ
;;
@@yy
ÀÀ
;;
yy
@@
ÀÀ
;;
yy
6
5
7
4
2
1
3
6
5
7
4
2
1
3
3
9
8
12
10
10
4
yy
ÀÀ
@@
;;
3
14
15
4
13 11
7
yy
@@
ÀÀ
;;
;@Àyyy
@@
ÀÀ
;;
4
14
6
5
I
yy
ÀÀ
;;
@@
y;À@ yy
@@
ÀÀ
;;
y;À@ yy
;;
@@
ÀÀ
2
6
English
'5,//.5.5.5.5
&21*5$78/$7,216
,17(1'('86(
You have chosen a Black & Decker tool. Our aim
is to provide quality tools at an affordable price.
We hope that you will enjoy using this tool for
many years.
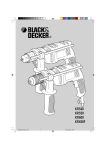
Your Black & Decker drill KR540/KR550/KR600
has been designed for drilling in wood, metal,
plastics and masonry as well as for screwdriving
purposes.
Your Black & Decker drill KR572 has been
designed for drilling in wood, metal, plastics and
masonry.
This tool is intended for consumer use only.
(&'(&/$5$7,212)&21)250,7<
KR540/KR550/KR572/KR600
Black & Decker declares that these
products conform to: 98/37/EC,
89/336/EEC, 73/23/EEC, EN 50144,
EN 55014, EN 55104
6$)(7<,16758&7,216
:DUQLQJV\PEROV
Level of sound pressure, measured according to
EN 50144:
LpA
LWA
(sound pressure)
(acoustic power)
KR540
dB(A) 99
dB(A) 112
KR550
99
112
The following symbols are used in this manual:
Denotes risk of personal injury, loss of life
or damage to the tool in case of nonobservance of the instructions in this
manual.
KR572 KR600
99
99
112
112
Always wear ear protection if the sound
pressure exceeds 85 dB(A).
Read the manual prior to operation.
Hand/arm weighted vibration value according to
EN 50144:
.QRZ\RXUWRRO
◆
KR540 KR550 KR572 KR600
8,9 m/s2 8,9 m/s2 8,9 m/s2 8,9 m/s2
◆
◆
Brian Cooke
Director of Engineering
Spennymoor, County Durham DL16 6JG,
United Kingdom
◆
7
Warning! When using mains-powered
tools, basic safety precautions, including
the following, should always be followed
to reduce the risk of fire, electric shock,
personal injury and material damage.
Read all of this manual carefully before
operating the tool.
Before operating the tool, make sure
that you know how to switch the tool
off in an emergency.
Retain this manual for future reference.
English
13. Use appropriate tool
The intended use is described in this instruction
manual. Do not force small tools or attachments
to do the job of a heavy-duty tool. The tool will do
the job better and safer at the rate for which it
was intended. Do not force the tool.
Warning! The use of any accessory or
attachment or performance of any operation with
this tool other than those recommended in this
instruction manual may present a risk of personal
injury.
14. Check for damaged parts
Before use, carefully check the tool and mains
cable for damage. Check for misalignment and
seizure of moving parts, breakage of parts,
damage to guards and switches and any other
conditions that may affect its operation.
Ensure that the tool will operate properly and
perform its intended function. Do not use the tool
if any part is damaged or defective. Do not use
the tool if the switch does not turn it on and off.
Have any damaged or defective parts repaired or
replaced by an authorised repair agent. Never
attempt any repairs yourself.
15. Unplug the tool
Unplug the tool when it is not in use, before
changing any parts of the tool, accessories or
attachments and before servicing.
16. Avoid unintentional starting
Do not carry the tool with a finger on the on/off
switch. Be sure that the tool is switched off when
plugging in.
17. Do not abuse cord
Never carry the tool by its cord or pull it to
disconnect from the socket. Keep the cord away
from heat, oil and sharp edges.
18. Store idle tools
When not in use, tools should be stored in
a dry, locked up or high place, out of reach of
children.
19. Maintain tools with care
Keep cutting tools sharp and clean for better and
safer performance. Follow the instructions for
maintenance and changing accessories. Keep
handles and switches dry, clean and free from oil
and grease.
20. Repairs
This tool complies with relevant safety
requirements. Repairs should only be carried out
by qualified persons using original spare parts;
otherwise this may result in considerable danger
to the user.
*(1(5$/
1. Keep work area clean
Cluttered areas and benches can cause
accidents.
2. Consider work area environment
Do not expose the tool to rain. Do not use the tool
in damp or wet conditions. Keep the work area
well lit. Do not use the tool where there
is a risk of causing fire or explosion, e.g. in
the presence of flammable liquids and gases.
3. Keep children away
Do not allow children, visitors or animals to come
near the work area or to touch the tool
or mains cable.
4. Dress properly
Do not wear loose clothing or jewellery, as these
can be caught in moving parts. Preferably wear
rubber gloves and non-slip footwear when
working outdoors. Wear protective hair covering
to keep long hair out of the way.
5. Personal protection
Always use safety glasses. Use a face or dust
mask whenever the operations may produce dust
or flying particles. Wear ear protection whenever
the sound level seems uncomfortable.
6. Guard against electric shock
Prevent body contact with earthed or grounded
surfaces (e.g. pipes, radiators, cookers and
refrigerators). Electric safety can be further
improved by using a high-sensitivity
(30 mA / 30 mS) residual current device (RCD).
7. Do not overreach
Keep proper footing and balance at all times.
8. Stay alert
Watch what you are doing. Use common sense.
Do not operate the tool when you are tired.
9. Secure workpiece
Use clamps or a vice to hold the workpiece.
It is safer and it frees both hands to operate the
tool.
10. Connect dust extraction equipment
If devices are provided for the connection of dust
extraction and collection facilities, ensure that
these are connected and properly used.
11. Remove keys and adjusting wrenches
Always check that keys and adjusting wrenches
are removed from the tool before operating the
tool.
12. Extension cables
Before use, inspect the extension cable and
replace if damaged. When using the tool
outdoors, only use extension cables intended for
outdoor use.
8
English
$66(0%/<
$GGLWLRQDOVDIHW\LQVWUXFWLRQVIRUGULOOV
◆
◆
Before drilling into walls, floors or ceilings,
check for the location of wiring and pipes.
Avoid touching the tip of a drill bit just after
drilling, as it may be hot.
Before assembly, make sure that the tool
is switched off and unplugged.
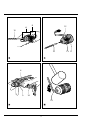
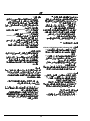
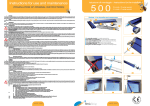
)LWWLQJDGULOOELWRUVFUHZGULYHUELW
(/(&75,&$/6$)(7<
KR540CRE/KR550CRE/KR600CRE (fig. B)
These tools are equipped with a keyless chuck to
allow for an easy exchange of bits.
◆ Make sure that the tool is switched off and
unplugged.
◆ Open the chuck by turning the front part (8)
with one hand while holding the rear part (9)
with the other.
◆ Insert the bit shaft (10) into the chuck.
◆ Firmly tighten the chuck by turning the front
part with one hand while holding the rear
part with the other.
The electric motor has been designed for one
voltage only. Always check that the power supply
corresponds to the voltage on the rating plate.
This tool is double insulated in
accordance with EN 50144; therefore no
earth wire is required.
8VLQJDQH[WHQVLRQFDEOH
Always use an approved extension cable suitable
for the power input of this tool (see technical data).
Before use, inspect the extension cable for signs
of damage, wear and ageing. Replace the
extension cable if damaged or defective.
When using a cable reel, always unwind the cable
completely. Use of an extension cable not suitable
for the power input of the tool or which is damaged
or defective may result in a risk of fire and electric
shock.
KR540RE/KR550RE/KR572/KR600RE (fig. C)
◆ Make sure that the tool is switched off and
unplugged.
◆ Open the chuck by turning the sleeve (11)
counterclockwise.
◆ Insert the bit shaft (10) into the chuck.
◆ Insert the chuck key (12) into each hole (13) in
the side of the chuck and turn clockwise until
tight.
&$5721&217(176
The carton contains:
1 Drill
1 Side handle
1 Depth stop
1 Chuck key
(KR540RE/KR550RE/KR572/KR600RE)
1 Instruction manual
◆
◆
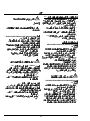
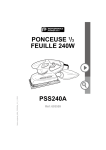
)LWWLQJWKHVLGHKDQGOHDQGGHSWKVWRS
ILJ'
◆
◆
Carefully unpack all parts.
Please note that additional items may be found
in the carton, depending on the letter suffix
following the catalogue number of your tool.
◆
◆
◆
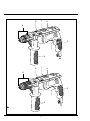
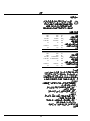
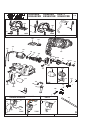
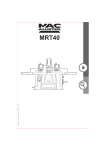
29(59,(:ILJ$
1. Variable speed switch (KR540/KR550/KR600)
1. On/off switch (KR572)
2. Lock-on button
3. Side handle
4. Depth stop
5. Chuck
6. Drilling mode selector
7. Forward/reverse switch (KR540/KR550/
KR600)
7. Speed selector switch (KR572)
Make sure that the tool is switched off and
unplugged.
Turn the grip (14) counterclockwise until you
can slide the side handle (3) onto the front of
the tool as shown.
Rotate the side handle into the desired
position.
Insert the depth stop (4) into the mounting hole
as shown.
Tighten the side handle by turning the grip (14)
clockwise.
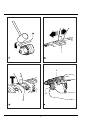
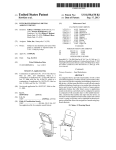
5HPRYLQJDQGUHILWWLQJWKHFKXFN
KR540CRE/KR550CRE/KR600CRE (fig. E)
◆ Make sure that the tool is switched off and
unplugged.
◆ Open the chuck as far as possible.
◆ Insert a screwdriver into the chuck and loosen
the chuck retaining screw by turning it
clockwise one turn.
◆ Tighten an Allen key (15) into the chuck and
strike it with a hammer as shown.
◆ Remove the Allen key.
◆ Remove the chuck retaining screw by turning it
clockwise.
9
English
◆
◆
Remove the chuck by turning it
counterclockwise.
To refit the chuck, screw it onto the spindle and
secure it with the chuck retaining screw.
6HOHFWLQJWKHGULOOLQJPRGHILJ+
Use the hammer drilling mode when drilling in
masonry. Use the rotary drilling mode when drilling
in other materials and when screwdriving.
◆ For rotary drilling, set the drilling mode selector
(6) to the position.
◆ For hammer drilling, set the drilling mode
selector (6) to the position.
Securely tighten the chuck retaining screw.
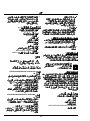
KR540RE/KR550RE/KR572/KR600RE (fig. F)
◆ Make sure that the tool is switched off and
unplugged.
◆ Open the chuck as far as possible.
◆ Insert a screwdriver into the chuck and remove
the chuck retaining screw by turning it clockwise.
◆ Insert the chuck key (12) into one of the holes
in the side of the chuck and turn the chuck so
that the chuck key is just above the horizontal
position on the right hand side of the tool.
◆ Strike the chuck key with a hammer as shown.
◆ Remove the chuck by turning it
counterclockwise.
◆ To refit the chuck, screw it onto the spindle and
secure it with the chuck retaining screw.
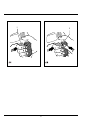
6HWWLQJWKHGHSWKVWRSILJ,
The depth stop is used to limit the drilling depth.
◆ Make sure that the tool is switched off and
unplugged.
◆ Turn the grip (14) counterclockwise until you
can slide the depth stop (4).
◆ Set the depth stop to the desired position.
The maximum drilling depth is equal to the
distance between the tip of the drill bit and the
front end of the depth stop.
◆ Turn the grip clockwise to tighten the depth
stop.
6ZLWFKLQJRQDQGRIIILJ-
KR540(C)RE/KR550(C)RE/KR600(C)RE
◆ To switch the tool on, press the variable speed
switch (1). The tool speed depends on how far
you press the switch.
◆ For continuous operation, press the lock-on
button (2) and release the variable speed
switch. This option is available only at full
speed.
◆ To switch the tool off, release the variable
speed switch.
◆ To switch the tool off when in continuous
operation, press the variable speed switch
once more and release it.
Securely tighten the chuck retaining screw.
86(
Let the tool work at its own pace. Do not
overload.
KR540(C)RE/KR550(C)RE/KR600(C)RE Selecting the direction of rotation (fig. G)
For drilling and for tightening screws, use forward
(clockwise) rotation.
For loosening screws or removing a jammed drill
bit, use reverse (counterclockwise) rotation.
◆ To select forward rotation, slide the
forward/reverse switch (7) forward.
◆ To select reverse rotation, slide the
forward/reverse switch (7) backward.
KR572
◆ To switch the tool on, press the on/off switch (1).
◆ For continuous operation, press the lock-on
button (2) and release the on/off switch.
◆ To switch the tool off, release the on/off switch.
◆ To switch the tool off when in continuous
operation, press the on/off switch once more
and release it.
Never change the direction of rotation
while the motor is running.
KR572 - Selecting the speed setting (fig. G)
Use the low speed setting for drilling large
diameter holes. Use the high speed setting for
drilling small diameter holes.
◆ To select the low speed setting, set the speed
selector switch (7) to position 1.
◆ To select the high speed setting, set the speed
selector switch (7) to position 2.
+LQWVIRURSWLPXPXVH
◆
◆
10
Do not exert too much pressure on the tool.
Consult your retailer for more information on
available accessories.
English
'ULOOLQJ
◆
◆
◆
◆
◆
◆
◆
◆
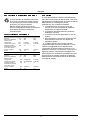
7HFKQLFDOGDWD
Always apply a light pressure in a straight line
with the drill bit.
Just before the drill tip breaks through the
other side of the workpiece, decrease pressure
on the tool.
Use a block of wood to back up workpieces
that may splinter.
Use spade bits when drilling large diameter
holes in wood.
Use HSS drill bits when drilling in metal.
Use masonry bits when drilling in masonry.
Use a lubricant when drilling metals other
than cast iron and brass.
Make an indentation using a centre punch at
the centre of the hole to be drilled in order to
improve accuracy.
Voltage
Power input
No-load speed
No-load impact
Chuck capacity
Max. drilling capacity
in steel/wood/concrete
Weight
VAC
W
min-1
min-1
mm
KR540
230
540
0-2.800
0-42.000
13
KR550
230
550
0-2.800
0-42.000
13
mm
kg
13/25/13
1,8
13/25/13
1,8
Voltage
Power input
No-load speed
No-load impact
Chuck capacity
Max. drilling capacity
in steel/wood/concrete
Weight
VAC
W
min-1
min-1
mm
KR572
230
570
2.500/3.000
37.500/45.000
13
KR600
230
600
0-3.000
0-45.000
13
13/25/13
1,8
13/25/13
1,8
mm
kg
6FUHZGULYLQJ
◆
◆
◆
Always use the correct type and size of
screwdriver bit.
If screws are difficult to tighten, try applying
a small amount of washing liquid or soap as
a lubricant.
Always hold the tool and screwdriver bit in
a straight line with the screw.
*8$5$17((
Should your Black & Decker product become
defective due to faulty materials or workmanship,
within 6 months from the date of purchase,
we guarantee to either replace all defective parts
or -at our discretion- to replace the unit free of
charge, provided that:
◆ The product is returned to us or one of our
authorised repair agents with proof of
purchase.
◆ The product has not been used for trade,
professional or hire purposes.
◆ The product has not been subjected to misuse
or neglect.
◆ The product has not sustained any damage
through foreign objects, substances or
accidents.
◆ Repairs have not been attempted by anyone
other than our service staff or authorised repair
agents.
This guarantee is offered as an extra benefit and
does not affect your statutory rights.
0$,17(1$1&(
Your Black & Decker tool has been designed to
operate over a long period of time with a minimum
of maintenance. Continuous satisfactory operation
depends upon proper tool care and regular
cleaning.
Before performing any maintenance,
switch off and unplug the tool.
◆
◆
◆
Regularly clean the ventilation slots in your tool
using a soft brush or dry cloth.
Regularly clean the motor housing using a
damp cloth. Do not use any abrasive or
solvent-based cleaner.
Regularly open the chuck and tap it to remove
any dust from the interior.
3527(&7,1*7+((19,5210(17
Should you find one day that your tool
needs replacement, or if it is of no further
use to you, think of the protection of the
environment. Black & Decker repair agents
will accept old Black & Decker tools and
ensure that they are disposed of in an
environmentally safe way.
11
Français
3(5&(86(.5.5.5.5
)(/,&,7$7,216
87,/,6$7,2135(98(
Vous avez choisi un outil Black & Decker. Notre
but est de fournir des outils de qualité au juste prix.
Nous espérons que vous profiterez de cet outil
pendant longtemps.
Votre perceuse Black & Decker
KR540/KR550/KR600 a été conçue pour percer le
bois, le métal, le plastique et la maçonnerie, ainsi
que pour fonctionner comme visseuse-dévisseuse.
Votre perceuse Black & Decker KR572 a été
conçue pour percer le bois, le métal, le plastique et
la maçonnerie.
Cet outil a été conçu pour une utilisation
exclusivement domestique.
'(&/$5$7,21'(&21)250,7(&(
KR540/KR550/KR572/KR600
Black & Decker déclare que ces outils sont
conformes aux normes: 98/37/CEE,
89/336/CEE, 73/23/CEE, EN 50144,
EN 55014, EN 55104
,16758&7,216'(6(&85,7(
6\PEROHVGHSUpYHQWLRQ
Niveau de pression acoustique, mesuré suivant la
norme EN 50144:
KR540
LPa (pression acoustique) dB(A) 99
LWA (puissance acoustique) dB(A) 112
KR550
99
112
Les symboles suivants sont utilisés dans le
présent manuel:
KR572 KR600
99
99
112
112
Indique qu'en cas de non-respect des
instructions du présent manuel, il y a
risque de blessure, danger de mort ou
risque de dégradation de l'outil.
Prendre les mesures nécessaires pour la
protection de l'ouïe lorsque le niveau de
pression acoustique est supérieur à 85
dB(A).
Lire le manuel avant d'utiliser l'outil.
&RQQDLVVH]YRWUHRXWLO
Niveau de vibration main/bras selon la norme
EN 50144:
◆
KR540 KR550 KR572 KR600
8,9 m/s2 8,9 m/s2 8,9 m/s2 8,9 m/s2
◆
◆
◆
Brian Cooke
Directeur du Développement
Spennymoor, County Durham DL16 6JG,
Royaume-Uni
12
Attention! Lors de l'utilisation d'outils
électriques, observez les consignes de
sécurité fondamentales, y compris celles
qui suivent afin de réduire les risques
d'incendie, de décharges électriques, de
blessures et de dommages matériels.
Lisez et observez attentivement les
instructions avant d'utiliser l'outil.
Avant d'utiliser l'outil, assurez-vous de
savoir comment mettre votre outil à
l'arrêt en cas d'urgence.
Conservez ces instructions.
Français
*e1e5$/,7e6
1. Tenez votre aire de travail propre et bien
rangée
Le désordre augmente les risques d'accident.
2. Tenez compte des conditions ambiantes
N'exposez pas l'outil à la pluie. N'exposez pas
l'outil à l'humidité. Veillez à ce que l'aire de
travail soit bien éclairée. N'utilisez pas l'outil s'il
existe un risque d'incendie ou d'explosion, par
exemple en présence de liquides ou de gaz
inflammables.
3. Tenez les enfants éloignés
Ne laissez pas les enfants, les visiteurs ou les
animaux s’approcher de l’aire de travail ou
toucher l'outil ou le câble d'alimentation.
4. Portez des vêtements de travail appropriés
Ne pas porter de vêtements flottants ou de
bijoux. Ils pourraient être happés par les pièces
en mouvement. Lors de travaux
à l'extérieur, il est recommandé de porter
des gants en caoutchouc et des chaussures
à semelle anti-dérapante. Le cas échéant,
attachez vos cheveux s'ils sont longs, ou
couvrez vous la tête.
5. Protection
Portez toujours des lunettes de protection.
Portez des lunettes de protection et un masque
pour protéger le visage si le travail exécuté
produit de la poussière ou des copeaux volants.
Portez des protections auditives lorsque le
niveau sonore semble gênant.
6. Protégez-vous des décharges électriques.
Veillez à ce que le corps n'entre pas en contact
avec des surfaces reliées à la prise de masse ou
de terre (par ex. Tuyaux, radiateurs, cuisinières
et réfrigérateurs). Utilisez un interrupteur de
protection contre les courants de court-circuits à
haute sensibilité (30 mA / 30 mS) pour améliorer
la sécurité électrique.
7. Adoptez une position confortable
Toujours tenir les deux pieds à terre et garder
l'équilibre.
8. Faites preuve de vigilance
Observez votre travail. Faites preuve de bon
sens. Ne pas employer l’outil en cas de fatigue.
9. Fixez bien la pièce à travailler
Pour plus de sécurité, fixez la pièce à travailler
avec un dispositif de serrage ou un étau. Ainsi,
vous aurez les deux mains libres pour manier
l'outil.
10. Branchez le dispositif d’extraction de
poussière.
Si vous disposez de systèmes pour brancher
les dispositifs d'extraction et de ramassage de
poussière, assurez-vous qu'ils sont bien
branchés et qu'ils fonctionnent correctement.
13
11. Enlevez les clés et outils de réglage
Avant de mettre l’outil en marche, retirez les
clés et outils de réglage.
12. Rallonges
Vérifiez la rallonge avant de l'utiliser et
remplacez-la en cas de dommage. Si vous
souhaitez utiliser cet outil à l'extérieur, n'utilisez
que des rallonges prévues à cet effet.
13. Utilisez l'outil adéquat
Le domaine d'utilisation de l'outil est décrit
dans le présent manuel. Ne pas utiliser d'outils
ou d'accessoires de trop faible puissance pour
exécuter des travaux lourds. L'utilisation
d'accessoires autres que ceux recommandés
dans le présent manuel pourrait entraîner un
risque de blessure. Ne forcez pas l'outil.
Attention! Utilisez l'outil conformément à sa
destination.
14. Contrôlez les dommages éventuels de votre
outil
Avant d'utiliser l'outil et le câble d'alimentation,
vérifiez soigneusement qu'ils ne sont pas
endommagés. Vérifiez l'alignement des pièces
en mouvement, leur prise et toute rupture de
pièces, tout dommage des protections et des
interrupteurs et toute autre condition pouvant
affecter le fonctionnement de l'outil. Veillez à
ce que l'outil fonctionne correctement et qu'il
exécute les tâches pour lesquelles il est prévu.
N'utilisez pas l'outil si une pièce est
défectueuse. Ne pas utiliser l'outil si
l'interrupteur marche/arrêt ne fonctionne pas.
Faites réparer ou échangez toute pièce
endommagée par un service de réparation
agréé. Ne tentez jamais de le réparer vousmême.
15. Retirez la fiche de l’outil
Retirez la fiche de l’outil lorsque l’outil n’est pas
utilisé, avant de changer toute pièce de l'outil ou
tout accessoire et avant de procéder à l'entretien.
16. Evitez tout démarrage involontaire
Ne portez pas l’outil avec un doigt sur
l’interrupteur marche/arrêt. Assurez-vous que
l'outil est en position d'arrêt avant de le
brancher.
17. Ne tirez pas sur le câble d'alimentation
Ne portez jamais l'outil par le câble et ne tirez
pas sur celui-ci pour le débrancher de la prise.
Préservez le câble de la chaleur, de l'huile et
des arêtes tranchantes.
18. Rangez vos outils dans un endroit sûr
Lorsque vous n’utilisez pas vos outils, rangezles dans un endroit sec, fermé ou élevé, hors
de portée des enfants.
Français
19. Entretenez vos outils avec soin
Maintenez vos outils affûtés et propres afin de
travailler mieux et plus sûrement. Suivez les
instructions d'entretien et de changement
d'accessoires. Maintenez les poignées et les
interrupteurs secs, propres et exempts d'huile
et de graisse.
20. Réparations
Cet outil est conforme aux conditions de
sécurité requises. Les réparations devront
uniquement être effectuées par des personnes
qualifiées utilisant des pièces de rechange
d'origine ; en cas contraire, cela pourrait être
très dangereux pour l'utilisateur.
◆
◆
$3(5d8),*$
,QVWUXFWLRQVGHVpFXULWpVXSSOpPHQWDLUHV
SRXUOHVSHUFHXVHV
◆
◆
Déballez soigneusement toutes les pièces.
La boîte peut contenir encore d’autres articles,
en fonction de la lettre qui figure après le
numéro de catalogue de votre outil.
Avant de percer les murs, les planchers ou les
plafonds, vérifiez l'emplacement des fils
électriques et des tuyaux.
Évitez de toucher l'extrémité d'un foret juste
après avoir percé car il peut être chaud.
1. Interrupteur à variateur de vitesse
(KR540/KR550/KR600)
1. Interrupteur marche/arrêt
(KR572)
2. Bouton de verrouillage
3. Poignée latérale
4. Butée de profondeur
5. Mandrin
6. Sélecteur de mode
7. Interrupteur avant/arrière
(KR540/KR550/KR600)
7. Bouton de sélection de vitesse (KR572)
$66(0%/$*(
Avant l’assemblage, assurez-vous que
l’outil est éteint et débranché.
6(&85,7((/(&75,48(
Le moteur électrique a été conçu pour une seule
tension. Vérifiez si la tension secteur correspond à
la tension indiquée sur la plaque d'identification.
&RPPHQWLQVWDOOHUXQIRUHWRXXQHPERXW
GHWRXUQHYLV
KR540CRE/KR550CRE/KR600CRE (fig. B)
Ces outils sont équipés d’un mandrin sans clef
pour vous permettre de changer les pointes plus
rapidement.
◆ Assurez-vous que l'outil est bien éteint et
débranché.
◆ Ouvrez le mandrin en faisant tourner la partie
avant (8) d’une main tout en tenant la partie
arrière (9) de l'autre main.
◆ Insérez la tige du foret (10) dans le mandrin.
◆ Serrez fermement le mandrin en tournant la
partie avant avec une main tout en tenant la
partie arrière avec l'autre.
Cet outil à double isolation est conforme à
la norme EN 50144; un branchement à
une prise de terre n'est donc pas
nécessaire.
&kEOHVGHUDOORQJH
Utilisez un câble de rallonge adapté à la puissance
absorbée de cet outil (voir les caractéristiques
techniques). Avant d'utiliser l'outil, vérifiez que le
câble n'est ni endommagé ni usé. Changez le
câble de rallonge s'il est endommagé. En cas
d'utilisation d'un dévidoir, déroulez toujours le
câble complètement. L’utilisation d’une rallonge
non adaptée ou endommagée ou défectueuse
peut entraîner un risque d’incendie ou
d’électrocution.
KR540RE/KR550RE/KR572/KR600RE (fig. C)
◆ Assurez-vous que l'outil est bien éteint et
débranché.
◆ Ouvrez le mandrin en faisant tourner le
manchon (11) dans le sens inverse des
aiguilles d’une montre.
◆ Insérez la tige du foret (10) dans le mandrin.
◆ Insérez la clé du mandrin (12) dans chaque
orifice (13) du côté du mandrin et faites-la
tourner dans le sens des aiguilles d’une
montre jusqu’à ce que l’ensemble soit bien
serré.
&217(18'(/$%2,7(
La boîte contient :
1 Perceuse
1 Poignée latérale
1 Butée de profondeur
1 Clé de mandrin
(KR540RE/KR550RE/KR572/KR600RE)
1 Manuel d’instructions
14
Français
◆
&RPPHQWDMXVWHUODSRLJQpHODWpUDOHHW
ODEXWpHGHSURIRQGHXUILJ'
◆
◆
◆
◆
◆
◆
Assurez-vous que l'outil est bien éteint et
débranché.
Faites tourner la poignée (14) dans le sens
inverse des aiguilles d’une montre jusqu’à ce
que vous puissiez faire glisser la poignée
latérale (3) sur le devant de l’outil comme
indiqué.
Faites tourner la poignée latérale dans la
position souhaitée.
Insérez la butée de profondeur (4) dans le trou
de montage comme indiqué.
Serrez la poignée latérale en faisant tourner la
poignée (14) dans le sens des aiguilles d’une
montre.
◆
Enfoncez la clé de mandrin avec un marteau
comme indiqué.
Enlevez le mandrin en le faisant tourner dans
le sens inverse des aiguilles d’une montre.
Pour replacer le mandrin, vissez-le sur l’arbre
et serrez-le avec la vis de serrage.
Vissez fermement la vis de serrage du
mandrin.
87,/,6$7,21
Laissez l’outil fonctionner à sa propre
vitesse. Ne le surchargez pas.
KR540(C)RE/KR550(C)RE/KR600(C)RE Sélection du sens de rotation (fig. G)
Pour le perçage et le serrage des vis, utilisez la
rotation vers l'avant (dans le sens des aiguilles
d'une montre).
Pour desserrer les vis ou enlever un foret de
perçage coincé, utilisez la rotation vers l'arrière
(dans le sens inverse des aiguilles d'une montre).
◆ Pour choisir la rotation vers l’avant, faites
glisser l’interrupteur de sens de marche (7)
vers l’avant.
◆ Pour choisir la rotation vers l’arrière, faites
glisser l’interrupteur de sens de marche (7)
vers l’arrière.
&RPPHQWHQOHYHUHWUHSODFHUOHPDQGULQ
KR540CRE/KR550CRE/KR600CRE (fig. E)
◆ Assurez-vous que l'outil est bien éteint et
débranché.
◆ Ouvrez le mandrin autant que possible.
◆ Insérez un embout de tournevis dans le
mandrin et relâchez la vis de serrage du
mandrin, en la faisant tourner une fois dans le
sens des aiguilles d’une montre.
◆ Placez une clé Allen (15) dans le mandrin et
enfoncez-la avec un marteau comme indiqué.
◆ Enlevez la clé Allen.
◆ Enlevez la vis de serrage du mandrin en la
faisant tourner dans le sens des aiguilles d’une
montre.
◆ Enlevez le mandrin en le faisant tourner dans
le sens inverse des aiguilles d’une montre.
◆ Pour replacer le mandrin, vissez-le sur l’arbre
et serrez-le avec la vis de serrage.
Ne changez jamais le sens de rotation
lorsque le moteur est en marche.
KR572 - Sélection de la vitesse (fig. G)
Utilisez la vitesse lente pour percer des trous de
grand diamètre. Utilisez la vitesse rapide pour
percer des trous de petit diamètre.
◆ Pour choisir la vitesse lente, placez le bouton
de sélection de vitesse (7) en position 1.
◆ Pour choisir la vitesse rapide, placez le bouton
de sélection de vitesse (7) en position 2.
Vissez fermement la vis de serrage du
mandrin.
KR540RE/KR550RE/KR572/KR600RE (fig. F)
◆ Assurez-vous que l'outil est bien éteint et
débranché.
◆ Ouvrez le mandrin autant que possible.
◆ Insérez un embout de tournevis dans le
mandrin et relâchez la vis de serrage du
mandrin, en la faisant tourner dans le sens des
aiguilles d’une montre.
◆ Insérez la clé du mandrin (12) dans l’un des
trous du côté du mandrin et faites tourner le
mandrin pour que la clé du mandrin soit juste à
l’horizontale sur le côté droit de l’outil.
6pOHFWLRQGXPRGHGHSHUoDJHILJ+
Utilisez le mode percussion lorsque vous percez
de la maçonnerie. Utilisez le mode de perçage
rotatif lorsque vous percez d’autres matériaux et
lorsque vous utilisez l’outil comme un tournevis.
◆ Pour le perçage rotatif, fixez le sélecteur de
mode de perçage (6) en position /symbole
perçage .
◆ Pour le perçage à percussion, fixez le
sélecteur de mode de perçage (6)
en position .
15
Français
&RPPHQWIL[HUODEXWpHGHSURIRQGHXU
&RQVHLOVSRXUXQHXWLOLVDWLRQRSWLPDOH
ILJ,
◆
La butée de profondeur est utilisée pour limiter la
profondeur de perçage.
◆ Assurez-vous que l'outil est bien éteint et
débranché.
◆ Faites tourner la poignée (14) dans le sens
inverse des aiguilles d’une montre, jusqu’à ce
que vous puissiez faire glisser la butée de
profondeur (4).
◆ Fixez la butée de profondeur dans la position
souhaitée. La profondeur de perçage
maximale est égale à la distance entre le bout
de l’embout du foret et l’extrémité avant de la
butée de profondeur.
◆ Faites tourner la poignée dans le sens des
aiguilles d’une montre pour serrer la butée de
profondeur.
◆
N'exercez pas trop de pression sur l'outil.
Renseignez-vous chez votre revendeur pour
plus d’informations sur les accessoires
disponibles.
Perçage
◆ Appliquez toujours une pression légère en
ligne droite avec le foret de perçage.
◆ Juste avant que le foret de perçage ne passe
de l'autre côté de la pièce, diminuez la
pression sur l'outil.
◆ Utilisez un bloc de bois pour protéger les
pièces pouvant se briser.
◆ Utilisez des mèches à bois lorsque vous percez
des trous d'un large diamètre dans du bois.
◆ Utilisez des forets de perçage HSS lorsque
vous percez du métal.
◆ Utilisez des forets de maçonnerie lorsque vous
percez des pièces de maçonnerie légères.
◆ Utilisez un lubrifiant lorsque vous percez des
métaux autres que de la fonte et du laiton.
◆ Faites une entaille à l'aide d'une contrepointe
de centrage au centre du trou à percer afin
d'améliorer la précision
'pPDUUDJHHWDUUrWILJ-
KR540(C)RE/KR550(C)RE/KR600(C)RE
◆ Pour allumer l'outil, appuyez sur l'interrupteur
de vitesse variable (1). La vitesse de l'outil
dépend de la façon dont vous appuyez sur
l'interrupteur.
◆ Pour un fonctionnement en continu, appuyez
sur le bouton de verrouillage (2) et relâchez
l’interrupteur de vitesse variable. Cette option
n’est disponible qu’en vitesse maximale.
◆ Pour éteindre l'outil, relâchez l'interrupteur de
vitesse variable.
◆ Pour éteindre l’outil lorsqu’il est en
fonctionnement continu, appuyez sur
l’interrupteur de vitesse variable une fois de
plus et relâchez-le.
Vissage
◆ Utilisez toujours le bon type et la bonne taille
d’embout de tournevis.
◆ Si les vis sont difficiles à serrer, essayez
d'appliquer un petit peu de liquide vaisselle ou
de savon en tant que lubrifiant.
◆ Tenez toujours l'outil et l’embout de tournevis
en ligne droite par rapport à la vis.
(175(7,(1
Votre outil Black & Decker a été conçu pour
fonctionner durablement avec un minimum
d’entretien. Un fonctionnement continu satisfaisant
dépend d’un nettoyage régulier et d’un entretien de
l’outil approprié.
KR572
◆ Pour allumer l'outil, appuyez sur l'interrupteur
marche/arrêt (1).
◆ Pour un fonctionnement en continu, appuyez
sur le bouton de verrouillage (2) et relâchez
l’interrupteur marche/arrêt.
◆ Pour éteindre l'outil, relâchez l'interrupteur
marche/arrêt.
◆ Pour éteindre l’outil lorsqu’il est en
fonctionnement continu, appuyez sur
l’interrupteur marche/arrêt une fois de plus et
relâchez-le.
Avant d’effectuer tout entretien, éteignez et
débranchez l’outil.
◆
◆
◆
16
Nettoyez régulièrement les orifices de
ventilation de votre outil à l'aide d'une brosse
douce ou d'un chiffon sec.
Nettoyez régulièrement la carcasse du moteur
à l'aide d'un chiffon mouillé. N'utilisez pas de
produit abrasif ou à base de solvant.
Ouvrez régulièrement le mandrin et tapotez
dessus pour retirer toute poussière à l'intérieur.
Français
3527(&7,21'(/
(19,5211(0(17
*$5$17,(
Si votre produit Black & Decker était défectueux
dans les 6 mois suivant la date d’achat, nous vous
garantissons le remplacement de toutes les pièces
défectueuses ou l'échange du produit
gratuitement, aux conditions suivantes:
◆ Le produit nous a été renvoyé ou a été
renvoyé à l’un de nos agents de réparation
agréés avec une preuve d’achat.
◆ Le produit a été utilisé dans les conditions
d’utilisation prévues.
◆ Le produit n’a pas été utilisé dans un but de
location.
◆ Des réparations n’ont pas été effectuées par
toute personne autre que nos agents de
réparation agréés.
◆ Le défaut provient d’une usure normale.
La garantie légale couvrant les défauts ou vices
cachés est applicable en tout état de cause.
La garantie est effective dans la mesure où ce
produit est retourné, non démonté, à l'une de nos
agences agréées, il doit être accompagné d'un
avis indiquant les anomalies constatées ainsi que
d'une preuve de garantie (certificat de garantie
dûment rempli et portant le cachet du revendeur
ou ticket de caisse).
Si vous décidez de remplacer votre outil,
ou si vous n'en avez plus l'utilité, pensez
à la protection de l'environnement avant
de le jeter. Les services agréés
Black & Decker reprennent tous les
anciens outils Black & Decker et s'assurent
qu'ils seront détruits en respectant
l'environnement.
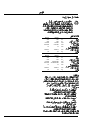
&DUDFWpULVWLTXHVWHFKQLTXHV
Tension
Puissance absorbée
Vitesse sans
chargement
Impact sans charge
Capacité mandrin
Capacité de perçage
max. dans l'acier /
le bois / le béton
Poids
Tension
Puissance absorbée
Vitesse sans
chargement
Impact sans charge
Capacité mandrin
Capacité de perçage
max. dans l'acier /
le bois / le béton
Poids
KR540
230
540
KR550
230
550
min-1
min-1
mm
0-2.800
0-42.000
13
0-2.800
0-42.000
13
mm
kg
13/25/13
1,8
13/25/13
1,8
KR572
230
570
KR600
230
600
VAC
W
VAC
W
min-1 2.500/3.000
min-1 37.500/45.000
mm 13
0-3.000
0-45.000
13
mm
kg
13/25/13
1,8
13/25/13
1,8
17
18
KR550
230
550
0-2.800
0-42.000
13
KR540
230
540
0-2.800
0-42.000
13
VAC
W
min-1
min-1
mm
13/25/13
1,8
13/25/13
1,8
mm
kg
KR600
230
600
0-3.000
0-45.000
13
KR572
230
570
2.500/3.000
37.500/45.000
13
13/25/13
1,8
13/25/13
1,8
VAC
W
min-1
min-1
mm
mm
kg
– ◆
◆
◆
◆
◆
19
HSS ◆
◆
´
◆
◆
◆
◆
◆
◆
◆
◆
◆
´
◆
´
◆
20
KR540(C)RE/KR550(C)RE/KR600(C)RE
◆
I
◆
◆
◆
◆
J
◆
◆
◆
◆
KR572
◆
◆
◆
◆
◆
◆
◆
G
KRREKRREKRKRRE
◆
◆
. KRCREKRCREKRCRE
◆
◆
◆
◆
◆
E
◆
◆
◆
◆
◆
◆
◆
KRREKRREKRKRRE
F
◆
◆
◆
◆
◆
+
G
◆
◆
KR ◆
D
◆
◆
21
. ´
A
KRKRKR
KR
KRKRKR
KR
.1
.1
B
◆
◆
◆
◆
KR540RE/KR550RE/KR572/KR600RE . . ◆
◆
. 22
EN 50144
C
◆
◆
◆
KRCREKRCREKRCRE
◆
◆
´
mSRCD
´ mA
23
.5.5.5.5
KR540/KR550/KR600
KR572
KR540/KR550/KR572/KR600
EN 50144
◆
KR572
KR550
99
99
99
99 dB(A)
112
112
112
112 dB(A) KR540
dB(A) EN 50144
KR600
EN KR600 KR572 KR550 KR540
8,9 m/s2 8,9 m/s2 8,9 m/s2 8,9 m/s2
◆
◆
(&
Brian Cooke
Spennymoor, County Durham DL16 6JG, UK
◆
24
LpA
LWA
KR550
230
550
0-2.800
0-42.000
13
KR540
230
540
0-2.800
0-42.000
13
VAC
W
min-1
min-1
mm
13/25/13
1,8
KR600
230
600
0-3.000
0-45.000
13
KR572
230
570
2.500/3.000
37.500/45.000
13
13/25/13
1,8
mm
kg
VAC
W
min-1
min-1
mm
mm
kg
13/25/13
1,8
13/25/13
1,8
◆
◆
◆
◆
◆
25
masonry bits
◆
(14)
◆
(4)
◆
◆
◆
◆
◆
◆
◆
◆
◆
◆
-
KR540(C)RE/KR550(C)RE/ KR600(C)RE
(1)
(2)
KR572
(1)
(2)
,
◆
◆
◆
spade bits
HSS bits
◆
◆
◆
26
◆
◆
◆
◆
◆
◆
◆
◆
◆
◆
D
±KR540(C)RE/KR550(C)RE/ KR600(C)RE
G
◆
(7)
◆
(7)
G
±KR572
◆
(7)
(7)
◆
H
(6)
◆
(6)
◆
(14)
(14)
(3)
(4)
◆
◆
◆
◆
◆
KR540CRE/KR550CRE/ KR600CRE
E ◆
◆
◆
(15)Allen
◆
◆
◆
◆
◆
KR540RE/KR550RE/KR572/KR600RE
F (12)
27
◆
◆
◆
◆
◆
◆
.
A ◆
◆
KR540/KR550/KR600
KR572
KR540/KR550/KR600
KR572
KR540CRE/KR550CRE/ KR600CRE
B
(8) (9)
(10)
KR540RE/KR550RE/KR572/ KR600RE
C
(11) (10)
(13) (12)
◆
◆
◆
◆
◆
◆
EN 50144
◆
◆
(KR540RE/KR550RE/KR572/KR600RE)
◆
◆
28
11
29
Residual Current Device (RCD) .5.5.5.5
KR540/KR550/KR600 KR572 98/37/EC, 89/336/EEC, 73/23/EEC,
EN 50144, EN 55014, EN 55104
KR572
99
112
◆
KR600
99
112
KR540/KR550/KR572/KR600
KR550
99
112
KR540
99 dB(A)
112 dB(A)
85 dB(A)
EN 50144
EN 50144
(sound pressure)
(acoustic power)
KR600 KR572 KR550 KR540
8,9 m/s2 8,9 m/s2 8,9 m/s2 8,9 m/s2
◆
◆
◆
Brian Cooke
Spennymoor, County Durham
DL16 6JG, UK
30
LpA
LWA
TYP.
KR550RE
KR600RE KR572
KR540CRE KR550CRE KR600CRE
1-2
104
104
104
123
122
125
123
120V
240V
KR550RE KR600RE KR540CRE KR550CRE KR600CRE
126
KR572
127
128
129
101
115
103
116
102
106 107
108110
111
112 113
109
114
133
114
138
120
134
145
RE
CRE
146
133
103
139
132
140
135
KR550RE KR550CRE KR540CRE
KR600RE KR600CRE
10
12
KR572
141
12
10
12
12
10
12
11
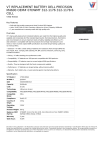
TYPE
E12545 / 374224-00
11
11
TYPE
www.2helpu.com
18 - 08 - 2000
121
Black & Decker service centres
Bahrain
Bahrain
Bangladesh
Bangladesh
Egypt
Egypt
Ethiopia
Eritrea
Gibraltar
Iran
Iran
Jordan
Kenya
Kuwait
Lebanon
Libya
Malta
Mauritius
Morocco
Nigeria
Oman
Oman
Oman
Pakistan
Qatar
Saudi (Centre)
Saudi (East)
Saudi (West)
Saudi (EW)
Sri Lanka
Sudan
Syria
Tanzania
Tunisia
Tunisia
UAE - Dubai
UAE - Dubai
UAE - Shj
UAE - Shj
UAE - Adh
Uganda
Yemen - Sana’a
Yemen - Aden
Zimbabwe
Al Fouz Services
Safa Co. Ltd
Ezzi Workshop (Crystal Co.)
Ezzi Workshop – Chittagong
Al Farabi Company
Al Farabi Company
Tewfik Sherif & Co. Ltd
Delina International
Corner Shop
Service Center of Iran
Cayhan Electric Co.-Kish Island
Bashititi Hardware
Dextron Tools Ltd.
Al Omar Technical Co.
Est. Shaya & Azar
El Ghoul Brothers
G. Grech & Bors…Ltd…
F.Hertogs & Co. Ltd
Ets. Louis Guillaud & Cie
Amin Bros.Eng.Co.Ltd.
Oman Hardware
Al Amri Trd, & Cont. Est
Khimji Ramdas
Ammar Service & Spares.
Shaheen Electric Works.
Ind. Mat. Organization (IMO)
Al Najim Saudi Intl.-Dammam
EAC (Al Yousuf)-Jeddah
Mohd Abdulla Mohd Al Amoudi
Delmege General Equip.Pvt.Ltd
United Distribution
Al Bayan Trading
Lehmann’s (East Africa) Ltd.
Souissi Ace Home Center
Techni-Suc
Black & Decker (o) A.G.
Ideal Machinery & Eqpt Works
Spectrum Ind. Services
Tabook W/Shop Eqpt. Trdg.
Light House Electric
The Building Center
Metco
Metco
JD Ditributors
973-7150 252/712 756
973-2610 73/257 067
880-2-956 27 31/240 199
880-31-612 612
20-2-360 39 46/340 58 06
20-2-770 973
251-1-651 700/651 601
291-1-126 683
350-784 52
98-21-640 76 72/649 06 56
98-76444-22894
962-6-535 00 09/4770741
254-2-211 285
965-484 85 95/484 00 39
961-1-872 305/6,870 647
218-61-909 7681
356-488 318/441 738
230-212 94 37/212 94 48
212-2-305 971/301 446
234-1-266 00 01
968-771 5131
968-210 369
968-771 4793
92-21-242 69 05
974-460 0230/460 0525
966-1-402 63 20/402 63 50
966-3-882 2 299
966-2-651 99 12
6966-4-390 09 46
94-1-334 106
249-11-772 612/777 296
963-11-212 76-55/212 51 94
255 51 11 4264
216-1-428 038/428 188
216-2-226 335
9714-702 82 34/702 82 33
971-4-347 4160
971-6-533 9563
971-6-533 4452
971-2-672 6131
256-41-234 567
967-1-266 841/2
967-7-256847
263-4-753 913
713 789
273 768
956 65 07
618 061
335 27 96
340 58 06
650 570
121 095
700 83
270 32 281111
76444-22894
535 00 12/474 99 47
219 279
484 56 52
872 303
909 7681
446 309
212 95 34
317 888
261 42 59
771 6491
268 259
771 7845
431 05 94/242 52 43
460 1338
403 79 70
882 70 27
651 11 53
390 09 46
334 105
770 919
212 7600
11 42 63
429 540/429 330
282 2765
347 4157
533 7052
533 44 52
672 0667
236 413
266 843
256 746
753 918