1
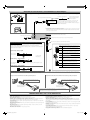
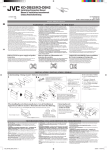
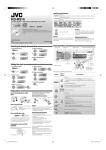
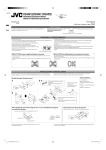
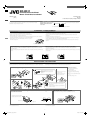
KD-R511
Installation/Connection Manual
Manuel d’installation/raccordement
GET0635-010A
1209DTSMDTJEIN
[E/EU]
EN, FR
© 2009 Victor Company of Japan, Limited
ENGLISH / FRANÇAIS
You need the installation kits which corresponds to your car. / Vous avez besoin des kits
d’installation correspondants à votre voiture.
Check the battery system in your car /
Vérifiez le système de batterie de
votre voiture
To the car system / Au système autoradio
12 V DC, NEGATIVE ground / 12 V CC, masse NÉGATIVE
WARNINGS / AVERTISSEMENTS
• To prevent short circuits:
– Disconnect the battery’s negative terminal and make all electrical connections before installing the unit.
– Cover the terminals of the UNUSED leads with insulating tape.
• Be sure to ground this unit to the car’s chassis again after installation.
• Replace the fuse with one of the specified rating.
• Connect speakers with a maximum power of more than 50 W (impedance of 4 Ω to 8 Ω). Otherwise,
change the <AMP GAIN> setting. (See page 17 of the INSTRUCTIONS.)
• The heat sink becomes very hot after use. Be careful not to touch it
when removing this unit.
• Pour éviter les courts-circuits:
– Déconnectez la borne négative de la batterie et réaliser toutes les connexions avant d’installer l’appareil.
– Recouvrez les prises des fils NON UTILISÉS avec du ruban isolant.
• Assurez-vous de raccorder de nouveau la mise à la masse de cet appareil au châssis de la voiture après
l’installation.
• Remplacer le fusible par un de la valeur précisée.
• Connectez des enceintes avec une puissance maximum de 50 W (impédance de 4 Ω à 8 Ω). Sinon, changez le
réglage <AMP GAIN>. (Voir la page 17 du MANUEL D’INSTRUCTIONS.)
• Le dissipateur de chaleur devient très chaud après usage. Faire attention de ne pas le toucher en retirant cet
appareil.
Heat sink / Dissipateur de chaleur
PRECAUTIONS on power supply and speaker connections
PRECAUTIONS sur l’alimentation et la connexion des enceintes
• DO NOT connect the speaker leads of the power cord to the car battery; otherwise, the unit will be
seriously damaged.
• BEFORE connecting the speaker leads of the power cord to the speakers, check the speaker wiring in
your car.
• NE CONNECTEZ PAS les fils d’enceintes du cordon d’alimentation à la batterie; sinon, l’appareil serait
sérieusement endommagé.
• AVANT de connecter les fils d’enceintes du cordon d’alimentation aux enceintes, vérifiez le câblage des enceintes
de votre voiture.
INSTALLATION / INSTALLATION
The following illustration shows a typical installation. If you have any questions or require information
regarding installation kits, consult your JVC IN-CAR ENTERTAINMENT dealer or a company supplying kits.
L’illustration suivante est un exemple d’installation typique. Si vous avez des questions ou avez besoin
d’information sur des kits d’installation, consulter votre revendeur d’autoradios JVC.
In-dash mounting / Montage encastré
Do the required electrical connections
(see page 2).
Réalisez les connexions électriques (voir
page 2).
Install the unit at an angle
of less than 30˚.
Installez l’appareil avec un
angle de moins de 30˚.
Part list / Liste de pièces
A Control panel / Panneau de
commande (×1)
B Sleeve / Manchon (×1)
C Trim plate / Plaque d’assemblage
(×1)
D Power cord / Cordon d’alimentation
(×1)
E Handles / Poignées (×2)
Bend the appropriate tabs to hold the sleeve
firmly in place.
Tordez les languettes appropriées pour maintenir le
manchon en place.
*1
When installing the unit without using the sleeve / Lors de l’installation de l’appareil
scans utiliser de manchon
Removing the unit / Retrait de l’appareil
Release the rear section first... / Ouvrez la section arrière en premier...
Flat head screws (M5 × 8 mm) /
Vis à tête plate (M5 × 8 mm) *2
Pocket / Poche
Bracket / Support *2
*1 When you stand the unit, be careful not to damage the fuse on the rear.
*2 Not supplied for this unit.
*1 Lorsque vous mettez l’appareil à la verticale, faire attention de ne pas endommager le fusible situé sur l’arrière.
*2 Non fourni avec cet appareil.
1
Install_KD-R511_010A_f.indd 1
12/10/09 4:52:17 PM
ELECTRICAL CONNECTIONS / RACCORDEMENTS ELECTRIQUES
Connecting the external amplifier or subwoofer / Connexion d’un amplificateur extérieur ou d’un caisson de grave
Y-connector / Connecteur Y *1
Remote lead / Fil d’alimentation à distance
JVC Amplifier /
JVC Amplificateur
Signal cord /
Cordon de signal *1
Reset the unit. / Réinitialisez l’autoradio.
To the blue (white stripe) lead
of the unit / Au fil bleu (bande
blanche) de l’appareil
Rear speakers or subwoofer / Enceintes arrière ou le caisson de grave
Make the <L/O MODE> setting accordingly, see page 16 of the
INSTRUCTIONS. / Faite le réglage <L/O MODE> en fonction, voir page 16
du MANUEL D’INSTRUCTIONS.
*1 Not supplied for this unit. / Non fourni avec cet appareil.
*2 Firmly attach the ground wire to the metallic body or to the chassis of the car—to the place uncoated
with paint. / Attachez solidement le fil de mise à la masse au châssis métallique de la voiture—à un endroit
qui n’est pas recouvert de peinture.
Rear ground terminal / Borne arrière de masse
Aerial input / Entrée d’antenne
Steering wheel remote input / Entrée de la télécommande de volant
15 A fuse / Fusible 15 A
D Power cord (supplied) / Cordon d’alimentation (fournie)
For some VW/Audi or Opel (Vauxhall) automobiles / Pour certaines automobiles
VW/Audi ou Opel (Vauxhall)
ISO connector / Connecteur ISO
You may need to modify the wiring of the supplied power cord as illustrated. / Vous aurrez peut-être
besoin de modifier le câblage du cordon d’alimentation fourni comme montré sur l’illustration.
• Contact your authorized car dealer before installing this unit. / Contactez votre revendeur automobile
autorisé avant d’installer l’appareil.
Å / ı Rear speaker, right (Purple/Purple, black stripe) (+/–) /
Enceintes arrière, droit (Violet/Violet, bande noire) (+/–)
Ç / Î Front speaker, right (Gray/Gray, black stripe) (+/–) /
Enceintes avant, droit (Gris/Gris, bande noire) (+/–)
‰ / Ï Front speaker, left (White/White, black stripe) (+/–) /
Enceintes avant, gauche (Blanc/Blanc, bande noire) (+/–)
Original wiring / Câblage original
Ì / Ó Rear speaker, left (Green/Green, black stripe) (+/–) /
Enceintes arrière, gauche (Vert/ Vert, bande noire) (+/–)
ISO connector /
Connecteur ISO
Y: Yellow / Jaune
R: Red / Rouge
Modified wiring 1 / Câblage modifié 1
Use modified wiring 2 if the unit does not turn on. / Utilisez le câblage modifié 2 si l’appareil ne se met
pas sous tension.
Ô
To mobile phone system (Brown) / Au système de
téléphoneportable (Marron)
Ò
Car battery 12 V (Yellow) / Batterie de la voiture 12 V
(Jaune)
˜
Remote lead/power aerial, 200 mA max. (Blue,
white stripe) / Fil d’alimentation à distance/antenne
automatique, 200 mA max. (Bleu, bande blanche)
Ø
Accessory terminal (Red) / Prise accessoire (Rouge)
∏
Metallic body/chassis of the car (Black) / Corps
métallique/châssis de la voiture (Noir)
Modified wiring 2 / Câblage modifié 2
IMPORTANT/IMPORTANT: A custom wiring harness (separately purchased) which is suitable for your car is recommended for connection between the unit and your car. / Un faisceau de câbles personnalisé (vendu
séparément) correspondant à votre voiture est recommandé pour raccorder l'appareil et votre voiture.
(A) If your car has an ISO terminal / Si votre voiture possède une prise ISO
(B) If your car does NOT have an ISO terminal / Si votre voiture ne possède pas de prise ISO
Custom wiring harness (separately purchased) /
Faisceau de fils personnalisé (à acheter séparément)
Custom wiring harness (separately purchased) /
Faisceau de fils personnalisé (à acheter séparément)
D Power cord (supplied) / Cordon
d’alimentation (fournie)
D Power cord (supplied) / Cordon
d’alimentation (fournie)
Consult your JVC IN-CAR ENTERTAINMENT dealer or a company supplying kits for
details about connection. / Pour en savoir plus sur connexions, consultez votre revendeur
d’autoradio JVC ou une compagnie fournissant des kits.
TROUBLESHOOTING / EN CAS DE DIFFICULTES
• The fuse blows. ] Are the red and black leads connected correctly?
• Power cannot be turned on. ] Is the yellow lead connected?
• No sound from the speakers. ] Is the speaker output lead short-circuited?
• “PROTECT” appears on the display and no operation can be done. ] Is the speaker output lead
short-circuited or touches the chassis of the car/head unit? ; Have you reset your unit?
• Sound is distorted. ] Is the speaker output lead grounded? ; Are the “–” terminals of L and R speakers
grounded in common?
• Noise interfere with sounds. ] Is the rear ground terminal connected to the car’s chassis using shorter
and thicker cords?
• This unit becomes hot. ] Is the speaker output lead grounded? ; Are the “–” terminals of L and R
speakers grounded in common?
• This unit does not work at all. ] Have you reset your unit?
•
•
•
•
•
•
•
•
Le fusible saute. ] Les fils rouge et noir sont-ils racordés correctement?
L’appareil ne peut pas être mise sous tension. ] Le fil jaune est-elle raccordée?
Pas de son des enceintes. ] Le fil de sortie d’enceinte est-il court-circuité?
“PROTECT” apparaît sur l’affichage et aucune opération ne peut être réalisée. ] Est-ce qu’un fil de
sortie d’enceinte est court-circuité ou touche le châssis de la voiture/appareil principal? ; Avez-vous réinitialisez
votre appareil?
Le son est déformé. ] Le fil de sortie d’enceinte est-il à la masse? ; Les bornes “–” des enceintes gauche et droit
sont-elles mises ensemble à la masse?
Interférence avec les sons. ] La prise arrière de mise à la terre est-elle connectée au châssis de la voiture avec
un cordon court et épais?
Cet appareil devient chaud. ] Le fil de sortie d’enceinte est-il à la masse? ; Les bornes “–” des enceintes
gauche et droit sont-elles mises ensemble à la masse?
Cet appareil ne fonctionne pas du tout. ] Avez-vous réinitialisé votre appareil?
2
Install_KD-R511_010A_f.indd 2
12/10/09 4:52:18 PM