1
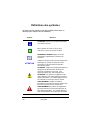
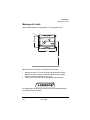
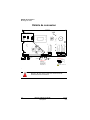
Panneau annonciateur
Annunciator Panel
Manuel de l’utilisateur
301AP
User Manual
ERP 511392
2/07
Annunciator Panel
301AP
User Manual
ERP 511392
2/07
Notices and Trademarks
Copyright by Honeywell International Inc.
Release 511392 February 2007
While this information is presented in good faith and believed to be accurate,
Honeywell disclaims the implied warranties of merchantability for a particular
purpose and makes no express warranties except as may be stated in its
written agreement with and for its customers.
In no event is Honeywell liable to anyone for any indirect, special or
consequential damages. The information and specifications in this document
are subject to change without notice.
Honeywell Analytics
4005 Matte Blvd, Unit G
Brossard, Quebec, J4Y 2P4
511392
2/07
301AP User Manual
Honeywell
iii
Contacts
World Wide Web
The following Honeywell Websites may be of interest to our customers:
Honeywell Organization
Honeywell Analytics
Corporate
International
WWW Address (URL)
http://www.honeywellanalytics.com
http://www.honeywell.com
http://content.honeywell.com/global/
Telephone
Contact us by telephone at the numbers listed below:
Organization
United States
and Canada
Asia Pacific
Europe
Latin America
Honeywell Analytics
Honeywell Asia Pacific Inc.
Hong Kong
Honeywell Pace
Brussels, Belgium
Honeywell International Inc.
Sunrise, Florida, U.S.A.
Phone Number
1-800-563-2967
1-450-619-2450
Fax: 1-888-967-9938
(852) 23 31 9133
[32-2]728-2711
(954) 845-2600
Sales Informations
Contact us at [email protected]
511392
2/07
301AP User Manual
Honeywell
v
Symbol Definitions
The following table lists the symbols used in this document to denote
certain conditions:
Symbol
Definition
ATTENTION: Identifies information that requires
special consideration
TIP: Identifies advice or hints for the user, often
in terms of performing a task
REFERENCE _ INTERNAL: Identifies an
additional source of information within the
bookset.
CAUTION
511392
2/07
Indicates a situation which, if not avoided, may
result in equipment or work (data) on the system
being damaged or lost, or may result in the
inability to properly operate the process.
CAUTION: Indicates a potentially hazardous
situation which, if not avoided, may result in minor
or moderate injury. It may also be used to alert
against unsafe practices.
CAUTION: Symbol on the equipment refers the
user to the product manual for additional
information. The symbol appears next to required
information in the manual.
WARNING: Indicates a potentially hazardous
situation which, if not avoided, could result in
serious injury or death.
WARNING symbol on the equipment refers the
user to the product manual for additional
information. The symbol appears next to required
information in the manual.
301AP User Manual
Honeywell
vii
Contents
INTRODUCTION ............................................................11
Description ........................................................................................ 11
Unpacking ............................................................................................. 11
INSTALLATION ..............................................................12
General Guidelines ............................................................................ 12
Mounting the Unit .............................................................................. 13
SYSTEM WIRING ...........................................................14
PROGRAMMING MENU ................................................15
User Interface .................................................................................... 15
Menu Options .................................................................................... 16
Using the Menu ................................................................................. 17
Setting the Address ............................................................................... 18
Changing Relay Settings ....................................................................... 18
Changing Silence Settings .................................................................... 19
Activating Key Beeps ............................................................................ 19
Erasing Unit Memory ............................................................................. 20
Exiting the Programming Menu ............................................................. 20
SPECIFICATIONS ..........................................................21
Technical Specifications .................................................................... 21
Maintenance ...................................................................................... 22
Cleaning ................................................................................................ 22
LIMITED WARRANTY ....................................................23
Limited Warranty ................................................................................... 23
Re-Stocking Policy ................................................................................ 23
Exclusions ............................................................................................. 24
Warranty Limitation and Exclusion ........................................................ 24
Disclaimer of Unstated Warranties ........................................................ 25
Limitation of Liability .............................................................................. 25
511392
2/07
301AP User Manual
Honeywell
ix
Introduction
Description
Introduction
Description
The 301AP is the latest generation of remote annunciator panels,
incorporating all (previously existing) functionalities, such as the easy to
read visual indicators, multiple alarm level displays and fault alarms.
The 301AP displays readings from the 301C controller with no user
programming required.
The 301AP also has 3 relays that can be activated from the 301C,
according to specifications configured on the controller.
The 301AP offers the following key features:
•
•
•
•
Three relay outputs, for added functionality
Audible alarm
Easy-to-read status indicators (LEDs) and LCD display
Robust RS-485 Modbus communication interface.
Unpacking
When the package is received, proceed following this checklist:
•
•
•
Check that the package is undamaged
Carefully open the package.
Locate the packing slip, or purchase order, and verify that all items
on the order are present and undamaged
Note: If the package or any of its contents are damaged, please refer to
the Warranty section at the back of the manual for instructions.
511392
2/07
301AP User Manual
Honeywell
11
Installation
General Guidelines
Installation
General Guidelines
These guidelines must be strictly observed to assure that the
equipment works properly. If they are not applied, Honeywell will not
recognize any liability in case of improper operation.
•
•
•
•
•
Make sure to locate all units easily accessible for proper service.
Avoid any location where units could be subject to vibrations.
Avoid any location close to any electromagnetic interference.
Avoid any location where there are large temperature swings.
Verify local requirements and existing regulations which may affect
the choice of location.
For safety reasons, this equipment must be operated and
serviced by qualified personnel only. read and understand
the instruction manual completely before operating or
servicing.
12
301AP User Manual
Honeywell
511392
2/07
Installation
Mounting the Unit
Mounting the Unit
It is recommended that units be installed 5 feet (1.5 m) above the floor,
at approximate eye level.
Ø .5cm
¼”
17.4 cm
6 13/32”
26.8 cm
10 9/16”
1.5m
5’
Mark the holes, as shown:
•
•
•
•
Height markers 17.4 cm (6 13/32”) apart
Width markers 26.8 cm (10 9/16”) apart
Pre-drill 0.5 cm (1/4”) mounting holes as needed
Securely mount the unit using the appropriate screws
Wiring for the unit must be passed through the knock-outs provided at
the bottom.
511392
2/07
301AP User Manual
Honeywell
13
System Wiring
Mounting the Unit
System Wiring
PCB301IRFTR1
MADE IN CANADA
TP1
TP2
4@20+
EOL Jumper Positions
4@20TP3
TP4@20
LCD1
D5
SW4
A
STEST
ALARM_A
D6
Disabled
ALARM_B
K
RC
R
D7
ALARM_C
K1
K2
K3
SW3
UP
D3
SHDN
SW5
D8
FAULT
Rel. 2
SW6
Rel. 1
SW1
Rel. 3
POWER
D16
SW2
DOWN
JP3
J1
VAC IN
J2
VAC OUT
+4@20
/VOUT
-4@20
/GND
RED GREENN/C WHITEBLACK SHIELD
A
TX
EOL-R
EOL-RC
J10
J12
J5
B
SHIELD
J8
J11
A
B
N.O.
N.C.
J7
N.O.
J6
N.C.
N.O.
N.C.
RELAY OUTPUTS
6
Next
Previous
4
2
Next
COMMUNICATION
Communication Wire Gauge:
2-24 AWG (Belden 9841)
Twisted and shielded cable
2000 feet (600 m) per channel
T-tap: 65 feet (20 m) / T-tap
130 feet (40 m) total
5
3
Normally
open
3+5
4+6
Normally
1 closed
1+3
2+4
RISK OF ELECTRIC SHOCK
.
Warning: Do not connect power to this unit until all wiring
connections are complete.
14
301AP User Manual
Honeywell
511392
2/07
Programming Menu
User Interface
Programming Menu
User Interface
The image below illustrates the components of the user interface.
Detailed use instructions will follow later in the manual.
Pushbuttons:
Arrows:
Esc:
Enter:
Silence:
Allow users to navigate through menu options and to
increase or decrease values
Allows the user to exit a function and save changes
Provides access to the menu and confirms selections and
changes
Silences the unit’s buzzer
LED Indicators:
Alarm A:
Alarm B:
Alarm C:
Power:
Fault:
TX:
511392
2/07
Lights when Alarm A is reached
Lights when Alarm B is reached
Lights when Alarm C is reached
Power, lights when unit is on
Fault, lights when a fault condition has occured.
Lights when the unit is transmitting.
301AP User Manual
Honeywell
15
Programming Menu
Menu Options
Menu Options
The 301AP programming menu offers many options, as illustrated in
the image below:
Menu
Set ADR.
16
Set ADR.
ADR:003
Menu
SetRelay
SetRelay
Rel #1
FailSafe
R1 = No?
Menu
Silence
Silence
Rel #1
R1= Yes?
Menu
KeyBeep
KeyBeep
No?
Menu
ClearMem
ClearMem
All Adr.
Menu
QUIT
WAIT
Re-init
301AP User Manual
Honeywell
All Adr
No?
511392
2/07
Programming Menu
Using the Menu
Using the Menu
Follow these steps to access and use the programming menu:
1. Press the Enter pushbutton to access the menu. The password
screen appears requesting the password.
2. The first letter in the password is underlined to
PASSWORD
show that it can be changed. Press the up or
VA
down arrow to scroll to the desired letter.
3. Press the Enter pushbutton to confirm the first
letter.
4. Use the arrows to scroll to the desired second letter.
5. Press the Enter pushbutton to confirm the
Menu
password. If it is correct, the following screen
Set
ADR.
appears.
Note: The default password is VA. If an incorrect
password is entered, the menu cannot be accessed and the unit
returns to normal operation mode.
511392
2/07
301AP User Manual
Honeywell
17
Programming Menu
Using the Menu
Setting the Address
Each unit is configured with a default address. However, if the unit is
part of a network of devices, each should have a different address.
Follow these steps to set the address:
1. When the screen displays the Menu Set ADR.
Menu
option (immediately after password login), press
Set
ADR.
the Enter pushbutton to select the option.
2. Press an arrow pushbutton to scroll through the
Set ADR.
different addresses (001 to 254). When the
ADR:003
desired address is displayed, press Enter to set
the new address. The display returns to the
Menu Set ADR. screen.
3. Press an arrow to scroll to the next desired option or to the QUIT
screen and press Enter to confirm the selection or exit the
programming menus.
Note: If the 301AP is to be compatible with the 301C controller, the
address must be between 1 and 96.
Changing Relay Settings
Although the unit is ready to use, with default relay settings, this option
allows users to modify relay failsafe settings.
The process to change the settings for each relay is identical:
1. Press an arrow to scroll to the SetRelay menu
option and press Enter to select.
Menu
SetRelay
2. SetRelay Rel #1 appears on the screen. Press
SetRelay
an arrow to scroll to the desired relay number and
Rel #1
press Enter to select.
3. The screen now shows the current failsafe
FailSafe
setting. Use the arrows to scroll to the desired
R1
= No?
setting (Yes to activate the failsafe, No to
deactivate) and press Enter to confirm the new setting.
4. Once the new value is accepted, the unit returns to the SetRelay
Rel #1 screen.
18
301AP User Manual
Honeywell
511392
2/07
Programming Menu
Using the Menu
Changing Silence Settings
The unit user interface contains a “Silence” pushbutton. This button is
only functional if the Silence setting has been activated for each option
using this menu.
1. Press an arrow to scroll to the Menu Silence
option and press Enter to select.
Menu
Silence
2. Silence Rel #1 appears on the screen. Press an
arrow to scroll to the desired relay number (or
Buzzer) and press Enter to select.
Silence
Rel #1
3. The screen now requests confirmation. Use the
arrows to scroll to the desired setting (Yes
R1= Yes?
activates the Silence pushbutton for the specified
relay or buzzer, No leaves the pushbutton
inactive) and press Enter to confirm the new setting.
4. Once the new value is accepted, the unit returns to the Silence Rel
#1 screen.
Repeat for other options.
Note: Selecting buzzer means that pressing the Silence key will turn off
the unit’s audible alarm.
Selecting Rel #1, #2 or #3 means that pressing the Silence key
will deactivate a relay that was activated by an alarm.
Activating Key Beeps
This function activates the Beep function, which makes the unit emit a
beep whenever a pushbutton is pressed:
1. When the screen displays the Menu KeyBeep
option, press the Enter pushbutton to select.
Menu
KeyBeep
2. Press an arrow pushbutton to scroll to Yes or No
KeyBeep
and press Enter to set the new value. The display
No?
returns to the Menu Set ADR. screen.
3. Press an arrow to scroll to the next desired option
or to the QUIT screen and press Enter to confirm the selection or
exit the programming menus.
511392
2/07
301AP User Manual
Honeywell
19
Programming Menu
Using the Menu
Erasing Unit Memory
This function enables the user to clear addresses from the unit’s
memory. This is useful if, for reasons unknown, the 301AP display
panel experiences technical difficulties. Once the 301AP memory is
cleared, the 301C controller resets the AP memory and the display
should return to normal.
1. Press an arrow to scroll to the Menu ClearMem
option, press the Enter pushbutton to select.
Menu
ClearMem
2. The screen displays ClearMem All Adr. Press
ClearMem
the Enter pushbutton to select the option or use
All Adr.
the arrows to select the address to delete.
3. Press an arrow pushbutton to scroll to Yes or No
All Adr
and press Enter to confirm. The display returns to
No?
the Menu Set ADR. screen.
4. Press an arrow to scroll to the next desired option
or to the QUIT screen and press Enter to confirm the selection or
exit the programming menus.
Exiting the Programming Menu
Follow the steps below to exit the programming menu.
Press an arrow to scroll to the QUIT screen and press Enter to exit the
programming menus.
The LCD displays * WAIT * Re-init as the transmitter implements all the
changes that were made in the user’s menu before returning to normal
operation.
20
301AP User Manual
Honeywell
511392
2/07
Specifications
Technical Specifications
Specifications
Technical Specifications
Power requirements:
Relays
Relay output rating:
Communication cable
Communication :
Operating humidity
range:
Operating
temperature range:
Audible alarm:
Visual indicators:
Display:
Dimensions:
Weight:
Housing rating:
Certifications:
511392
2/07
17 - 27 Vac, 24 - 38 Vdc, 200 mA @ 24 Vdc,
3 DPDT relays
5 A, 30 Vdc or 250 Vac (resistive load)
RS-485 two twisted/shielded wires 24 AWG
Length of conductors: Up to 600 m (2000 ft.) per
channel
T-Tap: 20 m (65 ft.) maximum per t-tap
40 m (130 ft.) total
RS-485 ModBus
0-95% RH, non-condensing
0 to 40ºC (32 to 104ºF)
65 dB at 1 m (3 feet)
Alarm A: red LED
Alarm B: red LED
Alarm C: red LED
Power: green LED
Fault: yellow LED
Tx: yellow LED
Alphanumeric backlight liquid crystal display (LCD)
20.3 x 28 x 5.7 cm (H x W x D)
(8 x 11 x 2.15 in.)
1.58 kg (3.5 lbs.)
NEMA 4X, ABS polycarbonate indoor
CSA C22.2 no. 205-M1983
UL 1244
301AP User Manual
Honeywell
21
Specifications
Maintenance
Maintenance
If the transmitter experiences any communication difficulties, the fault
LED will automatically turn on. The fault LED will also light when a fault
occurs on the 301C controller. If the system is in fault mode, contact
Honeywell.
In the event of a fault, the LCD will display the following messages:
WAIT
MASTER
NO
MASTER
ERR
MEM
Cleaning
•
•
22
Clean the exterior with a soft, damp cloth. Do not use solvents,
soaps, or polishes.
Do not immerse the unit in liquids.
301AP User Manual
Honeywell
511392
2/07
Limited Warranty
Limited Warranty
Honeywell Analytics, Inc. warrants to the original purchaser and/or
ultimate customer ("Purchaser") of Vulcain products ("Product") that if
any part thereof proves to be defective in material or workmanship
within twelve (12) months, such defective part will be repaired or
replaced, free of charge, at Honeywell Analytics' discretion if shipped
prepaid to Honeywell Analytics at 4005 Matte Blvd., Unit G, Brossard,
Quebec, J4Y 2P4, in a package equal to or in the original container.
The Product will be returned freight prepaid and repaired or replaced if
it is determined by Honeywell Analytics that the part failed due to
defective materials or workmanship. The repair or replacement of any
such defective part shall be Honeywell Analytics' sole and exclusive
responsibility and liability under this limited warranty.
Re-Stocking Policy
The following re-stocking fees will apply when customers return
products for credit:
•
15% re-stocking fee will be applied if the product is returned within
1 month following the shipping date
•
30% re-stockingfee will be applied if the product is returned within 3
months following the shipping date
A full credit (less re-stocking fee) will only be issued if the product is in
perfect working condition. (If repairs are required on the returned
product, the cost of these repairs will be deducted from the credit to be
issued.)
No credits will be issued beyond the three month period.
511392
2/07
301AP User Manual
Honeywell
23
Limited Warranty
Exclusions
a. If Gas sensors are part of the Product, the gas sensor is covered by
a twelve (12) month limited warranty of the manufacturer.
b. If gas sensors are covered by this limited warranty, the gas sensor
is subject to inspection by Honeywell Analytics for extended
exposure to excessive gas concentrations if a claim by the
Purchaser is made under this limited warranty. Should such
inspection indicate that the gas sensor has been expended rather
than failed prematurely, this limited warranty shall not apply to the
Product.
c. This limited warranty does not cover consumable items, such as
batteries, or items subject to wear or periodic replacement,
including lamps, fuses, valves, vanes, sensor elements, cartridges,
or filter elements.
Warranty Limitation and Exclusion
Honeywell Analytics will have no further obligation under this limited
warranty. All warranty obligations of Honeywell Analytics are
extinguishable if the Product has been subject to abuse, misuse,
negligence, or accident or if the Purchaser fails to perform any of the
duties set forth in this limited warranty or if the Product has not been
operated in accordance with instructions, or if the Product
serial number has been removed or altered.
511392
2/07
301AP User Manual
Honeywell
24
Limited Warranty
Disclaimer of Unstated Warranties
The warranty printed above is the only warranty applicable to this
purchase. All other warranties, express or implied, including, but not
limited to, the implied warranties of merchantability or fitness for a
particular purpose are hereby disclaimed.
Limitation of Liability
It is understood and agreed that Honeywell Analytics’ liability, whether
in contract, in tort, under any warranty, in negligence or otherwise shall
not exceed the amount of the purchase price paid by the purchaser for
the product and under no circumstances shall Honeywell Analytics be
liable for special, indirect, or consequential damages. The price stated
for the product is a consideration limiting honeywell analytics' liability.
No action, regardless of form, arising out of the transactions under this
warranty may be brought by the purchaser more than one year after the
cause of actions has occurred.
511392
2/07
301AP User Manual
Honeywell
25
Panneau annonciateur
301AP
Manuel d’utilisateur
ERP 511392
2/07
Avis et marques de commerce
Tous droits réservés par Honeywell International Inc.
Parution 511392 février 2007
Quoique cette information est présentée en bonne foi et est présumée exacte,
Honeywell décline la garantie tacite de la qualité marchande pour un emploi
particulier et offre aucune garantie exprès, à l’exception des conventions écrites
avec et pour ses clients.
Honeywell ne sera, sous aucune circonstance, responsable à qui que ce soit
pour des dommages spéciaux ou indirectes. Les informations et les
spécifications dans ce document sont susceptibles d’être modifiées sans
préavis.
Honeywell Analytics
4005 Matte Blvd, Local G
Brossard, Québec, J4Y 2P4
511392
2/07
Manuel d’utilisateur 301AP
Honeywell
iii
Nous joindre
Web
Les sites Web suivant d’Honeywell peuvent être utilies pour nos clients :
Organisation Honeywell
Honeywell Analytics
Corporate
International
Adresses WWW (URL)
http://www.honeywellanalytics.com
http://www.honeywell.com
http://content.honeywell.com/global/
Téléphone
Utiliser les numéros de téléphone ci-dessous pour nous contacter :
Organisation
États Unis
et Canada
Asie Pacifique
Europe
Amérique latine
Honeywell Analytics
Honeywell Asia Pacific Inc.
Hong Kong
Honeywell Pace
Bruxelles, Belgique
Honeywell International Inc.
Sunrise, Floride, É.U.
Numéro de téléphone
1-800-563-2967
1-450-619-2450
Fax: 1-888-967-9938
(852) 23 31 9133
[32-2]728-2711
(954) 845-2600
Informations des ventes
Nous contacter à [email protected]
511392
2/07
Manuel d’utilisateur 301AP
Honeywell
ii
Définitions des symboles
Le tableau suivant contient la liste des symboles utilisés dans ce
document pour indiquer certaine conditions :
Symbole
Définition
ATTENTION: Identifie une information demandant
une attention spéciale
Truc: Identifie un conseil ou un truc pour
l’utilisateur, souvent concernant une tâche
RÉFÉRENCE- INTERNE Indique une source
d’information supplémentaire à l’intérieur du
document.
ATTENTION
511392
2/07
Indique une situation à éviter pouvant entraîner des
dommages au système ou la perte de travail
(documents) ou pouvant prévenir l’opération
normale du système.
ATTENTION : Indique une situation potentiellement
dangereuse qui peut entraîner des blessures
mineures ou modérées si pas évité. Peut
également signaler des actions dangereuses
ATTENTION: Un symbole sur l’équipement qui
réfère l’utilisateur à la documentation pour de plus
amples informations. Ce symbole apparaît à côté
des informations nécessaires dans le manuel.
AVERTISSEMENT : Indique une situation
potentiellement dangereuse qui peut entraîner des
blessures majeures ou la mort si pas évité.
AVERTISSEMENT Un symbole sur l’équipement
qui réfère l’utilisateur à la documentation pour de
plus amples informations. Ce symbole apparaît à
côté des informations nécessaires dans le manuel.
Manuel d’utilisateur 301AP
Honeywell
iv
Table des matières
INTRODUCTION ............................................................11
Description ........................................................................................ 11
Réception .............................................................................................. 11
INSTALLATION ..............................................................12
Directives générales .......................................................................... 12
Montage de l’unité ............................................................................. 13
DÉTAILS DE CONNEXION ............................................14
MENU DE PROGRAMMATION .....................................15
Interface utilisateur ............................................................................ 15
Options de menu ............................................................................... 16
Comment utiliser les menus .............................................................. 17
Configurer l’adresse .............................................................................. 18
Modifier les paramètres des relais ........................................................ 18
Changer les paramètres Silence ........................................................... 19
Activer les touches sonores .................................................................. 20
Effacer la mémoire de l’unité ................................................................. 20
Quitter le menu de programmation ........................................................ 21
SPÉCIFICATIONS ..........................................................22
Spécifications techniques .................................................................. 22
Entretien ............................................................................................ 23
Nettoyage .............................................................................................. 23
GARANTIE LIMITÉE ......................................................25
Garantie limitée ..................................................................................... 25
Politique de Retour ................................................................................ 25
Exclusions ............................................................................................. 26
Limitation et exclusion de la garantie .................................................... 26
Dénégation de responsabilité d’autres garanties .................................. 27
Limitation de responsabilité ................................................................... 27
511392
2/07
Manuel d’utilisateur 301AP
Honeywell
vi
Introduction
Description
Introduction
Description
Le 301AP est le plus récent d’une famille de panneaux annonciateurs et
comprend toutes les fonctionnalités, tels les DEL indicateurs facile à
lire, les multiples indicateurs d’alarme et les alarmes de faute. Le
301AP affiche les lectures d’une centrale 301C sans qu’une
programmation par l’utilisateur ne soit nécessaire.
Le 301AP comporte également trois (3) relais pouvant être activés
depuis la centrale 301C, selon les paramètres configurés de la centrale.
Le 301AP offre les fonctions suivantes :
•
•
•
•
Trois sorties de relais, offrant une fonctionnalité accrue
Alarme sonore
Indicateurs (DEL) facile à lire et un écran d’affichage à CL
Interface de comnmunication RS-485 Modbus robuste.
Réception
Suivre les étapes de vérifications suivantes lors de la réception de la
marchandise :
•
•
•
Vérifier que l’emballage n’est pas endommagé
Ouvrir le colis.
Trouver le bon de connaissement ou le bon de commande puis
vérifier que tous les articles de la commande y sont et qu’il n’y a
aucun dommage.
Note: Si le colis ou la marchandise est endommagé, consulter la
section Garantie pour des instructions détaillées.
511392
2/07
Manuel d’utilisateur 301AP
Honeywell
11
Installation
Directives générales
Installation
Directives générales
Ces directives doivent etre strictement respectées pour assurer le bon
fonctionnement de l'equipement. Si elles ne sont pas suivies,
Honeywell ne se tiendra aucunement responsable des incidents
pouvant en decouler:
•
•
•
•
•
Localiser chaque unité à un endroit facile d'accès pour un
technicien.
Éviter toute localisation des unités près des sources de vibrations.
Évitez d'installer les unités près d'équipements émettant des
interférences electromagnetiques.
Évitez les emplacements où la température change rapidement.
Avant de débuter l'installation, vérifier tous les codes, normes ou
legislations pouvant affecter le choix de l'emplacement.
En raison de sécurité, cet équipement doit seulement être
entretenu par le personnel qualifié. Lire et comprendre les
instructions de ce guide avant l’utilisation ou l’entretien.
12
Manuel d’utilisateur 301AP
Honeywell
511392
2/07
Installation
Montage de l’unité
Montage de l’unité
Nous recommandons une installation à 1.5 m (5 pieds) du sol.
Ø .5cm
¼”
17.4 cm
6 13/32”
26.8 cm
10 9/16”
1.5m
5’
Mesurer les trous, selon les instructions de l’illustration :
•
•
•
•
Mesurer les trous à 17.4 cm (6 13/32”) de distance en hauteur
Mesurer les trous à 26.8 cm (10 9/16”) de distance en largeur
Perçer les trous de montage 0.5 cm (1/4”)
Fixer l’unité au mur avec les vis appropriées (non-incluses)
Le câblage pour l’unité doit être enfiler par les pastilles poinçonnées
(knock-outs) avec un conduit.
511392
2/07
Manuel d’utilisateur 301AP
Honeywell
13
Détails de connexion
Montage de l’unité
Détails de connexion
PCB301IRFTR1
MADE IN CANADA
TP1
TP2
4@20+
Positions de cavalier de fin de
ligne
4@20TP3
TP4@20
LCD1
D5
SW4
A
STEST
ALARM_A
D6
Désactivé
ALARM_B
K
RC
R
D7
ALARM_C
K1
K2
K3
SW3
UP
D3
SHDN
POWER
SW1
SW6
SW5
D8
FAULT
D16
SW2
DOWN
JP3
J1
VAC IN
J2
VAC OUT
J12
J5
+4@20
/VOUT
-4@20
/GND
RED GREENN/C WHITEBLACK SHIELD
A
TX
EOL-R
EOL-RC
J10
B
SHIELD
J8
J11
A
B
N.O.
N.C.
J7
N.O.
N.C.
J6
N.O.
N.C.
suivant
précédent
précédent
suivant
SORTIES RELAIS
6
4
2
COMMUNICATION
Calibre de câble de
Communication:
2-24 AWG (Belden 9841)
câble torsadé et blindé
600 m (2000 pi) par canal
T-tap: 20 m (65 pi) / T-tap
40 m (130 pi) total
5
3
Normalement 3+5
ouvert
4+6
Normalement 1+3
1 fermé
2+4
RISQUE DE CHOC ÉLECTRIQUE
.
Attention: Ne pas mettre l’unité sous tension avant de
terminer toutes les connexions.
14
Manuel d’utilisateur 301AP
Honeywell
511392
2/07
Menu de programmation
Interface utilisateur
Menu de programmation
Interface utilisateur
L’image ci-dessous est un aperçu de l’interface utilisateur. Les
instructions d’utilisation suivront.
Boutons poussoirs :
Flèches : Permettent de naviguer dans les menus et d’augmenter ou
de diminuer les valeurs
Esc :
Permet de quitter un menu et de sauvegarder les
modifications
Enter :
Permet d’accéder au menu, de confirmer les sélections et les
modifications
Silence : Désactive l’alarme sonore
DEL indicateurs :
Alarm A :
Alarm B :
Alarm C :
Power :
Fault :
TX :
511392
2/07
Allumé lorsque le niveau d’alarme A est atteint
Allumé lorsque le niveau d’alarme B est atteint
Allumé lorsque le niveau d’alarme C est atteint
Allumé lorsque l’unité est sous tension
Allumé lorsqu’il y a une condition de faute
Allumé lorsque l’unité est en communicationS.
Manuel d’utilisateur 301AP
Honeywell
15
Menu de programmation
Options de menu
Options de menu
Le 301AP comporte plusieurs options de menu, selon le dessin cidessous :
Menu
Set ADR.
16
Set ADR.
ADR:003
Menu
SetRelay
SetRelay
Rel #1
FailSafe
R1 = No?
Menu
Silence
Silence
Rel #1
R1= Yes?
Menu
KeyBeep
KeyBeep
No?
Menu
ClearMem
ClearMem
All Adr.
Menu
QUIT
WAIT
Re-init
Manuel d’utilisateur 301AP
Honeywell
All Adr
No?
511392
2/07
Menu de programmation
Comment utiliser les menus
Comment utiliser les menus
Suivres les étapes ci-dessous pour accéder aux fonctions de menu et
effectuer des modifications :
1. Appuyer sur la touche Enter pour accéder au menu. L’écran de mot
de passe apparaît.
2. La première lettre du mot de passe est
PASSWORD
soulignée pour indiquer qu’elle peut être
VA
modifiée. Utiliser les flèches haut ou bas pour
afficher la lettre désirée.
3. Appuyer sur la touche Enter pour confirmer la première lettre.
4. Utiliser les flèches pour afficher la deuxième lettre désirée.
5. Appuyer sur la touche Enter pour confirmer le
Menu
mot de passe. S’il est exacte, l’écran ci-droit
Set
ADR.
apparaîtra.
Note: Le mot de passe par défaut est VA. Si un mot
de passe inexacteI est inscrit, il n’est pas possible d’accéder au
menu de programmation puis l’écran revient au mode de
fonctionnement normal.
511392
2/07
Manuel d’utilisateur 301AP
Honeywell
17
Menu de programmation
Comment utiliser les menus
Configurer l’adresse
Chaque unité est préconfigurée avec une adresse par défaut.
Cependant, si l’unité est dans un réseau d’appareils (avec plus d’un
301AP), l’unité devrait porter une adresse différente. Voici les étapes
pour modifier l’adresse :
1. Le premier écran affiché (après l’accès par mot
Menu
de passe) est Menu Set ADR. Appuyer sur la
Set
ADR.
touche Enter pour sélectionner l’option.
2. Appuyer sur une flèche pour dérouler dans les
Set ADR.
addresses disponibles (001 à 254). Lorsque
ADR:003
l’adresse désirée est affichée, appuyer sur la
touche Enter pour sélectionner la nouvelle
adresse. L’afficheur revient à l’écran Menu Set ADR..
3. Appuyer sur une flèche pour naviguer à la prochaine option ou à
l’écran QUIT pour quitter les menus de programmation.
Note: L’adresse doit être entre 1 et 96 si le 301AP doit être compatible
à la centrale 301C
Modifier les paramètres des relais
Quoique le 301AP est configuré avec les paramètres de relais par
défaut, il est possible de modifier les paramètres de sécurité intégrée
(failsafe) des relais.
Le processus est identique pour chacun des relais :
1. Appuyer sur une flèche pour dérouler à l’option
Menu
Menu SetRelay puis appuyer sur la touche Enter
SetRelay
pour sélectionner l’option.
2. L’écran SetRelay Rel #1 apparaît. Appuyer sur
SetRelay
une flèche pour dérouler au relais désiré puis
Rel #1
appuyer sur la touche Enter pour sélectionner
3. L’écran affiche le paramètre de sécurité intégrée
FailSafe
(failsafe) existant. Utiliser les flèches pour afficher
R1
= No?
le paramètre désiré (Yes pour activer le relais
sécurité intégrée, No pour désactiver) puis appuyer sur la touche
Enter pour confirmer le nouveau paramètre.
18
Manuel d’utilisateur 301AP
Honeywell
511392
2/07
Menu de programmation
Comment utiliser les menus
4. L’écran revient à l’option SetRelay Rel #1.
5. Appuyer sur une flèche pour naviguer à la prochaine option ou à
l’écran QUIT pour quitter les menus de programmation.
Changer les paramètres Silence
L’interface utilisateur de cet unité comporte un bouton « Silence ». Ce
bouton est uniquement fonctionnel lorsque le paramètre Silence est
activé depuis ce menu.
1. Appuyer sur une flèche pour naviguer à l’option
Menu
Menu Silence puis appuyer sur la touche Enter
Silence
pour sélectionner.
2. L’option Silence Rel #1 apparaît à l’écran.
Silence
Appuyer sur une flèche pour dérouler au relais
Rel #1
désiré (ou à Buzzer) puis appuyer sur la touche
Enter pour sélectionner.
3. L’écran demande ensuite la confirmation. Utiliser
les flèches pour sélectionner la confirmation
R1= Yes?
désirée (sélectionner Yes pour activer le bouton
poussoir Silence, No pour laisser le bouton
poussoir Silence inactif) puis appuyer sur la touche Enter pour
confirmer la nouvelle configuration.
4. L’écran revient à l’option Silence Rel #1.
5. Appuyer sur une flèche pour naviguer à la prochaine option ou à
l’écran QUIT pour quitter les menus de programmation.
Répéter pour les autres options.
Note: La sélection de l’option Buzzer signifie que la touche Silence
désactivera l’alarme sonore de l’unité.
La sélection de Rel #1, #2 ou #3 signifie que la touche Silence
désactivera le relais activé par un alarme.
511392
2/07
Manuel d’utilisateur 301AP
Honeywell
19
Menu de programmation
Comment utiliser les menus
Activer les touches sonores
Cette fonction permet d’activer le son pour chaque pression d’un
bouton poussoir :
1. Appuyer sur une flèche pour naviguer à l’option
Menu
Menu KeyBeep, puis appuyer sur la touche Enter
KeyBeep
pour sélectionner.
2. Appuyer sur une flèche pour afficher soit Yes ou
KeyBeep
No puis appuyer sur la touche Enter pour
No?
sélectionner la nouvelle valeur. L’écran revient à
l’option Menu KeyBeep..
3. Appuyer sur une flèche pour naviguer à la prochaine option ou à
l’écran QUIT pour quitter les menus de programmation.
Effacer la mémoire de l’unité
Cette fonction permet de mettre à zéro la mémoire du 301AP. Ceci est
utile pour corriger les erreurs d’affichage (résultant d’une difficulté
technique). Puisque les données de la mémoire du 301AP proviennent
de la centrale 301C, la centrale réinitialisera la mémoire du 301AP au
prochain cycle de rafraîchissement. L’affichage devrait donc revenir au
mode normal.
1. Appuyer sur une flèche pour naviguer à l’option
Menu
Menu ClearMem, puis appuyer sur la touche
ClearMem
Enter pour sélectionner.
2. L’écran affiche ClearMem All Adr. Appuyer sur
la touche Enter pour sélectionner ou appuyer sur ClearMem
All Adr.
les flèches pour naviguer à l’adresse à supprimer.
3. Appuyer sur une flèche pour afficher soit Yes ou
All Adr
No puis appuyer sur la touche Enter pour
No?
confirmer. L’écran revient à l’option Menu
ClearMem.
4. Appuyer sur une flèche pour naviguer à la prochaine option ou à
l’écran QUIT pour quitter les menus de programmation.
20
Manuel d’utilisateur 301AP
Honeywell
511392
2/07
Menu de programmation
Comment utiliser les menus
Quitter le menu de programmation
Voici les étapes pour quitter le menu de programmation :
Appuyer sur une flèche pour naviguer à l’écran QUIT puis appuyer sur
la touche Enter pour confirmer.
L’écran affiche * WAIT * Re-init pendant que l’unité enregistre toutes
les modifications. Aussitôt les modifications enregistrées, l’unité revient
au mode d’opération normal.
511392
2/07
Manuel d’utilisateur 301AP
Honeywell
21
Spécifications
Spécifications techniques
Spécifications
Spécifications techniques
Alimentation :
Relais :
Puissance de sortie :
Câble de
communication :
Communication :
Plage d’humidité
d’opération :
Plage de température
d’opération :
Alarme sonore :
Indicateurs visuels :
Affichage :
Dimensions :
Poids :
Certification du
boîtier :
Certifications :
22
17 - 27 Vca, 24 - 38 Vcc, 200 mA @ 24 Vcc,
3 relais DPDT
5 A, 30 Vcc ou 250 Vca (charge résistive)
RS-485 pair torsadé/blindé 24 AWG
Longueur de ligne : jusqu’à 600 m (2000 pi.) par canal
(dérivation (T-Tap) : 20 m (65 pi.) maximum par
dérivation 40 m (130 pi.) total
RS-485 ModBus
0-95% HR, non-condensé
0 à 40ºC (32 à 104ºF)
65 dB à 1 m (3 pi.)
Alarm A: DEL rouge
Alarm B: DEL rouge
Alarm C:DEL rouge
Alimentation : DEL vert
Fault: DEL jaune
Tx: DEL jaune
Afficheur à CL alphanumérique rétroéclairé
20.3 x 28 x 5.7 cm (H x L x P)
(8 x 11 x 2.15 po.)
1.58 kg (3.5 lbs.)
NEMA 4X, ABS polycarbonate usage intérieur
CSA C22.2 no. 205-M1983
UL 1244
Manuel d’utilisateur 301AP
Honeywell
511392
2/07
Spécifications
Entretien
Entretien
Si l’unité subit des difficultés de communication, le DEL « Fault »
s’allumera.Ce DEL s’allumera également s’il existe une condition de
faute affiché sur la centrale 301C. Communiquer avec honeywell
Analytics si le systèm est en mode de faute.
Lors d’un état de faute, l’écran affichera les informations suivantes :
WAIT
MASTER
NO
MASTER
ERR
MEM
Nettoyage
•
•
•
Nettoyer l’extérieur de l’unité avec un linge doux, humide.
Ne pas utiliser de savons, de polis ou de solvants.
Ne pas plonger dans des liquides.
511392
2/07
Manuel d’utilisateur 301AP
Honeywell
23
Garantie limitée
Garantie limitée
Garantie limitée
Honeywell Analytics, Inc. garantie à l’Acheteur d’origine et/ou au client
final (« Acheteur ») de produits Vulcain (« Produit ») que si une pièce
quelconque du produit s’avère défectueuse , soit en matériel ou en
main d’oeuvre dans les douze (12) mois, cette pièce sera réparée ou
remplacer, sans frais, à la discrétion d’Honeywell Analytics si expédié,
port payé, à Honeywell Analytics at 4005 Matte Blvd., Unit G, Brossard,
Quebec, J4Y 2P4, dans l’emballage d’origine ou l’équivalent. Le Produit
sera retourné au client port payé si Honeywell Analytics détermine que
la pièce est défectueuse en raison de défaut matériel ou de main
d’oeuvre. La réparation ou le remplacement d’une telle pièce
défectueuse représente la seule et exclusive responsabilité
d’Honeywell Analytics sous cette garantie limitée.
Politique de Retour
Les frais suivants seront applicables lors de retour de produit pour
crédit :
•
Des frais de retour de 15% seront appliqués lorsque le produit est
retourné dans le 1er mois suivant la date d’expédition
•
Des frais de retour de 30% seront appliqués lorsque le produit est
retourné dans les 3 mois suivant la date d’expédition
Un crédit total (moins les frais de retour) sera uniquement appliqué si le
produit est en parfait état de fonctionnement. Si des réparations sont
nécessaires sur le produit retourné, les frais de cette réparation seront
déduit du crédit.
Auncun crédits ne seront appliqués pour les retours après les 3 mois
suivant la date d’expédition.
511392
2/07
Manuel d’utilisateur 301AP
Honeywell
25
Garantie limitée
Exclusions
A. Si des capteurs de gaz font partie du Produit, le capteur est
couvert par une garantie limitée de douze (12) mois du fabricant.
B. Si les capteurs de gaz sont couverts par cette garantie limitée,
le capteur sera assujeti à l’inspection par Honeywell Analytics pour
l’exposition prolongée à des concentrations de gaz élevées si
l’Acheteur fait une réclamation sous cette garantie limitée. SI
l’inspection indique que la cause de la défectuosité est l’épuisement du
capteur plutôt qu’un défaut, cette garantie ne s’appliquera pas au
Produit.
C. Cette garantie limitée ne s’applique pas au produits
consommables, tels les piles, ou les articles sujets à l’usure ou au
remplacement régulier, incluant les lampes, les fusibles, les valves, les
aubes, les élements de sonde, les cartouches ou les éléments de
filtres.
Limitation et exclusion de la garantie
Honeywell Analytics n’aura aucun autre responsabilité sous cette
garantie limitée. Toutes responsabilités de garantie d’Honeywell
Analytics sont annulées si le Produit a subi des abus, de la
négligeance, un accident ou si l’Acheteur est en défaut de ses
obligations tels que décrit dans cette garantie ou si le Produit n’a pas
été utilisé selon les instructions ou si le numéro de série du Produit été
enlevé ou modifié.
511392
2/07
Manuel d’utilisateur 301AP
Honeywell
26
Garantie limitée
Dénégation de responsabilité d’autres garanties
La garantie ci-haut est la seule garantie applicable à cet achat. Toutes
autres garanties, soit implicites ou exprès, incluant mais pas limité à,
les garanties tacites de qualité marchande ou de l’aptitude à un emploi
particulier sont dénéguées par le présent document.
Limitation de responsabilité
Il est entendu que la responsabilité d’Honeywell Analytics, soit en
contrat, en délit civil, sous n’importe quelle garantie de responsabilité,
en négligence ou autrement n’excédera pas le prix d’achat payé par
l’Acheteur pour le produit. Honeywell Analytics ne sera pas
responsable, sous aucune circonstance, pour des dommages spéciaux
ou indirectes. Le prix déclaré pour le produit est une considération
limitant la responsabilité d’Honeywell Analytics. Aucune action, en
quelle forme que soit, survenant des transactions sous cette garantie
peuvent être entreprises par l’Acheteur plus d’un an après l’occurence
de la cause de ces actions.
511392
2/07
Manuel d’utilisateur 301AP
Honeywell
27