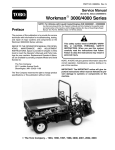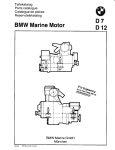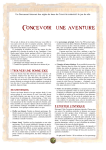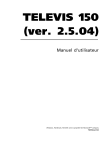
1
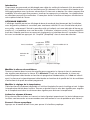
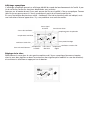
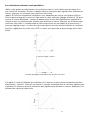
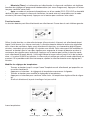
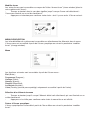
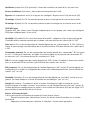
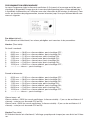
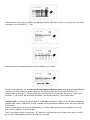
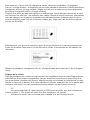
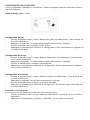
Table of CTR07 the floor, far from must be not fixed US to the s‐marked on error check the Manuel
d’utilisation
Introduc
SIMPLIFIED
SYNOPTIC CTR07
FANS SPEE
BOOSTER F
POST‐HEAT
Nr. parution : Rev. 04 250711
SELECTION
User manual Logiciel version 3.12
OPERATIN
WEEKLY PR
Nr. release: Rev. 04 250711 CONFIGUR
Software version 3.12 ALARMS ..
USER’S PA
CONFIGUR
INSTALLAT
TERMS OF
of receipt must repair all faults acturer will uarantee equent damage. h the reseller, ds will be shipped ense. In no case with the user nufacturer y people foreign UTEK srl. Via provinciale, 30 | 23030 Mazzo di Valtellina (So)
Tel. + 39 0342 862031 | Fax + 30 0342 862029
www.utek.eu | [email protected] 24 UTEK srl. Via provinciale, 30 | 23030 Mazzo di Valtellina (So)
Tel. + 39 0342 862031 | Fax+ 30 0342 862029
www.utek.eu | [email protected]
Table de matières
Introduction
Affichage simplifié
Affichage synoptique
Vitesse de ventilateur
Fonction booster
Post-chauffage
Menu de sélection
Mode de sélection
Programmation hebdomadaire
Configuration de l’horloge
Alarmes
Paramètres d’utilisation
Configuration de l’installation
Installation
Conditions de garantie
Introduction
Ce panneau de commande est développé pour régler les unités de traitement d’air de manière la
Introduction % parameters can be set: Changing plus simple. L’utilisateur
active les fonctions pour le traitement d’air au moyen d’un bouton et un Rotate the k
This Control Panel is designed to control machines used to change the air in the simplest way possible. The vely the control will refer user activates the air change functions by means of a knob and looking at the graphic display that shows affichage graphique avec
les écrans nécessaires. En tournant au bouton, les valeurs peuvent être timer is sele
the pertinent windows. Rotating the knob makes appuyant
it possible to change the bouton
values and ,scroll menu programme
modifiées et le menu peut
être parcouru,
tandis
qu’en
sur le
lesthe modifications
and Automax% items, while pressing it confirms the changes or selections made. The icon for closing the window is always ou sélections peuvent être
confirmées. L’icone pour fermer la fenêtre est toujours affiché dans le depending o
espectively (in percentage) displayed at the top right of the screen. To move to the next window, rotate the knob until this icon is coin supérieur droit de reached, and then press the knob. The operating status of the entire air change plant is summarised in the l’écran.
Changing window that is normally displayed, and the user has a choice of a simplified version or a complete overview of the machine. It is availabl
room. Rota
Synoptic
AFFICHAGE SIMPLIFIE
L’affichage simplifié permet
un affichage
SIMPLIFIED DISPLAY
de base du mode de fonctionnement de l’installation,
Alarms Ac
avec de grands symboles
et caractères pour une bonne visibilité. En cas d’installation de plusi- When alarm
The simplified display provides a basic representation of the machine’s status, indicated by means of large symbols and characters that are even visible from a distance. Only if several machines are installed: the eurs unités : uniquement
l’état de la première unité est indiqué, mais une indication d’alarme ap- indicate dir
status of the first machine only is displayed but an alarm indication will appear when any of the machines paraîtra s’il y un problème avec une des unités. L’utilisateur a toujours accès à l’écran simplifié à Switching is in alarm. The user can access the simplified window at any time and from any window by simply partir de n’importe quelholding the knob pushed down for 5 seconds. Alternatively, it can be accessed by selecting the Simplified écran en appuyant simplement sur le bouton durant 5 secondes. L’écran To pass to t
est aussi accessible enitem in the selection menu. appuyant sur “simplifié” (Simplified)” dans le menu de sélection.
Simplified window vitesse ventilateur
er of cumulated hours et it the value must be will appear (e.g. 2000 Æ icone
température fermer
extérieure écran
icone humidité de l’air
indication de
vitesse
température réglée
pass operation when the état post-chauffage
pass operation when the Modifier
la vitesse du ventilateur
Tournez au bouton dans le sens des aiguilles pour augmenter la vitesse et dans le contresens
des aiguilles pour diminuer la vitesse. Si la Minuterie (Timer) est sélectionnée, la vitesse est
automatiquement sélectionnée en fonction du programme hebdomadaire, et si Auto est sélectionné, la vitesse est automatiquement sélectionnée en fonction de la qualité de l’air du ventilateur
d’extraction et du profil de confort programmé.
22 3 Modifier le réglage de la température
Cette fonction est seulement disponible si l’unité est équipée d’un post-chauffage et sert à régler
la température désirée dans la pièce. Tournez au bouton dans le sens des aiguilles pour augmenter la température et dans le contresens des aiguilles pour diminuer la température.
Activer les signaux d’alarme
Si les alarmes sont activées, un icone et un texte clignotant apparaissent. Le texte indiquera que
les filtres sont encrassés ou recommandera une intervention en cas de problèmes plus sérieux.
Passer à l’écran synoptique
Appuyez sur le bouton durant 5 sec pour passer à la fenêtre synoptique.
The synopti
the availabl
To pass from
the synopti
Only if seve
indication w
Affichage synoptique
L’affichage synoptique permet un affichage détaillé du mode de fonctionnement de l’unité. A partir de cet écran, toutes les fonctions disponibles sont activées.
Appuyez sur le bouton durant 5 sec pour passer de l’écran simplifié à l’écran synoptique. Fermez
tous les écrans pour passer à l’écran synoptique à partir de n’importe quel écran.
En cas d’installation de plusieurs unités : seulement l’état de la première unité est indiqué, mais
une indication d’alarme apparaitra s’il y a un problème avec une des unités.
Possible se
Synoptic window
Synoptic window
icone signal
d’alarme
icone fermer écran
vitesse du ventilateur
température de récupération
température extérieure
icone post-chauffage
ventilateur sortie d’air
ble through the bypass température
tion of the change of air; icone minuterie booster
ited as best as possible through the bypass excédée
select not defined sults in wrong operation of the change of air; t would be better to select not defined right writing against a matic. Réglage de la vitesse du ventilateur
be displayed as a bright writing against a icone humidité d’air
température
réglée
ventilateur amenée d’air
Controlling fans speed Sélectionnez la case dans
le coin gauche supérieur de l’écran synoptique (tournez au bouton
In order to change this parameter, select the field in the top left corner of the synoptic window (turn the dans le sens des aiguilles
ou dansControlling fans speed le contresens des aiguilles pour modifier la case de sélection)
ght writing against a knob clockwise or counterclockwise to change the field selection) and confirm your selection by pressing the knob. In order to change this parameter, select the field in the top left corner of the synoptic window (turn the et confirmez la sélection
en appuyant
sur le bouton.
be displayed as a bright writing against a knob clockwise or counterclockwise to change the field selection) and confirm your selection by pressing the knob. and selecting on or off. arameters window and selecting on or off. ead. k background bright against a dark background will be displayed nstaller window from the s by accessing the installer window from the 1, 2 or 3: I
1, speed 2
the knob t
20 5 20 5 Les sélections suivantes sont possibles :
Vitesse
-off: si cette option est sélectionnée, les ventilateurs sont à l’arrêt. Veillez tout-de-même à ce
que l’unité soit alimentée. Tournez au bouton dans le contresens des aiguilles pour atteindre ces
valeurs. Appuyez sur le bouton pour confirmer votre choix.
-xxx%: Si l’unité est équipéePossible selections are as follows: de ventilateurs avec adaptation de vitesse sans étapes (CAV ou
VAV),un pourcentage de la valeur est
réglé entre la valeur minimale (réglage d’usine) et 100 pour‐ off: when this selection is selected, fans are still; however, be aware that the unit is energized anyway; in order to reach this value, turn the knob counterclockwise. Press the knob to confirm cent de la vitesse disponible ; tournez au bouton dans le sens des aiguilles pour augmenter la
your selection. vitesse et dans le contresens des aiguilles
pour diminuer la vitesse. Appuyez sur le bouton pour
‐ xxx%: if the unit is fit with stepless adjustment speed fans (CAV or VAV), a percentage value of the fan speed can be set starting from a minimum value (factory setting) up to 100 percent of confirmer votre choix. La modification
de vitesse peut avoir lieu en étapes de 5 pourcent ou 1
the available speed; turn the knob clockwise to increase speed and counterclockwise to reduce pourcent (réglage usine). La valeur it. Press the knob to confirm your selection. Speed change steps can be 5 percent or 1 percent de la pression désirée (niveau constant) derrière le ventilateur
(factory setting). If the unit is COP version a value of the desired pressure (to be kept constant) peut être réglée pour les unités avec
COP. La valeur sera exprimée en pourcentage de la valeur
downstream of the fan can be set. The value will be expressed as a percentage of the real full‐
totale.
scale. er of the synoptic window (turn the d confirm your selection by pressing Vitesse
Pression réglée = 250Pa
charge
Exemple de réglage automatique avec pression constante
1, 2 or 3: If the unit is equipped with 3‐speed fans, any one of the speeds available can be selected: speed 1, speed 2 or speed 3; turn the knob clockwise to increase speed and counterclockwise to reduce it. Press 1, 2 ou 3: si l’unité est équipée
de ventilateurs à 3 vitesses, chaque vitesse disponible peut être
the knob to confirm your selection. sélectionnée : vitesse 1, vitesse 2 ou vitesse 3 ; tournez au bouton dans le sens des aiguilles pour
augmenter la vitesse ou dans le contresens des aiguilles pour diminuer la vitesse. Appuyez sur le
bouton pour confirmer votre choix.
6 against a dark background Vitesse
displayed as a bright writing against gainst a dark background splayed be obtained by opening the specific the selection menu. to know: a bright writing against a •
•
timer: when this option is selected, the fan speed is controlled according to the settings of the weekly timetable (see Program menu). Press the knob to confirm your selection. auto: this mode is only available when a sensor is present (CO2, CO2‐VOC or relative humidity RH) whose measure the fan speed depends on. The auto mode is compatible with the timer mode (see Program menu). Press the knob to confirm your selection. right against a dark background Minuterie
ill be displayed (Timer) : si cette option est sélectionnée, la vitesse de ventilateur est réglée en
fonction des réglages du programme hebdomadaire (voir menu Programme). Appuyez sur le bouton pour confirmer votre choix.
em can be obtained by opening the specific CO2-VOC ou humidité
Auto: ce mode est seulement
disponible
en cas d’une sonde (CO2,
tem in the selection menu. •
timer: when this option is selected, the fan speed is controlled according to the settings of the relative RV) pour mesurer la vitesse du ventilateur.
Le mode auto est compatible avec le mode
weekly timetable (see Program menu). Press the knob to confirm your selection. •
auto: this mode is only available when a sensor is present (CO
2, CO2‐VOC or relative humidity minuterie (voir menu Programme). Appuyez sur le bouton pour confirmer votre choix.
RH) whose measure the fan speed depends on. The auto mode is compatible with the timer mode (see Program menu). Press the knob to confirm your selection. u want to know: a bright writing against a Booster function ng alarm windows will be displayed Fonction booster
The booster function can be accessed by selecting the bottom left icon La fonction booster peut être sélectionnée en sélectionnant l’icone dans le coin inférieur gauche.
Grâce à cette fonction, un intervalle
de temps (d’une minute à 4 heures) est sélectionné durant
By this function, a time interval (from 1 minute to 4 hours) can be selected during which the unit can run at maximum speed. The booster function bypasses any other fan speed control modes. After selecting the lequel
l’unité
tourne
à
sa
vitesse
maximale.
La fonction booster détourne toute autre régulation
nication between the card in the machine function, a digital chronometer (hours.minutes.seconds) is displayed that is preset on 5 minutes; this value de la vitesse du ventilateur. Aprèscan be changed by turning the knob clockwise to increase the booster time or counterclockwise to reduce avoir sélectionné la fonction, un chronomètre digital (heures,
. See installation. minutes, secondes) qui est préréglé
à 5 minutes sera affiché. Cette valeur peut être modifiée en
this time. After selecting the time desired, press the knob to stop the function: the display shows the air temperature sensor, while ko indicates remaining time to the end of the procedure; when the 00.00.00 value is reached, the speed returns to be tournant au bouton dans le sens des
aiguilles pour augmenter le temps du booster ou dans le
controlled in the previously selected mode. If the procedure is to be stopped, just repeat the booster contresens des aiguilles pour le diminuer. Appuyez sur le bouton pour arrêter la fonction après
setting operations by selecting 0 minutes. mperature sensor, while ko indicates sensor avoir sélectionné le temps désiré ; l’affichage indique le temps restant jusqu’à la fin de la procédure ; si la valeur 00:00:00 est atteinte,
la vitesse sera la même que celle du mode sélectionné au
Changing the temperature setting paravent.
Si
la
procédure
doit
être
interrompue,
répétez la sélection booster avec réglage de 0
‐ Rotate the knob until the Temperature icon is selected, which will appear on a dark background. emperature sensor, while ko indicates ‐ Press the knob – the temperature set starts to flash. minutes.
‐ Rotate the knob to change the temperature setting. ‐ Press the knob to confirm the change made. The set temperature stop flashing. température
7 Modifier les réglages
de
18 Tournez au bouton jusqu’à ce que l’icone Température soit sélectionné, qui apparaîtra sur
un arrière-fond foncé.
Appuyez sur le bouton – le réglage de la température commence à clignoter.
Tournez au bouton pour modifier le réglage de la température.
Appuyez sur le bouton pour confirmer votre choix. La température réglée arrête de clignoter.
Si off est sélectionné, le post-chauffage n’est pas activé.
rolled according to the settings of the confirm your selection. Icone température
nt (CO2, CO2‐VOC or relative humidity o mode is compatible with the timer r selection. ‐ When off is set, post‐heating is kept switched off.
Temperature icon on Alarmes
En cas d’alarme, un icone etAlarms texte apparaissent ; et l’alarme est aussi signalée au moyen d’une
In alarms, peut
a flashing icon and writing are filtre
displayed; the alarm will be also filters)
indicated ou
by a suglampe LED rouge clignotante.case Le of texte
indiquer
que le
estand encrassé
(dirty
flashing red led. The writing may indicate Dirty filters or suggest to Call service in case of more serious gérer qu’une intervention estproblems. nécessaire (Call service) en cas de problèmes plus sérieux.
cted during which the unit can run at ontrol modes. After selecting the hat is preset on 5 minutes; this value time or counterclockwise to reduce unction: the display shows the s reached, the speed returns to be opped, just repeat the booster En cas de problèmes de lecture de la sonde de température, la valeur correspondante ne sera
pas affichée à l’écran. CetteIn case of problems when reading a temperature probe, the corresponding value will be not displayed on action sera seulement empêchée en cas de problèmes avec la
the screen. The said operation will be inhibited only in case of problems with the exhaust air temperature pear on a dark background. sonde de température de la probe (Tx). sortie d’air (Tx).
Affichage de l’état du système
op flashing. ter may take a value not smaller System state display L’écran synoptique affiche aussi
la configuration de l’unité de récupération de chaleur et le mode
8 meter may take a value not smaller System state display meter may take a value not smaller System state display llowing time range (with 30‐
The synoptic window also shows the heat‐recovery VCM unit configuration and operating state. In addition de
fonctionnement.
Mise
à
part
des
fonctions
décrites
ci-dessus,
voir
aussi
:
following time range (with 30‐
The synoptic window also shows the heat‐recovery VCM unit configuration and operating state. In addition following time range (with 30‐
The synoptic window also shows the heat‐recovery VCM unit configuration and operating state. In addition to the features described in above paragraphs, please note: to the features described in above paragraphs, please note: to the features described in above paragraphs, please note: can be switched on (on) or not ng can be switched on (on) or not Valeur de
ng can be switched on (on) or not • Temperature value read by each probe; Temperature value read by each probe; la température enregistrée
par chaque sonde.
•• Temperature value read by each probe; C
T
sc
‐ ‐ dow procedure; now, either set indow procedure; now, either set indow procedure; now, either set re). Otherwise, set another day or dure). Otherwise, set another day or dure). Otherwise, set another day or oint or copying the timetable of point or copying the timetable of point or copying the timetable of nesday, select Wednesday (press ednesday, select Wednesday (press ednesday, select Wednesday (press il the Copy day function is until the Copy day function is until the Copy day function is -
•
Unité sans bypass
Unit without by‐pass; Unit without by‐pass; ••
Unit without by‐pass; S
V
w
M
sday) and press the knob. Return uesday) and press the knob. Return uesday) and press the knob. Return ). (6). (6). Unité avec bypass : l’état
du
bypass est affiché au moyen d’une représentation grap•
Unit with by‐Pass, the bypass state is pointed out by the graphics; ••
Unit with by‐Pass, the bypass state is pointed out by the graphics; Unit with by‐Pass, the bypass state is pointed out by the graphics; hique.
T
-
Unité avec hygrostat : le dépassement de la valeur limite
réglée est affiché.
•
16 16 16 9 9 9 ••
Unit with hygrostat: the overcoming of the set threshold value is pointed out. Unit with hygrostat: the overcoming of the set threshold value is pointed out. Unit with hygrostat: the overcoming of the set threshold value is pointed out. Modifier écran
Les autres écrans sont accessibles au moyen de l’icône “fermer écran” (close window) (dans le
coin supérieur de l’écran) :
Changing window Tournez au bouton dansChanging window le sens des aiguilles jusqu’à ce que l’icone soit sélectionné :
onfiguration and operating state. In addition The remaining windows are accessed through the "close window" icon (in the top right corner of the screen): l’icone
sera
illuminé
sur
un
arrière-fond
foncé ;
figuration and operating state. In addition The remaining windows are accessed through the "close window" icon (in the top right corner of the ‐ turn the knob clockwise until you select the icon: the icon will look bright on a dark background; screen): confirmer votre choix : ainsi il y aura accès à l’écran suivant.
Appuyez sur le bouton pour
‐ press the knob to confirm your selection: so, next window will be accessed. ‐ turn the knob clockwise until you select the icon: the icon will look bright on a dark background; ‐ press the knob to confirm your selection: so, next window will be accessed. SELECTION MENU MENU DE SELECTION
Various detailed information on the system are accessed by selecting the items in the menu. The menu Les infos détaillées du systèmeSELECTION MENU
sont accessibles
en sélectionnant les éléments dans le menu.
window is accessed from the synoptic window by following the change window procedure Various detailed information on the system are by selecting the items in the menu. The menu L’écran menu est accessible à partir de l’écran synoptique
enaccessed suivant
la procédure
“modifier
window is accessed from the synoptic window by following the change window procedure Menu écran” (change window).
Menu Menu
y the graphics; he graphics; The following functions can be accessed from the menu window: The following functions can be accessed from the menu window: •
State; •
Program; accessibles
à partir de l’écran menu :
• • State; Clock; • • Program; Alarms; • • Clock; Simplified; • • Alarms; Installer; • • Simplified; Factory ( protected password, accessible only from factory). •
Installer; •
Factory ( protected password, accessible only from factory). Les fonctions suivantes sont
Etat (State) ;
Programme (Program) ;
Horloge (Clock) ;
shold value is pointed out. Alarmes (Alarms) ;
Simplifié (Simplified) ;
old value is pointed out. Installateur (Installer) ;
Usine (Factory) (mot de passe protégé, uniquement accessible à partir de l’usine).
10 10 Sélection d’un élément du menu
Tournez au bouton jusqu’à ce que l’élément désiré soit sélectionné, qui sera illuminé sur un
arrière-fond foncé.
Appuyez sur le chiffre pour confirmer votre choix: le nouvel écran est affiché.
Retour à l’écran synoptique
L’écran synoptique est accessible à partir de l’écran Menu en suivant la procédure “modifier
écran”.
background press the number to confirm your selection: the new window will be displayed. ‐
Returning to the synoptic window The synoptic window is accessed from the Menu window by following the change window procedure. MODE DE FONCTIONNEMENT
Si la commande est utilisée pour plusieurs unités (mode master – slave), un écran est affiché
OPERATING STATE dans le menu avec la liste d’unités
disponibles (max. 8):
If the control is used to operate several units (master‐slave mode), a screen will be displayed in the menu Unité 1
with the list of available units (max. 8): Unit1 Unité 2
Unit2 …
… Unité 8
Unit8 L’unité dont il faut régler l’état
doit être sélectionnée : tournez au bouton jusqu’à ce que l’unité
The unit whose state is to be monitored must be selected: turn the knob until the desired unit is highlighted, then press the knob. désirée soit sélectionnée ; appuyez ensuite sur le bouton.
Te (
Tr (
Tx (
Ant
the abo
sam
orde
Fan
peed fans) – auto (in case of CO2 d fans) – auto (in case of CO2 or Si la commande est configurée
pour une seule unité, l’état de l’unité est directement indiqué
If the control is configured for one unit, the state of the unit is shown directly by displaying the values of the parameters that characterize the unit: grâce à l’affichage des valeurs
des paramètres de l’unité.
f the week subdivided into 24 Menu / status
e displayed with bright writing on a dark Menu / State Fan
Fan
will be displayed. Byp
ing the change window procedure. Hea
Hea
a screen will be displayed in the menu CO2
14 knob until the desired unit is Te (external)
11 Te (external): External input air temperature in °C. : température de l’entrée de l’air extérieur
Tr (return) : température de Tr (return
l’air de) : Return air temperature in °C.. retour
Tx (expelled) : température Tx (expelled)
de la sortie
d’air
: Exhaust air temperature in °C. Anti‐frost: "Anti‐frost" function state (ON‐OFF). The anti‐frost function is triggered automatically when Antigel (anti-frost) : état dethe temperature taken by the Tx probe drops below 1 °C and then goes off when the temperature returns la fonction “antigel” (ON-OFF). La fonction antigel est automatiqueabove 3 °C. The anti‐frost is operated by adjusting the fan speed, the input fan will be inhibited and, at the ment activée si la température
mesurée par la sonde Tx est inférieure à 1°C et est désactivée si
same time, the return will be forced to its maximum speed. All the above until 3°C are achieved. This in la température dépasse 3°C.order to avoid the formation of ice in the exchanger. La fonction antigel est réglée en modifiant la vitesse du ventilateur,
le ventilateur d’amenée d’air sera en arrêt et le ventilateur de retour sera forcé de fonctionner à
Input fan speed; this value is expressed as: sa vitesse maximale jusqu’àFan (supply):
ce que 3°C
soit atteints. Ceci afin d’éviter la formation de glace dans
l’échangeur.
•
rounds per minute (RPM), when fans with tachimetric signal are installed; •
Ventilateur (amenée
own directly by displaying the values of percentage, when variable speed fans are installed without tachimetric signal (Off when the fan is off); Fan• (supply)
: vitesse du ventilateur de l’amenée d’air, cette valeur
Off, 1 ,2 or 3 for 3‐speed fans. •
d’air)
est
exprimée comme suit :
Tours par minute (TPM) en cas de ventilateurs avec un signal tachymétrique.
Fan (exhaust.): Exhaust fan speed, see above. Pourcentage, en cas de ventilateurs avec vitesse variable sans signal tachymétrique (Off si
le ventilateur est éteint).
Fan hours: Unit operation hours. Off, 1, 2 ou 3 pour les ventilateurs à 3 vitesses.
Bypass: It is on when the ByPass is configured: ByPass open (On) or closed (Off). Heat 1 on‐off: The first post‐heating stage is working or not. Heat 2 on‐off: The second post‐heating stage is working or not. CO /VOC ppm Amo
dirt
Ventilateur (sortie d’air) (Fan (exhaust)): vitesse de ventilateur de sortie d’air, voir plus haut.
Heures ventilateur (Fan hours) : heures de fonctionnement de l’unité.
Bypass: est uniquement activé si le bypass est configuré : Bypass ouvert (On) ou fermé (Off).
Chauffage 1 (Heat) On-Off: La première phase du post-chauffage est en marche ou en arrêt.
Chauffage 2 (Heat) On-Off: La deuxième phase du post-chauffage est en marche ou en arrêt.
CO2/VOC ppm
Quantité d’air (des valeurs sous 700 ppm indiquent que l’air est propre, des valeurs qui atteignent
2000 ppm indiquent que l’air est vicié).
Humidité% (Humidity%): En cas d’une sonde d’humidité : indique la valeur en pourcentage de
l’humidité relative comme mesurée par la sonde : elle peut afficher des valeurs de 0 à 100.
Auto est.%: En cas de configuration de l’entrée digitale par un “signal externe” 0-10V : affiche la
valeur en pourcentage comme indiqué par le système externe. Elle peut afficher des valeurs de 0
à 100.
Commande (remote): En cas de configuration de l’entrée digitale par “commande”. S’il se trouve
en “on”, la vitesse du ventilateur est égale à la vitesse réglée sur le panneau de commande. S’il
se trouve en “off”, le système forcera les ventilateurs à l’arrêt.
PIR: En cas de configuration de l’entrée digitale par “PIR” (usine). Il indique la vitesse des ventilateurs si la fonction PIR est activée. Il peut afficher des valeurs max. ou min.
Eté (summer): En cas de configuration de l’entrée digitale par “été” (usine). Si l’entré digitale est
configurée par ce mode, le changement de saison aura automatiquement lieu. Il peut afficher les
valeurs “yes” ou “no”.
Humidité (Humidity): En cas de configuration de l’entrée digitale par “humidité” (usine) et un hygrostat. Ce mode indique si la limite d’humidité est excédée par “yes” ou “no”.
Antigel (W. nofrost) : Ce mode est activé si le post-chauffage est réglé au moyen du circuit
d’eau et indique si le mode “no-frost” est activé en cas de configuration par “no-frost” (usine). Si
l’entrée digitale est configurée par ce mode, il faut installer un thermostat (NC) qui est réglé à 3°C
pour mesurer la température du circuit d’eau.
Retour à l’écran principal :
L’écran principal est accessible au moyen de l’icone fermer (close) :
Tournez le bouton pour sélectionner l’icone : les lettres seront illuminées sur un arrièrefond foncé.
Appuyez sur le bouton pour confirmer la sélection : l’écran menu apparaîtra.
The main window is accessed by means of the close icon: ‐ turn the knob to select the icon: this will appear in light letters on a dark background ‐ press the knob to confirm the selection: the menu window will appear PROGRAMMATION HEBDOMADAIRE
EEKLY PROGRAMMING
règle laWvitesse
du ventilateur
(à 3 niveaux) et le passage on/off du postThe Program menu controls the fan speed (on three levels) and the switching on/off of the post‐heating (if chauffage (si disponible) chaque jour de la semaine spécifiquement pour chaque période (de 1
available) in a different way each day of the week for different time ranges (from 1 to 8 time ranges to be à 8 périodes à déterminer par
l’utilisateur avec des intervalles de 30 minutes au minimum). Pour
defined by the user with minimum 30 minute intervals).In order to access the programming functions, turn accès aux fonctions de programmation,
tournez le bouton jusqu’à ce que l’élément désiré comthe knob until the desired item is highlighted and then press the knob. mence à clignoter.
are installed; Le menu Programme
achimetric signal (Off when the fan ed (Off). s close to 2000 ppm indicate very 12 13 Par défaut (default) :
Si cet élément est sélectionné, les valeurs préréglées sont soumises à des paramètres.
Horaire (Time table):
De lundi à vendredi :
1.
2.
3.
4.
5.
6.
7.
8.
00:00 a.m. -> 06:30 a.m. vitesse médium, post-chauffage OFF ;
06:30 a.m. -> 08:00 a.m. vitesse médium, post-chauffage ON ;
08:00 a.m. -> 11:30 a.m. vitesse basse, post-chauffage ON;
11:30 a.m. -> 01:00 p.m. vitesse haute, post-chauffage ON ;
01:00 p.m. -> 06:00 p.m. vitesse basse, post-chauffage ON ;
06:00 p.m. -> 10:00 p.m. vitesse haute, post-chauffage ON ;
10:00 p.m. -> 00:00 a.m. vitesse médium, post-chauffage OFF ;
--:-- -> --:-- vitesse --, post-chauffage --.
Samedi et dimanche :
1.
2.
3.
4.
5.
6.
7.
8.
00:00 a.m. -> 07:30 a.m. vitesse médium, post-chauffage OFF ;
07:30 a.m. -> 08:00 a.m. vitesse médium, post-chauffage ON ;
08:00 a.m. -> 11:30 a.m. vitesse médium, post-chauffage ON ;
11:30 a.m. -> 01:00 p.m. vitesse haute, post-chauffage ON ;
01:00 p.m. -> 06:00 p.m. vitesse médium, post-chauffage ON ;
06:00 p.m. -> 10:00 p.m. vitesse haute, post-chauffage ON ;
10:00 p.m. -> 00:00 a.m. vitesse médium, post-chauffage OFF ;
--:-- -> --:-- vitesse --, post-chauffage --.
Vitesse basse : off
Vitesse médium : 030% (en cas de ventilateurs à vitesse variable) – 1 (en cas de ventilateurs à 3
vitesses) – auto (en cas de sonde CO2 ou RV).
Vitesse haute : 065% (en cas de ventilateurs à vitesse variable) – 2 (en cas de ventilateurs à 3
vitesses) – auto (en cas de sonde CO2 ou RV).
Horaire (Time table)
Si l’élément Horaire est sélectionné, l’affichage synoptique de chaque jour sera divisé en 24 heures.
When the Time Table item is selected, the summary display of each day of the week subdivided into 24 hours is accessed. 14 Just select one day to change its settings. After selecting the day, a list of the eight possible time ranges will Sélectionnez un jour pour modifier
les réglages. Après sélection du jour, la liste des huit périodes
Just select one day to change its settings. After selecting the day, a list of the eight possible time ranges will be displayed (C1→C8) " icon (in the top right corner of the be displayed (C1→C8) possibles sera affichée (C1 -> C8).
" icon (in the top right corner of the ok bright on a dark background; ok bright on a dark background; e accessed. e accessed. ecting ecting the the items items in in the the menu. menu. The The menu menu hange window procedure hange window procedure actory). actory). Select a specific time range to change its content. Select a specific time range to change its content. Sélectionnez une période spécifique
pour modifier le contenu.
Le jour correspondant est affichéThe corresponding day is displayed in the top left corner of the screen, while the summary graphic of the dans le coin supérieur gauche, tandis que le graphique d’été de
The corresponding day is displayed in the top left corner of the screen, while the summary graphic of the timetable is displayed in the bottom part; the other lines of the screen are as follows: l’horaire est affiché dans la partietimetable is displayed in the bottom part; the other lines of the screen are as follows: inférieure; les autres lignes de l’écran sont comme suit :
Change 1: when this line is selected, the time range that is being modified (1→8) can be changed Change 1: when this line is selected, the time range that is being modified (1→8) can be changed Modification 1 (change 1) : Si cette
ligne
est sélectionnée, il est possible de passer à une autre
without having to return to the previous page. without having to return to the previous page. période (1 ->8) à partir de la période modifiée sans devoir passer à l’écran précédent.
10 10 15 15 Temps 00:00 : Le temps de démarrage de la période actuelle est réglé, ce paramètre ne peut pas
adopter des valeurs inférieures à celle au début de la période précédente (avec des intervalles de
30 minutes).
Vitesse de ventilateur basse (fan speed low) : La vitesse du ventilateur peut adopter les valeurs
basse (low), médium en haute (high).
Post-chauffage on (post-heating on) : Si l’unité est installée dans un système avec post-chauffage, ce post-chauffage peut être activé (on) ou non (off).
Time 00.00: the starting time of the current time range is set; this parameter may take a value not smaller than the beginning of the previous time range and not greater than the following time range (with 30‐
Time 00.00: the starting time of the current time range is set; this parameter may take a value not smaller t of the eight possible time ranges will minute intervals). than the beginning of the previous time range and not greater than the following time range (with 30‐
Pour retourner à l’écran avec Fan speed low: the fan speed may take low, medium and high values. les réglages de temps, démarrez la procédure “changement
minute intervals). d’écran” (change window) ; etPost‐heating on: if the unit is fit with a post‐heating system, post‐heating can be switched on (on) or not réglez ensuite une autre période ou retournez à Horaire (procédure
Fan speed low: the fan speed may take low, medium and high values. (off). Post‐heating on: if the unit is fit with a post‐heating system, post‐heating can be switched on (on) or not changement d’écran) (changeIn order to return to the screen with the time ranges, run the change window procedure; now, either set window). Réglez un autre jour ou retournez au menu programme
(off). (procédure changement d’écran
(change window)).
another time range or return to the Time table (change window procedure). Otherwise, set another day or In order to return to the screen with the time ranges, run the change window procedure; now, either set L’horaire d’un autre jour peut return to the Program menu (change window procedure). être
réglé par un redémarrage à partir du point relevant ou en copianother time range or return to the Time table (change window procedure). Otherwise, set another day or The timetable of another day can be set by restarting from the relevant point or copying the timetable of return to the Program menu (change window procedure). ant l’horaire d’un autre jour : par exemple, pour copier l’horaire de mardi à mercredi, sélectionnez
another day: for example, in order to copy the Tuesday timetable to Wednesday, select Wednesday (press The timetable of another day can be set by restarting from the relevant point or copying the timetable of mercredi (appuyez sur le bouton)
et parcourez les périodes (tournez au bouton dans le contrethe knob) and scroll the time ranges (turn the knob counterclockwise) until the Copy day function is another day: for example, in order to copy the Tuesday timetable to Wednesday, select Wednesday (press sens des aiguilles) jusqu’à cehighlighted, then press the knob. que la fonction “Copier jour” (Copy day) soit illuminée et appuyez
the knob) and scroll the time ranges (turn the knob counterclockwise) until the Copy day function is t of the eight possible time ranges will ensuite sur le bouton.
highlighted, then press the knob. Select the day you want to copy from the list of the days of the week (Tuesday) and press the knob. Return Sélectionnez le jour que vousto the relevant screen and verify data have been copied properly. souhaitez copier de la liste des jours de la semaine (mardi) et apSelect the day you want to copy from the list of the days of the week (Tuesday) and press the knob. Return to the relevant screen and verify data have been copied properly. puyez sur le bouton. Retournez
à l’écran relevant et vérifiez si les données ont été copiées correctement.
Répétez la procédure
n, while the summary graphic of the n are as follows: me (6).
n, while the summary graphic of the modified (1→8) can be changed n are as follows: modified (1→8) can be changed “changement
d’écran” (change window) pour
retourner à l’écran Program Repeat the change window procedure to return to the Program screen (6). Repeat the change window procedure to return to the Program screen (6). Réglage de la vitesse
16 Vitesses préréglées low, medium et high peuvent être modifiées à partir du menu Programme en
16 sélectionnant le paramètre correspondant (tournez au bouton et parcourez le menu jusqu’à ce
que le paramètre à modifier soit illuminé, appuyez ensuite sur le bouton) et sélectionnez la valeur
désirée en tournant au bouton. Si la valeur désirée est affichée, appuyez alors sur le bouton pour
confirmer votre choix. Les trois paramètres peuvent adopter une des valeurs suivantes :
Off
Un pourcentage entre la valeur minimale et 100% pour les unités avec des ventilateurs à
vitesse variable; 1, 2 ou 3 pour les unités avec des ventilateurs à 3 vitesses ;
Auto pour les unités avec une sonde pour la qualité d’air ou l’humidity relative.
•
for units with 3‐speed fans; auto for units with air quality or relative humidity probe. CONFIGURATION DE L’HORLOGE
L’écran comprenant l’horloge est accessible si l’élément horloge (clock) est sélectionné dans le
CONFIGURING THE CLOCK menu de sélection.
The clock window is accessed when the clock item in the selection menu is selected. Menu /Horloge (Menu / clock) Menu / Clock d the alarm will be also indicated by a to Call service in case of more serious Configuring the day Configuration du jour
‐ ce
turn the knob until the day item is selected: it will be bright against a dark background Tournez au bouton jusqu’à
que l’élément jour (day) soit sélectionné : il sera illuminé sur
‐
press the knob: the currently configured day will flash un arrière-fond foncé. ‐ turn the knob to configure the day desired ‐ configuration
press the knob to confirm the configuration: the day will displayed as a bright writing against a Appuyez sur le bouton ; la
actuelle
commencera
à be clignoter.
dark background. Tournez au bouton pour configurer le jour désiré.
Configuring the hour Appuyez sur le bouton pour
confirmer la configuration, le jour commencera à clignoter sur
‐
turn the knob until the hours item is selected: it will be bright against a dark background un arrière-fond foncé. ‐ press the knob: the currently configured hour will flash esponding value will be not displayed on oblems with the exhaust air temperature ‐
‐
turn the knob to configure the hour desired press the knob to confirm the configuration: the hour will be displayed as a bright writing against a dark background. Configuration de l’heure
Tournez au bouton jusqu’à ce que l’élément heure (hour) soit sélectionné. Il sera illuminé
8 17 sur un arrière-fond foncé.
Appuyez sur le bouton : la configuration actuelle commencera à clignoter.
Tournez au bouton pour configurer l’heure désirée.
Appuyez sur le bouton pour confirmer la configuration : l’heure commencera à clignoter
sur un arrière-fond foncé.
Configuration des minutes
Tournez au bouton jusqu’à ce que l’élément minutes soit sélectionné : il sera illuminé sur
un arrière-fond foncé.
Appuyez sur le bouton : les minutes commencent à clignoter.
Tournez au bouton pour configurer les minutes désirées.
Appuyez sur le bouton pour confirmer la configuration : les minutes seront illuminées sur
un arrière-fond foncé.
Retourner à l’écran menu
L’écran menu est accessible au moyen de l’icone fermer (close) :
Tournez au bouton jusqu’à ce que l’icone soit sélectionné : il sera illuminé sur un arrièrefond foncé.
Appuyez sur le bouton pour confirmer la sélection : l’écran menu sera affiché.
e Program menu by selecting the ter to be changed is highlighted, then When the desired value is displayed, e one of the following values: ALARMES
‐
‐
turn the knob to configure the minutes desired press the knob to confirm the configuration: the minutes will be displayed as a bright writing against a dark background. Returning to the menu window The menu window is accessed through the "close" icon: En cas d’alarme, plus de détails
concernant la cause du problème peuvent être obtenus en ou‐ turn the knob until the icon is selected. The icon will become bright against a dark background vrant un écran spécifique. L’écran d’alarme est accessible en sélectionnant l’élément alarme dans
units with variable speed fans; 1, 2 or 3 ‐ Press the knob to confirm your selection: the menu window will be displayed le menu de sélection.
e. ALARMS Sélectionner l’unité (seulement
en cas de plusieurs unités)
In case of alarms, additional details on the cause of the problem can be obtained by opening the specific window. The alarm window is accessed by selecting the alarm item in the selection menu. Tournez au bouton jusqu’à
ce que l’unité soit sélectionnée pour laquelle les alarmes doi vent être vérifiées : elle Selecting the unit (in case of several machines only) sera illuminée sur un arrière-fond foncé.
‐
turn the knob until la
you sélection
select the unit : whose alarms you d’alarme
want to know: correspondants
a bright writing against a Appuyez sur le bouton pour
confirmer
les écrans
menu is selected. dark background will be displayed sont affichés.
‐
press the knob to confirm your selection: the corresponding alarm windows will be displayed Menu / Alarms Menu / alarmes
ainst a dark background Communication: Ok indicates good operation of the communication between the card in the machine and the control panel, while ko indicates communication failure. See installation. Communication : Ok implique un bon fonctionnement de la communication entre la platine dans
displayed as a bright writing a l’appareil
etagainst le panneau
de commande,
que
Ko
implique
une erreur
de communication.
Te (external): tandis
Ok indicates good operation of the external air temperature sensor, while ko indicates sensor failure. Te (extérieur) (external) : Ok implique
bon fonctionnement de la sonde pour la température
Tr (return): un
Ok indicates good operation of the return air temperature sensor, while ko indicates sensor failure. de la sonde.
extérieure et Ko implique un défaut
against a dark background displayed as a bright writing against a Tr (retour) (return)
Tx(expelled): Ok indicates good operation of the exhaust air temperature sensor, while ko indicates implique
un bon fonctionnement de la sonde de température du retour
sensor failure. : Ok
Ko implique un défaut de la sonde.
et
18 Tx (air vicié) (expelled) : Ok implique un bon fonctionnement de la sonde de température de la
sortie d’air et Ko implique un défaut de la sonde.
Filtres : Ok implique des filtres efficaces, Ko implique des filtres encrassés ou – si l’alarme est
réglée par une horloge – que le nombre d’heures réglées dans le menu d’installation est excédé.
Ventilateurs (fans) : Ok implique un bon fonctionnement des ventilateurs et Ko implique un défaut des ventilateurs. Cet alarme est uniquement disponible si l’unité est équipée d’alarmes de
ventilateur.
Retour à l’écran menu
L’écran menu est accessible au moyen de l’icone fermer (close) :
Tournez au bouton jusqu’à ce que l’icone soit sélectionné, qui apparaitra sur un arrièrefond foncé.
Appuyez sur le bouton pour confirmer la sélection – l’écran menu est ouvert.
Fans: OK indicates that the fans are working properly. KO indicates that the fans are faulty. This alarm is available only if the unit is equipped with fans alarm. s (CAV or VAV), a percentage value of (factory setting) up to 100 percent of peed and counterclockwise to reduce Go back to the Menu window REGLAGES D’UTILISATION To access the menu window, use the close icon. e steps can be 5 percent or 1 percent desired pressure (to be kept constant) L’utilisateur peut configurer le‐ Rotate the knob until the icon is selected, which will appear on a dark background. rafraichissement d’air pour le meilleur rapport rendement
essed as a percentage of the real full‐
‐ Press the knob to confirm the selection made – the menu window opens.
confort agréable.
maximal /
L’écran avec les paramètres est
accessible à partir du menu de sélection.
USER’S PARAMETERS L’écran est seulement accessible
si may l’unité
de air récupération
dethe chaleur
est équipée
d’un bypass.
The user configure recycling to achieve best compromise between maximum yield and satisfying comfort. En plus, l’écran ne sera pas affiché
si la saison est automatiquement modifiée (à l’usine au moyen
The parameters window is accessed from the selection menu. d’un signal externe).
The window is only available when the air recycling machine includes a bypass. Additionally, the window will be not displayed if the season is changed automatically (from the factory through an external signal). Deux affichages différents sont
disponibles dépendant du fait si le bypass est réglé en fonction
Two different displays will be available depending on either the bypass control is set according to the de la saison ou d’un réglage automatique
on – off. Le type de réglage est réglé à l’usine.
season or by on‐off‐automatic control. The adjustment type is set in the factory. Menu / Parameters Menu / paramètres
Sur base de la saison
f the alarm is hours based – that the On – off automatique
season based automatic‐on‐off that the fans are faulty. This alarm is eds available can be selected: speed counterclockwise to reduce it. Press rk background. pens. 6 omise between maximum yield and 19 Sélectionner la saison
Selecting the season Si la bonne saison est sélectionnée,
l’échangeur peut être utilisé de façon optimale en ouvrant et
es a bypass. Additionally, the window When the right season is selected, the exchanger can be exploited as best as possible through the bypass factory through an external signal). opening‐closing. However, forgetting to update the season results in wrong operation of the change of air; fermant
le
bypass.
Oublier
de
changer
la saison causera un mauvais fonctionnement du rafraiypass control is set according to the if the proper update of the parameter cannot be guaranteed, it would be better to select not defined he factory. chissement d’air ; si le changement correct du paramètre ne peut pas être garanti, il vaut mieux
season. The not defined adjustment type is the same as automatic. de sélectionner non défini (not‐ turn the knob until the currently set season is selected: it will be displayed as a bright writing against a defined). Le type non défini est le même qu’automatique.
dark background Tournez au bouton jusqu’à
ce que la saison actuelle soit sélectionnée : elle sera illuminée
‐ press the knob: the currently set season will flash sur un arrière-fond foncé
‐ turn the knob to select the new season Appuyez sur le bouton ‐ press the knob to confirm your selection: the set season will be displayed as a bright writing against a : la saison actuelle commencera à clignoter
Tournez au bouton pourdark background. sélectionner la nouvelle saison
Appuyez sur le bouton pour confirmer la sélection : la saison sélectionnée sera illuminée
On‐Off automatic selection sur un arrière-fond foncé.
The bypass can be adjusted manually by accessing the parameters window and selecting on or off. Select “automatic” if you want the automatic adjustment instead. Returning to the window menu Sélection automatique On-Off
The menu window is accessed through the "close" icon: Le bypass peut être réglé manuellement
en sélectionnant off dans l’écran des paramètres. Sélec‐ turn the knob until the icon is selected. The icon will become bright against a dark background tionnez “automatique” pour le‐ press the knob to confirm your selection: the menu window will be displayed réglage automatique.
CONFIGURING THE INSTALLATION Retour à l’écran menu
Expert installers can configure the input and exhaust air flows by accessing the installer window from the L’écran menu est accessible au
moyen de l’icone “fermer” (close) :
selection menu. Access is protected by password. The access password is 5678. Tournez au bouton jusqu’à
ce que l’icone soit sélectionné. L’icône sera illuminé sur un
arrière-fond foncé.
Appuyez sur le bouton pour confirmer votre choix : l’écran menu est affiché.
it. When it. When ally, ation. ally, ation. CONFIGURATION DE L’INSTALLATION
Les installateurs expérimentés peuvent configurer les débits de l’entrée et la sortie d’air au moyen
de l’écran installateur (installer window) à partir de l’écran de sélection. L’accès est protégé par
un mot de passe.
Le mot de passe est 5678.
par
_ex
the
par
the
mperature desired in the ise to reduce it. mperature desired in the ise to reduce it. ng. The wording may ms. ng. The wording may ms. _RH
the
_RH
to f
the
to f
_ex
Menu / Installer Menu / installateur (menu
/ installer)
Menu / Installer ne’s status and from here all ne’s status and from here all own for 5 seconds. To access own for 5 seconds. To access isplayed but an alarm Filt
isplayed but an alarm Langue (language)
Ceci offre la possibilité deLanguage modifier la langue, tous les réglages sont affichés dans la langue sélectionnée. Le réglage d’usine
est en anglais.
Language This is the possibility to change language ,all settings will be displayed in the language selected default is english. This is the possibility to change language ,all settings will be displayed in the language selected default is english.
Auto
C’est le type de sonde qui est installé dans l’appareil.
_None : aucune
Auto Auto _CO2 VOC : En cas d’installation
d’une sonde pour la qualité de l’air, les paramètres AutoMin%
It is the type of sensor installed in the machine: et AutoMax% peuvent aussi
être
réglés
: ils donnent respectivement les valeurs minimum et
_None : none maximum de la qualité deIt is the type of sensor installed in the machine: l’air (en ppm) qui servent d’indication pour le réglage automatique de la
_None : none _CO2 VOC : when an air quality sensor is installed.Also AutoMin% and AutoMax% parameters can be set: vitesse du ventilateur.
they represent the minimum and maximum air quality values respectively (in ppm, parts per million) the _CO2 VOC : when an air quality sensor is installed.Also AutoMin% and AutoMax% parameters can be set: control will refer to for the automatic fan speed adjustment. they represent the minimum and maximum air quality values respectively (in ppm, parts per million) the sensor)control will refer to for the automatic fan speed adjustment. : en cas d’installation d’une sonde humidité. Les paramètres AutoMin%
_Sonde HR (RH
4 21 et AutoMax%
peuvent aussi
être réglés : ils donnent respectivement les valeurs minimum et
4 21 maximum de l’humidité relative de l’air qui servent de référence pour le réglage automatique de la
vitesse du ventilateur.
_Signal externe (ext signal) : Si le réglage du ventilateur se fait au moyen d’un signal externe
0-10V. Les paramètres AutoMin% et AutoMax% peuvent aussi être réglés : ils donnent les valeurs
respectives du voltage (en pourcentage) qui servent de référence pour le réglage automatique de
la vitesse du ventilateur.
It is
Filt
afte
It is
inc
afte
400
inc
400
Ma
It is
Ma
It is
Byp
It i
Byp
adj
It i
adj
Byp
It i
Byp
adj
It i
adj
Filtres h 02000
Ce mode est activé si l’alarme pour filtre est configurée par heure (hours) dans l’usine. C’est le
nombre total d’heures après quoiFilters h 02000 le système donnera un signal d’alarme qui propose de nettoyer
It is activated if the filters alarm is configured as hours in factory . It is the number of cumulated hours les filtres. Pour la réinitialisation, les
valeurs doivent être majorées jusqu’au nombre d’heures totaafter which the system will display an alarm which suggest to clean filters. To reset it the value must be les suivant après quoi suivra un signal
d’alarme (ex. 2000 -> 4000).
increased to the next number of cumulated hours desired after which the alarm will appear (e.g. 2000 Æ 4000). Vitesse max (max speed)
Max speed du ventilateur
exprimée en pourcentage de la valeur nominale.
It is the maximum fan speed expressed as a percentage of the rated value. played in the language selected default is C’est la vitesse maximale
Bypass Tmin Bypass Tmin
It is the minimum temperature value the system will refer to for the bypass operation when the C’est la température minimale quiadjustment setting is "not defined" or "automatic". sert de référence pour le système pour l’activation du bypass si
le réglage est réglé par “non défini” (not defined) ou “automatique” (automatic).
Bypass Tmax It is the maximum temperature value the system will refer to for the bypass operation when the adjustment setting is "not defined" or "automatic". Bypass Tmax
C’est la température maximale qui sert de référence pour le système pour l’activation du bypass
si le réglage est réglé par “non défini” (not defined) ou “automatique” (automatic).
in% and AutoMax% parameters can be set: espectively (in ppm, parts per million) the 22 ....................................... 3 ....................................... 3 ....................................... 4 ...................................... 5 ...................................... 7 ...................................... 7 Ventilateur sortie
d’air (fanFan exhau. exhau.)
..................................... 10 C’est le rapport entre les deux
vitesses du ventilateur qui sont réglées par l’installateur pour
It is the ratio between the two fan speeds, which has been set by the installer to balance the two air flows ..................................... 1 (input and exhaust) according to the system needs. The menu window is accessed through the "close maintenir en1équilibre
les deux
débits d’air (entrée et sortie) suivant les besoins du système.
window" icon: L’écran menu
au moyen de l’icone “fermer écran” (close window) :
..................................... 13 est accessible‐ turn the knob until the icon is selected. The icon will become bright against a dark background Tournez au bouton jusqu’à
ce que l’icone soit sélectionné. L’icone sera illuminé sur un
‐ press the knob to confirm your selection: the menu window will be displayed arrière-fond foncé.
PIR time m. 010 ..................................... 18 sur le bouton
Appuyez
pour confirmer votre choix : l’écran menu sera affiché.
..................................... 17 ..................................... 19 PIR time m. 010
..................................... Seulement si20 la fonction
It is only present when the "PIR" function is on (as set in the factory). It indicates the time (expressed in minutes) during which fans will run at maximum speed after an external consent received from a motion detector. After this span of time, the fans will return to the speed set from the control panel, and then to the minimum speed if no motion is detected in the monitored room. “PIR”
est activée (réglage d’usine). Elle indique le temps (exprimé en
minutes) de 2la4 vitesse maximale après un signal externe d’une sonde d’ambiance. Après, les ven..................................... tilateurs tourneront à la vitesse réglée par le panneau de commande et à la vitesse minimale s’il
n’y a pas de mouvement dans la pièce.
..................................... 24 ...................................... 24 Retour à l’écran menu
Cet écran est accessible en Go back to the menu window cliquant sur l’icone fermer (close) :
You can access this window by clicking the close icon: Tournez au bouton pour sélectionner l’icone : il sera illuminé sur un arrière-fond foncé.
‐ Turn the knob to select the icon: this appears in light letters on a dark background. Appuyez sur le bouton‐ Press the knob to confirm the selection: the menu window displays. pour confirmer votre choix : l’écran menu est affiché.
INSTALLATION
2 23 L’appareil doit être installé par du personnel qualifié.
INSTALLATION Position
The machine must be installed by expert staff. Pour un fonctionnement optimal,
l’appareil doit être fixé à un mur intérieur, à peu près à 1,5m du
sol, à l’abri de sources de chaleur
(comme des radiateurs, poêles ,…) et ne peut pas être exposé
Position au rayons solaires directs. L’appareil
ne peut pas être fixé à des portes, qui peuvent se fermer et
For the best operation, it must be fixed to an indoor wall, approximately 1.5 m above the floor, far from endommager l’électronique. heat sources (like radiators, stoves, etc.), and must be not exposed to direct sun rays. It must be not fixed to doors, which might slam and damage electronics. Câblage
Wiring Connect the power to + and – terminals observing the correct polarity. Connect the BUS to the s‐marked Raccordez le courant aux pôles
+ et – en tenant compte des polarités. Raccordez le BUS à la
2
terminal. minimum 0.3mm shielded is recommended. For Vérifiez
communication error check porte qui est marquée par S. UtilisezUse unof câble
protégé
d’aucable moins
0,3mm².
qu’il
n’y
aitthe connections between the control panel and the electronic board. pas d’erreurs de communication aux raccordements entre le panneau de commande et le panneau électrique.
e installer to balance the two air flows w is accessed through the "close t against a dark background displayed . It indicates the time (expressed in rnal consent received from a motion t from the control panel, and then to . SPECIFICATIONS
SPECIFICATIONS
Puissance électrique : 9 / 30 VDC
250mW Power: 9 / 30 VDC 250mW Température de fonctionnement
maximale : 0 / 50 °C
Maximum operating temperature: 0 / 50 °C Température de stockage maximale
: -20 / 70°C
Maximum storage temperature: ‐20 / 70 °C CONDITIONS DE GARANTIE TERMS OF GUARANTEE The 2 year (24 month) guarantee period starts when the equipment is received. The date of receipt must La période de garantie de 2 ans
entre en vigueur à la réception des marchandises. La facture
be proved by the purchasing invoice. During the guarantee period, the manufacturer will repair all faults d’achat fait preuve de la date de
réception. Durant la période de garantie, le fabricant se portera
arising from manufacturing defects or material vices on a free of charge basis. The manufacturer will replace the defective pieces or the entire equipment in its opinion. Any other claims for guarantee garant pour toutes les réparations
sans frais de pannes qui sont dues à des défauts d’usine ou
performance are excluded. The manufacturer also accepts no responsibility for any subsequent damage. des déficiences matérielles. Le fabricant remplacera toutes les pièces défectueuses ou l’appareil
The material that is claimed to be defective must be shipped to the manufacturer through the reseller, en entier de sa propre initiative.together with a detailed description of the fault, to be drawn up by the reseller. The goods will be shipped Toute autre réclamation de garantie est exclue. Le fabricant refusera aussi toute responsabilité
pour des endommagements ultérieurs. Les matériaux qui sont
at the customer's expense. The repaired goods will be shipped at the manufacturer's expense. In no case will the manufacturer be liable for defects caused by improper use that does not comply with the user prétendus être défectueux, doivent être envoyés au fabricant par le revendeur, avec un descriptif
ark background. manual provided and natural events like lightning, floods, earthquakes, fires, etc. The manufacturer . détaillé du défaut qui est rédigé
par le revendeur. Les marchandises seront envoyées au frais du
accepts no responsibility for repairs or changes to the equipment that have been made by people foreign client. Les marchandises réparées
seront envoyées
au frais du fabricant. Le fabricant ne sera en
to the manufacturer.
aucun cas responsable pour des défauts dus à une mauvaise utilisation qui ne correspond pas
aux instructions du manuel qui est livré par le fabricant ou à des phénomènes naturels comme24 un orage, un tremblement de terre, une incendie… Le fabricant n’est pas responsable pour les
réparations ou modifications à l’équipement qui ont été apportées par une autre personne que le
fabricant-même.