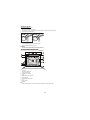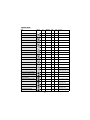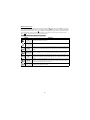
1
(Apply the label from warranty here)
Benutzer- und Wartungshandbuch
User and maintenance manual
Manuel d’utilisation et d’entretien
WICHTIGE SICHERHEITSHINWEISE
IHRE EIGENE UND DIE SICHERHEIT ANDERER PERSONEN IST ABSOLUT PRIORITÄR
Diese Anweisungen sowie das Gerät beinhalten wichtige Sicherheitshinweise, die Sie durchlesen und stets beachten sollten.
Dieses Symbol warnt vor möglichen Gefahren für die Sicherheit des Benutzers und anderer Personen.
Alle Sicherheitshinweise werden von dem Gefahrensymbol und folgenden Begriffen begleitet:
GEFAHR
Weist auf eine Gefahrensituation hin, die zu schweren Verletzungen führt, wenn sie nicht vermieden wird.
WARNUNG
Weist auf eine Gefahrensituation hin, die bei mangelnder Vorsicht zu schweren Verletzungen führt.
Alle Gefahrenhinweise bezeichnen das potenzielle Risiko, auf das sie sich beziehen und geben an, wie Verletzungsgefahren, Schäden und Stromschläge durch
unsachgemäßen Gebrauch des Gerätes vermieden werden können. Halten Sie sich genau an folgende Anweisungen:
- Halten Sie das Gerät von der Stromversorgung getrennt, bis der Einbau durchgeführt wurde.
- Die Installation oder Wartung muss von einer Fachkraft gemäß den Herstellerangaben und gültigen örtlichen Sicherheitsbestimmungen durchgeführt werden.
Reparieren Sie das Gerät nicht selbst und tauschen Sie keine Teile aus, wenn dies vom Bedienungshandbuch nicht ausdrücklich vorgesehen ist.
- Die Erdung des Gerätes ist gesetzlich vorgeschrieben.
- Das Netzkabel muss lang genug sein, um das in die Küchenzeile eingebaute Gerät an das Stromnetz anzuschließen.
- Um die einschlägigen Sicherheitsvorschriften zu erfüllen, muss installationsseitig ein allpoliger Trennschalter mit einer Kontaktöffnung von mindestens 3 mm
vorgesehen werden.
- Verwenden Sie keine Mehrfachstecker oder Verlängerungskabel.
- Ziehen Sie nicht am Netzkabel des Gerätes, um den Stecker aus der Steckdose zu ziehen.
- Nach der Installation dürfen Strom führende Teile für den Benutzer nicht mehr zugänglich sein.
- Berühren Sie das Gerät nicht mit feuchten Händen und benutzen Sie es nicht, wenn Sie barfuß sind.
- Das Gerät ist ausschließlich zur Zubereitung von Nahrungsmitteln für private Haushalte konzipiert. Jeder hiervon abweichende Gebrauch ist nicht gestattet
(z.B. das Beheizen von Räumen). Der Hersteller übernimmt keine Verantwortung für Schäden aufgrund von unsachgemäßer oder falscher Verwendung.
- Der Backofen darf ohne Aufsicht weder von Kindern noch von Personen mit herabgesetzten körperlichen, sensuellen oder mentalen Fähigkeiten oder ohne die
erforderliche Erfahrung und Kenntnis benutzt werden, es sei denn, sie wurden durch für ihre Sicherheit verantwortliche Personen entsprechend eingewiesen.
- Die erreichbaren Teile des Backofens können während des Betriebs sehr heiß werden. Halten Sie Kinder vom Gerät fern und achten Sie darauf, dass sie das Gerät
nicht als Spielzeug benutzen.
- Berühren Sie die Heizelemente sowie die Geräteinnenflächen während und unmittelbar nach dem Betrieb nicht, es besteht Verbrennungsgefahr. Vermeiden Sie
den Kontakt mit Tüchern oder anderen entflammbaren Materialien, bis das Gerät wieder vollständig abgekühlt ist.
- Öffnen Sie die Gerätetür am Ende der Garzeit vorsichtig. Lassen Sie heiße Luft und Dampf austreten, bevor Sie ins Geräteinnere fassen. Bei geschlossener
Gerätetür wird die heiße Luft durch eine Öffnung oberhalb des Bedienpaneels nach außen geblasen. Die Belüftungsöffnung darf nicht blockiert werden.
- Verwenden Sie Backofenhandschuhe, um Kochgeschirr und Roste zu entnehmen. Achten Sie darauf, die Heizelemente nicht zu berühren.
- Stellen Sie kein brennbares Material in das Gerät oder in dessen unmittelbare Nähe. Es besteht Brandgefahr, falls das Gerät versehentlich eingeschaltet wird.
- Erhitzen Sie keine geschlossenen Gefäße im Backofen. Der Druck, der in solchen Gefäßen entsteht, kann zu ihrer Explosion und dadurch zu Beschädigungen am
Gerät führen.
- Verwenden Sie keine Behälter aus synthetischen Materialien.
- Heißes Fett und Öl sind leicht entzündlich. Beaufsichtigen Sie stets den Garvorgang, wenn Sie Speisen mit viel Fett oder Öl zubereiten.
- Lassen Sie das Gerät während des Dörrens von Speisen niemals unbeaufsichtigt.
- Bei Verwendung von alkoholischen Getränken (z. B. Rum, Cognac, Wein, usw.) zum Braten oder Backen ist zu beachten, dass Alkohol bei hohen Temperaturen
verdampft. Die entstandenen Dämpfe können sich entzünden, wenn sie in Kontakt mit dem elektrischen Heizelement kommen.
Entsorgung von Altgeräten
-
Dieses Gerät wurde aus recycelbaren oder wiederverwendbaren Werkstoffen hergestellt. Entsorgen Sie das Gerät im Einklang mit den lokalen Vorschriften zur
Abfallbeseitigung. Schneiden Sie das Netzkabel durch, bevor Sie das Gerät verschrotten.
Genauere Informationen zu Behandlung, Entsorgung und Recycling von elektrischen Haushaltsgeräten erhalten Sie bei Ihrer örtlichen Verwaltungsstelle, der
Müllabfuhr oder dem Händler, bei dem Sie das Gerät gekauft haben.
DE1
INSTALLATION
Prüfen Sie nach dem Auspacken, dass das Gerät keine Transportschäden aufweist und die Backofentür richtig schließt. Bei auftretenden Problemen wenden Sie sich
bitte an Ihren Händler oder rufen die nächste Kundendienststelle an. Um eventuellen Schäden vorzubeugen, sollten Sie das Gerät erst unmittelbar vor der Installation
von der Polystyrolunterlage nehmen.
VORBEREITUNG DES UNTERBAUSCHRANKS
•
•
•
•
Alle Küchenmöbel in unmittelbarer Nähe des Backofens müssen hitzebeständig sein (min. 90° C).
Schneiden Sie den Unterbauschrank vor Einschub des Backofens auf das Einbaumaß zurecht und entfernen Sie Sägespäne oder Schnittreste sorgfältig.
Der Geräteboden darf nach der Installation nicht mehr zugänglich sein.
Für einen einwandfreien Gerätebetrieb darf die Mindestöffnung zwischen Arbeitsfläche und Geräteoberseite nicht verschlossen werden.
ANSCHLUSS AN DAS STROMNETZ
Die Spannung auf dem Typenschild des Geräts muss der Spannung der Netzversorgung entsprechen. Das Typenschild befindet sich an der Vorderkante des Geräts
(bei offener Tür sichtbar).
• Das Netzkabel (Typ H05 RR-F 3 x 1,5 mm2) darf nur durch Fachpersonal ersetzt werden. Wenden Sie sich an eine autorisierte Kundendienststelle.
ALLGEMEINE HINWEISE
Vor der Inbetriebnahme:
-
Entfernen Sie Kartonteile, Schutzfolien und Klebeetiketten von den Zubehörteilen.
Nehmen Sie die Zubehörteile aus dem Backofen und heizen Sie den Backofen auf 200 °C auf; lassen Sie ihn ca. eine Stunde eingeschaltet, um den Geruch von
Isoliermaterial und Schutzfetten zu beseitigen.
Während des Gebrauchs:
-
Stellen Sie keine schweren Gewichte auf der Tür ab, um Beschädigungen zu vermeiden.
Halten Sie sich nicht an der Tür fest und hängen Sie keine Gegenstände an den Türgriff.
Kleiden Sie den Geräteinnenraum nicht mit Alufolie aus.
Gießen Sie niemals direkt Wasser in den warmen Backofen; dadurch kann die Emailbeschichtung beschädigt werden.
Ziehen Sie Töpfe und Pfannen nicht über den Boden des Geräteinnenraumes, um Kratzer zu vermeiden.
Stellen Sie sicher, dass die Kabel anderer Geräte keine heißen Teile berühren und nicht in der Backofentür eingeklemmt werden.
Vermeiden Sie es, den Backofen Witterungseinflüssen auszusetzen.
HINWEISE ZUM UMWELTSCHUTZ
Entsorgung von Verpackungsmaterial
Das Verpackungsmaterial ist zu 100 % wiederverwertbar und trägt das Recycling-Symbol (
sondern entsorgen Sie es auf die von den verantwortlichen Stellen festgelegte Weise.
). Werfen Sie das Verpackungsmaterial deshalb nicht einfach fort,
Entsorgung von Altgeräten
-
Dieses Gerät ist gemäß der Europäischen Richtlinie 2002/96/EC für Elektro- und Elektronik-Altgeräte (WEEE) gekennzeichnet.
Durch eine angemessene Entsorgung des Gerätes trägt der Nutzer dazu bei, potentiell schädliche Auswirkungen für Umwelt und Gesundheit zu vermeiden,
die ansonsten durch eine unsachgemäße Entsorgung dieses Produkts entstehen würde.
-
Das Symbol
auf dem Gerät bzw. auf dem beiliegenden Informationsmaterial weist darauf hin, dass dieses Gerät kein normaler Haushaltsabfall ist, sondern
in einer Sammelstelle für Elektro- und Elektronik-Altgeräte entsorgt werden muss.
Energiesparen
-
Heizen Sie den Backofen nur dann vor, wenn es in der Gartabelle oder Ihrem Rezept so angegeben ist.
Verwenden Sie dunkle, schwarz lackierte oder emaillierte Backformen, da sie die Hitze besonders gut aufnehmen.
Schalten Sie den Backofen 10 bis 15 Minuten vor Ende der eingestellten Garzeit aus. Falls die Speisen eine lange Garzeit benötigen, so garen diese in jedem Fall weiter.
KONFORMITÄTSERKLÄRUNG
-
Dieses Gerät ist für den Kontakt mit Lebensmitteln bestimmt und entspricht der EG-Richtlinie ( ) Nr. 1935/2004. Es wurde den Sicherheitsanforderungen der
„Niederspannungsrichtlinie“ 2006/95/EG (die 73/23/EWG und nachfolgende Änderungen ersetzt), den Schutzvorschriften der EMV-Richtlinie 2004/108/EWG
entsprechend entwickelt, gebaut und in den Handel gebracht.
DE2
STÖRUNG - WAS TUN
Der Backofen funktioniert nicht:
•
•
Prüfen Sie, ob das Stromnetz Strom führt und der Backofen an das Netz angeschlossen ist.
Schalten Sie das Gerät aus und wieder ein, um festzustellen, ob die Störung behoben ist.
Die Gerätetür lässt sich nicht öffnen:
•
•
Schalten Sie das Gerät aus und wieder ein, um festzustellen, ob die Störung behoben ist.
WICHTIG: Während des Selbstreinigungsvorgangs bleibt die Tür gesperrt. Warten Sie, bis die Tür automatisch entriegelt wird (siehe Abschnitt „Reinigungszyklus
bei Backöfen mit Pyrolyse-Funktion“).
Die Elektronikuhr funktioniert nicht:
•
Zeigt das Display ein „ “ und eine Nummer an, rufen Sie bitte die nächste Kundendienststelle an. Geben Sie dabei an, welche Zahl nach dem Buchstaben „ “ folgt.
KUNDENDIENST
Bevor Sie den Kundendienst rufen:
1. Versuchen Sie zuerst, die Störung anhand der in „Störung - was tun?“ beschriebenen Anleitungen selbst zu beheben.
2. Schalten Sie das Gerät aus und wieder ein, um festzustellen, ob die Störung behoben ist.
Falls die Störung nach den vorstehend beschriebenen Kontrollen weiter besteht, rufen Sie bitte die nächstliegende Kundendienststelle an.
Sie benötigen dabei folgenden Angaben:
• Eine kurze Beschreibung der Störung,
• Gerätetyp und Modellnummer,
• die Servicenummer (die Zahl nach dem Wort Service auf dem Typenschild), befindet sich rechts im Backofeninnenraum (bei offener Backofentür sichtbar). Die
Servicenummer finden Sie auch auf dem Garantieheft,
• Ihre vollständige Anschrift,
• Ihre Telefonnummer.
Im Reparaturfall wenden Sie sich bitte an eine vom Hersteller autorisierte Kundendienststelle (nur dann wird garantiert, dass Originalersatzteile verwendet
werden und eine sachgerechte Reparatur durchgeführt wird).
REINIGUNG
WARNUNG
-
Verwenden Sie keinen Dampfreiniger.
Lassen Sie den Backofen vor dem Reinigen auskühlen.
Trennen Sie das Gerät vor Wartungsmaßnahmen von der Stromversorgung.
Außenflächen
WICHTIG: Verwenden Sie keine aggressiven Reinigungs- oder Scheuermittel. Falls ein solches Mittel doch mit dem Gerät in Kontakt kommt, reinigen
Sie es sofort mit einem feuchten Tuch.
• Reinigen Sie die Flächen mit einem feuchten Tuch. Entfernen Sie starke Verschmutzungen mit Wasser und ein paar Tropfen Geschirrspülmittel. Reiben Sie mit
einem trockenen Tuch nach.
Geräteinnenraum
WICHTIG: Vermeiden Sie den Gebrauch von Scheuerschwämmen, Topfkratzern und Metallschabern. Diese können die Emailflächen und das Glas
der Gerätetür mit der Zeit beschädigen.
• Lassen Sie den Backofen nach jedem Gebrauch etwas abkühlen und reinigen Sie ihn, solange er noch warm ist, um Verkrustungen und Flecken durch Speisereste
(z. B. durch stark zuckerhaltige Speisen) besser entfernen zu können.
• Verwenden Sie ausschließlich für Backöfen vorgesehene Reinigungsmittel und beachten Sie die jeweiligen Herstellerangaben.
• Reinigen Sie das Türglas mit einem speziellen Flüssigreiniger. Die Backofentür lässt sich zum Reinigen vollständig aushängen (siehe PFLEGE).
• Das obere Grillelement lässt sich (nur bei bestimmten Modellen) zur Reinigung der oberen Fläche des Geräteinnenraums herunterklappen (siehe PFLEGE).
ANMERKUNG: während längeren Garens von Speisen mit hohem Wassergehalt (z. B. Pizza, Gemüse, usw.) könnte sich Kondenswasser an der
Innenseite der Tür und der Türdichtung bilden. Trocknen Sie den kalten Backofen mit einem Tuch oder Schwamm ab.
DE3
Zubehör:
•
•
Weichen Sie die Zubehörteile nach jedem Gebrauch in Geschirrspülmittellauge ein. Verwenden Sie Backofenhandschuhe, so lange das Zubehör noch heiß ist.
Speiserückstände können Sie dann leicht mit einer geeigneten Bürste oder einem Schwamm entfernen.
Reinigung der Backofenhinterwand und der katalytischen Seitenwände (falls mitgeliefert):
WICHTIG: Verwenden Sie keine ätzenden oder scheuernden Reinigungsmittel, harte Bürsten, Topfkratzer oder Backofensprays, da dadurch die
katalytische Emaillierung beschädigt werden und die Selbstreinigungsfähigkeiten verloren gehen können.
• Lassen Sie den leeren Backofen zur Reinigung eine Stunde mit der Heißluftfunktion bei 200° C laufen
• Lassen Sie das Gerät anschließend abkühlen und entfernen Sie dann einen Schwamm, um eventuell noch vorhandene Speisereste zu entfernen.
PFLEGE
-
WARNUNG
Verwenden Sie Schutzhandschuhe.
Führen Sie die beschriebenen Vorgänge aus, wenn das Gerät kalt ist.
Trennen Sie das Gerät vor Wartungsmaßnahmen von der Stromversorgung.
AUSBAU DER TÜR
Gehen Sie zum Ausbau der Tür wie folgt vor:
1. Öffnen Sie die Backofentür vollständig.
2. Ziehen Sie die Schließhaken der Scharniere bis zum Anschlag nach vorne (Abb. 1).
3. Schließen Sie die Tür bis zum Anschlag (A), heben Sie sie an (B) und drehen Sie sie (C) bis sie aushakt (D) (Abb. 2).
Einsetzen der Tür:
1.
2.
3.
4.
Setzen Sie die Scharniere in die Aussparungen ein.
Öffnen Sie die Backofentür vollständig.
Drücken Sie beide Schließhaken nach unten.
Schließen Sie die Tür.
Abb. 1
Abb. 2
ABSENKEN DES OBEREN GRILLELEMENTS (NUR BEI EINIGEN MODELLEN)
1. Entfernen Sie die seitlichen Einhängegitter (Abb. 3).
2. Ziehen Sie das Heizelement etwas nach vorn (Abb. 4) und senken Sie es anschließend ab (Abb. 5).
3. Um das Heizelement wieder korrekt einzusetzen, heben Sie es an und ziehen Sie es leicht zu sich her. Vergewissern Sie sich, dass es korrekt in den seitlichen
Aussparungen sitzt.
Abb. 3
Abb. 4
Abb. 5
DE4
AUSWECHSELN DER GLÜHLAMPE
Um die Glühlampe der hinteren Backofenbeleuchtung (falls mitgeliefert) auszuwechseln, gehen Sie wie folgt vor:
1. Trennen Sie den Ofen von der Stromversorgung.
2. Schrauben Sie die Lampenabdeckung ab (Abb. 6). Wechseln Sie die Glühlampe aus (bezüglich des Typs siehe nachstehenden Hinweis) und schrauben Sie die
Lampenabdeckung wieder auf (Abb. 7).
3. Schließen Sie den Ofen wieder an das Stromnetz an.
Abb. 6
Abb. 7
ANMERKUNG: - Verwenden Sie nur Glühlampen mit 25-40 W/230 V, Typ E-14, T300°C.
- Die Lampen sind bei den Kundendienstzentren erhältlich.
WICHTIG: - Benutzen Sie den Backofen erst, nachdem die Lampenabdeckung wieder aufgesetzt wurde.
BEDIENUNGSANLEITUNG FÜR DEN OFEN
FÜR DEN ELEKTRISCHEN ANSCHLUSS LESEN SIE BITTE DEN TEIL BEZÜGLICH DER INSTALLATION
1. Bedienfeld
2. Oberes Heizelement/Grill
3. Kühlsystem (falls vorhanden)
4. Typenschild (darf nicht entfernt werden)
5. Lampen
6. Heißluftsystem (falls vorhanden)
7. Drehspieß (falls vorgesehen)
8. Unteres Heizelement (nicht sichtbar)
9. Tür
10. Position der Einschübe
11. Rückwand
ANMERKUNG: - Das Kühlgebläse kann nach Beendigung des Garvorgangs und Ausschalten des Backofens noch einige Zeit nachlaufen.
DE5
PASSENDES ZUBEHÖR
(mitgeliefertes Zubehör siehe Technische Daten)
Abb. 1
Abb. 2
Abb. 3
Abb. 4
Abb. 7
Abb. 8
6a
6b
Abb. 5
Abb. 6
Abb. 9
Fettpfanne (Abb. 1)
Die Fettpfanne wird für die Zubereitung von z. B. Fleisch und Fisch mit oder ohne Gemüse verwendet und dient zum Auffangen von Fett oder Speisestücken unter dem
Rost. Geben Sie etwas Wasser in die Fettpfanne, um Rauchbildung und Fettspritzer zu vermeiden.
Kuchenblech (Abb. 2)
Zum Backen von Plätzchen, Kuchen und Pizza.
Rost (Abb. 3)
Zum Grillen von Speisen oder zum Abstellen von Töpfen, Kuchenformen und anderem Kochgeschirr. Der Einschub ist auf jeder Ebene möglich. Der Rost kann mit der
Krümmung nach oben oder unten eingesetzt werden.
Selbstreinigende katalytische Seitenwände (Abb. 4)
Die katalytischen Seitenwände sind mit einer feinporigen Beschichtung überzogen, die Fettspritzer absorbiert. Wir empfehlen, nach einem Garvorgang mit besonders
fettigen Speisen eine Selbstreinigung des Backofens durchzuführen (siehe REINIGUNG).
Drehspieß (Abb. 5)
Verwenden Sie den Drehspieß, wie in Abb. 9 beschrieben. Siehe auch „Hinweise zum Gebrauch und Empfehlungen“.
Grillpfannensatz (Abb. 6)
Dieses Zubehörset besteht aus einem Rost (6a) und einem emaillierten Gargefäß (6b). Das Set wird auf den Rost (3) gesetzt und zusammen mit der Grillfunktion
verwendet.
Fettfilter (Abb. 7)
Nur für die Zubereitung besonders fettiger Speisen. Haken Sie den Fettfilter in die Öffnungen vor dem Gebläse an der Innenraumrückwand ein. Der Fettfilter ist
spülmaschinenfest und darf nicht beim Backen im Heißluftbetrieb eingesetzt werden.
Backauszug (Abb. 8)
Hiermit können die Roste und Fettpfannen während des Garens halb herausgezogen werden. Diese sind für alle Zubehörteile geeignet und spülmaschinenfest.
DE6
BESCHREIBUNG DES BEDIENFELDS
1
1.
2.
3.
4.
2
3
4
Bedienknopf zur Funktionswahl
Elektronische Zeitschaltuhr
Thermostatknopf
Rote Thermostat-Kontrollleuchte
BETRIEB DES BACKOFENS
•
Drehen Sie den Bedienknopf zur Funktionswahl auf das Symbol der gewünschten Funktion.
Die Ofenbeleuchtung schaltet sich ein.
• Drehen Sie den Thermostat-Bedienknopf im Uhrzeigersinn auf die gewünschte Temperatur.
Die Thermostat-Kontrollleuchte schaltet sich ein und beim Erreichen der gewählten Temperatur wieder aus.
Drehen Sie nach dem Ende des Garvorgangs die Bedienknöpfe wieder auf „0“.
ELEKTRONISCHE ZEITSCHALTUHR
1. Taste - : Verringerung der vom Display angezeigten Uhrzeit
B
A
U
T
O
A
2. Taste
: Auswahl der verschiedenen Einstellungen:
a. Timer
b. Garzeit
c. Einstellung des Garzeitendes
3. Taste - : Erhöhung der vom Display angezeigten Uhrzeit
A. Das Symbol
zeigt an, dass der Timer gerade in Betrieb ist.
B. Das Symbol AUTO stellt eine Bestätigung der vorgenommenen Einstellung dar.
1
2
3
Einstellungen für erstmaligen Gebrauch
Einstellung der Uhrzeit und des Signaltons.
Nach dem Anschluss des Backofens an das Stromnetz blinken AUTO und 0.00 auf dem Display. Zum Einstellen der Uhrzeit die Tasten - und + gleichzeitig: drücken: der
mittlere Punkt blinkt. Die Uhrzeit mit den Tasten + und - einstellen. Anschließend die mittlere Taste drücken. Am Display wird “ton 1” angezeigt. Den gewünschten
Signalton mit der Taste – einstellen. Anschließend die mittlere Taste drücken. Zum Ändern der Uhrzeit wie oben beschrieben vorgehen.
Einstellung des Timers
Zum Einstellen des Timers die mittlere Taste drücken: am Display wird 0.00 angezeigt und das Glockensymbol blinkt. Den Timer mit der Taste + einstellen (der höchste
einstellbare Wert beträgt 23 Stunden und 59 Minuten). Der Countdown beginnt nach ein paar Sekunden. Am Display wird die Uhrzeit angezeigt und das Glockensymbol
bleibt zur Bestätigung der Einstellung des Timers leuchten. Der Countdown kann angezeigt und geändert werden: hierzu die mittlere Taste erneut drücken.
Programmierung der Garzeit
Nach der Auswahl der Garart und Gartemperatur mit den Bedienknöpfen die mittlere Taste drücken: am Display wird 0.00 angezeigt und das Glockensymbol blinkt. Die
mittlere Taste erneut drücken: auf dem Display werden nacheinander
und 0.00 angezeigt und AUTO blinkt. Die Garzeit mit den Tasten + und - einstellen (der
höchste einstellbare Wert beträgt 10 Stunden). Nach ein paar Sekunden wird die Uhrzeit angezeigt und AUTO bleibt zur Bestätigung der vorgenommenen Einstellung
leuchten. Um die verbleibende Garzeit anzuzeigen und ggf. zu ändern, die mittlere Taste 2 Sekunden lang drücken und dann erneut drücken. Nach Ablauf der
eingestellten Garzeit erlischt das Symbol
, ein Warnton ertönt und AUTO blinkt auf dem Display. Der Warnton kann mit jeder beliebigen Taste abgestellt werden.
Den Funktions- und Temperaturknopf auf Null stellen und die mittlere Taste zwei Sekunden lang drücken, um den Garvorgang abzuschließen.
DE7
Verschieben des Garzeitendes
Nach Auswahl der Garzeit die mittlere Taste drücken: am Display blinken nacheinander
, Garzeitende und AUTO auf. Die Taste + drücken, um das gewünschte
Garzeitende anzuzeigen (der Garvorgang kann um maximal 23 Stunden und 59 Minuten) verschoben werden. Nach ein paar Sekunden wird am Display die Uhrzeit
angezeigt angezeigt, das Symbol
erlischt und AUTO bleibt zur Bestätigung der vorgenommenen Einstellung leuchten. Um das Garzeitende anzuzeigen und ggf.
zu ändern, die mittlere Taste drücken und dann erneut zweimal drücken. Nach Ablauf des Countdowns leuchtet das Symbol
gewählten Garart fort.
auf und der Backofen fährt mit der
TABELLE DER FUNKTIONSBESCHREIBUNGEN
BETRIEBSART
OFF
LAMPE
BESCHREIBUNG
Zum Unterbrechen des Garvorgangs und Abschalten des Geräts.
Einschalten der Backofen-Innenbeleuchtung.
OBER- &
UNTERHITZE
Diese Betriebsart eignet sich zur Zubereitung aller Arten von Gerichten auf einer Einschubebene. Heizen Sie den Ofen auf die
gewünschte Gartemperatur vor und schieben Sie die Speisen in den Ofen, wenn die eingestellte Temperatur erreicht ist.
Verwenden Sie zum Garen möglichst die zweite oder dritte Einschubebene. Diese Funktion eignet sich zum Garen von
Tiefkühlfertigkost; Befolgen Sie die Hinweise auf der Verpackung.
UMLUFT
Zum Backen von Kuchen mit flüssiger Füllung auf 1 Ebene Diese Funktion eignet sich auch zum Garen auf zwei Ebenen Falls
notwendig, können die Einschubebenen vertauscht werden, um eine gleichmäßigere Garung zu erreichen.
Zum Grillen von Steaks, Fleischspießen und Bratwurst, zum Überbacken von Gemüse und Rösten von Brot. Den Backofen 3-5
Min. vorheizen. Während des Garvorgangs muss die Tür geschlossen bleiben. Beim Grillen von Fleisch empfehlen wir zur
GRILL
Vermeidung von Fettspritzern und Rauchbildung etwas Wasser in die Fettpfanne auf der untersten Einschubebene zu geben.
Wenden Sie die Speisen während des Garvorgangs.
Diese Funktion eignet sich besonders zum Garen großer Fleischstücke (Roastbeef und andere Rostbraten). Während des
Garvorgangs muss die Tür geschlossen bleiben. Beim Grillen von Fleisch empfehlen wir, etwas Wasser in die Fettpfanne auf der
GRILL + HEISSLUFT
untersten Einschubebene zu geben, um Fettspritzer und Rauchbildung zu vermeiden. Wenden Sie das Fleisch während des
Grillens.
AUFTAUEN
Diese Funktion dient der Beschleunigung des Auftauens von Speisen bei Raumtemperatur. Lassen Sie das Auftaugut verpackt,
um es vor Austrocknung zu schützen.
DE8
GARTABELLE
Rezept
Betriebsart Vorheizen Einschubebene Temp. Zeit Zubehör
(von unten)
(°C) (Min.)
Hefekuchen
Ja
2
160-180 35-55 Rost + Kuchenform
Plätzchen / Törtchen
Ja
3
170-180 15-40 Kuchenblech
Beignets
Ja
3
Blätterteigtörtchen / Salziges Blätterteiggebäck
Ja
3
Baiser
Ja
3
Lamm / Kalb / Rind / Schwein
Ja
2
190-200 90-110 Fettpfanne oder Rost + Auflaufform
Hähnchen / Kaninchen / Ente
Ja
2
190-200 65-85 Fettpfanne oder Rost + Auflaufform
Puter / Gans
Ja
2
190-200 140-180 Fettpfanne oder Rost + Auflaufform
Fisch gebacken / in Folie (Filet, ganz)
Ja
2
180-200 50-60 Fettpfanne oder Rost + Auflaufform
Lasagne / überbackene Pasta / Cannelloni /
Aufläufe
Ja
2
190-200 45-55 Rost + Auflaufform
Brot / Fladenbrot
Ja
2
190-230 15-50 Fettpfanne oder Backblech
Pizza
Ja
2
230-250
7-20
Fettpfanne oder Backblech
Toast
Ja
4
200
2-5
Rost
Gratiniertes Gemüse
Ja
3
200
15-20 Rost + Auflaufform
Fischfilets, -stücke gegrillt
Ja
3
200
30-40 Rost + Auflaufform
Bratwurst / Fleischspieße / Rippchen /
Hamburger
Ja
4
200
Rost + Fettpfanne mit Wasser auf
30-50 der 1. Einschubebene, nach halber
Garzeit wenden
Gefüllter Kuchen (Käsekuchen, Strudel,
Obstkuchen)
Ja
1
180-200 50-60 Fettpfanne oder Rost + Auflaufform
Salzige Kuchen (Gemüsetorte, Quiche)
Ja
1
180-200 35 -55 Rost + Kuchenform
Gefülltes Gemüse (Tomaten, Paprika, Zucchini,
Auberginen)
Ja
2
180-200 40-60 Rost + Auflaufform
Salzige Kuchen (Gemüsetorte, Quiche)
Ja
1/ 3
Pizza / Fladenbrot
Ja
1/3
Plätzchen / Törtchen
-
1 /3
Beignets
-
1/ 3
DE9
180
30-40 Kuchenblech
180-200 20-30 Kuchenblech
90
120-130 Kuchenblech
Rost + Grillpfanne, Einschubebenen
nach halber Garzeit vertauschen
Kuchenblech + Fettpfanne,
230-250 12-30 Einschubebenen nach halber Garzeit
vertauschen
Kuchenblech + Fettpfanne,
170-180 20-40 Einschubebenen nach halber Garzeit
vertauschen
Kuchenblech + Fettpfanne,
180
35-45 Einschubebenen nach halber Garzeit
vertauschen
180-190 45-55
Rezept
Betriebsart Vorheizen Einschubebene Temp. Zeit Zubehör
(von unten)
(°C) (Min.)
Kuchenblech + Fettpfanne,
180-200 20-40 Einschubebenen nach halber Garzeit
vertauschen
Rost + Fettpfanne mit Wasser auf
200
55-65
der 1. Einschubebene
Blätterteigtörtchen / Salziges Blätterteiggebäck
-
1/ 3
Brathähnchen
-
2
Ofenkartoffeln
-
3
200
45-55 Abtropfschale
Roastbeef roh
-
3
200
30-40
Lammkeule / Schweinshaxe
-
3
200
55-70 Rost + Fettpfanne
ANMERKUNG: Garzeiten und -temperaturen beziehen sich auf etwa 4 Portionen.
DE10
Rost + Fettpfanne mit Wasser auf
der 1. Einschubebene
HINWEISE ZUM GEBRAUCH UND EMPFEHLUNGEN
So lesen Sie die Garzeittabelle
Die Tabelle gibt die beste Garfunktion für ein bestimmtes Lebensmittel an, das auf einer oder mehreren Ebenen gleichzeitig gegart werden kann. Die Garzeiten gelten
ab dem Moment, in dem Sie das Gargut in den Ofen geben, die (eventuell erforderliche) Aufheizzeit zählt nicht dazu. Die Gartemperaturen und -zeiten sind Richtwerte
und hängen sowohl von der gegarten Menge als auch der Art des Zubehörs ab. Verwenden Sie zunächst die niedrigeren der empfohlenen Werte und gehen Sie, falls
das erzielte Garergebnis nicht ihren Wünschen entspricht, zu den höheren Werten über. Es wird empfohlen, die mitgelieferten Zubehörteile und möglichst
Kuchenformen und -bleche aus dunklem Metall zu verwenden. Sie können auch Töpfe und Zubehör aus feuerfestem Glas oder Keramik verwenden, die Garzeiten
verlängern sich dadurch etwas. Für ein optimales Ergebnis befolgen Sie bitte die Hinweise zur Positionierung der mitgelieferten Zubehörteile im Backofen wie in der
Gartabelle angegeben. Heizen Sie den Ofen vor, wenn Sie Speisen mit hohem Wassergehalt garen.
Garen von Speisen auf mehreren Einschubebenen gleichzeitig
Bei der Verwendung der Funktion „UMLUFT“ (falls vorhanden) lassen sich mehrere verschiedene Speisen (z. B.: Fisch und Gemüse) bei gleicher Temperatur auf
verschiedenen Ebenen gleichzeitig garen. Nehmen Sie die Speise mit kürzerer Garzeit heraus und lassen Sie die Speisen mit längerer Garzeit weiter im Ofen.
Dessert
-
-
Backen Sie sehr feine Süßspeisen bei Ober-/Unterhitze auf nur einer Ebene. Verwenden Sie Kuchenformen aus dunklem Metall und stellen Sie diese immer auf
den mitgelieferten Rost. Wählen Sie für das Garen auf mehreren Ebenen die Heißluftfunktion und stellen Sie die Kuchenformen versetzt auf die Roste, damit die
Luft frei zirkulieren kann.
Machen Sie bei Hefekuchen mit einem Holzstäbchen eine Garprobe an der höchsten Stelle des Kuchens. Wenn das Holzstäbchen trocken bleibt, ist der Kuchen
fertig.
Falls Sie beschichtete Kuchenformen verwenden, fetten Sie die Ränder nicht ein, damit der Kuchen an den Rändern gleichmäßig aufgeht.
Falls der Kuchen beim Backen wieder zusammenfällt, wählen Sie beim nächsten Mal eine niedrigere Temperatur, etwas weniger Flüssigkeit und rühren Sie den
Teig vorsichtiger.
Kuchen mit saftiger Füllung (Käse- oder Obstkuchen) backen Sie am besten mit der Funktion „UMLUFT“ (falls vorhanden). Ist der Kuchenboden zu feucht,
verwenden Sie eine niedrigere Ebene und bestreuen Sie den Boden mit Semmelbröseln oder Kekskrümeln, bevor Sie die Füllung hineingeben.
Fleisch
-
Verwenden Sie einen für die Größe des zu garenden Fleischstücks geeigneten Bräter oder Auflaufform. Garen Sie Braten möglichst in etwas Brühe und
beschöpfen Sie das Fleisch während des Garens, damit es schmackhaft wird. Lassen Sie den Braten nach dem Ende der Garzeit weitere 10-15 Minuten im Ofen
ruhen oder wickeln Sie ihn in Alufolie.
- Für ein gleichmäßiges Garergebnis wählen Sie zum Grillen von Fleischstücken lauter gleich dicke Scheiben. Sehr dicke Fleischscheiben benötigen eine längere
Garzeit. Um zu vermeiden, dass das Fleisch anbrennt, vergrößern Sie den Abstand der gegarten Stücke zum Grill und versetzen Sie den Rost auf eine der unteren
Ebenen. Wenden Sie das Fleisch nach zwei Dritteln der Garzeit.
Es wird empfohlen, eine Fettpfanne mit einem halben Liter Wasser direkt unter dem Rost mit dem Grillfleisch zu positionieren, um den Bratensaft aufzufangen. Füllen
Sie bei Bedarf nach.
Drehspieß (nur bei bestimmten Modellen vorhanden)
Dieses Zubehör dient zum gleichmäßigen Grillen von großen Fleischstücken und Geflügel. Stecken Sie das Fleisch auf den Drehspieß, binden Sie Geflügel mit
Küchengarn fest und vergewissern Sie sich, dass das Grillgut fest sitzt, bevor Sie den Spieß in die Öffnung an der vorderen Wand einsetzen und ihn auf die entsprechende
Halterung legen. Um Rauchentwicklung zu vermeiden und Bratensaft aufzufangen, sollten Sie eine Fettpfanne mit einem halben Liter Wasser auf der ersten Ebene
einschieben. Der Drehspieß ist mit einem Kunststoffgriff ausgestattet, der vor dem Grillen abzuziehen ist. Verwenden Sie ihn nach dem Ablauf der Garzeit, um das
Gargut aus dem Ofen zu nehmen ohne sich zu verbrennen.
Pizza
Fetten Sie die Bleche, damit auch der Pizzaboden knusprig wird. Verteilen Sie die Mozzarella nach zwei Dritteln der Garzeit auf der Pizza.
Funktion „Aufgehen“ (nur bei bestimmten Modellen vorhanden)
Sie sollten den Teig immer mit einem feuchten Tuch abdecken, bevor Sie ihn in den Ofen stellen. Bei dieser Funktion verkürzt sich die Gehzeit gegenüber dem Gehen
bei Raumtemperatur (20-25° C) um etwa ein Drittel. Die Gehzeit für 1 kg Pizzateig beträgt etwa 1 Stunde.
DE11
IMPORTANT SAFETY INSTRUCTIONS
YOUR SAFETY AND THAT OF OTHERS IS VERY IMPORTANT
This manual and the appliance itself provide important safety warnings, to be read and observed at all times.
This is the danger symbol, pertaining to safety, which alerts users to potential risks to themselves and others.
All safety warnings are preceded by the danger symbol and the following terms:
DANGER
Indicates a hazardous situation which, if not avoided, will cause serious injury.
WARNING
Indicates a hazardous situation which, if not avoided, could cause serious injury.
All safety warnings give specific details of the potential risk present and indicate how to reduce risk of injury, damage and electric shock resulting from improper
use of the appliance. Carefully observe the following instructions:
- The appliance must be disconnected from the power supply before carrying out any installation work.
- Installation and maintenance must be carried out by a qualified technician, in compliance with the manufacturer’s instructions and local safety regulations.
Do not repair or replace any part of the appliance unless specifically stated in the user manual.
- Regulations require that the appliance is earthed.
- The power cable must be long enough for connecting the appliance, once fitted in its housing, to the power supply socket.
- For installation to comply with current safety regulations, an all-pole disconnect switch with minimum contact gap of 3 mm must be utilized.
- Do not use multiple plug adapters or extension leads.
- Do not pull the power supply cable in order to unplug the appliance.
- The electrical components must not be accessible to the user after installation.
- Do not touch the appliance with any wet part of the body and do not operate it when barefoot.
- This appliance is designed solely for use as a domestic appliance for cooking food. No other type of use is permitted (e.g.: heating rooms). The Manufacturer
declines all responsibility for inappropriate use or incorrect setting of the controls.
- The appliance is not intended for use by persons (including children) with any physical, sensory or mental impairment, or without experience and knowledge
of the appliance, unless supervised or previously instructed in its use by those responsible for their safety.
- The accessible parts of the appliance may become very hot during use. Young children should be kept away from the appliance and supervised to ensure that
they do not play with it.
- During and after use, do not touch the heating elements or interior surfaces of the appliance - risk of burns. Do not allow the appliance to come into contact
with cloths or other flammable materials until all the components have cooled sufficiently.
- At the end of cooking, exercise caution when opening the appliance door, letting the hot air or steam exit gradually before accessing the oven. When the
appliance door is shut, hot air is vented from the aperture above the control panel. Do not obstruct the vent apertures.
- Use oven gloves to remove pans and accessories, taking care not to touch the heating elements.
- Do not place flammable materials in or near the appliance: a fire may break out if the appliance is inadvertently switched on.
- Do not heat or cook sealed jars or containers in the appliance. The pressure that builds up inside might cause the jar to explode, damaging the appliance.
- Do not use containers made of synthetic materials.
- Overheated oils and fats catch fire easily. Always remain vigilant when cooking foods rich in fat and oil.
- Never leave the appliance unattended during food drying.
- If alcoholic beverages are used when cooking foods (e.g. rum, cognac, wine), remember that alcohol evaporates at high temperatures. As a result, there is a risk
that vapours released by the alcohol may catch fire upon coming into contact with the electrical heating element.
Scrapping of household appliances
-
This appliance is manufactured with recyclable or reusable materials. Dispose of it in accordance with local waste disposal regulations. Before scrapping, cut off
the power supply cable.
For further information on the treatment, recovery and recycling of household electrical appliances, contact your competent local authority, the collection service
for household waste or the store where you purchased the appliance.
GB12
INSTALLATION
After unpacking the oven, be sure that it has not been damaged during transport and that the oven door closes properly. In the event of problems, contact the dealer
or your nearest After-sales Service. To avoid any damage, only remove the oven from its polystyrene foam base at the time of installation.
PREPARING THE HOUSING UNIT
•
•
•
•
Kitchen units in contact with the oven must be heat resistant (min 90°C).
Carry out all cabinet cutting work before fitting the oven in the housing and carefully remove all wood chips and sawdust.
After installation, the bottom of the oven must no longer be accessible.
For correct appliance operation, do not obstruct the minimum gap between the worktop and the upper edge of the oven.
ELECTRICAL CONNECTION
Be sure the power voltage specified on the appliance dataplate is the same as the mains voltage. The dataplate is on the front edge of the oven (visible when the door is open).
• Power cable replacement (type H05 RR-F 3 x 1.5 mm2) must be carried out by a qualified electrician. Contact an authorized service centre.
GENERAL RECOMMENDATIONS
Before use:
-
Remove cardboard protection pieces, protective film and adhesive labels from accessories.
Remove the accessories from the oven and heat it at 200° for about an hour to eliminate the smell and fumes from the insulating materials and protective grease.
During use:
-
Do not place heavy objects on the door as they could damage it.
Do not cling to the door or hang anything from the handle.
Do not cover the inside of the oven with aluminium foil.
Do not pour water into the inside of a hot oven; this could damage the enamel coating.
Do not drag pots or pans across the bottom of the oven as this could damage the enamel coating.
Be sure that the electrical cables of other appliances do not touch hot parts of the oven or become trapped in the door.
Do not expose the oven to atmospheric agents.
SAFEGUARDING THE ENVIRONMENT
Disposal of packing material
The packing material is 100% recyclable and is marked with the recycle symbol (
and in full compliance with local authority regulations governing waste disposal.
). The various parts of the packing must therefore be disposed of responsibly
Scrapping the product
-
This appliance is marked in compliance with European Directive 2002/96/EC, Waste Electrical and Electronic Equipment (WEEE).
By ensuring this product is disposed of correctly, you will help avoid potential negative consequences for the environment and human health, which could
otherwise be caused by inappropriate waste handling of this product.
-
The symbol
on the product or on the accompanying documentation indicates that it should not be treated as domestic waste but must be taken to an
appropriate collection centre for the recycling of electrical and electronic equipment.
Energy saving
-
Only pre-heat the oven if specified in the cooking table or your recipe.
Use dark lacquered or enamelled baking moulds as they absorb heat far better.
Switch the oven off 10/15 minutes before the set cooking time. Food requiring prolonged cooking will continue to cook even once the oven is switched off.
DECLARATION OF CONFORMITY
-
This oven, which is intended to come into contact with foodstuffs, complies with European Regulation ( ) n. 1935/2004 and has been designed,
manufactured and sold in conformity with the safety requirements of the “Low Voltage” directive 2006/95/CE (which replaces 73/23/CEE and subsequent
amendments), the protection requirements of “EMC” 2004/108/CE.
GB13
TROUBLESHOOTING GUIDE
The oven does not work:
•
•
Check for the presence of mains electrical power and if the oven is connected to the electrical supply.
Turn off the oven and restart it to see if the fault persists.
The door will not open:
•
•
Turn off the oven and restart it to see if the fault persists.
IMPORTANT: during self-cleaning, the oven door will not open. Wait until it unlocks automatically (see paragraph “Cleaning cycle of ovens with pyrolysis function”).
The electronic programmer does not work:
•
If the display shows the letter “ ” followed by a number, contact your nearest After-sales Service. Specify in this case the number that follows the letter “ ”.
AFTER-SALES SERVICE
Before calling the After-Sales Service:
1. See if you can solve the problem yourself with the help of the suggestions given in the “Troubleshooting guide”.
2. Switch the appliance off and back on again it to see if the fault persists.
If after the above checks the fault still occurs, get in touch with the nearest After-sales Service.
Always specify:
• a brief description of the fault;
• the type and exact model of the oven;
• the service number (number after the word Service on the rating plate), located on the right hand edge of the oven cavity (visible when the oven door is open).
The service number is also indicated on the guarantee booklet;
• your full address;
• your telephone number.
If any repairs are required, please contact an authorised After-sales Service (to guarantee that original spare parts will be used and repairs carried out correctly).
CLEANING
WARNING
-
Do not use steam cleaning equipment.
Clean the oven only when it is cool.
Disconnect power before servicing.
Oven exterior
IMPORTANT: do not use corrosive or abrasive detergents. If any of these products unintentionally comes into contact with the appliance, clean
immediately with a damp cloth.
• Clean the surfaces with a damp cloth. If it is very dirty, add a few drops of washing up detergent to the water. Finish off with a dry cloth.
Oven interior
IMPORTANT: do not use abrasive sponges or metallic scrapers or scourers. Over time, these can ruin enamelled surfaces and the oven door glass.
• After every use, allow the oven to cool then clean it preferably while it is still warm in order to remove built-up dirt and stains caused by food residues
(e.g. food with a high sugar content).
• Use proprietary oven detergents and follow the manufacturer’s instructions to the letter.
• Clean the door glass with a suitable liquid detergent. The oven door can be removed to facilitate cleaning (see MAINTENANCE).
• The top heating element of the grill (see MAINTENANCE) can be lowered (some models only) to clean the roof of the oven.
N.B.: during prolonged cooking of foods with a high water content (e.g. pizza, vegetables, etc.) condensation may form on the inside of the door
and around the seal. When the oven is cold, dry the inside of the door with a cloth or sponge.
Accessories:
•
•
Soak the accessories in water with washing up detergent immediately after use, handling them with oven gloves if still hot.
Food residues can be easily removed using a brush or sponge.
GB14
Cleaning the rear wall and catalytic side panels of the oven (if present):
IMPORTANT: do not use corrosive or abrasive detergents, coarse brushes, pot scourers or oven sprays which could damage the catalytic surface and
ruin its self-cleaning properties.
• Operate the oven empty with the fan-assisted function at 200°C for about one hour
• Next, leave the appliance to cool down before removing any food residue with a sponge.
MAINTENANCE
-
WARNING
Use protective gloves.
Ensure the oven is cold before carrying out the following operations.
Disconnect power before servicing.
REMOVING THE DOOR
To remove the door:
1. Open the door fully.
2. Lift the catches and push them forwards as far as they will go (Fig. 1).
3. Close the door as far as it will go (A), lift it up (B) and turn it (C) until it is released (D) (Fig. 2).
To refit the door:
1.
2.
3.
4.
Insert the hinges in their seats.
Open the door fully.
Lower the two catches.
Close the door.
Fig. 1
Fig. 2
MOVING THE TOP HEATING ELEMENT (SOME MODELS ONLY)
1. Remove the side accessory holder grilles (Fig. 3).
2. Pull the heating element out a little (Fig. 4) and lower it (Fig. 5).
3. To reposition the heating element, lift it up, pulling it slightly towards you, be sure it comes to rest on the lateral supports.
Fig. 3
Fig. 4
Fig. 5
GB15
REPLACING THE OVEN LAMP
To replace the rear lamp (if present):
1. Disconnect the oven from the power supply.
2. Unscrew the lamp cover (Fig. 6), replace the lamp (see note for lamp type) and screw the lamp cover back on (Fig. 7).
3. Reconnect the oven to the power supply.
Fig. 6
Fig. 7
N.B.:
- Only use 25-40W/230V type E-14, T300°C incandescent lamps.
- Lamps are available from our After-sales Service.
IMPORTANT:
- Do not use the oven until the lamp cover has been repositioned.
INSTRUCTIONS FOR OVEN USE
FOR ELECTRICAL CONNECTION, SEE THE PARAGRAPH ON INSTALLATION
1. Control panel
2. Upper heating element/grill
3. Cooling system (if present)
4. Dataplate (not to be removed)
5. Light
6. Baking ventilation system (if present)
7. Turnspit (if present)
8. Lower heating element (not visible)
9. Door
10. Position of shelves
11. Rear wall
N.B.:
- At the end of cooking, after the oven has been switched off, the cooling fan may continue to run for a while.
GB16
COMPATIBLE ACCESSORIES
(for the accessories supplied with oven refer to the tech fiche)
Fig. 1
Fig. 2
Fig. 3
Fig. 4
Fig. 7
Fig. 8
6a
6b
Fig. 5
Fig. 6
Fig. 9
Drip-tray (Fig. 1)
For collecting fat and bits of food when placed under the wire shelf, or as a plate for cooking meat, chicken and fish, etc., with or without vegetables. Pour a little water
into the drip-tray to avoid spatters of fat and smoke.
Baking tray (Fig. 2)
For baking biscuits, cakes and pizzas.
Wire shelf (Fig. 3)
For grilling food or as a support for pots, cake tins and other cooking receptacle. It can be placed on any available level. The wire shelf can be inserted with its curvature
facing up or down.
Catalytic side panels (Fig. 4)
These panels have a special microporous enamel coating that absorbs fat spatters. It is advisable to do an automatic cleaning cycle after cooking particularly fatty food
(see CLEANING).
Turnspit (Fig. 5)
Use the turnspit as indicated on Fig. 9. Also check “Recommended use and tips” section for advice.
Grill Pan Set (Fig. 6)
The set comprises a wire shelf (6a) and an enamelled recipient (6b). This set must be placed on the wire shelf (3) and used with the Grill function.
Grease filter (Fig. 7)
Use only for particularly greasy cooking. Hook it on the rear wall of the oven compartment, opposite the fan. It can be cleaned in a dishwasher and used with the fanassisted function.
Sliding shelves (Fig. 8)
They allow the wire shelves and drip-trays to be pulled half out during cooking. Suitable for all the accessories, they can be cleaned in a dishwasher.
GB17
CONTROL PANEL DESCRIPTION
1
1.
2.
3.
4.
2
3
4
Function selector knob
Electronic programmer
Thermostat knob
Red thermostat led
HOW TO OPERATE THE OVEN
•
Turn the selector knob to the required function.
The oven light switches on.
• Turn the thermostat knob clockwise to the required temperature.
The thermostat led lights up, switching off again when the oven reaches the selected temperature.
At the end of cooking, turn the knobs to “0”.
USING THE ELECTRONIC PROGRAMMER
1. Button - : to decrease the value shown on the display
B
A
U
T
O
A
2. Button
: for selecting the various settings:
a. Timer
b. Cooking time
c. Cooking end time setting
3. Button + : to increase the value shown on the display
A. The symbol
indicates that the timer function is in operation
B. The AUTO symbol confirms the setting has been made
1
2
3
Using the oven for the first time
Setting the time of day and the tone of the acoustic signal.
Upon connection of the oven to the mains power supply, AUTO and 0.00 flash on the display. To set the time of day, press buttons - and + at the same time: the central
dot flashes. Set the time of day using the buttons + and -. Having selected the desired value, press the middle button. The display shows “ton 1”. To select the desired
tone, press button –. Having selected the preferred tone, press the middle button. To change the time of day, proceed as described above.
Setting the timer
To set the timer, long-press the middle button: the display shows 0.00 and the bell symbol flashes. Set the timer using the button + (the maximum programmable
value is 23 hours and 59 minutes). The countdown begins after a few seconds. The display shows the time of day and the bell remains lit, confirming the timer has been
set. To view the countdown and change it if necessary, press the middle button again.
Setting cooking time
After selecting the cooking mode and temperature using the knobs, press the middle button: the display shows 0.00 and the bell symbol flashes. Press the middle
button again: on the display
and 0.00 appear in sequence and AUTO flashes. Set cooking time using the buttons + and - (the maximum programmable value
is 10 hours). After a few seconds the display shows the time of day and AUTO remains lit, confirming the setting. To view the remaining cooking time and change it if
necessary, press the middle button for 2 seconds and then press it again a second time. At the end of the set time, the symbol
switches off, the alarm sounds and
AUTO flashes on the display. Press any button to deactivate the alarm. Return the functions and temperature knob to zero and press the middle button for two seconds
to end cooking.
GB18
Delaying cooking end time
After selecting cooking time, press the middle button: the display shows
, cooking end time and AUTO flashing in sequence. Press the button + to view the
desired cooking end time (cooking can be delayed by a maximum of 23 hours and 59 minutes). After a few seconds the display shows the time of day, the symbol
switches off and AUTO remains lit, confirming the setting. To view cooking end time and change it if necessary, press the middle button and then press it again twice.
At the end of the countdown, the symbol
lights up and the oven proceeds with the selected cooking mode.
FUNCTION DESCRIPTION TABLE
FUNCTION
OFF
LAMP
CONVENTIONAL
CONVECTION BAKE
GRILL
TURBO GRILL
DEFROST
DESCRIPTION
To stop cooking and switch off the oven.
To switch on the oven light.
Function suitable for cooking any type of dish on one shelf. Preheat the oven to the required temperature and place the food in
it when the set temperature is reached. It is advisable to use the second or third shelf for cooking. This function is also suitable
for cooking frozen convenience foods; follow the instructions on the food packaging.
To bake cakes with liquid filling (sweet or savoury) on a single level. This function is ideal also for cooking on two levels. If
necessary, switch the positions of the dishes to cook food more evenly.
To grill steak, kebabs and sausages, to cook vegetables au gratin and to toast bread. Preheat the oven for 3 - 5 min. During
cooking the oven door must remain closed. When cooking meat, pour a little water into the drip tray (on the first level) to
reduce smoke and fat spatters. Ideally the meat should be turned during cooking.
To grill large joints of meat (roast beef and other roast meats). The oven door must be kept closed during the cooking cycle.
When cooking meat, it is advisable to pour water in the drip-tray placed on the first level. This will reduce smoke and
spattering of fat. Turn the meat during grilling.
This function can be used to speed up the thawing of food at room temperature. The food should be placed in the oven in its
wrapping to avoid it from drying out.
GB19
COOKING TABLE
Recipe
Preheating
Shelf (from
bottom)
Temp.
(°C)
Time
(min)
Accessories
Leavened cakes
Yes
2
160-180
35-55
Wire shelf + cake tin
Biscuits / Tartlets
Yes
3
170-180
15-40
Baking tray
Choux buns
Yes
3
180
30-40
Baking tray
Vols-au-vent / Puff pastry crackers
Yes
3
180-200
20-30
Baking tray
Meringues
Yes
3
90
Lamb / Veal / Beef / Pork
Yes
2
190-200
90-110
Drip tray or wire shelf + pyrex dish
Chicken / Rabbit / Duck
Yes
2
190-200
65-85
Drip tray or wire shelf + pyrex dish
Turkey / Goose
Yes
2
190-200
Baked fish / en papillote (fillet, whole)
Yes
2
180-200
50-60
Drip tray or wire shelf + pyrex dish
Lasagne / Baked pasta / Cannelloni / Flans
Yes
2
190-200
45-55
Wire shelf + pyrex dish
Bread / Focaccia
Yes
2
190-230
15-50
Drip tray or baking tray
Pizza
Yes
2
230-250
7-20
Drip tray or baking tray
Toast
Yes
4
200
2-5
Wire shelf
Vegetable gratin
Yes
3
200
15-20
Wire shelf + pyrex dish
Grilled fish fillets and steaks
Yes
3
200
30-40
Wire shelf + pyrex dish
Sausages / Kebabs / Spare ribs / Hamburgers
Yes
4
200
30-50
Grill + drip tray with water on 1st
shelf, turn halfway through cooking
Filled pies (cheesecake, strudel, apple pie)
Yes
1
180-200
50-60
Drip tray or wire shelf + pyrex dish
Yes
1
180-200
35 -55
Wire shelf + cake tin
Yes
2
180-200
40-60
Wire shelf + pyrex dish
Yes
1/ 3
180-190
45-55
Pizzas / Focaccia
Yes
1/3
230-250
12-30
Biscuits / Tartlets
-
1 /3
170-180
20-40
Choux pastry
-
1/ 3
180
35-45
Vols-au-vent / Puff pastry crackers
-
1/ 3
180-200
20-40
Meat & potato pies (vegetable pie, quiche
lorraine)
Stuffed vegetables (tomatoes, peppers,
courgettes, aubergines)
Meat & potato pies (vegetable pie, quiche
lorraine)
Function
GB20
120-130 Baking tray
140-180 Drip tray or wire shelf + pyrex dish
Grill +pan, switch levels halfway
through cooking
Baking tray+drip tray, switch levels
halfway through cooking
Baking tray+drip tray, switch levels
halfway through cooking
Baking tray+drip tray, switch levels
halfway through cooking
Baking tray+drip tray, switch levels
halfway through cooking
Recipe
Function
Preheating
Shelf (from
bottom)
Temp.
(°C)
Time
(min)
Accessories
Roast chicken
-
2
200
55-65
Grill + drip tray with water on
1st level
Roast potatoes
-
3
200
45-55
Drip tray
Roast Beef underdone
-
3
200
30-40
Grill + drip tray with water on
1st level
Leg of lamb / Knuckle
-
3
200
55-70
Grill + drip tray
N.B.: cooking times and temperatures are approximate for 4 portions.
RECOMMENDED USE AND TIPS
How to read the cooking table
The table indicates the best function to use for any given food, to be cooked on one or more shelves at the same time. Cooking times start from the moment food is
placed in the oven, excluding pre-heating (where required). Cooking temperatures and times are purely for guidance and will depend on the amount of food and type
of accessory used. Use the lowest recommended values to begin with and, if the food is not cooked enough, then move on to higher values. Use the accessories supplied
and preferably dark coloured metal cake tins and oven trays. You can also use pans and accessories in pyrex or stoneware, but bear in mind that cooking times will be
slightly longer. To obtain best results, follow the advice given in the cooking table for the choice of accessories (supplied) to be placed on the various shelves. When
cooking food that contains lots of water, preheat the oven.
Cooking different foods at the same time
Using the “CONVECTION BAKE” function (if present), you can cook different foods which require the same cooking temperature at the same time (for example: fish and
vegetables), using different shelves. Remove the food which requires less cooking time and leave food which requires longer cooking time in the oven.
Desserts
-
Cook delicate desserts with the conventional function on one shelf only. Use dark coloured metal cake tins and always position them on the wire shelf supplied. To
cook on more than one shelf, select the forced air function and stagger the position of the cake tins on the shelves, aiding optimum circulation of the hot air.
To check whether a raising cake is cooked, insert a wooden toothpick into the centre of the cake. If the toothpick comes out clean, the cake is ready.
If using non-stick cake tins, do not butter the edges as the cake may not rise evenly around the edges.
If the cake “sinks” during cooking, set a lower temperature the next time, perhaps reducing the amount of liquid in the mixture and mixing more gently.
For sweets with moist fillings (cheesecake or fruit pies) use the “CONVECTION BAKE” function (if present). If the base of the cake is soggy, lower the shelf and
sprinkle the bottom of the cake with breadcrumbs or biscuit crumbs before adding the filling.
Meat
-
Use any kind of oven tray or pyrex dish suited to the size of the piece of meat being cooked. For roast joints, it is best to add some stock to the bottom of the pan,
basting the meat during cooking for added flavour. When the roast is ready, let it rest in the oven for another 10-15 minutes, or wrap it in aluminium foil.
- When you want to grill meat, choose cuts with an even thickness all over in order to achieve uniform cooking results. Very thick pieces of meat require longer
cooking times. To avoid the meat from burning on the outside, lower the position of the wire shelf, keeping the food farther away from the grill. Turn the meat
two thirds of the way through cooking.
To collect the cooking juices it is advisable to place a drip-tray with half a litre of water directly under the grill on which the meat is placed. Top-up when necessary.
Turnspit (only in some models)
Use this accessory to evenly roast large pieces of meat and poultry. Place the meat on the spit rod, tying it with string if chicken, and check that it is secure before
inserting the rod in the seat located on the front wall of the oven and resting it on the respective support. To avoid smoke and to collect cooking juices, it is advisable
to place a drip-tray with half a litre of water on the first level. The rod has a plastic handle which must be removed before starting to cook, and used at the end of cooking
to avoid burns when taking the food out of the oven.
Pizza
Lightly grease the trays to ensure the pizza has a crispy base. Scatter the mozzarella over the pizza two thirds of the way through cooking.
Rising function (present only in specific models)
It is always best to cover the dough with a damp cloth before placing it in the oven. Dough proving time with this function is reduced by approximately one third
compared to proving at room temperature (20-25°C). Proving time for a 1 Kg batch of pizza dough is around one hour.
GB21
INSTRUCTIONS IMPORTANTES SUR LA SÉCURITÉ
VOTRE SÉCURITÉ ET CELLE D’AUTRUI EST TRÈS IMPORTANTE
Le présent manuel contient d’importants messages relatifs à la sécurité, qui figurent également sur l’appareil. Nous vous invitons à les lire soigneusement et à les
respecter en toute circonstance.
Ceci est le symbole de danger relatif à la sécurité. Il met en garde l’utilisateur et toute autre personne contre les risques potentiels dérivant de l’utilisation
de cet appareil.
Tous les messages relatifs à la sécurité sont précédés du symbole de danger et des termes suivants :
DANGER
Indique une situation dangereuse qui, si elle n’est pas évitée, occasionnera de graves lésions.
AVERTISSEMENT
Indique une situation dangereuse qui, si elle n’est pas évitée, est susceptible d’occasionner de graves
lésions.
Tous les messages relatifs à la sécurité spécifient le danger potentiel auquel ils se réfèrent et indiquent comment réduire le risque de lésions, de dommages et de chocs
électriques résultant d’une utilisation non réglementaire de l’appareil. Veuillez observer scrupuleusement les instructions suivantes :
- Débranchez le four de l’alimentation secteur avant d’entreprendre toute intervention sur celui-ci.
- Les opérations d’installation et d’entretien sont du ressort exclusif d’un technicien spécialisé. Celui-ci est tenu de se conformer aux instructions du fabricant et aux
normes locales en vigueur en matière de sécurité. Pour toute réparation ou tout remplacement de pièces, procédez uniquement aux opérations spécifiées dans le
manuel en utilisant les pièces expressément indiquées.
- La mise à la terre de l’appareil est obligatoire.
- Le cordon d’alimentation de l’appareil doit être suffisamment long pour permettre le branchement de l’appareil encastré à la prise du secteur.
- L’installation doit être conforme aux normes locales de sécurité. L’appareil doit être branché au moyen d’un interrupteur omnipolaire avec une distance
d’ouverture des contacts d’au moins 3 mm.
- N’utilisez en aucun cas de prises multiples ou de rallonges.
- ne tirez pas sur le cordon d’alimentation pour débranchez l’appareil.
- Une fois l’installation terminée, l’utilisateur ne devra plus pouvoir accéder aux composants électriques.
- Évitez de toucher l’appareil avec les mains mouillées et ne l’utilisez pas lorsque vous êtes pieds nus.
- Ce four a été conçu uniquement comme appareil ménager destiné à la cuisson des aliments. Toute autre utilisation est considérée comme impropre : chauffer une
pièce, par exemple. Le fabricant décline toute responsabilité en cas d’utilisation impropre ou de réglage incorrect des commandes.
- Les personnes (y compris les enfants) qui, en raison de leurs capacités physiques, sensorielles ou mentales, de leur inexpérience ou de leur méconnaissance,
ne sont pas en mesure d’utiliser l’appareil en toute sécurité, doivent se servir de l’appareil uniquement sous la surveillance ou en se conformant aux instructions
d’une personne responsable.
- Les parties accessibles du four peuvent atteindre une température élevée quand l’appareil est en service. Veillez à maintenir les enfants hors de portée de
l’appareil. Contrôlez que les enfants ne jouent pas avec l’appareil.
- Veillez à ne pas toucher les résistances ou les surfaces intérieures du four, sous peine d’encourir des brûlures. Évitez de mettre le four en contact avec des chiffons
ou tout matériau inflammable avant que les composants de l’appareil ne soient suffisamment refroidis.
- En fin de cuisson, soyez particulièrement prudent au moment d’ouvrir la porte. Laissez l’air chaud ou la vapeur s’évacuer progressivement de l’enceinte de cuisson
avant d’accéder à celle-ci. Lorsque la porte est fermée, l’air chaud est convoyé à travers l’ouverture située au-dessus du bandeau de commande. Évitez d’obstruer
les ouvertures de ventilation.
- Munissez-vous de gants pour retirer les plats et les accessoires chauds du four. Veillez à ne pas toucher les résistances.
- Ne placez jamais de produits inflammables à l’intérieur du four ou à proximité de celui-ci : ces produits risqueraient en effet de s’enflammer si le four était mis
sous tension par inadvertance.
- Évitez de chauffer ou de cuisiner dans le four des aliments contenus dans des récipients hermétiques. La pression qui se développe à l’intérieur du récipient
pourrait le faire exploser et endommager le four.
- N’utilisez en aucun cas de récipients en matière synthétique pour cuire des aliments au four.
- Les graisses et l’huile surchauffées s’enflamment facilement. Surveillez régulièrement la cuisson si vous utilisez une quantité importante de graisse ou d’huile.
- Ne laissez jamais l’appareil sans surveillance pendant la dessiccation des aliments.
- Si des liquides contenant de l’alcool (par exemple, rhum, cognac, vin) sont utilisés pour cuisiner des plats, rappelez-vous que l’alcool s’évapore à des températures
élevées. Il se peut, par conséquent, que les vapeurs dégagées par l’alcool s’enflamment en entrant en contact avec la résistance électrique.
Mise au rebut des appareils ménagers usagés
-
Cet appareil est fabriqué à partir de matériaux recyclables ou pouvant être réutilisés. Mettez-le au rebut en vous conformant aux prescriptions locales en matière
d’élimination des déchets. Avant de mettre votre appareil au rebut, coupez le cordon d’alimentation.
Pour toute information sur le traitement et le recyclage de cet appareil, contactez le service municipal compétent, le service de collecte des déchets ménagers ou
le magasin où vous l’avez acheté.
FR22
INSTALLATION
Après avoir déballé le four, contrôlez que l’appareil n’a pas été endommagé pendant le transport et que la porte ferme parfaitement. En cas de problème, contactez
votre revendeur ou le Service Après-vente le plus proche. Nous recommandons de retirer le four de la base en polystyrène uniquement avant de procéder à l’installation,
afin d’éviter tout risque d’endommagement de l’appareil.
PRÉPARATION DU MEUBLE POUR L’ENCASTREMENT
•
•
•
•
Les meubles de cuisine adjacents au four doivent résister à la chaleur (min. 90°C).
Procédez au découpage complet du meuble avant d’y installer l’appareil et éliminez soigneusement les copeaux et la sciure de bois.
On ne doit plus pouvoir accéder à la partie inférieure du four une fois l’installation terminée.
Afin de garantir le bon fonctionnement de l’appareil, veillez à ne pas obstruer l’ouverture minimale prévue entre le plan de travail et la partie supérieure du four.
BRANCHEMENT ÉLECTRIQUE
Vérifiez que la tension figurant sur la plaque signalétique de l’appareil correspond à celle de votre habitation. La plaque signalétique se trouve sur le rebord avant du
four (visible lorsque la porte est ouverte).
• Le remplacement éventuel du câble d’alimentation (type H05 RR-F 3 x 1,5 mm2) doit être effectué uniquement par un professionnel qualifié. Adressez-vous à un
Service Après-vente agréé.
RECOMMANDATIONS GÉNÉRALES
Avant d’utiliser le four pour la première fois :
-
Enlevez les protections en carton, les films transparents et les étiquettes autocollantes présentes sur les accessoires.
Retirez tous les accessoires du four et faites-le chauffer à 200°C pendant une heure environ afin d’éliminer les odeurs et les fumées qui se dégagent du matériau
isolant et de la graisse de protection.
Pendant l’utilisation :
-
Évitez de déposer des objets lourds sur la porte du four sous peine de l’endommager.
Évitez de prendre appui sur la porte du four ou de suspendre des objets sur la poignée du four.
Évitez de couvrir l’intérieur du four avec des feuilles d’aluminium.
Ne versez jamais d’eau dans le four lorsque celui-ci est chaud ; vous risqueriez d’endommager l’émail.
Évitez de déplacer les ustensiles de cuisson en les traînant sur le fond du four sous peine de rayer le revêtement en émail.
Veillez à ce que le câble électrique d’autres appareils électroménagers se trouvant à proximité immédiate ne puisse ni entrer en contact avec les parties chaudes,
ni se coincer dans la porte du four.
Évitez d’exposer le four aux agents atmosphériques.
CONSEILS POUR LA PROTECTION DE L’ENVIRONNEMENT
Élimination des emballages
Les matériaux d’emballage sont entièrement recyclables comme l’indique le symbole de recyclage (
conformez-vous aux réglementations locales en vigueur en matière d’élimination des déchets.
). Par conséquent, ne les jetez jamais dans la nature mais
Mise au rebut de l’appareil
-
Cet appareil est certifié conforme à la Directive Européenne 2002/96/CE, concernant les Déchets d’Équipements Électriques et Électroniques (DEEE ou WEEE).
En procédant correctement à la mise au rebut de cet appareil, vous contribuerez à protéger l’environnement et la santé humaine, qui pourraient être menacés
par une élimination incorrecte.
-
Le symbole
apposé sur le produit et sur la documentation qui l’accompagne indique qu’il ne doit pas être jeté avec les ordures ménagères, mais remis à un
centre de collecte spécialisé dans le recyclage des appareils électriques et électroniques.
Conseils pour économiser l’énergie
-
Préchauffez le four uniquement si le tableau de cuisson ou votre recette le précise.
Utilisez des moules à pâtisserie foncés, laqués noir ou émaillés, car ceux-ci absorbent très bien la chaleur.
Éteignez le four 10 à 15 minutes avant la fin du temps de cuisson réglé. En cas d’aliments nécessitant un temps de cuisson relativement long, ceux-ci continueront
néanmoins à cuire en utilisant la chaleur résiduelle du four.
DÉCLARATION DE CONFORMITÉ
-
Ce four, qui est destiné à entrer en contact avec des denrées alimentaires, est conforme au règlement ( ) N° 1935/2004. Il a été conçu, fabriqué et
commercialisé conformément aux exigences de sécurité de la directive « Basse Tension » 2006/95/CE (qui remplace la directive 73/23/CEE et modifications
suivantes) et aux exigences de protection de la directive « CEM » 2004/108/CE.
FR23
DIAGNOSTIC DES PANNES
Le four ne marche pas
•
•
Vérifiez qu’il n’y a pas de coupure de courant et que le four est correctement branché.
Éteignez puis rallumez le four pour voir si le problème a été éliminé.
La porte est bloquée :
•
•
Éteignez puis rallumez le four pour voir si le problème a été éliminé.
REMARQUE IMPORTANTE : durant la pyrolyse, il n’est pas possible d’ouvrir la porte du four. Attendez que celle-ci se débloque automatiquement (référez-vous
au paragraphe « Cycle de nettoyage des fours dotés de la fonction Pyrolyse »).
Le programmateur électronique ne fonctionne pas :
•
Si la lettre « » suivie d’un numéro s’affiche à l’écran, contactez votre Service Après-vente. Dans ce cas, indiquez le numéro qui suit la lettre « ».
SERVICE APRÈS-VENTE
Avant de faire appel au Service Après-vente :
1. Vérifiez d’abord s’il n’est pas possible de remédier par vous-même au défaut en suivant les points décrits au chapitre « Diagnostic des pannes ».
2. Éteignez puis rallumez le four pour voir si le problème a été éliminé.
Après ces contrôles, si le problème persiste, adressez-vous à votre Service Après-vente.
Veuillez toujours spécifier :
• une brève description du défaut ;
• le type et le modèle exact du four ;
• le code service (numéro suivant le mot « Service » sur la plaque signalétique) apparaissant sur le rebord droit de la cavité du four (visible lorsque la porte est
ouverte). Le code service est également indiqué dans le livret de garantie ;
• votre adresse complète ;
• votre numéro de téléphone.
Si le four doit être réparé, adressez-vous à un Service Après-vente agréé (vous aurez ainsi la garantie que les pièces défectueuses seront remplacées par des pièces
originales et que la réparation de votre appareil sera effectuée correctement).
NETTOYAGE
AVERTISSEMENT
-
N’utilisez pas d’appareil de nettoyage à vapeur.
Attendez que le four soit froid avant de procéder à son nettoyage.
Débranchez l’appareil avant de procéder à son entretien.
Extérieur du four
REMARQUE IMPORTANTE : n’utilisez en aucun cas de produits corrosifs ou de détergents abrasifs. Si l’un de ces produits entre en contact avec
l’appareil, essuyez-le immédiatement à l’aide d’un chiffon humide.
• Nettoyez les surfaces à l’aide d’un chiffon humide. S’il est très sale, utilisez une solution d’eau additionnée de quelques gouttes de détergent à vaisselle.
Essuyez à l’aide d’un chiffon doux.
Enceinte du four
REMARQUE IMPORTANTE : évitez l’emploi d’éponges abrasives et/ou de pailles de fer. À la longue, celles-ci risquent d’abîmer les surfaces émaillées
et la vitre de la porte.
• Après chaque utilisation, laissez refroidir le four et nettoyez-le, de préférence lorsqu’il est tiède, pour éviter que les résidus d’aliments ne s’incrustent
(par exemple, aliments à haute teneur en sucre).
• Utilisez des produits spéciaux pour fours et respectez les instructions du fabricant.
• Nettoyez la vitre de la porte avec un produit liquide spécifique. Pour faciliter le nettoyage du four, il est possible d’enlever la porte (référez-vous au chapitre
ENTRETIEN).
• Pour nettoyer la partie supérieure du four, il est possible d’abaisser (seulement dans certains modèles) la résistance supérieure du gril (voir le chapitre
ENTRETIEN).
REMARQUE : durant les cuissons prolongées avec beaucoup d’eau (par exemple, pizzas, légumes, etc.), de la condensation risque de se former
à l’intérieur de la porte et sur tout le joint. Attendez que le four refroidisse puis essuyez l’intérieur de la porte avec un chiffon ou une éponge.
Accessoires :
•
•
Faites tremper les accessoires dans du détergent à vaisselle immédiatement après leur utilisation. S’ils sont encore chauds, munissez-vous de gants pour les
manipuler.
Utilisez une brosse ou une éponge pour détacher facilement les résidus d’aliments.
FR24
Nettoyage de la paroi arrière et des panneaux catalytiques latéraux (s’ils sont fournis) :
REMARQUE IMPORTANTE : ne nettoyez en aucun cas les panneaux catalytiques et la paroi arrière avec des produits abrasifs, des brosses dures,
des éponges pour casseroles ou des bombes pour le nettoyage du four, car ils pourraient endommager la surface catalytique et lui faire perdre
ses propriétés autonettoyantes.
• Faites fonctionner le four à vide à 200°C pendant environ une heure en sélectionnant la fonction Ventilation
• Une fois ce temps écoulé, faites refroidir l’appareil, puis éliminez les éventuels résidus d’aliments à l’aide d’une éponge.
ENTRETIEN
AVERTISSEMENT
-
Munissez-vous de gants de protection.
Procédez aux opérations indiquées lorsque l’appareil est froid.
Débranchez l’appareil avant de procéder à son entretien.
DÉMONTAGE DE LA PORT
Pour démonter la porte :
1. Ouvrez complètement la porte du four.
2. Soulevez les deux manettes d’arrêt des charnières en les poussant vers l’avant, jusqu’à la butée (Fig. 1).
3. Fermez complètement la porte (A), soulevez-la (B) et faites-la pivoter (C) jusqu’à ce qu’elle se décroche (D) (Fig. 2).
Pour remettre la porte en place :
1.
2.
3.
4.
Introduisez les charnières dans leur logement respectif.
Ouvrez complètement la porte du four.
Abaissez à nouveau les deux manettes d’arrêt.
Fermez la porte du four.
Fig. 1
Fig. 2
DÉPLACEMENT DE LA RÉSISTANCE SUPÉRIEURE (UNIQUEMENT SUR CERTAINS MODÈLES)
1. Déposez les grilles porte-accessoires latérales (Fig. 3).
2. Dégagez légèrement la résistance (Fig. 4) et abaissez-la (Fig. 5).
3. Pour remettre la résistance en place, soulevez-la en la tirant légèrement vers vous. Vérifiez qu’elle repose sur les sièges latéraux prévus à cet effet.
Fig. 3
Fig. 4
Fig. 5
FR25
REMPLACEMENT DE L’AMPOULE
Pour remplacer l’ampoule arrière (si présente) :
1. Débranchez le four.
2. Dévissez le couvercle de l’ampoule (Fig. 6), remplacez l’ampoule grillée par une ampoule neuve (voir Remarque pour le type d’ampoule), revissez ensuite le
couvercle de l’ampoule (Fig. 7).
3. Rebranchez le four.
Fig. 6
Fig. 7
REMARQUE : - Utilisez exclusivement des ampoules incandescentes de 25-40W/230V type E-14, T300°C.
- Ces ampoules sont disponibles auprès de nos Services Après-vente.
REMARQUE IMPORTANTE : - Mettez le four sous tension uniquement après avoir réinstallé le couvercle de l’ampoule.
INSTRUCTIONS POUR L’UTILISATION DU FOUR
POUR LE BRANCHEMENT ÉLECTRIQUE, CONSULTEZ LA PARTIE RELATIVE À L’INSTALLATION
1. Bandeau des commandes
2. Résistance supérieure/gril
3. Système de refroidissement (si présent)
4. Plaque signalétique (à ne pas enlever)
5. Éclairage
6. Système de ventilation (si présent)
7. Tournebroche (si présent)
8. Résistance inférieure (non visible)
9. Porte
10. Position des gradins
11. Paroi
REMARQUE : - À la fin de la cuisson, après l’extinction du four, le ventilateur de refroidissement peut continuer de fonctionner pendant un certain temps.
FR26
ACCESSOIRES COMPATIBLES
(pour les accessoires fournis avec le four, consultez la fiche technique)
Fig. 1
Fig. 2
Fig. 3
Fig. 4
Fig. 7
Fig. 8
6a
6b
Fig. 5
Fig. 6
Fig. 9
Lèchefrite (Fig. 1)
Pour recueillir les graisses et les particules d’aliments lorsqu’elle est placée sous la grille du four ou utilisée comme plat de cuisson pour cuire de la viande, du poulet,
du poisson, etc., avec ou sans légumes. Versez de l’eau dans le fond de la lèchefrite pour éviter les éclaboussures de graisse et réduire les fumées.
Plaque à pâtisserie (Fig. 2)
À utiliser pour la cuisson de biscuits, de gâteaux, de pizzas.
Grille (Fig. 3)
Pour faire griller de la viande ou comme support de casseroles, de moules à gâteaux et autres récipients. Elle peut être placée sur n’importe quel gradin du four. Le côté
courbé de la grille peut être introduit soit vers le haut, soit vers le bas.
Panneaux catalytiques latéraux (Fig. 4)
Ces panneaux ont une revêtement en émail microporeux spécial qui absorbe les éclaboussures de graisse. Il est conseillé d’effectuer un cycle de nettoyage automatique
après la cuisson d’aliments particulièrement gras (voir NETTOYAGE).
Tournebroche (Fig. 5)
Utilisez le tournebroche comme indiqué sur Fig. 9. Vérifiez également « Conseils etsuggestions d’utilisation ».
Kit pour gril (Fig. 6)
Le kit se compose d’une grille (6a) et d’un récipient émaillé (6b). Ce kit doit être placé sur la grille (3) et utilisée avec la fonction Gril.
Filtre à graisses (Fig. 7)
À utiliser uniquement pour les cuissons particulièrement grasses. Accrochez-le à la paroi arrière de la cavité face au ventilateur. Il peut être lavé au lave-vaisselle ; il
ne doit pas être utilisé avec la fonction Ventilateur.
Grilles coulissantes (Fig. 8)
Elles permettent aux grilles et aux lèchefrites de sortir à moitié pendant la cuisson. Elle s’adaptent à tous les accessoires et peuvent être lavées au lave-vaisselle.
FR27
DESCRIPTION DU BANDEAU DE COMMANDE
1
1.
2.
3.
4.
2
3
4
Bouton de sélection des fonctions
Programmateur électronique
Bouton du thermostat
Voyant rouge du thermostat
MODE D’EMPLOI DU FOUR
•
Tournez le bouton de sélection des fonctions sur la fonction désirée.
L’éclairage du four s’allume.
• Tournez le bouton thermostat dans le sens des aiguilles d’une montre et positionnez-le sur la température souhaitée.
Le voyant du thermostat s’allume. Il s’éteint lorsque la température sélectionnée est atteinte.
En fin de cuisson, tournez les boutons sur la position « 0 ».
UTILISATION DES PLAQUES ÉLECTRIQUES
1. Touche - : pour diminuer la valeur visualisée à l’afficheur
B
A
U
T
O
A
2. Touche
: pour sélectionner les différents réglages :
a. Minuteur
b. Durée de cuisson
c. Heure de fin de cuisson
3. Touche + : pour augmenter la valeur visualisée à l’afficheur
A. Le symbole
indique que la fonction Minuteur est activée.
B. Le symbole AUTO confirme que le réglage a été effectué.
1
2
3
Programmations lors de la première utilisation
Réglage de l’heure du jour et de l’intensité du signal sonore.
Lorsque le four est connecté à l'alimentation secteur, les indications AUTO et 0.00 clignotent au niveau de la zone d'affichage. Pour régler l'heure, appuyez
simultanément sur les touches - et + : le point central clignote. Réglez l’heure du jour à l’aide des touches + et -. Après avoir sélectionné la valeur souhaitée, appuyez
sur la touche du milieu. L’afficheur visualise « bip 1 ». Appuyez sur la touche – pour sélectionner le signal sonore désiré. Après quoi, appuyez sur la touche du milieu.
Pour modifier l’heure du jour, procédez comme décrit ci-dessus.
Réglage du minuteur
Pour régler le minuteur, appuyez plusieurs secondes sur la touche du milieu : l’afficheur visualise 0.00 et le symbole de la cloche clignote. Réglez le minuteur à l’aide
de la touche + (la valeur maximale programmable est de 23 heures et 59 minutes). Le compte à rebours démarre après quelques secondes. L’afficheur visualise l’heure
du jour et la cloche reste allumée pour indiquer que le minuteur a été réglé. Pour visualiser le compte à rebours et modifier au besoin la valeur réglée, appuyez sur la
touche du milieu.
Programmation du temps de cuisson
Après avoir sélectionné le mode de cuisson et la température à l’aide des boutons correspondant, appuyez sur la touche du milieu : l’afficheur visualise 0:00 et le
symbole de la cloche clignote. Appuyez à nouveau sur la touche du milieu :
et 0.00 s’affichent en séquence à l’écran et AUTO clignote. Réglez la durée de cuisson
à l’aide des touches + et - (la valeur maximale programmable est de 10 heures). Après quelques secondes, l’afficheur visualise l’heure du jour et AUTO reste allumé en
confirmation du réglage. Pour visualiser la durée de cuisson restante et la modifier au besoin, appuyez sur la touche du milieu pendant 2 secondes, puis appuyez une
nouvelle fois sur cette même touche. Au terme de la durée réglée, le symbole
s’éteint, l’alarme retentit et AUTO clignote à l’afficheur. Appuyez sur une touche
quelconque pour désactiver l’alarme. Ramenez les boutons de sélection des fonctions et de la température sur zéro, puis appuyez sur la touche du milieu pendant deux
secondes pour terminer la cuisson.
FR28
Différé l’heure de fin de cuisson
Après avoir sélectionné la durée de cuisson, appuyez sur la touche du milieu : l’afficheur visualise
, l’heure de fin de cuisson et AUTO clignotent en séquence.
Appuyez sur la touche + pour visualiser l’heure de fin de cuisson souhaitée (l’heure de fin de cuisson peut être différée de 23 heures et 59 minutes). Au bout de quelques
secondes, l’afficheur visualise l’heure du jour, le symbole
s’éteint et AUTO reste allumé, indiquant que le réglage a été effectué. Pour visualiser l’heure de fin
de cuisson et la modifier au besoin, appuyez sur la touche du milieu, puis appuyez à nouveau deux fois sur cette même touche. À la fin du compte à rebours, le
symbole
s’allume et le four procède à la cuisson selon le mode de cuisson sélectionné.
TABLEAU DE DESCRIPTION DES FONCTIONS
FONCTION
OFF
LAMPE
DESCRIPTION
Pour arrêter la cuisson et mettre le four hors tension.
Pour activer l’éclairage du four.
CONVECTION
NATURELLE
Fonction idéale pour la cuisson de tout type de plat sur un seul gradin. Préchauffez le four à la température souhaitée et placezy les aliments une fois la température programmée atteinte. Il est conseillé d’utiliser le deuxième ou le troisième gradin pour la
cuisson. Cette fonction est également indiquée pour la cuisson des plats préparés surgelés. Suivez les instructions figurant sur
l’emballage.
CONVECTION FORCÉE
Cuisson des tartes à garniture liquide (salées ou sucrées) sur un seul gradin. Cette fonction est idéale pour les cuissons sur deux
gradins. Il est conseillé d’inverser, au besoin, la position des plats dans le four afin d’obtenir une cuisson plus homogène.
GRIL
TURBO GRIL
DÉCONGÉLATION
Pour cuire des entrecôtes, des brochettes ou des saucisses, faire gratiner des légumes et dorer du pain. Préchauffez le four 3 à
5 min. La porte du four doit rester fermée pendant la cuisson. Pour éviter les éclaboussures de graisse et la production de
fumée lorsque vous cuisez de la viande, versez un peu d’eau dans la lèchefrite. Il est conseillé de retourner la viande en cours de
cuisson.
Pour griller de gros morceaux de viande (rosbifs, rôtis). La porte du four doit rester fermée pendant la cuisson. Pour cuire de la
viande, versez un peu d’eau dans la lèchefrite installée sur le premier gradin. Vous réduirez ainsi la production de fumée et les
éclaboussures de graisse. Retournez la viande en cours de cuisson.
Vous pouvez utiliser cette fonction pour accélérer la décongélation des aliments à température ambiante. Laissez les aliments
dans leur emballage pour éviter qu’ils ne se dessèchent.
FR29
TABLEAU DE CUISSON
Recette
Préchauffage
Gradin
(du bas)
Temp.
(°C)
Durée Accessoires
(min)
Gâteaux levés
Oui
2
160-180
35-55 Grille + moule à gâteau
Biscuits/Tartelettes
Oui
3
170-180
15-40 Plaque à pâtisserie
Choux ronds
Oui
3
180
30-40 Plaque à pâtisserie
Vol-au-vent/Feuilletés
Oui
3
180-200
20-30 Plaque à pâtisserie
Meringues
Oui
3
90
120-130 Plaque à pâtisserie
Agneau/Veau/Bœuf/Porc
Oui
2
190-200
Poulet/Lapin/Canard
Oui
2
190-200
Dinde/Oie
Oui
2
190-200
Oui
2
180-200
Oui
2
190-200
45-55 Grille + plat en pyrex
Pain/Fougasse
Oui
2
190-230
15-50 Lèchefrite ou plaque à pâtisserie
Pizzas
Oui
2
230-250
7-20
Lèchefrite ou plaque à pâtisserie
Croque-monsieur
Oui
4
200
2-5
Grille
Légumes gratinés
Oui
3
200
15-20 Grille + plat en pyrex
Oui
3
200
30-40 Grille + plat en pyrex
Oui
4
200
30-50
Gril + lèchefrite avec eau sur le
1er gradin, tourner à mi-cuisson
Oui
1
180-200
50-60
Lèchefrite ou grille + plat en
pyrex
Oui
1
180-200
35 -55 Grille + moule à gâteau
Oui
2
180-200
40-60 Grille + plat en pyrex
Oui
1/ 3
180-190
45-55
Oui
1/3
230-250
12-30
Biscuits/Tartelettes
-
1 /3
170-180
Choux à la crème
-
1/ 3
180
Poisson au four/en papillote
(filet, entier)
Lasagnes/Pâtes au
four/Cannellonis/Flans
Filets et darnes/steaks de
poisson grillés
Saucisses/Brochettes/Pointes de
porc/Hamburgers
Tourtes (tarte au fromage blanc,
strudel aux pommes, tarte aux
fruits)
Tourtes à la viande et aux
pommes de terre (tourte de
légumes, quiches)
Légumes farcis (tomates,
poivrons, courgettes,
aubergines)
Tourtes à la viande et aux
pommes de terre (tourte de
légumes, quiches)
Pizzas/Fougasses
Fonction
FR30
Lèchefrite ou grille + plat en
pyrex
Lèchefrite ou grille + plat en
65-85
pyrex
Lèchefrite ou grille + plat en
140-180
pyrex
Lèchefrite ou grille + plat en
50-60
pyrex
90-110
Gril + plaque, inverser les
gradins à mi-cuisson
Plaque à pâtisserie+lèchefrite,
inverser les gradins à mi-cuisson
Plaque à pâtisserie+lèchefrite,
20-40
inverser les gradins à mi-cuisson
Plaque à pâtisserie+lèchefrite,
35-45
inverser les gradins à mi-cuisson
Recette
Fonction
Préchauffage
Gradin
(du bas)
Temp.
(°C)
Durée Accessoires
(min)
Vol-au-vent/Feuilletés
-
1/ 3
180-200
20-40
Poulet rôti
-
2
200
Pommes de terre au four
-
3
200
45-55 Lèchefrite
Rosbif saignant
-
3
200
30-40
Gigot d’agneau/Jarret
-
3
200
55-70 Gril + lèchefrite
Plaque à pâtisserie+lèchefrite,
inverser les gradins à mi-cuisson
Grille + lèchefrite avec eau au 1°
55-65
gradin
Grille + lèchefrite avec eau au 1°
gradin
REMARQUE : Les températures et les durées de cuisson sont fournies pour 4 portions.
CONSEILS POUR L’UTILISATION ET SUGGESTIONS
Comment lire le tableau de cuisson
Le tableau indique la meilleure fonction à utiliser pour un aliment déterminé, à cuire sur un ou plusieurs gradins simultanément. Les temps de cuisson commencent au moment de
l’introduction du plat dans le four et ne tiennent pas compte du préchauffage (lorsque demandé). Les températures et les durées de cuisson sont indicatives et dépendent de la
quantité à cuire et du type d’accessoire utilisé. Au départ, utilisez les valeurs conseillées les plus basses et, si le résultat de la cuisson n’est pas satisfaisant, sélectionnez des valeurs plus
élévées. Nous conseillons d’utiliser les accessoires fournis et des moules ou plats si possible en métal foncé. Il est également possible d’utiliser des casseroles et accessoires en pyrex ou
en céramique ; les temps de cuisson augmenteront légèrement. Pour obtenir de meilleurs résultats, suivez attentivement les conseils présentés dans le tableau de cuisson pour le
choix des accessoires (fournis) à positionner sur les différents gradins. Préchauffez le four lorsque les aliments à cuire contiennent beaucoup d’eau.
Cuisson simultanée d’aliments différents
En utilisant la fonction « CONVECTION FORCÉE » (si présente), il est possible de cuire plusieurs aliments nécessitant la même température au même moment (par
exemple : poisson et légumes) nécessitant la même température, sur différents gradins. Extrayez les aliments nécessitant des temps de cuisson inférieurs et laisser la
cuisson continuer pour ceux avec des temps plus longs.
Gâteaux
-
Cuisez la pâtisserie avec la fonction statique sur un seul gradin. Utilisez des moules à gâteau en métal foncé et placez-les toujours sur la grille fournie. Pour la
cuisson sur plusieurs gradins, sélectionnez la fonction avec air forcé et disposez les moules décalés sur les grilles, de manière à favoriser la circulation de l’air.
Pour comprendre si le gâteau est cuit, introduisez un cure-dent dans la partie la plus haute (généralement le centre) du gâteau. Si le cure-dent reste sec, le gâteau
est cuit.
Si vous utilisez des moules anti-adhérents, ne beurrez pas les bords ; le gâteau pourrait ne pas lever de manière homogène sur le pourtour.
Si le gâteau se « dégonfle » durant la cuisson, la fois suivante utilisez une température inférieure ; vous pouvez également réduire la quantité de liquide et
mélanger plus délicatement la pâte.
La pâtisserie avec une garniture juteuse (gâteaux au fromage ou avec des fruits) requiert la fonction « CONVECTION FORCÉE » (si présente). Si le fond de la tarte est
trop humide, placez-le sur un gradin inférieur et saupoudrez la base avec de la chapelure ou des biscuits émiettés avant d’ajouter la farce.
Viande
-
Utilisez n’importe quel type de plat approprié aux dimensions de la viande à cuire. Pour les rôtis, ajoutez de préférence du bouillon sur le fond du plat et mouillez
la viande durant la cuisson pour la rendre plus savoureuse. Lorsque le rôti est cuit, laissez-le reposer dans le four pendant 10-15 min ou bien enveloppez-le dans
du papier d’aluminium.
- Si vous désirez griller la viande, pour obtenir une cuisson uniforme, choisissez des morceaux de la même épaisseur. Les tranches de viande très épaisses
nécessitent un temps de cuisson supérieur. Pour éviter de les brûler, éloignez-les du gril, en plaçant la grille à des gradins inférieurs. Tournez la viande après 2/3
de la cuisson.
Nous conseillons d’utiliser une lèchefrite avec un demi-litre d’eau, directement sous la grille sur laquelle vous avez positionné la viande à griller pour recueillir le jus de
cuisson. Ajoutez de l’eau si nécessaire.
Tournebroche (disponible uniquement sur certains modèles)
Cet accessoire sert à griller de gros morceaux de viande et des volailles de façon uniforme. Enfilez la viande sur le tournebroche, fixez-la avec une ficelle de cuisine s’il
s’agit d’un poulet et vérifiez qu’il ne bouge pas avant d’installer la broche dans son logement sur la paroi frontale du four puis posez-la sur son support. Pour éviter la
formation de fumée et recueillir les jus de cuisson, nous conseillons de placer une lèchefrite sur le premier gradin avec un demi-litre d’eau. La broche est dotée d’une
poignée en plastique qu’il faut enlever avant de commencer la cuisson et qu’il faut replacer en fin de cuisson pour sortir la viande du four sans se brûler.
Pizzas
Graissez légèrement les plats pour obtenir une pizza croustillante également sur le fond. Distribuez la mozzarella sur la pizza après 2/3 de la cuisson.
Fonction levage de la pâte (disponible uniquement sur certains modèles)
Il est conseillé de couvrir la pâte avec un torchon humide avant de la mettre au four. Les temps de levage dans cette fonction diminuent d’environ un tiers par rapport
aux temps de levage à température ambiante (20-25°C). Le temps de levage pour 1 kg de pâte à pizza est d’environ une heure.
5019 610 01293
DE
GB
FR
Whirlpool is a registered trademark of Whirlpool, USA
10/2011