1
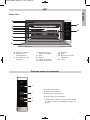
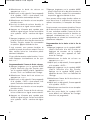
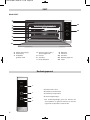
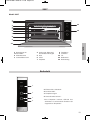
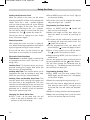
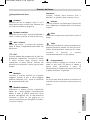
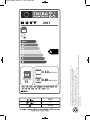
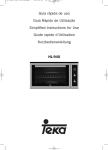
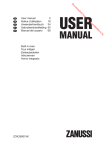
3172722-001 03/02/15 08:39 Página 1
Mode d'emploi
Gebruiksaanwijzing
Gebrauchsanweisung
Instructions for use
Hoja de Características
Istruzioni d'uso
2917
v 1.1
3172722-001 26/01/15 11:58 Página 2
3172722-001 26/01/15 11:58 Página 3
FRANÇAIS
2917
Modèle 2917
1
2
+
-
3
4
5
6
11
12
7
8
9
HI 900
4056-01
10
1 Fixation au Meuble
2 Sortie de l’air
de Réfrigération
3 Résistance du Gril
Abattable
4 Support Chromé/
Guide Télescopique
5 Grille
6 Turbine
7 Plateau pour Rôtis
8 Plateau à patisserie
9 Charnière
10 Porte
11 Panneau Frontal de
Commande
12 Lampe
Panneau avant de commande
+
-
1
1 Horloge électronique.
2 Sélecteur de fonctions.
2
3 Sélecteur de températures.
4 Voyant lumineux de chauffage*.
3
4
* Il indique que la chaleur est transmise à l'aliment
et s'éteint quand la température choisie est
atteinte.
HI 900
4056-01
3
3172722-001 26/01/15 11:58 Página 4
Fonctions du four
Arrêt du four
Traditionnel
Utiliser pour les gâteaux et les tartes qui
doivent recevoir une chaleur uniforme et pour
obtenir une texture moelleuse.
Traditionnel pulsé
Recommandé pour les rôtis et la pâtisserie. Le
ventilateur répartit la chaleur de façon
uniforme à l'intérieur du four.
Gril et résistance inférieure
Spécial pour les rôtis. Peut être utilisé pour
toutes sortes de morceaux, indépendamment
de leur volume.
Gril
Pour gratiner et rôtir superficiellement. Permet
de dorer la couche extérieure sans affecter
l'intérieur de l'aliment. Indiqué pour les
morceaux plats tels que les beefsteaks, les
côtelettes, les poissons, les toasts.
Maxi Gril
Permet de gratiner des surfaces plus grandes
qu'avec le Grill avec une puissance pour
gratiner supérieure, qui permet ainsi de dorer
l'aliment de façon plus rapide.
Maxi Gril avec turbine
Permet en même temps de rôtir de façon
uniforme et de dorer superficiellement. Idéal
pour les grillades. Spécial pour les pièces
volumineuses telles que les volailles, le gibier.
Il est recommandé de placer la pièce de
viande sur la grille du four et la lèchefrite endessous pour recueillir les jus de cuisson ou la
graisse.
4
Attention
Quand on utilise la fonction Grill ou MaxiGrill, la
porte doit rester fermée.
Sole
La chaleur provient seulement de la partie
inférieure. Approprié pour réchauffer des plats
ou faire lever des pâtes pour pâtisseries et
analogues.
Pizza
Spécial pour la misson des pizzas, pâtés en
croûte et tartes avec des fruits.
Chaleur tournante
La turbine répartit la chaleur qui provient d’une
résistance située à la partie arrière du four.
Grâce à l’uniformité de la chaleur produite, on
peut cuisiner à 2 hauteurs en même temps.
Décongeler
Cette fonction est réalisée grâce à un système
d'air chaud sur 2 niveaux. Niveau LO pour les
poissons, les pâtisseries et le pain. Niveau HI
(avec une température plus élevée à l’intérieur
du four) pour les viandes en général.
Remarque
La lumière reste allumée pendant toutes les
fonctions de cuisson. En revanche, celle-ci est
éteinte pendant le processus de nettoyage.
3172722-001 26/01/15 11:58 Página 5
Réglage de l’heure sur l’horloge électronique
Lors de la mise en marche du four, vous verrez le mot AUTO et l’indication 00:00 clignoter
sur l’afficheur de l’horloge. Appuyez simultanément et de façon prolongée sur les symboles + et –, vous entendrez alors un bip et
vous verrez un point lumineux clignotant entre
les chiffres de l’horloge. Ensuite, réglez l’heure de l’horloge en appuyant sur les symboles
+ ou –. Vous entendrez ensuite un bip pour
confirmer l’heure sélectionnée. Le symbole
restera allumé.
Si vous désirez modifier l'heure, veuillez
suivre les instructions précédemment indiquées.
Fonctionnement manuel
Une fois l’horloge réglée, votre four est prêt à
fonctionner. Appuyez et tournez les commandes du four pour sélectionner une température et une fonction de cuisson.
Pour arrêter le four, placez les commandes sur
la position
; si vous appuyez ensuite sur
des commandes, celles-ci restent invisibles.
Fonctions de l’horloge électronique
Avertisseur: il génère un signal sonore
lorsque la durée sélectionnée est écoulée.
Pour l’utiliser, il n’est pas nécessaire que le
four soit en cours de cuisson.
Durée de cuisson: permet d’ajuster le temps
de cuisson. Lorsque la durée sélectionnée est
écoulée, le four s’éteint automatiquement.
Heure de fin de cuisson: permet d’ajuster le
temps de cuisson jusqu’à une certaine heure.
Lorsque l’heure sélectionnée est atteinte, le
four s’éteint automatiquement.
Durée et fin de cuisson: permet de programmer la durée et l’heure de fin de cuisson.
Cette fonction permet une mise en marche
automatique du four pour l’heure choisie, et la
durée de cuisson sélectionnée (Durée). Le
four s’éteint automatiquement à l’heure indiquée (fin de cuisson).
Changement de la tonalité de l’avertisseur
de l’horloge
1 Appuyez simultanément sur les symboles +
et –. Vous verrez un point lumineux clignoter
entre les chiffres de l'afficheur de l'horloge.
2 Appuyez sur le symbole MODE et vous verrez l'indication « ton1 » sur l’afficheur de
l’horloge.
3 En appuyant de manière répétée sur le symbole –, vous pourrez modifier la tonalité de
l’avertisseur sonore.
Programmation de l’avertisseur
1 Appuyez longtemps sur MODE. Ensuite,
vous verrez le symbole
clignoter sur l’afficheur de l’horloge.
2 Sélectionnez le temps après lequel vous
désirez que l’horloge sonne en appuyant +
ou –.
3 Vous entendrez alors 1 bip puis l’heure s’affichera et le symbole
restera allumé, indiquant que l’avertisseur est activé.
4 Une fois écoulé le délai programmé, un signal sonore se fera entendre et le symbole
se mettra à clignoter.
5 Appuyez sur n’importe quel symbole pour
arrêter le signal sonore. Le symbole
continuera de clignoter.
6 Appuyez longtemps sur le symbole MODE
afin de terminer la fonction.
À tout moment vous pouvez visualiser le
temps restant en appuyant de façon prolongée sur le symbole MODE jusqu'à ce que le
symbole
clignote. Vous pouvez alors modifier le temps sélectionné en appuyant sur les
symboles + ou –. Vous entendrez ensuite 1
bip confirmant la modification .
Programmation de la durée de cuisson
1 Appuyez longtemps sur le symbole MODE
jusqu’à l’émission d’un bip. Ensuite, en
appuyant de nouveau sur le symbole MODE,
le mot « dur » apparaît sur l’afficheur de
l'horloge.
5
FRANÇAIS
Fonctionnement du four
3172722-001 26/01/15 11:58 Página 6
2 Sélectionnez la durée de cuisson en
appuyant sur + ou –.
3 Après quoi, un bip retentit, l’heure apparaît
et le symbole « AUTO » reste allumé, indiquant l’extinction automatique du four.
4 Sélectionnez une fonction et une température de cuisson.
5 Une fois la durée de cuisson écoulée, le
four s'éteint et un signal sonore retentit.
6 Appuyez sur n’importe quel symbole pour
arrêter le signal sonore. Le four reste éteint
et le symbole « AUTO » continue de clignoter.
7 Appuyez longtemps sur le symbole MODE
jusqu’à l’émission d’un bip pour terminer la
fonction. Ensuite, mettez les commandes
en position
pour éteindre le four.
À tout moment, vous pouvez visualiser et
modifier le temps de cuisson restant. Pour ce
faire, veuillez suivre les instructions précédemment indiquées.
Si vous désirez annuler cette fonction, il vous
suffit d’appuyer simultanément sur les symbole + et –.
Programmation de l’heure de fin de cuisson
1 Appuyez longtemps sur le symbole MODE
jusqu’à l’émission d’un bip. Ensuite, pressez le symbole MODE jusqu’à l’apparition
du mot « End » sur l’afficheur de l’horloge.
2 Sélectionnez l’heure de fin de cuisson en
appuyant sur + ou –.
3 Après quoi, un bip retentit, l’heure apparaît
et le symbole « AUTO » reste allumé, indiquant l’extinction automatique du four.
4 Sélectionnez une fonction et une température de cuisson.
5 Une fois arrivé à l’heure de fin de cuisson,
le four s'éteint et un signal sonore retentit.
6 Appuyez sur n’importe quel symbole pour
arrêter le signal sonore. Le four reste éteint
et le symbole « AUTO » continue de clignoter.
6
7 Appuyez longtemps sur le symbole MODE
jusqu’à l’émission d’un bip pour terminer la
fonction. Ensuite, mettez les commandes
en position
pour éteindre le four.
Vous pouvez utiliser cette fonction même en
cours de cuisson. Il suffit alors de suivre ces
mêmes instructions, à l’exception de l’étape
4.
À tout moment, vous pouvez visualiser l’heure
de fin de cuisson en suivant l’instruction nº 1.
Si vous souhaitez modifier l’heure de fin de
cuisson, vous devrez annuler la fonction en
appuyant simultanément sur + et –, et la
reprogrammer en suivant les instructions précédemment indiquées.
Programmation de la durée et de la fin de
cuisson
11 Appuyez longtemps sur le symbole MODE
jusqu’à l’émission d’un bip. Ensuite, en
appuyant de nouveau sur le symbole
MODE, le mot « dur » apparaît sur l’afficheur de l'horloge.
12 Sélectionnez la durée de cuisson en
appuyant sur + ou –.
13 Après quoi, un bip retentit, l’heure apparaît
et le symbole « AUTO ».
14 Appuyez longtemps sur le symbole MODE
jusqu’à l’émission d’un bip. Ensuite,
appuyez sur le symbole MODE jusqu’à
apparition du mot « End » sur l’afficheur de
l’horloge.
15 Sélectionnez l’heure de fin de cuisson en
appuyant sur + ou –.
16 Après quoi, un bip retentit, l’heure apparaît
et le symbole « AUTO ».
17 Sélectionnez une fonction et une température de cuisson.
18 Le four reste éteint. Le symbole AUTO
reste affiché sur l’afficheur de l’horloge.
Votre four est programmé.
3172722-001 26/01/15 11:58 Página 7
10 Une fois arrivé à l’heure de fin de cuisson
programmée, le four s’éteint et un signal
sonore se retentit.
Attention
En cas de coupure de courant, toute la programmation de l’horloge électronique sera
annulée et l’indication 00:00 clignotera sur
l’afficheur de l’horloge. Il vous faudra alors
remettre l’horloge à l’heure et procéder à une
nouvelle programmation.
11 Appuyez sur n’importe quel symbole pour
arrêter le signal sonore. Le four reste
éteint et le symbole « AUTO » continue de
clignoter.
12 Appuyez longtemps sur le symbole MODE
jusqu’à l’émission d’un bip pour arrêter la
fonction. Ensuite, mettez les commandes
en position
pour éteindre le four.
À tout moment, vous pouvez visualiser la programmation de votre horloge et suivant les
instructions nº 1 et 4.
Si vous désirez modifier la programmation,
vous devrez annuler la fonction en appuyant
simultanément sur + et –, et la reprogrammer
en suivant les instructions précédemment
indiquées.
7
FRANÇAIS
19 Lorsque vous atteindrez l’heure du début
de la cuisson, le four se mettra en marche
et la cuisson se fera durant le temps
sélectionné. Sur l’afficheur de l’horloge,
les symboles AUTO et
sont allumés.
3172722-001 26/01/15 11:58 Página 8
2917
Model 2917
1
2
+
-
3
4
5
6
12
7
8
9
HI 900
4056-01
10
1 Inbouw bevestiging
2 Luchtuitlaat
3 Inklapbare
grillweerstand
4 Verchroomde houder /
Telescoopgeleider
5 Rooster
6 Ventilator
7 Diepe bakplaat
8
9
10
11
12
Bakplaat
Scharnier
Ovendeur
Bedieningspaneel
Lamp
Bedieningspaneel
+
-
1
1 Elektronische klok.
2 Draaiknop ovenfuncties.
2
3 Draaiknop temperatuur.
4 Verwarmingslampje*.
3
4
HI 900
4056-01
8
11
* Het verwamingslampje gaat aan wanneer de
oven opwarmt, en gaat uit wanneer de oven de
ingestelde temperatuur heeft bereikt.
3172722-001 26/01/15 11:58 Página 9
Ovenfuncties
Traditioneel
Wordt gebruikt voor cakes en taarten waarbij
de warmte gelijkmatig verdeeld moet worden
om een luchtige textuur te verkrijgen.
Traditioneel met ventilator
Geschikt voor braadgerechten en gebak. De
ventilator verdeelt de warmte gelijkmatig in de
oven waardoor de baktijd en –temperatuur
wordt verlaagd.
Grill en onderwarmte
Speciaal voor gebraad. Kan gebruikt worden
voor elk stuk vlees of vis, ongeacht de grootte.
Grill
Om oppervlakkig gebraden gerechten te
bereiden. Hiermee kan de buitenlaag
goudbruin worden gebakken zonder de
binnenkant van het voedsel mee te bakken.
Ideaal voor platte gerechten zoals biefstuk,
koteletten, vis en toast.
MaxiGrill
Hiermee kunnen grotere oppervlakken bereid
worden dan met de grill en, dankzij het hogere
vermogen, worden de etenswaren sneller
goudbruin gebakken.
Opmerking
Als u de Grill of MaxiGrill gebruikt, moet de
ovendeur gesloten blijven.
Onderwarmte
Verwarmt alleen aan de onderkant. Geschikt
om gerechten op te warmen of gebak en
dergelijke te laten rijzen.
Pizza
Speciaal voor het bakken van pizza's, hartige
en zoete taarten.
Hetelucht
De ventilator verdeelt de warmte afkomstig van
een weerstand aan de achterkant van de oven.
Door de gelijkmatige verdeling van de
temperatuur kan tegelijkertijd op twee
verschillende
niveaus
worden
gebakken/gebraden.
Ontdooien
Deze functie maakt gebruik van een
heteluchtsysteem met twee niveaus. LO is
voor vis, cake, gebak en brood. HI (hogere
temperatuur in de oven) is voor vlees in het
algemeen.
Opmerking
De ovenverlichting blijft branden wanneer een
bakfunctie in werking is, behalve wanneer de
oven wordt gereinigd.
MaxiGrill met ventilator
Om gelijkmatig te braden en tegelijkertijd de
buitenkant lichtbruin te bakken. Ideaal voor
geroosterde gerechten. Geschikt voor grote
stukken vlees zoals gevogelte, wild, enz.
Aanbevolen wordt om het stuk vlees op het
rooster van de oven te leggen en de bakplaat
eronder te plaatsen om vleessap of vet op te
vangen.
9
NEDERLANDS
Oven uitzetten
3172722-001 26/01/15 11:58 Página 10
Gebruik van de oven
De elektronische klok instellen
De alarmtoon veranderen
Wanneer u de oven aanzet, zult u zien dat het
woord AUTO op het scherm gaat knipperen
met 00:00. Druk samen op de + en –
symbolen totdat u een geluidssignaal hoort en
een punt tussen de getallen ziet knipperen.
Selecteer de gewenste tijd door op de + en –
symbolen te drukken. U zult een pieptoon
horen, waarmee wordt aangegeven dat de tijd
is ingesteld. Het symbool
blijft branden.
1 Druk + en – tegelijk in. U zult opmerken dat
er een punt tussen de + en – symbolen op
het klokscherm oplicht.
Wilt u de tijd veranderen, volg dan de
instructies opnieuw op.
2 Druk op MODE en u zult zien dat “ton1” op
het klokscherm oplicht.
3 De alarmtoon kan worden gewijzigd door op
het - symbool te drukken.
De kookwekker programmeren
1 Blijf drukken op MODE todat het symbool
op het klokscherm gaat knipperen.
Handmatige bediening
Na het instellen van de klok is de oven klaar
voor gebruik. Kies een baktemperatuur en
bakfunctie door de knoppen in te drukken of
te draaien.
2 Selecteer de tijd waarna u wilt dat de
kookwekker afgaat door op + of – te drukken.
Zet de knoppen op
om de oven uit te
zetten. Druk de knoppen terug in om ze weg te
stoppen.
4 Op de geprogrammeerde tijd gaat het alarm
af en begint het
symbool te knipperen.
Elektronische klokfuncties
Kookwekker: Deze functie kunt u gebruiken
om een bepaald tijdstip in te stellen waarop
de oven een alarm moet laten weerklinken.
Baktijd: Met deze functie kan de baktijd (duur
van het bakproces) waarna de oven
automatisch wordt uitgeschakeld worden
geprogrammeerd.
Eindtijd van het bakproces: Met deze functie
kan de tijd waarna het bakproces moet
worden gestopt worden geprogrammeerd.
Hierna wordt de oven automatisch
uitgeschakeld.
Baktijd en eindtijd van het bakproces: Met
deze functie kunnen zowel de baktijd (duur
van het bakproces) als de eindtijd van het
bakproces worden geprogrammeerd. Op het
ingestelde tijdstip gaat de oven automatisch
aan en werkt hij gedurende de baktijd waarop
hij is ingesteld. De oven gaat automatisch uit
op de ingevoerde eindtijd.
10
3 Het alarm wordt bevestigd d.m.v. een
pieptoon en het scherm geeft de huidige tijd
aan. Het symbool
blijft branden.
5 Druk op willekeurig symbool om het alarm
uit te schakelen. Het symbool
blijft
knipperen.
6 Houd MODE ingedrukt totdat de functie is
uitgeschakeld.
U kunt op elk willekeurig moment kijken
hoelang het bakproces nog duurt door MODE
in te drukken totdat het
symbool gaat
knipperen. U kunt dan de geselecteerde tijd
wijzigen door op + of – te drukken. De
pieptoon die u hoort geeft aan dat de nieuwe
tijd is ingesteld.
Baktijd programmeren
1 Blijf drukken op MODE totdat u een
pieptoon hoort. Druk nogmaals op MODE en
het woord "dur" verschijnt op het
klokscherm.
2 Selecteer de baktijd door op + of – te
drukken.
3 Vervolgens hoort u een geluidssignaal en
lichten de huidige tijd en het woord “AUTO”
op om aan te geven dat de oven
automatisch zal uitgaan.
3172722-001 26/01/15 11:58 Página 11
5 Na afloop van de ingestelde baktijd gaat de
oven uit en gaat er een alarm af.
6 Druk op een willekeurig symbool om het
alarm uit te schakelen. De oven blijft uit en
AUTO blijft knipperen.
Baktijd en eindtijd van het bakproces
programmeren
1 Blijf drukken op MODE totdat u een
pieptoon hoort. Als u nogmaals op MODE
drukt, verschijnt het woord "dur" op het
klokscherm.
7 Houd MODE ingedrukt totdat u een pieptoon
hoort die aangeeft dat de functie nu is
uitgeschakeld. Zet vervolgens de knoppen
op
om de oven uit te zetten.
2 Selecteer de baktijd door op + of – te
drukken.
U kunt zien hoeveel tijd er nog te gaan is en
de resterende baktijd wijzigen. Volg de vorige
instructies op.
4 Blijf drukken op MODE totdat u een
pieptoon hoort. Druk vervolgens enkele
malen op MODE totdat het woord "End"
verschijnt op het klokscherm.
Druk, om deze functie
tegelijkertijd op + en –.
te
annuleren,
Eindtijd van het bakproces programmeren
1 Blijf drukken op MODE totdat u een
pieptoon hoort. Druk vervolgens enkele
malen op MODE totdat het woord "End" op
het klokscherm verschijnt.
2 Selecteer de baktijd door op + of – te
drukken.
3 Vervolgens hoort u een piepgeluid en lichten
de huidige tijd en het woord “AUTO” op om
aan te geven dat de oven automatisch zal
uitgaan.
4 Selecteer een bakfunctie en -temperatuur.
5 Na afloop van de ingestelde baktijd gaat de
oven uit en gaat er een alarm af.
6 Druk op een willekeurig symbool om het
alarm uit te schakelen. De oven blijft uit en
AUTO blijft knipperen.
7 Houd MODE ingedrukt totdat u een pieptoon
hoort die aangeeft dat de functie nu is
uitgeschakeld. Zet vervolgens de knoppen
op
om de oven uit te zetten.
U kunt deze functie ook gebruiken als uw oven
reeds in werking is. In dit geval dient u alle
bovenstaande aanwijzingen op te volgen,
behalve nr. 4.
3 Er gaat een pieptoon af en de huidige tijd
en AUTO wordt weergegeven.
5 Selecteer de eindtijd door op + of – te
drukken.
6 Er gaat een pieptoon af en de huidige tijd
en AUTO wordt weergegeven.
7 Selecteer een bakfunctie en -temperatuur.
8 De oven blijft uit en met AUTO op het
klokscherm.
De
oven
is
nu
geprogrammeerd.
9 Wanneer het tijd is om met bakken te
beginnen, gaat de oven aan en zal hij
gedurende de ingestelde tijd in werking
blijven. De symbolen AUTO en
gaan op
het klokscherm branden.
10 Na afloop van de ingestelde baktijd, gaat
de oven automatisch uit en gaat er een
alarm af.
11 Druk op een willekeurig symbool om het
alarm uit te schakelen. De oven blijft uit en
AUTO blijft knipperen.
12 Blijf drukken op MODE totdat u een
pieptoon hoort om de functie uit te
schakelen. Zet vervolgens de knoppen op
om de oven uit te zetten.
U kunt de staat van de timer op elk moment
bekijken door aanwijzingen 1 en 4 op te
volgen.
U kunt de eindtijd van het bakproces op elk
moment bekijken door aanwijzing nr. 1 op te
volgen.
11
NEDERLANDS
4 Selecteer een bakfunctie en -temperatuur.
3172722-001 26/01/15 11:58 Página 12
Als u de timerinstelling wilt wijzigen, moet u de
functie annuleren door + en – tegelijk in te
drukken. Programmeer de oven opnieuw door
de gegeven aanwijzingen op te volgen.
Opmerking
Bij een stroomonderbreking worden uw
instellingen van de elektronische klok gewist
en gaat 00:00 op het klokscherm knipperen.
Reset de klok en programmeer de oven
opnieuw.
12
3172722-001 26/01/15 11:58 Página 13
2917
Modell 2917
1
2
+
-
3
4
5
6
11
12
7
8
9
HI 900
4056-01
1 Befestigung am
Küchenmöbel
2 Kühlluftaustritt
3 Schwenkbaren Grill
4 Verchromte Halterung/
Ausziehbare Führungen
5 Rost
6 Lüfter
7 Fettpfane
8
9
10
11
12
DEUTSCH
10
Fettpfanne
Scharnier
Tür
Bedienfeld
Beleuchtung
Bedienfeld
+
-
1
1 Elektronische Schaltuhr.
2 Funktionswahl.
2
3 Temperaturregler.
4 Kontrolleuchte Heizen*.
3
4
* Das Lämpchen leuchtet während des
Aufheizens. Es erlischt beim Erreichen der
eingestellten Temperatur.
HI 900
4056-01
13
3172722-001 26/01/15 11:58 Página 14
Funktionen des Herds
Ausschalten des Herds
Normal
Verwendung für Kuchen und Tortenböden, bei
denen die Wärmeeinwirkung gleichmäßig sein
muß, damit diese gut aufgehen.
Normal mit Umluft
Geeignet für Braten und für Gebäck. Der Lüfter
verteilt die Wärme gleichmäßig im Herd.
Grill und Unterhitze
Besonders geeignet für Braten. Kann für
Stücke mit beliebiger Größe eingesetzt werden.
Grill
Gratinieren und Anbräunen. Gestattet das
Anbräunen der Außenschicht, ohne das Innere
der Nahrungsmittel zu beeinflussen. Geeignet
für flache Stücke wie Beefsteak, Rippchen,
Fisch, Toastbrot.
MaxiGrill
Grillen auf größerer Oberfläche und mit größerer Leistung als mit dem Grill, hierdurch erfolgt
ein schnelleres Bräunen der Speisen.
Achtung
Bei Benutzung der Funktionen Grill oder
MaxiGrill muß die Herdtür geschlossen sein.
Unterhitze
Es wird nur von der Unterseite Wärme zugeführt. Geeignet zum Anwärmen von Tellern,
zum Aufgehen von Teigmassen oder für ähnliche Anwendungen.
Pizza
Ideal um Pizzas, Torten und aller Art Kuchen zu
backen.
Turbo
Der Lüfter verteilt die von einem an der
Rückseite
des
Herds
angeordneten
Heizwiderstand erzeugte Wärme. Auf Grund
der
erzeugten
gleichmäßigen
Temperaturverteilung ist ein Garen in 2 Etagen
gleichzeitig möglich.
Auftauen
Dies erfolgt durch ein zweistufiges
Heißluftsystem. Stufe LO für Fisch, Gebäck
und Brot. Stufe HI (höhere Temperatur im
Backofen) für Fleisch allgemein.
Hinweis
MaxiGrill mit Umluft
Gestattet gleichzeitig ein gleichmäßiges Garen
und Anbräunen der Oberfläche. Ideal zum
Grillen. Besonders für große Stücke wie
Geflügel, Wild usw. Es wird empfohlen, das
Stück auf den Rost zu legen und die
Auffangschale darunter einzusetzen, um
Bratensaft und Fett aufzufangen.
14
Die Lampe bleibt während aller Garfunktionen,
außer in der Reinigungsfunktion, eingeschaltet.
3172722-001 26/01/15 11:58 Página 15
Bedienung des Backofens
Einstellen der Uhrzeit der Elektronikuhr
Ändern des Wecker-Tons
Wenn Sie den Backofen an das Netz anschließen, blinken auf der Uhr das Wort AUTO und
die Anzeige 00:00. Drücken Sie gleichzeitig
und länger die Symbole + und –, dann hören
Sie einen Piepton und sehen einen blinkenden
Leuchtpunkt zwischen den Ziffern der Uhr;
danach drücken Sie zur Zeiteinstellung die
Symbole + oder –. Schließlich hören Sie einen
Piepton zur Bestätigung der gewählten
Uhrzeit. Das Symbol
bleibt erleuchtet.
1 Berühren Sie gleichzeitig die Symbole +
und –. Sie sehen einen blinkenden
Leuchtpunkt zwischen den Ziffern der Uhr.
Wenn Sie irgendwann die Uhrzeit ändern wollen, folgen Sie den vorstehend erwähnten
Anleitungen.
1 Drücken Sie das Symbol MODE längere Zeit.
Danach blinkt das Symbol
auf der Uhr.
Nach Einstellung der Uhrzeit ist der Backofen
betriebsbereit. Durch Drücken und Drehen der
Bedienknöpfe können Sie Temperatur und
Garfunktionen wählen.
Um den Backofen auszuschalten, drehen Sie
den Knopf auf
; danach drücken Sie den
Knopf, damit dieser in der Versenkung verschwindet.
Funktionen der Elektronikuhr
Küchenwecker: Erzeugt ein Signal am Ende
der eingestellten Zeit, unabhängig davon, ob
der Backofen heizt oder nicht.
Garzeit-Dauer: Ermöglicht das Garen während
der gewählten Zeit, danach schaltet sich der
Backofen automatisch aus.
Garzeit-Ende: Ermöglicht die Garung bis zu
einer vorgewählten Zeit; danach schaltet sich
der Backofen automatisch ab.
Garzeit-Dauer und Garzeit-Ende: Ermöglicht
die Einstellung der Dauer und der Endzeit der
Garung. Mit dieser Funktion schaltet sich der
Backofen automatisch zu der passenden
Uhrzeit für die vorgewählte Garzeit (Dauer) ein
und schaltet sich automatisch beim Erreichen
der eingestellten Zeit (Garzeit-Ende) ab.
3 Indem Sie das Symbol – wiederholt berühren, können Sie den Ton des Weckers
ändern.
Programmierung des Weckers
2 Wählen Sie die Zeitdauer, nach deren Ablauf
der Wecker ertönen soll, indem Sie die
Symbole + oder – drücken.
3 Danach ertönt ein Piepton, die aktuelle
Uhrzeit wird angezeigt und das Symbol
bleibt erleuchtet, um anzuzeigen, dass
der Wecker programmiert ist.
4 Wenn die eingestellte Zeit abgelaufen ist,
ertönt ein Signal und das Symbol
fängt
an zu blinken.
5 Berühren Sie irgendein Symbol, um das
Signal abzustellen. Das Symbol
blinkt
weiterhin.
6 Drücken Sie längere Zeit das Symbol MODE,
um die Funktion auszuschalten.
Sie können jederzeit die Restzeit sehen,
indem Sie das Symbol MODE lange drücken,
bis das Symbol
blinkt. So können Sie auch
die gewählte Zeit ändern, indem Sie die
Symbole + oder – berühren. Danach hören Sie
einen Piepton zur Bestätigung der Änderung.
Programmierung der Gar-Dauer
1 Drücken Sie so lange das Symbol MODE,
bis ein Piep ertönt. Danach berühren Sie
nochmals das Symbol MODE und das Wort
"dur" erscheint auf der Uhr.
2 Wählen Sie die Gardauer, indem Sie die
Symbole + oder – drücken.
15
DEUTSCH
Manueller Betrieb
2 Berühren Sie das Symbol MODE und Sie
sehen die Anzeige “ton1” auf der Uhr.
3172722-001 26/01/15 11:58 Página 16
3 Danach ertönt ein Piep, die aktuelle Uhrzeit
wird angezeigt und das Symbol "AUTO"
leuchtet permanent und zeigt damit an,
dass der Backofen sich automatisch
abschalten wird.
7 Drücken Sie so lange das Symbol MODE,
bis ein Piep ertönt, um die Funktion zu beenden. Danach drehen Sie den Knopf auf
Position
, um den Backofen abzuschalten.
4 Wählen Sie eine Funktion und eine GarTemperatur.
Sie können diese Funktion einstellen, auch
wenn der Backofen schon in Betrieb ist. Dazu
folgen Sie den Anleitungen unter Punkt 4.
5 Wenn die Garzeit abgelaufen ist, schaltet
sich der Backofen ab und es ertönt ein
Signal.
6 Berühren Sie irgendein Symbol, um das
Signal abzustellen. Der Backofen bleibt ausgeschaltet; das Symbol "AUTO" blinkt.
7 Drücken Sie so lange das Symbol MODE,
bis ein Piep ertönt, um die Funktion zu beenden. Danach drehen Sie den Knopf auf
Position
, um den Backofen abzuschalten.
Sie können jederzeit die verbleibende Garzeit
sehen und ändern. Dazu befolgen Sie bitte die
vorher erwähnten Anleitungen.
Wenn Sie diese Funktion beenden möchten,
drücken Sie gleichzeitig + und –.
Programmierung des Garzeit-Endes
1 Drücken Sie so lange das Symbol MODE,
bis ein Piep ertönt. Danach drücken Sie das
Symbol MODE, bis das Wort "End" auf der
Uhr erscheint.
2 Wählen Sie das Garzeit-Ende, indem Sie die
Symbole + oder – drücken.
Sie können jederzeit das Garzeit-Ende sehen,
indem Sie den Anleitungen unter Nr. 1 folgen.
Wenn Sie das Garzeit-Ende ändern wollen,
müssen Sie die Funktion beenden, indem Sie
gleichzeitig die Symbole + und – drücken und
gemäß den vorher erwähnten Anleitungen neu
programmieren.
Programmierung der Gar-Dauer und des GarZeitendes
11 Drücken Sie so lange das Symbol MODE,
bis ein Piep ertönt. Danach berühren Sie
nochmals das Symbol MODE. Das Wort
"dur" erscheint auf der Uhr.
12 Wählen Sie die Gardauer, indem Sie die
Symbole + oder – drücken.
13 Danach ertönt ein Piep, die aktuelle
Uhrzeit und das Symbol "AUTO" werden
angezeigt.
14 Drücken Sie so lange das Symbol MODE,
bis ein Piep ertönt. Danach berühren Sie
das Symbol MODE, bis das Wort "End" auf
der Uhr erscheint.
3 Danach ertönt ein Piep, die aktuelle Uhrzeit
wird angezeigt und das Symbol "AUTO"
leuchtet permanent und zeigt damit an,
dass der Backofen sich automatisch
abschalten wird.
15 Wählen Sie das Garzeit-Ende, indem Sie
die Symbole + oder – drücken.
4 Wählen Sie eine Funktion und eine GarTemperatur.
17 Wählen Sie eine Funktion und eine GarTemperatur.
5 Wenn die eingestellte Uhrzeit erreicht ist,
schaltet sich der Backofen ab und es ertönt
ein Signal.
18 Der Backofen bleibt ausgeschaltet, doch
das Symbol "AUTO" leuchtet auf der Uhr.
Der Backofen ist nun programmiert.
6 Berühren Sie irgendein Symbol, um das
Signal abzustellen. Der Backofen bleibt ausgeschaltet; das Symbol "AUTO" blinkt.
19 Wenn die eingestellte Uhrzeit des GarBeginns erreicht ist, schaltet sich der
Backofen ein und führt die Garung während der vorgewählten Zeit durch. Auf der
Uhr leuchten die Symbole AUTO und
.
16
16 Danach ertönt ein Piep, die aktuelle
Uhrzeit und das Symbol "AUTO" werden
angezeigt.
3172722-001 26/01/15 11:58 Página 17
10 Wird das eingestellte Garzeit-Ende
erreicht, schaltet sich der Backofen ab. Es
ertönt ein Signal.
11 Berühren Sie irgendein Symbol, um das
Signal abzustellen. Der Backofen bleibt
ausgeschaltet; das Symbol "AUTO" blinkt.
Achtung
Im Fall eines Stromausfalls wird die gesamte
Programmierung der Elektronikuhr gelöscht,
und es erscheint die blinkende Anzeige 00:00
auf der Uhr. Sie müssen die Uhr wieder einstellen und erneut programmieren.
12 Drücken Sie so lange das Symbol MODE,
bis ein Piep ertönt, um die Funktion zu
beenden. Danach drehen Sie den Knopf
auf Position
, um den Backofen abzuschalten.
Sie können jederzeit die Programmierung Ihrer
Uhr sehen, indem Sie den Anleitungen unter
Nr. 1 und 4 folgen.
DEUTSCH
Wenn Sie die Programmierung ändern wollen,
müssen Sie die Funktion beenden, indem Sie
gleichzeitig die Symbole + und – drücken und
gemäß den vorher erwähnten Anleitungen neu
programmieren.
17
3172722-001 26/01/15 11:58 Página 18
2917
Model 2917
1
2
+
-
3
4
5
6
12
7
8
9
HI 900
4056-01
10
1
2
3
4
Fixing to Unit
Air Outlet
Fold-down Grill element
Chromed Support/
Telescopic Guide
5
6
7
8
Grid
Fan
Roasting Tray
Cake tray
9
10
11
12
Hinge
Door
Control Panel
Light
Control Panel
+
-
1
1 Electronic clock.
2 Function selector.
2
3 Temperature selector.
4 Heating indicator light*.
3
4
HI 900
4056-01
18
11
* Indicates that the oven is heating, and it goes
out when the set temperature is reached.
3172722-001 26/01/15 11:58 Página 19
Oven Functions
Conventional
It is used for sponges and cakes where the
heat received must be uniform to achieve a
spongy texture.
Conventional with fan
Appropriate for roasts and cakes. The fan
spreads the heat uniformly inside the oven.
Grill and Lower element
Special for roasts. It can be used for any
piece, whatever its size.
Grill
For preparing dishes with superficial roasting.
It allows the outer layer to be browned without
affecting the inside of the food. Ideal for flat
food, such as steaks, ribs, fish, toast.
MaxiGrill
Allows greater surfaces to be prepared, than
with the grill, together with higher power
reducing the time required for browning of the
food.
MaxiGrill with fan
Allows uniform roasting at the same time as
surface browning. Ideal for grills. Special for
large volume pieces, such as poultry, game
etc. It is recommended to put the item on a
rack with a tray beneath to collect the stock
and juices.
Caution
While using the Grill or MaxiGrill, the door must
be kept closed.
Lower element
Heats only from beneath. Suitable for heating
dishes and raising pastry and similar.
Pizza
Special for cooking pizzas, pastry and fruit
cakes.
Turbo
The fan distributes the heat produced by an
element located at the rear of the oven. Due to
the uniform heat distribution, it allows roasting
and baking to take place at two heights at the
same time.
Defrosting
This function uses a two-level hot air system.
LO is for fish, cakes, pastries and bread. HI
(higher temperature inside the oven) is for
meats in general.
Note
The light remains on when performing any cooking function, except when cleaning.
19
ENGLISH
Switch off oven
3172722-001 26/01/15 11:58 Página 20
Using the Oven
Setting the Electronic Clock
When you switch on the oven, you will notice
that the word AUTO will flash on the display with
00:00. Press the + and – symbols together
until you hear a beep and see a dot flashing
between the digits of the clock. Then set the
clock time by pressing on the + or – symbols.
You will hear a beep to confirm that the time
has been set. The
symbol will remain lit.
Should you wish to change the time, follow
these instructions again.
Manual Operation
After setting the clock, the oven is ready for
use. Select a cooking temperature and function
by pressing and turning the oven controls.
2 Press MODE and you will see “ton1” light up
on the clock display.
3 The alarm tone can be changed by repeatedly pressing on the – symbol.
Programming the Timer Alarm
1 Press on MODE until the
flash on the clock display.
symbol will
2 Select the length of time after which you
want the alarm to sound by pressing on
+ or –.
3 The alarm will be confirmed by a beep and
the display will show the current time. The
symbol will remain lit.
4 At the programmed time, the alarm will
sound and the
symbol will begin to flash.
To turn off the oven, set the controls to
.
Push down on the controls to conceal them.
5 Press on any symbol to turn off the alarm.
The
symbol will continue to flash.
Electronic Clock Functions
6 Keep pressing MODE until the function is
switched off.
Timer Alarm: An audible signal is produced at
the programmed time, even if the oven is not
being used.
Cooking Time: This function allows you to programme cooking time length, after which the
oven will turn off automatically.
Cooking Stop Time: This function allows you to
programme the time for cooking to stop, after
which the oven will turn off automatically.
Cooking Time and Cooking Stop Time: This
function allows both cooking time length and
the stop time to be programmed. The oven
switches on automatically at the set time and
operates for the cooking time it has been programmed for. It switches itself off automatically at the entered stop time.
Changing the Clock Alarm Tone
1 Press + and – at the same time. You will
notice a dot light up between the + and –
symbols on the clock display.
20
You can see how much time is left at any time
by pressing MODE until the
symbol flashes.
You can then change the selected time by
pressing + or -. The beep you hear will confirm
the new time has been set.
Programming Cooking Time
1 Press MODE until you hear a beep. Press
MODE again and the word “dur” will appear
on the clock display.
2 Select the cooking time by pressing + or –.
3 You will then hear a beep and the present
time and the word “AUTO” will light up to
show that the oven will switch off automatically.
4 Select a cooking function and temperature.
5 When the set cooking time is over, the oven
will turn off and an alarm will sound.
3172722-001 26/01/15 11:58 Página 21
7 Keep pressing on MODE until you hear a
beep to show the function is now off. Then
set the controls to
to switch off the
oven.
You can see how much time is left and change
the remaining cooking time. Follow the previous
instructions.
To cancel this function, just press + and – at
the same time.
Programming the Cooking Stop Time
1 Press MODE until you hear a beep. Then
press MODE until the word “End” appears
on the clock display.
2 Select the cooking stop time by pressing
+ or –.
3 You will then hear a beep and the present
time and the word “AUTO” will light up to
show that the oven will switch off automatically.
4 Select a cooking function and temperature.
5 When it is the time for cooking to stop, the
oven will switch off and an alarm will sound.
6 Press any symbol to turn of the alarm. The
oven will remain off and AUTO will continue
to flash.
7 Keep pressing on MODE until you hear a
beep to show the function is now off. Then
set the controls to
to switch off the
oven.
You can use this function even if you are cooking with the oven. If this is the case, follow all
of the above instructions except No. 4.
You can see the stop cooking time at any time
by following instruction No. 1.
Programming Cooking Time and Cooking
Stop Time
11 Press MODE until you hear a beep. If you
press MODE again, the word “dur” will
appear on the clock display.
12 Select the cooking time by pressing + or –.
13 A beep will then sound and the present
time and AUTO will show.
14 Press MODE until you hear a beep. Then
press MODE until the word “End” appears
on the clock display.
15 Select the stop cooking time by pressing
+ or –.
16 A beep will then sound and the present
time and AUTO will show.
17 Select a cooking function and temperature.
18 The oven will remain off with AUTO on the
clock display. The oven is now programmed.
19 When it is the time for cooking to start, the
oven will switch on and cooking will continue for the selected time. The symbols
AUTO and
will light up on the clock display.
10 When the programmed time is reach, the
oven will switch itself off and an alarm will
sound.
11 Press any symbol to stop the alarm. The
oven will remain off and AUTO will continue
to flash.
12 Press MODE until you hear a beep in order
to switch off the function. Then set the
controls to
to switch off the oven.
You can see the state of the timer at any time
by following instructions 1 and 4.
If you wish to modify the timer setting, you
must cancel the function by pressing + and –
at the same time. Re-programme the oven by
following the instructions given.
21
ENGLISH
6 Press any symbol to turn off the alarm. The
oven will remain off and AUTO will continue
to flash.
3172722-001 26/01/15 11:58 Página 22
Caution
In the event of power failure, your electronic
clock timer settings will be erased and 00:00
will flash on the display. Reset the clock and
programme again.
22
3172722-001 26/01/15 11:58 Página 23
2917
Modelo 2917
1
2
+
-
3
4
5
6
11
12
7
8
9
HI 900
4056-01
10
1 Fijación al mueble
2 Salida de aire
de refrigeración
3 Resistencia de Grill
Doble Abatible
4 Soportes Bandejas/
Guías Telescópicas
5 Parrilla
6 Turbina
7 Bandeja de Asados
8
9
10
11
12
Bandeja pastelera
Bisagra
Puerta
Frontal de mandos
Lámparas
ESPAÑOL
Frontal de Mandos
+
-
1
1 Reloj electrónico.
2 Selector de funciones.
2
3
4
3 Selector de temperaturas.
4 Piloto de calentamiento. Indica la transmisión
de calor al alimento y se apaga al alcanzar la
temperatura seleccionada.
HI 900
4056-01
23
3172722-001 26/01/15 11:58 Página 24
Funciones del Horno
Desconexión del horno
Convencional
Se usa en bizcochos y tartas en los que el
calor recibido debe ser uniforme y para que
consigan una textura esponjosa.
Convencional con Turbina
Adecuado para asados y pastelería. El ventilador reparte de forma uniforme el calor en el
interior del horno, reduciendo el tiempo y la
temperatura de cocinado.
Grill y Solera
Especial para asados. Puede usarse para cualquier pieza, independiente de su tamaño.
Grill
Gratinado y asado superficial. Permite el dorado de la capa exterior sin afectar al interior del
alimento. Indicado para piezas planas como
bistec, costillas, pescado, tostadas.
MaxiGrill
Permite el gratinado en mayores superficies
que en Grill, así como una mayor potencia de
gratinado, obteniendo un dorado del alimento
de forma más rápida.
MaxiGrill con Turbina
Permite el asado uniforme al mismo tiempo
que dora superficialmente. Ideal para parrilladas. Especial para piezas con gran volumen
como aves, caza,... Se recomienda colocar la
pieza de carne sobre la parrilla del horno y la
bandeja por debajo, para el escurrido de jugos
o grasa.
24
Atención
Durante el uso de la función Grill o MaxiGrill la
puerta debe mantenerse cerrada.
Solera
Calor sólo desde la parte inferior. Apropiado
para calentar platos o levantar masas de
repostería y afines.
Pizza
Especial para cocinar pizzas, empanadas y
pasteles o bizcochos rellenos de fruta.
Turbo
La turbina reparte el calor que proviene de una
resistencia situada en la parte trasera del
horno. Por la uniformidad de la temperatura
que se produce, permite cocinar en 2 alturas
al mismo tiempo.
Descongelación
Esta función es apropiada para descongelaciones suaves de alimentos. En especial aquellos que son consumidos sin calentar, por
ejemplo cremas, pastas, tartas, pasteles, etc.
Nota
La lámpara permanece encendida en cualquier
función de cocinado, excepto en la función de
limpieza.
3172722-001 26/01/15 11:58 Página 25
Manejo del Horno
Al conectar su horno, observará que en la pantalla del reloj aparece parpadeando la palabra
AUTO y la indicación 00:00. Toque a la vez y
de forma prolongada los símbolos + y –,
entonces oirá un beep y verá un punto luminoso parpadeando entre los dígitos del reloj;
a continuación tocando en los símbolos + ó –
pondrá el reloj en hora. Finalmente oirá un
beep como confirmación de la hora seleccionada. El símbolo
quedará iluminado.
Cambio del tono de sonido del avisador
del reloj
1 Toque a la vez en los símbolos + y –. Verá
parpadeando un punto luminoso entre los
dígitos de la pantalla del reloj.
2 Toque en el símbolo MODE y verá la
indicación “ton1” en la pantalla del reloj.
3 Tocando repetidamente el símbolo –, podrá
modificar el tono sonoro del avisador.
Programación del Avisador
Si en cualquier momento desea modificar la
hora, siga las instrucciones indicadas anteriormente.
1 Toque de forma prolongada en el símbolo
MODE. A continuación verá el símbolo
parpadeando en la pantalla del reloj.
Funcionamiento Manual
2 Seleccione el tiempo tras el cual desea que
el reloj avise, tocando en los símbolos + ó –.
Tras poner el reloj en hora, su horno está listo
para cocinar. Pulsando y girando los mandos
del horno, seleccione una temperatura y una
función de cocinado.
3 Posteriormente sonará 1 beep, se mostrará
la hora actual y el símbolo
permanecerá
iluminado, indicando que el avisador ya está
programado.
Para apagar el horno, ponga los mandos en
posición
, a continuación pulse los mandos
y éstos quedarán ocultos.
Funciones del Reloj Electrónico
Avisador: Genera una señal acústica al cabo
del tiempo, para ello no es necesario que el
horno esté cocinando.
Duración del Cocinado: Permite cocinar durante un tiempo seleccionado, a continuación el
horno se apagará de forma automática.
Hora de Finalización del Cocinado: Permite
cocinar hasta una hora establecida, a continuación el horno se apagará de forma automática.
Duración y Fin del Cocinado: Permite programar la duración y la hora de finalización del
cocinado. Con esta función el horno se pondrá en marcha de forma automática a la hora
necesaria para cocinar durante el tiempo
seleccionado (Duración) y finalizando de
forma automática a la hora que le hayamos
indicado (Fin del Cocinado).
4 Transcurrido el tiempo programado, sonará
una señal acústica y el símbolo
empezará a parpadear.
5 Toque en cualquier símbolo para detener la
señal acústica. El símbolo
permanecerá
parpadeando.
6 Toque de forma prolongada el símbolo
MODE para finalizar la función.
En cualquier momento usted puede visualizar
el tiempo restante, tocando de forma prolongada en el símbolo MODE hasta que el símbolo
parpadee. En ese momento usted
puede modificar el tiempo seleccionado
tocando en los símbolos + ó –. A continuación
escuchará 1 beep como confirmación del
cambio.
Programación de la Duración del Cocinado
1 Toque de forma prolongada el símbolo
MODE hasta que oiga un beep. A continuación tocando de nuevo el símbolo MODE,
aparecerá la palabra “dur” en la pantalla
del reloj.
25
ESPAÑOL
Puesta en Hora del Reloj Electrónico
3172722-001 26/01/15 11:58 Página 26
2 Seleccione la duración del cocinado, tocando en los símbolos + ó –.
3 Posteriormente sonará 1 beep, se mostrará
la hora actual y el símbolo “AUTO” permanecerá iluminado, indicando que su horno
se apagará de forma automática.
4 Seleccione una función y una temperatura
de cocinado.
5 Transcurrida la duración del cocinado, el
horno se desconectará y sonará una señal
acústica.
6 Toque en cualquier símbolo para detener la
señal acústica. El horno permanecerá apagado y con el símbolo “AUTO” parpadeando.
7 Toque de forma prolongada el símbolo
MODE hasta que oiga un beep para finalizar
la función; a continuación ponga los mandos en posición
para apagar el horno.
En cualquier momento usted puede visualizar y
modificar el tiempo restante de cocinado. Para
hacerlo siga las instrucciones indicadas anteriormente.
Si desea cancelar esta función basta con tocar
a la vez los símbolos + y –.
6 Toque en cualquier símbolo para detener la
señal acústica. El horno permanecerá apagado y con el símbolo “AUTO” parpadeando.
7 Toque de forma prolongada el símbolo
MODE hasta que oiga un beep para finalizar
la función; a continuación ponga los mandos en posición
para apagar el horno.
Puede emplear esta función aunque usted ya
esté cocinando con su horno. Para ello siga
las instrucciones indicadas salvo la número 4.
En cualquier momento usted puede visualizar
la hora de finalización del cocinado siguiendo
la instrucción Nº1. Si desea modificar la hora
de finalización deberá cancelar la función,
tocando a la vez los símbolos + y –, y programarla de nuevo siguiendo las instrucciones
indicadas anteriormente.
Programación de la Duración y Fin del
Cocinado
11 Toque de forma
MODE hasta que
nuación tocando
MODE, aparecerá
pantalla del reloj.
prolongada el símbolo
oiga un beep. A contide nuevo el símbolo
la palabra “dur” en la
Programación de la Hora de Finalización del
Cocinado
12 Seleccione la duración del cocinado,
tocando en los símbolos + ó –.
1 Toque de forma prolongada el símbolo
MODE hasta que oiga un beep. A continuación toque el símbolo MODE, hasta que
aparezca la palabra “End” en la pantalla del
reloj.
13 Posteriormente sonará 1 beep, se mostrará la hora actual y el símbolo “AUTO”.
2 Seleccione la hora de finalización del cocinado, tocando en los símbolos + ó –.
3 Posteriormente sonará 1 beep, se mostrará
la hora actual y el símbolo “AUTO” permanecerá iluminado, indicando que su horno
se apagará de forma automática.
4 Seleccione una función y una temperatura
de cocinado.
5 Alcanzada la hora de finalización del cocinado, el horno se desconectará y sonará
una señal acústica.
26
14 Toque de forma prolongada el símbolo
MODE hasta que oiga un beep. A continuación toque el símbolo MODE hasta que
aparezca la palabra “End” en la pantalla
del reloj.
15 Seleccione la hora de finalización del cocinado, tocando en los símbolos + ó –.
16 Posteriormente sonará 1 beep, se mostrará la hora actual y el símbolo “AUTO”.
17 Seleccione una función y una temperatura
de cocinado.
3172722-001 26/01/15 11:58 Página 27
18 El horno permanecerá desconectado, con
el símbolo AUTO en la pantalla del reloj.
Su horno está programado.
19 Cuando se alcance la hora de comienzo
del cocinado, el horno se pondrá en marcha y se realizará el cocinado durante el
tiempo seleccionado. En la pantalla del
reloj verá iluminado los símbolos AUTO y
.
Atención
En caso de un corte de suministro eléctrico,
se borrará toda la programación de su reloj
electrónico y aparecerá parpadeando la
indicación 00:00 en el reloj. Deberá ponerlo
en hora y programarlo de nuevo.
10 Alcanzada la hora de finalización que se
había programado, el horno se desconectará y sonará una señal acústica.
11 Pulse cualquier tecla para detener la señal
acústica. El horno permanecerá apagado y
con el símbolo “AUTO” parpadeando.
12 Toque de forma prolongada el símbolo
MODE hasta que oiga un beep para finalizar la función; a continuación ponga los
mandos en posición
para apagar el
horno.
En cualquier momento usted puede visualizar
la programación de su reloj siguiendo las instrucciones n.º 1 y 4.
ESPAÑOL
Si desea modificar la programación deberá
cancelar la función, tocando a la vez los símbolos + y –, y programarla de nuevo siguiendo
las instrucciones indicadas anteriormente.
27
3172722-001 26/01/15 11:58 Página 28
2917
Modello 2917
1
2
+
-
3
4
5
6
12
7
8
9
HI 900
4056-01
10
1 Fissaggio al mobile
2 Uscita dell'aria
3 Resistenza del grill
ripiegabile
4 Supporto cromato/
Guida telescopica
5 Griglia
6 Ventola
7 Vassoio per arrosto
8
9
10
11
12
Vassoio per dolci
Cerniera
Sportello
Pannello di controllo
Luce
Pannello di controllo
+
-
1
1 Orologio elettronico.
2 Selettore funzione.
2
3
4
HI 900
4056-01
28
11
3 Selettore temperatura.
4 Spia pilota riscaldamento. Indica la
trasmissione del calore all’alimento e si
spegne
quando
viene
raggiunta
la
temperatura impostata.
3172722-001 26/01/15 11:58 Página 29
Funzioni del forno
Spegnimento del forno
Standard
Utilizzato per pan di spagna e dolci in cui il
calore deve essere uniforme per ottenere una
consistenza morbida e spugnosa.
Standard ventilato
Adatto ad arrosti e dolci. La ventola diffonde il
calore in modo uniforme all'interno del forno.
Grill + inferiore
Adatto agli arrosti. Si utilizza per qualsiasi
pezzo di carne, indipendentemente dalle sue
dimensioni.
Grill
Funzione adatta alla preparazione di piatti con
gratinatura superficiale. Consente di dorare
lo strato esterno degli alimenti senza
modificarne la parte interna. Indicato per
alimenti come bistecche, costine, pesce, pane
tostato.
MaxiGrill
Consente di cuocere alimenti con superficie
maggiore rispetto al grill e offre maggiore
potenza riducendo così i tempi di necessari
per la gratinatura del cibo.
Attenzione
Durante l’utilizzo della funzione Grill o
MaxiGrill, lo sportello deve rimanere chiuso.
Inferiore
Il calore proviene solo dalla parte inferiore del
forno. Adatto per riscaldare piatti o far lievitare
impasti.
Pizza
Adatto per cuocere pizza, pasticceria e dolci di
frutta.
Turbo
La ventola distribuisce il calore prodotto da un
apposito elemento ubicato sul retro del forno.
Grazie alla distribuzione uniforme del calore,
consente
di
arrostire
e
cuocere
contemporaneamente su due altezze.
Scongelamento
Questa funzione impiega un sistema di aria
calda su due livelli. LO (basso) è adatto a
pesce, dolci, pasticceria e pane. HI
(temperatura più elevata all'interno del forno)
è adatto alla carne in generale.
Nota
La luce rimane accesa durante l'esecuzione di
qualsiasi funzione di cottura, tranne che per la
pulizia.
ITALIANO
MaxiGrill ventilato
Gratinatura e cottura arrosto superficiale.
Ideale per i piatti grigliati. Particolarmente
adatto a pezzi di grandi dimensioni come
pollame, cacciagione, ecc. Si raccomanda di
sistemare il pezzo su una griglia con un
vassoio sottostante per raccogliere il brodo e
il succo di cottura.
29
3172722-001 26/01/15 11:58 Página 30
Uso del forno
Impostazione dell'orologio elettronico
Modifica del tono dell'allarme acustico
Quando si accende il forno, si noterà che
AUTO lampeggia sul display insieme a 00:00.
Premere i simboli + e – fino a quando si
sentirà un bip e si vedrà un punto
lampeggiante tra le cifre dell'orologio. A
questo punto impostare l'orologio premendo i
simboli + o –. Si sentirà un bip che
confermerà che l'orologio è stato configurato.
Il simbolo
resterà acceso.
1 Premere + e – contemporaneamente. Si
noterà un punto illuminato tra il + e il – sul
display dell'orologio.
Qualora si desideri modificare l'ora, seguire
nuovamente queste istruzioni.
1 Premere MODE. Il simbolo
sul display dell'orologio.
Funzionamento manuale
2 Selezionare il tempo dopo il quale si
desidera che l'orologio emetta l'allarme
acustico toccando i pulsanti “+” o “–“.
Dopo aver impostato l'orologio, il forno è
pronto per essere utilizzato. Selezionare una
temperatura di cottura e una funzione
premendo e ruotando i comandi del forno.
Per spegnere il forno, basterà portare i
comandi in posizione
. Premere i comandi
per nasconderli.
Funzioni dell'orologio elettronico
Allarme acustico: all'ora programmata viene
prodotto un allarme acustico, anche se il
forno non è utilizzato.
Durata di cottura: consente di programmare
la durata della cottura fino a un orario definito,
trascorso il quale il forno si spegnerà
automaticamente.
Ora di fine cottura: consente di programmare
l'orario al quale deve terminare la cottura,
trascorso il quale il forno si spegnerà
automaticamente.
Durata di cottura e ora di fine cottura: questa
funzione consente di programmare sia la
durata della cottura che l'ora di fine cottura. Il
forno si accende automaticamente all'ora
impostata e funziona per il tempo di cottura
programmato. Si spegne poi automaticamente
all'ora di fine cottura impostata.
2 Premere MODE e sul display dell'orologio
apparirà “ton1” illuminato.
3 Il tono dell'allarme può essere modificato
premendo ripetutamente il simbolo –.
Programmazione dell'allarme acustico
lampeggerà
3 L'allarme sarà confermato da due bip
consecutivi e il display mostrerà l'ora
attuale. Il simbolo
resterà acceso.
4 All'ora programmata, verrà emesso un
segnale acustico e il simbolo
inizierà a
lampeggiare.
5 Premere qualsiasi simbolo per disattivare
l'allarme. Il simbolo
continuerà a
lampeggiare.
6 Continuare a mantenere premuto MODE
fino a quando la funzione sarà disattivata.
In qualsiasi momento è possibile sapere qual
è il tempo rimanente premendo MODE fino a
quando il simbolo
inizia a lampeggiare. Per
modificare il tempo selezionato, premere +
ó –. Il bip sonoro confermerà la configurazione
del nuovo tempo.
Programmazione della durata di cottura
1 Premere MODE fino a quando si avvertirà un
bip. Premere nuovamente MODE e sul
display dell'orologio sarà visualizzata la
parola "dur".
2 Selezionare la
premendo + o –.
durata
della
cottura
3 Si avvertirà un bip; l'ora attuale e la parola
“AUTO” si illumineranno per indicare che il
forno si spegnerà automaticamente.
30
3172722-001 26/01/15 11:58 Página 31
5 Trascorso il tempo di cottura impostato, il
forno si spegnerà e sarà emesso un allarme
acustico.
6 Premere qualsiasi simbolo per disattivare
l'allarme. Il forno resterà spento e AUTO
continuerà a lampeggiare.
7 Continuare a mantenere premuto MODE
fino a quando si sentirà un bip per indicare
che la funzione è stata disattivata. Portare i
comandi in posizione
per spegnere il
forno.
Sarà possibile visualizzare quanto tempo rimane e modificare il restante tempo di cottura.
Seguire le istruzioni precedentemente fornite.
Per annullare questa funzione basta premere +
e – contemporaneamente.
Programmazione dell'ora di fine cottura
1 Premere MODE fino a quando si avvertirà un
bip. Premere nuovamente MODE fino a
quando sul display dell'orologio sarà
visualizzata la parola "End".
Questa funzione può essere utilizzata anche
se il forno è in funzione. In tal caso, seguire
tutte le istruzioni sopra fornite saltando il
punto 4.
In qualsiasi momento è possibile visualizzare
il tempo di fine cottura seguendo le istruzioni
al punto 1.
Programmazione della durata di cottura e
dell'ora di fine cottura
1 Premere MODE fino a quando si avvertirà
un bip. Premendo nuovamente MODE, sul
display dell'orologio sarà visualizzata la
parola "dur".
2 Selezionare la durata
premendo + o –.
della
cottura
3 Verrà emesso un segnale acustico e
saranno visualizzati AUTO e l'ora attuale.
4 Premere MODE fino a quando si avvertirà
un bip. Premere nuovamente MODE fino a
quando sul display dell'orologio sarà
visualizzata la parola "End".
5 Selezionare l'ora di fine cottura premendo
+ o –.
2 Selezionare l'ora di fine cottura premendo +
o –.
6 Verrà emesso un segnale acustico e
saranno visualizzati AUTO e l'ora attuale.
3 Si avvertirà un bip; l'ora attuale e la parola
“AUTO” si illumineranno per indicare che il
forno si spegnerà automaticamente.
7 Selezionare funzione e temperatura di
cottura.
4 Selezionare funzione e temperatura di
cottura.
5 Raggiunta l'ora di fine cottura, il forno si
spegnerà e sarà emesso un allarme
acustico.
6 Premere qualsiasi simbolo per disattivare
l'allarme. Il forno resterà spento e AUTO
continuerà a lampeggiare.
7 Continuare a mantenere premuto MODE
fino a quando si sentirà un bip per indicare
che la funzione è stata disattivata. Portare i
comandi in posizione
per spegnere il
forno.
8 Il forno resterà spento con AUTO
visualizzato sul display dell'orologio. Il
forno adesso è programmato.
9 Quando viene raggiunto l'orario di inizio
cottura, il forno si accende e cuocerà per
il tempo programmato. I simboli AUTO e
lampeggeranno
sul
display
dell'orologio.
10 Trascorso il tempo di cottura impostato, il
forno si spegnerà e sarà emesso un
allarme acustico.
11 Premere qualsiasi simbolo per disattivare
l'allarme. Il forno resterà spento e AUTO
continuerà a lampeggiare.
31
ITALIANO
4 Selezionare una funzione di cottura e la
temperatura.
3172722-001 26/01/15 11:58 Página 32
12 Premere MODE fino a quando si avvertirà
un bip sonoro per disattivare la funzione.
Portare i comandi in posizione
per
spegnere il forno.
In qualsiasi momento è possibile visualizzare
lo stato del timer seguendo le istruzioni al
punto 1 e 4.
Per modificare le impostazioni del timer
occorre annullare la funzione premendo + e –
contemporaneamente. Riprogrammare poi il
forno seguendo le istruzioni fornite.
Attenzione
Nel caso di interruzione dell'alimentazione
elettrica, le impostazioni del timer/
dell'orologio saranno cancellate e 00:00
lampeggerà sul display. Reimpostare
l'orologio e programmarlo di nuovo.
32
3172722-001 26/01/15 11:58 Página 33
3172722-001 26/01/15 11:58 Página 34
3172722-001 26/01/15 11:58 Página 35
1.10 kWh/cycle*
77 L
0.86 kWh/cycle*
*
*
98,9
1
50 kg
Notre contribution à la protection de l’environnement: nous utilisons du papier recyclé.
Onze bijdrage aan de bescherming van het milieu: wij gebruiken kringlooppapier.
Unser Beitrag zum Umweltschutz: wir verwenden umweltfreundliches Papier.
Our contribution to enviromental protection: we use recycled paper.
Nuestra aportación a la protección del medio-ambiente: utilizamos papel reciclado.
Desideriamo anche noi dare il nostro contributo all'ambiente; per questo la carta che utilizziamo è riciclata.
Cod.: 3172722-001
3172722-001 26/01/15 11:58 Página 36
2917