1
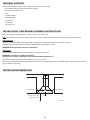
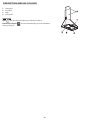
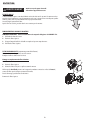
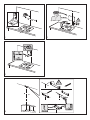
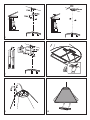
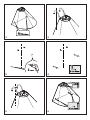
GB F AE User and maintenance manual Manuel d’utilisation et d’entretien ΔϧΎϳλϟϭϡΩΧΗγϻϝϳϟΩ IMPORTANT SAFETY INSTRUCTIONS These instructions shall also be available on website: www.whirlpool.eu. YOUR SAFETY AND THAT OF OTHERS IS HIGHLY IMPORTANT. This manual and the appliance itself provide important safety warnings, to be read and observed at all times. This is the attention symbol, pertaining to safety, which alerts users to potential risks to themselves and others. All safety warnings are preceded by the attention symbol and the following terms: DANGER: indicates a hazardous situation which, if not avoided, will cause serious injury. WARNING: indicates a hazardous situation which, if not avoided, could cause serious injury. All safety warnings specify the potential danger/warning to which they refer and indicate how to reduce the risk of injury, damage and electrical shock resulting from incorrect use of the appliance. Comply with the following instructions: • Installation or maintenance must be carried out by a specialized technician, in compliance with the manufacturer’s instructions and local safety regulations. Do not repair or replace any part of the appliance unless specifically requested in the user manual. • The appliance must be disconnected from the power supply before carrying out any installation work. • Earthing of the appliance is compulsory. (Not necessary for class II hoods identified by the symbol on the specifications label). • The power supply cable must be long enough to permit connecting the appliance to the mains socket outlet. • Do not pull the power supply cable in order to unplug the appliance. • The electrical components must no longer be accessible to the user after installation. • Do not touch the appliance with any wet part of the body and do not operate it when barefoot. • This appliance may be used by children older than 8 years of age and by persons with reduced physical, sensory or mental capacities or with inadequate experience and knowledge only if they are supervised or if they have been taught how to use the appliance in conditions of safety and if they are aware of the dangers involved. Children must not play with the appliance. Cleaning and maintenance must not be carried out by children, unless they are supervised by adults. • Do not repair or replace any part of the appliance unless specifically indicated in the manual. Defective parts must be replaced using genuine parts. All other maintenance services must be carried out by a specialized technician. • Children must be supervised to ensure they do not play with the appliance. • When drilling through a wall or the ceiling, pay attention not to damage electric connections and/or pipes. • The ventilation ducts must always discharge to the outside. • Exhaust air must not be vented through a flue used for removal of fumes produced by appliances burning gas or other fuels, but must have a separate outlet. All national regulations governing extraction of fumes must be observed. • If the hood is used together with other appliances operating on gas or other fuels, the negative pressure in the room must not exceed 4 Pa (4 x 10⁻⁵ bar). For this reason, make sure the room is adequately ventilated. • The Manufacturer declines any liability for improper use or incorrect setting of the controls. • Regular cleaning and maintenance is essential to correct functioning and good performance of the appliance. Frequently clean all encrustations from dirty surfaces to prevent the accumulation of grease. Regularly clean or replace the filters. • Never flame cook food (flambé) under the appliance. Using free flames might cause fire. • Do not leave frying pans unattended when frying, as the frying oil may catch fire. • Failure to observe the instructions for cleaning the hood and replacing the filters may result in a fire. • The fume extractor hood must never be opened without the grease filters installed and it should be kept under constant supervision. • Gas appliances must be used under the extractor hood only with pans resting. • When using more than three gas cooking points, the hood should be operating at power level 2 or greater. This will eliminate heat congestion in the appliance. • Before touching the bulbs, first ensure that they are cold. • Do not use or leave the hood without its lamps correctly installed - risk of electric shock. • Wear work gloves for all installation and maintenance operations. • The product is not suitable for outdoor use. • When the hob is in use, accessible parts of the hood may become hot. KEEP THIS BOOKLET FOR FUTURE CONSULTATION. GB1 Declaration of conformity • This appliance has been designed, manufactured and marketed in compliance with: - safety objectives of the “Low Voltage” Directive 2006/95/EC (which replaces 73/23/EEC and subsequent amendments); - the ecodesign requirements of european regulations n. 65/2014, and n. 66/2014 in conformity to the european standard EN 61591 - the protection requirements of Directive “EMC” 2004/108/EC. Electrical safety of the appliance can only be guaranteed if it is correctly connected to an approved earthing system. Energy saving tips • Switch ON the hood at minimum speed when you start cooking and kept it running for few minutes after cooking is finished. • Increase the speed only in case of large amount of smoke and vapour and use boost speed(s) only in extreme situations. • Replace the charcoal filter(s) when necessary to maintain a good odour reduction efficiency. • Clean the grease filter(s) when necessary to maintain a good grease filter efficiency. • Use the maximum diameter of the ducting system indicated in this manual to optimize efficiency and minimize noise. INSTALLATION After unpacking the appliance, check for any transport damage. In the event of problems, contact the dealer or your nearest After-sales Service. To prevent any damage, only remove the appliance from its polystyrene foam packaging at the time of installation. PREPARING FOR INSTALLATION WARNING: this is a heavy product; the hood should only be lifted and installed by two or more people. The minimum distance between the support of the cooking pans on top of the cooker and the bottom of the hood must not be less than 50 cm for electric cookers and 65 cm for gas or mixed cookers. Before installation also check the minimum distances stated in the manual of the cooker. If the installation instructions for the cooker specify a greater distance between cooker and hood, this distance must be observed. ELECTRICAL CONNECTION Make sure the power voltage specified on the appliance rating plate is the same as the mains voltage. This information may be found on the inside of the hood, under the grease filter. Power cable replacement (type H05 VV-F 3 x 0,75 mm²) must be carried out by a qualified electrician. Contact an authorized service centre. If the hood is fitted with an electric plug, connect the plug to a socket complying with current regulations, located in an accessible place after installation. If no plug is fitted (direct wiring to the mains), or if the socket is not located in an accessible place, install a standardised double pole power switch that will enable complete isolation from the mains in case of category III overvoltage conditions, in accordance with installation rules. GENERAL RECOMMENDATIONS Before use Remove cardboard protection pieces, protective film and adhesive labels from accessories. Check the appliance for any transport damage. During use To avoid any damage do not place any weights on the appliance. Do not expose the appliance to atmospheric agents. SAFEGUARDING THE ENVIRONMENT Disposal of packing The packing material is 100% recyclable and is marked with the recycle symbol and in full compliance with local authority regulations governing waste disposal. . The various parts of the packing must therefore be disposed of responsibly Scrapping the product - This appliance is marked in compliance with European Directive 2012/19/EU, Waste Electrical and Electronic Equipment (WEEE). - By ensuring this product is disposed of correctly, you will help prevent potential negative consequences for the environment and human health, which could otherwise be caused by inappropriate waste handling of this product. - The symbol on the product or on the accompanying documentation indicates that it should not be treated as domestic waste but must be taken to an appropriate collection centre for the recycling of electrical and electronic equipment. Scrapping of household appliances • This appliance is manufactured with recyclable or reusable materials. Dispose of it in accordance with local waste disposal regulations. Before scrapping, cut off the power supply cable. • For further information on the treatment, recovery and recycling of household electrical appliances, contact your competent local authority, the collection service for household waste or the store where you purchased the appliance. GB2 TROUBLESHOOTING GUIDE The appliance does not work: • Check for the presence of mains electrical power and if the appliance is connected to the electrical supply; • Turn off the appliance and restart it to see if the fault persists. The hood's suction level is not sufficient: • Check the suction speed and adjust as necessary; • Check that the filters are clean; • Check the air vents for any obstructions. The light does not work; • Check the light bulb and replace if necessary; • Check that the light bulb has been correctly fitted. AFTER-SALES SERVICE Before calling the After-Sales Service: 1. See if you can solve the problem yourself with the help of the suggestions given in the "Troubleshooting guide". 2. Switch the appliance off and back on again it to see if the fault persists. If after the above checks the fault still occurs, get in touch with the nearest After-Sales Service. Always specify: • • • • • A brief description of the fault; The exact type and model of the appliance; The service number (number after the word "Service" on the rating plate), located on the inside of the appliance. The service number is also indicated on the guarantee booklet; Your full address; Your telephone number. If any repairs are required, please contact an authorised After-sales Service (to guarantee that original spare parts will be used and repairs carried out correctly). CLEANING WARNING - Never use steam cleaning equipment. - Disconnect the appliance from the power supply. IMPORTANT: do not use corrosive or abrasive detergents. If any of these products accidentally comes into contact with the appliance, clean immediately with a damp cloth. • Clean the surfaces with a damp cloth. If it is very dirty, add a few drops of washing up detergent to the water. Finish off with a dry cloth. IMPORTANT: do not use abrasive sponges or metallic scrapers or scourers. Over time, these can ruin the enamel surface. • Use detergents specifically designed for cleaning the appliance and follow the manufacturer instructions. IMPORTANT: clean the filters at least monthly to remove any oil or grease residuals. GB3 MAINTENANCE ATTENTION: - use protective gloves. - disconnect the appliance from the power supply. GREASE FILTERS The metal grease filter has an unlimited life and should be cleaned once a month by hand or in a dishwasher at low temperature and with a short cycle. Cleaning in a dishwasher may cause discoloring of the grease filter, but its filtering efficiency is unaffected. Pull out the handle to remove the filter. Wash the filter and leave it to dry, proceeding in reverse order to refit. REPLACING HALOGEN LAMPS IMPORTANT: Only use halogen lamps 28W MAX - E14. 1. Disconnect the hood from the household power supply. 2. Remove the grease filters. 3. Remove the burnt-out lamp by unscrewing it from the lamp holder and fit a new one. 4. Refit the grease filters. ACTIVATED CARBON FILTER (filter hoods only): It retains the unpleasant odors produced during cooking. Change the carbon filter every 4 months. Fitting or changing the carbon filter R 1. Disconnect the hood from the power supply. S 2. Remove the grease filters. 3. Fit the filters over the motor. Make sure the pins R on the manifold match the slots S; turn the filters to secure them to the pins. R Proceed in reverse order to remove. Refit the grease filters. R GB4 S S S MATERIAL SUPPLIED Remove all the components from the packets. Check that all the components are included. • Hood assembled with motor, lamps and grease filters installed. • Instructions for assembly and use • 1 collar • 1 Assembly template • 6 wall plugs Ø 8mm • 6 screws Ø 5x45 • 6 screws Ø 3 x 9 • 2 screws Ø 3.5 x 9.5 INSTALLATION - PRELIMINARY ASSEMBLY INSTRUCTIONS The hood is designed for installation and use in "Extractor version" or in "Filter version". Note: The model with electric shutter can only be used in "Extractor version" and the exhaust pipe must be connected to a peripheral extraction unit. Extractor Version Fumes are extracted and expelled to the outside through an exhaust pipe (not supplied) fixed to the hood exhaust pipe connector. Depending on the exhaust pipe purchased, provide for suitable fixing to the exhaust pipe connector. IMPORTANT: If already installed, remove the carbon filter/s. Filter Version Air is filtered through the carbon filter/s and recycled into the surrounding environment. IMPORTANT: check that air recirculation is facilitated. If the hood does not have a carbon filter/s, order one/them and fit it/them before use. Install the hood away from very dirty locations, windows, doors and sources of heat. The hood comes supplied with all the materials required for installation on most walls/ceilings. However, a qualified technician is needed to make sure that the plugs are suitable for your ceiling. INSTALLATION DIMENSIONS Adjacent wall units 65 cm (gas or combi cookers) 50 cm (electric cookers) 900 mm min (90 cm wide model) 600 mm min (60 cm wide model) Adjacent wall units centre line hob surface GB5 INSTALLATION - ASSEMBLY INSTRUCTIONS The instructions below, to be carried out in the order in which they are numbered, refer to the figures (with the same step numbers) given on the last pages of this manual. 1. Mark a line on the wall, up to the ceiling, corresponding to the centre line. 2. Place the drilling template against the wall (fix it with adhesive tape): the vertical centre line printed on the template must match the centre line drawn on the wall, and the bottom edge of the drilling template must match the bottom edge of the hood. Make the holes indicated on the template. 3. Remove the drilling template and insert plugs and screws as indicated. Tighten a little 4. Place the flue support bracket on the wall, against the ceiling. Drill and insert the wall plugs as shown. Fix the bracket. 5. For Extractor Version only - rear exhaust: Make a hole in the rear wall for the flue pipe. 6. For Extractor Version only - exhaust towards the ceiling: Make a hole in the ceiling for the flue pipe. 7. Prepare the connection to the household electrical system. 8. Remove the grease filter/s. 9. Hook the hood to the wall. 10. Adjust the hood horizontally. 11. Mark the hole/s for final fixing of the hood as indicated. 12. Remove the hood from the wall. 13. Drill as indicated 14. Insert the wall plugs as indicated. 15. Rehook the hood to the wall. 16. Secure the hood to the wall with screws as indicated. 17. For Extractor Version only - Fix the collar to the exhaust outlet hole. 18. Carry out the connection to the household electrical system. For Extractor Version only - Connect the flue pipe to the collar; the pipe must be run towards the outside (extractor version) or towards the deflector (filter version). 19. Filter Version only: Fix the deflector to the bottom flue section. 20. Fit the flues in the special place over the hood. 21. Slide the top section upwards and fix the flues with the screws as indicated. 22. Fit the carbon filter (For Filter Version only) and refit the grease filter/s. Check hood operation, referring to the section giving a description of the hood and its use. GB6 DESCRIPTION AND USE OF HOOD 1. 2. 3. 4. Control panel. Grease filters. Lamps. Telescopic flue. Control panel Light : move the switch to the right or press the button to switch on. Extraction speed/power increase power/speed. : move the switch to the right or press the next button to GB7 CONSIGNES DE SÉCURITÉ IMPORTANTES Ces instructions sont également disponibles sur le site web : www.whirlpool.eu. ACCORDEZ TOUJOURS LA PRIORITÉ À LA SÉCURITÉ. D’importants messages relatifs à la sécurité figurent dans le présent manuel et sur l’appareil. Nous vous invitons à les lire attentivement et à les observer en toute circonstance. Ceci est le symbole de précaution sécuritaire. Il met en garde l’utilisateur et toute autre personne contre les risques potentiels dérivant de l’utilisation de cet appareil. Tous les avertissements concernant la sécurité sont précédés par le symbole de précaution et les termes suivants : DANGER: indique une situation dangereuse qui, si elle n’est pas évitée, provoque des blessures graves. AVERTISSEMENT: indique une situation dangereuse qui, si elle n’est pas évitée, est susceptible de provoquer des blessures graves. Tous les avertissements précisent le risque/danger auquel il est fait référence et indiquent comment réduire le risque de blessures, de dommages et de choc électrique résultant d’une utilisation incorrecte de l’appareil. Conformez-vous aux instructions suivantes : • L’installation ou la maintenance doit être réalisée par un technicien spécialisé, conformément aux instructions du fabricant et dans le respect des normes de sécurité en vigueur dans le pays d’installation. Ne procédez à aucune réparation ni aucun remplacement de pièce sur l’appareil autres que ceux spécifiquement exigés dans le manuel d’utilisation. • Débranchez l’appareil de l’alimentation électrique avant de procéder à l’installation. • La mise à la terre de l’appareil est obligatoire. (Pas nécessaire pour les hottes aspirantes de classe II identifiées par le symbole sur l’étiquette des caractéristiques techniques.) • Le cordon d’alimentation doit être assez long pour permettre le branchement de l’appareil sur la prise secteur. • Ne tirez jamais sur le cordon d’alimentation pour débrancher l’appareil de la prise secteur. • Une fois l’installation terminée, l’utilisateur ne devra plus pouvoir accéder aux composants électriques. • Évitez de toucher l’appareil avec les mains mouillées et ne l’utilisez pas lorsque vous êtes pieds nus. • Cet appareil peut être utilisé par des enfants âgés de 8 ans minimum ainsi que par des personnes aux capacités physiques, sensorielles ou mentales réduites ou manquant d’expérience et de connaissances, à condition d’être surveillés ou instruits sur l’utilisation de l’appareil en toute sécurité et d’être conscients des dangers encourus pendant l’utilisation. Les enfants ne doivent pas jouer avec l’appareil. Le nettoyage et la maintenance ne doivent pas être confiés à des enfants, sauf s‘ils sont surveillés par un adulte. • Pour toute réparation ou tout remplacement de pièces, procédez uniquement aux opérations spécifiées dans le manuel. Les pièces défectueuses doivent être remplacées par des pièces authentiques. Toutes les autres opérations d’entretien sont du ressort exclusif d’un technicien spécialisé. • Pour éviter que les enfants ne jouent avec l’appareil, ne les laissez pas sans surveillance à proximité de ce dernier. • Lorsque vous devez percer dans un mur ou le plafond, prenez garde de ne pas endommager les raccordements électriques et/ou la tuyauterie. • Les conduits d’évacuation doivent toujours acheminer les vapeurs/fumées vers l’extérieur. • L’air évacué ne doit pas être acheminé via un conduit servant à l’évacuation des fumées d’appareils à gaz ou autres combustibles, mais doit être dirigé vers une sortie indépendante. Respectez toutes les réglementations nationales relatives à l’évacuation des fumées. Si la hotte est utilisée en même temps que des appareils alimentés au gaz ou autres combustibles, la dépression dans la pièce ne doit pas dépasser 4 Pa (4 x 10⁻⁵ bars). Pour cette raison, veillez à vous assurer que la pièce est correctement ventilée. • Le fabricant décline toute responsabilité en cas de dommages résultant d’une utilisation impropre ou d’un réglage erroné des commandes. • Un entretien et un nettoyage réguliers sont une garantie de bon fonctionnement et de bon rendement de l’appareil. Nettoyez régulièrement tous les dépôts présents sur les surfaces sales pour éviter que les graisses ne s’accumulent. Enlevez et nettoyez ou remplacez fréquemment les filtres. • Ne flambez jamais des aliments sous l’appareil. Des flammes nues risqueraient de provoquer un incendie. • Ne laissez pas de poêles à frire sans surveillance lors de la cuisson, car l’huile de friture peut s’enflammer. • Un non-respect des instructions de nettoyage de la hotte et de remplacement des filtres peut être à l’origine d’un incendie. • La hotte aspirante ne doit jamais être ouverte sans que les filtres à graisse soient installés et elle doit être sous surveillance constante. • Les appareils à gaz doivent être utilisés sous la hotte uniquement avec les casseroles posées dessus. • Lorsque vous utilisez trois points de cuisson au gaz, la hotte doit fonctionner au niveau de puissance 2 ou plus. Ceci éliminera l’accumulation de chaleur dans l’appareil. • Assurez-vous que les ampoules sont froides avant de les toucher. • N’utilisez pas ou ne laissez pas la hotte sans ampoules correctement montées, afin d’éviter les risques de choc électrique. • Munissez-vous de gants de travail avant d’effectuer toute opération d’installation et d’entretien. • Cet appareil n’est pas conçu pour une utilisation à l’extérieur. • Lorsque la table de cuisson est en cours d’utilisation, les parties accessibles de la hotte peuvent devenir très chaudes. CONSERVEZ LE PRÉSENT LIVRET POUR TOUTE CONSULTATION FUTURE. F8 Déclaration de conformité • Cet appareil a été conçu, fabriqué et commercialisé en conformité avec : - les objectifs sécurité de la directive « Basse Tension » 2006/95/CE (en remplacement de la directive 73/23/CEE et amendements ultérieurs) ; - les exigences d’écodesign des réglementations européennes 65/2014 et 66/2014, conformément à la norme européenne EN 61591 - les exigences de protection de la directive “CEM” 2004/108/EC. La sécurité électrique de l’appareil est garantie uniquement lorsqu’il est correctement raccordé à une installation de mise à la terre approuvée. Astuces d’économies d’énergi • Mettez la hotte en marche à la vitesse minimum quand vous commencez à faire cuire et laissez-la en marche pendant quelques minutes après la fin de la cuisson. • Augmentez la vitesse uniquement en présence de grandes quantités de fumées et de vapeurs et réservez la ou les vitesses d’appoint aux cas extrêmes. • Remplacez le ou les filtres de charbon si nécessaire pour maximiser la réduction des odeurs. • Remplacez le ou les filtres à graisse si nécessaire pour maximiser la capture des graisses. • Utilisez le diamètre maximum de canalisation indiqué dans ce manuel pour optimiser l’efficacité et minimiser le bruit. MONTAGE Après le déballage de l’appareil, vérifiez qu’il n’a pas été endommagé pendant le transport. En cas de problème, contactez le revendeur ou le service après-vente. Pour éviter tout endommagement, attendez le moment de l’installation pour extraire l’appareil de son emballage en polystyrène. PRÉPARATION EN VUE DE L’INSTALLATION AVERTISSEMENT: en raison de son poids élevé, la hotte doit être soulevée et installée par deux personnes au moins. La distance minimum entre le support des ustensiles de cuisson placés sur la cuisinière et la partie inférieure de la hotte ne doit pas être inférieure à 50 cm pour les cuisinières électriques et 65 cm pour les cuisinières au gaz ou mixtes. Avant de procéder à l’installation, vérifiez également les distances minimum spécifiées dans le manuel de la cuisinière. Si les instructions d’installation de la cuisinière spécifient une distance supérieure entre la cuisinière et la hotte, cette distance doit être observée. RACCORDEMENT ÉLECTRIQU Vérifiez que la tension électrique spécifiée sur la plaque signalétique de l’appareil correspond à la tension de secteur. Cette information figure sur la partie intérieure de la hotte, sous le filtre à graisses. Le remplacement du câble électrique (type H05 VV-F 3 x 0,75 mm²) doit être effectué par un électricien qualifié. Contactez un centre d’entretien agréé. Si la hotte est équipée d’une fiche électrique, branchez cette fiche sur une prise conforme aux réglementations en vigueur et située à un emplacement accessible après l’installation. En l’absence de fiche (câblage direct sur le réseau électrique) ou si la prise n’est pas située à un emplacement accessible, installez un interrupteur bipolaire normalisé permettant une coupure complète du réseau électrique en cas de surtension de catégorie III, conformément aux réglementations sur le câblage. RECOMMANDATIONS GÉNÉRALES Avant utilisation Retirez les protections en carton, les films transparents et les étiquettes autocollantes présentes sur les accessoires. Vérifiez que l’appareil n’a pas été endommagé pendant le transport. Durant l’utilisation Pour éviter tout endommagement, ne placez aucun poids sur l’appareil. Évitez d’exposer l’appareil aux agents atmosphériques. CONSEILS POUR LA PROTECTION DE L’ENVIRONNEMENT Mise au rebut de l’emballage Les matériaux d’emballage sont entièrement recyclables et portent le symbole de recyclage . L’emballage doit par conséquent être mis au rebut de façon responsable et en conformité avec les réglementations locales en vigueur en matière d’élimination des déchets. Mise au rebut de l’appareil - Cet appareil porte le symbole du recyclage conformément à la Directive Européenne 2012/19/EU relative aux Déchets d’Équipements Électriques et Électroniques (DEEE ou WEEE). - En procédant correctement à la mise au rebut de cet appareil, vous contribuerez à éviter des conséquences nuisibles pour l’environnement et la santé de l’homme. - Le symbole apposé sur le produit ou sur la documentation qui l’accompagne indique que cet appareil ne doit pas être traité comme une ordure ménagère mais doit être remis à un centre de collecte spécialisé dans le recyclage des appareils électriques et électroniques. Mise au rebut des appareils ménagers usagé • Cet appareil est fabriqué à partir de matériaux recyclables ou réutilisables. Mettez-le au rebut en vous conformant aux prescriptions locales en matière d’élimination des déchets. Avant de mettre votre appareil au rebut, coupez le cordon d’alimentation. • Pour toute information sur le traitement, la récupération et le recyclage des appareils électroménagers, contactez le service municipal compétent, le service de collecte des déchets ménagers ou le revendeur de l’appareil. F9 DIAGNOSTIC DES PANNES L’appareil ne fonctionne pas : • Vérifier la présence d’alimentation secteur et le branchement de l’appareil sur secteur • Mettre l’appareil hors tension et le remettre sous tension pour voir si le problème persiste. Le niveau d’aspiration de la hotte est insuffisant : • Vérifiez la vitesse d’aspiration sélectionnée et modifiez-la selon le besoin ; • Vérifiez la propreté des filtres • Vérifiez si les bouches d’aération ne sont pas bloquées. L’éclairage ne fonctionne pas ; • Vérifiez l’ampoule électrique et remplacez-la si nécessaire • Vérifiez si l’ampoule électrique est bien installée. SERVICE APRÈS-VENTE Avant d’appeler le service après-vente : 1. Voyez si vous pouvez résoudre vous-même le problème avec l’aide des suggestions de la section « Diagnostic des pannes ». 2. Mettez l’appareil hors tension, puis à nouveau sous tension pour voir si le problème persiste. Si les contrôles ci-dessus ne corrigent pas le problème, contactez le service après-vente. Précisez toujours : • Une brève description du problème ; • Le type et le modèle exacts de l’appareil • Le numéro de service (numéro qui figure après le mot « Service » sur la plaque signalétique), situé à l’intérieur de l’appareil. Le numéro de service est également indiqué sur le livret de la garantie • Votre adresse complète • Votre numéro de téléphone. Si des réparations sont requises, contactez in agent SAV agréé (pour garantir l’utilisation de pièces détachées identiques aux pièces d’origine et des réparations correctes). NETTOYAGE AVERTISSEMENT: - N’utilisez jamais d’appareil de nettoyage à la vapeur. - Débranchez l’appareil du réseau électrique. REMARQUE IMPORTANTE : n’utilisez ni produits corrosifs ni détergents abrasifs. En cas de contact accidentel d’un tel produit avec l’appareil, essuyez-le immédiatement à l’aide d’un chiffon humide. • Nettoyez les surfaces à l’aide d’un chiffon humide. Si elles sont particulièrement sales, utilisez de l’eau additionnée de quelques gouttes de liquide à vaisselle. Essuyez avec un chiffon sec. REMARQUE IMPORTANTE : évitez d’utiliser des éponges abrasives ou des pailles de fer. À la longue, elles risqueraient d’endommager la surface émaillée. • Utilisez des détergents spécifiquement conçus pour le nettoyage de l’appareil et suivez les instructions du fabricant. REMARQUE IMPORTANTE : nettoyez les filtres au moins une fois par mois afin d’éliminer tout résidu d’huile ou de graisse. F10 ENTRETIEN AVERTISSEMENT : - munissez-vous de gants de travail. - débranchez l'appareil du secteur. FILTRES À GRAISSE Le filtre métallique à graisse a une durée illimitée et doit être lavé une fois par mois à la main ou au lavevaisselle à basse température et en sélectionnant un cycle court. Le lavage en lave-vaisselle peut opacifier le filtre à graisse, mais son pouvoir filtrant n'en est pas pour autant altéré. Sortez la poignée pour retirer le filtre. Après l'avoir lavé et séché, procédez dans le sens contraire pour le remonter. REMPLACEMENT DES AMPOULES HALOGÈNES REMARQUE IMPORTANTE : utilisez exclusivement des ampoules halogènes de 28W MAX - E14. 1. Débranchez la hotte du secteur. 2. Retirez les filtres à graisse. 3. Dégagez l'ampoule brûlée de la douille et remplacez-la par une ampoule neuve. 4. Remontez les filtres à graisse. FILTRE AU CHARBON ACTIF (uniquement pour modèles filtrants) : Il absorbe les odeurs désagréables issues de la cuisson. Remplacez le filtre à charbon tous les 4 mois. Montage et remplacement du filtre à charbon R 1. Débranchez la hotte. S 2. Retirez les filtres à graisse. 3. Montez les filtres de façon à ce qu'ils recouvrent le moteur. Vérifiez que les chevilles R présentes sur le support de ventilation sont situées en face des fentes S ; tournez les filtres pour les bloquer au niveau des chevilles. R Pour le démontage, procédez dans l'ordre inverse S Remontez les filtres à graisse. R F11 S S MATÉRIEL FOURNI AVEC L'APPAREIL Déballez tous les composants. Contrôlez qu'ils sont au complet. • Hotte assemblée avec moteur, ampoules et filtres à graisse installés. • Instructions de montage et d'utilisation • 1 bague de raccordement • 1 Gabarit de montage • 6 chevilles murales Ø 8mm • 6 vis Ø 5x45 • 6 vis Ø 3 x 9 • 2 vis Ø 3,5 x 9,5 INSTALLATION - INSTRUCTIONS PRÉLIMINAIRES DE MONTAGE La hotte est conçue pour être utilisée en "Version Aspiration" ou "Version Recyclage". Remarque : le modèle avec valve électrique peut fonctionner uniquement en version "Aspirante" et le tuyau d'échappement doit être connecté à une unité périphérique d'aspiration. Version aspiration Les vapeurs sont aspirées et rejetées à l'extérieur par un conduit d'évacuation (non fourni) fixé au raccord de sortie d'air de la hotte. Prévoyez un système de fixation au raccord de sortie d'air adapté à votre tuyau d'évacuation. REMARQUE IMPORTANTE : S'il(s) est/sont déjà installé/s, retirez le(s) filtre(s) au charbon. Version Recyclage L'air est filtré en passant à travers un/des filtre(s) à charbon, puis recyclé dans la pièce. REMARQUE IMPORTANTE : Vérifiez que le recyclage de l'air s'effectue de façon aisée. Si la hotte n'est pas dotée de filtre(s) au charbon, commandez-le(s) et montez-le(s) avant d'utiliser la hotte. N'installez pas la hotte à proximité d'une zone très sale, d'une fenêtre, d'une porte ou d'une source de chaleur. La hotte est équipée de tout le matériel nécessaire pour une installation sur la majeure partie des cloisons/plafonds. Il est nécessaire de s'adresser à un technicien qualifié afin de s'assurer que le matériel est approprié au type de mur/plafond.. DIMENSIONS POUR L'INSTALLATION Éléments suspendus latéraux 65 cm (cuisinières à gaz ou mixtes) 50 cm (cuisinières électriques) 900 mm min (grand modèle 90 cm) 600 mm min (grand modèle 60 cm) Éléments suspendus latéraux ligne centrale surface de la table de cuisson F12 INSTALLATION - INSTRUCTIONS DE MONTAGE Les instructions en séquence numérique ci-dessous se réfèrent aux schémas figurant dans les dernières pages de ce manuel, avec leur numérotation respective. 1. Tracez une ligne sur le mur, jusqu'au plafond, correspondant à l'axe de symétrie. 2. Appliquez le schéma de perçage sur le mur (fixé avec un ruban adhésif) : la ligne verticale de centrage imprimée sur le schéma de perçage doit correspondre à la ligne de centrage dessinée sur le mur. En outre, le bord inférieur du schéma de perçage doit correspondre au bord inférieur de la hotte. Procédez au perçage des trous, comme indiqué sur le gabarit. 3. Retirez le schéma de perçage, introduisez les chevilles et les vis, comme indiqué. Vissez partiellement. 4. Appliquez le support de cheminée sur le mur en contact avec le plafond. Percez les trous et introduisez les chevilles, comme indiqué. Fixez l'étrier. 5. Uniquement pour la version Aspiration - déchage vers l'arrière : Percez un trou dans la cloison arrière pour le passage du conduit d'évacuation. 6. Uniquement pour la version Aspiration - décharge vers le plafond : Percez un trou au plafond pour le passage du conduit d'évacuation. 7. Effectuez le raccordement électrique à l'alimentation de l'habitation. 8. Retirez le/s filtre/s à graisse. 9. Accrochez la hotte au mur. 10. Redressez la hotte de manière à ce qu'elle soit bien à l'horizontale. 11. Marquez le(s) orifice(s) pour la fixation définitive de la hotte, comme indiqué. 12. Retirez la hotte du mur. 13. Percez les trous, comme indiqué. 14. Introduisez les chevilles dans le mur, comme indiqué. 15. Accrochez la hotte au mur. 16. Fixez définitivement la hotte au mur à l'aide de vis, comme indiqué. 17. Uniquement pour la version Aspiration - Fixez la bague de raccordement à l'orifice d'évacuation. 18. Effectuez le branchement au réseau électrique domestique. Uniquement pour la version Aspiration - Effectuez le raccordement du conduit d'évacuation des fumées à la bague de raccordement - le conduit est orienté directement vers l'extérieur (version aspirante) ou vers le déflecteur (version filtrante). 19. Uniquement pour version Filtrante : Fixez le déflecteur à la section de la cheminée inférieure. 20. Introduisez les cheminées dans leur logement respectif, au-dessus de la hotte. 21. Déposez la section supérieure et fixez les cheminées avec les vis, comme indiqué. 22. Installez le filtre au charbon (Uniquement pour version Filtrante) et remontez le(s) filtre(s) à graisse. Vérifiez le fonctionnement de la hotte en vous référant au paragraphe "Description et utilisation de la hotte". F13 DESCRIPTION ET UTILISATION DE LA HOTTE 1. Bandeau de commande 2. Filtres à graisse 3. Ampoules 4. Cheminée télescopique Bandeau de commande Éclairage : déplacez la touche vers la droite ou appuyez sur le bouton pour allumer. Puissance/vitesse d'aspiration : déplacez la touche vers la droite ou appuyez sur le bouton suivant pour augmenter la puissance/vitesse. F14 1 3 4 2 5 6 7 8 9 10 11 12 13 14 15 16 17 18 19 20 21 22 ΔϧΧΩϣϟϡΩΧΗγϭϑλϭϟ ϡϛΣΗϟΔΣϭϟ1 ϡϭΣηϟέΗϼϓ2 ϳΑΎλϣϟ3 ΔϳΑϭϛγϠΗΔϧΧΩϣ4 ϡϛΣΗϟΔΣϭϟ ϝϳϐηΗϠϟέίϟϰϠϋρϐοϭˬϥϳϣϳϟϰϟ·ΡΎΗϔϣϟϙέΣ ΓΩΎϳίϟϲϟΎΗϟέίϟϰϠϋρϐο·ϭϥϳϣϳϟΔϬΟΡΎΗϔϣϟϙϳέΣΗΑϡϗ AE7 ˯ϭοϟ ρϔηϟΔϋέγΓϭϗ ρϔηϟΔϋέγΓϭϗ ΏϳϛέΗϟΕΎϣϳϠόΗ˰˰ΏϳϛέΗϟ ϝϳϟΩϟΫϫϥϣΓέϳΧϷΔΣϔλϟϰϠϋΓΩέϭϟ ΕϭρΧϟϡΎϗέαϔϧΑ έϭλϟϊΟέˬϪΑΔϣϗέϣϟΏϳΗέΗϟΎΑΎϫΫϳϔϧΗϥϛϣϳϲΗϟϭϩΎϧΩΓΩέϭϟΕΎϣϳϠόΗϟ ϲργϭϟρΧϟϊϣϕΑΎρΗϳˬρΎΣϟϰϠϋρΧϝϣόΑϡϗ1 ρΧϊϣέϔΣϟΏϟΎϗϰϠϋωϭΑρϣϟϱΩϭϣόϟργϭϟρΧϕΑΎρΗϳϥΏΟϳ ϕλϻρϳέηϡΩΧΗγΎΑϪΗϳΑΛΗϊϣ έΩΟϟϰϠϋέϔΣϟΏϟΎϗϊοϭΑϡϗ2 ΏϟΎϘϟϲϠϋΎϬϳϟέΎηϣϟΕΎΣΗϔϟϝϣόΑϡϗΔϧΧΩϣϠϟΔϳϠϔγϟΔϓΎΣϟϊϣέϔΣϟΏϟΎϘϟΔϳϠϔγϟΔϓΎΣϟϕΑΎρΗΗϥϭˬέΩΟϟϰϠϋϡϭγέϣϟργϭϟ ϼϳϠϗρΑέοϭϣϭϫΎϣϛϲϏέΑϟϭΕέηϳϔϟαΑΎϘϣϟΝέΩ·ϭέϔΣϟΏϟΎϗΔϟίΈΑϡϗ3 ΓΩΎϧγϟΕϳΑΛΗΑϡϗϥϳΑϣϟϭΣϧϟϰϠϋρΎΣϟαΑϭϗϝΧΩϭΏϘΛϑϘγϟΔϬΟϭϣϲϓέΩΟϟϰϠϋΔϧΧΩϣϟϡϋΩαϭϗϊο4 ΔϧΧΩϣϟΓέϭγΎϣϟϲϔϠΧϟέΩΟϟϲϓΔΣΗϓϝϣόΑϡϗϲϔϠΧϟϡΩΎόϟΝέΧϣρϘϓρΎϔηϟϝϳΩϭϣϟ .5 ΔϧΧΩϣϟΓέϭγΎϣϟϑϘγϟϲϓΔΣΗϓϝϣόΑϡϗϑϘγϟϭΣϧϡΩΎόϟΝέΧϣρϘϓρΎϔηϟϝϳΩϭϣϟ .6 ϲϟίϧϣϟϲΎΑέϬϛϟϡΎυϧϟΎΑΕϼϳλϭΗϟίϳϬΟΗΑϡϗ7 ϡϭΣηϟέΗϼϓέΗϠϓϝί.8 ρΎΣϟΎΑΔϧΧΩϣϟϕϳϠόΗΑϡϗ9 ΎϳϘϓΔϧΧΩϣϟρΑοΑϡϗ10 οϭϣϭϫΎϣϛΔϧΧΩϣϟ˯ΎρϐϟϲΎϬϧϟΕϳΑΛΗϠϟ ΕΎΣΗϔϟ ΔΣΗϔϟϡ͋Ϡϋ11 ρΎΣϟϥϣΔϧΧΩϣϟΔϟίΈΑϡϗ12 ϥϳΑϣϭϫΎϣϛέϔΣϟΎΑϡϗ13 ϥϳΑϣϟϭΣϧϟϰϠϋρΎΣϟέηϳϓϝΧΩϭΏϘΛ14 ρΎΣϟϲϠϋΔϧΧΩϣϟϕϳϠόΗΩϋ15 ϥϳΑϣϭϫΎϣϛϲϏέΑϟϡΩΧΗγΎΑρΎΣϟΎΑΔϧΧΩϣϟΕΑΛ16 ϡΩΎόϟΫϔϧϣΔΣΗϓϰϟ·ΓέϭγΎϣϟΕϳΑΛΗΑϡϗρϘϓρΎϔηϟϝϳΩϭϣϟ .17 ϲϟίϧϣϟϲΎΑέϬϛϟϡΎυϧϟΎΑΕϼϳλϭΗϟϝϣόΑϡϗ18 ϭ ρΎϔηϟϝϳΩϭϣ ΝέΎΧϟϭΣϧΏϭΑϧϷέϳγϳϥΏΟϳ˭ΓέϭγΎϣϟΎΑϡΩΎόϟΏϭΑϧϝϳλϭΗΑϡϗρϘϓρΎϔηϟϝϳΩϭϣ έΗϠϔϟϝϳΩϭϣ ΔϳϭϬΗϟαϛΎϋϭΣϧ ΔϧΧΩϣϟΎΑιΎΧϟ˯ίΟϟϝϔγΔϳϭϬΗϟαϛΎϋΕϳΑΛΗΑϡϗρϘϓέΗϠϔϟϝϳΩϭϣϟ .19 ˯ΎρϐϟϰϠϋΎϬΑιΎΧϥΎϛϣϟϲϓϥΧΩϣϟΕϳΑΛΗϳϡϗ20 οϭϣϭϫΎϣϛϲϏέΑϟΔργϭΑϥΧΩϣϟΕΑΛϭϲϠϋϷϱϭϠόϟϡγϘϟΏΣγΑϡϗ21 ϡΣηϟ έΗϼϓ έΗϠϓΏϳϛέΗΩϋϡΛ ρϘϓέΗϠϔϟϝϳΩϭϣ ϥϭΑέϛϟέΗϠϓΕΑΛΗΑϡϗ22 ϪϣΩΧΗγϭΔϧΧΩϣϟ˯ΎρϐϟΎϔλϭϡΩϘϳϱΫϟϡγϘϟϰϟ·ωϭΟέϟϊϣˬΔϧΧΩϣϟ˯ΎρϏϝϳϐηΗϥϣϕϘΣΗ AE6 ΔϘϓέϣϟΩϭϣϟ ΕΎϧϭϛϣϟϊϳϣΟΩϭΟϭϥϣϕϘΣΗΎϬΗϭΑϋϥϣΕΎϧϭϛϣϟϊϳϣΟΝέΧ ΔΗΑΛϣϟϳΑΎλϣϟϭˬϡϭΣηϟέΗϼϓϭϙέΣϣϟΎΑΓΩϭίϣΔϧΧΩϣϟ ϡΩΧΗγϻϭϊϳϣΟΗϠϟΕΎϣϳϠόΗ Δϧϭργ·1 ϊϳϣΟΗΏϟΎϗ1 ϡϣ8έρϗρΎΣΕέηϳϓαΑϭϗ6 45×5έρϘΑϲϏέΑ6 9î3έρϘΑϲϏέΑ6 9.5î3.5έρϘΑϲϏέΑ2 ϲϟϭϷϊϳϣΟΗϟΕΎϣϳϠόΗΏϳϛέΗϟ ϩέΗϠϔϟϝϳΩϭϣϲϓϭΝέΎΧϠϟρϔηϟϝϳΩϭϣϲϓϡΩΧΗγϹϭΏϳϛέΗΗϠϟϡΩΧΗγϼϟΔϣϣλϣΔϧΧΩϣϟ ΔϳΟέΎΧϟρϔηϟΓΩΣϭΑΔϠλΗϣϡΩΎόϟΓέϭγΎϣϥϭϛΗϥΏΟϳϭρϔηϟϝϳΩϭϣϲϓρϘϓϪϣΩΧΗγϥϛϣϳϲΎΑέϬϛϕϠϏΡΎΗϔϣΑΩϭίϣϟϝϳΩϭϣϟΔυΣϼϣ ρΎ˷˰ϔηϟϝϳΩϭϣ ΔϧΧΩϣϟ˯ϭϫΝϭέΧΔϠλϭϰϠϋΔΗΑΛϣ ΓΩϭίϣέϳϏ ϑϳέλΗΓΎϧϗϝϼΧϥϣΝέΎΧϟϰϟ·ϪϬϳΟϭΗϭέΎΧΑϟρϔηϡΗϳ ˯ϭϬϟΝϭέΧΔϠλϭϲϓΔΑγΎϧϣΕϳΑΛΗΔϳϠϣόΑϡΎϳϘϟΏΟϳˬΎϫ˯έηϡΗϲΗϟϑϳέλΗϟΓΎϧϗΏΟϭϣΑ ϪΗϟί·ΏΟϳˬϲϧϭΑέϛ έΗϼϓ έΗϠϔΑΓΩϭίϣΔϧΧΩϣϟΕϧΎϛΫ·ϡΎϫ έΗϠϔϟϝϳΩϭϣ ρϳΣϣϟϥΎϛϣϟϲϓϩέϳϭΩΗΩΎόϳϡΛϥϣϭϲϧϭΑέϛ έΗϼϓ έΗϠϓΔργϭΑ˯ϭϬϟηέϳ ΔΣϳΣλΓέϭλΑϡΗϳ˯ϭϬϟϥέϭΩϥϥϣΩϛ΄ΗϡΎϫ ϝΎϣόΗγϻϝΑϗϪΑϳϛέΗΑϭέΗϠϔϟΫϫ˯έηΑϡϗˬϲϧϭΑέϛ έΗϼϓ έΗϠϔΑΓΩϭίϣέϳϏΔϧΧΩϣϟΕϧΎϛΫ· ΓέέΣϟέΩΎλϣϭΏϭΑϷϭΫϓϭϧϟϭΥΎγΗϻΓΩϳΩηϥϛΎϣϷϥϋ˱ΩϳόΑΔϧΧΩϣϟΏϛέ ΩϭϣϟΓΩϭΟϭΔϣ˯ϼϣϥϣΩϛ΄ΗϠϟϝϫ΅ϣϲϧϘΗΓέΎηΗγΏΟϳϑϘγϷϥέΩΟϟωϭϧϡυόϣϰϠϋΎϬΑϳϛέΗϟΔϣίϼϟΕΩόϣϟϊϳϣΟΑΓΩϭίϣΔϧΧΩϣϟΩέϭΗ ϑϘγϟέΩΟϟωϭϧΏγΣΕΩόϣϟϭ ΏϳϛέΗϟΩΎόΑ ΓέϭΎΟϣϟΕΩΣϭϟ ρΎΣϠϟ ΩϗϭϣϭίΎϏΩϗϭϣ ϡγ65 ΔρϠΗΧϣ ΔϳΎΑέϬϛΩϗϭϣ ϡγ50 ϡγ90νέϋϝϳΩϭϣ ϰϧΩΩΣϛϡϣ900 ϡγ60νέϋϝϳΩϭϣ ϰϧΩΩΣϛϡϣ600 ΓέϭΎΟϣϟΕΩΣϭϟ ρΎΣϠϟ ργϭϟρΧ Ωϗϭϣϟργ AE5 ΔϧΎϳλϟ ΔϳϗϭΕίΎϔϗϡΩΧΗγ ϲΎΑέϬϛϟέΎϳΗϟέΩλϣϥϋίΎϬΟϟϝλϔΑϡϗ ϪϳΑϧΗ ϡϭΣηϟέΗϼϓ ϥϭΣλϟΔϟΎγϏϲϓϭΩϳϟΎΑέϬηϝϛΓέϣϪϔϳυϧΗΏΟϳϭϲοέΗϓέϣϋϪϟαϳϟϲϧΩόϣϟϡϭΣηϟέΗϠϓ έΗϠϓϥϭϟϥΩϘϓϰϟ·ϥϭΣλϟΔϟΎγϏϲϓϝγϐϟΏΑγΗϳΩϗΔοϔΧϧϣΓέϭΩΑϭΔοϔΧϧϣΓέέΣΔΟέΩϰϠϋ ϳηέΗϟϲϓϪΗ˯ΎϔϛϰϠϋέΛ΅ϳϻϙϟΫϥϛϟϭϡϭΣηϟ έΗϠϔϟΔϟίϹνΑϘϣϟΏΣγ ΏϳϛέΗϟΓΩΎϋϹϲγϛϋϝϛηΑ˯έΟϹϝϣόΑϡϗϭˬϑΟϳϪϛέΗϭέΗϠϔϟϝγϏ ϥϳϳΟϭϟΎϬϟϳΑΎλϣϝΩΑΗγ ϰλϗΩΣΑρϭ28ϥϳΟϭϟΎϫE14ϳΑΎλϣρϘϓϡΩΧΗγϡΎϫ ϲΎΑέϬϛϟέΎϳΗϟέΩλϣϥϋΔϧΧΩϣϟϝλϓ 1 ϡϭΣηϟέΗϼϓωίϧ 2 ΩϳΩΟέΧΡΎΑλϣΏϳϛέΗΑϡϗϡΛΡΎΑλϣϟϝϣΎΣϥϣϪϛϓϕϳέρϥϋϕέΗΣϣϟΡΎΑλϣϟΔϟίΈΑϡϗ 3 ϡϭΣηϟέΗϼϓΏϳϛέΗΩϋ 4 έΗϼϔϟΎΑϝϣόΗϲΗϟϥΧΩϣϠϟρϘϓ ρηϧϟϥϭΑέϛϟέΗϠϓ ϲϬρϟ˯ΎϧΛΞΗϧΗϲΗϟΔϬϳέϛϟϭέϟίΟΣϳ έϬη4ϝϛϲϧϭΑέϛϟέΗϠϔϟέϳϳϐΗΑϡϗ ϥϭΑέϛϟέΗϠϓέϳϳϐΗϭΏϳϛέΗ S ϲΎΑέϬϛϟέΎϳΗϟϥϋΔϧΧΩϣϟϝλϔΑϡϗ 1 T ϡϭΣηϟέΗϼϓωίϧ 2 ϙέΣϣϟϰϠϋέΗϼϔϟΕϳΑΛΗΑϡϗ 3 S T ΎϬϧϳϣ΄ΗϟέΗϼϔϟϙέΣSΕΎΣΗϔϠϟΔϣϼϣΕΎΣΗϔϟΩΩόΗϣΏϭΑϧϷϰϠϋRαϳΑΎΑΩϟϥϥϣΩϛ΄Η αϳΑΎΑΩϟΎΑ T ΔϟίϺϟϲγϛϋϝϛηΑ˯έΟϹΎΑϡϗ ϡϭΣηϟέΗϼϓΏϳϛέΗΩϋ S T 1 AE4 ϝΎρϋϷϱέΣΗϝϳϟΩ ϝϣόϳϻίΎϬΟϟ ϲΎΑέϬϛϟέΎϳΗϟέΩλϣΑϝλϭϣίΎϬΟϟϥϭˬϲΎΑέϬϛϟέΎϳΗϟέΩλϣΩϭΟϭϥϣΩϛ΄Η ˱ΩϭΟϭϣϝίΎϣϝρόϟϥΎϛΫ·ΎϣϯέΗϲϛϟϪϠϳϐηΗΩϋϭίΎϬΟϟΊϔρ ΎϳϓΎϛαϳϟΔϧΧΩϣϟϲϓρϔηϟϯϭΗγϣ ΔΟΎΣϟΏγΣϪρΑοϭρϔηϟΔϋέγϊΟέ ˭ΔϔϳυϧΕΎΣηέϣϟϥϥϣΩϛ΄Η ΩΩγϧϱϥϋΎΛΣΑ˯ϭϬϟΕΎΣΗϓϊΟέ ϝϣόϳϻΡΎΑλϣϟ ˭ΎΑϭϠρϣϥΎϛϰΗϣϪϟΩΑΗγϭέϭϧϟΡΎΑλϣϊΟέ ϳΣλϭΣϧϰϠϋΕΑΛϣέϭϧϟΡΎΑλϣϥϥϣΩϛ΄Η ϊϳΑϟΩόΑΎϣΔϣΩΧ ϊϳΑϟΩόΑΎϣΔϣΩΧΑϝΎλΗϻϝΑϗ ΕϼϛηϣϟϝΣϝϳϟΩϲϓΓΩέϭϟΕΎΣέΗϗϻΓΩϋΎγϣΑϙγϔϧΑΔϠϛηϣϟϝΣΗϥϝϭΎΣ 1 ΓέϣΗγϣΔϠϛηϣϟΕϧΎϛΫ·ΎϣϯέΗϟϯέΧΓέϣϪϠϳϐηΗΩϋϭίΎϬΟϟΊϔρ 2 ϊϳΑϟΩόΑΎϣΔϣΩΧϟίϛέϣΏέϗ΄ΑϝλΗΕΎλϭΣϔϟϩΫϫΩόΑϝϠΧϟΙϭΩΣέϣΗγΫ· ϲϠϳΎϣΩΩΣΗϥ˱ΎϣΩΏΟϳ ϝρόϠϟίΟϭϣϑλϭ ˭ΔϓΩΑίΎϬΟϟϝϳΩϭϣϭωϭϧ ΏϳΗϛϰϠϋΎοϳΩϭΟϭϣΔϳϧϔϟΕΎΣϼλϹϭΔϧΎϳλϟϡϗέίΎϬΟϟϝΧΩΓΩϭΟϭϣϟ ΓέϳΎόϣϟΔΣϭϟϰϠϋServiceΔϣϠϛϲϠϳϱΫϟϡϗέϟ ΔϣΩΧϟϡϗέ ϥΎϣοϟ ˭ϝϣΎϛϟΎΑϙϧϭϧϋ ϙϔΗΎϫϡϗέ ΔϘϳέρϟΎΑΕΎΣϳϠλΗϟ˯έΟ·ϭΔϳϠλέΎϳϏϊρϗϡΩΧΗγϥϣοΗϲϛϟ ΎϬϟΡέλϣϟϊϳΑϟΩόΑΎϣΔϣΩΧΑϝλΗΔΑϭϠρϣΕΎΣϼλ·ϱϙΎϧϫΕϧΎϛΫ ΔΣϳΣλϟ ϑϳυϧΗϟ έΎΧΑϟΦοΑϑϳυϧΗΓίϬΟΎΗΎΗΑϡΩΧΗγΗϻ ˰ ϲΎΑέϬϛϟέΎϳΗϟέΩλϣϥϋίΎϬΟϟϝλϓ˰ έρΧ ΔϠϠΑϣεΎϣϗΔόρϘΑέϭϔϟϰϠϋϪϔϳυϧΗΑϡϗίΎϬΟϟΎΑΕΎΟΗϧϣϟϙϠΗΕγϣϼΗϥ΄ρΧϟϕϳέρΑΙΩΣΫ·ΔηΩΎΧϭΔϛΎΣΕΎϘυϧϣϡΩΧΗγΗϻϡΎϫ ΔϓΎΟεΎϣϗΔόρϘΑΏρη˯ΎϣϠϟϝϳγϐϟϑυϧϣϥϣρϘϧϊοΑϑοˬ˱ΩΟ˱ΎΧγΗϣϥέϔϟϥΎϛΫ·ΔϠϠΑϣεΎϣϗΔόρϘΑργϷϑυϧ ϝϳϣΎϧϹργϟΫϫϑϠΗϳΩϗϥϣίϟϯΩϣϰϠϋΕϼϘλϣϭΔϳϧΩόϣΕΎρηΎϛϭΔρηΎϛΕΎΟϧϔγϡΩΧΗγΗϻϡΎϫ ΔόϧΎλϟΔϛέηϟΕΎϣϳϠόΗϊΑΗϭίΎϬΟϟϑϳυϧΗϟΎλϳλΧΔϣϣλϣΕΎϔυϧϣϡΩΧΗγ ϡΣηϭΕϳίΎϳΎϘΑϱΔϟίϹέϬηϝϛΓέϣέΗϼϔϟϑϳυϧΗΑϡϗϡΎϫ AE3 ΔϘΑΎρϣϟΎΑϳέλΗ ˰ϟ˱ΎϘϓϭίΎϬΟϟΫϫϕϳϭγΗϭˬϊϳϧλΗϭˬϡϳϣλΗϡΗ ΔϘΣϼϟϥϳϧϭϘϟϭEECϥϭϧΎϘϟϝ˷ΩΑϳϱΫϟ ΔϳΑέϭϷϕϭγϠϟEC³νϔΧϧϣϟΩϬΟϟΎΑΔλΎΧϟ´ΕΎϳλϭΗϟΏγΣϥΎϣϷΕΎΑϠρΗϣϟ EN 61591ϡϗέΔϳΑϭέϭϷέϳϳΎόϣϠϟ˱ΎϘϓϭϭϡϗέΔϳΑϭέϭϷΔϣυϧϷΏΟϭϣΑΔϳΑϟϕϳΩλϡϳϣλΗϟΕΎΑϠρΗϣ .(0&(&ΓέηϧϟΔϳΎϣΣϟΕΎρέΗη˰ ΩϣΗόϣνϳέ΄ΗϡΎυϧΑϳΣλϝϛηΑ˱ϼλΗϣϥΎϛΫ·ϻ·ίΎϬΟϠϟΔϳΎΑέϬϛϟΔϣϼγϟϥΎϣοϥϛϣϳϻ ΔϗΎρϟέϳϓϭΗΎλϧ ϲϬρϟ˯ΎϬΗϧΩόΑϕΎϗΩΓΩόϟϪϠϳϐηΗΑέϣΗγϭˬϲϬρϟ˯ΩΑΩϧϋΔϋέγϰϧΩϰϠϋΔϧΧΩϣϟϝϐ͋ η ϯϭλϘϟΕϻΎΣϟϲϓϻ·Γίίόϣϟ ΕΎϋέγϟ ΔϋέγϟϡΩΧΗγΗϻϭˬέΎΧΑϟϭϥΎΧΩϟϥϣέϳΛϛϟϙΎϧϫϥΎϛϥ·ϻ·ΔϋέγϟΓΩΎϳίΑϡϘΗϻ ΔϬϳέϛϟϭέϟϥϣΩΣϟΓ˯ΎϔϛϰϠϋυΎϔΣϠϟˬΓέϭέοϟΩϧϋϡΣϔϟ ΕΎΣηέϣ ηέϣϝΩΑΗγ ͋ ϥϭϫΩϟηέϣΓ˯ΎϔϛϰϠϋυΎϔΣϠϟˬΓέϭέοϟΩϧϋϥϭϫΩϟ ΕΎΣηέϣ ηέϣϑυϧ ˯ΎοϭοϟϝϳϠϘΗϭΓ˯ΎϔϛϟϥϳγΣΗϟϝϳϟΩϟΫϫϲϓϪϳϟ·έΎηϣϟΏϳΑΎϧϷϡΎυϧϟϰλϗϷέρϘϟϡΩΧΗγ ΏϳϛέΗϟ ϥϣΔϳΎϗϭϠϟϊϳΑϟΩόΑΎϣΔϣΩΧΏέϗ΄ΑϭϊΎΑϟΎΑϝλΗϝϛΎηϣϱΩϭΟϭΔϟΎΣϲϓϝϘϧϟ˯ΎϧΛϑϠΗϠϟίΎϬΟϟνέόΗϡΩϋϥϣΩϛ΄ΗϑϳϠϐΗϟϥϣίΎϬΟϟϙϓΩόΑ ΏϳϛέΗϟΩϧϋρϘϓϑϳϠϐΗϟέΗγϳϟϭΑϥϣίΎϬΟϟϝίέέοϱ ΏϳϛέΗϠϟΩΩϋϹ έΛϛϭϥϳλΧηΔργϭΑϪΑϳϛέΗϭΔϧΧΩϣϟ˯ΎρϏϊϓέϡΗϳϥΏΟϳ˭ϥίϭϟϝϳϘΛΞΗϧϣϟΫϫ έρΧ ϡγ65ϭΔϳΑέϬϛϟΓίϬΟϷϲϓϡγ50ϥϋΔϧΧΩϣϟϥϣϝϔγϷ˯ίΟϟϭϲϬρϟίΎϬΟϰϠϋ ΔϳϋϭϷ ϲϧϭϷΔϣΎϋΩργϥϳΑΔϓΎγϣϰϧΩϝϘΗϻϥΏΟϳ ϲϬρϟϝϳϟΩϲϓΓέέϘϣϟΎϳϧΩϟΔϓΎγϣϟΎοϳϊΟέΏϳϛέΗϟϝΑϗΔϛέΗηϣϟΓίϬΟϷϭίΎϐϟΓίϬΟϷ ΔϓΎγϣϟϩΫϫΓΎϋέϣΏΟϳϓˬΔϧΧΩϣϟϭΩϗϭϣϟϥϳΑέΑϛΔϓΎγϣΩΩΣΗΩϗϭϣϟΏϳϛέΗΕΎϣϳϠόΗΕϧΎϛΫ· ϲΎΑέϬϛϟϝϳλϭΗϟ ϲγϳέϟέΩλϣϟΔϳρϟϭϓΎϬγϔϧϲϫίΎϬΟϟΕϻΩόϣΔΣϭϟϰϠϋΔϧϳΑϣϟΔϗΎρϟΔϳρϟϭϓϥϥϣΩϛ΄Η ϡϭΣηϟέΗϠϓΕΣΗˬΔϧΧΩϣϟ˯ΎρϏϝΧΩΩΟϭΗϥϥϛϣϳΔϣϭϠόϣϟϩΫϫ ΩϣΗόϣΔϣΩΧίϛέϣΑϝλΗϝϫ΅ϣϲΎΑέϬϛΔργϭΑϡΗϳϥΏΟϳ 2ϡϣH05 VV-F 3 x 0,75ωϭϧ ΓέΩϘϟϝΑΎϛϝΩΑΗγ ΎϬϳϓϥϛϳϡϟΫ·ΏϳϛέΗϟΩόΑϪϳϟ·ϝϭλϭϟϝϬγϳϥΎϛϣϲϓϪΗϳΑΛΗΏΟϳϭˬΔϳέΎγϟϥϳϧϭϘϟϊϣϕΑΎρΗϳαΑϘϣΑίΎϬΟϟϝϳλϭΗΑϡϗˬαΑΎϘΑΩ˱ ϭίϣίΎϬΟϟϥΎϛΫ· ϝϣΎϛϟϝλϔϟϥϣοϳΔϳΑρϘϟϲΎϧΛΩϣΗόϣΡΎΗϔϣΕϳΑΛΗΑϡϗˬϪϳϟ·ϝϭλϭϟϥϛϣϳϻϥΎϛϣϲϓαΑϘϣϟϥΎϛΫ·ϭ ϲγϳέϟέΩλϣϟΎΑέηΎΑϣϟϝϳλϭΗϟ αΑΎϗ .IIIΔϳρϟϭϔϠϟΔΛϟΎΛϟΔϔϟϲϓϲγϳέϟέΩλϣϟϥϋ ΔϣΎϋΕΎϳλϭΗ ϡΩΧΗγϻϝΑϗ ϝϘϧϟ˯ΎϧΛϑϠΗϠϟίΎϬΟϟνέόΗϡΩϋϥϣΩϛ΄ΗΕΎϘΣϠϣϟϥϣΕΎϘλϠϣϟϭϑΎϔηϟϑϼϐϟϭϯϭϘϣϟϕέϭϟϥϣΔϳΎϣΣϟϊρϗϊϠΧ ϡΩΧΗγϻ˯ΎϧΛ ΔϳϭΟϟϝϣϭόϠϟ˱ΩΑίΎϬΟϟνέόΗϻίΎϬΟϟϰϠϋϥίϭΔϳϊοΗϻϑϠΗϱϲηΎΣΗϟ ΔϳΑϟϰϠϋυΎϔΣϟ ΔϔϠΗΧϣϟϑϳϠϐΗϟ˯ίΟϥϣιϠΧΗϟΏΟϳΫϬϟ ϑϳϠϐΗϟϥϣιϠΧΗϟ έϳϭΩΗϟΓΩΎϋ·ίϣέϝϣΣΗϲϫϭˬΔΎϣϟΎΑ100ΎϬϣΩΧΗγΓΩΎϋ·ϥϛϣϳϥέϔϟϑϳϠϐΗϟΔϣΩΧΗγϣϟΓΩΎϣϟ ΔϣΎϣϘϟϥϣιϠΧΗϟϡυϧΗϲΗϟΔϳϠΣϣϟΕΎρϠγϟϭϠϟΔϣΎΗϟΓΎϋέϣϟΓέϭέοϭˬΔϟϭγϣΔϘϳέρΑ ΞΗϧϣϟϥϣιϠΧΗϟ (WEEE ΔϳϧϭέΗϛϟϹϭΔϳΑέϬϛϟΓίϬΟϷΕΎϳΎϔϧϥ΄ηΑˬEC192012 ΔϳΑέϭϷϕϭγϟΕΎϬϳΟϭΗϊϣίΎϬΟϟΫϫϕϓϭΗϳ˰ ΞΗϧΗΩϗϲΗϟˬϥΎγϧϹΔΣλϭΔϳΑϠϟΔϠϣΗΣϣϟΔϳΑϠγϟΞΎΗϧϟϊϧϣϲϓΩϋΎγΗϑϭγΔΣϳΣλϟΔϘϳέρϟΎΑΞΗϧϣϟΫϫϥϣιϠΧΗϟϥϣΩϛ΄ΗϟϝϼΧϥϣ ΞΗϧϣϟΫϫϊϣϳΣλϟέϳϏϝϣΎόΗϟϥϋϙϟΫϑϼΧΑ ΔΑγΎϧϣϊϳϣΟΗΔρϘϧϰϟ·ϪϣϳϠγΗΏΟϳϥϛϟϭˬΔϳϟίϧϣϟΕΎϔϠΧϣϟΎϛϪΗΟϟΎόϣϥϛϣϳϻϪϧϰϟ·ΔϘϓέϣϟΕΩϧΗγϣϟϭίΎϬΟϟϰϠϋΩϭΟϭϣϟ ίϣέϟέϳηϳ ΔϳϧϭέΗϛϟϹϭΔϳΎΑέϬϛϟΓίϬΟϷέϳϭΩΗΓΩΎϋΈΑΔλΎΧ ΔϳϟίϧϣϟΓίϬΟϷϥϣιϠΧΗϟ ϥϣιϠΧΗϟϝΑϗΕΎϔϠΧϣϟϥϣιϠΧΗϠϟΔϳϠΣϣϟϭϠϟ˱ΎϘϓϭϪϧϣιϠΧΗΎϬϟΎϣόΗγΓΩΎϋ·ϭΎϫέϳϭΩΗΓΩΎϋ·ϥϛϣϳΩϭϣϥϣϪόϳϧλΗϡΗίΎϬΟϟΫϫ ϲΎΑέϬϛϟϝΑϛϟϊρϘΑϡϗˬίΎϬΟϟ ΕΎϔϠΧϣϟϥϣιϠΧΗϟΔϣΩΧίϛέϣϭΔλΗΧϣϟΔϳϠΣϣϟΔϬΟϟΎΑϝΎλΗϻϰΟέϳˬϩέϳϭΩΗΓΩΎϋ·ϭϩΩΩέΗγϭΞΗϧϣϟΫϫΔΟϟΎόϣϥϋϝϳλΎϔΗϟϥϣΩϳίϣϟ ίΎϬΟϟϪϧϣΕϳέΗηϱΫϟϝΣϣϟϭΔϳϟίϧϣϟ AE2 ΔϣϼγϟΎΑΔλΎΧΔϣΎϫΕΩΎηέ· .www.whirlpool.euΏϳϭϟϊϗϭϣϰϠϋ˱ΎοϳΕΎϣϳϠόΗϟϩΫϫέϓϭΗΗ ˱ΩΟΔϣΎϫϥϳέΧϵΔϣϼγϭϙΗϣϼγ ΕΎϗϭϷϊϳϣΟϲϓΎϬΑϡίΗϟϻϭΎϬΗ˯έϗΏΟϳΔϣϼγϠϟΔϣΎϫΕέϳΫΣΗϪγϔϧίΎϬΟϟϭϝϳϟΩϟΫϫϙϟϡΩϘϳ ϥϳέΧϵϰϠϋϭϡϬγϔϧϰϠϋΔϠϣΗΣϣέΎρΧϥϣϥϳϣΩΧΗγϣϟέΫΣϳΙϳΣˬΔϣϼγϟΎΑϕϠόΗϳϭˬϪϳΑϧΗϟίϣέϭϫΫϫ ΔϳϟΎΗϟΕΎΣϠρλϣϟϭϪϳΑϧΗϟίϣέΎϬϘΑγϳΔϣϼγϟΕέϳΫΣΗϊϳϣΟ ϪΑϧΟΗϡΩϋΔϟΎΣϲϓΓέϳρΧΔΑΎλ·ΏΑγϳΩϗέρΧΩϭΟϭϰϟ·έϳηϳ έρΧ ΔΑϧΟΗϡΩϋΔϟΎΣϲϓΓέϳρΧΔΑΎλ·ϰϟ·ϱΩ΅ϳΩϗέρΧΩϭΟϭϰϟ·έϳηϳ έϳΫΣΗ ϡΩΧΗγϻϥϋΔΟΗΎϧϟΔϳΑέϬϛϟΔϣΩλϟϭϑϠΗϟϭΔΑΎλϹέρΎΧϣϝϳϠϘΗΔϳϔϳϛϰϟ·έϳηΗϭϪϳϟ·έϳηΗϲΗϟϝϣΗΣϣϟέϳΫΣΗϟέρΧϟΩΩΣΗΔϣϼγϟΕέϳΫΣΗϝϛ ΔϳϟΎΗϟΕΎϣϳϠόΗϠϟϝΎΛΗϣϻϰΟέϳίΎϬΟϠϟϳΣλϟέϳϏ ϡϘΗϻΔϣϼγϟϥϳϧϭϘΑϕϠόΗϳΎϣϳϓΔϳέΎγϟΔϳϠΣϣϟΕΎϬϳΟϭΗϟΎΑΎϣίΗϟϭϊϧλϣϟΕΩΎηέϹΎ˱˰ϘΑριΗΧϣϲ˷˰ϧϓΔϧΎϳλϟϭΏϳϛέΗϟΔϳϠϣόΑϡϭϘϳϥΏΟϳ ϡΩΧΗγϣϟϝϳϟΩϲϓΩϳΩΣΗϟΎΑ˱ΎΑϭϠρϣϥϛϳϡϟΎϣίΎϬΟϟϥϣ˯ίΟϱϝΩΑΗγϭΡϼλΈΑ ΏϳϛέΗϝΎϣϋϱ΄ΑϡΎϳϘϟϝΑϗΔϗΎρϟέΩλϣϥϣίΎϬΟϟϝλϓΏΟϳ ίϣέϟΎΑΓίϳϣϣϟ2ΔϔϟϥϣϥΧΩϣϠϟϱέϭέοέϳϏ ϱέΎΑΟ·ίΎϬΟϟνϳέ΄Η ΔϗΎρϟΫΧ΄ϣΑίΎϬΟϟϝϳλϭΗϟϲϔϛϳΙϳΣΑ˱ϼϳϭρΔϗΎρϟϝΑΎϛϥϭϛϳϥΏΟϳ ίΎϬΟϟαΑΎϗϝλϓϝΟϥϣΔϗΎρϟΎΑΔϳΫϐΗϟϝΑΎϛΏΣγΗϻ ΔϳΑέϬϛϟΕΎϧϭϛϣϟϰϟ·ϝλϭΗϟϥϣϡΩΧΗγϣϟϥϛϣΗϳϻϥΏΟϳˬΏϳϛέΗϟΕΎϳϠϣϋ˯ΎϬϧ·ΩόΑ ϥΎΗϳέΎϋϙΎϣΩϗϭϪϠϐηΗϻϭϙϣγΟϥϣϝϠΑϣ˯ίΟϱ΄ΑίΎϬΟϟαϣϠΗϻ ΔϳϧΩΑϟϭΔϳγΣϟϭΔϳϧϫΫϟΕέΩϘϟιϘϧϥϣϥϭϧΎόϳϥϳΫϟιΎΧηϷϙϟΫϛϭίΎϬΟϟΫϫϡΩΧΗγΕϭϧγ8ϥϋϡϫέΎϣϋΩϳίΗϥϳΫϟϝΎϔρϸϟϥϛϣϳ ΏΟϳΔϧϣοΗϣϟέρΎΧϣϟϭϛέΩϭΔϧϣΔϘϳέρΑίΎϬΟϟϡΩΧΗγΎΑΔλΎΧϟΕΎϣϳϠόΗϟϡϬϟΕέϓϭΗϭϑέηϹϡϬϟέϓϭΗΫ·ΔϓέόϣϟϭΓέΑΧϟιϘϧϭ ϥϳϐϟΎΑιΎΧηϝΑϗϥϣϑέηϹϡϬϟέϓϭΗΫ·ϻ·ˬΔϧΎϳλϟϭϑϳυϧΗϟΎΑϝΎϔρϷϡΎϳϗϡΩϋΏΟϳίΎϬΟϟΎΑϝΎϔρϷΙΑϋϡΩϋ ϊϳϣΟΔϳϠλ˯ίΟ΄ΑΔΑϳόϣϟ˯ίΟϷϝΩΑΗγΏΟϳϡΩΧΗγϣϟϝϳϟΩϲϓΩϳΩΣΗϟΎΑϪϳϟέΎηϣϥϛϳϡϟΎϣίΎϬΟϟϥϣ˯ίΟϱϝΩΑΗγϭΡϼλΈΑϡϘΗϻ ιΗΧϣϲϧϓΎϬΑϡϭϘϳϥΏΟϳϯέΧϷΔϧΎϳλϟΕΎϣΩΧ ίΎϬΟϟΎΑϡϬΛΑϋϡΩϋϥΎϣοϟϝΎϔρϷΔΑϗέϣΏΟϳ ΕΩϳΩϣΗϟΏϳΑΎϧϭϭΔϳΑέϬϛϟΕϼϳλϭΗϟΎΑέέοϕΣϠΗϻϲϛιέΣϭΔϗΩΑϪΑΗϧˬϑϘγϟϭέΩΟϟΏϘΛΩϧϋ ΝέΎΧϟϰϟ·ΎϣϭΩΔϳϭϬΗϟΕϭϧϗϑέλΗϥΏΟϳ ΏΟϳϥϛϟϭˬϯέΧϷΩϭϗϭϟωϭϧϭίΎϐϟϕέΣΈΑϡϭϘΗΓίϬΟϥϋΔΟΗΎϧϟΓέΧΑϷϥϣιϠΧΗϠϟϡΩΧΗγϣΏϭΑϧϕϳέρϥϋϡΩΎόϟ˯ϭϫϝϘϧϡΩϋΏΟϳ ΓέΧΑϷϥϣιϠΧΗϟϡυϧΗϲΗϟΔϳϧρϭϟϭϠϟϊϳϣΟΓΎϋέϣΏΟϳϝλϔϧϣΝέΧϣϪϟϥϭϛϳϥ x 10-5 4 ϝΎϛγΎΑ4ρϳΣϣϟϲΑϠγϟρϐοϟίϭΎΟΗϳϻϥΏΟϳϯέΧϷΩϭϗϭϟωϭϧϭίΎϐϟΎΑϝϣόΗϯέΧΓίϬΟϊϣΔϧΧΩϣϟϡΩΧΗγΔϟΎΣϲϓ ΓΩϳΟϥΎϛϣϟϲϓΔϳϭϬΗϟϥϥϣΩϛ΄ΗˬΏΎΑγϷϩΫϬϟ έΎΑ ΔρΎΧΓέϭλΑϡϛΣΗϟΓίϬΟΩΩϋ·ϭϑϟΎΧϣϟϝΎϣόΗγϻΔϳϟϭγϣϊϧλϣϟϝϣΣΗϳϻ ϊϣΟΗΏϧΟΗϟϙϟΫϭΔϧΧΩϣϟργϥϋΦγϭϟέϭηϗϑϳυϧΗΑΎϣϭΩϡϗίΎϬΟϠϟϝΎόϔϟ˯ΩϷϭϝϳϐηΗϟΔϣϼγΔϳέϭΩϟϑϳυϧΗϟϭΔϧΎϳλϟΕΎϳϠϣϋϥϣοΗ ϡΎυΗϧΎΑέΗϠϔϟϝΩΑΗγϭϑϳυϧΗΑϡϗϡΣηϟ ϕϳέΣϟΏΑγϳΩϗΓέΣϟΕϼόηϟϡΩΧΗγίΎϬΟϟΕΣΗ ϱϭηϣ ϡΎόρϟϱϭηϟέΎϧϝόηΗϻ ϝΎόΗηϼϟνέόΗϳϥϥϛϣϳϲϠϘϟΕϳίϥϷΕϻϭϛ΄ϣϟϲϠϗΩϧϋΔΑΎϗέϥϭΩΓϼϘϣϟϙέΗΗϻ ϕϳέΣΏϭηϧϲϓέΗϼϔϟϝΩΑΗγϭΔϧΧΩϣϟϑϳυϧΗΑΔλΎΧϟΕΎϣϳϠόΗϟΎΑϡίΗϟϻϡΩϋΏΑγΗϳΩϗ έϣΗγϣϑέη·ΕΣΗϊοϭΗϥϲϐΑϧϳϭϡΣηϟέΗϼϓΕϳΑΛΗϥϭΩϥΎΧΩϟρϔηΔϧΧΩϣΗϓϡΩϋΏΟϳ ΓέϘΗγϣϲϟΎϘϣϟϝόΟϊϣρϘϓϥΎΧΩϟρϔηΔϧΧΩϣΕΣΗίΎϐϟΓίϬΟϡΩΧΗγΏΟϳ ίΎϬΟϟϝΧΩΓέέΣϟϡϛέΗΫϫϊϧϣϳγϰϠϋϭ2ΔϗΎρϟϯϭΗγϣΩϧϋΔϧΧΩϣϟϝϣόΗϥΏΟϳˬίΎϐϟΎΑϲϬρρΎϘϧΙϼΛϥϣέΛϛϡΩΧΗγΩϧϋ ΓΩέΎΑΎϬϧϻϭΩϛ΄ΗˬϳΑΎλϣϟαϣϟϝΑϗ ΔϳΑέϬϛΔϣΩλΙϭΩΣϲϓϙϟΫΏΑγΗϳΩϗ±ϳΣλϝϛηΑϪΑΔλΎΧϟϳΑΎλϣϟΏϳϛέΗϥϭΩ˯ΎρϐϟϙέΗΗϻϭϝϣόΗγΗϻ ϝϣόϟΕίΎϔϗϝϣόΗγˬΔϧΎϳλϟϭΏϳϛέΗϟΕΎϳϠϣϋϊϳϣΟ˯ΎϧΛ ΝέΎΧϟϲϓϡΩΧΗγϼϟϡϼϣέϳϏίΎϬΟϟ ΔϧΧΎγΎϬϳϟ·ϝϭλϭϟϥϛϣϳϲΗϟ˯ίΟϷϥϭϛΗΩϗΔϣΩΧΗγϣΔϧΧΩϣϟϥϭϛΗΎϣΩϧϋ ΕΎϔλϭϣϟΔΣϭϟϰϠϋ ϝΑϘΗγϣϟϲϓΓέΎηΗγϼϟϝϳϟΩϟΫϫϰϠϋυϓΎΣ AE1 06/2015 400010808485 GB F AE n Whirlpool® Registered trademark/TM Trademark of Whirlpool group of companies - © Copyright Whirlpool Europe s.r.l. 2015. All rights reserved - http://www.whirlpool.eu Printed in Italy