1
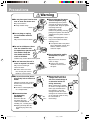
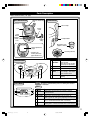
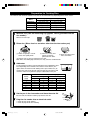
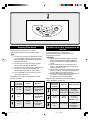
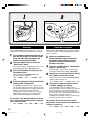
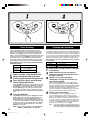
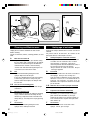
®
Electronic Rice Cooker/Warmer
Cuiseur de riz / Réchaud électronique
==
!"
Operating Instructions
Manuel d’utilisation
!"
!"
SR-LE10 (1.0L)
SR-LE18 (1.8L)
● Thank you very much for
purchasing Panasonic
Electronic Rice Cooker/Warmer.
Read all instructions before use. Save
these instructions for future reference.
● Nous vous remercions d’avoir
arrêté votre choix sur ce
cuiseur de riz / réchaud
électronique Panasonic.
Il est recommandé de lire
attentivement ce manuel avant
d’utiliser l’appareil.
● Panasonic =
!"= = =
== !K
= !== != != !
I= !"#= !"= !"
!"#= !K
Contents
Table des matières ==
Safety .............................. 1
Precautions
Consignes de ............... 1 =
sécurité
Important ......................... 2
Safeguards
Precautions ..................... 3
Parts Description ............ 11
Preparation for .............. 15
Cooking Rice
Cooking Rice ................. 19
Keeping Rice ................. 21
Warm
● !"#$%&'
!
!"#$%&'()$
!"#$%
! KKKKKKKKK 1
!"# KKKKKKKKKKKKKKK N
Précautions à ............... 5 != KKKKKKKKKKKK 7
prendre
= KKKKKKKKKKKKK 13
Nomenclature ............. 12
= KKKKKKKKKKKKKKK 17
Préparation pour ........ 16
la cuisson du riz
KKKKKKKKKKKKKKKKKKK 20
Cuisson du riz ............ 19
Maintien du riz à la ..... 21 KKKKKKKKKKKKKKKKKKKKK 22
! KKKKKKKKKKKKKKKKKKKKK V
!" KKKKKKKKKKKKKKK NQ
! KKKKKKKKKKKKKKKKKK NU
KKKKKKKKKKKKKKKKKKKKKKKKKK OM
KKKKKKKKKKKKKKKKKKKKKKKKKK OO
température de service
Reheating ...................... 23
Réchauffage ............... 23 KKKKKKKKKKKKKKKKKKK 24
KKKKKKKKKKKKKKKKKKKKKK OQ
Stewing ......................... 25
Cuisson en ragoût ...... 25 = = ! KKKK 26
Cuisson à l’étuvée ...... 27
= ! KKKKKKKKKK 28
Cuisson par ................ 29
! KKKKKKKKKKKKKKKK 30
minuterie
!" KKKKKKKKKKKKKKK OS
! KKKKKKKKKKKKKKKKKK OU
! KKKKKKKKKKKKKKKKKK PM
Nettoyage et ............... 31 = KKKKKKKKKKKKK 32
entretien
KKKKKKKKKKKKKKKKKKKKKKKKKK PO
Problèmes de ............. 35 == KKKKKKK 37
cuisson
=====
Guide de ..................... 42
!>\ KKKKKKKKKKKKK 43
dépannage
Spécifications ............. 45 KKKKKKKKKKKKKKKKKKKKK 46
!" KKKKKKKKKKKKKKK PV
!
!"#$ KKKKKKK QQ
Steaming ....................... 27
Timer Cooking ............... 29
Cleaning and ................. 31
Maintenance
If rice is not .................... 33
cooked well
Troubleshooting ............ 41
Specifications ................ 45
Recipes ......................... 47
(Steaming Vegetables)
SR-LE10/18 (Cover)
1
7/7/06, 9:44 AM
KKKKKKKKKKKKKKKKKKKKKKKKKK QS
Safety Precautions
always follow these precautions
Consignes de sécurité Toujours respecter ces instructions
= ! == !"= !"K
!"#
!"#
In order to prevent the risk of danger to the operator of this product or those nearby, and damaging
property, be sure to follow the safety precautions outlined below.
Afin d’éviter à l’utilisateur de ce produit et à son entourage tout risque de danger et afin d’éviter tout
dommage sur le produit, suivre attentivement les consignes de sécurité indiquées ci-dessous.
= = === !====== != =
!"#$%&'()*+,-&./01-23456789:;<=>
•
•
•
•
= !"== !"K== = !==== != =
= == != !K
!"#$%&$'()*+,-./$01231$456789:;<=>?@
å
å
•
•
==
!"=
!"K
The following terms are used for precautions. They are separated depending on the degree of the
danger or damage that may occur if their contents are ignored while using this product.
Les indications suivantes sont utilisées à titre de précaution. Elles sont classées en fonction du degré
de danger ou de l’importance des dégâts susceptibles de se produire si elles sont ignorées los de
l’utilisation de ce produit.
Warning
Mise en garde
=
•
•
!"=
Caution
Attention
=
!=
====
This symbol indicates information that, if not heeded, could possibly result in loss of life or serious injury.
Ce symbole identifie des mesures dont le non respect peut entrainer des blessures graves, voire mortelles.
= ======== != !K== !"K
!"#$ !"#$%&'( !
This symbol indicates information that, if not heeded, could result in injury or property damage.
Ce symbole identifie des mesures dont le non respect peut entrainer des blessures graves et des
dommages materiels importants.
= == == === != != != !K== !"K
!"#$ !"#$%&= !
The following signs are used to explain operations that you are requested to follow. They are separated
as shown below. (Below are examples of the signs used in this manual.)
Les pictogrammes suivants sont utilisés pour expliquer les opérations que vous devez suivre. Ils sont
classés comme indiqué ci-dessous (Voir ci-dessous des exemples de pictogrammes utilisés dans ce
manuel).
= = != !== = !== !"K= == !=
= != === !KF
!" !"#$%&'() !"#$%&'(
This signs designates actions that you must never do (prohibited actions).
Ce pictogramme désigne ce que vous ne devez faire en aucun cas (actions interdites).
ø
˚
= = !== === =
!"#$%&' !
===
!"E =FK
This signs designates actions that you must do (required actions).
Ce pictogramme désigne ce que vous devez toujours faire (actions obligatoires).
= = != ===
!"#$%&' ! !
=
!"E
å
•
ø
•
May result in fire or explosion.
Risque d’incendie ou d’explosion.
!K=E
= !"= ==
!"#$%&'(
!K
•
•
=FK
Warning
Mise en garde
=
Never use this vacuum cleaner near or to clean up flammable or
burning items or materials (i.e., gasoline, kerosene, thinner, or
burning cigarettes).
Ne jamais utiliser cet aspirateur à proximité d’éléments ou de matériaux
inflammables ou incandescents (essence, kérosène, diluant ou cigarettes
allumées).
== != ======= = !==
= != !EW= I=I= === !=FK
!"#$%&'()*+,-./0 !" !#$%!&'()*+,-
1
SR-LE10/18 (1-3)
1
7/7/06, 1:34 PM
IMPORTANT SAFEGUARDS
When using electrical appliances, basic safety precautions should always be followed, including the following:
1.
Read all instructions.
2.
Do not touch hot surfaces. Use handles or knobs.
3.
To protect against electrical hazards do not immerse cord, plugs, and Rice Cooker, except pan, in
water or other liquid.
4.
Close supervision is necessary when any appliance is used by or near children.
5.
Unplug from outlet when not in use and before cleaning. Allow cooling before putting on or taking off
parts.
6.
Do not operate any appliance with a damaged cord or plug or after the appliance malfunctions, or
has been damaged in any manner. Return appliance to the nearest authorized service facility for
examination, repair or adjustment.
7.
The use of accessory attachments not recommended by the appliance manufacturer may be
hazardous.
8.
Do not use outdoors.
9.
Do not let cord hang over edge of table or counter, or touch hot surfaces.
10.
Do not place on or near a hot gas or electric burner, or in a heated oven.
11.
Extreme caution must be used when moving an appliance containing hot oil or other hot liquids.
12.
Always attach plug to appliance first, then plug cord into the wall outlet. To disconnect, turn any
control to “off”, then remove plug from wall outlet.
13.
Do not use appliance for other than intended use.
14.SAVE THESE INSTRUCTIONS
15.
This product is intended for household use.
NOTE
A.
A short power supply cord (or cord set) is to be provided to reduce the hazards resulting from
becoming entangled in or tripping over a longer cord.
B.
Longer cord set or extension cords are available and may be used if care is exercised in their use.
C.
If a long cord set or extension cord is used,
(1) the marked electrical rating of the cord set or extension cord should be at least as great as the
electrical rating of the appliance.
(2) if the appliance is of the grounded type, the extension cord should be a grounding-type threewire cord, and
(3) the longer cord should be arranged so that it will not drape over the countertop or tabletop
where it can be pulled on by children or tripped over accidentally.
This appliance has a polarized plug; (one blade is wider than the other). As a safety feature, this plug will
fit into a polarized outlet only one way. If the plug does not fit fully into the outlet, reverse the plug. If it still
does not fit, contact a qualified electrician. Do not attempt to defeat this safety feature.
2
SR-LE10/18 (1-3)
2
7/7/06, 1:34 PM
Precautions
åWarning
Do not place your hand or face
over or near the steam vent.
May result in burns.
Keep children away.
Steam vent
ø
Do not plug or unplug
the rice cooker with wet
hands.
May result in electrical shock.
ø
Do not let children or those
who are unfamiliar with
the operations operate the
rice cooker. Keep the
rice cooker out of the
reach of children.
ø
Introduction
Do not immerse the unit in
water or expose it to water.
May result in shorting or
electrical shock.
If water enters the main
unit, consult your nearest
retailer or service center.
ø
Using a damaged power cord
may result in electrical shock,
shorting, or fire.
If the power cord or the power
plug is damaged, consult your
nearest retailer or service
center for repair.
Do not attempt to modify,
disassemble, or repair
the unit.
May result in fire, electrical
shock, or injury.
Consult your nearest
retailer or service center
for repair.
ø
ø
Be sure to insert the power
plug firmly into an electrical
outlet.
Improper insertion may result in
electrical shock or fire due to
overheating
˚
Do not use a damaged plug
or a warped outlet.
Remove dust from
the power plug
periodically.
Excessive dust on
the power plug may
reduce insulation due to
humidity, etc., resulting in fire.
(Avoid damage to the power
cord. Do not attempt to modify
the power cord. Keep the power
cord away from high
temperatures. Avoid
unnecessary bending, twisting,
pulling of the power cord. Do not
attempt to tie the power cord in a
bundle.)
Introduction
Children may receive burns or be injured.
Do not damage the power
cord or the power plug.
Do not use the unit at a
voltage other than 120 V
AC or the rated voltage of
an electrical outlet or a
wiring accessory.
When connecting a number
of cords to a single electrical
outlet, pay attention to the
total wattage. If the total
wattage exceeds the rated
wattage of an electrical outlet
or an extension cord, fire may
be caused due to
overheating.
Other than
120V
˚
˚
Unplug and wipe dust off
the power plug with a dry
cloth.
3
SR-LE10/18 (1-3)
3
7/7/06, 1:34 PM
Precautions
åCaution
Do not use the rice cooker on an
unstable surface or a mat easily affected
by heat.
Possible toppling of the unit may cause injury
or fire.
ø
Do not touch the metal
part on the inside of
the lid during or just
after use.
Metal
ø
May receive burns.
Do not place things near the steam vent.
The part exposed to steam may be deformed.
When using the rice cooker in a cabinet, etc.,
leave enough clearance to permit steam to
escape.
ø
Introduction
Be sure to grasp the power plug when
unplugging.
Pulling the cord may cause electrical
shock, shorting or fire.
Unplug the rice cooker from the
electrical outlet when not in use.
˚
˚
May cause electrical shock, electrical
leaks or fire due to insulation deterioration.
Do not use the unit in wet locations or
high temperatures.
May cause electrical
shock, electrical leaks or
fire.
ø
Use only the specified pan.
Burns or injury may be received due to
overheating or abnormal operations.
ø
Do not touch the hook button while
carrying the rice cooker.
Cover will open and may cause injury or
burns.
ø
Be sure to hold onto the power plug
when rewinding it to keep from being
hit by the plug.
˚
May receive injury.
Please use with dry hands.
Touching high temperature parts may
cause burns.
˚
To avoid damage to the non-stick coating on the cooking pan.
Avoid tapping
or scratching
the pan
Do not put
spoons or
other utensils
in the pan
Do not attempt to clean
the pan with scouring
powder, steel wool or
a nylon scouring pad.
Clean the pan
with a sponge
Do not use Wash the pan immediately after Do not attempt to wash When using a metal tablespoon, be
vinegar.
cooking with any seasoning.
rice with a whisk.
careful not to damage the coating.
Very Important
Keep the outside of the pan and the
Close the lid when in use.
pan sensor clean and dry.
Bottom and side
Pan sensor
Heating plate
Any foreign substance may cause the rice
cooker to malfunction.
To pull the power plug,
pull it horizontally as
shown.
Do not use the rice cooker in direct
sunlight.
The rice cooker may malfunction.
Do not cover the lid with a cloth.
The lid may become deformed, cracked or
discolored.
Unplug the rice cooker from the
electrical outlet when the pan is
removed.
4
SR-LE10_18 (4-7)
4
7/7/06, 9:49 AM
Parts Description
Figures show SR-LE10 (1.0L type)
Moisture Retaining
Cap
Part Identification
Accessories
Outer Lid
Rice Scoop
1.0
Pan
L
CUP
5
0.6
3
0.2
1
Power
Cord
Hook
Button
Control
Panel/
LCD
Scoop Holder
Power
Plug
Measuring Cup
(Approx. 180ml)
Heater protective
paper
Steaming Basket
• Remove the
heater protective
paper before use.
Control Panel
1
Keep
Warm/Off
2
3
4
Timer
Menu
Cooking
Timer
5
Start
MICROCOMPUTER
Keep Warm
Off
FUZZY
Regular
Porridge
Quick
Timer
Start
Slow Cook
Reheat
Cooking
Timer
Steam
Timer
Cooking Timer
Menu
1 2
3
Turns on/off the keep
warm function.
Turns off the timer function.
Cancels preset operations.
Sets the timer.
Selects a cooking menu.
Sets the cooking time for
the “Porridge”, “Slow Cook”
or the “Steam” menu.
Starts cooking or timer
cooking.
4 5
LCD
LCD / Menu
Displays selected cooking menu, the cooking time and other
information.
Menu
1
2
3
Regular
Porridge
Quick
Slow Cook
Reheat
Steam
Timer
Cooking Timer
4
5
6
1 Regular
2 Quick
3
4
5
6
Cooks white rice into regular hardness.
Cooks white rice faster than the “Regular” menu by
10 to 20 minutes.
Reheat
Use for reheating cold rice.
Porridge Cooks white rice into porridge. You can select the
“thick” type or the “thin” type by adjusting the water level.
Slow cook Stews meat or vegetables. (You can select the cooking
time in 30-minute increments from 1 to 4 hours.)
Steam
Steams vegetables or other foods. (You can select the
cooking time in 1-minute increments from 1 to 60 minutes.)
11
SR-LE10_18 (11-12)
11
7/7/06, 1:41 PM
Preparation for Cooking Rice
The minimum and maximum amount of rice that can be cooked will vary depending on the menu chosen.
Menu
White Rice
Thick Porridge
Thin Porridge
Slow Cook
Cooking Capacity (Measuring cup)
SR-LE10 (1.0L)
SR-LE18 (1.8L)
1 cup to 5.5 cups
3 cup to 10 cups
0.5 cup to 1.5 cups
1 cup to 3 cups
0.5 cup to 1 cup
0.5 cup to 2 cups
1.8qts (1.7 L)
3.2qts (3.1 L)
Measure rice. (Use the measuring cup [approx. 180 ml] provided with the
rice cooker.)
Measure in level cups.
Rinse rice. (Rinse rice in a container other than the rice cooker pan)
(2) Rinse rice evenly and
(3) Rinse rice with a lot of
quickly so that rice
water, then drain.
grains rub each other.
(4) Repeat steps (2) and (3) until water runs clear.
Note: Rinse rice thoroughly. Otherwise, rice may scorch or smell like bran.
(1) Rinse rice quickly in a lot of
water, then quickly drain.
Add water.
Put the rinsed rice into the pan and add water to the appropriate water
level depending on the amount of rice and the menu chosen. (The
figure shows the water level for cooking three cups of white rice.) To
measure the water level correctly, place the pan on a flat surface and
check the water level against the gauges at both sides of the pan.
Volume
of rice
(cup)
1
/2
1
1 1/2
2
2 1/2
3
1.0
L
CUP
5
0.6
3
0.2
1
Volume of water (measuring cup)
Thick Porridge
Thin Porridge
SR-LE10
SR-LE18
SR-LE10
SR-LE18
2 1/2
–
3 1/2
3 1/4
1
5
5
6 /2
6 1/2
1
7 /4
7
–
9 3/4
–
9
–
12 3/4
–
11
–
–
–
13
–
–
Set the pan in the rice cooker and close the outer lid.
Be sure to fit the moisture retaining cap into the outer lid.
Plug the rice cooker into an electrical outlet.
☞ Refer to page 18 for cooking.
☞ Refer to page 28 for timer cooking.
15
SR-LE10_18 (15-16)
15
7/7/06, 10:07 AM
MICROCOMPUTER
Keep Warm
Off
FUZZY
Regular
Quick
Timer
Start
Porridge
Slow Cook
Reheat
Cooking
Timer
Steam
Timer
Cooking Timer
Menu
Cooking Rice
Cuisson du riz
Select a menu. Each pressing of the
[Menu] key moves 1 (or 2) from one
menu to another as follows.
“Regular” “Quick” “Reheat” “Porridge” “Slow Cook” “Steam” “Regular” KKK
(The figure shows the indication on the LCD
when the “Regular” menu is selected.)
Press the [Start] key.
The [Start] lamp lights up when cooking starts.
The remaining time counter will appear on the
LCD display when the remaining time reaches
the time shown on the chart below.
Quick
Regular or Porridge
9 minutes
13 minutes
When cooking is finished, the rice cooker beeps
and automatically switches to the keep warm
mode.
Fluff (mix) rice completely within 30
minutes after cooking is finished.
Rice is ready to be served.
Sélectionner un menu. Chaque
pression de la touche [Menu] appelle
l’affichage d’un menu différent dans
l’ordre suivant.
“Regular” “Quick” “Reheat” “Porridge” “Slow Cook” “Steam” “Regular” KKK
(L’illustration à la page précédente montre
l’affichage lorsque le menu “Regular” a été
sélectionné.)
Appuyer sur [Start].
Le voyant [Start] s’allume lorsque la cuisson
s’amorce.
Le compte à rebours de la durée restante apparaît
sur l’afficheur à cristaux liquides lorsque la durée
atteint le temps indiqué au tableau ci-dessous.
Quick
Regular ou Porridge
9 minutes
13 minutes
La cuisson terminée, le cuiseur émet une tonalité
d’avertissement et passe automatiquement dans
le mode maintien de température de service.
Moins de 30 minutes après la fin de
la cuisson, aérer (mélanger) le riz.
Le riz est alors prêt à servir.
Standard cooking time (Approx. in minutes)
Temps de cuisson (en minutes)
Regular
Quick
Porridge
Regular
Quick
Porridge
50
29 to 39
62 to 78
50
29 à 39
62 à 78
Note
Do not use the keep warm function
for porridge or mixed rice to prevent
rice from producing odor, becoming
discolored or sticky. Press the [Keep
Warm/Off] key to turn off the keep
warm function.
Remarque
Ne pas utiliser la fonction
maintien au chaud pour le
porridge ou le riz mélangé car il
pourrait dégager des odeurs ou
devenir décoloré ou collant.
Appuyer sur [Keep Warm/Off]
pour désactiver cette fonction.
19
SR-LE10_18 (19-20)
19
7/7/06, 10:14 AM
MICROCOMPUTER
Keep Warm
Off
FUZZY
Regular
Quick
Timer
Start
Porridge
Slow Cook
Reheat
Steam
Timer
Cooking
Timer
Cooking Timer
Menu
Keeping Rice Warm
When cooking is finished, the rice cooker
automatically switches to the keep warm mode.
Note
1) Do not use the keep warm function for mixed
rice, or porridge to prevent mixed rice from
releasing odors or discoloration, and porridge
from becoming gluey.
2) Do not keep rice warm more than 12 hours.
May result in odor and discoloration.
3) Do not leave rice scoop or other utensils in the
pan. The rice may be contaminated with
unwanted bacteria and may cause odors.
4) Do not add cold rice to the warm rice in the
pan. May result in odor.
Depending on the elapsed warming time, the unit
operates as follows:
Elapsed time
in the keep
warm mode
Less than
24 hours
Display
Operation
Elapsed time Operating in the
in the keep
keep warm mode
warm mode (The [Keep Warm/Off]
(hours)
lamp is lit.)
24 to 96
hours
No display
After 96
hours
Standby
condition
Maintien du riz à la température de
service
La cuisson terminée, le cuiseur passe
automatiquement dans le mode maintien de
température de service.
Remarque
1) Ne pas utiliser la fonction maintien au chaud
pour le riz mélangé ou le porridge il pourrait
dégager des odeurs ou devenir décoloré ou
gluant.
2) Ne pas maintenir le riz au chaud plus de 12
heures. Cela pourrait dégager une mauvaise
odeur et décolorer le riz.
3) Ne pas laisser la louche ou tout autre ustensile
dans la casserole. Cela pourrait contaminer le
riz et lui donner une mauvaise odeur.
4) Ne pas ajouter de riz froid au riz chaud dans la
casserole. Cela pourrait provoquer le
dégagement d’une mauvaise odeur.
Selon le temps de maintien au chaud écoulé, le
cuiseur fonctionne comme suit:
Temps écoulé
dans le mode
température
de service
Moins de
24 heures
Affichage
Mode d’opération
Temps écoulé Mode température
dans le mode
de service
température de
(Le voyant [Keep
service (heures) Warm/Off] est allumé.)
Operating in the
keep warm mode
(The [Keep Warm/Off]
lamp is lit.)
24 à 96
heures
Aucun
affichage
The keep warm
function will
be automatically
turned off.
Après 96
heures
État d’attente
Mode température
de service
(Le voyant [Keep
Warm/Off] est allumé.)
La fonction maintien
au chaud est
automatiquement
désactivée.
21
SR-LE10_18 (21-22)
21
7/7/06, 10:19 AM
1.0
L
CUP
5
0.6
3
0.2
1
MICROCOMPUTER
Keep Warm
Off
FUZZY
Regular
(e.g. = 1.0L type)
Quick
Timer
Start
Porridge
Slow Cook
Reheat
Steam
Timer
Cooking
Timer
Cooking Timer
Menu
Measuring cup
Reheating
Réchauffage
Fluff the cold rice in the pan.
Aérer le riz dans la casserole.
Before reheating cold rice, add water as
shown in the table below with the measuring
cup provided.
Avant de réchauffer le riz froid, ajouter de l’eau
avec la tasse graduée incluse selon la quantité
indiquée au tableau.
Volume of cold rice (refer to water Volume of water (cup)
level scale on the pan)
1.0 L
1.8 L
1/4
1
–
1/2
2
–
1/2
1/2
3
1/2
4
–
5
–
1
Cold rice reheating maximum capacity (level)
3
5
e.g.: Figure 1 shows the volume of cold rice at level 3
and amount of water have to add in is 1/2 cup.
Press [Menu] key to select “Reheat”
function.
Press [Start] key.
The [Start] lamp lights to indicate that reheating
process has started. The LCD will display ‘20’,
regardless of how much rice is being reheated,
indicating that it will take 20 minutes for
reheating process to finish. The displayed time
will be reduced one minute at a time. The rice
cooker beeps when the reheating process is
complete and automatically switches to keep
warm. The [Keep Warm/Off] light goes on. Fluff
(mix) the rice as soon as the reheating process is
complete in order to ensure good tasting rice.
Note
1) Do not add cold rice exceeding
the maximum capacity.
2) Reheat cold rice only once to
avoid deterioration of flavor.
3) Use the reheat function for white
rice only.
Volume de riz froid (voir l’échelle
de niveau d’eau sur la casserole)
1
2
3
4
5
Capacité maximale de réchauffage
de riz froid (niveau)
23
3
5
Ex. : La figure 1 montre le volume de riz froid au niveau
3 et la quantité d’eau nécessaire, soit 1/2 tasse.
Appuyer sur la touche [Menu] pour
sélectionner la fonction “ Reheat ”
(Réchauffage).
Appuyer sur la touche [Start].
Le voyant [Start] s’allume pour indiquer que le
réchauffage a débuté. L’afficheur indique “20”,
quelle que soit la quantité de riz à réchauffer,
confirmant qu’il faut 20 minutes avant la fin du
réchauffage. La durée affichée diminue d’une
minute à la fois. Le cuiseur de riz émet un signal
sonore lorsque le réchauffage est terminé et se
commute automatiquement en mode maintien au
chaud. Le voyant [Keep Warm/Off] s’allume.
Aérer (mélanger) le riz le plus tôt possible après la
fin du réchauffage pour obtenir un riz de bon goût.
Remarque 1) Ne pas dépasser la capacité
maximale de riz froid.
2) Réchauffer une seule fois le riz
froid pour éviter la perte de saveur.
3) Utiliser la fonction de réchauffage
avec du riz blanc seulement.
23
SR-LE10_18 (23-24)
Volume d’eau (tasse)
1,0 L
1,8 L
1/4
–
1/2
–
1/2
1/2
1/2
–
–
1
7/7/06, 10:24 AM
MICROCOMPUTER
Keep Warm
Off
FUZZY
Regular
Quick
Timer
Start
Porridge
Slow Cook
Reheat
Steam
Timer
Cooking
Timer
Cooking Timer
Menu
Stewing
Use the “Slow Cook” menu for stewing. You can set the
cooking time in 30-minute increments from 1 to 4 hours.
Put ingredients and seasonings into the
pan and set the pan into the rice cooker.
Close the outer lid and plug the rice
cooker into an electrical outlet.
Press the [Menu] key to select the
“Slow Cook” menu.
“1H” (1 hour 0 minutes) is displayed on the LCD as the
default cooking time for the “Slow Cook” menu.
Press the [Cooking Timer] key to set
the cooking time.
Cuisson en ragoût
Utiliser le menu “Slow Cook” pour la cuisson en ragoût.
Le temps de cuisson se règle par période de 30 minutes,
entre 1 à 4 heures.
Mettre les ingrédients et les
assaisonnements dans la casserole
puis placer celle-ci dans le cuiseur.
Fermer le couvercle extérieur, puis
brancher le cuiseur.
Appuyer sur [Menu] pour sélectionner
le menu “Slow Cook”.
L’indication “1H” (1 heure 0 minute) s’affiche (temps
de cuisson par défaut dans le mode “Slow Cook”).
Each pressing of the [Cooking Timer] key
changes the time as follows:
Appuyer sur la touche [Cooking Timer]
pour régler la durée de cuisson.
“1H” “1H30M” “2H” “3H30M” “4H” “1H”
Chaque pression sur la touche [Cooking Timer]
change la durée comme suit:
Press the [Start] key when the desired
cooking time is displayed.
The [Start] lamp lights up when stewing starts.
The LCD will change every thirty minutes to show
the remaining cooking time. The display will count
down by one-minute increments when the
remaining time reaches one hour. The unit will
automatically switch to the Keep Warm mode
when the desired cooking time is complete.
For example: If the desired cooking time is two
hours, the remaining cooking time is displayed
on the LCD as follows:
“2H” “1H30M” “1H” “59M” “58M” “1M”
“1H” “1H30M” “2H” “3H30M” “4H” “1H”
Lorsque le temps de cuisson désiré
s’affiche, appuyer sur [Start].
Le voyant [Start] s’allume pour indiquer que la
cuisson en ragoût s’amorce. L’indication sur l’afficheur
change à chaque trente minutes pour indiquer la
durée restante de cuisson. Lorsque la durée restante
passe sous une heure, l’afficheur fait le décompte une
minute à la fois. L’appareil se commute
automatiquement en mode maintien au chaud lorsque
la durée de cuisson choisie est écoulée.
Par exemple: Si la durée de cuisson est de
deux heures, la durée restante est indiquée sur
l’afficheur comme suit:
“2H” “1H30M” “1H” “59M” “58M” “1M”
25
SR-LE10_18 (25-26)
25
7/7/06, 1:37 PM
MICROCOMPUTER
Keep Warm
FUZZY
Off
Regular
Quick
Timer
Start
Porridge
Slow Cook
Reheat
Steam
Timer
Cooking
Timer
Cooking Timer
Menu
Steaming
Cuisson à l’étuvée
Using the measuring cup provided,
place the amount of water shown
below into the pan, and place the pan
in the rice cooker.
À l’aide de la tasse graduée fournie,
placer la quantité d’eau indiquée cidessous dans la casserole et déposer
la casserole dans le cuiseur de riz.
1.0L=type 450ml=(2.5 cups)
Type 1,0 L= 450 ml=(2,5 tasses)
Type 1,8 L= 630 ml=(3,5 tasses)
1.8L=type 630ml=(3.5 cups)
Set the steaming basket in the pan
and place ingredients on the plate.
Close the outer lid.
Press the [Menu] key to select the
“Steam” menu.
Placer le panier de cuisson à la
vapeur dans la casserole et déposer
les aliments dans le panier. Refermer
le couvercle extérieur.
Appuyer sur [Menu] pour sélectionner
le menu “ Steam ”.
“10M” (10 minutes) is displayed on the LCD as
the default cooking time for the “Steam” menu.
L’indication “10M” (10 minutes) s’affiche (temps
de cuisson par défaut dans le mode de cuisson à
l’étuvée).
Press the [Cooking Timer] key to set
the cooking time. You can select the
cooking time from 1 to 60 minutes.
Appuyer sur la touche [Cooking
Timer] pour régler la durée de
cuisson. Il est possible de choisir une
durée de cuisson de 1 à 60 minutes.
Each pressing of the [Cooking Timer] key
changes the time as follows:
“10M” “11M” “12M” “60M” “1M” “2M” “10M”
Press the [Start] key when the desired
cooking time is displayed.
The [Start] lamp lights when steaming starts.
The remaining cooking time is displayed on LCD
and it counts down in one minutes increments.
When the preset cooking time elapses or when water
evaporates completely, the rice cooker beeps and
automatically switches to the keep warm mode.
Chaque pression sur la touche [Cooking Timer]
change la durée comme suit:
“10M” “11M” “12M” “60M” “1M” “2M” “10M”
Lorsque le temps de cuisson désiré
s’affiche, appuyer sur [Start].
Le voyant [Start] s’allume pour indiquer que la
cuisson à l’étuvée s’amorce. La durée restante
de cuisson est indiquée sur l’afficheur et le
décompte s’effectue une minute à la fois.
Une fois le temps de cuisson écoulé ou lorsque l’eau
s’est complètement évaporée, l’avertisseur se
déclenche et le cuiseur passe automatiquement dans
le mode température de service.
27
SR-LE10_18 (27-28)
27
7/7/06, 10:35 AM
MICROCOMPUTER
MICROCOMPUTER
Keep Warm
FUZZY
Off
Regular
Slow Cook
Reheat
Steam
Timer
FUZZY
Off
Porridge
Quick
Timer
Keep Warm
Start
Regular
Quick
Cooking
Timer
Timer
Cooking Timer
Start
Porridge
Slow Cook
Reheat
Steam
Timer
Cooking
Timer
Cooking Timer
Menu
Menu
Timer Cooking
Cuisson par minuterie
This is a count down timer, not a clock timer, so, the rice
cooker will complete cooking when the number of hours the
Timer was set for elapses. The Timer begins to count down
from the time the [Start] key is pressed. For example, if the
Timer is set for 4H 30M cooking will be completed 4 hours and
30 minutes from the time the [Start] key was pressed, not at
4:30a.m. or 4:30p.m.. Timer cooking is not recommended
when using seasonings or other ingredients since they settle
to the bottom of the pan which may cause abnormal cooking.
Applicable Menus for Timer Cooking and Recommended
Time Setting Range.
Comme il s’agit d’une minuterie à rebours et non pas d’une horloge, le cuiseur
de riz arrête la cuisson lorsque le durée entrée s’est écoulée sur la minuterie.
Par exemple, si la minuterie est réglée à 4 h 30 min, la cuisson s’arrête 4 h
et 30 min après qu’une pression a été exercée sur la touche [Start], non
pas à 4 h 30 ou 16 h 30. La cuisson par minuterie n’est pas recommandée
lorsque des assaisonnements ou autres ingrédients sont utilisés car ceux-ci
se déposent au fond de la casserole et donnent une cuisson anormale.
Menus applicables à la cuisson par minuterie et durées de cuisson
recommandées
Menu
Time Setting Range
Regular
1 ~ 13 hours
Porridge
Cooking Time ~ 13 hours
e.g.: To complete 2-hour 30-minute Porridge 6 hours later.
Select “Porridge” using the [Menu] key.
Set the cooking time (2:30) by pressing
[Cooking Timer] key before setting the timer.
Press the [Timer] key to select the timer
setting. ([Start] light flashes)
Press the [Timer] key until 6H is displayed. The first time
the [Timer] key is pressed the previous timer setting will
be displayed. The timer will advance 30 minutes each
time the [Timer] key is pressed. You can keep the key
pressed so that the timer changes continuously. Timer
for “Porridge” cannot be set for shorter than the cooking
time.
Press the [Start] key.
The [Start] lamp goes off and the [Timer] lamp lights.
Timer cooking is set. As soon as cooking starts, the
[Timer] lamp goes off and the [Start] lamp lights. If
the selected menu is Regular and the Timer is set for
1 hour, or the selected menu is Porridge and the Timer
setting is the same as the cooking timer’s, the [Start]
lamp will light and cooking will begin as soon as the
[Start] key is pressed.
Note: Timer setting cannot be used for “Quick”,
“Reheat”, “Slow Cook” and “Steam”.
Menu
Regular
Porridge
Plage de temps de cuisson
1 à 13 heures
Durée de cuisson ~ 13 heures environ
Ex. : Pour compléter 6 heures plus tard un porridge en 2 h 30 min.
Sélectionner “Porridge” (Gruau) à l’aide de la
touche [Menu].
Régler la durée de cuisson (2 h 30 min) en
appuyant sur la touche [Cooking Timer] avant
de régler la minuterie.
Appuyer sur la touche [Timer] pour
sélectionner le réglage de la minuterie. (Le
voyant [Start] clignote)
Appuyer sur la touche [Timer] jusqu’à ce que l’afficheur indique
“6H”. Lors de la première pression sur la touche [Timer], l’afficheur
indique le réglage précédent de la minuterie. La minuterie avance de
30 minutes à chaque pression sur la touche [Timer]. Il est possible
de maintenir une pression pour avancer la durée de manière
continue. La minuterie pour le “Porridge” (Gruau) ne peut pas être
réglée à une valeur inférieure à celle de la durée de cuisson.
Appuyer sur la touche [Start].
Le voyant [Start] s’éteint et le voyant [Timer] s’allume. La
cuisson par minuterie est alors réglée. Dès que la cuisson
débute, le voyant [Timer] s’éteint et le voyant [Start] s’allume. Si
le menu “Regular” (Cuisson normale) est choisi et la minuterie
est réglée à 1 heure, ou si le menu “Porridge” (Gruau) est choisi
et la minuterie est réglée à la même valeur que celle de la durée
de cuisson, le voyant [Start] s’allume et la cuisson débute dès
qu’une pression est exercée sur la touche [Start].
Nota : Le réglage de la minuterie ne peut pas être utilisé pour les
fonctions “Quick” (Rapide), “Reheat” (Réchauffage), “Slow
Cook” (Cuisson lente) et “Steam” (Cuisson à la vapeur).
29
SR-LE10_18 (29-30)
29
7/7/06, 10:38 AM
E
A
(1)
B
C
D
Nettoyage et entretien
Cleaning and Maintenance
Unplug the rice cooker and allow the unit to cool
before cleaning.
Avant de le nettoyer, débrancher le cuiseur et le laisser
refroidir.
Do not use benzine, thinner, scouring powder, or steel
wool.
Ne jamais utiliser de benzène, de solvant ou de
détergent abrasif, ni de tampon à récurer.
A
A
Main unit and outer lid
Nettoyer avec un chiffon humide. Si le cuiseur
est utilisé avec un couvercle sale, la saleté
aura tendance à s’incruster. Bien que le
couvercle pourrait devenir décoloré ou taché, il
ne présente aucun risque de nocivité.
*Ne pas utiliser de savon à vaisselle. Ne pas
immerger l’appareil.
Wipe with a damp cloth. If you continue using
the rice cooker with a soiled lid, the soil will not
come off. The outer lid may be discolored or
stained with the soil, but is not unsanitary.
*Do not wash with dishwashing detergent. Do
not immerse the main unit in water.
B
B
Pan
Wash with dishwashing detergent and a
sponge. Wipe water off the pan.
If the pan is deformed or the non-stick coating
is worn away, purchase a new pan at your
nearest retailer and replace the old pan with
the new one.
C D Pan sensor and heating plate
Wipe with a damp cloth, if caked with foreign
substances.
E
Moisture retaining cap
C D Détecteur de casserole et plaque chauffante
Au besoin, nettoyer avec un chiffon humide.
E
Wash with dishwashing detergent and a
sponge. Rinse and wipe water off.
Capuchon de rétention d’humidité
Tirer vers l’extérieur pour enlever le capteur
d’humidité (1). Le laver à l’eau et l’essuyer
pour enlever toute humidité (2). Essuyer
l’intérieur de l’orifice avec un linge humide (3).
Fixer correctement le capteur en le poussant
dans l’orifice (4).
F
Accessories
Casserole
Laver la casserole avec du savon à vaisselle et
une éponge. Essuyer avec un linge sec.
Si la casserole est déformée ou si la surface antiadhésive est usée, il est recommandé de se
procurer une nouvelle casserole chez un
détaillant et de remplacer l’ancienne casserole
par la nouvelle.
Pull outwards to remove the moisture retaining
cap (1). Wash it with water and wipe off any
moisture (2). Wipe the inside of the hole with
damp cloth (3). Securely fit the cap by pushing
it (4).
F
Unité principale et couvercle extérieur
Accessoires
Laver avec du savon à vaisselle et une
éponge. Rincer, puis essuyer.
31
SR-LE10_18 (31-32)
31
7/7/06, 10:46 AM
If rice is not cooked well
Problem
Possible Cause (Reference page)
● The amount of rice was not measured with the measuring cup
provided with the rice cooker. (☞ Page 15)
The amount of rice cannot be measured correctly with a
measuring rice bin or other methods.
● The water level was not adjusted correctly.
Rice boils over.
● Rice was not washed and rinsed thoroughly until water ran clear.
(☞ Page 15)
● The moisture retaining cap was not used. (☞ Page 15)
● Rice may be cooked hard or soft depending on the type of rice or
the storage period. Newer rice crop has more moisture so slightly
less water than usual should be used when cooking.
● Adjust the water level according to your preference.
● The amount of rice was not measured with the measuring cup
provided with the rice cooker. (☞ Page 15)
● The water level was not checked against the gauges on both
Rice is hard/soft/
half-boiled.
sides of the pan.
● The menu key was not set correctly. (☞ Page 19)
● Rice mixed with various ingredients and seasonings was cooked
using the timer cooking function. (☞ Page 29)
● Foreign substances stuck to the outside surface of the pan, the
pan sensor or the heating plate. (☞ Page 31)
● Rice may be cooked hard when cooked in the “Quick” menu.
● Rice was not washed and rinsed thoroughly until water ran clear.
(☞ Page 15)
Rice is scorched.
A light brown layer of
rice at the very bottom
of the pan is normal.
● Rice mixed with various ingredients and seasonings was cooked.
● Foreign substances stuck to the outside surface of the pan, the
pan sensor, or the heating plate. (☞ Page 31)
● The pan was not washed thoroughly.
Wash the pan carefully especially after cooking mixed rice.
33
SR-LE10_18 (33-34)
33
7/7/06, 10:52 AM
Problem
Possible Cause (Reference page)
● Porridge may become gluey if the timer function is used to cook it.
Porridge becomes
gluey.
● Do not use the keep warm function for porridge.
● The moisture retaining cap was not used. (☞ Page 15)
● Rice was kept warm for longer than 12 hours. (☞ Page 21)
Rice is dry.
● The outer lid was not closed completely, permitting steam to
escape and cause rice to become dry.
● Rice was not washed and rinsed thoroughly until water ran clear.
(☞ Page 15)
● The pan was not washed thoroughly.
Wash the pan carefully especially after cooking mixed rice.
● Rice was not fluffed (mixed) within 30 minutes after cooking was
finished. (☞ Page 19)
Fluff (mix) rice to prevent its surface from becoming dry.
Rice is
discolored/smells.
● Rice was kept warm for longer than 12 hours. (☞ Page 21)
● Cold rice was added to warm rice.
● Rice scoop was left in the pan while rice was kept warm.
● Mixed rice was kept warm. (☞ Page 21)
● Rice was repeatedly reheated. (☞ Page 23)
● The rice cooker was turned off.
34
SR-LE10_18 (33-34)
34
7/7/06, 10:52 AM
Troubleshooting
Problem
(Check the following items before you
contact your retailer or service center.)
Possible Cause (Reference page)
● Rice is not cooked at
a preset time.
● The [Start] key was not pressed.
● The timer was set to a time shorter than the minimum time required
● Cooking started as
soon as timer cooking
was activated.
for cooking. (☞ Page 29)
Cooking starts upon activation of the timer cooking function
under such contitions.
● Key functions were
disabled.
● Pressing the [Start]
key did not activate
the cooking function.
● Steam escaped from
other than the steam
vent.
● The rice cooker was disconnected from an electrical outlet.
● The [Start] key was pressed while the [Keep Warm/off] lamp was
lit.
● The packing of the lid or the brim of the pan was deformed or rice
was stuck to them.
● The cooking finishing time may be delayed.
● Power failed while
the rice cooker was
in operation.
● Cooking may not be done properly depending on the length of
power failure.
● Clicking sounds are produced by power adjustments.
● The rice cooker
produced sounds
while the unit was in
the cooking or the
keep warm mode.
Error Code
● Popping sounds are produced when bursts of steam escape from
between the pan and the heating plate. Over time this will damage
the heater and pan, so it is important to keep them dry before
using the unit.
Possible Cause
2 or 3 indication lamps
flash together
● Consult your nearest retailer or service center for repair.
❈ Replace damaged or deformed pan.
❈ Consult your nearest retailer or service center if rice, water or other material is put directly into the main unit
without using the pan.
❈ The marks (●,
) above the [Start] and the [Keep Warm/Off] keys are for blind people.
41
SR-LE10_18 (41-42)
41
7/7/06, 11:03 AM
Specifications
SR-LE10
Model
SR-LE18
120 V AC
Power Supply
590
Cooking
Power Consumption
(Approx.) W
835
Keeping Warm
84 (26* )
95 (28*1)
White Rice
0.18~1.0 (1~5.5)
0.54~1.8 (3~10)
Cooking Capacity
L
(cups)
1
Mixed Rice
0.18~0.54 (1~3)
0.54~1.08 (3~6)
Thick Porridge
0.09~0.27 (0.5~1.5)
0.18~0.54 (1~3)
Thin Porridge
0.09~0.18 (0.5~1)
0.09~0.36 (0.5~2)
Power Cord Length m (ft)
0.9 (3)
0.9 (3)
Weight (Approx.) kg
2.7 (5.9 lbs.)
3.4 (7.5 lbs)
Dimensions
(Approx.) cm
Width
23.4 (9.2”)
26.3 (10.4”)
Depth
32.1 (12.6”)
35.1 (13.8”)
Height
20.1 (7.9”)
23.2 (9.1”)
39.6*2 (15.6”*2 )
45.2*2 (17.8”*2)
*1: Average power consumption in the keep warm mode in a stable condition (at a room temperature of 20˚C or
68˚F)
*2: Height with the outer lid open
• Power consumption is approximately 2W when the rice cooker is turned off.
For further assistance contact Panasonic at: 800-211-PANA (7262) or visit our website at
www.panasonic.com
Spécifications
Modèle
SR-LE10
SR-LE18
Alimentation
Consommation
(approx.) W
120 V c.a.
Cuisson
590
835
1
Température de service
84 (26* )
95 (28*1)
Riz blanc
0,18~1,0 (1~5,5)
0,54~1,8 (3~10)
Riz mélangé
0,18~0,54 (1~3)
0,54~1,08 (3~6)
Porridge épais
0,09~0,27 (0,5~1,5)
0,18~0,54 (1~3)
Porridge léger
0,09~0,18 (0,5~1)
0,09~0,36 (0,5~2)
Longueur du cordon m (pì)
0,9 (3)
0,9 (3)
Poids (approx.) kg
Capacité en L
(tasses)
Dimensions
(approx.) cm
2,7 (5,9 lb)
3,4 (7,5 lb)
Largeur
23,4 (9,2 po)
26,3 (10,4 po)
Profondeur
32,1 (12,6 po)
35,1 (13,8 po)
Hauteur
20,1 (7,9 po)
39,6*2 (15,6 po*2)
23,2 (9,1 po)
45,2*2 (17,8 po*2)
*1 : Consommation d’énergie moyenne en mode maintien à la température de service
(à une température ambiante de 20˚C ou 68˚F )
*2 : Hauteur avec le couvercle extérieur ouvert
• La consommation d’énergie est d’environ 2 W lorsque le contact est coupé sur le cuiseur de riz.
Pour obtenir de l’aide, composez le 800-211-PANA (7262) ou visiter notre site Internet à www.panasonic.com
45
SR-LE10_18 (45-46)
45
7/7/06, 11:07 AM
Recipes
STEAMING VEGETABLES
1.
2.
3.
4.
Pour water into the rice cooker pan.
Place the steaming basket inside the pan.
Add vegetables (place in a dish if required).
Close the lid and plug in the power cord.
Vegetable
Artichokes : Globe
: Jerusalem
Asparagus
Beans : Green waxed, whole
Broccoli
Beets
: Whole
: Peeled, Whole
: Spears
: Whole
Carrots
: Small, whole
Cauliflower
: Flowerettes
Corn on the Cob
Peas
: Shelled
Potatoes, Sweet Potatoes, Quartered
Summer Squash, Zucchini
: Cut-up
Winter Squash
: Pieces
Acorn Squash
: Half
Spinach
Frozen Mixed Vegetables
Panasonic Consumer Electronics Company,
Division of Panasonic Corporation of America
One Panasonic Way, Secaucus, New Jersey 07094
5. Select “Steam” and set the “Cooking time”.
(refer to the table below)
6. Stir the vegetables occasionally and continue
cooking until the “Cooking time” is complete.
Quantity
Time ( minute)
2-4
2-4
8 oz. (200N)
1 lb. (500N)
1 lb. (500N)
1 lb. (500N)
30-40
15-20
5-10
10-12
5-10
30-35
1 lb. (500N)
1 lb. (500N)
3-6 ears
8 oz. (200N)
5 oz. (140N)
1 lb. (500N)
1 lb. (500N)
1 lb. (650N)
5 oz. (150N)
10 oz. (300N)
10-12
12-14
10-13
6-8
20-25
5-10
20-30
17-20
6-8
6-8
Matsushita Electric Industrial Co., Ltd.
Osaka 542-8588, Japan
RZ19A393
M0109P1093
Printed in Malaysia
47
SR-LE10/18 Back page (47)
47
7/7/06, 11:34 AM