1
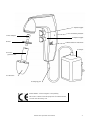
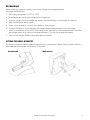
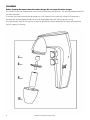
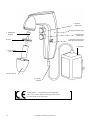
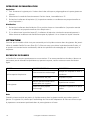
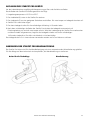
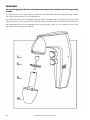
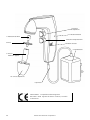
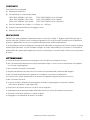
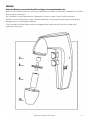
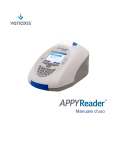
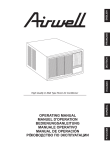
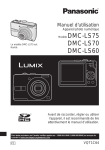
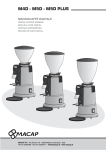
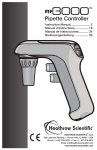
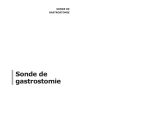
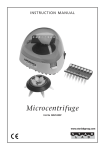
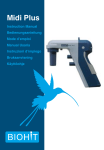
I N S T R U C T I O N M ANUAL
Cordless Pipette Controller
Cat. No: E4866-0021 (UK Plug)
Cat. No: E4866-1126 (Euro Plug)
www.starlabgroup.com
English
Français
Deutsch
Italiano
2–8
9 – 15
16 – 22
23 – 29
English
INTRODUCTION
The StarPet Pro has been carefully designed and manufactured as a lightweight, cordless pipetting aid for
use with all plastic/glass pipettes in volumes from 1 to 100ml.
Constructed in recyclable materials, the StarPet Pro operates on two rechargeable, long-life,
environmentally friendly, 1.2V nickel metal hydride batteries, and has uniquely formed finger triggers to
minimize any high pressure points. These triggers also control the intake and dispense speeds.
A battery warning light (4) is triggered whenever the charge in the batteries is low to let you know the
batteries should be recharged. Pipetting with a StarPet Pro can also take place while the unit is connected
to the charger (5).
The StarPet Pro has a conveniently located slide switch (3) which allows you to select between three
modes of operation:
Slide switch position ‘High’ (top)
Slide switch position ‘Low’ (middle)
Slide switch position ‘G’ (bottom)
Suction and dispense at full speed (Blow-out)
Suction and dispense at reduced speed (Blow-out)
Suction at reduced speed, dispense by gravity (To Deliver)
TECHNICAL DATA
Batteries
2 x 1.2V nickel metal hydride
Battery service Life
500–1000 cycles from empty
Charger
75mA/h for 14 hours plug-in;
UK, European, USA, Indian, Japanese or Australian versions
Installation (over voltage) category II
Double insulation indicated on charger by symbol
Overall weight
180g without stand
Filter (8)
Hydrophobic 25mm dia 0.45μm (fitted), plus two additional spare filters
1 x 0.45μm
1 x 0.20μm
Case material
ASA
Nosecone material (10) ASA
Pipette holder (9)
Silicone
Pipette types
Plastic or glass 1–100ml
2
StarPet Pro Operator Instructions
1. Aspirate trigger
4. Low battery indicator
7. Filter adaptor
2. Dispense trigger
8. Filter
3. Mode selection slide switch
5. Charger
9. Silicone
pipette holder
10. Nosecone
6. Charging jack
2004/108/EEC
The
StarPet ProElectromagnetic
is CE markedCompatibility
to
Low
Voltage
Directive
73/23/EEC
and
EN 61326-1:2006 Electrical Equipment
for Measurement,
Control and Laboratory
Use.
Electromagnetic
Compatibility
Directive 89/336/EEC
StarPet Pro Operator Instructions
3
CONTENTS
The StarPet Pro kit comprises
(a) StarPet Pro cordless pipette controller
(b) Charger; either
220V-240V 50/60Hz 3-pin (UK),
220V-240V 50/60Hz 2-pin (Europe),
100V-120V 50/60Hz 2-pin (USA),
100V-120V 50/60Hz 2-pin (Japan),
220V-240V 50/60Hz 3-pin (India), or 220V-240V 50/60Hz 2-pin (Australia)
(c) Two spare hydrophobic filters, 1 x 0.45μm and 1 x 0.20μm
(d) Bench stand / wall bracket
(e) Instruction manual
SAFETY INSTRUCTIONS
The StarPet Pro has been designed with safety in mind. It is lightweight and balances safely in the hand.
The triggers have been carefully designed to eliminate pressure points and control of intake and delivery
is, therefore, made easier.
It is recommended when using deleterious liquids that the user wears protective clothing including
goggles and gloves. If in doubt ask your safety officer. Please consult and establish appropriate health
and safety practices applicable to the liquid being dispensed within your working environment.
WARNING!
• Only use this instrument within the recommended limits of its chemical resistance.
• Never use with fuming liquids which are incompatible with ASA, silicone or polyproplyene.
• Never use with highly flammable liquids.
• Observe the reagent manufacturer’s safety information.
• Never use the instrument in an atmosphere with danger of explosion.
• Always store on bench stand or wall bracket when not in use.
• Never use force when in use.
• Should the instrument fail to work to specification, stop pipetting and check instructions
headed Trouble Shooting (see page 7).
• Only recharge with manufacturer’s original charger.
• All repairs must be carried out by an authorised dealer.
• Only use the manufacturer’s accessories and spare parts.
• Charger must only be used indoors and protected against moisture.
4
StarPet Pro Operator Instructions
RECHARGING
Before starting to operate, carefully check mains voltage and recharge batteries.
To charge the StarPet Pro:
1
Recharging temperature +10°C to +35°C.
2
Plug the charger jack (6) into the base of the StarPet Pro.
3
Plug the charger (5) into a suitable wall socket. The red indicator on the charger will light up.
4
Place StarPet Pro on bench stand.
5
Allow unit to charge for 14 hours from empty to fully charged.
6
Once the StarPet Pro is fully charged, the charger automatically switches to a trickle charge
and the red indicator will turn off. If the charge to the StarPet Pro is interrupted and then re-started,
the charger starts its full 14-hour charging cycle again. This will not damage the battery.
7
Only use the charger indoors and protect against moisture.
FITTING THE WALL BRACKET
The StarPet Pro bench stand is supplied ready to use as a wall bracket. When used as a bench stand it is
recommended that the wall fitting section is removed.
Bench Stand
Wall Bracket
StarPet Pro Operator Instructions
5
CLEANING
Before cleaning disconnect from the mains charger. Do not clean the mains charger.
The StarPet Pro can be cleaned with most common laboratory disinfectants. The silicone pipette holder (9)
can be autoclaved.
To remove the nosecone and pipette holder turn the nosecone anti-clockwise. When the nosecone is
removed the silicone pipette holder can also be disengaged from the filter by gently turning.
The hydrophobic filter (8) will require occasional replacement when wetted by the liquid and whenever
suction capacity is slowing.
6
StarPet Pro Operator Instructions
PIPETTING
To aspirate
1
Carefully hold the pipette and insert it securely into the polypropylene nose cone and silicone holder.
2
Select mode of operation–High, Low, for blowout pipettes. ‘G’ for ‘to deliver’.
3
Depress upper trigger (1) (The harder the pipetting triggers are pressed the faster the aspiration.)
To dispense
1
In BLOW-OUT mode, (mode switch on high or low) depress the lower trigger (2)
(The harder the pipetting triggers are pressed, the faster the dispense).
2
If ‘G’ gravity mode is chosen, the upper aspirate trigger automatically operates at low speed while
the lower trigger opens the pipette to atmosphere, allowing liquid to run out.
WARNING!
Please ensure that no liquid enters the instrument. The StarPet Pro should never be used without the
filter (8). The filter also prevents liquid from entering the instrument. Where liquid has entered please
clean and replace filter.
TROUBLE SHOOTING
The StarPet Pro is virtually service-free. If the recommendations above do not resolve the problem, please
contact your authorised dealer.
PROBLEM
Suction capacity slow
Pipette drips
POSSIBLE CAUSE
REMEDY
Filter Blocked, dirty or damaged
Clean or replace membrane filter
Batteries low
Recharge
Pipette not securely positioned in
silicone pipette holder
Re-attach
Pipette holder or pipette damaged
Replace
Note
When the meniscus level has been reached liquid should not drip out of the pipette. If the pipette does
drip, check that the adaptor assembly and filter are correctly assembled and the pipette is properly located
into the silicone pipette holder.
StarPet Pro Operator Instructions
7
RETURN FOR REPAIR
In the unlikely event of repair, or where the damage to the unit necessitates return to your distributor or
the manufacturer, please decontaminate the unit and complete the required decontamination certificate
where appropriate. Please also give details of the fault.
VOLTAGES
UK
220V-240V 50/60Hz 3-pin
Europe
220V-240V 50/60Hz 2-pin
USA
100V-120V 50/60Hz 2-pin
Japan
100V-120V 50/60Hz 2-pin
India
220V-240V 50/60Hz 3-pin
Australia 220V-240V 50/60Hz 2-pin
ORDERING DATA
StarPet Pro comes complete with charger, bench stand/ wall bracket with two spare membrane filters.
UK Plug
European Plug
Cat. No. E4866-0021
Cat. No. E4866-1126
Replacement charger
Cat. No. E4266-0050
ASA nosecone (white)
Cat. No. P2131-0002
5 spare 0.20μm filters
Cat. No. E4266-0890
5 spare 0.45μm filters
Cat. No. E4266-0030
Silicone Pipette holder
Cat. No. E4266-0040
8
StarPet Pro Operator Instructions
Français
INTRODUCTION
Le StarPet Pro est un pipeteur de faible poids sans fil compatible avec toutes les pipettes en verre et
plastique de 1 à 100 ml.
Le StarPet Pro est réalisé à partir de matériaux recyclables et fonctionne avec deux piles hybrides
nickel / métal de 1,2 V écologiques, rechargeables et à longue durée de vie. Ils disposent de deux
sélecteurs ergonomiques qui permettent de réduire les points de pression élevée tout en contrôlant les
vitesses d’aspiration et de distribution.
Un voyant d’alarme (4) s’allume lorsque les piles sont en fin de vie et doivent être rechargées. Le StarPet
Pro continue de fonctionner mème branché à l’unité de chargement (5).
Le StarPet Pro dispose également d’un sélecteur coulissant latéral autorisant trois modes de
fonctionnement:
Position haute
Position intermédiaire
Position basse (G)
Aspiration et distribution à vitesse maximum
Aspiration et distribution à vitesse réduite
Aspiration à vitesse réduite et distribution par gravité
INFORMATIONS TECHNIQUES
Piles
Deux piles hybrides nickel/métal de 1,2V
Durée de vie des piles
500 à 1000 cycles à compter du chargement
Chargeur
75 mA/h – Temps de fonctionnement une fois branché: 14 heures Versions britanniques, européennes, américaines, indiennes, japonaises
ou australiennes disponibles.
Résistance (surtension): Catégorie II
Le symbole
indique la présence d’une double isolation.
Masse
180 g sans support
Filtres (8)
Un filtre hydrophobe de 25 mm de diamètre (Capacité: 0,45 μm)
monté plus deux filtres supplémentaires disponibles en rechange
1 x 0,45 μm
1 x 0,20 μm
Matériau boîtier
ASA (Acrylonitrile – Styrène – Acrylate)
Matériau cône de nez (10)
ASA
Matériau porte pipette (9)
Silicone
Matériau pipettes
Verre ou plastique (Contenance: 1 à 100 ml)
Consignes d’utilisation StarPet Pro
9
1. Sélecteur
d’aspiration
4. Voyant d’alarme piles
7. Adaptateur
de filtre
2. Sélecteur de
distribution
3. Sélecteur coulissant de
mode de fonctionnement
8. Filtre
5. Chargeur
9. Porte pipette
en silicone
10. Cône de nez
6. Prise de
chargeur
2004/108/EEC
Compatibilité
Electromagnétique.
Un
marquage CE
a été accordé
au StarPet Pro suivant les
Directives
73/23/CEE
– Basse
Tensionde- et
89/336/CEE –
EN 61326-1:2006
Matériels
électriques
mesure,
de commande Electromagnétique
et de laboratoire
Compatibilité
10
Consignes d’utilisation StarPet Pro
DESCRIPTION
Le StarPet Pro se compose de:
(a) Un contrôleur de pipette
(b) Un chargeur:
220-240 V – 50/60 Hz – 3 broches (GB)
100-120 V – 50/60 Hz – 2 broches (USA)
220-240 V – 50/60 Hz – 3 broches (Inde)
220-240 V – 50/60 Hz – 2 broches (Europe)
100-120 V – 50/60 Hz – 2 broches (Japon)
220-240 V – 50/60 Hz – 2 broches (Australie)
(c) Deux filtres hydrophobes de rechange (1 x 0,45μm et 1 x 0,20μm)
(d) Un support fixé sur paillasse / Un support mural
(e) Un manuel d’utilisation
CONSIGNES DE SÉCURITÉ
Le StarPet Pro a été conçu pour fonctionner en toute sécurité. Il est léger et ergonomique (Bonne prise
en main). Ses sélecteurs ont été conçus pour éliminer les points de pression et autorisent ainsi le contrôle
des opérations d’aspiration et de distribution.
Les utilisateurs doivent porter des gants et lunettes de protection lors des opérations de manipulation de
fluides toxique. Consulter le Responsable Sécurité en cas de doute. Consulter et appliquer les consignes
Santé-Sécurité relatives aux fluides utilisés sur les lieux de travail.
AVERTISSEMENTS!
• Les modèles décrits ci-dessus doivent être utilisés dans les limites recommandées de leur résistance
chimique uniquement.
• Ne pas utiliser ces modèles pour la manipulation de liquides fumants dont les caractéristiques sont
incompatibles avec celles des matériaux ASA, silicone ou polypropylène.
• Ne jamais utiliser ces modèles pour la manipulation de liquides inflammables.
• Respecter les consignes de sécurité fournies par les fabricants de réactifs.
• Replacer ces modèles sur leurs supports respectifs (paillasse ou mur) en dehors des périodes
d’utilisation.
• Ne pas appliquer d’efforts lorsque ces modèles sont en fonctionnement.
• Lorsque ces modèles ne fonctionnent pas correctement, arrêter les opérations de manipulation puis
vérifier les consignes du chapitre Recherche de pannes (Page 14)
• Le chargement doit être réalisé à l’aide du chargeur fourni par le fabricant.
• Les réparations doivent être réalisées par un distributeur agréé uniquement.
• Utiliser les accessoires et les pieces de rechange fournies par le fabricant uniquement.
• Le chargeur doit être utilisé en intérieur uniquement et protégé contre l’humidité.
Consignes d’utilisation StarPet Pro
11
CONSIGNES DE CHARGEMENT
Vérifier la tension du secteur puis recharger les piles avant de lancer les opérations de manipulation.
Le chargement du StarPet Pros’ effectue comme indiqué ci-dessous:
1. Température de chargement: +10°C à +35°C
2. Engager la prise de chargement (6) dans l’embase du modèle StarPet Pro.
3. Brancher le chargeur (5) à une prise murale. Un voyant rouge s’allume lors du branchement.
4. Placer le modèle StarPet Pro sur la paillasse.
5. Le chargement complet (Vide – Maxi) s’effectue en 14 heures.
6. Une fois le chargement terminé, le chargeur passe automatiquement en mode ‘charge réduite’ et le
voyant rouge s’éteint. Le cycle de 14 H est réinitialisé en cas d’interruption suivi d’un redémarrage du
chargement. Cette réinitialisation n’entraîne aucun endommagement de la pile.
Le chargeur doit être utilisé en intérieur uniquement et protégé contre l’humidité.
FIXATION MURALE
Le support du modèle StarPet Pro monté sur paillasse est livré pré-équipé avec un support mural. Il est
recommandé de retirer les fixations murales.
Support monte
sur paillasse
12
Support mural
Consignes d’utilisation StarPet Pro
OPÉRATIONS DE NETTOYAGE
Débrancher pipeteur de son chargeur avant toutes opérations de nettoyage.
Ne pas nettoyer le chargeur.
Le StarPet Pro se nettoie à l’aide de produits désinfectants de laboratoire courants. Le porte pipette (9)
peut se nettoyer à autoclave.
Faire tourner le bec cônique dans le sens contraire des aiguilles d’une montre pour le déposer ainsi que le
porte pipette. Le porte pipette se dévisse du filtre en tournant lentement une fois ce cône déposé.
Le filtre hydrophobe (8) doit être remplacé lorsqu’il est imprégné par les liquides manipulés ou lorsque sa
capacité d’absorption est réduite.
Consignes d’utilisation StarPet Pro
13
OPÉRATIONS DE MANIPULATION
Aspiration:
1. Tenir fermement la pipette puis l’insérer dans le bec cônique en polypropylène et le porte pipette en
silicone.
2. Sélectionner le mode de fonctionnement: Position haute, intermédiaire ou ‘G’
3. Enclencher le sélecteur d’aspiration (1) (La pression exercée sur ce sélecteur est proportionnelle au
taux d’aspiration )
Distribution:
1. Enclencher le sélecteur de distribution (2) en position haute ou intermédiaire (La pression exercée
sur ce sélecteur est proportionnelle au taux d’aspiration )
2. Si l’on sélectionne la position basse (G), le sélecteur d’aspiration s’enclenche automatiquement à
faible vitesse et le sélecteur de distribution expose la pipette à l’air en laissant le liquide s’écouler.
ATTENTION!
S’assurer que le modèle utilisé n’est pas contaminé par les liquides contenus dans les pipettes. Ne jamais
utiliser le modèle StarPet Pro sans filtre (8). Ce filtre est conçu pour éviter la pénétration des fluides; s’il
se produit une contamination accidentelle, réaliser les opérations de nettoyage qui s’imposent puis le
remplacer.
RECHERCHE DE PANNES
Le StarPet Pro ne requiert pratiquement aucun entretien. Si les recommandations données ci-dessus ne
permettent pas de résoudre les problèmes qui peuvent se poser, veuillez contacter votre distributeur
agréé.
PANNE
Faible capacité d’aspiration
Fuites pipette
CAUSE POTENTIELLE
CORRECTION
Filtre encrassé ou endommagé
Nettoyer ou remplacer le filtre à
membrane
Faible puissance des piles
Remplacer les piles
Mauvais positionnement de la
pipette dans son support
Repositionner nement
Pipette ou porte pipette
endommagé
Remplacer la pipette ou le porte
pipette
Note
Quand le niveau souchité est atteint, le liquide contenu dans la pipette ne doit pas tomber goutte à
goutte. Si la pipette fuit, vénfiez que l’assemblage du filtre et de l’adaptateur de filtre est correct et que
la pipette est correctement positionée dans le porte-pipette en silicone.
14
Consignes d’utilisation StarPet Pro
RETOUR POUR RÉPARATION
Si une réparation s’avère nécessaire (Ce cas est peu probable) ou si l’endommagement subi impose
le retour du modèle concerné au distributeur, veuillez procéder à sa décontamination et remplir
le certificat approprié. Veuillez également fournir une description de la panne.
TENSIONS:
Grande Bretagne:
Europe:
USA:
Japon:
Inde:
Australie:
220-240V – 50/60 Hz – 3 broches
220-240V – 50/60Hz – 2 broches
100/120V – 50/60 Hz – 2 broches
100-120V – 50/60 Hz – 2 broches
220-240 V – 50/60 Hz – 3 broches
220-240V – 50/60 Hz – 2 broches
COMMANDES
Ensemble complet avec chargeur, support fixé sur paillasse / support mural et deux filtres à membrane de
rechange.
Starpet Pro
GB
Europe
N° Rèf.
N° Rèf.
E4866-0021
E4866-1126
Chargeur de rechange
E4266-0050
Bec cônique en ABS (Blanc)
P2131-0002
Boîte contenant 5 filtres 0,20μm de rechange
E4266-0890
Boîte contenant 5 filtres 0,45μm de rechange
E4266-0030
Porte pipette en silicone
E4266-0040
Consignes d’utilisation StarPet Pro
15
Deutsch
VORWORT
StarPet Pro ist eine leichte, kabellose Pipettierhilfe für alle Kunststoff- oder Glaspipetten mit einem
Volumen zwischen 1 und 100 ml.
StarPet Pro ist aus recyceltem Material hergestellt und wird mit zwei aufladbaren und langlebigen 1,2 V
Nickelmetallhydrid-Hochleistungsakkus umweltfreundlich betrieben. Die StarPet Pro verfügt über zwei
prägnant geformte Dosierknöpfe, mit denen sich Ansaug- und Abgabegeschwindigkeiten mit einem
Minimum an Druckaufwand regeln lassen.
Bei niedriger Akkuladung leuchtet eine Akkuwarnlampe (4) auf als Hinweis, dass ein Wechseln der Akkus
nötig wird. Das Pipettieren ist mit der StarPet Pro aber auch möglich, während das Gerät an das Ladegerät
(5) angeschlossen ist.
Der Anwender kann zwischen drei Funktionen wählen, die mit dem bequem angebrachten
Schiebeschalter (3) eingestellt werden:
Schiebeschalterstellung ‘High’ (oben)
Ansaugung und Ausgabe bei voller
(Geschwindigkeit) Ausblasen
Schiebeschalterstellung ‘Low’ (Mitte)
Ansaugen und Abgeben bei verringerter
Geschwindigkeit (Ausblasen)
Schiebeschalterstellung ‘G’ (unten)
Ansaugen bei verringerter Geschwindigkeit,
Abgeben durch Schwerkraft (Ausfließen)
TECHNISCHE DATEN
Akku
2 x 1,2 V Nickelmetallhydrid
Akku-Lebensdauer
500-1000 Aufladezyklen
Ladegerät
75 mA/h bei 14 Std. Einschaltzeit, Gesonderte
Ausführungen für Europa, Indien, Japan, Australien,
UK und USA
Installation (Überspannung) Kategorie II Doppelisolierung
auf Ladegerät durch Symbol
markiert
Gesamtgewicht
180 g ohne Ablagevorrichtung
Filter (8)
Hydrophobisch, 25 mm Ø, 0,45 μm (installiert) plus zwei
zusätzliche Ersatzfilter
1 x 0,45 μm
1 x 0,20 μm
Gehäusematerial
ASA
Konusmaterial (10)
ASA
Pipettenhalter (9)
Silikon
Pipettenarten
Kunststoff oder Glas 1-100ml
16
StarPet Pro Gebrauchsanweisung
1. Ansaug-Dosierknopf
1.
Ansaug-Dosierknopf
4.
4.Akku-Anzeige
Akku-Niedrigstand-Anzeige
7.
7. Filteranschluss
Filteradapter
2.
2.Abgabe-Dosierknopf
Ausgabe-Dosierknopf
8.
8. Filter
Filter
Zustandsauswahl3.3.Funktionsschalter
Schieberschalter
5.
5. Ladegerät
Ladegerät
Silikon-Pipettenhalter
9. Silikon
Pipettenhalter
10. Konus
10. Nasenkegel
Ladestecker
6. 6.
Ladekabel
CE
StarPet
dasKennzeichen
CE Kennzeichen
StarPet
ProPro
trägtträgt
das CE
nach nach.
2004/108/EEC Elektromagnetische
Verträglichkeit
Niederspannungsrichtlinie
73/23/EEC
und EMV-Richtlinie
EN61326-1:2006 Elektrische Mess-, Steuer- und Laborgeräte
89/336/EEC
StarPet Pro Gebrauchsanweisung
17
LIEFERUMFANG
Der StarPet Pro Satz besteht aus:
(a) StarPet Pro Pipettenkontrolle
(b) Ladegerät, entweder
220 V - 240 V 50/60 Hz, 3 Stifte (GB),
100 V - 120 V 50/60 Hz, 2 Stifte (USA),
220 V - 240 V 50/60 Hz, 3 Stifte (Indien) oder
220 V - 240 V 50/60 Hz, 2 Stifte (Europa),
100 V - 120 V 50/60 Hz, 2 Stifte (Japan)
220 V - 240 V 50/60 Hz, 2 Stifte (Australien)
(c) Zwei hydrophobische Ersatzfilter: 1 x 0,45 μm und 1 x 0,20 μm
(d) Halter für die Tischablage / Wandhalterung
(e) Gebrauchsanweisung
SICHERHEITSHINWEISE
Bei der Entwicklung der StarPet Pro wurde auf Sicherheit geachtet. Die Geräte sind leicht und liegen sicher
in der Hand. Die Dosierknöpfe sind so konstruiert, dass Druckstellen vermieden werden und die Steuerung
des Ansaugens und der Abgabe erleichtert wird.
Bei der Verwendung von schädlichen Flüssigkeiten wird das Tragen von Schutzkleidung einschließlich
Schutzbrillen und Handschuhen empfohlen. Im Zweifelsfall wenden Sie sich an Ihren Sicherheitsbeauftragten. Vor Abgabe der Flüssigkeit in Ihrer Arbeitsumgebung sind die einschlägigen
Arbeitsschutzbestimmungen für die Flüssigkeit zu beachten.
WARNUNG!
• Dieses Gerät darf nur entsprechend seiner chemischen Widerstandsfähigkeit eingesetzt werden.
• Nie mit rauchenden Flüssigkeiten verwenden, die nicht mit ASA, Silikon oder Polypropylen verträglich
sind.
• Nie mit leicht brennbaren Flüssigkeiten verwenden.
• Die Sicherheitsinformationen des Reagenzienherstellers sind zu beachten.
• Das Gerät darf nie in explosionsgefährdeter Umgebung eingesetzt werden.
• Nach Gebrauch in dem Pipettenhalter ablegen.
• Bei der Verwendung nie Gewalt anwenden.
• Sollte das Gerät nicht wie vorgesehen funktionieren, sofort das Pipettieren einstellen und in der
Gebrauchsanweisung den Absatz Fehlersuche (Seite 21) zu Rate ziehen.
• Nur mit dem Originalladegerät des Herstellers aufladen.
• Alle Reparaturen müssen durch einen Vertragshändler ausgeführt werden.
• Nur Zubehör und Ersatzteile des Herstellers verwenden.
• Das Ladegerät darf nur in Innenräumen verwendet werden und ist gegen Nässe zu schützen.
18
StarPet Pro Gebrauchsanweisung
AUFLADEN DER STARPET PRO GERÄTE
Vor der Inbetriebnahme sorgfältig die Netzspannung prüfen und die Akkus aufladen.
Das Aufladen der StarPet Pro Geräte geschieht wie folgt:
1. Umgebungstemperatur +10°C bis +35°C.
2. Das Ladekabel (6) unten in die StarPet Pro stecken.
3. Das Ladegerät (5) an eine geeignete Steckdose anschließen. Die rote Lampe am Ladegerät leuchtet auf.
4. StarPet Pro in den Halter legen.
5. Das leere Ladegerät sollte für die vollständige Aufladung 14 Stunden laden.
6. Nach dem vollständigen Aufladen der StarPet Pro schaltet das Ladegerät automatisch auf
Erhaltungsladung um und die rote Lampe erlischt. Wird der Ladevorgang der StarPet Pro unterbrochen
und dann wieder aufgenommen, beginnt das Ladegerät wieder mit einem vollständigen
14-Stunden-Ladezyklus. Das Akku wird dadurch nicht beschädigt.
Das Ladegerät darf nur in Innenräumen verwendet werden und ist vor Nässe zu schützen.
ANBRINGEN DER STARPET PRO WANDHALTERUNG
Der StarPet Pro Halter wird für die Wandbefestigung mit einer entsprechenden Wandhalterung geliefert.
Für die Ablage auf dem Labortisch wird empfohlen, die Wandhalterung zu entfernen.
Halter für die Tischablage
Wandhalterung
StarPet Pro Gebrauchsanweisung
19
REINIGUNG
Vor der Reinigung das Gerät von der Spannung trennen. Das Ladegerät darf nicht gereinigt
werden.
Die StarPet Pro kann mit den meisten herkömmlichen Labor-Desinfektionsmitteln gereinigt werden.
Der Silikon-Pipettenhalter (9) ist autoklavierbar.
Zur Abnahme von Konus und Pipettenhalter den Konus entgegen dem Uhrzeigersinn drehen. Nach
Abnahme des Koni lässt sich der Silikon-Pipettenhalter durch leichtes Drehen vom Filter abnehmen.
Der hydrophobe Filter (8) muss gelegentlich erneuert werden, wenn er mit Flüssigkeit benetzt wird
oder wenn die Ansaugkraft nachlässt.
20
StarPet Pro Gebrauchsanweisung
PIPETTIEREN
Ansaugen
1 Pipette vorsichtig aufnehmen und den Polypropylen-Konus und den Silikonhalter fest einsetzen.
2 Betriebsfunktion wählen – High und Low für Ausblas-Pipetten, ‘G’ für das „Ausfließen“
3 Oberen Dosierknopf (1) drücken (je kräftiger die Pipettier-Dosierknöpfe gedrückt werden, desto
schneller das Ansaugen).
Abgeben
1 In der „Ausblas“-Funktion (Schalterstellung High oder Low) den unteren Dosierknopf (2) drücken
(je kräftiger die Pipettier-Dosierknöpfe gedrückt werden, desto schneller die Ausgabe).
2 Wurde die Betriebsart ‘G’ „Ausfließen“ gewählt, läuft der obere Ansaug-Dosierknopf automatisch mit
geringer Geschwindigkeit, während der untere Dosierknopf die Pipette öffnet, so dass die Flüssigkeit
austreten kann.
WARNUNG!
Bitte stellen Sie sicher, dass keine Flüssigkeit in das Gerät eintritt. Die StarPet Pro Pipettierhilfen dürfen
nie ohne den Filter (8) verwendet werden. Der Filter verhindert auch das Eindringen von Flüssigkeit in das
Gerät. Ist Flüssigkeit eingedrungen, ist das Gerät zu reinigen und der Filter auszutauschen.
FEHLERSUCHE
Die StarPet Pro ist nahezu wartungsfrei. Falls die nachstehenden Empfehlungen das Problem nicht
beheben, wenden Sie sich bitte an Ihren Vertragshändler.
PROBLEM
MÖGLICHE URSACHE
BEHEBUNG
Geringe Ansaugleistung
Filter blockiert, verunreinigt oder
beschädigt
Membranfilter reinigen
oder erneuern
Batterieleistung zu niedrig
Batterie wieder aufladen
Pipette sitzt nicht fest im Silikonhalter
Neu einsetzen
Pipettenhalter oder Pipette
ist beschädigt
Pipettenhalter oder Pipette
erneuern
Pipette tropft
Hinweis
Wenn das Meniskusniveau erreicht ist, darf keine Flüssigkeit aus der Pipette tropfen. Sollte die Pipette
tropfen, prüfen Sie, ob der Adapter und der Filter korrekt montiert wurden und dass die Pipette korrekt
im Silikon-Pipettenhalter eingesetzt ist.
StarPet Pro Gebrauchsanweisung
21
EINSENDEN ZUR REPARATUR
Für den unwahrscheinlichen Fall einer erforderlichen Reparatur, oder wenn das Gerät wegen
Beschädigung an Ihren Händler oder den Hersteller zurückgeschickt werden muss, dekontaminieren Sie
bitte das Gerät und füllen Sie die erforderliche Dekontaminationsbescheinigung aus. Machen Sie bitte
außerdem nähere Angaben zum Fehler.
SPANNUNGEN
GB
220 - 240V 50/60Hz, 3 Stifte
Europa
220 - 240V 50/60Hz, 2 Stifte
USA
100 - 120V 50/60Hz, 2 Stifte
Japan
100 - 120V 50/60Hz, 2 Stifte
Indien
220 - 240V 50/60Hz, 3 Stifte
Australien
220 - 240V 50/60Hz, 2 Stifte
BESTELLDATEN
Zum Lieferumfang der StarPet Pro gehören ein Ladegerät, ein Halter mit Wandbefestigungsmaterial und
zwei Ersatz-Membranfilter.
Bestell-Nr.
UK Stecker
Kat.-Nr. E4688-0021
Europäischer Stecker
Kat.-Nr. E4866-1126
Starpet Pro E4866-0021 / E4866-1126
1 Ersatz-Ladegerät
Kat.-Nr. E4266-0050
1 ASA Konus (weiß)
Kat.-Nr. P2131-0002
5 Ersatzfilter 0,20 μm
Kat.-Nr. E4266-0890
5 Ersatzfilter 0,45 μm
Kat.-Nr. E4266-0030
1 Silikon-Pipettenhalter
Kat.-Nr. E4266-0040
22
StarPet Pro Gebrauchsanweisung
Italiano
INTRODUZIONE
StarPet Pro è stato prodotto ed ideato come un pipettatore leggero, senza cavo, per l’utilizzo con tutte
le pipette di plastica o vetro da 1 a 100 ml.
Costruito in materiale riciclabile, lo StarPet Pro funziona con due batterie ricaricabili al nickel da 1.2V.
Ha due comodi pulsanti di comando da utilizzare con un dito; questi pulsanti controllano inoltre la velocità
di aspirazione e dispensazione.
Una spia luminosa (4) avverte quando la batteria è scarica e necessita di essere ricaricata. E’ possibile
pipettare anche quando StarPet Pro è collegato all’unità di ricarica (5).
StarPet Pro ha un selettore (3) che permette all’utilizzatore di scegliere tre differenti modi di dispensazione:
Selettore sulla posizione ‘High’ (top)
Aspirazione e dispensazione alla massima velocità
Blow-out)
Selettore sulla posizione ‘Low’ (middle)
Aspirazione e dispensazione a velocità ridotta
(Blow-out)
Selettore sulla posizione ‘G’ (bottom)
Aspirazione a velocità ridotta e dispensazione per
gravità (To Deliver)
DATI TECNICI
Batterie
2 x 1.2V nickel
Durata batterie
500–1000 cicli di ricarica
Ricarica
75mA/h per 14 ore
Doppio isolamento, indicato sul caricabatteria dal simbolo
Peso
180g senza supporto
Filtro (8)
Idrofobico da 25mm 0.45μm (incorporato) più due
filtri addizionali di ricambio
1x 0.45μm
1x 0.20μm
Materiale
ASA
Cono di aspirazione
(10) ASA
Adattatore pipetta
Silicone (9)
Pipette utilizzabili
Plastica o vetro 1–100ml
StarPet Pro Istruzioni di operatore
23
1. Pulsante
di aspirazione
4. Indicatore batteria
7. Adattatore del filtro
2. Pulsante di dispensazione
8. Filtro
3. Selettore velocità
5. Caricabatteria
9. Silicone
Adattatore pipetta
10. Cono di aspirazione
6. Spinotto
2004/108/EEC
Compatibilità
Elettromagnetica
StarPet
Pro possiede
marcature
CE in accordo alle
Direttive
73/23/EECApparecchi
per apparecchi
tensione
EN61326-1:2006
elettriciadibassa
Misura,
Controlloe
Direttive
89/336/EEC per la compatibilità elettromagnetica
e Laboratorio
24
StarPet Pro Istruzioni di operatore
CONTENUTO
Il kit StarPet Pro comprende
(a) Pipettatore StarPet Pro
(b) Caricabatterie (in funzione del paese)
220V-240V 50/60Hz 3-pin (UK),
100V-120V 50/60Hz 2-pin (USA),
220V-240V 50/60Hz 3-pin (India)
220V-240V 50/60Hz 2-pin (Europe),
100V-120V 50/60Hz 2-pin (Japan),
220V-240V 50/60Hz 2-pin (Australia)
(c) Due filtri idrofobici di ricambio, 1 x 0.45μm e 1 x 0.20μm
(d) Supporto da banco/staffa di montaggio a muro
(e) Manuale di istruzioni
PRECAUZIONI
StarPet Pro è stato progettato rispettando tutte le norme di sicurezza. E’ leggero e ben bilanciato per un
utilizzo manuale. I pulsanti hanno un design ergonomico al fine di eliminare qualsiasi punto di pressione
eccessiva, agevolando un più sicuro controllo dell’aspirazione e della dispensazione.
E’ raccomandato l’utilizzo di dispositivi di protezione individuale come guanti ed occhiali qualora vengano
trattati liquidi pericolosi. In caso di dubbio rivolgersi ai propri responsabili per la sicurezza. L’utilizzatore è
responsabile del rispetto delle opportune misure di sicurezza per l’uso dei liquidi utilizzati nel suo processo
di lavoro.
ATTENZIONE!
• Utilizzare questo strumento esclusivamente nei limiti della sua resistenza chimica.
• Non utilizzare assolutamente con liquidi che esalano vapori o fumi e sono chimicamente incompatibili
con silicone e polipropilene.
• Non utilizzare con liquidi infiammabili.
• Seguire attentamente le prescrizioni di sicurezza raccomandate dal produttore dei reagenti.
• Non utilizzare assolutamente il pipettatore in ambienti con pericolo di esplosione.
• In caso di non utilizzo posizionare lo strumento sull’apposito supporto a banco od a muro.
• Non utilizzare con forza.
• In caso di arresto o difetto di funzionamento, arrestare il pipettaggio e consultare la tabella
“Soluzione ai problemi” (vedi pagina 28).
• Ricaricare lo strumento solo con l’unità di ricarica originale.
• Qualunque riparazione deve essere effettuata solo da un centro di assistenza autorizzato.
• Utilizzare unicamente accessori e ricambi originali.
• Proteggere il caricabatteria da eccessi di umidità.
StarPet Pro Istruzioni di operatore
25
RICARICA
Prima di iniziare l’operazione controllare il voltaggio di rete e le batterie.
Per ricaricare StarPet Pro
1
Temperatura da +10°C a +35°C.
2
Inserire la spina (6) nella base dello StarPet Pro.
3
Inserire il caricabatteria (5) in una presa a muro. Si illuminerà una spia rossa.
4
Posizionare StarPet Pro sul supporto da tavolo.
5
Lasciare in ricarica per 14 ore, da scarico a completamente carico.
6
Una volta che StarPet Pro è completamente carico, il caricabatterie passa automaticamente su una
posizione di compensazione e la spia rossa si spegne. Se il ciclo di ricarica viene interrotto e poi
riattivato, il caricabatteria effettuerà nuovamente un ciclo di ricarica di 14 ore, senza che questo
comporti un danno alla batteria.
Proteggere il caricabatteria da eccessi di umidità.
MONTAGGIO STAFFA A MURO
Il supporto da banco per StarPet Pro viene fornito pronto all’uso anche come possibilità di montaggio a
muro.
Supporto da banco
26
Staffa a muro
StarPet Pro Operator Instructions
PULIZIA
Prima di effettuare operazioni di pulizia scollegare lo strumento dalla rete.
StarPet Pro può essere pulito con i più comuni disinfettanti utilizzati in laboratorio. L’adattatore in silicone
(9) può essere autoclavato.
Per rimuovere il cono di aspirazione e l’adattatore in silicone ruotare il cono in senso antiorario.
Quando il cono di aspirazione è stato rimosso l’adattatore in silicone può essere disinserito dal proprio
alloggiamento con una leggera rotazione.
Il filtro idrofobico (8) deve essere sostituito se bagnato dal liquido ed ogni volta che la capacità di
aspirazione diminuisce.
StarPet Pro Operator Instructions
27
PER PIPETTARE
Aspirazione
1
Inserire la pipetta nel cono di aspirazione.
2
Selezionare la modalità di operazione, High, Low, oppure ‘G’.
3
Premere il pulsante superiore (1) (quanto più intensa è la pressione, tanto più rapidamente avviene
l’aspirazione.)
Dispensazione
1
Premere il pulsante inferiore (2) (quanto più intensa è la pressione del pulsante tanto più rapidamente
avviene la dispensazione).
2
Se si seleziona il modo ‘G’ gravità il pulsante superiore di aspirazione opera automaticamente ad una
bassa velocità mentre il pulsante inferiore consente lo svuotamento della pipetta per gravità (senza
utilizzo della pompa).
ATTENZIONE!
Assicurarsi che non entri liquido nello strumento. StarPet Pro non deve mai essere utilizzato senza il filtro
inserito (8). Il filtro impedisce ai liquidi di entrare nello strumento. Nel caso si verificasse un ingresso
accidentale di liquido è necessario pulire lo strumento e sostituire il filtro.
GUIDA ALLA RISOLUZIONE DEI PROBLEMI
StarPet Pro non necessita di alcuna manutenzione straordinaria. Nel caso i suggerimenti sotto proposti
non risolvano il problema contattate STARLAB Srl.
DIFETTO
Ridotta capacità di
aspirazione
La pipetta gocciola
POSSIBILE CAUSA
SOLUZIONE
Filtro bloccato, sporco o
denneggiato
Pulire o sostituire il filtro
a membrana
Batterie scariche
Ricaricare le batterie
La Pipetta non è posizionata
correttamente nell‘adattatore
in silicone
Riposizionare la pipetta
L‘adattatore o la ipetta sono
danneggiati
Sostituire
Nota
Quando si è prelevato il volume desiderato, il liquido non dovrebbe fuoriuscire dalla pipetta. Se la pipetta
gocciola controllare che tutti i componenti interni siano stati correttamente assemblati.
28
StarPet Pro Istruzioni di operatore
RESTITUZIONE PER RIPARAZIONE
In caso di spedizione per controllo e/o riparazione è necessario decontaminare lo strumento. Compilare un
certificato di decontaminazione ed allegare una breve descrizione del difetto riscontrato.
VOLTAGGI
UK
220V-240V 50/60Hz 3-pin
Europe
220V-240V 50/60Hz 2-pin
USA
100V-120V 50/60Hz 2-pin
Japan
100V-120V 50/60Hz 2-pin
India
220V-240V 50/60Hz 3-pin
Australia
220V-240V 50/60Hz 2-pin
INFORMAZIONI PER L’ORDINE
StarPet Pro viene fornito completo di caricabatteria, supporto da banco/muro e due filtri a membrana di
ricambio.
Starpet Pro
UK
Cat. No.
Europe
Cat. No.
E4866-0021
E4866-1126
Carica batterie
E4266-0050
Cono portapipetta (bianco)
P2131-0002
Scatola di 5 filtri da 0.20 μm
E4266-0890
Scatola di 5 filtri da 0.45 μm
E4266-0030
Adattatore pipetta in silicone
E4266-0040
StarPet Pro Istruzioni di operatore
29
NOTES
30
StarPet Pro Operator Instructions
NOTES
Waste Electrical and Electronic Equipment (WEEE) Directive (EN 50419)
This equipment is marked with the above recycling symbol. It means that at the end of
the life of the equipment it must not be disposed of with unsorted landfill waste. Contact
STARLAB for collection and proper disposal of this equipment. (European Union Only.)
StarPet Pro Operator Instructions
31
www.starlabgroup.com
STARLAB Int. GmbH
Neuer Höltigbaum 38
22143 Hamburg
Germany
STARLAB GmbH
Neuer Höltigbaum 38
22143 Hamburg
Germany
STARLAB (UK), Ltd
4 Tanners Drive
Milton Keynes MK14 5NA
United Kingdom
STARLAB FRANCE SARL
38 Avenue Henri Barbusse
92220 Bagneux
France
STARLAB S.r.l.
Via Corelli 36/5
20134 Milano
Italy
T: +49 (0)40 6759 939-0
F: +49 (0)40 6759 939-20
[email protected]
www.starlabgroup.com
T: +49 (0)40 6759 939-0
F: +49 (0)40 6759 939-20
[email protected]
www.starlab.de
T: +44 (0)1908 283800
F: +44 (0)1908 283802
[email protected]
www.starlab.co.uk
T: +33 (0)1 45 3652 80
F: +33 (0)1 45 3604 86
[email protected]
www.starlab-france.com
T: +39 02 7020 1040
F: +39 02 7020 1033
[email protected]
www.starlabitalia.it
February 2012. Technical specifications subject to change without notice.