1
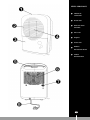
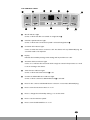
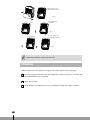
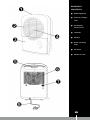
D 110 3 MANUEL D’UTILISATION 2 4 OPERATING MANUAL 16 1 GEBRUIKSAANWIJZING 30 Madame, Monsieur, Nous vous félicitons sincèrement pour l’achat de votre déshumidificateur. Vous venez d’acheter un produit de qualité qui vous donnera satisfaction pendant de longues années si vous l’utilisez de façon adéquate. Pour assurer une durée de vie optimale de votre déshumidificateur, lisez d’abord ces instructions d’utilisation. Les produits Tectro sont garantis contre tout vice de fabrication ou de conception pendant une durée de 2 ANS à compter de la date d’achat. Nous vous souhaitons beaucoup de confort avec votre déshumidificateur. Cordialement, PVG Holding B.V. Service Clientèle 1 LISEZ D’ABORD CES INSTRUCTIONS D’UTILISATION. 2 EN CAS DE DOUTE, CONSULTEZ VOTRE REVENDEUR. 3 2 PIÈCES PRINCIPALES A Tableau de commande B Entrée d’air C Réservoir d’eau amovible 4 Filtre à air E Poignée F Sortie d’air G Embout d’évacuation d’eau Fig. 1 H Cordon d’alimentation Fig. 2 3 3 PRESCRIPTIONS DE SÉCURITÉ Lisez attentivement ce manuel d’utilisation avant d’utiliser l’appareil et conservez-le pour toute référence ultérieure. Installez cet appareil uniquement s’il est conforme à la législation, aux ordonnances et aux normes locales et nationales. Ce produit a été conçu pour être utilisé comme déshumidificateur dans des maisons résidentielles, et il doit être utilisé uniquement dans des conditions domestiques normales et en intérieur, dans un séjour, une cuisine, une salle de bain ou un garage. Cet appareil est conçu uniquement pour une prise de courant avec mise à la terre avec une tension de raccordement de 220-240 V./ ~50 Hz. GÉNÉRAL •Pour obtenir un résultat optimal de votre appareil, ne pas le placer près d’un radiateur ou d’une autre source de chaleur. •Fermez toutes les fenêtres de la pièce pour une efficacité maximum. •La capacité de déshumidification dépend de la température de la pièce et du degré d’humidité de l’air. À basse température, il est normal que l’appareil extraie moins d’humidité de l’air. •Veillez à ce que le filtre soit toujours propre. Ceci évite un gaspillage d’énergie inutile et garantit un résultat optimal. •Si l’appareil a été débranché, il se remettra en route au bout de trois minutes. Ce retardement automatique protège le compresseur. 3 4 IMPORTANT L’appareil DOIT toujours être branché sur une prise de terre. Si l’alimentation électrique n’est pas connectée à la terre, l’appareil ne doit absolument pas être branché. La fiche électrique doit toujours être facilement accessible lorsque l’appareil est branché. Lisez soigneusement ce manuel et suivez les instructions. ≥ 40cm ≥ 20cm ≥ 20cm ≥ 20cm Fig. 3 ≥ 20cm Avant de brancher l’appareil, vérifiez si: •la tension de raccordement est bien la même que celle indiquée sur la plaque signalétique; •la prise et l’approvisionnement en courant sont bien adaptés à l’appareil; •la fiche électrique rentre bien dans la prise de contact; •l’appareil est bien posé sur une surface plane et stable. Si vous n’êtes pas certain que tout est en ordre, faites vérifier l’installation électrique par un professionnel. •Cet appareil n’est pas conçu pour des utilisateurs (y compris les enfants) qui présentent un handicap moteur, mental ou sensoriel, ou qui manquent d’expérience et de connaissances, sauf s’ils sont surveillés par une personne responsable de leur sécurité. •Cet appareil est fabriqué selon les normes de sécurité CE. Soyez cependant prudent lors de l’utilisation comme avec tout autre appareil électrique. •Ne jamais recouvrir la grille d’entrée et/ou de sortie d’air. 3 5 3 6 •Videz le réservoir d’eau avant de déplacer l’appareil. •Ne mettez jamais l’appareil en contact avec des produits chimiques. • Ne trempez l’appareil dans de l’eau. •N’enfilez aucun objet dans les diverses ouvertures de l’appareil. •Débranchez toujours l’appareil avant d’en nettoyer ou d’en changer une pièce. •Ne branchez JAMAIS l’appareil sur une rallonge électrique. Si vous ne disposez pas de prise de courant avec mise à la terre, faites assurer l’installation par un électricien reconnu. •Surveillez les enfants présents, ils ne doivent en aucun cas jouer avec l’appareil. •Si une éventuelle réparation est nécessaire, faites-la exécuter par un monteur reconnu ou par votre distributeur. Suivez les instructions d’entretien de l’appareil. •Débranchez toujours l’appareil lorsque vous ne l’utilisez pas. •Si le câble d’alimentation est endommagé, il doit être remplacé par le fabricant, son service après vente ou des personnes de qualification similaire afin d’éviter un danger. •Cet appareil peut être utilisé par des enfants de plus de 8 ans et des personnes aux capacités physiques, sensorielles ou mentales réduites, ou manquant d’expérience et de connaissances ; il faut pour cela leur avoir fourni un encadrement ou des consignes à propos de l’utilisation sécurisée de l’appareil et leur avoir expliqué clairement les dangers potentiels. • Ne pas laisser les enfants jouer avec l’appareil. •Les enfants ne doivent pas être chargés du nettoyage et de l’entretien de l’appareil sauf s’ils sont encadrés. ATTENTION! •N’utilisez jamais l’appareil avec un cordon ou une fiche électrique endommagé. Ne serrez jamais le cordon électrique et évitez tout contact avec des arêtes tranchantes. G ATTENTION! •Le non-respect des instructions peut conduire à une annulation de la garantie de l’appareil. LE PANNEAU DE COMMANDE 5 6 7 8 9 4 10 3 2 11 1 12 Fig. 4 1 Lampe d’indication Allumé/éteint. Va s’allumer lorsque l’appareil est mis en marche à l’aide de la touche . 2 Lampe d’indication de la vitesse du ventilateur. Va s’allumer lorsque une faible vitesse du ventilateur est sélectionnée avec la touche . 3 Lampe d’indication que le réservoir est plein. Va s’allumer lorsque le réservoir d’eau est plein. L’appareil arrête la déshumidifcation. Le réservoir doit être vidé. 4 Ecran Affiche l’humidité de l’air paramétrée, le temps déterminé pour le minuteur ou un éventuel code de panne. 5 Lampe d’indication du dégivrage automatique. Va s’allumer pour indiquer que automatique a démarré : Va s’allumer pour indiquer que le dégivrage automatique a démarré 6 Lampe d’indication de la fonction du minuteur. Va s’allumer lorsque la fonction du minuteur 9 est mise en marche. 3 7 7 Lampe d’indication de la déshumidification continue. Va s’allumer lorsque la fonction de déshumidification continue 8 est sélectionnée. 8 Touche pour une sélection de déshumidification continue ou de déshumidification automatique. 9 Touche pour activer ou désactiver le minuteur automatique. Touche pour modifier l’humidité de l’air paramétrée, ou pour déterminer les horaires pour le minuteur. Touche pour paramétrer la vitesse du ventilateur. Touche pour activer ou désactiver le déshumidificateur. L’UTILISATION 1. Mettez la prise dans la prise de courant. 2. Assurez-vous que le réservoir d’eau est à la bonne place. Si vous utilisez l’appareil pour la première fois, une lampe va s’allumer. Enlevez alors le réservoir d’eau de l’appareil et remettez-le dans la bonne position. 3. Appuyer sur la touche pour mettre en marche le déshumidificateur. La lampe d’indication 1 va s’allumer. Avec les touches de réglage , vous pouvez paramétrer l’humidité de l’air souhaitée. L’hygrostat peut être réglé de 35% à 85%. À chaque fois que vous appuyez sur les touches , la valeur déterminée est majorée ou minorée de 5 %. Le déshumidificateur va commencer la déshumidification lorsque l’humidité de l’air dans la pièce est supérieure à la valeur paramétrée. Lorsqu’il atteint la valeur paramétrée, l’appareil s’éteint automatiquement, pour se remettre en marche lorsque l’humidité de l’air augmente à nouveau dans la pièce. On peut également opter pour un fonctionnement continu. Pour ce faire, appuyez sur la touche 8, et la lampe de l’indicateur va ensuite s’allumer. Le déshumidificateur va déshumidifier la pièce continuellement, quelle que soit l’humidité de l’air dans celle-ci. 4. La vitesse du ventilateur peut être adaptée avec la touche . L’appareil dispose de deux vitesses pour le ventilateur : Faible (la lampe d’indication 2 s’allume), Haute (la lampe d’indication 2 s’éteint). 5. Si vous le désirez, vous pouvez utiliser la fonction du minuteur. 3 8 Réglage de la période de déclenchement Enclenchez l’unité avec la touche et appuyez sur la touche 9. La lampe d’indication 6 va s’allumer. Avec les touches , il est possible de régler la période de déclenchement souhaitée. Pour les 10 premières heures, la période de déclenchement est augmentée ou réduite d’une demi-heure en appuyant sur les touches . Ensuite, à chaque fois que vous appuyez sur les touches , le temps d’une heure est reglé. Après avoir paramétré la période de déclenchement, attendez trois secondes et l’écran va revenir automatiquement en position de fonctionnement. L’unité va maintenant être déclenchée automatiquement après avoir dépassé la période déterminée. Réglage de la période de mise en marche. Assurez-vous que l’unité est connectée. Appuyez sur la touche 9, et la lampe d’indication 6 va ensuite s’allumer. Avec les touches , il est possible de régler la période de mise en marche souhaitée. Pour les 10 premières heures, la période de mise en marche est augmentée ou réduite d’une demi-heure en appuyant sur les touches . Ensuite, à chaque fois que vous appuyez sur les touches , le temps d’une heure est reglé. L’unité va maintenant être mise en marche automatiquement après avoir dépassé la période déterminée. Déclenchement de la fonction du minuteur La fonction du minuteur peut être déclenchée en mettant en marche l’unité et en l’arrêtant avec la touche ou en paramétrant la période du minuteur sur 0,0 heure. 6. Appuyer sur la touche pour arrêter l’appareil. L’ÉVACUATION DE L’EAU Lorsque le réservoir d’eau est plein, le témoin lumineux s’allume et le déshumidificateur Fig. 5 s’éteint automatiquement. Videz le réservoir et remettez-le en position dans l’appareil. Le déshumidificateur se remet alors en route. Si vous le souhaitez, il est possible de fixer un tuyau d’évacuation sur l’appareil pour un drainage permanent. Pour cela, procédez comme suit: Drainage continu 1. Retirez le bouchon en caoutchouc situé à l’arrière de l’appareil (a) et conservez-le Fig. 6: Ne bloquez pas l’écoulement d’eau (montée). soigneusement (fig 5). 2. Fixez-le sur l’embout de l’appareil (fig 5). Veillez à ce que le branchement soit bien étanche. 3. Guidez l’extrémité du tuyau vers un lieu d’évacuation adéquat, situé en contrebas pour permettre à l’eau de s’écouler. 4. Veillez à ce que le tuyau soit bien en pente pour que l’eau puisse s’écouler sans Fig. 7: Ne bloquez pas l’écoulement d’eau (pliure). retenue. N’installez pas le tuyau comme indiqué sur le schéma (fig 6 + 7). 3 9 5. Pour utiliser l’appareil sans drainage continu, débranchez le tuyau de l’appareil et replacez le bouchon en caoutchouc. LE NETTOYAGE Avant de nettoyer le déshumidificateur, éteignez-le puis débranchez-le. L’EXTÉRIEUR Nettoyez l’extérieur de l’appareil avec un chiffon doux et sec. Si l’appareil est vraiment sale, vous pouvez utiliser un produit nettoyant doux. Passer ensuite un chiffon légèrement humide. Ne jamais verser d‘eau sur l’appareil. LE FILTRE À AIR Après une utilisation régulière, il peut être encrassé. C’est pourquoi le filtre doit être nettoyé toutes les deux semaines. Pour cela, procédez comme suit: 1.Retirez le réservoir d’eau de l’appareil. Faites légèrement basculer l’appareil vers l’arrière et retirez le filtre fig. 8 + 9). 2.Nettoyez le filtre à l’aspirateur ou avec de l’eau. Séchez le filtre et remettez-le en place. Veillez à ce qu’il soit bien sec. Remettez le réservoir d’eau en place. (fig. 10). Appuyez sur les languettes du filtre. Fig. 8 Languettes Retirez le filtre par le bas. Fig. 9 Insérez le filtre Appuyez sur les languettes et insérez le filtre par le bas. Fig. 10 G 3 10 N’utilisez jamais l’appareil sans filtre à air. LE STOCKAGE Si vous n’utilisez plus l’appareil pendant une longue période, appliquez les consignes suivantes: 1.Débranchez l’appareil et videz le réservoir. Laissez bien sécher le réservoir et l’appareil. 2.Nettoyez le filtre à air. 3.Rangez l’appareil dans un endroit à l’abri de la poussière, de préférence recouvert d’une housse. TABLEAU DES PANNES Avant de demander une assistance technique, contrôlez d’abord les points suivants: Problème Origines Solutions L’appareil ne fonctionne pas. L’appareil n’est pas branché. Branchez l’appareil. Le niveau d’humidité souhaité est trop élevé. Baissez le niveau d’humidité souhaité. Le réservoir d’eau est plein. Videz le réservoir. Le réservoir d’eau n’est pas placé correctement. Placez le réservoir d’eau Le filtre à air est sale. Nettoyez le filtre à air. La température ou l’humidité relative de la pièce est trop basse. Dans ces conditions, il est normal que l’appareil ne déshumidifie pas. La pièce à déshumidifier est trop grande. Nous vous recommandons d’utiliser un déshumidificateur de plus grande capacité. Il y a trop de sources d’humidité. Nous vous recommandons d’utiliser un déshumidificateur de plus grande capacité. La ventilation est trop importante. Réduire la ventilation (par exemple en fermant les fenêtres et les portes). Problème au niveau du capteur de température ou d’humidité de l’air Enlevez la prise de la prise de courant et attendez 10 secondes. Remettez la prise de courant et démarrez l’unité. Si la lampe continue à clignoter 1, prenez alors contact avec un revendeur Qlima. L’appareil ne déshumidifie pas. Le déshumidificateur fonctionne, mais ne réduit pas suffisamment le taux d’humidité relative. La lampe d’indication 1 clignote 5 fois par seconde. 3 11 LES CONDITIONS DE GARANTIE Le déshumidificateur est garanti deux ans à partir de la date d’achat. Durant cette période, toutes les réparations nécessaires dues à des défauts de fabrication et de matériels sont effectuées gratuitement. Dans ce cadre, les règles suivantes s’appliquent: • Toutes les autres demandes de dommages et intérêts, y compris pour dommages indirects ne seront pas honorées. • La réparation ou le changement d’une pièce durant la période de garantie ne provoque pas un prolongement de cette même garantie. • La garantie n’est pas valable en cas de modification de l’appareil, de montage de pièces qui ne sont pas d’origine, ou de réparation du déshumidificateur effectuée par des tierces personnes. • Les pièces subissant une usure normale ne sont pas garanties (à préciser). • La garantie n’est valable que sur présentation de la preuve d’achat originale et datée sur laquelle aucune modification n’a été apportée. • La garantie ne couvre pas les dégâts causés par une utilisation ne respectant pas le mode d’emploi, ou suite à des négligences. • Les frais d’expédition et les risques liés à l’envoi du déshumidificateur ou de ses pièces sont toujours à la charge de l’acheteur. Pour éviter des dépenses inutiles, nous vous conseillons de toujours consulter en premier lieu mode d’emploi. Si celui-ci ne donne pas de résultat, emmenez le déshumidificateur à réparer chez votre distributeur. SPÉCIFICATION TECHNIQUES Modèle D 110 Puissance absorbée kW Tension secteur V / Hz / Ph Intensité électrique A Déshumidificacion (30°C, 80% HR) L / 24h 10 Déshumidificacion (27°C, 60% HR) L / 24h 5,2 Capacité réservoir L Surface pièce (nom.) * m3 /h Volume traité * m3 Température ambiente entre °C Type de compresseur 12 220-240 / ~ 50 / 1 1,34 2 120 40 - 60 5 - 35 rotatif Fluide réfrigérant type / poids r / gr R134a / 80 Pression d'admission / d'évacuation (max.) MPa 12 / 24 (max. 25) Dimensions unité (l x p x h ) mm 308 x 247 x 456 Net poids unité kg 11,2 Brut poids unité kg 12,5 Niveau de pression sonore * dB(A) Classe de protection unité IP Valeur nominale de fusible 3 0,29 * À utiliser comme indication 40 / 43 X0 3,15A/250V Le fabricant se réserve le droit d’apporter des modifications sans préavis. GRAPHIQUE DES PERFORMANCES L/day 12 RH 80% 11 10 9 8 RH 60% 7 6 5 4 3 2 1 2 4 6 8 10 12 14 16 18 20 22 24 26 28 30 32 T( ) (Ce tableau ne peut être utiliser à titre indicatif) Ne pas jeter des appareils électriques avec les déchets managers municipaux non triés. Utiliser des équipements de collecte séparés. Contacter votre gouvernement local pour toute information concernant les systèmes de collecte disponibles. Si les appareils électriques sont jetés sur des sites d’enfouissement des déchets ou dans déchetteries, des substances dangereuses risquent de pénétrer dans les nappes phréatiques et entrer dans la chaîne alimentaire et peuvent poser des risques à votre santé et bien-être. Lors du remplacement d’appareils électriques usagés par des appareils neufs, le revendeur est tenu de reprendre votre vieil appareil pour recyclage au moins gratuitement. Environnement: Cet appareil contient un gaz fluoré à effet de serre dont l’utilisation est régie par le protocole de Kyoto. Toute réparation ou démontage de cet appareil doit exclusivement être effectué par un personnel qualifié. Cet appareil contient du gaz réfrigérant R134a. Voir quantité dans le tableau cidessus. Ne diffusez pas de gaz R134a dans l’atmosphère: R134a est un gaz fluoré à effet de serre à potentiel de réchauffement global (Global Warming Potential - GWP) = 1300. 3 13 DECLARATION DE CONFORMITE 3 14 3 15 Dear Sir, Madam, Congratulations with the purchase of your dehumidifier. You have acquired a high quality product which will give you many years of pleasure, if you use it responsibly. Please read the user’s manual first in order to ensure the optimum life span of your dehumidifier. On behalf of the manufacturer, we provide a two-year warranty on material- or manufacturing defects. Enjoy your dehumidifier. Yours sincerely, PVG Holding B.V. Customer Service Department 1 PLEASE READ THE USER’S MANUAL FIRST. 2 IF YOU HAVE ANY DOUBTS, CONSULT YOUR DEALER. 4 16 IMPORTANT COMPONENTS A Control panel B Humid air inlet C Removable water container 4 Air filter set E Handle F Dry air outlet G Drainage spout H Power cord and plug Fig. 1 Fig. 2 4 17 SAFETY INSTRUCTIONS Read this user manual carefully before using the appliance and keep it for future reference. Install this device only when it complies with local/ national legislation, ordinances and standards. This product is intended to be used as a dehumidifier in residential houses and is only suitable for use in normal household conditions, indoors in living room, kitchen, bathroom and garage. This unit is only suitable for earthed sockets, connection voltage 220-240 V. / ~50 Hz. GENERAL •To obtain optimum performance from your dehumidifier, do not place it near a radiator or any other heat source. •Ensure that all windows are closed in order to achieve maximum efficiency. •The capacity of the dehumidifier depends on the temperature and the humidity in the room. At lower temperatures, less moisture will be removed. •Ensure that the screen filter is kept clean. This prevents unnecessary power consumption and guarantees optimum efficiency. •If the power supply has been interrupted, the dehumidifier will restart after three minutes. The automatic delay protects the compressor. 4 18 IMPORTANT The device MUST always have an earthed connection. If the power supply is not earthed, you may not connect the unit. The plug must always be easily accessible when the unit is connected. Read these instructions carefully and follow the instructions. Before connecting the unit, check the following: •The voltage supply must correspond with the mains voltage stated on the rating label. •The socket and power supply must be suitable for the current stated on the rating label. •The plug on the cable of the device must fit into the wall socket. •The device must be placed on a flat and stable surface. ≥ 40cm ≥ 20cm ≥ 20cm ≥ 20cm Fig. 3 ≥ 20cm The electricity supply to the device must be checked by a recognised professional if you have any doubts regarding the compatibility. •This appliance is not intended for use by persons (including children) with reduced physical, sensory or mental capabilities, or lack of experience and knowledge, unless they have been given supervision or instruction concerning use of the appliance by a person responsible for their safety. •This device is manufactured according to CE safety standards. Nevertheless, you must take care, as with any other electrical device. • Do not cover the air inlet and/or outlet. •Empty the water reservoir before moving the unit. •Never allow the device to come into contact with chemicals. • Never submerge the unit in water. •Do not insert objects into the openings of the unit. •Always remove the plug from the electric power supply before cleaning or replacing the unit or components of the unit. 4 19 •Never use an extension cable to connect the device to the electric power supply. If there is no suitable, earthed wall socket available, have one installed by a recognised electrician. •Children should be supervised to ensure that they do not play with the appliance. •Have any repairs only carried out by a recognised service engineer or your supplier. Follow the instructions for use and maintenance as indicated in the user manual of this device. •Always remove the plug of the unit from the wall socket when it is not in use. •If the power cable is damaged it must be replaced by the manufacturer, its customer service department or persons with comparable qualifications in order to prevent danger. •This appliance can be used by children aged from 8 years and above and persons with reduced physical, sensory or mental capabilities or lack of experience and knowledge if they have been given supervision or instruction concerning use of the appliance in a safe way and understand the hazards involved. • Children shall not play with the appliance. •Cleaning and user maintenance shall not be made by children without supervision. ATTENTION! •Never use the device with a damaged power cord, plug, cabinet or control panel. Never trap the power cord or allow it to come into contact with sharp edges. G 4 20 ATTENTION! •Failing to follow the instructions may lead to nullification of the guarantee on this device. THE CONTROL PANEL 5 6 7 8 9 4 3 10 2 11 1 12 Fig. 4 1 On/off indicator light Comes on when the device is turned on using button . 2 Ventilator speed indicator light Comes on when the low ventilator speed is selected using button . 3 Container full indicator light. Comes on when the water container is full. The device will stop dehumidifying. The container needs to be emptied. 4 Display Indicates the humidity setting, timer setting and any malfunction code. 5 Automatic defrost indicator light. Comes on to indicate that automatic defrosting has started. This prevents too much ice from forming in the device. 6 Timer function indicator light. Comes on when the timer function 9 is set. 7 Continuous dehumidification indicator light. Comes on when continuous dehumidification 8 is selected. 8 Press for the continuous dehumidification selection or automatic dehumidifying. 9 Press to turn the automatic timer on or off. Press to change the air humidity setting, or to set the timer. Press to set the ventilator speed. Press to turn the dehumidifier on or off. 4 21 OPERATION 1. Plug the power cord into the socket. 2. Make sure that the water container is positioned correctly. When the device is used for the first time a light will come on. Afterwards, remove the water container from the device and replace it in the correct position. 3. Press button to turn the dehumidifier on or off. The indicator light 1 will come on. The setting buttons (10) can be used to set the desired air humidity. The hygrostat can be set from 35% - 85%. Each time the button (10) is pressed the setting increases or decreases by 5%. The dehumidifier begins dehumidifying when the air humidity in the room is higher than the setting. When the setting has been reached the device automatically switches off, and comes on again when the humidity in the air increases. Continuous operation can also be selected. To do this, press button 8, and the indicator light 7 will come on. The air dehumidifier will now start dehumidifying, irrespective of the level of air humidity in the room. 4. The ventilator speed can be adjusted with the button . The device has two ventilator speeds: Low (the indicator light 2 is on), High (the indicator lamp 2 is off). 5. If desired, the timer function can be used. Setting the off timer Turn on the unit using button and press on button 9. The indicator light 6 will come on. The buttons can be used to set the desired off period. For the first 10 hours the off period for each press on the button will be increased or decreased by half an hour. After that, every press on the button will adjust the time by one hour. After setting the off period, wait three seconds and the display will automatically return to the operating stand. The unit will now automatically switch off after the set time has elapsed. Setting the timer Make sure that the unit is turned off. Press the button 9, the indicator light 6 will come on. The buttons can be used to set the desired period. For the first 10 hours the on period for each press on the button will be increased or decreased by half an hour. After that, every press on the button will adjust the time by one hour. The unit will now automatically switch on after the set time has elapsed. Turning off the timer The timer can be turned off by turning on and off the unit using button or by setting the timer to 0.0 hours. 4 22 6. Press button to turn off the device. WATER DRAINAGE When the water container is full, the -light switches on and the dehumidifier switches off automatically. Empty the container and replace it in the correct position. The device Fig. 5 will restart. If desired, it is possible to connect a drainage hose to the device for permanent water drainage. Follow these steps: Continuous draining 1. Remove the rubber plug from the back of the unit (fig. 5a) and store it in a safe location Fig. 6: Do not block water flow by a rise (fig. 5). 2. Attach the water hose to the drain hose outlet of the unit (fig. 5b). Make sure the connection of the water hose and the drain hose outlet of the unit is tight and does not let the water leak. 3. Then lead the water hose to the floor drain or a suitable drainage facility. The drainage facility should be lower than the drain outlet of the unit. Fig. 7: Do not block water flow by a retortion 4. B e sure to run the water hose sloping downward and let the water flow out smoothly. Do not install the water hose as shown (fig. 6 + 7). 5. When the continuous drain feature is not being used remove the drain hose from the outlet and attach the rubber plug back to the drain outlet. CLEANING Switch the dehumidifier off and remove the plug from the socket before cleaning. THE EXTERIOR Clean the exterior with a soft, dry cloth. If the device is extremely dirty, use a mild cleaning agent. Wipe the device with a slightly damp cloth. Never spray the device with water. THE AIR FILTER When used regularly, the filter may become clogged with dust and particles. Therefore the filter should be cleaned every two weeks. Follow these steps: 1 Remove the water container from the device. Tilt the device backwards a little and remove the filter (fig. 8 + 9). 2 Clean the filter with a vacuum cleaner or with water. Dry the filter and replace it. Ensure that the filter is completely dry. Replace the water container (fig. 10). 4 23 Grip the tabs on the filter and press them in Fig. 8 Tabs Pull out the filter downward Fig. 9 Insert the filter Press the tabs in and push the filter upward Fig. 10 G Never use the device without the air filter. STORAGE If the machine will not be used for a long period of time, take the following steps: 1 Remove the plug from the socket and empty the container. Allow the container and the dehumidifier to dry completely. 2 Clean the air filter. 3 Store the device in a dust-free location, preferably covered with a sheet of plastic. 4 24 TROUBLE SHOOTING Check the following before contacting technical support: Problem Cause Solution The unit does not work. The powercord is not connected. Insert the plug into the wall outlet. The required humidity setting is too high. Turn the required humidity to a lower desired setting. The water container is full. Remove the water from the container. The water container has not been replaced correctly. Place the water container in the correct position. The air filter is clogged. Clean the air filter. The temperature or relative humidity in the room where the device is operating is too low. It is normal that the device does not dehumidify in these conditions. The device does not dehumidify. The dehumidifier The room is too large. works, but reduces the relative humidity insufficiently. There are too many sources of humidity. Indicator light 1 will blink 5 times a second. We recommend using a dehumidifier with a greater capacity. We recommend using a dehumidifier with a greater capacity. There is too much ventilation. Reduce ventilation (e.g. close curtains and shut doors). Temperature or air humidity sensor malfunction Remove the plug from the socket and wait for 10 seconds. Plug in and start the unit. If light 1 continues to blink, then contact a Qlima dealer. CONDITIONS OF WARRANTY There is a two-year warranty on your dehumidifier from the date of purchase. All material or manufacturing defects will be repaired free of charge. The following applies: • All claims for compensation, including consequential damage, will not be entertained. • Any repairs or replacement of components during the warranty period will not result in an extension of the warranty period. • The warranty will expire if any alterations have been made, not genuine components have been fitted or if the dehumidifier has been repaired by a third party. • Components subject to normal wear and tear, such as the air filter, are not covered by the warranty. • The warranty is only valid on presentation of the original, unaltered, and datestamped purchase receipt. 4 25 • The warranty does not cover damage caused by actions that deviate from those as described in the user’s manual or by neglect. • Transportation costs and the risks involved during the transportation of the dehumidifier or components shall always be for the account of the purchaser. To prevent unnecessary expenses, we recommend that you always carefully read the user’s manual first. If this does not provide a solution, take the dehumidifier to your distributor for repair. TECHNICAL SPECIFICATIONS Model D 110 Power consumption kW Power supply V / Hz / Ph Current (nom.) A Dehumidifying capacity (moisture removal) at 302ºC, 80%RH L / 24h 10 Dehumidifying capacity (moisture removal) at 27ºC, 60%RH L / 24h 5,2 Capacity water container L Air flow (nom.)* m3 /h For rooms up to* m3 Operating range °C 0,29 220-240 / ~ 50 / 1 1,34 2 120 40 - 60 5 - 35 Compressor type rotary Refrigerant type / charge r / gr R134a / 80 Pressure suction / discharge (max.) MPa 12 / 24 (max. 25) Dimensions (w x d x h ) mm 308 x 247 x 456 Net weight kg 11,2 Gross weight kg 12,5 Sound pressure level * dB(A) Unit Protection IP Fuse rating Subject to change without prior notice. PERFORMANCE GRAPH L/day 12 RH 80% 11 10 9 8 RH 60% 7 6 5 4 3 2 1 2 4 6 8 10 12 14 16 18 20 22 24 26 28 30 32 T( 26 X0 3,15A/250V * To be used as indication 4 40 / 43 ) (to be used as indication only) Do not dispose of electrical appliances as unsorted municipal waste, use separate collection facilities. Contact your local government for information regarding the collection systems available. If electrical appliances are disposed of in landfills or dumps, hazardous substances can leak into the groundwater and get into the food chain, damaging your health and well-being. When replacing old appliances with new once, the retailer is legally obligated to take back your old appliance for disposal at least for free of charge. Environmental information: This equipment contains fluorinated greenhouse gases covered by the Kyoto Protocol. It should only be serviced or dismantled by professional trained personnel. This equipment contains R134a refrigerant in the amount as stated in the table above. Do not vent R134a into atmosphere: R134a, is a fluorinated greenhouse gas with a Global Warming Potential (GWP) = 1300 4 27 DECLARATION OF CONFORMITY 4 28 4 29 Geachte mevrouw, mijnheer, Van harte gefeliciteerd met de aankoop van uw ontvochtiger. U heeft een kwaliteitsproduct aangeschaft waar u nog vele jaren plezier van zult hebben, mits u het apparaat verantwoord gebruikt. Lees daarom eerst deze gebruiksaanwijzing voor een optimale levensduur van uw ontvochtiger. Wij geven u namens de fabrikant twee jaar garantie op mogelijke materiaal- of fabricagefouten. Wij wensen u veel comfort met uw ontvochtiger. Met vriendelijke groet, PVG Holding B.V. Afdeling Klantenservice 1 LEES EERST DE GEBRUIKSAANWIJZING. 2 RAADPLEEG BIJ TWIJFEL UW DEALER. 1 30 BELANGRIJKE ONDERDELEN A Bedieningspaneel B Inlaat van vochtige lucht C Uitneembaar waterreservoir 4 Luchtfilter E Handvat F Uitlaat van droge lucht Fig. 1 G Afvoertuit H Stekker en snoer Fig. 2 1 31 VEILIGHEIDSVOORSCHRIFTEN Lees deze gebruikershandleiding aandachtig alvorens het toestel te gebruiken en bewaar het voor later. Installeer dit toestel enkel wanneer het voldoet aan de lokale/nationale wetgeving, regelgeving en normen. Dit product is bedoeld om gebruikt te worden als een luchtontvochtiger in woningen en is alleen geschikt voor gebruik binnenshuis in woonkamers, keukens, badkamers en garages, in normale huishoudelijke omstandigheden. Dit apparaat is uitsluitend geschikt voor een geaard stopcontact, aansluitspanning 220-240 V./ ~50 Hz. ALGEMEEN •Om een optimaal resultaat te krijgen, het apparaat niet dicht bij een radiator of een andere warmtebron plaatsen. • Zorg ervoor dat alle ramen gesloten zijn om maximale efficiëntie te bereiken. • De ontvochtigingscapaciteit is afhankelijk van de temperatuur en de luchtvochtigheid in de ruimte. Het is normaal dat bij een lage temperatuur minder vocht wordt onttrokken. • Zorg ervoor dat het luchtfilter schoon blijft. Dit voorkomt onnodig energieverbruik en waarborgt een optimaal resultaat. • Als de stekker uit het stopcontact is geweest, start het apparaat pas na drie minuten weer op. De automatische vertraging beschermt de compressor. 1 32 BELANGRIJK Het apparaat MOET altijd geaard worden aangesloten. Als de stroomvoorziening niet geaard is, mag u het apparaat absoluut niet aansluiten. De stekker moet altijd makkelijk toegankelijk zijn als het apparaat is aangesloten. Lees deze gebruiksinstructie zorgvuldig en volg de aanwijzingen. ≥ 40cm ≥ 20cm ≥ 20cm ≥ 20cm Fig. 3 ≥ 20cm Controleer voor het aansluiten van het apparaat of: •de aansluitspanning overeenkomt met die op het typeplaatje; • stopcontact en stroomvoorziening geschikt zijn voor het apparaat; • de stekker van het snoer in het stopcontact past; • het apparaat op een stabiele en vlakke ondergrond staat. Laat de elektrische installatie controleren door een erkend vakman als u er niet zeker van bent dat alles in orde is. •Dit apparaat is niet bedoeld voor gebruik door personen (inclusief kinderen) met verminderde lichamelijke, geestelijke of zintuiglijke vermogens, of gebrek aan ervaring en kennis, tenzij er toezicht wordt gehouden op en instructies worden gegeven voor het gebruik van het apparaat door iemand die verantwoordelijk is voor hun veiligheid. • Dit apparaat is volgens de CE veiligheidsnormen gefabriceerd. Toch dient u, zoals bij ieder elektrisch apparaat, voorzichtig te zijn. • H et luchtinlaat- en/of uitblaasrooster nooit afdekken. 1 33 • Leeg het waterreservoir voordat u het apparaat verplaatst. • Breng het apparaat nooit in contact met chemicaliën. • Het apparaat nooit in water onderdompelen. • Steek geen voorwerpen in de openingen van het apparaat. • Haal altijd eerst de stekker uit het stopcontact voordat het apparaat of een onderdeel ervan moet worden schoongemaakt of vervangen. • Sluit het apparaat NOOIT aan met behulp van een verlengsnoer. Is een geschikt geaard stopcontact niet voorhanden, laat dit dan installeren door een erkend elektricien. • Er dient toezicht te worden gehouden op kinderen om er zeker van te zijn dat zij niet met het apparaat spelen. • Laat eventuele reparaties altijd uitvoeren door een erkend servicemonteur of uw leverancier. Volg de onderhoudsinstructies • Haal altijd de stekker van het apparaat uit het stopcontact als het niet wordt gebruikt. • Indien de voedingskabel beschadigd is, dient deze vervangen te worden door de fabrikant, zijn klantenservice of personen met vergelijkbare kwalificaties om gevaren te voorkomen. • Dit apparaat kan worden gebruikt door kinderen vanaf 8 jaar en mensen met een lichamelijke, zintuiglijke of verstandelijke beperking en door mensen die geen ervaring met of kennis over het apparaat hebben als er toezicht op hen wordt gehouden of ze instructies hebben gekregen over veilig gebruik van het apparaat en op de hoogte zijn van de risico’s. • Zorg ervoor dat kinderen niet met het apparaat spelen. 1 34 • Reiniging en onderhoud dient niet te worden uitgevoerd door kinderen waarop geen toezicht wordt gehouden. LET OP! •Gebruik het apparaat nooit met een beschadigd snoer of stekker. Klem het snoer nooit af en voorkom contact met scherpe kanten. G LET OP! • Niet volgen van de aanwijzingen kan leiden tot het vervallen van de garantie op het apparaat. HET BEDIENINGSPANEEL 5 6 7 8 9 4 10 3 2 11 1 12 Fig. 4 1 Aan/uit indicatie lamp. Gaat branden wanneer het apparaat ingeschakeld wordt met behulp van toets . 2 Ventilatorsnelheid indicatie lamp. Gaat branden wanneer de lage ventilatorsnelheid is geselecteerd met toets . 3 Reservoir vol indicatie lamp. Gaat branden wanneer het waterreservoir vol is. Het apparaat stopt met ontvochtigen. Het reservoir moet geleegd worden. 4 Display. Geeft de ingestelde luchtvochtigheid, de ingestelde tijd voor de timer of een eventuele storingscode weer. 5 Automatisch ontdooien indicatie lamp. Gaat branden om aan te geven dat de automatische ontdooiing gestart is. Dit voorkomt overmatig ijsvorming in het apparaat. 1 35 6 Timerfunctie indicatie lamp. Gaat branden wanneer de timerfunctie is ingeschakeld. 7 Continu ontvochtigen indicatie lamp. Gaat branden wanneer de functie continu ontvochtigen geselcteerd is. 8 Toets voor selectie continu ontvochtigen of automatisch ontvochtigen. 9 Toets om de automatische timer in- of uit te schakelen. Toetsen om de ingestelde luchtvochtigheid te wijzigen, of de tijden voor de timer in te stellen. Toets om de ventilatorsnelheid in te stellen. Toets om de ontvochtiger in- en uit te schakelen. BEDIENING 1. Steek de stekker in het stopcontact. 2. Zorg ervoor dat het waterreservoir juist geplaatst is. Als het apparaat voor de eerste maal gebruikt wordt en lampje 3 gaat branden, neem dan het waterreservoir uit het apparaat en plaats het in de juiste positie terug. 3. Druk op toets om de ontvochtiger in te schakelen. Het indicatie lampje 1 zal gaan branden. Met de insteltoetsen kan de gewenste luchtvochtigheid ingesteld worden. De hygrostaat is instelbaar van 35% tot 85%. Met elke druk op de toetsen wordt de ingestelde waarde met 5% verhoogd of verlaagd. De ontvochtiger begint te ontvochtigen wanneer de luchtvochtigheid in de ruimte hoger is dan de ingestelde waarde. Bij het bereiken van de ingestelde waarde slaat het apparaat automatisch af, om opnieuw in werking te treden wanneer de luchtvochtigheid in de ruimte weer stijgt. Er kan ook worden gekozen voor continu bedrijf. Druk hiervoor op toets , waarna het indicatorlampje 7 gaat branden. De luchtonvochtiger zal nu blijven ontvochtigen, ongeacht de luchtvochtigheid in de ruimte. 4. De ventilatorsnelheid kan aangepast worden met toets . Het apparaat heeft twee ventilatorsnelheden: Laag (het indicatie lampje 2 brandt), Hoog (het indicatie lampje 2 is uit). 5. Indien gewenst kan er gebruik worden gemaakt van de timer functie. 1 36 Instellen van de uitschakel periode Schakel de unit in met toets en druk op toets . Het indicatie lampje gaat branden. Met de toetsen kan de gewenste uitschakel periode worden ingesteld. Voor de eerste 10 uren wordt de uitschakelperiode per druk op de toetsen met een half uur verhoogd of verlaagd. Daarna zal bij ieder druk op de toetsen de tijd één uur versteld worden. Wacht, na het instellen van de uitschakelperiode, drie seconden en het display zal automatisch terugkeren naar de bedrijfsstand. De unit zal nu automatisch worden uitgeschakeld na het verstrijken van de ingestelde tijdsperiode. Instellen van de inschakel tijdperiode Zorg ervoor dat de unit is uitgeschakeld. Druk op toets , het indicatie lampje 6 gaat branden. Met de toetsen kan de gewenste inschakel tijdsperiode worden ingesteld. Voor de eerste 10 uren wordt de inschakelperiode per druk op de toetsen met een half uur verhoogd of verlaagd. Daarna zal bij ieder druk op de toetsen 10 de tijd één uur versteld worden. De unit zal nu automatisch worden ingeschakeld na het verstrijken van de ingestelde tijdsperiode. Uitschakelen timerfunctie De timerfunctie kan worden uitgeschakeld door de unit in en uit te schakelen met toets of door de timer tijdsperiode in te stellen op 0,0 uren. 6. Druk op toets om het apparaat uit te schakelen. WATERAFVOER Wanneer het waterreservoir vol is, gaat het -lampje branden en slaat de ontvochtiger automatisch af. Leeg het reservoir en plaats het in de juiste positie terug. Het apparaat Fig. 5 treedt vervolgens opnieuw in werking. Indien gewenst is het mogelijk een afvoerslang aan het apparaat te bevestigen voor een permanente waterafvoer. Ga hierbij als volgt te werk: Constante waterafvoer 1.Verwijder de rubberdop aan de achterzijde van het apparaat (a) en berg hem veilig Fig. 6: Zorg ervoor dat de waterstroom niet door een verhoging in de slang geblokkeerd wordt. op (fig 5). 2.Bevestig de waterslang aan de waterafvoer van het apparaat (fig 5). Zorg ervoor dat de aansluiting van de waterslang op de waterafvoer van het apparaat goed vastzit en er geen water uitlekt. 3.Leid de waterslang vervolgens naar een afvoerputje in de vloer of een andere geschikte afvoer. Deze afvoer moet zich op een lager punt bevinden dan de waterafvoer van het apparaat. Fig. 7: Zorg ervoor dat de waterstroom niet door een knik in de slang geblokkeerd wordt. 1 37 4.Zorg ervoor dat de waterslang naar beneden toe afloopt en het water ongestoord kan weglopen. Installeer de waterslang niet zoals getoond (fig 6 + 7). 5. Als u de constante waterafvoerfunctie niet gebruikt, verwijder dan de afvoerslang van de afvoer and sluit de afvoeropening weer af met de rubberdop. REINIGING Voordat u begint met reinigen dient u de ontvochtiger uit te schakelen. Neem daarna de stekker uit het stopcontact. DE BUITENKANT Reinig de buitenkant met een zachte, droge doek. Indien het apparaat erg vuil is kunt u een mild schoonmaakmiddel gebruiken. Vervolgens afvegen met een licht-vochtige doek. Het apparaat nooit nat spuiten. HET LUCHTFILTER Bij regelmatig gebruik kan het filter geblokkeerd raken door een opeenhoping van stof. Daarom dient het filter om de twee weken als volgt gereinigd te worden: 1.Haal het waterreservoir uit het apparaat. Kantel het apparaat iets naar achteren en neem het filter eruit (fig. 8 + 9). 2.Reinig het filter met een stofzuiger of met water. Droog het filter af en plaats het terug. Zorg ervoor dat het filter goed droog is. Plaats het waterreservoir terug (fig. 10). Pak de lippen op het filter vast en druk ze in. Fig. 8 Lippen Trek het filter omlaag om het te verwijderen. Fig. 9 Breng het filter aan. Druk de lippen in en druk het filter omhoog. Fig. 10 1 38 G Gebruik het apparaat nooit zonder luchtfilter. OPSLAG Wanneer u het apparaat lange tijd niet gebruikt, kunt u het beste als volgt te werk te gaan: 1.Haal de stekker uit het stopcontact en leeg het reservoir. Laat het reservoir en het apparaat goed drogen. 2. Reinig het luchtfilter. 3. Berg het apparaat op in een stofvrije ruimte, bij voorkeur afgedekt met plastic. STORINGSTABEL Voordat u om technische ondersteuning vraagt, dient u de volgende zaken te controleren: Probleem Oorzaak Oplossing Het apparaat werkt niet. De stekker zit niet in het stopcontact. Steek de stekker in het stopcontact. De ingestelde luchtvochtigheid is te hoog. Stel een lagere luchtvochtigheid in. Het waterreservoir is vol. Verwijder het water uit het reservoir. Het waterreservoir is niet juist geplaatst. Plaats het waterreservoir in de juiste positie. Het luchtfilter is vuil. Maak het luchtfilter schoon. De temperatuur of relatieve luchtvochtigheid van de ruimte waar het apparaat is geplaatst is te laag. Onder deze omstandigheden is het normaal dat het apparaat niet ontvochtigt. Het apparaat ontvochtigt niet. De ontvochtiger werkt, De ruimte is te groot. maar vermindert de relatieve luchtvochtigheid onvoldoende. Er zijn teveel vochtbronnen. Indicatielamplje knippert 5 maal per seconde Het wordt aanbevolen een ontvochtiger met een grotere capaciteit te plaatsen. Het wordt aanbevolen een ontvochtiger met een grotere capaciteit te plaatsen. Er wordt teveel geventileerd. Beperk de ventilatie (bijvoorbeeld ramen en deuren sluiten). Storing aan de temperatuurof luchtvochtigheidssensor Neem de stekker uit het stopcontact en wacht 10 seconden. Plaats de stekker en start de unit. Blijft lampje knipperen, neem dan contact op met een Qlima dealer. 1 39 GARANTIEVOORWAARDEN U krijgt op uw ontvochtiger twee jaar garantie vanaf de aankoopdatum. Binnen deze periode worden materiaal- en fabricagefouten kosteloos verholpen. Hierbij gelden de volgende regels: • Alle verdere aanspraken op schadevergoeding, inclusief gevolgschade, worden niet gehonoreerd. • Reparatie of vervanging van onderdelen binnen de garantietermijn leidt niet tot verlenging van de garantie. • De garantie geldt niet wanneer veranderingen zijn aangebracht, niet-originele onderdelen zijn gemonteerd of reparaties zijn verricht door derden. • Onderdelen die aan normale slijtage onderhevig zijn vallen buiten de garantie. • De garantie geldt uitsluitend als u de originele, gedateerde aankoopbon overlegt en als daarop geen veranderingen zijn aangebracht. • De garantie geldt niet bij schade ontstaan door handelingen die afwijken van die in de gebruiksaanwijzing zijn vermeld of door verwaarlozing. • De verzendkosten en het risico van het opsturen van de ontvochtiger of onderdelen daarvan, komen altijd voor rekening van de koper. Om onnodige kosten te voorkomen, raden wij u aan eerst altijd zorgvuldig de gebruiksaanwijzing te raadplegen. Wanneer deze geen uitkomst biedt, breng de ontvochtiger dan ter reparatie naar uw dealer. TECHNISCHE SPECIFICATIES Model D 110 Opgenomen vermogen kW Netspanning V / Hz / Ph Stroomsterkte A Ontvochtigingscpaciteit (ontvochtiging bij 30°C, 80% RH) L / 24h 10 Ontvochtigingscpaciteit (ontvochtiging bij 27°C, 60% RH) L / 24h 5,2 Inhoud waterreservoir L Luchtstroom (nom.) * m3 /h Voor ruimtes tot * m3 Werkingstemperatuur °C Compressor type Koudemiddel type / hoeveelheid 40 220-240 / ~ 50 / 1 1,34 2 120 40 - 60 5 - 35 roterend r / gr R134a / 80 Druk inlaat / uitlaat (max.) MPa 12 / 24 (max. 25) Afmetingen (b x d x h) mm 308 x 247 x 456 Netto gewicht kg 11,2 Bruto gewicht kg 12,5 Geluidsdruk niveau * dB(A) Beschermingsklasse IP Zekeringen 1 0,29 * te gebruiken als indicatie 40 / 43 X0 3,15A/250V De fabrikant is het recht voorbehouden veranderingen door te voeren zonder voorafgaand bericht. CAPACITEITSGRAFIEK L/day 12 RH 80% 11 10 9 8 RH 60% 7 6 5 4 3 2 1 2 4 6 8 10 12 14 16 18 20 22 24 26 28 30 32 T( ) (waarden zijn indicatief) Werp elektrische apparatuur niet weg bij het huisvuil; lever het in op de daarvoor aangewezen plaats. Neem contact op met de plaatselijke autoriteiten voor informatie waar apparatuur kan worden ingeleverd. Wanneer elektrische apparaten worden weggegooid op de vuilstort of in de dump, kunnen gevaarlijke stoffen in het grondwater en in de voedselketen terecht komen met alle gevolgen voor de gezondheid. Bij de vervanging van oude apparaten door nieuwe is de leverancier wettelijk verplicht zonder kosten het oude apparaat voor vernietiging in te nemen. Milieu-informatie: Deze apparatuur bevat gefluoreerde broeikasgassen zoals opgenomen in het Protocol van Kyoto. De apparatuur mag alleen worden gerepareerd of gedemonteerd door professioneel, geschoold personeel. Deze apparatuur bevat koelmiddel R134a in de hoeveelheid als aangegeven in bovenstaande tabel. Laat R134a niet ontsnappen in de atmosfeer: R134a is een gefluoreerd broeikasgas met een broeikasgaseffect (GWP) = 1300. 1 41 CONFORMITEITSVERKLARING 1 42 1 43 --- --- -- ----- -- --- ------ -- --- ------ ---- -- ---- -- -- --- ------ -- --- ------- --- -- ----- ---- -- ---- www.qlima.com Distributed in Europe by PVG Holding B.V. D Benötigen Sie weitere Informationen oder treten Probleme auf, besuchen Sie bitte unsere Website www.qlima.com, oder setzen Sie sich mit unserem Kundendienst in Verbindung (Telefonnummer auf www.qlima.com). DK For alle yderligere oplysninger eller ved eventuelle problemer med apparatet henvises til www.qlima.com eller det lokale Kundecenter (telefon(hallará el número de teléfono en www.qlima.com). F Si vous souhaitez obtenir des informations supplémentaires ou si vous rencontrez un problème, rendez-vous sur notre site Web (www.qlima.com) ou contactez notre service client (vous trouverez l’adresse et numéro de téléphone sur www.qlima.com). man_D110 numre findes i www.qlima.com). ES Si necesita información o si tiene algún problema, visite nuestra página Web www.qlima.com, o póngase en contacto con el servicio cliente FIN Jos haluat huoltoapua, lisätietoja tai laitteen kanssa tulee ongelmia, tutustu verkkosivustoon osoitteessa www.qlima.com tai kysy neuvoa PVG number on www.qlima.com) I Per informazioni e in caso di problemi, visitate il sito Web www.qlima.com oppure contattate il Centro Assistenza Clienti (per conoscere il numero di telefono, consultate www.qlima.com). N Hvis du trenger informasjon, eller hvis du har et problem med produktet, kan du gå til nettsidene www.qlima.com. Alternativt kan du kontakte avg©150515 kuluttajapalvelukeskuksesta (www.qlima.com). GB If you need information or if you have a problem, please visit the our website (www.qlima.com) or contact our sales support (you find its phone sales support (adres en telefoon op www.qlima.com). P Se necessitar de informações ou se tiver problemas, visite o Web site www.qlima.com ou contacte o Centro de Assistência (número de telefone o www.qlima.com) PL W przypadku problemów i w celu uzyskania szczegółowych informacji odwiedź stronę internetową Qlima dostępną pod adresem www.qlima.com lub skontaktuj się z Centrum kontaktów Qlima (www.qlima.com) S Om du behöver service eller information eller har problem med apparaten kan du besöka www.qlima.com eller kontakta Qlima kundtjänst (du hittar telefonnumret på www.qlima.com). SLO Če želite dodatne informacije, obiščite spletno mesto podjetja na naslovu www.qlima.com ali pokličite na telefonsko (www.qlima.com). TR Daha fazla bilgiye ihtiyaç duyarsanız veya bir sorunla karşılaşırsanız, www.qlima.com adresindeki Qlima Internet sitesini ziyaret edin ülkenizde bulunan Qlima müşteri merkeziyle iletişim kurun (telefon numarasını: www.qlima.com). veya PVG Traffic med PVG’ forbrukertjeneste (telefonnummeret i www.qlima.com). NL Als u informatie nodig hebt of als u een probleem hebt, bezoek dan de onze website (www.qlima.com) of neem contact op met de afdeling