1
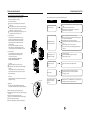
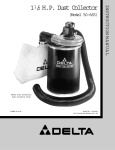
Ε
Σ
ΗΛΕ
ELE ΚΤΡΙ
CT
RI ΚΕΣ
C
AP ΣΥ
PL ΣΚ
DE-MDT10
DE-MDT20
IA Ε
N Υ
C
E
S
Dehumidifier
User’s Manual
Αφυγραντήρας
Εγχειρίδιο Χρήσης
Σας ευχαριστούμε που επιλέξατε
αφυγραντήρα της INVENTOR.
Για τη σωστή χρήση της μονάδας
παρακαλούμε διαβάστε προσεκτικά
το παρόν εγχειρίδιο και φυλάξτε
το για αναφορά στο μέλλον.
Thank you for choosing INVENTOR
dehumidifier. For correct use of
this unit, please read this manual
carefully and keep it for future
reference.
English/Ελληνικά/ Română
CONTENTS
SOCIABLE REMARK
When using this dehumidifier in the European countries, the following information
must be followed:
DISPOSAL: Do not dispose this product as unsorted municipal waste. Collection
of such waste separately for special treatment is necessary.
It is prohibited to dispose of this appliance in domestic household waste.
For disposal, there are several possibilities:
A) The municipality has established collection systems, where electronic waste can
be disposed of at least free of charge to the user.
B) When buying a new product, the retailer will take back the old product at least
free of charge.
C) The manufacture will take back the old appliance for disposal at least free of
charge to the user.
D) As old products contain valuable resources, they can be sold to scrap metal
dealers.
Wild disposal of waste in forests and landscapes endangers your health when
hazardous substances leak into the ground-water and find their way into the food
chain.
SAFETY PRECAUTIONS
Warning....................................................................................................................................................................................................... 2
Caution ........................................................................................................................................................................................................ 2
Electrical information............................................................................................................................................................................ 3
CONTROL PADS ON THE DEHUMIDIFIER
Indicator lights ......................................................................................................................................................................................... 4
Control pads.............................................................................................................................................................................................. 4
Other features .......................................................................................................................................................................................... 5
IDENTIFICATION OF PARTS
Identification of parts............................................................................................................................................................................ 5
Positioning the unit ............................................................................................................................................................................... 6
OPERATIING THE UNIT
When using the unit .............................................................................................................................................................................. 6
Removing the collected water .......................................................................................................................................................... 7
CARE AND MAINTENANCE
Care and cleaning the dehumidifier ............................................................................................................................................... 8
TROUBLESHOOTING TIPS
Troubleshooting tips ............................................................................................................................................................................. 9
Re ad Th is Ma nua l
Ins ide you will find many helpful hints on how to use and ma intain your air co nditioner
properly. Ju st a little preventive ca re o n your pa rt can sav e y ou a g rea t deal o f time
and money over the life of your ai r co nditioner. Y ou'll find many an swe rs t o c ommon
problems in the ch art of troublesho oting tips. If you reviewo ur chart of Troub les hooting
Tips fi rst, you may not ne ed to call for ser vice at all.
! CA UT ION
T his appliance can be us ed by children a ged from 8 ye ars an d a bove a nd person s
w ith reduce d phys ical, se nso ry o r mental c apa bilities or lack of experie nce an d
k nowledge if they have b een given supervision or instruction c oncerning us e o f the
a ppliance in a sa fe way and understa nd the ha zar ds involved. Ch ildren sha ll not play
th e a ppliance. Cle aning and us er m aintenanc e s hall not be ma de by children without
s upervis ion. ( be applicable for the Eu ropean Co untries )
T his appliance is n ot intended for us e b y pers ons (in cluding ch ildren) with re duced
p hys ical ,se nso ry o r mental c apa bilities or lack of experie nce an d knowledge, unless
th ey have b een given supervision or instruction c oncerning us e o f the a ppliance by a
p ers on res ponsible fo r their saf ety. (b e a pplicable for other co untries ex cept the
E uropea n C ountries )
C hildren sh ould be s upervis ed to ensu re that they do not play with the ap pliance .
If the su pply co rd is d amage d, i t must be rep lace d by the m anufac turer, its s ervice
a gent or sim ilarly qualified pe rso ns in order to av oid a h aza rd.
T he appliance sha ll be ins talled in ac cordance with na tional w iring re gulations.
Th e a ppliance with ele ctric h eater sha ll have atl eas t 1 meter space tot he combu stible
m aterials.
C ontact the au thorise d s ervice technician for rep air or maintenanc e o f this u nit.
1
SAFETY PRECAUTIONS
SAFETY PRECAUTIONS
To prevent injury to the user or other people and property damage, the following instructions must be
followed. Incorrect operation due to ignoring of instructions may cause harm or damage.
The seriousness is classified by the following indications.
WA R NING
This sym bol indicates the possibi lity of de ath or se rious inj ury.
C A UT IO N
This sym bol indicates the possibil ity of injury or d amage t o prope rty.
CAUTION
Do not cover t he intak e or
exhaus t openings with
cloths o r towels .
A lac k of air flow ca n lead
to over heating and fir e.
Meaning s of sym bols use d in this manual are as shown b elow.
Never inser t your finger or
other foreign objects into grills
or ope nings. T ake s pecia l care
to warn chi ldren of these
dange rs.
Never do this.
Always do this.
Otherwise, it may cause electric
shock or fire due to excess heat
generation.
It may cause electric shock or fire
due to heat generation.
Do not modify power cord
length or share the outlet
with other appliances
Do not insert or pull out
plug with wet hands.
Do not place the unit near
a heat source.
It may cause electric shock.
Plastic parts may melt and cause
a fire.
It may cause electric shock or
fire due to heat generation.
!
Do not damage or use an
unspecified power cord.
Do not operate or stop the
unit by switching on or off
the power.
Disconnect the power if
strange sounds, smell, or
smoke comes from it.
It may cause fire and electric
shock.
Do not us e the machine near
flammable gas or combus tibles , s uch
as gas oline, benzene, thinner, etc.
It may cause an explosion or fire.
You should never try to take
apart or repair the unit by
yourself.
It may cause failure of machine
or electric shock.
Do not drink or use the
water drained from the unit.
It contains contaminants and
could make you sick.
It may cause electric shock or fire.
!
Before cleaning, turn off
the power and unplug the
unit.
It may cause electrical shock or
injury.
Do not take the water bucket out during operation.
It may cause bucket full protect of
the unit and cause electric shock.
CAUTION
Do not use the unit in small
spaces .
Do not put in places where
water may splash onto the
unit.
Lack of ventila tion can cause
overhe ating an d fire.
Water may en ter the u nit and
degrade the insu lation. It may
cause a n electri c shock or fire.
2
!
Place t he unit on a
level, s turdy se ction
of the f loor.
!
Always insert the filters
securely. Clean filter
once every two weeks.
Opera tion without filters
may c ause f ailure.
Care sh ould be taken w hen
using th e unit in a room with
the following persons:
Do not use in areas
where chemicals are
handled.
Infants, children, elderly people,
and peo ple not s enstive to
humidity.
This will cause t he unit
deterioration due to
chemica ls and s olvents
dissolve d in the air.
Do not place heavy object on the
power cord a nd take care s o that
the cord is not compress ed.
Do not climb up on
or sit on the unit.
There is danger of fire or
electric shock.
It may cause electric shock
or failure of appliance.
WARNING
Do not exceed the rating
of the power outlet or
connection device.
!
!
If water enters the unit, turn
the unit off and disconnect the
power , contact a qualified
service technician.
It may cause failure of
appliance or accident.
You ma y be injured if you
fall or if the un it falls ove r.
Do not place flower
vases or other water
container on top of
the unit.
Wate r may spill in side th e
unit, c ausing insula tion
failure and e lectrical
shock or fire .
Electrical Information
The ma nufactures name plate is located on the r ear pan el of the unit and contain s electri cal and other
technica l data sp ecific to this uni t.
Be sure the unit is prop erly grou nded. T o minimize shoc k and fir e hazard s, prope r grounding is im portant.
The pow er cord is equip ped with a three -prong grounding plug for protection again st shock
hazards .
Your unit must be us ed in a p roperly g rounded wall rec eptacle. If the w all recep tacle yo u intend to use i s
not adeq uately g rounded or prote cted by a time d elay fus e or circ uit break er, ha ve a qua lified ele ctrician
install the proper recepta cle.
Ensure the rece ptacle is access ible afte r the un it installation.
Do not use ext ension cords o r an ada pter plu gs with this un it. Howeve r, if i t is nece ssary to use an
extensio n cord, u se an ap proved Dehum idifier e xtension cord on ly (avail able at m ost loca l hardwa re
stores).
To avoid th e possib ility of personal injury, always disconn ect the p ower su pply to the unit, before in stalling
and/or s ervicing .
If the un it falls o ver, i t may
cause w ater to s pill and
damage belongings, or
cause e lectrical shock or
fire.
3
CONTROL PADS ON THE DEHUMIDIFIER
IDENTIFICATION OF PARTS
Th e co ntr ol pa ne l o f the de hu mi dif ier yo u pu rch as ed m ay be lo ok lik e on e of th e fol low ing :
1
4
2
1
3
2
O the r f e a tur e s
Auto Defros t
When frost builds up on the evaporator coils, the
compressor will cycle off a nd the fan will continue to
run until the frost disappears.
B ucket Full L ight
G lows when the bucket is ready to be
emptied, or when the bucket is removed
or not replaced in the proper position.
Auto S hut Off
The water level control switch s huts off the
dehumidifier when the bucket is full, or when
the bucket is removed or not replaced in the
proper position. When the s etting humidity
is reached, the unit will be s hut off a utomatically.
5
6
6
Wa it 3 m in utes befo re r es umin g o pera tion
After the unit ha s s topped, it ca n not be res tart
operta tion in the firs t 3 minutes . T his is to protect
the unit. O pera tion will a utoma tica lly s tart a fter
3 minutes .
5
7
Auto-R es tart(on s ome models )
If the unit breaks off unexpectedly due to the power cut,
it will restart with the previous function s etting a utomatically when the power resumes.
Fig.1
Front
Control panel(2)
Control panel(1)
1
Identification of parts
In dic a tor l ig hts
1
P ower on indicator light(green)
2
B ucket full indicator light(red)
3
C ontinuous operation on indicator light(green)
4
Dis play
S hows the s et % humidity level while s etting, then s hows
the a ctual(+5% a ccuracy) room % humidity level.
C ontr ol pa ds
5 P OWE R P ad
P ress to turn the dehumidifier on a nd off.
6 Humidity S et C ontrol P ads
The humidity level can be s et within a
range of 35%R H(R elative H umidity) to 80%
R H(R elative H umidity) in 5% increments.
For drier air, press the pad a nd s et to a
lower percent value(% ).
For damper air, press the pad a nd s et to
a higher percent value(% ).
E rror C odes :
E 1- Humidity s ensor error--Unplug the unit a nd plug
it back in. If error repeats, call for service.
E 2- Temperature s ensor error-- Unplug the unit a nd
plug it back in. If error repeats, call for service.
P rotect C odes :
P 1- Unit is defrosting-- Allow the unit to a utomatically
defrost. T he portect will clear after the unit s elf defrosts.
P 2- B ucket is full or bucket is not in the right position-E mpty the bucket and replace in the right position.
7 C ontinue P ad
S elect for the dehumidifier to operate
continuously for maximum dehumidification
until the bucket is full. T he H umidity s et
control pads cannot be used when
C ontinuous operation is on.P ress this pad
again to cancel C ontinuous operation.
1
Control panel
2
3
4
Water bucket
5
6
7
8
5
2
Air intake grille
3
Water level window
4
Handle
6
Fig.2
Air filter (behind the air intake grille)
Rear
Air Outlet grille
Drain hose outlet (see page 7)
9
Power cord band (Used only when storing the unit.)
100
111
Power Cord
7
8
Power Plug
9
NOTE: All the pictures in the manual are
for explanation purposes only.Your unit
may be slightly different.The actual shape
shall prevail.The operations and functions
are the same.
4
100
111
Fig.3
5
OPERATING THE UNIT
OPERATING THE UNIT
Removing the collected water
Positioning the unit
40cm or
more
A dehumidifier opera ting in a ba se ment will have little o r no
effect in drying a n a djacent enclose d s torage a rea , s uch a s a
closet, unles s t here is adequate circulation of ai r in an d out of
the a rea .
D o not use o utdoors.
T his dehumidifer is intended for indoor re sidential
ap plica tions only. T his dehumidifier sh ould not be u se d
for c ommercial or industrial a pplications.
Pl ac e the dehumidifier on a smooth, level floor s trong
en ough to su pport the u nit with a full bucket of water.
Allow at least 20cm of ai r s pace on al l s ides o f the u nit
for good a ir circulation.
Pl ac e the unit in a n a rea where the tempera ture will not
O
O
fa ll below 5 C( 41 F). T he co ils ca n become c overed with
frost at temperatures b elow 5 O C( 41 O F), which may re duce
performance.
Pl ac e the unit away from the c lothes d ryer, heater or ra diator.
U se the u nit to prevent moisture damage a nywhere books
or va luables a re stored.
U se the dehumidifier in a base ment to help prevent
m oisture damage.
T he dehumidifier must be o perated in an en close d
ar ea to be most effective.
C lose a ll doors, windows a nd other outside openings
to the r oom.
Air outlet grille
Air intake
grille
20cm or more
20cm or more
20cm or more
20cm or more
Fig.4
Casters(Install at four points on the bottom
of unit)
Casters can only move laterally.
Do not force casters to move over carpet,
nor move the unit with water in the bucket.
(The unit may tip over and spill water.)
NOTE:Casters is optional,some models without.
When using the unit
W hen first using the dehumidifier, o perate the unit continuously 24 hours.
This unit is d es igned to opera te with a working en vironment between 5 O C( 41 O F) and 35 O C( 95 O F).
If the unit has been sw itched off and ne eds t o be s witched on ag ain quickly, a llow approximately
three minutes for the c orrect operation to re sume.
Do not connect the dehumidifier to a multiple socket outlet, which is a lso being us ed for other e lectrical appliances.
Se lect a su itable loca tion, making s ure you have e as y a cces s t o a n e lectrical outlet.
Plu g the unit into a 115V~ 6 0Hz/220~240V 5 0Hz ( Re fer to the n ameplate located on the si de/rear of the unit ) e lectrical
socket-outlet with ea rth co nnection.
Make su re the W ater bucket is co rrectly fitted otherwise the u nit will not opera te properly.
1. Pull out the bucket a little.
There are two ways to remove collected water.
1. Use the bucket
When the bucket is full, the unit will automatically
stop running, and the Full indicator light will flash.
Slowly pull out the bucket. Grip the left and right
handles securely, and carefully pull out straight so
water does not spill. Do not put the bucket on the floor
because the bottom of the bucket is uneven.
Otherwise the bucket will fall and cause the water
to spill.
Throw away the water and replace the bucket. The
bucket must be in place and securely seated for
the dehumidifier to operate.
The machine will re-start when the bucket is restored
in its correct position.
2. Hold both sides of the bucket
with even strength, and pull it
out from the unit.
NOTES:
When you remove the bucket, do not touch any parts
inside of the unit. Doing so may damage the product.
Be sure to push the bucket gently all the way into the
unit. Banging the bucket against anything or failing to
push it in securely may cause the unit not to operate.
2. Continuous draining
Water can be automatically emptied into a floor
drain by attaching the unit with a water hose
(ID 13.5mm) (not included).
Re move the r ubber plug from the ba ck of the u nit an d s tore
it in a sa fe location.
Ins ert the water hose into the u nit from the drain outlet in the
back of the u nit as sh own in F ig.8. Make su re the co nnection
of the water hose a nd the drain hose o utlet of the unit is t ight
and do not let the water leak.
Then lead the water hose to the floor drain or a s uitable drainage
facility.Th e drainage fa cility should be lower than the drain outlet
of the unit.
Be su re to run the water hose s loping downward and let the
water to flow out s moothly.D o not install the water hose a s
shown F ig.9a an d F ig.9b.
Fig.6
3. Pour the water out.
Fig.7
Remove the
rubber plug
Insert the hose
from the drain
outlet
Fig.8
NOTE: When the continuous drain feature is not
being used,remove the drain hose from the outlet
and attach the rubber plug back to the drain outlet.
Fig.9b
Fig.9a
Do not block water flow by a rise.
6
Fig.5
Do not block water flow by a retortion.
7
CARE AND MAINTENANCE
TROUBLESHOOTING TIPS
Care and cleaning of the dehumidifier
Before calling for service, review the chart below first yourself.
Turn the dehumidifier off and remove the plug
from the wall outlet before cleaning.
Problem
1. Clean the Grille and Case
Use water and a mild detergent. Do not use bleach
or abrasives.
Do not splash water directly onto the main unit. Doing
so may cause an electrical shock, cause the insulation
to deteriorate, or cause the unit to rust.
The air intake and outlet grilles get soiled easily, so use
a vacuum attachment or brush to clean.
2. Clean the bucket
Every few weeks, clean the bucket to prevent
growth of mold, mildew and bacteria. Partially
fill the bucket with clean water and add a little
mild detergent. Swish it around in the bucket,
empty and rinse.
NOTE: Do not use a dishwasher to clean the
bucket. After clean, the bucket must be in place
and securely seated for the dehumidifier to operate.
3. Clean the air filter
The air filter behind the front grille should be
checked and cleaned at least every 30 days
or more often if necessary.
NOTE: DO NOT RINSE OR PUT THE FILTER
IN AN AUTOMATIC DISHWASHER.
F ig. 9
What to check
Unit does not start
,
Make sure the dehumidifier s plug is pushed completely into the
outlet.
Check the house fuse/circuit breaker box.
Dehumidifier has reached its preset level or bucket is full.
Bucket is not in the proper position.
Dehumidifier does not
dry the air as it should
Did not allow enough time to remove the moisture.
Make sure there are no curtains, blinds or furniture blocking the
front or back of the dehumidifier.
The humidity selector may not be set low enough.
Check that all doors, windows and other openings are securely
closed.
Room temperature is too low, below 5oC(41oF).
There is a kerosene heater or something giving off water vapor
in the room.
The unit makes a loud
noise when operating
The air filter is clogged.
The unit is tilted instead of upright as it should be.
The floor surface is not level.
Frost appears on the
coils
This is normal. The unit has Auto defrost feature.
Water on floor
Hose to connector or hose connection may be loose.
Intend to use the bucket to collect water, but the back
drain plug is removed.
F ig. 10
To remove:
Pull the water bucket out as shown in Fig.9.
Grasp the lower side of the filter and pull it downward,
see Fig.10.
Clean the filter with warm, soapy water. Rinse and
let the filter dry before replacing it. Do not clean the
filter in a dishwasher.
F ig. 11
To attach:
Insert the air filter into the unit from the side and push
it upward. See Fig.10.
CAUTION:
DO NOT operate the dehumidifier without a filter
because dirt and lint will clog it and reduce performance.
4. When not using the unit for long time periods
After turning off the unit, wait one day before emptying
the tank.
Clean the main unit, bucket and air filter.
Wrap the cord and bundle it with the band(see Fig.12).
Cover the unit with a plastic bag.
Store the unit upright in a dry, well-ventilated place.
8
P ower cord
B and
Power indicator light
flashes at 5 times per
second.
Temperature sensor or Humidity sensor error. Unplug the unit
and plug it back in.If error repeats, call for service.
Fig.12
9