1
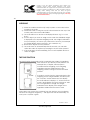
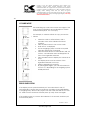
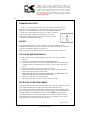
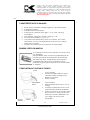
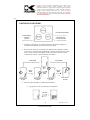
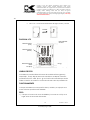
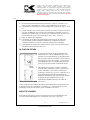
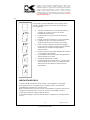
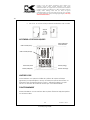
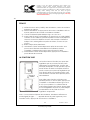
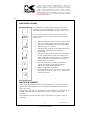
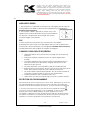
Copies of the I/B. Please reproduce them without any
changes except under special instruction from Team
International USA. The pages must be reproduced and folded
in order to obtain a booklet A5 (+/- 148.5 mm width x 210 mm
height). When folding, make sure you keep the good
numbering when you turn the pages of the I/B. Don’t change
the page numbering. Keep the language integrity. Print only
what is inside the frame,
Fax +1 305 430 9692
Digital kitchen scale with
volume measuring function
Bascula de cocina digital con
función de cálculo de volumen
Balance de cuisine digitale
avec fonction de mesure des
volumes
USK EKS 39724
www.KALORIK.com
2 x 1.5V (AAA batteries)
Front cover page (first page)
Assembly page 1/28
Fax +1 305 430 9692
Copies of the I/B. Please reproduce them without any
changes except under special instruction from Team
International USA. The pages must be reproduced and folded
in order to obtain a booklet A5 (+/- 148.5 mm width x 210 mm
height). When folding, make sure you keep the good
numbering when you turn the pages of the I/B. Don’t change
the page numbering. Keep the language integrity. Print only
what is inside the frame,
IMPORTANT SAFEGUARDS
Please read these instructions carefully before using the appliance.
Important: People (including children) who are not able to use the
appliance in a safe way, due to their physical, sensorial or mental capacity
or their lack of experience or knowledge, must never use the appliance
except if they are supervised by a person responsible for their safety or if
they previously received instructions concerning the safe use of the
appliance.
Close supervision is necessary to prevent children from using the appliance
as a toy.
•
•
•
•
•
•
•
Never leave the appliance unsupervised when in use.
From time to time check the appliance for damages. Never use the
appliance if it shows any signs of damage. All repairs should be
made by a qualified electrician.
Only use the appliance for domestic purposes and in the way
indicated in these instructions.
Never immerse the appliance in water or any other liquid for any
reason whatsoever.
Before cleaning, always remove the batteries.
If the batteries leak, remove them, clean the contacts of the
appliance and wash your hands.
If you do not use the appliance for a long time, remove the batteries
so that they do not leak.
SAVE THESE INSTRUCTIONS
HOUSEHOLD USE ONLY
NOT SUITABLE FOR TRADE
2
Assembly page 2/28
EKS 39724 - 120501
Fax +1 305 430 9692
Copies of the I/B. Please reproduce them without any
changes except under special instruction from Team
International USA. The pages must be reproduced and folded
in order to obtain a booklet A5 (+/- 148.5 mm width x 210 mm
height). When folding, make sure you keep the good
numbering when you turn the pages of the I/B. Don’t change
the page numbering. Keep the language integrity. Print only
what is inside the frame,
CHARACTERISTICS OF YOUR SCALE
•
•
•
•
•
•
•
•
Removable Stainless steel measuring bowl, hygienic and easy to
clean
Automatic switch-off
Backlit LCD display
Two weight unit systems: convertible g / lb. + oz. (1 ounce = 28.35 g)
Maximum weight (for normal weighing) = 5000 g / 11 lb.
Precision of the measurement = 1 g / 0.1 oz
Automatic conversion of the weights into volumes (ml or US cups / Fl.
Oz.; for common ingredients like flour, water, milk or Oil).
Low battery indicator and overloading indicator
BEFORE THE FIRST USE
This appliance works with 2 batteries (1.5V, type AAA,
not included). To install, remove the lid of the battery
housing on the bottom part of the scale. Place the
batteries, making sure to respect the polarity indicated
in the battery compartment, and then put the lid back
in place. You can now use your scale.
HOW TO INSTALL OR REMOVE THE BOWL
Bowl
To remove:
• Using your thumb, slide the sliding
closure towards the handle to
release the bowl.
• Remove the stainless steel bowl with
your other hand
Sliding closure
• Release the sliding closure
Plate
Groove
Scale
Body
Buttons
LCD Display
To install:
• Align the plate on the bowl with the
handle
• Insert the plate on the bowl into the
groove below the sliding closure.
• Press the bowl in place until you hear
a click sound indicating the sliding
closure is in place and the bowl is
locked
3
Assembly page 3/28
EKS 39724 - 120501
Fax +1 305 430 9692
Copies of the I/B. Please reproduce them without any
changes except under special instruction from Team
International USA. The pages must be reproduced and folded
in order to obtain a booklet A5 (+/- 148.5 mm width x 210 mm
height). When folding, make sure you keep the good
numbering when you turn the pages of the I/B. Don’t change
the page numbering. Keep the language integrity. Print only
what is inside the frame,
FUNCTION BUTTONS
ON/OFF/ZERO
Press MODE for
mode conversion
Press UNIT for unit
conversion
1. The On/Off-zero button is used to switch the scale on or off, and to
reset the scale to 0.00 (Tare function).
2. The mode conversion button is used to switch mode: press in
sequence to set the scale to Weighing mode / Water mode / Milk
mode / Oil Mode / Flour mode and then again: Weighing mode ….
Press MODE
Press MODE
Weight
mode
Press
MODE
Water Volume mode
Press
MODE
Press
MODE
Oil Volume mode
Milk Volume mode
Flour Volume mode
3. The Unit button is made to switch from
• g to lb:oz in weighing mode
Press UNIT
4
Assembly page 4/28
EKS 39724 - 120501
Fax +1 305 430 9692
•
Copies of the I/B. Please reproduce them without any
changes except under special instruction from Team
International USA. The pages must be reproduced and folded
in order to obtain a booklet A5 (+/- 148.5 mm width x 210 mm
height). When folding, make sure you keep the good
numbering when you turn the pages of the I/B. Don’t change
the page numbering. Keep the language integrity. Print only
what is inside the frame,
Fl. Oz. or ml to US cups in the Water, Milk and Oil mode
Press UNIT
LCD DISPLAY
Arrow indicators in
“Mode” settings
Volume Unit (Fl. Oz.)
Volume Unit (US Cups)
Tare function symbol
Weight unit (g)
Volume Unit (ml)
Weight Unit (lb:Oz)
WEIGHT UNIT
Your scale allows you to use the metric measurement system (grams) OR
the imperial system (lb.; ounce). Choose the measurement system at any
time by pressing the “Unit” button (lb:oz … g), depending on the
measurement system you wish to use. This button is situated above the LCD
display.
USE
Put the scale on an even and hard surface, for instance a table or
countertop. Avoid soft surfaces.
5
Assembly page 5/28
EKS 39724 - 120501
Fax +1 305 430 9692
Copies of the I/B. Please reproduce them without any
changes except under special instruction from Team
International USA. The pages must be reproduced and folded
in order to obtain a booklet A5 (+/- 148.5 mm width x 210 mm
height). When folding, make sure you keep the good
numbering when you turn the pages of the I/B. Don’t change
the page numbering. Keep the language integrity. Print only
what is inside the frame,
WEIGHING
1) Place the stainless steel bowl (if used) in place on the scale, before
turning on the scale.
2) Switch the scale on using the on/off switch situated on the top of the
control panel. LCD screen will initialize.
3) The scale will turn on and the LCD display will show “0 g” or “0:0.0
lb:oz.”.
4) Put the object you want to weigh on the scale. The stabilized weight
is displayed. In the imperial weighing mode, the weight is indicated
in US pounds (lb.), US ounces (oz.) and tenth of ounces. (for example
the weight display 2:3.2 means 2 lb., 3Oz. and 2/10 oz.).
5) Remove the object from the platform.
6) The scale turns off automatically after 30 seconds. You can also
switch the scale off anytime by keeping the on/off switch pressed.
7) If the scale goes off automatically, press on the ON/ZERO button to
switch on again.
THE TARE FUNCTION
The tare function is extremely useful to calculate the weight of ingredients
that cannot be put directly on the platform. For
example flour, or liquids, which require a
container before weighing, or for weighing
ingredients that are added after the first
weighing, without having to remove the initial
product.
Press
“On/Zero”
In order to use this function, proceed with the first
weighing, let the weight stabilize, and then press
the “On/Zero” button above the LCD display.
The scale will reset, display a “T” at the lower left
corner, and indicate now 0g or 0:00.0 lb:oz. Add
the new ingredient to weigh. The weight
indicated on the display is the weight of the
ingredient added after the reset to zero!
Note: When you remove the container from the platform, the LCD display
will show the weight as negative (“-” will appear on the left-hand side). To
reset, press “On/Zero” again.
6
Assembly page 6/28
EKS 39724 - 120501
Copies of the I/B. Please reproduce them without any
changes except under special instruction from Team
International USA. The pages must be reproduced and folded
in order to obtain a booklet A5 (+/- 148.5 mm width x 210 mm
height). When folding, make sure you keep the good
numbering when you turn the pages of the I/B. Don’t change
the page numbering. Keep the language integrity. Print only
what is inside the frame,
Fax +1 305 430 9692
VOLUME MODE
This measuring cup scale can convert the weight of the
most common ingredients automatically into volume
measurements (ml; Fl. Oz. or US cups).
Press
“On/Zero”
For example, to measure milk in US cups, proceed as
follows:
•
Press
MODE
•
•
•
•
•
Press UNIT
•
•
•
Add Liquid
Place the scale on a flat surface, with a
container such as the stainless steel bowl
supplied.
Press On/Zero button to turn on the scale.
Wait until “0” is displayed.
Set the weighing system to metric or imperial
using the UNIT button (if needed).
Press the MODE button to select Water, Milk, Oil
or Flour – an indication arrow shall appear in in
front of the ingredient selected.
Press the UNIT button to display the volume in US
Cups.
The display shows now the volume of the
ingredient selected, in US cups.
Add the ingredient to measure.
By pressing UNIT again, you can switch back to
ml or Fl. Oz., depending on the weighing system
initially selected.
ERROR INDICATION
If the display shows symbols randomly or if the scale doesn’t turn off
automatically, it means that your scale has a problem (wrong initialization
or weighing error). Remove any object from the scale and wait for it to turn
off. Make sure the steel bowl is well in place (if used). Then start again.
If the problem goes on, remove the batteries for 10 seconds, and then put
them back in place.
7
Assembly page 7/28
EKS 39724 - 120501
Fax +1 305 430 9692
Copies of the I/B. Please reproduce them without any
changes except under special instruction from Team
International USA. The pages must be reproduced and folded
in order to obtain a booklet A5 (+/- 148.5 mm width x 210 mm
height). When folding, make sure you keep the good
numbering when you turn the pages of the I/B. Don’t change
the page numbering. Keep the language integrity. Print only
what is inside the frame,
WARNING INDICATORS
1. If the “Lo” symbol is displayed on the LCD screen, it means that the
batteries of your scale are low and should be replaced soon. Please
dispose of the old batteries in an environmentally friendly way.
2. If the ”Err” symbol appears on the LCD screen, it means
that the maximum weight accepted by your scale is
exceeded, please remove the object from the scale in
order not to damage your scale.
BATTERY
If your appliance does not work properly, it is probably because the
batteries are dead. In that case, replace them with new ones of the same
type (see paragraph “Before the first use”).
Please dispose of the old batteries in an environmentally friendly way.
TIPS FOR USE AND MAINTENANCE
•
•
•
•
•
•
•
•
Be careful when manipulating the scale because it is a precision
device.
Clean the outside parts only with a lightly damp cloth.
All plastics parts shall be cleaned immediately after contact with fat,
vinegar, spices or strongly flavored foods. Avoid contact with acid
juices
Never use abrasive products to clean your scale.
Remove the bowl for cleaning. Ensure it is empty before removing.
Clean the bowl in warm soapy water.
NEVER USE THIS APPLIANCE NEAR WATER; NEVER IMMERSE THE SCALE
ITSELF IN WATER OR ANY LIQUID WHATSOEVER.
Keep the scale in a cool and dry place.
Treat with care. Do not strike, shake or drop the scale
PROTECTION OF THE ENVIRONMENT
In order to preserve our environment and protect human health, the waste
of electrical and electronic equipment should be disposed of in
accordance with specific rules with the implication of both suppliers and
users. For this reason, as indicated by the symbol
on the rating label or on
the packaging, your appliance should not be disposed of as unsorted
municipal waste. The user should bring it to a municipal collection point
performing waste recovery by means of reuse, recycling or use for other
applications in accordance with the directive.
8
Assembly page 8/28
EKS 39724 - 120501
Fax +1 305 430 9692
Copies of the I/B. Please reproduce them without any
changes except under special instruction from Team
International USA. The pages must be reproduced and folded
in order to obtain a booklet A5 (+/- 148.5 mm width x 210 mm
height). When folding, make sure you keep the good
numbering when you turn the pages of the I/B. Don’t change
the page numbering. Keep the language integrity. Print only
what is inside the frame,
WARRANTY
We suggest that you complete and return the enclosed Product
Registration Card promptly to facilitate verification of the date of
original purchase. However, return of the Product Registration Card is
not a condition of these warranties. You can also fill out this warranty
card online, at the following address: www.KALORIK.com
This KALORIK product is warranted in the U.S.A. for 1 year from the
date of purchase against defects in material and workmanship. This
warranty is not transferable. Keep the original sales receipt. Proof of
purchase is required to obtain warranty performance.
During this period, if the KALORIK product, upon inspection by
KALORIK, is proven defective, it will be repaired or replaced, at
Kalorik’s option, without charge to the customer. If a replacement
product is sent, it will carry the remaining warranty of the original
product.
This warranty does not apply to any defect arising from a buyer's or
user's misuse of the product, negligence, failure to follow KALORIK
instructions noted in the user’s manual, use on current or voltage
other than that stamped on the product, wear and tear, alteration
or repair not authorized by KALORIK, or use for commercial purposes.
There is no warranty for glass parts, glass containers, filter basket,
blades and agitators, and accessories in general. There is also no
warranty for parts lost by the user.
ANY WARRANTY OF MERCHANTABILITY OR FITNESS WITH RESPECT TO
THIS PRODUCT IS ALSO LIMITED TO THE ONE YEAR LIMITED WARRANTY
PERIOD.
Some states do not allow limitation on how long an implied warranty
lasts or do not allow the exclusion of incidental or consequential
damages, so the above limitations may not apply to you. This
warranty gives you specific legal rights, and you may also have other
rights which vary from state to state.
9
Assembly page 9/28
EKS 39724 - 120501
Fax +1 305 430 9692
Copies of the I/B. Please reproduce them without any
changes except under special instruction from Team
International USA. The pages must be reproduced and folded
in order to obtain a booklet A5 (+/- 148.5 mm width x 210 mm
height). When folding, make sure you keep the good
numbering when you turn the pages of the I/B. Don’t change
the page numbering. Keep the language integrity. Print only
what is inside the frame,
If the appliance should become defective within the warranty
period and more than 30 days after date of purchase, do not return
the appliance to the store: often, our Customer Service
Representatives can help solve the problem without having the
product serviced. If servicing is needed, a Representative can
confirm whether the product is under warranty and direct you to the
nearest service location.
If this is the case, bring the product, or send it, postage prepaid by
the user (all Kalorik customers are responsible for the initial shipment
back to the warranty center), along with proof of purchase and a
return authorization number indicated on the outer package, given
by our Customer Service Representatives. Send to the authorized
KALORIK Service Center (please visit our website at
www.KALORIK.com or call our Customer Service Department for the
address of our authorized KALORIK Service Center).
When sending the product, please include a letter explaining the
nature of the claimed defect.
If you have additional questions, please call our Customer Service
Department (please see below for complete contact information),
Monday through Thursday from 9:00am - 5:00pm (EST) and Friday
from 9:00am - 4:00pm (EST). Please note hours are subject to change.
If you would like to write, please send your letter to:
KALORIK Customer Service Department
Team International Group of America Inc.
1400 N.W 159th Street, Suite 102
Miami Gardens, FL 33169 USA
Or call:
Toll Free: +1 888-521-TEAM / +1 888-KALORIK
Only letters can be accepted at this address above. Shipments and
packages that do not have a return authorization number will be
refused.
10
Assembly page 10/28
EKS 39724 - 120501
Fax +1 305 430 9692
Copies of the I/B. Please reproduce them without any
changes except under special instruction from Team
International USA. The pages must be reproduced and folded
in order to obtain a booklet A5 (+/- 148.5 mm width x 210 mm
height). When folding, make sure you keep the good
numbering when you turn the pages of the I/B. Don’t change
the page numbering. Keep the language integrity. Print only
what is inside the frame,
CONSEJOS DE SEGURIDAD
Lea detenidamente el modo de empleo antes de utilizar el aparato.
Importante: Las personas (incluidos niños) con incapacidades físicas,
sensoriales o mentales, o sin experiencia o conocimiento nunca deben
utilizar el aparato, salvo si están bajo la vigilancia de una persona
responsable de su seguridad o si recibieron previamente instrucciones con
respecto al uso seguro del aparato.
Es necesario vigilar a los niños para que no jueguen con el aparato.
•
•
•
•
•
•
•
No deje nunca su aparato sin vigilancia cuando esté en marcha.
Compruebe de vez en cuando que el aparato no esté dañado.
Nunca utilice el aparato si está dañado. Todas las reparaciones
deben ser hechas por un servicio técnico cualificado
recomendado por el distribuidor.
Utilice el aparato solamente para usos domésticos y de la manera
indicada en este manual de instrucciones.
No sumerja nunca el aparato en el agua o en cualquier otro líquido
por ninguna razón.
Antes de limpiar el aparato, quite siempre la pila.
Si la pila gotea, quítela, limpie los contactos del aparato y lávese las
manos.
Si no va a utilizar el aparato durante un largo periodo de tiempo,
quite la pila para que no gotee.
GUARDE ESTAS INSTRUCCIONES
SOLAMENTE PARA USO DOMESTICO
NO APTO PARA EL COMERCIO
11
Assembly page 11/28
EKS 39724 - 120501
Fax +1 305 430 9692
Copies of the I/B. Please reproduce them without any
changes except under special instruction from Team
International USA. The pages must be reproduced and folded
in order to obtain a booklet A5 (+/- 148.5 mm width x 210 mm
height). When folding, make sure you keep the good
numbering when you turn the pages of the I/B. Don’t change
the page numbering. Keep the language integrity. Print only
what is inside the frame,
CARACTERÍSTICAS DE SU BALANZA
•
•
•
•
•
•
•
•
Bol de acero inoxidable extraíble, higiénico y de fácil limpieza.
Parada automática
Pantalla LCD retro-iluminada
2 sistemas de unidad de peso: g/lb. + oz. (1 onza = 28.35 g)
convertibles
Peso máximo (para peso normal) = 5000 g / 11 lb
Precisión de la medida = 1 g / 0.1 oz
Conversión automática de los pesos en volumen (ml o tazas
americanas / Fl. Oz.) para ingredientes comunes como: harina,
agua, leche o aceite.
Avisador de batería escasa y indicación de sobrecarga
PRIMERA PUESTA EN MARCHA
E se aparato funciona con 2 pilas de 1.5V de tipo AAA
(no incluidas).
Para instalarlas, quite la tapa de emplazamiento de
las pilas ubicada en la parte inferior de la balanza.
Introduzca las pilas, asegurándose de respetar la
polaridad indicada en el compartimento de las
baterías; luego ponga la tapa. Ahora se puede utilizar
su balanza.
COMO INSTALAR O QUITAR EL CUENCO
Cuenco
Ranura
Placa
•
•
Cierre deslizante
Ranura
•
•
•
Cuerpo de
la báscula
Botones
Como quitarlo:
Usando el pulgar, deslice el cierre
corredero hacia el mango para
liberar el recipiente.
Suelte el cierre
Como instalar:
Alinear la placa del cuenco, con el
mango
Coloque la placa del cuenco en la
ranura debajo del cierre deslizante.
presione el cuenco en su lugar, hasta
que escuche un sonido de clic, que
indica que el cierre deslizante esta
en su lugar y el cuenco esta
bloqueado.
Pantalla LCD
12
Assembly page 12/28
EKS 39724 - 120501
Copies of the I/B. Please reproduce them without any
changes except under special instruction from Team
International USA. The pages must be reproduced and folded
in order to obtain a booklet A5 (+/- 148.5 mm width x 210 mm
height). When folding, make sure you keep the good
numbering when you turn the pages of the I/B. Don’t change
the page numbering. Keep the language integrity. Print only
what is inside the frame,
Fax +1 305 430 9692
FUNCION DE LOS BOTONES
Encendido/apagado/ZERO
Encendido/apagado/ZERO
Presione MODE par
el modo de
conversión
Presione UNIT para
conversión de unidad
1. El botón On/Off-Zero es para encender o apagar el aparato y
restablecer la balanza a 0.00 (función de tara).
2. El botón de modo de conversión se utiliza para cambiar el modo:
pulse en secuencias para establecer el modo en la báscula: modo
peso, modo volumen de agua, modo volumen de leche, modo
volumen de aceite, modo volumen de harina…
Presione MODE
Presione MODE
Modo
peso
Presione
MODE
Modo volumen
de agua
Presione
MODE
Presione
MODE
Modo volumen
de aceite
Modo volumen
de leche
Modo volumen
de harina
3. El botón de la unidad se utiliza para cambiar:
•
de gr a lb:oz en el modo de ponderación
Pulse UNIT
13
Assembly page 13/28
EKS 39724 - 120501
Fax +1 305 430 9692
•
Copies of the I/B. Please reproduce them without any
changes except under special instruction from Team
International USA. The pages must be reproduced and folded
in order to obtain a booklet A5 (+/- 148.5 mm width x 210 mm
height). When folding, make sure you keep the good
numbering when you turn the pages of the I/B. Don’t change
the page numbering. Keep the language integrity. Print only
what is inside the frame,
de Fl. Oz. o ml a tazas americanas de agua, leche y aceite
Pulse UNIT
PANTALLA LCD
Flecha indicadora
del modo
Unidad de volumen
(Fl. Oz.)
Unidad de volumen
(US tazas)
Símbolo de la función
de tara
Peso (g)
Volumen (ml)
Peso (lb:Oz)
UNIDAD DE PESO
Su balanza le permite utilizar el sistema de medida métrica (gramos),
imperial (lb., onzas). Elija el sistema de medida en cualquier momento,
poniendo el botón “UNIT” (lb:oz…g) en función de la medida que desee
utilizar. El botón de cambio se encuentra situado sobre la pantalla LCD.
FUNCIONAMIENTO
Coloque la balanza en una superficie dura y estable, por ejemplo una
mesa. Evite las superficies más blandas.
PESO
1) Coloque el cuenco de acero inoxidable (si no esta en su sitio) en su
lugar antes de encender la bascula.
14
Assembly page 14/28
EKS 39724 - 120501
Fax +1 305 430 9692
Copies of the I/B. Please reproduce them without any
changes except under special instruction from Team
International USA. The pages must be reproduced and folded
in order to obtain a booklet A5 (+/- 148.5 mm width x 210 mm
height). When folding, make sure you keep the good
numbering when you turn the pages of the I/B. Don’t change
the page numbering. Keep the language integrity. Print only
what is inside the frame,
2) Encienda la báscula pulsando el interruptor “On/Off” situado en la
parte superior del panel de control. La pantalla LCD se enciende.
3) La balanza se encenderá y en la pantalla LCD aparecerá “0 g” o “0:0.0
oz”.
4) Ponga el objeto que usted quiera pesar en el cuenco. El peso se indica
una vez estabilizado. En el modo de ponderación imperial, el peso es
indicado en US libras (lb), US onzas (oz) y la décima parte de onzas. (ex
la indicación de peso 2:3.2 quiere decir 2 lb., 3Oz y 2/10 oz.).
5) Quite el objeto de la balanza.
8) La balanza se apaga automáticamente después de 30 segundos.
Usted también puede apagar la balanza en cualquier momento
usando el interruptor “On/Off” (presione hasta que se apague)
9) Si la balanza se apaga automáticamente, pulse en la superficie táctil
ON/ZERO para encender de nuevo.
LA FUNCION DE TARA
La función de tara es de gran utilidad para
calcular el peso de los ingredientes que no se
pueden poner directamente en la plataforma.
Por ejemplo la harina, o líquidos, que requieren
un recipiente antes de pesarlos, o para el peso
de ingredientes que se añaden tras el primer
peso, sin tener que quitar el producto inicial
Presione
“On/Zero”
Para utilizar esta función, realice la primera
pesada, deje estabilizar el peso, y presione el
botón "ON/ZERO". La escala se enciende e
indica 0g o 0:0.0 lb:oz., y una “T” aparece en el
bajo del lado izquierdo de la pantalla LCD.
Añadir el ingrediente que quiere pesar. El peso
indicado en la pantalla es el peso del
ingrediente añadido después de haber lo
puesto a 0!
Nota: Cuando usted quite el recipiente de la plataforma, la pantalla LCD
mostrará el peso de los objetos en negativo (“-” aparecerá en la parte
izquierda). Para recomponerlo, pulse “ON/ZERO” de nuevo.
MODO DE VOLUMEN
Esta bascule tipo taza, puede convertir el peso de los ingredientes mas
comunes automáticamente en volúmenes (ml; Fl. Oz. o US cups).
15
Assembly page 15/28
EKS 39724 - 120501
Copies of the I/B. Please reproduce them without any
changes except under special instruction from Team
International USA. The pages must be reproduced and folded
in order to obtain a booklet A5 (+/- 148.5 mm width x 210 mm
height). When folding, make sure you keep the good
numbering when you turn the pages of the I/B. Don’t change
the page numbering. Keep the language integrity. Print only
what is inside the frame,
Fax +1 305 430 9692
Por ejemplo, para medir líquidos como agua, leche,
aceite o incluso harina en US tazas, proceda de la
forma siguiente:
•
Presione
“On/Zero”
•
•
•
Presione
MODE
•
•
Presione
UNIT
•
•
•
Añada el
líquido
Coloque la bascule en una superficie plana, y
coloque en su sitio el cuenco de acero
inoxidable suministrado.
Presione el botón On/Zero par encender la
bascula.
Espere hasta que aparezca “0” en la pantalla.
Programe el peso en el sistema métrico o
imperial usando el botón UNIT (si necesario).
Pulse el botón MODE para seleccionar agua,
leche, aceite o harina una flecha de indicación
aparecerá en el frente del ingrediente
seleccionado.
Presione el botón UNIT para visualizar el volumen
en US tazas en la pantalla.
La pantalla muestra el volumen del ingrediente
seleccionado en US tazas.
Añada el ingrediente a medir.
Pulsando el botón UNIT de Nuevo, puede volver
a las medidas de ml o de Fl. Oz., dependiendo
del sistema de ponderación seleccionado
inicialmente.
INDICACIÓN DE ERROR
Si en la pantalla aparecen cifras al azar o si la balanza no se apaga
automáticamente, eso significa que su balanza tiene un problema
(inicialización incorrecta o error de peso).
Baje cualquier objeto que hay puesto en la balanza y espere hasta que se
apague. Compruebe que el cuenco de acero inoxidable esta bien
colocado. Después puede probar de nuevo.
Si el problema sigue, quite las pilas durante 10 segundos y colóquenles de
nuevo.
16
Assembly page 16/28
EKS 39724 - 120501
Fax +1 305 430 9692
Copies of the I/B. Please reproduce them without any
changes except under special instruction from Team
International USA. The pages must be reproduced and folded
in order to obtain a booklet A5 (+/- 148.5 mm width x 210 mm
height). When folding, make sure you keep the good
numbering when you turn the pages of the I/B. Don’t change
the page numbering. Keep the language integrity. Print only
what is inside the frame,
INDICADORES DE ADVERTENCIA
1. Si el símbolo “LO” aparece en la pantalla de LCD, significa que la
batería de su balanza está baja y debería ser remplazada pronto.
Por favor para deshacerse de las baterías usadas deposítelas en un
contenedor propio para este propósito.
2. Si el símbolo “EEEE” aparece en la pantalla LCD, significa que se
excede el peso máximo aceptado por su balanza. Por favor, retire el
objeto de la báscula con el fin de no dañarla.
PILA
Si su aparato no funciona correctamente, eso significa
probablemente que las pilas estas descargadas. En este caso, remplácelas
por pilas de tipo idéntico. (Véase el párrafo “Primera puesta en marcha”).
Les rogamos eliminen las pilas usadas de manera ecológica.
CONSEJOS DE USO Y DE MANTENIMIENTO
•
•
•
•
•
•
•
Trate la balanza con cautela porque es un instrumento de precisión.
Limpie el exterior únicamente con un pañuelo seco ligeramente
húmedo.
Nunca limpie su aparato con productos abrasivos.
NUNCA UTILICE ESE APÂRATO CERCA DEL AGUA. No sumerja nunca
el aparato en el agua o en cualquier otro líquido.
Conserve la balanza en un lugar fresco y seco.
Siempre conserve su balanza en posición horizontal.
No se puede comprometer ninguna responsabilidad por
deterioraciones debidas a un uso inapropiado o no conforme con
el modo de empleo. La garantía vuelve caduca si el aparato ha
sido abierto o dañado.
PROTECCIÓN DEL MEDIO AMBIENTE
Para poder preservar nuestro medio ambiente y proteger la salud humana,
los residuos eléctricos y equipos electrónicos deberían ser destruidos de
acuerdo con unas normas específicas con la implicación de ambos
en
proveedores y consumidores. Por esta razón, como indica el símbolo
la placa de datos técnicos, su aparato no debería ser tirado en un
contenedor municipal sino que debería ser devuelto a la tienda, o dejado
en un punto de recolección para ser reciclado o usado para otras
aplicaciones conforme a la directiva
17
Assembly page 17/28
EKS 39724 - 120501
Fax +1 305 430 9692
Copies of the I/B. Please reproduce them without any
changes except under special instruction from Team
International USA. The pages must be reproduced and folded
in order to obtain a booklet A5 (+/- 148.5 mm width x 210 mm
height). When folding, make sure you keep the good
numbering when you turn the pages of the I/B. Don’t change
the page numbering. Keep the language integrity. Print only
what is inside the frame,
GARANTÍA
Le sugerimos rellenen y nos envíen rápidamente la Tarjeta de
Registro de Producto adjunta para facilitar la verificación de la
fecha de compra. Por lo tanto, la devolución de esa Tarjeta de
Registro de Producto no es una condición imprescindible para la
aplicación de esa garantía. Puede también rellenar dicha tarjeta de
garantía en línea en la dirección siguiente: www.KALORIK.com
A partir de la fecha de compra, este producto KALORIK está
garantizado un año contra los defectos materiales y de fabricación,
en los Estados Unidos. Esta garantía no es transferible. Conserve la
prueba de compra original. Se exige una prueba de compra para
obtener la aplicación de la garantía.
Durante este período, si el producto KALORIK después de una
inspección por parte de KALORIK, se manifiesta defectuoso, será
reparado o remplazado, según lo que decida KALORIK, sin gastos
para el consumidor. Si se envía un producto de remplazo, se
aplicará la garantía que queda del producto original.
Esta garantía no se aplica a los defectos causados por una mala
utilización por parte del comprador o del usuario, o una negligencia
al no respeto del manual de instrucciones KALORIK, o una utilización
en un circuito eléctrico cuyo voltaje es diferente al que figura en el
producto, o un desgaste normal, o modificaciones o reparaciones
no autorizadas por KALORIK, o por un uso con fines comerciales. No
existe garantía por las partes de cristal, jarras de cristal, filtros, cestos,
cuchillas y accesorios en general. No existe tampoco garantía por
las piezas perdidas por el usuario.
Toda garantía de valor comercial o de adaptabilidad a este
producto está limitada a un año también.
Algunos estados no ponen límites a la duración de la garantía tácita
o no autorizan la exclusión de daños y perjuicios accesorios o
indirectos, por lo que puede que las restricciones anteriormente
mencionadas no le sean aplicables a Usted. Esta garantía le otorga
derechos legales particulares, pero usted puede tener también otros
18
Assembly page 18/28
EKS 39724 - 120501
Fax +1 305 430 9692
Copies of the I/B. Please reproduce them without any
changes except under special instruction from Team
International USA. The pages must be reproduced and folded
in order to obtain a booklet A5 (+/- 148.5 mm width x 210 mm
height). When folding, make sure you keep the good
numbering when you turn the pages of the I/B. Don’t change
the page numbering. Keep the language integrity. Print only
what is inside the frame,
derechos que varían de un estado a otro y algunos derechos
pueden variar de un estado a otro.
Si el aparato tuviera un defecto durante el periodo de garantía y / o
más de 30 días después de que se compró, no devuelva el aparato
en la tienda donde le compró: a menudo, nuestro Servicio al
Consumidor puede ayudar a resolver el problema sin que el
producto tenga que ser reparado. Si hace falta una reparación, uno
de nuestros representantes puede confirmar si el producto está bajo
garantía y dirigirle al servicio post-venta más próximo.
Si fuera el caso, traiga el producto (o envíelo, correctamente
franqueado) con la prueba de compra que mencione el número de
autorización de devolución indicado por nuestro Servicio al
Consumidor, al servicio post-venta KALORIK más próximo. (Visite
nuestra web www.KALORIK.com o llame al Servicio al Consumidor
para obtener la dirección del Servicio post-venta KALORIK exclusivo
más próximo).
Si envía el producto, le rogamos añadan una carta explicando la
naturaleza del defecto.
Si tiene preguntas adicionales, por favor llame al Servicio al
Consumidor (véase abajo para los datos completos), de lunes a
jueves, de las 9:00 a las 17:00 (EST), y el viernes de las 9:00 a las 16:00
(EST). Note que las horas pueden ser modificadas.
Si quiere escribirnos, puede hacerlo a la dirección siguiente:
KALORIK Servicio al Consumidor
Team International Group of America Inc.
1400 N.W 159th Street, Suite 102
Miami Gardens, FL 33169 USA
O llame gratuitamente (U.S.A.) al +1 888-521-TEAM / +1 888-KALORIK
Las cartas se aceptan solamente en la dirección anteriormente
mencionada. Los envíos y paquetes que no tengan número de
autorización de devolución serán rechazados.
19
Assembly page 19/28
EKS 39724 - 120501
Fax +1 305 430 9692
Copies of the I/B. Please reproduce them without any
changes except under special instruction from Team
International USA. The pages must be reproduced and folded
in order to obtain a booklet A5 (+/- 148.5 mm width x 210 mm
height). When folding, make sure you keep the good
numbering when you turn the pages of the I/B. Don’t change
the page numbering. Keep the language integrity. Print only
what is inside the frame,
POUR VOTRE SECURITE
Lisez attentivement cette notice avant toute utilisation.
Important : Votre appareil n’est pas prévu pour être utilisé par des
personnes ( y compris les enfants ) dont les capacités physiques, sensorielles
ou mentales sont réduites, ou des personnes dénuées d’expérience ou de
connaissance, sauf si elles ont pu bénéficier, par l’intermédiaire d’une
personne responsable de leur sécurité, d’une surveillance ou d’instructions
préalables concernant son utilisation en toute sécurité.
Il convient de surveiller les enfants pour s’assurer qu’ils ne jouent pas avec
l’appareil.
•
•
•
•
•
•
•
Ne laissez jamais votre appareil sans surveillance lorsque celui-ci est
en fonctionnement ou sous tension.
Vérifiez régulièrement l’état de votre appareil et s’il est endommagé
de quelque façon que ce soit, faites le vérifier et réparer par un
service ou électricien qualifié.
Utilisez l'appareil uniquement pour des usages domestiques et de la
manière indiquée dans la notice.
Ne plongez jamais l'appareil dans l'eau ou dans tout autre liquide ni
pour son nettoyage ni pour toute autre raison.
Retirez la pile avant de nettoyer l'appareil
Si la pile fuit, retirez-la, nettoyez les contacts de votre appareil puis
lavez-vous les mains.
En cas d’arrêt prolongé, retirez la pile pour éviter qu’elle ne fuie.
GARDEZ CES INSTRUCTIONS
USAGE DOMESTIQUE UNIQUEMENT
NE PAS UTILISER A DES FINS
COMMERCIALES
20
Assembly page 20/28
EKS 39724 - 120501
Copies of the I/B. Please reproduce them without any
changes except under special instruction from Team
International USA. The pages must be reproduced and folded
in order to obtain a booklet A5 (+/- 148.5 mm width x 210 mm
height). When folding, make sure you keep the good
numbering when you turn the pages of the I/B. Don’t change
the page numbering. Keep the language integrity. Print only
what is inside the frame,
Fax +1 305 430 9692
CARACTÉRISTIQUES DE VOTRE BALANCE
•
•
•
•
•
•
•
•
Bol amovible en acier inoxydable, hygiénique et facile à laver.
Arrêt automatique.
Ecran à cristaux liquides rétroéclairé.
2 unités de masse : g ; lb. + Oz. (Etats-Unis).
Pesée Maximale = 5000g / 11 lb.
Précision de la mesure = 1g/0.1 Oz.
Conversion automatique des poids en volumes (ml ou US cups /
Fl. Oz.) pour les ingrédients les plus courants (Eau, Lait, Huile ou
Farine)
Avertisseur de batterie faible et indication de surcharge.
PREMIERE MISE EN MARCHE
Cet appareil fonctionne avec 2 piles de 1.5V, de
type AAA (non fournies).
Pour installes les batteries, ouvrez le couvercle du
logement des piles situé au-dessous de la balance.
Introduisez les piles en respectant les polarités
indiquées dans le compartiment, puis refermer le
couvercle, Vous pouvez maintenant utiliser votre
balance.
COMMENT RETIRER OU INSTALLER LE BOL
Bol Acier
Plaque
Glissière de
verrouillage
Pour le retirer:
• Avec votre pouce, tirez la glissière de
verrouillage vers la poignée pour
libérer le bol.
• Retirez le bol en acier avec votre
autre main.
• Relâchez la glissière.
Encoche
Corps de la
balance
Boutons
Ecran LCD
Pour le mettre en place:
• Alignez la plaque sur le côté du bol
avec la poignée.
• Insérez la plaque dans l’encoche
située sous la glissière.
• Appuyer sur le bol pour l’enclencher,
jusqu’à entendre un click signifiant
que la glissière verrouille bien le bol
en place.
21
Assembly page 21/28
EKS 39724 - 120501
Fax +1 305 430 9692
Copies of the I/B. Please reproduce them without any
changes except under special instruction from Team
International USA. The pages must be reproduced and folded
in order to obtain a booklet A5 (+/- 148.5 mm width x 210 mm
height). When folding, make sure you keep the good
numbering when you turn the pages of the I/B. Don’t change
the page numbering. Keep the language integrity. Print only
what is inside the frame,
BOUTONS DE FONCTION
MARCHE/ARRET/ZERO
Appuyez sur
MODE pour
alterner mesure
de la masse ou
des volumes
Appuyez sur UNIT pour changer
de système de mesure
1. Le bouton ON/ZERO est utilisé pour allumer ou éteindre la balance,
et pour la réinitialiser (Fonction TARE).
2. Le bouton MODE est utilisé pour changer de mode: appuyez en
séquence pour utiliser le mode Pesée / Eau (Water) / Lait (Milk) /
Huile (Oil) et Farine (Flour) / Pesée …
Appuyez sur MODE
Appuyez sur MODE
Mode
Pesée
Appuyez
sur MODE
Mode Volume d’Eau
Appuyez
sur MODE
Appuyez
sur MODE
Mode Volume d’Huile
Mode Volume de Lait
Mode Volume de Farine
3. Le bouton UNIT est utilisé pour changer d’unité de mesure
• De g vers lb:oz en mode pesée
Appuyez
sur UNIT
22
Assembly page 22/28
EKS 39724 - 120501
Fax +1 305 430 9692
•
Copies of the I/B. Please reproduce them without any
changes except under special instruction from Team
International USA. The pages must be reproduced and folded
in order to obtain a booklet A5 (+/- 148.5 mm width x 210 mm
height). When folding, make sure you keep the good
numbering when you turn the pages of the I/B. Don’t change
the page numbering. Keep the language integrity. Print only
what is inside the frame,
De Fl. Oz. ou ml vers US cups dans le mode Eau, Lait, ou Huile
Appuyez
sur UNIT
AFFICHEUR A CRISTAUX LIQUIDES
Flèches indiquant le
mode sélectionné
Unité de volume (Fl. Oz.)
Unité de volume (US Cups)
Tare function symbol
Unité de poids (g)
Unité de volume (ml)
Unité de poids (lb:Oz)
UNITE DE POIDS
Votre balance vous permet d’utiliser le système de mesure métrique
(grammes) ou Imperial (livres; onces). Choisissez le système de mesure, en
pressant à tout moment le bouton « Unit ». L’afficheur indique « g » puis
« lb:oz » en fonction de l'unité de mesure que vous désirez utiliser.
FONCTIONNEMENT
Placez la balance sur une surface dure et plane. Évitez les tapis/Moquettes
ou surfaces molles.
23
Assembly page 23/28
EKS 39724 - 120501
Fax +1 305 430 9692
Copies of the I/B. Please reproduce them without any
changes except under special instruction from Team
International USA. The pages must be reproduced and folded
in order to obtain a booklet A5 (+/- 148.5 mm width x 210 mm
height). When folding, make sure you keep the good
numbering when you turn the pages of the I/B. Don’t change
the page numbering. Keep the language integrity. Print only
what is inside the frame,
PESAGE
1) Insérez le bol en acier (si utilisé) dans la balance, avant de mettre la
balance en marche.
2) Allumez la balance en appuyant sur le bouton « ON/ZERO » situé en
haut du panneau de contrôle. La balance s’initialise.
3) L’écran à cristaux liquides indique « 0g » ou « 0:0.0 oz. »
4) Posez l’objet à peser sur la balance ou dans le bol. Le poids stabilisé
s’affiche. Si vous utilisez le système impérial, la masse est indiquée en
Livres US, Onces US et dixième d’onces. Par exemple si l’afficheur
indique 2 :3.2, cela signifie une pesée de 2 livres, 3 onces et 2/10
d’once.
5) Retirer l’objet de la plateforme.
6) La balance s’éteint automatiquement après 30 secondes. Vous
pouvez aussi l’éteindre manuellement en utilisant le bouton
« ON/ZERO » (maintenez le bouton appuyé jusqu’à l’arrêt)
7) Si la balance s’éteint automatiquement, appuyez sur « ON/ZERO »
pour l’allumer de nouveau.
LA FONCTION TARE
Appuyez sur
ON/ZERO
La fonction tare est très utile pour peser des
ingrédients qui ne peuvent pas être posés
directement sur la plateforme. Comme par
exemple des liquides, ou des poudres, qui ont
besoin d’être mis dans un récipient avant la
pesée; ou bien pour peser des ingrédients qui
sont ajoutés après une première pesée, sans
avoir à retirer le contenu de la premier pesée
de la balance.
Pour utiliser cette fonction, effectuez une
première pesée, et une fois faite, appuyez sur
« ON/ZERO ». La balance affiche 0g ou 0:0.0
lb :oz, et un symbole « T » s’affiche dans le
coin inférieur gauche de l’écran. Ajouter alors
le nouvel ingrédient à peser. Le poids indiqué
par la balance est le poids du nouvel
ingrédient uniquement!
Note : si vous retirez le récipient de la balance, la balance affichera un
poids négatif (le signe ‘’ - ‘’ apparait devant le poids à gauche). Pour
remettre à zéro, appuyez de nouveau sur « ON/ZERO ».
24
Assembly page 24/28
EKS 39724 - 120501
Copies of the I/B. Please reproduce them without any
changes except under special instruction from Team
International USA. The pages must be reproduced and folded
in order to obtain a booklet A5 (+/- 148.5 mm width x 210 mm
height). When folding, make sure you keep the good
numbering when you turn the pages of the I/B. Don’t change
the page numbering. Keep the language integrity. Print only
what is inside the frame,
Fax +1 305 430 9692
MESURE DES VOLUMES
Cette balance a la particularité unique de pouvoir
convertir le poids des ingrédients les plus courants en
unités de volume (comme des “US cups”, ml ou Fl. Oz.)
Appuyez sur
“On/Zéro”
Par exemple, pour mesurer le volume d’une pesée
d’eau, de lait, d’huile, ou même de farine, procédez
comme suit :
•
Appuyez
sur MODE
•
•
•
•
Appuyez
sur UNIT
•
Ajoutez le
liquide
•
•
Placez la balance sur une surface plane et dure,
avec un récipient tel que le bol en acier fourni.
Appuyez sur ON/ZERO pour allumer la balance.
Attendez que “0” s’affiche.
Sélectionnez le système de pesage (métrique ou
impérial) en utilisant le bouton UNIT (si
nécessaire).
Appuyez sur le bouton MODE pour sélectionner
le type d’ingrédient à peser: Eau (Water), Lait
(Milk), Huile (Oil) ou Farine (Flour) – un indicateur
en forme de flèche apparait à côté du type
d’ingrédient sélectionné.
Appuyez sur le bouton UNIT pour afficher le
volume en US cups. Vous affichez alors le
volume de l’ingrédient sélectionné.
Ajoutez l’ingrédient à mesurer.
En ré-appuyant sur UNIT, vous pouvez afficher la
pesée de nouveau en ml ou Fl. oz. , selon l’unité
choisie au départ.
INDICATION D’ERREURS
Si des symboles apparaissent de façon inexpliquée sur l’écran LCD, cela
signifie que votre balance a eu un problème (Initialisation incorrecte ou
erreur de pesée).
Veuillez retirer tout objet ou ingrédient de votre balance et attendre qu’elle
s’éteigne. Vérifiez que le bol (si utilisé) est bien en place. Essayez de
nouveau.
Si le problème persiste, retirez les piles, et remettez les en place après 10
secondes.
25
Assembly page 25/28
EKS 39724 - 120501
Fax +1 305 430 9692
Copies of the I/B. Please reproduce them without any
changes except under special instruction from Team
International USA. The pages must be reproduced and folded
in order to obtain a booklet A5 (+/- 148.5 mm width x 210 mm
height). When folding, make sure you keep the good
numbering when you turn the pages of the I/B. Don’t change
the page numbering. Keep the language integrity. Print only
what is inside the frame,
MESSAGES D’ERREUR
1. Si le symbole « Lo » apparait sur l’écran LCD, cela signifie que les piles de
votre balance sont faibles et doivent être remplacées (voir paragraphe
Première mise en marche).
2. Si le symbole « EEEE » apparait sur l’écran LCD, cela
signifie que le poids maximal accepté par votre balance
est dépassé, veuillez retirer de la charge afin d'éviter
d’endommager votre balance.
PILE
Si votre appareil ne fonctionne plus correctement, cela signifie
probablement que les piles sont déchargées. Dans ce cas, remplacez-les
par des piles de type identique (voir paragraphe Première mise en marche).
Veuillez éliminer les piles usagées de manière écologique.
CONSEILS D’UTILISATION ET D’ENTRETIEN
•
•
•
•
•
Traitez la balance avec précaution car il s'agit d'un instrument de
précision.
Nettoyez l’extérieur uniquement avec un chiffon légèrement
humide.
Les parties plastiques doivent être nettoyées immédiatement en
case de contact avec des acides, du gras, des épices ou des
aliments au gout très fort.
Ne nettoyez jamais votre appareil à l’aide de produits abrasifs.
Retirez le bol pour le nettoyer. Assurez-vous qu’il soit vide avant de le
retirer. Nettoyez le bol dans de l’eau chaude savonneuse.
•
NE JAMAIS UTILISER CETTE BALANCE PRÈS DE L’EAU, NE JAMAIS PLONGER LE
CORPS DE LA BALANCE DANS DE L’EAU OU TOUT AUTRE LIQUIDE.
•
•
Gardez la balance dans un endroit frais et sec.
Traitez avec soin. Ne pas entrechoquer, secouer ou laisser tomber !
PROTECTION DE L’ENVIRONNEMENT
Afin de préserver notre environnement et notre santé, l’élimination en fin de vie
des appareils électriques et électroniques doit se faire selon des règles bien
précises et nécessite l’implication de chacun, qu’il soit fournisseur ou utilisateur.
C’est pour cette raison que votre appareil, tel que le signale le symbole
apposé sur sa plaque signalétique ou sur l'emballage, ne doit en aucun cas
être jeté dans une poubelle publique ou privée destinée aux ordures
ménagères. L'utilisateur a le droit de déposer l'appareil dans des lieux publics
de collecte procédant à un tri sélectif des déchets pour être soit recyclé, soit
réutilisé pour d’autres applications conformément à la directive.
26
Assembly page 26/28
EKS 39724 - 120501
Fax +1 305 430 9692
Copies of the I/B. Please reproduce them without any
changes except under special instruction from Team
International USA. The pages must be reproduced and folded
in order to obtain a booklet A5 (+/- 148.5 mm width x 210 mm
height). When folding, make sure you keep the good
numbering when you turn the pages of the I/B. Don’t change
the page numbering. Keep the language integrity. Print only
what is inside the frame,
GARANTIE
Nous vous suggérons de remplir et de nous renvoyer rapidement la
Carte d’Enregistrement Produit ci-jointe afin de faciliter la vérification
de la date d’achat. Cependant, le renvoi de la Carte
d’Enregistrement Produit n’est pas une condition indispensable à
l’application de la présente garantie. Vous pouvez aussi remplir
cette carte de garantie en ligne à l’adresse suivante :
www.KALORIK.com.
A compter de la date d’achat, ce produit KALORIK est garanti un
an, sur le territoire des Etats-Unis, contre les défauts matériels et de
fabrication. Cette garantie n’est pas transférable. Conservez la
preuve d’achat originelle. Une preuve d’achat est exigée pour
obtenir l’application de la garantie.
Durant cette période, le produit KALORIK qui, après inspection par
KALORIK, s’avère défectueux, sera réparé ou remplacé, au choix de
KALORIK, sans frais pour le consommateur. Si un produit de
remplacement est envoyé, c’est la garantie restante du produit
originel qui s’appliquera.
La présente garantie ne s’applique pas aux défauts dus à une
mauvaise utilisation de la part de l’acheteur ou de l’utilisateur, à une
négligence, au non-respect des consignes du manuel d’utilisation
KALORIK, à une utilisation sur un circuit électrique au voltage
différent de celui renseigné sur le produit, à une usure normale, à des
modifications ou réparations non autorisées par KALORIK, ou par un
usage à des fins commerciales. Il n’existe pas de garantie pour les
parties en verre, récipients en verre, filtres, paniers, lames et
accessoires en général. Il n’existe également pas de garantie pour
les pièces perdues par l’utilisateur.
Toute garantie de valeur commerciale ou d’adaptabilité à ce
produit est également limitée à la garantie d’un an.
Certains états ne limitent pas la longueur de la garantie tacite ou
n’autorisent pas l’exclusion de dommages-intérêts accessoires ou
indirects, les restrictions ci-dessus peuvent donc ne pas s’appliquer à
27
Assembly page 27/28
EKS 39724 - 120501
Fax +1 305 430 9692
Copies of the I/B. Please reproduce them without any
changes except under special instruction from Team
International USA. The pages must be reproduced and folded
in order to obtain a booklet A5 (+/- 148.5 mm width x 210 mm
height). When folding, make sure you keep the good
numbering when you turn the pages of the I/B. Don’t change
the page numbering. Keep the language integrity. Print only
what is inside the frame,
vous. Cette garantie vous donne des droits légaux particuliers, et
certains droits peuvent varier d’un état à l’autre.
Si l’appareil devait présenter un défaut durant la période de
garantie et plus de 30 jours après l’achat, ne ramenez pas l’appareil
au magasin : souvent, notre Service Clientèle peut aider à résoudre
le problème sans que le produit ne doive être réparé. Si une
réparation est nécessaire, un représentant peut confirmer si le
produit est sous garantie et vous rediriger vers notre centre de
réparation.
Le cas échéant, ramenez le produit (ou envoyez-le, dûment
affranchi), ainsi qu’une preuve d’achat, en mentionnant le numéro
d’autorisation de retour, indiqué par notre service clientèle, au
service après-vente KALORIK agrée (visitez notre site internet
www.KALORIK.com ou appelez notre département Service Clientèle
pour obtenir l’adresse du service après-vente KALORIK agréé).
Si vous envoyez le produit, veuillez y joindre une lettre expliquant la
nature du défaut.
Si vous avez des questions complémentaires, veuillez appeler notre
département Service Clientèle (voyez plus bas pour les coordonnées
complètes), du Lundi au Jeudi de 9h à 17h (EST) et le Vendredi de 9h
à 16h (EST). Veuillez noter que les heures sont sujettes à modification.
Si vous souhaitez nous écrire, adressez votre courrier à:
KALORIK Customer Service Department
Team International Group of America Inc.
1400 N.W 159th Street, Suite 102
Miami Gardens, FL 33169 USA
Ou appelez (Gratuitement des Etats-Unis): +1 888-521-TEAM ou +1
888-KALORIK.
Seules les lettres seront acceptées à l’adresse ci-dessus. Les envois
et colis n’ayant pas de numéro d’autorisation de retour seront
refusés.
28
Back cover page (last page)
Assembly page 28/28
EKS 39724 - 120501