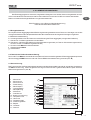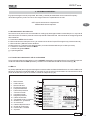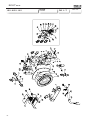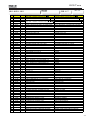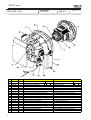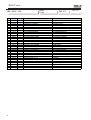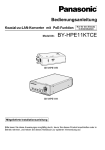
1
MANUALE DI USO E MANUTENZIONE mase GENERATORS USE AND MAINTENANCE MANUAL I GB GEBRAUCHSANWEISUNG UND WARTUNGSVORSCHRIFTEN D MANUEL DUTILISATION ET DENTRETIEN F MANUAL DE USO Y MANTENIMIENTO E GEBRUIKS- EN ONDERHOUDSHANDLEIDING NL mase GRUPPO ELETTROGENO IS 10 T 50 Hz GENER cod.42430 ATORS REV.0 S.S. 11/06/2003 IS 10 T 50 Hz -2 IS 10 T 50 Hz 10 1 2 3 4 5 6 7 8 9 Fig. 2 -3 IS 10 T 50 Hz 2 4 3 1 6 9 5 11 10 12 24 8 7 17 18 19 20 13 16 15 14 21 22 23 Fig. 3 -4 IS 10 T 50 Hz 9 6 7 10 11 12 8 2 1 3 4 5 Fig. 4 5 4 3 1 2 2 Fig. 5 -5 IS 10 T 50 Hz 1 3 2 2 1 Fig. 6 : S.A.E Service Grade : : : : : -30 -20 TAB "A" -6 -10 0 10 20 30 Ambient temperature (oC) 40 Fig. 8 Fig. 7 IS 10 T 50 Hz Fig. 9 2 1 3 Fig. 10 -7 IS 10 T 50 Hz Fig. 11 1 2 3 Fig. 12 -8 IS 10 T 50 Hz cod. 45428 Fig. 13 -9 I IS 10 T 50 Hz I INDICE IL MANCATO RISPETTO DELLE SPECIFICHE CONTENUTE NEL SEGUENTE MANUALE DI USO E MANUTENZIONE COMPORTA IL DECADIMENTO DELLA GARANZIA Figure ..................................................................... 2 1 1.1 1.2 1.3 1.5 2 2.1 2.2 2.3 3 INTRODUZIONE ........................................... 11 Scopo e campo di applicazione del manuale11 Documentazione allegata ............................ 12 Identificazione della macchina ..................... 12 Norme di sicurezza ...................................... 12 INFORMAZIONI GENERALI ......................... 12 Documenti di riferimento .............................. 12 Facsimile della dichiarazione CE di conformità .......................................... 12 Marcatura .................................................... 12 Descrizione del generatore ....................... 15 3.1 3.2 3.3 Generalità .................................................... 15 Sistema di raffreddamento ........................... 15 Pannello di comando ................................... 15 4. UTILIZZO DEL GENERATORE ..................... 15 4.1 4.2 4.3 4.4 5 Controlli preliminari ...................................... Disareazione dell'impianto di alimentazione . Avviamento .................................................. Arresto del gruppo ....................................... PROTEZIONI ................................................ 16 5.1 Protezione bassa pressione olio .................. 5.2 Protezione alta temperatura acqua ................ 5.3 Protezione sovratemperatura alternatore ...... 5.4 Protezione da cortocircuito e sovraccarico ... 5.5 Protezione da cortocircuito dell'impianto ...... elettrico in bassa tensione. .......................... 6 6.1 6.2 6.3 6.4 6.5 6.6 6.7 6.8 6.9 I - 10 15 16 16 16 16 16 17 17 17 17 MANUTENZIONE .......................................... 17 Manutenzione ordinaria del motore .............. Cambio dell'olio motore e filtro olio ............... Pulizia del filtro aria ..................................... Sostituzione del filtro carburante .................. Controllo del liquido refrigerante ................... Controllo della tensione delle cinghie trapezoidali ..................................... Svuotamento dell'impianto di raffreddamento Sostituzione del liquido refrigerante ............. Sostituzione anodi di zinco .......................... 17 17 18 18 18 18 19 19 19 6.10 6.11 6.12 6.13 6.14 6.15 Manutenzione della pompa acqua mare ....... 19 Manutenzione dell'alternatore....................... 19 Manutenzione della batteria ......................... 19 Periodi di inattività ....................................... 20 Tavola riassuntiva degli interventi programmati20 Tavola guasti ............................................... 20 7 CARATTERISTICHE TECNICHE ................... 22 IS 10 T 50 Hz I 1. INTRODUZIONE Consultare attentamente questo manuale prima di procedere a qualsiasi intervento sulla macchina. 1.1 Scopo e campo di applicazione del manuale Grazie per aver scelto un prodotto mase. Questo manuale è stato redatto dal Costruttore allo scopo di fornire le informazioni e le istruzioni essenziali per effettuare, correttamente e in condizioni di sicurezza, costituisce parte integrante del corredo del gruppo elettrogeno, deve essere conservato con cura e protetto da qualsiasi agente che potrebbe deteriorarlo per tutto il ciclo di vita del gruppo elettrogeno. Esso deve seguire il gruppo elettrogeno qualora questo sia trasferito ad un nuovo utente o proprietario. Le informazioni contenute in questo manuale sono dirette a tutte le persone coinvolte nel ciclo di vita operativa del gruppo elettrogeno e sono necessarie per informare sia chi materialmente effetuerà le diverse attività, sia chi dovrà coordinare le attività, predisporre la necessaria loggistica e regolamentare gli accessi al luogo dove sarà installato ed opererà il gruppo elettrogeno. Il manuale definisce lo scopo per cui la macchina è stata costruita contiene tutte le informazioni necessarie per garantirne un uso sicuro e corretto. La costante osservanza delle indicazioni, in esso contenute, garantisce la sicurezza delluomo della macchina, leconomia desercizio ed una maggiore durata della macchina stessa. Il gruppo elettrogeno non è una macchina destinata ad essere manovrata da parte di utilizzatori non professionali e tutte le attività legate alla parte operativa del suo ciclo di vita devono essere effettuate da personale specializzato ed opportunamente addestrato. Si consiglia vivamente di leggere attentamente quanto contenuto in questo manuale e nei documenti di riferimento; solo così viene assicurato il regolare funzionamento nel tempo del gruppo elettrogeno, la sua affidabilità e la salvaguardia dai danni a persone e cose. Nota: le informazioni contenute in questa pubblicazione sono corrette al momento della stampa, ma possono essere modoficate senza preavviso Per facilitare la consultazione esso è stato suddiviso in sezioni che ne identificano i concetti principali; per una consultazione rapida degli argomenti consultare lindice descrittivo. Le parti di testo da non trascurare sono state evidenziate in grassetto e precedute da simboli qui di seguito illustrati e definiti. Indica che è necessario prestare attenzione al fine di non incorrere in serie conseguenze che potrebbero provocare la morte del personale o possibili danni alla salute. Situazione che potrebbe verificarsi durante il periodo di vita di un prodotto, sistema o impianto considerato a rischio in materia di danni alle persone, alle proprietà, allambiente o di perdite economiche. Indica che è necessario prestare attenzione al fine di non incorrere in serie conseguenze che potrebbero portare al danneggiamento di beni materiali quali le risorse o il prodotto Indicazioni di particolare importanza. I - 11 IS 10 T 50 Hz I 1.2 Documentazione allegata 1.4 Pannello strumenti Parte integrante del presente manuale è la seguente documentazione: Legenda FIG. 4 - Dichiarazione CE di conformità (fig.1); - Manuale uso e manutenzione del motore; - Libretto Service; - Certificato di garanzia; - Cartolina di garanzia. 1.3 Identificazione della macchina Vedere FIG.2 1 - Codice macchina 2 - Anno di costruzione 3 - Fattore di potenza 4 - Frequenza dichiarata 5 - Potenza continua 6 - Tensione nominale 7 - Corrente 8 - Peso 9 - Classe di prestazione 10- Numero di serie I dati che identificano il nro di codice della macchina, il nro di matricola e lanno di costruzione devono essere sempre precisati al costruttore per informazioni, richieste di parti di ricambio Vedere FIG. 3 1 - Cassa insonorizzante 2 - Portello di accesso superiore 3 - Portello di accesso laterale 4 - Pannello strumenti 5 - Staffe di ancoraggio 6 - Raccordo scarico fumi e acqua di raffreddamento 7 - Raccordo collegamento presa acqua mare 8 - Raccordi di collegamento a serbatoio carburante 9 - Morsetti di collegamento alla batteria 10-Filtro aria motore 11-Vaso di espansione liquido refrigerante 12-Pompa estrazione olio motore 13-Cartuccia filtro gasolio 14-Pompa acqua mare 15-Pompa carburante 16-Cartuccia filtro olio 17-Tappo carico olio 18-Scatola collegamento linea elettrica 19-Alternatore caricabatteria 20-Serbatoio liquido refrigerante 21-Scambiatore di calore acqua/aria 22-Collettore scarico 23-Motorino di avviamento 1 - Contaore 2 - Interruttore magnetotermico 3 - Interruttore termico corrente DC 4 - Pulsante START / STOP 5 - Modulo protezione motore 6 - Spia "RUN" motore avviato 7 - Spia "OIL" bassa pressione olio 8 - Spia " °C " alta temperatura motore 9 - Spia "BATT." funzionamento caricabatteria 10 - Spia " °C " alta temperatura alternatore 11-Candelette (non presenti) 12-Fuoriuscita carburante (versione "RINA") 1.5 Norme di sicurezza Leggere attentamente tutte le informazioni contenute in questo manuale e nel manuale d'installazione; esse sono fondamentali per una corretta installazione ed utilizzo del gruppo elettrogeno e per essere in grado d'intervenire tempestivamente in caso di necessità. Il Costruttore declina ogni responsabilità per danni a persone o cose, conseguenti linosservanza delle norme di sicurezza. Esaminare attentamente le targhe segnaletiche di sicurezza applicate sulla macchina e rispettarne le indicazioni in esse contenute - Non consentire luso del gruppo a persone non competenti o senza una adeguata istruzione. - Non consentire a bambini od animali di avvicinarsi al gruppo elettrogeno in funzione. - Non accedere al generatore o al cruscotto di comando con mani bagnate, essendo il generatore una potenziale fonte di shock elettrici se male utilizzato. - Eventuali controlli sul gruppo elettrogeno vanno eseguiti a motore spento e scollegando il polo negativo della batteria di avviamento. Controlli con il gruppo elettrogeno in funzione vanno effettuati solo da personale specializzato. - Non aspirare i fumi di combustione perché contengono sostanze nocive alla salute. - Utilizzare il gruppo elettrogeno con i portelli di accesso chiusi. - Non toccare mai con le mani il corpo del motore o dell'alternatore quando il gruppo elettrogeno è in funzione o è ancora caldo. Nel caso si verifichino perdite di olio o di carburante provvedere ad una accurata pulizia per non creare condizioni di rischio di incendio. In caso d'incendio non utilizzare acqua per lo spegnimento, ma estintori. Dovesse presentarsi un problema, o doveste aver bisogno di qualche chiarimento, vogliate contattare l'ufficio SERVICE della Mase I - 12 IS 10 T 50 Hz I 2. INFORMAZIONI GENERALI Il gruppo elettrogeno è stato progettato, costruito e collaudato per soddisfare le vigenti normative Europee e nazionali e ridurre al minimo i rischi elettrici rispettando le norme : 89/336 CEE direttiva relativa alla compatibilità elettromagnetica 73/23 CEE direttiva relativa alla bassa tensione CE 98/37 direttiva macchine 2.1 Documenti di riferimento Le istruzioni per l'uso fornite con ciascun gruppo elettrogeno sono costituite da una raccolta di documenti di cui il presente manuale rappresenta la Parte Generale. Normalmente sono forniti i seguenti documenti. a b c d e f g Dichiarazione CE di Conformità. Manuale di istruzioni per l'uso e la manutenzione dei gruppi elettrogeni, (il presente manuale). Manuale d'uso e manutenzione del motore. Manuale d'uso e manutenzione dell'alternatore (nel caso di alternatori non di produzione mase). Elenco Centri Assistenza mase. Certificato di garanzia mase. Cartolina garanzia. 2.2 Facsimile della dichiarazione CE di conformità I gruppi elettrogeni, costruiti dalla ditta mase, destinati ai paesi della Comunità Europea sono conformi alle direttive CEE applicabili, e sono corredati di una Dichiarazione CE di Conformità, (Fig.B). 2.3 Marcatura La targa predisposta per i gruppi elettrogeni contiene tutti i dati identificativi in conformità alla Norma ISO 8528 e secondo quanto richiesto per la Marcatura CE, per i casi in cui è prevista. Si riporta qui il facsimile della targa identificativa che è fissata sul quadro di controllo di ciascuna macchina, (Fig. A). 1 - Nome macchina 2 - Codice macchina 3 - Numero di serie 4 - Potenza continua 5 - Frequenza dichiarata 6 - Fattore di potenza 7 - Tensione nominale 8 - Corrente nominale 9 - Grado di protezione 10 - Classe disolamento 11 - Temperatura max.utilizzo 12 - Altitudine max.utilizzo 13 - Livello rumorosità 14 - Classe di prestazione 15 - Anno di costruzione 16 - Costruttore - Indirizzo 17 - Peso 1 4 2 3 5 6 7 8 10 9 11 12 16 13 14 15 17 Fig.A I - 13 IS 10 T 50 Hz I NR.000000 mase GENERATORS S.p.A. Tel. +39 (0) 547 354311 Fax +39 (0) 547 317555 DICHIARAZIONE CE DI CONFORMITÀ EC DECLARATION OF CONFORMITY Fabbricante/Manufacturer: mase GENERATORS S.p.A. Indirizzo /Address : Via Tortona 345, Pievesestina (FC) mase Il sottoscritto Luigi Foresti in qualità di direttore tecnico della GENERATORS S.p.A., dichiara sotto la propria responsabilità che il gruppo elettrogeno modello .................... : mase IL E The undersigned Luigi Foresti as GENERATORS S.p.A. technical manager declares, under his sole responsability, that the generator model................: Codice / Code Descrizione / Model S Matricola / Serial N. M I è conforme alle disposizioni delle Direttive di seguito elencate: 98/37 CE (come emendata delle Direttive 98/79 CE) 73/23 CEE modificata da CEE 93/68. 89/336 CEE direttiva sulla compatibilità elettromagnetica A F C corresponds to the requirements of the following EEC Directives: 98/37/EEC (as amended by the Directive 98/79/EEC ) 73/23/EEC as amended by 93/68/EEC. 89/336 EEC directive on the electromagnetic compatibility Cesena, / / Direttore Tecnico Technical Director mase GENERATORS S.p.A. Sede legale ed Amm.: 47023 CESENA (FC) ITALY - Via Tortona, 345 - C.F./P.I. 00687150409 Cap. Soc. milioni 2000 di cui 949 versati - Registro Società Tribunale Forlì n. 6818 - CCIAA Forlì n.164063 - c.c.p. n. 11541471 - EXPORT FO n. 006368 Fig.B I - 14 IS 10 T 50 Hz I 3. DESCRIZIONE DEL GENERATORE 3.1 Generalità I gruppi elettrogeni IS 19 sono stati progettati per essere installati agevolmente a bordo di imbarcazioni. La cassa insonorizzante, ottenuta con pannelli coibentati di alluminio marino verniciato, permette un facile accesso al motore e all'alternatore per gli interventi di manutenzione, di controllo e al tempo stesso consente un elevato abbattimento del livello sonoro. Il motore diesel, 4 tempi, a iniezione diretta, costruito dalla Yanmar, è estremamente affidabile e robusto; le emissioni allo scarico sono conformi alle normative CARB . L'alternatore, di tipo sincrono, 4 poli, senza spazzole, dispone di regolatore elettronico di tensione (SR7) che ne garantisce la stabilità a ± 5% rispetto al valore nominale. La grande capacità di spunto dell'alternatore rende il gruppo elettrogeno particolarmente adatto all'alimentazione di motori elettrici di condizionatori, dissalatori, compressori, ecc. Il gruppo elettrogeno dispone di un pannello di comando locale [fig.3 rif.4 ] sul quale si trovano i comandi e gli strumenti di controllo. 3.2 Sistema di raffreddamento Il motore del gruppo elettrogeno viene raffreddato tramite circolazione, in circuito chiuso, di liquido refrigerante che cede calore all'acqua di mare per mezzo di uno scambiatore di calore [fig.3 rif.20] . Tale scambiatore, costruito in cupronichel, è stato progettato appositamente da mase per la marinizzazione del motore. Un secondo scambiatore di calore provvede a raffreddare l'aria all'interno della cassa insonorizzante e l'aria necessaria alla ventilazione dell'alternatore. All'atto dell'installazione è necessario predisporre un circuito di adduzione dell'acqua di mare per il raffreddamento e un sistema di scarico per convogliare all'esterno i gas della combustione e l'acqua utilizzata per il raffreddamento. 3.3 Pannello di comando Sul gruppo elettrogeno è posizionato un pannello di comando per i controlli e per eseguire le operazioni di avviamento e arresto. Un modulo protezione motore [fig. 4, rif. 5] gestisce le protezioni del gruppo elettrogeno arrestando il motore in caso di guasto e segnalando, tramite le apposite spie l'anomalia rilevata. - Lampada spia "RUN" [fig. 4, rif. 6] colore verde segnala, se accesa, che il gruppo è in funzione e nessuna anomalia di funzionamento è rilevata. - Lampada spia "BATT." [fig. 4, rif. 9] colore rosso segnala, se accesa, che l'alternatore caricabatteria è in avaria. - Lampada spia "OIL" [fig.4, rif. 7] colore rosso segnala, se accesa, che la pressione olio motore è insufficiente. - Lampada spia come da fig.4, rif.10 di colore rosso segnala, se accesa, che la temperatura del liquido di raffreddamento o dell'acqua circolante negli scambiatori di calore, è troppo elevata. - Lampada spia da fig.4, rif.8 di colore rosso segnala, se accesa, che gli avvolgimenti dell'alternatore hanno raggiunto temperature troppo elevate. Sul pannello di comando si trova anche: - un interruttore magnetotermico tripolare [fig. 4, rif. 2] il quale interrompe l'erogazione della corrente in caso di sovraccarico e cortocircuito; - un'interruttore termico [fig. 4, rif.3] a protezione dell'impianto elettrico in bassa tensione da cortocircuito; - un contaore [fig. 4, rif.1]; - il pulsante per l'avviamento e l'arresto del gruppo elettrogeno [fig. 4, rif.4]. Il gruppo elettrogeno è predisposto per essere collegato, tramite connettore al pannello di avviamento a distanza, fornito come optional dalla mase, installabile eventualmente in plancia di comando. Sono disponibili due diversi modelli di pannello avviamento a distanza come rappresentato in fig. 5. La versione più semplice dispone del pulsante per l'avviamento e l'arresto [fig. 5, rif. 1], una lampada spia colore verde [fig. 5, rif. 2] che se accesa indica gruppo avviato. La seconda versione di pannello comando a distanza [fig. 5, rif. 3] prevede, oltre al pulsante di avviamento e arresto , uno strumento che indica il valore della pressione olio motore [fig. 5, rif. 4], uno strumento che indica il valore della temperatura del liquido di raffreddamento [fig. 5, rif. 5]. Quando si eseguono interventi di manutenzione sul gruppo elettrogeno scollegare il polo negativo della batteria di avviamento per evitare avviamenti accidentali. 4. UTILIZZO DEL GENERATORE 4.1 Controlli preliminari Al primo avviamento del gruppo elettrogeno, o dopo aver eseguito un qualsiasi intervento di manutenzione, è buona norma accertarsi sempre: - che lolio sia a livello tramite lastina [fig. 7, rif. 2], vedi tabella "A" oli consigliati, [fig. 8 ] - Che tutti i punti di ancoraggio del gruppo siano adeguatamente serrati. - Che tutte le utenze elettriche siano disinserite per evitare di avviare il gruppo sotto carico. - Che le linee acqua e combustibile siano correttamente collegate I - 15 IS 10 T 50 Hz I - Che tutti i collegamenti elettrici siano stati eseguiti in maniera corretta e non vi siano connessioni in cattivo stato. - Che il rubinetto dell'acqua sia aperto [fig. 6, rif. 2] - Che sia stato riempito manualmente il tratto del circuito acqua dalla pompa alla valvola nel caso sia montata una valvola di non-ritorno sulla presa a mare (come consigliato sul manuale d'installazione) [fig. 4, rif. 1]. 4.2 Disareazione dell'impianto di alimentazione La presenza di bolle daria, allinterno dellimpianto di alimentazione, è causa di funzionamento irregolare del motore o d'incapacità di raggiungere il numero di giri nominale. Laria può penetrare, allinterno del circuito di alimentazione, attraverso una giunzione non perfettamente a tenuta (tubazione, filtri, serbatoio) o quando il carburante, allinterno del serbatoio, è al livello minimo. Il sistema di alimentazione è progettato in modo da eliminare, in maniera autonoma, le bolle daria penetrate allinterno del circuito. Lo spurgo automatico si ottiene attivando la pompa carburante per qualche minuto prima di avviare il motore. L'attivazione della pompa carburante si ottiene premendo per un'istante il pulsante di START. Se dopo tale operazione il motore dovesse funzionare ancora in modo irregolare sarà necessario consultare un tecnico per l'accurato controllo dell'impianto di alimentazione. 4.4 Arresto del gruppo Il gruppo si arresta premendo il pulsante OFF sul cruscotto comandi . Prima di arrestare il gruppo elettrogeno si consiglia di farlo funzionare, per alcuni minuti, senza prelevare corrente elettrica, al fine di consentire il raffreddamento del motore e dell'alternatore. 5. PROTEZIONI I gruppi elettrogeni IS 8, IS 9.5 sono dotati di una serie di protezioni che li salvaguardano da un utilizzo non corretto e da inconvenienti di funzionamento. Quando il gruppo elettrogeno si arresta per l'intervento di una protezione, sul modulo protezioni motore [fig. 5, rif. 5], del pannello comandi, si illuminerà la spia di segnalazione relativa all'avaria verificatasi. 5.1 Protezione bassa pressione olio Interviene spegnendo il gruppo quando la pressione dellolio motore è insufficiente; il suo intervento è segnalato dallaccensione della spia "OIL" [fig. 4, rif. 7]. E generalmente sufficiente reintegrare la quantità di olio mancante per poter riavviare il gruppo. 4.3 Avviamento La protezione bassa pressione Prima di avviare il gruppo accertarsi che i controlli preliminari, descritti al paragrafo 3.1, siano stati eseguiti. Procedere allavviamento premendo il pulsante di START posto pannello di comando [fig.4, rif. 4] e rilasciare solo ad avviamento avvenuto facendo attenzione a non superare i 15 s. per ogni tentativo e rispettando una pausa di almeno 30 s. Si noterà laccensione per qualche secondo di tutte le spie di segnalazione del modulo protezioni motore [fig. 4, rif. 5] e se non vi sono anomalie sul motore o sul generatore resterà accesa solo la spia verde di RUN [fig. 4, rif.6] ad indicare che il gruppo è avviato e il funzionamento è regolare. Ripetuti tentativi di avviamento, con esito negativo, possono causare un eccessivo accumulo di acqua nell'impianto di scarico, con possibili gravi conseguenze al motore. Qualora si verificasse la condizione di difficoltoso avviamento del motore è indispensabile non insistere a lungo senza aver prima chiuso il rubinetto della presa a mare [fig. 6, rif. 2] . I - 16 olio non da una indicazione sul livello dellolio motore in coppa. Un controllo giornaliero di questo livello è quindi indispensabile. Il motore funziona correttamente se non supera un'inclinazione massima di 30° per tempi inferiori a 3 minuti; 25° senza limiti di tempo, sia sull'asse longitudinale che su quello trasversale. Qualora il motore si trovasse nelle condizioni di funzionare a inclinazioni maggiori, il rischio che corre è quello di insufficiente lubrificazione o aspirazione dal filtro aria di olio lubrificante. 5.2 Protezione alta temperatura acqua Interviene spegnendo il gruppo elettrogeno qualora la temperatura del liquido refrigerante del motore sia troppo elevata o venga a mancare la circolazione dell'acqua di mare. L'intervento della protezione è segnalato dallaccensione della spia [fig. 4, rif. 10]. Il gruppo elettrogeno deve essere riavviato solo dopo aver individuato ed eliminato la causa dellanomalia. IS 10 T 50 Hz I 5.3 Protezione sovratemperatura alternatore 6.1 Manutenzione ordinaria del motore Interviene spegnendo il gruppo elettrogeno quando si verifica un sovraccarico termico allalternatore. L' intervento della protezione è segnalato dallaccensione della spia [fig. 4, rif. 8] . Il gruppo elettrogeno può essere riavviato dopo qualche minuto quando la temperatura degli avvolgimenti dellalternatore si riporta ai valori normali. Si raccomanda, comunque, di ricercare ed eliminare le cause che ne ha provocato lintervento. Gli interventi periodici da eseguire sul motore sono riportati sulla TAB "B". Per informazioni più dettagliate consultare il manuale fornito dal costruttore del motore che accompagna ogni gruppo elettrogeno. Nel caso di intervento di una delle protezioni sopra indicate, dopo aver accertato ed eliminato la causa dellintervento, è necessario premere il pulsante STOP per resettare il pannello di comando (il segnale rimarrebbe altrimenti in memoria inibendo l'avviamento del motore). 5.4 Protezione da cortocircuito e sovraccarico Il gruppo elettrogeno è protetto da cortocircuito e sovraccarico elettrico. Un interruttore magnetotermico tripolare [fig. 4, rif. 2] interrompe l'erogazione della corrente elettrica al verificarsi di un cortocircuito o quando la corrente elettrica erogata supera il valore nominale. Prima di ripristinare il contatto sollevando la leva dell'interruttore magnetotermico scollegare gli utilizzi. Controllare il livello dellolio motore tramite lapposita astina graduata [fig. 7, rif. 2]. Il livello deve sempre essere compreso fra le tacche MAX e MIN riportate sullastina [fig. 7, rif. 1] . 6.2 Cambio dell'olio motore e filtro olio La capacità carter motore è di 3.6 litri I rabbocchi e i caricamenti di olio motore vanno eseguiti attraverso il foro [fig. 3, rif.17 ]. Per la sostituzione dellolio nel carter motore si procede togliendo lastina di indicazione livello [fig.7, rif. 2] e agendo sull'apposita pompa di estrazione [fig.3, rif. 12] dopo aver tolto la vite che funge da tappo. Si consiglia di eseguire lo svuotamento con olio ancora sufficientemente caldo in modo da consentire un agevole deflusso. Per gli oli consigliati si veda la tabella "A", fig. 8 Il primo cambio dell'olio motore 5.5 Protezione da cortocircuito dell'impianto elettrico in bassa tensione. In caso di cortocircuito dell'impianto elettrico in bassa tensione un interruttore termico [fig. 4, rif.3] interromperà il circuito arrestando il gruppo elettrogeno. In questo caso le spie di segnalazione del modulo protezioni motore saranno tutte spente e non sarà possibile ritentare l'avviamento. Prima di ripristinare il circuito elettrico, premendo il pulsante posto sull'interruttore termico [fig. 4, rif. 3] è necessario far ricercare ed eliminare, ad un tecnico specializzato, la causa del cortocircuito. 6 MANUTENZIONE Qualsiasi intervento di manutenzione al gruppo elettrogeno va effettuato a motore spento, dopo averlo lasciato raffreddare a sufficienza, e va eseguito solo da personale autorizzato. Prima di accedere al gruppo elettrogeno staccare un polo della batteria di avviamento, al fine di evitare avviamenti accidentali deve essere effettuato dopo 50h di utilizzo del gruppo elettrogeno; per il secondo e successi è sufficiente una sostituzione ogni 200h. Per informazioni più dettagliate sulla lubrificazione del motore, consultare il manuale uso e manutenzione del motore allegato al gruppo elettrogeno. Non disperdere nell'ambiente l'olio esausto o carburante in quanto prodotti inquinanti. Consegnare l'olio lubrificante esausto presso gli appositi Centri di Raccolta incaricati dello smaltimento. Non portare a contatto della pelle l'olio motore. Durante le operazioni di manutenzione usare guanti e occhiali protettivi. In caso di contatto con olio lubrificante lavare immediatamente e accuratamente la parte con acqua e sapone. Per sostituire la cartuccia del filtro olio motore [fig. 3, rif. ] è necessario svitarla dall'apposito supporto utilizzando appropriati attrezzi reperibili normalmente in commerI - 17 IS 10 T 50 Hz I cio. Riposizionare la nuova cartuccia avendo cura di lubrificare la guarnizione di gomma ad anello. Il primo cambio deve essere eseguito dopo 50 h di funzionamento del gruppo elettrogeno, per il secondo e i successivi rispettare un intervallo di 400 h. Per maggiori informazioni consultare il manuale di uso e manutenzione del motore. Per la sicurezza del motore utilizzare solo parti di ricambio originali. Ad operazioni ultimate pulire accuratamente tutte le parti del gruppo elettrogeno sporche di olio e carburante. to di alimentazione eseguendo le operazioni descritte al paragrafo 3.2 Non portare a contatto della pelle il carburante. Durante le operazioni di manutenzione usare guanti e occhiali protettivi. In caso di contatto con carburante lavare immediatamente e accuratamente la parte con acqua e sapone. Ad operazione ultimata pulire accuratamente tutte le tracce di carburante e versare gli stracci utilizzati presso gli appositi Centri di Raccolta 6.5 Controllo del liquido refrigerante I gruppi elettrogeni della serie IS dispongono di un filtro aria a secco che impedisce l'entrata nella camera di combustione di corpi estranei. Per la sua manutenzione è sufficiente pulire con gasolio la massa filtrante una volta all'anno, per liberarla dalla presenza di impurità. E' necessario controllare periodicamente il livello del liquido refrigerante del circuito chiuso di raffreddamento. Gli indici di riferimento, per tale controllo, sono stampigliati sul vaso di espansione [fig. 3, rif. 11]. Qualora il livello fosse insufficiente, inserire liquido refrigerante all'interno del vaso di espansione, facendo attenzione a non superare l'indice di livello massimo. Non disperdere nell'ambiente i Non aprire mai il tappo di chiusu- liquidi utilizzati per il lavaggio del filtro aria che devono essere versati presso appositi Centri di Raccolta. ra del vaso di espansione [fig. 3, rif. 11] e del serbatoio [fig. 3, rif. 20] a motore caldo, per evitare pericolose fuoriuscite di liquido refrigerante. 6.3 Pulizia del filtro aria Qualsiasi intervento di manutenzione al gruppo elettrogeno va effettuato a motore spento, dopo averlo lasciato raffreddare a sufficienza, e va eseguito solo da personale autorizzato. Prima di accedere al gruppo elettrogeno staccare un polo negativo della batteria di avviamento, al fine di evitare che inavvertitamente si avvii il gruppo stesso. 6.4 Sostituzione del filtro carburante Per garantire una lunga durata ed il corretto funzionamento del motore, è estremamente importante sostituire periodicamente la cartuccia del filtro carburante, rispettando i tempi indicati dal costruttore del motore riportati alla tabella al paragrafo 5.12. Tale operazione si esegue tramite i seguenti passaggi: - chiudere il rubinetto carburante [fig. 3, rif. 24]. - svitare completamente la ghiera del supporto [fig. 3, rif. 13] - rimuovere la vecchia cartuccia e posizionare la nuova. - per il rimontaggio ripetere le operazioni con sequenza inversa. A sostituzione avvenuta è necessario disareare l'impianI - 18 6.6 Controllo della tensione delle cinghie trapezoidali Una cinghia trapezoidale viene usata per trasmettere il moto di rotazione dalla puleggia dell'albero motore a quella della pompa acqua di mare [fig. 9, rif. 1] . Un'eccessiva tensione della cinghia ne accelera l'usura, mentre una scarsa tensione fa girare a vuoto le pulegge e non permette un sufficiente circolo di acqua. Regolare la tensione della cinghia nel modo seguente: allentare le due viti di regolazione [fig. 9, rif. 2] e spostare la pompa acqua di mare verso l'esterno per aumentare la tensione, o verso l'interno per diminuirla. Bloccare le viti e verificarne la tensione. Una giusta tensione della cinghia è quella che permette, sotto lo sforzo di spinta di 8 Kg, un cedimento di circa 5 mm [fig. 9 ]. Una seconda cinghia è utilizzata per trasmettere il moto di rotazione dalla puleggia dell'albero motore a quella della pompa del liquido a circuito chiuso e dell'alternatore DC caricabatteria [fig. 9, rif. 3]. Regolare la tensione della cinghia nel modo seguente: allentare la vite di registro [fig. 9, rif.4] e spostare l'alternatore DC caricabatteria [fig. 9, rif. 5] verso l'ester- IS 10 T 50 Hz no per aumentare la tensione e verso l'interno per diminuirla. Una giusta tensione della cinghia è quella che permette, sotto lo sforzo di spinta di 8 Kg, un cedimento di circa 10 mm [fig. 9 ]. Per evitare che la cinghia giri a vuoto, non sporcarla con olio. Pulire la cinghia con benzina se al controllo risultasse sporca di olio. Non avvicinarsi con le mani alla cinghia trapezoidale o alle pulegge a motore avviato. 6.7 Svuotamento dell'impianto di raffreddamento Per eseguire la manutenzione sullo scambiatore acquaaria o sull'impianto di raffreddamento è necessario vuotare il circuito di aspirazione dall'acqua di mare. Tale operazione si esegue operando nel seguente modo: - chiudere il rubinetto di presa a mare [fig. 6, rif. 2]; - aprire l'apposito rubinetto di scarico [fig. 6, rif. 3] fino a far defluire completamente l'acqua; - richiudere il rubinetto di scarico. Riaprire il rubinetto di presa acqua a mare prima di riavviare il gruppo elettrogeno. 6.8 Sostituzione del liquido refrigerante Ogni anno sostituire il liquido refrigerante all'interno del circuito chiuso di raffreddamento. Collegare un tratto di tubo in gomma [fig. 10, rif. 2] della lunghezza di 20 - 30 cm al rubinetto di scarico [fig. 10, rif. 1], situato sul basamento del motore, per facilitare la raccolta del liquido refrigerante esausto all'interno di un recipiente di raccolta [fig. 10, rif. 3]. Aprire il rubinetto e svuotare completamente il circuito chiuso di raffreddamento. Ad operazione ultimata chiudere il rubinetto e riempire nuovamente il circuito con nuovo liquido refrigerante. Non disperdere nell'ambiente liquido refrigerante esausto in quanto prodotto inquinante. Consegnare il liquido refrigerante esausto presso gli appositi Centri di Raccolta incaricati dello smaltimento. I irreparabilmente lo scambiatore. Si consiglia di controllare gli zinchi almeno una volta al mese, a gruppo nuovo, per verificarne la velocità di consumo, e successivamente regolarsi di conseguenza. E' comunque opportuno sostituire gli anodi di zinco almeno una volta all'anno. In fig. 11 sono indicati i punti dove sono collocati gli anodi di zinco 6.10 Manutenzione della pompa acqua mare Almeno una volta all'anno è necessario controllare l'integrità della girante in gomma della pompa acqua mare (fig.12 rif. 1). Prima di aprire la pompa acqua mare per l'ispezione della girante è necessario svuotare l'impianto di raffreddamento dall'acqua di mare come descritto al paragrafo 5.7. Per accedere alla girante è necessario rimuovere il coperchio di chiusura (fig.12 rif. 2) e con l'ausilio di un paio di pinze estrarre la girante tirandola con forza verso l'esterno. Per il rimontaggio di una nuova girante ripetere le operazioni sopra descritte operando in sequenza inversa. 6.11 Manutenzione dell'alternatore L'alternatore impiegato su questo modello di generatore è di tipo sincrono, autoeccitato, con regolazione elettronica della tensione. Tale modello di alternatore, privo di collettore e spazzole non necessita di operazioni di manutenzione particolari. I controlli e le manutenzioni periodiche si limitano ad eliminare eventuali tracce di umidità e ossidazione che potrebbero danneggialo. 6.12 Manutenzione della batteria Si consiglia di utilizzare, per l'avviamento di tutti i modelli di gruppo elettrogeno, una batteria da 80 A/h per temperatura ambientale superiore a 0° C e da 100 A/h per temperature inferiori. Prima di installare una nuova batteria è importante che questa sia stata sottoposta ad un ciclo completo di ricarica. Controllare almeno una volta al mese il livello dell'elettrolita ed eventualmente rabboccare con acqua distillata. Durante un lungo periodo d'inutilizzo del gruppo elettrogeno è consigliabile scollegare la batteria e immagazzinarla in un luogo asciutto e a temperatura superiore a 10° C, ed eseguire una volta al mese un ciclo completo di ricarica. 6.9 Sostituzione anodi di zinco A protezione dello scambiatore di calore acqua-aria [fig. 11, rif. 1] dello scambiatore di calore acqua - liquido [fig. 11, rif. 2] da correnti galvaniche, sono stati inseriti al loro interno due anodi sacrificali in zinco.[fig. 11, rif. 4] E' necessario controllarne periodicamente lo stato di usura ed eventualmente operare la loro sostituzione al fine di evitare che le correnti galvaniche corrodano Se la batteria viene lasciata per lunghi periodi completamente scarica, si rischia di danneggiarla irreparabilmente. E' necessario aver cura di proteggere con grasso di vaselina il morsetto positivo della batteria per prevenire corrosione e formazione di ossido. I - 19 IS 10 T 50 Hz I Per rabbocchi con acido solforico è indispensabile utilizzare soluzioni già preparate Le operazioni di rabbocco delle batterie, con acqua distillata e o con acido, vanno eseguite con guanti in gomma e occhiali protettivi per evitare contatti accidentali di acido solforico con la pelle. In caso di contatto accidentale lavare con cura la parte interessata con acqua e sapone e consultare un medico. Prima di procedere alla ricarica delle batterie controllare il livello dell'elettrolita ed eventualmente ripristinarlo con acqua distillata. Tale operazione va ripetuta a ciclo di ricarica ultimato. 6.13 Periodi di inattività Avviare il gruppo elettrogeno almeno una volta al mese. Se il gruppo elettrogeno deve estrarre inutilizzato per un lungo periodo, è necessario procedere alle seguenti operazioni: - Sostituire l'olio motore. - Sostituire la cartuccia filtro olio (vedi par.5.2). - Sostituire la cartuccia del filtro combustibile (vedi par. 5.4). - Togliere gli iniettori e inserire all'interno di ciascun cilindro 2 cc di olio motore e far eseguire alcuni giri al motore agendo manualmente sulla puleggia dell'albero motore. Rimontare gli iniettori. - Sostituire le pastiglie di zinco (vedi par. 5.9) - Far aspirare, dal tubo presa acqua di mare, del liquido anticongelante, la cui funzione è di proteggere gli scambiatori dalle basse temperature e di lubrificare la girante della pompa acqua di mare e le parti metalliche interne all'impianto di raffreddamento. - Scollegare la batteria di avviamento e collocarla in ambiente asciutto (vedi par. 5.12) - Scollegare il tubo dello scarico a mare dal collettore del motore. - Pulire il filtro acqua di mare - Chiudere il rubinetto della presa acqua di mare - Svuotare la marmitta dall'acqua di mare - Pulire e lubrificare la valvola antisifone, se installata (siphon break) I - 20 6.14 Tavola riassuntiva degli interventi programmati OPERAZIONE ORE Controllo livello olio motore 10 Controllo livello liquido refrigerante 10 Controllare che non vi siano perdite di olio 20 Controllare che non vi siano perdite di carbur. 20 Controllare che non vi siano perdite di liquido 20 Regolazione tensione cinghia trapezoidale 100 Verifica carica batteria 100 Pulire filtro combustibile 200 Regolazione della tensione cinghie 200 * Cambio olio motore 200 Controllare la girante pompa acqua mare 400 Controllare il numero di giri motore 400 Controllare l'integrità dei collegamenti elettr. 400 Sostituzione filtro combustibile 400 * Sostituzione filtro olio 400 Controllare iniettori 400 Controllare la fasatura iniezione 400 Regolazione gioco valvola presa/scarico 400 Controllare la pompa di iniezione combustib. 1000 Controllo livello elettrolita batteria mens. Pulire e disossidare le parti metalliche anno Pulizia filtro aria anno Sostituzione totale liquido refrigerante anno Sostituzione anodi di zinco anno * Eseguire il primo intervento dopo 50 ore i successivi secondo gli intervalli previsti. TAB "B" 6.15 Tavola guasti Il motorino di avviamento gira ma il motore principale non si avvia. - Verificare la presenza di carburante allinterno del serbatoio. (Rifornire) - Verificare se lelettromagnete di stop è in posizione di tiro. (Consultare Centro Assistenza) - Eseguire l'operazione di spurgo da bolle d'aria all'interno del circuito di alimentazione. (Vedi par. 3.2) Il modulo protezioni motore non si attiva premendo il pulsante START - Controllare se l'interruttore termico [fig. 4, rif. 3] di protezione è aperto. (Ripristinare il contatto premendo sul pulsante rosso [fig. 4, rif. 3] ) - Controllare i cavi e i morsetti di collegamento alla batteria e le connessioni elettriche. (Ricollegare ) - Controllare lintegrità della batteria. (Ricaricare o sostituire) IS 10 T 50 Hz I Il gruppo elettrogeno si spegne durante il periodo di lavoro. - Verificare se è stata attivata una protezione con laccensione della relativa spia. (Rimuoverne la causa e ritentare lavviamento) - Controllare la presenza di carburante nel serbatoio. (Ripristinare il livello) Il motore ha un'alta fumosità allo scarico - Controllare che il livello olio in coppa non superi l'indice MAX. (Ripristinare il livello) - Verificare che il gruppo non sia in sovraccarico. - Controllare la taratura degli iniettori. (Consultare Centro Assistenza) Il motore funziona in maniera irregolare. - Controllare i filtri del carburante. (Sostituire) - Eseguire l'operazione di spurgo da bolle d'aria all'interno del circuito di alimentazione. (Vedi par. 3.2) La tensione dell'alternatore è troppo bassa. - Correggere il valore della tensione agendo sul regolatore elettronico - Controllare il nro giri motore (1560 rpm senza utilizzi collegati). - Regolatore di tensione guasto (sostituire). Batteria di avviamento scarica. - Controllare il livello dell'elettrolita all'interno della batteria. (Ripristinare il livello) - Controllare il funzionamento dell'alternatore DC. - Controllare l'integrità della batteria Il gruppo elettrogeno non eroga tensione. - Controllare che l'interruttore magnetotermico [fig.4 rif.2 ]sia in posizione "ON". Se tale operazione non ha esito positivo contattare un Centro di Assistenza Autorizzato I - 21 IS 10 T 50 Hz I 7 CARATTERISTICHE TECNICHE Modello Tipo Cilindri (nr.) Materiale blocco cilindri Alesaggio (mm) Corsa (mm) Cilindrata (cc) Potenza(hp) RPM Rapporto di compressione Sistema di iniezione Materiale testata Regolatore di giri Sistema di lubrificazione Capacità carter olio (l) Sistema di arresto motore Pompa alimentazione carburante Prevalenza max.pompa carburante (cm) Consumo carburante a pieno carico(l/h) Volume aria combustione (l/min) Batteria d'avviamento (Ah-V) Carica batteria Motorino d'avviamento (kW-V) Inclinazione max.di utilizzo Portata pompa acqua mare (l/min) Tipo Regolazione Raffreddamento Tensione (V) Frequenza (Hz) Potenza max. (Kw-Kwa) Potenza cont. (Kw-Kwa) Fattore di potenza ( cos ø ) Classe d'isolamento Stabilità di tensione Stabilità di frequenza I - 22 ,67 50 Hz Yanmar 3TNE78A Diesel 4 tempi 3 Ghisa 78 84 1204 - 1331 13,5 1500 18:1 Diretta Ghisa Centrifugo, meccanico Forzata 5,2 Solenoide Elettrica 70 2,9 730 70 - 12 40 - 12 1,2 - 12 30° 25 50 Hz Sincrono, 4-poli, autoeccitato Elettronica Aria / acqua ( Intercooler W/A ) 400 50 7,8 - 9,75 7,2 - 9 1 - 0,8 H ±2% ±5% IS 10 T 50 Hz I Riferimenti per lo schema elettrico Vedi Pag.9 1 2 3 4 5 6 7 8 9 10 11 12 13 14 15 16 17 18 19 20 21 22 23 24 25 26 27 Interruttore magnetotermico Contaore Alternatore Rotore Eccitatrice Regolatore elettronico di tensione Interruttore termico Modulo protezione motore Pulsante START/STOP Galleggiante fuori uscita carburante Trasduttore pressione olio Trasduttore temperatura liquido refrigerante Pompa carburante Termostato alta temperatura acqua Termostato alta temperatura liquido refrigerante Pressostato olio Alternatore ricarica batteria Elettromagnete stop Motorino di avviamento Morsetti collegamento batteria Strumento indicatore pressione olio Strumento indicatore temp. liquido refrigerante Pulsante START/STOP Cavo di collegamento pannello comando a distanza Connettore per collegam. pannello com. a distanza Pannello comando a distanza senza strumenti Pannello comando a distanza con strumenti I - 23 I IS 10 T 50 Hz INDEX GB THE GUARANTEE OF THE PRODUCT BECOMES VOID IF THE SPECIFICATIONS CONTAINED IN THE FOLLOWING INSTALLATION MANUAL ARE NOT RESPECTED 1 1.1 1.2 1.3 1.4 1.5 2 2.1 2.2 2.3 3 3.1 3.2 3.3 4 4.1 4.2 4.3 4.4 5 5.1 5.2 5.3 5.4 5.5 GB - 10 GENERAL INFORMATION ........................... 11 PURPOSE OF THE MANUAL ..................... Attached documentation .............................. Machine identification .................................. Instrument panel .......................................... Safety regulations ........................................ 11 12 12 12 12 GENERAL INFORMATION ........................... 13 Reference documents .................................. 13 Facsimile of CE declaration of conformity .... 13 Marking ....................................................... 13 GENERATOR DESCRIPTION ....................... 15 General ....................................................... 15 Cooling system ........................................... 15 Control panel ............................................... 15 USING THE GENERATOR ............................ 15 Preliminary checks ...................................... Bleeding the fuel system ............................. Starting ....................................................... Stopping ...................................................... 15 16 16 16 PROTECTIONS ............................................ 16 Low oil pressure protection .......................... High water temperature protection ............... Alternator overheating protection .................. Protection against short-circuit and overload Protection against short-circuit of the .......... low-voltage electric system .......................... 16 16 16 17 17 17 6 6.1 6.2 6.3 6.4 6.5 6.6 6.7 6.8 6.9 6.10 6.11 6.12 5.13 6.14 6.15 MAINTENANCE ............................................ 17 Ordinary engine maintenance ...................... Engine oil and oil filter change ..................... Air filter cleaning .......................................... Fuel filter replacement ................................. Coolant check ............................................. V-belt tension check .................................... Emptying the cooling system ...................... Coolant replacement .................................... Zinc anode replacement ............................... Seawater pump maintenance....................... Alternator maintenance ................................ Battery maintenance ................................... Periods of inactivity...................................... Summary table of scheduled maintenance .. Troubleshooting ........................................... 17 17 17 18 18 18 18 19 19 19 19 19 19 20 20 7 Technical characteristics ............................... 21 IS 10 T 50 Hz GB 1. GENERAL INFORMATION Carefully consult this manual before proceeding with any operation on the generator. 1.1 PURPOSE OF THE MANUAL Thank you for choosing a MASE product. This manual has been drawn up by the manufacturer and constitutes an integral part of the generator equipment. It must be kept safely, protected from humidity and from any agent which might damage it, and must accompany the generator if transferred to another user or to a new owner. The information contained in the manual is addressed to all those persons involved in the operating life cycle of the generator, and is useful for information for both those who effectively carry out the different operations and those who coordinate the activities, arrange the necessary logistics and regulate access to the place of installation. The manual defines the purpose for which the generator was constructed and contains all the information necessary to guarantee safe and proper use. Constant observance of the instructions contained in this manual guarantees the safety of the operator, operating economy and a longer life of the generator. To facilitate consultation, it has been divided into sections identifying the main concepts. For a quick look at the topics, consult the index on Page 23. Symbols Those parts of the text not to be ignored are highlighted in bold type preceded by a symbol, as illustrated and defined below: Indicates that particular attention must be paid in order to prevent running into serious danger which could lead to death of personnel or possible hazards to health. A condition which may occur during the lifetime of a product, system or plant considered at risk regarding damage to persons, property, the environment or economic loss. Indicates that particular attention must be paid in order to prevent serious consequences which could result in damage to tangible goods, such as the resources or the product. Instructions of particular importance. The drawings are provided by way of example. Even if the generator in your possession differs considerably from the illustrations contained in this manual, the safety of the generator and the information provided are nevertheless guaranteed. The manufacturer in his pursuit of a policy of constant development and upgrading of the product may make any modifications without prior notice. GB - 11 IS 10 T 50 Hz GB 1.2 Attached documentation 1.4 Instrument panel The following documentation forms an integral part of this manual: - EEC declaration of conformity (Fig. 1) - Engine use and maintenance manual - Service logbook - Certificate of guarantee - Guarantee card Legend Fig. 4 1.3 Machine identification See Fig. 2 1 2 3 4 5 6 7 8 9 10 - Machine code - Year of construction - Power factor - Declared frequency - Continuous power - Rated voltage - Current - Weight - Performance class - Serial number The data identifying the machine code number, the serial number and the year of construction must always be specified when contacting the manufacturer for information or for requests for spare parts. See Fig. 3 1- Soundproof casing 2- Top access door 3- Side access door 4- Instrument panel 5- Anchoring brackets 6- Exhaust and cooling water pipe fitting 7- Seawater intake connection pipe fitting 8- Connection pipe fittings to fuel tank 9- Connection terminals to battery 10- Engine air filter 11- Coolant expansion tank 12- Engine oil extraction pump 13- Diesel fuel filter cartridge 14- Seawater pump 15- Fuel pump 16- Oil filter cartridge 17- Oil fillercap 18- Electric line connection box 19- Battery charger alternator 20- Coolant tank 21- Water/air heat exchanger 22- Exhaust manifold 23- Starter motor 1 2 3 4 5 6 7 8 9 10 11 12 - Hour counter - Magnetothermal switch - DC current thermal switch - START/STOP button - Engine protection module - RUN light engine running - OIL light low oil pressure - ºC light high engine temperature - BATT light battery charger operating - ºC light high alternator temperature - Glow plugs (not present) - Fuel leak (version RINA) 1.5 Safety regulations Carefully read all the information contained in this manual and the installation manual as it is fundamental for proper installation and use of the generator and for timely intervention in case of necessity. The manufacturer declines all responsibility for damage to persons or things deriving from inobservance of the safety regulations. Carefully examine the safety warning plates on the machine and respect the relevant instructions. - Do not permit incompetent persons or without adequate training to use the generator. - Do not permit children or animals to approach the generator when it is in operation. - Do not access the generator or the control panel with wet hands, since it is a potential source of electric shock if improperly used. - Any inspections of the generator must be carried out with the engine off. Inspections with the engine on are to be carried out by specialised personnel only. - Do not inhale the combustion smoke since it contains substances hazardous to health. - Use the generator with the access doors closed. - Never touch the engine or alternator body with the hands when the generator is running or still hot. In the event of oil or fuel leaks, clean off thoroughly to prevent creating fire hazard conditions. In the event of fire, do not use water, but fire extinguishers. Should any problem arise or should you have any questions, please contact the Mase SERVICE department. GB - 12 IS 10 T 50 Hz GB 2 GENERAL INFORMATION The generator was designed, constructed and tested to meet the current European and national regulations and to reduce the electrical risks to a minimum in compliance with the following regulations: EEC 73/23 directive: low voltage EEC 89/392 machine directive 2.1 Reference documents The instructions for use provided with each generator are made up of a set of documents of which this manual represents the General Part. Normally, the following documents are provided. a b c d e f g CE Declaration of Conformity. Instruction manual for use and maintenance of the generators (this manual). Engine use and maintenance manual. Alternator use and maintenance manual (in case of alternators not manufactured by Mase). List of Mase Service Centres. Mase Warranty certificate. Warranty card. 2.2 Facsimile of CE declaration of conformity The generators constructed by Mase, intended for countries in the European Community, are in conformity with the applicable EEC Directives and are furnished with an EC Declaration of Conformity (Fig.B). 2.3 Marking The generator identification plate carries all the identification data in conformity in accordance with the provisions for CE Marking for those cases where required. Below is a facsimile of the identification plate fixed on the control panel of each generator (Fig. A). 1 - Machine name 2 - Machine code 3 - Serial number 4 - Rated power 5 - Declared frequency 6 - Rated power factor 7 - Rated voltage 8 - Rated current 9 - Degree of protection 10 - Class of isolation 11 - Temperature max. of use 12 - Altitude max. of use 13 - Noise level 14 - Performance class 15 - Year of construction 16 - Manufacturer - Adress 17 - Weight 1 4 2 3 5 6 7 8 10 9 11 12 16 13 14 15 17 Fig.A GB - 13 IS 10 T 50 Hz GB NR.000000 mase GENERATORS S.p.A. Tel. +39 (0) 547 354311 Fax +39 (0) 547 317555 DICHIARAZIONE CE DI CONFORMITÀ EC DECLARATION OF CONFORMITY Fabbricante/Manufacturer: mase GENERATORS S.p.A. Indirizzo /Address : Via Tortona 345, Pievesestina (FC) mase Il sottoscritto Luigi Foresti in qualità di direttore tecnico della GENERATORS S.p.A., dichiara sotto la propria responsabilità che il gruppo elettrogeno modello .................... : mase IL E The undersigned Luigi Foresti as GENERATORS S.p.A. technical manager declares, under his sole responsability, that the generator model................: Codice / Code Descrizione / Model S Matricola / Serial N. M I è conforme alle disposizioni delle Direttive di seguito elencate: 98/37 CE (come emendata delle Direttive 98/79 CE) 73/23 CEE modificata da CEE 93/68. 89/336 CEE direttiva sulla compatibilità elettromagnetica A F C corresponds to the requirements of the following EEC Directives: 98/37/EEC (as amended by the Directive 98/79/EEC ) 73/23/EEC as amended by 93/68/EEC. 89/336 EEC directive on the electromagnetic compatibility Cesena, / / Direttore Tecnico Technical Director mase GENERATORS S.p.A. Sede legale ed Amm.: 47023 CESENA (FC) ITALY - Via Tortona, 345 - C.F./P.I. 00687150409 Cap. Soc. milioni 2000 di cui 949 versati - Registro Società Tribunale Forlì n. 6818 - CCIAA Forlì n.164063 - c.c.p. n. 11541471 - EXPORT FO n. 006368 Fig.B GB - 14 IS 10 T 50 Hz GB 3. GENERATOR DESCRIPTION 3.1 General The IS 19 generators were designed for easy installation on boats. The soundproof casing, obtained with insulated, painted marine aluminium panels, allows easy access to the engine and the alternator for maintenance and inspection operations, and at the same time strongly reduces noise. The 4-stroke, direct-injection, diesel engine, built by Yanmar, is extremely reliable and robust. Exhaust emission is in conformity with CARB regulations. The synchronous-type, 4-pole, brushless alternator has an electronic voltage regulator (SR7) which guarantees stability to + 5% with respect to the nominal value. The high pickup capacity of the alternator makes the generator particularly suitable for the power supply of electric motors of air conditioners, desalination plants, compressors, etc. The generator has a local control panel [Fig. 3 Ref. 4] on which the controls and control instruments are housed. 3.2 Cooling system The generator engine is cooled by closed-circuit circulation of coolant which yields heat to the seawater by means of a heat exchanger [Fig. 3, Ref. 20]. This heat exchanger built of cupronickel was specially designed by mase to make the engine suitable for use at sea. A second heat exchanger cools the air inside the soundproof casing and the air necessary for alternator ventilation. At the time of installation a seawater feed circuit for cooling must be installed and an exhaust system to convey the combustion gas and the water used for cooling to the outside. 3.3 Control panel A control panel is positioned on the generator for running checks and to start and stop the generator. An engine protection module [Fig. 4 Ref. 5] controls the generator protections, stopping the engine in case of a fault and signalling the fault detected by means of special warning lights. - Green RUN pilot light [Fig. 4 Ref. 6], when on, indicates that the generator is running and no operating fault has been detected. - Red BATT pilot light [Fig. 4 Ref. 9), when on, indicates that the alternator battery charger is faulty. - Red OIL pilot light [Fig. 4 Ref. 7], when on, indicates that the engine oil pressure is insufficient. - Red [Fig. 4 Ref. 10] pilot light, when on, indicates that - the temperature of the coolant or the water circulating in the heat exchangers is too high. Red [Fig. 4 Ref. 8] pilot light, when on, indicates that the alternator windings have reached too high temperatures. The following may also be found on the control panel: - A tripolar magnetothermal switch [Fig. 4 Ref. 2] which cuts the power in case of an overload or shortcircuit. A thermal switch (Fig. 4 Ref. 3] to protect the lowvoltage electric system against short-circuit. An hour counter (Fig. 4 Ref. 1]. The generator start/stop button [Fig. 4 Ref. 4]. The generator can be connected with a connector to the remote starting panel, supplied by mase as an optional, and can be installed on the dashboard. Two different remote starting panels are available as shown in Fig. 5. The most simple version has a start/stop button [Fig. 5 Ref. 1] and a green pilot light [Fig. 5 Ref. 2] which, when on, indicates that the generator is running. The second version of the remote starting panel [Fig. 5 Ref. 3] has, in addition to the start/stop button, an instrument which indicates the engine oil pressure value (Fig. 5 Ref. 4] and an instrument which indicates the coolant temperature value [Fig. 5, Ref. 5]. When carrying out maintenance operations on the generator, disconnect the negative pole of the starter battery to prevent accidental starting. 4. USING THE GENERATOR 4.1 Preliminary checks At first starting of the generator, or after having done any type of maintenance work, it is always good practice to check: - the oil level by means of the dipstick [Fig. 7 Ref. 2] (see table A for recommended oils [Fig. 8]). - that all the anchoring points of the generator are properly tightened. - that all the electrical utilities are off to prevent starting the generator on load - that the water and fuel pipes are properly connected - that all the electrical connections have properly been carried out and that there are no electrical connections in a bad state. - that the water cock is open [Fig. 6 Ref. 2] - that the section of the water circuit from the pump to the valves has been filled manually if a non-return valve has been mounted on the sea intake (as recommended in the installation manual) [Fig. 4 Ref. 1]. GB - 15 IS 10 T 50 Hz GB 5 PROTECTIONS 4.2 Bleeding the fuel system The presence of air bubbles in the fuel system is caused by irregular functioning of the engine or the incapacity to reach the nominal number of revolutions. Air might enter the fuel circuit through a not perfectly tight seal (pipes, filters, tank) or when the fuel in the tank is at minimum level. The fuel system has been designed in such a way as to autonomously eliminate air bubbles that have penetrated the circuit. Automatic bleeding is obtained by activating the fuel pump for a few minutes before starting the engine. The fuel pump is activated by pressing the START button for a second. Should the engine still function irregularly after this operation, consult a technician for a thorough inspection of the fuel system. 4.3 Starting Before starting the generator, ensure that the preliminary checks described in paragraph 3.1 have been carried out. Start the generator by pressing the START button located on the control panel [Fig. 4 Ref. 4] and release it only when the generator has started, taking care not to exceed 15 sec. for each attempt and respecting an interval of at least 30 sec. All the warning lights of the engine protection module [Fig. 4, Ref. 5] will come on for a few seconds, and if there are no engine or generator faults, only the green RUN light [Fig. 4 Ref. 6] will remain on to indicate that the generator has been started and that functioning is regular. Repeated attempts at starting with negative outcome may cause excess accumulation of water in the exhaust system with possible serious damage to the engine. If it is difficult to start the engine, do not insist for too long without first having closed the sea intake cock [Fig. 6 Ref. 2]. 4.4 Stopping The generator is stopped by pressing the OFF button on the control panel. Before stopping the generator it is recommended to let it run for a few minutes without drawing electric current, in order to allow the engine and the alternator to cool down. GB - 16 The IS 8 and IS 9.5 generators are equipped with a series of protections which safeguard them against improper use and operating problems. When the generator stops because a protection has intervened, on the engine protection module [Fig. 5, Ref. 5] of the control panel the warning light relative to the fault will come on. 5.1 Low oil pressure protection Intervenes switching off the generator when the engine oil pressure is insufficient. Its intervention is signalled by the OIL light [Fig., 4, Ref. 7] coming on. Normally it is sufficient to top up with the lacking quantity of oil to be able to restart the generator. The low oil pressure protection does not give an indication of the level of engine oil in the sump. Therefore, check this level daily. The engine functions properly if it does not exceed an inclination of maximum 30º for less than 3 minutes, 25º without time limit, both on the longitudinal and the transverse axis. If the engine is operated at a greater inclination, the risk is insufficient lubrication or aspiration of engine oil through the air filter. 5.2 High water temperature protection Intervenes switching off the generator when the engine coolant temperature is too high or there is no circulation of seawater. Its intervention is signalled by the ºC light [Fig. 4, Ref. 10] coming on. Only restart the generator after the cause of the fault has been identified and removed. 5.3 Alternator overheating protection Intervenes switching off the generator when there is a thermal overload on the alternator. Its intervention is signalled by the ºC light [Fig. 4, Ref. 8] coming on. The generator can be restarted after a few minutes when the temperature of the alternator windings has returned to normal values. It is, however, recommended to find and remove the causes of the intervention. In the event of one of the above described protections intervening, after ascertaining and removing the cause of the intervention, press the STOP button to reset the control panel (otherwise the signal would remain in memory preventing the engine from starting). IS 10 T 50 Hz GB 5.4 Protection against short-circuit and overload The generator is protected against short-circuit and overload. A tripolar magnetothermal switch [Fig. 4 Ref. 2] cuts the supply of electric current when a short-circuit occurs or when the electric current delivered exceeds the nominal value. Before restoring the contact by lifting the lever of the magnetothermal switch, disconnect the utilities. 5.5 Protection against short-circuit of the low-voltage electric system In the event of a short-circuit in the low-voltage electric system, a thermal switch [Fig. 4, Ref. 3] breaks the circuit stopping the generator. In this case the warning lights of the engine protection module will all be off and it will not be possible to re-attempt starting. Before restoring the electric circuit by pressing the button located on the thermal switch [Fig. 4 Ref. 3], have a specialised technician find and remove the cause of the short-circuit. 6 MAINTENANCE Any maintenance operation on the generator must be carried out with the engine off after letting it cool down sufficiently, and must be carried out by authorised personnel. Before accessing the generator, disconnect one pole of the starter battery in order to prevent accidental starting. 6.1 Ordinary engine maintenance The periodic maintenance to be carried out on the engine is listed in TABLE B. For more detailed information consult the manual provided with each generator by the engine manufacturer. Check the oil level by means of the graduated dipstick [Fig. 7, Ref. 2]. The level must always be between the MAX and MIN notches on the dipstick [Fig. 7 Ref. 1]. 6.2 Engine oil and oil filter change The engine oil sump capacity is 3.6 litres. Top-ups and filling with engine oil is carried out through the hole [Fig. 3, Ref. 17]. To change the oil in the oil sump, remove the dipstick [Fig. 7, Ref. 2] and operate the special extraction pump [Fig. 3, Ref. 12] after having removed the screw which functions as plug. It is recommended to drain the oil when it is still sufficiently warm to flow easily. For recommended oils see table A, Fig. 8. The first engine oil change must be carried out after 50 hours of generator operation. For the second and subsequent oil changes, every 200 hours is sufficient. For more detailed information on engine lubrication, consult the engine use and maintenance manual attached to the generator. Dispose of the used oil or fuel in an appropriate manner as they are polluting products. Take the used engine oil to special collection centres responsible for disposal. Avoid contact of engine oil with the skin. During maintenance operations use gloves and protective glasses. In case of contact with engine oil, immediately and thoroughly wash the affected part with soap and water. To replace the engine oil filter cartridge [Fig. 3, Ref. ?], unscrew it from its support, using suitable tools normally found on the market. Reposition the new cartridge, taking care to lubricate the rubber ring gasket. The first replacement must be carried out after 50 hours of generator operation. For the second and subsequent replacements, respect an interval of 400 hours. For further information consult the engine use and maintenance manual. For the safety of the engine, use only original spare parts. When the operation has been completed, thoroughly wipe off all oil and fuel from the engine parts. 6.3 Air filter cleaning The generators of the IS series have a dry air filter which prevents foreign bodies from entering the combustion chamber. For its maintenance it is sufficient to clean the GB - 17 IS 10 T 50 Hz GB filtering mass with diesel fuel once a year to remove nay impurities. Dispose of the liquids used for air filter washing in an appropriate manner. Take them to special collection centres. Any maintenance operation on the generator must be carried out with the engine off after letting it cool down sufficiently, and must be carried out by authorised personnel. Before accessing the generator, disconnect the negative pole of the starter battery to prevent accidental starting of the generator. 6.4 Fuel filter replacement To guarantee long life and proper functioning of the engine, it is extremely important to periodically replace the fuel filter cartridge, respecting the frequency indicated by the engine manufacturer as listed in the table in Paragraph 5.12. This operation is carried out in the following steps: - Close the fuel cock [Fig. 3, Ref. 24] - Completely unscrew the ring nut of the support [Fig. 3, Ref. 13] - Remove the old cartridge and position the new one. - For remounting repeat the operations in reverse order. When the filter has been replaced, bleed the fuel system carrying out the operations described in Paragraph 3.2. Avoid contact of the fuel oil with the skin. During maintenance operations use gloves and protective glasses. In case of contact with fuel, immediately and thoroughly wash the affected part with soap and water. When the operation has been completed, thoroughly wipe off all traces of fuel and take the used cloths to special collection centres. GB - 18 6.5 Coolant check Periodically check the coolant level in the closed-circuit cooling system. The reference index for this check is printed on the expansion tank [Fig. 3, Ref. 11]. If the level is insufficient, pour coolant into the expansion tank, taking care not to exceed the maximum level index. Never open the cap of the expansion tank [Fig. 3, Ref. 11] or coolant tank [Fig. 3, Ref. 20] when the engine is hot to prevent dangerous coolant leaks. 6.6 V-belt tension check A V-belt is used to transmit the rotary motion from the drive shaft pulley to that of the seawater pump [Fig. 9 Ref. 1]. Excessive belt tension accelerates wear, while a slack belt makes the pulleys idle and does not allow sufficient water circulation. Adjust the belt tension as follows: Loosen the two adjusting screws [Fig. 9, Ref. 2] and move the seawater pump outwards to increase the tension or inwards to decrease it. Lock the screws and check the tension. The correct belt tension is such as to allow a yield of about 5 mm [Fig. 9] under a thrust force of 8 kg. A second belt is used to transmit the rotary motion from the drive shaft pulley to that of the closed-circuit coolant pump and the battery charger DC alternator [Fig. 9 Ref. 3]. Adjust the belt tension as follows: Loosen the adjusting screw [Fig. 9 Ref. 4] and move the battery charger DC alternator [Fig. 9, Ref. 5] outwards to increase the tension and inwards to decrease it. The correct belt tension is such as to allow a yield of about 10 mm [Fig. 9] under a thrust force of 8 kg. To prevent the belt from slipping, do not dirty it with oil. Clean the belt with petrol if any oil is spilled. Keep hands away from the V-belt or the pulleys when the engine is running. 6.7 Emptying the cooling system To carry out maintenance on the water/air exchanger or on the cooling system the seawater must be drained from the intake circuit. This operation is carried out as follows: - Close the sea intake cock [Fig. 6, Ref. 2] - Open the drain tap [Fig. 6, Ref. 3] until all the water has run out - Close the drain tap. IS 10 T 50 Hz GB Reopen the seawater intake cock before starting the generator. brushes, does not require particular maintenance operations. The periodic checks and maintenance are limited to removing any traces of damp and oxidation which might damage it. 6.8 Coolant replacement 6.12 Battery maintenance Yearly change the coolant in the closed-circuit cooling system. Connect a 20-30 cm long rubber tube [Fig. 10, Ref. 2] to the drain tap [Fig. 10, Ref. 1] located on the engine base to facilitate collection of the used coolant in a collection receptacle [Fig. 10, Ref. 3]. Open the tap and completely drain the closed-circuit cooling system. When the operation has been completed, close the tap and fill the circuit with new coolant. For starting all the generator models, it is recommended to use an 80 A/h battery for ambient temperatures exceeding 0ºC, and 100 A/h for lower temperatures. Before installing a new battery it is important that it undergoes a full charging cycle. At least once a month check the level of the electrolyte and, if necessary, top up with distilled water. If the generator is not to be used for a long period, it is recommended to disconnect the battery and store it in a dry place at a temperature over 10ºC and to carry out a full charging cycle once a month. Dispose of the used coolant in an appropriate manner as it is a polluting product. Take the used coolant to special collection centres responsible for disposal. 6.9 Zinc anode replacement To protect the water/air heat exchanger [Fig. 11, Ref. 1] and the water/coolant heat exchanger [Fig. 11, Ref. 2] against galvanic current, two sacrificial zinc anodes [Fig. 11, Ref. 4] have been inserted inside them. Periodically check their state of wear and, if necessary, replace them in order to prevent that the galvanic current irreparably corrodes the heat exchanger. It is recommended to check the zinc anodes at least once a month when the generator is new to check how fast consumption is, to then be able to act accordingly. It is, however, opportune to replace the zinc anodes at least once a year. Fig. 11 shows the points where the zinc anodes are positioned. 6.10 Seawater pump maintenance At least once a year check the integrity of the rubber rotor of the seawater pump [Fig. 12, Ref. 1]. Before opening the seawater pump to inspect the rotor, drain the seawater from the cooling system as described in Paragraph 5.7. To access the rotor, remove the cover [Fig. 12, Ref. 2] and with the aid of a pair of pliers extract the rotor pulling it out with force. To remount a new rotor, repeat the operations described above in reverse order. 6.11 Alternator maintenance The alternator used on this model of generator is type synchronous, self-energised, with electronic voltage regulation. This model alternator, without manifold and If the battery is left completely flat for long periods, there is a risk of irreparably damaging it. The positive terminal of the battery must be protected with Vaseline to prevent corrosion and the formation of oxide. For top-ups with sulphuric acid, ready solutions must be used. The battery top-up operations with distilled water or with acid must be carried out with rubber gloves and protective glasses to prevent accidental contact of the sulphuric acid with the skin. In the event of accidental contact, thoroughly wash the part affected with soap and water and consult a doctor. Before recharging the battery check the level of the electrolyte and, if necessary, fill up with distilled water. This operation must be repeated when the recharging cycle has been completed. 5.13 Periods of inactivity Start up the generator at least once a month. If the generator is not to be used for a long time, the following operations must be carried out: - Change the engine oil - Replace the oil filter cartridge (see par. 5.2) - Replace the fuel filter cartridge (see par. 5.4) - Remove the injectors and pour 2 cc engine oil into each GB - 19 IS 10 T 50 Hz GB - - cylinder and let the engine turn over a few times, manually operating the drive shaft pulley. Remount the injectors. Replace the zinc anodes (see par. 5.9) Through the seawater intake pipe aspirate some antifreeze whose function is to protect the heat exchangers against low temperatures and to lubricate the seawater pump rotor and the metallic parts in the cooling system. Disconnect the starter battery and store it in a dry place (see par. 5.12) Disconnect the sea exhaust pipe from the engine manifold. Clean the seawater filter. Close the seawater intake cock. Drain the seawater from the exhaust. Clean and lubricate the antisiphon valve, if installed (siphon break). 6.14 Summary table of scheduled maintenance OPERATION HOURS Check engine oil level ........................................... 10 Check coolant ...................................................... 10 Check for oil leaks ............................................... 20 Check for fuel leaks .............................................. 20 Check for coolant leaks ........................................ 20 Adjust V-belt tension .......................................... 100 Check battery charger ........................................ 100 Clean fuel filter ................................................... 200 Adjust belt tension ............................................. 200 *Change engine oil ............................................. 200 Check seawater pump rotor ................................ 400 Check engine rpm .............................................. 400 Check integrity of electrical connections ............ 400 Replace fuel filter ................................................ 400 * Replace oil filter ............................................... 400 Check injectors .................................................. 400 Check injector timing ......................................... 400 Adjust play on intake/exhaust valve .................... 400 Check the fuel injection pump .......................... 1000 Check battery electrolyte level ...................... monthly Clean and deoxidise the metallic parts ............ yearly Clean air filter .................................................. yearly Replace coolant completely ............................ yearly Replace zinc anodes ....................................... yearly * Carry out the first maintenance operation after 50 hours, subsequently according the required intervals. TAB "B" GB - 20 6.15 Troubleshooting The starter motor turns but the main engine does not start - Check that there is fuel in the tank (fill up) - Check if the stop electromagnet is in the firing position (consult Service Centre) - Bleed the air bubbles from the fuel circuit (see par. 3.2) The engine protection module is not activated when the START button is pressed - battery, and the electrical connections (reconnect). - Check integrity of the battery (recharge or replace). The generator switches off during the operating period - Check if a protection has been activated with the relevant light coming on (remove the cause and retry starting). - Check if there is fuel in the tank (fill up). There is a high grade of smoke at the engine exhaust - Check that the oil level in the sump does not exceed the MAX index (restore level). - Check that the generator is not in overload. - Check calibration of the injectors (consult Service Centre). The engine runs irregularly - Check the fuel filters (replace). - Bleed the air bubbles from the fuel circuit (see par. 3.2). The alternator voltage is too low - Correct the voltage value acting on the electronic regulator. - Check the engine rpm (1560 rpm without utilities connected). - Voltage regulator broken (replace). Starter battery flat - Check the electrolyte level in the battery (restore the level). - Check functioning of the DC alternator. - Check integrity of the battery. The generator does not deliver power - Check that the magnetothermal switch [Fig. 4, Ref. 2] is in the ON position. If not, contact an authorised Service Centre. IS 10 T 50 Hz 7 TECHNICAL CHARACTERISTICS Model Type Cylinders (nr.) Cylinder block material Bore (mm. - in.) Stroke (mm.- in.) Displacement (cc. - CID) Power (hp) RPM Compression ratio Combustion system Engine head material Speed governor Lubrication system Oil sump capacity with filter(l -gl) Engine stop system Fuel pump Fuel pump discharge (cm. - ft) Fuel consumption (l/h - gl/h) Air intake (l/min. - gl/min.) Starting battery (Ah-V) Battery charger (Ah-V) Starter (KW-V) Max. inclination Water pump flow (l/min. - gl/min.) Type Cooling Voltage (V) Frequency (Hz) Max. power (KW) Continuous power (KW) Power factor ( cos ø ) Insulating class Voltage stability Frequency stability GB ,67 50 Hz Yanmar 3TNE78A Diesel 4 stroke 3 Cast iron 78 84 1204 - 1331 13,5 1500 18:1 Direct injection Cast iron Centrifugal mechanical Forced 5.2 - 1.2 Stop solenoid Electric 70 2.9 730 70 40 1.2 30° 25 50 Hz Synchronous, 4-poles, brush less self-excited electronic voltage regulation (AVR) Air/water ( Intercooler W/A ) 400 50 7.8 - 9,75 7.2 - 9 1 - 0,8 H ±2% ±5% GB - 21 IS 10 T 50 Hz GB References for the wiring diagram Pag.9 1 2 3 4 5 6 7 8 9 10 11 12 13 14 15 16 17 18 19 20 21 22 23 24 25 26 27 GB - 22 Magnetothermal switch Hour counter Alternator Stator Exciter Electronic voltage regulator Thermal switch Engine protection module START/STOP button Fuel level gauge Oil pressure gauge Water temperature gauge Fuel pump High water temperature sensor High coolant temperature sensor Oil pressure switch DC alternator Stop electromagnet Starter motor Battery connection terminals Oil pressure gauge instrument Coolant temperature gauge instrument START/STOP button Remote control panel connection cable Connector for remote control panel connection Remote control panel Remote control panel IS 10 T 50 Hz GB GB - 23 I IS 10 T 50 Hz INHALT DE GARANTIE KOMT TE VERVALLEN ALS DE INBOUW EN HET GEBRUIK NIET VOLGENS DE SPECIFICATIES IN DEZE INSTALLATIEHANDLEIDING GEBEURT. D 1 1.1 1.2 1.3 1.4 1.5 2 ALLGEMEINE INFORMATIONEN ................. 11 Zweck der Bedienungsanleitung .................. Beiliegende Unterlagen ................................ Identifizierung der Maschine ........................ Instrumententafel ......................................... Sicherheitsregeln ......................................... 11 12 12 12 12 ALLGEMEINE INFORMATIONEN ................. 12 2.1 Bezugsdokumente .......................................... 12 2.2 Faksimile der EG-Konformitätserklärung ......... 12 2.3 Kennzeichnung ............................................... 12 3 3.1 3.2 3.3 4 4.1 4.2 4.3 4.4 5 5.1 5.2 5.3 5.4 5.5 D - 10 BESCHREIBUNG DES GENERATORS ......... 15 Allgemeines ............................................... 15 Kühlsystem ................................................. 15 Steuertafel ................................................... 15 VERWENDUNG DES GENERATORS ........... 15 Überprüfungen vor der Inbetriebnahme ........ Entlüftung des Versorgungssystems ........... Starten ........................................................ Stoppen des Elektroaggregats ..................... 15 16 16 16 SICHERHEITSVORRICHTUNGEN ................ 16 Sicherheit niedriger Öldruck ......................... 16 Sicherheit hohe Wassertemperatur .............. 16 Sicherheit Übertemperatur des Drehstromgenerators ........................... 17 Sicherheit gegen Kurzschluß und Überlastung .......................................... 17 Sicherheit gegen Kurzschluß der elektrischen Niederspannungsanlage ............................... 17 6 6.1 6.2 5.3 6.4 5.5 5.6 6.7 5.8 6.9 6.10 6.11 6.12 6.13 7 WARTUNG ................................................... 17 Regelmäßige Wartung des Motors .............. Wechsel des Motoröls und des Ölfilters ...... Reinigung des Luftfilters ............................... Austausch des Kraftstoffilters ...................... Überprüfung der Kühlflüssigkeit .................... Überprüfung der Keilriemenspannung ........... Entleerung der Kühlanlage ........................... Auswechseln der Kühlflüssigkeit ................. Austausch der Zinkanoden .......................... Wartung der Meerwasserpumpe .................. Wartung des Drehstromgenerators .............. Wartung der Batterie ................................... Stillstandzeiten ............................................ 17 17 18 18 18 18 19 19 19 19 19 19 20 Technische Eigenschaften ......................... 22 IS 10 T 50 Hz 1. ALLGEMEINE INFORMATIONEN Vor sämtlichen Eingriffen an der Maschine die vorliegende Bedienungsanleitung aufmerksam durchlesen. D 1.1 Zweck der Bedienungsanleitung Vor allen Dingen möchten wir Ihnen danken, daß Sie ein MASE-Produkt gewählt haben. Diese Bedienungsanleitung wurde vom Hersteller abgefaßt und ist als integrierender Teil der dem Elektroaggregat beigepackten Unterlagen zu betrachten. Sie ist stets sorgfältig an einem geschützten Platz aufzubewahren und im Falle eines Abtretens des Aggregats dem neuen Benutzer oder Besitzer stets auszuhändigen. Die in der Bedienungsanleitung enthaltenen Informationen sind an alle Personen gerichtet, denen der Betrieb und die Pflege des Elektroaggregats obliegt. Ferner dienen diese Informationen als nützliche und unerläßliche Anhaltspunkte sowohl bei der Ausführung als auch bei der Koordination der verschiedenen Arbeitsgänge, sowie zur Einrichtung der mathematischen Logik und deren Zugriffs-Vorgabe zum Installationsplatz. Die Bedienungsanleitung dient als Grundlage für den bestimmungsgerechten Einsatz der Maschine und enthält alle nötigen Informationen für einen sicheren und ordnungsgemäßen Betrieb. Die skrupelhafte Befolgung der Anleitungen ist Voraussetzung für ein Arbeiten in voller Sicherheit, einen sparsamen Betrieb und eine lange Nutzdauer der Maschine. Für ein leichteres Nachschlagen wurde die Bedienungsanleitung in Abschnitte unterteilt, in denen die wichtigsten Themen behandelt werden; das Inhaltsverzeichnis auf Seite 43 ermöglicht ein schnelles Auffinden der verschiedenen Argumente. Symbole Wichtige Hinweise sind halbfett gedruckt und durch Symbole gekennzeichnet, die nachstehend dargestellt und aufgeschlüsselt werden. Größte Achtsamkeit und Vorsicht anwenden, um Todesfolgen oder Gesundheitsschäden zu vermeiden. Gefahrensituationen, die während der Nutzdauer gewisser Produkte, Systemen oder Anlagen eintreten und Personen-, Sach- oder Umgebungsschäden, sowie wirtschftliche Verluste bewirken könnten. Unbedingt zu beachtende Regeln, um Sachschäden oder Produktschäden zu vermeiden. Besonders wichtige Hinweise Es kann vorkommen, daß Ihre Maschine von den Abbildungen dieser Bedienungsanleitung in einigen Einzelheiten abweicht, dies beeinflußt jedoch in keinster Weise die Richtigkeit der Angaben und die Sicherheit der Maschine. Der Hersteller behält sich vor, dem technischen Fortschritt dienende Änderungen an der Maschine ohne Vorbescheid vorzunehmen. D - 11 IS 10 T 50 Hz D 1.2 Beiliegende Unterlagen 1.4 Instrumententafel Der vorliegenden Bedienungsanleitung werden die folgenden Unterlagen beigeschlossen: Zeichenerklärung ABB. 4 - Konformitätserklärung CEE (Abb. 1) Bedienungs- und Wartungsanleitung des Motors Service-Heft Garantiebescheinigung Garantiekarte 1.3 Identifizierung der Maschine Siehe ABB. 2 1 - Maschinencode 2 - Baujahr 3 - Leistungsfaktor 4 - Erklärte Frequenz 5 - Dauerleistung 6 - Sollspannung 7 - Elektr. Strom 8 - Gewicht 9 - Leistungsklasse 10 - Seriennummer Bei sämtlichen Rücksprachen mit dem Hersteller zur Einholung technischer Informationen, sowie bei Ersatzteilbestellungen sind stets der Maschinencode, die Kennummer und das Baujahr anzugeben. Siehe ABB. 3 1 - Schallschluckender Kasten 2 - Obere Tür 3 - Seitliche Tür 4 - Instrumententafel 5 - Verankerungsbügel 6 - Rauch- und Kühlwasserablaßstutzen 7 - Anschlußstutzen für Meerwasser 8 - Anschlußstutzen Kraftstofftank 9 - Batterie-Anschlußklemmen 10 - Motorluftfilter 11 - Expansionsgefäß Kühlflüssigkeit 12 - Motorölpumpe 13 - Dieselöl-Filtereinsätze 14 - Meerwasserpumpe 15 - Kraftstoffpumpe 16 - Ölfiltereinsatz 17 - Ölfüllschraube 18 - Stromanschlußdose 19 - Drehstromgenerator 20 - Kühlflüssigkeitsbehälter 21 - Wasser/Luft Wärmeaustauscher 22 - Auspuffkrümmer 23 - Anlasser D - 12 1 - Stundenzählwerk 2 - Magnet-Thermoschalter 3 - Thermoschalter DC-Strom 4 - START / STOPP Taste 5 - Motorschutzmodul 6 - RUN-Kontrolleuchte Motor gestartet 7 - OIL-Kontrolleuchte niedriger Öldruck 8 - °C-Kontrolleuchte hohe Motortemperatur 9 - BATT-Kontrolleuchte Ladegerätfunktion 10 - °C-Kontrolleuchte Drehstromgenerator-Übertemperatur 11 - Zündkerzen (nicht vorhanden) 12 - Kraftstofflecks (Version RINA) 1.5 Sicherheitsregeln Die Anleitungen des vorliegenden Handbuchs und der Montageanleitungen aufmerksam durchlesen. Dies ist von wesentlicher Bedeutung für eine einwandfreie Montage und Verwendung des Elektroaggregats und für ein rechtzeitiges Eingreifen in Notfällen. Der Hersteller haftet nicht für Personen- und/oder Sachschäden, die durch die Nichtbeachtung der Sicherheitsregeln bewirkt sind. Den auf der Maschine angebrachten Warnschildern größte Aufmerksamkeit widmen und die diesbezüglichen Hinweise befolgen. - Das Elektroaggregat darf auf keinen Fall von unzuständigen oder ungeschulten Personen verwendet werden. - Kinder oder Tiere dürfen sich auf keinen Fall dem Elektroaggregat nähern, während dieses in Betrieb steht. - Nie mit nassen Händen am Generator oder an der Steuertafel arbeiten: Stromschlaggefahr! - Vor der Ausführung sämtlicher Überprüfungen des Elektroaggregats ist der Motor abzustellen; Überprüfungen beilaufendemMotordürfenausschließlichvonFachpersonal ausgeführt werden. - Die Verbrennungsgase sind gesundheitsschädlich und dürfen daher nie eingeatmet werden. - Das Elektroaggregat ausschließlich mit geschlossenen Türen verwenden. - Das Gehäuse des Motors oder des Drehstromgenerators nie berühren, wenn das Elektroaggregat in Betrieb steht oder noch heiß ist. Öl- oder Kraftstofflecks sind sorgfältig wegzuputzen, um Brandgefahr zu vermeiden. Einen Brand nie mit Wasser zu löschen versuchen, sondern stets die geeigneten Feuerlöschmittel verwenden. Bei Auftreten von Problemfällen oder zur Einholung von Erklärungen nehmen Sie bitte stets mit der SERVICEAbteilung der Fa. Mase Rücksprache. IS 10 T 50 Hz 2. ALLGEMEINE INFORMATIONEN Das Elektroaggregat ist so entwickelt, hergestellt und abgenommen worden, dass es die geltenden europäischen und inländischen Rechtsvorschriften erfüllt und die Stromrisiken auf ein Minimum beschränkt werden. Dabei sind insbesondere folgende Bestimmungen beachtet worden: D EWG-Richtlinie 73/23 in Bezug auf die Niederspannung EWG-Richtlinie 89/392 für Maschinen 2.1 Bezugsdokumente Die mit jedem Elektroaggregat gelieferte Bedienungsanleitung besteht aus einer Reihe von Unterlagen, wovon das vorliegende Handbuch den Hauptbestandteil bildet. Normalerweise werden folgende Unterlagen mitgeliefert: a b c d EG-Konformitätserklärung Anleitungshandbuch für den Gebrauch und die Wartung der Elektroaggregate (vorliegendes Handbuch) Gebrauchs- und Wartungshandbuch für den Motor Gebrauchs- und Wartungshandbuch für den Wechselstromgenerator (im Falle von Wechselstromgeneratoren, die nicht von der Firma Mase hergestellt werden) e Verzeichnis der Mase-Kundendienststellen. f Garantiezertifikat Mase. g Garantiekarte. 2.2 Faksimile der EG-Konformitätserklärung Die von der Firma Mase für die Länder der europäischen Gemeinschaft hergestellten Elektroaggregate entsprechen den einschlägigen EWG-Richtlinien und sind mit einer EG-Konformitätserklärung versehen (Abb. B). 2.3 Kennzeichnung Das Typenschild für die Elektroaggregate trägt sämtliche Identifikationsdaten gemäß der gemäß den Vorgaben für die EG-Kennzeichnung, sofern vorgesehen. Es folgt ein Faksimile des Typenschildes, das auf jeder einzelnen Maschine angebracht ist (Abb. A). 1 - Maschinen 2 - Kennnummer 3 - Seriennummer 4 - Dauerleistung 5 - Nennfrequenz 6 - Leistungsfaktor 7 - Nennspannung 8 - Nennstrom 9 - Grad Schutz 10 - Klasse von Isolierung 11 - Temperatur max. 12 - Höhe max. 13 - Geräuschniveau 14 - Aufführungsklasse 15 - Baujahr 16 - Hersteller 17 - Gewicht 1 4 2 3 5 6 7 8 10 9 11 12 16 13 14 15 17 Abb.A D - 13 IS 10 T 50 Hz NR.000000 mase GENERATORS S.p.A. Tel. +39 (0) 547 354311 Fax +39 (0) 547 317555 D DICHIARAZIONE CE DI CONFORMITÀ EC DECLARATION OF CONFORMITY Fabbricante/Manufacturer: mase GENERATORS S.p.A. Indirizzo /Address : Via Tortona 345, Pievesestina (FC) mase Il sottoscritto Luigi Foresti in qualità di direttore tecnico della GENERATORS S.p.A., dichiara sotto la propria responsabilità che il gruppo elettrogeno modello .................... : mase IL E The undersigned Luigi Foresti as GENERATORS S.p.A. technical manager declares, under his sole responsability, that the generator model................: Codice / Code Descrizione / Model S Matricola / Serial N. M I è conforme alle disposizioni delle Direttive di seguito elencate: 98/37 CE (come emendata delle Direttive 98/79 CE) 73/23 CEE modificata da CEE 93/68. 89/336 CEE direttiva sulla compatibilità elettromagnetica A F C corresponds to the requirements of the following EEC Directives: 98/37/EEC (as amended by the Directive 98/79/EEC ) 73/23/EEC as amended by 93/68/EEC. 89/336 EEC directive on the electromagnetic compatibility Cesena, / / Direttore Tecnico Technical Director mase GENERATORS S.p.A. Sede legale ed Amm.: 47023 CESENA (FC) ITALY - Via Tortona, 345 - C.F./P.I. 00687150409 Cap. Soc. milioni 2000 di cui 949 versati - Registro Società Tribunale Forlì n. 6818 - CCIAA Forlì n.164063 - c.c.p. n. 11541471 - EXPORT FO n. 006368 Fig.B D - 14 IS 10 T 50 Hz 3. BESCHREIBUNG DES GENERATORS 3.1 Allgemeines Die Elektroaggregate IS 19 sind für eine problemlose Installation auf Schiffen ausgelegt. Der schallschluckende Kasten mit Isolierplatten aus meerwasserbeständigem, lackiertem Aluminium ermöglicht einen leichten Zugriff zum Motor und zum Drehstromgenerator bei der Ausführung der Wartungsund Kontrollarbeiten und hat ein extrem hohes Schalldämpfungsvermögen. Der 4-Takt Dieselmotor mit direkter Einspritzung, Hersteller Yanmar, weist eine extrem robuste Bauweise auf und gewährleistet hohe Zuverlässigkeit; die Auspuffemission entspricht den CARB-Normen. Der Drehstromgenerator, synchron, 4-polig, ohne Bürsten, ist mit einem elektronischen Spannungsregler (SR7) versehen, der eine ±5%ige Stabilität zum Sollwert garantiert. Durch das hohe Anlaufvermögen des Drehstromgenerators eignet sich das Elektroaggregat vortrefflich zur Stromversorgung der Elektromotoren von Klimaanlagen, Entsalzungsanlagen, Verdichtern usw. Das Elektroaggregat ist mit einer Steuertafel (Abb. 3 Bez. 4) ausgestattet, auf der die Bedienungsvorrichtungen und Kontrollinstrumente vereint sind. 3.2 Kühlsystem Die Kühlung des Elektroaggregatmotors erfolgt durch den Umlauf von Kühlflüssigkeit in einem geschlossenen Kreis, in dem ein Wärmeaustauscher für die Wärmeableitung in das Meerwasser sorgt (Abb. 3 Bez. 20). Dieser Wärmeaustauscher aus Kupfernickel wurde eigens von mase für den Einsatz in Meeresumgebung entwickelt. Die Luft im schallschluckenden Kasten und jene zur Kühlung des Drehstromgenerators wird von einem zweiten Wärmeaustauscher gekühlt. Bei der Installation ist unbedingt eine Meerwasserzufuhrleitung für die Kühlung und eine Ableitung ins Freie der Verbrennungsgase und des verbrauchten Kühlwassers herzustellen. - Kontrolleuchte BATT (Abb. 4, Bez. 9), rot, meldet im Leuchtzustand, daß das Batterieladegerät defekt ist. - Kontrolleuchte OIL (Abb. 4, Bez. 7), rot, meldet im Leuchtzustand, daß der Motoröldruck unzureichend ist. - Kontrolleuchte °C, rot, meldet im Leuchtzustand, daß die Kühlflüssigkeit oder das in den Wärmeaustauschern zirkulierende Wasser zu warm ist. - Kontrolleuchte °C, rot, meldet im Leuchtzustand, daß die Wicklung des Drehstromgenerators unzulässig hohe Temperaturwerte erreicht haben. D Auf der Steuertafel sind zudem installiert: - Ein dreipolig Magnet-Thermoschalter (Abb. 4, Bez. 2), der bei Überlastung oder Kurzschluß die Stromzufuhr unterbricht. - Ein Thermoschalter (Abb. 4, Bez. 3), der die Niederspannungsanlage vor Kurzschluß schützt. - Ein Stundenzählwerk (Abb. 4, Bez. 1). - Eine Start/Stoptaste des Elektroaggregats (Abb. 4, Bez. 5). Das Elektroaggregat kann über eine Anschlußbuchse mit dem entfernt aufgestellten Startpult verbunden werden, das von mase als Sonderausstattung geliefert wird und eventuell auch in der Steuertafel integriert werden kann. Das Fernstartpult ist in zwei verschiedenen Modellen erhältlich (Abb. 5). In der einfacheren Version hat es eine Start/Stoptaste (Abb. 5, Bez. 1) und eine grüne Kontrolleuchte (Abb. 5, Bez. 2), die im Leuchtzustand die erfolgte Einschaltung meldet. Bei der anderen Version des Fernstartpults (Abb. 5, Bez. 3) ist außer der Start/Stopptaste eine Motoröldruckanzeige (Abb. 5, Bez. 4) und eine Kühlflüssigkeitstemperaturanzeige (Abb. 5, Bez. 5) vorhanden. Bei angeschlossenem Fernstartpult kann das Elektroaggregat nicht über das Steuerpult am Aggregat gestartet werden. Vor der Ausführung sämtlicher Wartungsarbeiten am Elektroaggregat ist der negative Pol der Startbatterie abzuschließen, um ein versehentliches Starten zu vermeiden. 4. VERWENDUNG DES GENERATORS 3.3 Steuertafel Das Elektroaggregat ist mit einer Steuertafel versehen, die zur Bedienung und zum Starten bzw. Stoppen dient. Das Elektroaggregat ist durch ein eigenes Modul (Abb. 4 Bez. 5) gesichert, das den Motor bei Auftreten von Störungen, die von einer Kontrolleuchte angezeigt werden, stoppt. - Kontrolleuchte RUN (Abb. 4, Bez. 6), grün, meldet im Leuchtzustand, daß das Elektroaggregat störungsfrei in Betrieb steht. 4.1 Überprüfungen vor der Inbetriebnahme Vor dem erstmaligen Starten des Elektroaggregats und nach der Ausführung der Wartungsarbeiten gilt als gute Regel, stets die folgenden Überprüfungen vorzunehmen: - Ölstand mit dem Ölstab (Abb. 7, Bez. 2), vgl. hierzu Tabelle A der empfohlenen Ölsorten (Abb. 8). - Feste Verankerung an den Befestigungsstellen. - Sämtliche Stromverbraucher müssen ausgeschaltet sein, damit das Aggregat nicht unter Last gestartet wird. D - 15 IS 10 T 50 Hz D - Einwandfreier Anschluß der Wasser- und Kraftstoffleitungen. - Korrekte Ausführung der elektrischen Anschlüsse und deren einwandfreier Zustand. - Der Wasserhahn muß aufgedreht sein (Abb. 6, Bez. 2). - Die Strecke des Wasserkreises von der Pumpe zu den Ventilen, sofern in der Meerwasseraufuhrleitung ein Rückschlagventil montiert ist (wie in der Montageanleitung empfohlen), muß von Hand befüllt worden sein (Abb. 4, Bez. 1). 4.2 Entlüftung des Versorgungssystems Luftblasen im Versorgungssystem verursachen, daß der Motor Betriebsstörungen aufweist oder die Solldrehzahl nicht erreicht. Luftdurchbruch im Versorgungssystem kann auf eine undichte Verbindung (Rohre, Filter, Tank) oder auf den Mindeststand des Kraftstoffes im Tank zurückzuführen sein. Das Versorgungssystem ist so ausgelegt, daß die in den Kreis eingedrungenen Luftblasen automatisch beseitigt werden. Die Entluftung erforgt durch Einschalten der Kraftstoffpumpe einige Minuten vor Anlassen des Motors. Die Kraftstoffpumpe wird durch kurzes Betätigen der START-Taste eingeschaltet. Sollte der Motor auch nach der Entlüftung noch nicht korrekt funktionieren, ist ein Techniker zur Überprüfung des Versorgungssystems zu Hilfe zu ziehen. 4.3 Starten Vor Starten des Elektroaggregats sicherstellen, daß sämtliche im Abs. 3.1 beschriebenen Überprüfungen ausgeführt wurden. An dieser Stelle wird das Aggregat über die START-Taste auf der Steuertafel (Abb. 4, Bez. 4) gestartet. Die Taste erst nach Anspringen des Motors freigeben und bei etwaiger Wiederholung eines Startversuches nie länger als 15 Sek. betätigen, wobei ein neuer Startversuch erst nach mindestens 30 Sek. vorgenommen werden darf. Es leuchten dabei alle Meldeleuchten des Motorschutzmoduls (Abb. 4, Bez. 5) auf und sofern keine Motor- oder Generatorstörungen vorliegen, bleibt nur die grüne Kontrolleuchte RUN (Abb. 4, Bez. 6) im Leuchtzustand, die das erfolgte Starten und den einwandfreien Betrieb des Aggregats anzeigt. 4.4 Stoppen des Elektroaggregats Zum Anhalten des Aggregats wird einfach die Taste OFF auf der Steuertafel betätigt. Es empfiehlt sich, das Elektroaggregat vor dem Anhalten einige Minuten ohne Stromentnahme laufen zu lassen, damit Motor und Drehstromgenerator abkühlen. 5. SICHERHEITSVORRICHTUNGEN Die Elektroaggregate IS8 und IS9.5 sind mit einer Reihe von Sicherheiten ausgestattet, die bei ordnungswidriger Verwendung und bei Betriebsstörungen eingreifen. Bei Ansprechen einer Sicherheit stoppt das Elektroaggregat und die Störung wird durch die zugeordnete Meldeleuchte am Motorschutzmodul (Abb. 5, Bez. 5) der Steuertafel angezeigt. 5.1 Sicherheit niedriger Öldruck Diese Sicherheit spricht unter Stoppen des Aggregats bei unzureichendem Öldruck an. Anzeige durch Leuchtzustand der Kontrolleuchte OIL (Abb. 4, Bez. 7). Normalerweise startet das Aggregat, wenn das Öl bis zum vorgeschriebenen Stand nachgefüllt wird. Der Ölstand in der Ölwanne des Motors wird bei Ansprechen dieser Sicherheit nicht angezeigt. Es ist daher wichtig, daß der Ölfüllstand täglich überprüft wird. Der einwandfreie Motorbetrieb setzt voraus, daß der Motor für weniger als 3 Minuten die max. Neigung von 30° nicht überschreitet; 25° ohne Zeitbeschränkung auf der Längs- und Querachse. Im Falle, daß der Motor mit größeren Neigungen arbeitet, besteht die Gefahr einer mangelhaften Schmierung oder Absaugung durch den Schmieröl-Luftfilter. 5.2 Sicherheit hohe Wassertemperatur Wiederholte und erfolglose Startversuche können eine übermäßige Wasseransammlung im Ablaßsystem verursachen und somit schwere Motorschäden bewirken. Bei hartnäckiger Startunwilligkeit des Motors ist vor dem Fortsetzen der Startversuche der Meerwasserhahn (Abb. 6, Bez. 2) zu schließen. D - 16 Diese Sicherheit spricht unter Stoppen des Aggregats an, wenn die Temperatur der Kühlflüssigkeit des Motors zu hoch ist oder das Meerwasser nicht um Umlauf steht. Ansprechen der Sicherheit wird durch den Leuchtzustand der Kontrolleuchte °C (Abb. 4, Bez. 10) angezeigt. Das Elektroaggregat darf erst nach Beseitigung der Störungsursache gestartet werden. IS 10 T 50 Hz 5.3 Sicherheit Übertemperatur des Drehstromgenerators Diese Sicherheit spricht bei Überhitzung des Drehstromgenerators unter Stoppen des Aggregats an. Ansprechen der Sicherheit wird durch den Leuchtzustand der Kontrolleuchte °C (Abb. 4, Bez. 8) angezeigt. Das kann gestartet werden, nachdem die Temperatur der Generatorwicklungen auf die Normwerte abgesunken ist. Es empfiehlt sich auf jeden Fall, der Störung auf den Grund zu gehen. Bei Ansprechens einer der beschriebenen Sicherheiten ist nach Feststellung und Beseitigung der Störungsursache die Steuertafel über die Taste STOP rückzustellen, andernfalls bleibt das Signal gespeichert und verhindert den Motorstart. 5.4 Sicherheit gegen Kurzschluß und Überlastung Das Elektroaggregat ist gegen Kurzschluß und Überlastung geschützt. Ein dreipolig MagnetThermoschalter (Abb. 4, Bez. 2) unterbricht die Stromabgabe, wenn ein Kurzschluß vorliegt oder der abgegebene Strom über dem Sollwert liegt. 5.5 Sicherheit gegen Kurzschluß der elektrischen Niederspannungsanlage Bei Eintreten eines Kurzschlusses in der elektrischen NiederspannungsanlageunterbrichteinThermoschalter (Abb. 4, Bez. 3) den Stromkreis, wodurch das Elektroaggregat gestoppt wird. Sämtliche Meldeleuchten des Motorschutzmoduls befinden sich in diesem Fall im erloschenen Zustand und ein Wiederstart ist daher unmöglich. Bevor der Stromkreis durch Betätigen der Schaltertaste (Abb. 4, Bez. 3) rückgestellt wird, ist ein Fachelektriker zur Behebung des Kurzschlusses zu Hilfe zu ziehen. 6 WARTUNG Vor der Ausführung sämtlicher Wartungsarbeiten, die ausschließlich autorisiertem Personal vorbehalten sind, ist der Motor des Elektroaggregats nach entsprechender Abkühlung abzustellen. Vor jedem Eingriff am Elektroaggregat ist ein Pol der Startbatterie abzuschließen, um ein versehentliches Starten zu vermeiden. 6.1 Regelmäßige Wartung des Motors Die Zeitintervalle zur Ausführung der Wartungsarbeiten sind in der Tabelle B angegeben. Genauere Angaben finden Sie im Motorhandbuch, das vom Hersteller jedem Elektroaggregat beigepackt wird. D Den Füllstand des Motoröls anhand des Ölstabs (Ab. 7, Bez. 2) überprüfen. Das Öl muß stets zwischen die MAX.- und MIN.-Markierung des Ölstabs reichen (Abb. 7, Bez. 1). 6.2 Wechsel des Motoröls und des Ölfilters Das Motorgehäuse hat ein Fassungsvermögen (Inhalt) von 3.6 Liter. Das Motoröl wird durch die Füllöffnung (Abb. 3, Bez. 17) nachgefüllt. Zum Ölwechsel im Motorgehäuse wird nach Abdrehen der Füllschraube der Ölstab (Abb. 7, Bez. 2) entfernt und die Ölpumpe (Abb. 3, Bez. 12) eingeschaltet. Hier sei darauf hingewiesen, daß heißes Öl flüssiger ist und daher noch in diesem Zustand ausgepumpt werden sollte. Die empfohlenen Ölsorten sind in der Tab. A, Abb. 8, angegeben. Das Öl ist erstmalig nach 50 Betriebsstunden des Elektroaggregats zu wechseln. Danach alle 200 Betriebsstunden. Genauere Angaben über die Motorschmierung können in der Bedienungs- und Wartungsanleitung, die dem Motor beigefügt ist, nachgeschlagen werden. Aböle oder Kraftstoff sind stets normgerecht zu entsorgen, indem sie den zuständigen Entsorgungsstellen ausgeliefert werden. Es ist unbedingt zu vermeiden, daß das Motoröl mit der Haut in Berührung kommt. Während der Wartungsarbeiten sind daher stets Arbeitshandschuhe und Schutzbrillen zu tragen. Bei versehentlichem Kontakt die betroffene Stelle unverzüglich mit Wasser und Seife gründlich waschen. Der Motorölfiltereinsatz (Abb. 3, Bez. ?) wird für den Austausch vom eigenen Halter unter Verwendung handelsüblicher Werkzeuge abgedreht. Bei Anbringen des neuen Filtereinsatzes darf nicht vergessen werden, D - 17 IS 10 T 50 Hz D den Gummidichtring zu schmieren. Das Öl ist erstmalig nach 50 Betriebsstunden des Elektroaggregats zu wechseln. Danach alle 400 Betriebsstunden. Genauere Angaben können in der Bedienungs- und Wartungsanleitung, die dem Motor beigefügt ist, nachgeschlagen werden. Zur Gewährleistung eines einwandfreien Motorbetriebs dürfen ausschließlich OriginalErsatzteile verwendet werden. Nach Beendung der Arbeiten sind die dabei durch Öl und Kraftstoff verschmutzten Teile des Elektroaggregats gründlich zu säubern. 5.3 Reinigung des Luftfilters Die Elektroaggregate der Serie IS sind mit einem Trockenluftfilter ausgestattet, der verhindert, daß Fremdkörper in die Verbrennungskammer gelangen. Damit er stets funktionstüchtig ist, genügt es, einmal jährlich, die Filtriermasse unter Verwendung von Dieselöl zu säubern. Die verwendeten Reinigungsflüssigkeiten sind an die zuständigen Entsorgungsstellen auszuliefern. Vor der Ausführung sämtlicher Wartungsarbeiten, die ausschließlich autorisiertem Personal vorbehalten sind, ist der Motor des Elektroaggregats nach entsprechender Abkühlung abzustellen. Vor der Ausführung sämtlicher Wartungsarbeiten am Elektroaggregat ist der negative Pol der Startbatterie abzuschließen, um ein versehentliches Starten des Aggregats zu vermeiden. 6.4 Austausch des Kraftstoffilters Zur Gewährleistung einer langen Nutzdauer und einwandfreien Funktion des Motors, ist es von ausschlaggebender Wichtigkeit, daß der Kraftstoffilter regelmäßig, in den vom Hersteller vorgegebenen Zeitintervallen, die in der Tabelle Abs. 5.12 angegeben sind, ausgewechselt wird. Hierzu werden die folgenden Arbeitsschritte vorgenommen: D - 18 - Das Kraftstoffventil schließen (Abb. 3, Bez. 24). - Die Nutmutter des Lagers (Abb. 3, Bez. 13) vollständig abdrehen. - Den Filtereinsatz durch einen neuen austauschen. - Zur Wiedermontage die beschriebenen Arbeitsgänge in umgekehrter Folge ausführen. Nach erfolgtem Austausch die Versorgungsanlage wie im Abs. 3.2 beschrieben entlüften. Es ist unbedingt zu vermeiden, daß der Kraftstoff mit der Haut in Berührung kommt. Während der Wartungsarbeiten sind daher stets Arbeitshandschuhe und Schutzbrillen zu tragen. Bei versehentlichem Kontakt die betroffene Stelle unverzüglich mit Wasser und Seife gründlich waschen. Nach Beendung der Arbeiten sämtliche Kraftstoffspuren sorgfältig wegputzen und die verwendeten Lappen an die zuständigen Entsorgungsstellen ausliefern. 5.5 Überprüfung der Kühlflüssigkeit Die im geschlossenen Kühlkreis im Umlauf stehende Kühlflüssigkeit ist regelmäßig auf ordnungsgemäßen Füllstand zu überprüfen. Hierzu sind auf dem Expansionsgefäß (Abb. 3, Bez. 11) die entsprechenden Markierungen eingeschlagen. Die Kühlflüssigkeit, wenn nötig, nachfüllen und achtgeben, daß sie nicht über die Max.-Markierung reicht. Den Verschluß des Expansionsgefäßes (ab. 3, Bez. 11) und des Tanks (Abb. 3, Bez. 20) nie bei warmgelaufenem Motor abschrauben, um ein gefährliches Austreten der Kühlflüssigkeit zu vermeiden. 5.6 Überprüfung der Keilriemenspannung Die Keilriemen sorgen für die Übertragung der Drehbewegung von der Motorwellen-Riemenscheibe an die Meerwasserpumpe (Abb. 9, Bez. 1). Die Riemen werden durch eine zu starke Spannung rascher abgenützt, während bei zu schwacher Spannung die Riemenscheiben leer drehen, was einen unzureichenden Wasserumlauf zur Folge hat. Die Spannung der Riemen wird folgendermaßen geregelt: Die beiden Regulierungsschrauben (Abb. 9, Bez. 2) lösen und für eine stärkere Spannung die Meerwasserpumpe nach außen verschieben, und umgekehrt zum Lockern der Spannung. Die Spannung ist regelrecht, wenn der Riemen unter einer IS 10 T 50 Hz Druckkraft von 8 KG etwa 5 mm durchhängt (Abb. 9). Ein zweiter Riemen überträgt die Drehbewegung von der Motorwellen-Riemenscheibe an die Pumpe der im geschlossenen Kreis zirkulierenden Flüssigkeit und an den Batterielade-DC-Drehstromgenerator (Abb. 9, Bez. 3). Die Spannung dieses Riemens wird folgendermaßen geregelt: Die Regulierungsschraube (Abb. 9, Bez. 4) lösen und für eine stärkere Spannung den Generator nach außen verschieben, und umgekehrt zum Lockern der Spannung. Die Schrauben festspannen und Spannung kontrollieren. Die Spannung ist regelrecht, wenn der Riemen unter einer Druckkraft von 8 KG etwa 10 mm durchhängt (Abb. 9). Ein durch Öl verschmierter Riemen dreht durch und muß daher stets sauber sein. Nötigenfalls mit Benzin reinigen. Bei laufendem Motor nie die Hände der Keilriemenscheibe oder den Riemenscheiben nähern. 6.7 Entleerung der Kühlanlage Vor der Ausführung der Wartungsarbeiten am Wasser/ Luft-Wärmeaustauscher oder an der Kühlanlage ist stets der Meerwasser-Saugkreis zu entleeren. Dies wir auf folgende Weise vorgenommen: - Das Meerwasseranschlußventil (Abb. 6, Bez. 2) schließen. - Das Ablaßventil (Abb. 6, Bez. 3) öffnen und das Wasser vollständig ausfließen lassen. - Das Ablaßventil schließen. Die abgelassene Kühlflüssigkeit ist stets normgerecht zu entsorgen, indem sie den zuständigen Entsorgungsstellen ausgeliefert wird. D 6.9 Austausch der Zinkanoden Um den Wasser/Luft-Wärmeaustauscher (Abb. 11, Bez. 1) und den Wasser/Kühlflüssigkeit-Wärmeaustauscher (Abb. 11, Bez. 2) vor galvanischem Strom zu schützen, sind in diesen Austauschern zwei Zinkanoden integriert (Abb. 11, Bez. 4). Diese Anoden sind regelmäßig auf Abnützungserscheinungen zu überprüfen und nötigenfalls auszuwechseln, um unbehebbare Korrosionsschäden der Wärmeaustauscher zu vermeiden. In einem neuen Aggregat sind diese Zinke wenigstens einmal im Monat auf ihren Abnützungsgrad zu überprüfen und folglich in erfahrungsgemäß festgestellten Zeitabständen. Die Zinkanoden sollten auf jeden Fall jährlich ausgewechselt werden. In Abb. 11 sind die Anbringungsstellen der Zinkanoden gezeigt. 6.10 Wartung der Meerwasserpumpe Das Gummilaufrad der Meerwasserpumpe (Abb. 12, Bez. 1) ist wenigstens einmal im Jahr auf einwandfreien Zustand zu überprüfen. Bevor die Pumpe für die Kontrolle des Laufrades geöffnet wird, muß das Meerwasser aus der Kühlanlage ausgelassen werden, vgl. hierzu Abs. 5.7. Den Deckel (Abb. 12, Bez. 2) abnehmen und mithilfe von zwei Zangen das Laufrad herausziehen. Für die Montage des neuen Laufrades die beschriebenen Arbeitsgänge in umgekehrter Folge ausführen. 6.11 Wartung des Drehstromgenerators Vor Starten des Elektroaggregats ist das Meerwasseranschlußventil wieder zu öffnen. 5.8 Auswechseln der Kühlflüssigkeit Die Kühlflüssigkeit im geschlossenen Kreis ist jährlich zu wechseln. Ein Gummischlauchstück (Abb. 10, Bez. 2) mit einer Länge von 20 - 30 cm an das Ablaßventil (Abb. 10, Bez. 1), das am Motorblock angebracht ist, anschließen, damit die abfließende Kühlflüssigkeit in einen Sammelbehälter (Abb. 10, Bez. 3) geleitet wird. Das Ventil öffnen und bis zur vollständigen Entleerung des Kühlkreises offen lassen. Danach das Ablaßventil schließen und den Kühlkreis mit einer frischen Kühlflüssigkeit befüllen. Der für dieses Generatormodell verwendete Drehstromgenerator ist synchron, mit Selbsterregung und elektronischer Spannungsregelung. Dieser Drehstromgenerator bedarf durch die Abwesenheit von Kollektor und Bürsten keiner besonderen Wartung. Die Überprüfungen und regelmäßigen Wartungseingriffe sind auf die Beseitigung der Spuren schädlicher Feuchtigkeit und Oxydation beschränkt. 6.12 Wartung der Batterie Zum Starten sämtlicher Elektroaggregate ist bei Raumtemperaturen über 0°C eine 80 A/h-Batterie empfohlen und eine 100 A/h-Batterie für Minustemperaturen. Eine neue Batterie ist vor dem Einbau einem kompletten Ladezyklus zu unterziehen. Die Batterieflüssigkeit (Elektrolyt) wenigstens einmal im Monat auf vorschriftsmäßigen Füllstand überprüfen und D - 19 IS 10 T 50 Hz D nötigenfalls mit destilliertem Wasser auffüllen. Bei längeren Stillstandzeiten ist die Batterie abzuschließen und in einem trockenen Raum bei einer Temperatur von über 10°C zu lagern und einmal im Monat einem kompletten Ladezyklus zu unterziehen. Die Batterie darf nie über lange Zeit ungeladen bleiben, da sie dadurch endgültig beschädigt würde. Auf die positive Batterieklemme Fett oder Vaselin auftragen, um sie vor Oxydation zu schützen. Zum Auffüllen der Schwefelsäure sind unbedingt verwendungsfertige Lösungen zu benutzen. Beim Auffüllen der Batterieflüssigkeit durch destilliertes Wasser oder Säure sind unbedingt Gummihandschuhe und Schutzbrillen zu tragen, um Haut- bzw. Augenschäden durch einen versehentlichen Kontakt mit der Schwefelsäure zu vermeiden. Sollte dies dennoch passieren, ist die betroffene Stelle unverzüglich mit Wasser und Seife gründlich zu waschen und ein Arzt zu rufen. Vor dem Aufladen der Batterie den Elektrolytstand kontrollieren und, sofern nötig, nach erfolgter Ladung mit destilliertem Wasser auffüllen. 6.13 Stillstandzeiten Das Elektroaggregat wenigstens einmal im Monat anlassen. Soll das Elektroaggregat eine längere Zeit außer Betrieb stehen, sind die folgenden Arbeitsschritte vorzunehmen: - Das Motoröl wechseln. - Den Ölfiltereinsatz austauschen (vgl. hierzu Abs. 5.2). - Den Kraftstoffiltereinsatz austauschen (vgl. hierzu Abs. 5.4). - Die Einspritzventile entfernen und in jeden Zylinder 2 Kubikzentimeter Motoröl füllen und den Motor unter Handbetätigung der Motorwellenriemenscheibe einige Umdrehungen ausführen lassen. Die Einspritzventile wieder montieren. - Die Pastillen aus Zink austauschen (vgl. hierzu Abs. 5.9). - Durch das Rohr für den Meerwassereinlaß eine Frostschutzflüssigkeit ansaugen, damit die Wärmeaustauscher nicht einfrieren und das Laufrad der Meerwasserpumpe sowie die Metallteile im Inneren der Kühlanlage schmieren. D - 20 - Die Startbatterie abschließen und in einem trockenen Raum abstellen (vgl. hierzu Abs. 5.12). - Das Rohr für den Meerwasserausfluß vom Motorkrümmer abtrennen. - Den Meerwasserfilter reinigen. - Das Meerwasserventil schließen. - Den Auspuff vom Meerwasser entleeren. - Das Antisiphonventil (siphon break), sofern installiert, reinigen und schmieren. 5.14 Übersichtstabelle der geplanten Wartung ARBEIT ZEITINTERVALL IN STUNDEN Überprüfung Motorölstand .................................... 10 Überprüfung Kühlflüssigkeitsstand ........................ 10 Überprüfung auf Öllecks ....................................... 20 Überprüfung auf Kraftstofflecks ............................. 20 Überprüfung auf Flüssigkeitslecks ........................ 20 Regulierung der Keilriemenspannung ................... 100 Überprüfung der Batterieladung ........................... 100 Reinigung des Kraftstoffilters ............................... 200 Regulierung der Riemenspannung ....................... 200 * Motorölwechsel ................................................. 200 ÜberprüfungdesMeerwasserpumpenlaufrades ......... 400 Überprüfung der Motordrehzahl ............................ 400 Überprüfung der elektr. Anschlüsse ..................... 400 Austausch des Kraftstoffilters .............................. 400 * Austausch des Ölfilters ..................................... 400 Überprüfung der Einspritzventile .......................... 400 Überprüfung der Einspritzsteuerzeiten ................. 400 Spielausgleich Ein-/Auslaßventil ......................... 400 Überprüfung der Kraftstoffpumpe ........................ 1000 Überprüfung des Batterieflüssigkeitsstandes .. monatlich Reinigung und Schmierung der Metallteile .... jährlich Reinigung des Luftfilters ................................ jährlich Vollständiger Wechsel der Kühlflüssigkeit .... jährlich Austausch der Zinkanoden ............................ jährlich * Den ersten Eingriff nach 50 Betriebsstunden und darauffolgend in den geplanten Zeitabständen ausführen TAB "B" IS 10 T 50 Hz 6.15 Problemfälle D Der Anlassermotor läuft, der Hauptmotor springt aber nicht an. - Kraftstoffstand im Tank überprüfen und ggf. nachfüllen. - Überprüfen, ob der Stopp-Solenoid gezogen ist (mit einem Service-Zentrum Rücksprache nehmen). - Den Versorgungskreis entlüften, bis der Kraftstoff blasenfrei austritt (vgl. hierzu Abs. 3.2). Das Motorschutzmodul wird bei Betätigen der Starttaste nicht aktiviert. - Überprüfen, ob der Thermoschalterkontakt (Abb. 4, Bez. 3) offen ist und den Kontakt über die rote Taste (Abb. 4, Bez. 3) rückstellen. - Anschlußkabel und Anschlußklemmen der Batterie, sowie die elektr. Anschlüsse überprüfen. - Die Batterie auf einwandfreien Zustand überprüfen (aufladen oder austauschen). Das Elektroaggregat schaltet sich während des Betriebs aus. - Überprüfen, ob eine Sicherheitsvorrichtung unter Aufleuchten der dazugehörigen Kontrolleuchte angesprochen hat (die Störungsursache beseitigen und erneut starten). - Kraftstoffstand im Tank überprüfen (ggf. nachfüllen). Motorauspuff raucht stark - Sich vergewissern, daß der Ölstand in der Ölwanne nicht über die Max.-Markierung reicht (auf den richtigen Füllstand bringen). - Sicherstellen, daß das Aggregat nicht überlastet ist. - Einstellung der Einspritzventile überprüfen (mit einem Service-Zentrum Rücksprache nehmen). Ordnungswidriger Motorbetrieb - Kraftstoffilter überprüfen (auswechseln). - Den Versorgungskreis entlüften, bis der Kraftstoff blasenfrei austritt (vgl. hierzu Abs. 3.2) Spannung des Drehstromgenerators zu niedrig - Den Spannungswert über den elektronischen Regler korrigieren. - Motordrehzahl kontrollieren (1560 UpM ohne angeschlossene Verbraucher) - Spannungsregler defekt (ersetzen). Startbatterie entladen - Elektrolytstand in der Batterie kontrollieren (auffüllen). - DC-Drehstromgenerator auf Funktionstüchtigkeit überprüfen. - Batterien auf einwandfreien Zustand überprüfen. Elektroaggregat gibt keine Spannung ab - Überprüfen, ob der Magnet-Thermoschalter (Abb. 4, Bez. 2) auf ON steht, wenn nicht, mit einem ServiceZentrum Rücksprache nehmen. D - 21 IS 10 T 50 Hz 7 TECHNISCHE EIGENSCHAFTEN D Model Typ Zylinderanzahl Material Zylinderblock Bohrung Hub Hubraum Leistung 50 / 60 Hz Motordrehungen 50 / 60 Hz Verdichtungsverhältnis Verbrennungssystem Material Zylinderkopf Regler Schmiersystem Inhalt Ölbehälter Motorstoppsystem Versorgungspumpe Max. Kraftstoffhub (cm) Kraftstoffverbrauch (l/h) Erforderte Luftmenge (l/min.) Startbatterie (Ah-V) Ladegerät (Ah-V) Anlassermotor (kW-V) Max. Neigung Typ Einstellung Kühlung Spannung Frequenz Max. Leistung Dauerleistung Leistungsfaktor Isolierklasse Spannungsstabilität Frequenzstabilität D - 22 ,67 50 Hz Yanmar 3TNE78A 4-Takt-Dieselmotor 3 Gußeisen 78 84 1204 13,5 1500 18:1 direkte Einspritzung Gußeisen zentrifugal, mechanisch Zwangsschmierung 5,2 Solenoid elektrisch 70 2,9 730 70 - 12 40 - 12 1,2 - 12 30° 50 Hz synchron, 4-polig, mit Selbsterregung, elektronisch Luft-/Wasserkühlung (Intercooler W/A) 400 50 7,8 - 97,5 7,2 - 9 1 - 0,8 H ±2% ±5% IS 10 T 50 Hz Anhaltspunkte für den Stromschaltplan (Abb 9) 1 2 3 4 5 6 7 8 9 10 11 12 13 14 15 16 17 18 19 20 21 22 23 24 25 26 27 D Magnet-Thermoschalter Stundenzählwerk Drehstromgenerator Stator Erregungselement Elektronischer Spannungsregler Thermoschalter Motorschutzmodul START/STOP Taste Kraftstoffstandanzeige Öldruckanzeige Wassertemperaturanzeige Kraftstoffpumpe Sensor hohe Wassertemperatur Sensor hohe Kühlflüssigkeitstemperatur Öldruckwächter DC-Drehstromgenerator Stopp-Solenoid Anlassermotor Batterieanschlußklemmen Öldruckanzeige Kühlflüssigkeitstemperaturanzeige START/STOPP Taste Anschlußkabel Fernsteuerpult Verbinder für Anschluß des Fernsteuerpults Fernsteuerpult Fernsteuerpult D - 23 I IS 10 T 50 Hz TABLE DES MATIERES LE NON-RESPECT DES DIRECTIVES REPRISES DANS CE MANUEL D'INSTALLATION ENTRAINE LA DECHEANCE DE LA GARANTIE SUR LE PRODUIT F 1 1.1 1.2 1.3 1.4 1.3 2 2.1 2.2 2.3 3 3.1 3.2 3.3 4 4.1 4.2 4.3 4.4 5 5.1 5.2 5.3 5.4 5.5 F - 10 INFORMATIONS GENERALES .................... 11 Objectif de cette notice ................................ Beiliegende Unterlagen ................................ Identifizierung der Maschine ........................ Tableau des instruments ............................. Consignes de sécurité ................................. 11 12 12 12 12 INFORMACION GENERAL ........................... 13 Documentación de referencia ....................... 13 Facsímil de la declaración CE de conformidad . 13 Marca .......................................................... 13 DESCRIPTION DU GENERATEUR ............... 15 Généralités .................................................. 15 Système de refroidissement ........................ 15 Tableau de commande ................................ 15 UTILISATION DU GENERATEUR ................. 16 Contrôles préliminaires ................................ Désaération du circuit dalimentation ........... Démarrage ................................................... Arrêt du groupe ............................................ 16 16 16 16 PROTECTIONS ............................................ 16 Protection basse pression dhuile ................ Protection haute température de leau ......... Protection échauffement alternateur ............. Protection contre les courts-circuits ............ et les surcharges ......................................... Protection contre les courts-circuits sur le ... circuit électrique à basse tension. ............... 16 17 17 17 17 17 17 6 6.1 6.2 6.3 6.4 6.5 6.6 6.7 6.8 6.9 6.10 6.11 6.12 6.13 6.14 6.15 7 ENTRETIEN ................................................. 17 Entretien courant du moteur ........................ Vidange de lhuile moteur et remplacement du filtre à huile ............................................. Nettoyage du filtre à air ................................ Remplacement du filtre carburant ................ Contrôle du liquide réfrigérant....................... Contrôle de la tension des courroies trapézoïdales ................................ Vidange du circuit de refroidissement .......... Vidange du liquide réfrigérant ....................... Remplacement des anodes de zinc ............. Entretien de la pompe deau de mer ............ Entretien de lalternateur .............................. Entretien de la batterie ................................ Périodes dinactivé ....................................... Tableau récapitulatif des .............................. interventions programmées .......................... Tableau des pannes .................................... 17 17 18 18 18 18 19 19 19 19 19 19 20 20 20 21 CARACTERISTIQUES TECHNIQUES ........... 22 IS 10 T 50 Hz 1. INFORMATIONS GENERALES Lire attentivement cette notice avant deffectuer toute intervention sur la machine. 1.1 Objectif de cette notice Nous vous remercions davoir choisi un produit MASE. Cette notice a été conçue par le Constructeur et fait partie intégrante du groupe électrogène. Elle doit être conservée minutieusement, protégée contre lhumidité et contre tout agent pouvant la détériorer. Elle doit toujours accompagner le groupe, si ce dernier est cédé à un autre utilisateur ou à un nouveau propriétaire. Les informations, contenues dans cette notice, sont réservées à toutes les personnes qui utilisent le groupe électrogène, durant son cycle de vie, et cette dernière est utile et nécessaire pour informer les personnes qui effectueront matériellement les différentes activités, ainsi que pour les personnes qui devront coordonner les activités, prévoir la logistique nécessaire et en régler les accès à lendroit où il sera installé. La notice définit lobjectif pour lequel la machine a été fabriquée et contient toutes les informations nécessaires permettant den assurer une utilisation exacte et en toute sécurité. Le respect permanent, des indications fournies dans cette dernière, garantit la sécurité de louvrier, léconomie dexercice et une plus longue durée de vie de la machine. Pour faciliter la consultation, elle a été divisée en chapitres qui en identifient les concepts principaux. Pour une consultation rapide des arguments voir la table des matières figurant à la page 33. F Symboles Les parties du texte à ne pas négliger sont écrites en gras et sont précédées de symboles qui sont définis et illustrés ci-après. Indique quil faut faire attention afin de ne pas provoquer une série de conséquences qui pourraient entraîner la mort de personnes ou de possibles troubles de santé. Situation qui pourrait se produire pendant la durée de vie dun produit, système ou installation considéré dangereux en matière de dommages pour les personnes, la propriété, lenvironnement ou des pertes économiques. Indique quil faut faire attention, afin de ne pas risquer une série de conséquences qui pourraient détériorer les biens matériels comme les ressources ou le produit. Indications particulièrement importantes. Les figures sont fournies à titre dexemple. Même si la machine que vous possédez est sensiblement différente des illustrations se trouvant dans cette notice, la sécurité et les informations concernant cette dernière sont garanties. Le fabricant, dans une recherche continuelle de développement et de réactualisation du produit, peut à tout moment et sans préavis effectuer des modifications. F - 11 IS 10 T 50 Hz F 1.2 Beiliegende Unterlagen 1.4 Tableau des instruments Der vorliegenden Bedienungsanleitung werden die folgenden Unterlagen beigeschlossen: Légende FIG. 4 - Konformitätserklärung CEE (Abb. 1) Bedienungs- und Wartungsanleitung des Motors Service-Heft Garantiebescheinigung Garantiekarte 1.3 Identifizierung der Maschine Siehe ABB. 2 1 - Maschinencode 2 - Baujahr 3 - Leistungsfaktor 4 - Erklärte Frequenz 5 - Dauerleistung 6 - Sollspannung 7 - Elektr. Strom 8 - Gewicht 9 - Leistungsklasse 10 - Seriennummer Bei sämtlichen Rücksprachen mit dem Hersteller zur Einholung technischer Informationen, sowie bei Ersatzteilbestellungen sind stets der Maschinencode, die Kennummer und das Baujahr anzugeben. Siehe ABB. 3 1 - Schallschluckender Kasten 2 - Obere Tür 3 - Seitliche Tür 4 - Instrumententafel 5 - Verankerungsbügel 6 - Rauch- und Kühlwasserablaßstutzen 7 - Anschlußstutzen für Meerwasser 8 - Anschlußstutzen Kraftstofftank 9 - Batterie-Anschlußklemmen 10 - Motorluftfilter 11 - Expansionsgefäß Kühlflüssigkeit 12 - Motorölpumpe 13 - Dieselöl-Filtereinsätze 14 - Meerwasserpumpe 15 - Kraftstoffpumpe 16 - Ölfiltereinsatz 17 - Ölfüllschraube 18 - Stromanschlußdose 19 - Drehstromgenerator 20 - Kühlflüssigkeitsbehälter 21 - Wasser/Luft Wärmeaustauscher 22 - Auspuffkrümmer 23 - Anlasser 1. 2. 3. 4. 5. 6. 7. 8. 9. Compteur horaire Interrupteur magnétique et thermique Interrupteur thermique courant continu (cc) Bouton START / STOP Module protection moteur Voyant lumineux «RUN» moteur démarré Voyant lumineux «OIL» basse pression de lhuile Voyant lumineux «°C» haute température du moteur Voyant lumineux «BATT.» fonctionnement du chargeur batterie 10. Voyant lumineux «°C» haute température alternateur 11. Bougies (pas présentes) 12. Sortie carburant (version «RINA») 1.3 Consignes de sécurité Lire attentivement toutes les informations se trouvant dans cette notice et dans la notice dinstallation: elles sont essentielles pour une bonne installation, lutilisation du groupeélectrogèneetpourêtreàmêmedintervenirrapidement en cas de besoins. Le constructeur décline toute responsabilité pour des dommages à des personnes ou à des choses, découlant du non-respect des consignes de sécurité. Examiner attentivement les plaques signalétiques de sécurité appliquées sur la machine et respecter les indications quelles contiennent - Interdire lutilisation du groupe à des personnes incompétentes ou nayant pas une formation appropriée. - Empêcher les enfants et les animaux de sapprocher du groupe électrogène en fonction. - Ne pas accéder au générateur ou au tableau des commandes avec les mains mouillées, car il y a des risques potentielles délectrocution en cas de mauvaise utilisation. - Tout contrôle sur le groupe électrogène doit être effectué avec le moteur arrêté. Les contrôles avec le groupe électrogène qui fonctionne ne doivent être effectués que par un personnel spécialisé. - Ne pas aspirer les fumées de combustion parce quelles contiennent des substances nocives pour la santé. - Utiliser le groupe électrogène avec les portes daccès fermées. - Ne jamais toucher, avec les mains, la carcasse du moteur ou de lalternateur lorsque le groupe électrogène fonctionne ou sil est encore chaud. En cas de fuites dhuiles ou de carburant effectuer un nettoyage minutieux, afin déviter tout risque dincendie. En cas dincendie ne pas utiliser deau pour éteindre le feu, mais des extincteurs. En cas de problème ou pour tout éclaircissement, veuillez contacter le SERVICE mase. F - 12 IS 10 T 50 Hz 2. INFORMACION GENERAL El grupo electrógeno ha sido proyectado, fabricado y probado para satisfacer las normativas Europeas y nacionales vigentes y reducir al mínimo los riesgos eléctricos respetando las normas: CEE 73/23 directiva sobre la baja tensión CEE 89/392 directiva máquinas F 2.1 Documentación de referencia Las Instrucciones para el uso suministradas con cada grupo electrógeno están constituidas por un conjunto de documentos, de los cuales el presente manual representa la Parte General. Normalmente se entrega la siguiente documentación: a b c d e f g Declaración CEE de Conformidad. Manual de Instrucciones para el uso y el mantenimiento de los Grupos Electrógenos (el presente manual). Manual de Uso y Mantenimiento del Motor. Manual de uso y mantenimiento del alternador (en el caso de alternadores que no fabrique mase). Lista de los Centros de Asistencia Mase. Certificato de garantía Mase. Cupón de garantía. 2.2 Facsímil de la declaración CE de conformidad Los grupos electrógenos fabricados por la firma MASE y destinados a los países de la Comunidad Europea son conformes a las directivas CEE aplicables y cuentan con una Declaración CE de Conformidad (Fig. B). 2.3 Marca La placa preparada para los grupos electrógenos contiene todos los datos de identificación en conformidad con la base a los requisitos para la Marca CE, en los casos en que se prevé. A continuación se ilustra el facsímil de la placa de identificación que se encuentra en todas las máquinas (Fig. A). 1 2 3 4 5 6 7 8 9 10 11 12 13 14 15 16 17 - Nom machine - Code machine - Numéro de série - Puissance continue - Fréquence déclarée - Facteur de puissance - Tension nominale - Courant nominale - Degré de protection - Classe d'isolement - Température max. jouissance - Altitude max. jouissance - Je nivelle bruit - Classes de performance - Année de construction - Constructeur - Adresse - Je pends 1 4 2 3 5 6 7 8 10 9 11 12 16 13 14 15 17 Fig.A F - 13 IS 10 T 50 Hz NR.000000 mase GENERATORS S.p.A. Tel. +39 (0) 547 354311 Fax +39 (0) 547 317555 F DICHIARAZIONE CE DI CONFORMITÀ EC DECLARATION OF CONFORMITY Fabbricante/Manufacturer: mase GENERATORS S.p.A. Indirizzo /Address : Via Tortona 345, Pievesestina (FC) mase Il sottoscritto Luigi Foresti in qualità di direttore tecnico della GENERATORS S.p.A., dichiara sotto la propria responsabilità che il gruppo elettrogeno modello .................... : mase IL E The undersigned Luigi Foresti as GENERATORS S.p.A. technical manager declares, under his sole responsability, that the generator model................: Codice / Code Descrizione / Model S Matricola / Serial N. M I è conforme alle disposizioni delle Direttive di seguito elencate: 98/37 CE (come emendata delle Direttive 98/79 CE) 73/23 CEE modificata da CEE 93/68. 89/336 CEE direttiva sulla compatibilità elettromagnetica A F C corresponds to the requirements of the following EEC Directives: 98/37/EEC (as amended by the Directive 98/79/EEC ) 73/23/EEC as amended by 93/68/EEC. 89/336 EEC directive on the electromagnetic compatibility Cesena, / / Direttore Tecnico Technical Director mase GENERATORS S.p.A. Sede legale ed Amm.: 47023 CESENA (FC) ITALY - Via Tortona, 345 - C.F./P.I. 00687150409 Cap. Soc. milioni 2000 di cui 949 versati - Registro Società Tribunale Forlì n. 6818 - CCIAA Forlì n.164063 - c.c.p. n. 11541471 - EXPORT FO n. 006368 Fig.B F - 14 IS 10 T 50 Hz 3. DESCRIPTION DU GENERATEUR 3.1 Généralités Les groupes électrogènes IS 19 ont été conçus pour être installés facilement à bord de bateaux. La caisse insonorisante, obtenue avec des panneaux isolés en aluminium marin peint, permet un accès aisé au moteur et à lalternateur pour les interventions dentretien, de contrôle et permet en même temps une importante réduction du niveau sonore. Le moteur diesel, 4 temps, à injection directe, construit par Yanmar, est extrêmement fiable et robuste. Les émissions à léchappement sont conformes aux normes CARB. Lalternateur, de type synchrone, 4 pôles, sans balais, est équipé dun régulateur électronique de tension (SR7) qui en garantit la stabilité à ±5% par rapport à la valeur nominale. Limportante capacité de démarrage de lalternateur rend le groupe électrogène particulièrement adapté pour lalimentation de moteurs électriques de climatiseur, de dessaleurs, de compresseurs, etc. Le groupe électrogène est équipé dun tableau de commande local [fig.3 - réf.4] sur lequel sont installés les commandes et les instruments de contrôle. 3.2 Système de refroidissement Le moteur du groupe électrogène est refroidi par circulation, dans un circuit fermé, dun liquide réfrigérant qui chauffe leau de mer grâce à un échangeur thermique [fig.3 - réf.20]. Cet échangeur, construit en cupronickel, a été conçu spécialement par mase pour le traitement marin du moteur. Un deuxième échangeur thermique refroidit lair à lintérieur de la caisse dinsonorisation et lair nécessaire à la ventilation de lalternateur. Lors de linstallation il faut prévoir un circuit dadduction deau de mer pour le refroidissement et un système déchappement pour convoyer à lextérieur les gaz de la combustion et évacuer leau utilisée pour le refroidissement. - Voyant lumineux «°C» rouge signale, sil est allumé, que la température du liquide de refroidissement ou de leau circulant dans les échangeurs thermiques est trop élevée. - Voyant lumineux «°C» rouge signale, sil est allumé, que les bobinages de lalternateur atteignent des températures trop élevées. Sur le tableau de commande on trouve également: - un interrupteur magnétique et thermique tripolaire [fig.4 réf.2] qui coupe le courant en cas de surcharge et de courtcircuit; - un interrupteur thermique [fig.4 - réf.3] protégeant linstallation électrique en basse tension contre les courtscircuits; - un compteur horaire [fig.4 - réf.1]; - un bouton pour le démarrage et larrêt du groupe électrogène [fig.4 - réf.5]. F Le groupe électrogène est prévu pour être raccordé, à laide dun connecteur, au boîtier de démarrage à distance qui est fourni en option par mase et pouvant être éventuellement installé sur le tableau de commande. Deux différents modèles de boîtier de démarrage à distance sont disponibles, comme indiqué sur la fig. 5. La version la plus simple possède le bouton pour le démarrage et larrêt [fig.5 - réf.1], un voyant lumineux vert [fig.5 - réf.2] qui, sil est allumé, indique que le groupe fonctionne. La deuxième version boîtier de commande à distance [fig.5 - réf.3] prévoit, en plus du bouton de démarrage et darrêt, un instrument indiquant la pression de lhuile moteur [fig.5 - réf.4], un instrument indiquant la température du liquide de refroidissement [fig.5 - réf.5]. Avec le boîtier de démarrage à distance raccordé il nest pas possible deffectuer le démarrage du groupe électrogène à partir du tableau local. Lorsquon effectue des interventions dentretien sur le groupe électrogène, il faut déconnecter le pôle négatif de la batterie de démarrage, afin déviter des démarrages accidentels. 3.3 Tableau de commande Le groupe électrogène est équipé dun tableau de commande permettant les contrôles et les démarrages et arrêts. Un module de protection du moteur [fig.4 - réf.5] gère les protections du groupe électrogène en arrêtant le moteur en cas de panne et en signalant, à laide de voyants lumineux, lanomalie détectée. - Voyant lumineux «RUN» [fig.4 - réf.6] vert signale, sil est allumé, que le groupe est en fonction et quaucune anomalie de fonctionnement na été détectée. - Voyant lumineux «BATT.» [fig.4 - réf.9] rouge signale, sil est allumé, que lalternateur chargeur batterie est en panne. - Voyant lumineux «OIL» [fig.4 - réf.7] rouge signale, sil est allumé, que la pression de lhuile moteur est insuffisante. F - 15 IS 10 T 50 Hz 4. UTILISATION DU GENERATEUR 4.1 Contrôles préliminaires F Lors du premier démarrage du groupe électrogène, et après avoir effectué des interventions dentretien, il faut toujours sassurer: - que lhuile est à niveau, à laide de la jauge [fig.7 - réf.2], voir tableau «A» huiles conseillées [fig.8]; - que tous les points dancrage du groupe sont serrés comme il se doit; - que tous les équipements électriques sont débranchés, afin déviter que le groupe ne démarre sous charge; - que les lignes deau et de carburant sont correctement raccordées; - que tous les branchements électriques ont été effectués correctement et quil ny a pas de connexions en mauvais état; - que le robinet de leau est ouvert [fig.6 - réf.2]; - que le trajet du circuit deau de la pompe à la vanne, a été rempli manuellement, si un clapet de non-retour est monté sur la prise de mer (comme cela est conseillé sur la notice dinstallation) [fig.4 - réf.]. 4.2 Désaération du circuit dalimentation La présence de bulles dair, dans le circuit dalimentation, entraîne un fonctionnement irrégulier du moteur ou limpossibilité darriver au nombre nominal de tours. Lair peut entrer, dans le circuit dalimentation, par un joint nétant pas parfaitement étanche (tuyau, filtres, réservoir) ou lorsque le carburant, dans le réservoir, est au niveau minimum. Le système dalimentation est conçu de manière à éliminer, en toute autonomie, les bulles dair entrées dans le circuit. La purge automatique seffectue en actionnant la pompe carburant pendant quelques minutes avant de faire tourner le moteur. On actionne la pompe carburant en appuyant un instant sur le bouton START. Si après cette opération le moteur fonctionne encore de manière irrégulière, il faut contacter un technicien pour un contrôle minutieux du circuit dalimentation. 4.3 Démarrage Avant de faire démarrer le groupe il faut sassurer que les contrôles préliminaires, décrits au paragraphe 3.1, ont été effectués. Ensuite, faire démarrer en appuyant sur le bouton START, situé sur le tableau de commande [fig.4 - réf.4] et le relâcher uniquement après le démarrage en faisant attention à ne pas dépasser 15 secondes pour chaque essai et en respectant une pause dau moins 30 secondes. A ce moment tous les voyants lumineux de signalisation, du module de protection moteur, sallument pendant quelques secondes [fig.4 - réf.5] et sil ny a aucune anomalie sur le moteur ou sur le générateur, seul le voyant lumineux vert «RUN» reste allumé [fig.4 - réf.6] pour indiquer que le groupe est démarré et quil fonctionne régulièrement. F - 16 Plusieurs tentatives de démarrage ayant échoué, peuvent entraîner une accumulation excessive deau dans le circuit dévacuation et cela peut provoquer de graves problèmes au moteur. Par conséquent, si lon a des problèmes pour faire démarrer le moteur il ne faut surtout pas insister trop longtemps, sans avoir dabord fermé le robinet de la prise deau de mer [fig.6 - réf.2]. 3.4 Arrêt du groupe Le groupe sarrête lorsquon appuie sur le bouton «OFF se trouvant sur le tableau des commandes. Avant darrêter le groupe électrogène, il est conseillé de le faire fonctionner, pendant quelques minutes, sans tirer de courant électrique, afin de permettre le refroidissement du moteur et de lalternateur. 5 PROTECTIONS Les groupes électrogènes IS 8, IS 9.5 sont équipés dune série de protections qui protège contre toute mauvaise utilisation et contre des dysfonctionnements. Lorsque le groupe électrogène sarrête à cause de lintervention dune protection, sur le module des protections moteur [fig.5 - réf.5] du tableau des commandes, le voyant lumineux sallume pour signaler le problème qui sest produit. 5.1 Protection basse pression dhuile Cette protection intervient en arrêtant le groupe lorsque la pression de lhuile moteur est insuffisante; son intervention est signalée par léclairage du voyant lumineux «OIL» [fig.4 - réf.7]. En général il suffit de rétablir le niveau dhuile pour faire redémarrer le groupe. Laprotectionbassepressiondhuile ne fournit pas une indication quant au niveau de lhuile moteur dans le carter. Un contrôle journalier de ce niveau est donc indispensable. Le moteur fonctionne correctement sil ne dépasse pas une inclinaison maximale de 30° pendant des périodes inférieures à 3 minutes; 25° sans limites de temps, tant sur laxe longitudinal que sur laxe transversal.Silemoteurfonctionneavecdesinclinaisons supérieures, il risque dy avoir une lubrification insuffisante ou une aspiration depuis le filtre à air de lhuile lubrifiante. IS 10 T 50 Hz 5.2 Protection haute température de leau Cette protection intervient en arrêtant le groupe électrogène lorsque la température du liquide réfrigérant du moteur est trop élevée ou en cas dabsence de circulation de leau de mer. Lintervention de la protection est signalée par léclairage du voyant lumineux «°C» [fig.4 - réf.10]. Le groupe électrogène ne doit être remis en marche quaprès avoir déterminé et éliminé la cause de lanomalie. 5.3 Protection échauffement alternateur Cette protection intervient en arrêtant le groupe électrogène lorsquil y a une surcharge thermique sur lalternateur. Lintervention de la protection est signalée par léclairage du voyant lumineux «°C» [fig.4 - réf.8]. Le groupe électrogène peut repartir après quelques minutes, lorsque la température des bobinages de lalternateur est redevenue normale. Il est conseillé de rechercher et déliminer les causes ayant provoqué lintervention. En cas dintervention de lune des protections, indiquées ci-dessus, après avoir déterminé et éliminé la cause de lintervention, il faut appuyer sur le bouton «STOP» pour la réinitialisation du tableau de commande (sinon le signal reste mémorisé et interdit le redémarrage du moteur). 5.4 Protection contre les courts-circuits et les surcharges Le groupe électrogène est protégé contre les courtscircuits et les surcharges électriques. Un interrupteur magnétique et thermique tripolaire [fig.4- réf.2] coupe le courant électrique lorsquun court-circuit se produit ou lorsque le courant électrique distribué dépasse la valeur nominale. Avant de rétablir le contact, en soulevant la manette de linterrupteur magnétique et thermique, il faut débrancher les utilisations. 5.5 Protection contre les courts-circuits sur le circuit électrique à basse tension. En cas de courts-circuits, sur le circuit électrique à basse tension, un interrupteur thermique [fig.4 - réf.3] bloque le circuit en arrêtant le groupe électrogène. Dans ce cas les voyants lumineux de signalisation du module des protections du moteur sont éteints et il est impossible deffectuer un redémarrage. Avant de rétablir le courant sur le circuit électrique, en appuyant sur le bouton situé sur linterrupteur thermique [fig.4 - réf.3], il faut quun technicien spécialisé, recherche et élimine la cause du court-circuit. 6 ENTRETIEN Toute intervention dentretien, sur le groupe électrogène, doit être effectuée avec le moteur arrêté, après lavoir laissé suffisamment refroidir et ne doit être exécutée que par un personnel autorisé. F Avant daccéder au groupe électrogène, il faut déconnecter un pôle de la batterie de démarrage, afin déviter tout démarrage accidentel. 6.1 Entretien courant du moteur Les interventions périodiques à effectuer sur le moteur sont indiquées sur le TAB. «B». Pour de plus amples informations, voir la notice fournie par le constructeur du moteur qui accompagne chaque groupe électrogène. Contrôler le niveau de lhuile du moteur à laide de la jauge, prévue à cet effet [fig.7 - réf.2]. Le niveau doit toujours être compris entre les encoches MAX et MIN indiquées sur la jauge [fig.7 réf.1]. 6.2 Vidange de lhuile moteur et remplacement du filtre à huile La capacité du carter moteur est de 3,6 litres. Les remises à niveau et les remplissages de lhuile moteur doivent être effectués par le trou de remplissage [fig.3 - réf.17]. Pour la vidange de lhuile dans le carter moteur, il faut enlever la jauge de niveau [fig.7 - réf.2] et agir sur la pompe de vidange prévue à cet effet [fig.3 - réf.12] après avoir déposé la vis servant de bouchon. Il est conseillé deffectuer la vidange lorsque lhuile est encore suffisamment chaude, de manière à en faciliter lécoulement. Pour les huiles conseillées, voir le tableau «A», fig. 8. La première vidange de lhuile moteur doit être effectuée après 50 heures de service du groupe électrogène. Pour la deuxième et les suivantes une vidange toutes les 200 heures suffit. Pour de plus amples informations, quant à la lubrification du moteur, voir la notice dutilisation et dentretien du moteur fournie avec le groupe électrogène. F - 17 IS 10 T 50 Hz Ne pas jeter lhuile usagée ou le F carburant dans la nature, car se sont des produits polluants. Remettre lhuile lubrifiante usagée à des Centres Spécialisés dans la Récupération de ce genre de produits. Lhuile ne doit pas être en contact avec la peau. Pendant les opérations dentretien, utiliser des gants et des lunettes de protection. En cas de contact avec lhuile lubrifiante, laver immédiatement et minutieusement lemplacement touché avec de leau et du savon. Pour remplacer la cartouche du filtre de lhuile moteur [fig.3 - réf. ?] il faut la dévisser du support spécial, à laide doutils appropriés se trouvant dans le commerce. Replacer la nouvelle cartouche en ayant soin de lubrifier les joints en caoutchouc à rondelle. Le premier remplacement doit être effectué après 50 heures de fonctionnement du groupe électrogène, pour le deuxième et les suivants respecter un intervalle de 400 h. Pour de plus amples informations voir la notice dutilisation et dentretien du moteur. Pour la sécurité du moteur nutiliser que des pièces détachées dorigine. Après ces opérations, nettoyer minutieusement toutes les pièces du groupe électrogène salies par de lhuile et du carburant. 6.3 Nettoyage du filtre à air Les groupes électrogènes de la série IS possèdent un filtre à air à sec qui empêche lentrée de corps étrangers dans la chambre de combustion. Pour son entretien il suffit de nettoyer la masse filtrante une fois par an à laide de gasoil, afin déliminer toutes les impuretés pouvant sy trouver. Ne pas jeter dans la nature les liquides utilisés pour le lavage du filtre à air, mais les remettre à des Centres Spécialisés de Récupération de ce genre de produit. Toute intervention dentretien sur le groupe électrogène doit être effectuée avec le moteur arrêté, après lavoir laissé suffisamment refroidir, et ne doit être exécutée que par un personnel autorisé. Avant daccéder au groupe électrogène, il faut déconnecter un pôle de la batterie de démarrage, afin déviter tout démarrage accidentel du groupe. F - 18 6.4 Remplacement du filtre carburant Pour garantir une longue durée et un bon fonctionnement du moteur, il est extrêmement important de remplacer périodiquement la cartouche du filtre carburant, en respectant les temps indiqués par le constructeur du moteur et figurant sur le tableau du paragraphe 5.12. Cette opération seffectue en procédant comme suit: - fermer le robinet du carburant [fig.3 - réf.24]; - dévisser complètement le collier du support [fig.3 réf.13]; - enlever la vieille cartouche et placer la nouvelle; - pour le remontage répéter les mêmes opérations dans le sens inverse. Après avoir effectué le remplacement il faut désaérer le circuit dalimentation en effectuant les opérations décrites au paragraphe 3.2. Le carburant ne doit pas être en contact avec la peau. Pendant les opérations dentretien il faut utiliser des gants et des lunettes de protection. En cas de contact avec le carburant, laver immédiatement et minutieusement la partie concernée avec de leau et du savon. Après cette opération nettoyer minutieusement toutes les traces de carburant et remettre les chiffons utilisés pour cela aux Centres Spécialisé dans la récupération de ce genre de produit. 6.5 Contrôle du liquide réfrigérant Il faut contrôler périodiquement le niveau du liquide réfrigérant du circuit fermé de refroidissement. Les repères de référence, pour ce contrôle, sont marqués sur le vase dexpansion [fig.3 - réf.11]. Si le niveau est insuffisant, remettre du liquide réfrigérant à lintérieur du vase dexpansion, en faisant attention à ne pas dépasser le repère du niveau maximum. Ne jamais ouvrir le bouchon de fermeture du vase dexpansion [fig.3 - réf.11] et du réservoir [fig.3 - réf.20] lorsque le moteur est chaud, afin déviter tout risque de débordement du liquide réfrigérant. 6.6 Contrôle de la tension des courroies trapézoïdales Une courroie trapézoïdale est utilisée pour transmettre le mouvement de rotation de la poulie de larbre moteur à la poulie de la pompe deau de mer [fig.9 - réf.1]. Une tension excessive, de la courroie, en accélère lusure, tandis quun relâchement de la courroie fait tourner à vide les poulies et ne permet pas une circulation suffisante deau. IS 10 T 50 Hz Régler la tension de la courroie comme suit: desserrer les deux vis de réglage [fig.9 - réf.2] et déplacer la pompe deau de mer vers lextérieur pour augmenter la tension, ou vers lintérieur pour la diminuer. Bloquer les vis et en contrôler la tension. Une bonne tension de la courroie est celle qui permet, sous un effort de poussée de 8 kg, un fléchissement denviron 5 mm [fig.9]. Une deuxième courroie est utilisée pour transmettre le mouvement de rotation de la poulie de larbre moteur à la poulie de la pompe du liquide à circuit fermé et de lalternateur à courant continue (CC) chargeur batterie [fig.9 - réf.3]. Régler la tension de la courroie comme suit: desserrer la vis de réglage [fig.9 - réf.4] et déplacer lalternateur à courant continu (CC) chargeur batterie [fig.9 - réf.5] vers lextérieur pour augmenter la tension et vers lintérieur pour la diminuer. La bonne tension de la courroie est celle qui permet, sous un effort de poussée de 8 kg, un fléchissement denviron 10 mm [fig.9]. Pour éviter que la courroie ne tourne à vide, ne pas la salir avec de lhuile. Nettoyer la courroie avec de lessence si elle est sale dhuile, lors du contrôle. Ne pas approcher les mains de la courroie trapézoïdale ou des poulies lorsque le moteur tourne. 6.7 Vidange du circuit de refroidissement Pour lentretien sur léchangeur eau-air ou sur le circuit de refroidissement, il faut vidanger le circuit daspiration de leau de mer. Cette opération seffectue en procédant comme suit: - fermer le robinet de prise deau de mer [fig.6 - réf.2]; - ouvrir le robinet de vidange [fig.6 - réf.3] de manière à vidanger complètement leau; - refermer le robinet de vidange. Ouvrir de nouveau le robinet de prise deau de mer avant de faire redémarrer le groupe électrogène. 6.8 Vidange du liquide réfrigérant Tous les ans il faut vidanger le liquide réfrigérant à lintérieur du circuit fermé de refroidissement. Raccorder un morceau de tuyau en caoutchouc [fig.10 - réf.2], ayant une longueur de 20 - 30 cm, au robinet de vidange [fig.10 - réf.1], situé sur le socle du moteur, pour faciliter la récupération du liquide réfrigérant usagé dans un récipient de récupération [fig.10 - réf.3]. Ouvrir le robinet et vidanger complètement le circuit fermé de refroidissement. Après cette opération, refermer le robinet et remplir de nouveau le circuit avec du nouveau liquide réfrigérant. Ne pas jeter dans la nature le liquide réfrigérant usagé, car cest un produit polluant. Le remettre à des Centres Spécialisés dans la Récupération de ce genre de produit. F 6.9 Remplacement des anodes de zinc Pour protéger léchangeur thermique eau-air [fig.11 réf.1] et léchangeur thermique eau-liquide [fig.11 - réf.12] contre des courants galvaniques, on a installé, à lintérieur de ces derniers, deux anodes sacrificielles en zinc [fig.11 - réf.4]. Il faut en contrôler périodiquement létat dusure et, le cas échéant, les remplacer afin déviter que les courants galvaniques corrodent irrémédiablement léchangeur. Il est conseillé de contrôler les anodes au moins une fois par mois, lorsque le groupe est neuf, pour en vérifier la vitesse de consommation et par la suite se régler en conséquence. De toutes les manières, il est préférable de remplacer les anodes en zinc au moins une fois par an. Sur la fig. 11 on peut voir les points où sont placées les anodes en zinc. 6.10 Entretien de la pompe deau de mer Il faut, au moins une fois par an, contrôler le bon état de la turbine en caoutchouc de la pompe deau de mer [fig.12 - réf.1] . Avant douvrir la pompe deau de mer, pour inspecter la turbine, il faut vidanger le circuit de refroidissement de leau de mer comme indiqué au paragraphe 5.7. Pour accéder à la turbine il faut enlever le couvercle de fermeture [fig.12 - réf.2] et à laide dune paire de pinces extraire la turbine en la tournant très fort vers lextérieur. Pour le remontage dune nouvelle turbine répéter les mêmes opérations mais dans le sens inverse. 6.11 Entretien de lalternateur Lalternateur utilisé sur ce modèle de générateur est de type synchrone, à excitation automatique, avec un réglage électronique de la tension. Ce modèle dalternateur, sans collecteur ni balais, na besoin daucune opération particulière dentretien. Les contrôles et les entretiens périodiques se limitent à éliminer déventuelles traces dhumidité et doxydation qui pourraient le détériorer. 6.12 Entretien de la batterie Il est conseillé dutiliser, pour le démarrage de tous les modèles de groupe électrogène, une batterie de 80A/h. F - 19 IS 10 T 50 Hz F pour des températures ambiantes supérieures à 0°C et de 100 A/h pour des températures inférieures. Avant dinstaller une nouvelle batterie il est important que cette dernière ait été soumise à un cycle complet de recharge. Contrôler, au moins une fois par mois, le niveau de lélectrolyte et, le cas échéant, remettre à niveau avec de leau distillée. Pendant une longue période dinutilisation du groupe électrogène il est conseillé de débrancher la batterie et de la remiser dans un endroit sec, à une température supérieure à 10°C, puis effectuer une fois par mois un cycle complet de recharge. Si la batterie est laissée pendant de longues périodes complètement déchargée, cela risque de la détériorer irrémédiablement. Il faut avoir soin de protéger, avec de la graisse de vaseline, la borne positive de la batterie, afin déviter toute corrosion et formation doxyde. Pour rétablir le niveau avec de lacide sulfurique il faut impérativement utiliser des solutions déjà préparées. Les opérations de remise à niveau des batteries, avec de leau distillée et ou avec de lacide, doivent être effectuées avec des gants en caoutchouc et des lunettes de protection, pour éviter tout contact accidentel dacide sulfurique avec la peau. En cas de contact accidentel, laver minutieusement la partie touchée avec de leau et du savon, puis voir un médecin. Avant de recharger les batteries, il faut contrôler le niveau de lélectrolyte et, le cas échéant, le rétablir avec de leau distillée. Cette opération doit être répétée une fois le cycle de recharge terminé. 6.13 Périodes dinactivé Faire démarrer le groupe électrogène au moins une fois par mois. Si le groupe électrogène doit être inutilisé pendant une longue période, il faut effectuer les opérations suivantes: - Vidanger lhuile du moteur. - Remplacer la cartouche du filtre à huile (voir par. 5.2). - Remplacer la cartouche du filtre du carburant (voir par. 5.4) - Déposer les injecteurs et mettre à lintérieur de chaque cylindre 2 cm³ dhuile moteur, puis faire tourner le moteur manuellement à laide de la poulie de larbre moteur. Remonter les injecteurs. - Remplacer les plaques en zinc (voir par. 5.9). - Faire aspirer, par le tuyau de prise deau de mer, du liquide antigel qui permet de protéger les échangeurs F - 20 - contre les basses températures et de lubrifier la turbine de la pompe deau de mer, ainsi que les parties métalliques dans le circuit de refroidissement. Débrancher la batterie de démarrage et la remiser dans un endroit sec (voir par. 5.12). Débrancher le tuyau de lévacuation à la mer du collecteur du moteur. Nettoyer le filtre deau de mer. Fermer le robinet de la prise deau de mer. Vider le pot de leau de mer. Nettoyer et lubrifier la soupape anti-siphon, si elle est installée (siphon break). 6.14 Tableau récapitulatif des interventions programmées OPERATION HEURES Contrôle niveau dhuile moteur ............................ 10 Contrôle niveau du liquide réfrigérant ................... 10 Contrôler quil ny a pas de fuites dhuile ............. 20 Contrôler quil ny a pas de fuites de carburant ... 20 Contrôler quil ny a pas de fuites de liquide ........ 20 Réglage de la tension de la courroie trapézoïdale 100 Vérification de la charge de la batterie ............... 100 Nettoyer le filtre carburant .................................. 200 Réglage de la tension des courroies .................. 200 * Vidange de lhuile moteur ................................200 Contrôler la turbine de la pompe deau de mer ... 400 Contrôler le nombre de tours du moteur ............. 400 Contrôler le bon état des branchements électriques 400 Remplacement du filtre carburant ...................... 400 * Remplacement du filtre à huile ........................ 400 Contrôler les injecteurs ......................................400 Contrôler le calage injection ............................... 400 Réglage du jeu de la soupape prise/évacuation ... 400 Contrôler la pompe dinjection carburant .............. 1000 Contrôle du niveau de lélectrolyte de la batterie ....................... tous les mois Nettoyer et désoxyder les pièces métalliques ............................ tous les ans Nettoyer le filtre à air ............................... tous les ans Vidange complète du liquide de refroidissement .................................. tous les ans Remplacement des anodes en zinc ......... tous les ans * Effectuer la première intervention après 50 heures, ensuite selon les intervalles prévus TAB "B" IS 10 T 50 Hz 5.15 Tableau des pannes Le démarreur tourne mais le moteur principal ne démarre pas. - Vérifier sil y a du carburant dans le réservoir. (faire le plein). - Contrôler si lélectro-aimant de stop est en position rétractée. (Voir le Centre dAssistance) - Purger les bulles dair dans le circuit dalimentation (voir par. 3.2). Le groupe électrogène ne fournit pas de tension. - Contrôler que linterrupteur magnétique et thermique [fig.4 - réf.2] est sur la position «ON». Sans résultats positifs contacter le Centre dAssistance Autorisé. F Le module des protections moteur ne sactive pas lorsquon appuie sur le bouton START - Contrôler si linterrupteur thermique [fig.4 - réf.3] de protection est ouvert. (Rétablir le contact en appuyant sur le bouton rouge [fig.4 - réf.3]. - Contrôle les câbles et les bornes de raccordement à la batterie, ainsi que les connexions électriques. (Reconnecter). - Contrôler le bon état de la batterie. (Recharger ou remplacer) Le groupe électrogène séteint pendant la période de travail. - Vérifier si une protection a été activée avec léclairage du voyant lumineux correspondant (Eliminer la cause et essayer de redémarrer). - Contrôler sil y a du carburant dans le réservoir. (Rétablir le niveau) Le moteur fume beaucoup à léchappement - Contrôler que le niveau dhuile dans le carter ne dépasse pas le rep.ère MAX. (Rétablir le niveau). - Contrôler que le groupe nest pas en surcharge. - Contrôler létalonnage des injecteurs. (Contacter le Centre dAssistance). Le moteur fonctionne irrégulièrement - Contrôler les filtres du carburant. (Remplacer) - Purger les bulles dair se trouvant à lintérieur du circuit dalimentation (Voir par. 3.2). La tension de lalternateur est trop basse - Corriger la valeur de la tension en agissant sur le régulateur électronique. - Contrôler le nombre de tours du moteur (1560 RPM sans utilisations reliées). - Régulateur de tension en panne (remplacer). Batterie de démarrage déchargée. - Contrôler le niveau de lélectrolyte dans la batterie (Rétablir le niveau). - Contrôler le fonctionnement de lalternateur à courant continu (CC). - Contrôler le bon état de la batterie. F - 21 IS 10 T 50 Hz 7 CARACTERISTIQUES TECHNIQUES F Modèle Type Cylindres (n.) Matériaux bloc cylindres Alésage (mm) Course (mm) Cylindrée (cc) Puissance Tours/min. Rapport de compression Système d'injection Matériaux tête Régulateur de tours Système de lubrification Capacité carter huile (l) Système d'arrêt moteur Pompe alimentation carburant Hauteur d'élévation max. pompe carburant (cm) Consommation carburant à pleine charge (l/h) Volume d'air combustion (l/min) Batterie de démarrage (Ah-V) Chargeur batterie Démarreur (KW-V) Inclinaison max. d'utilisation Débit pompe eau de mer (l/min) Type Refroidissement Tension (V) Fréquence (Hz) Puissance max. (Kw - Kwa) Puissance continue (Kw - Kwa) Facteur de puissance (cos ø ) Classe d'isolation Stabilité de tension Stabilité de fréquence F - 22 ,67 50 Hz Yanmar 3TNE78A Diesel 4 temps 3 Fonte 78 84 1204 13,5 1500 18:1 Directe Fonte Centrifuge, mécanique Forcée 5,2 Solénoïde Electrique 70 2,9 730 70 - 12 40 - 12 1,2 - 12 30° 25 50 Hz Synchrone, 4 pôles, auto-excité Air / eau (Intercooler W/A) 400 50 7,8 - 9,75 7,2 - 9 1 H ±2% ±5% IS 10 T 50 Hz Références concernant le schéma électrique Pag. 9 1 2 3 4 5 6 7 8 9 10 11 12 13 14 15 16 17 18 19 20 21 22 23 24 - Interrupteur magnétique et thermique - Compteur horaire - Alternateur - Stator - Dispositif dexcitation - Régulateur électronique de tension - Interrupteur thermique - Module protection moteur - Bouton START/STOP - Indicateur de niveau carburant - Indicateur de pression dhuile - Indicateur température eau - Pompe carburant - Capteur haute température eau - Capteur haute température liquide réfrigérant - Pressostat huile - Alternateur à courant continu (CC) - Electro-aimant stop - Démarreur - Bornes de raccordement batterie - Instrument indicateur de pression dhuile - Instrument indicateur temp. liquide réfrigérant - Bouton START/STOP - Câble de raccordement au boîtier de commande à distance 25 - Connecteur pour raccordement au boîtier comm. à distance 26 - Boîtier de commande à distance 27 - Boîtier de commande à distance F F - 23 I IS 10 T 50 Hz ÍNDICE LA INOBSERVANCIA DE LAS ESPECIFICACIONES PRESENTES EN EL SIGUIENTE MANUAL DE USO Y MANUTENCION COMPORTA LA CADUCIDAD DE LA GARANTIA 1 E 1.1 1.2 1.3 1.4 1.5 2 2.1 2.2 2.3 3 3.1 3.2 3.3 4 4.1 4.2 4.3 4.4 5 5.1 5.2 5.3 5.4 5.5 6 6.1 6.2 6.3 6.4 6.5 6.6 INFORMACIÓN GENERAL ........................... 11 Finalidad del manual .................................... Documentación adjunta ............................... Identificación de la máquina ......................... Panel de mando .......................................... Normas de seguridad ................................... 11 12 12 12 12 INFORMACION GENERAL .......................... 12 Documentación de referencia ....................... 12 Facsímil de la declaración CE de conformidad12 Marca .......................................................... 12 DESCRIPCION DEL GENERADOR ............... 15 Información general ...................................... 15 Sistema de refrigeración .............................. 15 Panel de mando .......................................... 15 USO DEL GENERADOR ............................... 16 Controles preliminares ................................. Purga del circuito de alimentación ............... Arranque ...................................................... Parada del grupo ......................................... 16 16 16 16 DISPOSITIVOS DE PROTECCION .............. 16 Dispositivo de protección baja presión aceite 16 Dispositivo de protección alta temperatura agua 17 Dispositivo de protección recalentamiento alternador ........................... 17 Dispositivo de protección contra cort circuito y sobrecarga ................................... 17 Dispositivo de protección contra cortocircuitos de la instalación eléctrica en baja tensión ... 17 MANTENIMIENTO ........................................ 17 Mantenimiento ordinario del motor ............... 17 Cambio del aceite motor y del filtro de aceite 17 Limpieza del filtro de aire ............................. 18 Sustitución del filtro carburante .................... 18 Control del líquido refrigerante ...................... 19 Control de la tensión de las correas trapezoidales .................................. 19 6.7 Vaciado del circuito de refrigeración ............ 19 6.8 Sustitución del líquido refrigerante ............... 19 6.9 Sustitución ánodos de zinc ......................... 19 6.10 Mantenimiento de la bomba agua de mar .... 19 E - 10 6.11 6.12 6.13 6.14 Mantenimiento del alternador ....................... 20 Mantenimiento de la batería ......................... 20 Períodos de inactividad ................................ 20 Tabla sintética de las intervenciones programadas ....................... 205 6.15 Tabla de averías ........................................... 21 7 características técnicas .............................. 22 IS 10 T 50 Hz 1. INFORMACIÓN GENERAL Consulte detenidamente este manual antes de efectuar cualquier tipo de intervención sobre la máquina. 1.1 Finalidad del manual Gracias por haber elegido un producto MASE. Este manual ha sido redactado por el fabricante y forma parte integrante de todo el equipo del grupo electrógeno; tiene que ser conservado con cuidado, protegido de la humedad y de cualquier otro agente que pudiera deteriorarlo. Dicho manual tiene que acompañar al grupo electrógeno en caso que éste vaya a parar a otro usuario o a un nuevo propietario. Las informaciones que contiene este manual están dirigidas a todas las personas relacionadas con el ciclo de trabajo operativo del grupo electrógeno; es útil y necesario para informar tanto a quien efectúa materialmente las diversas actividades como a quien tiene que coordinar los trabajos, preparar la logística necesaria y regular los accesos al lugar donde será instalado. El manual define la finalidad para la que la máquina ha sido fabricada y contiene toda la información necesaria para garantizar un uso seguro y correcto. La constante observación de las indicaciones que contiene el manual garantiza la seguridad para el operador, la economía de utilización, y una mayor duración de la máquina en cuestión. Para facilitar su consulta ha sido dividido en secciones que identifican los conceptos principales: para poder consultar más rápidamente los temas consulte el índice (pág. 54). E Símbolos Las partes de texto que no hay que pasar por alto han sido destacadas en negrita y llevan delante los símbolos que se ilustran y definen a continuación: Indica que hay que prestar atención a fin de no incurrir en consecuencias serias que podrían provocar la muerte del personal o posibles daños a la salud. Situación que podría crearse durante el periodo de duración de un producto, sistema o instalación considerado peligroso en materia de daños a personas, propiedades, al ambiente o incluso de pérdidas económicas. Indica que hay que prestar atención a fin de no incurrir en serias consecuencias que podrían dañar los bienes materiales como los recursos o el producto. Indicaciones de particular importancia. Los dibujos se suministran a titulo indicativo. Aunque su máquina sea levemente diferente de las ilustraciones contenidas en este manual, están garantizadas de todas formas la seguridad y las informaciones sobre la misma. El fabricante, al adoptar una política de constante desarrollo y actualización del producto, puede aportar modificaciones sin previo aviso. E - 11 IS 10 T 50 Hz E 1.2 Documentación adjunta 1.4 Panel de mando El presente manual está compuesto por la siguiente documentación: Referencias FIG. 4 - Declaración de conformidad CEE (fig. 1) Manual de uso y mantenimiento del motor Libreta Servicio de Asistencia Certificado de Garantía Postal de garantía 1.3 Identificación de la máquina Referencias FIG. 2 1. Código máquina 2. Año de fabricación 3. Factor de potencia 4. Frecuencia declarada 5. Potencia continua 6. Tensión nominal 7. Corriente 8. Peso 9. Clase de prestación 10.Número de serie Los datos que identifican el número de código de la máquina, el número de matrícula y el año de fabricación deben ser comunicados siempre al fabricante cuando se solicita información o piezas de repuesto. Referencias FIG. 3 1. Caja de insonorización 2. Puerta de acceso posterior 3. Puerta de acceso lateral 4. Panel de mando 5. Estribos de anclaje 6. Boca de evacuación gases y agua de refrigeración 7. Boca de conexión toma agua de mar 8. Boca de conexión a tanque de combustible 9. Bornes de conexión a la batería 10.Filtro aire motor 11.Depósito de expansión líquido refrigerante 12.Bomba de extracción aceite motor 13.Cartucho filtro gasoil 14.Bomba agua de mar 15.Bomba carburante 16.Cartucho filtro aceite 17.Tapón de carga aceite 18.Caja de conexiones línea eléctrica 19.Alternador cargador de batería 20.Tanque líquido refrigerante 21.Intercambiador de calor agua/aire 22.Colector de evacuación 23.Motor de arranque E - 12 1. 2. 3. 4. 5. 6. 7. 8. 9. Cuentahoras Interruptor magnetotérmico Interruptor térmico corriente CC Pulsador START/STOP Módulo protección motor Luz testigo RUN (motor en marcha) Luz testigo OIL (baja presión aceite) Luz testigo ºC (alta temperatura motor) Luz testigo BATT (funcionamiento cargador de batería) 10. Luz testigo ºC (alta temperatura alternador) 11. Bujías (no presentes) 12. Pérdida de combustible (versión RINA) 1.5 Normas de seguridad Leer detenidamente toda la información incluida en el presente manual y en el de instalación; la misma es fundamental para una correcta instalación y uso del grupo electrógeno y para ser capaces de intervenir rápidamente en caso de necesidad. El fabricante declina cualquier responsabilidad por daños a personas o cosas causados por la inobservancia de las normas de seguridad. Observar atentamente las placas de señalización relativas a la seguridad aplicadas en la máquina y respetar las indicaciones de las mismas. - No permitir el uso del grupo a personas incompetentes o sin una instrucción adecuada. - No permitir el acercamiento de niños o animales al grupo electrógeno en funcionamiento. - No acceder al generador o al panel de mando con las manos mojadas, dado que el generador es una fuente potencial de choque eléctrico si es usado incorrectamente. - Los controles al grupo electrógeno deben ser efectuados con el motor apagado; los que se necesiten hacer con el motor encendido deben ser efectuados por personal especializado. - No aspirar los gases de combustión, dado que contienen sustancias nocivas para la salud. - Utilizar el grupo electrógeno con las puertas de acceso cerradas. - Nunca tocar con las manos el cuerpo del motor o del alternador cuando el grupo electrógeno se encuentre en funcionamiento o cuando aún esté caliente. Si se presentan pérdidas de aceite o de combustible, efectuar una buena limpieza para no crear condiciones de riesgo de incendio. En caso de incendio, para apagarlo no utilizar agua sino extintores. Si se presentase un problema o la necesidad de aclaraciones se ruega ponerse en contacto con el departamento ASISTENCIA de la firma Mase. IS 10 T 50 Hz 2. INFORMACION GENERAL El grupo electrógeno ha sido proyectado, fabricado y probado para satisfacer las normativas Europeas y nacionales vigentes y reducir al mínimo los riesgos eléctricos respetando las normas: CEE 73/23 directiva sobre la baja tensión CEE 89/392 directiva máquinas E 2.1 Documentación de referencia Las Instrucciones para el uso suministradas con cada grupo electrógeno están constituidas por un conjunto de documentos, de los cuales el presente manual representa la Parte General. Normalmente se entrega la siguiente documentación: a b c d e f g Declaración CEE de Conformidad. Manual de Instrucciones para el uso y el mantenimiento de los Grupos Electrógenos (el presente manual). Manual de Uso y Mantenimiento del Motor. Manual de uso y mantenimiento del alternador (en el caso de alternadores que no fabrique mase). Lista de los Centros de Asistencia Mase. Certificato de garantía Mase. Cupón de garantía. 2.2 Facsímil de la declaración CE de conformidad Los grupos electrógenos fabricados por la firma MASE y destinados a los países de la Comunidad Europea son conformes a las directivas CEE aplicables y cuentan con una Declaración CE de Conformidad (Fig. B). 2.3 Marca La placa preparada para los grupos electrógenos contiene todos los datos de identificación en conformidad con la base a los requisitos para la Marca CE, en los casos en que se prevé. A continuación se ilustra el facsímil de la placa de identificación que se encuentra en todas las máquinas (Fig. A). 1 2 3 4 5 6 7 8 9 10 11 12 13 14 15 16 17 - Fabricante - Dirección - Nombre maquina - Código maquina - Año de construcción - Factor de potencia - Frecuencia declarada - Potencia continua - Tensión nominal - Corriente nominal - Grado de protección - Clase de aislamiento - Temperatura max. empleo - Altitud max. empleo - Nivel rumorosidad - Peso - Clase de prestaciones - Número de serie 1 4 2 3 5 6 7 8 10 9 11 12 16 13 14 15 17 Fig.A E - 13 IS 10 T 50 Hz NR.000000 mase GENERATORS S.p.A. Tel. +39 (0) 547 354311 Fax +39 (0) 547 317555 DICHIARAZIONE CE DI CONFORMITÀ EC DECLARATION OF CONFORMITY E Fabbricante/Manufacturer: mase GENERATORS S.p.A. Indirizzo /Address : Via Tortona 345, Pievesestina (FC) mase Il sottoscritto Luigi Foresti in qualità di direttore tecnico della GENERATORS S.p.A., dichiara sotto la propria responsabilità che il gruppo elettrogeno modello .................... : mase IL E The undersigned Luigi Foresti as GENERATORS S.p.A. technical manager declares, under his sole responsability, that the generator model................: Codice / Code Descrizione / Model S Matricola / Serial N. M I è conforme alle disposizioni delle Direttive di seguito elencate: 98/37 CE (come emendata delle Direttive 98/79 CE) 73/23 CEE modificata da CEE 93/68. 89/336 CEE direttiva sulla compatibilità elettromagnetica A F C corresponds to the requirements of the following EEC Directives: 98/37/EEC (as amended by the Directive 98/79/EEC ) 73/23/EEC as amended by 93/68/EEC. 89/336 EEC directive on the electromagnetic compatibility Cesena, / / Direttore Tecnico Technical Director mase GENERATORS S.p.A. Sede legale ed Amm.: 47023 CESENA (FC) ITALY - Via Tortona, 345 - C.F./P.I. 00687150409 Cap. Soc. milioni 2000 di cui 949 versati - Registro Società Tribunale Forlì n. 6818 - CCIAA Forlì n.164063 - c.c.p. n. 11541471 - EXPORT FO n. 006368 Fig.B E - 14 IS 10 T 50 Hz 3 DESCRIPCION DEL GENERADOR 3.1 Información general Los grupos electrógenos IS 19 han sido proyectados para ser instalados fácilmente a bordo de embarcaciones. La caja de insonorización, fabricada con paneles aislantes de aluminio marino pintado, permite un fácil acceso al motor y al alternador para efectuar operaciones de mantenimiento y de control, y al mismo tiempo reduce eficazmente la intensidad acústica. El motor diesel de 4 tiempos e inyección directa fabricado por la firma Yanmar es sumamente seguro y robusto; las emisiones de escape son conformes a las normativas CARB. El alternador de tipo sincrónico, con 4 polos y sin cepillos, dispone de un regulador electrónico de tensión (SR7) que garantiza su estabilidad a ± 5% respecto del valor nominal. El gran poder de arranque del alternador hace que el grupo electrógeno sea ideal para la alimentación de motores eléctricos de acondicionadores, desaladores, compresores, etc. El grupo electrógeno dispone de un panel de mando local (fig.3 - ref. 4) en el cual se encuentran los mandos y la instrumentación de control. 2.2 Sistema de refrigeración El motor del grupo electrógeno es enfriado mediante un circuito cerrado de circulación, con líquido refrigerante que transmite calor al agua de mar por medio de un intercambiador de calor (fig. 3 ref. 20). Este intercambiador, fabricado con cuproníquel, ha sido diseñado por la firma Mase específicamente para la marinización del motor. Un segundo intercambiador de calor enfría el aire dentro de la caja de insonorización y el necesario para la ventilación del alternador. En el momento de la instalación es necesario preparar un circuito de aducción para el agua marina de refrigeración y un sistema de evacuación para conducir hacia el exterior los gases de combustión y el agua utilizada para el enfriamiento. - Luz testigo OIL (fig. 4 ref. 7) de color rojo: Cuando está encendida, señala que la presión del aceite motor es insuficiente. - Luz testigo ºC de color rojo: Cuando está encendida, señala que la temperatura del líquido refrigerante o del agua que circula por los intercambiadores de calor es demasiado alta. - Luz testigo ºC de color rojo: Cuando está encendida, señala que las bobinas del alternador han alcanzado una temperatura demasiado alta. E El panel de mando también contiene: - Un interruptor magnetotérmico tripolar (fig. 4 ref. 2) que interrumpe el suministro de corriente en caso de sobrecarga y cortocircuito - Un interruptor térmico (fig. 4 ref. 3) que protege la instalación eléctrica en baja tensión por cortocircuito - Un cuentahoras (fig. 4 ref. 1) - El pulsador de arranque y parada del grupo electrógeno (fig. 4 ref. 5) El grupo electrógeno está preparado para ser conectado, mediante un conector, al panel de control remoto, que Mase suministra como accesorio opcional y que se puede instalar eventualmente en la plancha de mando. Existen dos modelos diferentes de panel de control remoto, como ilustrado en la fig. 5. La versión más sencilla dispone del pulsador de arranque y parada (fig. 5 ref. 1) y una luz testigo de color verde (fig. 5 ref. 2) que cuando está encendida indica que el grupo está en funcionamiento. La segunda versión de panel de control remoto (fig. 5 ref. 3) contiene, además del pulsador de arranque y parada, un instrumento que indica el valor de la temperatura del líquido refrigerante (fig. 5 ref. 5). Cuando el panel de control remoto está conectado, ya no es posible efectuar la puesta en marcha del grupo electrógeno desde el panel de mando local. Cuando se efectúan operaciones de mantenimiento del grupo electrógeno, desconectar el polo negativo de la batería para evitar arranques accidentales. 2.3 Panel de mando El grupo electrógeno está dotado de un panel de mando para los controles y las operaciones de arranque y parada. Un módulo de protección motor (fig. 4 ref. 5) controla las protecciones del grupo electrógeno, parando el motor en caso de avería y señalando, por medio de la luz testigo correspondiente, la anomalía detectada. - Luz testigo RUN (fig. 4 ref. 6) de color verde: Cuando está encendida señala que el grupo está en funcionamiento y que no se ha detectado ninguna avería. - Luz testigo BATT (fig. 4 ref. 9) de color rojo: Cuando está encendida, señala que existe una avería en el alternador cargador de batería. E - 15 IS 10 T 50 Hz 4 USO DEL GENERADOR 4.1 Controles preliminares E La primera vez que se pone en marcha el grupo electrógeno, o bien tras haber efectuado cualquier operación de mantenimiento, es oportuno cerciorarse siempre de lo siguiente: - Que el aceite esté a nivel, mediante la varilla (fig. 7 ref. 2). Consultar la tabla A correspondiente a los aceites aconsejados (fig. 8). - Que todos los puntos de anclaje del grupo estén perfectamente ajustados. - Que todos los aparatos eléctricos estén desactivados, para evitar el arranque del grupo con baja carga de tensión. - Que las líneas del agua y del combustible estén conectadas correctamente. - Que todas las conexiones eléctricas hayan sido efectuadas de manera correcta y que no hayan conexiones en mal estado. - Que la llave del agua esté abierta (fig. 6 ref. 2). - Que se haya llenado manualmente el tramo del circuito del agua que va desde la bomba hasta la válvula, en caso de que haya sido montada una válvula de retención en la toma de agua de mar (como se aconseja en el manual de instalación) (fig. 4 ref. 1). 4.2 Purga del circuito de alimentación La presencia de burbujas de aire dentro del circuito de alimentación provoca irregularidades de funcionamiento del motor o la incapacidad de alcanzar el número nominal de revoluciones. El aire puede penetrar en el circuito de alimentación a través de una junta no completamente estanca (tuberías, filtro, tanque) o cuando el combustible llega al nivel mínimo dentro del tanque. El sistema de alimentación está diseñado para eliminar autónomamente las burbujas de aire presentes en el circuito. La purga automática se obtiene activando la bomba de carburante algunos minutos antes de poner en marcha el motor. La activación de la bomba de carburante se obtiene presionando un instante el pulsador START. Si después de dicha operación el motor funcionase todavía de manera irregular, será necesario consultar un técnico para que controle detenidamente el circuito de alimentación. 4.3 Arranque Antes de poner en marcha el grupo, cerciorarse de que hayan sido efectuados los controles preliminares previstos en el apartado 3.1. Proceder al arranque presionando el pulsador de START situado en el panel de mando (fig. 4 ref. 4) y soltándolo sólo tras el arranque del grupo. Prestar atención en no E - 16 superar los 15 seg. por cada tentativa y en respetar una pausa de al menos 30 seg. entre las mismas. Todas las luces testigos del módulo protección motor (fig. 4 ref. 5) se encenderán algunos segundos y, si no se verifican anomalías en el motor o en el alternador, quedará encendida sólo la luz testigo verde de RUN (fig. 4 ref. 6) indicando que el grupo está en marcha y que su funcionamiento es regular. Numerosas tentativas de arranque con éxito negativo pueden causar una excesiva acumulación de agua en el circuito de evacuación, con graves consecuencias para el motor. Si el arranque del motor fuese dificultoso, es indispensable no insistir demasiadas veces sin haber cerrado antes la llave de la toma de mar (fig. 6 ref. 2). 4.4 Parada del grupo El grupo se para presionando el pulsador de OFF en el panel de mando. Antes de parar el grupo electrógeno, se aconseja hacerlo funcionar algunos minutos sin absorber corriente eléctrica, con el fin de permitir el enfriamiento del motor y del alternador. 5 DISPOSITIVOS DE PROTECCION Los grupos electrógenos IS 8 e IS 9.5 están dotados de una serie de dispositivos que los protegen contra un uso incorrecto y contra inconvenientes de funcionamiento. Cuando el grupo electrógeno se para debido a la intervención de un dispositivo de protección, la luz testigo correspondiente a dicha avería se encenderá en el módulo de protección motor situado en el panel de mando (fig. 5 ref. 5). 5.1 Dispositivo de protección baja presión aceite Interviene apagando el grupo cuando la presión del aceite motor es insuficiente; su intervención es señalada por el encendido de la luz testigo OIL (fig. 4 ref. 7). Para poder encender nuevamente el grupo, generalmente es suficiente reintegrar la cantidad de aceite faltante. El dispositivo de protección de baja presión aceite no da indicaciones sobre el nivel del aceite motor en el cárter. Por tanto es indispensable efectuar un control diario de este nivel. IS 10 T 50 Hz El motor funciona correctamente si no supera una inclinación máxima de 30º por períodos inferiores a los 3 minutos y de 25º sin límite de tiempo, tanto sobre el eje longitudinal como sobre el transversal. Si el motor se encontrara en condiciones de funcionar a inclinaciones superiores, el riesgo que corre es el de una insuficiente lubricación o el de la aspiración de aceite lubricante por parte del filtro de aire. 5.2 Dispositivo de protección alta temperatura agua Interviene apagando el grupo electrógeno cuando la temperatura del líquido refrigerante del motor es demasiado elevada o falta la circulación del agua de mar. La intervención de este dispositivo de protección es señalada por la luz testigo ºC (fig. 4 ref. 10). El grupo electrógeno debe ser puesto en marcha nuevamente sólo tras haber detectado y eliminado la causa de la anomalía. 5.3 Dispositivo de protección recalentamiento alternador Interviene apagando el grupo electrógeno cuando se presenta una sobrecarga térmica en el alternador. La intervención de este dispositivo de protección es señalada por la luz testigo ºC (fig. 4 ref. 8). El grupo electrógeno puede ser puesto en marcha nuevamente algunos minutos después, cuando la temperatura de los bobinas del alternador vuelva a los valores normales. De todos modos, se aconseja detectar y eliminar las causas que han provocado la intervención. 5.5 Dispositivo de protección contra cortocircuitos de la instalación eléctrica en baja tensión En caso de cortocircuito de la instalación eléctrica en baja tensión, un interruptor térmico (fig. 4 ref. 3) interrumpe el circuito parando el grupo electrógeno. En este caso, las luces testigos del módulo de protección del motor estarán todas apagadas y no será posible intentar otro arranque. Antes de restablecer el circuito eléctrico presionando el pulsador situado en el interruptor térmico (fig. 4 ref. 3), es necesario hacer detectar y eliminar la causa del cortocircuito por un técnico especializado. E 6 MANTENIMIENTO Todas las operaciones de mantenimiento del grupo electrógeno deben ser efectuadas con el motor apagado, tras haberlo dejado enfriar lo suficiente, y exclusivamente por personal especializado. Antes de acceder al grupo electrógeno desconectar un polo de la batería de encendido, para evitar arranques accidentales. 6.1 Mantenimiento ordinario del motor Las operaciones periódicas a efectuar en el motor se encuentran señaladas en la tabla B. Si se desea información más detallada, consultar el manual suministrado por el fabricante del motor y que acompaña cada grupo electrógeno. En cas dintervention de lune des protections, indiquées ci-dessus, après avoir déterminé et éliminé la cause de lintervention, il faut appuyer sur le bouton «STOP» pour la réinitialisation du tableau de commande (sinon le signal reste mémorisé et interdit le redémarrage du moteur). 5.4 Dispositivo de protección contra cort circuito y sobrecarga El grupo electrógeno está protegido contra los cortocircuitos y sobrecargas eléctricas. Un interruptor magnetotérmico tripolar (fig. 4 ref. 2) interrumpe el suministro de corriente eléctrica en caso de cortocircuito o cuando la corriente suministrada supera el valor nominal. Antes de restablecer el contacto mediante la palanca del interruptor magnetotérmico es importante desconectar los otros dispositivos conectados a la red eléctrica. Controlar el nivel del aceite motor mediante la varilla graduada correspondiente (fig. 7 ref. 2). El nivel debe estar comprendido entre las marcas MAX y MIN de la varilla (fig. 7 ref. 1). 6.2 Cambio del aceite motor y del filtro de aceite La capacidad del cárter motor es de 3.6 litros. Las restauraciones de nivel y las cargas de aceite deben ser efectuadas a través del orificio correspondiente (fig. 3 ref. 17). Para el cambio de aceite en el cárter motor, proceder extrayendo la varilla indicadora de nivel (fig. 7 ref. 2) y sirviéndose de la correspondiente bomba de extracción (fig. 3 ref. 12) tras haber quitado el tornillo que funciona como tapón. Se aconseja efectuar el vaciado con el aceite todavía bastante caliente, de manera de facilitar su salida. Los aceites aconsejados se encuentran indicados en la tabla A de la fig. 8. E - 17 IS 10 T 50 Hz El primer cambio de aceite motor debe ser efectuado después de 50 horas de uso del grupo electrógeno; para el segundo y los sucesivos es suficiente un cambio cada 200 horas. E Si se desea información más detallada acerca de la lubricación del motor, consultar el manual de uso y mantenimiento específico, adjunto al grupo electrógeno. No desechar en el medio ambiente el aceite descargado o el combustible, dado que se trata de productos contaminantes. Llevar el aceite lubricante descargado a los centros de recolección especializados para su desecho. Evitar que el aceite motor entre en contacto con la piel. Durante las operaciones de mantenimiento utilizar guantes y gafas de protección. En caso de contacto con aceite lubricante, lavar inmediata y detenidamente la zona en cuestión con agua y jabón. Para sustituir el cartucho del filtro aceite motor (fig. 3 ref. 13) es necesario desenroscarlo de su soporte sirviéndose de las herramientas apropiadas que normalmente se encuentran en el mercado. Colocar el cartucho nuevo prestando atención en lubricar el anillo de goma. El primer cambio debe ser efectuado después de 50 horas de funcionamiento del grupo electrógeno; para el segundo y los sucesivos respetar un intervalo de 400 horas. Para más información consultar el manual de uso y mantenimiento del motor. Para la seguridad del motor, utilizar exclusivamente piezas de repuesto originales. Una vez terminadas estas operaciones, limpiar detenidamente todas las piezas del grupo electrógeno que se hayan ensuciado con aceite y combustible. 6.3 Limpieza del filtro de aire Los grupos electrógenos de la serie IS disponen de un filtro de aire en seco que impide la entrada de cuerpos extraños a la cámara de combustión. Para su mantenimiento es suficiente limpiar la masa filtrante con gasoil una vez por año para eliminar la presencia de impurezas. E - 18 La première vidange de lhuile moteur doit être effectuée après 50 heures de service du groupe électrogène. Pour la deuxième et les suivantes une vidange toutes les 200 heures suffit. Pour de plus amples informations, quant à la lubrification du moteur, voir la notice dutilisation et dentretien du moteur fournie avec le groupe électrogène. Ne pas jeter lhuile usagée ou le carburant dans la nature, car se sont des produits polluants. Remettre lhuile lubrifiante usagée à des Centres Spécialisés dans la Récupération de ce genre de produits. Lhuile ne doit pas être en contact avec la peau. Pendant les opérations dentretien, utiliser des gants et des lunettes de protection. En cas de contact avec lhuile lubrifiante, laver immédiatement et minutieusement lemplacement touché avec de leau et du savon. 6.4 Sustitución del filtro carburante Para asegurar una gran duración y un funcionamiento correcto del motor, es sumamente importante sustituir periódicamente el cartucho del filtro carburante, respetando los intervalos indicados por el fabricante del motor que se encuentran en la tabla del apartado 5.12. Dicha operación se realiza de la siguiente manera: - Cerrar la llave del combustible (fig. 3 ref. 24) - Desenroscar completamente la brida del soporte (fig. 3 ref. 13) - Extraer el cartucho viejo y sustituirlo por el nuevo - Para el montaje, repetir las operaciones en secuencia inversa Una vez efectuada la sustitución, es necesario purgar el circuito de alimentación siguiendo las operaciones descritas en el apartado 3.2. Evitar que el combustible entre en contacto con la piel. Durante las operaciones de mantenimiento utilizar guantes y gafas de protección. En caso de contacto con el combustible, lavar inmediata y detenidamente la zona en cuestión con agua y jabón. Una vez terminadas estas operaciones, limpiar bien todos los restos de combustible y desechar los trapos utilizados en los centros de recolección especializados. IS 10 T 50 Hz 6.5 Control del líquido refrigerante Es necesario controlar periódicamente el nivel del líquido refrigerante del circuito cerrado de refrigeración. Las marcas de referencia para dicho control están impresas en el depósito de expansión (fig. 3 ref. 11). Si el nivel fuera insuficiente, versar líquido refrigerante en el depósito de expansión prestando atención en no superar la marca de nivel máximo. Nunca abrir el tapón de cierre del depósito de expansión (fig. 3 ref. 11) y del tanque (fig. 3 ref. 20) con el motor caliente, para evitar pérdidas peligrosas de líquido refrigerante. 6.6 Control de la tensión de las correas trapezoidales Una de las correas trapezoidales se utiliza para transmitir el movimiento de rotación de la polea del eje motor a la de la bomba del agua de mar (fig. 9 ref. 1). Una tensión excesiva de la correa acelera su desgaste, mientras que su aflojamiento hace girar las poleas en vacío e impide una circulación de agua suficiente. Regular la tensión de la correa de la siguiente manera: Aflojar los dos tornillos de regulación (fig. 9 ref. 2) y desplazar la bomba del agua de mar hacia afuera para aumentar la tensión, o bien hacia adentro para disminuirla. Ajustar los tornillos y comprobar la tensión. La tensión correcta de la correa es la que permite un aflojamiento de aproximadamente 5 mm con una fuerza de empuje de 8 Kg (fig. 9). La segunda correa se utiliza para transmitir el movimiento de rotación de la polea del eje motor a la de la bomba del líquido en circuito cerrado y a la del alternador CC cargador de batería (fig. 9 ref. 3). Regular la tensión de la correa de la siguiente manera: Aflojar el tornillo de regulación (fig. 9 ref. 4) y desplazar el alternador CC cargador de batería (fig. 9 ref. 5) hacia afuera para aumentar la tensión, o bien hacia adentro para disminuirla. La tensión correcta de la correa es la que permite un aflojamiento de aproximadamente 10 mm con una fuerza de empuje de 8 Kg (fig. 9). Para evitar que la correa gire en vacío, no ensuciarla con aceite. Limpiar la correa con gasolina si se nota sucia de aceite. No acercar las manos a la correa trapezoidal o a las poleas con el motor en funcionamiento. 6.7 Vaciado del circuito de refrigeración Para efectuar el mantenimiento del intercambiador aguaaire o del circuito de refrigeración, es necesario vaciar el circuito de aspiración del agua de mar. Dicha operación se efectúa de la siguiente manera: - Cerrar la llave de la toma de mar (fig. 6 ref. 2) - Abrir la llave de desagüe correspondiente (fig. 6 ref. 3) hasta que el agua salga por completo - Cerrar nuevamente la llave de desagüe Abrir nuevamente la llave de toma del agua de mar antes de poner en marcha el grupo electrógeno. E 6.8 Sustitución del líquido refrigerante Sustituir cada año el líquido refrigerante del circuito cerrado de refrigeración. Conectar un tramo de tubo de goma (fig. 10 ref. 2) de 20-30 cm de longitud a la llave de desagüe (fig. 10 ref. 1) situada en la base del motor para facilitar la recolección del líquido refrigerante descargado en un recipiente (fig. 10 ref. 3). Abrir la llave y vaciar completamente el circuito cerrado de refrigeración. Una vez terminada esta operación, cerrar la llave y llenar otra vez el circuito con líquido refrigerante nuevo. No desechar en el medio ambiente el líquido refrigerante descargado, dado que se trata de un producto contaminante. Llevar el líquido refrigerante descargado a los centros de recolección especializados para su desecho. 6.9 Sustitución ánodos de zinc Para proteger el intercambiador de calor agua-aire (fig. 11 ref. 1) y el intercambiador de calor agua-líquido (fig. 11 ref. 2) contra las corrientes galvánicas, los mismos contienen dos ánodos de zinc (fig. 11 ref. 4). Es necesario controlar periódicamente su estado de desgaste y sustituirlos cuando sea necesario con el fin de evitar que las corrientes galvánicas corroan los intercambiadores irreparablemente. Cuando el grupo es nuevo, se aconseja controlar los ánodos de zinc al menos una vez por mes para constatar su velocidad de consumo y más adelante regularse en base a ello. De todos modos es oportuno cambiar los ánodos de zinc al menos una vez por año. En la fig. 11 se indican los puntos donde están ubicados los ánodos de zinc. 6.10 Mantenimiento de la bomba agua de mar Al menos una vez por año, es necesario controlar la integridad del rodete de goma de la bomba para el agua de mar (fig. 12 ref. 1). Antes de abrir la bomba agua de mar para la inspección del rodete es necesario vaciar el circuito de refrigeración del agua de mar como se describe en el apartado 5.7. E - 19 IS 10 T 50 Hz Para acceder al rodete, quitar la tapa de cierre (fig. 12 ref. 2) y, con el auxilio de un par de pinzas, extraer el rodete tirando con fuerza hacia el exterior. Para montar un nuevo rodete repetir las operaciones anteriores en secuencia inversa. 6.11 Mantenimiento del alternador E El alternador empleado en este modelo de generador es de tipo sincrónico, autoexcitado y con regulación electrónica de la tensión. Este modelo de alternador, sin colector ni cepillos, no necesita operaciones particulares de mantenimiento. Los controles y las operaciones de mantenimiento periódico se limitan a eliminar los posibles restos de humedad y de óxido que podrían dañarlo. 6.12 Mantenimiento de la batería Para el arranque de todos los modelos de grupo electrógeno, se aconseja utilizar una batería de 80 A/h para temperatura ambiente superior a 0ºC y de 100 A/h para temperaturas inferiores. Antes de instalar una nueva batería es importante que la misma haya sido sometida a un ciclo completo de recarga. Al menos una vez por mes, controlar el nivel del electrólito y versar agua destilada si es necesario. Durante un largo período de inactividad del grupo electrógeno, se aconseja desconectar la batería y conservarla en un lugar seco y a temperaturas superiores a los 10ºC, efectuando una vez por mes un ciclo completo de recarga. Si la batería queda completamente descargada por mucho tiempo, existe el riesgo de que se dañe irreparablemente. Es necesario tomar la precaución de proteger con vaselina el borne positivo de la batería para prevenir la corrosión y la formación de óxido. Para restablecer el nivel del ácido sulfúrico es indispensable utilizar soluciones ya preparadas. Las operaciones de aplicación de agua destilada o de ácido en la batería deben ser efectuadas con guantes de goma y gafas de protección, para evitar contactos accidentales de ácido sulfúrico con la piel. En ese caso, lavar detenidamente la parte en cuestión con agua y jabón y consultar a un médico. Antes de proceder a la recarga de la batería, controlar el nivel del electrólito y restablecerlo con agua destilada si es necesario. Dicha operación debe ser repetida una vez terminado el ciclo de recarga. 5.13 Períodos de inactividad Poner en marcha el grupo electrógeno al menos una vez por mes. Si el grupo electrógeno debiera quedar inutilizado por un largo período, es necesario efectuar las siguientes operaciones: - Sustituir el aceite motor - Sustituir el cartucho del filtro aceite (véase apartado 5.2) - Sustituir el cartucho del filtro combustible (véase apartado 5.4) - Quitar los inyectores, introducir en cada cilindro 2 cc de aceite motor y hacer cumplir algunos giros al motor moviendo la polea del eje manualmente. Luego montar nuevamente los inyectores. - Sustituir los ánodos de zinc (véase apartado 5.9) - Hacer que el tubo de toma agua de mar aspire líquido anticongelante, cuya función es la de proteger los intercambiadores contra las bajas temperaturas, y lubricar el rodete de la bomba agua de mar y las partes metálicas internas del circuito de refrigeración. - Desconectar la batería de arranque y conservarla en un ambiente seco (véase apartado 5.12) - Desconectar el tubo de desagüe al mar del colector del motor - Limpiar el filtro del agua de mar - Cerrar la llave de la toma para el agua de mar - Eliminar el agua de mar del silenciador del escape - Limpiar y lubricar la válvula de antisifonaje (siphon break), en caso de que haya sido instalada 5.14 Tabla sintética de las intervenciones programadas OPERACION HORAS Control nivel aceite motor ...................................... 10 Control nivel líquido refrigerante .............................. 10 Control pérdidas de aceite ..................................... 20 Control pérdidas de combustible ............................ 20 Control pérdidas de líquido .................................... 20 Regulación tensión correa trapezoidal ................... 100 Control carga batería ............................................ 100 Limpieza filtro combustible ................................... 200 Regulación tensión correas .................................. 200 * Cambio aceite motor ......................................... 200 Control rodete bomba agua mar ............................ 400 Control número revoluciones motor ....................... 400 Control integridad conexiones eléctricas ................ 400 Sustitución filtro combustible ................................ 400 * Sustitución filtro aceite ...................................... 400 Control inyectores ................................................ 400 Control calado inyección ...................................... 400 Regulación juego válvula toma/desagüe ................. 400 Control bomba de inyección combustible ............ 1000 Control nivel electrólito batería ....................... mensual Limpieza y desoxidación partes metálicas .......... anual Limpieza filtro aire ............................................. anual Sustitución total líquido refrigerante .................... anual Sustitución ánodos de zinc ............................... anual * Efectuar la primera intervención después de 50 horas, luego en base a los intervalos previstos. TAB "B" E - 20 IS 10 T 50 Hz 5.15 Tabla de averías El motor de arranque gira pero el motor principal no arranca - Controlar si hay combustible en el tanque. (Cargar combustible) - Controlar si el electroimán de parada se encuentra en posición de tiro. (Consultar el Centro de Asistencia) - Eliminar las burbujas de aire purgando el circuito de alimentación (Véase apartado 3.2) El grupo electrógeno no suministra tensión - Controlar que el interruptor magnetotérmico (fig. 4 ref. 2) se encuentre en posición ON. Si no es así, ponerse en contacto con un Centro de Asistencia Autorizado. E El módulo de protección motor no se activa cuando se presiona el pulsador START - Controlar si el interruptor térmico (fig. 4 ref. 3) de protección está abierto. (Restablecer el contacto presionando el pulsador rojo, fig. 4 ref. 3) - Controlar los cables y los bornes de conexión a la batería y las conexiones eléctricas. (Conectar nuevamente) - Controlar la integridad de la batería. (Recargarla o cambiarla) El grupo electrógeno se apaga durante su funcionamiento - Controlar si se ha activado un dispositivo de protección con el encendido de la luz testigo correspondiente. (Eliminar la causa e intentar un nuevo arranque) - Controlar si hay combustible en el tanque. (Restablecer el nivel) El motor emite un elevado nivel de humo de escape - Controlar que el nivel de aceite en el cárter no supere la marca de MAX. (Restablecer el nivel) - Controlar que el grupo no esté en sobrecarga. - Controlar el calibrado de los inyectores. (Consultar el Centro de Asistencia) El motor funciona de manera irregular - Controlar los filtros de combustible. (Sustituirlos) - Eliminar las burbujas de aire purgando el circuito de alimentación. (Véase apartado 3.2) La tensión del alternador es demasiado baja - Corregir el valor de la tensión sirviéndose del regulador electrónico. - Controlar los números de revoluciones del motor (1560 r.p.m. sin dispositivos conectados). - Regulador de tensión roto. (Sustituirlo) La batería de arranque está descargada - Controlar el nivel del electrólito dentro de la batería. (Restablecer el nivel) - Controlar el funcionamiento del alternador CC. - Controlar la integridad de la batería. E - 21 IS 10 T 50 Hz 7 CARACTERÍSTICAS TÉCNICAS E Modelo Tipo Cilindros (nr.) Material bloque cilindro Desplazamiento (mm) Carrera (mm) Cilindrada (cc) Potencia (hp) RPM Fuerza de compresión Sistema de inyección Material tapa Regulador Sistema de lubrificación Capacidad de aceite (l) Sistema de paro motor Bomba de carburante Altura máxima carburante (cm) Consumo carburante máximo (l/h) 2,9 Volumen aire combustión (l/min) 730 Batería de arranque (Ah-V) Cargabatería Motor de arranque (kW-V) Inclinación max. uso Rendimiento bomba de agua de mar (l/min) 70 - 12 40 - 12 1,2 - 12 30° Tipo Regulación Enfriamiento Tensión (V) Frecuencia (Hz) Potencia máx. (kW) Potencia Cont. (kW) Factor de potencia ( cos ø ) Tipo de aislamiento Estabilidad de tensión Estabilidad de frecuencia E - 22 ,6 50 Hz Yanmar 3TNE78A Diesel 4 tiempos 3 Fundición 78 84 1204 13,5 1500 18:1 Directa Fundición Centrífugo, mecánico Forzada 5,2 Solenoide Eléctrica 70 25 50 Hz Sincrónico, 4 polos, autoexcitado Electrónica Aire / agua (Intercooler W/A) 400 50 7,8 - 9,75 7,2 - 9 1 - 0,8 H ±2% ±5% IS 10 T 50 Hz Referencias relativas al esquema eléctrico ( pág. 9) 1. Interruptor magnetotérmico 2. Cuentahoras 3. Alternador 4. Estator 5. Excitatriz 6. Regulador electrónico de tensión 7. Interruptor térmico 8. Módulo protección motor 9. Pulsador START/STOP 10.Indicador nivel combustible 11.Indicador presión aceite 12.Indicador temperatura agua 13.Bomba carburante 14.Sensor alta temperatura agua 15.Sensor alta temperatura líquido refrigerante 16.Presóstato aceite 17.Alternador CC 18.Electroimán stop 19.Motor de arranque 20.Bornes conexión batería 21.Instrumento indicador presión aceite 22.Instrumento indicador temperatura líquido refrigerante 23.Pulsador START/STOP 24.Cable de conexión panel control remoto 25.Conector panel control remoto 26.Panel control remoto 27.Panel control remoto E E - 23 I IS 10 T 50 Hz INHOUDSOPGAVE IN GEVAL DE SPECIFICATIES UIT DEZE INSTALLATIE-HANDLEIDING VERONACHTZAAMD WORDEN, KOMT DE GARANTIE OP HET PRODUCT TE VERVALLEN 1 NL 1.1 1.2 1.2 1.3 1.5 2 2.1 2.2 2.3 3 3.1 3.2 3.3 4 4.1 4.2 4.3 4.4 ALGEMENE INFORMATIE ............................ 11 Doel van de handleiding ............................... Symbolen .................................................... Bijgaande informatie .................................... Identificatie van de machine ......................... Veiligheidsvoorschriften ............................... 11 11 12 12 12 ALGEMENE INFORMATIE ............................ 13 Referentiedocumenten ................................. 13 Facsimile van de EG-verklaring van overeenstemming ........................................ 13 Markering .................................................... 13 BESCHRIJVING VAN DE GENERATOR ....... 15 Algemeen .................................................... 15 Koelsysteem ............................................... 15 Bedieningspaneel ........................................ 15 GEBRUIK VAN DE GENERATOR ................. 16 Controles vooraf ........................................... Ontluchting van het brandstofsysteem ......... Starten ........................................................ Stoppen van de groep .................................. 16 16 16 16 5 BESCHERMINGEN ............................................ 16 5.1 5.2 5.4 5.5 Bescherming lage oliedruk ........................... Bescherming hoge temperatuur wat wisselstroomdynamo ................................... Bescherming tegen kortsluiting en overbelasting ........................................... Bescherming tegen kortsluiting van ............. de elektrische laagspanningsinstallatie ........ 16 17 17 17 17 6 ONDERHOUD .................................................... 17 6.1 5.2 6.3 6.4 6.5 6.6 6.7 6.8 6.9 6.10 6.11 - 10 Buitengewoon onderhoud van de motor ........ Verversing motorolie en vervanging oliefilter .. Reiniging van het luchtfilter .......................... Vervanging van het brandstoffilter ................. Controle van de koelvloeistof ........................ Controle van de spanning van de V-snaren ... Lediging van het koelsysteem ...................... Verversing van de koelvloeistof ..................... Vervanging van de zinkanodes ..................... Onderhoud van de zeewaterpomp ................ Onderhoud van de wisselstroomdynamo ...... 17 17 18 18 18 19 19 19 19 19 20 6.12 Onderhoud van de accu ............................... 6.13 Inactieve periodes ........................................ 6.14 Samenvattingstabel van de geprogrammeerde ingrepen ......................... 6.15 Storingentabel ............................................. 7 20 20 21 21 TECHNISCHE EIGENSCHAPPEN ................. 22 IS 10 T 50 Hz 1. ALGEMENE INFORMATIE Raadpleeg deze handleiding aandachtig alvorens over te gaan tot willekeurige werkzaamheden op de machine. 1.1 Doel van de handleiding Hartelijk dan voor uw keuze van een MASE product. Deze handleiding is opgesteld door de fabrikant en vormt onderdeel van de uitrusting van het generatoraggregaat en moet zorgvuldig worden bewaard, beschermd tegen vocht en andere invloeden die hem zouden kunnen schaden. De handleiding moet het aggregaat volgen als deze in over zou gaan in handen van een andere gebruiker of nieuwe eigenaar. De informatie in de handleiding is gericht aan al diegenen die betrokken zijn bij de levenscyclus van het generatoraggregaat en is nuttig en noodzakelijk ter informatie van zowel degenen die de verschillende werkzaamheden daadwerkelijk uit zullen voeren, alsook voor degenen die deze activiteiten zullen coördineren, de nodige logistiek zullen voorbereiden en de toegang zullen regelen tot de plaats waarop de groep geïnstalleerd zal worden. De handleiding definieert het doel waarvoor de machine is gebouwd en bevat alle informatie die nodig is om een veilig en correct gebruik te garanderen. Het voortdurend in acht nemen van de aanwijzingen in de handleiding garandeert de veiligheid voor de bediener, de zuinigheid in het gebruik en een langere duur van de machine zelf. Om de raadpleging ervan te vergemakkelijken is zij onderverdeeld in hoofdstukken die de voornaamste begrippen identificeren; voor een snelle raadpleging van de onderwerpen kunt u de inhoudsopgave raadplegen (pag. 63). NL 1.2 Symbolen De tekstgedeelten die speciale aandacht verdienen worden vet gedrukt weergegeven en voorafgegaan door de hierna geïllustreerde en gedefinieerde symbolen. Geeft aan dat er met aandacht moet worden gewerkt, om geen ernstige consequenties te ondervinden die tot de dood van personeel of mogelijke schade aan de gezondheid zouden kunnen leiden. Situatie die zich zou kunnen voordoen tijdens de levensduur van een product, systeem of installatie en die riskant geacht wordt en persoonlijk letsel of schade aan eigendommen, het milieu of financiële verliezen zou kunnen veroorzaken. Geeft aan dat er moet worden opgelet om geen ernstige consequenties te ondervinden die materiële met zich mee zouden brengen, zoals bijvoorbeeld aan productiemiddelen of het product. Aanwijzingen van bijzonder belang De tekeningen zijn als voorbeeld bedoeld. Ook als de machine die u in uw bezit heeft aanzienlijk afwijkt van de illustraties in deze handleiding, worden de veiligheid en de informatie hiervoor toch gegarandeerd. De fabrikant streeft een constante ontwikkeling en bijwerking van zijn product na, en kan derhalve zonder enige waarschuwing vooraf wijzigingen aanbrengen. - 11 IS 10 T 50 Hz 1.2 Bijgaande informatie Legenda afb. 4 De volgende documentatie maakt deel uit van deze handleiding: 1 2 3 4 5 6 7 8 9 10 11 12 - CE Verklaring van overeenstemming (afb. 1); Gebruiks- en onderhoudshandleiding van de motor; Serviceboekje; Garantiebewijs; Garantiekaart. 1.3 Identificatie van de machine NL Zie afb. 2 1 3 4 5 6 7 8 9 10 11 Machinecode Bouwjaar Vermogensfactor Verklaarde frequentie Continu vermogen Nominale spanning Stroom Gewicht Prestatieklasse Serienummer De gegevens die het codenummer van de machine, het serienummer en het bouwjaar identificeren moeten altijd aan de fabrikant worden doorgegeven bij verzoeken om informatie of bij bestelling van vervangingsonderdelen. Zie afb. 3 1 Geluiddempende kast 2 Bovenste toegangsdeur 3 Onderste toegangsdeur 4 Instrumentenpaneel 5 Verankeringsbeugels 6 Verbinding rook- en koelwaterafvoer 7 Verbinding aansluiting zeewaterinlaat 8 Verbinding aansluiting brandstoftank 9 Verbindingsklemmen accu 10 Luchtfilter motor 11 Expansievat koelvloeistof 12 Extractiepomp motorolie 13 Inzetstuk gasoliefilter 14 Zeewaterpomp 15 Brandstofpomp 16 Filterelement oliefilter 17 Olievuldop 18 Verbindingskast elektriciteitslijn 19 Wisselstroomdynamo batterijlader 20 Koelvloeistoftank 21 Warmtewisselaar water/lucht 22 Uitlaatspruitstuk 23 Startmotor 1.4 Instrumentenpaneel - 12 Urenteller Magnetothermische schakelaar Thermische wisselstroomschakelaar START-/STOP-knop Motorbeschermingsmodule Lampje RUN motor gestart Lampje OIL lage oliedruk Lampje °C hoge temperatuur motor Lampje BATT werking batterijlader Lampje °C hoge temperatuur wisselstroomdynamo Bougies (niet aanwezig) Brandstofuitgang (uitvoering RINA) 1.5 Veiligheidsvoorschriften Lees alle informatie in deze handleiding en in de installatiehandleidingaandachtigdoor;zijzijnvanfundamenteel belang voor een correcte installatie en het juiste gebruik van de stroomopwekkinggroep en nodig om onmiddellijk in te kunnen grijpen in geval dat nodig is. De fabrikant aanvaardt geen enkele aansprakelijkheid voor persoonlijk letsel of materiele schade, die voortkomen uit veronachtzaming van de veiligheidsvoorschriften. Bekijkdeveiligheidsbordendieopdemachinezijnaangebracht aandachtig, en neem de aanwijzingen ervan in acht. - Laat de groep niet gebruiken door ondeskundige personen of personen die geen geschikte opleiding hebben gehad. - Laat kinderen of dieren niet in de buurt komen van de stroomopwekkingsgroep wanneer deze in werking is. - Kom niet met natte handen aan de generator of het bedieningspaneel, aangezien de generator een mogelijke oorzaak van elektrische schokken is als hij slecht wordt gebruikt. - Eventuele controles op de stroomopwekkingsgroep moeten worden uitgevoerd bij uitgeschakelde motor; controles op een ingeschakelde groep mogen uitsluitend worden verricht door gespecialiseerd personeel. - Zuig nooit de verbrandingsgassen aan, want zij bevatten stoffen die schadelijk zijn voor de gezondheid. - Zorg ervoor dat de toegangsdeuren gesloten zijn wanneer de stroomopwekkingsgroep in gebruik is. - Raak nooit met uw handen het motorlichaam of de wisselstroomdynamo aan als de stroomopwekkingsgroep in werking is of nog warm is. Als er olie- of brandstoflekkages geconstateerd worden, dient u te zorgen voor een nauwkeurige reiniging, om brandgevaar te vermijden. In het geval van brand mag geen water worden gebruikt voor het doven, maar moeten brandblusapparaten worden gebruikt. Als er zich problemen voordoen o u uitleg nodig heeft, neem dan contact op met de SERVICE-dienst van Mase. IS 10 T 50 Hz 2. ALGEMENE INFORMATIE De stroomopwekkingsgroep is ontworpen, gebouwd en getest om te voldoen aan de geldende Europese en nationale voorschriften, en om risicos van elektrische aard tot een minimum te beperken door overeenkomstigheid met de volgende normen: 89/336 EEG Richtlijn inzake de elektromagnetische compatibiliteit 73/23 EEG Laagspanningsrichtlijn CE 98/37 richtlijn machines 2.1 Referentiedocumenten De gebruiksinstructies geleverd met elke stroomopwekkingsgroep bestaan uit een reeks documenten waarvan deze handleiding het Algemeen Deel is. Normaal gezien worden de volgende documenten geleverd: a b c d - EG-verklaring van overeenstemming. - Handleiding met instructies voor het gebruik en het onderhoud van de stroomopwekkingsgroepen (deze handleiding). - Handleiding voor het gebruik en het onderhoud van de motor. - Handleiding voor het gebruik en het onderhoud van de wisselstroomdynamo (bij wisselstroomdynamos die niet door mase geproduceerd zijn). e - Lijst Technische Centra mase. f - Garantiebewijs mase. g - Garantiekaart. NL 2.2 Facsimile van de EG-verklaring van overeenstemming De stroomopwekkingsgroepen, gebouwd door het bedrijf mase, bestemd voor de landen van de Europee Gemeenschap, zijn conform de van kracht zijnde EG-richtlijnen (zie 1.5), en zijn voorzien van een EG-verklaring van overeenstemming (Fig.1). 2.3 Markering Op de plaat voor de stroomopwekkingsgroepen staan alle identificatiegegevens vermeld, zoals wordt voorgeschreven door de norm ISO 8528 e n volgens de vereisten voor CE-markering, voor de gevallen waarop dat van toepassing is. Hier wordt een voorbeeld van de identificatieplaat afgebeeld, die op het bedieningspaneel van elke machine is bevestigd (afb. A). 1 2 3 4 5 6 7 8 9 10 11 12 13 14 15 16 17 - Naam machine - Machinecode - Serienummer - Continu vermogen - Aangegeven frequentie - Vermogensfactor - Nominale spanning - Nominale stroom - Beschermingsgraad - Isolatieklasse - Max. gebruikstemperatuur - Max. gebruikshoogte - Geluidsniveau - Prestatieklasse - Bouwjaar - Fabrikant - Gewicht 1 4 2 3 5 6 7 8 10 9 11 12 16 13 14 15 17 afb.A - 13 IS 10 T 50 Hz NR.000000 mase GENERATORS S.p.A. Tel. +39 (0) 547 354311 Fax +39 (0) 547 317555 DICHIARAZIONE CE DI CONFORMITÀ EC DECLARATION OF CONFORMITY Fabbricante/Manufacturer: mase GENERATORS S.p.A. Indirizzo /Address : Via Tortona 345, Pievesestina (FC) NL mase Il sottoscritto Luigi Foresti in qualità di direttore tecnico della GENERATORS S.p.A., dichiara sotto la propria responsabilità che il gruppo elettrogeno modello .................... : mase IL E The undersigned Luigi Foresti as GENERATORS S.p.A. technical manager declares, under his sole responsability, that the generator model................: Codice / Code Descrizione / Model S Matricola / Serial N. M I è conforme alle disposizioni delle Direttive di seguito elencate: 98/37 CE (come emendata delle Direttive 98/79 CE) 73/23 CEE modificata da CEE 93/68. 89/336 CEE direttiva sulla compatibilità elettromagnetica A F C corresponds to the requirements of the following EEC Directives: 98/37/EEC (as amended by the Directive 98/79/EEC ) 73/23/EEC as amended by 93/68/EEC. 89/336 EEC directive on the electromagnetic compatibility Cesena, / / Direttore Tecnico Technical Director mase GENERATORS S.p.A. Sede legale ed Amm.: 47023 CESENA (FC) ITALY - Via Tortona, 345 - C.F./P.I. 00687150409 Cap. Soc. milioni 2000 di cui 949 versati - Registro Società Tribunale Forlì n. 6818 - CCIAA Forlì n.164063 - c.c.p. n. 11541471 - EXPORT FO n. 006368 Fig.B - 14 IS 10 T 50 Hz 3 BESCHRIJVING VAN DE GENERATOR 3.1 Algemeen De stroomopwekkingsgroepen IS 19 zijn ontworpen om gemakkelijk aan boord van schepen te kunnen worden geïnstalleerd. De geluiddempende kast, gemaakt van isolerende panelen van gelakt zeewaardig aluminium, geeft gemakkelijk toegang tot de motor en de wisselstroomgenerator voor het uitvoeren van onderhoudsen controlewerkzaamheden, en zorgt tegelijkertijd voor een aanzienlijke verlaging van het geluidsniveau. De 4-takt diesel motor met directe injectie, gebouwd door Yanmar, is uiterst betrouwbaar en robuust; de emissies aan de uitlaat zijn in overeenstemming met de CARB-normen. De wisselstroomdynamo, van het synchrone, 4-polige type, zonder borstels, heeft een elektronische spanningsregelaar (SR7) die de stabiliteit ±5% ervan ten opzichte van de nominale waarde garandeert. De grote lostrekcapaciteit van de wisselstroomdynamo maakt de stroomopwekkingsgroep zeer geschikt voor het voeden van elektromotoren van air-conditioners, ontziltingsinstallaties, compressoren, enz. De stroomopwekkingsgroep beschikt over een lokaal bedieningspaneel (afb 3 ref. 4) waarop zich de bedieningen en de controle-instrumenten bevinden. 3.2 Koelsysteem De motor van de stroomopwekkingsgroep wordt gekoeld door de circulatie in een gesloten circuit van koelvloeistof die de warmte afgeeft aan zeewater door middel van een warmtewisselaar (afb. 3 ref. 20). Deze warmtewisselaar, gemaakt van kopernikkel, is speciaal ontworpen door mase om de motor zeewaardig te maken. Een tweede warmtewisselaar zorgt voor koeling van de lucht in de geluidgedempte kast en de lucht die nodig is voor ventilatie van de wisselstroomdynamo. Bij installatie moeten een brandstofcircuit van zeewater voor koeling en een afvoersysteem voor de verbrandingsgassen en het water dat gebruikt is voor de koeling, worden aangebracht. 3.3 Bedieningspaneel - brandt, signaleert het dat de groep in werking is en dat er geen storingen worden waargenomen. Als het rode controlelampje BATT (afb. 4 ref. 9) brandt, signaleert het dat de wisselstroomdynamo van de batterijlader defect is. Als het rode controlelampje OIL (afb. 4 ref. 7) brandt, signaleert het dat de druk van de motorolie onvoldoende is. Als het rode controlelampje °C brandt, signaleert het dat de temperatuur van de koelvloeistof of van het water dat circuleert in de warmtewisselaars, te hoog is. Als het rode controlelampje °C brandt, signaleert het dat de wikkelingen van de wisselstroomdynamo te hoge temperaturen hebben bereikt. NL Op het bedieningspaneel zitten verder: - een 3 - polige magnetothermische schakelaar (afb. 4 ref. 2), die de stroomtoevoer onderbreekt in het geval van overbelasting en kortsluiting. - een thermische schakelaar (afb. 4 ref. 3) ter bescherming van de elektrische laagspanningsinstallatie tegen kortsluiting. - een urenteller (afb. 4 ref. 1); - de start- en stopknop van de stroomopwekkingsgroep (afb. 4 ref. 5). De stroomopwekkingsgroep is voorbereid voor aansluiting via een connector op het afstands-startpaneel, door mase als optie geleverd, dat eventueel kan worden geïnstalleerd op het bedieningspaneel. Er zijn twee verschillende modellen afstand-startpanelen leverbaar, zoals te zien op afbeelding 5. De eenvoudigste uitvoering heeft een start- en stopknop (afb. 5 ref. 1), een groen controlelampje (afb. 5 ref. 2) dat aangeeft dat de groep gestart is, als het gaat branden. De tweede uitvoering van het afstandsbedieningspaneel (afb. 5 ref. 3) voorziet, afgezien van de start- en stopknop, in een instrument dat de drukwaarde van de motorolie aangeeft (afb. 5 ref. 4) en een instrument dat de temperatuur van de koelvloeistof aangeeft (afb. 5 ref. 5). Als het afstand-startpaneel is aangesloten, is het niet mogelijk de stroomopwekkingsgroep te starten vanaf het lokale paneel. ls er onderhoudswerkzaamheden worden uitgevoerd op de stroomopwekkingsgroep, moet de negatieve pool van de startaccu worden afgekoppeld om onopzettelijke starts te vermijden. Op de stroomopwekkingsgroep zit een bedieningspaneel voor de besturingen voor het starten en stoppen. Een motorbeschermingsmodule (afb. 4 ref. 5) beheert de beschermingen van de stroomopwekkingsgroep, door de motor in het geval van storingen te stoppen en de geconstateerde afwijking aan te geven door de lampjes. - Als het groene controlelampje RUN (afb. 4 ref. 6) - 15 IS 10 T 50 Hz 4. GEBRUIK VAN DE GENERATOR 4.1 Controles vooraf NL Bij de eerste start van de stroomopwekkingsgroep, of na een onderhoudsingreep te hebben uitgevoerd, is het een goede regel altijd te controleren: - of de olie het juiste niveau heeft, met behulp van de peilstok (afb. 7 ref. 2), zie de tabel A van de aanbevolen oliën (afb. 8). - of alle verankeringspunten van de groep goed zijn gespannen. - of alle elektrische gebruikers afgekoppeld zijn om te vermijden dat de groep wordt gestart terwijl hij belast wordt. - of alle water- en brandstofleidingen goed verbonden zijn - of alle elektrische aansluitingen op de juiste manier zijn uitgevoerd en of er geen aansluitingen in slechte staat zijn. - of de waterkraan open staat (afb. 6 ref. 2) - of het gedeelte van het watercircuit van de pomp naar de kleppen met de hand gevuld is, in het geval er een afsluitklep is gemonteerd op de zeewaterinlaat (zoals aanbevolen in de installatiehandleiding) (afb. 4 ref. 1). 4.2 Ontluchting van het brandstofsysteem De aanwezigheid van luchtbellen in het brandstofsysteem heeft tot gevolg dat de motor onregelmatig werkt of niet in staat is het nominale toerental te bereiken. De lucht kan in het brandstofcircuit doordringen via een niet perfecte afgedichte koppeling (leidingen, filters, tank) of als de brandstof in de tank op het minimum niveau is. Het brandstofsysteem is zo ontworpen dat de luchtbellen die in het circuit zijn doorgedrongen, zelfstandig worden geëlimineerd. De automatische ontluchting wordt verkregen door de brandstofpomp een aantal minuten voordat de motor gestart wordt, te activeren. De pomp wordt geactiveerd door de START-knop een ogenblik in te drukken. Als de motor na deze handeling nog steeds onregelmatig functioneert, moet een technicus worden geraadpleegd voor een nauwgezette controle van het brandstofysteem. 4.3 Starten Alvorens de groep te starten dient u zich ervan te vergewissen dat de voorafgaande controles, die beschreven worden in paragraaf 3.1, zijn uitgevoerd. Start de groep door op de START-knop op het bedieningspaneel (afb. 4 ref. 4) te drukken en hem pas los te laten nadat de groep gestart is. Let er hierbij op dat elke poging niet langer dan 15 sec. duurt en laat minstens 30 sec. voorbijgaan tussen de pogingen. Alle signaleringslampjes van de motorbeschermingsmodule (afb. 4 ref. 5) zullen bij de start enkele seconden gaan branden, en als er geen storingen in de motor of de generator zijn, blijft alleen het groene lampje RUN (afb. 4 ref. 6) branden om aan te geven dat de groep gestart is en regelmatig functioneert. - 16 Herhaaldelijke startpogingen met negatief resultaat kunnen een overmatige waterophoping in de afvoerinstallatie veroorzaken, met mogelijk ernstige consequenties voor de motor. Als het moeilijk blijkt de motor te starten, mag men het niet te lang blijven proberen zonder eerst de kraan van de zeewaterinlaat (afb. 6 ref. 2) te sluiten. 4.4 Stoppen van de groep De groep wordt gestopt door op de knop OFF op het bedieningspaneel te drukken. Alvorens de stroomopwekkingsgroep te starten wordt geadviseerd hem enkele minuten te laten functioneren zonder stroom op te nemen, om de motor en de wisselstroomdynamo te laten afkoelen. 5 BESCHERMINGEN De stroomopwekkingsgroepen IS 8, IS 9,5 zijn uitgerust met een serie beschermingen die hen behoeden tegen onjuist gebruikt en storingen in de werking. Wanneer een stroomopwekkingsgroep stopt doordat een bescherming heeft ingegrepen, zal het lampje, dat de betreffende storing aangeeft, gaan branden op de motorbeschermingsmodule (afb. 5 ref- 5) van het bedieningspaneel. 5.1 Bescherming lage oliedruk Grijpt in door de groep te stoppen wanneer de druk van de motorolie onvoldoende is; de ingreep wordt gesignaleerd doordat het lampje OIL gaat branden (afb. 4 ref. 7). Over het algemeen is het voldoende de olie aan te vullen om de groep weer te kunnen starten. De bescherming tegen lage oliedruk geeft geen indicatie over het niveau van de motorolie in de oliepan. Een dagelijkse controle van dit niveau is derhalve noodzakelijk. De motor functioneert correct zolang hij niet langer dan 3 minuten maximaal 30° gekanteld is; er zijn geen tijdslimieten voor een kanteling van 25°, zowel in de lengte als in de breedte. Als de motor zich in omstandigheden bevindt waarbij hij moet werken bij sterkere kantelingen, bestaat het risico dat er onvoldoende smering of afzuiging is door het luchtfilter van de smeerolie. IS 10 T 50 Hz 5.2 Bescherming hoge temperatuur water Grijpt in door de stroomopwekkingsgroep uit te schakelen als de temperatuur van de koelvloeistof van de motor te hoog is of als de circulatie van het zeewater komt te ontbreken. De ingreep van de bescherming wordt gesignaleerd door de inschakeling van het lampje °C (afb. 4 ref. 10). De stroomopwekkingsgroep dient mag pas opnieuw worden gestart nadat de oorzaak van de storing is opgespoord en geëlimineerd. 5.3 Bescherming overtemperatuur wisselstroomdynamo Grijpt in door de stroomopwekkingsgroep uit te schakelen wanneer er zich een thermische overbelasting op de wisselstroomdynamo voordoet. De ingreep van de bescherming wordt gesignaleerd doordat het lampje °C (afb. 4 ref. 8) gaat branden. De stroomopwekkinggroep kan pas na enkele minuten worden gestart wanneer de temperatuur van de wikkelingen van de wisselstroomdynamo terugkeert naar normale waarden. Het wordt hoe dan ook geadviseerd de oorzaken van de ingreep op te sporen en te elimineren. In het geval van een ingreep van een van de bovenstaande beschermingen, moet, nadat de oorzaak van de ingreep is opgezocht en opgeheven, de STOP-knop worden ingedrukt om het bedieningspaneel te resetten (het signaal zou anders in het geheugen blijven, waardoor de motor niet kan worden gestart). mogelijk een nieuwe startpoging te doen. Alvorens het elektrische circuit te herstellen door op de knop op de thermische schakelaar (afb. 4 ref. 3) te drukken, moet een gespecialiseerd technicus de oorzaak van de kortsluiting opsporen en verhelpen. 6 ONDERHOUD Alle onderhoudswerkzaamheden op de stroomopwekkingsgroep moeten worden verricht bij uitgeschakelde motor, nadat deze voldoende is afgekoeld, en mogen alleen worden verricht door geautoriseerd personeel. NL Voordat u zich toegang verschaft tot de stroomopwekkingsgroep moet een pool van de startaccu worden afgekoppeld, om onopzettelijke starts te vermijden. 6.1 Buitengewoon onderhoud van de motor De periodieke ingrepen die op de motor moeten worden verricht worden vermeld in de tabel B. Raadpleeg voor nadere bijzonderheden de handleiding die door de fabrikant van de motor wordt geleverd, en elke stroomopwekkingsgroep vergezelt. Controleer het niveau van de motorolie met behulp van de peilstok (afb. 7 ref. 2). Het niveau moet altijd tussen de kenmerken MAX en MIN liggen die op de peilstok (afb. 7, ref. 1) staan aangegeven. 5.2 Verversing motorolie en vervanging oliefilter 5.4 Bescherming tegen kortsluiting en overbelasting De stroomopwekkingsgroep is beschermd tegen kortsluiting en elektrische overbelasting. Een 3 - polige, magnetothermische schakelaar (afb. 4 ref. 2) onderbreekt de stroomtoevoer wanneer er zich kortsluiting voordoet of wanneer de stroomtoevoer hoger is dan de nominale waarde. Alvorens het contact te herstellen door de hendel van de magnetothermische schakelaar op te tillen, moeten de gebruikers worden afgekoppeld. 5.5 Bescherming tegen kortsluiting van de elektrische laagspanningsinstallatie In het geval van kortsluiting van de elektrische laagspanningsinstallatie zal het circuit (afb. 4 ref. 3) worden verbroken zodat de groep gestopt wordt. In dit geval gaan de signaleringslampjes van de motorbeschermingsmodule allemaal uit en is het niet De inhoud van de oliepan van de motor bedraagt 3,6 liter. Het bijvullen of vullen van de motorolie moet gebeuren via de opening (afb. 3 ref.17). Om de olie in de oliepan te verversen moet de niveaupeilstok (afb. 7 ref. 2) worden verwijderd en moet de extractiepomp (afb. 3 ref. 12) worden bediend nadat de schroef die als dop fungeert is weggehaald. Het wordt geadviseerd de olie af te tappen als hij nog voldoende warm is, zodat het gemakkelijker wegstroomt. Zie tabel A, afb. 8, voor de aanbevolen olie. De eerste verversing van de motorolie dient te worden verricht na 50 bedrijfsuren van de stroomopwekkingsgroep; de tweede en latere verversingen dienen om de 200 u. te geschieden. Voor nadere bijzonderheden over de smering van de motor dient u de gebruiks- en onderhoudshandleiding van de motor te raadplegen, die bij de stroomopwekkingsgroep geleverd wordt. - 17 IS 10 T 50 Hz Laat afgewerkte olie of brandstof nooit in het milieu achter, want het zijn vervuilende producten. Geef afgewerkte smeerolie af bij de speciale Verzamelcentra die zijn belast met de verwerking ervan als afval. Zorg ervoor dat de motorolie NL niet in contact komt met de huid. Draag handschoenen en een veiligheidsbril tijdens de onderhoudswerkzaamheden. Komt u toch in contact met smeerolie, was het betreffende lichaamsdeel dan onmiddellijk zorgvuldig met veel water en zeep. Om het filterelement van het motoroliefilter (afb. 3 ref. ?) te vervangen, moet de betreffende steun worden losgeschroefd met behulp van gereedschap dat gewoon in de handel verkrijgbaar is. Plaats het nieuwe filterelement en zorg ervoor dat de rubberen ringpakkingen worden gesmeerd. De eerste verversing dient te worden uitgevoerd na 50 bedrijfsuren van de stroomopwekkingsgroep, voor de tweede en latere verversingen dient een interval van 400 uur in acht te worden genomen. Raadpleeg voor nadere bijzonderheden de gebruiks- en onderhoudshandleiding van de motor. Gebruik voor de veiligheid van de motor uitsluitend oorspronkelijke vervangingsonderdelen. Maak alle onderdelen van de Voordat u zich toegang verschaft tot de stroomopwekkingsgroep moet de negatieve pool van de startaccu worden afgekoppeld, om onopzettelijke starts van de groepte vermijden. 6.4 Vervanging van het brandstoffilter Om een lange levensduur en de juiste werking van de motor te waarborgen, is het uiterst belangrijk dat het filterelement van het brandstoffilter regelmatig wordt vervangen, op de tijden die worden aangegeven door de fabrikant van de motor en vermeld staan in de tabel van paragraaf 5.12. Dit dient te gebeuren met de volgende handelingen: - sluit de brandstofkraan (afb. 3 ref. 24). - schroef de steunringmoer (afb. 3 ref. 13) helemaal los - verwijder het oude filterelement en plaats het nieuwe - herhaal voor het terugplaatsen dezelfde handelingen in omgekeerde volgorde. Na de vervanging is het noodzakelijk het brandstofsysteem te ontluchten, volgens de handelingen van paragraaf 3.2. Zorg ervoor dat de brandstof niet in contact komt met de huid. Draag handschoenen en een veiligheidsbril tijdens de onderhoudswerkzaamheden. Komt u toch in contact met brandstof, was het betreffende lichaamsdeel dan onmiddellijk zorgvuldig met veel water en zeep. stroomopwekkingsgroep die vervuild zijn met olie en brandstof na de werkzaamheden schoon. Verwijder na de vervanging alle sporen brandstof en geef de hiervoor gebruikte doeken af bij een speciaal Verzamelcentrum. 6.3 Reiniging van het luchtfilter 6.5 Controle van de koelvloeistof De stroomopwekkingsgroepen van de serie IS beschikken over een droog luchtfilter, dat verhindert dat er vreemd voorwerpen kunnen binnenkomen in de verbrandingsruimte. Voor het onderhoud is het voldoende de filterkern een maal per jaar schoon te maken met gasolie, om onzuiverheden te verwijderen. Periodiek moet het niveau van het koelmiddel in het gesloten koelcircuit worden gecontroleerd. De referentietekens voor deze controle zijn op het expansievat (afb. 3 ref. 11) aangegeven. Als het niveau onvoldoende is, moet er koelvloeistof worden toegevoegd in het expansievat, erop lettend dat de aanwijzing van het maximum niveau niet wordt overschreden. Laat de vloeistoffen die gebruikt worden voor het wassen van het luchtfilter niet in het milieu achter, maar geef hen af bij de speciale Verzamelcentra. Alle onderhoudswerkzaamheden op de stroomopwekkingsgroep moeten worden verricht bij uitgeschakelde motor, na hem voldoende te hebben laten afkoelen, en mogen alleen worden verricht door geautoriseerd personeel. - 18 Open de sluitdop van het expansievat (afb. 3 ref. 11) en van de tank (afb. 3 ref. 20) nooit als de motor warm is, om te vermijden dat de koelvloeistof gevaarlijk naar buiten komt. IS 10 T 50 Hz 6.6 Controle van de spanning van de V-snaren 6.8 Verversing van de koelvloeistof Er wordt een V-snaar gebruikt om de rotatiebeweging over te brengen van de poelie van de motoras naar die van de zeewaterpomp (afb. 9 ref. 1). Een overmatige spanning van de riem versnelt de slijtage ervan, terwijl een geringe spanning de poelies onbelast laat draaien en dus niet voor voldoende circulatie van het water zorgt. Regel de spanning van de riem als volgt: Ververs de koelvloeistof in het gesloten koelcircuit ieder jaar. Sluit een stuk rubberslang (afb. 10 ref. 2) met een lengte van 20-30 cm aan op de aftapkraan (afb. 10 ref. 1) die op het onderstel van de motor zit, om de opvang van afgewerkte koelvloeistof in een opvangbak (afb. 10 ref. 3) te vergemakkelijken. Open de kraan en laat het gesloten koelcircuit helemaal leeglopen. Sluit de kraan weer na deze handeling en vul het circuit opnieuw met koelvloeistof. haal de twee stelschroeven (afb. 9 ref. 2) los en verplaats de zeewaterpompen naar buiten om de spanning te vergroten, of naar binnen om haar te verkleinen. Blokkeer de schroeven en controleer de spanning ervan. De riem is correct gespannen als hij ongeveer 5 mm doorbuigt (afb. 9) onder een belasting van 8 kg. Een tweede riem wordt gebruikt voor overdracht van de rotatie van de poelie van de aandrijfas naar die van de vloeistofpomp van het gesloten circuit en van de wisselstroomdynamo van de batterijlader (afb. 9 ref. 3). Regel de spanning van de riem als volgt: haal de stelschroef (afb. 9 ref. 4) los en verplaats de wisselstroomdynamo van de acculader (afb. 9 ref. 5) naar buiten om de spanning te vergroten en naar binnen om haar te verkleinen. De riem is correct gespannen als hij ongeveer 10 mm doorbuigt (afb. 9) onder een belasting van 8 kg. Om te vermijden dat de riem onbelast draait, mag hij niet met olie worden vervuild. Maak de riem schoon met benzine als er bij een controle vet op blijkt te zitten. Kom nooit met uw handen aan de V-snaar of aan de poelies als de motor gestart is. 6.7 Lediging van het koelsysteem Voor onderhoud op de warmtewisselaar water-lucht of op het koelsysteem moet het aanzuigcircuit van het zeewater worden geleegd. Dit dient als volgt te worden gedaan: - sluit de kraan van de zeewaterinlaat (afb. 6 ref. 2); - open de aftapkraan (afb. 6 ref. 3) totdat het water helemaal is weggelopen. - sluit de aftapkraan weer. Open de zeewaterinlaatkraan weer voordat u de stroomopwekkingsgroep start. Laat afgewerkte koelvloeistof niet in het milieu achter, want het is een vervuilende stof. Geef afgewerkte koelvloeistof af bij de speciale verzamelcentra die belast zijn met de verwerking ervan als afval. NL 6.9 Vervanging van de zinkanodes Ter bescherming van de warmtewisselaar water-lucht (afb. 11 ref. 1) en de warmtewisselaar water-vloeistof (afb. 11 ref. 2) tegen galvanische stromen zitten hierin twee opofferingsanodes van zink (afb. 11 ref. 4). De slijtagetoestand hiervan moet regelmatig worden gecontroleerd, en zo nodig moeten ze worden vervangen om te voorkomen dat galvanische stromen de warmtewisselaar onherstelbaar beschadigen. Het wordt geadviseerd het zink minstens eenmaal per maand te controleren als de groep nieuw is, om de slijtagesnelheid na te gaan, en vervolgens op basis daarvan een regelmaat vast te stellen Het is hoe dan ook wenselijk de zinkanoden minstens eenmaal per jaar te vervangen. Op afb. 11 worden de punten aangegeven waarop de zinkanoden geplaatst zijn. 6.10 Onderhoud van de zeewaterpomp Minstens eenmaal per jaar moet worden gecontroleerd of de rubberen rotor van de zeewaterpomp intact is (afb. 12 ref. 1). Alvorens de zeewaterpomp open te maken voor inspectie van de rotor moet het zeewater uit het koelcircuit worden afgetapt, zoals beschreven in paragraaf 5.7. Om bij de rotor te kunnen komen moet het sluitdeksel (afb. 12 ref. 2) worden verwijderd en moet de rotor met een tang worden weggehaald, door hem met kracht naar buiten te trekken. Voor het terugplaatsen van een nieuwe rotor moeten de bovenstaande handelingen in omgekeerde volgorde worden herhaald. - 19 IS 10 T 50 Hz 6.11 Onderhoud van de wisselstroomdynamo 6.13 Inactieve periodes De wisselstroomdynamo die op dit model generator wordt gebruikt is van het synchrone, zelfbekrachtigde type met elektronische spanningsregeling. Dit model wisselstroomdynamo, zonder spruitstuk en borstels, vereist geen bijzondere onderhoudswerkzaamheden. De controles en het periodieke onderhoud zijn beperkt tot het elimineren van eventuele vocht- en oxidatiesporen die de dynamo zouden kunnen beschadigen. Start de stroomopwekkingsgroep minstens eenmaal per maand. Als de groep lange tijd niet gebruikt zal worden, moeten de volgende werkzaamheden worden verricht: - ververs de motorolie - vervang het filterelement van het oliefilter (zie par. 5.2) - vervang het filterelement van het brandstoffilter (zie par. 5.4) - verwijder de verstuivers en doe in elke cilinder 2 cc motorolie, en laat de motor enkele toeren draaien door de poelie van de aandrijfas met de hand te draaien. Monteer de verstuivers weer. - Vervang de zinkblokjes (zie par. 5.9). - Laat antivriesvloeistof opzuigen door de zeewaterinlaatslang, hetgeen tot taak heeft de warmtewisselaars te beschermen tegen lage temperaturen en de rotor van de zeewaterpomp en de metalen onderdelen die in het koelsysteem zitten te smeren. - Koppel de startaccu af en zet hem op een droge plaats (zie par. 5.12) - Koppel de afvoerleiding in zee van het motorspruitstuk af. - Maak het zeewaterfilter schoon. - Sluit de kraan van de zeewaterinlaat - Laat het zeewater uit de uitlaatpijp lopen. - Maak de antisifonklep schoon en smeer hem, als hij geïnstalleerd is (siphon break). 6.12 Onderhoud van de accu NL Het wordt geadviseerd om voor het starten van alle modellen stroomopwekkingsgroepen een accu van 80 A/h te gebruiken bij omgevingstemperaturen boven 0°C, en van 100 A/h voor lagere temperaturen. Het is belangrijk dat een nieuwe accu die geïnstalleerd wordt, helemaal is opgeladen. Controleer minstens eenmaal per maand het niveau van het elektrolyt en vul het eventueel aan met gedistilleerd water. Als de stroomopwekkingsgroep lange tijd niet wordt gebruikt, is het raadzaam de accu af te koppelen en op een droge plaats bij een temperatuur boven 10°C te bewaren, en hem eenmaal per maand helemaal op te laden. Als de accu lange tijd helemaal leeg wordt gelaten, bestaat de kans dat hij onherstelbaar beschadigd wordt. Bescherm de positieve accuklem beslist zorgvuldig met vaseline, om corrosie en roestvorming te vermijden. Voor het bijvullen van zwavelzuur moeten beslist al geprepareerde oplossingen worden gebruikt. Bij het uitvoeren van de werkzaamheden voor het bijvullen van accus, met gedistilleerd water of zuur, moeten rubberen handschoenen en een beschermbril worden gedragen, om onopzettelijke contact van zwavelzuur met de huid te voorkomen. Komt u toch in contact met zwavelzuur, was het betreffende lichaamsdeel dan zorgvuldig met veel water en zeep, en raadpleeg een arts. Alvorens de accu weer te gaan opladen dient u het niveau van het elektrolyt te controleren en eventueel aan te vullen met gedistilleerd water. Dit moet opnieuw worden gedaan als de oplaadcyclus beëindigd is. - 20 IS 10 T 50 Hz 6.14 Samenvattingstabel van de geprogrammeerde ingrepen HANDELING UREN Controle niveau motorolie ..................................... 10 Controle niveau koelvloeistof ................................ 10 Controle op olielekkages ...................................... 20 Controle op brandstoflekkages ............................. 20 Controle op vloeistoflekkages ............................... 20 Instelling spanning V-snaar ................................. 100 Controle acculading ............................................ 100 Reiniging brandstoffilter ....................................... 200 Instelling van de riemspanning ............................ 200 *Verversing motorolie .......................................... 200 Controle rotor zeewaterpomp .............................. 400 Controle toerental motor ...................................... 400 Controle toestand elektrische aansluitingen ........ 400 Vervanging brandstoffilter .................................... 400 *Vervanging oliefilter ............................................ 400 Controle verstuivers ............................................. 400 Controle injectiefasering ...................................... 400 Instelling speling inlaat/aftapklep ........................ 400 Controle brandstofinjectiepomp ......................... 1000 Controle elektrolytniveau accu .................. MENSILE Metalen onderdelen reinigen en roest verwijderen ...................................... ANNUALE Reiniging luchtfilter ................................... ANNUALE Totale verversing koelvloeistof .................. ANNUALE Vervanging zinkanodes ............................ ANNUALE * De eerste verversing na 50 uur, daarna volgens de aangegeven intervallen. De motor vormt veel rook bij de uitlaat - Controleer of het olieniveau in de pan niet hoger is dan de aanduiding MAX. (het niveau herstellen). - Controleer of de groep niet overbelast is. - Controleer de afstelling van de verstuivers (Raadpleeg de Assistentie). De motor werkt onregelmatig - Controleer de brandstoffilters (vervangen). - Tap de luchtbellen af uit het brandstofcircuit. (Zie par. 3.2) De spanning van de wisselstroomdynamo is te laag. - Corrigeer de spanningswaarde via de elektronische regelaar. - Controleer het toerental van de motor (1560 rpm zonder aangesloten gebruikers). - Spanningsregelaar defect (vervangen). NL Startaccu leeg - Controleer het niveau van de elektrolyt in de accu (Niveau herstellen). - Controleer de werking van de wisselstroomdynamo. - Controleer of de accu intact is. De stroomopwekkingsgroep geeft geen spanning af. - Controleer of de magnetothermische schakelaar (afb. 4 ref. 2) in de stand ON staat. Als dit niet zo is, neem dan contact op met een erkend assistentiecentrum. TAB "B" 6.15 Storingentabel De startmotor draait maar de hoofdmotor start niet - Controleer of er brandstof in de tank zit. (Bijvullen) - Controleer of de stop-elektromagneet in trekkende stand is (Raadpleeg de Assistentie). - Tap luchtbellen uit het brandstofcircuit af. (Zie par. 3.2) De motorbeschermingsmodule wordt niet geactiveerd als op de START-knop wordt gedrukt. - Controleer of de beschermende thermische schakelaar (afb. 4 ref. 3) open is. (Herstel het contact door op de rode knop te drukken (afb. 4 ref. 3). - Controleer de verbindingskabels en -klemmen op de accu en de elektrische aansluitingen (weer aansluiten). - Controleer of de accu intact is (heropladen of vervangen). De stroomopwekkingsgroep gaat uit tijdens het werk - Controleer of er een bescherming is geactiveerd en het bijbehorende lampje is gaan branden. (Elimineer de oorzaak en probeer opnieuw te starten). - Controleer of er brandstof in de tank zit (bijvullen). - 21 IS 10 T 50 Hz 7. TECHNISCHE EIGENSCHAPPEN Model Type Cilinders Materiaal cilinderblok Boring (mm) Slag (mm) Cilinderinhoud (cc) Vermogen 50/60 Hz (PK) Toerental 50/60 Hz (rpm) Compressieverhouding Verbrandingssysteem Materiaal kop Regelaar Smeersysteem Inhoud oliepan (l.) Motorstopsysteem Brandstofpomp Max. opstuwing brandstof (cm) Brandstofverbruik (g/hp/h) Vereiste lucht (l/min) Startaccu /Ah-V) Acculader (Ah-V) Startmotor (kW-V) Max. kanteling NL Type Instelling Koeling Spanning (V) Frequentie (Hz) Max. vermogen (Kw) Cont. vermogen (Kw) Vermogensfactor (cos. Ø ) Isolatieklasse Spanningsstabiliteit Frequentiestabiliteit - 22 ,67 50 Hz Yanmar 3TNE78A diesel, 4-takt 3 gietijzer 78 84 1204 13,5 1500 18:1 Directe injectie gietijzer centrifuge, mechanisch gestuwd 5,2 spoel elektrisch 70 2,9 730 70 - 12 40 - 12 1,2 - 12 30° 50 Hz synchroon, 4-polig, zelfbekrachtigd elektronisch lucht/water (Intercooler W/A) 400 50 7,8/9,75 7,2/9 1 - 0,8 H ±2% ±5% IS 10 T 50 Hz Onderdelen van het schakelschema - afb. 9 1 2 3 4 5 6 7 8 9 10 11 12 13 14 15 16 17 18 19 20 21 22 23 24 25 26 27 Magnetothermische schakelaar Urenteller Wisselstroomdynamo Stator Bekrachtiger Elektronische spanningsregelaar Thermische schakelaar Motorbeschermingsmodule START/STOP-knop Brandstofmeter Indicator oliedruk Indicator watertemperatuur Brandstofpomp Sensor hoge watertemperatuur Sensor hoge temperatuur koelvloeistof Oliedrukschakelaar Wisselstroomdynamo Elektromagnetische stopmagneet Startmotor Verbindingsklemmen accu Instrument indicator oliedruk Instrument indicator temperatuur koelvloeistof STAT/STOP-knop Verbindingskabel afstandsbedieningspaneel Connector voor verbinding afstandbedieningspaneel Afstandsbedieningpaneel Afstandsbedieningpaneel NL - 23 IS 10 T 50 Hz IS 8 - 9.5/ 9 - 10.2 - 24 MOTORE ENGINE FIG. 1 / 7 Rev. / Rel. IS 10 T 50 Hz MOTORE ENGINE IS 8 - 9.5/ 9 - 10.2 5LI &RG 1 1 1 1 2 3 4 5 6 7 8 9 10 11 12 13 13A 13B 13C 14 15 16 17 18 19 20 21 22 23 24 25 26 27 28 29 30 31 32 33 34 35 36 37 38 39 40 41 42 43 44 45 46 47 48 49 50 51 L M N 81078 81127 81214 81215 62319 62317 62318 70309 010952 20250 10791 70198 10785 11203 10581 011084 11290 32235 32234 92682 92640 11286 11278 11285 31004 71059 010664 11280 10817 11282 910280 910281 910282 910283 910284 910232 910296 910076 71169 71185 10294 20104 10561 40307 92891 11281 910306 010541 11284 910319 010668 70229 10703 71062 10567 010670 70211 4W\ 'HVFUL]LRQH 1 1 1 1 2 2 2 4 1 1 9 mt.0,35 2 1 1 1 1 1 1 1 1 1 1 2 1 1 1 2 1 1 2 1 1 2 2 4 1 1 mt.1,8 mt.1,5 1 1 8 4 1 3 1 1 2 1 1 cm.60 1 0,012 1 1 cm.27 MOTORE YANMAR 3TNE78A MG ,6 MOTORE YANMAR 3TNE78 MG EPA ,6 MOTORE YANMAR 3TNE 82A MG,6 MOTORE YANMAR 3TNE 82A-EMG EPA,6 STAFFA FISSAGGIO GRUPPO STAFFA DX/SX SUPPORTO ALTERNATORE STAFFA SX/DX SUPPORTO MOTORE ANTIVIBRANTE D50X30 STAFFA SUPPORTO POMPA OLIO POMPA RICAMBIO OLIO 3/4" FASCETTA D.8/16 H9 TUBO CARBURANTE D.10X17 RONDELLA D22 RACC. AD OCCHIO D.22 PORTAGOM.D.13 VITE FORATA M22X1,5 KIT TRASMETTITORI OLIO ACQUA RACC.3VIE TRASMETTITORI PRESS.OLIO TRASMETTITORE VDO 1/8" 5 BAR TRASMETTITORE VDO 16X1,5 120° PRESSOSTATO OLIO TERMOCONTATTO RACCORDO 3 VIE 1/8" F. RACCORDO D.5 X 1/8" M. RACCORDO PORTAGOMMA 1/8" D.7 POMPA PIERBURG 7.21440.03 VASO ESPANSIONE + TAPPO STAFFA SUPPORTO FILTRO NAFTA RACC. OCCHIO D.12 PORTAGOM. D.8 RACC. OCCHIO D.14 PORTAGOM. D.8 RACC. OCCHIO D.8 PORTAGOM. D.6 RONDELLA VITE FORATA VITE FORATA VITE FORATA RONDELLA RONDELLA SUPPORTO FILTRO NAFTA FILTRO NAFTA TUBO CARBURANTE A1 D.8 ISO7840 TUBO CARBURANTE A1 D.6 ISO7840 CABLAGGIO MOTORE DIODO BY 255 FASCETTA CABLAGGI 300X7,8 FASCETTA CABLAGGI 130X2,9 FILTRO OLIO FASCETTA D.30 GOMMATA FLANGIA MOTORE YANMAR 3TNE78A FLANGIA ACCOPPIAMENTO MOTORE SPINA ELASTICA D.8X16 VOLANO MOTORE CASSA FILTRO ARIA GUARNIZIONE ADESIVA 10X3 TIRANTE M 6X145 ELEMENTO FILTRANTE 10PPI PASSACAVO DG.48 COPERCHIO FILTRO ARIA GUARNIZIONE ADESIVA 50X6 INGRESSO POMPA INIEZIONE MOTORE INGRESSO POMPA INIEZIONE MOTORE RITORNO INIETTORI FIG. 1 / 7 Rev. / Rel. 'HVFULSWLRQ ENGINE YANMAR 3TNE78A MG 50Hz ,6 ENGINE YANMAR 3TNE78A MG 60Hz EPA ,6 ENGINE YANMAR 3TNE82A MG 50Hz ,6 ENGINE YANMAR 3TNE82A EMG 60Hz EPA - ,6 BRACKET RH/LH BRACKET ALTERNATOR SUPPORT RH/LH BRACKET ENGINE SUPPORT SHOCK ABSORBER BRACKET OIL PUMP SUPPORT OIL DRAINAGE PUMP CLAMP D.8/16 H9 FUEL PIPE D.10X17 WASHER D.22 UNION D.22 HOLLOW SCREW M22X1,5 OIL WATER TRANSMITTER KIT OIL WATER TRANSMITTER UNION TRANSMITTER VDO 1/8" 5 BAR TRANSMITTER VDO 16X1,5 120° LOW OIL PRESSURE SWITCH THERMOSTAT UNION UNION UNION PIERBURG PUMP SUB-TANK + PLUG FUEL FILTER BRACKET SUPPORT UNION UNION UNION WASHER HOLLOW SCREW HOLLOW SCREW HOLLOW SCREW WASHER WASHER FUEL FILTER SUPPORT FUEL FILTER FUEL PIPE A1 D.8 ISO7840 FUEL PIPE A1 D.6 ISO7840 ENGINE HARNESS DIODE BY 255 HARNESS CLAMP HARNESS CLAMP OIL FILTER RUBBERIZED CLAMP ENGINE FLANGE ENGINE ASSEMBLING FLANGE SPRING PIN MOTOR FLYWHEEL AIR FILTER BOX ADHESIVE GASKET ROD AIR FILTER ELEMENT GROMMET AIR FILTER COVER ADHESIVE GASKET ENGINE INJECTION PUMP ENTRANCE ENGINE INJECTION PUMP ENTRANCE INJECTOR RETURN - 25 IS 10 T 50 Hz ALTERNATORE ALTERNATOR IS 8 - 9.5/ 9 - 10.2 5LI &RG 1 2 3 4 5 6 7 8 9 10 11 12 13 14 15 16 17 010526 012408-0 910285 010540 910316 910313 80158 010758 910317 70229 71197 010674 97724 010293 71195 32421 70522 010676 41668 - 26 4W\ 'HVFUL]LRQH 1 1 2 1 1 6 1 1 1 cm.60 1 1 1 1 2 1 2 1 1 ALTERNATORE ECM032 50Hz,6,6 ALTERNATORE ECM032 60Hz ,6,6 DISCO ACCOPPIAMENTO VENTOLA ALTERNATORE ROTORE DIODO ROTORE CUSCINETTO ROTORE FASCIA PROTEZIONE ALTERNATORE STATORE GUARNIZIONE ADESIVA 10X3 O-RING D. 52,07X 2,62 COPERCHIO ALTERNATORE REGOLATORE DI TENSIONE CABLAGGIO MOTORE BOCCOLA PASSACAVO MORSETTIERA MANOPOLA COPERCHIO MORSETTIERA ADESIVO SCHEMA ELETTRICO FIG. 2 / 7 Rev. / Rel. 'HVFULSWLRQ ALTERNATOR ECM032 50Hz ,6,6 ALTERNATOR ECM032 60Hz,6,6 ASSEMBLING DISK ALTERNATOR FAN ROTOR ROTOR DIODE ROTOR BALL BEARING ALTERNATOR PROTECTION BAND STATOR ADHESIVE GASKET 10X3 O-RING D.52,07X 2,62 ALTERNATOR COVER VOLTAGE REGULATOR ENGINE HARNESS CORE HITCH MAIN TERMINAL BOARDS HANDLE MAIN TERMINAL BOARDS COVER WIRING DIAGRAM ADHESIVE IS 10 T 50 Hz IS 8 - 9.5/ 9 - 10.2 CASSA FRAME FIG. 3 / 7 Rev. / Rel. - 27 IS 10 T 50 Hz CASSA FRAME IS 8 - 9.5/ 9 - 10.2 5LI &RG 1 2 3 4 5 6 7 8 9 10 11 12 13 14 15 16 17 18 19 20 21 22 23 24 25 26 27 28 29 30 010532 010533 010534 010535 010536 010537 010538 71172 011066 011067 62334 71078 41628 70210 71182 71105 71139 010663 010754 071171 62331 10566 10299 70415 70416 11277 71170 10782 70958 10823 - 28 4W\ 'HVFUL]LRQH 1 1 2 1 2 1 1 1 1 8 4 1 1 cm.4 cm.20 mt.0,21 mt.6 1 1 4 2 6 2 2 2 2 2 1 1 13 PANNELLO FISSO ALTERNATORE PANNELLO FISSO MOTORE SPORTELLO LATERALE SPORTELLO SUPERIORE CHIUSURA DX/SX FONDO CHIUSURA POSTERIORE FONDO CHIUSURA ANTERIORE FONDO KIT FONOASSORBENTE KIT PROFILATI ANGOLO 3 VIE CHIUSURA REGOLABILE MANIGLIA POCKET PULL PIANALE COMPENSATO GUARNIZIONE ADESIVA 20X3 CHIUSURA A STRAPPO TRAFILATO AD "U" EPDM GUARNIZIONE ADESIVA 20X5 PROTEZIONE CRUSCOTTO PANNELLO STRUMENTI ANTIVIBRANTE D50X30 STAFFA FISS.DOPPIO ANTIVIBRANTE PASSACAVO DG. 29 VITE M8x35 BOCCOLA D.20/12/ H 8 BOCCOLA D.20X12 H 4 PORTAGOMMA NAFTA TAPPO RACC.P.P.ACQUA D17/16,3 L60 TAPPO ATTACCO RAPID M6 NUT 986 FIG. 3 / 7 Rev. / Rel. 'HVFULSWLRQ ALTERNATOR FIX PANEL ENGINE FIX PANEL LATERAL DOOR UPPER DOOR BOTTOM RH/LH CLOSURE BOTTOM REAR CLOSURE BOTTOM FRONT CLOSURE SOUNDPROOFING KIT DRAW PIECES KIT CORNER ADJUSTING CLOSURE HANDLE WOODEN BASE ADHESIVE GASKET TUG CLOSING EPDM DRAFT ADHESIVE GASKET CONTROL PANEL PROTECTION INSTRUMENTS PANEL SHOCK ABSORBER BRACKET CORE HITCH SCREW BUSHING BUSHING FUEL NIPPLE PLUG UNION PLUG UNION IS 10 T 50 Hz IS 8 - 9.5/ 9 - 10.2 GRUPPO MARINIZZAZIONE SEA WATER FIG. 4 / 7 Rev. / Rel. - 29 IS 10 T 50 Hz GRUPPO MARINIZZAZIONE IS 8 - 9.5/ 9 - 10.2 - 30 5LI &RG 1 2 3 4 5 6 7 8 9 10 11 12 13 14 15 16 17 18 19 20 21 22 23 24 25 26 27 28 29 30 31 32 33 34 35 35A 35B 35C 35D 35E 35F 35G 35H 35I 35L 35M 35N 62320 010666 10814 10614 70442 70969 11164 10825 10872 910200 71167 11276 011273 010525 010296 11279 910287 11196 71164 011388 30253 70873 011390 11281 62323 80162 50282 71166 11199 08886 50292 010735 71168 10342 20639 910320 910321 80163 910322 910323 910324 910325 910326 910327 910328 910329 910330 SEA WATER 4W\ 'HVFUL]LRQH 1 1 4 6 cm.320 mt.1,07 6 10 4 1 1 2 1 1 1 1 1 6 1 1 1 mt.0,2 1 1 1 1 1 1 2 1 1 1 1 1 1 1 1 1 1 1 1 1 1 1 1 1 1 SCAMBIATORE ACQUA/ACQUA STAFFA SUPPORTO SCAMBIATORE GOMITO A 90° M/F 3/8" PORTAGOMMA D.15 TUBO D.15X23 TUBO RADIATORE FASCETTA D.32/ 44 FASCETTA D.16/ 25 H 9 FASCETTA D.50/ 70 H13 ZINCO SCAMBIATORE ACQUA/ACQUA MANICOTTO PORTAGOMMA FIL.1"GAS TAPPO SCAMBIATORE RACCORDO M40X 2 + BOCCHETTONE COLLETTORE SCARICO ACQUA TAPPO 1"GAS GUARNIZIONE COLL.SCARICO MOTORE TIRANTE M8X130 GUARNIZIONE COLL. MISCELATORE MISCELATORE TERMOCONTATTO VDO 70° RIF.867 TUBO SPIRALBENZ D. 50 CURVA SCARICO D.50/60° FASCETTA D.30 GOMMATA SCAMBIATORE ACQUA/ARIA ZINCO SCAMBIATORE ACQUA/ARIA PULEGGIA MOTORE CINGHIA TIRANTE M 8X115 STAFFA SUPP.POMPA PULEGGIA POMPA ACQUA STAFFA FISSAGGIO POMPA MANICOTTO D.16/90° RONDELLA D14X20X1,5 POMPA JOHNSON F4B-8 3/8" - NEOPRENE COPERCHIO GUARNIZIONE COLL.SCARICO MOTORE GIRANTE CAMMA CORPO TENUTA A LABBRO O-RING ALBERO ANELLO ELASTICO CUSCINETTO RONDELLA ANELLO ELASTICO FIG. 4 / 7 Rev. / Rel. 'HVFULSWLRQ WATER/WATER EXCHANGER EXCHANGER SUPPORT BRACKET ELBOW NIPPLE PIPE RADIATOR PIPE CLAMP CLAMP CLAMP WATER/WATER EXCHANGER ZINC SLEEVE NIPPLE EXCHANGER PLUG NIPPLE + HUB WATER EXHAUST MANIFOLD PLUG GASKET ROD MIXER GASKET MIXER THERMAL SWITCH PIPE D.50/90° EXHAUST BEND RUBBERIZED CLAMP WATER/AIR EXCANGER WATER/AIR EXCANGER ZINC ENGINE PULLEY V-BELT ROD PUMP SUPPORT BRACKET WATER PUMP PULLEY PUMP FASTENING BRACKET SLEEVE WASHER JOHNSON PUMP END COVER GASKET IMPELLER CAM BOBY LIP SEAL O-RING SHAFT RETAINING RING BALL BEARING WASHER RETAINING RING IS 10 T 50 Hz CRUSCOTTO COMANDI CONTROL PANEL IS 8 - 9.5/ 9 - 10.2 5LI &RG 1 2 3 4 5 5 6 6 6 7 8 010291 011266 012977 012978 012397 32393 32402 30270 30474 30475 32375 32689 32223 31029 30356 4W\ 'HVFUL]LRQH 1 1 1 1 1 1 1 1 1 1 1 1 1 1 1 QUADRO DI COMANDO ,6 50.115/230 QUADRO DI COMANDO ,6 60.120/240 QUADRO DI COMANDO ,6 50.115/230 QUADRO DI COMANDO ,6 60.120/240 PANNELLO + ADESIVO MODULO PROTEZIONE MOTORE INTERRUTTORE START/0/STOP CALOTTA PER T11-211 TIPO H CONTAORE 110V 50Hz ,6,6 CONTAORE 110V 60Hz ,6,6 INT.AM2S 35A 250V BIPOLARE,6,6 INT.AM2S 38A 250V BIPOLARE ,6 INT.AM2S 45A 250V BIPOLARE ,6 DISGIUNTORE TERMICO 12A FUSIBILE 6A 5x20 FIG. 5 / 7 Rev. / Rel. 'HVFULSWLRQ CONTROL PANEL CONTROL PANEL CONTROL PANEL CONTROL PANEL PANEL + LABEL ENGINE PROTECTION MODULE START/0/STOP BUTTON THERMAL SWITCH PROTECTION HOURSMETER 50Hz ,6,6 HOURSMETER 60Hz ,6,6 CIRCUIT BREAKER 35A 250V ,6,6 CIRCUIT BREAKER 38A 250V ,6 CIRCUIT BREAKER 45A 250V,6 THERMAL SWITCH 12A FUSE 6A - 31 IS 10 T 50 Hz CRUSCOTTO COMANDI A DISTANZA CON STRUMENTI REMOTE CONTROL PANEL WITH INSTRUMENTS IS 8 - 9.5/ 9 - 10.2 5LI &RG 1 1a 1b 1c 1d 1e 2 010878 010879 012396 41669 32402 32412 32413 011083 - 32 4W\ 'HVFUL]LRQH 1 1 1 1 1 1 1 1 KIT COMANDO A DIST. CON STRUMENTI QUADRO COMANDO A DISTANZA PANNELLO ADESIVO INTERRUTTORE START/0/STOP TERMOMETRO 12V 120°C MANOMETRO 12V 5BAR CAVO COMPLETO 20MT FIG. 6 / 7 Rev. / Rel. 'HVFULSWLRQ REMOTE CONTROL PANEL KIT WITH INSTRUMENTS REMOTE CONTROL PANEL WITH INSTRUMENTS PANEL LABEL START/0/STOP BUTTON WATER THEMPERATURE GAUGE OIL PRESSURE GAUGE 20m CABLE IS 10 T 50 Hz CRUSCOTTO COMANDI A DISTANZA SENZA STRUMENTI REMOTE CONTROL PANEL WITHOUT INSTRUMENTS IS 8 - 9.5/ 9 - 10.2 5LI &RG 1 1a 1b 1c 2 010881 010882 012395 41675 32402 011083 4W\ 'HVFUL]LRQH 1 1 1 1 1 1 KIT COMANDO A DISTANZA QUADRO COMANDO A DISTANZA PANNELLO ADESIVO INTERRUTTORE START/0/STOP CAVO COMPLETO 20MT FIG. 7 / 7 Rev. / Rel. 'HVFULSWLRQ REMOTE CONTROL PANEL KIT REMOTE CONTROL PANEL PANEL LABEL START/0/STOP BUTTON 20m CABLE - 33