1
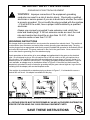
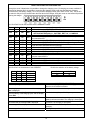
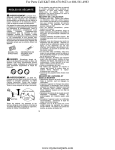
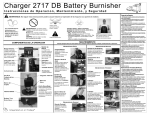
OPERATION MANUAL
COLT 800 PB
IMPORTANT SAFETY INSTRUCTIONS
WARNING: Failure to observe these instructions can cause
personal injury to machine operator or bystanders.
WARNING: Fire or explosion hazard.
NEVER operate this machine in an
explosive atmosphere (grain dust,
flammable liquids or fumes, etc.).
INTENDED USE
The Colt 800 PB units are intended for commercial use,
vacuuming up wet and / or dry spills from floors, in an
indoor environment. This machine is NOT for use in
asbestos or hazardous waste removal. NSS does not
recommend using these machines for any other
purpose.
FOR SAFETY:
• ALWAYS read and understand all instructions before
operating or servicing machine.
• ALWAYS use this machine ONLY as described in
this manual.
• NEVER attempt to operate this machine unless you
have been trained in its operation.
• NEVER allow an untrained person to operate this
machine.
• NEVER attempt to operate this machine if it is not
working properly or has been damaged in any
manner.
• If appliance is not working as it should, has been
dropped, damaged, left outdoors, or dropped into
water, return it to a service center.
• NEVER disconnect or modify any switches or safety
devices.
• NEVER drop or insert any object into any machine
opening.
• NEVER operate this machine with any air opening
blocked. Keep all air openings free of dust, lint, hair, etc.
• NEVER allow the vacuum motor or battery-charging plug
to get wet or a short may occur.
• NEVER operate this machine when the battery charger is
plugged in.
WARNING: Fire or explosion hazard.
NEVER use to pick up flammable or
combustible liquids, or any thing that is
burning or smoking, such as cigarettes,
matches, or hot ashes.
• NEVER unplug charger by pulling on the cord. To
unplug the battery charger cord from the outlet,
grasp the plug, not the cord.
• NEVER pick up anything that is burning or smoking,
such as cigarettes, matches or hot ashes.
• NEVER allow this machine to be used as a toy.
Close attention is necessary when used by or near
children.
• ALWAYS wear clean tennis shoes or “non-slip”
shoes. Leather shoes will become extremely
slippery when wet.
• ALWAYS keep face, fingers, hair or any other body
part or loose clothing away from any machine
opening or moving part.
• ALWAYS use extreme caution when operating the
machine on a ramp or loading / unloading this
machine into or out of a truck / trailer. Use extreme
caution if the ramp is wet, oily, or covered with
cleaning chemicals.
• NEVER stop or turn the machine on a ramp or
incline.
• ALWAYS use extreme care when cleaning on stairs
or when machine is placed on stairs.
• NEVER operate this machine with out the dust bag
and / or filters in place, except during wet pick-up.
• NEVER use any attachments other than the
manufacturers recommended attachments.
• NEVER spray this machine with water or any liquids.
• NEVER operate the machine outdoors.
• NEVER expose the machine to rain, snow, or
extreme temperatures.
• ALWAYS store this machine indoors in a dry, cool
area.
ALL REPAIR SERVICE MUST BE PERFORMED BY AN NSS AUTHORIZED DISTRIBUTOR /
SERVICE STATION USING ONLY NSS ORIGINAL EQUIPMENT PARTS.
SAVE THESE INSTRUCTIONS
Colt 800 PB Operation Manual, Orig. 09-05 Rev A 10-05
7591021
MANUEL D'UTILISATION
COLT 800 PB
IMPORTANTES INSTRUCTIONS DE SÉCURITÉ
AVERTISSEMENT: Ne pas respecter ces instructions peut mener à des
blessures pour l'opérateur de l'appareil ou les spectateurs.
AVERTISSEMENT : Danger
d'incendie ou d'explosion.
NE JAMAIS faire fonctionner cet
appareil dans un milieu explosif
(poussière céréalière, liquides ou
fumées inflammables, etc.).
UTILISATION PRÉVUE
Les appareils Colt 800 PB sont des appareils à
utilisation commerciale pour aspirer les
déversements humides et/ou secs des planchers,
dans un milieu intérieur. Cet appareil N'est PAS pour
retirer l'amiante ou les déchets dangereux. NSS ne
recommande pas d'utiliser ces appareils à d'autres
fins.
DE SÉCURITÉ :
• TOUJOURS lire et comprendre toutes les
instructions avant d'utiliser ou de réparer l'appareil.
• TOUJOURS utiliser l'appareil SEULEMENT selon
la description dans ce manuel.
• NE JAMAIS essayer de faire fonctionner cet
appareil à moins d'être formé pour son utilisation.
• NE JAMAIS permettre à une personne non formée
de faire fonctionner cet appareil.
• NE JAMAIS essayer de faire fonctionner cet
appareil s'il ne fonctionne pas correctement ou s'il
a été endommagé de quelque manière que ce soit.
• SI l’appareil ne fonctionne pas correctement, a été
échappé, endommagé, laissé à l’extérieur ou
échappé dans l’eau, retournez-le à un centre de
service.
• NE JAMAIS débrancher ou modifier les
interrupteurs ou les dispositifs de sécurité.
• NE JAMAIS laisser tomber ou insérer un objet
dans toute ouverture de l'appareil.
• NE JAMAIS faire fonctionner cet appareil lorsqu'une
ouverture d'air est bloquée. Garder toutes les
ouvertures d'air libres de poussières, peluche, cheveux,
etc.
• NEJAMAIS laisser le moteur ou la prise de charge de la
batterie se mouiller ou se court-circuiter.
• NE JAMAIS faire fonctionner cet appareil avec le
chargeur de batterie branché.
AVERTISSEMENT : Danger d'incendie ou
d'explosion.
NE JAMAIS utiliser pour ramasser des liquides
inflammables ou combustibles ou toute autre
chose qui brûle ou fume, comme des cigarettes,
des allumettes ou des cendres chaudes.
• NE JAMAIS débrancher le chargeur en tirant le cordon.
Pour débrancher le cordon du chargeur de batterie de la
prise, agripper la fiche non pas le cordon.
• NE JAMAIS ramasser quelque chose qui brûle ou fume,
comme des cigarettes, des allumettes ou des cendres
chaudes.
• NE JAMAIS laisser cet appareil servir de jouet.
Attention tout particulièrement lorsque l'appareil est
utilisé par ou près d'enfants.
• TOUJOURS porter des souliers de tennis ou des
souliers « antidérapants ». Les souliers à semelles de
cuir sont extrêmement glissants lorsqu'ils sont mouillés.
• TOUJOURS garder le visage, les doigts, les cheveux ou
toute autre partie du corps ou vêtements amples loin de
toute ouverture de l'appareil ou pièce mobile.
• TOUJOURS être prudent en utilisant l'appareil sur une
rampe ou en chargeant / déchargeant cet appareil dans
ou hors d'un camion / d'une remorque. Être
particulièrement prudent si la rampe est mouillée,
huileuse ou couverte de produits chimiques de
nettoyage.
• NE JAMAIS s'arrêter ou tourner l'appareil sur une
rampe ou une pente.
• TOUJOURS utiliser l'appareil prudemment en nettoyant
les escaliers ou lorsque l'appareil lui-même est sur
l'escalier.
• NE JAMAIS faire fonctionner cet appareil sans sac à
poussières et / ou filtres en place, sauf durant le
ramassage mouillé.
• NE JAMAIS utiliser d'accessoires autres que ceux
recommandés par le fabricant.
• NE JAMAIS pulvériser cet appareil d'eau ou d'autres
liquides.
• NE JAMAIS faire fonctionner l'appareil à l'extérieur.
• NE JAMAIS exposer l'appareil à la pluie, à la neige ou à
des températures extrêmes.
• TOUJOURS ranger cet appareil à l'intérieur dans un
endroit sec et frais.
TOUTES LES RÉPARATIONS DOIVENT ÊTRE EFFECTUÉES PAR UN DISTRIBUTEUR / STATION
SERVICE AUTORISÉ(E) NSS UTILISANT SEULEMENT DES PIÈCES ORIGINALES NSS.
CONSERVER CES INSTRUCTIONS
IMPORTANT SAFETY INSTRUCTIONS
BATTERY POWERED EQUIPMENT WITH ON BOARD CHARGERS
WARNING: Failure to observe these instructions can cause personal injury to
machine operator or bystanders.
Read and understand all
instructions before installing
or charging batteries.
No smoking, open
flames, or sparks while
working with batteries.
Contains acid.
Avoid contact.
Poison. Causes
severe burns. Avoid
contact.
WARNING: Batteries emit hydrogen, which can cause fire or explosion.
NEVER smoke, light a match, or cause a spark during operation or charging.
ALWAYS charge in a well-ventilated area away from open flame.
GENERAL
BATTERY CHARGING
• ALWAYS read and understand all instructions
before installing or charging batteries.
• NEVER attempt to install or charge batteries
unless you have been trained to do so.
• NEVER allow an untrained person to install or
charge batteries.
• ALWAYS remove all jewelry when working on or
near the batteries.
• ALWAYS turn off all switches during installation
and service.
• ALWAYS disconnect the battery leads before
performing any service or repair.
• ALWAYS wear eye protection and protective
clothing to avoid contact with battery acid.
• NEVER lay anything on top of batteries as arcing
may occur.
• IF CONTACT WITH BATTERY ACID OCCURS,
follow these instructions:
• SKIN – rinse area with water.
• EYES – Flush with water for 15 minutes.
• INTERNAL – Drink water or milk. Follow with Milk
of Magnesia, beaten egg or vegetable oil. Call a
physician immediately.
• ALWAYS read instructions on charger carefully.
• ALWAYS use the NSS supplied charger with proper
voltage rating.
• ALWAYS check to ensure the battery water level
covers the battery plates before charging.
• ALWAYS check water level after charging and add
water if necessary to bring level to the bottom of the
fill hole.
• NEVER overfill batteries as
battery and machine damage
may result.
• ALWAYS wipe any acid from the
top of batteries using a soap solution.
• ALWAYS study battery manufacturers’ specific
precautions such as recommended rates of charge.
• ALWAYS reattach caps to batteries. Do not charge
with caps loose or removed.
• ADD only distilled or treated city water. Not well
water.
• NEVER charge a frozen battery.
• ALWAYS plug the charger into a grounded socket
outlet.
• NEVER touch uninsulated portion of output connector
or uninsulated battery terminal.
• ALWAYS disconnect the AC supply before making or
breaking the connections to the battery while
charging.
• NEVER open or disassemble charger.
• NEVER operate charger if the AC supply cord is
damaged or if the charger has received a sharp blow,
been dropped, or otherwise damaged in any way.
BATTERY INSTALLATION
• ALWAYS use two people to install, as batteries are
heavy.
• ALWAYS turn off all machine switches.
• ALWAYS position batteries as shown on the
machine installation decal.
• ALWAYS connect batteries as shown on the
machine installation decal to avoid shorting out the
batteries and the electrical system.
ALL REPAIR SERVICE MUST BE PERFORMED BY AN NSS AUTHORIZED DISTRIBUTOR /
SERVICE STATION USING ONLY NSS ORIGINAL EQUIPMENT PARTS.
IMPORTANTES INSTRUCTIONS DE SÉCURITÉ
ÉQUIPEMENT À BATTERIE AVEC CHARGEURS INTÉGRÉS
AVERTISSEMENT : Ne pas respecter ces instructions peut mener à des
blessures pour l'opérateur de l'appareil ou les spectateurs.
Lire et comprendre toutes les
instructions avant d'installer
ou de charger les batteries.
Ne pas fumer, aucune
flamme nue ou étincelles en
travaillant avec les batteries.
Contient de l’acide.
Évitez tout contact.
Poison. Cause de
graves brûlures.
Évitez tout contact.
AVERTISSEMENT: Les batteries émettent de l'hydrogène, qui pourrait provoquer un incendie
ou une explosion.
NE JAMAIS fumer, allumer une allumette ou provoquer une étincelle durant l'utilisation ou la charge.
TOUJOURS charger dans un endroit bien ventilé loin des flammes nues.
GÉNÉRALITÉS
• TOUJOURS lire et comprendre toutes les
instructions avant d'installer ou de charger les
batteries.
• NE JAMAIS essayer d'installer ou de charger les
batteries à moins d'être formé pour le faire.
• NE JAMAIS permettre à une personne non
formée d'installer ou de charger les batteries.
• TOUJOURS retirer tous les bijoux avant de
travailler sur ou près des batteries.
• TOUJOURS éteindre les commutateurs durant
l'installation et l'entretien.
• TOUJOURS débrancher les fils de la batterie
avant tout entretien ou réparation.
• TOUJOURS porter une protection oculaire et des
vêtements protecteurs pour éviter tout contact
avec l'acide de batterie.
• NE JAMAIS déposer quelque chose sur le dessus
des batteries car un arc pourrait en découler.
• S'IL Y A CONTACT AVEC L'ACIDE DES
BATTERIES, suivre ces instructions :
• PEAU – rincer l'endroit à l'eau.
• YEUX – rincer à grande eau pendant 15 minutes.
• INTERNE – boire de l'eau ou du lait. Faire suivre
de lait de magnésie, d'un oeuf fouetté ou d'huile
végétale. Appeler immédiatement un médecin.
INSTALLATION DE LA BATTERIE
• TOUJOURS utiliser deux personnes pour installer car
les batteries sont lourdes.
• TOUJOURS éteindre tous les interrupteur de
l'appareil.
• TOUJOURS placer les batteries tel qu'indiqué sur le
décalque d'installation de la machine.
• TOUJOURS brancher les batteries tel qu'indiqué sur
le décalque d'installation de la machine pour éviter
tout court-circuit des batteries et du système
électrique.
CHARGE DE BATTERIE
• TOUJOURS lire les instructions attentivement sur le
chargeur.
• TOUJOURS utiliser le chargeur fourni par NSS avec la
bonne tension.
• TOUJORUS vérifier pour s'assurer que le niveau
d'eau de la batterie couvre les plaques de batterie
avant la charge.
• TOUJOURS vérifier le niveau d'eau après la charge et
en ajouter au besoin pour que le niveau d'eau soit au
bas du trou de remplissage.
• NE JAMAIS trop remplir les
batteries car cela pourrait
endommager la batterie et la
machine.
• TOUJOURS essuyer tout acide du dessus des
batteries à l'aide d'une solution savonneuse.
• TOUJOURS étudier les précautions spécifiques du
fabricant de batteries comme les vitesses de charge
recommandées.
• TOUJOURS remettre les bouchons des batteries. Ne
pas charger avec des bouchons desserrés ou retirés.
• AJOUTER seulement de l'eau distillée ou de ville
traitée. Non pas de l'eau de puits.
• NE JAMAIS charger une batterie gelée.
• TOUJOURS brancher le chargeur dans une prise mise
à la terre.
• NE JAMAIS toucher de section non isolée du
connecteur de sortie ou de la borne de batterie non
isolée.
• TOUJOURS couper le courant alternatif avant d'établir
ou de couper les connexions de la batterie en
chargeant.
• NE JAMAIS ouvrir ou démonter le chargeur.
• NE JAMAIS faire fonctionner le chargeur si le cordon
est endommagé ou si le chargeur a reçu un coup dur, a
été échappé ou endommagé de quelque autre façon.
TOUTES LES RÉPARATIONS DOIVENT ÊTRE EFFECTUÉES PAR UN DISTRIBUTEUR / STATION
SERVICE AUTORISÉ(E) NSS UTILISANT SEULEMENT DES PIÈCES ORIGINALES NSS.
IMPORTANT SAFETY INSTRUCTIONS
GROUNDING OF ELECTRICAL EQUIPMENT
WARNING: Improper connection of the equipment–grounding
conductor can result in a risk of electric shock. Check with a qualified
electrician or service person if you are in doubt as to whether the outlet
is properly grounded. Do not modify the plug provided with the machine
– if it will not fit the outlet; have a proper outlet installed by a qualified
electrician.
Always use a properly grounded 3-wire extension cord, which has
male and female plugs. If 25 foot extension cords are used, the cord
size and construction should be no less than 14-3 ST., 50-foot
extension cords no less than 12-3 ST.
GROUNDING INSTRUCTIONS
This charger shall be grounded while in use to protect the operator from electric shock. The machine is
provided with a three-conductor cord and a three-contact grounding type attachment plug. The plug
must be plugged into an appropriate outlet that is properly installed and grounded in accordance with all
local codes and ordinances. The green conductor in the cord is the ground wire. Never connect this
wire to other than the grounding pin of the attachment plug.
Check nameplate on the machine to be sure voltage and cycle stated is the same as the electrical
outlet. Do not attempt to plug a 120-volt machine into a 240-volt outlet or a 240-volt machine into a
120-volt outlet. If the machine is provided with an attachment plug as shown in Figure A. below, it is
intended for use on a nominal 120-volt circuit. If a properly grounded receptacle as shown in Figure A.
is not available, an adapter may be installed as shown in Figure B. if the outlet box that houses the
receptacle is grounded. Be sure to fasten the grounding tab (the green colored rigid ear, lug or the like
extending from the adapter) with a metal faceplate screw.
If the machine is provided with an attachment plug as shown in Figure C., it is intended for use on a
nominal 240-volt circuit. No adapter is available for this plug.
NOTE: In Canada, the use of a temporary adaptor is not permitted by Canadian electrical code.
ALL REPAIR SERVICE MUST BE PERFORMED BY AN NSS AUTHORIZED DISTRIBUTOR /
SERVICE STATION USING ONLY NSS ORIGINAL EQUIPMENT PARTS.
SAVE THESE INSTRUCTIONS
IMPORTANTES INSTRUCTIONS DE SÉCURITÉ
MISE À LA TERRE DE L'ÉQUIPEMENT ÉLECTRIQUE
AVERTISSEMENT : Toute mauvaise connexion de l'appareilconducteur de mise à la terre peut mener à un risque de choc
électrique. Vérifier auprès d'un électricien ou d'un réparateur qualifié si
vous avez des doutes quant à la mise à la terre appropriée de la prise.
Ne pas modifier la fiche fournie avec l'appareil – si elle n'entre pas dans
la prise, faire installer une prise appropriée par un électricien qualifié.
Toujours utiliser une rallonge à 3 fils mise à la terre et à prises mâle et
femelle. Si vous utilisez une rallonge de 25 pieds, la taille du cordon
et sa construction ne doit pas être inférieure à 14-3 ST., les
rallonges de 50 pieds d'au moins 12-3 ST.
INSTRUCTIONS DE MISE À LA TERRE
Cet appareil chargeur doit être mis à la terre lorsqu'il est en marche pour protéger l'opérateur de tout
choc électrique. L'appareil est fourni avec un cordon à 3 conducteurs et une fiche de branchement
masse à trois contacts. La fiche doit être branchée dans une prise appropriée, installée et mise à la
terre correctement selon tous les codes et ordonnances locaux. Le conducteur vert du cordon est le fil
de masse. Ne jamais brancher ce fil à autre chose que la broche de masse de la fiche de
branchement.
Vérifier la plaque signalétique de l'appareil pour être certain que la tension et le cycle indiqués sont
les mêmes que la prise électrique. Ne pas essayer de brancher un appareil de 120 volts à une prise de
240 volts ou un appareil de 240 volts à une prise de 120 volts. Si l'appareil est fourni avec une fiche de
branchement tel qu'indiqué dans la figure A. plus bas, il doit donc être utilisé avec un circuit nominal de
120 volts. S'il n'y a pas de prise mise à la terre telle qu'indiqué dans la figure A. disponible, on peut
installer un adaptateur tel qu'indiqué dans la figure B. si la boîte à prises est mise à la terre. S'assurer
d'attacher la patte de mise à la terre (boucle, cosse rigide de couleur verte ou quelque chose de
semblable sortant de l'adaptateur) avec une vis de plaque signalétique de métal.
Si l'appareil est fourni avec une fiche de branchement tel qu'indiqué dans la figure C., il doit donc être
utilisé avec un circuit nominal de 240 volts. Il n'y a aucun adaptateur disponible pour cette fiche.
REMARQUE : Au Canada, l'utilisation d'un adaptateur temporaire est interdite par le code d'électricité canadien.
TOUTES LES RÉPARATIONS DOIVENT ÊTRE EFFECTUÉES PAR UN DISTRIBUTEUR / STATION
SERVICE AUTORISÉ(E) NSS UTILISANT SEULEMENT DES PIÈCES ORIGINALES NSS.
CONSERVER CES INSTRUCTIONS
Attaching Various Hoses
Hose cuffs may be difficult to attach when new. To ease
installation you may have to hold the hose cuff under
HOT tap water for 2 to 3 minutes to soften the hose cuff.
NOISE AND VIBRATION
NOISE – COLT 800 PB
Sound pressure level at
Operator position (wet Pick-up)
62 dB(A)
Squeegee Hose (if applicable)
• The end of the hose with the larger diameter cuff is
attached to the hose coupling by sliding it on. The
opposite end with the cuff that is smaller in diameter is
attached to the squeegee.
MACHINE INSPECTION
• Now that the machine is unpacked remember to
recycle all packing materials.
• Inspect the machine for damage or missing
components. If damage is found, contact the local
freight company to file a freight claim.
Super Flex hose with Swivel cuff for use with a wand
• The end of the hose with the larger diameter cuff is
attached to the hose coupling by sliding it on. The
opposite end with the cuff that is smaller in diameter
and movable is attached to the wand.
PREPARING THE MACHINE
Installing the batteries:
• Read all safety instructions in this manual before
installing batteries.
• Turn off switch.
• Unplug power head cord and remove power head.
• Empty the tank of all dirt or liquid.
• Unlock the tank latches at the front of the machine
and tilt back 8-gallon can.
• Refer to the wiring diagram on the bottom of the 8gallon can.
• Align the batteries in the compartment as shown on
the diagram.
• Install the battery cables as shown on the wiring
diagram.
• Tighten hex nuts with a wrench.
Install the Squeegee Assembly (if applicable):
• Place the squeegee lift arm in the storage (up)
position.
• The squeegee assembly mounts to the squeegee lift
arm using two (2) mounting knobs. Loosen the
mounting knobs and slide the squeegee assembly
onto the mounting plate.
• The squeegee assembly has two (2) small wheels to
prevent “rollover”. The roller wheels must be forward
of the squeegee assembly. Hand tighten the mounting
knobs. Do not use pliers to tighten.
• Do not add any weights or other pressure to the
squeegee mechanism. This will not improve the
performance and will shorten the life of the blades.
Caution: Do not short across two terminals with a
OPERATING THE MACHINE
wrench.
To turn the machine on, flip the switch located on the
upper left corner of the rear of the machine base.
• When using the wand with the squeegee tool on
floors, the operator should drop his / her arm slightly to
allow air to enter the front edge of the tool on the
forward stroke. On the backward stroke the operator
should raise his / her arm slightly to allow the back
edge of the tool to clear the floor. This method gives
the air a chance to do the work in the most effective
manner.
• The operator should make strokes at a leisurely pace
and at a length that feels the most natural.
• Always work away from the machine, pulling the
machine behind you.
• Loose or improper battery connections will cause
battery or machine damage and possible personal
injury.
Battery Charging
• To recharge the batteries plug the charger cord,
located at the rear of the machine, into an electrical
outlet.
• When the cord is plugged into an outlet the machine
will become disabled.
See charging instructions for more details.
Installing the hose coupling
• Push in on the plunger pin, on the left side of the
intake, then, insert the larger diameter end of the
hose coupling into the intake opening until it stops.
Release the plunger pin.
• To remove; push in on the plunger pin, grasp the
coupling and pull.
Dry Pick Up
• Clean or replace the filter bag when suction is
reduced.
• Choose the proper wand and tool
• Use a paper bag to make disposal easier.
Wet Pick Up
The Micro Filter Assembly, HEPA Assembly, or Filter
Bag may be used when picking up liquids. The Filter
Bag helps prevent debris and foam from being pulled
into the vacuum motor and fans, causing motor damage
and possible failure.
• The motor will speed up and sound different when the
airflow is closed off.
7
• As the liquid level rises the built-in float will be
activated, when the liquid reaches the bottom of the
float the float will close off the airflow only, not the
vacuum motor.
• The built in float will not be activated by foam.
• NSS recommends that you always use a defoamer
agent along with low foaming chemicals diluted
according to manufacturers specifications. If the
vacuum motor is flooded with liquids or foam
immediately turn the motor OFF.
Battery Electrolyte (Liquid) Level
• Inspect the electrolyte level of at least one cell in each
battery before charging. The liquid must be visible
above the internal plates. Do not charge the batteries
if the liquid is below the plates.
• Add only water to the cell of a battery to adjust the
liquid level. Distilled water preferred, Do Not use well
water. Before charging, add only enough water to
cover the top of the internal plates. After charging,
add only enough water to bring the level to the bottom
of the fill tube.
• Do not overfill the battery liquid level, this will cause
electrolyte (acid) spill. Spilled electrolyte (acid) can
cause machine damage and personal injury. Clean up
and dispose of all spills immediately.
• See the battery-warning sheet for more details.
HEPA Units - Dry Pick Up
The HEPA and the Micro Filter Assemblies must be
used to maintain HEPA level filtration.
• Clean or replace the Micro Filter discs (3), and the
filter bag when suction is reduced.
• Replace the HEPA Filter (complete box) when
suction is reduced.
• DO NOT modify the filter assemblies in any manner.
• Return the motor to an authorized NSS service
center for inspection.
Squeegee Assembly
• Remove squeegee assembly from machine.
• Rinse with clean water to prevent chemical residue
build-up.
• Allow to air dry, it can be stored on top of the machine
for drying.
• Inspect the squeegee assembly and vacuum hose for
wear, damage, or obstruction. Repair or replace as
needed.
• Remove debris from squeegee hose.
HEPA units are not approved for hazardous
materials.
MACHINE MAINTENANCE
Routine maintenance is critical to ensure proper
machine operation and cleaning performance. Perform
all maintenance procedures as follows:
Adjusting the squeegee assembly
As the machine is used, the squeegee blades will wear
or need to be replaced due to damage. Some
adjustment may be needed.
• Squeegee blades should lie over slightly (like a
window squeegee) when the machine is moving in
forward or reverse.
WARNING: Always disconnect the battery leads
before performing any maintenance.
Daily Maintenance
• Inspect the battery charger cord and plug for any
damage.
Weekly Maintenance
• Verify that all daily maintenance has been performed.
• Inspect all battery liquid levels. Adjust to proper level
as needed. Add only water.
• Check all battery terminal and cable connections.
Tighten as needed. Loose connections are
dangerous and can cause personal injury and
machine damage.
• Clean any corrosion from battery terminals and
cables.
• Drain all liquids from battery tray. Dispose of
according to local government regulations.
• Flush clean tank and hoses with a mixture of 8 oz.
(250ml.) white vinegar to one-gallon (4 liter) warm
water.
• Repair or replace any worn or damaged components
as needed.
• Clean the float and float stem to remove residue buildup, and insure proper float operation.
• Check all gaskets for damage and to ensure an
airtight fit. Repair and / or replace as necessary.
• Vacuum the filter bag to remove imbedded dirt and
maintain airflow.
• Oil casters and wheels with a small amount of light oil.
• Apply a small amount of oil to the intake coupling and
pin.
NOTE: To prevent damage to the battery charger
power cord, ALWAYS store the machine with the
battery charger power cord coiled and tucked into its
storage compartment in the machine.
• Remove the hose from the machine at the end of
each workday, check for obstructions and / or
damage. Repair or replace as necessary.
• The wand should be removed from the hose and the
hose should be laid in a loose coil or hung over
several pegs on the wall.
• Clean the floor tool and wand of dirt and / or liquid
residue.
• Empty the tank after each use.
• Shake the dirt and or debris from the Filter bag; if the
tank and / or filter bag is wet allow to air dry. The
filter bag must be cleaned after each use to prevent
loss of vacuum suction and possible machine
damage.
Battery Charging
• The power switch must be turned OFF.
• Recharge the batteries at the end of every shift.
• Consult your local authorized NSS distributor or
service center for assistance.
8
For machine with HEPA filters:
• Vacuum the micro filter discs to remove imbedded
dirt and maintain airflow.
• Replace prefilters when soiled.
• Replace HEPA filter when loss of suction develops.
BATTERY CHARGER OPERATING
INSTRUCTIONS
GENERAL INFORMATION AND WARNINGS
• Electronic automatic battery charger with
microprocessor suitable for lead acid batteries.
• Fully automatic charging cycle with electronic
setting; protected against overload, short-circuit at
clamps and reversed polarity.
• Before starting to charge, make sure the voltage of
the equipment suits the voltage of the battery, that
the charging current suits the capacity of the
battery and that the selected charging curve (for
lead-acid batteries or airtight gel batteries) is
correct for the type of battery to be charged. In
addition, make sure the rated input voltage of the
charger suits the available supply voltage and the
system is equipped with grounding.
• Pay attention to any remarks of the battery
manufacturer.
Monthly Maintenance
• Verify that all daily and weekly maintenance has
been performed.
• Clean polyethylene body components to remove
chemical and liquid residue and maintain a “like
new” appearance.
CONTROLS (see figure below)
1. Three-digit display + symbol (1), to view A = the
charging current, U = the battery voltage, h = the
charging time, C = the charging ampere-hours
[Ah], E = the energy used [KWh].
2. Button for the Selection of the display mode
(2):A, U, h, C, E. After about 10 seconds the
display returns to the visualization of the charging
current.
3. Red control indicator (3): when it is on, the
charging cycle has started.
4. Yellow control indicator (4): when it is on, the final
phase of the charging cycle has started.
5. Green control indicator (5): when it is on, the
charging cycle has finished.
OPERATION
• Plug the cord into a socket.
• Now, the battery charger’s display will show a
sequence of details on the charger’s internal
programming: after the name “SPE”, it will show
the software release installed in the equipment,
then, in sequence, the following parameters:
battery voltage, charging current, charging curve
number and, finally, the words “GEL” or “Acd”
depending on the set up charging curve being
suitable for airtight gel batteries or lead-acid
batteries. Now, a test is run on the battery voltage
to decide if the charging process should be started
or not. If the battery is not connected to the battery
charger, the display will show the word “bat”. The
word will stay on, even if the test is failed (for
instance, reversed polarities or incorrect battery
connection). If the test is passed, the display will
show the battery voltage for approximately 5
seconds and the battery will begin to be charged.
The charging cycle progress will be shown by red
(3), yellow (4) and green (5) LED indicators. At the
end of the charge, when the green indicator (5) is
on, unplug the cord from the socket and operate
the machine.
SMART BATTERY CHARGER
3
4
5
A = Amps
U = Volts
h = hours
C = Ah
E = KWh
1
S
2
MOD. CBHF1-SM 24V 12A
9
CBHF1-SM DIP SWITCH CONFIGURATION
Through the set of 8 dipswitches it is possible to change the charging curve (15 charging curves are available for
Wet and Gel batteries and it is possible to customize the charging profile under the specifications of battery
manufacturers), the battery voltage (12V or 24V) and the charging current (4A or 8A or 10A or 12A). The set of 8
dip switch is easy to find (is located under the front label of the charger, lifting the corner on the bottom-left) without
opening the charger.
ON
DIP1 DIP2 DIP3 DIP4 for the selection of the CHARGING CURVE
DIP1
ON
DIP2
ON
DIP3
ON
DIP4
ON
OFF
ON
ON
ON
ON
OFF
ON
ON
OFF
OFF
ON
ON
ON
OFF
ON
ON
OFF
OFF
ON
ON
ON
OFF
OFF
ON
OFF
ON
OFF
ON
OFF
ON
ON
OFF
OFF
ON
ON
ON
ON
OFF
OFF
OFF
OFF
OFF
ON
OFF
ON
OFF
ON
OFF
ON
ON
OFF
OFF
OFF
OFF
OFF
OFF
OFF
OFF
OFF
OFF
CHARGING CURVE
0 - Curve for charging DRYFIT TRACTION BLOCK (traction gel batteries).
1 - Curve for charging TRACTION Lead-Acid (wet) batteries.
SETTING FOR NSS 2392111 - BATTERY, WET 12V, 115 AMP/HR
2 - Curve for charging SEALED LEAD-ACID batteries.
3 - Curve for charging Sealed Lead-acid and GEL batteries from Trojan and
other manufacturers.
4 - Curve for charging TRACTION Lead-Acid (wet) batteries w/float charge.
5 - Curve for charging SEALED LEAD-ACID batteries w/float charge.
6 - Curve for charging Sealed Lead-acid batteries and GEL batteries from
Trojan and other manufacturers w/float charge.
7 - Curve for charging large capacity DRYFIT PzV (A800) GEL batteries.
8 - Curve for charging GNB Sealed Lead-Acid batteries.
9 - Curve for charging Lead-Acid start-up batteries.
10 - Curve for charging DRYSAFE HAGEN batteries.
11 - Curve for charging dryfit traction block batteries from Sonnenschein, DEKA
and other manufacturers.
12 - Curve for charging Lead-Acid starting batteries with stop.
13 - Curve for charging Lead-Acid starting batteries with stop.
14
15
DIP5 DIP6 DIP7 for the selection of the CURRENT
DIP5
ON
OFF
ON
OFF
DIP6
ON
ON
OFF
OFF
DIP7
ON
ON
ON
ON
DIP8 for the selection of the battery voltage
CURRENT
4A
8A
10A
12A
PROBLEMS
The battery charger does not switch on
The charging cycle does not start and the message
‘bat’ is displayed.
The yellow indicator (4) will not light up even 15 hours
from the starting of the charging cycle, and the display
shows E03.
The message E01 is displayed
If the battery charger is provided with a safety
thermostat and the message E02 is displayed.
The message SCt is displayed
The message Srt is displayed
DIP8
ON
OFF
VOLTS
12
24
SOLUTIONS AND CHECKS
Check that the plug is connected to the supply mains and
that the circuit breaker is efficient.
Check the connection to the battery and the polarity.
Check the battery for possible faulty components.
This means that the maximum voltage admissible by the
battery has been exceeded. The charging is interrupted.
This means that the maximum temperature has been
exceeded. The charging is interrupted.
This means that the total safety timer has interrupted the
charging.
This signals a possible internal short circuit.
10
TROUBLESHOOTING
Symptom
Machine does not run.
Cause
Batteries not charged.
Solution
Charge batteries.
Circuit breaker tripped.
Reset circuit breaker.
Unplugged power head cord.
Plug in power head cord.
Battery cables loose or not connected.
Check and connect or tighten.
Damaged switch.
Replace switch.
Damaged power head cord.
Replace power head cord.
Carbon brushes worn out.
Replace brushes.
Vacuum motor worn out.
Battery charger plugged in.
Repair / replace vac motor.
Unplug charger cord from wall outlet.
Obstruction in hose, tool, wand or intake.
Remove obstruction.
Tank is full.
Empty tank.
Dirty filters.
Improper coupling connection / air leak.
Gasket missing or damaged.
Clean or replace filters.
Check gaskets for fit or damage.
Adjust coupling connection.
Replace gasket.
Holes in hose.
Replace hose.
Machine is difficult to move.
Damaged wheels.
Replace wheels.
Batteries do not seem to run
long enough.
Damaged caster.
Over charging batteries. (Charging too
frequently.)
Tops of batteries are dirty / wet.
Replace caster.
Monitor run time, and adjust charging
frequency accordingly.
Clean / dry, charge batteries.
Machine has poor or no
suction.
Battery terminals are dirty / damaged, or
loose.
Electrolyte level is too low.
Batteries are not fully charged.
Clean terminals, and connectors,
replace damaged cables. Charge.
Add distilled water and charge.
Charge batteries for a full cycle on the
battery charger.
Charger is damaged.
Have an authorized serviceman
repair.
Battery is defective or worn out.
Check cell voltage while discharging.
Repair service for this machine must be performed by an NSS authorized service center. Repairs performed by an
unauthorized company will void the machine warranty. If you require assistance finding an authorized service
center, contact NSS Enterprises.
11
NSS® Enterprises, Inc.
3115 Frenchmens Road, Toledo, Ohio 43607
PHONE (419) 531-2121 FAX (419) 531-3761
NSS ® Enterprises, Inc. European Distribution Centre
Unit II, Pinfold Trading Estate * 55 Nottingham Road
STAPLEFORD, NOTTINGHAM NG9 8AD ENGLAND U.K.
PHONE: (44) 0115 939 1568 * FAX: (44) 0115 949 0615
12