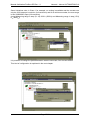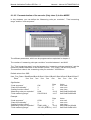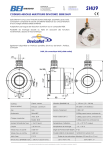
1
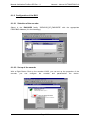
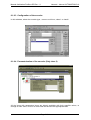
IDEACOD hohner AUTOMATION S.A.
B.P. 2
F 67038 STRASBOURG CEDEX
Tél.
Fax
: (33) 388 789 378
: (33) 388 789 389
MANUEL D'UTILISATION POUR
CODEUR Profibus DP
PROCESS FIELD BUS
Certifié
Dernière mise à jour: 17/12/98
Manuel d'utilisation Profibus DP Rev. 1.1
Ideacod – hohner AUTOMATION S.A.
Table des matières
1.
Introduction .................................................................................................................... 3
1.1 Le codeur absolu ........................................................................................................ 3
1.2 Profil ........................................................................................................................... 4
1.3 Définitions................................................................................................................... 4
2. Le reseau Profibus-DP ................................................................................................... 5
2.1 Les Câbles sous Profibus ........................................................................................... 5
2.2 structure du Segment ................................................................................................. 6
2.3 Utilisation des répéteurs ............................................................................................. 6
3. Classification des codeurs.............................................................................................. 7
3.1 Codeurs Classe 1 ....................................................................................................... 7
3.2 Class 2 Encoder ......................................................................................................... 7
4. Programmable Encoder Parameters .............................................................................. 9
4.1 Code Sequence.......................................................................................................... 9
4.2 Class 2 Functionality................................................................................................. 10
4.3 Commissioning Diagnostics (optional) ...................................................................... 10
4.4 Scaling Function ....................................................................................................... 10
4.5 Measuring Units per Revolution ................................................................................ 11
4.6 Total Measuring Range in Measuring Units .............................................................. 11
4.7 Preset Value ............................................................................................................. 11
5. Diagnostic Information ................................................................................................. 13
5.1 Extended Diagnostic Header .................................................................................... 13
5.2 Alarms ...................................................................................................................... 14
5.3 Operating Status....................................................................................................... 14
5.4 Encoder Type ........................................................................................................... 14
5.5 Single-Turn Resolution ............................................................................................. 15
5.6 Number of Distinguishable Revolutions .................................................................... 15
5.7 Additional Alarms...................................................................................................... 15
5.8 Supported Alarms..................................................................................................... 15
5.9 Warnings .................................................................................................................. 16
5.10 Supported Warnings ............................................................................................. 16
5.11 Profile Version....................................................................................................... 17
5.12 Encoder Software Version..................................................................................... 17
5.13 Operating time ...................................................................................................... 17
5.14 Offset value........................................................................................................... 18
5.15 Offset value of the Encoder manufacturer............................................................. 18
5.16 Scaling parameter settings.................................................................................... 19
5.17 Encoder serial number .......................................................................................... 19
6. Annexe......................................................................................................................... 20
6.1 Installation ................................................................................................................ 20
6.1.1 Connecting the Connection cap......................................................................... 20
6.1.2 Configuring the device Address ......................................................................... 20
6.1.3 Dip switches ...................................................................................................... 20
6.1.4 Switch signification ............................................................................................ 21
6.1.5 Set_Slave_Address ........................................................................................... 21
6.1.6 Line termination ................................................................................................. 21
6.1.7 Type File............................................................................................................ 21
6.1.8 Configuration of the BUS ................................................................................... 23
6.2 TECHNICAL DATA................................................................................................... 28
6.2.1 Electrical Data ................................................................................................... 28
6.2.2 Mechanical data ................................................................................................ 28
6.2.3 Shielding (From WWW.PROFIBUS.COM) ........................................................ 28
1.
Page 2/2
Manuel d'utilisation Profibus DP Rev. 1.1
Ideacod – hohner AUTOMATION S.A.
INTRODUCTION
1.1 Le codeur absolu
Les codeurs absolus rotatifs fournissent une valeur unique pour chaque position possible.
Toutes ces valeurs proviennent d'un disque codé, un rayon lumineux infra-rouge traverse le
disque et est reçu par un opto-asic. Les signaux résultants sont amplifiés et transférés à
l'interface.
Le codeur absolu a comme résolution maximum 8192 points/tour (13 bits). La version
multitours peut compter jusqu'à 65536 tours (16 bits). Par conséquent La résolution totale
du codeur est de 29 bits= 229 = 536.870.912 points. Le codeur monotour en standard a une
résolution de 13 bits, le multitours 29 bits.
Le codeur absolu respecte toutes les spécifications relatives à PROFIBUS DP, DIN 19245
première et deuxième partie. L'interface Profibus DP du codeur garanti un taux de transfert
jusqu'à 12 Mbaud. Le logiciel développé supporte toutes les fonctions du profil Profibus DP
Classe 1 et Classe 2. Les données du codeur sont transmises en code binaire.
Les paramètres suivant du codeur absolu peuvent être directement reprogrammées au
travers du bus Profibus DP :
•
•
•
•
Sens de croissance du code (Complément)
Nombre de points par tour
Nombre de points total
Valeur de Présélection (Prese)t
Pour réduire de manière significative le temps de configuration et d'installation, un fichier
GSD de définition du codeur est fourni pour être utilisé avec la version Windows de Com
Profibus. Ce logiciel est supporté par Siemens et est destiné a la configuration des modules
IM308C de la famille d'automate Simatic S5 ainsi que pour une grande variété de modules
du Simatic S7
Le succès au test de conformité et d'interopérabilité du laboratoire Siemens garanti une
communication sans erreur entre le codeur et tous les systèmes Profibus DP.
Page 3/3
Manuel d'utilisation Profibus DP Rev. 1.1
Ideacod – hohner AUTOMATION S.A.
1.2 Profil
Ce codeur respecte le profil des codeurs Profibus DP, version 1.1 de mai 1997.
1.3 Définitions
Résistance de Terminaison Résistance de terminaison pour l'adaptation d'impédance des
paires; les résistances de terminaison sont nécessaires à
chaque extrémité de câble et de segment..
Baudrate
Vitesse de transmission; donnée en nombre de bits par
seconde transmis (Baudrate = Bitrate).
Busdevice
Module qui envoie, reçoit ou répète des données sur le Bus.
Diagnostique
Détection, localisation, classification, affichage, contrôles
d'erreurs, malfonctions et messages.
FREEZE
est une commande du maître pour l'esclave. Elle permet de
figer l'état des entrées à leur valeur actuelle. Les données
d'entrée seront rafraîchies lorsque la commande UNFREEZE
sera envoyée par le maître.
Fichier GSD
Fichier de caractéristiques du codeur. Fichier, dans lequel les
informations relatives au codeur sont stockées, a destination
du maître.
DP
Périphérie décentralisée
DDLM
Direct Data Link Mapper Interface entre les fonctions
Profibus DP et le programme du codeur.
PROFIBUS
PROcess Fleldbus, norme de bus de terrain européenne, qui
est décrite dans la norme PROFIBUS (EN 50170). Elle définit
les fonctionnalités, les spécifications électriques et
mécaniques du système de bus sériel.
Les abréviations suivantes seront utilisées dans ce manuel:
H
Horaire. Croissance du code pour une rotation horaire de
l'axe (vu du coté de l'axe codeur)
AH
Anti-Horaire. Croissance du code pour une rotation antihoraire de l'axe (vu du coté de l'axe codeur)
PO
Valeur de la position
PR
Valeur de Présélection
Page 4/4
Manuel d'utilisation Profibus DP Rev. 1.1
Ideacod – hohner AUTOMATION S.A.
2. LE RESEAU PROFIBUS-DP
L'interface des codeurs absolus rotatifs est basée sur la norme PROFIBUS-DP (DIN 19245,
Part 1 et 3). Pour utiliser le codeur à interface Profibus DP comme esclave, un module
maître Profibus-DP tel qu'un automate est nécessaire.
Ci-dessous est schématisé le principe de connexion PROFIBUS-DP.
2.1 Les Câbles sous Profibus
Pour les réseaux PROFIBUS,
restrictions suivantes:
utiliser
un
câble
adapté
en
accord
avec
les
Pour atteindre les longueurs maximum, il est nécessaire d'utiliser des répéteurs, ils
régénèrent l'amplitude et la chronologie des signaux. Il est possible de connecter jusqu'à 9
répéteurs.
Page 5/5
Manuel d'utilisation Profibus DP Rev. 1.1
Ideacod – hohner AUTOMATION S.A.
2.2 structure du Segment
Twisted, shielded
2-wire line
Repeater
Bus Terminal
...
Bus
Connector
1200 m (RS 485) max.,
32 Stations max.
2.3 Utilisation des répéteurs
Connect
segments*
Remote
Repeater
...
...
Interface for
SINEC L2FO Networks
..
.
Branch segments
Max. Number Repeater Cascading: 9
Page 6/6
Link Segment
(Segment without
stations)
Manuel d'utilisation Profibus DP Rev. 1.1
Ideacod – hohner AUTOMATION S.A.
3. CLASSIFICATION DES CODEURS
Les codeurs absolus en Profibus DP transmettent la valeur de la position codée en binaire.
Il existe deux classes différentes de codeurs, les non programmables (Classe 1) et les
programmables (Classe 2). Quatre configurations sont possibles d'où la possibilité de
répondre à une grande variété de configurations.
3.1 Codeurs Classe 1
The absolute encoders of Class 1 are unprogrammable. Depending on the resolution two
configurations can be chosen:
Conf.
No.
1
2
Type
Class
1
1
Configuration
Length
Byte
1
D0
1
D1
Input-Word
No.
1
2
Output-Word
No.
0
0
Description
16 Bit PO
32 Bit PO
If the resolution of the encoder is less than 16 Bit, configuration 1 can be chosen. The
position value (PO) is transmitted to the PROFIBUS-Master according to the hardware side
of the resolution of encoder.
3.2 Class 2 Encoder
The absolute encoders of Class 2 are programmable. Depending on the resolution two
configurations can be chosen:
Conf.
No.
3
Type
Class
2
Configuration
Length
Byte
1
F0
Input-Word
No.
1
Output-Word
No.
1
4
2
1
F1
2
2
Description
16 Bit PO
16 Bit PR
32 Bit PO
32 Bit PR
If the resolution of the encoder less than 16 Bit, configuration No.3 can be chosen. Class 2
encoders offer extensive programming possibilities, e.g. preset function and programmable
resolution.
Page 7/7
Manuel d'utilisation Profibus DP Rev. 1.1
Ideacod – hohner AUTOMATION S.A.
The PO is transmitted in the DDLM_Data_Exchange Modus according to following telegram:
Configurations No.: 1 and 3
Octet
Bit
Data
1
2
15 - 8
7-0
15 - 8
7
0
2 2
2 -2
Data_Exchange - 16 Bits
Configurations No. : 2 and 4
Octet
Bit
Data
1
31 - 24
31
24
2 -2
2
3
23 - 16
15 - 8
23
16
15
8
2 -2
2 -2
Data_Exchange - 32 Bits
Page 8/8
4
7-0
7
0
2 -2
Manuel d'utilisation Profibus DP Rev. 1.1
Ideacod – hohner AUTOMATION S.A.
4. PROGRAMMABLE ENCODER
PARAMETERS
In the following the encoder parameters are described, which can be programmed
according to the chosen configuration. The Class 2 parameters use the DDLM_Set_Prm
function. Programmable parameters are shown in the table below:
Parameter
Code Sequence
Class 2 functionality
Commissioning diag. control
Scaling function control
Measuring units per rev.
Total measuring range
Reserved for further use
Reserved for manufacturer
Data type
Parameter
octet number
Bit
9
Bit
9
Bit
9
Bit
9
unsigned 32
10 - 13
unsigned 32
14 - 17
18 - 25
26...
Device class
1
2
optional
2
2
2
2
optional
Overview Operating Parameter (Octet 9):
Bit
0
1
2
3
4
5
6
7
Parameter
Code Sequence
Class 2 functionality
Commissioning diagnostics
Scaling function control
Reserved
Reserved
Reserved
Reserved
4.1 Code Sequence
The code sequence defines whether increasing position values are output when the encoder
shaft rotates clockwise CW or counterclockwise CCW (as seen on shaft). The code
sequence bit is set with the code sequence bit 0 in the operating parameters Octet 9.
Bit 0
0
1
Code sequence
CW
CCW
Page 9/9
Manuel d'utilisation Profibus DP Rev. 1.1
Ideacod – hohner AUTOMATION S.A.
4.2 Class 2 Functionality
This bit enables/disables the device class 2 functionality. The default setting is disabled (0),
which means that a DP-Master must set this bit to be able to use the class 2 functions.
When the class 2 functionality is disabled, the encoder performs exactly like a class 1
encoder. To use class 2 functionality, set bit 1 in Octet 9.*0
Bit 1
0
1
Class 2 Functionality
disabled
enabled
4.3 Commissioning Diagnostics (optional)
With the commissioning diagnostic function it is possible to check the encoder components
responsible for position detection at encoder standstill. In conjunction with the position
alarms, this enables an extensive check of the correctness of the position values. The
commissioning diagnostics are initiated by the bit 2 in octet 9. If errors are detected it will be
announced by the commissioning diagnostic alarm bit in the diagnostic function (see
Alarms).
Bit 2
0
1
Commissioning Diagnostics
disabled
enabled
The commission diagnostic function is optional. To find out if the encoder supports
commissioning diagnostics, the « Operating Status » should be read with the diagnostic
function and the commissioning diagnostic bit checked.
4.4 Scaling Function
With the scaling function the encoder internal numerical value is converted in software to
change the physical resolution of the encoder. The parameters « Measuring Units per
Revolution » and « Total Measuring Range in Measuring Units » are the scaling parameters
set by the scaling function control bit 3 in octet 9.
Bit 3
0
1
Scaling Function
disabled
enabled
Page 10/10
Manuel d'utilisation Profibus DP Rev. 1.1
Ideacod – hohner AUTOMATION S.A.
4.5 Measuring Units per Revolution
The parameter « Measuring Units per revolution » is used to program the desired number of
steps per revolution. Each value between 1 and 8192 can be realised.
Octet
Bit
Data
10
11
12
13
31 - 24
23 - 16
15 - 8
7-0
31
24
23
16
15
8
7
0
2 -2
2 -2
2 -2
2 -2
Measuring Units per Revolution
If a value larger than 8192 is set, the process value of the encoder will not be single stepped
and values will be skipped while rotating the shaft. So, it is recommended, to keep the
measuring units per revolution below 8192 measuring units.
4.6 Total Measuring Range in Measuring Units
This parameter is used to program the desired number of measuring units over the total
measuring range. This value must not exceed the total resolution of the encoder with
536870912 steps (29 Bit).
If the encoder is used in a continuous measuring application, the parameter must be
x
programmed in values with powers of 2 (2 with x<= 29).
Octet
Bit
Data
14
15
16
17
31 - 24
23 - 16
15 - 8
7-0
31
24
23
16
15
8
7
0
2 -2
2 -2
2 -2
2 -2
Total Measuring Range in Measuring Units
4.7 Preset Value
The parameter « Preset Value » is the desired position value, which should be reached at a
certain physical position of the axis. The position value of the encoder is set to the desired
process value by the parameter Preset. The preset value must not exceed the parameter
« Total Measuring Range in Measuring Units ». The preset function is used after the scaling
function which means that the preset value is given in the current measuring units. The
preset value is written to the encoder as output data in the Data_Exchange function.
The MSB of the preset value controls the preset function in the following way:
Normal operating mode: MSB = 0 (Bit 31)
The encoder will make no change in preset value.
Page 11/11
Manuel d'utilisation Profibus DP Rev. 1.1
Ideacod – hohner AUTOMATION S.A.
Preset mode:
MSB = 1 (Bit 31)
With MSB=1 the encoder accepts the transferred value (Bit: 0-28) as a preset value in
binary code.
The encoder reads the current position value and calculates an offset value from the preset
value and the read position value. The position value is shifted with the calculated offset
value. When the output position value equals the preset value the preset mode is ended and
the MSB can be set to zero by the master. The offset value can be read with the diagnostic
function and is securely stored in case of voltage breakdown in the encoder EEPROM.
Attention:
The preset function should only be used at encoder standstill!
Page 12/12
Manuel d'utilisation Profibus DP Rev. 1.1
Ideacod – hohner AUTOMATION S.A.
5. DIAGNOSTIC INFORMATION
The encoder supports extensive diagnostic routines. A large number of different parameters
can be tested via the network.
Diagnostic function
Data type
Extended diagnostic header
Alarms
Operating status
Encoder type
Singleturn resolution
Number of distinguishable revolutions
Additional alarms
Supported alarms
Warnings
Supported warnings
Profile version
Software version
Operating time
Offset value
Manufacturer offset value
Measuring units per revolution
Total measuring range in measuring units
Serial number
Reserved for future use
Manufacturer specific diagnostics
Octet string
Octet string
Octet string
Octet string
Unsigned 32
Unsigned 16
Octet string
Octet string
Octet string
Octet string
Octet string
Octet string
Unsigned 32
Signed 32
Signed 32
Unsigned 32
Unsigned 32
ASCII string
Diagnostic
octet number
7
8
9
10
11 - 14
15 - 16
17
18 - 19
20 - 21
22 - 23
24 - 25
26 - 27
28 - 31
32 - 35
36 - 39
40 - 43
44 - 47
48 - 57
58 - 59
60 - 63
Encoder class
1
1
1
1
1
1
2
2
2
2
2
2
2
2
2
2
2
2
2
Optional
5.1 Extended Diagnostic Header
The diagnostic header byte 7 specifies the length of the encoder diagnostics including the
header byte. The format of the length value is hexadecimal. For the encoders with Class 1
configuration the length of the encoder specific diagnostics is 10 bytes (0A hex).
Bit
Data
7
6
0
0
Fixed to 00 indicate
device related diagnostics
5-0
xxh
Length including header
Page 13/13
Manuel d'utilisation Profibus DP Rev. 1.1
Ideacod – hohner AUTOMATION S.A.
5.2 Alarms
An alarm is set if malfunction in the encoder could lead to incorrect process values. Octet 8
in the diagnostic function (DDLM_Slave_Diag) shows the status of the alarms. Additional
alarms for class 2 encoders are added in diagnostic octet 17.
If an alarm occurs, then the Ext_Diag bit and the Stat_Diag bit in the diagnostic function is
set to logical high until the alarm is cleared and the encoder is able to provide an accurate
process value. Alarms are cleared when the functionality is within the specification and the
process value is correct.
Bit
0
1
2
3
4
Definition
Position error
Supply Voltage error
Current too high
Commissioning diagnostics
Memory error
=0
No
No
No
OK
No
=1
Yes
Yes
Yes
Error
Yes
These alarms are not supported today.
5.3 Operating Status
Octet 9 in the diagnostic function gives information on encoder internal parameters.
Bit
0
1
2
3
Definition
Code sequence
Class 2 functionality
Commissioning diagnostics
Scaling function
=0
CW
No
No, not supported
Disabled
=1
CCW
Yes
Yes
Enabled
The commissioning diagnostics are not implemented yet.
5.4 Encoder Type
The encoder type can be read in Octet 10 of the hex code.
code
00 h
01 h
Definition
Single-Turn absolute rotary encoder
Multi-Turn absolute rotary encoder
Page 14/14
Manuel d'utilisation Profibus DP Rev. 1.1
Ideacod – hohner AUTOMATION S.A.
5.5 Single-Turn Resolution
The diagnostic octet 11 to 14 gives the number of measuring steps per revolution that are
outputted for the absolute singleturn position value. The value is stored in binary code.
Octet
Bit
Data
11
31 - 24
31
24
2 -2
12
13
23 - 16
15 - 8
23
16
15
8
2 -2
2 -2
Singleturn resolution
14
7-0
7
0
2 -2
5.6 Number of Distinguishable Revolutions
The number of distinguishable revolutions that the encoder can output is given in octet 15
and 16 of the diagnostic function. The value is stored in binary code.
Due to the difficulty to store 65536 turns in a 16 bits number, the value stored is 65536-1
turn (FFFFhex).
Octet
Bit
Data
15
16
15 - 8
7-0
15
8
7
0
2 -2
2 -2
Number of Distinguishable
Revolutions
5.7 Additional Alarms
Diagnostic octet 17 is reserved for additional alarms, which are currently not assigned.
5.8 Supported Alarms
Information on supported alarms can be read in diagnostic octets 18 and 19.
Bit
0
1
2
3
4
5-15
Definition
Position error
Supply Voltage error
Current too high
Commissioning diagnostics
Memory error
Reserved
=0
Not supported
Not supported
Not supported
Not supported
Not supported
The supported alarms are not implemented yet
Page 15/15
=1
Supported
Supported
Supported
Supported
Supported
Manuel d'utilisation Profibus DP Rev. 1.1
Ideacod – hohner AUTOMATION S.A.
5.9 Warnings
Warnings indicate that tolerances for certain internal parameters of the encoder have been
exceeded. In contrast to alarms warnings do not imply incorrect position values.
Octet 20 and 21 of the diagnostic function shows the status of the warnings. If a warning
occurs, then the Ext_Diag bit in the Diagnostic function is set to logical high until the warning
is cleared. All warnings are cleared after the diagnostic message is read from the encoder,
but if tolerances are still exceeded the warning will be set again. For the operating time limit
(Bit 4) the warning is only set again after power-on sequence.
Bit
0
1
2
3
4
5
6
7 - 15
Definition
Frequency exceeded
Temperature exceeded
Light control reserve
CPU Watchdog Status
Operating time limit warning
Battery charge
Reference point
Reserved
=0
No
No
Not reached
OK
No
OK
Reached
=1
Yes
Yes
Reached
Reset generated
Yes
Too low
Not reached
Only bit 5, « Battery charge » , is implemented.
No control of this Warning in Class 1 , if case of warning, contact factory.
5.10 Supported Warnings
Information on supported warnings can be read in the diagnostic octets 22 and 23.
Bit
0
1
2
3
4
5
6
7-15
Definition
Frequency warning
Temperature warning
Light control reserve warning
CPU Watchdog Status
Operating time limit warning
Battery charge warning
Reference point warning
Reserved
=0
Not supported
Not supported
Not supported
Not supported
Not supported
Not supported
Not supported
Page 16/16
=1
Supported
Supported
Supported
Supported
Supported
Supported
Supported
Manuel d'utilisation Profibus DP Rev. 1.1
Ideacod – hohner AUTOMATION S.A.
5.11 Profile Version
Octet 24 and 25 of the diagnostic function gives the DP encoder profile version implemented
in the encoder. The octets are combined to a revision number and an index.
Example:
Profile version:
Octet no.:
Binary code:
Hex:
1.40
24
00000001
1
25
01000000
40
Octet
Bit
Data
24
25
15-8
7-0
7
0
7
0
2 -2
2 -2
Revision number
Index
Profile version
The profile version of the encoder is 1.10
5.12 Encoder Software Version
Octet 26 and 27 of the DDLM_Slave_Diag function give the encoder software version. The
octets are combined to a revision number and an index, like the Profile version.
Octet
Bit
Data
26
27
15-8
7-0
7
0
7
0
2 -2
2 -2
Revision number
Index
Software version
5.13 Operating time
The operating time monitor stores the operating time for the Encoder in operating hours.
The operating time is stored every 6 minutes in the Encoder non volatile memory as long as
the Encoder is power supplied. The operating time value is presented in 0.1 hours as an
unsigned 32 binary value of the function DDLM_Slave_Diag.
If the operating time function is not used, the operating time value is set to the maximum
value (FFFFFFFF hex) by the Encoder manufacturer.
A maximum operating time limit can be set by the Encoder manufacturer. When this limit is
exceeded an operating time limit warning bit is set.
Octet
Bit
Data
28
31 - 24
31
24
2 -2
29
30
31
23 - 16
15 - 8
7-0
23
16
15
8
7
0
2 -2
2 -2
2 -2
Operating time
This function is not implemented yet, until then the value FFFFFFFF hex is permanently
stored.
Page 17/17
Manuel d'utilisation Profibus DP Rev. 1.1
Ideacod – hohner AUTOMATION S.A.
5.14 Offset value
The offset value is calculated in the preset function and shifts the position value with the
calculated value. The offset value is stored and can be read from the Encoder in the
diagnostic octet 32 to 35. The data type for the offset value is signed binary 32 with an
offset value range equal to the measuring range of the Encoder. The preset function is used
after the scaling function which means that the offset value is given according to the current
measuring resolution.
NOTE! If an offset value is used it must be added to the offset value of the Encoder
manufacturer to get the offset value from the physical zero point of the Encoder disk.
Octet
Bit
Data
32
31 - 24
31
24
2 -2
33
34
23 - 16
15 - 8
23
16
15
8
2 -2
2 -2
Offset value
35
7-0
7
0
2 -2
5.15 Offset value of the Encoder manufacturer
The Manufacturer offset value indicates the Encoder offset set by the Encoder
manufacturer. This value gives information on the shift of the zero point in number of
positions from the physical zero point of the Encoder disk. The data type for the offset value
is signed binary 32 with an offset value range equal to the measuring range of the Encoder.
The Manufacturer offset value is given in number of steps according to the basic resolution
of the Encoder and is located in the write protected memory area changeable only by the
Encoder manufacturer.
Octet
Bit
Data
36
31 - 24
31
24
2 -2
37
38
39
23 - 16
15 - 8
7-0
23
16
15
8
7
0
2 -2
2 -2
2 -2
Manufacturer offset value
Page 18/18
Manuel d'utilisation Profibus DP Rev. 1.1
Ideacod – hohner AUTOMATION S.A.
5.16 Scaling parameter settings
The Scaling parameters are set in the DDLM_Set_Prm function, the parameters are stored
and can be read from the Encoder in octet 40 to 47 of the diagnostic function. The
parameters "Measuring units per revolution" and "Total measuring range in measuring units"
sets the desired Encoder resolution. The Scaling function status bit in the Operating status
indicates if the Scaling function is enabled or disabled.
Default values of the Encoder manufacturer:
Measuring units per revolution = Singleturn resolution
Total measuring range in measuring units = Singleturn resolution * Number of
distinguishable revolutions
The data type for both values is unsigned 32.
Octet
Bit
Data
40
41
42
43
31 - 24
23 - 16
15 - 8
7-0
31
24
23
16
15
8
7
0
2 -2
2 -2
2 -2
2 -2
Measuring units per revolution
Octet
Bit
Data
44
45
46
47
31 - 24
23 - 16
15 - 8
7-0
31
24
23
16
15
8
7
0
2 -2
2 -2
2 -2
2 -2
Total measuring range in measuring units
5.17 Encoder serial number
Octet 48 to 57 in the diagnostic function gives the Encoder serial number as an ASCII string
of ten characters. If the serial number is not used the ASCII string will contain only stars
(**********), hexcode 2A.
Octet
Bit
Data
48 - 57
79 - 0
ASCII
Serial number
Page 19/19
Manuel d'utilisation Profibus DP Rev. 1.1
Ideacod – hohner AUTOMATION S.A.
6. ANNEXE
6.1 Installation
6.1.1 Connecting the Connection cap
Connect the Power supply (switched OFF!) on the
GND and +24V
Configure the device address
Connect to the BUS (A/B in; A/B out)
Switch ON the Terminator Dip-Switch if the device
is the last of the line.
6.1.2 Configuring the device Address
The Master Station sends messages to slaves via their station addresses. It is also possible
to send messages as broadcast messages.
It is possible to have 32 Master/Slave stations on one bus in any combination possible. A
maximum of 127 stations can be connected using repeater stations. It must be noted that
the fewer masters connected on the line the better the performance will be.
The user has two ways to choose the encoder address :
• by dip switches
• by Set_Slave_Address (SAP55)
6.1.3 Dip switches
If the Dip 8 is OFF, the encoder address is defined by dips 1 - 7.
If the Dip 8 is ON, the encoder address is defined by Set_Slave_Address (SAP 55).
ON
1 2 3 4 5 6 7 8
Dip 1
Dip 2
Dip 3
Dip 4
Dip 5
Dip 6
Dip 7
Page 20/20
Dip 8
Mode
Manuel d'utilisation Profibus DP Rev. 1.1
X
X
Ideacod – hohner AUTOMATION S.A.
X
X
X
X
Encoder Address(0 to 125)
X
ON
OFF
Address by SAP55
Address from Switch
Address 126 is reserved for Set Slave Adress
6.1.4 Switch signification
Address
0
1
2
3
...
124
125
Dip 1 Dip 2
OFF OFF
ON OFF
OFF ON
ON
ON
OFF
ON
OFF
OFF
Dip 3
OFF
OFF
OFF
OFF
Dip 4
OFF
OFF
OFF
OFF
Dip 5
OFF
OFF
OFF
OFF
Dip 6
OFF
OFF
OFF
OFF
Dip 7
OFF
OFF
OFF
OFF
Dip 8
OFF
OFF
OFF
OFF
ON
ON
ON
ON
ON
ON
ON
ON
ON
ON
OFF
OFF
6.1.5 Set_Slave_Address
The master can change the encoder address via the Set_Slave_Address (SAP55) (only
accepted in the power-on mode). Once the encoder address is changed, the new address is
securely stored in case of voltage breakdown in the encoder EEPROM.
The address by default is 126 (0FEh). To reset the address stored in the encoder EEPROM,
just turn off the dip switch 8 end power on the encoder : the new address in the encoder
EEPROM will be the default address 126 (FE hex).
6.1.6 Line termination
The last device of the bus has to terminate the line with 3 resistors. To activate them, switch
ON to activate them.
6.1.7 Type File
To run the encoder on Profibus-DP Master, A GSD file named IDEA1658.GSD has been
written, which is stored on the floppy disk included with the encoder on request.
Refer to your Profibus-DP documentation to insert this file in the right place in your
configuration device.
For example, location where the files can be copied:
IDEA1658.GSD
in C:\SINEC\COMPB.W95\GSD
IDEACOD?.BMP
in C:\SINEC\COMPB.W95\BITMAP\
Page 21/21
Manuel d'utilisation Profibus DP Rev. 1.1
Ideacod – hohner AUTOMATION S.A.
To insert the IDEACOD GSD in the Com Profibus GSD database, after the copy of the files,
run “Scan GSD Files” like below.
Page 22/22
Manuel d'utilisation Profibus DP Rev. 1.1
Ideacod – hohner AUTOMATION S.A.
6.1.8 Configuration of the BUS
6.1.8.1 Selection of the encoder
Select in the ENCODER family “IDEACOD_DP_ENCODER” with the appropriate
PROFIBUS Address (3 in the Hardcopy).
6.1.8.2 Set up of the encoder
With a Right Button Click on the encoder LOGO, you can set up the properties of the
encoder, you can configure the encoder and parameterize the device.
Page 23/23
Manuel d'utilisation Profibus DP Rev. 1.1
Ideacod – hohner AUTOMATION S.A.
6.1.8.3 Configuration of the encoder
In this windows, select the encoder type , mono or multi turn, class 1 or class2
6.1.8.4 Parameterization of the encoder (Only class 2)
All the items with parameters items are directly available with their possible values, to
change an item value, click on its value field and choose the appropriate data.
Page 24/24
Manuel d'utilisation Profibus DP Rev. 1.1
Ideacod – hohner AUTOMATION S.A.
Some limitations exist, in Class 1 for example, no scaling is available and the encoder can
only be 8192 steps per revolution (full resolution) and for a multiturn encoder, the max range
is hex 2000000016 steps (full resolution)
(noted Measuring range in step (31-16) 819210 (200016) and Measuring range in step (15-0)
010 (000016))
It is possible to change the parameterization with the hex mask, click on HEX button
This kind of configuration is explained in the next chapter.
Page 25/25
Manuel d'utilisation Profibus DP Rev. 1.1
Ideacod – hohner AUTOMATION S.A.
6.1.8.5 Parameterization of the encoder (Only class 2) In Hex MODE
In this windows, you can define the “Measuring units per revolution”, “Total measuring
range” and the “code sequence”.
The different parameters, which can be programmed are explained in chapter 4.
The number of “measuring units per revolution” must be between 1 and 8192
The “Total measuring range” must be between the “measuring units per revolution” and the
maximum possible resolution of the encoder (29 bits : 13 X 16 bit = 536 870 912 points).
The maximum value is the “measuring units per revolution” X 65536 turn.
Default values from GSD
User_Prm_Data = Byte8,Byte9,Byte10,Byte11,Byte12,Byte13,Byte14,Byte15,Byte16,Byte17
Hexa
0x00 0x0A
0x00
0x00
0x20
0x00
0x20
0x00
0x00
0x00
Signification:
“Code sequence”
“Class 2 functionality”
“Scaling function control”
“Measuring units per revolution”
“Total measuring range”
Byte
9
9
9
10-13
14-17
Value
xxxx xxx0
xxxx xx1x
xxxx 1xxx
0x00 0x00 0x20 0x00
0x20 0x00 0x00 0x00
Byte
CCW
9
Y
9
Y
9
10-13
4 200 (106816)
125 126 (1E8C616) 14-17
Value
xxxx xxx1
xxxx xx1x
xxxx 1xxx
0x00 0x00 0x10 0x68
0x00 0x01 0xE8 0xC6
CW
Y
Y
8192
536 870 912
Example :
“Code sequence”
“Class 2 functionality”
“Scaling function control”
“Measuring units per revolution”
“Total measuring range”
Page 26/26
Manuel d'utilisation Profibus DP Rev. 1.1
Ideacod – hohner AUTOMATION S.A.
User_Prm_Data = Byte8,Byte9,Byte10,Byte11,Byte12,Byte13,Byte14,Byte15,Byte16,Byte17
Hexa
0x00 0x0B
0x00
0x00
0x10
0x68
0x00
0x01
0xE8
0xC6
Page 27/27
Manuel d'utilisation Profibus DP Rev. 1.1
Ideacod – hohner AUTOMATION S.A.
6.2 TECHNICAL DATA
6.2.1 Electrical Data
Supply Voltage
Power consumption (monoturn)
Power consumption (multiturn)
11/30 V DC
185 mA at 24V
165 mA at 24V
Bus connection
Interface
Clock Frequency
Device addressing
galvanic isolation (opto-couplers and DC/DC)
Line driver according to RS485
9600 to 12 Mbaud
With Dip-switch in cap or EEPROM
Resolution
Code
max 8192 steps/revolution (13 bits)
Max 65536 revolutions (16 bits)
Binary
Profibus PNO Certification
done the 11/12/1998 n° (under request)
PNO : Profibus NützerOrganisation
The Profibus Trade Organisation (PNO) is the only institution which is allowed to certificate
Profibus components on conformity and interoperability.
6.2.2 Mechanical data
See your specific commercial documentation
6.2.3 Shielding (From WWW.PROFIBUS.COM)
More information about Profibus is available on this WEB site, don’t hesitate to consult it.
6.2.3.1 Shielding: Yes or No?
EN 50170 leaves it to the user if a shielded or unshielded cable shall be used. In areas with
no disturbances unshielded cable is permitted. The following reasons, however, make it
advisable to use a shielded cable:
(a) An area free of disturbances will only exist inside of a shielded cabinet. As soon as a
relay is mounted into the cabinet, interference free is no longer ensured.
(b) The use of unshielded cables requires additional protection mechanisms at the
bussignal inputs against overvoltage.
Therefore it is recommended to always use shielded cable.
This recommendation is also applicable for eventually needed supply cables from external
power supplies to the PROFIBUS devices. (e.g. repeaters). Double shielded lines are
Page 28/28
Manuel d'utilisation Profibus DP Rev. 1.1
Ideacod – hohner AUTOMATION S.A.
especially suitable for surroundings with heavy electromagnetic interference. In order to
guarantee optimal protection the outer shield (shielding braid) and the inner shield (shielding
foil) should be connected to ground on both cable ends flatly with a ground termination clip.
6.2.3.2 Shielding Rules
When using a shielded bus cable it is recommended to connect the shield on both sides low
inductively with the protective ground in order to achieve optimal electromagnetic
compatibility. In case of separate potentials (e.g. refinery) the shield should be connected
only at one side of the bus cable to the protective ground.
Preferably the connection between shield and protective ground is made via the metal cases
and the screw top of D-sub connector. Should this mechanism not be possible then the
connection can be made via pin 1 of the D-sub connector. It should be noticed that this is
not the optimal solution. In such a case it is better to bare the cable shield at an appropriate
point and to ground with a cable as short as possible to the metallic structure of the cabinet.
This could be achieved with a ground bus bar in front of the bus connector.
6.2.3.3 Bus Cable
The PROFIBUS standard defines two variations of the bus cable for PROFIBUS - FMS and
PROFIBUS - DP. Type A is especially recommended for high transmission speeds ( > 500
kBaud) and permits doubling of the network distance in comparison to Type B. Type B
should only be used at low baud rates and low requirements on the network distances.
Therefore it is recommended to use cable Type A.
Cable specification Type A for PROFIBUS - FMS and PROFIBUS - DP
Impedance:
Cable capacity:
Core diameter:
Cable type:
Resistance:
Signal attenuation:
Shielding:
foil
135 up to 165 Ohm at a frequency of 3 to 20 MHz.
< 30 pF per Meter
> 0,34 mm², corresponds to AWG 22
twisted pair cable. 1x2 or 2x2 or 1x4 lines
< 110 Ohm per km
max. 9 dB over total length of line section
CU shielding braid or shielding braid and shielding
Cable specification Type B for PROFIBUS - FMS and PROFIBUS - DP
Impedance:
Cable capacity:
Core diameter:
Cable type:
Signal attenuation:
Shielding:
135 up to 165 Ohm at a frequency of > 100 kHz
typ. < 60 pF per Meter
> 0,22 mm², corresponds to AWG 24
twisted pair cable. 1x2 or 2x2 or 1x4 lines
max. 9 dB over total length of line section
CU shielding braid or shielding braid and shielding
foil
Page 29/29