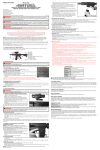
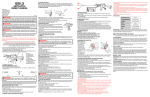
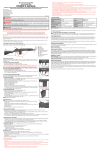
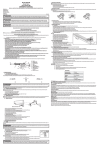
1
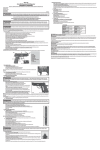
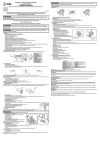
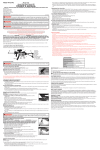
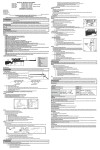
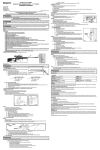
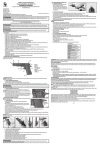
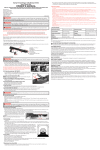
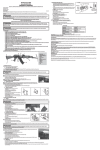
Full Auto TACR91
SPECIFICATIONS
6mm Airsoft Rifle / Shotgun Combo
OWNER’S MANUAL
READ ALL INSTRUCTIONS AND WARNINGS BEFORE USING
Crosman Corporation
7629 Routes 5 & 20
Bloomfield, NY 14469
United States of America
www.crosman.com
1-800-7AIRGUN (724-7486)
Manual Part number R91-515
REMEMBER, THIS AIRSOFT GUN IS NOT A TOY. ALWAYS TREAT THE AIRSOFT GUN AS THOUGH IT IS LOADED AND WITH THE SAME RESPECT YOU WOULD A FIREARM.
NOT A TOY. ADULT SUPERVISION REQUIRED. MISUSE OR CARELESS USE MAY CAUSE SERIOUS INJURY, ESPECIALLY TO THE EYE.
EYE PROTECTION MUST BE USED BY THE USER AND ANY PERSON WITHIN RANGE. MAY BE DANGEROUS UP TO 100 YARDS (91.44 METERS). READ OWNER’S
MANUAL BEFORE USING.
YOU AND OTHERS WITH YOU SHOULD ALWAYS WEAR SHOOTING GLASSES TO PROTECT YOUR EYES.
BUYER AND USER HAVE THE DUTY TO OBEY ALL LAWS ABOUT THE USE AND OWNERSHIP OF THIS AIRSOFT GUN.
DO NOT BRANDISH OR DISPLAY THIS AIRSOFT GUN IN PUBLIC – IT MAY CONFUSE PEOPLE AND MAY BE A CRIME. POLICE AND
OTHERS MAY THINK IT IS A FIREARM. DO NOT CHANGE THE COLORATION AND MARKINGS TO MAKE IT LOOK MORE LIKE A FIREARM. THAT IS DANGEROUS
AND MAY BE A CRIME.
WARNING: THIS PRODUCT CONTAINS ONE OR MORE CHEMICALS KNOWN TO THE STATE OF CALIFORNIA TO CAUSE CANCER AND BIRTH DEFECTS (OR OTHER REPRODUCTIVE HARM).
1. SAFETY FIRST
•• ALWAYS treat the AIRSOFT GUN as though it is loaded and ready to fire
•• ALWAYS treat the AIRSOFT GUN with the same respect you would a firearm
•• ALWAYS store the AIRSOFT GUN unloaded
•• ALWAYS store the AIRSOFT GUN away from children
•• ALWAYS aim in a SAFE DIRECTION
•• ALWAYS keep the muzzle of the AIRSOFT GUN pointed in a SAFE DIRECTION
•• ALWAYS keep your finger off the trigger and out of the trigger guard until ready to shoot
•• ALWAYS keep the AIRSOFT GUN “ON SAFE” until you are ready to shoot (see Fig. 2a)
•• ALWAYS check to see if the AIRSOFT GUN is “ON SAFE” (see Fig. 2a) and unloaded when handing it to or receiving it from another person
•• ALWAYS have you and others wear shooting glasses to protect your eyes
•• ALWAYS wear shooting glasses over eye glasses if your prescription or reading glasses are not safety glasses
•• ALWAYS place the backstop in a location that will be safe should the backstop fail
•• ALWAYS check your backstop for wear before and after each use. All backstops are subject to wear and will eventually fail. Replace your backstop if
the surface is worn or damaged, or if a ricochet occurs
•• ALWAYS use the proper size BB in your AIRSOFT GUN. Check the markings on your AIRSOFT GUN to verify the BB size is 6mm
•• NEVER reuse ammunition
•• NEVER shoot at hard surfaces or at the surface of water. The BB may bounce off or ricochet and hit someone or something you had not intended
to hit
•• NEVER attempt to disassemble or tamper with your AIRSOFT GUN. Modifying the function of your AIRSOFT GUN in any way, may be unsafe and will
void your warranty
•• NEVER point the AIRSOFT GUN at any person or at anything you do not intend to shoot
2. LEARNING THE PARTS OF YOUR AIRSOFT GUN
Learning the names of the parts of your new airsoft gun will help you to understand your owner’s manual. Use this manual to increase your enjoyment of this airsoft gun.
A. Stock
B. Muzzle
C. Safety
D. Battery
E. Trigger
F. Trigger Guard
G. Loading Chamber
H. Battery Release Button
I. Stock Release Button
3. Operating the Safety
CAUTION: Like all mechanical devices, an airsoft gun safety can fail. Even when the safety is “ON SAFE”, you should continue to handle the airsoft gun in a safe manner.
A. TO PUT THE AIRSOFT GUN “ON SAFE:”
1. Locate the safety on the left side of the airsoft gun.
2. Rotate the safety selector switch upward, into the “SAFE” position (Fig. 2) for “ON SAFE”.
KEEP THE AIRSOFT GUN IN THE “ON SAFE” (“SAFE”) POSITION UNTIL YOU ARE ACTUALLY READY TO SHOOT. THEN ROTATE THE
SAFETY TO THE “OFF SAFE” POSITION.
B. TO TAKE THE AIRSOFT GUN “OFF SAFE”:
1. Rotate the safety selector switch downward into the “FULL” position (Fig. 2) for “OFF SAFE”.
2. When the safety selector switch on the airsoft gun is rotated into the “FULL” position, the airsoft gun can be fired.
4. Adjusting the Size of Your Airsoft Gun
A. Installing and Removing the Stock
1. To install, line stock up with grooves at the back of the rifle. With the stock in this position push the stock down until it
locks into place.
2. To remove the stock, pull the stock release button toward the back of the stock. Push the stock upward until it has
cleared the rail.
B. Removing/installing the Compensator
1. Before installing/removing the compensator, make sure your airsoft gun is “ON SAFE” (see section 2A) and is UNLOADED
SAFE
FULL
Fig. 2
(see section 4B).
2. Point the airsoft gun in a SAFE DIRECTION.
3. While holding the gun in the shooting position, turn the compensator clockwise to remove it from the gun.
4. To put the compensator back on, thread the compensator onto the gun by turning it counter-clockwise until tight
(Fig. 3).
5. Loading and Unloading Plastic BBs
NOTE: For optimum performance use Crosman®, GameFace™, Marines Airsoft® or Duty Calls® 6mm plastic BBs only.
A. Installing and Filling the Hopper- Loading Chamber.
1. Make sure the airsoft gun is “ON SAFE” (section 2A) and pointed in a SAFE DIRECTION.
2. Make sure your loading chamber is empty.
3. Loosen the mounting screws on the loading chamber.
4. With the small end toward the rear of the gun, place the loading chamber on the top rail, lining up the hole on the gun
Fig. 3
with the hole on the loader (fig.4).
5. Tighten the mounting screws.
6. Slide open the loading chamber door located on top of the chamber. (fig. 5)
7. Fill the chamber with 6mm BBs and slide the door closed.
NOTE: Use 6 mm plastic BBs only in this airsoft gun. Use of any other ammunition can cause injury to you or damage to the airsoft gun.
B. Unloading Plastic BBs
1. Make sure the airsoft gun is “ON SAFE” (see section 2A).
2. Point the airsoft gun in a SAFE DIRECTION.
3. To empty the chamber slide open the door on the top of the chamber and pour the BBs out into a container or your hand.
4. Point the airsoft gun in a SAFE DIRECTION, take “OFF SAFE” and fire the gun in a safe direction until no more BBs fire.
5. Put the airsoft gun back “ON SAFE”.
Fig. 4
EVEN THOUGH YOU GO THROUGH THE UNLOADING PROCEDURE, CONTINUE TO TREAT THE AIRSOFT GUN AS THOUGH IT WERE
LOADED. DO NOT POINT AT ANYTHING YOU DO NOT INTEND TO SHOOT.
6. Charging, Loading and Removing the Battery
A. Charging the Battery
1. Remove the battery from the airsoft gun (see section 5C).
2. Plug the charger into the top of the battery.
3. Plug the charger into a standard 110v outlet.
4. Charge for no more than 5 hours and unplug charger from outlet.
5. Disconnect the battery from the charger.
IMPORTANT: Charge the battery a MINIMUM of 4 hours and a MAXIMUM of 5 hours prior to initial use. This airsoft gun will not operate
properly without a fully charged battery.
CAUTION: TO REDUCE THE RISK OF FIRE AND/OR DAMAGE TO YOUR BATTERY, DO NOT OVERCHARGE THE BATTERY, UNPLUG THE BATTERY
Fig. 5
CHARGER WHEN NOT IN USE, AND USE ONLY THE CHARGER SUPPLIED WITH YOUR AIRSOFT GUN.
B. Loading the Battery
1. Make sure the airsoft gun is “ON SAFE” (see section 2A) and is UNLOADED. (see section 4B)
2. Point the airsoft gun in a SAFE DIRECTION.
3. Insert the battery into the gun so that the metal connectors (positive end) are on top and lock battery in place (fig. 6A).
C. Removing the Battery
1. Make sure the airsoft gun is “ON SAFE” (see section 2A) and is UNLOADED.
2. Point the airsoft gun in a SAFE DIRECTION.
3. While supporting the bottom of the battery, press the battery release button on the right side of the gun, and pull
down to remove the battery from the receiver (Fig. 6B).
7. Aiming and Firing Safely
NOTE: This airsoft gun fires in full-auto mode only. Full-auto means it will continue to fire plastic BBs as long as you hold the trigger.
1. Your airsoft gun is designed for target shooting and is suited for both indoor and outdoor use. Always remember to
Fig. 6A
place your target carefully. THINK about what you will hit if you miss the target.
2. When you are sure of your target and backstop, and the area around the target is clear, take the airsoft gun “OFF SAFE” (see Section 2B), aim and pull the trigger to fire.
8. Maintaining your airsoft gun
• DO NOT ATTEMPT TO DISASSEMBLE YOUR AIRSOFT GUN.
• DO NOT MODIFY OR ALTER YOUR AIRSOFT GUN. ATTEMPTS TO MODIFY THE AIRSOFT GUN IN ANY WAY INCONSISTENT WITH THIS MANUAL MAY MAKE
YOUR AIRSOFT GUN UNSAFE TO USE, CAUSE SERIOUS INJURY, ESPECIALLY TO THE EYE AND WILL VOID THE WARRANTY.
• IF YOU DROP YOUR AIRSOFT GUN, VISUALLY CHECK TO SEE THAT IT WORKS PROPERLY BEFORE YOU USE IT AGAIN.
• IF ANYTHING SEEMS CHANGED, LIKE A SHORTER OR WEAKER TRIGGER PULL, THIS MAY MEAN WORN OUT OR BROKEN PARTS. CALL GAME FACE CUSTOMER SERVICE FOR ASSISTANCE BEFORE USING YOUR AIRSOFT GUN AGAIN.
A. To Clean the Airsoft Gun Barrel
1. Never look down the end of the barrel of an airsoft gun.
2. Make sure the airsoft gun is “ON SAFE” and pointed in a SAFE DIRECTION.
3. Remove the loading chamber from the gun.
4. Spray a cleaning patch with Crosman Nitro Lubricant oil.
5. With the cleaning patch on rod (rod may not be included with your airsoft gun), insert it into barrel to clean.
6. Make sure rod retains cleaning patch or the patch could get stuck in the barrel of the gun
7. Swab barrel 3-4 times.
8. Repeat swabbing procedure with a dry patch.
9. Barrel is clean when patches come out clean after dry swabbing.
B. Clearing a Jam
1. Never look down the end of the barrel of an airsoft gun to see if a jam has been cleared.
2. Make sure the airsoft gun is “ON SAFE” and pointed in a SAFE DIRECTION.
3. Remove the loading chamber from the gun.
4. Insert the tapered end of the cleaning rod into the barrel.
5. CAREFULLY and slowly apply more pressure until you push the BB out of the breech.
6. Reinstall the loading chamber and test gun.
C. Trouble shooting/Increasing Your Shooting Enjoyment
1. Occasionally shake the gun to ensure smooth BB feeding.
2. Prevent dust and dirt from getting into the magazine to help maintain the performance of your airsoft rifle.
3. Change the battery if firing cycle becomes slow.
Fig. 6B
Mechanism/Action
Electronic or AEG
Caliber/Ammunition
6mm plastic BBs
Reservoir
Up to 500 BBs
Safety
Selector
Velocity
Up to 200 fps
Length:
28.5”
Weight
2.0 lbs
PERFORMANCE: Many factors can affect velocity, including brand of projectile, type and weight of projectile and barrel condition. For optimum performance use Crosman®, Gameface®,
Marine Airsoft® or Duty Calls® branded ammunition only. Use of other airsoft ammunition may cause your product to malfunction and may void your warranty.
30 DAY LIMITED WARRANTY
This product is warranted to the retail consumer for 30 days from date of retail purchase against defects in material and workmanship and is transferable. You should retain the original
sales receipt as record of date of purchase. If no receipt, the product is warranted for 30 days from date of manufacture.
WHAT IS COVERED:
1. Product replacement
2. Transportation charges to consumer for product replacement
WHAT IS NOT COVERED:
1. Transportation charges to Crosman Corporation
2. Damages caused by abuse, modification or failure to perform normal maintenance – see Owner’s Manual
3. Any other expense
4. CONSEQUENTIAL DAMAGES, INCIDENTAL DAMAGES, OR INCIDENTAL EXPENSES INCLUDING DAMAGE TO PROPERTY. SOME LOCAL, STATE OR FEDERAL LAWS DO NOT ALLOW THE
EXCLUSION OR LIMITATION OF INCIDENTAL OR CONSEQUENTIAL DAMAGES SO THE ABOVE LIMITATION OR EXCLUSION MAY NOT APPLY TO YOU.
IMPLIED WARRANTIES
ANY IMPLIED WARRANTIES INCLUDING THE IMPLIED WARRANTIES OF MERCHANTABILITY AND FITNESS FOR A PARTICULAR PURPOSE ARE LIMITED IN DURATION TO 90 DAYS FROM DATE OF
RETAIL PURCHASE. SOME STATES DO NOT ALLOW LIMITATIONS ON HOW LONG AN IMPLIED WARRANTY LASTS SO THE ABOVE LIMITATIONS MAY NOT APPLY TO YOU.
To the extent any provision of this warranty is prohibited by federal, state or municipal law, which cannot be preempted, it shall not be applicable. This warranty gives you specific legal
rights and you may have other rights, which vary, from state to state.
STOP – BEFORE YOU RETURN THIS PRODUCT TO THE STORE
Save on gas and avoid the trip back to the store. Contact our Customer Service/Technical Support representatives for information and trouble-shooting help. Call 1-800-7AIRGUN
(1-800-724-7486) or find answers to frequently asked questions at www.crosman.com.
WARRANTY CLAIM
U.S. Customers- Contact Crosman Customer Service at 800-724-7486 or email us via www.crosman.com. You will be instructed where and how to send your air gun in for repair under
warranty or referred to one of our authorized service centers in your area.
Crosman Corporation
Attn: Warranty Dept.
7629 Route 5 & 20
Bloomfield, NY 14469
Include with your product a copy of your receipt and a brief description of the problem. Be sure to indicate your name, mailing address, email address and telephone number. Allow 2-4
weeks for repairs. We recommend you use a method of shipping that provides you with a tracking number and insurance options. Crosman is not liable for any damaged, lost or stolen
merchandise during shipping.
Canadian Customers - Contact the Gravel Agency, in Quebec at 866- 662-4869.
Outside U.S. Customers: Please contact your point of purchase dealer/distributor. If you do not know your dealer/distributor, contact our International Dept. for assistance at
585-657-6161 or email us via www.crosman.com.
CROSMAN, DUTY CALLS and GAMEFACE are trademarks of Crosman Corporation in the United States. MARINES AIRSOFT is a trademark of the United States Marine Corps and is used under
license. ©2014
TACR91
Combinación de rifle de aire suave / escopeta de 6 mm
MANUAL DEL PROPIETARIO
LEA TODAS LAS INSTRUCCIONES Y ADVERTENCIAS ANTES DE USARLO
Crosman Corporation
7629 Routes 5 & 20
Bloomfield, NY 14469
Estados Unidos de América
www.crosman.com
1-800-7AIRGUN (724-7486)
Núm. de pieza del manual R91-515
RECUERDE, ESTE RIFLE DE AIRE SUAVE NO ES UN JUGUETE. SIEMPRE TRATE EL RIFLE DE AIRE SUAVE COMO SI ESTUVIERA CARGADO Y CON EL MISMO RESPETO QUE LE TENDRÍA A UN ARMA
DE FUEGO.
NO ES UN JUGUETE. SE REQUIERE LA SUPERVISIÓN DE UN ADULTO. EL USO INCORRECTO O DESCUIDADO PUEDE CAUSAR
LESIONES GRAVES, ESPECIALMENTE EN LOS OJOS. EL USUARIO Y TODAS LAS PERSONAS AL ALCANCE DEL RIFLE DEBEN UTILIZAR PROTECCIÓN PARA LOS
OJOS. PUEDE SER PELIGROSO HASTA A 100 YARDAS (91,44 METROS). LEA EL MANUAL DEL PROPIETARIO ANTES DE USARLO.
4. Rocíe un paño de limpieza con aceite lubricante Crosman Nitro.
5. Con el paño de limpieza en la baqueta (es posible que la baqueta no esté incluida con su rifle de aire suave), insértela en el cañón para limpiarlo.
6. Asegúrese de que la baqueta conserve el paño de limpieza o éste podría quedar atrapado en el cañón del rifle
7. Recorra el cañón 3 o 4 veces.
8. Repita el procedimiento de frotado con un paño seco.
9. El cañón está limpio cuando los paños salgan limpios después de frotarlo en seco.
B. Eliminar un atasco
1. Nunca mire dentro del cañón de un rifle de aire suave para ver si se ha eliminado un atasco.
2. Asegúrese de que el rifle de aire suave tenga el seguro activado (“ON SAFE”) y esté apuntando en una DIRECCIÓN SEGURA.
3. Quite la cámara de carga del rifle.
4. Introduzca el extremo cónico de la varilla de limpieza en el cañón.
5. CUIDADOSAMENTE y con lentitud, aplique más presión hasta que empuje el balín sacándolo de la recámara.
6. Vuelva a instalar la cámara de carga y pruebe el rifle.
C. Resolución de problemas y aumento de su disfrute disparando
1. Sacuda ocasionalmente el rifle para garantizar una alimentación fácil de las municiones.
2. Evite que entren polvo y suciedad en el cargador para ayudar a conservar el rendimiento de su rifle de aire suave.
3. Cambie la batería si el ciclo de disparo se hace lento.
ESPECIFICACIONES
USTED Y LOS DEMÁS QUE ESTÉN CON USTED DEBEN USAR SIEMPRE ANTEOJOS PARA DISPARAR CON OBJETO DE PROTEGERSE LOS OJOS.
EL COMPRADOR Y EL USUARIO TIENEN LA OBLIGACIÓN DE OBEDECER TODAS LAS LEYES REFERENTES AL USO Y PROPIEDAD DE ESTE RIFLE DE AIRE SUAVE.
NO BLANDA NI MUESTRE ESTE RIFLE DE AIRE SUAVE EN PÚBLICO; PUEDE CONFUNDIR A LA GENTE Y PUEDE SER UN
DELITO. LA POLICÍA Y OTRAS PERSONAS PUEDEN PENSAR QUE SE TRATA DE UN ARMA DE FUEGO. NO CAMBIE LA COLORACIÓN O LAS MARCAS DE MODO
QUE TENGA UN ASPECTO MÁS PARECIDO AL DE UN ARMA DE FUEGO. ES PELIGROSO Y PODRÍA TRATARSE DE UN DELITO.
ESTE PRODUCTO CONTIENE UNA O MÁS SUSTANCIAS QUÍMICAS QUE EL ESTADO DE CALIFORNIA HA DETERMINADO QUE
OCASIONAN CÁNCER Y DEFECTOS CONGÉNITOS (U OTROS DAÑOS REPRODUCTIVOS).
1. LA SEGURIDAD ES LO PRIMERO
•• SIEMPRE trate el RIFLE DE AIRE SUAVE como si estuviera cargado y listo para disparar
•• SIEMPRE trate el RIFLE DE AIRE SUAVE con el mismo respeto que le tendría a un arma de fuego
•• SIEMPRE guarde el RIFLE DE AIRE SUAVE descargado
•• SIEMPRE guarde el RIFLE DE AIRE SUAVE lejos de los niños
•• SIEMPRE apunte en una DIRECCIÓN SEGURA
•• Mantenga SIEMPRE la boca del RIFLE DE AIRE SUAVE apuntando en una DIRECCIÓN SEGURA
•• Mantenga SIEMPRE el dedo apartado del gatillo y fuera del guardamonte hasta que esté listo para disparar
•• Mantenga SIEMPRE el RIFLE DE AIRE SUAVE con el seguro puesto (“ON SAFE”) hasta que esté listo para disparar (vea la Fig. 2a)
•• Compruebe SIEMPRE que el RIFLE DE AIRE SUAVE tenga el seguro puesto (“ON SAFE”) (vea la Fig. 2a) y esté descargado al entregárselo a otra
persona o al recibirlo de otra persona
•• SIEMPRE utilice, y haga que los demás a su alrededor lo hagan, anteojos para disparar a fin de protegerse los ojos
•• Utilice SIEMPRE anteojos para disparar sobre sus anteojos para lectura o recetados si éstos no son de seguridad
•• Coloque SIEMPRE el respaldo en un lugar que sea seguro si llegase a fallar
•• Compruebe SIEMPRE el desgaste del respaldo antes y después de cada uso. Todos los respaldos están sujetos a desgaste y con el tiempo fallarán.
Reemplace el respaldo si la superficie está desgastada o dañada, o si ocurre un rebote
•• Utilice SIEMPRE balines del tamaño adecuado en su RIFLE DE AIRE SUAVE. Compruebe las marcas de su RIFLE DE AIRE SUAVE para verificar que el
tamaño de los balines sea de 6 mm
•• NUNCA reutilice la munición
•• NUNCA dispare contra superficies duras o a la superficie del agua. Los balines pueden rebotar y golpear a alguien o algo a los que usted no tenía
intención de golpear
•• NUNCA intente desmontar su RIFLE DE AIRE SUAVE ni alterarlo. Modificar la función de su RIFLE DE AIRE SUAVE de cualquier manera puede ser
inseguro y anulará la garantía
•• NUNCA apunte el RIFLE DE AIRE SUAVE a ninguna persona o cosa a las que no tenga la intención de dispararles
2. CONOZCA LAS PARTES DE SU RIFLE DE AIRE SUAVE
Aprender los nombres de las partes de su nuevo rifle de aire suave le ayudará a entender su manual del propietario. Aproveche este manual para aumentar su disfrute de este rifle de
aire suave.
3. Funcionamiento del seguro
PRECAUCIÓN: Como todos los dispositivos mecánicos, el seguro de un rifle de aire suave puede fallar. Incluso con el seguro activado (“ON SAFE”), debe seguir manipulando el rifle de
aire suave de modo seguro.
A. PARA ACTIVAR EL SEGURO DEL RIFLE DE AIRE SUAVE (“ON SAFE”):
1. Encuentre el seguro del lado izquierdo del rifle de aire suave.
2. Gire el interruptor selector del seguro hacia arriba, a la posición de “Seguro” (“SAFE”) (Fig. 2) para activar el seguro (“ON SAFE”).
MANTENGA EL SEGURO DEL RIFLE DE AIRE SUAVE EN POSICIÓN DE ACTIVADO (“ON SAFE”) HASTA QUE ESTÉ REALMENTE
LISTO PARA DISPARAR. ENTONCES GIRE EL SEGURO A LA POSICIÓN DE DESACTIVADO (“OFF SAFE”).
SAFE
el rifle de aire suave.
4. Ajuste del tamaño de su rifle de aire suave
A. Instalar y quitar la culata
1. Para instalarla, alinee la culata con las ranuras de la parte trasera del rifle. Con la culata en esta posición, empújela
hacia abajo hasta que se bloquee en su lugar.
2. Para quitar la culata, tire del botón de liberación hacia la parte posterior de la culata. Empuje la culata hacia arriba
hasta que salga del riel.
FULL
Fig. 2
B. Extraer e instalar el compensador
1. Antes de instalar o quitar el compensador, asegúrese de que su rifle de aire suave tenga el seguro activado (“”ON
SAFE””) (vea la sección 2A) y esté DESCARGADO (vea la sección 4B).
2. Apunte el rifle de aire en una DIRECCIÓN SEGURA.
3. Sosteniendo el rifle en posición de disparo, gire el compensador en sentido horario para quítalo del rifle.
4. Para volver a colocar el compensador, enrósquelo en el rifle girándolo en sentido antihorario hasta que esté apretado
(Fig. 3).
5. Cargar y descargar las municiones de plástico
Nota: Para obtener un rendimiento óptimo, utilice únicamente balines de plástico de 6 mm Crosman®, Gameface™, Marines Airsoft® o
Duty Calls®.
Fig. 3
A. Instalación y llenado de la tolva y recámara de carga.
1. Asegúrese de que el rifle de aire suave tenga el seguro activado (“ON SAFE”) (sección 2A) y esté apuntado en una
DIRECCIÓN SEGURA.
2. Asegúrese de que su recámara de carga esté vacía.
3. Afloje los tornillos de instalación de la cámara de carga.
4. Con el extremo pequeño hacia la parte trasera del rifle, coloque la cámara de carga sobre el riel superior, alineando el
orificio del rifle con el del cargador (fig. 4).
5. Apriete los tornillos de instalación.
6. Abra deslizándola la puerta de la recámara de carga situada en la parte superior de la recámara. (fig. 5)
7. Llene la recámara con municiones de 6 mm y cierre la puerta deslizándola.
Fig. 4
NOTA: Utilice únicamente municiones de plástico de 6 mm en este rifle de aire suave. El uso de cualquier otra munición puede causarle
lesiones o dañar el rifle de aire suave.
B. Descarga de las municiones de plástico
1. Asegúrese de que el rifle de aire suave tenga el seguro activado (“ON SAFE”) (sección 2A).
2. Apunte el rifle de aire en una DIRECCIÓN SEGURA.
3. Para vaciar la recámara, abra la puerta de la parte superior de la recámara deslizándola y vierta las municiones en un recipiente o en su mano.
4. Apunte el rifle de aire suave en una DIRECCIÓN SEGURA, quite el seguro (“OFF SAFE”) y dispare el rifle en una dirección segura hasta que ya no se disparen municiones.
5. Active nuevamente el seguro del rifle de aire suave (“ON SAFE”).
AUNQUE SIGA TODO EL PROCEDIMIENTO DE DESCARGA, SIGA TRATANDO EL RIFLE DE AIRE SUAVE COMO SI ESTUVIERA
CARGADO. NUNCA APUNTE HACIA NADA A LO QUE NO TENGA INTENCIÓN DE DISPARARLE.
6. Carga, inserción y extracción de la batería
A. Cargar la batería
1. Extraiga la batería del rifle de aire suave (vea la sección 5C).
2. Conecte el cargador a la parte superior de la batería.
3. Conecte el cargador a un enchufe de corriente estándar de 110V.
4. Cárguela durante no más de 5 horas y desconecte el cargador del enchufe.
5. Desconecte la batería del cargador.
IMPORTANTE: Cargue la batería un MÍNIMO de 4 horas y un MÁXIMO de 5 horas antes de utilizarla por primera vez. El rifle de aire suave
no funcionará correctamente sin una batería bien cargada.
PRECAUCIÓN: PARA REDUCIR EL RIESGO DE INCENDIO O DAÑOS A LA BATERÍA, NO LA CARGUE EN EXCESO, DESCONECTE EL CARGADOR DE
BATERÍAS CUANDO NO LO ESTÉ USANDO Y UTILICE ÚNICAMENTE EL CARGADOR SUMINISTRADO CON SU RIFLE DE AIRE SUAVE.
Fig. 5
B. Cargar la batería
1. Asegúrese de que el rifle de aire suave tenga el seguro activado (“ON SAFE”) (sección 2A) y esté DESCARGADO. (sección 4B)
2. Apunte el rifle de aire en una DIRECCIÓN SEGURA.
3. Inserte la batería en el rifle de modo que los conectores metálicos (extremo positivo) estén en la parte superior y
bloquee la batería en su sitio (fig. 6A).
C. Quitar la batería
1. Asegúrese de que el rifle de aire suave tenga el seguro activado (“ON SAFE”) (sección 2A) y esté DESCARGADO.
2. Apunte el rifle de aire en una DIRECCIÓN SEGURA.
3. Sosteniendo el extremo inferior de la batería, presione el botón de liberación de la batería del lado derecho del rifle y
Fig. 6A
tire hacia abajo para quitar la batería del receptor (Fig. 6B).
7. Apuntar y disparar con seguridad
NOTA: Este rifle de aire suave dispara en modo automático completo. Automático completo significa que seguirá disparando municiones
de plástico siempre y cuando se mantenga oprimido el gatillo.
1. Su rifle de aire suave está diseñado para el tiro al blanco y es adecuado para su uso en interiores y al aire libre. Recuerde
siempre colocar cuidadosamente su blanco. PIENSE sobre lo que puede golpear si falla el blanco.
2. Cuando esté seguro de su blanco y su respaldo, y el área alrededor del blanco esté despejada, quite el seguro del rifle de
aire suave (“OFF SAFE”) (vea la sección 2B) y oprima el gatillo para disparar.
Fig. 6B
8. Mantenimiento de su rifle de aire suave
• NO INTENTE DESMONTAR SU RIFLE DE AIRE SUAVE.
• NO MODIFIQUE NI ALTERE SU RIFLE DE AIRE SUAVE. LOS INTENTOS DE MODIFICAR EL RIFLE DE AIRE SUAVE DE CUALQUIER FORMA QUE SEA CONTRARIA
A ESTE MANUAL PUEDEN HACER QUE SU RIFLE DE AIRE SUAVE SEA INSEGURO PARA USARSE Y CAUSE LESIONES GRAVES O LA MUERTE, ADEMÁS DE QUE
ANULARÁN LA GARANTÍA.
• SI DEJA CAER SU RIFLE DE AIRE SUAVE, COMPRUEBE VISUALMENTE QUE FUNCIONE CORRECTAMENTE ANTES DE VOLVER A UTILIZARLO.
• SI CUALQUIER COSA PARECE HABER CAMBIADO, COMO UN RECORRIDO DE GATILLO MÁS CORTO O MÁS DÉBIL, PUEDE SIGNIFICAR QUE HAY PIEZAS
DESGASTADAS O ROTAS. LLAME A SERVICIO AL CLIENTE DE GAME FACE PARA OBTENER AYUDA ANTES DE USAR NUEVAMENTE SU RIFLE DE AIRE SUAVE.
A. Para limpiar el cañón del rifle de aire suave
1. Nunca mire por el extremo del cañón de un rifle de aire suave.
2. Asegúrese de que el rifle de aire suave tenga el seguro activado (“ON SAFE”) y esté apuntando en una DIRECCIÓN SEGURA.
3. Quite la cámara de carga del rifle.
Electrónico o AEG
Calibre/Municiones
Municiones de plástico de 6 mm
Depósito
Hasta 500 balines
Seguro
Selector
Velocidad
Hasta 60.96 m/s (200 fps)
Longitud
28.5”
Peso
2.0 lbs
DESEMPEÑO: Muchos factores pueden afectar a la velocidad, entre ellos la marca del proyectil, el tipo y peso de dicho proyectil y el estado del cañón. Para obtener un rendimiento
óptimo, utilice únicamente munición de las marcas Crosman®, Gameface®, Marine Airsoft® o Duty Calls®. El uso de otra munición de aire suave puede hacer que su producto funcione
incorrectamente y podría anular su garantía.
GARANTÍA LIMITADA DE 30 DÍAS
Este producto se garantiza al consumidor al menudeo durante 30 días desde la fecha de la compra al menudeo contra defectos de materiales o mano de obra y es transferible. Debe
conservar el recibo original de venta como registro de la fecha de la compra. Si no hay recibo, el producto está garantizado durante 30 días desde la fecha de su fabricación.
QUÉ ESTÁ CUBIERTO:
1. Reemplazo del producto
2. Cargos al consumidor por transporte del producto reemplazado
QUÉ NO ESTÁ CUBIERTO:
1. Cargos por transporte a Crosman Corporation
2. Daños causados por maltrato, modificación u omisión en la realización del mantenimiento normal; vea el manual del propietario
3. Cualquier otro gasto
4. DAÑOS CONSECUENCIALES, DAÑOS INCIDENTALES O GASTOS INCIDENTALES, INCLUIDOS LOS DAÑOS A LA PROPIEDAD. ALGUNAS LEYES LOCALES, ESTATALES O FEDERALES NO
PERMITEN LA EXCLUSIÓN O LIMITACIÓN DE LOS DAÑOS Y PERJUICIOS INCIDENTALES O CONSECUENCIALES, DE MODO QUE LA LIMITACIÓN O EXCLUSIÓN ARRIBA INDICADA PODRÍA NO
APLICÁRSELE A USTED.
GARANTÍAS IMPLÍCITAS
CUALQUIER GARANTÍA IMPLÍCITA, INCLUIDAS LAS GARANTÍAS IMPLÍCITAS DE COMERCIABILIDAD E IDONEIDAD PARA UN OBJETIVO DETERMINADO, TIENE UNA DURACIÓN LIMITADA DE
90 DÍAS A PARTIR DE LA FECHA DE LA COMPRA AL MENUDEO. ALGUNOS ESTADOS NO PERMITEN LIMITACIONES A CUÁNTO TIEMPO DURA UNA GARANTÍA IMPLÍCITA, DE MODO QUE LAS
LIMITACIONES ANTERIORES PODRÍAN NO APLICÁRSELE A USTED.
En la medida en que cualquier disposición de esta garantía esté prohibida por las leyes federales, estatales o municipales, que no puedan anticiparse, no será aplicable. Esta garantía le
otorga derechos legales concretos y es posible que tenga también otros derechos que varían según el estado.
ALTO – ANTES DE DEVOLVER ESTE PRODUCTO A LA TIENDA
Ahorre gasolina y evítese el viaje de vuelta a la tienda. Comuníquese con nuestros representantes de Servicio al Cliente/Asistencia Técnica a fin de obtener información y ayuda
para la resolución de problemas. Llame al 1-800-7AIRGUN (1-800-724-7486) o encuentre respuestas a preguntas frecuentes en www.crosman.com.
RECLAMACIÓN DE GARANTÍA
Clientes de los EE.UU. - Comuníquese con Servicio al Cliente de Crosman al 800-724-7486 o envíenos un correo electrónico por medio de www.crosman.com. Se le indicará dónde y
cómo enviar su rifle de aire para reparación bajo la garantía o se le remitirá a uno de nuestros centros de servicio autorizados en su zona.
Crosman Corporation • Atn: Depto. de Garantía • 7629 Route 5 & 20 • Bloomfield, NY 14469
Incluya con su producto una copia de su recibo y una breve descripción del problema. Cuide de incluir su nombre, dirección postal, dirección de correo electrónico y número de teléfono.
Permita que pasen de 2 a 4 semanas para reparaciones. Le recomendamos que utilice un método de transporte que le ofrezca un número de seguimiento y opciones de seguro. Crosman
no es responsable de ninguna mercancía dañada, perdida o robada durante el transporte.
Clientes canadienses - Comuníquese con la Gravel Agency en Quebec al 866- 662-4869.
Clientes de fuera de los EE.UU.: Póngase en contacto con su concesionario o distribuidor de compra. Si no conoce a su concesionario o distribuidor, póngase en contacto con nuestro
Departamento Internacional para obtener ayuda al 585-657-6161 o envíenos un correo electrónico mediante www.crosman.com.
CROSMAN, DUTY CALLS y GAMEFACE son marcas comerciales registradas de Crosman Corporation en los Estados Unidos. MARINES AIRSOFT es una marca registrada de los Marines de los
Estados Unidos y se utiliza bajo licencia. ©2014
A. Culata
B. Boca
C. Seguro
D. Batería
E. Gatillo
F. Guardamonte
G. Cámara de carga
H. Botón de liberación del Batería
I. Botón de liberación de la culata
B. PARA QUITAR EL SEGURO DEL RIFLE DE AIRE SUAVE (“OFF SAFE”):
1. Gire el interruptor selector del seguro hacia abajo, a la posición “”FULL”” (Fig. 2) para quitar el seguro (“”OFF SAFE””)
2. Cuando el interruptor selector de seguridad del rifle de aire suave está girado a la posición “”FULL””, se puede disparar
Mecanismo/Acción
TACR91
Combinaison carabine / fusil airsoft 6 mm
MANUEL D’UTILISATION
LIRE TOUTES LES INSTRUCTIONS ET AVERTISSEMENTS AVANT D’UTILISER CETTE CARABINE À AIR COMPRIMÉ
Crosman Corporation
7629 Routes 5 & 20
Bloomfield, NY 14469 USA
www.crosman.com
1-800-7AIRGUN (724-7486)
Référence du manuel R91-516
NE JAMAIS OUBLIER QUE CETTE RÉPLIQUE AIRSOFT N’EST PAS UN JOUET. MANIPULEZ TOUJOURS CETTE RÉPLIQUE AIRSOFT COMME SI ELLE ÉTAIT CHARGÉE ET AVEC AUTANT DE PRÉCAUTIONS
QUE VOUS LE FERIEZ POUR UNE ARME À FEU.
PAS UN JOUET. SURVEILLANCE D’UN ADULTE OBLIGATOIRE. UN USAGE INAPPROPRIÉ PEUT PROVOQUER DES
BLESSURES GRAVES, PARTICULIÈREMENT AUX YEUX. L’UTILISATEUR, AINSI QUE TOUTE PERSONNE SE TROUVANT À PROXIMITÉ, DOIVENT PORTER UNE PROTECTION OCULAIRE. CETTE RÉPLIQUE PEUT REPRÉSENTER UN DANGER DANS UN RAYON DE 100 YARDS (91,44 MÈTRES). LIRE LE MANUEL D’UTILISATION
AVANT D’UTILISER CETTE RÉPLIQUE.
VOUS ET TOUTES PERSONNES PRÈS DE VOUS DEVRIEZ TOUJOURS PORTER DES LUNETTES DE TIR POUR PROTÉGER VOS YEUX.
L’ACHETEUR ET L’UTILISATEUR SONT TENUS DE SE CONFORMER À TOUTES LES LOIS RELATIVES À L’UTILISATION ET À LA PROPRIÉTÉ DE CETTE RÉPLIQUE AIRSOFT.
NE PAS BRANDIR OU EXPOSER CETTE REPLIQUE AIRSOFT EN PUBLIC – CELA POURRAIT PORTER A CONFUSION ET
CONSTITUER UN CRIME. LES POLICIERS ET AUTRES PERSONNES POURRAIENT CROIRE QU’IL S’AGIT D’UNE ARME A FEU. NE PAS CHANGER LA COULEUR NI LE
MARQUAGE AFIN QU’ELLE RESSEMBLE DAVANTAGE A UNE ARME A FEU. CELA EST DANGEREUX ET PEUT CONSTITUER UN CRIME.
CE PRODUIT CONTIENT UN OU PLUSIEURS PRODUITS CHIMIQUES RECONNUS PAR L’ETAT DE CALIFORNIE COMME
PROVOQUANT LE CANCER ET DES ANOMALIES CONGENITALES (OU D’AUTRES ANOMALIES LIEES AU SYSTEME REPRODUCTEUR).
1. PRIORITE A LA SECURITE
•• Manipulez TOUJOURS la RÉPLIQUE AIRSOFT comme si elle était chargée et prête à faire feu
•• Traitez TOUJOURS cette RÉPLIQUE AIRSOFT avec autant de précautions que vous le feriez pour une arme à feu
•• Rangez TOUJOURS votre RÉPLIQUE AIRSOFT déchargée.
•• Rangez TOUJOURS votre RÉPLIQUE AIRSOFT hors de portée des enfants
•• Visez TOUJOURS vers un ENDROIT SÛR
•• Pointez TOUJOURS la bouche de la RÉPLIQUE AIRSOFT vers ENDROIT SÛR
•• Ne placez JAMAIS le doigt sur la détente ni sur le pontet tant que vous n’êtes pas prêt à tirer
•• Laissez TOUJOURS la sûreté de la RÉPLIQUE AIRSOFT ENCLENCHÉE jusqu’à ce que vous soyez prêt à tirer (voir Fig. 2a)
•• Vérifiez TOUJOURS si la sûreté de la RÉPLIQUE AIRSOFT est ENCLENCHÉE (voir Fig. 2a) et déchargée lorsque vous la confiez à une autre personne ou
la recevez d’une autre personne
•• Vous et toutes personnes près de vous devriez TOUJOURS porter des lunettes de tir pour protéger vos yeux
•• Si vous portez des lunettes de lecture ou des verres correcteurs, portez TOUJOURS des lunettes de tir par-dessus vos lunettes régulières
•• Placez TOUJOURS l’écran pare-balles dans un endroit où la sécurité est assurée au cas où le dispositif ferait défaut
•• Vérifiez TOUJOURS l’état d’usure de votre l’écran pare-balles avant et après chaque utilisation. Tous les écrans pare-balles s’usent avec le temps et
finissent par ne plus fonctionner. Remplacez votre écran pare-balles si la surface est usée ou endommagée ou si un ricochet se produit.
•• Utilisez TOUJOURS le calibre approprié de bille BB pour votre RÉPLIQUE AIRSOFT. Vérifiez les marquages sur votre RÉPLIQUE AIRSOFT pour vérifier
que le calibre de la bille BB est bien de 6 mm.
•• Ne JAMAIS réutiliser des munitions
•• NE tirez JAMAIS sur des surfaces dures ou sur la surface de l’eau. Les billes BB peuvent rebondir ou ricocher en direction d’une personne ou de
quelque chose que vous n’aviez pas l’intention d’atteindre.
•• N’essayez JAMAIS de démonter ou de modifier votre RÉPLIQUE AIRSOFT. Toute modification de la fonction de votre RÉPLIQUE AIRSOFT de quelque
manière que ce soit, peut être dangereuse et annulera votre garantie.
•• Ne pointez JAMAIS la RÉPLIQUE AIRSOFT en direction de quelqu’un ou de quelque chose que vous n’avez pas l’intention d’atteindre
2. CONNAÎTRE LES PIÈCES DE VOTRE RÉPLIQUE AIRSOFT
Vous comprendrez mieux votre manuel d’utilisation si vous connaissez le nom des pièces qui composent votre nouvelle réplique airsoft. Pour profiter pleinement de votre réplique airsoft,
servez-vous de ce manuel.
A. Monture
B. Bouche du canon
C. Mécanisme de sûreté
D. Pile
E. Détente
F. Pontet
G. Chambre de chargement
H. Bouton de dégagement du Pile
I. Bouton de dégagement de la crosse
3. Comment utiliser la sûreté
ATTENTION: Comme tout dispositif mécanique, il est possible que le mécanisme de sûreté de la réplique airsoft fasse défaut. Même quand la sûreté est ENCLENCHÉE, vous devriez
continuer à manipuler la réplique airsoft avec précaution.
A. POUR ENCLENCHER LA SURETE DE LA REPLIQUE AIRSOFT :
1. Repérez la sûreté située sur le côté gauche de la réplique airsoft.
2. Tournez le sélecteur de sûreté vers le haut de sorte qu’il soit sur la position « SAFE » (Fig. 2), ce qui signifie que la sûreté est ENCLENCHÉE.
LAISSEZ LA SURETE DE LA REPLIQUE AIRSOFT ENCLENCHEE (POSITION « SAFE ») JUSQU’A CE QUE VOUS SOYEZ
VRAIMENT PRET A TIRER. TOURNEZ ENSUITE LE SELECTEUR DE SURETE DE SORTE QUE LA SURETE SOIT DEGAGEE.
B. POUR DEGAGER LA SURETE DE LA REPLIQUE AIRSOFT:
1. Tournez le sélecteur de sûreté vers le bas de sorte qu’il soit sur la position « FULL » (Fig. 2), ce qui signifie également
que la sûreté est DÉGAGÉE.
SAFE
2. Lorsque le sélecteur de sûreté de la réplique airsoft est tourné de sorte qu’il soit sur la position « FULL », la réplique
peut faire feu.
4. Comment ajuster la taille de votre arme airsoft
A. Installer et retirer la crosse
1. Pour installer la crosse, alignez la crosse avec les encoches à l’arrière de l’arme. En maintenant la crosse dans cette
2.
position, poussez-la vers le bas jusqu’à ce qu’elle se verrouille en place.
Pour retirer la crosse, tirez le bouton de dégagement de la crosse vers l’arrière de la crosse. Poussez la crosse vers le haut
jusqu’à ce qu’elle se dégage du rail.
FULL
Fig. 2
B. Comment installer/retirer le compensateur
1. Avant d’installer/retirer le compensateur, assurez-vous que la sûreté de votre réplique airsoft est ENCLENCHÉE (voir
section 2A) et que la réplique est DÉCHARGÉE (voir section 4B).
2. Pointez la réplique airsoft vers un ENDROIT SÛR.
3. Tout en maintenant la réplique en position de tir, tournez le compensateur dans le sens des aiguilles d’une montre pour
le retirer de la réplique.
4. Pour remettre le compensateur en place, vissez-le sur la réplique dans le sens inverse des aiguilles d’une montre jusqu’à
ce qu’il soit bien serré (Fig. 3).
5. Comment charger et décharger les balles BB en plastique
Remarque: Pour une performance optimale, utilisez seulement des billes BB 6 mm en plastique Crosman®, GameFace™, Marines Airsoft®
Fig. 3
ou Duty Calls®.
A. Assurez-vous que la sûreté de l’arme est ENCLENCHÉE (section 2A) et pointe vers un ENDROIT SÛR.
1. Assurez-vous que votre chambre de chargement est vide.
2. Desserrez les vis de fixation de la chambre de chargement.
3. L’extrémité plus petite pointant vers l’arrière de l’arme, placez la chambre de chargement sur le rail supérieur, en veillant à aligner le trou de l’arme avec le trou du chargeur (Fig. 4).
4. Resserrez les vis de fixation.
5. Ouvrez la porte de la chambre de chargement, située au sommet de la chambre de chargement, en la glissant. (fig. 5)
Fig. 4
6. Remplissez la chambre de balles BB de 6 mm et refermez la porte en la glissant.
B. Comment décharger les balles BB en plastique
1. Assurez-vous que la sûreté de l’arme airsoft est ENCLENCHÉE (section 2A).
2. Pointez l’arme airsoft vers un ENDROIT SÛR.
3. Pour vider la chambre de chargement, ouvrez la porte au sommet de la chambre de chargement en la glissant et versez les balles BB dans un contenant ou votre main.
4. Pointez l’arme airsoft vers un ENDROIT SÛR, DÉGAGEZ la sûreté et tirez vers un endroit sûr jusqu’à ce que vous ne tiriez plus de balles BB.
5. ENCLENCHEZ à nouveau la sûreté de l’arme airsoft.
MEME SI VOUS PROCEDEZ AU DECHARGEMENT, CONTINUEZ A MANIPULER VOTRE REPLIQUE AIRSOFT COMME SI
ELLE ETAIT CHARGEE. NE POINTEZ JAMAIS LA REPLIQUE AIRSOFT EN DIRECTION DE QUELQUE CHOSE QUE VOUS N’AVEZ PAS L’INTENTION D’ATTEINDRE.
6. Comment charger, installer et retirer la pile
A. Pour charger la pile
1. Retirez la pile de l’arme airsoft (voir section 5C).
2. Branchez le chargeur dans la partie supérieure de la batterie.
3. Branchez le chargeur dans une prise standard de 110 V.
4. Ne chargez pas pendant plus de 5 heures et débranchez ensuite le chargeur de la prise.
5. Déconnectez la pile du chargeur.
IMPORTANT: Chargez la batterie pendant un MINIMUM de 4 heures et un MAXIMUM de 5 heures avant la première utilisation. Cette
réplique airsoft ne fonctionnera pas adéquatement si la batterie n’est pas complètement chargée.
Fig. 5
ATTENTION: AFIN DE RÉDUIRE TOUT RISQUE D’INCENDIE ET/OU DE DÉGÂTS AU NIVEAU DE VOTRE BATTERIE, NE SURCHARGEZ PAS LA
BATTERIE, DÉBRANCHEZ LE CHARGEUR DE BATTERIE LORSQU’IL N’EST PAS UTILISÉ ET UTILISEZ SEULEMENT LE CHARGEUR FOURNI AVEC VOTRE RÉPLIQUE AIRSOFT.
B. Pour installer la pile
1. Assurez-vous que la sûreté de l’arme airsoft est ENCLENCHÉE (section 2A) et que l’arme est DÉCHARGÉE. (section 4B)
2. Pointez l’arme airsoft vers un ENDROIT SÛR.
3. Insérez la pile dans l’arme de manière à ce que les connecteurs en métal (pôle positif) soient sur la partie supérieure et
verrouillent la pile en place (Fig. 6A).
C. Pour retirer la pile
1. Assurez-vous que la sûreté de l’arme airsoft est ENCLENCHÉE (section 2A) et que l’arme est DÉCHARGÉE.
2. Pointez l’arme airsoft vers un ENDROIT SÛR.
3. Tout en soutenant le bas de la batterie, appuyez sur le bouton de dégagement de la batterie sur le côté droit de la
réplique et tirez vers le bas pour retirer la batterie de la carcasse (Fig. 6B).
7. Comment viser et tirer en toute sécurité
REMARQUE: Cette arme airsoft est conçue pour tirer en mode entièrement automatique. Entièrement automatique signifie qu’elle
Fig. 6A
continuera à tirer des balles BB en plastique aussi longtemps que vous maintiendrez la détente appuyée.
1. Votre réplique airsoft est conçue pour le tir sur cible et peut être utilisée tant à l’intérieur qu’à l’extérieur. N’oubliez jamais de toujours choisir prudemment
l’emplacement de votre cible. PENSEZ à ce que vous pourriez atteindre si vous ratiez la cible.
2. Lorsque vous êtes sûr de votre cible et de l’écran pare-balles, et qu’il n’y a rien dans l’entourage de la cible, DÉGAGEZ la sûreté de votre réplique airsoft (voir Section 2B),
visez et appuyez sur la détente pour faire feu.
8. Comment entretenir votre réplique airsoft
N’ESSAYEZ JAMAIS DE DÉMONTER VOTRE RÉPLIQUE AIRSOFT. NE JAMAIS MODIFIER NI TRANSFORMER LA RÉPLIQUE AIRSOFT. TOUTE TENTATIVE DE MODIFICATION CONTREVENANT DE QUELQUE MANIÈRE QUE CE SOIT AUX INSTRUCTIONS DE CE MANUEL PEUT RENDRE
L’UTILISATION DE CETTE RÉPLIQUE AIRSOFT DANGEREUSE, PEUT PROVOQUER DES BLESSURES GRAVES, PARTICULIÈREMENT AUX YEUX ET ANNULERA LA
GARANTIE. SI VOUS LAISSEZ TOMBER VOTRE RÉPLIQUE AIRSOFT, EXAMINEZ-LA POUR VÉRIFIER SI ELLE FONCTIONNE BIEN AVANT DE L’UTILISER À NOUVEAU. SI QUELQUE CHOSE VOUS SEMBLE DIFFÉRENT, COMME UNE FORCE DE DÉTENTE PLUS COURTE OU PLUS FAIBLE, IL POURRAIT S’AGIR DE PIÈCES USÉES
OU CASSÉES. APPELEZ LE SERVICE CLIENTÈLE DE GAME FACE POUR OBTENIR DE L’AIDE AVANT D’UTILISER VOTRE RÉPLIQUE AIRSOFT À NOUVEAU.
A. Pour nettoyer le canon de la réplique airsoft
1. Ne jamais regarder par l’extrémité du canon d’une réplique airsoft.
2. Assurez-vous que la sûreté de la réplique airsoft est ENCLENCHÉE et que la réplique pointe vers un ENDROIT SÛR.
3. Retirez le chambre de chargement de la réplique.
4. Vaporisez de l’huile Crosman Nitro Lubricant sur un tampon de nettoyage.
5. Placez le tampon de nettoyage sur une baguette (la baguette peut ne pas être comprise avec votre réplique airsoft) et
insérez la baguette dans le canon pour le nettoyer.
6. Assurez-vous que le tampon de nettoyage reste attaché à la baguette sinon le tampon risque de rester coincé dans le
canon de l’arme
Fig. 6B
7. Nettoyez le canon 3 à 4 fois.
8. Répétez la procédure de nettoyage avec un tampon sec.
9. Le canon sera propre lorsque le tampon sec ressortira propre après avoir nettoyé le canon.
B. Comment dégager une bille BB coincée
1. Ne jamais regarder par l’extrémité du canon d’une réplique airsoft pour vérifier si une bille BB coincée a été dégagée.
2. Assurez-vous que la sûreté de la réplique airsoft est ENCLENCHÉE et que la réplique pointe vers un ENDROIT SÛR.
3. Retirez le chambre de chargement de la réplique.
4. Insérez la pointe effilée de la baguette de nettoyage dans le canon.
5. PRUDEMMENT et lentement, exercez une pression jusqu’à ce que vous poussiez la bille BB hors de la culasse.
6. Réinstallez le chambre de chargement et faites un tir d’essai.
C. Dépannage/Optimisation de vos séances de tir
1. Secouez l’arme de temps en temps pour assurer une bonne alimentation en balles BB.
2. Empêchez la poussière et la saleté de s’infiltrer dans le chargeur pour maintenir votre arme airsoft au meilleur de son rendement.
3. Changez les piles si le cycle de tir devient lent.
SPÉCIFICATIONS
Mécanisme/action
électronique ou AEG
Calibre/munitions
BB 6 mm en plastique
Réservoir
jusqu’à 500 billes BB
Sûreté
sélecteur
Vitesse de tir
jusqu’à 200 pi/s (61 m/s)
Longueur
28.5”
Poids
2.0 lbs
PERFORMANCE: Plusieurs facteurs peuvent influencer la vitesse, notamment la marque du projectile, le type de projectile, le poids du projectile et l’état du canon. Pour une
performance optimale, utilisez des munitions de marque Crosman®, GameFace™, Marines Airsoft® ou Duty Calls® seulement. L’utilisation de munitions airsoft appartenant à d’autres
marques peut entraîner un mauvais fonctionnement de votre réplique et peut annuler la garantie.
GARANTIE LIMITÉE DE 30 JOURS
Ce produit, vendu au détail, est garanti contre tout défaut de matériau et de fabrication pour une période de 30 jours à compter de la date d’achat au détail. Cette garantie est
transférable. Conservez le reçu original comme preuve de la date d’achat. En l’absence d’un reçu, le produit sera garanti pour une période de 30 jours à compter de la date de fabrication.
CE QUI EST COUVERT:
1. Le remplacement du produit
2. Les frais d’expédition pour le retour au consommateur du produit remplacé.
CE QUI N’EST PAS COUVERT:
1. Les frais d’expédition pour tout produit retourné à Crosman Corporation.
2. Les dommages causés par un usage abusif, une modification ou une négligence dans l’entretien normal du produit – voir le Manuel d’utilisation
3. Toute autre dépense engagée
4. LES DOMMAGES INDIRECTS, LES DOMMAGES OU FRAIS ACCESSOIRES, Y COMPRIS LES DOMMAGES MATÉRIELS. CERTAINES LOIS LOCALES, NATIONALES OU FÉDÉRALES NE PERMETTENT
PAS L’EXCLUSION OU LA LIMITATION DES DOMMAGES ACCESSOIRES OU INDIRECTS. PAR CONSÉQUENT, LA CLAUSE LIMITATIVE OU EXCLUSIVE CITÉE CI-DESSUS POURRAIT NE PAS
S’APPLIQUER DANS VOTRE CAS.
GARANTIES TACITES
TOUTES GARANTIES TACITES, Y COMPRIS LES GARANTIES TACITES DE QUALITÉ MARCHANDE ET DE D’ADÉQUATION À UN USAGE PARTICULIER, SONT LIMITÉES À UNE DURÉE DE 90 JOURS
À COMPTER DE LA DATE D’ACHAT AU DÉTAIL. CERTAINS ÉTATS NE PERMETTENT PAS LES CLAUSES LIMITATIVES SUR LA DURÉE D’UNE GARANTIE TACITE. PAR CONSÉQUENT, LA LIMITE DE
GARANTIE CITÉE CI-DESSUS POURRAIT NE PAS S’APPLIQUER DANS VOTRE CAS.
Si une disposition de cette garantie est interdite en vertu d’une loi fédérale, nationale ou municipale, sur laquelle la disposition ne peut prévaloir, cette dernière ne sera pas applicable.
Cette garantie vous confère certains droits reconnus par la loi. Vous pouvez également détenir d’autres droits qui varient d’un État à l’autre.
ATTENTION – AVANT DE RETOURNER CE PRODUIT AU MAGASIN
Économisez de l’essence et évitez des déplacements inutiles. Veuillez contacter les représentants de notre service clientèle/support technique pour obtenir des informations et
des renseignements de dépannage. Appelez le 1-800-7AIRGUN (1-800-724-7486) ou consultez notre foire aux questions sur www.crosman.com.
RÉCLAMATIONS AU TITRE DE LA GARANTIE
Clients aux États-Unis - Veuillez contacter le service clientèle Crosman au 800-724-7486 ou envoyez-nous un e-mail via www.crosman.com Nous vous fournirons les détails sur
la façon de procéder pour nous faire parvenir votre réplique airsoft pour toute réparation sous garantie ou pour vous conseiller un de nos centres de service après-vente agréés dans
votre région.
Crosman Corporation • Attn: Warranty Dept. • 7629 Route 5 & 20 • Bloomfield, NY 14469
Veuillez inclure avec votre produit, une copie de votre reçu et une brève description du problème. N’oubliez pas d’indiquer votre nom, adresse postale, numéro de téléphone et votre
adresse e-mail. Veuillez compter entre 2 et 4 semaines avant que la réparation soit effectuée. Nous recommandons que vous utilisiez une méthode d’expédition qui vous fournira un
numéro de suivi et des options d’assurance. Crosman ne sera pas tenu responsable des marchandises endommagées, perdues ou volées pendant l’expédition.
Clients canadiens - Veuillez contacter Gravel Agency, au Québec au 866- 662-4869.
Clients hors des États-Unis : Veuillez contacter votre revendeur/distributeur. Si vous ne connaissez pas votre revendeur/distributeur, contactez notre service international au
585-657-6161 ou envoyez-nous un e-mail via www.crosman.com.
CROSMAN, DUTY CALLS et GAMEFACE sont des marques de commerce de Crosman Corporation aux États-Unis. MARINES AIRSOFT est une marque commerce du Corps des Marines des
États-Unis et est utilisée sous licence. ©2014