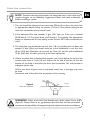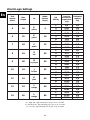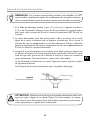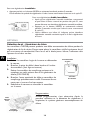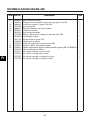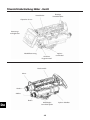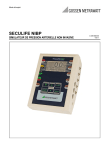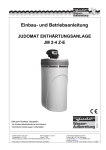
1
Performa / LOGIX 740 - 760
Operation Manual
Start up and Maintenance
Manuel d’utilisation
Mise en marche et Maintenance
Steuerung Bedienungshandbuch
Inbetriebnahme und Wartung
En
2
Fr
24
De
46
SYNOPSIS
En
Valve Features . . . . . . . . . . . . . . . . . . . . . . . . . . . . . . . . . . . . . . . . . . . . . 42
LCD Display . . . . . . . . . . . . . . . . . . . . . . . . . . . . . . . . . . . . . . . . . . . . . . 53
Installation . . . . . . . . . . . . . . . . . . . . . . . . . . . . . . . . . . . . . . . . . . . . . . 64
Location selection . . . . . . . . . . . . . . . . . . . . . . . . . . . . . . . . . . . . . 64
Water line connection . . . . . . . . . . . . . . . . . . . . . . . . . . . . . . . . . 64
Drain line connection
. . . . . . . . . . . . . . . . . . . . . . . . . . . . . . . . . 75
Overflow line connection . . . . . . . . . . . . . . . . . . . . . . . . . . . . . . 86
Regenerant line connection . . . . . . . . . . . . . . . . . . . . . . . . . . . . . 86
Start-up of your softener
. . . . . . . . . . . . . . . . . . . . . . . . . . . . . . . . 97
Step 1 - Program system size . . . . . . . . . . . . . . . . . . . . . . . . . . . . 97
Step 2 - Placing conditioner into operation . . . . . . . . . . . . . . . . . 97
Step 3 - Basic programming . . . . . . . . . . . . . . . . . . . . . . . . . . . . . 11
9
World LOGIX settings . . . . . . . . . . . . . . . . . . . . . . . . . . . . . . . . . 14
12
Step 4 - Capacity . . . . . . . . . . . . . . . . . . . . . . . . . . . . . . . . . . . . . 15
13
Step 5 - Hardness setting
. . . . . . . . . . . . . . . . . . . . . . . . . . . . . . 15
13
Resetting the control to unprogrammed . . . . . . . . . . . . . . . . . . . . . . . 15
13
Manual regenerations
. . . . . . . . . . . . . . . . . . . . . . . . . . . . . . . . . . . . . . 15
13
Options . . . . . . . . . . . . . . . . . . . . . . . . . . . . . . . . . . . . . . . . . . . . . . . . . 16
14
Flow diagrams . . . . . . . . . . . . . . . . . . . . . . . . . . . . . . . . . . . . . . . . . . . . . 18
16
Valve exploded view . . . . . . . . . . . . . . . . . . . . . . . . . . . . . . . . . . . . . . . 20
18
Nomenclature . . . . . . . . . . . . . . . . . . . . . . . . . . . . . . . . . . . . . . . . . . . . 21
19
2
En
3
Complete Valve - Front view
En
One piece valve
disc spring
Valve discs
Optical sensor
Control module
mount
Refill
Controller
Regenerant tank
tube connection
Injector
and cap
Complete Valve - Back view
Camshaft
Motor
Outlet
Drain
Inlet
Backwash
drain control
4
Injector
screen filter
LCD Display
En
LCD Display
Down
button
Set
button
Up
Button
Manual regen
button
Chlorine generator outlet
(EU and 742/762 versions only)
AC adapter input
(low voltage
Lockout connection
(772 only)
Secondary valve
motor control
(772 only)
Sensor input 716
by turbine 760/762
Dry contact signal input 740/742
5
INSTALLATION
En
Location selection
Location of a water treatment system is important. The following conditions are required :
●
●
●
●
●
●
●
●
●
●
●
Level platform or floor.
Room to access equipment for maintenance and adding regenerant (salt) to tank.
Ambiant temperatures over 34°F (1°C) and below 120°F (49°C).
Water pressure below 120 psi (8.27 bar) and above 20 psi (1.4 bar).
Constant electrical supply to operate the controller.
Total minimum pipe run to water heater of ten feet (three meters) to prevent
backup of hot water into system.
Local drain for discharge as close as possible.
Water line connections with shutoff or bypass valves.
Must meet any local and state codes for site of installation.
Valve is designed for minor plumbing misalignments. Do not support weight of
system on the plumbing.
Be sur all soldered pipes are fully cooled before attaching plastic valve to the
plumbing.
Water line connection
A by-pass valve system should be installed on all water conditioning systems.
Bypass valves isolate the conditioner from the water system and allow unconditioned
water to be used. Service or routine maintenance procedures may also require that
the system is bypassed. Figure 1 and 2 show the three common bypass methods.
In
Out
In
Out
Figure 1
256 By-pass for use
with 255 valve body.
Normal operation
Figure 2
Typical globe valve
by-pass system
In by-pass
Water
conditioner
Water
conditioner
Normal
operation
In by-pass
6
Drain line connection
NOTE : Standard commercial practices are expressed here. Local codes may
require changes to the following suggestions. Check with local authorities
before installing a system.
1. The unit should be above and not more than 20 feet (6.1m) from the drain. Use
an appropriate adapter fitting to connect 1/2-inch (1.3cm) plastic tubing to the
drain line connection of the control valve.
2. If the backwash flow rate exceeds 5 gpm (22.7 Lpm) or if the unit is located
20-40 feet (6.1-12.2 m) from drain, use 3/4-inch (1.9 cm) tubing. Use appropriate
fittings to connect the 3/4-inch tubing to the 3/4-inch NPT drain connection on
valve.
3. The drain line may be elevated up to 6 feet (1.8 m) providing the run does not
exceed 15 feet (4.6m) and water pressure at the conditioner is not less than
40 psi (2.76 bar). Elevation can increase by 2 feet (61 cm) for each addditional
10 psi (0.69 bar) of water pressure at the drain connector.
4. Where the drain line is elevated but empties into a drain below the level of the
control valve, form a 7-inch (18 cm) loop at the far end of the line so that the
bottom of the loop is level with the drain line connection. This will provide an
adequate siphon trap.
Where the drain empties into an overhead sewer line, a sink-type trap must
be used.
Secure the end of the drain line to prevent it from moving.
air gap
Figure 3
Drain line connection
drain
WARNING : Never insert drain line directly into a drain, sewer line or trap
(figure 3). Always allow an air gap between the drain line and the wastewater
to prevent the possibility of sewage being back-siphoned into the conditioner.
7
En
Overflow line connection
En
In the event of a mal function, the regenerant tank overflow will direct “overflow”
to the drain instead of spilling on the floor.This fitting should be on the side of the
cabinet or regenerant tank. Most tank manufacturers include a post for the tank
overflow connector.
To connect the overflow line, locate hole on side of tank. Insert overflow fitting into
tank and tighten with plastic thumb nut and gasket as shown (figure 4). Attach
length of 1/2-inch (1.3 cm) I.D. tubing (not supplied) to fitting and run to drain.
Do not elevate overflow higher than overflow fitting.
Do not tie into drain line of control unit. Overflow line must be a direct, separate
line from overflow fitting to drain, sewer or tub. Allow an air gap as per drain line
instructions.
overflow fitting
drain tubing
Figure 4
secure hose in place
air gap
drain
Regenerant line connection
The regenerant line from the tank connects to the valve. Make the connections and
hang tighten. Be sure that the regenerant line is secure and free from air leaks. Even
as small leak may cause the regenerant line to drain out, and the conditioner will
not draw regenerant from the tank. This may also introduce air into the valve
causing problems with the valve operation.
Figure 5
Regenerant line connection
8
START-UP OF YOUR SOFTENER
Preliminary check of hydraulic parameters of the valve
This step must have been done by your OEM. You need to check that there is no mistake. In
fact, every setting stored in the electronic is largely dependant of hydraulic parameters
(injector/backwash) installed on the valve.
Please check that you are using the correct injector and backwash control in accordance with
the used pressure tank (see table page 14).
Initial start-up step-by-step instructions
Step 1 - Program system size
This step may be performed by your system’s OEM manufacturer.
In this case, proceed to step 2.
● Input system size - resine volume - in cubic feet or liters.
● Use UP and DOWN buttons to scroll through resin volume
choices.
● Choose the nearest volume to your actual system size.
● To choose a 3-cycle filter operation - press the DOWN button
until an “F” is displayed.
● Press the SET button to accept the system size you’ve selected.
If incorrect setting is programmed, see “Resetting the control”
on page 15.
Step 2 - Placing conditioner into operation (conditioner start-up)
After you have performed the previous initial power-up steps, you will need to place the
conditioner into operation. Follow these steps carefully, as they differ from previous
Autotrol valve instructions.
1. Remove the cover from the valve. Removing the cover will
allow you to see that the camshaft is turning, and in which
cycle the camshaft is currently positioned.
2. With the supply water for the system still turned off, position
the bypass valve to the “not in bypass” (normal operation)
position.
3. Hold the REGEN button on the controller down for
5 seconds.This will initiate a manual regeneration.
The controller will indicate that the motor is turning the
camshaft to the cycle C1 (backwash) position by flashing an
hourglass. The controller will display the total regen time
remaining.
If you press and hold the SET button, the controller will
indicate the time remaining in the current cycle.
9
En
4. Fill the media tank with water.
En
A. While the controller is in cycle C1 (backwash), open the water supply valve very slowly to
approximately the 1/4 open position.
B. When all of the air has been purged from the media tank (water begins to flow steadily from
the drainline), open the main supply valve all of the way. This will purge the final air from the tank.
C. Allow water to run to drain until the water runs clear from the drain line. This purges any
refuse from the media bed.
D. Turn off the water supply and let the system stand for about five minutes.This will allow for
any air trapped to escape from the tank.
5. Add water to the regenerant tank (initial fill) - Conditioner only.
A. With a bucket or hose, add approximately 4 gallons (15 liters) of water to the regenerant tank.
B. If the tank has a salt platform in the bottom of the tank, add water until the water level is
approximately 1 inch (25 mm) above the platform.
6. Engage the refill cycle to prime the line between the regenerant tank and the valve
Conditioner only.
A. Slowly open the main water supply valve again, to the fully open position. Be sure not to open
too rapidly as that would push the media out the media tank.
B. Advance the controller to the refill position. From cycle C1 (backwash), press and hold the SET
button. This will display the current cycle.
While pressing the SET button, press the UP arrow to advance to the next cycle. Continue
to advance through each cycle until you have reached cycle C8 (refill).
C. With the water supply completely open, when you arrive at
cycle C8 (refill), the controller will direct water down through
the line to the regenerant tank. Let the water flow through the
line until all air bubbles have been purged from the line.
D. Do not let the water flow down the line to the tank for more
than one to two minutes, or the tank may overfill.
E. Once the air is purged from the line, press the SET button and
the UP button simultaneously to advance to cycle C0 (treated
water) position.
7. Draw water from the regenerant tank.
A. From the treated water position (cycle C0), advance the valve to the draw regenerant
position. Hold the REGEN button down for five seconds.
The controller will begin a manual regen, and advance the control valve to the cycle C1
(backwash). Press the SET and UP buttons to advance to cycle C2 (draw).
B. With the controller in this position, check to see that the water in the regenerant tank is being
drawn out of the tank. The water level in the tank should recede very slowly.
10
C. Observe the water being drawn from the regenerant tank for at least three minutes. If the
water level does not recede, or goes up, reference the Troubleshooting section.
8. If the water level is receding from the regenerant tank you can then advance the controller back
to the treated water (C0) position by pressing SET and UP buttons simultaneously to advance
the controller to the C0 position.
9. Finally, turn on a faucet plumbed after the water conditioner. Run the faucet until the water runs
clear.
Step 3 - 740/760 Basic Programming
NOTE : If a button is not pushed for thirty seconds, the controller returns
to normal operation mode. Pushing the regenerate button immediately
returns the controller to normal operation.
●
Time of day
When the time of the day is displayed, push SET. The time will
flash. Use the arrows buttons to increase/decrease the time.
Push SET to enter the selection.
●
Day of the week
The day of the week does not have a default setting. It is entered
at power-up.To change the current day, push SET when day of
week is displayed. A flag will flash beneath the current day. Use
the arrow buttons to change. Push SET to enter the selection.
●
Time of regeneration
This is set for 2:00 AM as the default.The controller does not
account for daylight savings time.
To change this setting, push SET. Use the arrow buttons to
increase/decrease the time. Push SET to enter the selection.
●
Number of days between regeneration
The controller can be programmed to regenerate automatically
from a 1/2 (.5) day to a 99 day frequency.
The 1/2 day regeneration mode will regenerate at the “time of
regeneration”, as well as 12 hours opposite from that time. For
example, the controller will regenerate at 2 AM and at 2 PM on
the same day.
740
The default setting is three days for the 740. To change, push SET when this setting is
displayed. Use the arrow buttons to increase/decrease. Push SET to enter the selection.
760
The default setting is 0 days for the 760. To change, push SET when this setting is
displayed. Use the arrow buttons to increase/decrease. Push SET to enter the selection.
11
En
●
Specific day of week regeneration (740 only)
En
740
To change the controller to regenerate on specific days, set the number of days between
regeneration to zero.
After this has been completed, the arrow on the left side of the display will be pointing
to regeneration time/day. Press the SET button and the display will show a flashing
cursor at the top under Sunday. The day of week can be selected when the cursor is
below it.
To toggle the day on/off, the triangular cursor must be below that day and flashing.
The UP or DOWN buttons are used to turn the days flag on/off. If the cursor is in
position but steady on, use the UP or DOWN buttons.
To move the cursor when it is flashing push the SET button once. This will move the
cursor one position to the right and change the status to steady on.
WARNING : Setting days between regeneration to zero will cause the
system to not regenerate. This setting is used for selecting regeneration on
specific days or to use with a remote regeneration input. See below.
NOTE : Regeneration on specific day is used to provide regeneration when
water demands are not steady. Example : if the weekdays have low usage and
the weekend is high, then regeneration every three days will not meet the
requirements.
●
Calendar override (760 only)
760
The controller can be programmed to regenerate automatically from a 1/2 (.5) day to a
99 day frequency.
The 1/2 day regeneration mode will regenerate at the “time of regeneration”, as well as
12 hours from that time. For example, the controller will regenerate at 2 AM and
at 2 PM on the same day.
The default setting is 0 days. To change, push SET when this setting is displayed. Use the
arrow buttons ton increase/decrease. Push SET to enter the selection.
12
●
Amount of regenerant used per regeneration
If the installation is a 3-cycle filter, skip to Filter Backwash Time. The amount of regenerant does not
apply.
The Logix series controllers are set-up to automatically calculate
the capacity of the system by multiplying the resin/media volume
that was entered earlier into the controller, with the regenerant
amount entered by the dealer/installer. This eliminates the need
for salting efficiency tables.
The default setting is “S” (Standard salt)
To enable the most simple programming possible on the 740
controllers, the dealer/installer has three salt amount options to
choose from. These are set up to give the installation the maximum performance based on the inputs by the dealer/installer.
The three salting options are :
High salt
This setting gives the installation the highest
capacity possible for that resin volume. This is a
great setting for applications with very high
hardness, many occupants or for applications
where the dealer wants to always ensure that the
application has soft water. This setting may tend
to use less water over the course of a year, because
it generally needs to be regenerated less often.
This setting is displayed as an “H”.
Standard salt This is the default setting for the controller. This
setting fits most applications around the word. It
gives you an efficient use of salt, while maintaining
a large enough capacity to regenerate every three
days for most applications.
This setting is displayed as an “S”.
Low salt
This setting is provided to give your installation
the maximum efficiency of salt usage, as measured
in grains of hardness softened per pound of salt
used (grams of CaCO3 removed per kilogram of
salt used). This setting is useful for markets where
highy efficient conditioners are expected or required
by the consumers or law.
This setting is displayed as an “L”.
13
En
World Logix Settings
En
Tank
Volume
(liters)
Max
Height
Inj.
6
18
E
6
35
7
44
8
44
9
48
10
54
12
54
13
54
14
65
yellow
E
yellow
F
peach
G
tan
H
Lt purple
J
Lt blue
K
pink
L
orange
L
orange
Media
Volume
(liters)
5
10
15
20
30
35
40
50
80
Salt
Setting
L
S
H
L
S
H
L
S
H
L
S
H
L
S
H
L
S
H
L
S
H
L
S
H
L
S
H
Total Salt
Amount per
regeneration
(kgs)
Estimated
capacity
(kg)
0,2
0,45
0,91
0,45
0,91
1,81
0,68
2,04
3,40
1,13
3,17
4,98
1,58
4,08
6,80
1,80
4,99
8,62
2,27
6,12
10,20
2,94
8,16
13,61
4,53
12,25
20,41
0,1
0,2
0,3
0,3
0,4
0,5
0,4
0,8
1,0
0,7
1,2
1,5
1,0
1,6
2,0
1,2
2,1
2,5
1,5
2,5
3,0
2,0
3,2
3,9
3,0
4,9
5,8
H = High salt - approximately 15 lbs. per cu. ft. of media
S = Standard salt - approximately 9 lbs. per cu. ft. of media
L = Low salt - approximately 3.3 lbs. per cu. ft. of media
14
Step 4 - Capacity
The 740 controller is designed to estimate capacity of the system by multiplying the
initial resin/media volume by the regenerant amount programmed in under “Amount of
regenerant used per regeneration”. An estimated total system capacity is displayed in
kilograins (kilograms CaCO3) that can be removed by the fully regenerated media bed.
This value is derived by standard water treatment industry norms. The system
capacity is displayed merely for the installers reference when determining regeneration
frequency. This value is displayed, but cannot be directly changed of the 740 time clock
controller.
●
Capacity is only displayed for information purposes on 740 control.
It does not (and cannot) need to be changed. If using 740 control,
programming is complete, the control will return you to the normal
operation mode
●
To change capacity on 760 control, presse the SET button to make default
capacity flash. Use the UP and DOWN buttons to increment to the
desired capacity. Presse the SET button to accept the setting and advance
to next parameter.
740
760
Step 5 - Hardness setting (760 only)
760
The hardness setting is set in grains per gallon (ppm CaCO3).
The hardness is divided into the total capacity setting, giving a total volume of water that
can be conditioned before a regeneration is needed.
To set, press SET when P8 is displayed, and use the UP or DOWN buttons to increment.
Press SET again to accept the setting.
Resetting the control to unprogrammed
The control can be returned to its unprogrammed state. To erasse
all information that was programmed in :
1. Press the DOWN arrow and the SET button for five seconds.
2. Press and hold the SET button for five seconds.
3. The display will show three dashes and a decimal point.
4. The display will be flashing.
The display indicates all programming has been erased.
Manual regeneration
For a delayed regeneration (at the next set time of regeneration)
● Push the REGEN button once. The recycle symbol will be
flashing on the display. Push the REGEN button again to cancel.
15
En
For an immédiate regeneration :
Push and hold the REGEN button for five seconds. The display will show the regeneration symbol.
The camshaft will start rotating to cycle C1.
●
En
For an immédiate, double regeneration :
●
After an immediate manual regeneration has begun, and the
camshaft has rotated to cycle C1, you can initiate a second
immediate manual regeneration.
●
Press and hold the REGEN button for 5 seconds once the
camshaft has begun cycle C1.
●
The display will show a x2 icon indicating that a second
manual regeneration will occur after the current regeneration
is completed.
OPTIONS
Logix Chlorine Generator (Check Salt Light)
The Logix 740C/742 and 760C/762 controls have the capability to produce a low level of chlorine
to chlorinate the resin bed during regeneration. Included with the chlorine generator is the check
salt light which indicates when the end user needs to add salt to the regenerant tank. Potassium chloride or sodium chloride may be used. Installing the chlorine generator is simple.
Installation instructions
Chlorine Generator Outlet
(740C/742 and 760C/742 versions only)
STEP 1 - Remove the Logix control from the valve and disconnect power.
● STEP 2 - Insert the small chlorine generator connector and
wire to the back of the Logix control at the connection labled
“Chlorine Generator Outlet 740C/742 and 760C/742”. Logix
control removal procedure can be found in the Logix technical
manual.
● STEP 3 - Remove the existing refill controler and ball from the
Back on Logix Control
valve and replace it with the chlorine generator refill flow control.
See the illustrations to the left for the location of the refill controler.
● STEP 4 - Insert the small chlorine generator connector and wire to the back of the Logix control
at the connection labled “Chlorine Generator Outlet 740C/742 and 760C/742”. Logix control
removal procedure can be found in the Logix technical manual.
● STEP 5 - Reconnect power to the logix control and reinstall the control to the valve
●
Programmation
No programming is necessary for the chlorine generator to
work properly on the 740C/760C. After the chlorine generator senses regenerant for the first time it will be functional.
There is a check salt light on the front of the Logix control
that will illuminate when there is no regenerant present during
the regenerant draw.
Check
Salt Light
Refill controler
Injector and cap
16
255 Blending Valve Kit
Kit (P/N 1239760) for the 255/700 series includes :
- Nut (10-32) and Adjusting scew
En
Installation
Insert the nut into the Blending Valve orifice located near the Bypass Flapper shown below.
Insert the screw through the top plate and then through the nut (Figure A).
Figure A
Tighten the screw until it touches the Bypass Flapper (Fig. B).
Figure B
Operation
Tightening the adjusting screw will force the Bypass Flapper open. The open Flapper will
allow untreated (hard) water to blend with the treated water supply. As the adjusting
screw is turned in, the hardness of the oulet water increases (Fig. C).
Figure C
Figure D
Loosening the adjusting screw will allow the Bypass Flapper to close. The closing action
will blend less untreated water into the oulet flow.
To blend a specific amount of hardness into outflow, adjust the screw and test the water.
Repeat the procedure as needed until the desired hardness level is reached.
17
Flow Diagram
En
Rinse Drain (6)
Outlet (4)
Bypass (2)
Backwash/Drain (7)
Refill (5)
Inlet (3)
Regenerant (1)
C0 Treated water position
C1 Backwash 1 position
(normal position)
Valve Nr
1 - Closed
2 - Opened
3 - Opened
4 - Closed
5 - Closed
6 - Closed
Valve Nr
1 - Closed
2 - Closed
3 - Opened
4 - Opened
5 - Closed
6 - Opened
C2 Draw position
Valve Nr
1 - Opened
2 - Closed
3 - Closed
4 - Opened
5 - Opened
6 - Closed
C3 Slow Rinse position
Valve Nr
1 - Opened
2 - Closed
3 - Closed
4 - Opened
5 - Opened
6 - Closed
18
C4 System Pause position
C5 Fast Rinse 1 position
(repressurize)
En
Valve Nr
1 - Closed
2 - Closed
3 - Closed
4 - Opened
5 - Closed
6 - Closed
Valve Nr
1 - Closed
2 - Opened
3 - Closed
4 - Opened
5 - Opened
6 - Closed
C6 Backwash 2 position
Valve Nr
1 - Closed
2 - Closed
3 - Opened
4 - Opened
5 - Closed
6 - Opened
C7 Fast Rinse 2 position
Valve Nr
1 - Closed
2 - Opened
3 - Closed
4 - Opened
5 - Opened
6 - Closed
C8 Refill
Valve Nr
1 - Opened
2 - Opened
3 - Opened
4 - Closed
5 - Closed
6 - Closed
19
PERFORMA EXPLODED VIEW
En
20
268 VALVE NOMENCLATURE
Code
1
2
3
4
5
6
7
8
9
10
*
*
11
Part
Number
1294650
1033784
1010429
1010428
1235640
1235341
1236246*
1001404
1040459
1001986
1000250
1239760
1031402
1031403
1031404
1031405
1031406
1031407
1006093
12
13
14
15
16
17
1235353
1236251
1236269
1000226
1035730
1035731
1035732
1035733
1035734
1035735
1035736
1000269
1000209
1000210
1000211
1000212
1002130
1000214
1000215
Description
268 Valve Assembly, w/o flow controls
268 Tank adapter New style
O-Ring BN
O-Ring EP
Top plate, 268 Valve, 700/860 Series controller
Spring One piece 268 valve
Cover,Valve, 268/Performa, 700/860 Series controller
O-Ring group : tank adapter
O-Ring group : piping boss
13/16 inch rubber insert (optional)
Valve disk kit - standard
Blending valve kit 900/700 series top plate
Locking bar
English language locking bar
French language locking bar
German language locking bar
Italian language locking bar
Japanese language locking bar
Spanish language locking bar
Locking bar screw N° 8-9/196 inch
Camshaft options
Cam 268/700-860 series valve, STD, black
Cam 268/700-860 series valve,TWIN, tan (insert)
Motor/Optical cable assembly, 700 series controller
Screen/Cap Assembly w/ O-Ring
Injector (high efficiency) Options
“E” Injector (high efficiency) - yellow
“F” Injector (high efficiency) - peach
“G” Injector (high efficiency) - tan
“H” Injector (high efficiency) - lt purple
“J” Injector (high efficiency) - lt blue
“K” Injector (high efficiency) - pink
“L” Injector (high efficiency) - orange
Injector cap with O-Ring
Drain control assembly with O-Ring
N°7 (1.2 gpm; 4.5 Lpm)
N°8 (1.6 gpm; 6.1 Lpm)
N°9 (2.0 gpm; 7.6 Lpm)
N°10 (2.5 gpm; 9.5 Lpm)
N°12 (3.5 gpm; 13.2 Lpm)
N°13 (4.1 gpm; 15.5 Lpm)
N°14 (4.8 gpm; 18.2 Lpm)
21
Qty
1
1
1
1
1
1
1
1
1
1
1
1
1
1
1
1
1
1
1
En
268 VALVE NOMENCLATURE
En
Code
18A
18B
19
20
21
22
*
Part
number
1000222
1243510
1032416
1032417
1235373
1238861
1030502
1033066
Description
Regenerant Refill controller, No ball
Regenerant Refill controller
Air Check Kit
Air Check Kit 3/8 inch male
Air Check Kit 1/4 inch male
Module, Sensor, Photo interupter
Motor w/Spacer & Pinion, 700 Series controller, 12V, 50/60 Hz
Ball Flow Control
New to Old Style Aircheck Adapter
22
Qty
1
1
1
1
1
1
740/760 Control
En
Code Part Number
Description
1
2
3
4
5
6
7
8
9
Kit chlorine generator
Extension cable for remote blezel
Overlay 740
Overlay 740C
Overlay 740F
Overlay 760
Overlay 760C
Overlay 760F
Transformer
1234336
1242411
1263910
1263911
1263912
1263913
1263914
1263914
1000814
Bypass 1265
Code Part Number
Description
5
*
*
1040930
1034302
1030541
By-pass 1265
Repair kit (rotor seals & clips)
Garniture for 1” pipe or tube
12
KIT-P3
KIT-P4
KIT-P7
KIT-P8
KIT-PV
KIT-PV-1
KIT-PV-34
3/4 inch BSPT Brass pipe adapter kit
1 inch BSPT Brass pipe adapter kit
22 mm Copper Tube adapter kit
28 mm Copper Tube adapter kit
32 mm PVC Tube adapter kit
1 inch PVC Tube adapter kit
3/4 inch PVC Tube adapter kit
23
SOMMAIRE
Vanne complète - Corps de vanne et Bypass . . . . . . . . . . . . . . . . . . . . 26
2
Ecran affichage LCD . . . . . . . . . . . . . . . . . . . . . . . . . . . . . . . . . . . . . . . . 27
3
Installation . . . . . . . . . . . . . . . . . . . . . . . . . . . . . . . . . . . . . . . . . . . . . . 28
4
Sélection de l’emplacement . . . . . . . . . . . . . . . . . . . . . . . . . . . . . 28
4
Raccord ligne d’eau . . . . . . . . . . . . . . . . . . . . . . . . . . . . . . . . . . . 28
4
Raccord au tuyau d’évacuation . . . . . . . . . . . . . . . . . . . . . . . . . . 29
5
Raccord tuyauterie trop-plein . . . . . . . . . . . . . . . . . . . . . . . . . . . 30
6
Raccord tuyauterie saumure . . . . . . . . . . . . . . . . . . . . . . . . . . . . 30
6
Mise en route de l’adoucisseur . . . . . . . . . . . . . . . . . . . . . . . . . . . 31
7
Fr
Etape 1 - Programmation de la taille du système . . . . . . . . . . . . 31
7
Etape 2 - Démarrage hydraulique . . . . . . . . . . . . . . . . . . . . . . . . . 31
7
Etape 3 - Programmation des contrôleurs . . . . . . . . . . . . . . . . . 33
9
Réglages LOGIX Monde . . . . . . . . . . . . . . . . . . . . . . . . . . . . . . . 36
12
Etape 4 - Capacité estimée . . . . . . . . . . . . . . . . . . . . . . . . . . . . . 37
13
Etape 5 - Entrée de la dureté . . . . . . . . . . . . . . . . . . . . . . . . . . . 37
13
Réinitialisation du contrôleur . . . . . . . . . . . . . . . . . . . . . . . . . . . . . . . . 37
13
Régénérations manuelles . . . . . . . . . . . . . . . . . . . . . . . . . . . . . . . . . . . . 37
13
Options . . . . . . . . . . . . . . . . . . . . . . . . . . . . . . . . . . . . . . . . . . . . . . . . . 38
14
Diagramme de flux
. . . . . . . . . . . . . . . . . . . . . . . . . . . . . . . . . . . . . . . . 40
17
Vue éclatée . . . . . . . . . . . . . . . . . . . . . . . . . . . . . . . . . . . . . . . . . . . . . . . 42
19
Nomenclature . . . . . . . . . . . . . . . . . . . . . . . . . . . . . . . . . . . . . . . . . . . . 43
20
24
Fr
25
Vanne complète - Vue de face
Ressort de clapets
en une pièce
Clapets
Capteur optique
Support du module
de contrôle
Contrôle
de remplissage
Fr
Raccord Tuyau
Régénérant
Injecteur
et bouchon
Vanne complète - Vue arrière
Arbre
à cames
Moteur
Sortie
Egout
Entrée
Contrôleur
de détassage
à l’égout
26
Crépine
d’injecteur
Ecran d’affichage LCD
Affichage
à cristaux liquides
Flèche
bas
Bouton
régé. manuelle
Bouton
réglage
Flèche
haut
Fr
Sortie générateur chlore
(versions EU et 742/762 uniquement)
Entrée adaptateur AC
(faible voltage)
Raccord verrouillage
(772 uniquement)
Contrôle du moteur
de vanne secondaire
(772 uniquement)
Entrée capteur 716
par turbine 760/762 - Signal 740/742
27
INSTALLATION
Sélection de l’emplacement
L’emplacement d’un système de traitement d’eau est important. Les conditions suivantes
sont requises :
Fr
●
Plate-forme de niveau ou sol plan.
●
Espace pour accéder à l’appareil pour la maintenance et l’ajout de sel dans le bac.
●
Température ambiante supérieure à 1°C et inférieure à 49°C.
●
Pression de l’eau inférieure à 8,3 bars et supérieure à 1,4 bars.
●
Alimentation électrique constante pour le fonctionnement du contrôleur.
●
Longueur totale minimum du tuyau relié au chauffe-eau de 3 mètres pour
empêcher les retours d’eau chaude dans le système.
●
Evacuation locale pour rejet à l’égout aussi proche que possible.
●
Raccords à la tuyauterie d’eau avec vannes d’arrêt ou de by-pass.
●
Doit respecter toutes les normes locales et nationales pour le lieu d’installation.
●
La vanne est conçue pour des défauts mineurs d’alignement. N’appuyez pas le
poids du système sur la plomberie.
●
Assurez-vous que tous les raccords soudés ont totalement refroidi avant de
relier la vanne en plastique à la plomberie.
Raccord ligne d’eau
Un by-pass devrait être installé sur tous les sytèmes d’adoucissement de l’eau. Les
vannes de by-pass isolent l’adoucisseur du système d’eau et permettent une
utilisation d’eau illimitée. Les procédures de révision ou d’entretien de routine
nécessitent parfois que le système soit en by-pass. La figure 1 présente le by-pass
disponible en option avec la vanne 268
Fonctionnement normal
entrée
sortie
En by-pass
entrée
sortie
Figure 1
By-pass 1265 à utiliser
avec le corps de vanne 268.
Adoucisseur
d’eau
28
Adoucisseur
d’eau
Raccord au tuyau d’évacuation
REMARQUE : Les pratiques commerciales standards sont détaillées ici. Les
normes locales nécessiteront parfois des modifications des instructions fournies
dans ce manuel.Vérifiez auprès des autorités locales avant d’installer un matériel.
1. Si le débit de détassage excède 5 gpm (1,2 m3/h) ou si l’appareil est placé à
6-12 m de l’évacuation, utilisez un tuyau de 20 mm. Utilisez les raccords appropriés pour relier le tuyau de 20 mm au raccord d’évacuation NPT 20 mm sur
la vanne.
2. Le tuyau d’évacuation peut être élevé jusqu’à 1,80 m au-dessus de la sortie
égout de la vanne à condition que sa longueur n’excède pas 4,6 m et que la
pression de l’eau au conditionneur ne soit pas inférieure à 2,8 bars. L’élévation
peut être augmentée de 60 cm pour chaque pression de l’eau supplémentaire de
0,7 bar au niveau du raccord d’évacuation.
3. Lorsque le tuyau d’évacuation est en hauteur et ne déverse dans un égout situé
en dessous du niveau de la vanne multivoie, faites une boucle de 20 cm à l’extrémité du tuyau afin que le bas de la boucle se trouve au niveau du raccord du
tuyau d’évacuation. Ceci constituera un siphon tout à fait adapté.
Là où l’évacuation s’écoule dans un rejet à l’égout en hauteur, utilisez un siphon
de type bouche d’évier.
Fixez l’extrémité du tuyau d’évacuation pour l’empêcher de bouger.
disrupteur de charge
Figure 2
Raccord tuyau d’évacuation
égout
ATTENTION : N’insérez jamais de tuyau d’évacuation directement dans un
égout, un rejet à l’égout ou un siphon (Figure 2). Laissez toujours un espace
d’air entre le tuyau d’évacuation et le rejet à l’égout pour éviter que les eaux
usées repassent par le siphon dans l’adoucisseur.
29
Fr
Raccord tuyauterie trop-plein
Dans l’éventualité d’une défaillance, le trop-plein du bac à sel “débordera”
directement à l’égout au lieu de s’écouler sur le sol.
N’élevez pas la tuyauterie de trop-plein au-dessus du raccord de trop-plein.
Ne raccordez pas au tuyau d’évacuation de l’unité de contrôle. Le tuyau de tropplein doit être un tuyau direct et séparé du rejet à l’égout. Laissez un espace d’air
comme pour les instructions du tuyau d’évacuation.
raccord de trop-plein
tuyau d’évacuation
Figure 3
fixez le raccord en place
disrupteur de charge
Fr
égout
Raccord tuyauterie saumure
La tuyauterie au bac à sel se branche sur la vanne. Effectuez les raccords et serrez
à la main. Assurez-vous que la tuyauterie de saumure est bien fixée et exempte de
fuites d’air. Même une fuite minime risque de remplir le bac à sel, et l’adoucisseur
n’aspirera pas de saumure pour la bouteille. Cela risque également d’introduire de
l’air dans la vanne et de nuire à son fonctionnement.
Figure 4
raccord tuyauterie régénérant
30
MISE EN ROUTE DE L’ADOUCISSEUR
Vérification préventive des paramètres hydrauliques de la vanne
Cette étape a dû être parfaitement configurée par votre assembleur. Il convient de vérifier
qu’aucune erreur n’ait été faite. En effet, les réglages rentrés dans l’électronique sont
dépendants intégralement des paramètres hydrauliques (inj./backwash) présent sur la
vanne.
Vérifier la conformité de votre contrôleur de détassage et de votre injecteur par rapport
au diamètre de la bouteille (cf. tableau page 36)
Instructions étape par étape de la mise sous tension initiale
Etape 1 - Programmation de la taille du système
Il est possible que cette étape ait été réalisée par l’assembleur de
votre système. Dans ce cas passez à l’étape 2.
● Brancher électriquement le contrôleur. Si l’arbre à câmes n’est pas
en service, le moteur tourne et le repositionne immédiatement.
● Entrée taille système - volume de résine - en litres.
● Utilisez les flèches HAUT et BAS pour faire défiler les choix
de volume de résine.
● Choisissez le volume le plus proche de la taille de votre système.
● Pour choisir le mode filtre à 3 cycles : appuyez sur la flèche BAS
jusqu’à ce qu’un “F” s’affiche.
● Appuyez sur SET pour valider la taille de système sélectionnée.
Si un réglage incorrect est programmé, reportez-vous à la
section “Réinitialisation du contrôleur” (cf. page 37)
Etape 2 - Démarrage hydraulique (vanne sous tension)
Après avoir effectué les étapes initiales précédentes, vous devrez mettre l’adoucisseur en
marche. Suivez ces étapes avec attention car elles différent de celles des vannes Autotrol
précédentes.
1. Retirez le couvercle de la vanne afin de voir que l’arbre à
came tourne et sur quel cycle il va se positionner.
2. Avec l’alimentation en eau fermée, placez le by-pass en
position “pas de dérivation” (fonctionnement normal).
3. Appuyez sur le bouton REGEN présent sur le contrôleur et
maintenez-le enfoncé pendant 5 secondes. Ceci enclenchera
une régénération manuelle.
Le contrôleur indiquera que le moteur tourne l’arbre à came
en position de cycle C1 (détassage) en faisant clignoter le
sablier. Le contrôleur affichera le temps total de régénération
restant.
31
Fr
4. Remplissez la bouteille de résine en eau.
A. Tandis que le contrôleur est en cycle C1 (détassage), ouvrez le robinet d’arrivée d’eau très
lentement sur environ 1/4 de tour.
B. Lorsque tout l’air a été purgé de la bouteille (l’eau commence à s’écouler régulièrement à
l’égout), ouvrez entièrement la vanne d’alimentation en eau. Ceci purgera l’air restant dans le
réservoir.
C. Laissez l’eau s’écouler par le tuyau d’égout jusqu’à ce qu’elle soit claire. Ceci purge toutes les
fines du lit de résine.
D. Fermez le robinet d’arrivée d’eau et laissez le système reposer environ 5 minutes.
Ceci laissera remonter l’air à la surface de la bouteille avant son évacuation à la prochaine
ouverture d’eau.
5. Ajoutez de l’eau dans le bac à sel (remplissage initial) - Adoucisseur uniquement.
A. A l’aide d’un seau ou d’un tuyau d’arrosage, ajoutez environ 15 litres d’eau dans le bac à sel.
B. Si le bac à sel dispose d’un plancher, ajoutez de l’eau jusqu’à ce que le niveau soit 2,5 cm au
dessus du plancher.
6. Enclenchez le cycle de remplissage pour mettre en pression la tuyauterie entre le bac à sel et la
vanne - Adoucisseur uniquement.
Fr
A. Ouvrez à nouveau lentement l’alimentation en eau, en position totalement ouverte. Veillez à
ne pas l’ouvrir trop rapidement car cela plaquerait la résine sur la crépine supérieure.
B. Placez le contrôleur en position de remplissage. Du cycle C1 (détassage), appuyez et maintenez
enfoncé le bouton SET. Ceci affichera le cycle en cours.
Tout en maintenant le bouton SET enfoncé, appuyez sur la flèche HAUT pour passer au cycle
suivant. Faites défiler chaque cycle jusqu’au cycle C8 (remplissage).
C. Avec l’arrivée d’eau totalement ouverte, lorsque vous arrivez
au cycle C8 (remplissage), le contrôleur dirigera l’eau dans la
tuyauterie jusqu’au bac à sel. Laissez l’eau couler dans la tuyauterie jusqu’à ce que toutes les bulles d’air aient été purgées.
D..Ne laissez pas l’eau couler dans le tuyau jusqu’au bac à sel
pendant plus d’une à deux minutes ou le bac risquerait de
déborder.
E. Une fois que l’air a été purgé de la tuyauterie, appuyez simulta
nément sur les boutons SET et HAUT pour passer en position
de cycle C0 (eau traitée).
7. Aspirez l’eau du réservoir de régénérant.
A. En position d’eau traitée (cycle C0), passez la vanne en position d’aspiration du régénérant.
Maintenez le bouton REGEN enfoncé pendant 5 secondes.
Le contrôleur commencera une régénération manuelle et passera la vanne multivoie en
position de cycle C1 (détassage). Appuyez sur les boutons SET et HAUT pour passer au cycle
C2 (aspiration).
32
B. Avec le contrôleur dans cette position, vérifiez que l’eau dans le bac à sel est aspirée correctement. Le niveau d’eau dans le bac devrait diminuer très lentement.
C. Observez l’eau aspirée du bac à sel pendant au moins 3 minutes. Si le niveau de l’eau ne
diminue pas ou augmente reportez vous à la section Dépannage.
8. Si le niveau de l’eau diminue dans le bac à sel, vous pouvez ensuite refaire passer le contrôleur
en position d’eau traitée (C0) en appuyant simultanément sur les boutons SET et HAUT.
9. Enfin, ouvrez un robinet branché après l’adoucisseur. Laissez ouvert jusqu’à ce que l’eau qui
s’écoule soit claire.
Etape 3 - Programmation des contrôleurs 740/760
REMARQUE : Si un bouton n’est pas maintenu enfoncé pendant trente
secondes, le contrôleur repasse en mode de fonctionnement normal. Le fait
d’appuyer sur le bouton de régénération replace immédiatement le contrôleur
en mode de fonctionnement normal
●
Heure du jour
Lorsque l’heure du jour s’affiche, appuyez sur SET. L’heure
clignotera. Règlez l’heure à l’aide des flèches. Appuyez sur SET
pour valider la sélection.
●
Jour de la semaine
Le jour de la semaine n’a pas de réglage par défaut. Il est entré
lors de la mise sous tension. Pour modifier le jour en cours,
appuyez sur SET lorsque le jour de la semaine s’affiche. Un
drapeau clignotera sous le jour actuel. Effectuez la modification
à l’aides flèches. Appuyez sur SET pour valider la sélection.
●
Heure de régénération
L’heure par défaut est réglée sur 2:00 AM. Le contrôleur ne
prend pas en charge l’heure d’été.
Pour modifier le réglage, appuyez sur SET. Utilisez les flèches
pour modifier l’heure. Appuyez sur SET pour valider la sélection.
●
Nombre de jours entre la régénération
Le contrôleur peut être programmé pour régénérer automatiquement à une fréquence d’une demi-journée (0,5) jusqu’à 99
jours. Le mode de régénération sur 1/2 journée régénérera à
“l’heure de régénération” ainsi que 12 heures plus tard. Par
exemple, le contrôleur régénérera à 2 AM et à 2 PM le même
jour.
740
Le réglage par défaut est de trois jours pour le modèle 740. Pour le modifier, appuyez
sur SET lorsque le réglage s’affiche et utilisez les flèches pour l’augmenter ou le diminuer.
Appuyez sur SET pour valider la sélection.
760
Le réglage par défaut est de 0 jour pour le modèle 760. Pas de régénération forcée.
33
Fr
●
Régénération un jour spécifique de la semaine (contrôleur 740 uniquement)
1. Le curseur doit être fixe. S’il clignote, appuyez sur le bouton SET.
2. A l’aide des flèches HAUT ou BAS, déplacez le curseur sous le jour qui doit être modifié.
3. Appuyez sur le bouton SET. Le curseur clignotera.
4. Utilisez les flèches HAUT ou BAS pour affichier le drapeau pour ce jour.
740
5. Appuyez sur le bouton SET pour déplacer le curseur sur le jour suivant. Le curseur
arrête de clignoter. Lorsque le curseur est sous SA (Samedi) et qu’il clignote, appuyez
sur le bouton SET pour terminer la programmation des jours de la semaine. Le
contrôleur passera au menu de quantité de régénérant.
Pour revenir aux jours entre la régénération, les jours sélectionnés pour régénérer
doivent être désactivés. Le réglage sur zéro pour les jours entre la régénération peut
alors être modifié.
ATTENTION : Si le réglage des jours entre la régénération est à zéro, le
système ne régénère pas. Ce réglage est utilisé pour sélectionner la
régénération sur des jours spécifiques ou pour utiliser une entrée de
régénération à distance. Voir ci-dessous
Fr
REMARQUE : La régénération pendant un jour spécifique est utilisée pour
fournir une régénération lorsque les demandes en eau ne sont pas stables.
Par exemple : si la consommation d’eau pendant les jours de la semaine est
faible mais élevée pendant le week end, alors une régénération tous les
3 jours ne sera pas suffisante.
●
Réglage Régénération forcée au temps (contrôleur 760 uniquement)
1. Réglez le nombre de jours pour la régénération forcée au temps sur le contrôleur
volumétrique.
2. “0” jours est le réglage par défaut pour le réglage prioritaire du calendrier.
760
3. Elle peut être réglée d’une demi-journée (0,5) à 99 jours.
4. Pour le modifier, appuyer sur SET pour faire clignoter “0”.
5. Utilisez les flèches HAUT et BAS pour régler le nombre de jours souhaité.
6. Appuyez sur SET pour valider la fréquence de régénération.
34
●
Quantité de régénérant utilisée par la régénération
Si l’installation est un filtre à 3 cycles, passez au Temps de détassage du filtre. La quantité de
régénérant ne s’applique pas dans ce cas
Les contrôleurs de la gamme Logix sont configurés pour calculer
automatiquement la capacité du système en multipliant le volume
de résine entré plus tôt dans le contrôleur avec la quantité de sel
entrée par le distributeur/installateur. Ceci supprime la nécessité
des tableaux d’efficacité de sel.
Le réglage par défaut est S (Saumurage standard).
Pour permettre la programmation la plus simple possible sur les
contrôleurs 740, le distributeur/installateur dispose d’un choix de
trois options de quantité de sel. Celles-ci sont configurées pour
fournir à l’installation la meilleure performance basée sur les réglages entrés par le distributeur/installateur. Les trois options de sel
sont :
Sel élevé
Ce réglage fournit à l’installation la plus grande
capacité possible pour ce volume de résine. C’est
un réglage très utile pour les applications présentant
une dureté très élevées, de nombreux occupants
ou pour des applications pour lesquelles le
distributeur souhaite s’assurer que le système
dispose toujours d’eau douce. Ce réglage a tendance
à utiliser moins d’eau pendant l’année car il requiert
en général des régénérations moins fréquentes.
Ce réglage est affiche par un “H”.
Sel standard C’est le réglage par défaut du contrôleur. Ce
réglage convient à la plupart des applications dans
le monde. Il fournit une utilisation efficace du sel
tout en maintenant une capacité suffisamment
grande pour régénérer tous les trois jours pour la
plupart des applications.
Ce réglage est affiché par un “S”.
Sel faible
Ce réglage est fourni pour une efficacité maximale
d’utilisation du sel pour votre installation, mesurée
en grammes de CaCO3 retiré par kilogramme de
sel utilisé. Ce réglage est utile pour les marchés
qui attendent ou exigent légalement des adoucisseurs hautement efficaces.
Ce réglage est affiché par un “L”.
35
Fr
Réglage Logix Monde
Diamètre
bouteille
Hauteur
max
Inj.
6
18
E
6
35
7
44
8
44
9
48
10
54
12
54
13
54
14
65
Fr
jaune
E
jaune
F
pêche
G
fauve
H
violet clair
J
bleu clair
K
rose
L
orange
L
orange
Volume
de résine
(litre)
5
10
15
20
30
35
40
50
80
Réglage
en sel
Quantité
totale de sel
pour
régénération
(kg)
Capacité
par défaut
modifiable
(kg)
L
S
H
L
S
H
L
S
H
L
S
H
L
S
H
L
S
H
L
S
H
L
S
H
L
S
H
0,2
0,45
0,91
0,45
0,91
1,81
0,68
2,04
3,40
1,13
3,17
4,98
1,58
4,08
6,80
1,80
4,99
8,62
2,27
6,12
10,20
2,94
8,16
13,61
4,53
12,25
20,41
0,1
0,2
0,3
0,3
0,4
0,5
0,4
0,8
1,0
0,7
1,2
1,5
1,0
1,6
2,0
1,2
2,1
2,5
1,5
2,5
3,0
2,0
3,2
3,9
3,0
4,9
5,8
H = Sel élevé - environ 250 grammes par litre de résine
S = Sel standard - environ 150 grammes par litre de résine
L = Sel faible - environ 55 grammes par litre de résine
36
Etape 4 - Capacité estimée
●
●
●
●
740
●
760
●
La capacité du système est affichée en kilogramme de dureté
retirée avant qu’une régénération soit nécessaire.
Cette valeur est obtenue à partir du réglage du volume de
résine du système et du réglage de la quantité de sel.
La capacité affichée est une valeur suggérée, telle que recommandée par les fabricants de résine.
La capacité est uniquement affichée à des fins informatives sur
les contrôleur 740 - elle ne peut et ne doit être modifiée.
Si vous utilisez le contrôleur 740 la programmation est terminée.
Le contrôleur retournera en mode de fonctionnement normal.
Pour modifier la capacité sur le contrôleur 760, appuyez sur
SET pour faire clignoter la capacité par défaut. Utilisez les
flèches HAUT et BAS pour passer à la capacité souhaitée.
Appuyez sur SET pour valider le réglage et passez au paramètre
suivant.
Etape 5 - Entrée de la dureté (Contrôleurs 760 uniquement)
●
●
●
760
●
●
Entrez le réglage de la dureté de l’eau sur le lieu d’installation.
Le réglage par défaut de la dureté est de 100 ppm sur le système métrique.
Pour modifier la dureté, appuyez sur SET pour que le réglage par défaut clignote.
Utilisez les flèches HAUT et BAS pour faire défiler le réglage de dureté adéquate.
Appuyez sur SET pour valider ce réglage.
Le contrôleur repassera en mode de fonctionnement normal.
La programmation initiale du système est maintenant terminée. Le contrôleur repasse
en mode de fonctionnement normal.
Réinitialisation du contrôleur
Pour réinitialiser le contrôleur :
1. Appuyer simultanément sur SET et la flèche BAS
pendant 5 secondes.
2. H0 et volume du système s’affiche.
3. Appuyer sur SET pendant 5 secondes.
s’affiche en clignotant.
Passer à l’étape 1 de la programmation.
Régénérations manuelles
Pour une régénération retardée (à l’heure programmée de régénération
● Appuyez une fois sur le bouton REGEN. Le symbole de recyclage clignotera à l’écran. Appuyez à nouveau sur le bouton
REGEN pour annuler.
37
Fr
Pour une régénération immédiate :
● Appuyez une fois sur le bouton REGEN et maintenez-le enfoncé pendant 5 secondes.
L’écran affichera le symbole de régénération. L’arbre à cames commencera à tourner sur le cycle C1.
Pour une régénération double, immédiate :
● Après qu’une régénération manuelle immédiate a commencé
et que l’arbre à cames a tourné en position de cycle C1, vous
pouvez démarrer une deuxième régénération manuelle immédiate.
● Appuyez sur le bouton REGEN et maintenez-le enfoncé
pendant 5 secondes une fois que l’arbre à cames a commencé
le cycle C1.
● L’écran affichera une icône x2, indiquant qu’une deuxième
régénération manuelle surviendra après la fin de la régénération
en cours.
OPTIONS
Détection de sel – Générateur de chlore
Les contrôleurs 740/760 peuvent produire une faible concentration de chlore pendant la
régénération du lit de résine. Durant cette phase, le contrôleur vérifie la présence de sel
par une mesure de conductivité. Dans le cas où la diode jaune s’allume, l’utilisateur doit
rajouter du sel dans son bac.
Fr
Installation
1. Retirer le contrôleur Logix de la vanne et débrancher
le courant
2. Brancher la prise du câble à deux broches à l’arrière
du contrôleur. (Voir figure ci-contre)
3. Retirer le contrôleur de remplissage existant et le
remplacer par celui présent dans le kit générateur de
chlore (P/N 1234336)
4. Brancher l’autre extrémité du câble au contrôleur de
remplissage précédemment installé. Connecter fermement pour s’assurer d’un bon contact.
5. Rebrancher le courant et réinstaller le contrôleur
sur la vanne.
Vue arrière
du contrôleur
Programmation
Aucune programmation n’est nécessaire. Après la
première utilisation et la détection de régénérant à
l’aspiration, le système générera automatiquement du
chlore.
Diode
détection
de sel
Contrôleur
de remplissage
Sortie Générateur
de chlore
Injecteur
et bouchon
38
Kit Vis de mélange
Installation
Insérer l’écrou dans l’orifice prévu en avant du clapet de by-pass.présenté ci-dessous.
Insérer la vis au travers la plaque supérieure puis de l’écrou. (figure A)
Figure A
Serrer la vis jusqu’à ce qu’elle touche le clapet de by-pass. (Figure B)
Figure B
Fr
Fonctionnement
La vis d’ajustement va appuyer sur le clapet de by-pass lors de la phase de vissage. Le
clapet ouvert va permettre un passage d’eau dure et un mélange à l’eau douce. Plus la vis
avance et ouvre le clapet, plus la dureté résiduelle est importante (Figure C)
Figure C
Figure D
La phase de dévissage permet de relâcher le clapet de by-pass. Ceci va diminuer le mélange
en sortie et donc procurer une eau avec une dureté résiduelle moins importante (Figure D).
Tester l’eau de sortie et effectuer les deux procédures décrites ci-dessus pour ajuster à la
dureté désirée.
39
Diagramme de flux
Position Eau traitée C0
Position C1 - Détassage 1
(fonctionnement normal)
Fr
Valve n°
1 - Fermé
2 - Fermé
3 - Ouvert
4 - Ouvert
5 - Fermé
6 - Fermé
7 - Ouvert
Valve n°
1 - Fermé
2 - Ouvert
3 - Fermé
4 - Ouvert
5 - Fermé
6 - Fermé
7 - Ouvert
Position C2 - Aspiration
Position C3 - Rinçage lent
Valve n°
1 - Ouvert
2 - Ouvert
3 - Fermé
4 - Fermé
5 - Fermé
6 - Ouvert
7 - Fermé
Valve n°
1 - Ouvert
2 - Ouvert
3 - Fermé
4 - Fermé
5 - Fermé
6 - Ouvert
7 - Fermé
40
Position C4 - Pause du système
Position C5 - Rinçage rapide 1
(repressurisation)
Valve n°
1 - Ouvert
2 - Ouvert
3 - Fermé
4 - Fermé
5 - Fermé
6 - Ouvert
7 - Fermé
Valve n°
1 - Ouvert
2 - Ouvert
3 - Fermé
4 - Fermé
5 - Fermé
6 - Ouvert
7 - Fermé
Position C6 - Détassage 2
Position C7 - Rinçage rapide 2
Fr
Valve n°
1 - Fermé
2 - Ouvert
3 - Ouvert
4 - Fermé
5 - Fermé
6 - Ouvert
7 - Fermé
Valve n°
1 - Fermé
2 - Ouvert
3 - Fermé
4 - Ouvert
5 - Fermé
6 - Fermé
7 - Ouvert
Position C8 - Remplissage
Valve n°
1 - Fermé
2 - Fermé
3 - Ouvert
4 - Ouvert
5 - Ouvert
6 - Fermé
7 - Fermé
41
VUE ECLATEE VANNE 268
Fr
42
NOMENCLATURE VANNE 268
Code Pièce n°
1
2
3
4
5
1255104
1235338
1235339
1236246
1235352
6
1000209
1000210
1000211
1000212
1000213
1000214
1000215
*
*
7
8
9
10A
1030355
1030356
1030357
1030358
1030359
1030360
1000406
1000407
1000409
1000226
1235269
1000226
1035730
1035731
1035732
1035733
1035734
1035735
1035736
1000222
Description
Assemblage vanne 268, sans contrôleurs de débit
Plaque supérieure, contrôleur gamme 268/700
Ressort de disque de valve monopièce Performa
Couvercle, vanne, 268/Performa séries 700/860
Arbre à cames Logix
Came, vanne gammes 263-268/700-860 STD, Noir
Assemblage du contrôle à l’égout :
N°7 - (1,2 gpm - 4,5 Lpm)
N°8 - (1,6 gpm - 6,1 Lpm)
N°9 - (2,0 gpm - 7,6 Lpm)
N°10 - (2,5 gpm - 9,5 Lpm)
N°12 - (3,5 gpm - 13,2 Lpm)
N°13 - (4,1 gpm - 15,5 Lpm) sans bille
N°14 - (4,8 gpm - 18,2 Lpm) sans bille
Contrôle externe de débit à l’égout :
5 gpm (19 Lpm)
6 gpm (22,5 Lpm)
7 gpm (26,5 Lpm)
8 gpm (30 Lpm)
9 gpm (34 Lpm)
10 gpm (38 Lpm)
12 gpm (45 Lpm)
15 gpm (56,8 Lpm)
20 gpm (75,7 Lpm)
Adaptateur pour contrôle de flux de détassage en externe DLFC
Assemblage moteur/câble optique, contrôleur gamme 700
Assemblage crépine/bouchon avec joint torique
Options injecteur (efficacité élevée)
Injecteur “E” (efficacité élevée) - Jaune - 6”
Injecteur “F” (efficacité élevée) - Pêche - 7”
Injecteur “G” (efficacité élevée) - Fauve - 8”
Injecteur “H” (efficacité élevée) - Violet clair - 9”
Injecteur “J” (efficacité élevée) - Bleu clair - 10”
Injecteur “K” (efficacité élevée) - Rose - 12”
Injecteur “L” (efficacité élevée) - Orange - 13”/14”
Contrôleur de remplissage au bac à sel sans bille, 0,33 gpm
43
Qté
1
1
1
1
1
1
1
Fr
1
1
1
1
1
NOMENCLATURE VANNE 268
Code Pièce n°
Fr
11
*
12
13
14
16
*
*
*
*
*
*
17
18
*
*
*
*
*
1030502
1030334
1002449
1239760
1000269
1035622
1010154
1239760
1033444
1041174
1244336
1239979
1235373
1238861
1233187
1239711
1239752
1239753
1239754
Description
Bille Contrôle de débit
Adapteur Contrôle de flux de remplissage pour série 263
Coude de raccord à l’égout (3/4 inch)
Joint torique EP
Bouchon injecteur avec joint torique
Adapteur bouteille
Joint torique bouteille
Plaque supérieure de mélange kit de valve série 700
Assemblage turbine
Kit de disque de valve STD
Générateur de chlore
Cable de régénération programmée 740F
Module, capteur, interrupteur photo
Moteur avec espaceur, pignon et câble, contrôleur gamme 700, 12V, 50/60 Hz
Clips de blocage du moteur
Kit switch, montage avant, 0,1 Amp.
Kit switch, montage avant, 5 Amp.
Kit switch, montage sur plaque, 0,1 Amp.
Kit switch, montage sur plaque, 5 Amp.
44
Qté
1
1
1
1
1
1
1
1
1
1
1
1
1
1
1
1
1
Contrôleur 740/760
Code Numéro d’article Description
1
2
3
4
5
6
7
8
9
1234336
1242411
1263910
1263911
1263912
1263913
1263914
1263914
1000814
Kit générateur de chlore 0,33 gpm
Câblage d’extension pour cabinet
Autocollant, Français, 740, diode cachée
Autocollant, Français, 740, diode visible
Autocollant, Français, 740F, diode cachée
Autocollant, Français, 760, diode cachée
Autocollant, Français, 760, diode visible
Autocollant, Français, 760, diode cachée
Transformateur
Fr
Bypass 1265
Code Numéro d’article Description
5
*
*
1040930
1034302
1030541
By-pass 1265
Kit de réparation (joints de rotor et clips)
Garniture de tube 1”
12
KIT-P3
KIT-P4
KIT-P7
KIT-P8
KIT-PV
KIT-PV-1
KIT-PV-34
Kit
Kit
Kit
Kit
Kit
Kit
Kit
d’adaptation
d’adaptation
d’adaptation
d’adaptation
d’adaptation
d’adaptation
d’adaptation
tube
tube
tube
tube
tube
tube
tube
45
laiton 3/4 inch BSPT
laiton1 inch BSPT
cuivre 22 mm
cuivre 28 mm
PVC 32 mm
PVC 1 inch
PVC 3/4 inch
VERZEICHNIS
Ventifunktionen . . . . . . . . . . . . . . . . . . . . . . . . . . . . . . . . . . . . . . . . . . . . 248
LCD-Display . . . . . . . . . . . . . . . . . . . . . . . . . . . . . . . . . . . . . . . . . . . . . . 349
Einrichtung . . . . . . . . . . . . . . . . . . . . . . . . . . . . . . . . . . . . . . . . . . . . . . 450
Standortwahl . . . . . . . . . . . . . . . . . . . . . . . . . . . . . . . . . . . . . . . . . 450
Wasseranschluss . . . . . . . . . . . . . . . . . . . . . . . . . . . . . . . . . . . . . . 450
Abflussleitung . . . . . . . . . . . . . . . . . . . . . . . . . . . . . . . . . . . . . . . . 551
Überlaufanschluss . . . . . . . . . . . . . . . . . . . . . . . . . . . . . . . . . . . . . 652
Anschluss Regenerationsleitung . . . . . . . . . . . . . . . . . . . . . . . . . . 652
Inbetriebnahme der Anlage . . . . . . . . . . . . . . . . . . . . . . . . . . . . . . 753
Fase 1 - Anlagenkapazität eingeben . . . . . . . . . . . . . . . . . . . . . . . . 753
Step 2 - Erstinbetriebnahme der Aufbereitungsanlage . . . . . . . . . 753
Step 3 - Basisprogrammierung . . . . . . . . . . . . . . . . . . . . . . . . . . . 955
58
Einstellungen,Weltausführung . . . . . . . . . . . . . . . . . . . . . . . . . . . 12
59
Step 4 - Kapazität . . . . . . . . . . . . . . . . . . . . . . . . . . . . . . . . . . . . . 13
59
Step 5 - Wasserhärte eingeben . . . . . . . . . . . . . . . . . . . . . . . . . . 13
60
Steuerung Rücksetzen . . . . . . . . . . . . . . . . . . . . . . . . . . . . . . . . . . . . . . 14
60
Manuelle Regeneration . . . . . . . . . . . . . . . . . . . . . . . . . . . . . . . . . . . . . 13
61
Fließbilder Ventilbaureihe . . . . . . . . . . . . . . . . . . . . . . . . . . . . . . . . . . . . 15
Explosionszeichnung Ventil
De
63
. . . . . . . . . . . . . . . . . . . . . . . . . . . . . . . . . . 17
64
Ventil Stückliste . . . . . . . . . . . . . . . . . . . . . . . . . . . . . . . . . . . . . . . . . . . 18
46
De
47
Übersichtsdarstellung 268er - Ventil
Ventilscheibe
Einteilige
Ventiltellerfeder
Optischer Sensor
Steuerungsmodulgehäuse
Nachfüllsteuerung
Anschluss
Regeniermittel
Injektor
und Deckel
Nockenwelle
Motor
Auslass
Abfluss
Einlass
De
Ablaufregler
beim Rückspülen
48
Injektor-Siebfilter
Ûbersichtsdarstellung 700er - Steuerung
LCD-Display
Ab-Taste
OK-Taste
Auf-Taste
Taste für manuelle
Regeneration
Ausgang Chlorgenerator
(nur EU-Version und 742/762)
AC-Adapter-Eingang
(Niederspannung)
Verriegelung
(nur 772)
Hauptanschluss Motor
und optischer Sensor
Nebenanschluss
Ventilmotorsteuerung
(nur 772)
740/760, 742/762 Eingang Turbine
oder potentialfreier Signaleingang
716 Sensoreingang.
49
De
EINRICHTUNG
Standortwahl
Die Wahl des richtigen Standorts für eine Wasseraufbereitungsanlage ist wichtig. Folgende
Bedingungen müssen erfüllt sein :
● Ebener Boden oder Sockel.
● Die Anlage muss zu Wartungszwecken und zum Nachfüllen von Regenerationssalz
frei zugänglich sein.
● Umgebungstemperatur über 34°F (1°C) und unter 120°F (49°C).
● Wasserdruck unter 120 psi (8.27 bar) und über 20 psi (1.4 bar).
● Unterbrechungsfreie Strom versorgung der Steuerung.
● Die Rohrlänge zwischen dem Boiler und dem System muss mindestens drei
Meter (zehn Fuß) betragen, sonst ist ein Rückdrücken von heißem Wasser in das
System möglich.
● Örtlicher Kanalabfluss so nah wie möglich.
● Anschluss an die Wasserversorgung mit Absperr-oder Bypassventilen.
● Der Aufstellort muss die gesetzlichen und örtlichen Vorschriften erfüllen.
● Das Ventil ist für geringe Verrohrungsspannungen ausgelegt. Das Gewicht der
Anlage darf nicht auf der Installation ruhen.
● Kunststoffventile dürfen erst nach dem vollständigen Abkühlen aller gelöteten
Teile angebracht werden.
Wasseranschluss
In alle Wasseraufbereitungssysteme solite ein Bypassventil eingebaut werden.
Bypassventile trennen die Anlage vom Wasserversorgungssystem und ermöglichen den
Verbrauch von nicht aufbereitetem Wasser (Rohrwasser). Auch bei Reparatur-oder
Wartungsarbeiten kann ein Bypass erfordelich sein. Die Drei häufigsten Bypass-methoden
sind auf den Abbildungen 1 und 2 dagestellt
Ein
Aus
Ein
Aus
Abbildung 1
Autotrol 256er - Bypass
mit 268er - Ventilkörper
Normalbetrieb
De
Bypassmodus
Abbildung 2
Typisches KugelventilBypass-System
Normalbetrieb Bypassmodus
50
Abflussleitung
HINWEIS : Hier sind übliche Vorgehensweisen beschrieben. Örtliche
Vorschriften können Änderungen der Vorschläge erfordern. Erkundigen Sie sich
vor Installation einer Anlage bei den örtlichen Behörden.
1. Die Anlage darf nur oberhalb des Abflusses und höchstens 6,1 m (20 Fuß)
entfernt liegen. Das 1,3 cm (1/2”)-Kunststoffrohr mit einem passenden
Rohradapter an den Abflussanschluss des Steuerventils anschließen.
2. Wenn die Rückspülrate 22,7 l/min. (5 gpm) übersteigt oder wenn die Anlage
6,1-12,2 m (20-40 Fuß) vom Kanal entfernt steht, muss ein Rohr mit 1,9 cm
Durchmesser (3/4”) verwendet werden. Das 3/4”-Rohr muss mit passenden
Armaturen an den 3/4”-NPT-Abwasserauslass des Ventils angeschlossen werden.
3. Die Abwasserleitung kann um 1,8 m (6 Fuß) erhöht werden, wenn der Abstand
4,6 m (15 Fuß) nicht überschreitet und der an der Anlage anstehende
Wasserdruck 2,76 bar (40 psi) nicht interschreitet. Pro zusätzliche 0,69 bar
(10 psi) Wasserdruck am Abwasseranschluss kann die Leitung um weitere 61 cm
(2 Fuß) erhöht werden.
Wenn die Abwasserleitung in eine Überkopf-Kanalisation entleert, muss ein
Ablauf in der Art eines Abflussbeckens verwendet werden.
Ende der Abflussleitung fixieren.
Luftspalt
Abbildung 3
Abflussanschluss
Abfluss
ACHTUNG : Die Abflussleitung nie direkt in einen Abfluss, den Kanal oder
einen Rückstauverschluss einleiten (Abbildung 3). Zwischen der Abflussleitung
und dem Kanal muss immer ein Luftspalt (Rohrunterbrecher) sein, damit kein
Kanalwasser in die Anlage zurückgedrückt werden kann.
51
De
Überlaufanschluss
Bei Funktionnsstörungen leitet der ÜBERLAUF des REGENEATIONS-BEHÄLTERS
überschüssige Flüssigkeit in den Kanal, bevor diese auf den Boden fließt. Diese
Armatur wird seitlich am Gehäuse oder am Regenerationsbehälter angerbracht.
Die meisten Behälterhersteller liefern eine Auflage für den Überlaufanschluss mit.
Anschluss des Überlaufs: schieben Sie die Überlaufarmatur in die seitliche Tanköffnung und
ziehen Sie diese mit einer Kunststoff-Flügelmutter fest (vgl. Abbildung 4). Schließen Sie
einen Schlauch mit 1,3 cm Innendurchmesser (1/2”, kundenseitig) an die Armatur an und
führen Sie diesen zum Ablauf. Die Überlaufleitung darf nicht oberhalb der Überlaufarmatur
verlegt werden. Nicht mit der Ablaufleitung der Steuerung verbinden. Die Überlaufleitung
muss direkt und unabhängig von der Überlaufarmatur zum Ablauf, Kanal oder zur
Auffangwanne laufen. Wie bei der Ablaufleitung ist auch hier ein Rohrunterbrecher
(Luftspalt) vorzusehen.
Überlaufarmatur
Überlaufschlauch
Abbildung 4
Anschluss
Überlaufleitung
Schlacuh fixieren
Luftspalt
Abfluss
Anschluss regenerationsleitung
Die Regeneriermittelleitung verläuft vom Behälter zum Ventil. Anschlüsse handfest
anziehen. Die Regeneriermittelleitung muss sicher verlegt und frei von Leckagen sein.
Selbest ein kleines Leck kann ein Auslaufen der Leitung verursachen, wordurch die Anlage
kein Regeneriermittel aus dem Behälter ansaugen kann. Außerdem kann Luft in das Ventil
gelangen und dessen Funktionsweise beeinträchtigen.
Bei den meisten Anlagen ist ein Absperrventil am Behälter vorgesehen. Dies ist beim
Einbau eines 268er-Ventils mit eingebauter Absperrvorrichtung nicht erforderlich. Wird
ein Behälter-Absperrventil zusammen mit dem 268er-Ventil mit Absperrvorrichtung verwendet schließt die Absperrvorrichtung vorzeitig, d.h. bevor der Behäleter leer ist.
De
Abbildung 5
268er-LuftRückschlagventil
Anschluss Regenerationsleitung
52
INBETRIEBNAHME DER ANLAGE
Erstinbetriebnahme schritt für schritt
Schritt 1 - Anlagenkapazität eingeben
Dieser Wert wurde eventuell vom Anlagenbauer Ihrer Anlage
eingegeben. In diesem Fall können Sie Schritt 2 überspringen.
● Anlagengröße - Harzvolumen - in Liter eingeben.
● Blättern Sie mit den AUF- und AB-Tasten durch die Harzmengen.
● Wählen Sie die Menge, die am besten zu Ihre Anlage passt.
● Wenn es sich um eine dreistufige Filtrationsanlage handelt,
drücken Sie auf die AB-Taste, bis “F” erscheint.
● Bestätigen Sie Ihre Wahl mit OK.
Wenn Sie das Gerät falsch programmiert haben, lesen Sie bitte
unten bei “Steuerung rücksetzen” weiter.
Schritt 2 - Erstinbetriebnahme der Aufbereitungsanlage
Nach den vorbereitenden Maßnahmen müssen Sie die Anlage in Betrieb nehmen. Bitte folgen
Sie genau den Anweisungen - sie weichen von den Angaben für frühere Autotrol-Ventil ab.
1. Entfernen Sie die Ventilabdeckung, um zu prüfen, ob sich die
Nockenwelle dreht und in welcher Position sie sich befindet.
2. Bringen Sie das Bypassventil bei geschlossenem Wasserzulauf
in die Position “kein Bypasse” (Normalbetrieb)
3. Halten Sie die REGEN-Taste der Steuerung 5 Sekunden lang
gedrückt. Dadurch wird eine manuelle Regeneration
ausgelöst.
Die Steuerung zeigt mit einer blinkenden Sanduhr an, dass der
Motor die Nockenwelle in Position C1 (Rückspülen) bringt.
Die verbleibende Regenerationszeit wird angegeben.
Wenn Sie die OK-Taste gedrückt halten, zeigt die Steuering
die in der aktuellen Phase verbleibende Zeit an.
4. Medienbehälter mit Wasser füllen
A. Wenn sich die Steuerung in Phase C1 (Rückspülen) befindet, öffnen Sie das Zulaufventil
langsam um etwa 1/4.
B. Ist der Medienbehälter vollständig entlüftet (Wasser trit gleichmäßig aus der Ablaufleitung),
öffnen Sie den Zulaufhahn vollständig, um die Restluft aus dem Behälter zu entfernen.
C. Lassen Sie Wasser in den Abfluss laufen, bis das Wasser klar austritt, um Unreinheiten aus dem
Medienbette auszuspülen.
53
De
D. Schließen Sie den Wasserzulauf und lassen Sie das System etwa fünf Minuten stehen. Dadurch
kann eingeschlossene Luft aus dem Behälter entweichen.
5. Speisen Sie Wasser in den Regeneriermittelbehälter ein (Ersstbefüllung, nur bei Aufbereitungsanlagen)
A. Füllen Sie etwa 15 liter (4 gallons) Wasser mit Hilfe eines Eimers oder eines Schlauchs in den
Regeneriermittelbehälter.
B. Wenn der Behälter über einen Salzträgerboden verfügt, muss Wasser hinzugefügt werden, bis
der Wasserstand etwa 25 mm (1”) oberhalb des Bodens liegt.
6. Lösen Sie die Phase “Nachfüllen” aus, um die Leitung zwischen Behälter und Ventil erstzubefüllen
(nur bei Aufbereitnsanlagen)
A. Hauptzulaufventil langsam vollständing öffnen. Achtung : beim zu schnellen Öffnen
wird Medium aus dem Behäleter gedrückt.
B. Bringen Sie die Steuerung in Position “Nachfüllen”. Halten Sie in Phase C1 (Rückspülen) die
OK-Taste gedrückt. Die aktuelle Phase wird angzeigt.
Während des Niederhaltens der OK-Taste drücken Sie die AUF-Taste, um in die nächtste
Phase zu gelangen. So fahren Sie fort, bis Phase C8 (Nachfüllen) erreicht ist.
C. Wenn der Wasserzulauf bei Erreichen von Phase C8 (Nachfüllen)
vollständig geöffnet ist, leitet die Steuerung Wasser durch die
Leitung in den Regeneriermittelbehälter. Das Wasser muss durch
die Leitung fließen, bis keine Blasen mehr austreten.
D. Das Wasser solte nicht länger als ein bis zwei Minuten in den
Behälter laufen, da dieser sonst überströmt.
E. Wenn die Leitung entlüftet ist, die OK-Taste und die AUF-Taste
gleichzeitig drücken, um zur Phase C0 (Produktion) zu
gelangen.
7. Wasser aus dem Regeneriermittelbehälter ansaugen
A. Das Ventil von der Produktionsstellung (Phase C0) in die Ansaugstellung bringen.
REGEN-Taste fünf Sekunden lang gedrückt halten.
Die Steuerung beginnt eine manuelle Regeneration und bringt das Steuerventil in Position C1
(Ruckspülen). OK-und AUF-Taste drücken, um in Phase C2 (Ansaugen) zu gelangen.
B. Wenn sich die Steuerung in dieser Position befindet, muss geprüft werden, ob das Wasser aus
dem Regeneriermittelbehälter angesaugt wird. Der Füllstand im Behälter sollte nur sehr
langsam sinken
De
C. Den Ansaugvorgang im Regeneriermittelbehälter mindestens drei Minuten lang beobachten.
Sinkt der Pegel nicht oder steigt er soger, schlagen Sie bitte den Abschnitt Fehlerbehebung auf.
54
8. Sinkt der Wasserstand im Regeneriermittelbehälter, können Sie die Steuerung wieder in
Produktionsposition (C0) bringen, indem Sie die Tasten OK und AUF gleichzeitig drücken.
9. Öffnen Sie einen Hahn, der nach der Aufbereitungsanlage montiert ist und warten Sie, bis
klares Wasser austritt.
Schritt 3 - Basisprogrammierung den steuerungen 740/760
HINWEIS : Wenn dreißig Sekunden lang keine Taste gedrückt wird, geht die
Steuerung wieder in Normalbetrieb. Durch Drücken der Regenerationstate
geht die Steuerung sofort wieder in Normalbetrieb.
●
●
●
●
Uhrzeit
Wenn die Uhrzeit angezeigt wird, drücken Sie auf OK. Die Zeit
blinkt. Ändern Sie die Zeit nun mit den AUF-/AB-Tasten. Ihre
Eingabe bestätigen Sie mit OK.
Wochentag
Es ist kein wochentag voreingestellt; er muss bei der
Inbetriebnahme eingegeben werden. Den aktuellen Tag ändern
Sie, indem Sie auf OK drücken, wenn der Wochentag angezeigt
wird. Neben dem Tag erscheint eine Markierung. Mit OK
speichern Sie Ihre Wahl.
Regenerationszeiten
Hier ist 2 Uhr morgens voreingestellt. Sommer- und Winterzeit
werden von der Steuerung nicht berücksichtigt.
Regenerationsintervall
Die Regeneration kann in Abständen von 1/2 Tag (0,5 Tagen) bis
99 Tagen erflogen, je nach Einstellung.
Bei einem Intervall von 1/2 Tag erfolgt die Regeneration zur
Regenerationszeit sowie 12 Stunden später. Die anlage regeneriert beispielsweise um 2 Uhr morgens und um 2 Uhr
nachmittags am gleichen Tag.
740
Bei der 740er-Steuerung sind drei Tage voreingestellt. Dies ändern Sie durch Drücken von
OK, wenn die Einstellung angezeigt wird. Dann erhölen/verringern Sie den angezeigten
Wert mit den Pfeiltasten und bestätigen mit OK.
760
0 Tag sind voreingestellt. Dies ändern Sie mit OK während die Einstellung angezeigt wird.
Mit den Pfeiltasten erhören/verringern Sie den Wert, mit OK wird gespeichert.
De
55
●
Regeneration an einem speziellen Wochentag (nür 740)
740
Wenn die Steuerung an bestimmten Tagen regenerieren soll, geben Sie null als
Regenerationsintervall ein.
Nun zeigt der Pfeil im linken Displaybereich auf Regenerationszeit/-tag. Wenn Sie auf OK
drücken, erscheint ein blinkender Cursor unter Sonntag. Der Wochentag, unter dem sich
der Cursor befindet, kann gewählt werden.
Der Tag kann gewählt/abgewählt werden, wenn sich unterhalb ein blinkendes Dreieck
befindet (Cursor).
Mit den AUF-/AB-Tasten kann die Tagesmarkerung an- und ausgeschaltet werden. Wenn
der Cursor an der richtigen Stelle ist, jedoch dauerhaft leuchtet, kann er mit der OK-Taste
zum Blinken gebracht werden.
Der dauerhaft leuchtende Cursor kann mit den AUF- und AB-Tasten bewegt werden.
Der blinkende Cursor kann durch einmaliges Drücken der OK-Taste um eine Stelle nach
rechts bewegt werden. Er leuchtet nun dauerhaft.
ACHTUNG : Wenn die Regeneration über den potentialfreien Eingang
ausgelöst werden soll, muss 0 als Regenerationsintervall eingestellt werden
und es darf kein Wochentag markiert sein.
HINWEIS : Die Regeneration wird für einen bestimmten Tag programmiert,
wenn der Wasserverbrauch schwankt. Wenn an Werktagen ein geringer
Wasserverbrauch herrscht, am Wochenende jedoch ein hoher, ist ein
Regenerationsintervall von drei Tagen ungeeignet.
●
Wochentagsvorrang einstellen (nur Bedarfssteuerung 760)
760
Die Regeneration kann in Abständen von 1/2 Tag (0,5 Tagen) bis 99 Tagen erfolgen, je nach
Einstellung.
Bei einem Intervall von 1/2 Tag erfolgt die Regeneration zue Regenerationszeit sowie 12
Stunden später. Die Anlage regeneriert beispielsweise um 2 Uhr morgens und um 2 Uhr
nachmittags am gleichen Tag.
0 Tag sind voreingestellt. Dies ändern Sie mit OK während die Einstellung angezeigt wird.
Mit den Pfeiltasten erhöhen/verringem Sie den Wert, mit OK wird gespeichert.
De
56
●
Regeneriermittelverbrauch pro Regeneration
Wenn die Anlage ein 3-stufiger-Filter ist, springen Sie zu Filterrückspülzeit. Die Regeneriermittelmenge hat
keine Funktion.
Die Logix-Steuerungen berechnen die Systemkapazität automatisch durch Multiplikation der zuvor eingegebenen Harz/Medienmenge mit der Regeneriermittelmenge, die der
Händler/Installateur eingegeben hat. Es müssen also keine
Salztabellen geführt werden.
Die Werseinstellung ist “S” (Normaler Füllstand).
Um die Programmierung der 740er-Steuerungen so einfach wie
möglich zu machen, kann der Händler/Installateur zwischen drei
Salzmengen wählen. Diese ermöglichen maximale Leistung der
Anlage aufgrund der Eingaben des Händlers/Installateur. Die Drei
Salzoptionen lauten :
Hoher
Füllstand
Normaler
Füllstand
Niedriger
Füllstand
Mit dieser Einstellung erreicht die Anlage die
größtmögliche
Leistung
bei
gegebenem
Harzvolumen. Die Einstellung ist ideal bei sehr
hohem Wasserhärtegrad, bei vielen Verbrauchern
oder bei Anwendungen, die eine ständige Weichwasserversorgung erfordern. Bei dieser
Einstellung besteht möglicherweise ein geringerer
Jahreswasserverbrauch, weil die Anlage im
Allgemeinen seltener regeneriert wird.
Die Einstellung wird mit “H” angezeigt.
Diese Einstellung ist ab Werk vorprogrammiert.
Sie eignet sich für die mesten Anwendungen und
ist sparsam im Salzverbrauch. Bei dieser Kapazität
reicht bei den meisten Anwendung ein
Regenerationsintervall von drei Tagen aus.
Die Einstellung wird mit “S” angezeigt.
Bei dieser Einstellung nutzt die Anlage das Salz am
effizientesten, da die Menge an entferntem CaCO3
in Gramm (grains) pro verbrauchtm kg (pound)
Salz gemessen wird. Diese Einstellung eignet sich
für Märkte, auf denen das Gesetz oder die
Verbraucher sehr effizient arbeitende Wasser-auf
bereitungsanlagen verlangen.
Die Einstellung wird mit “L” angezeigt.
57
De
Einstellungen der Logix-Steuerung,Weltausführung
Behälter
Durchmesser
De
max.
Höhe
Inj.
6
18
E
6
35
7
44
8
44
9
48
10
54
12
54
13
54
14
65
Gelb
E
Gelb
F
Pfirsich
G
Hellbraun
H
Lila, Hell
J
Hellblau
K
Pink
L
Orange
L
Orange
MedienVolumen
(L)
5
10
15
20
30
35
40
50
80
Salzeinstellung
GesamtsalzGeschätzte
menge pro
Kapazität
Regeneration
(kg)
(kg)
L
S
H
L
S
H
L
S
H
L
S
H
L
S
H
L
S
H
L
S
H
L
S
H
L
S
H
H = Hoher Füllstand - etwa 15 lbs. pro cu. ft. Medium
S = Normaler Füllstand - etwa 9 lbs. pro cu. ft. Medium
L = Niedriger Füllstand - etwa 3,3 lbs. pro cu. ft. Medium
58
0,2
0,37
0,75
0,2
0,75
1,5
0,6
1,7
2,8
0,9
2,6
4,1
1,3
3,4
5,6
1,4
4,2
7
1,8
5
8,4
2,4
6,7
11,2
3,7
10,1
16,8
0,1
0,2
0,3
0,3
0,4
0,5
0,4
0,8
1,0
0,7
1,2
1,5
1,0
1,6
2,0
1,2
2,1
2,5
1,5
2,5
3,0
2,0
3,2
3,9
3,0
4,9
5,8
Schritt 4 - Kapazität
Die Steuerung 740 kann die Anlagenkapazität durch Multiplizieren des anfänglichen
Harz-/Medienvolumens mit der bei “Regeneriermittelverbrauch pro Regeneration” eingegebenen Regeneriermittelmenge ermitteln.
Der ermittelte Anlagenkapazität wird in Kilogramm CaCO3 (kilograins) angezeigt, die
von einem vollständing regenerierten Harzbett entfernt werden können. Dieser Wert
wird ben allgemeinen Vorschriften der Wasseraufbereitungsindustrie entnommen. Die
Sstemkapazität ist als Hilfe für den Installateur beim Bestimmen des Regenerationsintervalls gedacht.
●
Die Kapazität wird bei der Steuerung 740 nur zur Information angezeigt-sie
muss (und kann) nicht geändert werden.
Der Wert wird angezeigt, kann jedoch bei der 740er-Steuerung nich direkt
geändert werden.
●
Bei der Steuerung 760 ändern Sie die Kapazität durch Drücken der
OK-Taste. Die Voreinstellung beginnt zu blinken. Mit den Tasten AUF und
AB ändern Sie die Kapazität.
Mit OK bestätigen Sie die Einstellung und gelangen zum nächten Parameter.
740
760
Schritt 5 - Wasserhärte eingeben (nur bei Bedarfssteuerung 760)
Geben Sie die Härte des Eingangswassers am Aufstellungsort ein.
10 ppm (grains) sind voreingestellt.
● Zum Ändern der Härte drücken Sie OK. Die Einstellungen blinken. Mit den AUF- und
AB-Tasten stellen Sie die passende Härte ein.
● Mit OK speichern Sie den eingegebenen Wert.
● Die Steuerung wechselt wieder in den Betriebsmodus
Die Anlage ist nun programmiert und die Steuerung wechselt wieder in Betriebsmodus.
●
●
760
Steuerung Rücksetzen
Steuerung rücksetzen :
1. OK und AB 5 Sekunden lang gleichzeitig gedrückt halten.
2. H0 und das eingegebene Harzvolumen (oder “F” für Filtermodus) werden angezeigt.
3. Wird ein anderer Verlaufswert angezeigt, blättern Sie mit der
AUF-Taste weiter, bis “H0” erscheint..
4. Zum Rücksetzen der Steuerung halten Sie die OK-Taste
5 sekunden lang gedrückt.
5. Die steuerung wird in einen unprogrammierten Status
zurückversetzt.
6. Programmieren Sie die Steuerung wie im Abschnitt
“Erstinbetriebnahme” beschrieben.
ACHTUNG : Das Rücksetzen der Steuerung leert den Speicher
vollständing. Sie müssen die Steuerung wie bei der Erstinbetriebnahme neu
programmeren.
59
De
Manuelle Regeneration
Zeitverzögerte Regeneration (zur nächsten eingestellten Regenrationszeit) :
● REGEN-Taste einmal drücken. Das Recyclinsymobl blinkt. Abbruch durch
Drücken der REGEN-Tast.
Sofortige Regeneration :
REGEN-Taste fünf Sekunden lang gedrückt halten. Auf dem Display
erscheint das Regenerationssymbol. Die Nockenwelle dreht sich in die
Position der Phase C1.
●
Sofortige, doppelte Regeneration :
Wenn sich die Nockenwelle nach Beginn einer manuellen Sofortregeneration in die Position für
Phase C1 gedreht hat, können Sie eine zweite manuelle Sofortregeneration auslösen.
● REGEN-Taste fünf Sekunden lang gedrückt halten, sobald die Nockenwelle mit Phase C1
begonnen hat.
● Auf dem Display wird w2 angezeigt, d. h. nach Ende der laufenden Regeneration findet eine zweite,
manuelle Regeneration statt.
●
De
60
Fliessbilder ventilbaureihe Performa
C0 Produktion
(Normalbetrieb)
C1 Rückspülen 1
C2 Ansaugen
C3 Langsamwaschen
De
61
C4 Systempause
C5 Schnellwaschen1
(Druckbeaufschlagung)
C6 Rückspülen 2
C7 Schnellwashen 2
C8 Nashfüllen
De
62
EXPLOSIONSZEICHNUNG VENTIL
De
63
VENTIL 268 STÜCKLISTE
Code Pièce n°
1
2
3
4
5
6
7
8
9
10
*
*
11
1294650
1033784
1010429
1010428
1235640
1235341
1236246*
1001404
1040459
1001986
1000250
1239760
1031402
1031403
1031404
1031405
1031406
1031407
1006093
12
13
14
15
16
17
De
1235353
1236251
1236269
1000226
1035730
1035731
1035732
1035733
1035734
1035735
1035736
1000269
1000209
1000210
1000211
1000212
1002130
1000214
1000215
Description
Qté
Baugruppe Ventil 268 ohne Durchflussregler
Behälteradapter 268, neue Ausführung
O-Ring BN
O-Ring EP
Ventildeckel,Ventil 268, Baureihe 700/860
Feder, eintellig,Ventil 268
Abdeckung,Ventile 255/Performa, Baureihe 700/860
O-Ring-Gruppe : Behälteradapter
O-Ring-Gruppe : Rohmabe
Gummieinsatz 16/16” (optional)
Bausatz Ventilscheibe - standard
Bausatz Verschneidventil, Baureihe 900/700,Ventildeckel
Arretierungsbügel
Arretierungsbügel, Englisch
Arretierungsbügel, Französisch
Arretierungsbügel, Deutsch
FArretierungsbügel, Italienisch
Arretierungsbügel, Japanisch
Arretierungsbügel, Spanisch
Arretierungsbügelschraube, Nr. 8-9/16”
Optionen Nockenwelle
Nocke,Ventil 268/700-860 STD schwarz
Nocke,Ventil 268/700-860 TWIN hellbraun (Einsatz)
Baugruppe Moter/Optisches Kabel, Steuerung Baureihe 700 - 700/860
Baugruppe Filter/abdeckung ohne O-Ring
Injektorotoptionen (hoher Wirkungsgrad)
Injektor “E” (hoher Wirkungsgrad) - Gelb
Injektor “F” (hoher Wirkungsgrad) - Pfirsich
Injektor “G” (hoher Wirkungsgrad) - Hellbraun
Injektor “H” (hoher Wirkungsgrad) - Lila, Hell
Injektor “J” (hoher Wirkungsgrad) - Hellblau
Injektor “K” (hoher Wirkungsgrad) - Pink
Injektor “L” (hoher Wirkungsgrad) - Orange
Injktordecket mit O-Ring
Baugruppe Abflussregmer mit O-Ring
N°7 (1.2 gpm; 4.5 Lpm)
N°8 (1.6 gpm; 6.1 Lpm)
N°9 (2.0 gpm; 7.6 Lpm)
N°10 (2.5 gpm; 9.5 Lpm)
N°12 (3.5 gpm; 13.2 Lpm)
N°13 (4.1 gpm; 15.5 Lpm)
N°14 (4.8 gpm; 18.2 Lpm)
1
1
1
1
1
1
1
1
1
1
1
1
1
64
1
1
1
1
1
1
VENTIL 268 STÜCKLISTE
Code Pièce n°
18A
18B
19
20
21
22
*
1000222
1243510
1032416
1032417
1235373
1238861
1030502
1033066
Description
Qté
Regeneriermittel-Nachfüllregler, ohne Kugel
Regeneriermittel-Nachfüllregler
Bausatz Rückschlagventil
Bausatz Rückschlagvent 3/8” AG
Bausatz Rückschlagvent 1/4” AG
Modul, Sensor, Photozelle
Motor mit Distanzstück u. Ritzel, Steuerung Baureihe 700 12V, 50/60 Hz
Kugel, Durchflussregler
Adapter Rückschlagventil von neuer zu alter Ausführung
1
1
1
1
1
1
De
65
Stückliste Steuerungen Logix
Num. Teil Nr.
Beschreibung
1
2
3
4
5
6
7
8
9
Kit générateur de chlore 0,33 gpm
Câblage d’extension pour cabinet
Autocollant, Français, 740, diode cachée
Autocollant, Français, 740, diode visible
Autocollant, Français, 740F, diode cachée
Autocollant, Français, 760, diode cachée
Autocollant, Français, 760, diode visible
Autocollant, Français, 760, diode cachée
Transformateur
1234336
1242411
1263910
1263911
1263912
1263913
1263914
1263914
1000814
Bypass 1265
Num. Teil Nr.
Beschreibung
5
*
*
1040930
1034302
1030541
By-pass 1265
Kit de réparation (joints de rotor et clips)
Garniture de tube 1”
12
KIT-P3
KIT-P4
KIT-P7
KIT-P8
KIT-PV
KIT-PV-1
KIT-PV-34
Kit
Kit
Kit
Kit
Kit
Kit
Kit
d’adaptation
d’adaptation
d’adaptation
d’adaptation
d’adaptation
d’adaptation
d’adaptation
tube
tube
tube
tube
tube
tube
tube
De
66
laiton 3/4 inch BSPT
laiton1 inch BSPT
cuivre 22 mm
cuivre 28 mm
PVC 32 mm
PVC 1 inch
PVC 3/4 inch
Notes • Nota • Anmerkung
P/N 3031986 - Rev 0