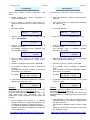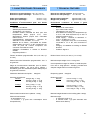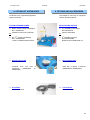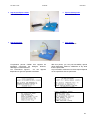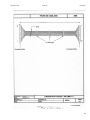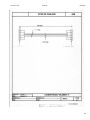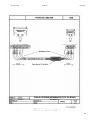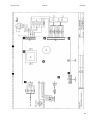
1
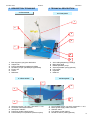
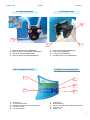
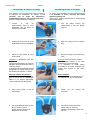
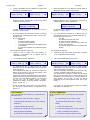
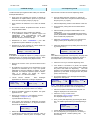
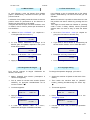
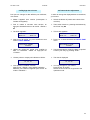
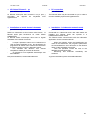
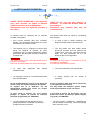
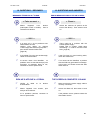
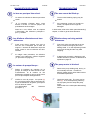
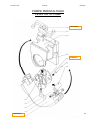
DILUMAT 3mk2 MANUEL MA105501 Rue Maryse Bastié – Ker Lann CS17219 – 35172 BRUZ cedex FRANCE Téléphone: (+33) (0)2 23 50 12 12 Fax: (+33) (0)2 23 50 12 00 E-mail: [email protected] Site Web: www.aeslaboratoire.com DILUMAT 3mk2 MANUEL D’UTILISATION ET MAINTENANCE USER AND SERVICE MANUAL MA105501:01-02-05 :D 1 DILUMAT 3mk2 MANUEL MA105501 DILUMAT 3mk2 DECLARATION DE CONFORMITE C.E. AES Laboratoire certifie que Le DILUMAT 3mk2 (référence: AESAP1055) est conforme aux directives européennes suivantes : • − Directive 89/336/CEE (Compatibilité Electromagnétique) Mise à jour par les directives 92/31/CEE et 93/68/CEE Norme de référence: Emission Norme Générique: NF EN 50 081 – 1 (Juin 1992) Norme de base: NF EN 55011 (en conduit et rayonnée) − Immunité Norme Générique: NF EN 50 082-1 (Juin 1992) Norme de base: NF EN 61 000-4-2 (Décharges électromagnétiques) NF EN 61 000-4-3 (Immunité aux champs rayonnés en enveloppe) NF EN 61 000-4-4 (Transitoires rapides en salves) • Directive 73/23/CEE (Sécurité appareils électriques) Mise à jour par la directive 93/68 CEE − Norme de référence: NF EN 61010-1 (08/93 + A2 11/95) • Directive 98/37/CEE (Sécurité Machines) Alain Le Roch Président Directeur Général Rue Maryse Bastié – Ker Lann – CS17219 35172 BRUZ cedex – France – Tel : (+33) (0)2 23 50 12 12 – Fax : (+33) (0)2 23 50 12 00 E-mail : [email protected] – Site web : http://www.aeslaboratoire.com 2 DILUMAT 3mk2 MANUEL MA105501 DILUMAT 3mk2 EC COMPLIANCE CERTIFICATE AES Laboratoire declares that the DILUMAT 3 mk2 (ref: AESAP1055) complies with the following European directives: • − 89/336/CEE Directive (Electromagnetic Compatibility) Updated by 92/31/CEE 93/68/CEE directives 3 MK2 Reference Standard: Emission Generic Standard: NF EN 50 081 – 1 (June 1992) Basic Standard: NF EN 55011 (conducted and radiated) − Immunity Generic Standard: NF EN 50 082-1 (June 1992) Basic Standard: NF EN 61 000-4-2 (Electromagnetic Burst) NF EN 61 000-4-3 (Immunity to radient fields) NF EN 61 000-4-4 (Fast transient bursts) • 73/23/CEE Directive (Electrical Equipment Safety) Updated by the 93/68 CEE directive − Reference Standard: NF EN 61010-1 (08/93 + A2 11/95) • 98/37/CEE Directive (Machines Safety) Managing Director Alain Le Roch Rue Maryse Bastié– Ker Lann – CS17219 35172 BRUZ cedex – France – Tel : (+33) (0)2 23 50 12 12 – Fax : (+33) (0)2 23 50 12 00 E-mail : [email protected] – Site web : http://www.aeslaboratoire.com 3 DILUMAT 3mk2 MANUEL TABLE DES MATIERES MA105501 CONTENTS 1. PREFACE ………………………………… p. 5 1. PREFACE ………………………………… p. 5 2. PRESENTATION ………………………… p.5 2. PRESENTATION ………………………… p.5 3. DESCRIPTION TECHNIQUE …………... p.6 3. TECHNICAL DESCRIPTION……………. p.6 4. INSTALLATION ………………………….. p.8 4. INSTALLATION ………………………… p.8 5. MODE OPERATOIRE …………………… p.10 5. OPERATION ……………………………... p.10 5.1 Familiarisation avec le clavier………. p.10 5.1 Getting used to the keyboard ……… p.10 5.2 Préparation d’une dilution ………….. p.12 5.2 Dilution preparation …………………. p.12 5.3 Effectuer une dilution ……………….. p.13 5.3 Starting a dilution ……………………. p.13 5.4 Mode dosage ……………………….. p.15 5.4 Dispensing mode ……………………. p.15 6. PARAMETRAGE DU DILUMAT 3MK2 ... p.16 6. DILUMAT 3MK2 SETTINGS …………… p.16 6.1 Menu imprimante ……………………. p.16 6.1 Printer menu …………………………. p.16 6.2 Menu pompe ………………………… p.17 6.2 Pump menu ………………………….. p.17 6.3 Menu pédale …………………………. p.18 6.3 Foot switch menu …………………… p.18 6.4 Changement de langue …………….. p.18 6.4 Language settings ………………….. p.18 6.5 Réglage date et heure ……………… p.19 6.5 Date & Time adjustment …………… p.19 6.6 Calibrage ……………………………. p.20 6.6 Calibration ……………………………. p.20 7. CARACTERISTIQUES TECHNIQUES ... p.21 7. TECHNICAL FEATURES ………………. p.21 8. OPTIONS …………………………………. p.22 8. OPTIONS …………………………………. p.22 9. NETTOYAGE / ENTRETIEN …………… p.25 9. CLEANING ……………………………….. p.25 10. QUESTIONS / REPONSES …………….. p.26 10. QUESTIONS / ANSWERS ……………… p.26 11. DEMONTAGE ……………………………. p.29 11. MAIN PARTS DISMANTLING …………. p.29 12. GARANTIE ……………………………….. p.34 12. WARRANTY ……………………………… p.34 13. LISTE DE PIECES DETACHEES ……… p.35 13. SPARE PARTS LIST …………………… p.35 ANNEXES ………………………………………….. p.38 APPENDICES ……………………………………… p.38 PLAN D’EMBALLAGE …………………………….. p.51 PACKING PROCEDURE ………………………... p.51 4 DILUMAT 3mk2 MANUEL MA105501 1. PREFACE Vous venez d’acquérir un Dilumat 3mk2. Ce diluteur a été conçu pour vous apporter un haut niveau de performance allié à une réelle simplicité d’utilisation. You have just bought a Dilumat 3mk2. This diluter was designed to combine performances and simplicity in use. Le Dilumat 3mk2 a été élaboré pour répondre à toutes vos attentes. Il a fait l’objet de tests poussés pour vous garantir qualité et fiabilité. The Dilumat 3mk2 was made to fulfil any of your expectations. Complete tests have been carried out to ensure the quality and reliability of the unit. Le principe de fonctionnement ainsi que les caractéristiques techniques sont conformes aux normes CE (voir certificat fourni dans ce manuel). The functioning and technical features comply with the EC regulations (a certificate is enclosed in this manual). Le Dilumat 3mk2 a été développé dans un souci constant de confort pour l’utilisateur. We made great efforts to design a machine that is convenient to use. high 2. PRESENTATION La qualité et la reproductibilité des résultats d’analyses microbiologiques dépendent de la préparation de l’échantillon (prélèvement, dilution, broyage). Le Dilumat 3mk2 est extrêmement simple d’utilisation. Nous avons tenu à développer un appareil à la fois élaboré et convivial dans son utilisation: The quality and reproductibility of microbiological analysis results depend on the sample treatment (sampling, dilution, and homogenisation). The Dilumat 3mk2 aims at simplifying these operations. We have made great efforts to produce a machine that is both outstanding in performance and user friendly: - L’écran LCD offre une approche simple et intuitive. - The LCD screen allows a simple and intuitive approach. - L’opérateur principaux. menus - It is easy to scroll up and down the main pages. - La pompe péristaltique garantit la distribution reproductible des doses. - The default peristaltic pump ensures a fast and accurate dispensing - Une seconde pompe peut facilement être installée en option. - A second pump unit can easily be added as an option. - Une imprimante (standard ou compacte) peut être connectée pour assurer ainsi la traçabilité(option). - A printer (standard or compact) can be connected to ensure traceability.(option) - Un lecteur code à barre peut être installé pour accroître la simplicité et la rapidité d’utilisation (option Labmonitor) - A bar code reader can be connected so that the operator’s task becomes even easier (Labmonitor option). - La distribution peut être déclenchée grâce à une pédale à pied (option). - Dispensing can be activated via a foot switch (option). - Le pont de jauge garantit une totale précision pour la dilution des échantillons. - The load cell ensures complete accuracy samples dilution. accède facilement aux for 5 DILUMAT 3mk2 MANUEL 3. DESCRIPTION TECHNIQUE MA105501 3. TECHNICAL DESCRIPTION 3.1 Face avant 3.1 Front panel 1 2 3 4 7 5 6 1. 2. 3. 4. 5. 6. 7. 1. 2. 3. 4. 5. 6. 7. Bras support tuyau(x) de distribution Support sac Pompe péristaltique installée par défaut Deuxième pompe péristaltique (optionnelle) Ecran LCD Clavier Deflecteur 3.2 Face arrière Arm holding dispensing nozzle(s) Bag holder stand Default peristaltic pump Second peristaltic pump (optional) LCD screen Keyboard Deflector 3.2 Rear panel 1 4 3 5 2 1. 2. 3. 4. 5. Sélecteur tension 110-120V / 220-240V +/- 10% Connexion câble d’alimentation Interrupteur ON/OFF Prise pour pédale à pied (option) Prise RS232 pour imprimante (livrée en option) 1. 2. 3. 4. 5. Dual Voltage Switch 110-120V / 220-240V +/- 10% Mains power supply cable connection ON/OFF switch Foot Switch socket (option) RS232 socket for printer (optional) 6 DILUMAT 3mk2 MANUEL MA105501 3.3 Pompe Péristaltique 3.3 Peristaltic Pump 4 1 2 1. 2. 3. 4. Bandeau de maintien (AESDI0059) Rotor de pompe à trois galets (AESDI0061) Clip de verrouillage (AESDI0060) Corps de pompe complet (AESDI0016) 3 1. 2. 3. 4. 3.4 Ecran graphique et clavier Holding plastic strip (AESDI0059) Pump rotor (AESDI0061) Locking clip (AESDI0060) Complete pump head (AESDI0016) 3.4 Graphic screen and keyboard 1 3 4 2 5 1. 2. 3. 4. 5. Ecran LCD Touches numériques Déplacement du curseur vers la gauche Touche Oui / Non Touche « Entrée ». 1. 2. 3. 4. 5. LCD screen Numerical keys. Key to move the cursor backward to the left Yes / No key “Enter” key 7 DILUMAT 3mk2 MANUEL MA105501 4. INSTALLATION 4.1 Installation of the Dilumat 3mk2 4.1 Installation of the Dilumat 3mk2 Le Dilumat 3mk2 doit être placé sur une surface plane et horizontale. Il doit être alimenté en 230 VAC ou 115 VAC avec des fusibles F1A L 250V. (limites: 110-120V +/- 10% 0.5A , ou 220-240V +/- 10% 0.3A). The Dilumat 3mk2 should be placed on a flat and horizontal surface. The room power supply should be 230 VAC or 115 VAC with fuses of F1A L 250V. (limits: 110/120V +/-10% 0.5A, or 220-240V +/-10% 0.3A). Attention : le support sac est sensible aux rayons ultraviolets. Caution: the bag holder is sensitive to ultraviolets. 9 Visser le bras avec les vis fournies. 9 Screw the arm with the screws that are provided. 9 Placer le plateau support sac. 9 Place the bag holder stand. Le support sac peut être positionné soit parallèle à l’opérateur, soit perpendiculaire, tel qu’il est illustré sur les photos ci-dessous : The bag holder may be placed either parallel or perpedicular to the operator, as shown on the photos below: ATTENTION : Pour passer d’une position à une autre, il est indispensable de tirer le support vers le haut avant de le faire pivoter. Sans cela, la base du déflecteur serait endommagée. CAUTION : To move the bag holder from one position to the other one, it is essential to lift the bag holder up before turning it into the other position. 9 9 Mettre la pâte adhésive sur le support sac Avant de brancher l’appareil, vérifier que le sélecteur de tension (placé à l’arrière de l’appareil) est correctement positionné selon les caractéristiques d’alimentation de la pièce. Place some sticky tacs on the bag holder. Before plugging the unit in, check that the voltage switch position (at the rear) fits the mains supply voltage of the room. = 220-240 V 9 Brancher le Dilumat 3mk2 sur secteur à l‘aide du câble d’alimentation fourni. 9 Plug the Dilumat 3mk2 in, using the provided cable. 9 Mettre l’interrupteur Marche/Arrêt (situé à l’arrière de l’appareil) sur la position 1. L’écran du Dilumat 3mk2 s ‘allume et l’appareil s’initialise. 9 Switch the unit on (main switch at the back of the unit). The screen lights up and the machine initialises. 8 DILUMAT 3mk2 MANUEL 4.2 Installation du tuyau sur la pompe Pour assurer le bon fonctionnement de la pompe et la précision de distribution du diluant, il est essentiel que le tuyau de distribution, préalablement stérilisé, soit correctement placé. Suivre les étapes illustrées ci-dessous : MA105501 4.2 Installing the tube on the pump To ensure good operation and accurate dispensing, it is essential to place correctly the sterile dispensing tubing set. Follow the 3 steps procedure that is schematically represented below: 1. Tourner le clip de déverrouillage, dans le sens antihoraire, afin de libérer le bandeau de maintien. 1. Turn the tubing locking clip anticlockwise to get the plastic strip out. 2. Positionner le raccord du tuyau de distribution dans le bandeau. 2. Slide the tubing into the holding strip. 3. Placer le tuyau autour du rotor de la pompe. 3. Place the tubing around the pump rotor. Attention : L’ajustement doit être parfait. Les formes triangulaires en relief du bandeau doivent s’encastrer dans le corps de pompe. Il est important de respecter le sens d’aspiration du liquide (indiqué par des flèches sur la photo ci-contre). Caution : Fitting should be perfect. The triangular shapes of the strip should fit into the pump head. It is important to install tubing according to the liquid circulation (as shown with arrows on the photo beside). Sens de rotation des pompes: Les 2 pompes du Dilumat 3 mk2, que ce soit la pompe installée par défaut ou la pompe optionnelle, tournent dans le sens antihoraire Pump rotation: Both pumps, either the default one or the optional one, turn anticlockwise. 4. Enfin, faire pivoter le clip de verrouillage. 4. Finally, turn clockwise. 5. Une fois installé le tuyau ne doit être ni coudé, ni pincé. Insérer ensuite l’embout de distribution sur le bras. 5. Once fitted, tubing should be neither bent nor pinched. Install the dispensing nozzle onto the arm. the locking clip 9 DILUMAT 3mk2 MANUEL MA105501 5. MODE OPERATOIRE A la mise sous tension, le Dilumat 3 affiche l'écran d'initialisation: 5. OPERATION When switching the diluter on, an initialisation screen appears : AES LABORATOIRE DILUMAT 3 V 5.20 Puis l'écran principal s'affiche: Imp. ON Dilution - Then the main screen is displayed : Fac. -<Y> / <N> Ô Cet écran indique: - AES LABORATOIRE DILUMAT 3 V 5.20 Si l'imprimante est activée ou non (ON / OFF). Le facteur de dilution utilisé pour la dilution précédente. La pompe sélectionnée (Ô avant ou Ò arrière), Ceci si l'appareil est équipé de l'option deuxième pompe. 5.1 Familiarisation avec le clavier et navigation d’un menu à l’autre Imp. ON Dilution Fac. -<Y> / <N> Ô This screen informs the operator : - About the printer (if it is disabled or not : ON / OFF). About the dilution factor that has been used for the previous operation. About the pump that is currently selected (Ô front or Ò back), if the diluter is equipped with the second pump option. 5.1 Getting used to the keyboard and moving from one menu to the other. Familiarisation avec les touches du clavier : Getting used with the keyboard : Lors d’une dilution, les touches numériques 0, 1, 2, 3 sont des raccourcis : During a dilution, numerical keys (0,1, 2, 3) are used as shortcut keys : - 0 permet de sortir d’un menu 1 permet d’effectuer la tare 2 permet de changer de pompe 3 permet de changer de facteur de dilution. - 0 to go out of a menu 1 to allow for the tare 2 to change pump 3 to modify the dilution factor La touche « Yes » permet d’entrer dans un menu ou de poursuivre dans une opération. La touche « No » permet de sortir d’un menu et d’accéder à un autre. Press « Yes » to enter a menu or carry on with an operation. Press « No » to go out of a menu or switch to another one. Lors de la saisie de chiffres, cette touche permet de faire reculer le curseur pour aller effectuer une modification. When dialing, you may use this key to move the cursor backward and modify figures. La touche « Entrée » valide un choix. The « Enter » key confirms an entry or a selection. 10 DILUMAT 3mk2 MANUEL MA105501 Navigation dans les menus : Moving from one menu to another: Les différents menus du Dilumat 3mk2 sont facilement accessibles. Le schéma ci-dessous représente le cheminement entre les différents menus. En répondant « NO », vous pourrez faire défiler un à un les menus. The various menus are easy of access. The flow chart below shows how you may go from one menu to another. By pressing “NO”, you may go from menu to the next one. Imp. ON Dilution Fac. -<Y> / <N> Ô YES Cf. page 12 Print. ON Dilution NO Imp. ON Dosage YES Cf. page 12 NO Fac. -<Y> / <N> Ô YES Cf. page 15 Print. ON Dispensing NO Fac. -<Y> / <N> Ô YES Cf. page 15 NO PARAMETRES ? <Y> / <N> YES PARAMETERS ? <Y> / <N> Cf. page 12 NO YES Cf. page 12 NO IMPRIMANTE ? <Y>/<N> YES YES PRINTER ? <Y>/<N> Cf. page 16 NO Cf. page 16 NO YES PEDALE ? <Y>/<N> FOOT SWITCH? <Y>/<N> Cf. page 18 NO YES Cf. page 18 NO YES Diluant - - - - ml Pompes ? Fac. -<Y> / <N> Ô <Y>/<N> Cf. page 17 YES Diluent - - - - ml Pumps ? <Y>/<N> Cf. page 17 A noter : Please note: Le menu « Paramètres » permet de déterminer les paramètres d’une dilution ou d’un dosage : - le facteur de dilution, le poids minimal et le poids maximal de l’échantillon (en mode dilution) - le poids à doser (en mode dosage). In the “Parameters” menu you may enter dilution or weighing settings. - dilution factor, sample minimum and maximum weight (in dilution mode) - amount to be dispensed (in dispensing mode) 11 DILUMAT 3mk2 MANUEL MA105501 5.2 Préparation d’une dilution Les paramètres d’une dilution sont déterminés dans le menu « Paramètres ». Suivre la procédure indiquée ci-dessous : MENU PARAMETRES 5.2 Dilution preparation Dilution settings are « Parameters » menu. Please follow this procedure: determined within the PARAMETERS MENU <Y> / <N> Répondre YES. <Y> / <N> Answer YES. FACTEUR DILUTION -<ENTER > Facteurs de dilution programmables: de 2,0 à 150,0 (1/2 à 1/150) Entrer le facteur de dilution et valider en appuyant sur la touche ↵ POIDS MIN (Echan) -- <ENTER > Poids minimum nécessaire d’échantillon: de 1 à 99 g. Entrer le poids choisi Et valider en appuyant sur ↵ POIDS MAX (Echan) -<ENTER > Le poids maximal acceptable d’échantillon doit être compris entre poids minimal + 1 g et 2000/ facteur de dilution. Entrer le poids choisi et valider en appuyant sur ↵ POIDS A DOSER - - -g <ENTER > Poids à distribuer en mode dosage: de 1à 1500 g. Entrer le poids choisi et valider en appuyant sur ↵ TARAGE AUTOMATIQUE 0g? <Y>/<N<> YES Les échantillons ont été préparés au préalable dans les sacs. La tare n’est pas 0 mais ( 0 – poids moyen du sac enregistré). Dans ce cas le poids YES du sac vide est enregistré au préalable (et ceci si tous les sacs utilisés sont identiques) DILUTION FACTOR -- Dilution factor may be: from 2,0 to 150,0 (1/2 to 1/150) Dial the dilution factor and press ENTER ↵ for confirmation MIN WEIGHT (sample) -<ENTER > Weight that may be entered: from 1 to 99g. Dial the weight. And confirm by pressing ENTER ↵. MAX WEIGHT (Sample) -<ENTER > The maximum weight should be between minimum weight + 1 gram and 2000 / dilution factor. Dial the weight and confirm with ENTER. Weight to dispense - - -g <ENTER > The weight should be from 1 to 1500 g. Dial the weight and confirm by pressing ENTER. AUTOMATIC TARE 0g? NO Le Dilumat est en mode de fonctionnement normal. A chaque dilution un sac vide est accroché au support, la tare s’affiche à 0g, puis l’échantillon est déposé dans le sac . <ENTER > YES The sample is already in the bag when the latter is placed on the stand. The tare is not equal to 0 but it is “0 - the weight the registered bag”. In this case the weight of the bag is identified prior any operation. This is valid if the bags that are used are identical. POIDS DU SAC - -, - -g <ENTER> BAG WEIGHT - -, - -g Entrer le poids moyen réel du sac vide. Ce poids sera alors pris en compte pour une dilution. Ex: P=10g, lorsque le support sac est vide, l’écran affiche P= -10g après avoir taré (touche 1) Enter the actual mean weight of the empty bag. This weight will then be taken into account. the screen Ex: P= 10g, <Y>/<N<> NO The Dilumat is in the normal functioning mode. For each dilution an empty bag is hung on the stand, then a sample is placed into the bag. <ENTER> displays P= -10g once you have pressed the 1 key to tare. 12 DILUMAT 3mk2 MANUEL MA105501 5.3 Effectuer une dilution 5.2 Starting a dilution Ö Après avois mis l’appareil sous tension et attendu la stabilisation du capteur balance (entre 15 et 30 minutes), placer le tuyau stérile sur le rotor de la pompe (cf. page 9). Ö Fixer l’embout de distribution sur le bras du Dilumat 3mk2. Ö Ö Ö Ö Once the machine is switched on, wait for the load cell to settle down (between 15 and 30minutes). Place the sterile tubing onto the pump rotor (cf. page 9). Ö Place the dispensing nozzle onto the diluter arm. Ö Then insert the priming nozzle into the sterile diluent container, or the 9l/19l/ 60l Masterclave. Puis insérer l’embout de prélèvement dans le flacon rempli de diluant stérile (ou dans Masterclave 9l, 19l ou 60l). Ö Placer le sac sur le plateau support sac. Il est important que le haut du sac ne dépasse pas les bords supérieurs du plateau, afin qu’il ne gêne pas le mouvement de l’embout de distribution. Place the bag on the bag holder stand. It is essential that the upper part of the bag is level with the stand upper sides. The dispensing nozzle should not touch the bag, as this could affect dilution or dispensing . Ö Pinch both sides of the stand against the bag, and let it go. The bag opens up and is maintained by the sticky tacs. Pincer les deux bords du plateau contre le sac, puis relâcher. Le sac s’ouvre automatiquement et est maintenu par la pâte adhésive. Ö Select the Dilution menu (scrolling down the menus by answering « No »). Then check that the dilution settings are suitable. Ö Afficher et sélectionner le menu Dilution (en faisant défiler les écrans à l’aide de la touche « No »). Ö Ö Puis vérifier adéquats. In the example below, the screen indicates that: A printer is connected and set as switched on (option). The dilution factor is 10. The diluter is equipped with a second optional pump , and the front pump is selected (arrow pointing downwards). que les paramètres affichés sont Dans l’exemple ci-dessous, l’écran indique que une imprimante est connectée et activée (option). le facteur de dilution est 10. l’appareil est équipé d’une deuxième pompe optionnelle, et la pompe sélectionnée est la pompe avant (flèche pointant vers le bas) Si les paramètres affichés ne conviennent pas, reportez vous au chapitre « Paramétrage », afin de les modifier. Vous pouvez également aller les modifier ultérieurement grâce aux touches raccourcis. Imp. ON Dilution Fac.10,0 <Y> / <N> Ô Print. ON Dilution Ö Appuyer sur la touche <Yes> pour entrer dans le menu dilution. Ö Si le Diluteur est connecté à une imprimante, le code opérateur est demandé (de 01 à 20). Ceci permet d’identifier la personne réalisant la dilution. Ce code apparaîtra sur l’étiquette imprimée après la dilution. (Ceci si le Diluteur est équipé de l’option « Imprimante », et si elle a été activée). Ö L’écran suivant s’affiche. Deux messages apparaissent en alternance sur la ligne supérieure : Placer Sac T <1> Poids = ----,- g Ô Ö If the displayed settings are not appropriate to the dilution that you wish to perform, please refer to the « Parameters settings » chapter, in order to modify them. You also may modifiy them during dilution, via the numerical shortcut keys. Baisser Bras Poids = ----,- g Ö Press the <Yes> key to enter the dilution menu. Ö If the diluter is connected to a printer, the operator code is asked (from 01 to 20). This is used to identify the person that makes the dilution. This code appears on the ticket that is printed once the dilution is performed. (if the diluter is equipped with the printer option, and if it is ON). Ö The following screen appears. On the upper line 2 messages are alternately displayed : P <2> Place Bag T <1> Weight = ----,- g Ô Ô Placer un sac vide sur le support. Appuyer sur <1>, pour faire la tare. Le message « Tarage en cours » apparaît . Ö Le poids affiché est alors 000,0 g. Ö Ajouter suffisamment d’échantillon pour l’analyse (> poids min), ou remplacer le sac vide par un sac contenant déjà un échantillon. Dans le deuxième cas le mode « Tarage automatique » doit avoir été activé préalablement dans le menu « Paramètres » (voir page précédente). Fac.10,0 <Y> / <N> Ô Put arm down Weight = ----,- g P <2> Ô Place an empty bag on the stand. Press <1>, to allow for the tare. The message « Tare in progress » appears. The displayed weight is 000,0 g. Ö Place enough sample for analysis into the bag, or replace the empty bag by another one containing a sample. In the second case, the “Automatic tare” mode should be set previously in the « Parameters » 13 menu. (see previous page). DILUMAT 3mk2 Ö MANUEL Ö Lorsque l’échantillon est sur le Diluteur, son poids réel apparaît sur la deuxième ligne : Placer Sac T <1> Poids = 10,10 g Ô Ö MA105501 Baisser Bras P <2> Poids = 10,10 g Ô Place Bag T <1> Weight = 10,10 g Ô Ö Baisser le bras pour réaliser la dilution. Lorsque la dilution est terminée, un bip sonore avertit l’opérateur et l’écran affiche : Dilution Poids : 0101,0g When the sample is on the diluter, its actual weight is diplayed on the second line of the screen : Put the arm down P <2> Weight = 10,10g Ô Lower the diluter arm to perform dilution. When the dilution is over, the operator is warned by an audible signal. On screen this appears: Ô Dilution : 0101,0g Ô Weight = 0010,10g Poids éch. = 0010,10g La ligne supérieure apparaît en alternance avec le message « Relever Bras ». On the upper line a message, the message alternately appears : « Lift the Arm ». Ö Si une imprimante est connectée et activée, un rapport de dilution est automatiquement édité , lorsque vous relevez le bras. Sur ce rapport figure la date le facteur de dilution utilisé la date du dernier calibrage un numéro de dilution et l’heure à laquelle elle a été réalisée. le poids de l’échantillon et le poids total après dilution. (voir exemple de rapport en page 23). Ö Ö Retirer le sac, le fermer avec des barettes de fermeture, et le déposer sur un support sacs en attendant le broyage. Ö Remove the bag, close it with closing clips, and place it on a bag holder before blending. Ö L’écran affiche alors en alternance : Ö You can read alternately on the screen: Placer Sac T <1> Poids = - 0008,7 g Ô (see example on page 23). Baisser Bras P <2> Ô Poids =- 0008,7 g Place Bag T <1> Weight = 10,10 g Ô Put the arm down P <2> Ô Weight = 10,10g En l’absence de sac, le poids affiché est négatif lorsqu’une tare de 0gr a été réalisée, avec un sac vide sur le support sac. Ceci vous permet de placer un nouveau sac vide sur le diluteur et de poursuivre avec une autre dilution, sans avoir à effectuer une nouvelle tare. Il suffit alors de placer l’échantillon dans le sac vide, de baisser le bras pour amorcer la pompe, et de le lever à nouveau une fois la dilution terminée. Et ceci autant de fois que vous le désirez, pourvu qu’aucun paramètre de dilution ne change (facteur de dilution, pompe, type de sac…). When there is no bag on the stand, a negative weight is displayed (in the case that a tare of 0g was allowed, with an empty bag on the stand). Then you may place a new bag on the stand and carry on with a new dilution without allowing the tare. You simply have to insert the sample into the empty bag, to lower the diluter arm to start the dilution.Once the dilution is over, lift the arm up. You may perform as many dilutions as you wish, as long as dilution parameters do not change (dilution factor, pump, type of bag…). Si vous le souhaitez, vous pouvez tout à fait effectuer une tare avant chaque dilution, en appuyant sur la touche <1>. If you wish, you may take time to make a tare before each dilution, by pressing <1>. PETIT RAPPEL ! Lors d’une dilution les touches 0,1,2,3 deviennent des raccourcis : - If a connected and switched on, a dilution report is automatically printed out, as you lift the diluter arm up. On this report you can read : the date The dilution factor that was used The date of the last calibration A dilution number, and the time at which the dilution was performed. The sample weight and the total weight after dilution. 0 permet de sortir d’un menu / stopper A QUICK REMINDER ! During a dilution, the 0,1,2,3 keys become shortcut keys : - 0 is used to go out of a menu / stop momentanément la dilution (ex : pour changer temporarily the dilution (ex: to change de flacon) bottle) - 1 permet d’effectuer une tare - 1 is used to make a tare - 2 permet de changer de pompe (si l’option - 2 is used to change pump (if the optional 2eme pompe est installée) - 3 permet de changer de facteur de dilution. pump is installed on the diluter) - 3 is used to modify the dilution factor. 14 DILUMAT 3mk2 MANUEL MA105501 5.3 Mode dosage 5.3 Dispensing mode Le Dilumat 3mk2 peut également être utilisé pour effectuer de simples distributions. Dilumat 3mk2 can also be used for dispensing doses. Ö Après avoir mis l’appareil sous tension et attendu la stabilisation du capteur balance, placer le tuyau stérile sur le rotor de la pompe pompe (cf. page 9). Ö Once the diluter has been switched on, wait for the load cell to settle down, and place the sterile tubing on the pump rotor. (cf. page 9). Ö Fixer l’embout de distribution sur le bras du Dilumat 3mk2. Ö Place the dispensing nozzle on the Dilumat 3 mk2 arm. Ö Ö Puis insérer l’embout de prélèvement dans le flacon rempli de diluant stérile. Then insert the priming tube into the sterile diluent container. Ö Ö Placer le flacon (ou bol) à remplir sur le plateau. Il est préférable d’utiliser un plateau support bol (AESDI0043) muni éventuellement d’une cale (AESDI0098 ou AESDI0099), pour un meilleur maintien des flacons ou bols à remplir. Place the bottle (or bowl) that will be filled in on the holding plate. It is advised to used a bowl (AESDI0043) stand with a spacer (AESDI0098 or AESDI0099) if required, so that bowl or bottles are properly held. Ö Ö Sélectionner le menu « Paramètres » pour aller programmer le poids à distribuer. (cf. page 14). Select the « Parameters » menu to go and enter the weight (volume) to be dispensed. (cf. page 14). Ö Sélectionner le menu Dosage (en faisant défiler les écrans à l’aide de la touche « No »). Ö Select the dispensing menu (scrolling down the menus by pressing « No »). Imp. ON Dosage <Y> / <N> Print. ON Dispense Ô <Y> / <N> Ô Remarque : ème pompe, la pompe Si le Diluteur est équipé de l’option 2 sélectionnée pour ce dosage est indiquée à l’écran. Dans l’exemple ci-dessus, la pompe avant (Ô) est activée. Note : If the diluter is equipped with a second pump, the pump that was selected for this dispensing is indicated on screen. In the example below, the front pump (Ô) was selected. Ö Appuyer sur la touche <Yes> pour entrer dans le menu dosage. Ö Press the “Yes” key to enter the dispensing menu. Ö Ö Si le Diluteur est connecté à une imprimante, le code opérateur est demandé (de 01 à 20). Ceci permet d’identifier la personne réalisant le dosage. Ce code apparaîtra sur l’étiquette imprimée après la dilution. (Ceci si le Diluteur est équipé de l’option « Imprimante », et si elle a été activée). If the diluter is connected to a printer, the operator code is asked (from 01 to 20). This is used to identify the person that makes the dispensing. This code appears on the ticket that is printed once the dilution is performed. (if the diluter is equipped with the printer option, and if it is ON). Ö Ö L’écran suivant s’affiche. Deux messages apparaissent en alternance sur la ligne supérieure : This screen appears. Two messages are alternately displayed on the top line: Placer Sac Dose = 0,0 g T <1> Ô Baisser Bras Dose = 0,0 g P <2> Ö Placer le récipient à remplir sur le plateau. Son poids ème ligne. apparaît sur la 2 Ö Appuyer sur la touche <1>, pour effectuer une tare. Le message « Tarage en cours » apparaît . Le poids affiché est alors 0,0 g. Ö Vous pouvez alors effectuer la distribution du liquide en baissant le bras du Diluteur. Un bip sonore informe de la fin de la distribution. Ö Ö T <1> Ô Lower arm P <2> Dose = 0,0 g Ô Ô P <2> : Si le diluteur est équipé d’une 2ème pompe, vous pouvez sélectionner la pompe qui servira à ce dosage. Relever le bras Dose = 16,0 g Place Bag Dose = 0,0 g P <2> : If the diluter is equipped with a second pump, you can select the pump that will be used or this dispensing. Ö Place the container to be filled in onto the plate. Its weight is displayed on the second line. Ö Press the <1> key, to make a tare. The message “Tare in progress” appears. The displayed weight is 0,0 gr. Ö Then you may start dispensing by lowering the diluter arm. An audible signal informs you that dispensing is over. Lift arm Dose = 16,0 g Ô Ô Relever le bras et retirer le récipient. La distribution suivante peut être effectuée, selon la même procédure : mise en place du récipient, Tare, Ö Ö Lift the diluter arm up and remove the container. The next dispensing can be performed, according to the same procedure: container placing, tare, 15 arm lowering. DILUMAT 3mk2 MANUEL MA105501 6. PARAMETRAGE DU DILUMAT 3 mk2 6. DILUMAT 3MK2 SETTINGS Lorsque le Dilumat 3mk2 est équipé d’options (Imprimante, 2ème pompe, pédale), des menus spécifiques donnent la possibilité de paramétrer ces accessoires. Le Dilumat 3mk2 permet aussi de paramétrer la langue, la date et d’effectuer un calibrage. When the diluter is equipped with options (printer, 2nd pump, foot switch), some additional menus appear to give you the possibility to change these accessories settings. Some parameters such as operation language, date or calibration may be set on the Dilumat 3 mk2. 6.1 Menu Imprimante 6.1 Printer Menu Si votre Dilumat 3 mk2 est équipé d’une imprimante (AESDI0042 Imprimante Epson pour les impressions A4, ou AESDI0042A Imprimante Star pour les impressions petit format), c’est dans ce menu que vous pourrez l’activer. Dans ce menu, vous pouvez configurer le type d’imprimante utilisée et le nombre d’étiquettes à éditer. Vous pouvez également décider de prendre en compte des numéros d’échantillons. If the Dilumat 3 mk2 is equipped with a printer (AESDI0042A Epson printer for A4 printouts, or AESDI0042A Star Printer for small printouts), it is in this menu that you can activate it. Ö Afficher le menu « Imprimante » (cf. chapitre 5.1. « Navigation dans les menus ».) Ö Go to the « Printer » menu (cf. chapter 5.1. «Moving from one menu to another ».) Within this menu you may determine the type of printer that you are using, and the number of tickets you wish to print. You may also take samples numbers into account. PRINTER MENU MENU IMPRIMANTE <Y>/<N> <Y>/<N> Ö Appuyer sur « Yes ». Ö Press the « Yes » key. IMPRIMANTE UTILISEE <Y>/<N> Ö Appuyer sur « Yes ». Ö Appuyer sur le chiffre correspondant au type d’imprimante connectée. <0> : Imprimante CITIZEN 120D+ ou Imprimante EPSON LX300 <1> : petite imprimante STAR. MODE ETIQUETTE UTILISEE <Y>/<N> NOMBRE ETIQUETTE -<ENTER> <Y>/<N> Ö Press the « Yes » key. CHOIX IMPRIMANTE CITI. <0> STAR <1> YES PRINTER USED NO Les impressions sont alors faites sur rouleau papier Entrer le nombre (1 à 9) d’étiquette(s) requis, puis valider. REFERENCE ECHANTILLON UTILISEE <Y>/<N> Si l’opérateur répond YES, à chaque dilution, il faudra entrer un code numérique pour l’identification de l’échantillon. Si l’opérateur répond NO, la référence réelle de l’échantillon n’est pas prise en compte. PRINTER SELECTION CITI. <0> STAR <1> Ö Dial the number 0 or 1 according to the type of printer that is connected. <0> : CITIZEN 120 D+ printer or EPSON LX300 printer. <1> : STAR small printer. TICKET PRINTING <Y>/<N> YES TICKETS NUMBER -<ENTER> NO Reports are printed on paper rolls. Dial the number of tickets (1 to 9) That you need, then confirm with ENTER. SAMPLE REFERENCE <Y>/<N> If you answer YES, for each future dilution, you will have to enter a numeric code to identify samples. If you answer NO, the actual sample reference is not taken into account. 16 DILUMAT 3mk2 MANUEL MA105501 6.2 Menu Pompe 6.2 Pump menu Dans ce menu vous avez la possibilité d’affecter un volume de diluant aux pompes respectives. Ceci est très utile, lorsque l’on connecte le Dilumat à un préparateur (S8000, Masterclave 19 ou 60), car la réserve de liquide ne peut pas être vérifiée visuellement. Ö Afficher le menu « Pompe » (cf. chapitre 5.1. « Navigation dans les menus ».) In this menu you may assign a volume of diluant that is available for each pump. This is quite helpful when the Dilumat is connected to an autopreparator (such as S8000, Masterclave 19 or 60), as the remaining volume cannot be checked visually. Ö Display the “Pump” menu (cf. Chapter 5.1 “moving from one menu to another”.) Diluant - - - - ml Pompes ? Ö Le volume restant dans l'autopréparateur ou le flacon s'affiche. La pompe sélectionnée est affichée (Ì) Appuyer sur YES pour effectuer une Modification. Choix pompe È <0> Diluant - - - - ml Pompes ? <Y>/<N> Ê Ö The volume that remains in the Autopreparator or container is displayed. The arrow indicates which pump is selected. Press YES to modifiy something. Choix pompe È <0> Ê <1> VOLUME DILUANT - - - - ml <ENTER> È Ö Il est possible d'entrer le volume de diluant Disponible dans l’autopréparateur ou flacon. Appuyer ensuite sur ENTER pour valider. CHOIX POMPE <0> <1> Ö You may enter the diluent volume that is available in the autopreparator or container. Press ENTER to confirm. Diluant - - - ml NO Impr. ON Dilution Fac. -<Y>/<N> Accès à l'écran principal Programmation de la deuxième pompe Ö Sélectionner la deuxième pompe devant être paramétrée REMARQUE: Si un volume diluant est paramétré, le Dilumat calcule automatiquement le volume restant en décrémentant la quantité dosée ou diluée pour chaque opération. Ainsi un message informe l'opérateur lorsque le contenant est vide et donne la possibilité de stopper l'opération pour pouvoir changer le flacon de diluant : DILUANT VIDE! Dilution VOLUME DILUANT - - - - ml <ENTER> È POMPES ? <Y> / <N> È YES Ê <1> Ö Dial the pump number that you want to set. Ex: <0>. Ö Choisir la pompe qui doit être paramétrée en appuyant sur le chiffre correspondant. Ex: <0>. Diluant - - - ml <Y>/<N> Ê <Y>/<N> Si vous répondez « YES » : L'opération continue. La gestion du volume diluant est interrompue. Si vous répondez « No » : L'opération est interrompue. L'écran "pompes" s'affiche pour permettre l'entrée du nouveau volume diluant. POMPES ? <Y> / <N> È YES CHOIX POMPE <0> <1> If you wish to enter the second pump settings Ö Select the second pump, to enter its settings. NO Impr. ON Dilution Fac. -<Y>/<N> Access to the main screen. NOTE: If a volume of diluant is taken into account, the diluter takes out each dispensed volume, and calculates automatically the remaining volume. You are informed when the container is empty. You have the possibility to stop the operation in order to replace the bottle of diluent: DILUENT EMPTY! <Y>/<N> Dilution If you answer “YES”: The operation carries on. Volume management is stopped. If you answer “No”: The operation is stopped. The pump menu appears to give you the possibility to enter the new volume of diluent. 17 DILUMAT 3mk2 MANUEL 6.3 Menu Pédale MA105501 6.3 Foot switch menu Si votre Dilumat 3 mk2 est équipé d’une pédale (option : AESPP0019), c’est dans ce menu que vous pourrez l’activer. If the Dilumat 3 mk2 is equipped with a foot switch (option : AESPP0019), it is in this menu that you can activate it. L’utilisation d’une pédale permet de laisser le bras en position basse en permanence et de démarrer la dilution par une pression sur la pédale. Cela peut être utile lorsque l’on utilise le diluteur sous un PSM II, dont la vitre ne permet pas de baisser le bras aisément. With a foot switch it is possible to leave the arm in the low position and start a dilution by pressing the foot switch. This might be useful when the Dilumat is operating under a class II Safety Cabinet, whose protection window does not make it easy to lower the diluter arm. Ö Ö Go to the “Foot switch “ menu (cf. chapter 5.1 going from one menu to another one) Afficher le menu « PEDALE » (cf. chapitre 5.1. « Navigation dans les menus ».) PEDALE ? <Y>/<N> Ö Si vous désirez déclencher le dosage ou la dilution grâce à la pédale, répondre « Yes » pour entrer dans le menu. PEDALE UTILISEE? <Y>/<N> Ö Appuyer sur la touche « Yes », pour l’activer. PEDALE ? <Y>/<N> Ö Appuyer sur « No » pour sortir du menu. 6.4 Changement de langue FOOT SWITCH ? <Y>/<N> Ö If you want to start a dilution or a dispensing via the foot switch, answer “Yes” to enter the menu. USE FOOT SWITCH? <Y>/<N> Ö Press the “Yes” key, to activate it. FOOT SWITCH ? <Y>/<N> Ö Press “No” to go out of the menu. 6.4 Language setting Pour pouvoir changer la langue d’utilisation du diluteur, vous devez : To change the operation language, you have to : Ö Mettre l’appareil hors tension (interrupteur à l’arrière de l’appareil). Ö Switch the machine off (button at the back of the diluter). Ö Puis le mettre à nouveau sous tension (bouton ON/OFF), en appuyant simultanément sur la touche « Entrée » . Ö Then switch the machine back on (ON/OFF button), pressing simultaneously the “Enter” key . Ö Cet écran apparaît : Ö This screen appears: CALI. <0> DATE <2> LANG. <1> TEST <3> Ö Appuyer sur la touche <1> pour accéder au sous menu « Langue ». FRANCAIS ? CALI. <0> DATE <2> LANG. <1> TEST <3> Ö Press the <1> key to have access to the “Language” menu. ENGLISH ? <Y>/<N> Ö A l’aide des touches « No » et « <Yes », sélectionner la langue d’utilisation souhaitée. <Y>/<N> Ö Use the “No” and “ Yes”, to select you operation language. 18 DILUMAT 3mk2 MANUEL 6.5 Réglage date et heure MA105501 6.5 Date and time adjustment Pour pouvoir changer la date affichée par le diluteur, vous devez : In order to change the displayed date on the diluter, you have to: Ö Mettre l’appareil hors tension (interrupteur à l’arrière de l’appareil). Ö Switch the diluter off (switch at the back of the machine). Ö Puis le mettre à nouveau sous tension, en appuyant simultanément sur la touche « Entrée » . Ö Then switch it back on, pressing simultaneously the “Enter” key . Ö Cet écran apparaît : Ö This screen appears: CALI. <0> DATE <2> LANG. <1> TEST <3> Ö Appuyer sur la touche <2> pour accéder au sous menu « DATE / HEURE». JOUR/ MOIS / ANNEE 27/09/02 CALI. <0> DATE <2> LANG. <1> TEST<3> Ö Press <2> to have access to the “DATE / TIME” menu. DAY/ MONTH / YEAR 27/09/02 Ö Utiliser les chiffres du clavier pour modifier la date, si nécessaire. Valider en appuyant sur « Entrée ». Ö Use the keyboard to modify the date, if required. Confirm your entry by pressing “Enter”. Ö L’heure prise en compte par le diluteur s’affiche. Ö The date is displayed. HEURE : MINUTE 10 : 29 : 33 Ö Vous pouvez la modifier si besoin. Appuyer sur « Entrée » pour valider l’opération. Eteindre, puis rallumer l’appareil pour revenir en mode « Utilisation ». HOUR : MINUTE 10 : 29 : 33 Ö You may change it if you need to. Press “Enter” to confirm. Switch the unit off and on to go back to the operation mode. 19 DILUMAT 3mk2 MANUEL MA105501 6.6 Calibrage 6.6 Calibration Pour pouvoir accéder au menu « Calibrage », vous devez : To access the « calibration » menu, you have to : Ö Mettre l’appareil hors tension (interrupteur à l’arrière de l’appareil). Ö Switch the diluter off ( switch at the back of the machine). Ö Puis le mettre à nouveau sous tension, en appuyant simultanément sur la touche « Entrée » . Ö Then switch it back on, pressing simultaneously the “Enter” key . Ö Cet écran apparaît : Ö This screen appears: CALI. <0> DATE <2> LANG. <1> TEST <3> Ö Appuyer sur la touche <0> pour accéder au sous menu « CALIBRAGE». CALI. <0> DATE <2> Ö Press <0> to go to the “CALIBRATION” menu. SUPPORT SAC VIDE <Y> / <N> Ö Appuyer sur « Yes » pour confirmer que le support sac est vide. Le message « Tarage en cours » apparaît , puis l’écran suivant apparaît : LANG. <1> TEST <3> EMPTY STAND <Y> / <N> Ö Press “Yes” to confirm that the bag holding stand is actually empty. The message “Tare in progress” appears, followed by this screen: POIDS TARAGE ---,-- g <ENTER> TARE WEIGHT ---,-- g <ENTER> Ö Placer le poids étalon sur le support sac, et entrer sa valeur Certifiée (min : 500g / max : 1000g). Ö Valider en appuyant sur la touche « Entrée » Ö Place the calibration weight on the bag holding stand, and dial its certified value. Ö Le message « Tarage en cours » apparaît de nouveau. Puis l’appareil demande de placer à nouveau le poids étalon, pour vérification. Ö The message “Tare in progress” is displayed again. Then the diluter requires the calibration weight a second time, for checking. Ex : 500gr PLACER 500,00g 500 , 06 OK? <Y>/<N> Ö Si les valeurs coincident suffisamment, valider en appuyant sur la touche « Yes ». REMISE A 0 g 1,0g <ENTER> Attention : Pour les utilisations courantes (poids de 10 à 25g), nous préconisons la valeur par défaut de 1 g. Pour des valeurs de pesées très faibles (0,5 à 1g), cette valeur peut être descendue vers 0,3 (notamment quand l’échantillon est sous forme de poudre). Ö Confirm your entry by pressing ”Enter” . Ex: 500g PLACE 500, 00g 500 , 06 OK? <Y>/<N> Ö If displayed values are sufficiently close, press “Enter” to confirm. RESET A 0 g 1,0g <ENTER> Caution: For usual operations (weights from 10 to 25gr), we advise the default value that is 1gr. For very light weighings (0,5 to 1gr), this value can be dropped down to 0,3 (especially when using powder sample). Ö Après validation de la remise à 0, l’appareil propose l’édition d’un rapport de calibration (ceci si l’appareil est équipé de l’option imprimante). Un exemple de rapport de calibration en page 23. Eteindre, puis rallumer l’appareil pour revenir en mode « Utilisation ». Ö Once calibration is over, you are offered to print a calibration report (if your diluter is equipped with the optional printer). An example of calibration report is given in page 23. Switch the unit off and then back on to go back to the “Operation” mode. Le calibrage doit être effectué tous les ans. Calibration should be carried out every year. 20 DILUMAT 3mk2 MANUEL MA105501 7. CARACTERISTIQUES TECHNIQUES 7. TECHNICAL FEATURES Dimensions avant emballage : 50 x 42 x 39 cm Dimensions après emballage : 35 x 50 x 50 cm Dimensions without package: 50 x42 x 39 cm Dimensions with package: 35 x 50 x 50 cm Poids avant emballage : Poids après emballage : Weight without package: Weight with package: environ 11 kg environ 13 kg Conditions d’environnement pour une bonne utilisation : - - - Utilisation en intérieur Altitude jusqu’à 2000 mètres Température : de 5 à 40°C Humidité relative maximale de 80% pour des températures allant jusqu’à 31°C, avec décroissance linéaire jusqu’à 50% d’humidité relative à 40°C. Caractéristiques d’alimentation : 110/220V ou 220/240V +/-10%, 50-60Hz ; 0,5 / 0,3A . Matériel de la classe I raccordable sur réseau d’alimentation de type TT ou NT uniquement, sur socle de prise de courant comportant une connexion raccordée à la terre. Catégorie d’installation II suivant la directive CEI664. Degré de pollution 2 Environment conditions working order: - - - approximately 11 kg approximately 13 kg to ensure a Needs to be used indoors. Up to 2000 meters height. Temperature: from 5 to 40°C 80% Maximum humidity for temperatures up to 31°C, with linear decrease up to 50% of relative humidity at 40°C. Power supply: 110/220V or 220/240V +/10% A, 50-60Hz; 0.5 / 0.3A . Class 1 equipment that can be exclusively connected to TT or NT, and connected to earth. Category II installation according to IEC664 directive. Pollution: degree 2 Facteur de dilution programmable : de 2,0 à 150,0 (½ à 1/150) Dilution factor: from 2,0 to 150,0 ( ½ to 1/150). Poids minimal de l’échantillon programmable : de 1 à 25 grammes Minimal sample weight: from 1 to 25 grams. Plage de fonctionnement habituelle pour la dilution d’échantillons solides : de 100 à 400 g (diluant + échantillon) pour des échantillons pesés allant jusqu’à 40 grammes maximum. Vitesse de distribution du liquide : 800g/min Précision de la dilution : Dilution: de 0g à 40g: +/- 0,3g de 40 g à 100g: +/- 0,4g de 100g à 1Kg: +/- 0,5g Dosage: de 0 g à 40g: +/- 0,3g de 40 g à 100g: +/- 0,4g de 100g à 1Kg: +/- 0,5g good Usual operational range for dilution of solid samples: from 100 to 400g (diluent + sample), provided that samples weight does not exceed 40 grams. Dispensing speed: Dilution accuracy: Dilution: Dispensing: 800g/min from 0 to 40g: +/- 0.3g from 40 to 100g: +/- 0.4g from 100g to 1 Kg: +/- 0.5g from 0 to 40g: +/- 0.3g from 40 to 100g: +/- 0.4g from 100g to 1 Kg: +/- 0.5g Poids maximal autorisé sur le plateau : 1500g Maximal weight allowed on the holding plate: 1500gr. Poids minimal autorisé : - en automatique : 5 g - en manuel : 1 g (avec tare automatique avant chaque dilution). Minimal weight: - in automatic mode: 5 gr - in manual mode: 1 gr (with automatic tare before each dilution). 21 DILUMAT 3mk2 8. OPTIONS ET ACESSOIRES MANUEL MA105501 8. OPTIONS AND ACCESSORIES Le Dilumat 3 mk 2 peut être équipé des options suivantes : The Dilumat 3 mk2 may be equipped with the following options: OPTION DEUXIEME POMPE SECOND PUMP OPTION Option 2 ème pompe péristaltique. Ref : AESDI0040 Installée en usine sur le Dilumat. ou or Kit 2ème pompe péristaltique Ref : AESDI0040A Livrée et installée ultérieurement. Plateau support bol Ref : AESDI0043 Combiné avec une cale si nécessaire (AESDI0098 ou AESDI0099). 2nd peristaltic pump option. Ref: AESDI0040 Factory assembled. Une pédale Ref : AESPP0019 2nd peristaltic pump kit Ref: AESDI0040A Delivered and installed later on. Bowl holding plate. Ref: AESDI0043 Used with a spacer if required (AESDI0098 or AESDI0099). A foot switch. Ref: AESPP0019 22 DILUMAT 3mk2 MANUEL MA105501 Imprimante Epson LX300 Ref : AESDI0042 Epson LX300 printer Ref: AESDI0042 Imprimante Star Ref : AESDI0042A Star printer Ref: AESI0042A L’imprimante permet d’éditer des rapports de traçabilité concernant les dosages, dilutions, calibrages ou tests effectués. Les informations figurant sur ces rapports dépendent du genre d’opérations réalisées. With this printer, you can print traceability reports about dispensing, dilutions, calibrations or any tests that are performed. Any information mentionned on these reports depend on the operations that are performed. 23 DILUMAT 3mk2 MANUEL Kit liaison Dilumat 3 - pc MA105501 (ref : AESDI0312) Le Dilumat 3mk2 peut être connecté à un pc pour y enregistrer les rapports de traçabilité sous hyperterminal. Installation en mode réseau Labmaster (ref : AESDI0312) The Dilumat 3mk2 may be connected to a pc in order to record traceability reports with Hyperterminal . - - Lorsque l’opérateur scanne sur le Labmonitor le code à barres identifiant le sac, les paramètres du programme de dilution sont transmis du labmonitor au Dilumat 3mk2, via le PC Labmaster central. Les résultats des dilutions sont ensuite récupérés et traités par la base de données. Un pilotage et une traçabilité automatique sont ainsi réalisés. Pour plus d'informations, contacter AES Laboratoire Installation in Labmaster network mode (ref: AESDL0107) (ref: AESDL0107) Relié à un Labmonitor et à un lecteur code à barre , le Dilumat 3mk2 peut fonctionner en mode réseau LABMASTER. Le Dilumat 3mk2 communique alors avec le logiciel Labmaster via le réseau Lonworks. PC connection Connected to a Labmonitor and a bar code reader are installed, the Dilumat 3mk2 can operate in a LABMASTER network mode. The Dilumat 3mk2 communicates with the Labmaster application via the Lonworks network. - - When the operator scans the identification bar code on the Labmonitor, the program's parameters are transmitted from the Labmonitor to the Dilumat 3mk2 via the Labmaster central PC. Then the operation results are sent to the database that manages them. Monitoring and automatic traceability are achieved. To get more information, please contact AES Laboratoire. 24 DILUMAT 3mk2 MANUEL MA105501 9. NETTOYAGE ET ENTRETIEN 9. CLEANING AND MAINTENANCE AVANT TOUTE OPERATION, il est important pour votre sécurité, de mettre le Dilumat 3mk2 hors tension et de le débrancher. Déconnecter tous les appareils pouvant y être reliés. FIRST OF ALL, for your own safety it is essential , to switch the Dilumat 3mk2 off and unplug it . Disconnect any machine that may be connected to it. Le Dilumat 3mk2 ne nécessite pas un entretien journalier contraignant. The Dilumat 3mk2 does not require a constraining daily cleaning. 9 Pour pouvoir travailler dans des conditions stériles, il est nécessaire d’autoclaver les tuyaux de distribution en chaleur humide. 9 In order to work in sterile conditions, the dispensing tubes needs to be autoclaved. 9 Les supports sac et supports bol doivent être retirés de l’appareil et nettoyés de façon quotidienne avec un chiffon imbibé d’eau chaude, puis séchés. Ne pas utiliser de tampon abrasif sur le support sac. 9 The bag holder and bowl holder stands should be removed from the machine and cleaned once a day with a wet cloth and hot water. Dry them afterwards. Do not use abrasive cloth on the bag holder. ATTENTION : Pour retirer le support sac, il est indispensable de tirer le support vers le haut. Sans cela, la base du déflecteur serait endommagée. CAUTION : To remove the bag holder, it is essential to lift the bag holder up beforehand. If not the bag holder base may break. 9 Le capot doit quotidiennement nettoyé 9 The cover needs also to be cleaned daily. 9 Un nettoyage à l’alcool à 70° doit être effectué de façon hebdomadaire. 9 A weekly cleaning with 70° alcohol is necessary. également être En cas de débordement, veiller à ne pas laisser de liquide couler sur la partie supérieure du capteur. Le support sac et le déflecteur ont été spécialement étudiés pour limiter les risques d’infiltration vers le capteur. In case of spillage, make sure that no liquid runs to the upper part of the sensor. The bag holder and deflector special shapes avoid liquid infiltration to the unit sensor. Si vous retirez le support sac, vous pouvez protéger le capteur en plaçant un bouchon plastique de type GL45 (ref : BIB36382) If you need to remove the bag holder, you can protect the sensor by placing a plastic stopper (eg. GL45)- ref: BIB36382. 9 9 Le tuyau prédécoupé fixé directement sur la pompe (AESDI0071 / AESDI0071A), doit être changé toutes les 100 heures The precut tubing ( AESDI0071 / AESDI0071A) that is installed on the pump, should be changed after 100 hours of use. 25 DILUMAT 3mk2 MANUEL 10. QUESTIONS – REPONSES 10. QUESTIONS AND ANSWERS ERROR MESSAGES DISPLAYED ON SCREEN : MESSAGES D’ERREURS A L’ECRAN : ? ) ? ) ) ) ? « Faire un reset » Mettre l’appareil hors (interrupteur on/off à l’arrière). remettre sous tension. tension Puis le ? Il se peut qu’il y ait un problème avec l’alimentation 24 Volts. Veuillez vous référer au chapitre « Démontage des éléments principaux », pour vérifier l’état du fusible FU2 . (page 28) Si le fusible FU2 n’est pas endommagé, vérifier le transformateur. Si aucune cause n’est identifiée , un problème avec la carte électronique peut provoquer ce message. Dans ce cas, contacter le Service Après Vente. ) ) ) « Reset » Switch the machine off (switch at the back of the diluter). Then switch it back on. « 0001 » There might be a problem with the 24Volts power supply. Please refer to chapter « Main parts dismantling », in order to check the FU2 fuse.( page 28) If the FU2 fuse is in good working order, check the transformer . If no cause can be identified, a problem with the PCB may generate this message. In this case, you should contact the After Sales Service. ? THE SCREEN IS COMPLETELY BLANK RIEN NE S’AFFICHE A L’ECRAN. ) ) « 0001 » ? ) MA105501 Vérifier le câble d’alimentation. et Mettre l’appareil hors essayer de le rallumer. la tension tension, puis Si le problème persiste, contacter le Service Après Vente. ) ) Make sure that the power supply cable is correctly connected. Switch the diluter off, then switch it back on. If the problem recurrs, please contact the After Sales Service. 26 DILUMAT 3mk2 MANUEL MA105501 DIAGNOSTICS DE PANNES ? Le bras ne peut pas être relevé. ) Le ressort de maintien du bras est peut être cassé. TROUBLESHOOTING ? ) ou ) Si le message « Baisser bras » reste affiché à l’écran, la fourche optique est probablement endommagée. Les dilutions effectuées sont hors tolérances. ) ) ? Avant toute chose, assurez vous que le haut du sac ne dépasse pas le bord du support. L’embout de distribution risque de frotter contre le sac et la dilution est donc faussée. Si malgré cette précaution, les dilutions restent hors tolérances, calibrer l’appareil (cf. procédure en page 20). Le moteur de pompe bloque . ) ) The arm shaft retaining spring may be broken. Or Dans les 2 cas, référer vous au chapitre « Démontage des éléments principaux » pour y accéder. ? The arm cannot be lifted up. Retirer le bandeau de maintien de la pompe, et essayer de faire tourner le rotor manuellement. Si la rotation se fait difficilement, appeler le service après vente pour de plus amples renseignements. Vérifier le rotor de pompe. Les picots (A) du rotor peuvent être usés et permettre au tuyau de distribution de glisser, provoquant ainsi un arrêt du moteur. (Cf.« Démontage des éléments principaux ») ) If the message “Lower arm” remains on screen, the optical sensor might be damaged. In both cases, refer to the “Main parts dismantling” chapter, in order to get to these elements. ? ) ) ? ) ) Dilutions keep on being outside tolerances. First of all, make sure that the top of the bag is not above the upper part of the holding stand. If so, the dispensing nozzle may touch the bag and this may false weighing. If despite this precaution, dilutions are stil outside tolerances, perform a calibration as explained in page 20. The pump motor is blocked. Remove the pump holding strip, and try to turn manually the rotor. If rotation is difficult, please call the After Sales Service for detailed explanation. Check the pump rotor. The rotor may be worn (A). If so, the dispensing tube may not fit properly and this stops the pump motor. Please refer to the “Main parts dismantling” section. A 27 DILUMAT 3mk2 MANUEL Instabilité des chiffres affichés ? ou MA105501 Figures display is unstable ? or ? La calibration est hors tolérances ou ? Calibration is outside tolerances or ? Un poids posé sur le plateau n’est pas pris en compte. Le poids affiché reste 0. Poids =00 ,0g ? the diluter does not take into account a weight placed on the plate. Displayed weight is 0. Ô Weight =00 ,0g Dilution <Y> / <N> ) ) ) Refaire une calibration comme indiqué en page 20. Si le problème persiste, vérifier le pont de jauge. Cf. « Démontage des éléments principaux » . Si malgré tout , le problème n’est pas résolu, le composant AD7710AN devra peut être être changé. Une vérification auprès du service après vente est toutefois conseillée. Ô Dilution <Y> / <N> ) ) ) Perform a calibration as explained on page 20. If the problem recurs, check that the load cell is in good working order. Cf. « Main parts dismantling » . If the problem does not come from the load cell, you may have to change the AD7710AN component. You should check with the After Sales Service before any intervention. 28 DILUMAT 3mk2 MANUEL MA105501 11. DEMONTAGE DES ELEMENTS PRINCIPAUX 10. MAIN PARTS DISMANTLING C’est dans ce chapitre que vous sont indiquées les interventions techniques pouvant être réalisées sur votre Dilumat 3 mk2. It is in this chapter that you can find explanations and diagrams about possible technical interventions on your Dilumat 3mk2. AVANT TOUTE OPERATION, il est important pour votre sécurité, de mettre le Dilumat 3mk2 hors tension et de le débrancher. Déconnecter tous les appareils pouvant y être reliés. FIRST OF ALL, for your own safety it is essential , to switch the Dilumat 3mk2 off and unplug it . Démontage de la pompe ) ) ) Faire pivoter le clip de verrouillage, pour pouvoir retirer le bandeau de maintien. Retirer les deux vis de fixation, pour libérer la pompe. Retirer le circlip qui maintient l’axe du rotor. Désolidariser l’axe et le rotor. Disconnect any connected to it. machine that may be Pump dismantling ) ) ) Turn the locking clip anticlockwise to remove the pump holding strip. Remove both holding screws, to release the pump. Then remove the circlip that holds the rotor. Separate the axle from the rotor. Référence rotor : AESDI0061 Rotor reference: AESDI0061 Un schéma éclaté de la pompe figure en annexe à la fin de ce manuel. An exploded view of the pump is given at the end of this manual as an appendix. 29 DILUMAT 3mk2 MANUEL MA105501 Démontage du capot Pour accéder à certaines pièces du Dilumat 3 mk2, il est nécessaire de démonter le capot de l’appareil. ) Cover dismantling To access some parts within the Dilumat 3mk2, you have to remove the cover first. ) Retirer le support sac. RAPPEL : Le support sac peut être positionné soit parallèle soit perpendiculaire à l’opérateur. Pour passer d’une position à une autre, il est indispensable de tirer le support vers le haut avant de le faire pivoter.Sans cela, la base du déflecteur serait endommagée. ) ) ) Retirer les 3 vis de fixation à l’arrière de l’appareil. Lever l’arrière du capot, puis basculer vers l’avant. Vous pouvez ensuite poser le capot sur le côté. L’accès aux différents éléments est alors possible (voir page suivante) Remove the bag holding stand. CAUTION : The bag holder may be placed either parallel or perpedicular to the operator. To move from one position to the other one, it is essential to lift the bag holder up before turning it into the other position. Otherwise the device base will be damaged. ) ) ) Remove the 3 holding screws at the back of the diluter. Lift the back of the cover, and tilt it forwards. You may lay the cover on its left side. The inside parts are now accessible (see next page). 30 DILUMAT 3mk2 MANUEL MA105501 FusibleFU2 FU2 Fuse Carte électronique Printed Circuit board Fourche optique Optical sensor AESDI0027 Ressort bras Arm Spring AESDI0092 Transformateur Torique Transformer AESDI0053 Pont de jauge Load Cell AESDI0021 Cf. page …. 31 DILUMAT 3mk2 MANUEL Démontage et réglage du pont de jauge ) Démonter le capot comme il est indiqué en page 29. MA105501 Load cell dismantling and adjustment ) Remove the Dilumat 3 mk2 cover as shown in page 29. ) ) ) ) ) Faire basculer le Dilumat 3 mk2 vers l’arrière pour aller dévisser les deux vis sous l’appareil. ) Retirer la plaque de blindage de la carte électronique pour débrancher le connecteur du pont de jauge. ) Remplacer ensuite le pont de jauge si nécessaire. ) ATTENTION : Pour monter correctement le pont de jauge, il est IMPORTANT de le centrer précisémment par rapport au coffret supérieur (centre de l’ouverture). ) Tilt the Dilumat3 mk2 backwards to be able to unscrew the 2 screws under the machine. Remove the PCB armour-plate so that you can unplug the load cell connector. You may replace the load cell if required. CAUTION: in order to place properly the load cell, it is IMPORTANT that is centred on the hole made in the cover. Réglage du pont de jauge : Load cell adjustment : ) ) ) ) Sans replacer le coffret supérieur, mettre l’appareil sous tension, et effectuer une calibration (voir procédure en page 20). Placer un poids de 2000 g sur le pont de jauge et visser / dévisser la vis de butée afin que l’appareil affiche 1800g (+ /- 200g). Vous pouvez ensuite remonter l’appareil. ) ) Before placing the cover back on, switch the diluter on and perform a calibration (see procedure in page 20). Place a 2000 g weight on the load cell. Then screw or unscrew until the diluter displays 1800 +/- 200g). Then you may reassemble the diluter. 32 DILUMAT 3mk2 Accès à la carte électronique ) Après avoir démonté le capot, la carte électronique sera accessible en démontant la plaque de blindage. MANUEL MA105501 Electronic board access ) Once the dilumat 3mk2 cover has been taken off, you can have access to the PCB by removing the armour-plate. Le composant AD7710AN AD7710AN component ) ) ) Pour accéder à ce composant, il est nécessaire de devisser les deux vis de fixation de la carte imprimante afin de retirer celle – ci. Ce composant devra être enlevé à l’aide d’une pince appropriée. ) To get to this component, unscrew the two screws that hold the printer board. Then remove the printer board. This component should be removed only with an appropriate tool. 33 DILUMAT 3mk2 MANUEL 11. GARANTIE MA105501 11. WARRANTY CONDITIONS AES Laboratoire certifie qu’à la livraison, l’appareil correspond aux caractéristiques définies dans ce manuel. Les machines sont garanties contre les problèmes de fabrication et de composants pour une durée de douze mois à partir de la date d’expédition. AES Laboratoire certifies that the delivered machine corresponds to the features described in this manual. Our equipment is guaranteed against manufacturing or components problems for twelve months from the delivery date. AES Laboratoire prend en charge dans ses locaux les éventuelles réparations de pièces pendant la période de garantie. Toute pièce ou appareil présentant un problème de mauvais fonctionnement devra être retourné à l’usine AES , après acceptation par le SAV, aux frais du représentant AES ou du client si nécessaire. AES Laboratoire will repair broken parts free of charge in its premises during the warranty period. Any instrument with a working problem should be , with the After Sales Department’s approval, sent back carriage paid by AES agent or customer when necessary. La garantie ne sera pas valable pour des problèmes dus au transport, à un accident, à une mauvaise utilisation, à des interférences internes causées par un mauvais réseau électrique ou à des personnes non autorisées à utiliser l’appareil. The warranty will not be valid for damages due to a transport problem, an accident, a wrong use or internal or internal interference caused by a faulty electricity network or non-autorised users. 34 DILUMAT 3mk2 MANUEL 12. LISTE DE PIECES DETACHEES REFERENCE Français MA105501 12. SPARE PARTS LIST English AESDI0002 SUPPORT SAC EN ALTUGLASS BAG HOLDER (PERSPEX) AESDI0008 DEFLECTEUR DILUMAT 3 DILUMAT 3 DEFLECTOR AESDI0011 EMBOUT DE DISTRIBUTION FILLING NOZZLE AESDI0011A EMBOUT DISTRIBUTION COUDE 18° FILLING NOZZLE (F. BLENDER CUP AESDI0013 SILENTBLOC MOTEUR MOTOR RUBBER STAND AESDI0016 POMPE COMPLETE SR25 PUMP (COMPLETE) AESDI0017 RACCORDS INOX CONNECTORS (STA.STEEL) 2U AESDI0021 PONT DE JAUGE (CAPTEUR BALANCE LOAD CELL AESDI0022 AFFICHEUR DISPLAY SCREEN AESDI0023 CARTE ELECTRONIQUE (DILUMAT 3) ELECTRONIC P.C BOARD (DIL 3) AESDI0024A CARTE IMPRIMANTE SERIE INTERFACE BOARD SERIAL PRINTER AESDI0025 MOTEUR PAS A PAS STEPPING MOTOR AESDI0026A CORDON AFFICHEUR DILUMAT3 DILUMAT 3 DISPLAY CABLE AESDI0027 FOURCHE OPTIQUE (POSITION BRAS OPTICAL SENSOR (ARM POSITION) AESDI0040 OPTION DEUXIEME POMPE DILUMAT3 SECOND PUMP KIT (COMPLETE) AESDI0040A KIT DEUXIEME POMPE DILUMAT3 SECOND PUMP KIT (COMPLETE) AESDI0041 JEU DE TUYAU COMPLET TUBING WITH NOZZLES AESDI0041A JEU TUYAU SANS EMBOUT PRELEVE. SILICONE TUBE W/O NOZZLES DIL3 AESDI0042 IMPRIMANTE EPSONLX300 DILUMAT3 PRINTER (SERIAL MODELL) AESDI0042A IMPRIMANTE DILUMAT3 PETIT MOD DILUMAT3 PRINTER SMALL SIZE AESDI0042B PAPIER LIST. PETITE TAILLE 5R LISTING PAPER 114mm SMALL SIZE AESDI0042C ETIQUETTE PETITE TAILLE 5RLX 5x880 STICKER PAPER SMALL SIZE AESDI0042F RUBAN ENCREUR IMPRIMANTE STAR STAR PRINTER INKING RIBBON AESDI0043 PLATEAU SUPPORT BOL BOWL STAND (COMPLETE) AESDI0044 4 PIEDS CAOUTCHOUC FEET (RUBBER) 4 U AESDI0045 PLATEAU SUPPORT SAC COMPLET BAG HOLDER (COMP.)W.FITTINGS AESDI0045A SUPPORT SAC COMPLET PETIT SAC BAG HOLDER (COMP.)F.SMALL BAG AESDI0046 TUBE DE PRELEVEMENT SEUL PRIMING TUBE AESDI0047 TUBE FIN ASPIRATION AIR VENTING STA.STEEL TUBE AESDI0048 FILTRE PURADISC 0.2 U (50 UNIT FILTER (0.2um) 50 U AESDI0049A RUBAN ENCREUR IMPRIMANTE LX300 LX300 PRINTER INKING RIBBON AESDI0052C CABLE LIAISON IMPRIMANTE CONNECTION CABLE FOR PRINTER AESDI0053 TRANSFORMATEUR TORIQUE DILUMAT TRANSFORMER AESDI0054 FILTRE SECTEUR AVEC BOUTON M/A ON/OFF SWITCH WITH FILTER AESDI0055 BOUCHON SILICONE SILICONE CAP AESDI0057 RALLONGE CLAVIER DILUMAT EXTENSION FOR DILUMAT KEYBOARD AESDI0058 TUYAU SILICONE 3/16(5-8MM) 2m TUBING (SILIC)3/16(5-8MM) 2M AESDI0058A TUYAU SILICONE 5-8MM ( 25 M ) TUBING (SILIC)3/16 5-8MM 25MET AESDI0059 BANDEAU MAINTIEN TUYAU POUR PO TUBING HOLDER (PLASTIC)F.PUMP AESDI0060 CLIP DE VERROUILLAGE BANDEAU CLOSING CLIPS F.PUMP TUB.HOLD AESDI0061 ROTOR DE POMPE POUR DILUMAT 3 PUMP ROTOR AESDI0062 EMBOUT DE PRELEVEMENT PRIMING NOZZLE AESDI0063 PATE ADHESIVE SACHET (78u) STICKERS (YELLOW)T.HOLD BAGS 35 DILUMAT 3mk2 AESDI0064 MANUEL MA105501 LISTING ETIQUETTE 250FEUILLES STICKERS PAPER FOR PRINTER AESDI0070 COLLIER INOX TIRE-RAPS (STA. STEEL) 2 U AESDI0071 TUYAUX PREDECOUPE POMP DIL3 TUBING (PRECUT)F.PUMP 5u AESDI0071A TUYAU ROTOR POMPE DILUM. (1M) TUBING ROTOR PUMP FOR DILUMAT3 AESPP0019 INTERRUPTEUR A PIED FOOT SWITCH AESDI0085 RESSORT SUPPORT EMBOUT DIST SPRING CLIP FOR DISPENS NOZZLE AESDI0086 AXE BRAS DILUMAT3 MK2 DILUMAT 3MK2 ARM SHAFT AESDI0088 DRAPEAU AXE BRAS DILUMAT3 MK2 FLAG DILUMAT 3MK2 ARM SHAFT AESDI0090 BOITIER INFERIEUR DILUMAT3 MK2 LOWER CASING DILUMAT 3MK2 AESDI0091 PORTE EMBOUT DE DISTRIBUTION DISPENSING NOZZLE DILUMAT3 AESDI0092 RESSORT DE RAPPEL AXE DE BRAS ARM SHAFT RETAINING SPRING AESDI0098 CALE HT 70mm Pr PLATEAU BOL SPACER FOR BOWL STAND AESDI0099 CALE HT 125mm Pr PLATEAU BOL SPACER FOR BOWL STAND AESDI0103 CLIPS SUPPORTS TUYAUX DILUMAT3 TUBING SUPPORTING CLIPS DIL3 AESDI0224 CLE SIX PANS DE 2,5 HEXAGONAL KEY (2.5) AESDI0226 ROULEMENT INT POMPE DILUMAT 3 INTERNAL BALL BEARING DIL3PUMP AESDI0227 ROULEMENT EXT POMPE DILUMAT 3 EXT BALLBEARING DIL 3 PUMP AESDI0229 ENJOLIVEUR BRAS DILUMAT3 MK2 DILUMAT 3MK2 ARM CAP AESDI0300 CHAPPE ENJOLIVEUR DILUMAT3 MK2 DILUMAT 3MK2 CAP AESDI0301 TOLE SUPPORT FOURCHE OPTIQUE SHEET METAL HOLDG OPTIC SENSOR AESDI0303 CLAVIER DILUMAT 3 MK2 DILUMAT 3 MK2 KEYBOARD AESDI0305 CAPOT SUP DILUMAT3 MK2 COMPLET UPPER COVER DILUMAT 3 MK2 AESDI0306 CAPOT SUPERIEUR AVEC CLAVIER UPPER COVER WITH KEYBOARD AESDI0307 BRAS COMPLET DILUMAT 3 MK2 DILUMAT 3 MK2 COMPLETE ARM AESDI0308 BOUCHON SILICONE PERCE D36/44 SILICONE CAP W/ HOLE D36/44 AESDI0312 KIT COMMUNICATION DILUMAT3/PC DIL 3 COMMUNICATION KIT W/ PC 36 DILUMAT MANUEL 3MK2 DILUMAT 3mk2 Quel jeu de tuyaux ? AESDI0041 AESAP1055 Which tubing set ? MA105501 AEB611499L (Tryptone Sel) AEB110308M (Eau Peptonée) AEB610419L (Fraser Demi) AESDI0308 SAM2521000 SAM2522000 SAM2525000 AESDI0041 AESAP1055 AESAP1055 AESAP1055 AESDI0041A AESAT00117AA AESDI0041A AESAP0422 AESAP1060 AESDI0041A AESDI0041 + AESDI0041A AESAP1047 + AESDI0062 AESDI0071 + AESDI0017 + AESDI0011 37 AESDI0058 (2m) AESDI0058A (25 ) DILUMAT 3mk2 MANUEL MA105501 ANNEXES APPENDICES 38 DILUMAT 3mk2 MANUEL MA105501 POMPE PERISTALTIQUE PERISTALTIC PUMP AESDI0060 AESDI0061 AESDI0059 39 DILUMAT 3mk2 MANUEL MA105501 40 DILUMAT 3mk2 MANUEL MA105501 41 DILUMAT 3mk2 MANUEL MA105501 42 DILUMAT 3mk2 MANUEL MA105501 43 DILUMAT 3mk2 MANUEL MA105501 44 DILUMAT 3mk2 MANUEL MA105501 45 DILUMAT 3mk2 MANUEL MA105501 46 DILUMAT 3mk2 MANUEL MA105501 47 DILUMAT 3mk2 MANUEL MA105501 48 DILUMAT 3mk2 MANUEL MA105501 49 DILUMAT 3mk2 MANUEL MA105501 50 DILUMAT 3mk2 MANUEL EMBALLAGE MA105501 PACKING ACCESSOIRES INCLUS / ENCLOSED ACCESSORIES ; ; ; ; ; ; ; ; ; Manuel d’utilisation/ User manual : MA104101 Procès verbal de contrôle (rempli)/ Control certificate Cordon Alimentation/ Power supply cable Une plaquette de pâte adhésive/ Sticky tacs : DI0063 2 filtres/ 2 filters: DI0048 Le bras/ Arm Le support sac/ Bag holder 1 jeu de tuyau/ 1 tubing set : DI0041 Clé six pans creux/ Hexagonal Allen key : DI0224 (1u) Observations/ Notes :……………………………………………………………………………………………………… ……………………………………………………………………………………………………………………………….……… ………………………………………………………………….…………………………………………………………………… ……………………………………………………………………………………………………………………………… 51 DILUMAT 3mk2 MANUEL MA105501 Rue Maryse Bastié – Ker Lann CS17219 - 35172 BRUZ cedex – France Téléphone: 33 (0)2 23 50 12 12 Fax: 33 (0)2 23 50 12 00 E-Mail: [email protected] Site Web: http://www.aeslaboratoire.com Si vous avez des remarques concernant le contenu de ce manuel, veuillez nous en informer par fax, en indiquant la référence du manuel et du produit concerné. If you have any remark or suggestion about this manual or its content, please feel free to contact us by fax, mentioning the manual and equipment references. …………………………………………………………………………………………………………………….. …………………………………………………………………………………………………………………….. …………………………………………………………………………………………………………………….. …………………………………………………………………………………………………………………….. 52