1
WS805 -- MULTIFUNCTIONAL TIME/WEATHER STATION
1. Introduction
Thank you for buying the WS805. This state-of-the-art time/weather station provides the user with a time read-out and a
weather forecast for the next 12 to 24 hours. The device is also equipped with weather icons and provides instant readouts of both indoor/outdoor temperatures and relative humidity. The WS805 is also equipped with a snooze alarm and a
calendar.
2. Batteries
Remove the cover of the battery compartment at the back of the device and insert 2 AA-batteries of 1.5VDC. Mind the
polarity indications on the inside of the battery compartment !
3. Setting the Correct Date and Time
Hold the MODE button for two seconds to make the digits for the 12h/24h-mode flash. Use the "+" or "-" button to
select 12h- or 24h-mode for the time display and confirm your choice with the MODE button. The digits will change
more rapidly if the button in question is held.
The digits for the hours start to flash. Enter the hours with "+" or "-" and confirm with MODE.
The digits for the minutes start to flash. Enter the minutes with "+" or "-" and confirm with MODE.
The digits for the year start to flash. Enter the year with "+" or "-" and confirm with MODE.
The digits for the month start to flash. Enter the month with "+" or "-" and confirm with MODE.
The digits for the day start to flash. Enter the day with "+" or "-" and confirm with MODE.
The digits for the time zone start to flash. Set the time zone with "+" or "-" (from -12h to +12h), confirm with MODE.
Note that the day of the week is adjusted automatically.
4. Using the Alarm and the Snooze Alarm
Hold the ALARM button for 2 seconds to activate the alarm setting mode and to make the digits for the hours flash. Wait ±
5 seconds until the device returns to the normal display mode if you simply wish to view the current alarm time. If you want
to set a new alarm time, you should press "+" or "-" to enter the hours before the device returns to the normal display
mode. Press ALARM to confirm the hours. The digits for the minutes start to flash. Enter the minutes with "+" or "-" and
confirm with ALARM. The device automatically returns to the normal display mode and the "!"-symbol is displayed.
Press "+" when the device is in the normal display mode to select one of three alarm ON/OFF modes : ALARM ON
("!"-symbol is displayed), ALARM ON with SNOOZE (the "!"- and "
"-symbols are displayed) or ALARM OFF
(neither symbol is displayed).
• ALARM ON
: The "!"-symbol appears on the display when the alarm is set, the symbol flashes
while the alarm is sounding and it disappears when the alarm is deactivated.
• ALARM ON with SNOOZE : Both the "!"- and the "
"-symbol appear on the display when the alarm is set with
snooze and the "!"-symbol flashes while the alarm is sounding. Press the
LIGHT/SNOOZE button to trigger a snooze alarm with an 8-minute activation interval
(the "
"-symbol flashes during the interval). Press any other button to deactivate
the alarm for 24 hours.
• ALARM OFF
: Both the alarm and the snooze function are deactivated.
WS805
1
VELLEMAN
5. Temperature/Humidity Read-Out
Press MODE when the device is in the normal display mode to display room temperature ("TEMP IN"), outside
temperature ("TEMP OUT"), relative humidity ("HUMIDITY") or the exact time in that order.
If the temperature is displayed in the normal display mode :
- press "-" to select either °C or °F.
- press the MAX/MIN button to display the max. inside or outside temperature for 5 seconds and press again to
display the min. inside or outside temperature.
- press the CLEAR button to clear the memory for min. and max. indoor/outdoor temperature.
Remark : The message "Lo" is displayed as "outside temperature" if the outdoor sensor is not connected.
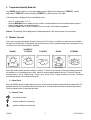
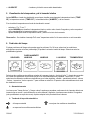
6. Weather Forecast
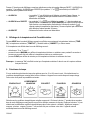
If you want a more precise weather forecast for the next 12 to 24 hours, you will have to select the correct weather
situation from the list below. Consequently, the device will warn you if any weather changes are to be expected. You
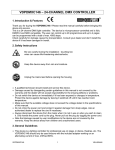
can select one of the following weather conditions :
SUNNY
SLIGHTLY
CLOUDY
CLOUDY
RAINY
STORMY
Select the current weather situation as follows : Hold the "-" button for two seconds in the normal display mode until
the weather icon on the display starts to flash. Select the various weather patterns with the "+" button in the order
mentioned above : sunny - slightly cloudy - cloudy - rainy- stormy. Press "-" again to confirm your choice. The device
automatically returns to the normal display mode.
" Storm Alarm
When the WS805 detects an approaching storm, the icons for rainy and cloudy weather will flash continuously. The
backlight will be lit for 5 seconds and the alarm will sound for 10 seconds (this procedure is repeated three times).
Press an arbitrary button to deactivate the alarm.
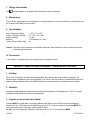
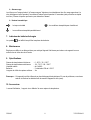
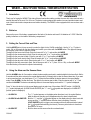
" Pressure Trend
: the weather is stable
: weather conditions are improving
: weather conditions are worsening
WS805
2
VELLEMAN
7. Battery-Low Indicator
The "
"-symbol appears on the display when the batteries need to be replaced.
8. Maintenance
Use a soft cloth moistened with a mild detergent for cleaning purposes. Do not drop the device on a hard surface and
do not subject the WS805 to severe shocks.
9. Specifications
Indoor Temperature Range :
Outdoor Temperature Range :
Relative Humidity
:
Batteries
:
Outdoor Sensor Cable Length :
0 - 50°C / 32 - 122°F
-50 - 70°C / -58 - 158°F
5 to 99%
2 x AA-batteries of 1.5VDC
3m
Remark : This device may be sensitive to electrostatic discharges. Reset the device in case of trouble by removing
and reinserting the batteries.
10. Accessories
1 user manual, 1 mounting support and a cable (3m) with temperature sensor.
WS805 -- MULTIFUNCTIONEEL TIJD/WEERSTATION
1. Inleiding
Dank u voor uw aankoop ! Dit ultramoderne tijd/weerstation doet veel meer dan enkel de juiste tijd aangeven. De
weersicoontjes voorspellen het weer voor de komende 12 tot 24u en u kunt ook de binnen- en buitentemperatuur en de
relatieve vochtigheidsgraad uitlezen. De WS805 beschikt over een snooze alarm en is uitgerust met een kalender.
2. Batterijen
Verwijder het batterijdeksel aan de achterkant van het toestel en breng twee 2 AA-batterijen van 1.5VDC in. Let op de
polariteitsindicaties aan de binnenkant van het batterijvak !
3. Ingeven van de correcte tijd en datum
Houd de MODE knop gedurende 2 seconden ingedrukt om de digits voor de 12u/24u-mode te doen knipperen.
Selecteer de 12u- of 24u-mode voor de tijdsuitlezing met de "+" of "-" knop en bevestig uw keuze met MODE. De
digits lopen sneller indien u de knop in kwestie ingedrukt houdt.
De digits voor de uren beginnen te knipperen. Geef de uren in met "+" of "-" en bevestig met MODE.
WS805
3
VELLEMAN
De digits voor de minuten beginnen te knipperen. Geef de minuten in met "+" of "-" en bevestig met MODE.
De digits voor het jaartal beginnen te knipperen. Geef het jaartal in met "+" of "-" en bevestig met MODE.
De digits voor de maand beginnen te knipperen. Geef de maand in met "+" of "-" en bevestig met MODE.
De digits voor de dag beginnen te knipperen. Geef de dag in met "+" of "-" en bevestig met MODE.
De digits voor de tijdzone beginnen te knipperen. Geef de tijdzone in met "+" of "-" (van -12u tot +12u), bevestig met
MODE.
Merk op dat de weekdag automatisch wordt aangepast.
4. Instellen van het alarm en het snooze alarm
Houd de ALARM knop gedurende 2 seconden ingedrukt om de instelmode van het alarm te activeren en om de digits
voor de uren te doen knipperen. Wacht ± 5 seconden tot het toestel terugkeert naar de normale display mode indien u
enkel het huidige alarmtijdstip wil controleren. Stel de uren in met "+" of "-" vóór het toestel terugkeert naar de normale
display mode indien u een nieuw alarmtijdstip wil ingeven. Druk op ALARM om de instelling voor de uren te bevestigen.
De digits voor de minuten beginnen te knipperen. Geef de minuten in met "+" of "-" en bevestig met ALARM. Het toestel
keert nu automatisch terug naar de normale tijdsuitlezing en het "!"-symbool verschijnt op de display.
Druk op "+" terwijl het toestel zich in de normale display mode bevindt om één van de drie alarm ON/OFF modes te
selecteren : ALARM ON ("!"-symbool verschijnt), ALARM ON met SNOOZE (het "!"- en het "
"-symbool
verschijnen) of ALARM OFF (geen van beide symbolen op de display).
• ALARM ON
: Het "!"-symbool verschijnt op de display zodra het alarm is ingesteld, het symbool
knippert terwijl het alarm afgaat en verdwijnt nadat u het alarm heeft uitgeschakeld.
• ALARM ON met SNOOZE : Zowel het "!"- als het "
"-symbool verschijnen op de display. Het "!"-symbool
knippert terwijl het alarm afgaat. Druk op de LIGHT/SNOOZE knop om de snoozefunctie te activeren. Deze functie heeft een inschakelvertraging van 8 minuten (het
"
"-symbool knippert tijdens de inschakelvertraging). Druk op om het even welke
andere knop om het alarm gedurende 24u te deactiveren.
• ALARM OFF
: Zowel het alarm als de snooze-functie zijn gedeactiveerd.
5. Uitlezing van temperatuur en vochtigheidsgraad
Druk op MODE terwijl het toestel zich in de normale display mode bevindt om achtereenvolgens de
binnentemperatuur ("TEMP IN"), de buitentemperatuur ("TEMP OUT"), de relatieve vochtigheidsgraad ("HUMIDITY")
of de juiste tijd uit te lezen.
Indien de temperatuur wordt weergegeven in de normale display mode :
- selecteer °C of °F met "-".
- druk op de MAX/MIN knop om de max. binnen- of buitentemperatuur gedurende 5 seconden weer te geven en
druk nogmaals indien u de min. binnen- of buitentemperatuur wil uitlezen.
- druk op CLEAR om het geheugen voor min. en max. binnen- en buitentemperatuur te wissen.
Opmerking : "Lo" verschijnt op de display als "buitentemperatuur" indien de sensor niet is aangesloten.
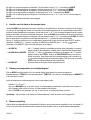
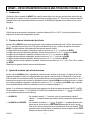
6. Weersvoorspelling
Haal de juiste weersgesteldheid uit onderstaande lijst indien u een precieze weersvoorspelling wil voor de komende 12
tot 24u. Het toestel zal u dan waarschuwen wanneer het weer verandert. Kies uit volgende weersomstandigheden :
WS805
4
VELLEMAN
ZONNIG
LICHT
BEWOLKT
BEWOLKT
REGENACHTIG STORMACHTIG
Zo selecteert u de huidige weersgesteldheid : Houd de "-" knop gedurende twee seconden ingedrukt in de normale
display mode tot het icoontje op de display begint te knipperen. Gebruik de "+" knop om de verschillende
weersomstandigheden in deze volgorde te selecteren : zonnig - licht bewolkt - bewolkt - regenachtig- stormachtig.
Druk opnieuw op "-" om uw keuze te bevestigen. Het toestel keert automatisch terug naar de gewone display mode.
" Alarm i.g.v. storm
De icoontjes voor regenachtig en bewolkt weer beginnen doorlopend te knipperen wanneer de WS805 een
naderende storm detecteert. De achtergrondverlichting wordt gedurende 5 seconden geactiveerd en het alarm
weerklinkt gedurende 10 seconden (deze procedure wordt 3 x herhaald). Druk op een willekeurige toets om het
alarm te deactiveren.
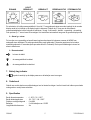
" Barometerstand
: het weer is stabiel
: de weersgesteldheid verbetert
: de weersgesteldheid verslechtert
7. Batterij-laag indicator
Het "
"-symbool verschijnt op de display wanneer u de batterijen moet vervangen.
8. Onderhoud
Gebruik een zachte doek en een milde detergent om het toestel te reinigen. Laat het toestel niet vallen op een harde
ondergrond en vermijd zware schokken.
9. Specificaties
Bereik binnentemperatuur
Bereik buitentemperatuur
Relatieve vochtigheidsgraad
Batterijen
Lengte kabel buitensensor
WS805
:
:
:
:
:
0 - 50°C / 32 - 122°F
-50 - 70°C / -58 - 158°F
5 tot 99%
2 x AA-batterijen van 1.5VDC
3m
5
VELLEMAN
Opmerking : Dit toestel kan worden beïnvloed door elektrostatische ontladingen. Bij problemen moet u de
batterijen verwijderen en weer inbrengen om het toestel te resetten.
10. Accessoires
1 gebruikershandleiding, 1 voetje en een kabel (3m) met temperatuursensor.
WS805 -- STATION METEO MULTIFONCTIONS AVEC HORLOGE
1. Introduction
Nous vous remercions de votre achat ! Cette station météo avec horloge est un appareil ultramoderne qui fait beaucoup
plus que simplement indiquer l'heure exacte. Les icônes prévoient le temps pour les 12 ou 24h à venir et l'appareil
affiche également l'humidité relative et les températures extérieures et intérieures. La WS805 est équipé d'une alarme
snooze et d'une fonction calendrier.
2. Batteries
Enlevez le couvercle au dos de l'appareil et insérez 2 batteries LR6 de 1.5VCC. Observez les indications de polarité à
l'intérieur du compartiment des batteries !
3. Mise à l'heure et introduction de la date
Enfoncez le bouton MODE pendant deux secondes pour faire clignoter les digits du mode 12h/24h. Pressez le
bouton "+" ou "-" pour sélectionner le mode 12h ou 24h pour l'affichage de l'heure et confirmez votre choix avec le
bouton MODE. Les digits changeront plus vite si vous gardez le bouton en question enfoncé.
Les digits des heures commencent à clignoter. Entrez les heures avec "+" ou "-" et confirmez avec MODE.
Les digits des minutes commencent à clignoter. Entrez les minutes avec "+" ou "-" et confirmez avec MODE.
Les digits de l'année commencent à clignoter. Entrez l'année avec "+" ou "-" et confirmez avec MODE.
Les digits du mois commencent à clignoter. Entrez le mois avec "+" ou "-" et confirmez avec MODE.
Les digits du jour commencent à clignoter. Entrez le jour avec "+" ou "-" et confirmez avec MODE.
Les digits du fuseau horaire commencent à clignoter. Entrez le fuseau horaire avec "+" ou "-" (de -12h à +12h) et
confirmez avec MODE.
Remarquez que le jour de la semaine est ajusté automatiquement.
4. Réglage de l'alarme et de l'alarme snooze
Enfoncez le bouton ALARM pendant 2 secondes pour activer le mode de réglage de l'alarme. Les digits des heures
clignotent. Attendez ± 5 secondes jusqu'à ce que l'appareil retourne au mode d'affichage normal si vous voulez
uniquement contrôler l'heure d'alarme actuelle. Si vous voulez instaurer une nouvelle heure d'alarme, vous devez
régler les heures avec "+" ou "-" avant que l'appareil retourne au mode d'affichage normal. Pressez ALARM pour
confirmer les heures. Les digits des minutes commencent à clignoter. Entrez les minutes avec "+" ou "-" et confirmez
avec ALARM. Ensuite, l'appareil retourne automatiquement au mode d'affichage normal et le symbole "!" est affiché.
WS805
6
VELLEMAN
Pressez "+" dans le mode d'affichage normal pour sélectionner un des trois modes d'alarme ON/OFF : ALARM ON (le
symbole "!"est affiché), ALARM ON avec SNOOZE (les symboles "!" et "
" sont affichés) ou ALARM OFF
(aucun des deux symboles n'est affiché).
• ALARM ON
: Le symbole "!" est affiché dès que l'utilisateur a instauré l'heure d'alarme. Le
symbole "!" clignote pendant que l'alarme retentit et il est effacé lors de la
désactivation de l'alarme.
• ALARM ON avec SNOOZE : Les symboles "!" et "
" sont affichés. Le symbole "!" clignote pendant que
l'alarme retentit. Pressez le bouton LIGHT/SNOOZE pour activer la fonction snooze.
Cette fonction a une temporisation d'activation de 8 minutes (le symbole "
"
clignote pendant la temporisation d'activation). Pressez n'importe quel autre bouton
pour désactiver l'alarme pendant 24 heures.
• ALARM OFF
: L'alarme et la fonction snooze sont désactivées.
5. Affichage de la température et de l'humidité relative
Pressez MODE dans le mode d'affichage normal pour afficher successivement la température intérieure ("TEMP
IN"), la température extérieure ("TEMP OUT"), l'humidité relative ("HUMIDITY") ou l'heure exacte.
Si la température est affichée dans le mode d'affichage normal :
- sélectionnez °C ou °F avec "-".
- pressez le bouton MAX/MIN pour afficher la température intérieure ou extérieure max. pendant 5 secondes et
pressez une nouvelle fois pour afficher la température intérieure ou extérieure min.
- pressez CLEAR pour effacer la mémoire pour la température intérieure et extérieure min./max.
Remarque : Le message "Lo" est affiché en tant que "température extérieure" dans le cas où le capteur extérieur
n'est pas connecté.
6. Prévisions du temps
Si vous voulez des prévisions du temps plus précises pour les 12 ou 24 heures à venir, il faut sélectionner les
conditions atmosphériques correctes dans la liste ci-dessous. L'appareil vous avertira lorsque le temps change.
Faites votre choix parmi les possibilités suivantes :
ENSOLEILLE
LEGEREMENT
NUAGEUX
COUVERT
PLUVIEUX
ORAGEUX
Sélectionnez les conditions atmosphériques actuelles comme suit : Enfoncez le bouton "-" pendant deux secondes
dans le mode d'affichage normal jusqu'à ce que l'icône affichée commence à clignoter. Employez le bouton "+" pour
sélectionner les différentes conditions atmosphériques dans l'ordre suivante : ensoleillé - légèrement nuageux nuageux - pluvieux- orageux. Pressez "-" une nouvelle fois pour confirmer votre choix. L'appareil retourne
automatiquement au mode d'affichage normal.
WS805
7
VELLEMAN
" Alarme orage
Les icônes pour "temps pluvieux" et "temps nuageux" clignoteront continuellement lors d'un orage approchant. Le
rétro-éclairage est activé pendant 5 secondes et l'alarme retentit pendant 10 secondes (cette procédure se répète
trois fois). Pressez n'importe quel bouton pour désactiver l'alarme.
" Hauteur barométrique
: le temps est stable
: les conditions atmosphériques s'améliorent
: les conditions atmosphériques détériorent
7. Indicateur de batterie déchargée
Le symbole "
" est affiché lorsqu'il faut remplacer les batteries.
8. Maintenance
Employez un chiffon et un détergent doux pour nettoyer l'appareil. Ne laissez pas tomber votre appareil sur une
surface dure et évitez les chocs lourds.
9. Spécifications
Gamme de températures intérieures
Gamme de températures extérieures
Humidité relative
Batteries
Longueur du câble du capteur extérieur
:
:
:
:
:
0 - 50°C / 32 - 122°F
-50 - 70°C / -58 - 158°F
de 5 à 99%
2 x batteries LR6 de 1.5VCC
3m
Remarque : Cet appareil peut être influencé par des décharges électrostatiques. En cas de problèmes, vous devez
enlever et réinsérer les batteries afin de remettre l'appareil à zéro (reset).
10. Accessoires
1 manuel d'utilisation, 1 support et un câble de 3m avec capteur de température.
WS805
8
VELLEMAN
WS805 -- ESTACIÓN METEOROLÓGICA MULTIFUNCIÓN CON RELOJ
1. Introducción
¡Gracias por haber comprado la WS805! Esta estación meteorológica con reloj muy moderna hace mucho más que
sólo indicar la hora exacta. Los iconos pronostican el tiempo para las próximas 12 / 24 horas. Se visualizan también la
humedad relativa y las temperaturas exteriores e interiores. La WS805 está equipada de una alarma snooze y de un
calendario.
2. Pilas
Quite la tapa en la parte superior del aparato e introduzca 2 baterías LR6 de 1.5VCC. ¡Controle las indicaciones de
polaridad en el interior del compartimiento de pilas!
3. Puesta en hora e introducción de la fecha
Apriete el botón MODE durante dos segundos para hacer parpadear los dígitos del modo 12h/24h. Apriete el botón
"+" o "-" para seleccionar el modo 12h o 24h para la visualización de la hora y confirme la selección con el botón
MODE. Los dígitos cambian más rápidamente manteniendo apretado el botón.
Los dígitos de las horas empiezan a parpadear. Introduzca las horas con "+" o "-" y confirme con MODE.
Los dígitos de los minutos empiezan a parpadear. Introduzca los minutos con "+" ou "-" y confirme con MODE.
Los dígitos del año empiezan a parpadear. Introduzca el año con "+" o "-" y confirme con MODE.
Los dígitos del mes empiezan a parpadear. Introduzca el mes con "+" o "-" y confirme con MODE.
Los dígitos del día empiezan a parpadear. Introduzca el día con "+" o "-" y confirme con MODE.
Los dígitos del huso horario empiezan a parpadear. Introduzca el huso horario con "+" o "-" (de -12h a +12h) y confirme
con MODE.
Observe que se ajusta el día de la semana automáticamente.
4. Ajuste de la alarma y de la función snooze
Apriete el botón ALARM durante 2 segundos para activar el modo de ajuste de la alarma. Los dígitos de las horas
empiezan a parpadear. Espere ± 5 segundos hasta que el aparato vuelva al modo de visualización normal si sólo
quiere controlar la hora de alarma actual. Si quiere instaurar una nueva hora de alarma, ajuste las horas con "+" o "-"
antes de que el aparato vuelva al modo de visualización normal. Apriete ALARM para confirmar las horas. Los dígitos
de los minutos empiezan a parpadear. Introduzca los minutos con "+" o "-" y confirme con ALARM. Luego, el aparato
vuelva automáticamente al modo de visualización normal y se visualiza el símbolo "!".
Apriete "+" en el modo de visualización normal para seleccionar uno de los tres modos de alarma ON/OFF : ALARM
ON (se visualiza el símbolo "!"), ALARM ON con SNOOZE (se visualizan los símbolos "!" y "
") o ALARM OFF
(no se visualiza ninguno de los dos símbolos).
• ALARM ON
• ALARM ON con SNOOZE
WS805
: Se visualiza el símbolo "!" tan pronto como se haya activada la alarma. El
símbolo "!" parpadea durante que la alarma suena y desaparece desactivando la
alarma.
: Se visualizan los símbolos "!" y "
". El símbolo "!" parpadea durante que la
alarma suena. Apriete el botón LIGHT/SNOOZE para activar la función snooze.
Esta función tiene una temporización de activación de 8 minutos (el símbolo "
"
parpadea durante la temporización de activación). Apriete cualquier otro botón para
desactivar la alarma durante 24 horas.
9
VELLEMAN
• ALARM OFF
: La alarma y la función snooze están desactivadas.
5. Visualización de la temperatura y de la humedad relativa
Apriete MODE en el modo de visualización normal para visualizar sucesivamente la temperatura interior ("TEMP
IN"), la temperatura exterior ("TEMP OUT"), la humedad relativa ("HUMIDITY") o la hora exacta.
Si se visualiza la temperatura en el modo de visualización normal :
- seleccione °C o °F con "-".
- apriete MAX/MIN para visualizar la temperatura interior o exterior máx. durante 5 segundos y vuelva a apretar el
botón para visualizar la temperatura interior o exterior mín.
- apriete CLEAR para borrar la temperatura interior y exterior mín./máx. de la memoria.
Observación : Se visualiza el mensaje "Lo" como "temperatura exterior" si el sensor exterior no está conectado.
6. Predicción del tiempo
Si quiere previsiones del tiempo más precisas para las próximas 12 o 24 horas, seleccione las condiciones
atmosféricas correctas en la lista (véase abajo). El aparato le avisará si cambie el tiempo. Seleccione entre las
posibilidades siguientes :
SOLEADO
PARCIALMENTE
NUBOSO
NUBOSO
LLUVIOSO
TORMENTOSO
Seleccione las condiciones atmosféricas actuales de la manera siguiente : Apriete el botón "-" durante dos segundos
en el modo de visualización normal hasta que el icono visualizado empiece a parpadear. Use el botón "+" para
seleccionar las diferentes condiciones atmosféricas por el orden siguiente : soleado – parcialmente nuboso - nuboso
- lluvioso - tormentoso. Vuelva a apretar "-" para confirmar su selección. El aparato vuelve automáticamente al modo
de visualización normal.
" Alarma de tormenta
Los iconos para " tiempo lluvioso" y "tiempo nuboso" empiezan a parpadear continuamente si el aparato detecta una
tormenta que se acerca. La retroiluminación se activa durante 5 segundos y la alarma suena durante 10 segundos
(este procedimiento se repite tres veces). Apriete cualquier botón para desactivar la alarma.
" Tendencia de la presión atmosférica
: el tiempo es estable
: se mejoran las condiciones atmosféricas
: se empeoran las condiciones atmosféricas
WS805
10
VELLEMAN
7. Indicador de batería baja
Aparece el símbolo "
" si debe reemplazar las pilas.
8. Mantenimiento
Limpie el aparato con un paño húmedo y un detergente suave para visualizar el aparato. No deje caer la WS805 en
una superficie dura y evite los choques duros.
9. Especificaciones
Rango de temperaturas interiores
Rango de temperaturas exteriores
Humedad relativa
Pilas
Longitud del cable del sensor exterior
:
:
:
:
:
0 - 50°C / 32 - 122°F
-50 - 70°C / -58 - 158°F
de 5 à 99%
2 x pilas LR6 de 1.5VCC
3m
Observación : Es posible que el aparato sea sensible a descargas electrostáticas. En caso de problemas, quite las
pilas y vuelva a introducirlas a fin de reajustar el aparato (reset).
10. Accesorios
1 manual del usuario, 1 soporte y un cable de 3m con sensor de temperatura.
WS805
11
VELLEMAN