1
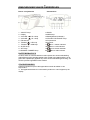
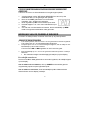
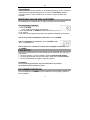
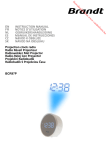
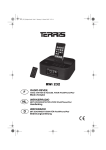
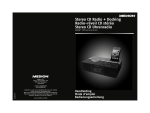
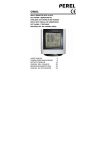
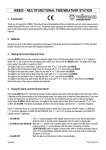
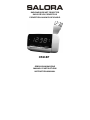
RADIOWEKKER MET PROJECTOR RADIO RÉVEIL PROJECTEUR PROJECTION ALARM CLOCK RADIO CR618P GEBRUIKSAANWIJZING MANUEL D’INSTRUCTIONS INSTRUCTION MANUAL NL WAARSCHUWINGEN Dit apparaat is alleen bedoeld voor huishoudelijk gebruik en mag niet voor andere doeleinden of toepassingen worden gebruikt, zoals niet-huishoudelijk gebruik of in een commerciële omgeving. Ventilatie Laat minstens een vrije ruimte van 10cm rond het product. Belemmer de ventilatie niet door het afdekken van de ventilatie-openingen met voorwerpen zoals een krant, tafelkleed, gordijn, enz. Plaats geen bronnen met open vlam, zoals een aangestoken kaars, op het apparaat. Om het milieu te beschermen, maak gebruik van de lokale recyclingvoorzieningen voor het verwijderen van gebruikte batterijen. Dit apparaat is niet geschikt voor gebruik in een tropisch klimaat. Stel het apparaat niet bloot aan druppelend of spattend water en plaats geen, met vloeistof gevulde, voorwerpen zoals vazen op het apparaat. Stel batterijen (accupack of geïnstalleerde batterijen) nooit bloot aan overmatige warmte zoals zonlicht, vuur, enz. Daar waar de NETstekker of een aansluiting op een apparaat als uitschakelapparaat wordt gebruikt, dient een dergelijke voorziening gemakkelijk bereikbaar te zijn voor de bediening. BELANGRIJKE VEILIGHEIDSINSTRUCTIES Netvoeding Dit apparaat is ontworpen om op een netvoeding van 230 Volt, 50 Hz AC te worden aangesloten. Andere stroombronnen kunnen het apparaat beschadigen. 1 NL Symbolen Waarschuwing: om het risico op een elektrische schok te verkleinen, dient u de voor- en achterkant niet te verwijderen. Binnenin zitten geen onderdelen voor onderhoud door de gebruiker. Neem contact op met een gekwalificeerde onderhoudsmonteur voor onderhoud. Er bevinden zich belangrijke gebruiks- en onderhoudsinstructies in de literatuur die met dit apparaat is geleverd. In het inwendige van het apparaat bestaat een gevaarlijke spanning die een risico op elektrische schokken oplevert. Het typeplaatje bevindt zich onderaan het apparaat. Installatie en gebruik van de batterijen Alleen volwassenen mogen handelingen met batterijen uit te voeren. Een kind mag dit apparaat alleen gebruiken als het batterijdeksel op de juiste manier op het batterijvak is bevestigd. Het apparaat werkt op 2 x 1,5V AAA batterijen (niet meegeleverd), die door de gebruiker eenvoudig kunnen worden vervangen. Haal het batterijdeksel onderaan het apparaat af om de batterijen te verwijderen 2 NL OMSCHRIJVING VAN DE ONDERDELEN Boven- en zijaanzicht 1. AAN/UIT knop 2. Display 3. VOLUME / AL2 knop 4. VOLUME / AL1 knop 5. FM-antenne 6. TUNING / HR knop 7. TUNING / MIN knop 8. SLEEP knop 9. SET knop 10. SNOOZE / DIMMER knop Vooraanzicht 11. BAND 12. MEM knop 13. Batterijdeksel (onderaan) 14. PROJECTOR ON/OFF knop 15. Projectorwiel 16. Projector 17. Alarm 1 zoemer indicator 18. Alarm 1 radio indicator 19. Alarm 2 zoemer indicator 20. Alarm 2 radio indicator BATTERIJBACK-UP De klok, alarm en voorkeurstations worden tijdens een stroomonderbreking gedurende een korte periode bewaard door middel van batterijvoeding. Als er geen back-upbatterijen geplaatst zijn of de stroomonderbreking duurt lang, zal de klok opnieuw ingesteld moeten worden. STAND-BYMODUS Plaats het apparaat op een vlak oppervlak en steek de stekker in een stopcontact. Het apparaat bevindt zich in de stand-bymodus en “0:00” knippert op het display. 3 NL DE KLOK INSTELLEN 1. 2. 3. In de stand-bymodus, druk en houd SET ingedrukt totdat het display knippert. Terwijl het display knippert, druk herhaaldelijk op HR en MIN totdat de gewenste tijd wordt weergegeven. Druk en houd HR en MIN ingedrukt om snel vooruit te gaan. Druk op SET om te bevestigen. De cijfers voor uur- en minutenweergave stoppen met knipperen. INSCHAKELEN/ RADIOMODUS Druk op POWER om het apparaat in te schakelen en de radiomodus wordt geopend. De radiofrequentie verschijnt kort op het display, waarna de kloktijd opnieuw wordt weergegeven. RADIOWERKING 1. 2. 3. 4. 5. Druk op POWER om de radio aan te zetten. De radio wordt op de standaard FM-frequentie of de laatst afgestemde frequentie afgestemd. De standaard FM-radiofrequentie is 87.5 MHz. Druk eenmaal op BAND om de AM-radiomodus te openen. De standaard AM-radiofrequentie is 522 kHz. Druk herhaaldelijk op BAND om de gewenste radioband te selecteren. Druk herhaaldelijk op of druk en houd VOLUME / ingedrukt om het volume te regelen. / om op het gewenst radiostation Druk herhaaldelijk op TUNING af te stemmen. / gedurende circa 2 seconden vast en Druk en houd TUNING laat de knop vervolgens los, het toestel scant de frequenties totdat een radiostation wordt gevonden dat sterk genoeg is om een goede ontvangst te hebben. OPMERKING: Voor de beste FM-ontvangst, strek de FM-antenne volledig uit. Voor de beste AM-ontvangst, draai het apparaat naar de positie waar de beste ontvangst wordt verkregen. 4 NL UW FAVORIETE RADIOSTATIONS IN HET GEHEUGEN OPSLAAN U kunt tot 10 FM en 10 AM radiostations in het geheugen opslaan. 1. 2. 3. 4. 5. Volg de stappen onder "DE RADIO BEDIENEN" en stem af op het radiostation dat u in het geheugen wilt opslaan. Druk en houd SET gedurende circa 2 seconden ingedrukt, “P01” knippert op het display. Druk nogmaals op SET om het station op te slaan. Herhaal stappen 1 tot 3 om meer radiostations op te slaan. Om naar een voorkeurstation te luisteren, drukt herhaaldelijk op MEM totdat u het gewenst radiostation hebt gevonden. WERKING VAN DE DUBBELE WEKKER Voordat u de wektijd instelt, controleer of de klok op de juiste tijd staat. Alarm 1 of Alarm 2 instellen 1. In de stand-bymodus, druk en houd AL1 of AL2 gedurende 2 seconden ingedrukt. 2. Terwijl de cijfers voor uur- en minutenweergave knipperen, stel de wektijd in door herhaaldelijk op HR en MIN te drukken. De cijfers voor uur- en minutenweergave knipperen. Druk en houd HR en MIN ingedrukt om snel vooruit te gaan. 3. Druk herhaaldelijk op AL1 / AL2 om de gewenste wekmodus (zoemer of radio) te selecteren. De overeenkomstige controlelampje(s) brand(t/en) op het display. De wektijd controleren Druk en houd AL1 / AL2 gedurende 2 seconden ingedrukt, de wektijd knippert op het display. Om de wekker uit te schakelen, druk op POWER en de wekker gaat de volgende dag opnieuw op de ingestelde tijd af. Om de wekker te annuleren, druk herhaaldelijk op AL1 / AL2 totdat de alarmindicator van het display verdwijnt. 5 NL Snoozefunctie Deze functie kan worden gebruikt om de wektijd gedurende circa 9 minuten te onderbreken eenmaal deze geactiveerd is. Door op SNOOZE te drukken wordt de zoemer of radio onderbroken en wordt na negen minuten weer hoorbaar. WERKING VAN DE INSLAAPTIMER De inslaapfunctie is bedoeld om de radio automatisch uit te schakelen. De inslaaptimer instellen 1. Druk op SLEEP. “90” wordt op het display weergegeven. 2. Druk herhaaldelijk op SLEEP om te kiezen uit 90, 80, 70, 60, 50, 40, 30, 20 of 10 minuten. 3. De radio wordt uitgeschakeld nadat de ingestelde inslaaptijd is verstreken. Om de resterende inslaaptijd te controleren, druk op SLEEP. Om de inslaaptimer te annuleren, druk op SLEEP totdat “OFF” is geselecteerd. Om de radio uit te schakelen alvorens de inslaaptijd is verstreken, druk op POWER. PROJECTIE Met deze projectiefunctie kunt u de kloktijd op een oppervlak, bijv. een muur, projecteren. Om de projectie in of uit te schakelen, druk op PROJECTOR ON/OFF. Om de geprojecteerde tijd scherp te stellen, draai aan het projectorwiel. Om de projectiehoek te wijzigen, draai de projector. OPMERKING: Als de tijd wordt geprojecteerd, kijk niet rechtstreeks in de projector. De maximale projectie‐afstand is 2 meter. DE DIMMER REGELEN Druk herhaaldelijk op DIMMER om de helderheid van het display (helder of dim) te regelen. 6 NL TECHNISCHE GEGEVENS Voeding: AC 230V~ 50Hz, 5W AM: 522-1620 kHz FM: 87.5 – 108 MHz Elektrische apparaten mogen niet bij het huishoudelijke afval worden gegooid. We verzoeken u het apparaat naar een afvalscheidingsstation te brengen. Neem contact op met de plaatselijke autoriteiten of uw dealer voor advies over recycling. We verontschuldigen ons voor enig ongemak veroorzaakt door kleine inconsistenties in deze gebruikershandleiding, die kunnen ontstaan door productverbetering of -ontwikkeling. 7 FR AVERTISSEMENTS Cet appareil est destiné à un usage domestique uniquement. Toute utilisation autre que celle prévue pour cet appareil, ou pour une autre application que celle prévue, par exemple une application commerciale, est interdite. Aération Prévoyez un espace libre d'au moins 10 cm tout autour du produit. Il convient que l’aération ne soit pas gênee par l’obstruction des ouvertures d’aération par des objets tels que journaux, nappes, rideaux, etc. Il convient de ne pas placer sur l’appareil de sources de flammes nues, telles que des bougies allumées. Déposez vos piles usagées auprès d'installation de recyclage pour protéger notre environnement. Cet appareil n'est pas destiné à être utilisé sous un climat tropical. L’appareil ne doit pas être exposé á des égouttements d'eau ou des éclaboussures et de plus qu'aucun objet rempli de liquide tel que des vases ne doit être placé sur l’ appareil. Les piles (piles installées) ne doivent pas être exposées à une chaleur excessive telle que celle du soleil, d'un feu ou d'origine similaire. Lorsque la prise du réseau d'alimentation ou une prise placée sur l’appareil est utilise comme dispositif de déconnexion, ce dispositif doit demeure aisément accessible. INSTRUCTIONS IMPORTANTES DE SÉCURITÉ Alimentation Cet appareil est conçu pour être alimenté par une prise de courant de 230 Volts, 50Hz CA. Toute autre source d'alimentation pourrait endommager l'appareil. 1 FR Symbols Attention : pour réduire les risques de choc électrique, n’enlevez pas le couvercle (ou l'arrière). Il n'y a pas de pièce réparable par l'utilisateur, faites appel à du personnel qualifié pour toute réparation. La documentation accompagnant cet appareil contient d'importantes instructions d'utilisation et d'entretien. Cet appareil contient des pièces sous haute tension pouvant représenter un risque d'électrocution. La plaque signalétique est située sous l'appareil. Manipulation et utilisation des piles Seuls les adultes doivent manipuler les piles. Ne laissez jamais les enfants utiliser cet appareil sauf si le couvercle du compartiment des piles est solidement fermé. Cet appareil fonctionne avec deux piles de type AAA de 1,5 V (non fournies). Ces piles sont accessibles et peuvent être remplacées. Ouvrez le couvercle du compartiment des piles sous l’appareil pour enlever les piles. 2 FR EMPLACEMENT DES BOUTONS DE CONTRÔLE Vues avant et latérale Vue avant 1. Bouton POWER (ALIMENTATION) 2. Écran d'affichage 3. Bouton VOLUME / AL2 button / AL1 4. Bouton VOLUME button 5. Antenne FM 6. Bouton de RÉGLAGE / HEURES / 7. Bouton de RÉGLAGE MINUTES 8. Bouton SLEEP (SOMMEIL) 9. Bouton SET (RÉGLAGES) 10. Bouton SNOOZE (RAPPEL D'ALARME) /DIMMER (LUMINOSITÉ) 11. Bouton de BANDE 12. BOUTON MEM (MÉMORISATION) 13. Couvercle du compartiment des piles (au fond) 14. Bouton MARCHE/ARRÊT: du PROJECTEUR 15. Molette du projecteur 16. Projecteur Indicateur de sonnerie de 17. l'alarme 1 Indicateur de radio de 18. l'alarme 1 r 19. Indicateur de sonnerie l'alarme 2 Indicateur de radio 20. l'alarme 2 PILE DE SAUVEGARDE En cas de coupure de courant, les piles de sauvegarde permettent de conserver en mémoire pendant une courte période les réglages de l’horloge, des alarmes et des stations préréglées. S’il n’y a pas de piles de sauvegarde dans l’appareil ou s'il y a une coupure de courant prolongée, il faudra à nouveau régler l'horloge. 3 FR MODE DE VEILLE Posez l’appareil sur une surface plane et stable, puis branchez son câble d’alimentation dans une prise électrique. L’appareil entre en mode veille et « 0:00 » clignote sur l’écran. RÉGLAGE DE L'HORLOGE 1. 2. 3. En mode de veille, appuyez sur SET jusqu’à ce que l’affichage se mette à clignoter. Alors que l'affichage clignote, appuyez plusieurs fois sur les boutons HR et MIN jusqu'à ce que les heures et les minutes désirées s'affichent. Maintenez respectivement les boutons HR ou MIN pressés pour que les chiffrent changent rapidement. Appuyez sur SET pour confirmer. Les chiffres des heures et des minutes s'arrêteront de clignoter. MISE EN MARCHE/MODE RADIO Appuyez sur POWER pour mettre l’appareil en marche et activer le mode radio. La fréquence radio s’affiche brièvement, puis l’horloge s'affichera de nouveau. FONCTIONNEMENT DE LA RADIO 1. 2. 3. 4. 5. Appuyez sur POWER pour mettre la radio en marche. La fréquence FM par défaut ou la dernière fréquence écoutée s'affiche. La fréquence FM par défaut est de 87.5 MHz. Appuyez une fois sur BAND pour sélectionner la bande radio AM. La fréquence AM par défaut est de 522 kHz. Appuyez plusieurs fois sur BAND pour sélectionner l’une des bandes de fréquences radio. Réglez le niveau du volume en appuyant plusieurs fois ou en maintenant / pressé. le bouton VOLUME Appuyez plusieurs fois sur TUNING / pour régler la fréquence de la station de radio désirée. Appuyez sur le bouton TUNING / pendant 2 secondes puis relâchez le bouton, l’appareil scannera les fréquences jusqu’à ce qu’il trouve une station de radio dont la réception est suffisamment bonne. 4 FR REMARQUES : Pour optimiser la réception FM, déployez complètement l’antenne FM. Pour améliorer la réception AM, tournez l’appareil dans la position dans laquelle la réception est la meilleure. MÉMORISATION DE VOS STATIONS DE RADIO PRÉFÉRÉES Vous pouvez mémoriser jusqu'à 10 stations FM et 10 stations AM. 1. 2. 3. 4. 5. Réglez la fréquence de la station de radio désirée en procédant comme indiqué au chapitre « FONCTIONNEMENT DE LA RADIO ». Appuyez sur SET pendant 2 secondes environ et « P01 » clignotera sur l'écran. Appuyez à nouveau sur SET pour mémoriser la station. Répétez les étapes 1 à 3 pour mémoriser d’autres stations. Pour écouter l’une des stations radio mémorisées, appuyez plusieurs fois sur MEM pour la sélectionner. FONCTIONNEMENT DES DEUX ALARMES Avant de régler l'heure d'une alarme, vérifiez que l’horloge a été réglée. Réglage de l’alarme 1 ou de l’alarme 2 1. 2. 3. En mode veille, appuyez 2 secondes sur AL1 / AL2. Les chiffres des heures et des minutes se mettent à clignoter. Alors que les chiffres des heures et des minutes clignotent, réglez l'heure de l'alarme en appuyant plusieurs fois sur les boutons HR et MIN. Maintenez respectivement le bouton HR ou MIN pressé pour que les chiffrent changent rapidement. Appuyez de manière répétée sur le bouton AL1 / AL2 pour sélectionner la sonnerie ou la radio comme alarme. L'(les) indicateur(s) correspondant(s) s’allumera(ront) sur l´écran. Vérification de l’heure d’une alarme Appuyez 2 secondes sur le bouton AL1 / AL2 et l’heure de l’alarme correspondante clignotera sur l’écran. 5 FR Pour éteindre une alarme quand elle se déclenche, appuyez sur POWER, elle s’éteindra et se déclenchera à nouveau les jours suivants à l’heure programmée. Pour désactiver une alarme, appuyez plusieurs fois sur AL1 / AL2 jusqu’à ce que l'indicateur d'alarme correspondant s’éteigne sur l’écran. Fonction de rappel d'alarme Cette fonction permet d'arrêter momentanément l’alarme pendant 9 minutes quand elle se déclenche. Lorsque vous appuyez sur la touche SNOOZE, l'alarme (sonnerie ou radio) s'éteint, puis retentit à nouveau 9 minutes après. FONCTIONNEMENT DE LA MINUTERIE D’ARRÊT AUTOMATIQUE (SOMMEIL) La minuterie d'arrêt automatique (fonction sommeil) permet de programmer l’arrêt automatique de la radio. Réglage de la minuterie d’arrêt automatique 1. Appuyez sur SLEEP. « 90 » s’affichera sur l’écran. 2. Appuyez plusieurs fois sur SLEEP pour sélectionner l’un des délais d’arrêt automatique suivants : 90, 80, 70, 60, 50, 40, 30, 20 ou 10 minutes. 3. La radio s’éteindra automatiquement une fois que le délai sélectionné se sera écoulé. Pour afficher le délai restant, appuyez sur le bouton SLEEP. Pour annuler cette fonction, appuyez plusieurs fois sur SLEEP jusqu’à sélectionner « OFF ». Pour éteindre la radio avant la fin du délai d’arrêt automatique, appuyez sur POWER. 6 FR PROJECTION Grâce à cette fonction de projection, vous pouvez facilement projeter l’heure sur une surface, par exemple sur un mur. Pour activer ou désactiver la projection, appuyez sur PROJECTOR ON/OFF. Pour faire la mise au point de l’heure projetée, tournez la molette du projecteur. Pour modifier légèrement l’angle de projection, faites pivoter le projecteur. REMARQUE : Lorsque la projection est activée, ne regardez jamais directement dans le projecteur. La distance maximale de projection est de 2 mètres. CONTRÔLE DE LUMINOSITÉ Appuyez plusieurs fois sur le bouton DIMMER pour ajuster la luminosité de l'affichage (clair ou pâle). SPÉCIFICATIONS Source d’alimentation: CA 230V 50Hz, 5W AM: 522-1620 kHz FM: 87.5 – 108 MHz Les produits électriques ne doivent pas être mis au rebut avec les déchets ménagers. Nous vous invitons à utiliser les points de collecte de recyclage prévus à cet effet. Consultez vos autorités locales ou votre revendeur pour obtenir des conseils sur le recyclage. En raison des mises au point et améliorations constamment apportées à nos produits, de petites incohérences peuvent apparaître dans ces instructions. Veuillez nous excuser pour la gêne occasionnée. 7 EN WARNINGS This appliance is intended for domestic household use only and should not be used for any other purpose or in any other application, such as for non domestic use or in a commercial environment. Ventilation Allow at least a 10 cm gap all around the product. The ventilation should not be impeded by covering the ventilation openings with items, such as newspapers, table-cloths, curtains, etc. No naked flame sources, such as lighted candles, should be placed on the apparatus. To protect the environment, use local recycling facilities for battery disposal. This apparatus is not suitable for use in a tropical climate. The apparatus shall not be exposed to dripping or splashing and that no objects filled with liquids, such as vases, shall be placed on the apparatus. Batteries (battery pack or batteries installed) shall not be exposed to excessive heat such as sunshine, fire or the like. Where the MAINS plug or an appliance coupler is used as the disconnect device, the disconnect device shall remain readily operable. IMPORTANT SAFETY INSTRUCTIONS Mains supply This equipment is designed to operate from a 230 Volt, 50Hz AC mains supply. Other power sources may damage it. Symbols Warning: to reduce the risk of electric shock, do not remove the cover (or back). There are no user serviceable parts inside, refer any servicing activities to qualified service personnel. There are important operating and maintenance instructions in the literature accompanying this equipment. Dangerous voltage constituting a risk of electric shock is present inside this equipment. 1 EN The marking plate is located at the bottom of the apparatus. Battery handling and usage Only adults should handle battery. Do not allow a child to use this apparatus unless the battery cover is securely attached to the unit. The battery type used in the unit is 2 x 1.5V AAA size batteries (not included) which are accessible and can be replaced. Remove the battery cover located at the bottom of the unit to remove the batteries. LOCATION OF CONTROL Top and Side Views 1. POWER button 2. Display 3. VOLUME / AL2 button 4. VOLUME / AL1 button 5. FM aerial 6. TUNING / HR button 7. TUNING / MIN button 8. SLEEP button 9. SET button 10.SNOOZE / DIMMER button Front View 11. 12. 13. 14. 15. 16. 17. 18. 19. 20. 2 BAND button MEM button Battery cover (at the bottom) PROJECTOR ON/OFF button Projector wheel Projector Alarm 1 buzzer indicator Alarm 1 radio indicator Alarm 2 buzzer indicator Alarm 2 radio indicator EN BATTERY BACKUP The clock, alarm and preset stations settings can be protected against AC power failure with the batteries for a short period of time. If no backup batteries are installed or the power failure is prolonged, you will need to set the clock again. STANDBY MODE Place the unit on a flat stable surface and plug the power cord into the mains socket. The unit is in standby mode and “0:00” will flash on the display. SETTING THE CLOCK 1. 2. 3. In standby mode, press and hold SET until the display flashes. Whilst the display is flashing, repeatedly press HR and MIN respectively until the desired clock time appears. Press and hold HR and MIN respectively for fast advance. Press SET to confirm. The hour and minute digits will stop flashing. POWER ON/RADIO MODE Press POWER to switch the unit on and enters the radio mode. The radio frequency will briefly appear on the display and then return to clock time. RADIO OPERATION 1. 2. 3. 4. 5. Press POWER to turn on the radio. The default FM frequency or the last frequency you tune the radio to. The default FM radio frequency is 87.5 MHz. Press BAND once to enter the AM radio mode. The default AM radio frequency is 522 kHz. Repeatedly press BAND to select the desired radio band. / . Adjust the volume by repeatedly pressing VOLUME / to tune into the desired station. Repeatedly press TUNING / for about 2 seconds and then Press and hold TUNING release the button, the unit will scan the frequencies until a broadcasting station strong enough for good reception is found. 3 EN NOTE: For the best FM reception, extend the FM aerial to its full length. For the best AM reception, rotate the unit to the position giving best reception. PRESETTING YOUR FAVOURITE RADIO STATIONS Up to 10 FM and 10 AM radio stations can be preset. 1. Follow steps in "RADIO OPERATION" and tune into the station that you wish to preset. 2. Press and hold SET for about 2 seconds, “P01” will flash on the display. 3. Press SET again to store the station. 4. Repeat steps 1 to 3 to store desired stations. 5. To listen to preset radio stations, press MEM repeatedly to select the desired radio station. DUAL ALARMS OPERATION Before setting the alarm time, make sure the Clock has been set. Setting Alarm 1 or Alarm 2 1. In standby mode, press and hold AL1 / AL2 for 2 seconds. 2. While the hour and minute digits are flashing, set the alarm time by repeatedly pressing HR and MIN respectively. 3. Repeatedly press AL1 / AL2 to set the alarm to wake to buzzer or radio. The hour and minute digits will flash. Press and hold HR and MIN respectively for fast advance. The corresponding indicator light(s) will illuminate on the display. Checking alarm time Press and hold AL1 / AL2 for 2 seconds, the alarm time will flash on the display. To turn off the alarm, press POWER and the alarm will come on again at the set time on the following days. To cancel the alarm, repeatedly press AL1 / AL2 until the alarm indicator light goes out on the display. 4 EN Snooze function This function can be used to stop the alarm temporarily for about 9 minutes once the alarm is activated. When you press SNOOZE, the buzzer or radio alarm sounds will stop and sound again after about 9 minutes. SLEEP TIMER OPERATION The sleep function is designed to automatically turn off the Radio. Setting sleep timer 1. Press SLEEP. “90” will illuminate on the display. 2. Repeatedly press SLEEP to select the desired sleep time from 90, 80, 70, 60, 50, 40, 30, 20 or 10 minutes. 3. The radio will be turned off after the selected time has elapsed. To check remaining sleep time, press SLEEP. To cancel sleep timer, press SLEEP until “OFF” is selected. To turn off the radio before the sleep time has elapsed, press POWER. PROJECTOR With this projection function, you can conveniently project the clock time onto a surface e.g. walls. To turn on or off the projection, press PROJECTOR ON/OFF. To focus the projected time, rotate the projector wheel. To change the projection to a desired angle, rotate the projector. NOTE: If projection is illuminated, do not look directly into the projector. The maximum projection distance is 2 metres. DIMMER CONTROL Repeatedly press DIMMER to adjust the brightness of display (bright or dim). 5 EN SPECIFICATIONS Power source: AC 230V~ 50Hz, 5W AM: 522-1620 kHz FM: 87.5 – 108 MHz Electrical products should not be disposed of with household waste. We kindly ask that you use the recycle collection points provided for this purpose. Consult with your local authorities or dealer for advice on recycling. We apologise for any inconvenience caused by minor inconsistencies in these instructions, which may occur as a result of product improvement and development. 6