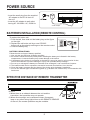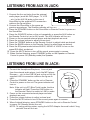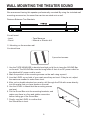
1
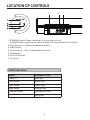
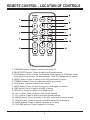
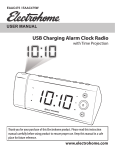
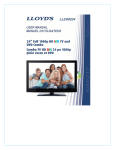
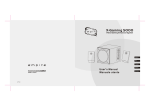
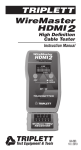
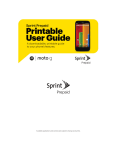
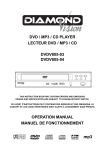
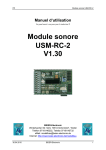
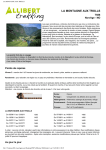
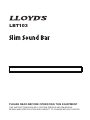
LBT103 PLEASE READ BEFORE OPERATING THIS EQUIPMENT THIS INSTRUCTION BOOK MAY CONTAIN ERRORS AND OMISSIONS. DESIGN AND SPECIFICATION ARE SUBJECT TO CHANGE WITHOUT NOTICE. Warnings and Precautions CAUTION: TO PREVENT ELECTRIC SHOCK, MATCH WIDE BLADE OF PLUG TO WIDE SLOT, FULLY INSERT. WARNING: To reduce the risk of fire or electric shock, do not expose this apparatus to rain or moisture. CAUTION: Use of any controls or adjustments or performance of procedures other than those herein specified may result in hazardous radiation exposure. WARNING: Changes or modifications to this unit not expressly approved by the party responsible for compliance could void the user’s authority to operate the equipment. WARNING: Do not place this unit directly onto furniture surfaces with any type of soft, porous, or sensitive finish. As with any rubber compound made with oils, the feet could cause marks or staining where the feet reside. We recommend using a protective barrier such as a cloth or a piece of glass between the unit and the surface to reduce the risk of damage and/or staining. WARNING: Use of this unit near fluorescent lighting may cause interference regarding use of the remote. If the unit is displaying erratic behavior move away from any fluorescent lighting, as it may be the cause. CAUTION: Danger of explosion if battery is incorrectly replaced. Replace only with the same or equivalent type. WARNING: The battery, batteries, and battery pack shall not be exposed to excessive heat such as sunshine, fire, or the like. WARNING: Lithium batteries, like all rechargeable batteries are recyclable and should be recycled or disposed of in normal household waste. Contact your local government for disposal or recycling practices in your area. They should never be incinerated since they might explode. WARNING: Shock hazard - Do Not Open. WARNING: Mains Plug or Direct plug-in adapter is used as disconnect device and it should remain readily operable during intended use. In order to disconnect the apparatus from the mains completely, the Mains Plug or Direct plug-in adapter should be disconnected from the mains socket outlet completely. WARNING: TO REDUCE THE RISK OF ELECTRIC SHOCK, DO NOT REMOVE COVER (OR BACK). NO USER-SERVICEABLE PARTS INSIDE. REFER SERVICING TO QUALIFIED SERVICE PERSONNEL. The lightning flash with arrowhead symbol, within an equilateral triangle, is intended to alert the user to the presence of uninsulated "dangerous voltage" within the product's enclosure that may be of sufficient magnitude to constitute a risk of electric shock to persons. The exclamation point within an equilateral triangle is intended to alert the user to the presence of important operating and maintenance (servicing) instructions in the literature accompanying the appliance. 1 Important Safety Instructions 1 Read these Instructions. 2 Keep these Instructions. 3 Heed all Warnings. 4 Follow all instructions. 5 Do not use this apparatus near water. 6 Clean only with a dry cloth. 7 Do not block any ventilation openings. Install in accordance with the manufacturer’s instructions. 8 Do not install near any heat sources such as radiators, heat registers, stoves, or other apparatus (including amplifiers) that produce heat. 9 Do not defeat the safety purpose of the polarized or grounding - type plug. A polarized plug has two blades with one wider than the other. A grounding type plug has two blades and a third grounding prong. The wide blade or the third prong are provided for your safety. When the provided plug does not fit into your outlet, consult an electrician for replacement of the obsolete outlet. 10 Protect the power cord from being walked on or pinched particularly at plugs, convenience receptacles, and the point where they exit from the apparatus. 11 Only use attachments/accessories specified by the manufacturer. 12 This symbol indicates that this product incorporates double insulation between hazardous mains voltage and user accessible parts. Use only with a cart, stand, tripod, bracket, or table specified by the manufacturer, or sold with the apparatus.When a cart is used, use caution when moving thecart/apparatus combination to avoid injury from tip-over. 13 Unplug this apparatus during lightning storms or when unused for long periods of time. 14 Refer all servicing to qualified service personnel. Servicing is required when the apparatus has been damaged in any way, such as power-supply cord or plug is damaged, liquid has been spilled or objects have fallen into the apparatus, the apparatus has been exposed to rain or moisture, does not operate normally,or has been dropped. Special note: When placing your unit on a lacquered or natural finish, protect your furniture with a cloth or other protective material. Industry canada Notice This device complies with Canada Industry lic ence-exempt RSS standard(s). Operation is subject to the following two conditions: (1) this device may not cause interference. and (2) this device must accept any interference. including interference that may cause undesired operation of the device. This Class B digital apparatus complies with Canadian ICES-003 CANICES-3 (B) 2 5 6 7 1. STANDBY button: Press 3 seconds to turn the unit on or off. SOURCE button: One touch to switch to either FM, bluetooth,AUX in or LINE in. 2. VOL (Volume) +: Press to increase the volume. 3. LINE IN jack. 4. VOL (Volume) -: Press to decrease the volume. 5. FM antenna. 6. AUX L/R IN jacks. 7. DC jack in. LED Indicators Status Indicator Color Power Off Red Light Aux In Mode White Light Line In Mode Green Light Radio Mode Orange Light Bluetooth Ready Flashing Blue Light Bluetooth Connected Blue Light 3 1. STANDBY button: Press to turn the unit on or off. 2. BLUETOOTH button: Press to switch to Bluetooth mode. 3. SCAN button: Press to scan for available radio stations in FM Radio mode, then store in the memory list automatically. Total 30 stations can be stored. 4. MUSIC button: Press to switch to the EQ optimized for music. 5. TREBLE buttons: Press to adjust the treble up or down. 6. AUX button: Press to switch to AUX mode. 7. MUTE button: Press to mute the sound, press again to resume. 8. LINE button: Press to switch to LINE In mode. 9. FM button: Press to switch to FM Radio mode. 10. CH + button: Press to skip to next stored channel. 11. CH - button: Press to skip to previous stored channel. 12. MOVIE button: Press to switch to the EQ optimized for movie sound. 13. VOICE button: Press to switch to the EQ optimized for dialogue. 14. BASS buttons: Press to adjust the bass up or down. 15. VOLUME buttons: Press to adjust the volume. 4 - Insert the small plug from the supplied AC adapter to the DC IN Jack on the unit. - Insert the AC adaptor to wall outlet having AC 100-240V~ AC, 50/60 Hz. AC/DC adapter OPEN CR2025 Lit CRhiu 20 m SC 3V 25 Cell UL To replace the button cell: 1. Push the tab, then slide out the battery tray as the figure on the right. 2. Replace the old button cell by a new CR 2025 button cell as the polarity markings on the remote control. 3. Close the battery tray. PUSH ll Ce m 25 hiu 20 Lit CR 3V UL SC OPEN PUSH BATTERY PRECAUTIONS: Follow the size and type of battery specified. 1. Use only the size and type of battery specified. 2. Be sure the follow the correct polarity when installing the battery as indicated in the battery compartment. A reversed battery may cause damage to the device. 3. If the battery in the device is consumed or the device is not to be used for a long period of time, remove the batteries to prevent damage or injury from possible battery leakage. 4. Do not try to recharge the battery not intended to be recharged; it can overheat and rupture. 5. The batteries shall not be exposed to excessive heat such as sunshine, fire or the like. 6. Clean the battery contacts and also those of the device prior the battery installation. 7. Do not mix different types of batteries together (e.g. Alkaline and Carbon-zine) or old batteries with fresh ones. NOTES: 1. When there is an obstacle between the unit and the transmitter, the transmitter may not operate. 2. When direct sunlight, an incandescent lamp, fluorescent lamp or any other strong light shines on the REMOTE SENSOR of the unit, the remote operation may be unstable. 5 1. Connect the Aux out jacks from the external audio player (such like DVD player, TV, VCR …etc.) to the AUX IN jacks on the rear of Sound Bar by the supplied RCA connection cable as the figure below: 2. Connect the Sound Bar to the power as previous procedures. The Standby indicator will turn on. 3. Press the STANDBY button on the Sound Bar or Remote Control to power on the Sound Bar. 4. Press the SOURCE button on the unit repeatedly or press the AUX button on the Remote Control to turn to AUX mode. The AUX indicator will turn on. 5. Power on the connected external player and start playback as usual. 6. Press the volume buttons to adjust volume level. 7. Press the TREBLE buttons on the Remote Control to adjust treble as desired. 8. Press the BASS buttons on the Remote Control to adjust bass as desired. 9. Press the EQ preset mode buttons MUSIC; MOVIE or VOICE to turn on the preset EQ effect as desired. 10. Press the MUTE button to turn off the sound, press again to resume. 11. When finished listening, press STANDBY button on the Speaker or Remote Control to power Off (Standby mode) the Speaker. 1. Connect the Headphone/Earphone; Line out jack from the external audio player (such like MP3 player; Discman … etc) to the LINE IN jack on the unit by the supplied LINE in connection cable as the figure on right.: 2. Press the STANDBY button on the unit or Remote Control to power on the unit.The green indicator will turn on. Note: If the unit is in BT (Blue Tooth) mode, the blue indicator will light. Press the LINE button on the Remote Control to switch to LINE in mode. 3. Power on the connected external player and start playback as usual. 4. Press the volume buttons to adjust volume level. 5. Press the MUTE button to turn off the sound, press again to resume. 6. When finished listening, press STANDBY button on the unit or Remote Control to power Off (Standby mode) the unit. NOTE: To saving electric power, unplug the AC/DC Adaptor from wall outlet if long periodof time will not use. 6 1. Power on the Sound Bar as previous procedures. 2. Press the SOURCE button on the Sound Bar repeatedly or press the BT (Bluetooth) button on the Remote Control to turn to BT mode. The BT indicatorwill turn on. 3. Turn on the BT function in the external BT player and wait a few seconds until the external BT player and the speaker were paired. Play the music in the external BT Player as usual. 4. Other operations are same as AUX IN mode. NOTES: In first time use, connect the external BT Player as below: A. Turn the Sound Bar to BT mode as previous procedures, the BT indicator will turn on and flash. B. Power on the external BT player and enter to BT searching mode. Start pairing as the on screen instructions on the external BT Player (For details pairing procedures, please refer to the user's manual of your BT player.). C. When the external BT player searched the Sound Bar, our model number “LBT103 ”will appear on the display of external BT player. D. Pairing code “0000 ”may need to enter. 1. Power on the Sound Bar as previous procedures. 2. Press the SOURCE button on the unit repeatedly or press the FM button on the Remote Control to turn to Radio (FM) mode. The FM indicator will turn on. 3. In first time: Press the SCAN button on the Remote Control to start auto searching (It may take a few minutes). The available FM stations will be stored into internal memory list. After scanning : Press the CH (Channel) + button to skip to next stored channel, press the CH (Channel) – button to skip to previous stored channel. Repeat the same procedures until the desired station are found and play. 4. Other operations are same as AUX IN mode. 7 We recommend having this speaker professionally mounted.By using the included wall mounting accessories, the sound bar can be mounted onto a wall. Distance Between Two Brackets You will need - Level - Pencil - Tape Measure - Manual or Electric drill 1/. Mounting on the wooden wall You should use 2 pcs short screws 1. Use the TAPE MEASURE to decide how high you'd like to hang the SOUND Bar on the wall. The SOUND Bar must be hung within 5 feet of an AC power outlet for the attached AC power cord to reach. 2. Mark the position of the mounting screws on the wall using a pencil. 3. Line the LEVEL up on both of your mark sure they are level. If they're not, adjust the marks as needed to make them level. 4. After you've double checked your marks, drill through the EVA with screw directly into the marks that you have made on the wall. 5. Use the LEVEL to check that the mounting screws are level. 6. Put the Sound Bar onto the mounting brackets, and make sure there is a firm and stable connection before letting go of the Sound Bar. 7. Finally, use the LEVEL to confirm that the Sound Bar is level. 8 2/. Mounting on the dry wall You should use 2 pieces of short screws 2 pieces of plastic tubes 1. Use the TAPE MEASURE to decide how high you'd like to hang the Speaker Bar on the wall. The SOUND Bar must be hung within 5 feet of an AC power outlet for the attached AC power cord to reach. 2. Mark the position of the mounting screws on the wall using a pencil. 3. Line the LEVEL up on both of your mark sure they are level. If they're not, adjust the marks as needed to make them level. 4. Drill a hole by a powerful electric drill. 5. Use a hammer gently nail 2 plastic tubs into the holes. 6. Drill through the EVA with screws directly into the holes. 7. Use the LEVEL to check that the mounting screws are level. 8. Put the SOUND Bar onto the mounting brackets, and make sure there is a firm and stable connection before letting go of the Sound Bar. 9. Finally, use the LEVEL to confirm that the Sound Bar is level. 9 Problem What to do No power Check the connection of the AC/DC adapter between the unit and wall outlet. No sound Check that the volume control is NOT at minimum Check that it is NOT set to mute. The remote control won' t work Replace the battery. No sound from in BT mode Check if you have pairing or not. It needs to pair the external BT player and the speaker with password "0000" before 1st time listening. Make sure there are no obstacles obscuring the front of the unit. Power Source :…………………….................DC 15V 1.2A Power Source of Remote Control:……..........DC 3V, 1X CR 2025 battery (Included) Power Consumption:………………………….Maximum 30W Audio Power : Left Channel …………………...........10W Right Channel……………….............10W Impedance of Speakers : Left Channel …………………...........8 Ohm, 10W max Right Channel…………….................8 Ohm, 10W max 1 x User's Manual 1 x Remote Control --- uses 1X CR 2025 button cell (Included) 1 x AC Adaptor (Input: AC 100-240V~, 50/60 Hz, 1.0A; Output: DC 15V, 1.2A, ) 1 x 3.5mm LINE In cable 1 x RCA cable 2 x Screws 2 x Plastic Tubes 2 x EVA spacer 10 COSMO COMMUNICATIONS LIMITED WARRANTY We at COSMO COMMUNICATIONS believe you will be pleased with your new Cosmo Communications Product. Please read this Warranty carefully. Cosmo Communications warrants this product to be free from manufacturing defects including original parts and workmanship for a period of one year from the date of original purchase in and if used in Canada. Should you find your unit is not operating properly during the terms of full coverage of this warranty (one year), Cosmo Communications will provide one of the following options (at Cosmo Communications discretion), providing the manufacturing defect is verified along with the date of purchase. Repair service for 1 year from the date of original purchase at no charge for labour and parts. Replacement of your defective unit with either a new, refurbished, or equivalent model at no charge for one year from the date of original purchase. CUSTOMER OBLIGATIONS This warranty applies to the product from the original date of purchase at retail. Therefore, the owner must provide a copy of the original, dated bill of sale. No warranty service will be performed without a bill of sale. Transportation to and from the service depot is the responsibility of the owner. This warranty is void if the product is: A) Damaged through negligence, abuse, misuse, accident or acts of God. B) Used in commercial applications or rentals. C) Modified or repaired by anyone other than Cosmo Communications or their expressly authorized representative. D) Damage resulting from the improper connection to equipment of other manufacturers. This warranty does not cover: A) Cost incurred in the shipping of the product to and from the Cosmo Communications authorized repair facility listed. B) Damage or improper operation caused by the failure to follow the operating instructions provided with the product. C) Routine adjustments to the product which can be performed by the customer as outlined in the owner's manual. D) Damage to compact disc, or audio tape. E) Signal reception problems caused by external factors. F) Products not purchased in Canada. G) Damage to the products used outside Canada. 11 THIS WARRANTY IS NON-TRANSFERABLE AND APPLIES SOLELY TO THE ORIGINAL PURCHASER AND DOES NOT EXTEND TO SUBSEQUENT OWNERS OF THE PRODUCT. ANY APPLICABLE IMPLIED WARRANTIES, INCLUDING THE WARRANTY OF MERCHANTABILITY, ARE LIMITED IN DURATION TO A PERIOD OF THE EXPRESSED WARRANTY AS PROVIDED HEREIN BEGINNING WITH THE DATE OF THE ORIGINAL PURCHASE AT RETAIL AND NO WARRANTIES, WHETHER EXPRESSED OR IMPLIED SHALL APPLY TO THE PRODUCT THEREAFTER. COSMO COMMUNICATIONS MAKES NO WARRANTY AS TO THE FITNESS OF THE PRODUCT FOR ANY PARTICULAR PURPOSE OR USE. THE EXTENT OF COSMO COMMUNICATIONS’S LIABILITY UNDER THIS LIMITED WARRANTY IS THE REPAIR OR REPLACEMENT PROVIDED ABOVE AT THE SOLE DISCRETION OF COSMO COMMUNICATIONS IN NO EVENT SHALL COSMO COMMUNICATIONS’S LIABILITY EXCEED THE PURCHASE PRICE PAID BY THE PRUCHASER. UNDER NO CIRCUMSTANCES SHALL COSMO COMMUNICATIONS BE LIABLE FOR ANY LOSS, DIRECT, INDIRECT, INCIDENTAL FORESEEN, UNFORESEEN, SPECIAL OR CONSEQUENTIAL DAMAGE ARISING OUT OF OR IN CONNECTION WITH THE USE OF THIS PRODUCT. THIS WARRANTY IS VALID ONLY IN CANADA. THIS WARRANTY GIVES YOU SPECIFIC LEGAL RIGHTS. HOWEVER, YOU MAY HAVE OTHER RIGHTS WHICH MAY VARY FROM PROVINCE TO PROVINCE. SOME PROVINCES DO NOT ALLOW LIMITATIONS ON IMPLIED WARRANTIES OR EXCLUSION OF CONSEQUENTIAL DAMAGE, THEREFORE THESE RESTRICTIONS MAY NOT APPLY TO YOU. THIS INSTRUCTION BOOK MAY CONTAIN ERRORS AND OMISSIONS. DESIGN AND SPECIFICATION ARE SUBJECT TO CHANGE WITHOUT NOTICE. Cosmo Communications Service 55 Travail Road Unit 2 Markham, Ontario L3S 3J1 1-888-208-4108 www.cosmocanada.ca 12 LBT103 S'IL VOUS PLAÎT LU AVANT D'ACTIONNER CE MATÉRIEL CE LIVRE D'INSTRUCTION PEUT CONTENIR DES ERREURS ET DES OMISSIONS. LA CONCEPTION ET LE CAHIER DES CHARGES SONT SUJETS À LA MODIFICATION SANS PRÉAVIS. Avertissements et précautions PRÉCAUTION :POUR EMPÊCHER LA DÉCHARGE ÉLECTRIQUE, APPARIEZ LA LAME LARGE DE LA PRISE AU SLOT LARGE, ENTIÈREMENT INSERTION. AVERTISSEMENT :Pour réduire le risque du feu ou de décharge électrique, n'exposez pas cet appareil à la pluie ou à l'humidité. PRÉCAUTION :L'utilisation de tous les contrôles ou réglages ou la représentation des procédures autres que ceux dans le présent spécifiques peut avoir comme conséquence l'exposition de rayonnement dangereuse. AVERTISSEMENT :Modifications ou modifications à cette unité pas expressément approuvée par la partie responsable de la conformité a pu vider l'autorité de l'utilisateur pour actionner le matériel. AVERTISSEMENT :Ne placez pas cette unité directement sur des surfaces de meubles avec aucun type de finition douce, poreuse, ou sensible.Comme avec n'importe quel composé en caoutchouc fait avec des huiles, les pieds pourraient entraîner des marques ou souiller où les pieds résident.Nous recommandons d'employer une barrière protectrice telle qu'un tissu ou une partie de verre entre l'unité et la surface pour réduire le risque de dommages et/ou de souillure. AVERTISSEMENT :L'utilisation de cette unité près de l'éclairage fluorescent peut entraîner l'interférence concernant l'utilisation du distant.Si l'unité affiche le mouvement de comportement erratique à partir de n'importe quel éclairage fluorescent, car ce peut être la cause. PRÉCAUTION :Danger d'explosion si la batterie est inexactement substituée.Remplacez seulement par la même chose ou le type équivalent. AVERTISSEMENT :La batterie, les batteries, et le pack batterie ne seront pas exposés à la chaleur excessive telle que le soleil, le feu, ou analogues. AVERTISSEMENT :Les batteries au lithium, comme toutes les batteries rechargeables sont recyclables et devraient être réutilisées ou rejetées en déchets normaux de ménage.Contactez votre administration locale pour la disposition ou des pratiques de réutilisation dans votre zone.Elles devraient ne jamais être incinérées puisqu'elles pourraient éclater. AVERTISSEMENT :Risque de choc - ne vous ouvrez pas. AVERTISSEMENT :Les canalisations branchent ou l'adaptateur embrochable direct est utilisé comme le dispositif et lui de débranchement devraient restent aisément fonctionnels pendant l'utilisation destinée.Afin de déconnecter l'appareil des canalisations complètement, les canalisations branchent ou l'adaptateur embrochable direct devrait être déconnecté du débouché de socket de canalisations complètement. AVERTISSEMENT :POUR RÉDUIRE LE RISQUE DE DÉCHARGE ÉLECTRIQUE, NE RETIREZ PAS LA COUVERTURE (OU ARRIÈRE).AUCUNE PIÈCES D'USER-SERVICEABLE À L'INTÉRIEUR. RÉFÉREZ-VOUS L'ENTRETIEN AU PERSONNEL DE SERVICE QUALIFIÉ. L'éclair de foudre avec le symbole de pointe de flèche, dans une triangle équilaterale, est destiné pour alerter l'utilisateur à la présence « de la tension dangereuse » non isolée dans la rubrique de description du produit qui peut être de la grandeur suffisante pour constituer un risque de décharge électrique aux personnes. Le point d'exclamation dans une triangle équilaterale est destiné pour alerter l'utilisateur à la présence de l'opération et des instructions importantes de maintenance (entretien) dans la littérature accompagnant l'appareil. 13 Instructions de sécurité importantes 13 débranchez cet appareil pendant les tempêtes de foudre ou si inutilisé pendant des longues périodes de temps. 14 référez-vous tous qui entretiennent au personnel de service qualifié.L'entretien est exigé quand l'appareil a été endommagé de quelque façon, comme le bloc d'alimentation la corde ou la prise est endommagée, le liquide a été renversé ou les objets sont tombés dans l'appareil, l'appareil a été exposé à la pluie ou l'humidité, ne fait pas fonctionnez normalement, ou avez été relâché. 1 lisez ces instructions. 2 gardez ces instructions. Attention 3 tous les avertissements. 4 suivez toutes les instructions. 5 n'utilisez pas cet appareil près de l'eau. 6 nettoyez seulement avec un tissu sec. 7 ne bloquez aucune ouverture de ventilation. Installez selon les instructions du constructeur. 8 n'installez près d'aucune source de chaleur telle que des radiateurs, des registres de la chaleur, des fourneaux, ou d'autres appareils (amplificateurs y compris) cette chaleur de produit. 9 ne défaites pas le but de sécurité de la polariser ou de fondre - tapez la prise.Une prise polarisée a deux lames avec une plus large que l'autre.Un type au sol prise a deux lames et une troisième fourche fondante. La lame large ou la troisième fourche sont données pour votre sécurité.Quand la prise fournie ne s'insère pas dans votre débouché, consultez un électricien pour le remplacement du débouché obsolète. 10 protégez le cordon d'alimentation contre être marchée en fonction ou pincée en particulier aux fiches, aux douilles de commodité, et au point où ils quittent de l'appareil. 11 seulement connexions/accessoires d'utilisation spécifiques par le constructeur. 12 ce symbole indique que ce produit incorpore l'isolation entre les canalisations dangereuses tension et les pièces accessibles d'utilisateur.Utilisez seulement avec un chariot, un support, un tripod, une parenthèse, ou une table spécifique par le constructeur, ou vendu avec l'appareil. Quand un chariot est utilisé, précaution d'usage en déplaçant la combinaison de chariot/appareil pour éviter la blessure de extrémité-au-dessus de. Note spéciale :En plaçant votre unité sur une finition laquée ou naturelle, protégez le votre meubles avec un tissu ou tout autre matériel protecteur. Avis d' Industrie Canada Le present appareil est conforme aux CNR d'industrie Canada applicables aux appareils radio exem pts de licence L'exploitation est autorisee aux deux conditions suivantes: 1) I'appareil ne doit pas produire de brouillage, et 2) I'utillsateur de I'appareil doit accepter brouillage radioelectrique subi meme si le brouillage est susceptible d'encompromettre le fonctionnement. mauvais fonctionnement de I'appareil. Cet appareil numériquie de la classe B est conforme à la norme NMB-003 du Canada. NMB-3 (B) 14 EMPLACEMENT DES CONTRÔLES 5 6 7 1. Bouton DE RÉSERVE :Appuyez 3 secondes pour tourner l'unité "Marche/Arrêt". Bouton de SOURCE :Un contact à commuter à l'un ou l'autre de FM, bluetooth, AUX. dedans ou LIGNE dedans. 2. Vol. (volume) + :Appuyez pour augmenter le volume. 3. RAYEZ DANS le jack. 4. Vol. (volume) - :Appuyez pour diminuer le volume. 5. Antenne de FM. 6. L/R AUX. DANS des jacks. 7. Jack de C.C dedans. Indicateurs LED Mode Couleur d'indicateur Mise hors tension Le feu rouge Aux. en mode Lumière blanche Ligne en mode Feu vert Mode par radio Lumière orange Bluetooth prêt Lumière bleue flashante Bluetooth s'est connecté Lumière bleue 15 À TÉLÉCOMMANDE - EMPLACEMENT DES CONTRÔLES 1. Bouton DE RÉSERVE :Appuyez pour tourner l'unité "Marche/Arrêt". 2. Bouton de BLUETOOTH :Appuyez pour commuter à Bluetooth le mode. 3. Bouton de BALAYAGE :Appuyez pour balayer pour les stations de radio disponibles dans radio fm le mode, entreposé alors dans la liste de mémoire automatiquement. Stations du total 30 peut être enregistré. 4. Bouton de MUSIQUE :Appuyez pour commuter à l'EQ optimisé pour la musique. 5. TRIPLEZ les boutons :Appuyez pour ajuster le triple en haut ou en bas. 6. Bouton AUX. :Appuyez pour commuter au mode AUX. 7. METTEZ EN SOMMEIL le bouton :Appuyez pour mettre en sommeil le bruit, appuyez de nouveau pour reprendre. 8. LIGNE bouton :Appuyez pour commuter à la LIGNE en mode. 9. Bouton de FM :Appuyez pour commuter au mode radio fm. 10. Ch + bouton :Appuyez pour sauter au prochain canal enregistré. 11. Ch - bouton :Appuyez pour sauter au canal enregistré précédent. 12. Bouton de FILM :Appuyez pour commuter à l'EQ optimisé pour le film bruit. 13. Bouton de VOIX :Appuyez pour commuter à l'EQ optimisé pour le dialogue. 14. Boutons BAS :Appuyez pour ajuster la basse en haut ou en bas. 15. Boutons de VOLUME :Appuyez pour ajuster le volume. 16 SOURCE D'ÉNERGIE - Insérez la petite prise du courant alternatif assuré adaptateur au C.C DANS le jack sur l'unité. - Insérez l'adaptateur à C.A. à la prise murale ayant Courant alternatif à C.A. 100-240V~, 50/60 hertz. AC/DC adapter OPEN CR2025 Lit CRhiu 20 m SC 3V 25 Cell UL Pour substituer la cellule de bouton : 1. Poussez l'onglet, puis glissez le plateau de batterie en tant que figurez du côté droit. 2. Remplacez la vieille cellule de bouton par un nouveau CR 2025 boutonnez la cellule comme inscriptions de polarité sur le distant contrôlez. 3. Fermez le plateau de batterie. PUSH INSTALLATION DE BATTERIES (À TÉLÉCOMMANDE) ll Ce m 25 hiu 20 Lit CR 3V UL SC OPEN PUSH PRÉCAUTIONS DE BATTERIE : Suivez la taille et le type de batterie spécifiques. 1. Utilisez seulement la taille et le type de batterie spécifiques. 2. Soyez sûr le suivre la polarité correcte en installant la batterie comme indiqué dans le compartiment à piles.Une batterie renversée peut endommager le dispositif. 3. Si la batterie dans le dispositif est consommée ou le dispositif ne doit pas être utilisé pendant une longue période de temps, retirez les batteries pour empêcher des dommages ou la blessure de la fuite possible de batterie. 4. N'essayez pas de recharger la batterie non destinée pour être rechargé ;elle peut surchauffer et se rompre. 5. Les batteries ne seront pas exposées à la chaleur excessive telle que le soleil, le feu ou analogues. 6. Nettoyez les contacts de batterie et également ceux du dispositif antérieurement l'installation de batterie. 7. Ne mélangez pas les différents types des batteries ensemble (par exemple alcalin et Carbone-zine) ou de vieilles batteries à les fraîches. DISTANCE PERTINENTE D'ÉMETTEUR DISTANT NOTES : 1. Quand il y a un obstacle entre l'unité et l'émetteur, l'émetteur peut ne pas fonctionner. 2. Quand la lumière du soleil directe, une lampe à incandescence, la lampe fluorescente ou n'importe quelle autre lumière forte brille sur le TÉLÉDÉTECTEUR de l'unité, l'exécution distante peut être instable. 17 ÉCOUTE D'AUX. DANS LE JACK : 1. Connectez les jacks aux. de sortie de l'externe lecteur audio (tels aiment le lecteur DVD, la TV, le magnétoscope… etc.) à l'AUX. DANS des jacks sur l'arrière de la barre saine par le câble fourni de connexion de RCA comme chiffre ci-dessous : 2. Connectez la barre saine à la puissance en tant que procédures précédentes.L'indicateur de réserve s'allumera. 3. Appuyez sur le bouton DE RÉSERVE sur la barre saine ou à télécommande pour mettre sous tension la barre saine. 4. Appuyez sur le bouton de SOURCE sur l'unité à plusieurs reprises ou appuyez sur le bouton AUX. en fonction l'à télécommande à se tourner vers le mode AUX. L'indicateur AUX. s'allumera. 5. Puissance sur le playback externe connecté de lecteur et de début comme d'habitude. 6. Appuyez sur les boutons de volume pour ajuster le niveau du volume. 7. Appuyez sur les boutons TRIPLES sur l'à télécommande pour ajuster le triple comme désiré. 8. Appuyez sur les boutons BAS sur l'à télécommande pour ajuster la basse comme désirée. 9. Appuyez l'EQ pour pré-établir la MUSIQUE de boutons de mode ;FILM ou VOIX à s'allumer effet du préréglage EQ comme désiré. 10. Appuyez sur le bouton MUET pour arrêter le bruit, appuyez de nouveau pour reprendre.Si de finition en écoutant, appuyez sur le bouton DE RÉSERVE sur le haut-parleur ou le distant 11. Contrôlez à la mise hors tension (mode standby) le haut-parleur. ÉCOUTE DE LA LIGNE DANS LE JACK : 1. Connectez le casque/écouteur ;Rayez le jack du lecteur audio externe (tels aiment le lecteur MP3 ; Baladeur CD… etc.) à la LIGNE DANS le jack sur l'unité par CANALISATION d'alimentation en câble de connexion comme chiffre sur la droite. : 2. Appuyez sur le bouton DE RÉSERVE sur l'unité ou le distant Contrôlez pour mettre l'unité.L'indicateur vert va le faire allumez-vous. Note :Si l'unité est en mode de BT (dent bleue), le bleu l'indicateur s'allumera.Appuyez la LIGNE bouton sur À télécommande pour commuter à la LIGNE en mode. 3. Puissance sur le playback externe connecté de lecteur et de début comme d'habitude. 4. Appuyez sur les boutons de volume pour ajuster le niveau du volume. 5. Appuyez sur le bouton MUET pour arrêter le bruit, appuyez de nouveau pour reprendre. 6. Si de finition en écoutant, appuyez sur le bouton DE RÉSERVE sur l'unité ou à télécommande à la mise hors tension (mode standby) l'unité. NOTE :À enrégistrer le courant électrique, débranchez l'adaptateur d'AC/DC de la prise murale si longtemps le laps de temps n'utilisera pas. 18 APPAREILLEMENT ET PLAYBACK DE BT : 1. Puissance sur la barre saine en tant que procédures précédentes. 2. Appuyez sur le bouton de SOURCE sur la barre saine à plusieurs reprises ou appuyez BT (Bluetooth) boutonnez sur l'à télécommande pour tourner à BT le mode. L'indicateur de BT s'allumera. 3. Allumez la fonction de BT dans le lecteur externe de BT et attendez quelques secondes jusqu'à le lecteur externe de BT et l'orateur ont été appareillés. Jouez la musique dans le lecteur externe de BT comme d'habitude. 4. D'autres exécutions correspondent AUX. EN mode. NOTES : Dans l'utilisation de première fois, connectez le lecteur externe de BT en tant que ci-dessous : A. Tournez la barre saine au mode de BT en tant que procédures précédentes, l'indicateur de BT s'allumera et éclair. B. Mettez le lecteur externe de BT et entrez sous tension au mode de recherche de BT. Commencez appareillement comme en fonction instructions d'écran sur le lecteur externe de BT (pour des détails en appareillant des procédures, référez-vous s'il vous plaît au manuel d'utilisation de votre lecteur de BT.). C. Quand le lecteur externe de BT a recherché la barre saine, notre numéro de version « LBT103 » apparaîtra sur l'affichage du lecteur externe de BT. D. L'appareillement du code « 0000 » peut devoir entrer. ÉCOUTEZ LA RADIO : 1. Puissance sur la barre saine en tant que procédures précédentes. 2. Appuyez sur le bouton de SOURCE sur l'unité à plusieurs reprises ou appuyez sur le bouton de FM sur À télécommande pour se tourner vers le mode par radio (de FM). L'indicateur de FM s'allumera. 3. Dans la première fois :Appuyez sur le bouton de BALAYAGE sur l'à télécommande pour mettre en marche l'automobile recherche (elle peut prendre quelques minutes). Les stations disponibles de FM seront enregistrées dans la liste de mémoire interne. Après balayage :Appuyez le ch (la Manche) + bouton à sautez au prochain canal enregistré, appuyez le ch (la Manche) - se boutonnent pour sauter à canal enregistré précédent.Répétez les mêmes procédures jusqu'à la station désirée sont trouvés et jeu. 4. D'autres exécutions correspondent AUX. EN mode. 19 MUR MONTANT LE BRUIT DE THÉÂTRE Nous recommandons de faire monter professionnellement ce haut-parleur.À l'aide des accessoires inclus de support de mur, la barre saine peut être montée sur un mur. Distance entre deux parenthèses Vous aurez besoin - Niveau - Crayon - Ruban métrique - Foret manuel ou électrique 1.Monter sur le mur en bois Vous devriez utiliser 2 PCS court-circuitent des vis 1. Utilisez le RUBAN MÉTRIQUE de décider comment la haute vous voudrait arrêter la barre SAINE sur le mur.La barre SAINE doit être arrêtée à moins de 5 pieds d'un débouché d'alimentation AC pour la corde ci-jointe d'alimentation AC à atteindre. 2. Marquez la position des vis de support sur le mur utilisant un crayon. 3. Rayez le NIVEAU sur chacun des deux votre marque sure qu'elles sont niveau. Si elles ne sont pas, ajustez les marques en tant que nécessaire pour les rendre de niveau. 4. Après que vous ayez vérifié une deuxième fois vos marques, forez par l'EVA avec la vis directement dans les marques que vous avez faites sur le mur. 5. Employez le NIVEAU pour vérifier que les vis de support sont niveau. 6. Mettez la barre saine sur les supports, et assurez-vous qu'il y a une connexion ferme et stable avant de laisser allez de la barre saine. 7. En conclusion, employez le NIVEAU pour confirmer cela la barre saine est niveau. 20 MUR MONTANT LE BRUIT DE THÉÂTRE 2.Monter sur le mur sec Vous devriez utiliser 2 parties de vis courtes 2 tubes de plastique de PCS 1. Utilisez le RUBAN MÉTRIQUE de décider comment la haute vous voudrait arrêter la barre de haut-parleur sur le mur.La barre SAINE doit être arrêtée à moins de 5 pieds d'un débouché d'alimentation AC pour que la corde jointe d'alimentation AC atteigne. 2. Marquez la position des vis de support sur le mur utilisant un crayon. 3. Rayez le NIVEAU sur chacun des deux votre marque sure qu'elles sont niveau. Si ellesne sont pas, ajustez les marques en tant que nécessaire pour les rendre de niveau. 4. Forez un trou par un foret électrique puissant. 5. Utilisez un marteau clouent doucement 2 baquets en plastique dans les trous. 6. Forez par l'EVA avec des vis directement dans les trous. 7. Employez le NIVEAU pour vérifier que les vis de support sont niveau. 8. Mettez la barre SAINE sur les supports, et assurez-vous qu'il y a une entreprise et la connexion stable avant de laisser vont de la barre saine. 9. En conclusion, employez le NIVEAU pour confirmer que la barre saine est niveau. 21 GUIDE DE DÉPANNAGE Problème Ce qui à faire Aucune puissance Contrôlez la connexion de l'adaptateur d'AC/DC entre l'unité et la prise murale. Aucun bruit Vérifiez que le contrôle du volume n'est pas au minimum Vérifiez qu'il n'est pas placé pour mettre en sommeil. L'à télécommande ne fonctionnera pas Substituez la batterie. Aucun bruit de en mode de BT Contrôlez si vous avez l'appareillement ou pas. Il doit appareiller le lecteur externe de BT et l'orateur avec mot de passe « 0000" avant la ?ère écoute de fois. Assurez-vous qu'il n'y a aucun obstacle obscurcissant l'avant de l'unité. CARACTÉRISTIQUES GÉNÉRALES Source d'énergie :.........................................C.C 15V 1.2A Source d'énergie d'à télécommande :...........C.C 3V, batterie 2025 du CR 1X (incluse) Consommation d'énergie :.............................Maximum 30W Puissance sonore : La Manche gauche .......................................10W La bonne Manche .........................................10W Impédance des haut-parleurs : La Manche gauche ........................................8 ohms, 10W maximum La bonne Manche ..........................................8 ohms, 10W maximum 1 manuel d'utilisation de x 1 x à télécommande---utilise 1X la cellule de bouton du CR 2025 (incluse) 1 adaptateur à C.A. de x (entrée :Courant alternatif 100-240V~, 50/60 hertz, 1.0A ; Sortie :C.C 15V, 1.2A,) LIGNE de 1 x de 3.5mm en câble 1 câble de x RCA 2 vis de x 2 tubes de plastique de x entretoise de 2 x EVA 22 GARANTIE LIMITÉE Chez COSMO, nous sommes persuadés que vous serez satisfait de votre nouvel appareil COSMO. Veuillez lire attentivement cette garantie. COSMO garantit que ce produit, y compris ses pièces d’origine, sont exempts de défauts de matières premières et de fabrication, pendant une période de 1 an suivant la date d’achat par le premier acheteur, et à condition qu’il a été utilisé au Canada. Si, pendant la période couverte par la garantie (1 an), vous trouvez que l’appareil ne fonctionne pas comme il faut, COSMO, vous offrira une des options suivantes, si le défaut de fabrication a été vérifié, ainsi que la preuve d’achat. Le service de réparations, pendant 1an à partir de la date d’achat, se fera sans frais, (pièces et main-d’oeuvre inclus). Le remplacement de votre appareil défectueux par un autre, neuf ou remis à neuf, ou par un autre appareil de valeur égale, sera sans frais pendant un an suivant la date d’achat.Télécommandes et accessoires sont couverts pendant 90 jours après la date d'achat originale. OBLIGATIONS DU CLIENT L’appareil est couvert par la garantie à partir de la date de l’achat initial au détail. En cas de services couverts par la garantie, le propriétaire de l’appareil doit présenter la facture originale, datée. Aucun service ne sera effectué sans présentation de la facture. Le propriétaire est seul responsable pour l’expédition ou le transport de l’appareil vers le centre de service et son retour. Cette garantie devient nulle et non avenue si: A) Les dommages ont été causés par la négligence, une mauvaise ulilsation, un abus, un accident ou un acte indépendent de notre volonté. B) L’appareil a été utilisé à des fins commerciales ou de location. C) L’appareil a été modifié ou réparé par une personne étrangère au centre de service agréé par COSMO. D) Les dommages de l’appareil sont causés par le raccordement incorrect à un appareil d’un autre fabricant. Cette garantie ne couvre pas: A) Les frais et les dommages subis pendant l’expédition de cet appareil vers le centre de service et son retour. B) Les dommages ou mauvais fonctionnement de l’appareil causés par le fait que l’utilisateur n’a pas suivi les instructions données dans le manuel. C) Les réglages ordinaires effectués par le client et décrits dans le manuel. D) Les dommages au disque compact, ou à la cassette audio. E) Les problèmes de réception du signal causés par des facteurs extérieurs. F) Les produits non achetés ou Canada. G) Les dommages aux produits utilisés hors du Canada. 23 CETTE GARANTIE EST NON TRANSFÉRABLE ET NE COUVRE QUE LE PREMIER ACHETEUR DE L’APPAREIL, ET NE S’APPLIQUE PAS AUX PROPRIÉTAIRES SUBSÉQUENTS DE L’APPAREIL. TOUTE AUTRE GARANTIE TACITE, Y COMPRIS LA GARANTIE DE VENDABILITÉ EST LIMITÉE À LA PÉRIODE DE LA GARANTIE EXPRIMÉE CI-DESSUS, COMMENÇANT À PARTIR DE LA DATE D’ACHAT INITIAL AU DÉTAIL ET AUCUNE AUTRE GARANTIE SOIT EXPRIMÉE SOIT TACITE NE S’APPLIQUERA ULTÉRIEUREMENT. L’ÉTENDUE DE CETTE GARANTIE LIMITÉE S’APPLIQUE SEULEMENT AUX RÉPARATIONS OU AU REMPLACEMENT DU PRODUIT, TEL QUE DÉCRITS C-DESSUS À LA SEULE DISCRÉTION DE COSMO. EN AUCUNE CIRCONSTANCE, COSMO N’EST RESPONSABLE DE PERTE OU DE DOMMAGES DIRECTS OU INDIRECTS, FORTUITS SPÉCIAUX OU INDIRECTS RÉSULTANT OU SE RAPPORTANT À L’UTILISATION DE CE PRODUIT. LA PRÉSENTE GARANTIE EST SEULEMENT VALIDE AU CANADA, POUR LES PRODUITS VENDUS, DISTRIBUÉS ET UTILISÉSAU CANADA, ET VOUS CONFÈRE DES DROITS JURIDIQUES PARTICULIERS. CEPENDANT, VOUS AVEZ PEUT-ÊTRE D’AUTRES DROITS QUI PEUVENT VARIER SUIVANT LA PROVINCE. CERTAINES PROVINCES NE PERMETTENT PAS LES RESTRICTIONS SUR LES GARANTIE IMPLICITES OU L’EXCLUSION DES DOMMAGES INDIRECTS. PAR CONSÉQUENT, LES RESTRICTIONS DE LA PRÉSENTE GARANTIE PEUVENT NE PAS S’APPLIQUER À VOTRE CAS. Cosmo Communications Service 55 Travail Road Unit 2 Markham, Ontario L3S 3J1 Sans Frais : 1-888-208-4108 Télécopieur: (905) 209-0489 www.cosmocanada.ca 24