1
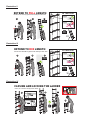
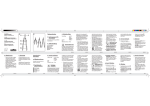
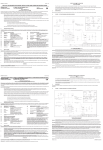
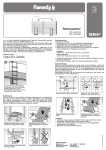
TELESCOPIC LADDER
USER’S MANUAL
GB NL FR D
DECLARATION OF CONFORMITY
We, the undersigned
Company:
TE-GROUP nv
Address:
Kapelsestraat 61, 2950 Kapellen - BELGIUM
declare, that the following equipment:
Product Name:
mr Safe Telescopic Ladder
Product Type:
Telescopic Ladder
is in conformity with the essential requirements and other relevant provisions of Directive 2001/95/EC.
The product has been tested against the following standards and specifications, applying versions valid on the date that it was
issued:
EN 131
The product also conforms with:
CLOSING AND LOCKING THE LADDER
NEN 2484
CLEAN FIRST IF NEEDED
Unlock / close the ladder starting from the bottom
9
8
Joseph Van Oosterum,
7 CEO TE-Group NV, August 2013
10
ILLUSTRATIONS
Release one lock at a time.
Use 1 hand while holding the
ladder with the other hand.
Illustration I
SAFETY PRECAUTIONS
A. LOAD
MAX
150 kg
C. 75° ANGLE
75˚
E
B. WORK HEIGHT
MAX
4.3 M
+F
H
I
2
PLACE ON FIRM LEVEL
SURFACE WITH A
SECURE FOOTING.
D. INSPECT/SECURE
BEFORE EACH USE.
G
J
DO NOT PLACE ON
BOXES, OR SCAFFOLDS TO
GAIN ADDITIONAL HEIGHT.
O
MAX. 1 PERSON
AT THE SAME TIME
DO NOT USE ON
SLIPPERY SURFACES.
K
DO NOT USE
IN WATER.
L
FACE LADDER WHEN
CLIMBING UP OR DOWN.
P
DO NOT USE UNDER THE
INFLUENCE OF
ALCOHOL/MEDICATION
DO NOT USE NEAR
LIVE ELECTRICAL WIRES.
DO NOT USE IN HIGH
WIND OR STORMS.
+M
N
KEEP BODY CENTERED BETWEEN SIDE RAILS.
DO NOT OVER REACH.
Q
ONLY USE FOR LIGHT
WORK AND FOR SHORT
PERIODS OF TIME
R
ALWAYS WEAR
SAFETY FOOTWEAR
KEEP AWAY
FROM CHILDREN
TION
TION
Illustration II
EXTEND TO FULL LENGTH
ATTENTION
Extend from the TOP rung upwards while holding the ladder down
POSITION
on all rungs
ATTENTION
Extend from the TOP rung upwards while holding the ladder
down
FULL
LENGTH
UNLOCKED
LOCKED
CLOS
Unlock / clos
POSITION
POSITION
on
onall
allrungs
rungs
3
2
Unlock / clos
LOCKED
3
2
1
EXTEND
TO FULL
LENGTH
1
CLOS
FULL
LENGTH
UNLOCKED
POSITION
on all rungs
MAX
150 kg
MAX
150 kg
75˚
Illustration
III
EXTEND
TO MID LENGTH
ATTENTION
Extend from the BOTTOM rung upwards while holding the ladder down
LOCKED
EXTEND
TO MID
LENGTH
5
6
4
POSITION
on all rungs
ATTENTION
Extend from the BOTTOM rung upwards while holding the ladder
down
MEDIUM
LOCKED
UNLOCKED
LENGTH
5
4
75˚
POSITION
POSITION
onall
allrungs
rungs
on
6
MEDIUM
LENGTH
UNLOCKED
POSITION
on all rungs
75˚
Illustration IV
CLEAN FIRST IF NEEDED
Unlock / close the ladder starting from the bottom
8
7
9
10
Release one lock at a time.
Use 1 hand while holding the
ladder with the other hand.
SAFETY PRECAUTIONS
SAFE
MAX
150
kg
A. LOAD
MAX
150 kg
C. 75° ANGLE
C. 75° ANGLE
75˚
CLOSING AND LOCKING THE LADDER
A. LOAD
75˚
MAX
150 kg
MAX
150 kg
SAFE
75˚
GB
INTRODUCTION
Congratulations on your purchase of the mr Safe telescopic ladder
ladder. The mr Safe ladder is a telescopic ladder that can be extended
from a compact size to full or medium length.
Please read these instructions carefully before using the telescopic
ladder! Also check the illustrations/pictograms that are shown on
the product itself. You must use, look after and maintain your mr Safe
telescopic ladder as described in these instructions.
SAFETY INSTRUCTIONS (illustration I)
Only use the telescopic ladder for the purpose for which it has been
made.
A. The maximum load for the ladder is 150 kg (= a person
climbing the ladder including any “baggage”).
B. The ladder can be used up to a working height of 4,3 m.
C. When using the ladder, it must have an angle of inclination
of 75° in relation to the ground.
D. Visually check the ladder for any defects, such as deformation
or wear, every time before use. Please verify that all rungs
are locked before climbing the ladder and make sure that
the ladder has been positioned correctly.
E. +F. Always place the ladder on a firm, stable, horizontal
surface, which is not slippery. This will ensure that the feet
of the ladder cannot sink into the ground and/or slip away.
G. Do not use the ladder in wells filled with water, as dirt can
get into the telescopic tubes and impair function.
H. Never position an aluminium ladder within range of noninsulated electrical components or low-voltage installations
and networks which are under live current.
I. Do not use the ladder outdoors in high winds or other
unfavourable weather conditions.
J. Do not place the ladder on tables, boxes or stands to access
other (higher) levels.
K. When ascending/descending the ladder, hold it tight.
Ascending/descending the ladder should always be done
while facing the ladder. While working, hold the ladder with
at least one hand, or take extra safety precautions if this is not
possible.
L. + M. Keep both feet steady on a rung of the ladder. Never
stand with just one foot on the ladder and the other foot
resting on a window frame. Never reach or lean too far to the
side when working on a ladder (max. 1 arm length). Avoid
any work that could cause sideways pressure (tipping over)
on the ladder, such as drilling holes in walls and concrete.
N. Never leave the ladder unsupervised. Think about children
that might be playing close by.
O. No more than one person should stand on the ladder at the
same time.
P. Concentrate when climbing the ladder and never do so under
the influence of alcohol, medication or other substances
that may affect your ability to react.
Q. Telescopic ladders may only be used for light work and for
short periods of time. Avoid using the ladder for longer periods
of time without taking regular breaks (tiredness is a risk!).
R. Always wear safety footwear to avoid slipping off the rungs.
Opening the ladder to full length (illustration II)
1.
2.
3.
Position the ladder upright on a firm and stable surface.
Hold the ladder still with a foot on ����������������
the bottom rung.
When extending the telescopic ladder, start with the
uppermost rung and extend this until the rung locks into
place. The mr Safe telescopic ladder locks automatically
when the ladder is being extended. Every rung section has
its own automatic lock on each side.
Repeat this step until the ladder has been extended to full
length.
IMPORTANT!
• Check if all rung sections are locked: all sliding safety locks
must be clicked into the tubes. Check this by pressing
the upper rung downwards on both sides. Also check the
position of the locks as shown in the illustration.
Once you have checked that all rung sections are locked,
you can use the ladder.
• Do not stand on the top 3 rungs of the ladder.
• Telescopic ladders must always be positioned on their feet
and not on the rungs.
Opening the ladder to medium length (illustration III)
4.
Position the ladder upright on a firm and stable surface.
Hold the ladder still with a foot on �����������������
the bottom rung.
5.
6.
Start at the bottom: Take the third rung from the bottom
and pull upwards until the rung section locks. The mr Safe
telescopic ladder locks automatically when the ladder is
being extended. Every rung section has its own automatic
lock on each side.
Continue to open one rung section at a time and repeat
this action until the ladder reaches the required length. The
remaining rungs on a partially extended ladder always have
to be stacked at the top of the ladder.
IMPORTANT!
Check if all rung sections are locked: all sliding safety locks must be
clicked into the tubes. Check this by pressing the upper rung downwards
on both sides. Also check the position of the locks as shown in the
illustration.
Once you have checked that all rung sections are locked, you can use
the ladder.
ATTENTION!
You cannot shorten an already opened ladder. If you need to make the
ladder shorter, you must first close the ladder completely and then
open it to the intermediate length required.
Closing the ladder (illustration IV)
Clean the ladder after each use if necessary.
7. Keep the ladder in a steady upright position with one hand
on the telescopic tube, preferably a few rungs higher. Unlock
and close the ladder from the bottom. Release one lock at
a time using your free hand and slide the two locks towards
one another using the thumb and first finger.
8. The rung section folds away as soon as you release the lock.
Hold the telescopic tubes a bit higher on the ladder and
close the rung section carefully using both hands.
9. Unlock and close the remaining rung sections one by one,
by alternately holding onto the ladder with one hand and
releasing the sliding safety locks with the other hand.
10. Collapse all the rungs in a similar way, finally ending up with
a fully closed ladder.
IMPORTANT!
• Never release both locks at the same time. Do not put your
hands on or between the rung sections you are unlocking
and closing. Close each rung �������������������
section carefully.
• Never adjust the height of the telescopic ladder while
somebody is standing on it.
CARRYING AND TRANSPORTING THE LADDER
Carry the ladder upright in its compact format so that it does not
extend or open up. Always transport the ladder completely closed in
its compact format. This protects the telescopic tubes against impact
and damage.
Avoid the telescopic ladder from opening and expanding by tightening
up the Velcro-belt around the rungs.
Cleaning the ladder
To guarantee your safety, the ladder must always be kept clean,
particularly the telescopic tubes and rungs.
Clean the ladder with a rag and some solvent. If necessary, the
telescopic tubes can be cleaned and treated with silicon spray (dry
with paper or a tissue!)
IMPORTANT!
Do not use the ladder for dirty work or in dirty environments. If, for
example, the ladder is used for bricklaying, concreting or painting,
over time it may become hard to keep it clean, impairing the telescopic
function.
CUSTOMER SUPPORT
For all questions and additional information concerning this product,
please contact [email protected]
GUARANTEE
Copyright © mr Safe®. mr Safe® is a registered trademark of TE-Group
NV. The mr Safe® brand stands for superior quality products and
excellent customer service. Therefore mr Safe® warrants this product
to be free from defects in materials and workmanship for a period of
two (2) years from the original purchase date of the product.
NL
INLEIDING
Gefeliciteerd met de aankoop van uw mr Safe telescopische ladder.
De mr Safe telescoopladder is een telescopische ladder die van een
compact formaat kan uitschuiven naar maximale lengte of naar een
tussenlengte.
Lees voor het gebruik van de telescopische ladder deze
gebruiksaanwijzing goed door! Bestudeer ook goed de aanwijzingen/
pictogrammen op het product zelf. U dient de ladder zo te gebruiken
en onderhouden als in de gebruiksaanwijzing wordt beschreven.
VEILIGHEIDSINSTRUCTIES (illustratie I)
Verzeker uzelf ervan dat de ladder geschikt is voor het desbetreffende
gebruik.
A. De ladder mag met maximaal 150 kg worden belast (=
persoon die de telescopische ladder beklimt inclusief
eventuele ‘bagage’).
B. Maximale werkhoogte is 4,3 m.
C. De ladder moet bij gebruik in een hoek van 75° ten opzichte
van de grond staan.
D. Inspecteer, iedere keer voor gebruik, de ladder op gebreken
zoals vervorming en slijtage. Alvorens de ladder te beklimmen
dient u zich er visueel van te overtuigen dat alle sporten
vergrendeld zijn en dat de ladder goed en veilig geplaatst is.
E. + F. Plaats de ladder altijd op een stevige, stabiele, horizontale
en niet gladde ondergrond waarin de voeten van de ladder
niet kunnen wegzakken en/of wegglijden.
G. Gebruik de ladder niet in putten met water, dat kan ertoe
leiden dat er vuil in de telescopische buizen komt en de
werking verslechtert.
H. Plaats een aluminium ladder nooit in de buurt van niet
geïsoleerde - onder spanning staande - elektrische delen
van laagspanningsinstallaties en –netten of nabij delen van
hoogspanningsinstallaties.
I. Gebruik de ladder niet bij harde wind of ander ongunstige
weersomstandigheden.
J. Plaats de ladder niet op dozen, tafels of stellingen of een
grotere hoogte te bekomen.
K. Houd tijdens het beklimmen/afdalen de ladder goed vast.
Doe dit altijd met het gezicht naar de ladder toe. Tijdens
werkzaamheden op de ladder, de ladder altijd met 1 hand
vasthouden, of extra veiligheidsmaatregelen nemen indien
dat niet mogelijk is.
L. + M. Sta altijd met twee voeten op een sport van de ladder.
Ga nooit met één voet op de ladder en met de andere voet
op bijvoorbeeld een deurkozijn staan. Reik en leun niet te
ver opzij tijdens werken op een ladder (max. 1 armlengte).
Voorkom werkzaamheden die een zijdelingse belasting van
de ladder veroorzaken, bijvoorbeeld het boren van gaten in
muren en beton.
N. Laat een opgestelde ladder nooit onbeheerd achter. Denk
aan (spelende) kinderen.
O. Ga nooit met meer dan 1 persoon op de ladder staan.
P. Beklim een ladder geconcentreerd en niet onder invloed
van alcohol, medicijnen of andere middelen die het
reactievermogen kunnen beïnvloeden.
Q. Telescopische ladders mogen enkel gebruikt worden voor
licht werk met een korte tijdsduur. Sta niet te lang op de
ladder zonder regelmatige pauzes (vermoeidheid is een
veiligheidsriscio).
R. Draag altijd geschikte schoenen als u op de ladder klimt.
DE LADDER UITSCHUIVEN NAAR MAXIMALE LENGTE
illustratie II)
1. Plaats de ladder rechtop op een stabiele ondergrond. Hou
de ladder met uw voet op de onderste sport tegen.
2. Begin bij het uitschuiven van de telescopische ladder bij de
bovenste sport en schuif deze uit tot de sport zich vergrendelt.
De mr Safe telescoopladder vergrendelt automatisch
wanneer u de ladder uitschuift. Elke sport heeft een eigen
vergrendeling aan iedere zijde.
3. Herhaal deze handeling tot de ladder volledig uitgeschoven is.
BELANGRIJK!
• Controleer of alle sporten vergrendeld zijn: alle
vergrendelpallen moeten in de buizen zijn geklikt.
Controleer dit door aan beide zijden de bovenliggende sport
naar beneden te drukken. Controleer ook de stand van de
schuifjes zoals aangegeven in de illustratie. Wanneer u heeft
gecontroleerd of alle sporten zijn vergrendeld, kunt u de
ladder gebruiken.
• De bovenste 3 sporten van de ladder mogen niet worden
gebruikt om op te staan.
• Telescopische ladders moeten altijd rusten op hun voeten
en niet op de sport.
DE LADDER UITSCHUIVEN NAAR EEN TUSSENLENGTE
(illustratie III)
4. Plaats de ladder rechtop op een stabiele ondergrond. Hou
de ladder met uw voet op de onderste sport tegen.
5. Begin onderaan bij het uitschuiven: Neem de onderste
uitschuifbare sport vast (de derde sport van onderen) en
schuif deze uit tot de sport zich vergrendelt. De mr Safe
telescoopladder vergrendelt automatisch wanneer u de
ladder uitschuift. Elke sport heeft een eigen vergrendeling.
6. Ga verder door de sport daarboven uit te schuiven en
herhaal deze handeling tot de ladder de juiste lengte
heeft. Bij een gedeeltelijk uitgeschoven ladder dienen de
overgebleven sporten altijd aan de bovenkant van de ladder
opgestapeld te zijn.
BELANGRIJK!
Controleer of alle sporten vergrendeld zijn: alle vergrendelpallen
moeten in de buizen zijn geklikt. Controleer dit door aan beide zijden
de bovenliggende sport naar beneden te drukken. Controleer ook de
stand van de schuifjes zoals aangegeven in de illustratie.
Wanneer u heeft gecontroleerd of alle sporten zijn vergrendeld, kunt
u de ladder gebruiken.
LET OP!
Als het nodig is de ladder korter te maken, moet u de ladder eerst
helemaal inschuiven en vervolgens opnieuw uitschuiven tot de
gewenste tussenlengte.
DE LADDER INSCHUIVEN (illustratie IV)
Reinig de ladder na gebruik indien nodig.
7. Houd de ladder in rechtopstaande positie stevig vast met
één hand aan de telescopische buis bij voorkeur enkele
sporten hoger. Begin met het ontgrendelen van de onderste
sport. Gebruik uw vrije hand om met duim en wijsvinger de
schuifjes naar elkaar toe te schuiven.
8. De sport valt in elkaar zodra u hem heeft ontgrendeld. Hou
de telescoopbuis van de ladder wat hoger op de ladder
vast en schuif de sport met beide handen gecontroleerd in
elkaar.
9. Ontgrendel en schuif de overige sporten één voor één van
onderaf in elkaar, door de ladder afwisselend met uw ene
hand vast te houden en de schuifjes met de andere hand te
ontgrendelen.
10. Op deze manier krijgt u uiteindelijk een in elkaar geschoven
ladder.
BELANGRIJK!
• Maak nooit beide schuifjes tegelijkertijd los. Hou uw handen
niet op of tussen de sporten wanneer u ontgrendelt en
inschuift. Schuif iedere sport gecontroleerd in.
• Bedien geen schuifjes terwijl er iemand op de ladder staat.
DE LADDER VERVOEREN
Houd de ladder rechtop zodat hij niet uitklapt en uitschuift. Vervoer
de ladder altijd geheel ingeschoven zodat de telescopische buizen
beschermd zijn tegen stoten en beschadigingen.
Zorg ervoor dat de ladder ingeschoven blijft door gebruik te maken van
de riem met Velcro-sluiting.
DE LADDER REINIGEN
De ladder moet na ieder gebruik gereinigd worden, vooral de
telescopische buizen en de sporten, om uw veiligheid te waarborgen.
Maak de ladder schoon met een doek met wat oplosmiddel. Indien
gewenst, kunnen de telescopische buizen met teflonspray worden
behandeld (droogwrijven met papier of een doek!).
BELANGRIJK!
Gebruik de ladder niet bij vieze werkzaamheden of in vieze omgevingen.
Als u de ladder gebruikt bij het metsen of schilderen, zal de ladder
na verloop van tijd moeilijk te reinigen zijn, wat de werking van de
telescoopfunctie verslechtert.
KLANTENONDERSTEUNING
Voor alle vragen in verband met dit product kunt u contact opnemen
met [email protected]
GARANTIE
Copyright © mr Safe®. Mr Safe® is een gedeponeerd handelsmerk van
TE-Group NV. Het merk mr Safe® staat voor producten van superieure
kwaliteit en een uitstekende klantenservice. Daarom garandeert
mr Safe® dat dit product vrij is van materiaal- en fabricagefouten
gedurende een periode van twee (2) jaar na de oorspronkelijke
aankoopdatum van het product.
FR
INTRODUCTION
Félicitations avec votre achat de l’échelle télescopique mr Safe. L’échelle
mr Safe est une échelle télescopique qui peut être dépliée d’un format
compact à sa longueur totale ou à une longueur intermédiaire.
Lisez attentivement ce mode d’emploi avant d’utiliser l’échelle
télescopique ! Etudiez également les indications sur le produit. Il est
essentiel que l’échelle soit utilisée et entretenue conformément aux
instructions suivantes.
INSTRUCTIONS DE SECURITE (illustration I)
Assurez-vous que l’échelle télescopique soit appropriée a l’usage pour
lequel vous comptez l’utiliser.
A. Chargement maximal de 150 kg (= personne qui grimpe
l’échelle télescopique, y compris son ‘bagage’ éventuel).
B. Hauteur de travail maximale est de 4,3 m.
C. L’échelle doit avoir une inclinaison de 75° par rapport au sol
quand elle est utilisée.
D. Avant chaque utilisation, vérifiez si vous voyez d’éventuels
défauts (par ex. déformation et usure). Avant de grimper
à l’échelle, assurez-vous que tous les coulisseaux sont
verrouillés et contrôlez que l’échelle est montée d’une façon
correcte et sûre.
E. + F. Placez toujours l’échelle sur un support dur, stable,
horizontal et non glissant, sur lequel les pieds de l’échelle ne
peuvent pas s’enfoncer ou glisser.
G. N’utilisez pas l’échelle dans les puits remplis d’eau; de la
saleté pourrait pénétrer dans les tubes télescopiques et
nuire au fonctionnement.
H. Ne placez jamais l’échelle en aluminium près de pièces
électriques non isolées sous tension, près de réseaux a basse
tension ou à proximité d’installations à haute tension.
I. Par vent fort ou autre temps défavorable, n’utilisez pas
l’échelle télescopique a l’extérieur.
J. Ne placez jamais l’échelle sur des tables ou des caisses afin
d’accéder un niveau supérieur.
K. En montant/descendant, tenez-vous bien à l’échelle, et
toujours avec le visage en direction de l’échelle. Pendant
les travaux, tenez l’échelle avec au moins une main libre, ou
prenez des mesures de sécurité si cela n’est pas possible.
L. + M. Posez toujours vos deux pieds sur l’échelon de l’échelle
télescopique. Ne posez jamais un seul pied sur l’échelle
et l’autre pied sur par exemple un appui de fenêtre. Ne
vous appuyez ou ne vous penchez pas trop de côté en
travaillant sur l’échelle (max. 1 longueur de bras). Evitez
les travaux qui exercent une pression latérale sur l’échelle
télescopique, comme le forage de murs ou béton afin
d’éviter basculement.
N. Ne laissez jamais une échelle montée sans surveillance.
Pensez aux enfants.
O. Utilisation réservée à 1 personne maximum.
P. Montez l’échelle télescopique de manière concentrée et pas
sous l’effet d’alcool, de médicaments ou de drogues pouvant
affecter la capacité de réaction.
Q. Des échelles télescopiques peuvent uniquement être utilisées
pour des travaux légers et de courte durée. Prenez suffisamment
de pauses et n’oubliez pas que la fatigue pose un risque!
R. Portez des chaussures appropriées pour éviter toute glissade.
Ouvrir l’échelle sur sa longueur totale (illustration II)
1.
2.
3.
Placez l’échelle à la verticale sur une base horizontale et stabile. Retenez l’échelle en plaçant un pied sur le barreau du bas.
Commencez à déplier l’échelle télescopique par l’échelon
supérieur et dépliez-la jusqu’à ce que l’échelon se verrouille.
Les sections de barreaux de l’échelle mr Safe se vérouillent
automatiquement. Chaque échelon a ses propres boutons
glissants à chaque côté.
Continuez à sortir les tubes jusqu’à ce que l’échelle soit
complètement dépliée.
IMPORTANT!
• Contrôlez que toutes les sections de barreaux sont bloquées:
tous les boutons glissants doivent être enclenchés contre
les tubes. Vérifiez en poussant l’échelon supérieur sur les
deux côtés vers le bas. Vérifiez également la position des
boutons glissants (voir illustration). Quand vous avez vérifié
que toutes les sections de barreaux sont verrouillées, vous
pouvez utiliser l’échelle.
• Les 3 barreaux les plus hauts de l’échelle ne peuvent pas
être utilisés pour poser les pieds.
• Les échelles télescopiques doivent toujours reposer sur
leurs pieds, pas sur les échelons.
Ouvrir l’échelle sur sa longueur intermédiaire
(illustration III)
4. Placez l’échelle à la verticale sur une base horizontale et stabile. Retenez l’échelle en plaçant un pied sur le barreau du bas.
5. Commencez à déplier l’échelle télescopique par le bas:
prenez le troisième barreau en partant du bas et tirez celuici vers le haut jusqu’à ce que la section de barreau se bloque.
Les sections de barreaux de l’échelle mr Safe se vérouillent
automatiquement. Chaque échelon a ses propres boutons
glissants à chaque côté.
6. Continuez à ouvrir la section au-dessus, une par une, jusqu’à
ce que l’échelle a la longueur souhaitée. Dans le cas d’une
échelle partiellement dépliée, les échelons restants se sont
superposés en haut de l’échelle.
IMPORTANT!
Contrôlez que toutes les sections de barreaux sont bloquées: tous les
boutons glissants doivent être enclenchés contre les tubes. Vérifiez en
poussant l’échelon supérieur sur les deux côtés vers le bas. Vérifiez
également la position des boutons glissants (voir illustration). Quand
vous avez vérifié que toutes les sections de barreaux sont verrouillées,
vous pouvez utiliser l’échelle.
ATTENTION!
Vous ne pouvez pas raccourcir une échelle déjà ouverte. Si vous devez
raccourcir une échelle, vous devez d’abord la fermer complètement
puis la rouvrir à la longueur intermédiaire souhaitée.
FERMER L’ECHELLE (illustration IV)
Nettoyez l’échelle après chaque utilisation si nécessaire.
7. Avec 1 main sur le montant, tenez fermement l’échelle à
la verticale, de préférence quelques échelons plus haut.
Commencez par déverrouiller les boutons glissants tout en
bas. Déverrouillez un bouton glissant à la fois tout en tenant
l’échelle télescopique de l’autre main.
8. La section de barreau se replie dès qu’elle est déverrouillée. Tenez
le tube télescopique de l’échelle en haut de l’échelle et fermez la
section de barreau de façon contrôlée avec les deux mains.
9. Bloquez et fermez les sections de barreaux restantes, une à
la fois en partant du bas, en tenant l’échelle d’une main et
déverrouillant le bouton glissant de l’autre et alternant de
côté à chaque bouton.
10. De cette manière, vous aurez une échelle complètement
fermée.
IMPORTANT!
• Ne libérez jamais les deux boutons glissants en même
temps. Ne placez pas vos mains sur ou entre les sections
de l’échelle lors de la fermeture. Fermez chaque section de
barreaux de façon contrôlée.
• Ne touchez pas les boutons glissants lorsque quelqu’un se
trouve sur l’échelle.
TRANSPORTER L’ECHELLE
Portez l’échelle dans le format compact et à la verticale pour qu’elle ne
s’ouvre pas. Transportez toujours l’échelle complètement fermée dans
le format compact. Les tubes télescopiques sont ainsi protégés contre
les chocs et les dommages.
Assurez-vous que l’échelle reste fermée en utilisant la ceinture de
sécurité Velcro.
NETTOYER L’ECHELLE
L’échelle doit être nettoyée après chaque utilisation, surtout les tubes
télescopiques et les sections de barreaux, afin de pouvoir garantir
votre sécurité.
Nettoyez l’échelle avec un chiffon et un peu de solvant. Si nécessaire,
les tubes télescopiques peuvent être traités avec un vaporisateur de
téflon (essuyez avec un papier ou chiffon!).
IMPORTANT!
N’utilisez pas l’échelle pour les travaux sales ou dans des environnements
sales. Si l’échelle est utilisée pour la maçonnerie, le travail avec du
béton ou la peinture, elle peut devenir tellement sale qu’il sera difficile
de la nettoyer, ce qui pourrait nuire à la fonction télescopique.
SUPPORT DE CLIENTS
Pour toute questions et infos supplémentaires concernant ce produit,
veuillez-bien contacter: [email protected]
GARANTIE
Copyright © mr Safe®. Mr Safe® est une marque déposée de TE-Group
NV. La marque de mr Safe® est synonyme de produits de qualité
supérieure et d’un service après-vente excellent. C’est la raison pour
laquelle mr Safe® garantit ce produit contre tout défaut de matériel ou
de fabrication pour une période de deux (2) ans à compter de la date
d’achat initiale.
D
EINLEITUNG
Herzlichen Glückwunsch zum Kauf Ihrer mr Safe Teleskopleiter. Mr Safe
Teleskopleiter lässt sich aus dem praktischen Kompaktformat entweder
auf die volle Länger oder auf eine Zwischenlänge ausziehen.
Bitte lesen Sie vor dem Gebrauch der Teleskopleiter diese
Gebrauchsanweisung sorgfältig durch! Lesen Sie auch sorgfältig
die Anweisungen/Symbole auf dem Produkt. Es ist von allergrößter
Bedeutung, dass sie wie folgt benutzt, gepflegt und gewartet wird.
SICHERHEITSHINWEISE (Abbildung I)
Stellen Sie sicher dass die Leiter für den jeweiligen Einsatz geeignet ist.
A. Die Leiter darf mit maximal 150 kg belastet werden (= die
Person auf der Leiter einschließlich eventueller zusätzlicher
Ausrüstungsgegenstände).
B. Maximale Arbeitshöhe ist 4,3 m.
C. Stellen Sie die Leiter in einem Winkel von 75. Grad zum
Boden auf.
D. Bevor Sie die Teleskopleiter besteigen, müssen Sie sich erst
durch Sichtkontrolle davon überzeugen, dass alle Sprossen
arretiert sind und dass die Leiter richtig und sicher platziert
ist.
E. + F. Stellen Sie die Leiter immer auf einem festen, stabilen,
waagerechten und rutschfesten Untergrund auf, auf dem die
Leiterfüße nicht einsinken und/oder wegrutschen können.
G. Die Leiter nicht in wassergefüllten Schächten verwenden, da
dadurch Schmutz in die Teleskopstangen eindringen und die
Funktion beeinträchtigen kann.
H. Positionieren Sie eine Leiter aus Aluminium nicht in der
Nähe von nicht isolierten - unter Spannung stehenden elektrischen Komponenten von Niederspannungsanlagen
und –netzen oder in der Nähe von Hochspannungsanlagen
und deren Komponenten.
I.
Die Leiter nicht im Freien bei ungünstigen Wetterbedingungen,
z.B. starkem Wind, benutzen.
J.
Stellen Sie die Leiter nicht auf Boxen, Tischen oder Regalen
um eine größere Höhe zu erhalten.
K. Beim Austeigen und Absteigen an der Leiter gut festhalten.
Immer mit dem Gesicht zur Leiter aufsteigen und absteigen.
Beim Arbeiten auf einer Leiter immer mit einer Hand
festhalten oder, falls dies nicht möglich ist, zusätzliche
Sicherheitsvorkehrungen treffen.
L. +M. Bleiben Sie beim Verrichten von Arbeiten immer mit
beiden Füßen auf einer Sprosse der Leiter stehen. Stellen
Sie sich nie mit nur einem Fuß auf die Leiter und mit dem
anderen Fuß auf z.B. einen Fensterrahmen. Reichen und
lehnen Sie sich während der Arbeit nicht zu stark auf die
Seite (max. 1 Armlänge). Vermeiden Sie Arbeiten die eine
seitliche Belastung bewirken, z.B. Bohren im Mauerwerk
und Beton.
N. Lassen Sie eine aufgestellte Leiter niemals unbeaufsichtigt.
Denken Sie an (spielende) Kinder.
O. Besteigen Sie eine Leiter nie mit mehr als einer Person.
P. Besteigen Sie eine Leiter konzentriert und nicht unter
Einfluss von Alkohol, Medikamenten oder Mitteln, die das
Reaktionsvermögen beeinträchtigen können.
Q. Teleskopleitern sollten nur für leichte Arbeiten von kurzer
Dauer benutzt werden. Nicht zu lange ohne Unterbrechungen
auf der Leiter stehen (Müdigkeit ist eine Gefahr).
R. Beim Aufsteigen auf die Leiter immer geeignete Schuhe
tragen.
AUSZIEHEN DER LEITER AUF VOLLE LÄNGE (Abbildung II)
1.
2.
3.
Die Leiter aufrecht auf einen sauberen und festen
Untergrund stellen und mit einem Fuß auf der untersten
Sprosse stabilisieren
Beginnen Sie beim Ausfahren der Teleskopleiter mit der
obersten Sprosse und ziehen Sie diese aus, bis die Sprosse
einrastet. Die mr Safe Teleskopleiter wird beim Öffnen
automatisch verriegelt, jedes Segment hat seinen eigenen
Sperrmechanismus.
Fahren Sie so fort bis die Teleskopleiter vollständig
ausgefahren ist.
WICHTIG!
•
Prüfen, dass sämtliche Sprossensegmente gesichert sind: Alle
Schiebeknöpfe müssen zu den Stangen hin eingerastet sein. Sie
können es überprüfen, indem Sie versuchen, an beiden Seiten die
darüber liegende Sprosse nach unten zu drücken. Überprüfen Sie
auch die Position der Verriegelungsschieber (Siehe Abbildung).
Wenn alle Sprossen ordnungsgemäß gesichert sind, können Sie
die Leiter benutzen.
•
Die obersten 3 Sprossen einer Leiter nicht als Standfläche
benutzen.
•
Teleskopleitern müssen immer auf den Leiterfüßen ruhen und
nicht auf den Sprossen.
AUSZIEHEN DER LEITER AUF DIE ZWISCHENLÄNGE (Abbildung III)
4.
5.
6.
Die Leiter aufrecht auf einen sauberen und festen
Untergrund stellen und mit einem Fuß auf der untersten
Sprosse stabilisieren.
Beginnen Sie beim Ausfahren der Teleskopleiter von unten:
Die unterste ausziehbare Sprosse ergreifen (dritte Sprosse
von unten) und nach oben ziehen, bis das Sprossensegment
verriegelt ist. Die mr Safe Teleskopleiter wird beim Öffnen
automatisch verriegelt, jedes Segment hat seinen eigenen
Sperrmechanismus.
Die darüber liegende Sprosse und nacheinander die nächsten
Segmente ausziehen, bis die Leiter die gewünschte Länge
hat. Bei einer teilweise ausgeschobenen Leiter müssen
die restlichen Sprossen immer als eine Gruppe im oberen
Abschnitt der Leiter zusammen bleiben.
WICHTIG!
Prüfen, dass sämtliche Sprossensegmente gesichert sind: Alle
Schiebeknöpfe müssen zu den Stangen hin eingerastet sein. Sie
können es überprüfen, indem Sie versuchen, an beiden Seiten die
darüber liegende Sprosse nach unten zu drücken. Überprüfen Sie
auch die Position der Verriegelungsschieber (Siehe Abbildung). Wenn
alle Sprossen ordnungsgemäß gesichert sind, können Sie die Leiter
benutzen.
ACHTUNG!
Eine bereits ausgezogene Leiter kann nicht verkürzt werden. Soll die
Leiter verkürzt werden, muss sie zuerst komplett zusammengeschoben
und dann auf die gewünschte Zwischenlänge ausgezogen werden.
AUSFAHREN DER TELESKOPLEITER (Abbildung IV)
Reinigen Sie die Leiter nach dem Gebrauch, wenn nötig.
7. Halten Sie die Leiter in senkrechter Position gut fest,
eine Hand befindet sich auf dem Holm, vorzugsweise 2
Sprossen höher. Beginnen Sie beim Zusammenschieben der
Teleskopleiter von unten. Drücken Sie mit der anderen Hand
mit Daumen und Zeigefinger die Schieber zueinander.
8. Das Sprossensegment fällt zusammen, sobald Sie die
Verriegelung gelöst haben. Die Teleskopstangen etwas
weiter oben an der Leiter halten und die Sprossensegmente
kontrolliert mit beiden Händen zusammenschieben.
9. Die verbleibenden Sprossensegmente nacheinander von
unten nach oben lösen und zusammenschieben, dabei
abwechselnd die Leiter mit der einen Hand halten und den
Schiebeknopf mit der anderen Hand entriegeln.
10. Die nächsten Sprossen schieben Sie genauso nacheinander
zusammen, bis die Leiter ganz zusammengeschoben ist.
WICHTIG!
•
Niemals beide Knöpfe gleichzeitig lösen. Die Hände nicht auf oder
zwischen den Sprossensegmenten halten, die Sie gerade lösen
und zusammenschieben.
•
Keine Verriegelungsmechanismen bedienen, wenn sich jemand
auf der Teleskopleiter befindet .
TRANSPORT DER LEITER
Die Leiter im kompakten Format und aufrecht tragen, sodass sie nicht
auseinander gleiten und sich öffnen kann. Die Leiter im kompakten
Format stets komplett zusammengeschoben transportieren. So
werden die Teleskopstangen gegen Stöße und Schäden gesichert, die
die Funktion der Leiter beeinträchtigen können.
Stellen Sie sicher, dass die Leiter eingefahren bleibt durch die Nutzung
des Bandes mit Klettverschluss.
REINIGUNG DER LEITER
Aus Sicherheits- und Funktionsgründen ist die Leiter, insbesondere die
Teleskopstangen und Sprossensegmente, stets sauber zu halten.
Die Reinigung erfolgt mit einem Lappen mit etwas Lösungsmittel. Die
Teleskopstangen können mit Teflonspray behandelt werden (mit Papier
oder einem Lappen trocknen!).
WICHTIG!
Die Leiter nicht bei schmutzintensiven Arbeiten oder in schmutzigen
Umgebungen verwenden. Wird die Leiter beispielsweise bei Maureroder Betonarbeiten oder beim Malen verwendet, kann sie mit der Zeit
schwer zu reinigen sein, und die Teleskopfunktion verschlechtert sich.
KUNDENDIENST
Bitte wenden Sie sich bei allen Fragen zum Produkt an: [email protected]
GARANTIE
Copyright © mr Safe. mr Safe® ist ein eingetragenes Warenzeichen der
TE-Group NV. Das Markenzeichen mr Safe® steht für hervorragende
Produktqualität und einen überdurchschnittlichen Kundendienst.
Deshalb gewährt mr Safe® eine Produktgarantie auf alle Material- und
Produktionsfehler für einen Zeitraum von zwei (2) Jahren ab Datum
des Kaufbelegs.
--------------------------------Manual/mr Safe Telescopic ladder/08-13/V01--------------------------