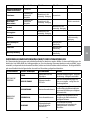
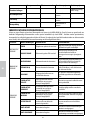
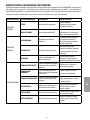
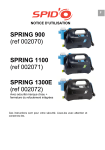
1
ITALY: NEWA TECNO INDUSTRIA Srl
Via dell’Artigianato 2 - 35010 Loreggia (PD)
Tel. +39 049 5794069 Fax +39 049 5794699
Numero Verde 800-860306
CHINA: NEWA ELECTRICAL (SUZHOU) CO Ltd
Plant A1 - 33 Minsheng R - Shengpu
Suzhou Ind. Park 215126 Jiangsu
Made in PRC
1
Index
IT Istruzioni d’uso e garanzia
EN Instructions and warranty
FR Mode d’emploi et garantie
DE Gebrauchs-anleitung und Garantie
NL Aanwunzingen garantie
ES Instrucciones y garantia
PT Instruções e garantia
RU Инструкции и гарантия
www.newa.it
NKF 250
page 1
page 10
page 19
page 28
page 37
page 46
page 55
page 64
NKF 350
FILTRO A CANESTRO
PRESSURIZZATO
Istruzioni e garanzia
EN PRESSURIZED
CANISTER FILTER
Instructions and warranty
a
a
2
2
2
FR FILTRE EXTERNE
SOUS PRESSION
Mode d’emploi et garantie
DE DRUCKFESTER
AUßENFILTER
Gebrauchs-anleitung und Garantie
NL DRUK BEKRACHTIGD
CILINDRISCH FILTER
Aanwunzingen garantie
ES FILTRO DE CARTUCHO
PRESURIZADO
Instrucciones y garantia
FILTRO PRESSURIZADO
DE LATA
Instruções e garantia
ГЕРМЕТИЧНЫЙ
КАНИСТРОВЫЙ ФИЛЬТР
17.88.001
Инструкции и гарантия
NKF 250
NKF 350
NKF 450
NKF 700
Technical data
MODELS
NKF 250 19 W 20 cm 35 cm
1
1
3
3
5
4
5
4
8
8
11
11
12
12
6L
2
3
2,78 L
FILTER
Q
PUMP
Q
H
FOR
AQUARIUMS
14
15
450 L/h
550 L/h
150 cm 60 - 250 l
2
1
1
3
3
5
5
4
4
8
8
11
11
12
13
13
12
9
9
13
12
9
9
a
12
13
13
W
FILTER
FILTERING BASKETS SPONGES BIOLOGIC
n°
VOLUME
DIMENSIONS VOLUME
n°
230 V
Ø
H
50 Hz
NKF 700
a
Pictures
IT
NKF 450
12
13
9
13
9
NKF 350 22 W 20 cm 39 cm
7L
3
4
4,17 L
600 L/h
750 L/h
NKF 450 36 W 25 cm 41 cm
10,5 L
3
4
7,10 L
800 L/h
1000 L/h 200 cm 310 - 450 l
NKF 700 39 W 25 cm 48 cm
14 L
4
5
9,40 L
1000 L/h 1300 L/h 220 cm 420 - 700 l
160 cm 180 - 350 l
14
15
10
9
14
14
15
15
9
6
IT Il volume di filtraggio (Volume tot. canestro) e la portata (Portata max. filtro) sono i principali elementi per scegliere correttamente il filtro esterno. Per acquari marini o
sovrappopolati, scegliere il filtro successivo a quello indicato. Nota *: le portate sono state misurate con i filtri completamente accessoriati dei materiali filtranti ed utilizzando
tubi flessibili di mandata e aspirazione in dotazione della stessa lunghezza. L’altezza di riferimento per la determinazione delle portate è di 150cm.
EN Filtering volume (total canister volume) and power (max. filter capacity) are the main factors for the right choice of the external filter. For marine and overpopulated
aquariums, use the filter model following the indicated one. Note*: The power is calculated for the filters fully equipped with filtering materials, when using a set of inlet and
outlet flexible tubes of the same length. Reference water height for power calculation is 150 cm.
FR Le volume de filtration (Volume total du jerrican) et la capacité (Capacité maximale du filtre) sont les paramètres principaux pour choisir correctement le modèle. Pour
les aquariums maritimes et surpeuplés, choisir le modèle de filtre dans le tableau ci-dessus. Remarque*: Les capacités sont calculées pour les filtres entièrement complétés
par les matériaux filtrants, à l’utilisation de l’assortiment des tubes flexibles d’entrée et de sortie de même longueur. La hauteur de référence de la montée de l’eau pour le
calcul de la capacité fait 150 cm.
DE Das Filtervolumen (Gesamtvolumen des Kanisterfilters) und die Wasserdurchflussmenge (Max. Wasserdurchflussmenge des Filters) sind die wichtigsten Aspekte, die es
bei der Wahl des richtigen Außenfilters zu berücksichtigen gilt. Für Meerwasseraquarien oder stark besetzte Aquarien wählen Sie am besten den nächstgrößeren Filter aus.
N.B.*: Die Wasserdurchflussmenge und die Förderleistung wurden an vollständig mit Filtermaterialien befüllten Filtern und unter Verwendung der zum Packungsumfang
gehörenden, gleich langen Druck- und Ansaugschläuche gemessen. Die Bezugshöhe für die Messung der Wasserdurchflussmenge und der Förderleistung beträgt 150 cm.
NL Het filtervolume (totale container volume) en het vermogen (maximale filtercapaciteit) zijn de twee belangrijkste factoren die van invloed zijn om een juiste Extern
filter te kiezen. Kies voor zee-en overbevolkte aquaria het juiste daarvoor aangegeven filter model. Het in de tabel beschreven filtervermogen is berekend voor filters welke
volledig voorzien zijn van filtermateriaal, en wanneer men een set flexibele leidingen (Inlaat & Uitlaatleidingen) van dezelfde diameter en lengte gebruikt. De voor de
vermogensberekening gebruikte waterhoogte is 150cm.
ES Volumen de filtración (Volumen total de cartucho)y consumo (max.consumo de filtro) son los principales indicadores de la correcta elección del modelo. Para los acuarios marinos superpoblados elija el modelo de filtro siguiente al indicado. Nota*: los consumos han sido calculados para los filtros, totalmente equipados con materiales
filtrantes, con el uso del conjunto de tubos flexibles de entrada y salida de la misma longitud. La altura de referencia del agua para los cálculos del consumo es de 150cm.
PT O volume da filtragem (o volume total da lata) e a potência (a potência máxima do filtro) são os indicadores principais para a escolha correcta do filtro externo.
Para os aquários de mar e congestionados escolham o modelo do filtro a seguir do indicado. Comentário*: As potências são calculadas para os filtros, completamente equipados com os meios de filtragem durante a utilização do conjunto de canos flexíveis de entrada e saida do mesmo comprimento. A altura de referência do levantamento da
água para a calculação de potência é de 150 sm.
RU FILTER VOLUME: (totaal cilindrisch volume) en vermogen (maximale filtercapaciteit) zijn de belangrijkste factoren welke van invloed zijn op de juiste keuze voor het
externe filter. Kies voor zee-en overbevolkte aquaria het juiste daarvoor aangegeven filter model. TIP *: Het in de tabel beschreven filtervermogen is berekend voor filters
welke volledig voorzien zijn van filtermateriaal, en wanneer men een set flexibele leidingen (Inlaat & Uitlaatleidingen) van dezelfde diameter en lengte gebruikt. De voor de
vermogensberekening gebruikte waterhoogte is 150cm.
9
9
10
9
10
6
ACCESSORIES
(for all models)
b
e
c
f
6
14
15
9
a
o
10
6
g
j
i
i
j
o
l
m
k
d
h
l
n
m
2
3
16
4
5
19
6
20
Spare parts
18
17
Kg
Kg
RICAMBI ED ACCESSORI
SPARE PARTS AND ACCESSORIES
PIÈCES DE RECHANGE ET ACCESSOIRES
ERSATZ- UND ZUBEHÖRTEILE
RESERVEONDERDELEN EN ACCESSOIRES
PIEZAS DE REPUESTO Y ACCESORIOS
PEÇAS DE REPOSIÇÃO
ЗАПЧАСТИ И АКСЕССУАРЫ
21
I
7
22
8
II
23
V
IV
OUT
9
NO
24
10
OK
25
Kg
12
27
13
28
VI
IN
26
REF. /
Codes
11
III
NKF 250
NKF 350
NKF 450
NKF 700
I
(*) Fiber for mechanical filtering
00.188.001
00.188.001
00.188.002
00.188.002
II
(*) Coarse-pored sponge (blue)
00.188.003
00.188.003
00.188.004
00.188.004
III
(*) Fine-porous sponge (black)
00.188.005
00.188.005
00.188.006
00.188.006
00.188.011
00.188.011
00.188.012
00.188.012
00.188.009
00.188.009
00.188.010
00.188.010
00.188.007
00.188.007
00.188.008
00.188.008
IV
V
VI
Description
O-ring (rotor unit)
(*) Impeller
O-ring (baskets)
(*)
IT - Componenti soggette ad usura.
FR- Composants sujets à usure.
NL- Onderdelen aan slijtage onderhevig.
PT - Componentes sujeitos ao desgaste.
14
j
15
k
m
j
EN- Components subject to wear and tear.
DE- Verschleißteile - aan slijtage onderhevige componenten.
ES - Componentes sujetos a desgaste.
RU- Расходные и изнашивающиеся компоненты устройства.
IT
Istruzioni d’uso
INDICE
NORME IMPORTANTI PER LA SICUREZZA
DESCRIZIONE DEL PRODOTTO
Componenti del filtro
Raccorderia
Materiali filtranti
FUNZIONAMENTO
ALLOGGIAMENTO DEI MATERIALI FILTRANTI
PREPARAZIONE DEL FILTRO
Assemblaggio raccorderia
Collegamento della valvola d’arresto
con rubinetti IN - OUT al filtro esterno
AVVIAMENTO DEL FILTRO
Collocazione
Messa in funzione
MANUTENZIONE
Manutenzione dell girante
Manutenzione dei materiali filtranti
PERSONALIZZAZIONE DEI MATERIALI FILTRANTI
CORRETTO SMALTIMENTO DEL PRODOTTO
GARANZIA
IT
pag.
pag.
pag.
pag.
pag.
pag.
pag.
pag.
pag.
pag.
1
2
2
2
2
2
3
4
4
5
pag.
pag.
pag.
pag.
pag.
pag.
pag.
pag.
pag.
5
5
5
6
6
7
8
9
9
NORME IMPORTANTI PER LA SICUREZZA
NEWA Kanist è un filtro esterno per acquari di acqua dolce o salata da utilizzare solo all’interno delle abitazioni, qualsiasi altro uso
non è ammesso e, conseguentemente, non è coperto dalla responsabilità del costruttore.
NEWA Kanist è conforme alla norma di sicurezza vigente nella UE (EN 60335-2-41).
ATTENZIONE: onde evitare qualsiasi tipo di infortunio osservare scrupolosamente, oltre alle più elementari disposizioni di
sicurezza, le seguenti avvertenze:
ATTENZIONE: il presente simbolo riportato sull’etichetta del prodotto indica che è necessario leggere attentamente questo
manuale di istruzioni operative prima di mettere in funzione, usare e manutenere l’apparecchio.
1. ATTENZIONE: scollegare tutti gli apparecchi elettrici presenti nell’acquario prima di svolgere operazioni di installazione
e manutenzione. Nel caso in cui la spina di connessione dell’apparecchio o la presa di corrente fosse bagnata, disinserire
l’interruttore generale prima di staccare il cavo di alimentazione;
2. Verificare che il voltaggio riportato sull’etichetta dell’apparecchio corrisponda alla tensione di rete;
3. Prima di collegarlo alla rete elettrica, controllare che l’apparecchio ed il rispettivo cavo non risulti in qualche modo danneggiato.
4. Il cordone di alimentazione non può essere né riparato né sostituito. Se danneggiato, sostituire l’apparecchio.
5. Il cavo d’alimentazione dell’ apparecchio deve formare un’opportuna ansa rivolta verso il basso (DRIP LOOP fig. 2). Questo per
evitare che dell’acqua possa scorrere lungo il cavo e raggiungere la rispettiva presa.
6. Si consiglia che l’apparecchio, come tutti gli altri dispositivi elettrici, sia protetto a monte da uno speciale interruttore
differenziale (salvavita) con corrente di intervento massima di 30mA (Idn ≤30mA).
7. Durante l’installazione e l’utilizzo dell’apparecchio evitare di sollevarlo per mezzo del rispettivo cavo di alimentazione.
8. Prima di mettere in funzione l’apparecchio, controllare che l’installazione sia corretta.
9. L’apparecchio non deve funzionare a secco.
10. E’ vietato far funzionare l’apparecchio con liquidi corrosivi od abrasivi.
11. La temperatura massima del liquido veicolato non deve superare i 35° C.
12. ATTENZIONE: il simbolo significa che gli apparecchi devono essere utilizzati solo all’interno delle abitazioni.
13. ATTENZIONE: questo filtro non deve funzionare immerso in acqua. Qualora dovesse accidentalmente cadervi, prima di
recuperarlo, staccare la spina dalla presa di alimentazione. Applicare gli stessi accorgimenti nel caso in cui si notino parti esterne
1
IT
dell’apparecchio bagnate.
20. ATTENZIONE: l’apparecchio non è destinato ad essere usato da persone (bambini compresi) le cui capacita fisiche, sensoriali
o mentali siano ridotte, oppure con mancanza di esperienza o di conoscenza, a meno che esse abbiano potuto beneficiare,
attraverso l’intermediazione di una persona responsabile della loro sicurezza, di una sorveglianza o di istruzioni riguardanti l’uso
dell’apparecchio.
21. ATTENZIONE: i bambini devono essere sorvegliati per sincerarsi che non giochino con l’apparecchio poiché questo non è un
giocattolo.
CONSERVARE CON CURA QUESTE ISTRUZIONI.
DESCRIZIONE DEL PRODOTTO
Componenti del filtro
1. Testata motore
2. Dispositivo a pressione per innesco filtro
3. O-ring testata motore
4. Coperchio camera girante
5. Gruppo rotore assemblato con albero e supporti in ceramica
6. Corpo del filtro
7. Cilindro interno di connessione
8. Grigli copri cestelli
9. Cestelli per materiali filtranti
10. Leve di apertura/chiusura
Raccorderia
a. Valvola d’arresto con rubinetti IN - OUT
b. Raccordo d’aspirazione ad “U”
c. Tubo di collegamento
d. Griglia prefiltro
e. Raccordo di mandata ad “U”
f. Tubetto adattatore per raccordo a gomito
g. Raccordo a gomito con 2 uscite
h. Tappo di chiusura per raccordo a gomito
i. Diffusori orientabili a becco d’oca
j. Diffusori orientabili per spray bars
k. Tubetto adattatore per collegamento tra spray bar
l. Spray bars
m. Tappi di chiusura per spray bars
n. Clips con ventosa
o. Tubi flessibili (150 cm cad.)
Materiali filtranti
11. Lana per filtrazione meccanica
12. Carbone attivo ad alta capacità adsorbente per filtrazione chimica
13. Spugna a porosità fine
14. Cannolicchi porosi per filtrazione biologica
15. Spugna a porosità grossa
FUNZIONAMENTO
NEWA Kanist garantisce il mantenimento di una ambiente acquatico sano, grazie ad un efficace e potente sistema di filtraggio,
ricco di supporti espressamente creati per assicurare il massimo in termini di filtrazione meccanica, chimica e biologica. Una
volta innescato, l’acqua viene estratta dall’acquario attraverso il tubo d’aspirazione e convogliata nel filtro NEWA Kanist, dove
l’imponente massa filtrante trattiene ogni impurità visibile ed invisibile grazie a 6 stadi di filtrazione:
2
MECCANICO:
• la conformazione del filtro ospita un ampio vano per la decantazione dell’acqua, ove la gran parte dei sedimenti più grossolani
si depositano progressivamente in una specifica zona sul fondo, evitando così l’intasamento delle spugne e garantendo loro una
maggior durata d’esercizio;
• resistentissime spugne a grossa porosità con azione meccanica anti-intasamento trattengono le particelle sospese quali
escrementi dei pesci,eccesso di cibo, etc. L’estrema resistenza all’usura delle fibre, consente di sopportare carichi di materiali
inquinanti estremamente elevato garantendo, al contempo, il corretto passaggio d’acqua agli stadi successivi.
BIOLOGICO:
• è lo stadio nel quale si insediano le colonie batteriche che trasformano i composti organici azotati in nitriti e, successivamente,
in nitrati. Questo è garantito dai cannolicchi NEWA AQUA Microceramic, espressamente studiati per garantire il miglior rapporto
tra superficie disponibile alla filtrazione e volume d’ingombro. La loro dimensione ridotta e l’altissima porosità, infatti, consente
di ospitare il doppio della flora batterica normalmente contenuta negli elementi ceramici standard, ottimizzando il filtraggio
biologico dell’acquario.
• NEWA Kanist assicura un elevatissimo supporto alla filtrazione biologica, inserendo in ognuno dei suoi filtri esterni fino a 5 strati
di spugne a diversa granulometria, da grossa a sempre più fine. L’elevata superficie complessiva delle spugne, fanno di NEWA
Kanist un ambiente ideale per i batteri nitrificanti consentendo loro di svilupparsi esponenzialmente.
CHIMICO-ADSORBENTE:
• questo stadio, destinato a purificare e mondare l’acqua da odori e colori sgradevoli, è assicurato dalle peculiarità di NEWA
AQUA Carbo-Active Pellets, carbone super attivo di origine minerale. Estremamente ricco di macropori e con un’elevata superficie
specifica, assicura grandi capacità adsorbenti sia fisiche sia chimiche, attraendo e legando a se numerose sostanze sia sulla
propria superficie esterna che interna. La struttura del resistente sacchetto ne consente un facile inserimento ed estrazione
prevenendo accidentali rotture, mentre la particolare conformazione della maglia ne impedisce l’otturazione, favorendo il
passaggio dell’acqua all’interno della massa di carbone.
ATTENZIONE: AL FINE DI MANTENERE COSTANTI NEL TEMPO LE PRESTAZIONI DEL FILTRO NEWA KANIST, SI RACCOMANDA L’USO DI
MATERIALI FILTRANTI E RICAMBI ORIGINALI NEWA®.
ALLOGGIAMENTO DEI MATERIALI FILTRANTI
I materiali filtranti sono alloggiati nella scatola contente gli accessori del filtro NEWA Kanist. Al fine del loro corretto
posizionamento si suggerisce di seguire attentamente le seguenti istruzioni.
1. Liberare la testata motore dal corpo del filtro sganciando i quattro ganci di chiusura tramite le fessure poste alla base degli stessi
(fig. 3). Togliere la testata motore sollevandola tramite gli incavi posizionati lungo il suo perimetro ed adagiarla su di un piano.
2. Togliere il coperchio dei materiali filtranti inserendo le dita negli appositi fori per facilitare l’operazione (fig.4).
3. Estrarre tutti i cestelli usufruendo dell’apposita maniglia e riporli su di un piano.
4. Primo cesto: prelevare il carbone attivo NEWA Aqua Carbo Active-Pellets dalla scatola degli accessori e riporlo tra lo strato di
lana bianca e la spugna nera a porosità fine (1 sacchetto microforato per i modelli KANIST 250 e 350, 2 sacchetti microforati per i
modelli NEWA Kanist 450 e 700), prestando attenzione affinché sia adagiato in posizione piana e che non copra il foro destinato
alla circolazione dell’acqua proveniente dall’acquario. Riposizionare lo strato di lana bianca (fig. 5). ATTENZIONE: NON APRIRE I
SACCHETTI MICROFORATI.
5. Secondo cesto: prelevare il rimanente carbone attivo NEWA Aqua Carbo Active-Pellets dalla scatola degli accessori e riporlo
sopra la spugna nera a porosità fine (2 sacchetti microforati per i modelli NEWA Kanist 350, 450 e 700), prestando attenzione
affinché sia adagiato in posizione piana e che non copra il foro destinato alla circolazione dell’acqua proveniente dall’acquario
(fig. 5). ATTENZIONE: NON APRIRE I SACCHETTI MICROFORATI.
6. Terzo e quarto cesto: Prelevare i sacchetti dei cannolicchi dalla scatola degli accessori e aprirli per disporli in modo uniforme nel
cestello sopra la sugna blu a porosità grossa (modelli NEWA Kanist 350, 450 e 700). ATTENZIONE: quanto descritto sopra ha valore
anche per il secondo cesto del NEWA Kanist 250 e per il quarto cesto del NEWA Kanist 700. (fig. 6)
7. Usufruendo dell’apposita maniglia ricavata in ognuno dei cesti, sciacquare con abbondante acqua corrente i materiali filtranti
e le spugne su cui sono adagiati.
8. Riposizionare i cesti nel corpo del filtro, prestando attenzione a che i singoli cestelli siano impilati l’uno sopra l’altro
mantenendo il tubo d’aspirazione dell’acqua libero e comunicante (fig. 7).
9. Inserire per primi i cesti contenenti i cannolicchi e la spugna blu a porosità grossa, quindi i quelli contenenti il carbone attivo e
la spugna nera a porosità fine e, per ultimo, il cestello con la lana bianca a filtrazione fine (fig. 8). ATTENZIONE: è estremamente
3
IT
IT
importante che l’ultimo cestello sia quello che presenta il foro per la circolazione dell’acqua di maggior dimensione, poiché
questo rappresenta il punto di collegamento con la testata del filtro tramite il cilindro interno di connessione.
10. Riposizionare il coperchio dei materiali filtranti prestando attenzione a che, una volta in sede, il foro presente su questo sia in
asse con il foro del primo cesto. Se cosi non fosse capovolgere il coperchio in oggetto (fig. 9).
11. Ricollocare la testata del motore prestando attenzione affinché il cilindro interno di connessione si innesti nel foro del
coperchio dei materiali filtranti (fig. 10).
N.B.: Osservando il corpo del filtro dall’alto, l’operazione di chiusura risulterà estremamente facile, se si tiene presente che
il dispositivo a pressione per innesco del filtro, posizionato sopra la testata del motore, si trova in asse col cilindro interno di
connessione (fig. 11).
12. ATTENZIONE: prima di chiudere i ganci assicurarsi che i materiali filtranti siano nelle loro sedi, i contenitori dei materiali
filtranti perfettamente sovrapposti (materiali non debordanti) e il coperchio dei materiali filtranti sia stato inserito in posizione
corretta.
13. Posizionare l’apice di ciascuno dei quattro ganci di chiusura sui rispettivi innesti presenti sulla testata del filtro e serrare la
testata al corpo del filtro premendo con forza sulla parte esposta dei ganci (fig 12).
PREPARAZIONE DEL FILTRO
b
e
c
f
FIG. 1
a
o
o
g
i
i
h
l
j
d
j
m
k
n
m
l
a) Assemblaggio raccorderia
I. Aprire l’imballo del NEWA Kanist e prelevare il cartone contenente l’accessoristica del filtro esterno disponendola su di un
tavolo come indicato in figura (fig.1). Assemblare il gruppo di aspirazione unendo la griglia di prefiltro (d) al tubo di collegamento
(c) e quindi al raccordo d’aspirazione ad “U” (b). È fondamentale che il montaggio di queste due componenti avvenga in modo
corretto, applicando una pressione atta a vincere la resistenza delle due guarnizioni o-ring, fino a che il tubo d’aspirazione trovi il
proprio fine corsa sul raccordo di aspirazione (fig. 13). Per favorire l’operazione si consiglia di inumidire gli o-ring. Se necessario, è
possibile regolare il tubo di aspirazione spostandolo verso il basso, fino al livello della prima guarnizione. Per un funzionamento
più efficiente, controllare che la griglia prefiltro (d) si trovi ad una distanza di almeno 4 – 5 cm dal fondo dell’acquario. Qualora il
tubo di collegamento (c) fosse troppo lungo, tagliarlo con un seghetto.
N.B.: posizionare il tubo di aspirazione lontano da aeratori o schiumatoi, poiché l’aria da loro emessa ridurrebbe l’efficienza del
filtro esterno.
II. Assemblare il gruppo di mandata unendo il raccordo di mandata ad “U” (e) al tubetto adattatore (f) e quindi al raccordo a
gomito con 2 uscite (g). Se necessario, è possibile ridurre la lunghezza del raccordo di mandata tagliandolo con un seghetto in
corrispondenza delle scannellature (fig. 14).
Adottando una semplice pressione, applicare al raccordo a gomito (g) i diffusori orientabili, scegliendo tra quelli “a becco d’oca”
(i) ed quelli “per spray bars” (j). Qualora si decidesse di usare solamente una delle due uscite del raccordo a gomito, si raccomanda
di chiudere quella non utilizzata tramite l’apposito tappo di chiusura per raccordo a gomito (h).
N.B.: per assicurare la migliore circolazione d’acqua tramite i diffusori “a becco d’oca”, si raccomanda di collocarli poco sotto la
4
superficie dell’acqua o al massimo allo stesso livello.
III. Le spray bars possono essere unite assieme tramite il tubetto adattatore (k) o usate singolarmente (fig. 15), in ogni caso
dovranno essere collegate all’apposito diffusore (j). Per il corretto uso, si raccomanda di chiudere l’uscita delle spray bar con i
rispettivi tappi dati in dotazione (m). N.B.: per assicurare la migliore circolazione d’acqua tramite le spray bars, si raccomanda di
collocarle poco sopra la superficie dell’acqua.
b) Collegamento della valvola d’arresto con rubinetti IN - OUT al filtro esterno
ATTENZIONE: per evitare perdite d’acqua e garantire il corretto funzionamento del filtro esterno NEWA Kanist, è
necessario che tale operazione avvenga con molta cura, seguendo attentamente le indicazioni sottostanti.
I. Assicurarsi che le ghiere verdi di fissaggio, poste sulle estremità libere dei gruppi di aspirazione e mandata, nonché quelle
posizionate sulla valvola d’arresto con rubinetti IN - OUT (a), siano completamente aperte. (parte filettata esposta - fig. 16).
II. Collegare ciascuno dei due tubi flessibili in dotazione all’estremità libera rispettivamente del gruppo di aspirazione (b) e del
gruppo di mandata (e), spingendo con forza fino a che il capo del tubo flessibile tocchi la parte filettata su cui scorre la ghiera verde di
fissaggio (circa 2,5 cm) (fig. 17). Girare le ghiere in senso orario per bloccare saldamente il tubo flessibile senza forzare il serraggio.
III. Inserire il gruppo di aspirazione e quello di mandata nella vasca appoggiando trasversalmente i rispettivi raccordi (b - e) al
bordo della vasca. Fissare i gruppi d’aspirazione e mandata tramite le clip con ventosa in dotazione, inserendone una all’interno
ed una all’esterno della vasca per ciascuno dei due gruppi (fig 18). N.B.: Si raccomanda di mantenere tra aspirazione e mandata
una certa distanza per favorire il corretto ricircolo d’acqua.
IV. Collocare il filtro NEWA Kanist nel luogo precedentemente selezionato, considerando la possibilità di essere facilmente
manovrato per le normali operazioni di manutenzione.
V. Collegare al filtro NEWA Kanist la valvola d’arresto con rubinetti IN - OUT, prestando attenzione a che questa aderisca
perfettamente alla testa del filtro. Data l’importanza di tale operazione si raccomanda di:
a. Chiudere la valvola di arresto, tirando la leva verde posizionata tra i due rubinetti ed alzandola fino al completo raggiungimento
del suo fine corsa. La leva verde si troverà in posizione verticale rispetto al piano in cui è alloggiata (fig. 19).
b. Inserire la valvola d’arresto nell’apposito alloggiamento sulla testa del filtro, premendo con forza sugli angoli esterni posti a
fianco dei rubinetti (fig. 20). Assicurarsi che la valvola d’arresto sia correttamente assemblata, controllando che non vi siano rialzi
tra il suo bordo e quello della testa del filtro.
c. Aprire la valvola di arresto, spingendo la leva verde fino al completo raggiungimento del suo fine corsa. La leva verde si troverà
in posizione orizzontale rispetto al piano in cui è alloggiata (fig. 21).
VI. Tagliare l’eccesso dei tubi flessibili per favore il corretto funzionamento del filtro. Questo consentirà di ottenere un percorso
dell’acqua il più diretto possibile ed eviterà possibili strozzature dei tubi flessibili (fig.22).
VII. Osservando le frecce posizionate sui raccordi di mandata ed aspirazione, nonché le scritte “IN” ed “OUT” posizionate sulla
valvola di arresto, collegare il tubo flessibile allacciato al gruppo di mandata (e - freccia verso l’alto) con il rubinetto piroettante
contrassegnato dalla scritta “OUT”. Unire il tubo flessibile allacciato al gruppi di aspirazione (b) con il raccordo contrassegnato dalla
scritta “IN”. Spingere con forza fino a che il capo del tubo flessibile tocchi la parte filettata su cui scorre la ghiera verde di fissaggio
(circa 2,5 cm) (fig. 23). Girare le ghiere in senso antiorario per bloccare saldamente il tubo flessibile senza forzare il serraggio (fig. 24).
AVVIAMENTO DEL FILTRO
a) Collocazione: Il filtro esterno NEWA Kanist è un filtro a gravità, si raccomanda quindi di posizionarlo, ove preventivamente
identificato, prima di collegare il gruppo comprendente la valvola d’arresto ed i tubi flessibili. Una posizione ideale per
l’installazione del filtro è sotto l’acquario in un mobile predisposto.
NOTA: La distanza tra il livello dell’acqua della vasca e la base inferiore del corpo filtro non dovrà superare i 150
centimetri. ATTENZIONE: IL FILTRO NON DEVE MAI ESSERE INSTALLATO AL DI SOPRA DEL LIVELLO DELL’ACQUA.
b) Messa in funzione: NEWA Kanist è dotato di un sistema integrato d’innesco che, operando sul tasto START, consente un
innesco automatico del filtro. A tal proposito seguire attentamente le fasi riportate qui di seguito:
I. Assicurarsi che le operazioni necessarie al collegamento della valvola d’arresto con rubinetti IN - OUT al filtro esterno sia stata
compiuta come indicato (vedi capitolo “PREPARAZIONE DEL FILTRO” punto b).
II. Spingere ripetutamente con forza il tasto Starter verso il basso (fig.25), fino a che l’acqua non sia aspirata nel corpo del filtro in
modo autonomo. Man mano che l’acqua riempirà il filtro, l’aria presente in esso uscirà tramite il gruppo di mandata producendo
5
IT
IT
bolle.
III. Una volta che tutti i circuiti idraulici saranno saturi d’acqua (il gruppo di mandata non emetterà bolle d’aria), sarà possibile
collegare il filtro esterno all’alimentazione elettrica. L’acqua dovrà allora uscire a flusso costante dai diffusori o dalle spray bar. In
caso contrario, staccare la spina del filtro dall’alimentazione e ripetere la procedura d’innesco.
N.B.: All’avvio del filtro, la presenza d’aria rimasta imprigionata nel materiale filtrante potrebbe generare rumorosità, ciò è da
considerarsi normale. La totale eliminazione dell’aria avverrà dopo qualche ora consentendo al filtro di lavorare nella massima
silenziosità.
ATTENZIONE: NON COLLEGARE LA SPINA DEL FILTRO ALL’ALIMENTAZIONE ELETTRICA PRIMA D’AVER RIEMPITO
D’ACQUA L’UNITÀ, QUESTO POTREBBE DANNEGGIARE IL MOTORE.
ATTENZIONE: NON POSIZIONARE PIETRE POROSE COLLEGATE AD AERATORI IN PROSSIMITA’ DEL GRUPPO DI
ASPIRAZIONE. QUESTO INFICIEREBBE LA FUNZIONALITA’ DEL FILTRO E GENEREREBBE RUMOROSITA’.
MANUTENZIONE
ATTENZIONE: SCOLLEGARE TUTTI GLI APPARECCHI ELETTRICI PRESENTI NELL’ACQUARIO PRIMA DI SVOLGERE
OPERAZIONI DI INSTALLAZIONE E MANUTENZIONE. NEL CASO IN CUI LE SPINE DI CONNESSIONE DELL’APPARECCHIO
O LA PRESA DI CORRENTE FOSSE BAGNATA, DISINSERIRE L’INTERRUTTORE GENERALE PRIMA DI STACCARE I CAVI DI
ALIMENTAZIONE.
Per effettuare qualsiasi operazione di manutenzione procedere col fermo del filtro esterno seguendo attentamente i punti qui
di seguito elencati:
1. Scollegare il filtro dall’alimentazione elettrica.
2. Chiudere la valvola di arresto, tirando la leva verde posizionata tra i due rubinetti alzandola fino al completo raggiungimento
del suo fine corsa. La leva verde si troverà in posizione verticale rispetto al piano in cui è alloggiata (fig. 26).
ATTENZIONE: durante le operazioni di manutenzione la valvola di arresto deve SEMPRE rimanere collegata ai tubi
flessibili in posizione di chiusura.
3. Scollegare dal filtro NEWA Kanist la valvola d’arresto tirando verso l’alto i rubinetti IN - OUT. Non è necessario togliere i tubi
flessibili ed i gruppi di aspirazione e mandata dall’acquario, a meno che questi non debbano essere puliti. In tal caso togliere le
eventuali incrostazioni tramite l’uso di spazzolini e scovolini.
ATTENZIONE: Si consiglia di tenere a disposizione del materiale assorbente per avvolgerlo intorno alla valvola d’arresto poiché,
una volta scollegata, potrebbe fuoriuscire dell’acqua.
4. Sollevare il filtro tramite gli incavi posizionati lungo il suo perimetro e trasportarlo in un luogo idoneo alla manutenzione (per
esempio una bacinella, un lavandino, una vasca da bagno, ecc.) mantenendolo in posizione verticale per evitare perdite d’acqua.
Non afferrare il filtro per le leve verdi di apertura/chiusura laterali.
5. Per istruzioni dettagliate sull’apertura del filtro, sui contenitori dei materiali filtranti nonché per il riassemblaggio del filtro
NEWA Kanist, riferirsi alla sezione “ALLOGGIAMENTO DEI MATERIALI FILTRANTI”.
ATTENZIONE: per facilitare le operazioni di manutenzione si raccomanda, una volta tolta la testata motore, di svuotare il filtro
inclinandolo e tenendo fermi i cestelli.
6. Terminate le operazioni di manutenzione (riferimento: punti a) e b) riportati qui di seguito), collegare la valvola d’arresto
con rubinetti IN - OUT al filtro NEWA Kanist, prestando attenzione a che questa aderisca perfettamente alla testa del filtro.
Aprire la valvola di arresto, spingendo la leva verde fino al completo raggiungimento del suo fine corsa (vedi anche la sezione
“Collegamento della valvola d’arresto con rubinetti IN - OUT al filtro esterno”).
7. Procedere con la messa in funzione del filtro seguendo attentamente le istruzioni riportate alla sezione “AVVIAMENTO DEL
FITRO” (punto b - Messa in funzione).
N.B.: si raccomanda di lubrificare periodicamente tutte le parti in gomma della testata del motore usando dell’olio di vaselina
sull’O-ring, sullo stantuffo e sul tampone del pulsante d’innesco.
a) Manutenzione della girante:
ATTENZIONE: la girante utilizzata nei filtri NEWA Kanist è composta da supporti ed alberino in ceramica. Si
raccomanda di prestare la massima attenzione nella sua manipolazione durante le operazioni di manutenzione.
1. Togliere il coperchio della camera della girante (4) dalla testata del motore (1) girandola in senso antiorario tramite le apposite
leve e tirarla delicatamente verso l’alto (fig. 27).
6
2. Staccare dalla coperchio della girante l’alberino in ceramica ed il supporto nero in gomma adagiandoli su di un tavolo. N.B.: il
secondo supporto in gomma potrebbe rimanere in sede all’interno dell’alloggiamento del rotore, per estrarlo inserire nel foro del
gommino un’estremità libera dell’alberino in ceramica, dopo aver tolto il gruppo rotore.
3. Rimuovere il gruppo rotore dal pozzetto, afferrando le pale della girante e sciacquarlo sotto acqua corrente, assieme al
coperchio della girante, utilizzando uno spazzolino non abrasivo per rimuovere lo sporco. Nel caso il gruppo rotore od il pozzetto
fossero incrostati da calcare, metterli a bagno in aceto per 15-20 minuti prima di pulirli, quindi sciacquare con cura.
ATTENZIONE: non utilizzare acidi o soluzioni diverse dal normale aceto ad uso alimentare, potrebbero risultare tossici per i pesci.
4. Riassemblare il gruppo rotore inserendovi prima l’alberino in ceramica e poi i rispettivi gommini neri di supporto sulle
estremità libere dell’alberino (fig. 28).
5. Reintrodurre il gruppo rotore nel pozzetto e ricollocare il coperchio della girante, assicurandosi che il gommino posizionato
sull’alberino in ceramica sia correttamente inserito nella sede del coperchio della girante.
6. Fissare il coperchio della girante alla testata del motore girandola in senso orario tramite le apposite leve.
b) Manutenzione dei materiali filtranti:
1. Sostituire i materiali filtranti secondo necessità e rispettando gli intervalli regolari consigliati (vedi tabella). Prestare attenzione
affinché i sacchetti di carbone siano adagiati in posizione piana e che ne questi, ne ogni altro elemento copra il foro destinato alla
circolazione dell’acqua proveniente dall’acquario.
2. Sciacquare il corpo del filtro senza usare sapone o detergenti. Ogni eventuale residuo potrebbe danneggiare i delicati tessuti
dei pesci.
3. Sciacquare delicatamente i cestelli contenenti il materiale biologico con dell’acqua prelevata dall’acquario, per evitare di
distruggere le colonie batteriche presenti nel substrato del filtro, vere responsabili del benessere dell’acquario.
ATTENZIONE: la presenza di cloro nell’acqua corrente di rubinetto, determina la morte delle colonie di batteri utili contenute nei
cannolicchi.
4. Reinserire i cestelli dei materiali filtranti nel corpo filtro seguendo scrupolosamente i punti dal 8 al 13 del capitolo
“ALLOGGIAMENTO DEI MATERIALI FILTRANTI”.
N.B.: Non sostituire contemporaneamente tutti i materiali filtranti ad azione biologica (spugne, cannolicchi, ecc.) scaglionando
nel tempo il loro rimpiazzo. Lasciare parte dei vecchi materiali nel filtro, consente di stimolare la reintegrazione d’importanti
colonie batteriche che sono andate perdute con i materiali eliminati. ATTENZIONE: AL FINE DI MANTENERE COSTANTI
NEL TEMPO LE PRESTAZIONI DEL FILTRO NEWA KANIST, SI RACCOMANDA L’USO DI MATERIALI FILTRANTI E RICAMBI
ORIGINALI NEWA®.
Mensilmente
Ogni 2 mesi
Ogni 6 mesi
Ogni 6 mesi
Carbone NEWA AQUA
CARBO ACTIVE- Pellets
Sostituzione
-
-
-
Spugne
Controllare sviluppo
carica batterica
Controllo e pulizia
se necessario
Sostituzione
-
Cannolicchi NEWA
AQUA Microceramic
Controllare sviluppo
carica batterica
Controllo e pulizia
se necessario
-
Sostituzione del
50%
Girante
-
-
Controllo e pulizia
se necessario
-
Griglia d’aspirazione
-
Controllo e pulizia
se necessario
-
-
Tubi flessibili
-
-
-
Controllo e pulizia
se necessario
Leva valvola d’arresto
-
-
pulizia e lubrificazione -
Pulsante Start
-
-
pulizia e lubrificazione -
Guarnizione testata
-
-
pulizia e lubrificazione 7
IT
IT
PERSONALIZZAZIONE DEI MATERIALI FILTRANTI
È possibile effettuare una personalizzazione dei materiali filtranti scegliendo tra gli articoli della linea NEWA AQUA, la gamma
di materiali filtranti d’alta qualità specificamente studiata da NEWA® per garantire praticità, durata di filtrazione e sicurezza
d’uso. La tabella seguente riassume le caratteristiche di ognuno dei materiali suddividendoli per le diverse azioni filtranti cui
sono destinati:
AZIONE FILTRANTE
MODELLO NEWA Aqua
DESCRIZIONE
CARATTERISTICHE
FIBER
Fibra sintetica in
Polietilene
Alta resistenza all’usura
Minimo compattamento
Biologicamente inerte
Fibra elettrosaldata in PVC
Sopporta elevati carichi di
materiale inquinante senza
intasarsi. Possiede memoria
strutturale.
Elementi ceramici miniaturizzati
La dimensione ridotta
massimizza la superficie
destinata alla flora batterica per
unità di volume disponibile
CERAMIC HI-Q
Elementi ceramici porosi
L’alta porosità incrementa
il volume disponibile alla
colonizzazione della flora
batterica
BIOGLOBE
Sfere in polipropilene
a diametro variabile
L’elasticità strutturale potenzia
la superficie specifica per la flora
batterica
CARBO ACTIVE PELLETS
Carbone minerale super attivo
ad alta capacità adsorbente
Elimina gli odori
Mantiene l’acqua cristallina
CARBO ACTIVE
GRANULES
Carbone attivo granulare di
origine vegetale ad alta capacità
adsorbente
Rimuove le sostanze tossiche
e i residui medicali
CARBO ACTIVE
MIXTURE
Carbone minerale iper attivo ad
alta capacità adsorbente
Elimina gli odori
Mantiene l’acqua cristallina
Rimuove le sostanze tossiche
ACTIVE ZEOLITE
Zeolite minerale di origine
vulcanica attivato chimicamente
Cattura e trattiene l’ammoniaca,
ammonio, solfuri, solfiti e metalli
pesanti
ANTI-NITRATE
Resina a scambio ionico
Elimina i nitrati - Previene e cura
lo sviluppo di alghe
ANTI-PHOSPHATE
Resina a scambio ionico
Rimuove i fosfati ed i silicati previene e cura lo sviluppo di
alghe
FILTRAZIONE
MECCANICA
KINSHY SPONGE
MICROCERAMIC
FILTRAZIONE
BIOLOGICA
FILTRAZIONE
CHIMICA
8
CORRETTO SMALTIMENTO DEL PRODOTTO
(rifiuti elettrici ed elettronici)
IT
2002/96/EC - EN50419
(Applicabile nei paesi dell’Unione Europea e in quelli con sistema di raccolta differenziata). II marchio riportato sul prodotto o
sulla sua documentazione indica che il prodotto non deve essere smaltito con altri rifiuti domestici al termine del ciclo di vita. Per
evitare eventuali danni all’ambiente o alla salute causati dall’inopportuno smaltimento dei rifiuti, si invita l’utente a separare
questo prodotto da altri tipi di rifiuti e di riciclarlo in maniera responsabile per favorire il riutilizzo sostenibile delle risorse
materiali. • Gli utenti domestici potranno riconsegnare l’apparecchio giunto a fine vita al rivenditore al momento dell’acquisto
di un nuovo apparecchio di tipo equivalente in ragione di uno a uno, oppure contattare l’ufficio locale preposto per tutte le
informazioni relative alla raccolta differenziata e al riciclaggio per questo tipo di prodotto. • Gli utenti aziendali sono invitati
a contattare il proprio fornitore e verificare i termini e le condizioni del contratto di acquisto. Questo prodotto non deve essere
smaltito unitamente ad altri rifiuti commerciali. • Lo smaltimento abusivo da parte dell’utente comporta l’applicazione delle
sanzioni amministrative come da vigente legge.
GARANZIA
Il prodotto è garantito secondo la Direttiva Europea 1999/44 CE da difetti di materiali e di lavorazione per un periodo di 24 mesi
dalla data d’acquisto. Se il prodotto non funzionasse correttamente entro i primi due anni dalla data d’acquisto, restituirlo al
rivenditore dal quale è stato acquistato. Il prodotto verrà sostituito senza nessun costo aggiuntivo. Nel periodo coperto dalla
garanzia, la sostituzione del prodotto avverrà se: 1) Il prodotto viene reso confezionato accuratamente e protetto dai danni da
trasporto. 2) Viene allegata la prova d’acquisto ed una dettagliata motivazione del reclamo. La garanzia è soggetta alle seguenti
restrizioni e condizioni: 1) Nessuna copertura in caso di rottura traumatica. 2) La sostituzione del prodotto non rappresenta in
nessun caso un’ammissione di responsabilità. 3) La garanzia non è valida nel caso di uso improprio del prodotto, né risponde
a danni causati da manomissioni o negligenza da parte dell’acquirente. 4) La garanzia non é valida per componenti soggetti a
consumo ed usura,(vedi (*) “ricambi ed accessori”).
9
EN Operating Instructions
Contents
EN
IMPORTANT SAFETY REGULATIONS
PRODUCT DESCRIPTION
Filter components
Fittings
Filtering materials
OPERATION
INSTALLATION OF THE FILTERING MATERIALS
SETTING UP PROCEDURE
Fittings assembling
Connection of the shutoff valve with
taps INLET – OUTLET with the external filter
FILTER START
Location
Actuation
MAINTENANCE
Maintenance of the impeller
Maintenance of the filtering materials
FILTERING MATERIALS IDENTIFICATION
CORRECT DISPOSAL OF THIS PRODUCT
WARRANTY
IMPORTANT SAFETY REGULATIONS
page 10
page 11
page 11
page 11
page 11
page 11
page 12
page 12
page 13
page 14
page 14
page 14
page 14
page 15
page 15
page 16
page 17
page 18
page 18
NEWA Kanist is an external filter for aquariums with fresh and salt water intended for use in residential accommodations only.
Any other application is not suitable, and therefore the manufacturer shall not be responsible for it.
NEWA Kanist complies with the safety regulations effective in the UN (EN 60335-2-41).
ATTENTION: to avoid any accident involving injuries, besides the ordinary safety rules, one must observe the following safety
precautions:
ATTENTION: This symbol, applied to the product label, indicates that it is necessary to carefully read this operations manual
prior to the start, use and service of the device.
1. ATTENTION: disconnect all electrical appliances in the aquarium before carrying out installation and maintenance operations.
In case of moisture ingress to the plug or electrical socket, break the network main switch, prior to disconnection of the supply
cable.
2. Make sure that the voltage on the device label corresponds with the network voltage.
3. Prior to the connection to electrical power network, make sure that there is no damage of the device and the corresponding
cable.
4. The electrical cord cannot be either repaired or replaced. If it is damaged, replace the entire unit.
5. The device supply cable must be properly bent downwards (DRIP LOOP, fig. 2), to avoid water running over the cable and
ingress into the corresponding socket.
6. It is recommended to initially protect the device, as well as all other electrical appliances, with the aid of a special differential
switch (protective cutout device) with maximum permissible interrupting current 30 mA (residual current Idn ≤ 30 mA).
7. It is prohibited to lift the device holding it at the supply cable during the installation and use of the device.
8. Before to start the device, make sure that it is installed properly.
9. The device must not operate in the idle mode.
10. It is prohibited to use the device with aggressive and abrasive fluids.
11. Maximum temperature of the fluid pumped through must not exceed 35° C.
12. ATTENTION: this symbol means that the devices may be used inside the residential accommodations only.
13. ATTENTION: do not use the filter, when it is immersed into water. If it falls accidentally, disconnect the plug from the
10
electrical socket before removing the filter from water. Observe the same precautions in case of moisture ingress to the external
parts of the device.
20. ATTENTION: This device is not intended for use by persons (including children) with reduced physical, sensory or mental
capabilities, or lack of experience and knowledge, unless they have been given supervision or instruction concerning use of the
device by a person responsible for their safety.
21. ATTENTION: Children should be supervised to ensure that they do not play with the appliance because this device is not a toy.
TAKE CARE TO SAVE THIS INSTRUCTION
EN
PRODUCT DESCRIPTION
Filter components
1. Rotor unit
2. Filer startover hold-down device
3. O-shaped rotor unit gasket
4. Impeller cell cover
5. Rotary block, and shaft and ceramic supports assembly
6. Filter case
7. Internal connecting cylinder
8. Basket protection grid
9. Baskets for filtering materials
10. Opening/closing levels
Fittings
a. Shutoff valve with taps INLET - OUTLET
b. U-shaped inlet nozzle
c. Connecting tube
d. Prefilter grid
e. U-shaped outlet nozzle
f. Elbowed coupling reducing tube
g. Elbowed coupling with 2 outlets
h. Elbowed coupling plug
i. Gooseneck swing-arm diffusers
j. Swing-arm diffusers for injectors
k. Reducing tube for injectors connection
l. Injectors
m. Injector stubs
n. Clamps with suction caps
o. Flexible hoses (150 cm)
Filtering materials
11. Fiber for mechanical filtering
12. Activated carbon with chemical filtration with high adsorption capacity
13. Fine-porous sponge
14. Porous rings for biological filtration
15. Coarse-pored sponge
OPERATION
NEWA Kanist ensures healthy aqueous environment due to the powerful and efficient filtration system with various options,
provided for achievement of maximum result of mechanical, chemical and biological filtration. Just after the activation, the
water is extracted from the aquarium through the suction pipe and fed into the NEWA Kanist, filter where a great number of
filtering materials treat any visible and invisible contaminating agents due to 6 stages of filtration:
MECHANICAL FILTRATION:
• the filter design includes a spacious section for water sterilization, where the main part of larger sludge particles gradually
11
EN
accumulates in the specific bottom section, which allows to avoid clogging up of the sponges, thus prolonging the operating life;
• high-strength coarse-pored sponges, which produce a mechanical effect against contamination, trap particulates, such as
fish excrements, uneaten food, etc. The highest wear resistance of the fibers ensures withstanding extreme pressure of the
contaminating agents, and at the same time enable proper transition of water to other stages.
BIOLOGICAL FILTRATION:
• this stage involves bacteria colonies which transform organic nitrogen compounds into nitrites, and then into nitrates.
It is possible due to porous rings NEWA AQUA Microceramic, developed for achievement the best relation between surfaces
taking part in the filtration process, and the filling volume. In fact, the reduced size and the highest degree of porosity
enable accommodating of double amount of the bacterial flora, as compared with standard ceramic elements, which ensures
optimization of the biological filtration.
• NEWA Kanist provides the highest level of the biological filtration. Every external filter consists of up to five sponge layers of
various mesh-size composition, from large pores to smaller ones. The increased total area of the sponges makes NEWA Kanist an
ideal environment for nitrifying bacteria, ensuring their exponential growth.
CHEMICAL-ADSORBENT FILTRATION:
• this stage is intended for water purification and removal of unpleasant odour and colour by peculiar NEWA AQUA Carbo-Active
Pellets, super-activated coal of mineral origin. A great amount of pores and increased specific area ensure the high physical and
chemical adsorbability, attracting and binding various substances both to its external and internal surface. Due to the structure
of the damage-proof bag, it is easy to install and remove it, avoiding occasional damages, while the special cell design prevents
the bag plugging and contributes to water ingress into the coal mass.
ATTENTION: IN ORDER TO MAINTAIN THE PERFORMANCE CHARACTERISTICS OF NEWA KANIST, IT IS RECOMMENDED TO USE
ORIGINAL FILTERING MATERIALS AND SPARE PARTS NEWA®.
INSTALLATION OF THE FILTERING MATERIALS
The filtering materials are stored in box with NEWA Kanist filter accessories. To install them properly, observe the following
instructions:
1. Detach the rotor unit from the filter case, unbuckling four clips, pressing the notches located on the bottom of the clips (fig. 3).
Remove the rotor unit by lifting it by it the grooves located across its perimeter, and put on a flat surface.
2. Remove the cover from the baskets unit for filtering materials, inserting fingers into the corresponding openings to facilitate
the operation (fig. 4).
3. Take out all baskets with the corresponding grip and put them on a flat surface.
4. The first basket: take out NEWA Aqua Carbo Active-Pellets from the accessories box, and place them between the layer of white
fiber and fine-porous black sponge (1 microperforated bag for models KANIST 250 and 350, 2 microperforated bags for models
KANIST 450 and 700). Make sure that they lie flat and do not block the holes intended for circulation of water from the aquarium.
Place the white fiber layer back (fig. 5). ATTENTION: DO NOT OPEN THE MICROPERFORATED BAGS.
5. The second basket: take out the remaining NEWA Aqua Carbo Active-Pellets from the accessories box, and place them on
fine-porous black sponge (2 microperforated bags for models KANIST 350, 450 and 700). Make sure that they lie flat and do not
block the holes intended for circulation of water from the aquarium. Place the white fiber layer back (fig. 6). ATTENTION: DO NOT
OPEN THE MICROPERFORATED BAGS.
6. The third and the fourth baskets: take out the bags with the porous rings from the accessories box, open them, and spread the
rings uniformly over the coarse-pored blue sponge (models NEWA Kanist 350, 450 and 700). ATTENTION: the above described is
also valid for the second basket NEWA Kanist 250 and the fourth NEWA Kanist 700.
7. With the aid of the corresponding grips on each basket, rinse the filtering materials and the sponges where they are located
with plenty of running water.
8. Install the baskets back into the filter case. Make sure that the baskets are arranged one above the other and do not block
water access to the suction tube (fig. 7).
9. First, install the baskets with the porous rings and coarse-pored white sponge, then install the baskets with the activated coal
and fine-porous black sponge, and finally install the basket with the white fiber for fine filtration (fig. 8). ATTENTION: it is vitally
important for the last basket to have the largest opening for water circulation, since it serves as junction of the filter with the
rotor unit by the internal connective cylinder.
12
10. Install the baskets unit cover back. Make sure that after the installation the cover bore matches the opening of the first
basket. If otherwise, turn over the cover (fig. 9).
11. Install the rotor unit. Make sure that the internal connective cylinder enters the baskets unit cover bore (fig. 10).
Note: From above of the filter case, the reassembly operation seems to be quite easy, if you take into account the fact that the
filter start hold-down device, located on the top of the rotor unit, is in alignment with the internal connective cylinder (fig. 11).
12. ATTENTION: Before you click-up the clips, make sure that the filtering materials are in their proper places, the containers with
the filtering materials are properly placed (the materials do not overlap the edges), and the baskets unit cover is installed in its
proper position.
13. Fit every of the four clips with the corresponding couplings on the rotor unit to the filter case, and attach the rotor unit to the
filter case, with firm pressure on the projecting parts of the clips (fig. 12).
SETTING-UP PROCEDURE
b
e
c
f
FIG. 1
a
o
o
g
i
i
h
l
j
d
j
m
k
n
m
l
a) Fittings assembling
I. Open NEWA Kanist package, take out the box with the external filter accessories, and place the accessories on the table, as
shown in the figure (fig. 1). Assemble the inlet block, connecting the prefilter grid (d) with the connecting tube (c), and then
with the U-shaped inlet nozzle (b). It is crucially important to ensure correct assembling of these two components, with a force
enough to overcome the resistance of two О-shaped gaskets, so that the suction tube tightly fits the inlet nozzle (fig. 13). To
facilitate the operation, it is recommended to moisten the О-shaped gaskets. If necessary, position of the suction tube can be
regulated by moving it downwards to the first gasket level. To provide a more efficient operation, make sure that the pre-filter
grid (d) is at a distance of 4-5 cm from the bottom of the aquarium. If the connecting pipe (c) is too long, cut it with a saw.
Note: position the suction tube away from aerators or skimmers, since the air emitted by them would reduce the efficiency of
the external filter.
II. Assemble the outlet block, connecting the U-shaped outlet nozzle (e) with the reducing tube (f), and then with the elbowed
coupling with 2 outlets (g). If necessary, you can reduce the length of the outlet nozzle by cutting it with a saw, with respect to
the grooves arrangement (fig. 14). Applying a slight force, put the swing-arm diffusors on the elbowed coupling (g), choosing
between the gooseneck swing-arm diffusers and the swing-arm diffusers for injectors (j). If you decide to use only one outlet of
the elbowed coupling, it is recommended to close the unused outlet with the elbowed coupling plug (h). Note: to ensure better
circulation of water through the gooseneck swing-arm diffusers, it is recommended to place them just below the surface of the
water or at most at the same level.
III. The injectors can be connected through the reducing tube (k), or can be used separately (fig. 15). In any case, they must
be connected with the corresponding diffuser (j). To ensure the correct use, it is recommended to close the injector outlet with
the corresponding stubs (m) from the supply package. Note: to ensure better circulation of water through the injectors, it is
recommended to place them just above the water surface.
13
EN
b) Connection of the shutoff valve with taps INLET – OUTLET with the external filter
EN
ATTENTION: to prevent water leakage and to ensure the proper functioning of the NEWA Kanist external filter, it
is necessary to carry out this operation carefully, strictly observing the instructions below.
I. Make sure that the green mounting nuts, located on the free edges of the inlet and outlet blocks, as well as the nuts on the
shutoff valve with taps INLET – OUTLET are completely eased off (free threaded part – fig. 16).
II. Connect each flexible tube from the supply package to the free edges of the inlet block (b) and outlet block (e), respectively,
tightening them by force, until the tube tip touches the threaded part, into which the green mounting nuts are installed (about
2.5 cm) (fig. 17). Turn the nuts clockwise to securely fix the flexible tube without forcing tightening.
III. Insert the inlet and outlet blocks into the aquarium, placing them transversally to the corresponding joints (b - e) on the
aquarium walls. Fix the inlet and outlet blocks with clamps with suction caps, installing one clamp inside, and the other one
outside of the aquarium for each of two blocks (fig. 18). Note: it is recommended to maintain some distance between the inlet
and outlet to facilitate the proper circulation of water.
IV. Place NEWA Kanist filter in a position previously selected, considering the possibility of being easily operated for the normal
maintenance operations.
V. Connect the shutoff valve with taps INLET – OUTLET to NEWA Kanist filter. Make sure that the former tightly fits the filter rotor
unit. Taking into account the importance of this operation, it is recommended:
a. Close the shutoff valve, by pulling the green lever located between the two taps and raising it up to the full attainment of its
end position. The green lever will be in a vertical position relative to the plane in which it is housed (fig. 19).
b. Insert the shutoff valve into the corresponding grooves in the filter head, pressing down firmly on the outer corners placed
alongside of valves (fig. 20). Make sure that the shutoff valve is properly assembled, checking that there are no gaps between
the valve edges and the filter head.
c. Open the shutoff valve, by pulling the green lever up to the stop. The green lever will be in a horizontal position relative to the
plane in which it is housed (fig. 21).
VI. Cut off the excessive parts of the flexible tubes to provide the correct operation of the filter. This will allow for a water route as
direct as possible and avoid possible bend of the flexible tubes (fig. 22).
VII. In accordance with the arrows on the inlet and outlet nozzles, and inscriptions IN and OUT on the shutoff valve, connect the
flexible tube, installed on the outlet block (upward arrow) to the tap with the inscription OUT. Connect the flexible tube installed
on the inlet block to the tap with the inscription IN. Tighten by force, until the tube tip touches the threaded part, into which
the green mounting nuts are installed (about 2.5 cm) (fig. 23). Turn the nuts counter clockwise to securely fix the flexible tube
without forcing tightening (fig. 24).
FILTER START
a) Location:
NEWA Kanist external filter is a gravity filter, therefore it is recommended to place it in the previously identified position before
connecting the block, which closes the shutoff valve and flexible tubes. An ideal location for the installation of the filter is under
the aquarium on the appropriate furniture.
NOTE: The distance between the water level in the aquarium and the bottom of the filter case must not exceed
150 cm. ATTENTION: DO NOT INSTALL THE FILTER ABOVE THE WATER LEVEL.
b) Actuation:
NEWA Kanist is equipped with an integrated starting system, which actuates the filter by pressing the START button. Therefore,
strictly follow the steps stated below:
I. Make sure that the operations for connection of the shutoff valve with the taps INLET – OUTLET to the external filter have been
carried out in conformity with the instructions (see Section “SETTING-UP PROCEDURE”, point b).
II. Repeatedly press START button (fig. 25), until water starts to enter the filter case by gravity. As the filter is filled with water,
the air present in it will be released through the outlet block, producing bubbles.
III. Once all the hydraulic system will be saturated with water (the bubbles do not come out of the outlet block any more), it is
possible to connect the external filter to the power supply. The water will then exit out of the diffusers or injectors in continuous
flow. Disconnect the filter plug from the power supply and repeat the starting procedure.
Note: At the start of the filter, the presence of air remained trapped in the filter material may generate noise, which is considered
normal. The total elimination of air will occur after a few hours allowing the filter to work in utmost silence.
14
ATTENTION: DO NOT CONNECT THE FILTER PLUG TO THE POWER SUPPLY UNTIL THE UNIT IS FILLED WITH WATER, AS IT
MAY CAUSE DAMAGE OF THE ROTOR.
ATTENTION: DO NOT PLACE THE AERATOR DRIPSTONES CLOSE TO THE INLET BLOCK, AS IT MAY IMPEDE THE EFFICIENT
FILTER OPERATION AND GENERATE NOISE.
MAINTENANCE
ATTENTION: REMOVE ALL ELECTRICAL APPLIANCES IN THE AQUARIUM BEFORE CARRYING OUT INSTALLATION AND
MAINTENANCE OPERATIONS. IN CASE OF MOISTURE INGRESS TO THE PLUG OR ELECTRICAL SOCKET, BREAK THE
NETWORK MAIN SWITCH, PRIOR TO DISCONNECTION OF THE SUPPLY CABLE.
Perform any maintenance operations when the filter is switched off, strictly observing the following instructions
1. Disconnect the filter from the power supply.
2. Close the shutoff valve, by pulling the green lever located between the two taps and raising it up to the full attainment of its
end position. The green lever will be in a vertical position relative to the plane in which it is housed (fig. 26).
ATTENTION: During the maintenance operations, the shutoff valve must ALWAYS be connected to the flexible
tubes in a closed position.
3. Disconnect the shutoff valve from NEWA Kanist filter, pulling taps INLET – OUTLET upwards. It is not necessary to take out
the flexible tubes and the outlet blocks from the aquarium, unless they must be cleaned. In this case, remove the possible
incrustation with brushes.
ATTENTION: It is recommended to provide an absorbing material, necessary for wrapping the shutoff valve, because water may
leak out of it during the disconnection.
4. Lift the filter by the grooves located around its perimeter and move to a suitable place for maintenance (for example, a basin,
a sink, a bathtub, etc.), keeping it upright to prevent leakage. Do not grab the filter for the side levers for opening / closing.
5. For detailed instructions on opening the filter, its containers with the filtering materials, and the reassembly of NEWA Kanist
filter, refer to the section “INSTALLATION OF THE FILTERING MATERIALS”.
ATTENTION: to facilitate the maintenance operations, it is recommended to drain the remaining water, holding the baskets,
after the rotor unit removal.
6. When the maintenance operations are finished (see: points a) and b)), connect the shutoff valve with taps INLET – OUTLET to
NEWA Kanist filter. Make sure that the former tightly fits the filter rotor unit. Open the shutoff valve, by pulling the green lever
(see also “Connection of the shutoff valve with taps INLET – OUTLET with the external filter”).
7. Put the filter into operation, strictly observing the instructions, stated in Section “FILTER START” (point b – Actuation).
Note: it is recommended to periodically lubricate all the rubber parts of the rotor unit applying vaseline oil on the O-shaped
gaskets, the plunger and the pushbutton pad.
a) Maintenance of the impeller:
ATTENTION: the impeller used in NEWA Kanist filters consists of supports and ceramic shaft. It is recommended to
be very careful in its handling during the maintenance operations.
1. Remove the impeller chamber cover (4) from the rotor unit (1), by turning it counter clockwise using the appropriate levers
and gently pull it upwards (fig. 27).
2. Disconnect the ceramic shaft and black rubber support from the impeller cover, and carefully put them on the table. Note: the
second rubber support may remain in place within the housing of the rotor: to extract it is necessary to insert the free end of the
ceramic shaft into the rubber support tag, after the removal of the rotor unit.
3. Take out the rotor group from the cylinder, holding the impeller blades, and rinse the rotor group together with the impeller
cover under running water with non-abrasive brush to remove dirt. In case, the rotor unit is covered with calcium plaque, soak it
in vinegar for 15-20 minutes before cleaning, then rinse thoroughly.
ATTENTION: do not use acids or solutions different from normal vinegar, as they may be toxic to fish.
4. Reassemble the rotor unit: first, insert the ceramic shaft, and then install corresponding black rubber supports on the free end
of the shaft (fig. 28). (5)
5. Install the rotor unit back into the cylinder and install the impeller cover, so that the rubber gasket on the ceramic is correctly
positioned in the impeller cover grooves.
6. Fix the impeller cover on the rotor unit, turning the corresponding levers clockwise.
15
EN
b) Maintenance of the filtering materials:
EN
1. Replace the filtering materials as required, observing the recommended intervals (see the table). Make sure that the coal
bags lie flat, and that neither the coal bags nor any other components block the hole for circulation of water coming from the
aquarium.
2. Rinse the filter body without soap or detergents. Any residue can damage the delicate tissues of the fish.
3. Gently rinse the baskets containing the biological material with water taken from the aquarium, to avoid destroying the
bacterial colonies in the filter substrate, which are responsible for the welfare of the aquarium.
ATTENTION: chloride in the tap water causes death of the colonies of beneficial bacteria contained in the porous rings
4. Install the baskets with the filtering materials into the filter case, carefully following the steps from 8 to 13 of Section
“INSTALLATION OF THE FILTERING MATERIALS”.
Note: Do not replace all the filtering materials with biological action (sponges, porous rings, etc.) simultaneously, ignoring
the determined intervals for their replacement. Part of the old materials left in the filter stimulates reintegration of important
bacterial colonies that were lost with the materials removed.
ATTENTION: IN ORDER TO MAINTAIN THE PERFORMANCE CHARACTERISTICS OF NEWA KANIST, IT IS RECOMMENDED TO
USE ORIGINAL FILTERING MATERIALS AND SPARE PARTS NEWA®.
Once a month
Every 2 months
Every 6 months
Every 12 months
Carbon NEWA AQUA
CARBO ACTIVE- Pellets
Replacement
-
-
-
Sponges
Control the
Control and cleaning,
development of the
if necessary
bacterial load
Replacement
-
NEWA AQUA
Microceramic
porous rings
Control the
Control and cleaning,
development of the
if necessary
bacterial load
-
Replacement 50%
Impeller
-
-
Control and cleaning,
if necessary
-
Inlet grid
-
Control and cleaning,
if necessary
-
-
Flexible tubes
-
-
-
Control and cleaning,
if necessary
Shutoff valve lever
-
-
Cleaning and
lubrication
-
START button
-
-
Cleaning and
lubrication
-
Rotor unit gasket
-
-
Cleaning and
lubrication
-
16
FILTERING MATERIALS IDENTIFICATION
You can make a customization of filtering materials to choose products from the line NEWA AQUA, a range of high-quality
filtering materials, specifically developed by NEWA®, to ensure practicality, durability and safety during filtration. The following
table summarizes the characteristics of all materials, subdivided in accordance with the intended by the different filter actions:
Filtering action
MODEL NEWA Aqua
DESCRIPTION
CHARACTERISTICS
FIBER
Polyethylene synthetic fiber
High resistance to wear
Minimal density
Biologically inert
KINSHY SPONGE
Electro-welded fiber from PVC
Withstands high loads of
pollutant material without
clogging - has structural memory
MICROCERAMIC
Miniature ceramic elements
The reduced size maximizes the
surface intended to bacterial flora
per unit volume available
CERAMIC HI-Q
Porous ceramic elements
The high porosity increases
the volume available to the
colonization of the bacterial flora
BIOGLOBE
Polypropylene balls of variable
diameter
The structural elasticity enhances
the specific surface area for the
bacterial flora
CARBO ACTIVE PELLETS
Super-activated mineral coal
with high adsorbability
Elimination of odours - crystal
clear water maintenance
CARBO ACTIVE
GRANULES
Activated granular carbon
of plant origin with high
adsorbability
Removal of toxic substances and
medical residues
CARBO ACTIVE MIXTURE
Super-activated mineral coal
with high adsorbability
Elimination of odours
Crystal clear water maintenance
Elimination of toxic substances
ACTIVE ZEOLITE
Chemically-activated mineral
zeolite of volcanic origin
Attraction and retention of
ammonia, ammonium, sulfides,
sulfites and heavy metals
ANTI-NITRATE
Ion exchange resin
Elimination of nitrates
Protection and stimulation of
algae growth
ANTI-PHOSPHATE
Ion exchange resin
Elimination of phosphates
and silicates - Protection and
stimulation of algae growth
MECHANICAL
FILTRATION
BIOLOGICAL
FILTRATION
CHEMICAL
FILTRATION
17
EN
CORRECT DISPOSAL OF THIS PRODUCT
(WASTE ELECTRICAL & ELECTRONIC EQUIPMENT)
EN
2002/96/EC - EN50419
Applicable in the European Union and other European countries with separate collection systems.
When you decide to scrap the aquarium, in order to recover the recyclable materials (plastic, glass, etc.) and to safely dispose of its electrical components, the various materials should be separated and disposed of separately in compliance with
the local regulations in force. The lighting unit (lid) should be separated from the glass tank and other electrical accessories.
In compliance with the European Directive WEEE, the lighting unit and the electrical appliances should be disposed of according
to the instructions given in the paragraph below entitled “Correct disposal of the product – electrical and electronic waste”.
This marking shown on the produci or its literature, indicates that it should not be disposed with other household wastes at
the end of its working life. To prevent possible harm to the environment or human health from uncontrolled waste disposal,
please separate this from other types of wastes and recycle it responsibly to promote the sustainable reuse of material resources.
• Household users should contact either the retailer where they purchased this product, or their local government office, for details
of where and how they can take this item for environmentally safe recycling. • Business users should contact their supplier and check
the terms and conditions of the purchase contract. This product should not be mixed with other commercial wastes for disposal.
WARRANTY
This product is guaranteed, in compliance to European directive 1999/44. as fee from faults both in materials and workmanship
for a period of 24 months from date of purchase. If the product fails to operatecorrectly within the first two years of the date
of purchase, return it to the retailer where it was purchased. The product shall be replaced free of charge. During the period of
warranty the product shall be replaced if: 1) The product is returned carefully packaged and has not been damaged intransport.
2) Proof of purchase is supplied along with a detailed explanation of reasons for the claim. The warranty is subject to the
following restrictions and conditions: 1) The warranty does not cover accidental damage or breakage. 2) Replacement of the
product in no way represents admission of responsibility. 3) The warranty is not valid in the case of improper use, and does not
cover damage caused by tempering or negligence on the part of the purchaser. 4) The warranty is not valid for components
subject to wear and tear (see * - Spare Parts ).
KEEP THESE INSTRUCTIONS.
18
FR
Instructions d’utilisation
Sommaire
NORMES PRINCIPALES DE SÉCURITÉ
DESCRIPTION DU PRODUIT
Composants du filtre
Les parties d’accouplement
Matériaux filtrants
FONCTIONNEMENT
ALLOGGIAMENTO DEI MATERIALI FILTRANTI
PRÉPARATION DU FILTRE
Assemblage des parties d’accouplement
Assemblage de la valve d’arrêt avec
les robinets IN - OUT au filtre extérieur
MISE EN MARCHE DU FILTRE
Placement
Entretien du moulinet
ENTRETIEN
Entretien du moulinet
Entretien des matériaux filtrants
IDENTIFICATION DES MATERIAUX FILTRANTS
COMMENT ÉLIMINER CE PRODUIT
GARANTIE
page 19
page 20
page 20
page 20
page 20
page 20
pag. 21
page 22
page 22
page 23
page 23
page 23
page 23
page 24
page 24
page 25
pag. 26
pag. 27
pag. 27
NORMES PRINCIPALES DE SÉCURITÉ
NEWA Kanist représente le filtre extérieur pour les aquariums à eau douce et maritime et n’est destiné qu’à l’utilisation dans les
habitations. Toute autre utilisation est interdite et, par conséquent, le fabricant décline toute responsabilité.
NEWA Kanist est conforme aux normes de sécurité en vigueur dans l’Union européenne (EN 60335-2-41).
ATTENTION: pour éviter les accidents de toute nature, respecter strictement, en plus des règles de sécurité les plus courantes,
les précautions suivantes:
ATTENTION: ce symbole sur l’étiquette du produit, indique qu’il est nécessaire de lire attentivement le présent mode
d’emploi, avant de lancer, utiliser et entretenir l’appareil.
1. ATTENTION: débrancher du réseau tous les appareils électriques dans l’aquarium, avant de procéder à l’installation et la
maintenance. En cas de contact de l’eau avec la fiche ou la prise électrique, ouvrir l’interrupteur principal du réseau, avant de
débrancher le câble d’alimentation;
2. S’assurer que la tension indiquée sur l’étiquette du produit, corresponde à celle du réseau;
3. Avant de brancher au réseau électrique, contrôler l’appareil et le câble correspondant pour tous endommagements.
4. Le cordon électrique ne peut pas être ni réparé, ni remplacé. S’il est endommagé, il est nécessaire de remplacer l’appareil.
5. Le câble d’alimentation de l’appareil doit être plié correctement, vers le bas (NOEUD DESCENDU, fig. 2), afin d’éviter l’écoulement
de l’eau le long du câble et de la faire entrer dans une prise appropriée.
6. Il est recommandé initialement de protéger l’appareil, ainsi que tous les autres appareils électriques, à l’aide d’un disjoncteur
différentiel spécial (l’installation de l’arrêt de protection), avec le courant à l’écart maximal admissible de 30 мА (la signification
du courant résiduel Idn ≤ 30 мA).
7. Lors de l’installation et l’utilisation de l’appareil, il est interdit de le lever par le câble d’alimentation.
8. Avant de lancer l’appareil, s’assurer de l’exactitude de l’installation.
9. Le dispositif ne doit pas fonctionner au ralenti..
10. Il est interdit d’utiliser l’appareil pour les liquides corrosifs ou abrasifs.
11. La température maximale du liquide pompé ne doit pas dépasser 35° C.
12. ATTENTION: le symbole donné
signifie que les appareils peuvent être utilisés seulement à l’intérieur des locaux habitables.
19
FR
13. ATTENTION: on ne peut pas utiliser ce filtre, immergé dans l’eau. En cas de chute accidentelle, avant de le sortir de l’eau,
retirer la fiche de la prise électrique. Respecter les mêmes précautions, s’il est constaté que les parties extérieures de l’appareil
sont humides.
20. ATTENTION: l’appareil n’est pas conçu pour être utilisé par des personnes (y compris les enfants) ayant un handicap physique,
sensoriel ou intellectuel réduit ou avec l’expérience ou connaissances insuffisantes, sauf quand ils sont assistés par une personne
responsable de leur sécurité, sont surveillés ou peuvent se servir des instructions d’utilisation de l’appareil.
21. ATTENTION: il est nécessaire de surveiller les enfants pour qu’ils ne jouent pas avec l’appareil, puisque cela n’est pas un jouet.
GARDER PRÉCIEUSEMENT LA PRÉSENTE INSTRUCTION
DESCRIPTION DU PRODUIT
FR
Composants du filtre
1. Bloc moteur
2. Installation à pression pour la mise en marche du filtre
3. Joint torique du bloc moteur
4. Couvercle de la chambre du moulinet
5. Bloc rotor assemblé avec l’arbre et les supports en céramique
6. Corps du filtre
7. Cylindre intérieur d’accouplement
8. Filet de protection des corbeilles
9. Corbeilles pour les matériaux filtrants
10. Leviers d’ouverture/fermeture
Les parties d’accouplement
a. Valve d’arrêt avec les robinets IN - OUT
b. Raccord de tuyau d’entrée en forme de U
c. Tube d’accouplement
d. Filet du préfiltre
e. Raccord de tuyau de sortie en forme de U
f. Tube de transition du manchon coudé
g. Manchon coudé avec 2 sorties
h. Obturateur du manchon coudé
i. Diffuseur rotatif de type “coup d’oeil”
j. Diffuseur rotatif pour les gicleurs
k. Tube de transition pour l’accouplement des gicleurs
l. Gicleurs
m. Obturateur des gicleurs
n. Clips à ventouses
o. Tuyaux flexibles (150 cm)
Matériaux filtrants
11. Fibre pour la filtration mécanique
12. Charbon actif avec une grande capacité d’adsorption
13. Éponge finement poreuse
14. Anneaux poreux pour la filtration biologique
15. Éponge macroporeuse
FONCTIONNEMENT
NEWA Kanist assure le maintien d’un environnement aquatique sain, grâce à un système de filtration puissant et efficace, avec
une variété de possibilités, spécialement conçues pour la garantie du résultat maximum au plan de la filtration mécanique,
chimique et biologique. Dès la mise en marche, l’eau est prise de l’aquarium par le tube d’aspiration et est amenée dans le filtre
NEWA Kanist, où la masse considérable des matériaux filtrants traitent tous les contaminants visibles et invisibles, grâce à 6
stades de filtration:
20
MÉCANIQUE:
• la conception du filtre comprend un large compartiment pour la désinfection de l’eau, où la majeure partie des plus grandes
particules du sédiment se réunit graduellement à une certaine zone du fond, ce qui permet d’éviter le colmatage des éponges,
en prolongeant, ainsi, leur durée de vie;
• les éponges macroporeuses de solidité extrême, avec l’action mécanique contre la pollution, retiennent les particules en
suspension, tels que les excréments des poissons, les restes de nourriture, etc. La résistance maximale des fibres à l’usure permet
de subir les charges extrêmes des substances polluantes, en même temps, en assurant le passage régulier de l’eau aux stades
suivants.
BIOLOGIQUE:
• c’est le stade, qui implique la participation des colonies des bactéries, qui transforment les composés organiques azotés en
nitrites, ensuite en nitrates. C’est assuré par les anneaux poreux NEWA AQUA Microceramic, spécialement élaborés pour obtenir
le meilleur rapport entre les surfaces impliquées dans la filtration et le volume de remplissage. En réalité, leur taille diminuée et
la porosité extrêmement élevée permettent de contenir la quantité double de flore bactérienne en comparaison de la quantité
d’habitude qui se trouve dans les éléments céramiques conventionnelles, ce qui permet d’optimiser la filtration biologique.
• NEWA Kanist assure le plus haut niveau de filtration biologique, chaque filtre extérieur contient jusqu’à cinq couches d’éponges
de différentes granulométries, du plus grand au plus petit. La surface totale augmentée des éponges transforme NEWA Kanist en
environnement idéal pour les bactéries nitrifiantes, leur permettant de croître de façon exponentielle.
CHIMIQUE D’ADSORPSION:
• ce stade consiste à purifier l’eau et éliminer les odeurs désagréables et les couleurs, grâce aux billes particulières de NEWA AQUA
Carbo-Active, le charbon hyper-activé d’origine minérale. La saturation extraordinaire par les macropores et la zone augmentée
spécifique assurent une capacité d’absorption élevée, physique, ainsi que chimique, en tirant et en liant de diverses substances
sur la surface extérieure et intérieure. La structure du paquet solide permet de l’installer et de l’enlever facilement, en évitant les
endommagements accidentels, tandis que la structure spéciale des cellules empêche leur colmatage, en favorisant la circulation
de l’eau à l’intérieur de la masse de charbon.
ATTENTION: EN VUE DE LA PRÉSERVATION DES QUALITÉS D’EXPLOITATION NEWA KANIST, IL EST RECOMMANDE
L’UTILISATION DES MATERIAUX FILTRANTS ET DES PIÈCES DE RECHANGE ORIGINAUX DE NEWA®.
INSTALLATION DES MATERIAUX FILTRANTS
Les matériaux filtrants sont dans la boîte avec les accessoires de filtre NEWA Kanist. Aux fins de leur placement correct, il est
recommandé d’accomplir strictement les instructions suivantes.
1. Séparer le bloc moteur du corps du filtre, ayant débouclé quatre clips de fixation, ayant appuyé sur leurs rainures situées en
bas (fig. 3). Retirer le bloc moteur, en le soulevant par ses encoches situées sur le périmètre, et le mettre prudemment sur une
surface plane.
2. Enlever la couvercle du bloc des co rbeilles pour les matériaux filtrants, en insérant les doigts dans les trous appropriés pour
la facilité d’utilisation (fig. 4).
3. Retirer toutes les corbeilles, en utilisant la pince correspondante, et les mettre sur une surface plane.
4. Première corbeille: sortir les billes du charbon actif NEWA AQUA Carbo-Active de la boîte avec les accessoires et les placer
entre la couche de fibre blanche et l’éponge finement poreuse noire (1 paquet microforé (avec les orifices microscopiques) pour
les modèles KANIST 250 et 350, 2 paquets microforés pour les modèles KANIST 450 et 700), en faisant attention sur le fait, qu’ils
soient à plat et ne fermant pas l’orifice destiné à la circulation de l’eau, venant de l’aquarium. Monter la couche de fibre blanche
à sa place (fig. 5). ATTENTION: NE PAS OUVRIR LES PAQUETS MICROFORES.
5. Deuxième corbeille: sortir les billes restées du charbon actif NEWA AQUA Carbo-Active de la boîte avec les accessoires et les
placer sur l’éponge finement poreuse noire (2 paquets microforés pour les modèles KANIST 350, 450 et 700), en faisant attention
sur le fait, qu’ils soient à plat et ne fermant pas l’orifice destiné à la circulation de l’eau, venant de l’aquarium (fig. 6). ATTENTION:
NE PAS OUVRIR LES PAQUETS MICROFORES.
6. Troisième et quatrième corbeilles: Sortir les paquets avec les anneaux poreux de la boîte avec les accessoires, les ouvrir et
distribuer régulièrement les anneaux sur la surface de l’éponge macroporeuse bleu clair (les modèles NEWA Kanist 350, 450 et
700). ATTENTION: ce qui précède s’applique également à la deuxième corbeille NEWA Kanist 250 et la quatrième corbeille NEWA
Kanist 700.
7. À l’aide des pinces correspondantes qui sont sur chaque corbeille, rincer abondamment avec de l’eau courante les matériaux
filtrants et les éponges, où ils sont situés.
21
FR
FR
8. Installer les corbeilles dans le corps du filtre, en faisant attention sur le fait, que les corbeilles s’installent l’une au-dessus de
l’autre, sans bloquer l’accès de l’eau dans le tube d’aspiration (fig. 7).
9. Premièrement, installer les corbeilles qui ont les anneaux poreux et l’éponge macroporeuse bleue claire, ensuite, les corbeilles
avec le charbon actif et l’éponge finement poreuse noire et, enfin, la corbeille avec la fibre blanche pour la filtration fine (fig. 8).
ATTENTION: il est impératif que cette dernière soit la corbeille avec l’orifice pour la circulation de l’eau, le plus grand, puisque c’est
l’endroit de l’accouplement avec le bloc moteur du filtre au moyen du cylindre intérieur d’accouplement.
10. Installer le couvercle du bloc des corbeilles, en faisant attention sur le fait, qu’après l’installation son orifice coïncide avec
l’orifice dans la premier corbeille. Sinon, tourner le couvercle (fig. 9).
11. Mettre le bloc moteur, en faisant attention sur le fait, que le cylindre intérieur d’accouplement entre dans l’orifice du couvercle
du bloc des corbeilles (fig. 10). Remarque: si vous regardez le corps du filtre par-dessus, l’opération d’accouplement inverse sera
extraordinairement simple, en prenant en considération que l’installation à pression pour la mise en marche du filtre, située
par-dessus le bloc moteur, est alignée avec le cylindre intérieur d’accouplement (fig. 11).
12. ATTENTION: avant de fermer les clips, s’assurer que les matériaux filtrants soient à leurs places, les containers avec les
matériaux filtrants soient mis absolument correctement (les matériaux ne s’étendent pas au-delà du bord) et le couvercle du
bloc des corbeilles soit dans la bonne position.
13. Faire coïncider chacun des quatre clips avec les accouplements correspondants sur le bloc moteur du filtre et plaquer le bloc
moteur au corps du filtre, en appuyant fermement sur les parties saillantes des clips (fig. 12).
PRÉPARATION DU FILTRE
b
e
c
f
FIG. 1
a
o
o
g
i
i
h
l
j
d
j
m
k
n
m
l
a) Assemblage des parties d’accouplement
Ouvrir l’emballage NEWA Kanist, sortir la boîte avec les accessoires du filtre extérieur, et mettre les accessoires sur la table, comme
cela est indiqué sur le dessin (fig. 1). Monter le bloc d’admission, ayant joint le filet du préfiltre (d) au tube d’accouplement (c), et
ensuite au raccord de tuyau d’entrée en forme de U (b). Il est principalement important que l’assemblage de ces deux éléments
soit réalisé correctement, en faisant les efforts, suffisants pour vaincre la résistance des deux joints toriques, pour que le tube
d’aspiration soit fixé solidement au raccord du tuyau d’entrée (fig. 13). Pour faciliter l’opération, il est recommandé d’humidifier
les joints toriques. S’il est nécessaire, on peut ajuster la position du tube d’aspiration, le glissant vers le bas, jusqu’au niveau du
premier joint. Pour un fonctionnement plus efficace, vérifier que le filet du préfiltre (d) soit à une distance d’au moins 4 à 5 cm
du fond de l’aquarium. Si le tube d’accouplement (c) est trop long, couper-le avec la scie.
Remarque: installer le tube d’aspiration à l’écart des aérateurs et séparateurs d’écume, puisque l’air qui y sort peut réduire
l’efficacité du filtre extérieur.
II. Monter le bloc d’admission, ayant joint le raccord de tuyau de sortie en forme de U (e) au tube de transition (f), et ensuite, au
manchon coudé avec 2 sorties (g). S’il est nécessaire, on peut diminuer la longueur du raccord de tuyau de sortie, en le coupant
avec la scie, conformément à la disposition des rainures (fig. 14).
Avec un léger effort, mettre sur le manchon coudé (g) les diffuseurs rotatifs, ayant choisi entre les diffuseurs de type “coup d’oeil”
22
(i) et les diffuseurs «pour les gicleurs» (j). Si l’on décide d’utiliser une seule des sorties du manchon coudé, il est recommandé de
fermer la sortie non utilisée avec l’obturateur du manchon coudé (h).
Remarque: pour assurer la meilleure circulation de l’eau dans les diffuseurs de type “coup d’oeil”, il est recommandé de les
installer un peu plus bas du niveau de l’eau ou, le maximum, au même niveau.
III. Les gicleurs peuvent être joints entre eux par le tube de transition (k) ou être utilisés séparément (fig. 15), en tout cas, ils
doivent être reliés à un diffuseur correspondant (j). Pour l’utilisation correcte, il est recommandé de fermer la sortie du gicleur
par les obturateurs correspondants de l’assortiment fourni (m). Remarque: pour assurer la meilleure circulation de l’eau dans les
gicleurs, il est recommandé de les installer un peu plus haut du niveau de l’eau.
b) Assemblage de la valve d’arrêt avec les robinets IN - OUT au filtre extérieur
ATTENTION: pour éviter la fuite d’eau et garantir le bon fonctionnement du filtre extérieur NEWA Kanist, il est
nécessaire d’effectuer l’opération donnée très attentivement, en suivant strictement les instructions ci-dessous.
I. S’assurer que les écrous de blocage verts, situés sur les bords libres des blocs d’admission et de sortie, ainsi que ceux situés sur
la valve d’arrêt avec les robinets IN-OUT, soient entièrement desserrés (avec la partie filetée ouverte - fig. 16).
II. Assembler chacun des tuyaux flexibles de l’assortiment fourni aux bords libres du bloc d’admission (b) et le bloc de sortie
(e), respectivement, en les tendant fermement jusqu’à ce que le bout du tuyau ne touche pas la partie filetée, dans laquelle on
insère les écrous de blocage verts (environ 2,5 cm) (fig. 17). Serrer les écrous dans le sens des aiguilles d’une montre pour fixer
fermement le tuyau flexible, sans retendre le blocage III. Mettre les blocs d’admission et de sortie à l’aquarium, en les plaçant
transversalement aux points d’assemblage correspondantes (b - e) sur les parois de l’aquarium. Fixer les blocs d’admission et
de sortie à l’aide des clips à ventouses de l’assortiment fourni, en installant l’un d’eux à l’intérieur, et l’autre à l’extérieur de
l’aquarium pour chacun de deux blocs (fig. 18). Remarque: Il est recommandé de laisser une certaine distance entre l’entrée et la
sortie pour assurer la circulation de l’eau. IV. Placer le filtre NEWA Kanist à la place, choisie d’avance, en prenant en considération
la possibilité de l’accès facile pour la réalisation des actions standard d’entretien.
V. Assembler au filtre NEWA Kanist, la valve d’arrêt avec les robinets IN-OUT, en faisant attention au fait que le dernier adhère
bien au bloc moteur du filtre. En prenant en considération l’importance de l’opération donnée, il est recommandé de:
a. Fermer la valve d’arrêt, en tirant le levier vert, situé entre deux robinets, et le soulevant jusqu’au bout. Le levier vert sera dans
la position verticale par rapport à la surface, sur laquelle il est situé (fig. 19).
b. Mettre la valve d’arrêt dans les rainures correspondantes de la tête du filtre, en appuyant fermement sur les angles externes
de côté des robinets (fig. 20). S’assurer que la valve d’arrêt soit montée correctement, ayant contrôlé l’absence des jeux entre les
bords de la valve et la tête du filtre.
c. Ouvrir la valve d’arrêt, en tirant le levier vert jusqu’au bout. Le levier vert sera dans la position horizontale par rapport à la
surface, sur laquelle il est situé (fig. 21).
VI. Couper les surplus des tuyaux flexibles pour assurer le bon fonctionnement du filtre. Cela permettra d’obtenir l’entrée de l’eau
la plus directe et d’éviter les coudes possibles des tuyaux flexibles (fig. 22).
VII. Conformément aux flèches sur les raccords de tuyau d’entrée et de sortie et les inscriptions “ENTREE” (IN) et “SORTIE” (OUT)
sur la valve d’arrêt, joindre le tuyau flexible installé sur le bloc de sortie (la flèche vers le haut) avec le robinet, ayant l’inscription
“SORTIE” (OUT). Joindre le tuyau flexible installé sur le bloc d’admission, avec le robinet, ayant l’inscription “ENTREE” (IN). Tendre
fermement jusqu’à ce que le bout du tuyau ne touche pas la partie filetée, dans laquelle on insère les écrous de blocage verts
(environ 2,5 cm) (fig. 23). Serrer les écrous dans le sens inverse des aiguilles d’une montre pour fixer fort le tuyau flexible, sans
le bloquer trop (fig. 24).
MISE EN MARCHE DU FILTRE
a) Placement:Le filtre extérieur NEWA Kanist est le filtre d’écoulement naturel, c’est pourquoi il est recommandé de l’installer
sur la place choisie d’avance, avant d’assembler le bloc qui comprend la valve d’arrêt et les tuyaux flexibles. La place idéale pour
l’installation du filtre est sous l’aquarium dans un meuble.
REMARQUE: La distance entre le niveau de l’eau dans l’aquarium et la base inférieure du corps du filtre, ne doit
pas dépasser 150 centimètres.
ATTENTION: NE JAMAIS INSTALLER LE FILTRE AU-DESSUS DU NIVEAU DE L’EAU.
b) Mise en marche:
NEWA Kanist est approvisionné en système intégré de la mise en marche, qui, lorsque vous appuyez “MARCHE” (START) met
23
FR
FR
automatiquement en marche le filtre. En raison de cela, suivre strictement les étapes mentionnées ci-dessous:
I. S’assurer que les opérations nécessaires de l’assemblage de la valve d’arrêt avec les robinets IN - OUT au filtre extérieur, soient
accomplies, conformément aux instructions (regarder le Paragraphe «PRÉPARATION DU FILTRE», point b).
II. Avec l’effort, appuyer plusieurs fois sur le bouton “MARCHE” (START) (fig. 25), jusqu’à ce que l’eau ne commence pas à entrer
au courant naturel dans le corps du filtre. Dans la mesure du remplissage du filtre par l’eau, l’air assistant sortira par le bloc de
sortie, en faisant des bulles.
III. Dès que le système hydraulique sera rempli par l’eau (les bulles d’air ne sortiront plus du bloc de sortie), on peut connecter le
filtre extérieur au réseau électrique. Dans ce cas, l’eau sortira par le flux continu à travers les diffuseurs ou les gicleurs. Débrancher
le filtre du réseau et répéter la procédure de la mise en marche.
Remarque: à la mise en marche du filtre, la présence de l’air retenu dans le matériau filtrant, peut provoquer un bruit qui
est considéré comme normal. L’élimination complète de l’air se passera dans quelques heures, ce qui permettra au filtre de
fonctionner pratiquement silencieusement.
ATTENTION: NE PAS BRANCHER LE FILTRE AU RÉSEAU ÉLECTRIQUE AVANT LE REMPLISSAGE DE L’APPAREIL PAR L’EAU,
CELA PEUT ENDOMMAGER LE MOTEUR.
ATTENTION: NE PAS INSTALLER LES PIERRES POREUSES DE L’AÉRATEUR PRÈS DU BLOC D’ADMISSION. CELA PEUT NUIRE
AU FONCTIONNEMENT EFFECTIF DU FILTRE ET PROVOQUER LE BRUIT.
ENTRETIEN
ATTENTION: ENLEVER TOUTES LES INSTALLATIONS ÉLECTRIQUES DE L’AQUARIUM, AVANT L’EXÉCUTION DES OPÉRATIONS
DE L’INSTALLATION ET D’ENTRETIEN. EN CAS DE CONTACT DE L’EAU AVEC LA FICHE OU LA PRISE ÉLECTRIQUE, OUVRIR
L’INTERRUPTEUR PRINCIPAL DU RÉSEAU, AVANT DE DEBRANCHER LE CÂBLE D’ALIMENTATION.
Pour effectuer quelques opérations d’entretien, travailler avec le filtre hors tension, en suivant strictement les points mentionnés
ci-dessous:
1. Débrancher le filtre du réseau électrique.
2. Fermer la valve d’arrêt, en tirant le levier vert, situé entre deux robinets, et le soulevant jusqu’au bout. Le levier vert sera dans
la position verticale par rapport à la surface, sur laquelle il est situé (fig. 26).
ATTENTION: pendant les opérations d’entretien, la valve d’arrêt doit TOUJOURS être raccordée aux tuyaux
flexibles, dans la position fermée.
3. Débrancher la valve d’arrêt du filtre NEWA Kanist, en tirant vers le haut les robinets IN - OUT. Il n’y a pas de nécessité d’enlever
les tuyaux flexible et les blocs d’admission et de sortie de l’aquarium, à moins qu’ils ne doivent être nettoyés. Dans ce cas, enlever
les dépôts avec les goupillons et les brosses.
ATTENTION: Il est recommandé d’avoir à portée de main un produit absorbant pour y enrouler la valve d’arrêt, puisqu’au
débranchement la fuite d’eau est possible.
4. Soulever le filtre par les encochages situées sur son périmètre, et le déplacer vers un endroit approprié pour l’entretien (par
exemple, le bassinet, l’évier, la baignoire, etc.), en le retenant dans la position verticale, pour éviter les fuites d’eau. Ne pas tenir
le filtre par les leviers latéraux de l’ouverture/fermeture.
5. Les instructions détaillées pour l’ouverture du filtre, ses containers avec les des matériaux filtrants, ainsi que pour l’assemblage
inverse du filtre NEWA Kanist: voir dans le Paragraphe «INSTALLATION DES MATERIAUX FILTRANTS».
ATTENTION: Pour faciliter les opérations d’entretien, après le retrait du bloc moteur, il est recommandé de vidanger l’eau
restante, en tenant fermement les corbeilles.
6. À la fin des opérations d’entretien (voir: les points a) et b)), assembler la valve d’arrêt avec les robinets IN - OUT au filtre NEWA
Kanist, en faisant attention que la valve d’arrêt adhère bien au bloc moteur du filtre. Ouvrir la valve d’arrêt, en tirant le levier vert
jusqu’au bout. (Voir aussi le Paragraphe «Assemblage de la valve d’arrêt avec les robinets IN - OUT au filtre extérieur»).
7. Passer à la mise en marche du filtre, en suivant strictement les instructions indiquées dans le Paragraphe «MISE EN MARCHE
DU FILTRE» (point b - Mise en marche).
Remarque: il est recommandé de graisser régulièrement toutes les parties de caoutchouc du bloc moteur, en mettant l’huile de
vaseline sur les joints toriques, plongeur et la bague du bouton de mise en marche.
a) Entretien du moulinet:
ATTENTION: le moulinet, utilisé dans les filtres NEWA Kanist, comprend les supports et l’arbre en céramique. Il est
recommandé d’être au maximum attentif à l’exécution des travaux d’entretien du moulinet.
24
1. Enlever le couvercle de la chambre du moulinet (4) du bloc moteur (1), en le tournant avec les leviers correspondants dans le
sens inverse des aiguilles d’une montre et en le tirant prudemment vers le haut (fig. 27).
2. Déconnecter l’arbre en céramique et le support noir en caoutchouc du couvercle du moulinet et les mettre délicatement sur
la table. Remarque: on peut laisser le deuxième support en caoutchouc à sa place, dans la rainure du rotor; pour le déconnecter,
après le retrait du bloc rotor, mettre l’extrémité libre de l’arbre en céramique dans le trou du support en caoutchouc.
3. Enlever le groupe rotor du cylindre, en le tenant par les aubes du moulinet, et le rincer à l’eau courante avec le couvercle du
moulinet, en utilisant une brosse non abrasive pour enlever la saleté. Si le bloc moteur est couvert de dépôt de calcium, avant le
nettoyage, le placer dans un récipient avec du vinaigre, pour 15-30 minutes, ensuite le rincer abondamment.
ATTENTION: ne pas utiliser les acides ou les solutions, différentes de vinaigre ordinaire alimentaire, ils peuvent être toxiques pour
les poissons.
4. Remonter le bloc rotor, en mettant d’abord l’arbre en céramique et ensuite installer les supports noirs en caoutchouc
correspondants, à l’extrémité libre de l’arbre (fig. 28).
5. Remettre le bloc rotor dans le cylindre et installer le couvercle du moulinet, de sorte que la couche de caoutchouc sur l’arbre
en céramique entre exactement dans la rainure du couvercle du moulinet.
6. Fixer le couvercle du moulinet sur le bloc moteur, en le tournant dans le sens des aiguilles d’une montre par les leviers
correspondants.
b) Entretien des matériaux filtrants:
1. Remplacer les matériaux filtrants d’après la nécessité, en respectant la périodicité recommandée (voir le tableau). Faire
attention que les paquets avec le charbon soient à plat, et que ni eux, ni autres composants ne ferment pas l’orifice destiné à la
circulation de l’eau de l’aquarium.
2. Rincer le corps du filtre, sans utiliser le savon ou les détergents. Tous les résidus éventuels peuvent endommager les tissus
délicats des poissons.
3. Avec de l’eau prise dans l’aquarium, rincer prudemment les corbeilles, contenant le matériel biologique, pour éviter la
destruction des colonies des bactéries dans le substratum du filtre, qui sont , en fait, responsables du “bien-être” de l’aquarium.
ATTENTION: la présence du chlore dans l’eau du robinet amène à la destruction des colonies des bactéries utiles qui se trouvent
dans les anneaux poreux.
4. Remettre les corbeilles avec des matériaux filtrants dans le corps du filtre, en suivant strictement les points 8 - 13 du
Paragraphe «INSTALLATION DES MATERIAUX FILTRANTS».
Remarque: Ne pas remplacer simultanément tous les matériaux filtrants de l’action biologique (les éponges, les anneaux
poreux, etc.), ayant atteint les délais de leur remplacement. Laisser une partie des vieux matériaux dans le filtre, contribuera à la
restitution des colonies, qui ont disparu avec les matériaux enlevés.
ATTENTION: AFIN DE PRÉSERVER DES QUALITÉS D’EXPLOITATION DE NEWA KANIST, IL EST RECOMMANDE D’UTILISER
LES MATERIAUX ORIGINAUX FILTRANTS Et LES PIÈCES DE RECHANGE DE NEWA®.
Une fois par mois
Une fois par 2 mois
Une fois par 6 mois
Une fois par an
Charbon NEWA AQUA
CARBO ACTIVE- Pellets
Remplacement
-
-
-
Eponges
Contrôler le
Surveillance et
développement de la nettoyage en cas
charge bactérienne
de nécessité
Remplacement
-
Anneaux poreux
NEWA AQUA
Microceramic
Surveillance et
Contrôler le
développement de la nettoyage en cas
de nécessité
charge bactérienne
-
Remplacement 50%
Moulinet
-
Surveillance et
nettoyage en cas
de nécessité
-
-
25
FR
Une fois par mois
Une fois par 2 mois
Une fois par 6 mois
Une fois par an
Filet sur l’entrée
-
Surveillance et
nettoyage en cas
de nécessité
-
-
Tuyaux flexibles
-
-
-
Surveillance et
nettoyage en cas
de nécessité
Levier de la valve
d’arrêt
-
-
Nettoyage et
graissage
-
Bouton «Marche»
-
-
Nettoyage et
graissage
-
Joint du bloc moteur
-
-
Nettoyage et
graissage
-
FR
IDENTIFICATION DES MATERIAUX FILTRANTS
Il est possible d’identifier les matériaux filtrants pour choisir une gamme de produits NEWA AQUA, représentant la gamme
des matériaux filtrants de haute qualité, spécialement élaborés par NEWA® pour assurer l’esprit pratique et la durabilité de
l’utilisation de filtration, ainsi que la sécurité de l’utilisation. Le Tableau, mentionné ci-dessous, résume les caractéristiques de
tous les matériaux, subdivisés, conformément à la destination de leur action filtrante:
Action filtrante
MODELE NEWA Aqua
DESCRIPTION
CARACTERISTIQUES
FIBER
Fibre synthétique du
polyéthylène
Haute résistance à l’usure
- densité minimale biologiquement inerte
KINSHY SPONGE
Fibre électrosoudées de PVC
Subit les charges élevées des
substances polluantes, sans être
obstrué - possède la mémoire
structurale
MICROCERAMIC
Eléments minuscules de la
céramique
La taille réduite maximise la
surface, destinée à la flore
bactérienne, par unité de volume
disponible
CERAMIC HI-Q
Eléments poreux de la
céramique
Un haut degré de la porosité
augmente le volume accessible
pour la colonisation par la flore
bactérienne
BIOGLOBE
Billes de polypropylène de
différents diamètres
L'élasticité structurale augmente
la surface spécifique pour la flore
bactérienne
FILTRATION
MECANIQUE
FILTRATION
BIOLOGIQUE
26
Action filtrante
FILTRATION
CHIMIQUE
MODELE NEWA Aqua
DESCRIPTION
CARACTERISTIQUES
CARBO ACTIVE PELLETS
Charbon minéral superactivé, à
haute capacité d'absorption
Fait disparaître les odeurs Maintient la clarté de l'eau
CARBO ACTIVE
GRANULES
Charbon activé en grains
d'origine végétale, à haute
capacité d'absorption
Supprime les substances toxiques
et les résidus médicamenteux
CARBO ACTIVE MIXTURE
Charbon minéral superactivé, à
haute capacité d'absorption
Fait disparaître les odeurs
Maintient la clarté de l'eau
Supprime les substances toxiques
ACTIVE ZEOLITE
Capte et retient l'ammoniac,
Zéolithe minérale chimiquement
l'ammonium, les sulfides, les
activée d’origine volcanique
sulfates et les métaux lourds
ANTI-NITRATE
Résine échangeuse d'ions
Elimine les nitrates
Protège et favorise la croissance
des algues
ANTI-PHOSPHATE
Résine échangeuse d'ions
Elimine les phosphates et silicates
Protège et favorise la croissance
des algues
COMMENT ÉLIMINER CE PRODUIT (déchets d’équipements électriques et électroniques)
2002/96/EC - EN50419
(Applicable dans les pays de l’Union Européenne et aux autres pays européens disposant de systémes de collecte sélective). Au moment du
démantèlement de l’aquarium, afin de récupérer les matières recyclables (plastiques, verre, etc.) et d’éliminer en toute sécurité
les composants électriques, il faut diviser et éliminer séparément les différents matériaux conformément aux normes locales en
vigueur. Il faudra veiller à séparer l’appareil d’éclairage (couvercle) de la cuve en verre et des accessoires électriques. Aux termes
de la directive européenne D3E, l’appareil d’éclairage et les appareils électriques suivent la voie de l’élimination selon les indications fournies au paragraphe ci-après « Élimination correcte du produit - déchets électriques et électroniques ». Ce symbole
apposé sur le produit ou sa documentation indique qu’il ne doit pas être éliminé en fin de vie avec les autres déchets ménagers.
L’élimination incontrôlée des déchets pouvant porter préjudice à l’environnement ou à la santé humaine, veuillez le séparer des
autres types de déchets et le recycler de façon responsable. Vous favoriserez ainsi la réutilisation durable des ressources matérielles. Les particuliers sont invités a contacter le distributeur leur ayant vendu le produit ou à se renseigner auprès de leur mairie
pour savoir où et comment ils peuvent se débarrasser de ce produit afin qu’il soit recyclé en respectant l’environnement. • Les
entreprises sont invitées à contacter leurs fournisseurs et à consulter les conditions de leur contrat de vente. Ce produit ne doit
pas étre éliminé avec les autres déchets commerciaux.
GARANTIE
Le produit est garanti contre tout vice de matériau ou de fabrication pendant 24 mois à compter de la date d’achat, conformément
à la Directive Européenne 1999/44 CE. Rendre le produit au revendeur chez qui il a été acheté s’il ne fonctionne pas correctement au
cours des deux premières années qui suivent la date d’achat. Il sera alors remplacé sans aucun frais supplémentaire. Le produit ne
sera remplacé sous garantie que: 1) S’il est rendu bien emballé pour éviter les dommages durant le transport. 2) S’il est accompagné
du ticket de caisse attestant l’achat et du motif de la réclamation. Limites et conditions de la garantie: 1) Aucune couverture en
cas de dommage dû à un choc. 2) Le remplacement du produit ne correspond en aucun cas à une admission de responsabilité.
3) La garantie n’est pas valable en cas d’usage impropre du produit et de dommages dus à une modification ou à de la négligence
de la part de l’utilisateur. 4) Le garantie n’est pas valable pour les composants sujets à usure (voir * PIÈCES DE RECHANGE).
CONSERVER CES INSTRUCTIONS.
27
FR
DE Gebrauchsanweisung
Inhaltsverzeichnis
WICHTIGE SICHERHEITSVORSCHRIFTEN
BESCHREIBUNG DES PRODUKTS
Bestandteile des Filters
Anschlussstücke
Filtermaterialien
BETRIEB
UNTERBRINGUNG DER FILTERMATERIALIEN
VORBEREITUNG DES FILTERS
Montage der Anschlusstücke
Anschluss des Absperrventils mit IN - OUT-Hähnen an den Außenfilter
INBETRIEBSETZUNG DES FILTERS
Aufstellung
Inbetriebsetzung
WARTUNG
Wartung des Laufrads
Wartung der Filtermaterialien
INDIVIDUELLE KOMBINATIONSMÖGLICHKEIT DER FILTERMATERIALIEN
KORREKTE ENTSORGUNG DIESES PRODUKTS (ELEKTROMÜLL)
GARANTIE
DE
WICHTIGE SICHERHEITSVORSCHRIFTEN
Seite 28
Seite 29
Seite 29
Seite 29
Seite 29
Seite 29
Seite 30
Seite 31
Seite 30
Seite 32
Seite 32
Seite 32
Seite 33
Seite 33
Seite 34
Seite 34
Seite 35
Seite 36
Seite 36
NEWA Kanist ist ein Außenfilter, der ausschließlich für Innenaquarien, sowohl Süß- als auch Meerwasseraquarien, zu verwenden
ist. Jede andere Benutzung ist unzulässig und fällt demzufolge nicht unter die Haftung des Herstellers.
NEWA Kanist entspricht der in der EU geltenden Sicherheitsnorm (EN 60335-2-41).
ACHTUNG: Um Unfälle zu vermeiden sind neben den allgemeinen, grundlegenden Sicherheitsvorschriften folgende Hinweise
strengstens zu beachten:
ACHTUNG: Dieses auf dem Produktetikett befindliche Symbol zeigt an, dass es vor der Inbetriebsetzung, dem Gebrauch
und der Wartung des Geräts notwendig ist, diese Gebrauchsanweisungen aufmerksam durchzulesen.
1. ACHTUNG: Vor jeder Installation- und Wartungsarbeit sind die Stecker aller im Aquarium befindlichen elektrischen Geräte
aus der Steckdose zu ziehen. Sind der Verbindungsstecker des Geräts oder die Steckdose nass, ist vor dem Ausstecken des
Speisekabels der Hauptschalter auszuschalten.
2. Vergewissern Sie sich, dass die auf dem Produktetikett angegebene Speisespannung mit der Netzspannung übereinstimmt.
3. Überprüfen Sie, bevor Sie das Gerät an das Stromnetz anschließen, dass weder das Gerät noch das dazugehörende Kabel in
irgendeiner Weise beschädigt sind.
4. Das Speisekabel kann weder repariert noch ausgewechselt werden. Ist es beschädigt, muss das Gerät ausgewechselt werden.
5. Das Speisekabel des Geräts hat eine ausreichend große Schlaufe nach unten zu bilden (DRIP LOOP Abb. 2). Dies verhindert,
dass das Wasser am Kabel entlang zu den Steckdosen gelangt.
6. Wichtig: Das Gerät ist, wie alle anderen elektrischen Geräte, durch einen speziellen Differentialschalter (Sicherungsschalter)
mit einem Auslösestrom ldn < 30mA zu schützen.
7. Vermeiden Sie bei der Installation und beim Gebrauch des Geräts, es an seinem Speisekabel hochzuheben.
8. Überprüfen Sie, bevor Sie das Gerät in Betrieb setzen, dass die Installation korrekt durchgeführt wurde.
9. Das Gerät darf nicht trocken laufen.
10. Das Gerät darf auf keinen Fall mit ätzenden oder abschleifenden Flüssigkeiten betrieben werden.
11. Die Höchsttemperatur der Betriebsflüssigkeit darf nicht mehr als 35°C betragen.
12. ACHTUNG: Das Symbol bedeutet, dass die elektrischen Geräte nur in Innenräumen verwendet werden dürfen.
13. ACHTUNG: Dieser Filter darf nicht im Wasser eingetaucht betrieben werden. Sollte er dennoch unbeabsichtigt ins
Wasser fallen, stecken Sie zuerst den Netzstecker aus der Steckdose, bevor Sie ihn aus dem Wasser holen. Treffen Sie dieselbe
Vorsichtsmaßnahme auch dann, wenn Sie nasse Stellen außen am Gerät bemerken.
28
20. ACHTUNG: Das Gerät ist nicht zur Nutzung durch Personen (einschließlich Kindern) vorgesehen, die über reduzierte
körperliche Eignung, Wahrnehmung oder geistige Fähigkeiten verfügen oder einen Mangel an Erfahrung und Wissen aufweisen,
sofern diese Personen nicht von einer verantwortlichen Person beaufsichtigt werden oder
in der Verwendung des Gerätes unterwiesen wurden.
21. ACHTUNG: Kinder sollten grundsätzlich beaufsichtigt werden, damit sie nicht mit dem Gerät spielen, da es kein Spielzeug ist.
DIESE GEBRAUCHSANWEISUNGEN SIND SORGFÄLTIG AUFZUBEWAHREN.
BESCHREIBUNG DES PRODUKTS
Bestandteile des Filters
1. Motorkopf
2. Druckvorrichtung zur Auslösung des Filtervorgangs
3. O-Ring für den Motorkopf
4. Deckel für die Laufradkammer
5. Zusammengebauter Rotorsatz mit Keramikwelle und -halterungen
6. Filtergehäuse
7. Interner Verbindungszylinder
8. Gitterdeckel für die Filterkörbe
9. Körbe für die Filtermaterialien
10. Hebel zum Öffnen und Schließen des Filtergehäuses
Anschlussstücke
a. Absperrventil mit IN - OUT-Hähnen
b. U-förmiges Ansaugrohr
c. Verbindungsrohr
d. Vorfiltergitter
e. U-förmiges Druckrohr
f. Anschlussröhrchen für das Winkelstück
g. Winkelstück mit 2 Ausgängen
h. Schließstopfen für das Winkelstück
i. Schwenkbare Entenschnabel-Düsen
j. Schwenkbare Düsen für Düsenrohre
k. Anschlussröhrchen für die Verbindung von mehreren Düsenrohren
l. Düsenrohre
m. Schließstopfen für die Düsenrohre
n. Clips mit Saugnapf
o. Schläuche (jeweils 150 cm)
DE
Filtermaterialien
11. Wolle für die mechanische Filterung
12. Extrem adsorptionsfähige Aktivkohle für die chemische Filterung
13. Feinporiger Filterschwamm
14. Poröse Keramikelemente für die biologische Filterung
15. Grobporiger Filterschwamm
BETRIEB
Mit NEWA Kanist ist das Aquariumwasser immer sauber und gesund. Dieses hochwirksame Filtersystem verfügt über eigens
für es entworfene Vorrichtungen, die im Bereich der mechanischen, chemischen und biologischen Filterung für wahrhafte
Höchstleistungen sorgen. Wird der Filtervorgang ausgelöst, wird das Wasser über das Ansaugrohr aus dem Aquarium in den
Filter NEWA Kanist geleitet, wo eine mächtige Filtermasse jede sichtbare und unsichtbare Unreinheit in 6 Filterstufen zurückhält:
MECHANISCHE FILTERUNG:
• Im Filter ist ein großzügiger Raum für die mechanische Klärung des Wassers vorgesehen. Hier lagern sich nach und nach
29
DE
die meisten gröberen Unreinheiten in einem bestimmten Bodenbereich ab. Auf diese Weise wird die Verstopfung der
Filterschwämme vermieden, die somit auch eine längere Lebensdauer haben.
• Extrem widerstandsfähige grobporige Filterschwämme mit mechanischer Anti-Verstopfungswirkung halten suspendierte
Teilchen, wie etwa Fischkot, Futterreste usw. zurück. Dank der extremen Abnutzungsfestigkeit der Fasern sind die Filterschwämme
imstande, äußerst hohe Belastungen auszuhalten und gewährleisten zugleich einen angemessenen Durchfluss des Wassers zu
den nächsten Filterstufen.
BIOLOGISCHE FILTERUNG:
• In dieser Stufe siedeln sich die Bakterienkolonien an, die die stickstoffhaltigen organischen Verbindungen zuerst in Nitrite und
dann in Nitrate umwandeln. Diese Filterleistung wird durch die Keramikelemente NEWA AQUA Microceramic gewährleistet, die
eigens entwickelt wurden, um ein optimales Verhältnis zwischen aktiver Filteroberfläche und Platzbedarf zu garantieren. Dank
ihrer geringen Ausmaße und extremen Porosität sind diese Keramikelemente imstande, im Vergleich zu den herkömmlichen
Keramikelementen die doppelte Menge an Bakterienflora aufzunehmen und optimieren auf diese Weise die biologische
Filterung im Aquarium.
• NEWA Kanist unterstützt die biologische Filterung auf sehr effiziente Weise: in jeden seiner Außenfilter wurden nämlich bis zu
5 Filterschwammschichten für unterschiedliche Korngrößen - von grob bis sehr fein- eingefügt. Die hohe Gesamtoberfläche
der Schwämme macht NEWA Kanist zu einem idealen Ambiente für die nitrifizierenden Bakterien und ermöglicht ihnen ein
exponentielles Wachstum.
CHEMISCH-ADSORBIERENDE FILTERUNG:
• Diese Filterwirkung wird durch die NEWA AQUA Carbo-Active Pellets - eine superaktive Kohle mineralischen Ursprungs
- gewährleistet, welche dafür sorgt, dass das Wasser von unangenehmen Gerüchen und Farben befreit wird. Dank ihrer
großporigen Struktur und ihrer großen spezifischen Oberfläche weist diese Kohle eine hohe sowohl physikalische als auch
chemische Adsorptionsfähigkeit auf, da sie zahlreiche Stoffe sowohl an ihre externe als auch an ihrer interne Oberfläche anzieht
und an sich bindet. Die widerstandsfähigen Säckchen können problemlos in den Filter gelegt und wieder herausgenommen
werden. Dank der besonderen Maschenstruktur sind sie zudem verstopfungsfrei und fördern den Durchfluss des Wassers durch
die Filtermasse.
ACHTUNG: UM DIE LEISTUNGEN DES FILTERS NEWA KANIST IM LAUFE DER ZEIT OPTIMAL ZU ERHALTEN, SIND AUSSCHLIESSLICH
ORIGINALERSATZTEILE SOWIE NEWA® FILTERMATERIALIEN ZU VERWENDEN.
UNTERBRINGUNG DER FILTERMATERIALIEN
Die Filtermaterialien sind in der Schachtel mit den Zubehörteilen des NEWA Kanist Filters untergebracht. Befolgen Sie die
folgenden Anweisungen, um den Filter richtig mit den Filtermaterialien zu befüllen.
1. Lösen Sie den Motorkopf vom Filtergehäuse, indem Sie die vier Verschlusshaken anhand der an ihrer Unterseite befindlichen
Aussparungen loshaken. Nehmen Sie nun den Motorkopf ab, indem Sie ihn an den am Rand befindlichen Aussparungen
hochheben. Legen Sie ihn nun auf eine ebene Arbeitsfläche.
2. Nehmen Sie den Filtermaterialdeckel ab, indem Sie die Finger in die eigens dafür vorgesehenen Löcher stecken (Abb. 4).
3. Nehmen Sie jetzt alle Filterkörbe an dem eigens dafür vorgesehenen Griff heraus und legen Sie sie auf eine Arbeitsfläche.
4. Erster Filterkorb: Nehmen Sie die Aktivkohle NEWA Aqua Carbo Active-Pellets aus der Zubehörschachtel und legen Sie sie
zwischen die weiße Wollschicht und den schwarzen feinporigen Schwamm (1 feinmaschiges Säckchen für die Modelle KANIST
250 und 350, 2 feinmaschige Säckchen für die Modelle NEWA Kanist 450 und 700). Geben Sie dabei acht, dass das Säckchen eben
liegt und das zum Durchlauf des aus dem Aquarium kommenden Wassers bestimmte Loch nicht abdeckt. Legen Sie nun weiße
Wollschicht wieder darüber (Abb. 5). ACHTUNG: DIE FEINMASCHIGEN SÄCKCHEN DÜRFEN NICHT GEÖFFNET WERDEN.
5. Zweiter Filterkorb: Nehmen Sie die restliche Aktivkohle NEWA Aqua Carbo Active-Pellets aus der Zubehörschachtel und legen
Sie sie auf den schwarzen feinporigen Schwamm (2 feinmaschige Säckchen für die Modelle KANIST 350, 450 und 700). Geben Sie
dabei acht, dass die Säckchen eben liegen und das zum Durchlauf des aus dem Aquarium kommenden Wassers bestimmte Loch
nicht abdecken (Abb. 6). ACHTUNG: DIE FEINMASCHIGEN SÄCKCHEN DÜRFEN NICHT GEÖFFNET WERDEN.
6. Dritter und vierter Filterkorb: Nehmen Sie die Säckchen mit den Keramikelementen aus der Zubehörschachtel und öffnen
Sie sie. Verteilen Sie die Keramikelemente gleichmäßig auf dem blauen grobporigen Schwamm ( Modelle NEWA Kanist 350,
450 und 700). ACHTUNG: Dies gilt auch für den zweiten Filterkorb des Modells NEWA Kanist 250 und den vierten Filterkorb des
NEWA Kanist 700.
7. Spülen Sie mithilfe des eigens an jedem Filterkorb dafür vorgesehenen Griffs die Filtermaterialien und die Schwämme, auf
denen sie liegen, unter reichlich fließendem Wasser aus.
30
8. Stellen Sie nun die Filterkörbe in das Filtergehäuse. Geben Sie dabei acht, dass die einzelnen Filterkörbe so aufeinander
gestapelt sind, dass das Ansaugrohr frei und mit dem Aquarium verbunden ist.
9. Stellen Sie zuerst die Filterkörbe mit den Keramikelementen und dem grobporigen blauen Schwamm in das Filtergehäuse,
dann die mit der Aktivkohle und dem feinporigen schwarzen Schwamm und zuletzt den Korb mit der weißen, fein filternden
Wolle (Abb. 8). ACHTUNG: Es ist sehr wichtig, dass der letzte Filterkorb derjenige mit dem größten Wasserdurchflussloch ist, da
dieses die Stelle ist, an dem das Filtergehäuse über den internen Verbindungszylinder an den Motorkopf angeschlossen wird.
10. Legen Sie nun den Filtermaterialdeckel wieder auf. Geben Sie dabei acht, dass das auf diesem befindliche Loch genau auf
dem Loch des ersten Filterkorbes liegt. Sollte dies nicht der Fall sein, drehen Sie den Deckel um (Abb. 9).
11. Montieren Sie nun den Motorkopf wieder an. Geben Sie dabei acht, dass der interne Verbindungszylinder sich in das Loch des
Filtermaterialdeckels einschiebt.
N.B.: Wenn man das Filtergehäuse von oben betrachtet, ist das Schließen des Filters ein sehr einfacher Vorgang. Man beachte,
dass die Druck-Auslösevorrichtung, die sich über dem Motorkopf befindet, auf einer Achse mit dem internen Verbindungszylinder
liegt (Abb. 11).
12. ACHTUNG: Vergewissern Sie sich, bevor Sie die Verschlusshaken wieder einhaken, dass sich die Filtermaterialien alle an der
richtigen Stelle befinden, perfekt übereinander liegen (nicht heraushängen oder überstehen) und dass der Filtermaterialdeckel
korrekt angebracht wurde.
13. Legen Sie nun die Spitze der vier Verschlusshaken auf die jeweilige Einhakstelle auf dem Motorkopf und verbinden Sie diesen
mit dem Filtergehäuse, indem Sie kräftig auf den herausstehenden Teil der Haken drücken.
VORBEREITUNG DES FILTERS
b
e
c
f
Abb. 1
a
DE
o
o
g
i
i
h
l
j
d
j
m
k
n
m
l
a) Montage der Anschlusstücke
I. Öffnen Sie die Packung des NEWA Kanist, nehmen Sie die Schachtel mit dem Zubehör des Außenfilters heraus und legen
Sie sie wie in Abb. 1 gezeigt auf einen Tisch. Bauen Sie nun den Ansaugsatz zusammen. Verbinden Sie dazu das Vorfiltergitter
(d) mit dem Verbindungsrohr (c) und dann mit dem U-förmigen Ansaugrohr (b). Es ist von wesentlicher Bedeutung, dass die
Montage dieser beiden Bestandteile korrekt erfolgt: Sie müssen so fest ineinander geschoben werden, dass der Widerstand der
beiden O-Ringe überwunden wird und das Verbindungsrohr auf dem Ansaugrohr auf seinen Endanschlag stößt (Abb. 13). Um
diesen Vorgang zu erleichtern, feuchten Sie am besten die O-Ringe etwas an. Falls notwendig, können Sie das Ansaugrohr etwas
nach unten, bis zum ersten Dichtring ziehen. Für einen effizienteren Betrieb muss das Vorfiltergitter (d) in einem Abstand von
mindestens 4-5 cm zum Aquariumboden angebracht werden. Ist das Verbindungsrohr (c) zu lang, sägen Sie es mit einer kleinen
Säge ab.
N.B.: Platzieren Sie das Ansaugrohr nicht in der Nähe von Belüftern oder Abschäumern, da die von diesen Geräten ausgeströmte
Luft die Leistungsfähigkeit des Außenfilters beeinträchtigen würde.
II. Bauen Sie nun den Drucksatz zusammen. Verbinden Sie dazu das U-förmige Druckrohr (e) mit dem Anschlussröhrchen für das
Winkelstück (f) und dann mit dem Winkelstück mit 2 Ausgängen (g). Falls notwendig, können Sie die Länge des Druckrohrs
31
verkürzen, indem Sie es an den Rillen absägen (Abb. 14).
Montieren Sie mit einem einfachen Druck die schwenkbaren Düsen an das Winkelstück (g). Wählen Sie dazu entweder die
Entenschnabel-Düsen (i) oder die Düsen für Düsenrohre (j). Falls Sie nur einen der beiden Ausgänge des Winkelstücks benutzen
möchten, müssen Sie den unbenutzten Ausgang unbedingt mit dem eigens dafür vorgesehenen Schließstopfen (h) verschließen.
N.B.: Um einen optimalen Wasserdurchfluss durch die Entenschnabel-Düsen zu gewährleisten, bringen Sie diese am besten
knapp unterhalb der Wasseroberfläche oder höchstens auf derselben Ebene an.
III. Die Düsenrohre können durch das Anschlussröhrchen (k) miteinander verbunden oder auch einzeln verwendet werden (Abb.
15). Sie müssen jedoch auf jeden Fall an die eigens dafür vorgesehene Düse (j) angeschlossen werden. Für einen korrekten
Gebrauch ist der Ausgang der Düsenrohre mit den zum Lieferumfang gehörenden Schließstopfen (m) zu verschließen. N.B.:
Um einen optimalen Wasserdurchfluss durch die Düsenrohre zu gewährleisten, bringen Sie diese am besten knapp oberhalb der
Wasseroberfläche an.
b) Anschluss des Absperrventils mit IN - OUT-Hähnen an den Außenfilter
DE
ACHTUNG: Um Wasserverluste zu vermeiden und einen korrekten Betrieb des NEWA Kanist-Außenfilters zu
gewährleisten, ist dieser Arbeitsschritt mit großer Sorgfalt und unter strenger Beachtung der folgenden
Anweisungen durchzuführen.
I. Vergewissern Sie sich, dass die grünen Befestigungsringe, die sich an den freien Enden des Ansaug- sowie des Drucksatzes
befinden, sowie die Befestigungsringe, die sich auf dem Absperrventil mit IN - OUT-Hähnen (a) befinden, vollständig offen
stehen (herausstehendes Gewindeteil - Abb. 16).
II. Schließen Sie nun die beiden zum Packungsinhalt gehörenden Schläuche an das freie Ende des Ansaugsatzes (b) bzw. des
Drucksatzes (e) an, indem Sie sie kräftig andrücken, bis das Schlauchende das Gewindeteil berührt, auf dem sich der grüne
Befestigungsring befindet (etwa 2,5 cm) (Abb. 17). Drehen Sie nun die Befestigungsringe im Uhrzeigersinn, um den Schlauch
zu befestigen, ohne jedoch zu fest anzuziehen.
III. Legen Sie nun den Ansaug- und den Drucksatz in das Aquariumbecken, indem Sie die jeweiligen Rohre (b - e) quer an den
Beckenrand legen. Befestigen Sie dann den Ansaug- und den Drucksatz mit den zum Packungsinhalt gehörenden Clips, indem
Sie für jeden der beiden Sätze einen Clip innen und einen anderen außen am Aquarium anbringen (Abb. 18). N.B.: Um einen
korrekten Wasserumlauf zu gewährleisten, muss zwischen Ansaug- und Drucksatz ein gewisser Abstand liegen.
IV. Stellen Sie den NEWA Kanist-Filter nun an den zuvor gewählten Aufstellplatz. Beachten Sie dabei, dass er für die normalen
Wartungsarbeiten problemlos zugänglich sein muss.
V. Schließen Sie nun das Absperrventil mit IN - OUT-Hähnen an den NEWA Kanist-Filter an. Vergewissern Sie sich, dass es perfekt
am Filterkopf anliegt. In Anbetracht der Wichtigkeit dieses Arbeitsschritts beachten Sie bitte folgende Anweisungen:
a. Das Absperrventil schließen: Dazu den grünen Hebel zwischen den beiden Hähnen hochziehen, bis er seinen Endanschlag
vollständig erreicht hat. Der grüne Hebel befindet sich nun in senkrechter Position zur Ebene, auf der er angebracht ist (Abb. 19).
b. Das Absperrventil dann in die eigens dafür vorgesehene Aussparung am Filterkopf legen und dabei fest auf die äußeren Ecken
neben den Hähnen drücken (Abb. 20). Vergewissern Sie sich, dass das Ventil richtig anmontiert wurde und überprüfen Sie, dass
sein Rand nicht vom Filterkopf übersteht.
c. Das Absperrventil öffnen: Dazu den grünen Hebel hinunterdrücken, bis er seinen Endanschlag vollständig erreicht hat. Der
grüne Hebel befindet sich nun in waagrechter Position zur Ebene, auf der er angebracht ist (Abb. 21).
VI. Schneiden Sie nun den überschüssigen Schlauch ab, um einen korrekten Betrieb des Filters zu gewährleisten. Auf diese Weise
kann das Wasser nämlich so direkt wie möglich verlaufen und es werden mögliche Drosselungen der Schläuche vermieden (Abb. 22).
VII. Schauen Sie sich nun die am Druck- und Ansaugrohr befindlichen Pfeile sowie die Aufschriften “IN” und “OUT” am
Absperrventil an und verbinden Sie dann den am Drucksatz angeschlossenen Schlauch (Pfeil nach oben) mit dem mit der
Aufschrift “OUT” gekennzeichneten drehbaren Hahn. Verbinden Sie nun den am Ansaugsatz angeschlossenen Schlauch mit
dem mit der Aufschrift “IN” gekennzeichneten Anschluss. Drücken Sie dabei kräftig an, bis das Schlauchende das Gewindeteil
berührt, auf dem sich der grüne Befestigungsring befindet (etwa 2,5 cm) (Abb. 23). Drehen Sie nun die Befestigungsringe im
Gegenuhrzeigersinn, um den Schlauch zu befestigen, ohne jedoch zu fest anzuziehen (Abb. 24).
INBETRIEBSETZUNG DES FILTERS
a) Aufstellung:
Der Außenfilter NEWA Kanist ist ein Schwerkraftfilter. Er ist daher an dem zuvor bestimmten Aufstellort aufzustellen, bevor der
32
Bausatz mit dem Absperrventil und den Schläuchen angeschlossen wird. Eine ideale Position für die Installation des Filters ist
unter dem Aquarium auf einem eigens dafür vorgesehenen Möbelstück.
HINWEIS: Der Abstand zwischen der Wasseroberfläche des Aquariums und dem Boden des Filtergehäuses darf
nicht mehr als 150 cm betragen. ACHTUNG: DER FILTER DARF AUF KEINEN FALL OBERHALB DES WASSERSPIEGELS
INSTALLIERT WERDEN.
b) Inbetriebsetzung:
NEWA Kanist verfügt über eine eingebaute Auslösevorrichtung, die durch die Betätigung der START-Taste eine automatische
Auslösung des Filtervorgangs ermöglicht. Folgen Sie diesbezüglich genauestens den folgenden Anweisungen:
I. Vergewissern Sie sich, dass die zum Anschluss des Absperrventils mit IN - OUT-Hähnen an den Außenfilter notwendigen
Arbeitsschritte gemäß den Anweisungen durchgeführt wurden (siehe Absatz “VORBEREITUNG DES FILTERS”, Punkt b).
II. Drücken Sie mehrmals kräftig die Start-Taste nach unten (Abb. 25), bis das Wasser selbsttätig in das Filtergehäuse angesaugt wird.
Während das Wasser den Filter füllt, entweicht die in diesem enthaltene Luft durch den Drucksatz aus und erzeugt dabei Blasen.
III. Sobald alle Hydraulikkreisläufe mit Wasser gefüllt sind (der Drucksatz erzeugt keine Luftblasen mehr), kann der Außenfilter
an das Stromnetz angeschlossen werden. Das Wasser muss dann in einem konstanten Durchfluss aus den Düsen oder aus den
Düsenrohren fließen. Andernfalls ist der Speisestecker des Filters aus der Steckdose zu ziehen und die Inbetriebsetzung zu
wiederholen.
N.B.: Bei der Inbetriebsetzung des Filters könnten im Filtermaterial verbliebene Luftreste Geräusche erzeugen. Dies ist als normal
zu betrachten. Die vollkommene Beseitigung aller Luftmengen erfolgt erst nach einigen Stunden, dann arbeitet der Filter sehr
geräuscharm.
ACHTUNG: SCHLIESSEN SIE DEN FILTER AUF KEINEN FALL ANS STROMNETZ AN, BEVOR SIE IHN MIT WASSER BEFÜLLT
HABEN. ES KÖNNTE SONST ZU MOTORSCHÄDEN KOMMEN.
ACHTUNG: LEGEN SIE KEINE AN BELÜFTER ANGESCHLOSSENE PORÖSE STEINE IN DIE NÄHE DES ANSAUGSATZES. DIESE
WÜRDEN DEN BETRIEB DES FILTERS BEEINTRÄCHTIGEN UND GERÄUSCHE ERZEUGEN.
WARTUNG
ACHTUNG: VOR JEDER INSTALLATIONS- UND WARTUNGSARBEIT SIND DIE STECKER ALLER IM AQUARIUM BEFINDLICHEN
ELEKTRISCHEN GERÄTE AUS DER STECKDOSE ZU ZIEHEN. SIND DIE VERBINDUNGSSTECKER DER GERÄTE ODER DIE
STECKDOSEN NASS, IST VOR DEM AUSSTECKEN DES SPEISEKABELS DER HAUPTSCHALTER AUSZUSCHALTEN.
Vor der Durchführung jedweder Wartungsarbeiten ist der Außenfilter zum Stillstand zu bringen. Folgen Sie dazu genauestens
den folgenden Anweisungen:
1. Ziehen Sie den Netzstecker des Filters aus der Steckdose.
2. Schließen Sie das Absperrventil: Ziehen Sie dazu den grünen Hebel zwischen den beiden Hähnen hoch, bis er seinen
Endanschlag vollständig erreicht hat. Der grüne Hebel befindet sich nun in senkrechter Position zur Ebene, auf der er angebracht
ist (Abb. 26).
ACHTUNG: Während der Wartungsarbeiten muss das Absperrventil IMMER in geschlossenem Zustand an den
Schläuchen angeschlossen bleiben.
3. Montieren Sie nun das Absperrventil vom NEWA Kanist-Filter ab, indem Sie die IN-OUT-Hähne nach oben ziehen. Die
Schläuche, der Ansaug- sowie der Drucksatz brauchen nicht aus dem Aquarium genommen zu werden, es sei denn sie sollen
gereinigt werden. Entfernen Sie in diesem Fall eventuelle Verkrustungen mit Bürstchen und Flaschenreinigern.
ACHTUNG: Halten Sie etwas saugfähiges Material bereit, um es um das Absperrventil zu wickeln, aus dem nach der Abmontage
etwas Wasser fließen könnte.
4. Heben Sie den Filter an den am Rand befindlichen Aussparungen hoch und transportieren Sie ihn an einen zur Wartung
geeigneten Ort (wie etwa eine Waschschüssel, ein Waschbecken, eine Badewanne usw.). Halten Sie ihn dabei senkrecht, um zu
vermeiden, dass Wasser herausfließt. Heben Sie den Filter auf keinen Fall an den seitlichen grünen Öffnungshebeln auf.
5. Detaillierte Anweisungen zum Öffnen des Filters, über die Behälter der Filtermaterialien sowie zum Zusammenbau des NEWA
Kanist-Filters finden Sie unter dem Abschnitt “UNTERBRINGUNG DER FILTERMATERIALIEN”.
ACHTUNG: Um sich die Wartungsarbeiten zu erleichtern, entleeren Sie den Filter - nachdem Sie den Motorkopf abmontiert
haben - am besten, indem Sie ihn schräg stellen und dabei die Filterkörbe festhalten.
6. Nachdem Sie die Wartungsarbeiten (siehe die im Folgenden angegebenen Punkte a) und b)) beendet haben, schließen Sie
33
DE
das Absperrventil mit IN - OUT-Hähnen wieder an den NEWA Kanist-Filter an. Vergewissern Sie sich, dass es perfekt am Filterkopf
anliegt. Öffnen Sie nun das Absperrventil: Drücken Sie dazu den grünen Hebel hinunter, bis er seinen Endanschlag vollständig
erreicht hat (siehe auch den Abschnitt “Anschluss des Absperrventils mit IN - OUT-Hähnen an den Außenfilter”).
7. Fahren Sie nun mit der Inbetriebsetzung des Filters fort, indem Sie genauestens die im Abschnitt “INBETRIEBSETZUNG DES
FILTERS” (Punkt b - Inbetriebsetzung) enthaltenen Anweisungen befolgen.
N.B.: Alle Gummiteile des Motorkopfs sind regelmäßig zu schmieren: Benutzen Sie dazu Vaselineöl, das Sie auf dem O-Ring, am
Kolben und an der Tastenscheibe der Starttaste auftragen.
a) Wartung des Laufrads:
DE
ACHTUNG: Das in den NEWA Kanist Filtern verwendete Laufrad besteht aus einer Welle und Halterungen aus
Keramik. Es ist daher während der Wartung sehr sorgfältig zu behandeln.
1. Nehmen Sie den Deckel der Laufradkammer (4) vom Motorkopf (1) ab, indem Sie diesen mithilfe der eigens dafür vorgesehenen
Hebel im Gegenuhrzeigersinn drehen und sanft nach oben ziehen (Abb. 27).
2. Montieren Sie die Keramikwelle und die schwarze Gummihalterung vom Laufraddeckel ab und legen Sie sie auf einen Tisch.
N.B.: Die zweite Gummihalterung könnte in der Rotorkammer stecken bleiben. Um sie herauszuholen, fahren Sie einfach,
nachdem Sie den Rotorsatz herausgenommen haben, mit dem freien Ende der Keramikwelle in das Loch der Gummihalterung
und ziehen diese heraus.
3. Nehmen Sie den Rotorsatz aus dem Schacht, indem Sie ihn an den Laufradflügeln hochziehen, und waschen Sie ihn zusammen
mit dem Laufraddeckel unter fließendem Wasser ab. Benutzen Sie eine weiche, nicht scheuernde Bürste, um den Schmutz zu
entfernen. Weisen der Rotorsatz oder der Schacht Kalkverkrustungen auf, weichen Sie sie 15-20 Minuten in Essig ein, waschen
sie dann ab und spülen sie sorgfältig aus.
ACHTUNG: Verwenden Sie keine anderen Säuren oder Mittel als den normalen, zu Nahrungszwecken bestimmten Essig, da diese
für die Fische giftig sein könnten.
4. Bauen Sie nun den Rotorsatz wieder zusammen, indem Sie zuerst die Keramikwelle anmontieren und dann die jeweiligen
schwarzen Gummihalterungen an den freien Enden der Welle anbringen (Abb. 28).(5)
5. Legen Sie nun den Rotorsatz wieder in den Schacht und bringen Sie den Laufraddeckel wieder an. Vergewissern Sie sich, dass
die an der Keramikwelle angebrachte Gummihalterung richtig in ihrer Aussparung im Laufraddeckel sitzt.
6. Befestigen Sie nun den Laufraddeckel am Motorkopf, indem Sie diesen mithilfe der eigens dafür vorgesehenen Hebel im
Uhrzeigersinn drehen.
b) Wartung der Filtermaterialien:
1. Wechseln Sie die Filtermaterialien nach Bedarf aus. Halten Sie sich dabei an die empfohlenen regelmäßigen Zeitintervalle
(siehe Tabelle). Geben Sie acht, dass die Kohle-Säckchen eben liegen und dass weder sie noch andere Elemente das zum
Durchlauf des aus dem Aquarium kommenden Wassers bestimmte Loch abdecken.
2. Spülen Sie das Filtergehäuse aus, ohne dazu Seife oder andere Reinigungsmittel zu verwenden. Eventuelle Rückstände
könnten die empfindlichen Gewebe der Fische beschädigen.
3. Spülen Sie die Filterkörbe, die das Material zur biologischen Filterung enthalten, vorsichtig mit aus dem Aquarium
entnommenem Wasser aus, um die im Filtersubstrat enthaltenen Bakterienkolonien nicht zu zerstören, die für das Wohlbefinden
des Aquariums sorgen.
ACHTUNG: Der im Leitungswasser enthaltene Chlor verursacht die Zerstörung der in den Keramikelementen enthaltenen
nützlichen Bakterienkolonien.
4. Legen Sie nun die Filterkörbe wieder in das Filtergehäuse, indem Sie die unter Punkt 8 bis Punkt 13 des Abschnitts
“UNTERBRINGUNG DER FILTERMATERIALIEN” enthaltenen Anweisungen genauestens befolgen.
N.B.: Wechseln Sie die biologischen Filtermaterialien (Keramikelemente, Schwämme usw.) nicht alle gleichzeitig aus, sondern
teilen Sie ihre Auswechslung zeitlich auf. Lassen Sie einen Teil der alten Materialien im Filter. Auf diese Weise wird die
Wiederherstellung von wichtigen Bakterienkolonien, die mit den entfernten Materialien verloren gegangen sind, angeregt.
ACHTUNG: UM DIE LEISTUNGEN DES FILTERS NEWA KANIST IM LAUFE DER ZEIT OPTIMAL ZU ERHALTEN, SIND
AUSSCHLIESSLICH ORIGINALERSATZTEILE SOWIE NEWA® FILTERMATERIALIEN ZU VERWENDEN.
34
Einmal im Monat
Alle 2 Monate
Alle 6 Monate
Jährlich
Aktivkohle NEWA AQUA
CARBO ACTIVE-Pellets
Auswechseln
-
-
-
Schwämme
Entwicklung der
Bakterienlast
überprüfen
Kontrolle und - falls
notwendig - Reinigung
Auswechseln
-
Keramikelemente
NEWA AQUA
Microceramic
Entwicklung der
Bakterienlast
überprüfen
Kontrolle und - falls
notwendig - Reinigung
-
Zu 50% auswechseln
Laufrad
-
-
Kontrolle und - falls
notwendig - Reinigung
-
Ansauggitter
-
Kontrolle und - falls
notwendig - Reinigung
-
-
Schläuche
-
-
-
Kontrolle und
- falls notwendig Reinigung
Hebel des Absperrventils
-
-
Reinigung und
Schmierung
-
Start-Taste
-
-
Reinigung und
Schmierung
-
Motorkopf-Dichtung
-
-
Reinigung und
Schmierung
-
INDIVIDUELLE KOMBINATIONSMÖGLICHKEIT DER FILTERMATERIALIEN
Die Filtermaterialien können ganz nach individuellem Bedarf frei kombiniert werden. Wählen Sie dazu nach Belieben aus den
Artikeln der Linie NEWA AQUA ihre Lieblingsprodukte aus: Diese hochwertige Filtermaterialpalette wurde von NEWA® eigens
entwickelt, um Aquarienfreunden benutzerfreundliche, haltbare und sichere Produkte anbieten zu können. Die folgende Tabelle
gibt einen Überblick über die Eigenschaften der nach ihrer Filterwirkung aufgeteilten Materialien:
FILTERWIRKUNG
MECHANISCHE
FILTERUNG
BIOLOGISCHE
FILTERUNG
MODELL NEWA AQUA
BESCHREIBUNG
DETAILS
FIBER
Synthetische Faser aus
Polyethylen
Hohe Abnutzungsfestigkeit - minimale
Verdichtung - biologisch unschädlich
KINSHY SPONGE
Elektrogeschweißte
PVC-Faser
Hält hohe Schmutzbelastungen aus,
ohne zu verstopfen - verfügt über ein
Strukturgedächtnis
MICROCERAMIC
Miniatur-Keramikelemente
Die geringen Ausmaße maximieren die
zur Ansiedlung der Bakterienkolonien
bestimmte Oberfläche pro verfügbarer
Volumeneinheit.
CERAMIC HI-Q
Poröse Keramikelemente
Die hohe Porosität optimiert das zur
Ansiedlung der Bakterienkolonien
verfügbare Volumen.
BIOGLOBE
Polypropylenkugeln
mit veränderbarem
Durchmesser
Die strukturelle Elastizität
maximiert die zur Ansiedlung der
Bakterienkolonien bestimmte
Oberfläche.
35
DE
FILTERWIRKUNG
CHEMISCHE
FILTERUNG
MODELL NEWA AQUA
BESCHREIBUNG
DETAILS
CARBO ACTIVE PELLETS
Extrem adsorptionsfähige
superaktive Mineralkohle
Beseitigt unangenehme Gerüche Erhält das Aquariumwasser kristallklar
CARBO ACTIVE
GRANULES
Extrem adsorptionsfähiges
Aktivkohle-Granulat
pflanzlichen Ursprungs
Beseitigt Giftstoffe und Rückstände
von Medikamenten
CARBO ACTIVE MIXTURE
Extrem adsorptionsfähige
hyperaktive Mineralkohle
Beseitigt unangenehme Gerüche Erhält das Aquariumwasser kristallklar
- Beseitigt Giftstoffe
ACTIVE ZEOLITE
Chemisch aktiviertes
mineralisches Zeolith
vulkanischen Ursprungs
Hält Ammoniak, Ammonium, Sulfide,
Sulfite und Schwermetalle zurück.
ANTI-NITRATE
Ionentauscherharz
Beseitigt Nitrate - Zur Vorbeugung und
Bekämpfung der Algenentwicklung
ANTI-PHOSPHATE
Ionentauscherharz
Beseitigt Phosphate und Silikate - Zur
Vorbeugung und Bekämpfung der
Algenentwicklung
KORREKTE ENTSORGUNG DIESES PRODUKTS (ELEKTROMÜLL)
DE
2002/96/EC - EN50419 Anzuwenden in den Ländern der Europäischen Union und anderen euroäischen Ländern
mlt einem separaten Sammelsystem. Soll das Aquarium aufgelöst werden, sind die verschiedenen Materialien gemäß den
im jeweiligen Benutzerland geltenden Vorschriften zu trennen und getrennt zu entsorgen, damit die wieder verwertbaren
Materiale (Kunststoff, Glas usw.) wiedergewonnen und die elektrischen Bestandteile in aller Sicherheit entsorgt werden
können. Die Beleuchtungsanlage (Deckel) ist sorgfältig vom Glasbecken und den elektrischen Zubehörteilen zu trennen. Die
Beleuchtungsanlage und die elektrischen Geräte werden im Sinne der Europäischen RAEE-Richtlinie wie im folgenden Absatz
“Die korrekte Entsorgung des Produkts - Elektro- und Elektronik-Altgeräte” beschrieben entsorgt. Die Kennzeichnung auf dem
Produkt bzw. auf der dazugehörigen Literatur gibt an, dass es nach seiner Lebensdauer nicht zusammen mit dem normaien
Haushaltsmüll entsorgt werden darf. Entsorgen Sie dieses Gerät bitte getrennt von anderen Abfällen, um der Umweit bzw. der
menschiichen Gesundheit nicht durch unkontrollierte Müllbeseitigung zu schaden. Recyceln Sie das Gerät, um die nachhaltige
Wiederverwertung von stofflichen Ressourcen zu fördern. • Private Nutzer sollten den Händler, bei dem das Produkt gekauft
wurde, oder die zuständigen Behörden kontaktieren, um in Erfahrung zu bringen, wie sie das Gerät auf umweltfreundliche Weise
recyceln können. • Gewerbliche Nutzer sollten sich an Ihren Lieferanten wenden und die Bedingungen des Verkaufsvertrags
konsultieren. Dieses Produkt darf nicht zusammen mit anderem Gewerbemüll entsorgt werden.
GARANTIE
Für das Produkt wird gemäß der EU-Richtlinie 1999/44 CE auf Material- und Herstellungsfehler eine 24-monatige Garantie ab
Kaufdatum übernommen. Sollte das Produkt während der ersten zwei Jahre ab Kaufdatum nicht einwandfrei funktionieren, so
ist es an den Händler, bei dem es gekauft wurde zurück zu geben. Das Produkt wird ohne zusätzliche Kosten ersetzt. Für die Dauer
der Garantie wird das Produkt in folgenden Fällen ersetzt: 1) Das Produkt wird sorgfältig verpackt und vor Transportschäden
geschützt zurückgegeben. 2) Dem Produkt liegen Kaufbescheinigung sowie eine ausführliche Begründung der Reklamation
bei. Die Garantie unterliegt den folgenden Einschränkungen und Bedingungen: 1) Ein Deckung besteht nicht im Falle von
vorsätzlichem Bruch. 2) Das Ersetzen des Produktes bedeutet keinesfalls eine Haftungsübernahme. 3) Die Garantie hat
keinerlei Gültigkeit im Falle eines unsachgemäßen Gebrauchs des Produktes. Für Schäden infolge Änderungen am Produkt oder
Nachlässigkeit durch den Käufer wird keinerlei Haftung übernommen. 4) Die Garantie gilt nicht für Bestandteile, die Verbrauch
und Verschleiß ausgesetzt sind (siehe * ERSATZ- UND ZUBEHÖRTEILE ).
DIESE GEBRAUCHSANWEISUNGEN UNBEDINGT AUFBEWAHREN.
36
NL
Gebruiksaanwijzing
Inhoudsopgave
BELANGRIJKSTE VEILIGHEIDSREGELS
PRODUCT BESCHRIJVING
Filtercomponenten
Koppelingen
Filtermaterialen
WERKING
INSTALLATIE VAN DE FILTERMATERIALEN
OPZET PROCEDURE
Het assembleren van de koppelingen
Aansluiten van de afsluitklep (met twee
kraantjes INLAAT-UITLAAT) op het externe filter
FILTER START
Locatie:
Bediening:
ONDERHOUD
Onderhoud van de impeller
Onderhoud van de filtermaterialen
INDENTIFICATIE VAN FILTERMATERIALEN
CORRECTE VERWIJDERING VAN DIT PRODUCT
GARANTIA
pag. 37
pag. 38
pag. 38
pag. 38
pag. 38
pag. 39
pag. 39
pag. 40
pag. 40
pag. 41
pag.
pag.
pag.
pag.
pag.
pag.
pag.
pag.
pag.
41
41
42
42
43
43
44
45
45
BELANGRIJKSTE VEILIGHEIDSREGELS
NEWA Kanist is een extern filter geschikt voor aquaria met zowel zoet- als zoutwater. Het filter is enkel geschikt voor binnenshuis
gebruik. Iedere andere applicatie is niet geschikt, en hiervoor is de producent niet aansprakelijk te stellen. NEWA Kanist voldoet
aan de veiligheidsregels welke gelden in de Verenigde Naties (EN 60335-2-41).
LET OP: onde evitare qualsiasi tipo di infortunio osservare scrupolosamente, oltre alle più elementari disposizioni di sicurezza,
le seguenti avvertenze:
LET OP: Dit symbool (welke op het productielabel zit) geeft aan dat het noodzakelijk is de gebruikershandleiding te lezen
voordat men begint het apparaat te gebruiken en onderhouden.
1) LET OP: ontkoppel alle electrische toepassingen in het aquarium voordat u installatie- en onderhoudswerkzaamheden gaat
uitvoeren. In het mogelijke geval van binnendringing van vervuiling in de plug of elektrische aansluiting, ontkoppel dan de
elektrische zekering van uw huis voordat u de stroomkabel van het filter lostrekt.
2) Zorg dat u de op het apparaat voorgeschreven juiste stroomnetwerkspanning gebruikt (welke aangegeven staat op het label
op het apparaat)
3) Zorg dat apparaat en de bijbehorende spanningskabel in een goede staat zijn voordat u het filter aansluit op het
spanningsnetwerk.
4) Het elektrische snoer kan niet gerepareerd of vervangen worden. Indien het elektrische snoer beschadigd is, vervang dan het
gehele apparaat.
5 )De elektrische spanningskabel dient op een juiste manier naar beneden geboden te zijn (druppellus, zie fig. 2) om te
voorkomen dat water over de spanningskabel loopt en om te voorkomen dat er water in de spanningsstekker binnendringt wat
kortsluiting kan veroorzaken.
6) Het is aan te bevelen om zowel het apparaat als andere elektrische toepassingen te beveiligen met behulp van een speciale
schakelaar welke een potentiaalverschil kan meten (elektrische noodstop beveiliging). Het maximale toelaatbare stroomverschil
van deze elektrische noodstop beveiliging mag niet groter zijn dan ≤ 30mA.
7) Het is verboden het apparaat op te tillen aan de elektrische spanningskabel tijdens de installatie en het gebruik van het filter.
8) Zorg er voor dat het filter op een juiste manier geïnstalleerd is voordat het apparaat ingeschakeld wordt.
9) Het apparaat dient niet te werken indien de filterwerking niet benodigd is.
37
NL
10) Het is verboden het apparaat te gebruiken in combinatie met agressieve vloeistoffen en vloeistoffen welke een schurende
werking hebben.
11) De maximale temperatuur van de door te pompen vloeistof mag niet hoger zijn dan 35 graden Celsius.
12) LET OP: Dit symbool geeft aan dat het apparaat enkel geschikt is voor binnenshuis gebruik.
13) LET OP: gebruik het filter niet indien het ondergedompeld is geweest in water. Indien het per ongeluk in het water valt,
verwijder dan de elektrische spanningskabel uit het stopcontact voordat u het filter uit het water haalt. Hanteer dezelfde
voorzichtigheid indien er vervuiling in het apparaat binnendringt.
14) LET OP: Dit apparaat is niet geschikt voor gebruik door kinderen en personen welke een verminderde fysieke en/of mentale
capaciteit hebben. Het filter is ook niet geschikt voor gebruik door personen die verminderde zintuigen hebben. Onervaren en
onwetende personen dienen het apparaat ook niet te gebruiken tenzij laatstgenoemde personen supervisie en/of instructie
krijgen over hoe het filter te gebruiken. Deze supervisie en/of instructie zou gegeven moeten worden door een persoon welke
instaat voor de veiligheid van deze onwetende en onervaren personen.
15) LET OP: kinderen zouden onder toezicht moeten staan in de directe omgeving van het filter. Dit apparaat is zeker geen speelgoed!
DRAAG ER ZORG VOOR DAT DEZE VEILIGHEIDSINSTRUCTIE GOED BEWAARD BLIJFT.
PRODUCT BESCHRIJVING
NL
Filtercomponenten
1) rotor
2) vulstart-preventie apparaat
3) O-vormige Rotoreenheid pakking
4) afdekkap impellerbehuizing
5) roterend blok + as inclusief de keramische steunenbehuizing
6) filterhuis
7) interne verbindingscilinder
8) beschermende rasterbehuizing
9) behuizing voor filtermaterialen
10) clips ten behoeve van openen en sluiten
Koppelingen
a) afsluitklep met twee kraantjes INLAAT-UITLAAT
b) U-vormige inlaatsproeier
c) verbindingsleiding
d) initieel filterraster
e) U-vormige uitlaatsproeier
f) reduceerleiding met een elleboogkoppeling
g) elleboogkoppeling met twee uitlaten
h) plug ten behoeve van een elleboogkoppeling
i) sifon met zwenkarm diffuser
j) zwenkarm diffuser ten behoeve van de injectoren
k) reducerende leiding voor injectoren connectie
l) injectoren
m) uiteinden van de injectoren
n) klemmen met suctie kapjes
o) flexibele slangen (150cm)
Filtermaterialen
11) vezelstof voor mechanische filtering
12) actief carbon met chemische filtering en tevens een grote absorptiecapaciteit
13) lichtporeuze spons
14) poreuze ring voor biologische filtratie
15) grofporige spons
WERKING
De NEWA Kanist voorziet in een gezonde aqua-omgeving door een krachtig en efficiënt filtratiesysteem. Dit filtratiesysteem
heeft meerdere opties om een maximaal resultaat in mechanische, chemische en biologische filtratie te realiseren. Wanneer het
apparaat geactiveerd is, wordt er water uit het aquarium opgenomen door een zuigleiding. Dit opgenomen water wordt door de
NEWA Kanist filter gevoed. In dit NEWA kanist filter bevinden zich een groot aantal filtermaterialen welke iedere zichtbare- en
onzichtbare vervuilende stoffen uit het water filteren. Dit gebeurt door middel van 6 trappen van filtering.
MECHANISCHE FILTRATIE
• Het filterontwerp bevat een ruimtelijk gedeelte voor watersterilisatie, waar het grootste gedeelte van de grotere vuildeeltjes
geleidelijk opgehouden wordt. In deze specifieke bodemsectie wordt verstopping van het filter verkomen waardoor het filter een
langere levensduur heeft. • Grofporige sponzen met een hoge sterkte zorgen voor een mechanisch effect tegen contaminatie.
Deze sponzen houden vuildeeltjes tegen zoals visontlasting, visvoer etc. De hoge slijtageweerstand van de filtervezels zorgen
ervoor dat een hoge vervuilingdruk van contaminerende stoffen geen invloed heeft op deze filtervezels. Tegelijkertijd wordt er
een goede waterdoorvoer gegarandeerd naar andere filtertrappen.
BIOLOGISCHE FILTRATIE
• In dit gedeelte van filtratie worden bacterie kolonies gebruikt welke organische stikstof componenten omzetten naar
nitrieten en uiteindelijk omzetten in nitraten. Dit is mogelijk door de NEWA AQUA Microkeramische poreuze ringen. Deze
poreuze ringen zijn zo ontworpen dat de verhouding tussen de filterende oppervlakken en de positieve waterdoorstroming
zo goed mogelijk is. Het is zo dat de gereduceerde grootte en hoge graad van poreusheid ervoor zorgen dat er een dubbel
zo grote bacteriële flora aanwezig kan zijn in een kleine ruimte. Als men dit vergelijkt met standaard keramische elementen
zorgt de NEWA AQUA Microkeramische poreuze ringen technologie voor een optimale biologische filtratie. • NEWA Kanist
levert het hoogste niveau van biologische filtratie. Ieder extern filter bestaat uit maximaal 5 sponslagen gemaakt van kleintot grootporige componenten met een variërende grootte. Het vergrootte totale oppervlak van de sponzen zorgen ervoor dat
NEWA Kanist een ideale omgeving creëert voor nitrificerende bacteriën omdat hun exponentiële groei gegarandeerd wordt.
CHEMISCH ABSORBERENDE FILTRATIE
• Dit gedeelte is bedoeld voor waterzuivering en het verwijderen van onaangename geuren en kleuren door middel van NEWA
AQUA actief carbon pellets welke supergeactiveerde kooldeeltjes van minerale herkomst bevatten. Een grote hoeveelheid
van poriën en een vergroot specifiek oppervlak garanderen een hoge fysieke en chemische absorbiteitsvermogen. Dit wordt
mogelijk doordat verschillende stoffen aangetrokken en vastgehouden worden door het interne en externe oppervlak van het
materiaal. Door de structuur van de schadebestendige zak is het gemakkelijk deze te verwijderen en te installeren. Hierdoor
wordt toevallige schade voorkomen. Het ontwerp van de speciale cellen voorkomt dat de zak verstopt raakt en bevordert de
waterintrede in de kooldeeltjes.
LET OP: OM DE JUISTE PRESTATIE KARAKTERESTIEKEN VAN NEWA KANIST TE BEHOUDEN WORDT ER AANBEVOLEN OM DE
ORIGINELE FILTER MATERIALEN EN RESERVE ONDERDELEN VAN NEWA® TE GEBRUIKEN.
INSTALLATIE VAN DE FILTERMATERIALEN
De filtermaterialen zijn opgeslagen in de doos met de NEWA Kanist filter accessoires. Om de filtermaterialen op een juiste manier
te installeren, volg dan de juiste instructies:
1) ontkoppel de rotor van de filterbehuizing. Maak de vier bevestigingsclips los, door op de nokjes te drukken (deze nokjes zitten
aan de onderkant van de clips, zie fig. 3). Verwijder de rotor door hem op te tillen uit de groeven welke zich aan de zijkanten van
de filterbehuizing bevinden. Leg de rotor na de verwijdering op een plat oppervlak.
2) verwijder de afdekkap van de behuizing waarin de filtermaterialen zich bevinden. Dit doet u door uw vingers in de
corresponderende openingen te steken (zie fig. 4).
3) verwijder alle behuizingen met de corresponderende grip en leg ze op een plat oppervlak.
4) bij de eerste behuizing: verwijder de NEWA Aqua actieve carbon pellets vanuit de accessoires doos en plaats ze tussen de witte
vezellaag en de lichtporeuze zwarte spons (1 microgeprefereerde zak voor de modellen KANIST 250 en 350, 2 microgeperforeerde
zakken voor de modellen KANIST 450 en 700). Zorg ervoor dat ze vlak liggen en dat ze niet de gaten welke bedoeld zijn voor de
watercirculatie in het aquarium blokkeren. Installeer de witte vezelstoflaag terug (zie fig. 5)
LET OP: OPEN DE MICRO-GEPERFOREERDE ZAKKEN NIET!
5) bij de tweede behuizing: verwijder de overblijvende NEWA Aqua actieve carbon pellets vanuit de accessoires doos en plaats
ze op de lichtporeuze zwarte spons (2 microgeperforeerde zakken voor de modellen KANIST 350,450 en 700). Zorg ervoor dat
ze vlak liggen en dat ze niet de gaten welke bedoeld zijn voor de watercirculatie in het aquarium blokkeren (zie fig. 6). LET OP:
39
NL
OPEN DE MICRO-GEPERFOREERDE ZAKKEN NIET!
6) bij de derde en vierde behuizing: verwijder de zakken met de poreuze ringen uit de accessoires doos. Open de zakken en
verspreid de ringen evenredig over de grof-porige blauwe spons (modellen NEWA Kanist 350,450 en 700). LET OP: het hierboven
beschreven is ook van toepassing voor de tweede behuizing van de NEWA Kanist 250 en de vierde behuizing van de NEWA Kanist 700.
7) reinig de filtermaterialen en de sponzen met voldoende stromend water door de corresponderende grepen op iedere
behuizing vast te houden.
8) installeer de behuizingen terug in het filterhuis. Zorg ervoor dat behuizingen keurig bovenop elkaar zitten en niet de
watertoevoer naar de zuigleiding blokkeren (fig. 7).
9) ten eerste: installeer de behuizingen met de poreuze ringen en de grof-porige witte sponzen. Installeer daarna de behuizingen
met de actieve kooldeeltjes en de lichtporeuze zwarte spons. Tenslotte: installeer de behuizing met het witte vezelstof voor de
lichte filtratie (fig. 8). LET OP: het is uiterst belangrijk dat de laatste behuizing de grootste opening heeft voor de watercirculatie
omdat het dient als een verbinding tussen het filter en de rotor door middel van de interne connectie cilinder.
10) monteer de afdekkap van de behuizing terug. Draag er zorg voor dat na de installatie het gat in de afdekkap past op de
opening in de eerste behuizing. Indien anders, draai dan de afdekkap om (zie fig. 9).
11) installeer de rotor. Draag er zorg voor dat de interne connectiecilinder door de opening van de behuizingafdekkap naar
binnen gaat (zie fig.10). TIP: vanaf de bovenkant van het filterhuis is het re-assembleren gemakkelijk te doen, als u zorgt dat het
vulstart preventie apparaat (gelokaliseerd aan de bovenkant van de rotor) in lijn ligt met de interne connectiecilinder ( zie fig. 11).
12) LET OP: voordat u de montage clips weer vastmaakt, zorg dan dat alle filtermaterialen op hun juiste plaats zitten en ook
dat de houders met filtermaterialen juist geïnstalleerd zijn (de materialen mogen niet overlappen aan de randen). Ook moet de
behuizing afdekkap op zijn juiste positie geïnstalleerd worden.
13) pas elke van de vier montage clips met zijn corresponderende koppelingen op het filterhuis en koppel de rotor met het
filterhuis. Druk met ferme kracht op de uitstekende delen van de montage clips (zie fig. 12).
OPZET PROCEDURE
Fig. 1
NL
b
e
c
f
a
o
o
g
i
i
h
l
j
d
j
m
k
n
m
l
A) Het assembleren van de koppelingen
I. maak het NEWA Kanist pakket open, verwijder de doos met de externe filter accessoires en plaats deze accessoires op een tafel,
zoals weergegeven in de figuur (fig. 1). Assembleer het inlaatblok, door het initiële filter raster (d) met de verbindingsleiding
(c) te verbinden, en dan uiteindelijk met de U-vormige inlaatsproeier (b) te verbinden. Het is zeer belangrijk om deze twee
componenten op de correcte manier te assembleren. Dit doet u door juist genoeg kracht uit te oefenen zodat de weerstand van
de twee O-vormige pakkingen overwonnen wordt. Het resultaat moet zijn dat de zuigleiding goed past op de inlaatsproeier
(zie fig. 13). Om de montage te vergemakkelijken is het aanbevolen de 2 O-vormige pakkingen vochtig te maken. Indien nodig
kan de positie van de zuigleiding aangepast worden door hem naar beneden te bewegen richting het niveau van de eerste
O-vormige pakking. Zorg dat het initiële filter raster (d) op een hoogte van 4-5cm vanaf de bodem van het aquarium hangt om
een zo efficiënt mogelijke werking te garanderen. Indien de verbindingsleiding (c) te lang is, kunt u hem inkorten met een zaag.
40
TIP: positioneer de zuigleiding uit de buurt van beluchters of schuimspanen omdat de door hun uitgestoten lucht de efficiëntie
van het filter benadeelt.
II. Assembleer het uitlaatblok door de U-vormige uitlaatsproeier (e) te verbinden met de reduceerleiding (f) en dan uiteindelijk
met de 2 uitlaten met elleboogkoppelingen (g) te verbinden. Indien nodig kunt u de uitlaatsproeier lengte inkorten met een
zaag, zodat de verhouding klopt met het aantal groeven (zie fig. 14).
Monteer de zwenkarm diffuser op de elleboogkoppelingen (g) waarbij u kunt kiezen tussen de sifon zwenkarm diffusers en
de zwenkarm diffusers voor injectoren (j). Dit doet u door een lichte kracht uit te oefenen op de koppelingen. Als u besluit
enkel 1 uitlaat van de elleboogkoppeling te gebruiken is het aan te bevelen de ongebruikte uitlaat af te sluiten met een
elleboogkoppeling afsluitdop (h).
TIP: om een betere watercirculatie door de sifon zwenkarm diffusers te krijgen is het aan te bevelen deze diffusers net onder het
wateroppervlak te plaatsen of ten hoogstens op hetzelfde niveau als het wateroppervlak.
III. De injectoren kunnen verbonden worden door de reduceerleiding (k) of ze kunnen gescheiden gebruikt worden (zie fig. 15).
Ze moeten in elk geval verbonden worden de corresponderende diffuser (j). Voor het juiste gebruik is het aan te bevelen om
de injector uitlaat af te sluiten met de corresponderende plug (m) uit het pakket. TIP: om een betere watercirculatie door de
injectoren te krijgen is het aan te bevelen om deze injectoren net boven het wateroppervlak te plaatsen.
Aansluiten van de afsluitklep (met twee kraantjes INLAAT-UITLAAT) op het externe filter.
B) Aansluiten van de afsluitklep (met twee kraantjes INLAAT-UITLAAT) op het externe filter.
LET OP: HET IS STRICT NOODZAKELIJK OM DEZE ACTIES VOLGENS DE ONDERSTAANDE INSTRUCTIES UIT TE VOEREN OM WATER
LEKKAGE TE VOORKOMEN EN OM HET NEWA KANIST EXTERNAL FILTER GOED TE LATEN FUNCTIONEREN.
I. Zorg ervoor dat zowel de groene montage moeren (deze zitten op de randen van de inlaat- en uitlaatblokken) alsook de
moeren van de afsluitklep (met twee kraantjes INLAAT-UITLAAT) compleet teruggedraaid zijn (vrije draad gedeelte-fig. 16).
II. Verbind elke flexibele leiding (welke in het pakket zitten) met de vrije randen van het inlaatblok (b) en het uitlaatblok (e). Monteer
ze met lichte kracht totdat de punt van de leiding het van draad voorziene gedeelte raakt. In dit gedeelte zijn de groene montage
moeren geïnstalleerd (ongeveer 2,5cm) (fig. 17). Draai de moeren met de klok mee zodat de flexibele leidingen handvast zitten.
III. Steek het inlaat-en uitlaatblok in het aquarium. Plaats deze inlaat-en uitlaatblokken haaks op de corresponderende
verbindingen (b-e) op de aquarium wanden. Monteer de inlaat-en uitlaatblokken met klemmen (voorzien van zuigdopjes). Hierbij
moet 1 klem binnen het aquarium en 1 klem buiten het aquarium gemonteerd worden, dit voor elk van de 2 blokken (fig. 18). TIP:
het is aan te bevelen om enige afstand tussen de inlaat en de uitlaat te bewaren om een correcte watercirculatie te verkrijgen.
IV. Plaats het NEWA Kanist filter in een voorkeurspositie zodat het filter gemakkelijk gebruikt kan worden.
V. Verbind de afsluitklep (met twee kraantjes INLAAT-UITLAAT) met het NEWA Kanist filter. Zorg ervoor dat de afsluitklep goed
past op de rotor. Rekening houdend met de importantie van deze bediening, is het aan te raden dat:
a) sluit de afsluitklep door aan de groene hendel te trekken (deze hendel bevindt zich tussen de twee kraantjes) totdat deze zijn
stop bereikt. De groene hendel zal in een verticale positie staan ten opzichte van de normale stand (fig. 19).
b) schuif de afsluitklep in de corresponderende groeven in de kop van het filter door goed te drukken op de buitenrand van de
afsluitklep (fig. 20). Zorg ervoor dat de afsluitklep goed geassembleerd is. Dit kunt u controleren door te kijken of er geen spleet
tussen de randen van de afsluitklep en de filterkop aanwezig is.
C ) open de afsluitklep door de groene hendel omhoog te trekken tot aan zijn stop. De groene hendel zal in een horizontale
positie staan ten opzichte van zijn beginstand (fig. 21).
VI. Verwijder overbodige lengtedelen van de flexibele leidingen zodat het filter op een juiste manier zal werken. Door het
inkorten van de flexibele leidingen zal de route van het water zo direct mogelijk verlopen en wordt een mogelijke buiging en
blokkade van de flexibele leidingen voorkomen (fig. 22).
VII. Verbind de flexibele leiding welke geïnstalleerd is op het uitlaatblok (pijl wijzend naar boven) met het kraantje (met
inscriptie UIT) volgens de pijlen op de inlaat- en uitlaatsproeiers, en de inscripties IN & UIT op de afsluitklep. Verbind de flexibele
leiding (welke geïnstalleerd is op het inlaatblok) met het kraantje met de inscriptie IN. Monteer ze met lichte kracht totdat
de punt van de leiding het van draad voorziene gedeelte raakt. In dit gedeelte zijn de groene montage moeren geïnstalleerd
(ongeveer 2,5cm) (fig. 23). Draai de moeren met de klok mee zodat de flexibele leidingen handvast zitten (fig. 24).
FILTER START
a) Locatie: Het NEWA Kanist extern filter werkt met behulp van zwaartekracht, plaats daarom het NEWA Kanist filter in een
voorkeurspositie voordat het met het blok verbonden wordt. Hierdoor zouden de afsluitklep en de flexibele leidingen afsluiten.
41
NL
Een ideale installatie locatie van het filter is onder het aquarium op daarvoor geschikte meubels. TIP: de afstand tussen het
wateroppervlak in het aquarium en de bodem van het filter zou niet meer mogen zijn dan 150 cm.
LET OP: INSTALLEER HET FILTER NIET BOVEN HET WATEROPPERVLAKTE NIVEAU.
b) Bediening: Het NEWA Kanist filter is uitgerust met een geïntegreerd startsysteem welke het filter automatisch aanzet na
het bedienen van de START knop. Volg de onderstaande stappen nauwkeurig op:
I. Zorg ervoor dat de aansluiting van de afsluitklep (met twee kraantjes INLAAT-UITLAAT) op het externe filter op de juiste
manier, volgens de voorschriften is voltooid (zie sectie: “OPZET PROCEDURE”, punt b).
II. Druk herhaaldelijk op de START knop (fig.25) totdat er water in het filterhuis loopt door middel van de zwaartekracht. Zodra
het filter gevuld is met water zal de overgebleven lucht via het uitlaatblok in de vorm van belletjes uitgestoten worden.
III. Zodra het gehele hydraulische systeem verzadigd is met water (geen uitstoot van luchtbelletjes via het uitlaatblok meer)
kan het externe filter aangesloten worden op zijn spanningsvoorziening (stopcontact). Het water zal dan via de diffusers of via
de injectoren in een vaste stroom het filter verlaten. Ontkoppel dan de filter spanningsplug van de spanningsvoorziening en
herhaal de gehele startprocedure. TIP: voorin het filter zal de opgesloten lucht lawaai produceren wat als normaal beschouwd
mag worden. Deze opgesloten lucht zal na enkele filter draaiuren verdwijnen, waarna het filter bijna geruisloos zal werken.
LET OP: VERBIND DE FILTER SPANNINGSPLUG NIET MET DE SPANNINGSVOORZIENING TOTDAT HET FILTER IS GEVULD MET WATER,
OM SCHADE AAN DE ROTOR TE VOORKOMEN.
LET OP: PLAATS DE BELUCHTINGSVORMEN NIET DICHT BIJ HET INLAATBLOK OM BELEMMERING VAN EEN EFFICIENTE WERKING
VAN HET FILTER TE VOORKOMEN. HIERDOOR KAN OOK LAWAAI GEGENEREERD WORDEN.
ONDERHOUD
NL
LET OP: VERWIJDER ALLE ELECTRISCHE TOEPASSINGEN UIT HET AQUARIUM VOORDAT U GAAT INSTALLEREN OF
ONDERHOUD UITVOEREN.IN HET MOGELIJKE GEVAL VAN BINNENDRINGING VAN VERVUILING IN DE PLUG OF
ELECTRISCHE AANSLUITING, ONTKOPPEL DAN DE ELECTRISCHE ZEKERING VAN UW HUIS VOORDAT U DE STROOMKABEL
VAN HET FILTER LOSTREKT.
Voer onderhoudswerkzaamheden uit wanneer het filter uitgeschakeld is. Volg de volgende instructies strikt op:
1) ontkoppel het filter van zijn spanningsvoorziening
2) sluit de afsluitklep door aan de groene hendel te trekken (deze hendel bevindt zich tussen de twee kraantjes) totdat deze zijn
stop bereikt. De groene hendel zal in een verticale positie staan ten opzichte van de normale stand (fig.26)
LET OP: DE AFSLUITKLEP MOET TIJDENS HET UITVOEREN VAN ONDERHOUDSWERKZAAMHEDEN ALTIJD VERBONDEN ZIJN MET DE
FLEXIBELE LEIDINGEN EN IN EEN GESLOTEN POSITIE STAAN.
3) ontkoppel de afsluitklep van het NEWA Kanist filter, door de inlaat-en uitlaatkraantjes omhoog te trekken. Het is niet
noodzakelijk om de flexibele leidingen en het uitlaatblok uit het aquarium te verwijderen, tenzij ze gereinigd dienen te worden.
In laatstgenoemd geval kunt u de aanslag verwijderen met behulp van borstels.
LET OP: het is aanbevolen een vocht absorberende doek om de afsluitklep heen te wikkelen tijdens de ontkoppeling omdat er
eventueel water uit de afsluitklep kan lekken.
4) til het filter met behulp van zijn gegroefde buitenkant op en leg het op een voor onderhoud geschikte locatie (bijvoorbeeld
een wastafel of een badkuip). Zorg dat het filter te allen tijde rechtop gehouden wordt om lekkage te voorkomen. Pak het filter
niet vast aan zijn clips welke bedoeld zijn voor het openen en sluiten van het filter.
5) voor gedetailleerde instructies over het openen van het filter, zijn interne containers met filtermaterialen en het reassembleren van het NEWA Kanist filter verwijs ik u naar de sectie: “INSTALLATIE VAN DE FILTERMATERIALEN”
LET OP: het is aan te bevelen het resterende water af te tappen uit het filter (waarbij de behuizingen vast gehouden dienen te
worden nadat de rotor verwijderd is) om onderhoudswerkzaamheden mogelijk te maken.
6) verbind de afsluitklep (met de kraantjes INLAAT-UITLAAT) met het NEWA Kanist filter wanneer de onderhoudswerkzaamheden
afgerond zijn (zie: punt a) en b)). Zorg ervoor dat de afsluitklep goed aansluit op de rotor. Open de afsluitklep door de groene
hendel omhoog te trekken tot hij zijn stop bereikt (zie ook “VERBINDING VAN DE AFSLUITKLEP MET DE KRAANTJES INLAATUITLAAT MET HET EXTERNE FILTER”)
7) stel het filter in werking door strikt de instructies vermeld in de sectie “FILTER START” (punt b-bediening) op te volgen. TIP:
het is aan te bevelen om alle rubberen delen van de rotor op periodieke basis te smeren met vaselineolie. Smeer dan vooral de
O-vormige pakkingen, de plunjer en het drukknopblok.
42
a) Onderhoud van de impeller
LET OP: DE IMPELLER WELKE GEBRUIKT WORDT IN DE NEWA KANIST FILTERS BESTAAT UIT STEUNEN EN EEN
KERAMISCHE AS. HET IS AAN TE BEVELEN OM ZEER VOORZICHTIG OM TE GAAN MET DEZE DELEN TIJDENS
ONDERHOUDSWERKZAAMHEDEN.
1) verwijder de impellerkamerafdekkap (4) van de rotor (1). Dit doet u door de daarvoor bedoelde hendels linksom te draaien
zodat u de impellerkamerafdekkap voorzichtig omhoog kunt trekken (fig.27).
2) ontkoppel de keramische as en de zwarte rubber steun van de impellerafdekkap, en leg deze delen voorzichtig op een tafel.
TIP: de tweede rubberen steun kan achterblijven in de rotorbehuizing. Om deze rubberen steun te verwijderen dient u het vrije
uiteinde van de keramische as in het uiteinde van de rubberen steun te steken nadat de rotor is verwijder.
3) verwijder de rotorgroep van de cilinder terwijl u de impellerbladen vasthoudt. Reinig de rotorgroep samen met de
impellerafdekkap onder een kraan met lopend water. Dit kunt u eventueel doen met een fijne, niet-schurende borstel. Mocht
het zo zijn dat de rotor aangetast is met een calciumlaag, dompel de delen dan onder met azijn. Laat de azijn 15 tot 20 minuten
intrekken voordat u de delen weer grondig met water gaat spoelen. LET OP: gebruik geen zuren of andere oplossingen anders
dan normale azijn want dat zou giftig kunnen zijn voor de vissen in uw aquarium.
4) re-assembleer de rotor. Breng eerst de keramische as in, daarna kunt u de corresponderende zwarte rubberen steunen op het
vrije uiteinde van de keramische as monteren (fig.28) (5).
5) installeer de rotor terug in de cilinder en installeer de impellerafdekkap. Zorg ervoor dat de rubberen pakking op het keramiek
goed is gepositioneerd in de impellerafdekkap groeven.
6) monteer de impellerafdekkap op de rotor en draai de daarvoor bedoelde hendels rechtsom.
b) Onderhoud van de filtermaterialen
1) vervang de filtermaterialen indien benodigd, waarbij gelet moet worden op de aanbevolen onderhoudsintervallen (zie de
tabel). Zorg dat de zakken met kooldeeltjes plat liggen. Voorkom dat de zakken met kooldeeltjes of andere componenten het
gat, welke de watercirculatie in het aquarium verzorgt, geblokkeerd raakt.
2) reinig het filterhuis zonder zeep of afwasmiddel. Enig achtergebleven residu hiervan kan het weefsel van vissen aantasten.
3) reinig de behuizingen (welke het biologisch materiaal bevatten) met water vanuit het aquarium om te voorkomen dat
bacteriële kolonies in het filter substract vernietigd worden. Deze bacteriële kolonies zijn verantwoordelijk voor het welzijn
van het aquarium. LET OP: chloordelen in het kraanwater veroorzaken een vernietiging van bevorderlijk werkende bacteriële
kolonies (welke zich in de poreuze ringen bevinden).
4) installeer de behuizingen inclusief de filtermaterialen in het filterhuis, waarbij de stappen 8 tot 13 van de sectie “INSTALLATIE
VAN DE FILTERMATERIALEN” nauwkeurig gevolgd dienen te worden. TIP: vervang nooit alle filtermatrialen met een biologische
werking (zoals sponzen en poreuze ringen) ineens (de voorafgestelde onderhoudsintervallen worden dan genegeerd). Delen
van de oude filtermaterialen bevorderen de re-integratie van belangrijke bacteriële kolonies welke verloren zijn gegaan door de
verwijdering van de oude filtermaterialen.
LET OP: OM DE JUISTE PRESTATIE KARAKTERESTIEKEN VAN NEWA KANIST TE BEHOUDEN WORDT ER AANBEVOLEN OM DE
ORIGINELE FILTER MATERIALEN EN RESERVE ONDERDELEN VAN NEWA® TE GEBRUIKEN.
Eens per maand
Elke twee maanden Twee keer per jaar
Een keer per jaar
NEWA AQUA CARBO
ACTIVE- Pellets
Vervangen
-
-
-
Sponzen
Controleer de
ontwikkeling van de
bacteriële belasting
Controleer en reinig,
indien nodig
Vervangen
-
Poreuze ringen NEWA
AQUA Microceramic
Controleer de
ontwikkeling van de
bacteriële belasting
Controleer en reinig,
indien nodig
-
Vervangen 50%
Impeller
-
-
Controleer en reinig,
indien nodig
-
Inlaat raster
-
Controleer en reinig,
indien nodig
-
-
43
NL
Eens per maand
Elke twee maanden Twee keer per jaar
Een keer per jaar
Flexibele leidingen
-
-
-
Controleer en reinig,
indien nodig
Afsluitklephe-ndel
-
-
Schoonmaken en
smeren
-
Start knop
-
-
Schoonmaken en
smeren
-
Rotorpakking
-
-
Schoonmaken en
smeren
-
INDENTIFICATIE VAN FILTERMATERIALEN
U kunt een eigen filtratie creëren door filtermaterialen te kiezen uit de NEWA AQUA lijn. Deze lijn bevat een groot bereik van
kwalitatief hoogwaardige filtermaterialen welke speciaal ontwikkeld zijn door NEWA®. Hierdoor worden practionaliteit,
duurzaamheid en veiligheid gegarandeerd tijdens de filtratie. De volgende tabel geeft alle karakteristieken van alle materialen
weer. Hierbij is alles onderverdeeld in overeenstemming met de beoogde filtratie acties.
FILTRATIE
MECHANISCHE
FILTRATIE
NL
BIOLOGISCHE
FILTRATIE
CHEMISCHE
FILTRATIE
MODEL NEWA Aqua
BESCHRIJVING
EIGENSCHAPPEN
FIBER
Polytheraan synthetische vezelstof
Hoge weerstand tegen slijtage-minimale
dichtheid-biologisch onschadelijk
KINSHY SPONGE
Elektronisch gelaste PVC vezelstof
Weerstaat hoge belastingen van
vervuilend materiaal zonder te
verstoppen-keert terug in zijn originele
vorm
MICROCERAMIC
Miniatuur keramische elementen
De gereduceerde grootte maximaliseert
het oppervlak bedoeld voor bacteriële
flora per eenheid die aanwezig is
CERAMIC HI-Q
Poreuze keramische elementen
De hoge poreusheid vergroot het volume
welke beschikbaar is voor de kolonisatie
van de bacteriële flora
BIOGLOBE
Polypropylene ballen met een
verschillende diameter
De structurele elasticiteit vergroot het
specifieke oppervlak voor de bacteriële
flora
CARBO ACTIVE
PELLETS
Super geactiveerde minerale
kooldeeltjes met een grote
absorptie mogelijkheid
Eliminatie van geuren-kraakhelder waterweinig onderhoud
CARBO ACTIVE
GRANULES
Geactiveerde korrelige carbon
(natuurlijk) met een grote
absorptie mogelijkheid
Verwijdert giftige stoffen en medische
reststoffen
CARBO ACTIVE
MIXTURE
Super geactiveerde minerale
kooldeeltjes met een grote
absorptie mogelijkheid
Eliminatie van geuren-kraakhelder waterweinig onderhoud-eliminatie van giftige
substanties
ACTIVE ZEOLITE
Chemisch geactiveerde minerale
zeoliet welke van vulkanisch
materiaal gemaakt is.
Trekt ammoniak, ammonium, sulfiden
en zware metalen aan en houdt deze
ook vast
ANTI-NITRATE
Ionenuitwisselingshars
Eliminatie van nitraten-bescherming en
stimulatie van algengroei
ANTI-PHOSPHATE
Ionenuitwisselingshars
Eliminatie van fosfaten en silicatenbescherming en stimulatie van algengroei
44
CORRECTE VERWIJDERING VAN DIT PRODUCT
(ELEKTRISCHE & ELEKTRONISCHE AFVALAPPARATUUR)
2002/96/EC - EN50419
Op het moment dat er besloten wordt het aquarium weg te gooien moeten de verschillende materiaalsoorten gescheiden en
apart afgevoerd worden volgens de plaatselijke normen om het recycleerbare materiaal (plastic, glas, enz.) te herwinnen en
de elektrische onderdelen veilig af te voeren. U moet er zorg voor dragen de verlichting (deksel) van de glazen aquariumbak
en van de elektrische accessoires te scheiden. De verlichting en de elektrische apparaten moeten, op grond van de Europese
Richtlijn RAEE, afgevoerd worden volgens hetgeen in onderstaande paragraaf “Correcte afvoer van het product - elektrisch en
elektronisch afval” uiteengezet wordt. Dit merkteken op het product of het bijbehorende informatiemateriaal duidt erop dat
het niet met ander huishoudelijk afval verwijderd moet worden aan het einde van zijn gebruiksduur. Om mogelijke schade aan
het milieu of de menselijke gezondheid door ongecontroleerde afvalverwijdering te voorkomen, moet u dit product van andere
soorten afval scheiden en op een verantwoorde manier recyclen, zodat het duurzame hergebruik van materiaalbronnen wordt
bevorderd. • Huishoudelijke gebruikers moeten contact opnemen met de winkel waar ze dit product hebben gekocht of met
de gemeente waar ze wonen om te vernemen waar en hoe ze dit product milieuvriendelijk kunnen laten recyclen. • Zakelijke
gebruikers moeten contact opnemen met hun leverancier en de algemene voorwaarden van de koopovereenkomsten nalezen.
Dit product moet niet worden gemengd met ander bedrijfsafval voor verwijdering.
GARANTIA
Op het product wordt, volgens de Europese Richtlijn 1999/44 CE, een garantie verleend van 24 maanden vanaf de aankoopdatum,
voor materiaal- en fabrieksfouten. Als het product binnen twee jaar vanaf de aankoopdatum niet goed mocht werken, breng
het dan terug naarde verkoper waar u het gekocht heeft. Het product wordt dan zonder enige extra kosten vervangen. Binnen
de garantieperiode wordt het product vervangen als: 1) Het product goed verpakt teruggebracht wordt, beschermd tegen
transportschade. 2) Het aankoopbewijs en gedetailleerde redenen van de klachten meegezonden worden. De garantie is
onderhevigaan de volgende beperkingen en voorwaarden: 1) De garantie vervalt als het apparaat door vallen/stoten beschadigd
is. 2) De vervanging van het product betekent niet dat de aansprakelijkheid toegegeven wordt. 3)De garantie geldt niet in geval
van een oneigenlijk gebruik van het product en dekt geen schade veroorzaakt door schendingen of nalatigheid van de koper.
4) De garantie is niet geldig voor onderdelen onderhevig aan slijtage en verbruik (zie * RESERVEONDERDELEN).
DEZE GEBRUIKSAANWIJZING BEWAREN.
45
NL
ES
Instrucciones de uso
Índice
NORMAS IMPORTANTES PARA LA SEGURIDAD
DESCRIPCIÓN DEL PRODUCTO
Componenti del filtro
Raccorderia
Materiali filtranti
FUNCIONAMIENTO
INSTALACIÓN DE LOS MATERIALES DE FILTRACIÓN
PREPARACIÓN DEL FILTRO
Montaje de las guarniciones
Conexión de la válvula de retención
con vías ENTRADA-SALIDA al filtro externo
PUESTA EN MARCHA DEL FILTRO
Lugar
Puesta en marcha
MANTENIMIENTO
Mantenimiento del impulsor
Mantenimiento de los materiales de filtración
IDENTIFICACIÓN DE LOS MATERIALES DE FILTRACIÓN
ELIMINACIÓN CORREDA DE ESTE PRODUCTO
GARANTIA
NORMAS IMPORTANTES PARA LA SEGURIDAD
ES
pág.
pág.
pág.
pág.
pág.
pág.
pág.
pág.
pág.
pág.
46
47
47
47
47
47
48
49
49
50
pág.
pág.
pág.
pág.
pág.
pág.
pág.
pág.
pág.
50
50
50
51
51
52
53
54
54
NEWA Kanist en un filtro externo para acuarios de agua dulce o salada, está diseñado sólo para el uso dentro de las viviendas, no
se permite ningún otro uso, y por lo tanto el fabricante no asume ninguna responsabilidad por ello.
NEWA Kanist cumple con las normas de seguridad vigentes en la UE (EN 60335-2-41).
ATENCIÓN: Para evitar accidentes de cualquier tipo estrictamente observar, además de las normas de seguridad más comunes,
las siguientes medidas de precaución:
ATENCIÓN: Este símbolo en la etiqueta del producto indica que se debe leer atentamente este manual de instrucciones
antes de poner en funcionamiento, utilizar y mantener el dispositivo.
1. ATENCIÓN: desconecte todos los dispositivos eléctricos en el acuario, antes de realizar la instalación y el mantenimiento. En
el caso de la presencia de la humedad en el enchufe o toma de corriente eléctrica,desconecte el interruptor principal antes de
desconectar el cable de alimentación;
2. Asegúrese de que la tensión indicada en la etiqueta del producto corresponde a la tensión de la fuente de alimentación;
3. Antes de conectar a la red, compruebe que el dispositivo y el cable correspondiente no están dañados de alguna manera.
4. 4. El cable de alimentación no puede ser reparado o cambiado. Si está dañado, sustituya el dispositivo.
5. El cable de alimentación del dispositivo debe formar una curva adecuada hacia abajo (DRIP LOOP fig. 2) para evitar el goteo del
agua a lo largo del cable y para que no llegue a la respectiva toma.
6. Se recomienda proteger el dispositivo, igual que todos los otros aparatos eléctricos, con un interruptor automático diferencial
especial (interruptor diferencial) con una corriente máxima de disparo 30 mA (la corriente residual Idn ≤ 30 mA).
7. Durante la instalación y el uso del dispositivo está prohibido levantarlo por medio del cable de alimentación.
8. Antes de poner en funcionamiento el equipo, compruebe que la instalación es correcta.
9. El aparato no debe funcionar en seco.
10. Prohibido el uso del dispositivo para líquidos corrosivos o abrasivos.
11. Temperatura máxima del fluido transportado no debe superar los 35 ° C.
12. ATENCIÓN: Este símbolo
significa que el dispositivo sólo se puede utilizar dentro de las viviendas.
13. ATENCIÓN: no se puede utilizar este filtro sumergido en el agua. En caso de una caída accidental, antes de sacarlo del agua,
retire el enchufe de la toma eléctrica. Observe las mismas precauciones, si se comprueba que la parte externa del dispositivo
46
está mojada.
20. ATENCIÓN El dispositivo no está diseñado para ser utilizado por personas (incluidos niños) con capacidades físicas, sensoriales
o mentales reducidas, o por falta de experiencia o conocimiento, salvo cuando son asistidos por una persona responsable de su
seguridad, se encuentran bajo la supervisión o en el estado adecuado para utilizar las instrucciones relativas al uso del dispositivo.
21. ATENCIÓN: Los niños deben ser supervisados para asegurarse de que no juegan con el aparato ya que esto no es un juguete.
GUARDE ESTAS INSTRUCCIONES.
DESCRIPCIÓN DEL PRODUCTO
Los componentes del filtro
1. Bloque del motor
2. Dispositivo de presión para activar el filtro
3. Junta tórica del bloque del motor
4. Tapa de la cámara del impulsor
5. Unidad de rotor con el eje y pinzas de cerámica
6. Cuerpo de filtro
7. Cilindro interno de conexión
8. Malla de protección de cestas
9. Cestas para los materiales filtrantes
10. Palancas de apertura / cierre
Guarniciones
a. Válvula de re tención con vías ENTRADA- SALIDA
b. Tubuladura de entrada en forma de U
c. Tubo de conexión
d. Malla prefiltro
e. Tubuladura de salida en forma de U
f. Adaptador de tubo del acoplamiento de codo
g. Acoplamiento de codo con 2 salidas
h. Tapón de cierre para el acoplamiento de codo
i. Difusores rotativos de tipo “ganso”
j. Difusores rotativos para boquillas
k. Adaptador de tubo para la conexión de las boquillas
l. Boquillas
m. Tapones de cierre de boquillas
n. Clips con ventosas
o. Mangueras flexibles (150 cm)
Materiales filtrantes
11. Fibra para la filtración mecánica
12. Carbón activado de alta capacidad de adsorción para la filtración química
13. Esponja de microporosidad
14. Anillos porosos para la filtración biológica
15. Esponja de macroporosidad
FUNCIONAMIENTO
NEWA Kanist garantiza el mantenimiento de un ambiente acuático sano, gracias a un sistema de filtración eficaz y potente, con
una variedad de posibilidades, especialmente diseñadas para proporcionar el resultado máximo de filtración mecánica, química
y biológica. Una vez activado, el agua se extrae del acuario a través de la tubería de succión y se introduce en el filtro NEWA
Kanist, donde la imponente masa de material filtrante se encarga de todos los contaminantes visibles e invisibles a través de 6
etapas de filtración:
47
ES
MECÁNICA:
• diseño de filtro incluye un amplio compartimento para la desinfección del agua, donde mayor parte de los sedimentos más
gruesos se depositan progresivamente en un área específica en la parte inferior, evitando así la obstrucción de las esponjas y
prolongando su vida;
• Esponjas macroporosas de mayor resistencia con la acción mecánica contra la contaminación retienen las partículas suspendidas,
tales como excrementos de los peces, restos de la comida, etc. Alta resistencia de la fibra al desgaste permite soportar cargas
extremas de contaminantes y al mismo tiempo proporciona el paso correcto de agua a las siguietes etapas
BIOLÓGICA:
• es una etapa en la que están implicadas colonias de bacterias que transforman compuestos de nitrógeno orgánicos a nitritos
y luego a nitratos. Esto está garantizado por añillos porosos NEWA AQUA Microceramic especialmente diseñado para asegurar
la mejor relación entre las superficies involucradas en la filtración y el volumen de llenado. De hecho, su tamaño reducido y
muy alta porosidad permiten acomodar el doble del número de la flora bacteriana en comparación con que normalmente se
encuentran en los elementos de cerámica convencionales, lo que permite optimizar la filtración biológica.
• NEWA Kanist proporciona un nivel muy alto de filtración biológica, cada filtro externo contiene hasta cinco capas de esponja de
diversos tamaños de grano, de grandes a pequeños y más pequeños. El aumento total de la superficie de las esponjas convierte
NEWA Kanist en un entorno ideal para las bacterias nitrificantes, que les permite crecer de forma exponencial.
QUÍMICO ADSORBENTE:
• esta etapa es para purificar y limpiar el agua de los olores y colores desagradables, gracias a las bolas especiales NEWA AQUA
Carbo-Active Pellets, de carbón super activado de origen mineral. La saturación muy alta de macroporos y el aumento de la
superficie específica proporcionan una alta capacidad adsorbente, tanco física como química, capturando y vinculando diversas
sustancias en su superficie tanto externa como interna. La estructura de la bolsa resistente permite que sea fácil de instalar y
quitar, evitando daños accidentales, mientras que el diseño especial evita que se obstruya células, promoviendo el flujo de agua
en el interior de la masa de carbón.
NOTA: CON EL FIN DE PRESERVAR LAS CALIDADES DE FUNCIONAMIENTO DE NEWA KANIST DURANTE MUCHO TIEMPO SE
RECOMIENDA EL USO DE MATERIALES DE FILTRACIÓN Y PIEZAS DE RECAMBIO ORIGINALES NEWA®.
INSTALACIÓN DE LOS MATERIALES DE FILTRACIÓN
ES
Materiales filtrantes están en la caja con el kit de filtro NEWA Kanist. Con el fin de su correcta colocación se recomienda cumplir
estrictamente con las siguientes instrucciones:
1. Separe el bloque de motor del cuerpo de filtro, desabrochando cuatro clips de sujestión haciendo click en sus raniuras ubicadas
en la parte inferior (fig. 3) Quite el bloque de motor levantándolo por las ranuras situadas a lo largo de su perímetro, y póngalo
con mucho cuidado en la superficie plana.
2. Retire la tapa de las cestas para material filtrante mediante la inserción de los dedos en los agujeros apropiados para facilitar
la operación (Fig. 4).
3. Quite todas las cestas, utilizando los mangos correspondiente, y póngalas en una superficie plana.
4. Primera cesta: saque las bolas de carbón activado NEWA Aqua Carbo Active-Pellets de la caja de accesorios y colóquelas entre
la capa de la fibra blanca y esponja negra de fina porosidad (1 bolsa con agujeros microscópicos para los modelos KANIST 250 y
350, 2 bolsas con agujeros microscópicos para los modelos KANIST 450 y 700), asegurándose de que están en una posición plana
y que no bloquean el orificio para la circulación del agua del acuario. Vuelva a colocar la capa de la fibra blanca (fig. 5).
ADVERTENCIA: NO ABRA LAS BOLSAS CON AGUJEROS MICRISCÓPICOS.
5. Segunda cesta: saque el resto de las bolas de carbón activado NEWA Aqua Carbo Active-Pellets de la caja de accesorios y
colóquelas en la esponja negra de microporosidad (2 bolsas con agujeros microscópicos para los modelos KANIST 350, 450 y 700),
asegurándose de que están en una posición plana y que no bloquean el orificio para la circulación del agua del acuario(fig.6).
ADVERTENCIA: NO ABRA LAS BOLSAS CON AGUJEROS MICRISCÓPICOS
6. Tercera y cuarta cestas: Saque las bolsas con los anillos porosos de la caja de accesorios, ábralas y extiéndalos uniformemente
sobre la superficie de la esponja azul de poros gruesos (modelos NEWA Kanist 350, 450 y 700).
NOTA: lo anteriormente dicho también se aplica para la segunda cesta NEWA Kanist 250 y la cuarta cesta NEWA Kanist 700.
7. Usando los mangos correspondientes disponibles en cada cesta, enjuague con mucha agua los materiales filtrantes y las
esponjas en las que se encuentran.
8. Vuelva a colocar cestas en el cuerpo de filtro, asegurándose de que cestas se colocan una por encima de la otra sin tapar el
acceso del agua al tubo de succión (fig. 7)
48
9. Primero, insierte las cestas con anillos porosos y la esponja azul de macroporosidad, luego las cestas con el carbón activado y la
esponja negra de microporosidad, y, finalmente la cesta con la fibra blanca para la filtración fina (fig. 8).
NOTA: es muy importante que la última en insertar sea la cesta con el agujero de tamaño más grande para la circulación del
agua, ya que es el punto de unión con el bloque de motor del filtro mediante cilindro interno de conexión.
10. Coloque en su sitio la tapa del bloque de cestas, asegurándose de que después de su instalación el orificio está alineado con
el orificio de la primera cesta. En caso contrario, gire la tapa (fig.9).
11. Coloque en su sitio el bloque de motor, asegurándose de que el cilindro interno de conexión entra en el orificio en la tapa del
bloque de las cestas (fig. 10).
Nota: Mirando al cuerpo de filtro desde arriba, la operación de montaje será muy fácil, si se tiene en cuenta que el dispositivo de
presión para activar el filtro situado sobre el bloque de motor, está en el mismo eje con el cilindro interior de conexión (fig. 11).
12. PRECAUCIÓN: antes de cerrar los clips, asegúrese de que los materiales filtrantes están en sus lugares, contenedores con
materiales de filtración están apilados de una forma correcta (los materiales no desbordan) y la tapa del bloque de las cestas está
instalada en la posición correcta.
13. Alinee cada uno de los elementos de fijación con enganches correspondientes situados en el bloque de motor y apriete el
bloque de motor al cuerpo de filtro, presionando firmemente en las partes sobresalientes de los elementos de fijación (fig. 12).
PREPARACIÓN DEL FILTRO
b
e
c
f
Fig. 1
a
o
o
g
i
i
h
l
j
d
j
m
k
n
m
l
a) Montaje de las guarniciones
I. Abra el paquete NEWA Kanist, saque la caja que contiene los componentes del filtro externo y colóquelos en la mesa, como se
muestra en la figura (fig. 1). Monte el bloque de entrada conectando la malla de prefiltro (d) con el tubo de conexión (c), luego
con la tubuladora de entrada en forma de U (b). Es muy importante, que el montaje de estos dos elementos se realice de una
manera correcta, haciendo un esfuerzo para vencer la resistencia de dos juntas tóricas para que el tubo de succión se coloque
con firmeza en la tubuladura de entrada (fig. 13). Para facilitar la operación se recomienda humedecer juntas tóricas. Si es
necesario, puede ajustar la posición del tubo de succión, desplazándolo hacia abajo hasta el nivel del primer acoplamiento. Para
un funcionamiento más eficaz compruebe que la malla de prefiltro se encuentre a una distancia de al menos 4-5 cm del fondo del
acuario. Si el tubo de conexión es demasiado largo, córtelo con sierra. Nota: coloque el tubo de succión a distancia de aireadors y
espumadores, ya que el aire que sale de ellos puede bajar la eficacia del filtro externo..
II. Monte el bloque de salida conectando la tubuladura de salida en forma de U(e) con el tubo adaptador (f), luego con el
acoplamiento de codo con 2 salidas (g). Si es necesario puede reducir la longitud de la tubuladura de salida, cortándola con
sierre de acuerdo con la ubicación de las ranuras (14). Con un pequeño esfuerzo ponga en la junta de codo (g) difusores rotativos,
eligiendo entre difusores de tipo “ganso” (i) y difusores para boquillas (j). Si se decide a usar sólo una de las salidas de la junta
de codo, se recomienda bloquear la salida no utilizada con un tapón de cierre de la junta de codo (h). Nota: para proporcionar
una mejor circulación del agua a través de los difusores de tipo “ganso”, se recomienda colocarlos un poco por debajo del nivel de
agua o como máximo en el mismo nivel.
49
ES
III. III. Boquillas pueden estar interconectadas a través de un tubo adaptador (k) o utilizarse por separado (fig. 15), en cualquier
caso deben estar conectadas a un difusor correspondiente (j). Para un uso correcto se recomienda bloquear la salida de boquilla
con tapones de cierre adecuados suministrados (m). Nota: para proporcionar una mejor circulación, se recomienda colocarlas un
poco por encima del nivel de agua.
b) Conexión de la válvula de retención con vías ENTRADA-SALIDA al filtro externo
PRECAUCIÓN: Para evitar fugas de agua y garantizar el correcto funcionamiento del filtro externo NEWA Kanist,
es necesario realizar esta operación con mucho cuidado, siguiendo atentamente las siguientes instrucciones.
I. Asegúrese de que las tuercas de fijación verdes, colocadas en los extremos libres de los grupos de admisión y escape, así como
las situadas en la válvula de retención con vías IN - OUT (a) están completamente aflojadas. (La parte roscada expuesta -. fig 16).
II. Conecte cada uno de los tubos flexibles suministrados a los extremos libres de la unidad de admisión (b) y la unidad de escape
(e) respectivamente, empujando con fuerza hasta que la punta del tubo toque la parte roscada en la cual se insiertan las tuercas
de fijación verdes (unos 2,5 cm) (fig. 17). Apriete las tuercas en el sentido horario para fijar firmemente el tubo flexible sin
apretar demasiado.III. Póngase las unidades de admisión y escape en el acuario colocándolas de manera transversal a los puntos
de conexión correspondientes (b-e) en las paredes del acuario. Fije los grupo de de admisión y escape con clips con ventosas
suministrados, instalando uno dentro del acuario y el otro fuera para cada uno de los dos grupos (fig. 18) Nota: Se recomienda
mantener una distancia entre la entrada y la salida para asegurar la correcta circulación del agua IV.. Ponga el filtro NEWA Kanist
en un lugar preseleccionado, dada la posibilidad de un acceso fácil para llevar a cabo el mantenimiento normal.
V. Conecte al filtro NEWA Kanist la válvula de retención con vías ENTRADA-SALIDA, asegúrese de que la última queda ajustada
contra el bloque de motor del filtro. Dada la importancia de esta operación se recomienda: a) cerrar la válvula de retención de la
palanca verde situada entre dos vías y levantándola hasta el tope. La palanca verde estará en la posición vertical con respecto al
plano en el que se encuentra (fig. 19)
b. Inserte la válvula de retención en las ranuras correspondientes de la cabeza del filtro presionando firmemente sobre las
esquinas exteriores colocadas junto a las vías (fig. 20). Asegúrese de que la válvula de retención está montada correctamente,
comprobando la ausencia de espacios entre los bordes de la válvula y la cabeza del filtro.
c. Abra la válvula de retención tirando de la palanca verde hasta que se detenga. La palanca verde estará en la posición horizontal
con respecto al plano en el que se encuentra.
VI. Corte el exceso de tubos flexibles para proporcionar un funcionamiento correcto del filtro. Esto permitirá tener el flujo de agua
más directo y evitar pliegue de los tubos flexibles (fig. 22).
VII. Conforme las flechas en los tubos de admisión y escape y las inscripciones “ENTRADA” (IN) y “SALIDA” (OUT) en la válvula
de retención, conecte el tubo flexible instalado en la unidad de escape (flecha hacia arriba) con la vía con inscripción “SALIDA”
(OUT). Conecte el tubo flexible montado en la unidad de admisión con la vía con la inscripción “ENTRADA” (IN). Tire con fuerza
hasta que la punta del tubo toque la parte roscada en la cual se insietan las tuercas de fijación verdes (unos 2,5cm) (fig. 23).
Apriete las tuercas contra las agujas de reloj para fijar firmemente el tubo flexible sin apretar demasiado el apriete (fig. 24).
ES
PUESTA EN MARCHA DEL FILTRO
a) Lugar: El filtro externo NEWA Kanist es un filtro de gravedad, por lo que se recomienda instalarlo en un lugar preseleccionado
antes de conectar el bloque que incluye la válvula de retención y tubos flexibles. El lugar perfecto para instalar el filtro es por
debajo del acuario en una pieza adecuada de muebles.
Nota: La distancia entre el nivel del agua en el acuario y la base inferior del cuerpo de filtro no debe exceder 150
centímetros. PRECAUCIÓN: NO instale el filtro por encima del nivel del agua.
b) Puesta en marcha: NEWA Kanist está equipado con un sistema de arranque que al pulsar botón “START” pone en
marcha el filtro automáticamente. Debido a eso, siga estrictamente los pasos siquientes:
I. Asegúrese de que las operaciones necesarias para conectar la válvula de retención con vías ENTRADA-SALIDA con el filtro
externo, has sido realizadas de acuerdo con las instrucciones (Véase la sección “Preparación de filtro”, párrafo b).
II. Pulse con el esfuerzo varias veces el botón “START” (fig. 25) hasta el momento cuando el agua fluya por la gravedad en el
cuerpo del filtro. A medida que el agua llene el filtro con el agua, el aire presente se escapará a través de la unidad de escape
formando las burbujas.
III. Una vez todo el sistema hidráulico está lleno de agua (las burbujas de aire no se escapan de la unidad de escape), puede
50
conectar el filtro externo a la red eléctrica. En este caso el agua sale en flujo constante a través de los difusores o las boquillas.
Desenchufe el filtro y repita el procedimiento del arranque.
Nota: Cuando se realiza el arranque del filtro, la presencia de aire retenido en el material filtrante puede provocar el ruido que
se considera normal. La retirada completa del aire sucederá en unas cuantas horas lo que permitirá que el filtro funcione casi
en silencio.
ADVERTENCIA: NO CONECTE EL ENCHUFE DEL FILTRO A LA RED ELÉCTICA ANTES DE LLENAR EL DISPOSITIVO CON
AGUA, ESTO PUEDE DAÑAR EL MOTOR.
ADVERTENCIA: NO COLOQUE LAS PIEDRAS POROSAS CERCA DE LA UNIDAD DE ADMISIÓN. ESTO PUEDE IMPEDIR EL
FUNCIONAMIENTO EFICAZ DEL FILTRO Y GENERAR RUIDO.
MANTENIMIENTO
PRECAUCIÓN: RETIRE TODOS LOS APARATOS ELÉCTRICOS PRESENTES EN EL ACUARIO ANTES DE EMPEZAR LA
INSTALACIÓN O EL MANTENIMIENTO. SI EL ENCHUFE O LA TOMA ELÉCTRICA ESTÁN HÚMEDOS, DESCONECTE EL
INTERRUPTOR PRINCIPAL ANTES DE DESENCHUFAR EL CABLE DE ALIMENTACIÓN.
Para llevar a cabo cualquier trabajo de mantenimiento, trabajar cuando el filtro está funcionando, siguiendo estrictamente los
siguientes puntos:
1. Desconecte el filtro del suministro eléctrico.
2. Cierre la válvula de retención tirando de la palanca verde que se encuentra entre dos vías, levantándola hasta que se detenga.
La palanca verde estará en la posición vertical con respecto al plano en el que se encuentra (fig. 26).
NOTA: durante las operaciones del mantenimiento la válvula de retención SIEMPRE debe estar conectada a los tubos flexibles
en la posición cerrada.
3. Desconecte la válvula de retención del filtro NEWA Kanist tirando hacia arriba de las vías ENTRADA-SALIDA. No es necesario
retirar los tubos flexibles y las unidades de admisión y escape del acuario, a no ser que necesitan una limpiza. En este caso
elimine las acumulaciones con escobillas y cepillos.
NOTA: Se recomienda tener al mano un material absorbente para envolver la válvula de retención, ya que al desconectarla
pueden haber fugas del agua.
4. Levante el filtro a través de las ranutas situadas a lo largo de su perímetro y trasládelo a un lugar adecuado para realizar el
mantenimiento (por ejempo, un lavabo, un fragadero, una bañera, etc.), manteniendolo en la posición vertical para evitar fugas
del agua. No sujete el filtro por las palancas laterales de apertura/cierre.
5. Para obtener las instrucciones detalladas sobre la apertura del filtro, sus contenedores con materiales filtrantes, así como las
instrucciónes de montaje del filtro NEWA Kanist, consulte la sección “INSTALACIÓN DE LOS MATERIALES DE FILTRACIÓN”.
NOTA: para facilitar el mantenimiento se recomiendo, una vez quitado el bloque del motor, drenar el agua restante sosteniendo
firmemente las cestas..
6. Al terminar el mantenimiento (véase los puntos a) y b)), conecte la válvula de retención con vías ENTRADA-SALIDA con el
filtro NEWA Kanist preste atención a que la válvula quede ajustada contra el bloque del motor del filtro. Abra la válvula de
retención tirando de la palanca verde hasta que se detenga. (véase también la Sección “Conexión de la válvula de retención con
vías ENTRADA- SALIDA al filtro externo”).
7. Continúe con la instalación del filtro, siguiendo estrictamente las instrucciones de la Sección “ARRANQUE del filtro” (párrafo
b-puesta en marcha)
Nota: se recomienda lubricar periódicamente todas las piezas de goma del bloque del motor, utilizando el aceite de vaselina para
la junta tórica, el pistón, manga de botón de inicio.
a) Mantenimiento del impulsor
ADVERTENCIA: el impulsor utilizado en los filtros NEWA Kanist, se compone de los soportes y eje de cerámica.Se
recomienda tener mucho cuidado en su manejo durante las operaciones de mantenimiento.
1. Retire la tapa de la cámara del impulsor (4) del bloque de motor (1) girándola hacia la izquierda usando las palancas adecuadas
y tire suavemente hacia arriba (fig. 27).
2. Desconecte la tapa del impulsor del eje cerámico y soporte negro de caucho y póngaselos con cuidado sobre la mesa.
Nota: el segundo soporte de goma puede dejar en su sitio, en la muesca del rotor; para desconectarlo es necesario
51
ES
después de haber retirado la unidad rotativa, insertar el extremo libre del eje cerámico en el ojete de soporte de goma.
3. Quite el grupo rotatorio del cilindro sosteniéndolo por los álabes del rodete y enjuague con agua corriente junto con
la tapa del impulsor, utilizando un cepillo no abrasivo para eliminar la suciedad. Si el bloque de motor está cubierto de la
placa de calcio, antes de limpiar déjelo en un recipiente con vinagre durante 15-30 minnutos, luego enjuague bien.
ADVERTENCIA: no utilice ácidos o soluciones que no sean vinagre normal para el uso alimentario, ya que puede ser tóxico para los peces.
4. Vuelva a montar la unidad de rotor, primero insertando el eje cerámico, luego instale soportes negros de goma correspondientes
en el extremo libre del eje (fig. 28) (5)
5. Inserte de nuevo el conjunto de rotor en el cilindro y coloque la tapa del impulsor,asegurándose de que la junta de goma en el
eje de cerámica está colocada correctamente en la muesca de la tapa del impulsor.
6. Fije la tapa del impulsor en el bloque de motor, tirándola en sentido horario usando las palancas adecuadas .
b) Mantenimiento de los materiales de filtración:
1. Cambie los materials de filtración según sea necesario, cumpla con los intervalos recomendados (véase la tabla). Asegúrese
de que las bolsas con carbón quedan en la posición plana y que ni ellas ni ningún otro componente no tapan el orificio diseñado
para la circulación del agua del acuario.
2. Enjuague el cuerpo del filtro sin usar jabón o detergentes. Cualquier residuo puede dañar los delicados tejidos de los peces.
3. Con el agua tomada del acuario enjuague suavemente las cestas que contienen material biológico, para evitar la destrucción
de las colonias de bacteria presentes en el sustrato del filtro, las que de hecho son responsables por el “bienestar” del acuario.
ATENCIÓN:la presencia de cloro en el agua del grifo lleva a la muerte de las colonias de bacterias beneficiosas contenidas en los
añillos porosos.
4. Vuelva a colocar en el cuerpo del filtro las cestas con materiales de filtración, siguiendo estrictamente los párrafos de 8 a 13 de
la Sección ” INSTALACIÓN DE LOS MATERIALES FILTRANTES”.
Nota: No cambie simultaneaménte todos los materiales filtrantes con acción biológica (esponjas, anillos porosos, etc.), es mejor
hacerlo en diferentes etapas. Si deja la parte de material viejo en el filtro, eso ayudará a la restauración de las colonias que
desaparecieron con el material eliminado.
NOTA: CON EL FIN DE PRESERVAR LAS CALIDADES DE FUNCIONAMIENTO DE NEWA KANIST DURANTE MUCHO TIEMPO
SE RECOMIENDA EL USO DE MATERIALES DE FILTRACIÓN Y PIEZAS DE RECAMBIO ORIGINALES NEWA®.
ES
Una vez al mes
Una vez en 2 meses
Una vez en 6 meses
Una vez al año
Carbón NEWA AQUA
CARBO ACTIVE- Pellets
Cambiar
-
-
-
Esponjas
Controlar el
desarrllo de la carga
bacteriológica
Control y limpieza si
es necesario
Cambiar
-
Anillos porosos
NEWA AQUA
Microceramic
Controlar el
desarrllo de la carga
bacteriológica
Control y limpieza si
es necesario
-
Cambiar 50%
Impulsor
-
-
Control y limpieza si
es necesario
-
Malla en la entrada
-
Control y limpieza si
es necesario
-
-
Tubos flexibles
-
-
-
Control y limpieza si
es necesario
Palanca de la válvula
de retención
-
-
Limpieza y lubricación -
Botón START
-
-
Limpieza y lubricación -
Junta de bloque de
motor
-
-
Limpieza y lubricación 52
IDENTIFICACIÓN DE LOS MATERIALES DE FILTRACIÓN
Es posible identificar los materiales de filtración con el fin de seleccionar de los productos de la línea NEWA AQUA, que representa
una amplia gama de materiales de filtración de alta calidad diseñados específicamente por NEWA ®, para garantizar la
funcionalidad y durabilidad en su uso para el filtrado, así como la seguridad del uso. La siguiente tabla resume las características
de todos los materiales, subdivididos de acuerdo con las acciones de filtración a las que están destinados:
ACCIÓN FILTRANTE
MODELO NEWA AQUA
DESCRIPCIÓN
CARACTERÍSTICAS
FIBER
Fibra sintética de polietileno
Alta resistencia al
desgaste-densidad mínimabiológicamente inerte
KINSHY SPONGE
Fibra electrosoldada de PVC
Soporta altas cargas de material
contaminante y sin obstrucción.
Tiene una memoria estructural
MICROCERAMIC
Elementos de cerámica en
miniatura
El tamaño reducido maximiza
la superficie destinada a la
flora bacteriana por unidad de
volumen disponibles
CERAMIC HI-Q
Elementos cerámicos porosos
Alto grado de porosidad
aumenta el volumen disponible
para la colonización de la flora
bacteriana
BIOGLOBE
Esferas de polipropileno de
diferentes diámetros
La elasticidad estructural
aumenta el área de superficie
específica para la flora bacteriana
CARBO ACTIVE PELLETS
Carbón Superactivado de origen
mineral con alta capacidad de
adsorción
Elimina olores - Mantiene la
transparencia del agua
CARBO ACTIVE
GRANULES
Carbón activado granular de
origen vegetal de alta capacidad
de adsorción
Elimina sustancias tóxicas y
residuos de medicamentos
CARBO ACTIVE MIXTURE
Carbón Superactivado de origen
mineral con alta capacidad de
adsorción
Elimina olores - Mantiene la
transparencia del agua - Elimina
sustancias tóxicas
ACTIVE ZEOLITE
Zeolita mineral químicamente
activada de origen volcánico
Captura y retiene el amoníaco,
amonio, sulfuros, sulfitos y
metales pesados
ANTI-NITRATE
Resina de intercambio de iones
Elimina nitratos-protege y ayuda
al crecimiento de algas
ANTI-PHOSPHATE
Resina de intercambio de iones
Elimina los fosfatos y silicatos.
Protege y ayuda al crecimiento
de algas
FILTRACIÓN
MECÁNICA
FILTRACIÓN
BIOLÓGICA
FILTRACIÓN QUÍMICA
53
ES
ELIMINACIÓN CORREDA DE ESTE PRODUCTO
(MATERIAL ELÉCTRICO Y ELECTRÓNICO DE DESCARTE)
2002/96/EC - EN50419
(Aplicable en la Unión Europea y en paises europeos con sistenmas de recogida selectiva de residuos).
En el momento en se decide desguazar el acuario, con el fin de recuperar los materiales reciclables (plásticos, vidrio, etc.), y
eliminar en condiciones seguras los componentes eléctricos, se deben dividir y desechar por separado los diferentes materiales
de acuerdo con las normas locales vigentes. Se deberá tener la precaución de dividir el equipo de iluminación (tapa) del
recipiente de vidrio y de los accesorios. El equipo de iluminación y los equipos eléctricos, según la Directiva Europea RAEE, deben
ser eliminados según lo expuesto en el apartado siguiente “Eliminación correcta del producto - residuos eléctricos y electrónicos”.
La presencia de està marca en el producto o en el material informativo que lo acompana, indica que al finalizar su vida útil no deberá eliminarse junto
con otros residuos domésticos. Para evitar los posibles daños al medio ambiente o a la salud humana que representa la eliminación incontrolada de
residuos, separe este producto de otros tipos de residuos y recíclelo correctamente para promover la reutilización sostenible de recursos materiales. •
Los usuarios particulares pueden contactar con el establecimiento donde adquirieron el producto, o con las autoridades locales pertinentes, para informarse sobre como y dónde pueden Ilevarlo para que sea sometido a un reciclaje ecológico y seguro. • Los usuarios comerciales pueden contactar con su
proveedor y consultar las condiciones del centrato de compra. Este producto no debe eliminarse mezclado con otros residuos comerciales.
GARANTIA
El producto está garantizado de defectos de materiales y fabricación por un período de 24 meses a partir de la fecha de
compra,según la Directiva Europea 1999/44 CE. Si el producto no funcionara correctamente dentro de un período de dos años a
partir de la fecha de compra, devuélvalo a la tienda donde lo compró. El producto le será sustituido sin ningún costo adicional.
Durante el período de garantía, el producto será sustituido si: 1) El producto se devuelve empaquetado correctamente y protegido
de los daños de transporte. 2) Se adjunta el recibo de compra y el motivo detallado de la reclamación. La garantía está sujeta a
las siguientes restricciones y condiciones: 1) Ninguna cobertura en caso de rotura traumática. 2) La sustitución del producto no
representa por ningún motivo una admisión de responsabilidad. 3) La garantía no es válida en el caso de un uso inadecuado del
producto, ni responde de daños provocados por modificaciones o negligencia por parte del comprador. 4) La garantía no es válida
para componentes sujetos a consumo y desgaste (véase * - PIEZAS DE REPUESTO).
CONSERVAR ESTAS INSTRUCCIONES.
ES
54
PT Instruções
ÍNDICE
NORMAS IMPORTANTES PARA A SEGURANÇA
DESCRIÇÃO DO ARTIGO
Componentes do filtro
Peças de ligação
Meios de filtragem
FUNCIONAMENTO
INSTALAÇÃO DOS MEIOS DE FILTRAGEM
PREPARAÇÃO DO FILTRO
Montagem das peças de ligação
Ligação da válvula de fechamento com tornteiras
ENTRADA-SAÍDA ao filtro externo
LIGAÇÃO DO FILTRO
Localização
Colocação em funcionamento
MANUTENÇÃO
Manutenção do impulsor
Manutenção dos meios de filtragem
IDENTIFICAÇÃO DOS MEIOS DE FILTRAGEM
ELIMINAÇÃO CORREDA DESTE PRODUTO
GARANTIA
pág. 55
pág. 56
pág. 56
pág. 56
pág. 56
pág. 56
pág. 57
pág. 58
pág. 58
pág. 59
pág. 59
pág. 59
pág. 59
pág. 60
pág. 60
pág. 61
pág. 62
pág. 63
pág. 63
NORMAS IMPORTANTES PARA A SEGURANÇA
O NAWA Kanist é um filtro externo para os aquários com água doce e água do mar, é destinado para a utilização apenas na
habitação, qualquer oura utilização é inadmissível e, como consequência, o produtor não tem responsabilidade por esta.
NEWA Kanist corresponde às normas de segurança da UE (EN 60335-2-41).
ATENÇÃO: Para prevenir os acidentes de qualquer tipo é preciso observar com muita rigidez, além das regras comuns, as
seguintes medidas de segurança:
ATENÇÃO: Este símbolo imprimido na etiqueta do artigo, indica que é necessário ler este manual de manutenção antes de
pôr em funcionamento, utilizar e manter o dispositivo.
1. ATENÇÃO: Desligar todos os aparelhos eléctricos que estão no aquário antes de começar a instalação e manutenção. Caso
esteja algum líquido na tomada ou conector, desligar a chave geral antes de desligar o cabo de alimentação;
2. Ter a certeza de que a tensão indicada na etiquete corresponde à tensão da rede eléctrica;
3. Antes de ligação à rede eléctrica, verificar o dispositivo e o cabo correspondente para não haver alguns danos;
4. O fio eléctrico não pode ser reparado nem substituído; Se apresentar danos deve-se substituir todo o filtro.
5. O cabo de alimentação do aparelho deve ser curvado de forma correspondente à baixo, (LAÇO SUSPENSO, imagem 2) para a
água não correr pelo cabo e penetrar na tomada correspondente.
6. É recomendável proteger o dispositivo do início, como todos outros dispositivos eléctricos, com a ajuda do interruptor
diferencial (o dispositivo da desligação protectora) com a corte de corrente máxima admissível de 30mA (o significado da
corrente persistente é de Idn ≤ 30mA).
7. Durante a instalação e utilização do dispositivo é proibido levantá-lo pelo cabo de alimentação.
8. Antes de pôr o dispositivo em funcionamento, tenha a certeza de tudo ter sido instalado da forma adequada;
9. O aparelho não deve funcionar em modo ocioso.
10. É proibido usar o dispositivo para os líquidos corrosivos e abrasivos.
11. A temperatura máxima do líquido usado não pode ser superior aos 35º C.
12. ATENÇÃO: Este símbolo significa que os dispositivos podem ser utilizados apenas dentro da habitação.
13. ATENÇÃO: não pode usar este filtro imergido na água. Caso queda acidental, antes de tirá-lo da água, desligue a ficha da
55
PT
tomada eléctrica. Observa as mesmas medidas da segurança se descobrir que as partes exteriores do dispositivo estão húmidos.
20. ATENÇÃO: O aparelho não se destina a ser utilizado por pessoas (crianças incluídas) cujas capacidades físicas, sensoriais ou
mentais sejam reduzidas ou, com falta de experiência ou conhecimentos, salvo se tiverem recebido supervisão ou instruções
relativas ao uso do aparelho por uma pessoa responsável pela sua segurança.
21. ATENÇÃO: As crianças devem ser controladas de forma a garantir que não brinquem com este aparelho porque não é um
brinquedo.
GUARDAR CAUTELOSAMENTE A PRESENTE INSTRUÇÃO!
DESCRIÇÃO DO ARTIGO
Componentes do filtro
1. Unidade de motor
2. Mecanismo rosqueado para ligação do filtro
3. Compressor em forma de “o” da unidade de motor
4. Porta da câmara de impulsor
5. Unidade rotativa montada com veio e suportes cerâmicos
6. Corpo do filtro
7. Cilindro de ligação interior
8. Rede protectora das portas
9. Portas para meios de filtragem
10. Alavancas de abertura / fechamento
Peças de ligação
a. Válvula de fechamento com as torneiras ENTRADA-SAÍDA
b. Cano derivado da entrada em forma de U
c. Cano de ligação
d. Rede do pre-filtro
e. Cano derivado da saída em forma de U
f. Cano de conexão de união em cotovelo
g. União em cotovelo com 2 saídas
h. Flange cega da união de cotovelo
i. Difusores de braço de oscilação tipo “conector curvo”
j. Difusores de braço de oscilação para bicos de pulverização
k. Cano de transição para ligação dos bicos de pulverização
l. Bicos de pulverização
m. Flanges cegas dos bicos de pulverização
n. Prendedores com ventosas
o. Mangueiras flexíveis (150 sm)
Meios de filtragem
11. Fibra para filtragem mecânica
12. Carbono activado para filtragem química de alta adsorbabilidade
13. Esponja de poros finos
14. Anéis porosos para filtragem biológica
15. Esponja de poros largos
PT
FUNCIONAMENTO
O NEWA Kanist garante a manutenção do habitat aquático saudável graças ao sistema potente e eficiente da filtragem com
as possibilidades diferentes especialmente destinadas para garantir o resultado máximo em relação à filtragem mecânica,
química e biológica. Logo depois da ligação, a bomba forte começa a fornecer a água para o filtro NEWA Kanist, onde o número
considerável dos meios de filtragem trabalham com quaisquer substâncias poluentes visíveis e invisíveis graças a 6 etapas da
filtragem:
56
MECÂNICA:
• a construção do filtro inclui uma secção ampla para desinfecção da água onde a maior parte das partículas mais largas do
sedimento pouco a pouco consentra-se no sector determinado do fundo, o que permite evitar o entupimento das espojas e assim
prolongar o prazo de exploração das esponjas.
• as esponjas de poros largas de solidez aumentada com a acção mecânica contra contaminação retem partículas em suspensão
como excrementos de peixes, restos da comida etc. A resistência das fibras muito alta ao desgaste permite ter encargos excessivos
das substâncias poluentes, e, ao mesmo tempo, garantir a transferência adequada da água para as etapas seguintes.
BIOLÓGICA:
• esta etapa tem as colonias de bactérias agidas que transformam os compostos de azoto orgânicos nos nitritos e depois nos
nitratos. Isto é garantido pelos anéis porosos “NEWA AQUA Microceramic”, elaborados especialmente para atingir a melhor
correlação entre as superfícies que participam na filtragem e o volume do preenchimento. Na realidade, o tamanho diminuído
destes e porosidade aumentada permite conter a quantidade dupla de flora bacteriana em comparação com os quais geralmente
os elementos cerâmicos contêm, o que permite optimizar a filtragem biológica.
• o NEWA Kanist garante o nível da filtragem biológica muito alto, cada filtro externo tem até cinco camadas da esponja de
grânulos diferentes, de largos até mais finos. A área aumentada comum das superfícies das esponjas transforma o NEWA Kanist
em ambiente ideal para bactérias nitrificantes, permitindo o desenvolvimento destas de forma exponencial.
ADSORSIVO-QUÍMICO:
• esta etapa é destinada para a purificação da água e eliminação de cheiros e cores desagradáveis graças às bolas especiais
“NEWA AQUA Carbo-Active”, carbono superactivado da origem mineral. A saturação excessiva com macroporos e a área específica
aumentada garantem a capacidade adsorsiva alta física e química, atraindo e ligando as substâncias diferentes como no lado
exterior tanto no interior. A estrutura do pacote sólido permite facilmente instalá-lo e tirá-lo, evitando danificações acidentais,
enquanto a estrutura das células impede o bloqueio, favorecendo à entrada da água na massa de carbono.
ATENÇÃO: PARA CONSERVAR AS QUALIDADES DE EXPLORAÇÃO DO NEWA KANIST É RECOMENDÁVEL UTILIZAR OS MEIOS DE
FILTRAGEM E PEÇAS SOBRESSALENTES ORIGINAIS NEWA®.
INSTALAÇÃO DOS MEIOS DE FILTRAGEM
Os meios de filtragem estão na caixa com os componentes do filtro NEWA Kanist. Para deslocá-los de forma adequada é
recomendável seguir rigurosamente às seguintes instrucções.
1. Separar a unidade de motor do corpo do filtro, desprendendo quatro fechos com dobradiça, apertando nas ranhuras,
localizadas em baixo (imagem 3). Tirar a unidade de motor, levantando-a por cavidades localizadas pelo perímetro dessa e pôr
com cuidado sobre a superfície lisa.
2. Tirar a tampa da unidade das portas para os meios de filtragem, pondo os dedos nos orifícios correspondentes para facilitar
a operação (imagem 4).
3. Tirar todas as portas, utilizando o prendedor correspondente e pô-las sobre a superfície lisa.
4. Primeira porta: tirar as bolas do carbono activado “NEWA AQUA Carbo-Active” da caixa com os componentes e pôr entre a
camada da fibra branca e da esponja preta de poros finos (1 microfórico (com os orifício microscópicos) um pacote para os
modelos KANIST 250 e 350, dois pacotes microfóricos para os modelos KANIST 450 e 750), prestando atenção para que estes
estejam postos planamente e não fecharam o orifício destinado para a circulação da água corrente do aquário. Instalar no seu
lugar a camada da fibra branca (imagem 5). ATENÇÃO: NÃO ABRIR OS PACOTES MICROFÓRICOS.
5. Segunda porta: tirar as bolas restantes do carbono activado “NEWA AQUA Carbo-Active” da caixa com os componentes e pôlas sobre a esponja negra de poros finos (3 pacotes microfóricos para os modelos KANIST 350, 450 e 700), chamando a atenção
para o facto que estiveram postos planamente e não fecharam o orifício destinado para a circulação da água corrente do aquário
(imagem 6). ATENÇÃO: NÃO ABRIR OS PACOTES MICROFÓRICOS.
6. Terceira e quarta portas: Tirar os pacotes com anéis porosos da caixa, abri-las e distribuir os anéis igualmente sobre a superfície
da esponja azul de poros largos (os modelos NEWA Kanist 350,450 e 700). ATENÇÃO: O acima descrito é aplicável também para a
segunda porta NEWA Kanist 250 e quarta porta NEWA Kanist 700.
7. Com a ajuda dos prendedores correspondentes que estão em cada porta passar por água corrente os meios de filtragem e
esponjas nas quais estes estão localizados.
8. Instalar as portas de volta para o corpo do filtro, prestando a atenção para as portas ficarem uma atrás de outra, não fechando
o acesso para o cano absorvente.
9. No início, colocar as portas que incluem os anéis porosos e a esponja azul de poros largos, depois, as portes com o carbono
57
PT
activado e a espoja negra de poros finos, e por fim, a porta com fibras brancas para a filtragem fina (imagem 8). ATENÇÃO: é
muito importante que a ultima seja a porta com o orifício para a circulação da água maior, porque este é o sítio para a ligação
com a unidade de motor do filtro através do cilindro de ligação interior.
10. Instalar no seu lugar a tampa da unidade das portas, prestando a atenção para que depois da instalação o seu orifício
corresponda ao orifício da primeira porta. No caso contrário, virar a tampa (imagem 9).
11. Instalar no seu lugar a unidade de motor, prestando a atenção para o cilindro de ligação interior entrar no orifício na tampa
da unidade das portas (imagem 10).
Comentário: Se olhar para o corpo do filtro de cima, a operação da montagem de volta será muito fácil, se tomar em conta que
o mecanismo rasqueado para ligação do filtro, localizado por cima da unidade de motor, esta no mesmo eixo que o cilindro de
ligação interior (imagem 11).
12. ATENÇÃO:antes de fechar fechos com dobradiça, tenha a certeza que os meios de filtragem estão nos seus lugares, os
contentores com meios de filtragem estão colocados de forma correcta (os meios não saem do bordo) e a tampa da unidade das
portas está instalada na posição correcta.
13. Juntar cada de três fechos à coesão correspondente situadas na unidade de motor do filtro e aderir a unidade de motor ao
corpo do filtro, apertando com esforço nas partes dos fechos sobre a borda (imagem 12).
PREPARAÇÃO DO FILTRO
fig. 1
b
e
c
f
a
o
o
g
i
i
h
l
j
d
j
m
k
n
m
l
Montagem das peças de ligação
PT
I. Abrir o empacotamento do NEWA Kanist, tirar a caixa com os componentes para o filtro externo e colocar os componentes
sobre a mesa, como é mostrado na imagem (imagem 1). Montar a unidade de entrada, ligando a rede do pré-filtro (d) ao
cano de ligação (c), e depois, ao cano derivado da entrada em forma de U (b). É muito importante que a montagem destes dois
componentes seja realizada de forma correcta, esforçando para superação da resistência de dois compressores em forma de “o”
da unidade de motor para o cano absorvente estar posto de forma sólida no cano derivado da entrada (imagem 13). Para facilitar
a operação, é recomendável humedecer os compressores em forma de “O”. Se for necessário, é possível regular a posição do cano
absorvente, deslocando-o mais para baixo até o nível do primeiro compressor. Para o trabalho mais eficiente, verificar que a rede
do pré-filtro (d) esteja à distância não menos de 4-5 sm do fundo do aquário. Se o cano de ligação (c) seja demasiado comprido,
cortá-lo com a serra. Comentário: colocar o cano absorvente longe do aeradores e separadores de espuma, porque o ar saído
pode baixar a eficiência do filtro externo.
II. Juntar a unidade de saída, ligando cano derivado da saída em forma de U (e) ao cano de transição (f), e depois à união em
cotovelo de 2 saídas (g). Se for necessário, é possível diminuir o comprimento do cano derivado da saída, cortando-o com a
serra para corresponder à localização das ranhuras (imagem 14). Com o esforço leve, colocar sobre a união em cotovelo (g),
os difusores de braço de oscilação escolhendo entre os difusores do tipo “conector curvo” (i) e difusores de braço de oscilação
para bicos de pulverização (j). Se for decidido usar apenas uma das saídas da união em cotovelo, é recomendável fechar a saída
58
não usada com a flange cega para a união em cotovelo (h). Comentário: para garantir a melhor circulação da água através dos
difusores do tipo “conector curvo”, é recomendável colocá-los um pouco mais baixo do nível da água.
III. Os bicos de pulverização podem ser ligados entre si através do cano de transição (k) ou ser usados separadamente (imagem
15), em qualquer caso, eles devem ser ligados ao difusor correspondente (j). Para a utilização correcta é recomendável fechar
a saída do bico de pulverização pelas flanges cegas do conjunto do artigo (m). Comentário: para garantir a circulação da água
melhor através dos bicos de pulverização, é recomendável colocá-los um pouco mais acima do nível da água.
Ligação da válvula de fechamento com tornteiras ENTRADA-SAÍDA ao filtro externo
ATENÇÃO: para evitar o escoamento da água e garantir o funcionamento correto do filtro externo NEWA Kanist, é necessário
efectuar esta operação com muito cuidado, seguindo rigorosamente às instrucções, abaixo indicadas.
I. Ter a certeza de que as porcas de fixação verdes situadas nas pontas livres das unidades de entrada e saída, bem como as que
estão situadas na válvula de fechamento com as torneiras de ENTRADA-SAÍDA, estão completamente soltados (com a parte de
rosca aberta – imagem 16).
II. Ligar cada cano flexível do conteúdo do pacote aos bordos livres das unidades de entrada (b) e saída (e) e, respetivamente,
colocando-as com esforço até que o bico do cano atinja a parte de rosca, na qual são colocados as porcas de fixação verdes
(cerca de 2.5 sm) (imagem 17). Virar as porcas no sentido dos ponteiros do relógio, para fixar solidamente o cano flexível, não
apertando demais III. Colocar as unidades de entrada e saída no aquário localizando-as de forma transversal respetivamente
aos lugares da ligação (b-e) nas paredes do aquário. Fixar as unidades de entrada e saída com ajuda dos prendedores com
ventosas do conteúdo do pacote, instalando uma delas dentro e outra fora do aquário para cada das duas unidades (imagem
18). Comentário: É recomendável deixar alguma distância entre a entrada e saída para garantir a circulação adequada da água.
IV. Colocar o filtro NEWA Kanist no lugar escolhido antecipadamente, tomando em conta a possibilidade do acesso fácil para
efectuar as acções comuns da manutenção.
V. Ligar a válvula de fechamento com as torneiras de ENTRADA-SAÍDA ao filtro NEWA Kanist, prestando atenção para que esta
esteja adjacente à unidade de motor do filtro. Tomando em conta a importância desta operação, é recomendável:
a. Fechar a válvula de fechamento, puxando a alavanca verde situada entre duas torneiras e, levantando-a até parar. A alavanca
verde transformar-se-á em posição vertical relativamente à superfície onde está situada (imagem 19).
b. Colocar a válvula de fechamento nas ranhuras correspondentes na parte dianteira do filtro, apertando com esforço nos cantos
externos ao lado das torneiras (imagem 20). Ter a certeza de que a válvula de fechamento está montada de forma adequada,
verificando a ausência dos espaços livres entre os pontos da válvula e parte dianteira do filtro.
c. Abrir a válvula de fechamento, levantando a alavanca verde até parar. A alavanca transformar-se-á em posição horizontal
relativamente à superfície onde está situada (imagem 21).
VI. Cortar o excesso dos canos flexíveis para garantir o funcionamento adequado do filtro. Isto permitirá a entrada mais directa
da água e evitar as dobraduras possíveis dos canos flexíveis (imagem 22).
VII. Em conformidade com os ponteiros localizados nos canos derivados da entrada e saída e com as inscrições “ENTRADA” (IN)
e “SAÍDA” (OUT) na válvula de fechamento, ligar o cano flexível colocado na unidade de saída (ponteiro, dirigida para cima) à
torneira que tem a inscrição “SAÍDA” (OUT). Ligar o cano flexível colocado na unidade de entrada à torneira que tem a inscrição
“ENTRADA” (IN). Puxar com esforço até que o bico do cano atinja a parte de rosca, na qual são colocados as porcas de fixação
verdes (cerca de 2.5 sm) (imagem 23). Virar as porcas no sentido inverso ao dos ponteiros do relógio para fixar solidamente o
cano flexível, não apertando demais (imagem 24).
LIGAÇÃO DO FILTRO
a) Localização: O filtro externo NEWA Kanist é um filtro aberto, por isso é recomendável instalá-lo no lugal antecipadamente
escolhido antes de conectae a unidade que inclui a válvula de fechamento e canos flexíveis. Um lugar ideal para instalar o filtro é
por baixo do aquário sobre a mobiliaria adequada. COMENTÁRIO: A distância entre o nível da água no aquário e o fundo do corpo
do filtro não deve superar 150 santímentros. ATENÇÃO: NUNCA INSTALAR O FILTRO SUPERIOR DO QUE O NÍVEL DA ÁGUA.
b) Colocação em funcionamento: O NEWA Kanist tem o sistema incorporado da ligação que com a pressão do botão
“INICIAR” (START) inicia automaticamente o filtro. Por causa disto, seguir rigorosamente às etapas seguintes:
I. Ter a certeza de que as operações necessárias para ligação da válvula de fechamento com as torneiras ENTRADA-SAÍDA são
efectuadas em conformidade com as instrucções (ver a secção “PREPARAÇÃO DO FILTRO”, ponto b).
59
PT
II. Com esforço apertar reiteradamente o botão “INICIAR” (START) (imagem 25) até que a água comece entrar abertamente
no corpo do filtro. Durante o preenchimento do filtro pela água, a ar presente fugirá através da unidade de saída, formando
bolhazinhas.
III. Quando todo o sistema hidráulico seja preenchido (as bolhazinhas de ar não saem mais da unidade de saída), é possível ligar
o filtro externo à rede eléctrica. Neste caso, a água sairá de uma única corrente dos difusores e bicos de pulverização. Desligar a
ficha do filtro da rede e repetir a procedura do início.
Comentário: Ao iniciar o filtro o ar presente nos meios de filtragem pode provocar o ruído, o que se acha normal. A eliminação
completa do ar acontecerá daqui a algumas horas, o que permitirá o filtro funcionar quase sem ruído.
ATENÇÃO:NÃO LIGAR A FICHA DO FILTRO À REDE ELÉCTRICA ATÉ PREENCHER O DISPOSITIVO COM A ÁGUA, ISTO PODE
DANIFICAR O MOTOR.
ATENÇÃO: NÃO COLOCAR AS PEDRAS POROSAS DO AERADOR AO PÉ DA UNIDADE DE ENTRADA. ISTO PODE IMPEDIR O
FUNCIONAMENTO EFECTIVO.
MANUTENÇÃO
PT
ATENÇÃO: ELIMINAR TODOS OS APARELHOS ELÉCTRICOS SITUADOS NO AQUÁRIO ATÉ REALIZAR A OPERAÇÃO DA
INSTALAÇÃO E ASSISTÊNCIA. CASO A FICHA OU TOMADA ELÉCTRICA ESTIVER HÚMIDA DESLIGUE O INTERRUPTOR
PRINCIPAL DA REDE ANTES DE DESLIGAR O CABO DE ALIMENTAÇÃO.
Para efectuar quaisquer operações da assistência, trabalhar com o filtro desligado, seguindo rigorosamente aos pontos seguintes:
1. Desligar o filtro da rede eléctrica.
2. Fechar a válvula de fechamento, puxar a alavanca verde situada entre duas torneiras, e levantando-a até parar. A alavanca
verde acontecerá na posição vertical relativamente à superfície onde está situada (imagem 26). ATENÇÃO: durante a operação
da assistência a válvula de fechamento SEMPRE deve estar ligada aos canos flexíveis na posição fechada.
3. Desligar a válvula de fechamento do filtro NEWA Kanist, puxar para cima as torneiras ENTRADA-SAÍDA. Não há necessidade
tirar os canos flexíveis e as unidades de entrada e saída do aquário, excepto precisarem de limpar. Neste caso, eliminar a camada
possível com escovas.
ATENÇÃO: É recomendável ter o meio absorvente para enrolá-lo em cima da válvula de fechamento, porque quando desligar, a
água pode escorrer.
4. Levantar o filtro pelas cavidades localizadas pelo perímetro e transferi-lo num lugar apropriado para a assistência (por
exemplo, o alguidar, lavatório, banheira etc.) mantendo-o na posição vertical para evitar escoamento da água. Não segurar o
filtro nas alavancas laterais de abertura/fechamento.
5. As instrucções pormenorizadas da abertura do filtro, dos contentores com os meios de filtragem, bem como da montagem de
volta do filtro NEWA Kanist, ver na secção “INSTALAÇÃO DOS MEIOS DE FILTRAGEM”.
ATENÇÃO: para facilitar as operações de assistência é recomendável depois de tirar a unidade de motor, despejar o resto da
água, segurando as portas.
6. Depois de terminar a operação de assistência (ver ponto a) e b)), ligar a válvula de fechamento com as torneiras ENTRADASAÍDA ao filtro NEWA Kanist, prestando atenção para que esta seja adjacente estreitamente à unidade de motor do filtro. Abrir
a válvula de fechamento, puxando até parar a alavanca verde (também ver a secção “Ligação da válvula de fechamento com as
torneiras ENTRADA-SAÍDA ao filtro externo”).
7. Passar para colocar o filtro em funcionamento, seguindo rigorosamente às instrucções, redigidas na secção “LIGAÇÃO DO
FILTRO” (ponto b – Colocação em funcionamento).
Comentário: é recomendável lubrificar regularmente todas as partes de borracha da unidade de motor, aplicando o óleo baseado
em vaselina sobre os compressores em forma de “O”, êmbolo e bico de pulverização do botão do início.
a)Manutenção do impulsor:
ATENÇÃO: o impulsor usado nos filtros NEWA Kanist consiste dos suportes e veio cerâmico. É recomendável estar
com atenção máxima a efectuar trabalhos de manutenção do impulsor.
1. Tirar a tampa da câmara do impulsor (4) da unidade de motor (1), virando-a pelas alavancas correspondentes no sentido
inverso ao dos ponteiros do relógio e com cuidado puxar para cima (imagem 27).
2. Desligar o veio cerâmico e suporte de borracha preto da tampa do impulsor e com cuidado colocá-los na mesa.
Comentário: o segundo suporte pode-se deixar no seu lugar, na ranhura do rotor, para desligá-lo é necessário, depois de tirar a
60
unidade de rotor, meter o ponto livre do veio cerâmico no buraco do suporte de borracha.
3. Tirar o grupo de rotor do cilindro, segurando nas palhetas do impulsor e lavá-lo sob água corrente com a tampa do impulsor,
usando a escova não-abrasiva para eliminação de poluição. Caso a unidade de motor estiver coberta com a camada de cálcio,
antes de lavar, colocá-la no reservatório com vinagre para 15-30 minutos, depois, enxaguar com cuidado.
ATENÇÃO: não usar ácidos ou soluções diferentes do vinagre alimentar, podem ser tóxicos para peixes.
4. Montar de volta a unidade de rotor, primeiro, colocar o veio cerâmico e depois, colocar os suportes de borracha pretos no ponto
livre do veio (imagem 28). (5)
5. Colocar a unidade de rotor de volta no cilindro e instalar para trás a tampa do impulsor, de maneira que a guarnição de
borracha entre na ranhura da tampa do impulsor.
6. Fixar a tampa do impulsor na unidade de motor, virando-a no sentido dos ponteiros do relógio pelas alavancas correspondentes.
b) Manutenção dos meios de filtragem:
1. Substituir os meios de filtragem quando for necessário, observando a periodicidade recomendável (ver a tabela)- Prestando
atenção para que os pacotes com carbono estejam na posição plana e que nenhuns componentes fecharam o orifício destinado
para a circulação da água ingressada do aquário.
2. Enxaguar o corpo do filtro não usando sabão nem detergentes. Quaisquer restos podem prejudicar tecidos frágeis dos peixes.
3. Com a água do aquário enxaguar com cuidado as portas que contêm material biológico para evitar destruição das colonias de
bactérias presentes no substrato do filtro, que na realidade são responsáveis pelo “bem-estar” do aquário. ATENÇÃO: a presença
do cloro na água de torneira causa o perecimento das colonias das bactérias úteis que se encontram nos anéis porosos.
4. Instalar de volta as portas com os meios de filtragem no corpo do filtro, observando obrigatoriamente os pontos de 8 a 13 do
Secção “INSTALAÇÃO DOS MEIOS DE FILTRAGEM”.
Comentário: Não substituir simultaneamente todos os meios de filtragem biológicos (esponjas, anéis porosos etc.), distribuindo
os prazos da substituição destes. Se deixar a parte dos meios antigos, isto favorecerá à recuperação da colonias que desapareceram
com os meios destruídos.
ATENÇÃO: PARA CONSERVAR AS QUALIDADES DE EXPLORAÇÃO DO NEWA KANIST, É RECOMENDÁVEL UTILIZAR OS
MEIOS DE FILTRAGEM E PEÇAS SOBRESSALENTES ORIGINAIS NEWA ®.
Uma vez por mês
Uma vez por 2 meses Uma vez por 6 meses Uma vez por ano
Carbono NEWA AQUA
CARBO ACTIVE- Pellets
Substituição
-
-
-
Esponjas
Controlar o
desinvolvimento
da carga bacteriana
Controlo e lavagem
caso for necessário
Substituição
-
Anéis porosos NEWA
AQUA Microceramic
Controlar o
desinvolvimento
da carga bacteriana
Controlo e lavagem
caso for necessário
-
Substituição de 50%
Impulsor
-
-
Controlo e lavagem
caso for necessário
-
Rede de saída
-
Controlo e lavagem
caso for necessário
-
-
Canos flexíveis
-
-
-
Controlo e lavagem
caso for necessário
Alavanca da válvula
de fechamento
-
-
lavagem e lubrificação -
Botão “Start”
-
-
lavagem e lubrificação -
Compressor da
unidade de motor
-
-
lavagem e lubrificação 61
PT
IDENTIFICAÇÃO DOS MEIOS DE FILTRAGEM
Exixte a possibilidade de identificar os meios de filtragem para escolher os artigos da linha NEWA AQUA que representa a
gama dos meios de filtragem de alta qualidade especialmente elaborados pelo NEWA®, para garantir vantagem e duração
em utilização durante a filtração, bem como a segurança da utilização. Na tabela abaixo estão representadas as características
generalizadas de todos os meios divididos pelo tipo de acção a qual se destinam.
ACÇÃO DE
FILTRAGEM
MODELO NEWA Aqua
DESCRIÇÃO
CARACTERÍSTICAS
FIBER
Fibra sintética de polieteno
Resistência ao desgaste elevada
- densidade mínima - inerte
biológicamente
Fibra electrosoldada de PVC
Resiste às cargas elevadasdas
substâncias poluentes, não
estando sujado– tem memória
estrutural
MICROCERAMIC
Elementos cerâmicos pequenos
Deminui o tamanho, aumenta ao
máximo a área destinada para a
flora bacteriana, por unidade do
volume acessível
CERAMIC HI-Q
Elementos cerâmicos porosos
Grau elevado de porosidade
aumenta o volume acessível para
a colonização da flora bacteriana
BIOGLOBE
Bola de polipropileno de
diâmetro diferente
Elasticidade estrutural aumenta
a área específica para a flora
bacteriana
CARBO ACTIVE PELLETS
Carbono mineral superactivado
com a adsorbabilidade elevada
Elimina cheiros- Mantem a
transparência da água
CARBO ACTIVE
GRANULES
Carbono activado de grânulos
de natureza vegetal com a
adsorbabilidade elevada
Elimina as substâncias tóxicas e
restos medicamentosos
CARBO ACTIVE MIXTURE
Carbono mineral superactivado
com a adsorbabilidade elevada
Elimina cheiros- Mantem a
transparência da água - Elimina
as substâncias tóxicas
ACTIVE ZEOLITE
Zeólito miniral quimicamente
activado de natureza vulcânica
Apanha e retem amoníaco,
amónio, sulfuretos, sulfatos e
metais pesados
ANTI-NITRATE
Resina de permuta iónica
Elimina nitratos – Protege e
favorece ao crescimento de algas
ANTI-PHOSPHATE
Resina de permuta iónica
Elimina fosfatos e silicatos
Protege e favorece ao
crescimento de algas
FILTRAGEM
MECÂNICA
KINSHY SPONGE
FILTRAGEM
BIOLÓGICA
FILTRAGEM
QUÍMICA
PT
62
ELIMINAÇÃO CORREDA DESTE PRODUTO
(Resíduo de Equipamentos Eléctricos e Electrónicos)
2002/96/EC - EN50419
Esta marca,apresentada no produto ou na sua literatura indica que ele não deverá ser eliminado juntamente com os residuos
domésticos indiferenciados no final do seu período de vida útil. Para impedir danos ao ambiente e à saúde humana causados
pela eliminação incontrolada de residuos deverá separar este equipamento de outros tipos de residuos e reciclá-lo de forma
responsável, para promover urna reutilização sustentável dos recursos materiais. • Os utilizadores domésticos deverão contactar
ou o estabelecimento onde adquiriram este produto ou as entidades oficiais locais para obterem informações sobre onde e de
que forma podem levar este produto para permitir efectuar urna reciclagem segura em termos ambientais. • Os utilizadores
profissionais deverão contactar o seu fornecedor e consultar os termos e condições do contrato de compra. Este produto nào
deverà ser misturado com outros residuos comerciais para eliminação.
CONDIÇÕES DE GARANTIA
O aparelho está garantido contra defeitos de materiais e de fabrico por um período de 3 anos a contar da data de compra. Se o aparelho
não funcionasse correctamente, dentro do prazo da data de compra, deve-se restituí-lo ao revendedor de zona. O aparelho será substituído
sem algum custo adicional. Para obter o serviço de garantia, devolver o aparelho anexando a prova de compra e uma detalhada motivação
da reclamação. O aparelho deve ser confeccionado cuidadosamente e protegido contra eventuais danos de transporte. A garantia não cobre
danos devidos a pancadas ou quedas sucessivas à venda. A garantia não é valida no caso de uso impróprio do produto, nem cobre os danos
causados por alterações ou negligência por parte do comprador com consequente perda de peixes ou outros animais, danos pessoais, perda
da propriedade ou outros danos que possam ocorrer. A garantia não é válida para componentes sujeitos a consumo e desgaste (ver * PEÇAS
DE REPOSIÇÃO).
PT
63
RU Инструкции по применению
Содержание
ОСНОВНЫЕ НОРМЫ БЕЗОПАСНОСТИ
ОПИСАНИЕ ИЗДЕЛИЯ
Компоненты фильтра
Соединительные части
Фильтрующие материалы
ФУНКЦИОНИРОВАНИЕ
УСТАНОВКА ФИЛЬТРУЮЩИХ МАТЕРИАЛОВ
ПОДГОТОВКА ФИЛЬТРА
Сборка соединительных частей
Подсоединение запорного клапана c
кранами ВПУСК - ВЫПУСК к внешнему фильтру
ЗАПУСК ФИЛЬТРА
Размещение
Приведение в действие
ОБСЛУЖИВАНИЕ
Уход за крыльчаткой
Уход за фильтрующими материалами
ИДЕНТИФИКАЦИЯ ФИЛЬТРУЮЩИХ МАТЕРИАЛОВ
ГАРАНТИЯ
ПРАВИЛЬНАЯ УТИЛИЗАЦИЯ ИЗДЕЛИЯ
ОСНОВНЫЕ НОРМЫ БЕЗОПАСНОСТИ
RU
стр. 64
стр. 65
стр. 65
стр. 65
стр. 65
стр. 66
стр. 66
стр. 67
стр. 67
стр. 68
стр. 69
стр. 69
стр. 69
стр. 69
стр. 69
стр. 70
стр. 71
стр. 72
стр. 72
NEWA Kanist представляет собой внешний фильтр для аквариумов с пресной и морской водой и предназначен для
использования только в жилых помещениях, любое другое применение недопустимо и, следовательно, производитель
не несет за него ответственность. NEWA Kanist соответствует нормам безопасности, действующим в ЕС (EN 60335-2-41).
ВНИМАНИЕ: во избежание несчастных случаев любого рода строго соблюдать, помимо самых обычных правил
безопасности, следующие меры предосторожности:
ВНИМАНИЕ: Данный символ, нанесенный на этикетку изделия, указывает на то, что необходимо внимательно
прочитать настоящее руководство по эксплуатации, прежде чем запустить, использовать и обслуживать устройство.
1. ВНИМАНИЕ: отключить от сети все электрические устройства, находящиеся в аквариуме, перед тем как приступить
к установке и обслуживанию. В случае попадания влаги на штепсельную вилку или электрическую розетку разомкните
главный выключатель сети, прежде чем отсоединить кабель питания;
2. Убедиться в том, что напряжение, указанный на этикетке устройства, соответствует напряжению в сети;
3. Перед подключением к электрической сети проверьте устройство и соответствующий кабель на отсутствие какихлибо повреждений.
4. Электрический шнур нельзя ни починить, ни заменить. Если он поврежден, необходимо заменить устройство.
5. Кабель питания устройства должен быть изогнут надлежащим образом по направлению вниз (НИСПАДАЮЩАЯ
ПЕТЛЯ, рис. 2) для того, чтобы избежать стекания воды по кабелю и попадания в соответствующую розетку.
6. Рекомендуется изначально защитить устройство, как и все прочие электрические приборы, при помощи специального
дифференциального выключателя (устройства защитного отключения) с максимально допустимым током разрыва 30
мА (значение остаточного тока Idn ≤ 30 мA).
7. Во время установки и использования устройства запрещено поднимать его за кабель питания.
8. Прежде чем запустить устройство, убедится в правильности установки.
9. Устройство не должно работать в холостом режиме.
10. Запрещено использовать устройство для едких или абразивных жидкостей.
11. Максимальная температура прокачиваемой жидкости не должна превышать 35° C.
12. ВНИМАНИЕ: данный символ значит, что устройства могут использоваться только внутри жилых помещений.
13. ВНИМАНИЕ: нельзя использовать этот фильтр, погруженным в воду. В случае случайного падения, прежде чем
вынуть его из воды, отсоедините вилку от электрической розетки. Соблюдать те же меры предосторожности, если
обнаружится, что на внешние части устройства попала влага.
64
20. ВНИМАНИЕ: устройство не предназначено для использования лицами (включая детей) с ограниченными
физическими, сенсорными или умственными возможностями либо с недостаточным опытом или знаниями за
исключением случаев, когда они при содействии какого-либо лица, отвечающего за их безопасность, находятся под
наблюдением либо в состоянии воспользоваться инструкциями, касающимися использования устройства.
21. ВНИМАНИЕ: необходимо присматривать за детьми, чтобы они не играли с устройством, так как это не игрушка.
БЕРЕЖНО ХРАНИТЬ НАСТОЯЩУЮ ИНСТРУКЦИЮ
ОПИСАНИЕ ИЗДЕЛИЯ
Компоненты фильтра
1. Моторный блок
2. Нажимное устройство для запуска фильтра
3. O-образный уплотнитель моторного блока
4. Крышка камеры крыльчатки
5. Роторный блок в сборе с валом и керамическими суппортами
6. Корпус фильтра
7. Внутренний соединительный цилиндр
8. Защитная сетка корзинок
9. Корзинки для фильтрующих материалов
10. Рычаги открытия/закрытия
Соединительные части
a. Запорный клапан с кранами ВПУСК - ВЫПУСК
b. U-образный патрубок входа
c. Соединительная трубка
d. Сетка префильтра
e. U-образный патрубок выхода
f. Переходная трубка коленчатой муфты
g. Коленчатая муфта с 2 выходами
h. Заглушка коленчатой муфты
i. Поворотные диффузоры типа «гусак»
j. Поворотные диффузоры для форсунок
k. Переходная трубка для соединения форсунок
l. Форсунки
m. Заглушки форсунок
n. Зажимы с присосками
o. Гибкие шланги (150 см)
Фильтрующие материалы
11. Волокно для механической фильтрации
12. Активированный уголь для химической фильтрации с высокой адсорбирующей способностью
13. Мелкопористая губка
14. Пористые кольца для биологической фильтрации
15. Крупнопористая губка
ФУНКЦИОНИРОВАНИЕ
NEWA Kanist гарантирует поддержание здоровой водной среды благодаря мощной и эффективной системе фильтрации
с разнообразными возможностями, специально предусмотренными для обеспечения максимального результата
в плане механической, химической и биологической фильтрации. Сразу же по включении вода начинает забираться
из аквариума через всасывающую трубку и подается в фильтр NEWA Kanist, где внушительная масса фильтрующих
материалов обрабатывает любые видимые и невидимые загрязняющие вещества благодаря 6-и стадиям фильтрации:
МЕХАНИЧЕСКАЯ:
• конструкция фильтра включает обширный отсек для обеззараживания воды, где основная часть более крупных частиц
осадка постепенно собирается на определенном участке дна, что позволяет избежать засорения губок, продлевая,
таким образом, срок их эксплуатации;
• крупнопористые губки повышенной прочности с механическим действием против загрязнения удерживают
65
RU
взвешенные частицы, такие как экскременты рыб, остатки еды и т. д. Высочайшая прочность волокон на износ
позволяет выдерживать чрезвычайные нагрузки загрязняющих веществ, в то же время, обеспечивая надлежащий
переход воды на следующие стадии.
БИОЛОГИЧЕСКАЯ:
• это стадия, на которой задействованы колонии бактерий, которые преобразовывают органические азотные соединения
в нитриты, а затем в нитраты. Это обеспечивается пористыми кольцами «NEWA AQUA Microceramic», специально
разработанными для достижения наилучшего соотношения между поверхностями, участвующими в фильтрации, и
объемом заполнения. В действительности, их уменьшенный размер и крайне высокая степень пористости позволяют
вместить двойное количество бактериальной флоры по сравнению с тем, что обычно содержится в стандартных
керамических элементах, что позволяет оптимизировать биологическую фильтрацию.
• NEWA Kanist обеспечивает высочайший уровень биологической фильтрации, каждый внешний фильтр содержит до
пяти слоев губки различного гранулометрического состава, от крупного до все более мелкого. Общая увеличенная
площадь поверхностей губок превращает NEWA Kanist в идеальную среду для нитрифицирующих бактерии, позволяя
им развиваться экспоненциально.
АДСОРБЦИОННО-ХИМИЧЕСКАЯ:
• эта стадия предназначена для очистки воды и удаления неприятных запахов и цвета благодаря особенным шарикам
«NEWA AQUA Carbo-Active», сверхактивированному углю минерального происхождения. Чрезвычайная насыщенность
макропорами и увеличенная специфическая площадь обеспечивают высокую адсорбирующую способность, как
физическую, так и химическую, притягивая и связывая разнообразные вещества как на свою внешнюю, так и
внутреннюю поверхность. Структура прочного пакета позволяет легко установить и вынуть его, избегая случайных
повреждений, в то время как особая конструкция ячеек препятствует его закупориванию, способствуя поступлению
воды вовнутрь угольной массы.
ВНИМАНИЕ: С ЦЕЛЬЮ СОХРАНЕНИЯ ЭКСПЛУАТАЦИОННЫХ КАЧЕСТВ NEWA KANIST РЕКОМЕНДУЕТСЯ ИСПОЛЬЗОВАНИЕ
ОРИГИНАЛЬНЫХ ФИЛЬТРУЮЩИХ МАТЕРИАЛОВ И ЗАПАСНЫХ ЧАСТЕЙ NEWA®.
УСТАНОВКА ФИЛЬТРУЮЩИХ МАТЕРИАЛОВ
RU
Фильтрующие материалы находятся в коробке с комплектующими фильтра NEWA Kanist. В целях их правильного
размещения рекомендуется строго выполнять следующие инструкции.
1. Отделить моторный блок от корпуса фильтра, отстегнув четыре клипсы-застежки, нажав на их пазы, расположенные
внизу (рис. 3). Снять моторный блок, приподняв его за выемки, расположенные по его периметру, и осторожно
положить на ровную поверхность.
2. Снять крышку с блока корзинок для фильтрующих материалов, вставив пальцы в соответствующие отверстия для
облегчения операции (рис. 4).
3. Вынуть все корзинки, используя соответствующий захват, и положить их на ровную поверхность.
4. Первая корзинка: вынуть шарики активированного угля «NEWA AQUA Carbo-Active» из коробки с комплектующими
и поместить их между слоем белого волокна и мелкопористой черной губкой (1 микрофорированный (с
микроскопическими отверстиями) пакетик для моделей KANIST 250 и 350, 2 микрофорированных пакетика для моделей
KANIST 450 и 700), обращая внимание на то, чтобы они лежали плоско и не закрывали отверстие, предназначенное
для циркуляции воды, поступающей из аквариума. Установить на место слой белого волокна (рис. 5). ВНИМАНИЕ: НЕ
ВСКРЫВАТЬ МИКРОФОРИРОВАННЫЕ ПАКЕТИКИ.
5. Вторая корзинка: вынуть оставшиеся шарики активированного угля «NEWA AQUA Carbo-Active» из коробки с
комплектующими и поместить их на мелкопористую черную губку (2 микрофорированных пакетика для моделей
КАНИСТ 350, 450 и 700), обращая внимание на то, чтобы они лежали плоско и не закрывали отверстие, предназначенное
для циркуляции воды, поступающей из аквариума (рис. 6). ВНИМАНИЕ: НЕ ВСКРЫВАТЬ МИКРОФОРИРОВАННЫЕ ПАКЕТИКИ.
6. Третья и четвертая корзинки: Вынуть пакетики с пористыми кольцами из коробки с комплектующими, вскрыть их и
равномерно распределить кольца по поверхности крупнопористой голубой губки (модели NEWA Kanist 350, 450 и 700).
ВНИМАНИЕ: вышеописанное распространяется также на вторую корзинку NEWA Kanist 250 и четвертую корзинку NEWA Kanist 700.
7. При помощи соответствующих захватов, имеющихся на каждой корзинке, обильно сполоснуть проточной водой
фильтрующие материалы и губки, на которых они расположены.
8. Установить корзинки обратно в корпус фильтра, обращая внимание на то, чтобы корзинки располагались одна над
другой, не перекрывая доступ воды во всасывающую трубку (рис 7).
9. Первыми вставить корзинки, содержащие пористые кольца и крупнопористую голубую губку, затем корзинки
с активированным углем и мелкопористой черной губкой и, наконец, корзинку с белым волокном для тонкой
фильтрации (рис. 8). ВНИМАНИЕ: чрезвычайно важно, чтобы последней была корзинка с отверстием для циркуляции
66
воды наибольшего размера, так как оно является местом соединения с моторным блоком фильтра посредством
внутреннего соединительного цилиндра.
10. Установить на место крышку блока корзинок, обращая внимания на то, чтобы после установки ее отверстие
совпадало с отверстием в первой корзинке. В противном случае перевернуть крышку (рис. 9).
11. Установить на место моторный блок, обращая внимания на то, чтобы внутренний соединительный цилиндр вошел
в отверстие в крышке блока корзинок (рис. 10).
Примечание: Если смотреть на корпус фильтра сверху, то операция обратной сборки окажется чрезвычайно простой,
если учитывать, что нажимное устройство для запуска фильтра, расположенное сверху моторного блока, находится на
одной оси с внутренним соединительным цилиндром (рис. 11).
12. ВНИМАНИЕ: перед тем как защелкнуть клипсы, убедиться в том, что фильтрующие материалы расположены на
своих местах, контейнеры с фильтрующими материалами уложены абсолютно правильно (материалы не выступают за
края) и крышка блока корзинок установлена в правильном положении.
13.Совместить каждую из четырех застежек с соответствующими сцеплениями, распложенными на моторном блоке
фильтра и прищелкнуть моторный блок к корпусу фильтра, нажав с усилием на выступающие части застежек (рис. 12).
ПОДГОТОВКА ФИЛЬТРА
b
e
c
f
(рис. 1)
a
o
o
g
i
i
h
l
j
d
j
m
k
n
m
l
соединительных частей
a) Сборка соединительных частей
I. Вскрыть упаковку NEWA Kanist, вынуть коробку, содержащую комплектующие внешнего фильтра, и разложить
комплектующие на столе, как показано на рисунке (рис. 1). Собрать впускной блок, соединив сетку префильтра (d) с
соединительной трубкой (c), а затем с U-образным патрубком входа (b). Принципиально важно, чтобы сборка этих двух
компонентов осуществлялась правильным образом, прилагая усилия, достаточные для преодоления сопротивления
двух О-образных уплотнителей для того, чтобы всасывающая трубка прочно наделась на патрубок входа (рис. 13). Для
облегчения операции рекомендуется увлажнить О-образные уплотнители. Если необходимо можно отрегулировать
положение всасывающей трубки, сдвинув ее ниже, до уровня первого уплотнителя. Для более эффективной
работы проверить, чтобы сетка префильтра (d) находилась на расстоянии не менее 4 – 5 см от дна аквариума. Если
соединительная трубка (c) окажется слишком длинной, обрезать ее пилой. Примечание: размещать всасывающую
трубку вдали от аэраторов и пеноотделителей, так как выходящий из них воздух может снизить эффективность
внешнего фильтра.
II. Собрать выпускной блок, соединив U-образным патрубок выхода (e) с переходной трубкой (f), а затем с коленчатой
муфтой с 2 выходами (g). Если необходимо, можно уменьшить длину патрубка выхода, обрезав его пилой в соответствии
с расположением пазов (рис. 14). С легким усилием насадить на коленчатую муфту (g) поворотные диффузоры, выбрав
между диффузорами типа «гусак» (i) и диффузорами «для форсунок» (j). Если будет решено использовать только один
из выходов коленчатой муфты, рекомендуется запереть неиспользуемый выход заглушкой для коленчатой муфты (h).
Примечание: чтобы обеспечить лучшую циркуляцию воды через диффузоры типа «гусак», рекомендуется разместить
их чуть ниже уровня воды или же, максимум, на том же уровне.
67
RU
III Форсунки могут быть соединены между собой через переходную трубку (k) или использоваться по отдельности (рис.
15), в любом случае, они должны быть подсоединены к соответствующему диффузору (j). Для правильного использования
рекомендуется запереть выход форсунки соответствующими заглушками из комплекта поставки (m). Примечание:
чтобы обеспечить лучшую циркуляцию воды через форсунки, рекомендуется разместить их чуть выше уровня воды.
b) Подсоединение запорного клапана с кранами ВПУСК - ВЫПУСК к внешнему фильтру
ВНИМАНИЕ: чтобы избежать утечки воды и гарантировать правильную работу внешнего фильтра
NEWA Kanist, необходимо выполнять данную операцию очень тщательно, строго следуя указаниям,
приведенным ниже.
I. Убедится в том, что зеленые крепежные гайки, расположенные на свободных краях впускного и выпускного блоков,
равно как и те, что расположены на запорном клапане с кранами ВПУСК – ВЫПУСК полностью отпущены
(с открытой резьбовой частью - рис. 16).
II. Подсоединить каждую из гибких трубок из комплекта поставки к свободным краям впускного блока (b) и выпускного
блока (e), соответственно, натягивая их с усилием до тех пор, пока наконечник трубки не коснется резьбовой части, в
которую вставляются зеленые крепежные гайки (около 2,5 см) (рис. 17). Заворачивать гайки по часовой стрелке, чтобы
прочно зафиксировать гибкую трубку, не перетягивая затяжку III. Поместить впускные и выпускные блоки в аквариум,
расположив их поперечно соответствующим местам соединения (b - e) на стенках аквариума. Закрепить впускные
и выпускные блоки при помощи зажимов с присосками из комплекта поставки, устанавливая один из них внутри, а
другой снаружи аквариума для каждого из двух блоков (рис. 18). Примечание: Рекомендуется оставить некоторое
расстояние между впуском и выпуском для обеспечения надлежащей циркуляции воды. IV. Поместить фильтр NEWA
Kanist в заранее выбранное место, учитывая возможность легкого доступа для проведения стандартных действий по
обслуживанию.
V. Подсоединить к фильтру NEWA Kanist запорный клапан с кранами ВПУСК – ВЫПУСК, обращая внимание на то,
чтобы последний абсолютно плотно прилегал к моторному блоку фильтра. Учитывая важность данной операции,
рекомендуется: a. Закрыть запорный клапан, потянув за зеленый рычажок, расположенный между двумя кранами,
и подняв его до упора. Зеленый рычажок окажется в вертикальном положении по отношению к плоскости, на которой
он расположен (рис. 19).
b. Вставить запорный клапан в соответствующие пазы в головной части фильтра, нажав с усилием на внешние углы
сбоку от от кранов (рис. 20). Убедиться в том, запорный клапан правильно собран, проверив на отсутствие зазоров
между краями клапана и головной части фильтра.
c. Открыть запорный клапан, потянув до упора зеленый рычажок. Зеленый рычажок окажется в горизонтальном
положении по отношению к плоскости, на которой он расположен (рис. 21).
VI. Обрезать излишки гибких трубок для обеспечения надлежащей работы фильтра. Это позволит добиться наиболее
прямого поступления воды и избежать возможных перегибов гибких трубок (рис. 22).
VII. В соответствии со стрелками, расположенными на выпускном и впускном патрубках и надписями «ВПУСК» (IN)
и «ВЫПУСК» (OUT) на запорном клапане соединить гибкую трубку, установленную на выпускном блоке (стрелка,
направленная вверх) с краном, несущим надпись «ВЫПУСК» (OUT). Соединить гибкую трубку, установленную на
впускном блоке, с краном, несущим надпись «ВПУСК» (IN). Натягивать с усилием до тех пор, пока наконечник трубки
не коснется резьбовой части, в которую вставляются зеленые крепежные гайки (около 2,5 см) (рис. 23). Заворачивать
гайки против часовой стрелки, чтобы прочно зафиксировать гибкую трубку, не перетягивая затяжку (рис. 24).
ЗАПУСК ФИЛЬТРА
a) Размещение: Внешний фильтр NEWA Kanist является самотечным фильтром, поэтому рекомендуется установить
его на заранее выбранное место перед подсоединением блока, включающего запорный . ПРИМЕЧАНИЕ: Расстояние
между уровнем воды в аквариуме и нижним основанием корпуса фильтра не должно превышать 150
сантиметров. ВНИМАНИЕ: НИКОГДА НЕ УСТАНАВЛИВАТЬ ФИЛЬТР ВЫШЕ УРОВНЯ ВОДЫ.
b) Приведение в действие: NEWA Kanist снабжен встроенной системой запуска, которая при нажатии на кнопку
RU
«ПУСК» (START) автоматически приводит в действие фильтр. В связи с этим, строго следовать нижеприведенным этапам:
I. Убедиться в том, что операции, необходимые для подключения запорного клапана с кранами ВПУСК – ВЫПУСК к
внешнему фильтру, выполнены в соответствии с инструкциями (смотреть Раздел «ПОДГОТОВКА ФИЛЬТРА», пункт b).
II. С усилием многократно нажать кнопку «ПУСК» (START) (рис. 25) до тех пор, пока вода не начнет поступать самотеком
в корпус фильтра. По мере заполнения фильтра водой присутствующий воздух будет выходить через выпускной блок,
образуя пузырьки.
III. Как только вся гидравлическая система будет заполнена водой (пузырьки воздуха больше не выходят из выпускного
68
блока), можно подсоединить внешний фильтр к электрической сети. В этом случае вода будет выходить сплошным
потоком из диффузоров или форсунок. Отсоединить вилку фильтра от сети и повторить процедуру запуска.
Примечание: При запуске фильтра присутствие воздуха, удерживаемого в фильтрующем материале, может вызывать
шум, что считается нормальным. Полное удаление воздуха произойдет через несколько часов, что позволит работать
фильтру практически бесшумно.
ВНИМАНИЕ: НЕ ПОДСОЕДИНЯТЬ ВИЛКУ ФИЛЬТРА К ЭЛЕКТРИЧЕСКОЙ СЕТИ ДО ЗАПОЛНЕНИЯ УСТРОЙСТВА ВОДОЙ,
ЭТО МОЖЕТ ПОВРЕДИТЬ МОТОР.
ВНИМАНИЕ: НЕ РАЗМЕЩАТЬ ПОРИСТЫЕ КАМНИ АЭРАТОРА ВБЛИЗИ ВПУСКНОГО БЛОКА. ЭТО МОЖЕТ ПОМЕШАТЬ
ЭФФЕКТИВНОЙ РАБОТЕ ФИЛЬТРА И ВЫЗВАТЬ ШУМ.
ОБСЛУЖИВАНИЕ
ВНИМАНИЕ: УДАЛИТЬ ВСЕ ЭЛЕКТРИЧЕСКИЕ УСТРОЙСТВА, НАХОДЯЩИЕСЯ В АКВАРИУМЕ, ДО ВЫПОЛНЕНИЯ ОПЕРАЦИЙ
ПО УСТАНОВКЕ И ОБСЛУЖИВАНИЮ. В СЛУЧАЕ ПОПАДАНИЯ ВЛАГИ НА ШТЕПСЕЛЬНУЮ ВИЛКУ ИЛИ ЭЛЕКТРИЧЕСКУЮ
РОЗЕТКУ РАЗОМКНИТЕ ГЛАВНЫЙ ВЫКЛЮЧАТЕЛЬ СЕТИ, ПРЕЖДЕ ЧЕМ ОТСОЕДИНИТЬ КАБЕЛЬ ПИТАНИЯ.
Для выполнения каких-либо операций по обслуживанию работать при выключенном фильтре, строго следуя
нижеперечисленным пунктам:
1. Отсоединить фильтр от электрической сети.
2. Закрыть запорный клапан, потянув за зеленый рычажок, расположенный между двумя кранами, и подняв его до упора.
Зеленый рычажок окажется в вертикальном положении по отношению к плоскости, на которой он расположен (рис. 26).
ВНИМАНИЕ: во время операций по обслуживанию запорный клапан должен ВСЕГДА оставаться
подсоединенным к гибким трубкам в закрытом положении.
3. Отсоединить от фильтра NEWA Kanist запорный кран, потянув вверх краны ВПУСК – ВЫПУСК. Нет необходимости
вынимать гибкие трубки и впускной и выпускной блоки из аквариума, если только они не нуждаются в чистке. В таком
случае удалить возможный налет при помощи ершиков и щеточек.
ВНИМАНИЕ: Рекомендуется иметь под рукой впитывающий материал, чтобы обмотать им запорный клапан, так как
при отсоединении из него может вытечь вода.
4. Поднять фильтр за выемки, распложенные по его периметру, и перенести его в место, подходящее для обслуживания
(например, тазик, раковина, ванна и т. п.), удерживая его в вертикальном положении, чтобы избежать вытекания воды.
Не держать фильтр за боковые рычаги открытия/закрытия.
5. Подробные инструкции по открытию фильтра, его контейнерам с фильтрующими материалами, а также по обратной
сборке фильтра NEWA Kanist смотреть в Разделе «УСТАНОВКА ФИЛЬТРУЮЩИХ МАТЕРИАЛОВ».
ВНИМАНИЕ: для облегчения операций по обслуживанию рекомендуется после съема моторного блока слить остатки
воды, прочно придерживая корзинки.
6. По завершении операций по обслуживанию (смотреть: пункты a) и b)), подсоединить к фильтру NEWA Kanist запорный
клапан с кранами ВПУСК – ВЫПУСК, обращая внимание на то, чтобы последний абсолютно плотно прилегал к моторному
блоку фильтра. Открыть запорный клапан, потянув до упора зеленый рычажок. (также смотреть Раздел «Подсоединение
запорного клапана с кранами ВПУСК - ВЫПУСК к внешнему фильтру»).
7. Перейти к приведению фильтра в действие, строго следуя инструкциям, изложенным в Разделе «ЗАПУСК ФИЛЬТРА»
(пункт b – Приведение в действие). Примечание: рекомендуется регулярно смазывать все резиновые части моторного
блока, нанося масло на основе вазилина на О-образные уплотнители, плунжер и втулку кнопки запуска.
a) Уход за крыльчаткой:
ВНИМАНИЕ: крыльчатка, применяемая в фильтрах NEWA Kanist, состоит из суппортов и керамического
вала. Рекомендуется быть максимально внимательным при выполнении работ по уходу за крыльчаткой.
1. Снять крышку камеры крыльчатки (4) с моторного блока (1), повернув ее за соответствующие рычажки против часовой
стрелки и осторожно потянув вверх (рис. 27).
2. Отсоединить от крышки крыльчатки керамический вал и черный резиновый суппорт и аккуратно положить их на стол.
Примечание: второй резиновый суппорт можно оставить на месте, в пазу ротора; чтобы его отсоединить необходимо, после
снятия роторного блока, вставить свободный конец керамического вала в ушко резинового суппорта.
3. Вынуть роторную группу из цилиндра, держась за лопатки крыльчатки, и промыть ее под проточной водой вместе с
крышкой крыльчатки, используя неабразивную щетку для удаления загрязнений. В случае если моторный блок покрыт
кальциевым налетом, перед чисткой поместить его в емкость с уксусом на 15-30 минут, затем тщательно прополоскать.
ВНИМАНИЕ: не использовать кислоты или растворы отличающиеся, от обычного пищевого уксуса, они могут быть
токсичными для рыб.
4. Собрать обратно роторный блок, сначала вставив керамический вал и затем установить соответствующие черные
69
RU
резиновые суппорты на свободном конце вала (рис. 28). (5)
5. Вставить роторный блок обратно в цилиндр и установить назад крышку крыльчатки, так чтобы резиновая прокладка на
керамическом вале точно вошла в паз крышки крыльчатки.
6. Зафиксировать крышку крыльчатки на моторном блоке, поворачивая ее по часовой стрелке за соответствующие рычажки.
b) Уход за фильтрующими материалами
1. Заменять фильтрующие материалы по мере необходимости, соблюдая рекомендуемую периодичность (смотри
таблицу). Уделять внимание тому, чтобы пакетики с углем лежали плоско, и чтобы ни они, ни какие-либо прочие
компоненты не закрывали отверстие, предназначенное для циркуляции воды, поступающей из аквариума.
2. Полоскать корпус фильтра, не используя мыло или чистящие средства. Любые возможные остатки могут повредить
нежные ткани рыб.
3. Водой, взятой из аквариума, осторожно прополаскивать корзинки, содержащие биологический материал, чтобы
избежать разрушения присутствующих в субстрате фильтра колоний бактерий, которые, на самом деле, отвечают за
«благополучие» аквариума.
ВНИМАНИЕ: наличие хлора в воде из-под крана приводит к гибели колоний полезных бактерий, находящихся в
пористых кольцах.
4. Установить обратно в корпус фильтра корзинки с фильтрующими материалами, неукоснительно следуя пунктам с 8 по
13 Раздела «УСТАНОВКА ФИЛЬТРУЮЩИХ МАТЕРИАЛОВ».
Примечание: Не заменять одновременно все фильтрующие материалы биологического действия (губки, пористые
кольца и т. д.), разнеся сроки их замены. Если оставить часть старых материалов в фильтре, то это будет способствовать
восстановлении колоний, которые исчезли вместе с уничтоженными материалами.
ВНИМАНИЕ: С ЦЕЛЬЮ СОХРАНЕНИЯ ЭКСПЛУАТАЦИОННЫХ КАЧЕСТВ NEWA KANIST РЕКОМЕНДУЕТСЯ
ИСПОЛЬЗОВАНИЕ ОРИГИНАЛЬНЫХ ФИЛЬТРУЮЩИХ МАТЕРИАЛОВ И ЗАПАСНЫХ ЧАСТЕЙ NEWA ®.
Раз в месяц
Раз в 2 месяца
Раз в 6 месяцев
Раз в год
Уголь NEWA AQUA CARBO
ACTIVE- Pellets
Замена
-
-
-
Губки
Контролировать
развитие
Контроль и чистка в
случае необходимости
Замена
-
Пористые кольца
NEWA AQUA Microceramic
Контролировать
развитие
Контроль и чистка в
случае необходимости
-
Замена 50%
Крыль-чатка
-
-
Контроль и чистка в
случае необходимости
-
Сетка на впуске
-
Контроль и чистка в
случае необходимости
-
-
Гибкие
трубки
-
-
-
Контроль и истка в
случае необходимости
Рычаг запорного
клапана
-
-
Чистка и смазка
-
Кнопка «Пуск» (Start)
-
-
Чистка и смазка
-
Уплотни-тель мот. блока
-
-
Чистка и смазка
-
RU
70
ИДЕНТИФИКАЦИЯ ФИЛЬТРУЮЩИХ МАТЕРИАЛОВ
Существует возможность идентифицировать фильтрующие материалы с тем, чтобы выбрать из товаров линии NEWA
AQUA, представляющей собой гамму фильтрующих материалов высокого качества, специально разработанных
NEWA®, чтобы гарантировать практичность и длительнос ть в использовании при фильтрации, а также безопасность в
применении. В нижеприведенной таблице обобщены характеристики всех материалов, подразделенных в соответствии
с тем, для какого фильтрующего действия они предназначены:
Фильтрующее
действие
МОДЕЛЬ NEWA Aqua
ОПИСАНИЕ
ХАРАКТЕРИСТИКИ
Высокая прочность на износ
- минимальная плотность биологически инертно
FIBER
МЕХАНИЧЕСКАЯ
ФИЛЬТРАЦИЯ
БИОЛОГИЧЕСКАЯ
ФИЛЬТРАЦИЯ
ХИМИЧЕСКАЯ
ФИЛЬТРАЦИЯ
KINSHY SPONGE
Электросварное волокно из
ПВХ
Выдерживает повышенные
нагрузки загрязняющих веществ,
не засоряясь – обладает
структурной памятью
MICROCERAMIC
Миниатюрные керамические
элементы
Уменьшенный размер
максимально увеличивает
площадь, предназначенную для
бактериальной флоры, на единицу
доступного объема
CERAMIC HI-Q
Пористые керамические
элементы
Высокая степень пористости
увеличивает объем, доступный
для колонизации бактериальной
флорой
BIOGLOBE
Полипропиленовые шарики
разного диаметра
Структурная эластичность
увеличивает специфическую
площадь для бактериальной
флоры
CARBO ACTIVE PELLETS
Сверхактивированный
минеральный уголь с высокой
адсорбирующей способностью
Уничтожает запахи - Поддерживает
прозрачность воды
CARBO ACTIVE
GRANULES
Активированный
гранулированный уголь
растительного происхождения
с высокой адсорбирующей
способностью
Удаляет токсичные вещества и
лекарственные остатки
CARBO ACTIVE MIXTURE
Сверхактивированный
минеральный уголь с высокой
адсорбирующей способностью
Уничтожает запахи - Поддерживает
прозрачность воды - Удаляет
токсичные вещества
ACTIVE ZEOLITE
Химически активированный
минеральный цеолит
вулканического происхождения
Захватывает и удерживает
аммиак, аммоний, сульфиды,
сульфаты и тяжелые металлы
ANTI-NITRATE
Ионнообменная смола
Удаляет нитраты – защищает и
способствует росту водорослей
ANTI-PHOSPHATE
Ионнообменная смола
Удаляет фосфаты и силикаты защищает и способствует росту
водорослей
71
RU
ПРАВИЛЬНАЯ УТИЛИЗАЦИЯ ИЗДЕЛИЯ
2002/96/EC - EN50419
Применяется в странах Евросоюза и странах, в которых действует система дифференцированного сбора мусора.
Если вы решили утилизировать аквариум, для сбора пригодных для переработки материалов (пластика, стекла и
пр.) и безопасной утилизации электрических компонентов следует разделять и отдельно перерабатывать различные
материалы в соответствии с действующими нормами. Необходимо отделить систему освещения (крышку) от
стеклянной ванны и от электрических аксессуаров. Система освещения и электрические устройства, исходя из
Европейской директивы RAEE, должны утилизироваться согласно параграфу «Правильная утилизация изделия отходы электрического и электронного оборудования». Этот знак, приведенный на изделии или относящейся к нему
документации, указывает, что данное изделие по окончании своего срока службы не должно утилизироваться вместе
с другими бытовыми отходами. Для предупреждения нанесения ущерба окружающей среде или здоровью населения
в результате неправильной утилизации отходов просим пользователей отделять это изделие от отходов других типов и
утилизировать его ответственно, способствуя повторному использованию материальных ресурсов. • Физические лица
могут сдать отработавший аппарат в магазин при покупке нового аппарата эквивалентного типа из расчета один к
одному или обратиться в местное отделение, призванное предоставлять всю информацию по дифференцированному
сбору мусора и переработке для изделия этого типа. • Юридические лица должны обращаться к своему поставщику
и проверить сроки и условия, указанные в договоре на покупку. Это изделие не подлежит утилизации с другими
отходами от торговой деятельности. • При неправильной утилизации этого устройства к пользователю применяются
административные санкции согласно действующим законам.
ГАРАНТИЯ
Гарантия на изделие предоставляется согласно европейской Директиве 1999/44/CE на дефекты материалов и
производства на период сроком 24 месяца со дня приобретения. Если изделие неисправно в первые два года со
дня приобретения, вернуть его дилеру, у которого оно было приобретено. Изделие будет заменено без каких-либо
дополнительных доплат. В гарантийный период замена изделия осуществляется в следующих случаях: 1) Изделие
аккуратно упаковано и защищено от повреждений во время транспортировки. 2) К изделию приложено подтверждение
акта покупки и подробное описание претензии. В отношении гарантии действуют следующие ограничения и условия: 1)
Гарантийное покрытие не предусмотрено, если прибор разбит. 2) Замена изделия ни в коем случае не означает принятия
ответственности. 3) Гарантия не действительна в случае неправильной эксплуатации изделия, в случае повреждений,
вызванных несанкционированными действиями или небрежностью со стороны покупателя. 4) Гарантия не действует в
отношении компонентов, подверженных износу, а также расходных материалов. (см.* - ЗАПЧАСТИ).
СОХРАНИТЬ ЭТИ ИНСТРУКЦИИ
RU
72