1
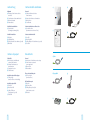
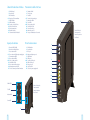
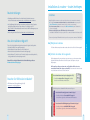
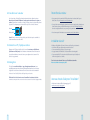
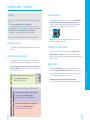
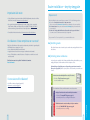
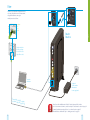
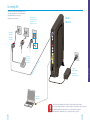
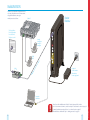
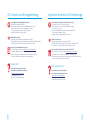
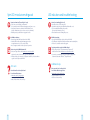
Centro Business Router einrichten
Installer le routeur Centro Business
Installare il router Centro Business
Centro Business router setup
1
Willkommen
Benvenuti
Herzlichen Glückwunsch zu Ihrem Centro Business Router!
Benvenuti al vostro router Centro Business!
Ihr Centro Business Router unterstützt alle bei Swisscom eingesetzten Technologien für Internet
und Festnetz. Dabei erkennt der Router, mit welcher Anschlusstechnologie er verbunden ist und
nimmt Einstellungen automatisch vor.
Il vostro router Centro Business supporta tutte le tecnologie impiegate da Swisscom per internet
e la telefonia di rete fissa (IP). Il router riconosce automaticamente il tipo di collegamento al
quale è allacciato ed effettua automaticamente le impostazioni.
Für die Installation Ihres Centro Business Router gehen Sie bitte direkt
zum Reiter «Installation».
Per installare il vostro router Centro Business andate direttamente alla voce
«Installazione».
Der Centro Business ist universell einsetzbar. Wenn Sie in Zukunft auf die neue Festnetztelefonie
(IP) wechseln, können Sie den Router und Ihre bestehenden Telefone weiterhin verwenden.
Il Centro Business è ad uso universale. Se in futuro passate alla nuova telefonia di rete fissa (IP)
potrete continuare a utilizzare il router e i vostri telefoni.
Der Funktionsumfang des Routers wird ständig erweitert. Ihr neuer Centro Business ist durch
automatische Updates immer auf dem aktuellsten Stand.
Le funzionalità del router sono in continua espansione. Il vostro Centro Business è
costantemente aggiornato grazie agli update automatici.
Weitere Informationen zu
>>Einsatzmöglichkeiten des Centro Business Router,
>>Tipps & Tricks
finden Sie auf unserer Website unter www.swisscom.ch/centrobusiness.
Ulteriori informazioni su
>>possibili utilizzi del router Centro Business
>>consigli & trucchi
sono disponibili sul nostro sito www.swisscom.ch/centrobusiness.
Bienvenue
Welcome
Nous vous félicitons d’avoir opté pour un routeur Centro Business.
Congratulations on your Centro Business router!
Votre nouveau routeur Centro Business est compatible avec toutes les technologies exploitées
par Swisscom en matière d’Internet et de réseau fixe. Il reconnaît le type de raccordement
auquel il est connecté et se configure automatiquement.
Your Centro Business router supports all Internet and fixed-network technologies used by
Swisscom. This means that the router recognises which connection technology it is linked to and
automatically adopts the relevant settings.
Pour installer votre routeur Centro Business, veuillez consulter la rubrique
«Installation».
To install your Centro Business router, please go straight to the “Installation”
section.
Le Centro Business s’emploie de façon universelle. Si vous optez plus tard pour la nouvelle
téléphonie fixe (IP), vous pourrez continuer d’utiliser ce routeur et vos téléphones actuels.
The Centro Business router can be used universally. If you switch to new fixed-network IP
telephony in the future, you can continue using the router and your existing telephones.
Les fonctions de ce routeur font l’objet d’un développement constant. Grâce aux mises à jour
automatiques, votre nouveau Centro Business est toujours à la pointe du développement
technologique.
The router’s functionality is being constantly extended. Your Centro Business router will always
meet the latest standards thanks to automatic updates.
Vous trouverez de plus amples informations sur
>>les possibilités d’utilisation du routeur Centro Business
>>les trucs et astuces
sous www.swisscom.ch/centrobusiness.
2
You can find further information about
>>how to use the Centro Business router
>>tips and tricks
on our website at www.swisscom.ch/centrobusiness.
3
Lieferumfang
Contenuto della confezione
Allgemein
a) Anleitung: Centro Business Router
einrichten
b) Centro Business Router und Netzteil
c) Rücksendeformular
d) Ethernetkabel
Generale
a) Guida: installazione del router
Centro Business
b) Router Centro Business e alimentatore
c) Modulo di resa
d) Cavo Ethernet
Paket Glasfaserinstallation
e) G
lasfaserkabel
(Packungsbezeichnung: Fibre)
Pacchetto installazione con fibra ottica
e) Cavo in fibra ottica
(denominazione confezione: Fibre)
Paket DSL-Installation
f) DSL-Kabel
g) xDSL-Mikrofilter
h) ISDN-Splitter für Centro Business (Spezial)
i) ISDN-Kabel
Pacchetto installazione DSL
f) Cavo DSL
g) Microfiltro xDSL
h) Splitter ISDN per il Centro Business (speciale)
i) Cavo ISDN
Contenu du paquet
Box contents
Généralités
a) Mode d’emploi: installation du
routeur Centro Business
b) Routeur Centro Business et
transformateur
c) Formulaire de retour
d) Câble Ethernet
General
a) Instructions: Centro Business router setup
b) Centro Business router and
power supply unit
c) Returns form
d. Ethernetkabel
Installation du pack fibre optique
e) C
âble optique
(mention «Fibre» sur l’emballage)
Installation du pack DSL
f) Câble DSL
g) Microfiltre xDSL
h) Splitter ISDN pour
Centro Business (spécial)
i) Câble ISDN
4
Fibre optic installation pack
e) Fibre optic cable
(box name: Fibre)
a)
b)
Centro Business Router einrichten
Installer le routeur Centro Business
Installare il router Centro Business
Centro Business router setup
1
c)
d)
e) Fibre
f) Copper/DSL
g)
h)
i)
DSL installation pack
f) DSL cable
g) xDSL microfilter
h) ISDN splitter specifically for
Centro Business router
i) ISDN cable
5
1 WLAN button
2 Reset button
3 DSL port
4, 5 Analogue telephone ports
6 ISDN switch
7, 8 ISDN ports
9–11 Security or LAN ports
12 WAN or LAN port
13 Fibre optic port
14 On/off switch
15 Socket for power supply unit
4
5
6
7
8
10
2
11
3
Router-Vorderseite
Panneau avant
Pannello anteriore
Front Panel
Tel.-LED
Internet-LED
WAN/
4
12
WLAN-LED
SG/
1
9
ISDN
1 Bouton WiFi (WLAN)
2 Bouton de réinitialisation
3 Raccordement DSL
4, 5 Raccordement téléphonique analogique
6 Commutateur ISDN
7, 8 Raccordement ISDN
9–11 Ports Security ou LAN
12 Port WAN ou LAN
13 Raccordement fibre optique
14 Interrupteur marche/arrêt
15 Prise de courant pour transformateur
3
ON
Structural overview
Router-Rückseite
Panneau arrière
Pannello posteriore
Back Panel
ISDN
Aperçu du routeur
2
2
1 Pulsante WLAN
2 Tasto di reset
3 Presa DSL
4, 5 Presa telefonica analogica
6 Interruttore ISDN
7, 8 Presa ISDN
9–11 Porta security o LAN
12 Porta WAN o LAN
13 Presa a fibra ottica
14 Interruttore on/off
15 Presa per l’alimentatore di corrente
Tel.
1 WLAN-Knopf
2 Reset-Knopf
3 DSL-Anschluss
4, 5 Analoger Telefonanschluss
6 ISDN-Schalter
7, 8 ISDN-Anschluss
9–11 Security- oder LAN-Ports
12 WAN- oder LAN-Port
13 Glasfaseranschluss
14Ein/Aus-Schalter
15 Stromanschluss für Netzteil
1
Panoramica della struttura
1 2
Übersicht über den Aufbau
13
14
15
Power-LED
1
6
7
Router installieren – Schritt für Schritt
2. Router starten
Stellen Sie vor der Installation sicher, dass Sie folgende Fragen mit Ja beantworten können:
✔ Bei einem neuem Internetanschluss oder Swisscom Dienst:
Haben Sie den Informationsbrief mit der Seriennummer Ihres Anschlusses erhalten?
✔ Für Neukunden: Haben Sie das Bestätigungs-SMS zur Aktivierung Ihres Anschlusses
erhalten?
✔ Ist ein PC/Laptop mit Ethernetkabel in der Nähe des Routerstandorts vorhanden?
Eine Verbindung zum Internet ist zu Beginn nicht über WLAN möglich.
Haben Sie alles gemäss Anleitung eingerichtet? Dann schalten Sie nun den Router ein.
Warten Sie, bis folgende LED (Internet, Power) am Router konstant weiss leuchten
(dieser Vorgang kann 10 Minuten oder länger dauern. Während dieser Zeit können die
LED dynamisch blinken). Erst danach ist der Router bereit und kann sich mit dem Internet
verbinden.
Konnten Sie alle Fragen mit Ja beantworten? Dann können Sie die Installation nun vornehmen.
Power
Internet
Tipp: Durch aufrechtes Hinstellen des Routers wird übermässige Wärmeentwicklung
verhindert und kann eine bessere WLAN-Abdeckung erzielt werden.
1. a)Router wechseln
Sofern der Centro Business einen anderen Router ersetzen soll, ziehen Sie beim alten
Gerät alle Kabelenden aus.
3. PC / Laptop mit dem Router verbinden.
Starten Sie Ihren PC/Laptop und stellen Sie sicher, dass dieser per Ethernetkabel (weisses
Kabel mit gelben Steckern) am Router angeschlossen ist. Ihr Computer ist jetzt über den
Centro Business Router mit dem Internet verbunden. Das Vorgehen zur Einrichtung Ihres
WLAN ist auf der nächsten Seite beschrieben.
1. b)Router und Geräte installieren
Verwenden Sie für die folgende Installation nur mitgelieferte Teile. Ziehen Sie während
der Installation sämtliche Telefon- und Faxgeräte aus den Telefonsteckdosen.
4. Registrieren
Prüfen Sie, welche Installation aufgrund Ihres Internetanschlusses (Glasfaser oder
Kupfer/DSL) zu wählen ist. Angaben zu Ihren Produkten entnehmen Sie Ihrem neuen
Swisscom Vertrag.
Glasfaser
Installation Deutsch
Voraussetzungen
Internetanschluss mit Glasfaserdose (OTO-Dose):
>>Nehmen Sie die Anleitung «Fibre» auf Seite 20 zur Hand
und installieren Sie den Router entsprechend.
A 123.456
.78
123.456.78
Bei einer Neuinstallation öffnet sich nach dem ersten Start Ihres Browsers automatisch
die Swisscom Registrationsseite. Füllen Sie die Pflichtfelder Schritt für Schritt aus, die
Informationen dazu finden Sie in Ihren Swisscom-Unterlagen. Als bereits bestehender
Kunde ist dieser Registrationsschritt nicht notwendig.
1 2 3 4
1 2 3 4
OTO-Dose
Herzlichen Glückwunsch! Sie sind nun mit dem besten Internet der Schweiz verbunden.
Das Vorgehen zur Inbetriebnahme Ihres WLAN ist auf der nächsten Seite beschrieben.
EconomyLINE
8
Analoger Festnetzanschluss mit 1 Rufnummer:
MultiLINE ISDN
Kupfer/DSL
Prüfen Sie, welchen Festnetzanschluss von Swisscom Sie haben.
ISDN-Festnetzanschluss mit bis zu 10 Rufnummern:
>>Fahren Sie mit Abbildung «EconomyLINE» auf Seite 22
fort und installieren Sie Ihre Geräte gemäss der Anleitung.
>>Gehen Sie zur Abbildung «MultiLINE ISDN» auf Seite 24
und installieren Sie Ihre Geräte entsprechend.
9
Installation du routeur – toutes les étapes
Routereinstellungen
>>Einstellungen zu WLAN können Sie auf dem Router direkt und in unserem
Swisscom Kundencenter unter www.swisscom.ch/kundencenter vornehmen.
>>Um Einstellungen direkt am Router vorzunehmen, verbinden Sie Ihren Computer
mittels Ethernetkabel mit dem Centro Business. Nach Eingabe der URL
http://192.168.1.1 in Ihrem Internetbrowser können Sie Ihre Einstellungen anpassen.
>>Weitere Angaben finden Sie auch auf www.swisscom.ch/centrobusiness.
Conditions
Avant l’installation, assurez-vous de pouvoir répondre par «oui» aux questions suivantes:
✔ S’il s’agit d’un nouveau raccordement Internet ou service Swisscom: avez-vous reçu la
lettre d’information contenant le numéro de série de votre raccordement?
✔ Pour les nouveaux clients: avez-vous reçu le SMS de confirmation pour l’activation de
votre raccordement?
✔ Avez-vous un PC/laptop avec câble Ethernet près de votre routeur?
Au début de l’installation, il n’est pas possible de se connecter à Internet via réseau sans fil.
Si vous avez répondu par l’affirmative à toutes les questions, vous pouvez commencer l’installation.
Testen Sie, ob die Installation erfolgreich war, indem Sie folgende Schritte prüfen:
>>Leuchten die LED für Power und Internet weiss?
>>Bei installierten Telefonen: Führen Sie ein Telefonat durch.
>>Werden die Internetseiten in Ihrem Browser korrekt angezeigt?
>>Bei installiertem TV: Schalten Sie den TV und die Setup Box an und überprüfen Sie,
ob die gewünschten Sender empfangen werden.
Waren alle Tests erfolgreich? Dann haben Sie die Installation abgeschlossen.
Wir wünschen Ihnen viel Vergnügen.
1. a)Remplacer le routeur
Installation Français
War die Installation erfolgreich?
Si le Centro Business remplace un autre routeur, retirez tous les câbles de l’ancien appareil.
1. b)Installer le routeur et les appareils
Utilisez uniquement les composants que vous avez reçus avec votre nouveau routeur.
Pendant l’installation, débranchez tous les télécopieurs et téléphones des prises
téléphoniques.
123.456.78
A 123.456
.78
1 2 3 4
1 2 3 4
Prise OTO
EconomyLINE
10
>>Consultez la rubrique «Fibre» à la page 20 et installez
le routeur conformément aux instructions.
Vérifiez de quel raccordement fixe Swisscom vous disposez.
Cuivre/DSL
>>LED-Hinweise und Störungsbehebung (Seite 26)
>>www.swisscom.ch/centrobusiness
>>Gratisnummer: 0800 055 055
Raccordement Internet avec la prise optique (prise OTO):
Raccordement fixe analogique avec 1 numéro d’appel:
MultiLINE ISDN
Brauchen Sie Hilfe bei der Installation?
Fibre optique
Vérifiez quelle procédure vous devez suivre, car l’installation diffère selon votre
raccordement Internet (fibre optique ou cuivre/DSL). Vous trouverez les indications sur
vos produits dans votre nouveau contrat Swisscom.
Raccordement fixe ISDN intégrant jusqu’à 10 numéros d’appel:
>>Consultez la rubrique «EconomyLINE» à la page 22
et installez vos appareils conformément aux instructions.
>>Consultez la rubrique «MultiLINE ISDN» à la page 24
et installez vos appareils conformément aux instructions.
11
2. Faire démarrer le routeur
Une fois que tout a été installé conformément aux instructions, allumez le routeur.
Attendez que les témoins LED (Internet, Power) apparaissent en blanc sur le routeur, en
continu (cela peut durer 10 minutes, voire plus; pendant ce temps, les témoins LED peuvent
clignoter de façon dynamique). Le routeur est alors prêt à être connecté à Internet.
Paramètres du routeur
>>Vous pouvez régler les paramètres WiFi directement sur le routeur et dans l’espace
clients Swisscom, sous www.swisscom.ch/kundencenter.
Internet
>>Pour procéder au paramétrage directement sur le routeur, connectez votre ordinateur au
Centro Business au moyen du câble Ethernet. Après avoir saisi l’URL http://192.168.1.1
dans votre navigateur Internet, vous pouvez régler les paramètres.
Marche/Arrêt
>>Vous trouverez plus d’informations sous www.swisscom.ch/centrobusiness.
Conseil: Placez le routeur en position verticale pour éviter tout risque de surchauffe et
obtenir une meilleure couverture WiFi.
3. Connecter un PC / laptop au routeur.
Allumez votre PC/laptop et vérifiez qu’il est raccordé au routeur par câble Ethernet
(câble blanc avec fiches jaunes). Votre ordinateur est maintenant connecté à Internet via
le routeur Centro Business. La marche à suivre pour configurer votre réseau sans fil est
décrite à la page suivante.
4. S’enregistrer
Installation réussie?
Vérifiez que l’installation a été menée à bien en contrôlant les points suivants:
>>Les témoins LED Power et Internet apparaissent-ils en blanc?
>>Si vous avez installé des téléphones, passez un appel.
>>Les pages Internet s’affichent-elles correctement dans votre navigateur?
>>Si vous avez installé la TV, enclenchez votre téléviseur ainsi que la Setup Box et
vérifiez la réception de vos chaînes.
Tous les tests sont concluants? Dans ce cas, l’installation est terminée.
Nous vous souhaitons beaucoup de plaisir.
S’il s’agit d’une nouvelle installation, la page d’enregistrement Swisscom s’ouvre
automatiquement au premier démarrage du navigateur. Remplissez tous les champs
obligatoires. Vous trouverez les informations nécessaires dans votre documentation
Swisscom. Si vous êtes déjà client, cette étape n’est pas nécessaire.
Félicitations! Vous êtes désormais connecté au meilleur réseau Internet de Suisse.
La marche à suivre pour la mise en service de votre réseau sans fil est décrite à la page suivante.
Avez-vous besoin d’aide pour l’installation?
>>Explication des témoins LED et dépannage (page 27)
>>www.swisscom.ch/centrobusiness
>>Numéro gratuit: 0800 055 055
12
13
Installare il router – le varie fasi
Preparativi
2. Accendere il router
Prima di procedere con l’installazione dovrete rispondere affermativamente alle seguenti
domande.
✔ In caso di nuovo collegamento a internet o servizio Swisscom:
avete ricevuto la lettera informativa con il numero di serie del vostro collegamento?
✔ Per i nuovi clienti: avete ricevuto l’SMS di conferma dell’attivazione del vostro collegamento?
✔ Nelle vicinanze del router è collocato un PC/laptop con cavo Ethernet?
Inizialmente non è possibile un collegamento a internet tramite WLAN.
Avete configurato tutto secondo le istruzioni? Ora accendete il router. Attendete finché
i seguenti LED bianchi (internet, Power) rimangono accesi fissi sul router (questo può
richiedere 10 o più minuti. Nel frattempo i LED potrebbero continuare a lampeggiare).
Dopodiché il router è pronto per l’utilizzo e può essere collegato a internet.
Internet
Power
Avete risposto affermativamente a tutte le domande? Ora potete iniziare l’installazione.
Consiglio: sistemando il router in posizione diritta si evita lo sviluppo di eccessivo calore,
garantendo così una migliore copertura WLAN.
1. a)Sostituire il router
3. Collegare il PC / laptop al router
Se il Centro Business sostituisce un altro router rimuovete tutti i fine cavo del vecchio
apparecchio.
Accendete il vostro PC/laptop e assicuratevi che sia collegato al router tramite cavo
Ethernet (cavo giallo con presa gialla). Ora il vostro computer è collegato a internet
attraverso il router Centro Business. La procedura di configurazione della WLAN è descritta
alla pagina successiva.
1. b)Installare router e apparecchi
Per la seguente installazione utilizzate solamente i componenti forniti. Durante
l’installazione staccate dalle prese telefoniche tutti gli apparecchi telefonici e i fax.
Fibra ottica
Nel caso di una nuova installazione, dopo il primo avvio del vostro browser si apre
automaticamente la pagina di registrazione Swisscom. Compilate passo dopo passo tutti
i campi obbligatori. Trovate le relative informazioni nella vostra documentazione Swisscom.
Se siete già clienti internet questa registrazione non è necessaria.
Collegamento a internet con presa a fibra ottica (presa OTO).
>>Consultate la guida «Fibre» a pagina 20
e installate il router di conseguenza.
A 123.456
.78
123.456.78
1 2 3 4
1 2 3 4
Presa OTO
Complimenti! Ora siete collegati con la migliore rete internet in Svizzera.
La procedura per la messa in funzione della vostra WLAN è descritta alla pagina successiva.
EconomyLINE
14
Collegamento di rete fissa analogico con 1 numero di telefono:
MultiLINE ISDN
Rame/DSL
Controllate qual è il vostro tipo di collegamento di rete fissa Swisscom.
Collegamento di rete fissa ISDN con fino a 10 numeri di telefono:
>>passate alla figura «EconomyLINE» a pagina 22
e installate i vostri apparecchi seguendo le istruzioni.
>>passate alla figura «MultiLINE ISDN» a pagina 24
e installate i vostri apparecchi di conseguenza.
15
Installazione Italiano
4. Registrazione
Verificate il tipo di installazione da scegliere in base al vostro collegamento internet
(fibra ottica o rame/DSL). Le indicazioni sui vostri prodotti sono riportate nel vostro
nuovo contratto Swisscom.
Router installation – step-by-step guide
Impostazioni del router
>>Potete effettuare le impostazioni relative alla WLAN direttamente sul router e nell’Area
clienti Swisscom sul sito www.swisscom.ch/areaclienti.
>>Per eseguire le impostazioni direttamente al router collegate il vostro computer al
Centro Business tramite cavo Ethernet. Dopo aver digitato l’URL http://192.168.1.1
nel browser internet, potete modificare le vostre impostazioni.
>>Trovate ulteriori indicazioni anche sul sito www.swisscom.ch/centrobusiness.
Requirements
Before installing the router, ensure that you can answer “Yes” to the following questions:
✔ If you have a new Internet connection or Swisscom service:
Have you received the information letter with the serial number for your connection?
✔ For new customers: Have you received an e-mail confirming that your connection has
been activated?
✔ Is there a PC or laptop with an Ethernet cable near the router’s proposed location?
You cannot connect to the Internet wirelessly to begin with.
Can you answer “Yes” to each question? If so, you can now install the router.
L’installazione è stata completata con successo?
Verificate se l’installazione è stata eseguita correttamente, controllando i seguenti aspetti.
>>I LED bianchi Power e internet sono accesi?
>>In caso di telefoni installati: fate una telefonata.
>>Le pagine internet nel vostro browser vengono visualizzate correttamente?
>>In caso di TV installata: accendete il televisore e il Setup Box e controllate se ricevete i
canali desiderati.
Tutti i test hanno avuto esito positivo? L’installazione è terminata.
Buon divertimento!
1. a)Switching router
If the Centro Business router is meant to replace another router, unplug all the cables from
the old device.
1. b)Installing router and devices
Only use the parts supplied for the following installation. During the installation process,
unplug all telephones and fax machines from the telephone sockets.
123.456.78
A 123.456
.78
1 2 3 4
1 2 3 4
OTO socket
EconomyLINE
Analogue fixed-network connection with 1 phone number:
ISDN fixed-network connection with up to 10 phone numbers:
>>Follow the “EconomyLINE” diagram on page 22
and install your devices according to the instructions.
>>Follow the “MultiLINE ISDN” diagram on page 24
and install your devices accordingly.
17
Installation English
16
>>Follow the “Fibre” instructions on page 20
in order to install the router.
Check what kind of Swisscom fixed-network connection you have.
Copper/DSL
>>Spie LED e risoluzione dei guasti (pagina 28)
>>www.swisscom.ch/centrobusiness
>>Numero gratuito: 0800 055 055
Internet connection with optical fibre socket (OTO socket):
MultiLINE ISDN
Vi serve aiuto nell’installazione?
Fibre optic
Check which type of installation you need, depending on your Internet connection
(fibre optic or copper/DSL). Details of your products can be found in your new Swisscom
contract.
2. Starting your router
Have you set everything up according to the instructions? If so, now turn the router on.
Wait until the Internet and power LEDs are constantly white (this can take 10 minutes or
more. The LEDs may flash rapidly during this time). Only then is the router ready and able to
connect to the Internet.
Router settings
>>You can enter your WLAN settings directly on the router and in the Swisscom
Customer Centre at www.swisscom.ch/customercentre
Internet
>>In order to enter settings directly on the router, connect your computer to the Centro
Business router using the Ethernet cable. After entering the URL http://192.168.1.1
in your Internet browser, you can adjust your settings.
Power
>>You can also find further information at www.swisscom.ch/centrobusiness.
Tip: By placing the router in an upright position, you can prevent it overheating and achieve
better WLAN coverage.
3. Connecting a PC / laptop to the router
Switch on your PC/laptop and ensure that it is connected to the router with the Ethernet
cable (white cable with yellow plugs). Your computer is now connected to the Internet via the
Centro Business router. Instructions on setting up your WLAN can be found on the next page.
4. Registration
With a new installation, the Swisscom registration page will open automatically after you
launch your browser for the first time. Fill in the obligatory fields step by step. You will find
information about this in your Swisscom documentation. Existing customers do not need
to register.
Congratulations! You are now connected to the best Internet service in Switzerland.
Instructions on setting up your WLAN can be found on the next page.
Was the installation successful?
Test whether the installation was successful by checking the following:
>>Are the power and Internet LEDs white?
>>If you have installed telephones: make a phone call.
>>Are web pages in your browser correctly displayed?
>>If you have installed a TV: switch on the TV and setup box and
check whether you can receive the required channels.
Were all the tests successful? If so, you have completed the installation.
We hope you enjoy using your new router.
Do you need help with the installation?
>>LED indicators and troubleshooting (page 29)
>>www.swisscom.ch/centrobusiness
>>Freephone number: 0800 055 055
18
19
WAN/
4
3
WAN/
4
Fibre
>>Nehmen Sie die Installation folgendermassen vor:
>>Procédez à l’installation selon le schéma suivant:
>>Eseguite l’installazione come segue:
>>Install your router as follows:
Steckplatz
Prise
Presa
Socket
78
Fibre
Tel.
2
1 2 3 4
Glasfasersteckdose
123.456.78
Prise fibre optique
Presa a fibra ottica
1 2 3 4
Optical fibre socket
1
A 123.456.
Router
Routeur
ON
ISDN
1 2
ISDN
SG/
1
2
3
WAN/
4
Computer
Ordinateur
Glasfaserk
abel / Câble
fib
Cavo in fib
ra ottica / F re optique
ibre optic
cable
20
Netzgerät
Transformateur
Alimentatore
Power supply unit
Fahren Sie nach der Installation mit «Schritt 2 – Router starten» auf Seite 9 weiter
Une fois les branchements terminés, consultez la rubrique «2. Faire démarrer le routeur» à la page 12
Terminata l’installazione passate alla «fase 2 – accendere il router» a pagina 15
After installation, continue with “Step 2 – Starting your router” on page 18
21
EconomyLINE
>>Nehmen Sie die Installation folgendermassen vor:
>>Procédez à l’installation selon le schéma suivant:
>>Eseguite l’installazione come segue:
>>Install your router as follows:
a)
Telefonsteckdose
Prise téléphonique
Presa telefonica
Telephone socket
Router
Routeur
b)
c)
Mikrofilter
Microfiltre
Microfiltro
Microfilter
klick
1
Tel.
2
ON
ISDN
1 2
ISDN
0
8
5
2
3
6
9
#
DS
b
Ka
L(
v
ca
e/
l
b
câ
el/
bl
ca
o/
e)
Netzgerät
Transformateur
Alimentatore
Power supply unit
EconomyLINE
1
WAN/
4
4
3
7
2
*
SG/
1
klick
Festnetz
Réseau fixe
Rete fissa
Fixed line
Computer
Ordinateur
Fahren Sie nach der Installation mit «Schritt 2 – Router starten» auf Seite 9 weiter
Une fois les branchements terminés, consultez la rubrique «2. Faire démarrer le routeur» à la page 12
Terminata l’installazione passate alla «fase 2 – accendere il router» a pagina 15
After installation, continue with “Step 2 – Starting your router” on page 18
22
23
MultiLINE ISDN
>>Nehmen Sie die Installation folgendermassen vor:
>>Procédez à l’installation selon le schéma suivant:
>>Eseguite l’installazione come segue:
>>Install your router as follows:
Router
Routeur
ISDN-NT
1
Telefonsteckdose
Prise téléphonique
Presa telefonica
Telephone socket
1
8
5
2
3
6
9
#
ISDN
0
ON
4
ISDN
7
2
*
Tel.
Line
1 2
Analog
Analogique
Analogico
Analogue
SG/
1
4
1
0
8
5
2
3
6
9
#
Splitter
DS
b
Ka
L(
v
ca
e/
l
b
câ
el/
bl
ca
o/
e)
WAN/
4
7
3
*
2
ISDN
RNIS
Netzgerät
Transformateur
Alimentatore
Power supply unit
Fahren Sie nach der Installation mit «Schritt 2 – Router starten» auf Seite 9 weiter
Une fois les branchements terminés, consultez la rubrique «2. Faire démarrer le routeur» à la page 12
Terminata l’installazione passate alla «fase 2 – accendere il router» a pagina 15
After installation, continue with “Step 2 – Starting your router” on page 18
24
25
MultiLINE ISDN
Computer
Ordinateur
LED-Hinweise und Störungsbehebung
Internet funktioniert nicht (Weltkugel leuchtet rot)
>>Sind alle Kabel richtig angeschlossen?
>>Starten Sie den Router neu, die Power-LED blinkt nun weiss oder rot.
>>Dies ist normal. Warten Sie, bis die Weltkugel weiss leuchtet
(dieser Vorgang kann 10 Minuten oder länger dauern).
>>Schalten Sie den Router solange nicht aus.
WLAN funktioniert nicht
>>Drücken Sie auf den WLAN-Knopf, um WLAN einzuschalten.
>>Das LED-Symbol sollte zunächst blau blinken und dann durchgehend blau leuchten.
>>Falls nicht, starten Sie den Router neu und versuchen Sie es erneut.
Swisscom Login oder WLAN-Daten vergessen?
>>Swisscom Login: Im Kundencenter www.swisscom.ch/kundencenter
den Dienst «Benutzername oder Passwort vergessen?» wählen.
>>Auch Ihre persönlichen WLAN-Daten können Sie im Kundencenter unter
«Internet» / «DSL-Router einrichten» einsehen und verwalten.
Weitere Hilfe
Konnte das Problem nicht gelöst werden?
Hier erhalten Sie zusätzliche Unterstützung:
>>www.swisscom.ch/centrobusiness
>>Gratisnummer: 0800 055 055
>>Besuchen Sie uns im Swisscom Shop
26
Explication des témoins LED et dépannage
Internet ne fonctionne pas (globe terrestre allumé en rouge)
>>Tous les câbles sont-ils correctement connectés?
>>Faites redémarrer votre routeur. Le témoin LED Power clignote
alors en blanc ou en rouge.
>>Cela est normal. Attendez que le globe terrestre s’allume en blanc
(cela peut durer 10 minutes, voire plus).
>>Pendant ce temps, n’éteignez surtout pas le routeur.
Le WiFi ne fonctionne pas
>>Appuyez sur le bouton WiFi pour enclencher le WiFi.
>>Le témoin LED devrait d’abord clignoter en bleu, puis rester allumé en bleu.
>>Si tel n’est pas le cas, faites redémarrer votre routeur et réessayez.
Vous avez oublié votre Swisscom Login ou vos données WiFi?
>>Swisscom Login: dans l’espace clients www.swisscom.ch/espaceclients,
sélectionnez le service «Oublié nom d’utilisateur ou mot de passe?».
>>Vous pouvez aussi consulter et gérer vos données personnelles WiFi dans l’espace
clients, sous «Internet» / «Installer routeur DSL».
Aide supplémentaire
Vous n’avez pas pu résoudre le problème?
Vous obtiendrez de l’aide supplémentaire ici:
>>www.swisscom.ch/centrobusiness
>>Numéro gratuit: 0800 055 055
>>Rendez-nous visite au Swisscom Shop
27
Spie LED e risoluzione dei guasti
Internet non funziona (l’icona del globo è rossa)
>>Tutti i cavi sono stati inseriti correttamente?
>>Se sì, riavviate il router, il LED Power lampeggia ora in bianco o rosso.
>>Non si tratta di un errore: attendete 10 minuti finché l’icona
del globo diventa bianca (possono trascorrere 10 o più minuti).
>>Durante questo procedimento non spegnete il router.
Internet is not working (globe is red)
>>Are all the cables correctly connected?
>>Restart the router, the power LED will now flash white or red.
>>This is normal. Wait until the globe is white
(this can take 10 minutes or more).
>>Do not turn the router off during this process.
La WLAN non funziona
>>Premete il pulsante WLAN per attivare la rete WLAN.
>>Il relativo LED dovrebbe dapprima lampeggiare in blu e
in seguito rimanere acceso fisso, sempre in blu.
>>In caso negativo, riavviate il router e ripetete l’operazione.
WLAN is not working
>>Press the WLAN button in order to switch on the WLAN.
>>The LED symbol should first flash blue and then remain constantly blue.
>>If it does not, restart the router and try again.
Swisscom Login o dati WLAN dimenticati?
>>Swisscom Login: nell’Area clienti www.swisscom.ch/areaclienti
selezionare il servizio «Nome utente o password dimenticata?».
>>Nell’Area clienti, sotto «Internet», «Configurare router DSL» potrete visualizzare
e gestire i vostri dati personali WLAN.
Altri aiuti
Non siete riusciti a risolvere il problema?
Ecco altri canali di assistenza:
>>www.swisscom.ch/centrobusiness
>>numero gratuito: 0800 055 055
>>venite a visitarci in uno Swisscom Shop
28
LED indicators and troubleshooting
Forgotten your Swisscom login or WLAN settings?
>>Swisscom login: select “Forgotten username or password?”
in the Customer Centre, www.swisscom.ch/customercentre
>>You can also see and manage your personal WLAN settings in the
Customer Centre under “Internet”, “Set up DSL router”.
Additional help
Were you unable to solve the problem?
You can find additional support here:
>>www.swisscom.ch/centrobusiness
>>Freephone number: 0800 055 055
>>Visit us in a Swisscom Shop
29
Notizen / Notes / Appunti / Notes
30
31
SAP 10050547 07/14
Swisscom (Schweiz) AG
KMU
Postfach
3050 Bern
www.swisscom.ch/kmu
0800 055 055
Swisscom (Suisse) SA
PME
Case postale
3050 Berne
www.swisscom.ch/pme
0800 055 055
Swisscom (Svizzera) SA
PMI
Casella postale
3050 Berna
www.swisscom.ch/pmi
0800 055 055
Swisscom (Switzerland) Ltd
SME
P.O. Box
3050 Berne
www.swisscom.ch/sme
0800 055 055
32