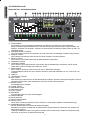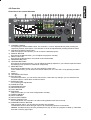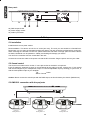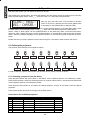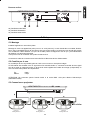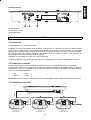
1
BEDIENUNGSANLEITUNG
USER MANUAL
MODE D'EMPLOI
MANUAL DEL USUARIO
CP-256/32
DMX-Controller
Version 4.0
Für weiteren Gebrauch aufbewahren!
© Copyright
Keep this manual for future needs!
Nachdruck verboten!
Gardez ce mode d’emploi pour des
Reproduction prohibited!
utilisations ultérieures!
Guarde este manual para posteriores usos.
Réproduction interdit!
Prohibida toda reproducción.
Weitere Produkte aus dem FUTURELIGHT-Sortiment:
Further products from the FUTURELIGHT-range:
Autres produits de l’assortiment de FUTURELIGHT:
Otros productos del surtido FUTURELIGHT:
www.futurelight.com
FUTURELIGHT LICHTEFFEKTE
FUTURELIGHT LIGHTING EFFECTS
FUTURELIGHT EFFETS LUMINEUX
FUTURELIGHT EFECTOS LUMINOSOS
FUTURELIGHT RT-240 lighting effect
FUTURELIGHT SPIDER centre-piece
FUTURELIGHT DF-250 lighting effect
FUTURELIGHT MIRACLE HMI 1200 W lighting effect
FUTURELIGHT CC-150 color-changer
FUTURELIGHT CC-200 PRO color-changer
FUTURELIGHT SC-240 scanner
FUTURELIGHT SC-250 scanner
FUTURELIGHT SC-375 scanner
FUTURELIGHT SC-335 scanner
FUTURELIGHT SC-570 scanner
FUTURELIGHT SC-740 scanner
FUTURELIGHT SC-780 scanner
FUTURELIGHT SC-940 scanner
FUTURELIGHT SC-980 scanner
FUTURELIGHT H-150 scanner
FUTURELIGHT Dominator MKII centre-piece
FUTURELIGHT MH-640 Moving-Head Washlight
FUTURELIGHT MH-640 Moving-Head silver Washlight
FUTURELIGHT MH-660 Moving-Head Spot
FUTURELIGHT MH-660 Moving-Head silver Spot
FUTURELIGHT MH-840 Moving-Head Washlight
FUTURELIGHT MH-860 Moving-Head Spot
FUTURELIGHT MH-670 Moving-Head Display
FUTURELIGHT MH-675 Moving-Head
FUTURELIGHT MH-680 Moving-Head white
FUTURELIGHT MH-680 Moving-Head black
FUTURELIGHT MH-680 Moving-Head silver
FUTURELIGHT Exterlight 250 CMY black
FUTURELIGHT Exterlight 250 CMY white
FUTURELIGHT Exterlight 250 CMY grey
FUTURELIGHT CONTROLLER
FUTURELIGHT CONTROLLERS
FUTURELIGHT CONTROLEURS
FUTURELIGHT CONTROLADORES
FUTURELIGHT HC-controller
FUTURELIGHT EX-1 controller
19" installation-frame for EX-1 controller
FUTURELIGHT EX-4 controller
19" installation-frame for EX-4 controller
FUTURELIGHT CP-192 controller
FUTURELIGHT CP-256 controller
FUTURELIGHT CP-256/32 controller
51830510
51832065
51832085
51832092
51832100
51832200
51832281
51832283
51832288
51832304
51832307
51832317
51832320
51832323
51832325
51832330
51832603
51833000
51833010
51833020
51833030
51833040
51833060
51833032
51833035
51833037
51833038
51833039
51833550
51833551
51833552
51834020
51834035
51834036
51834040
51834041
51834260
51834285
51834286
FUTURELIGHT ist eine eingetragene Marke der Steinigke Showtechnic GmbH, Deutschland.
FUTURELIGHT is a registered trademark of Steinigke Showtechnic GmbH, Germany.
FUTURELIGHT est une marque déposée du groupe Steinigke Showtechnic GmbH, Allemagne.
FUTURELIGHT es una marca registrada de Steinigke Showtechnic GmbH, Alemania.
CP-256/32 DMX-Controller
Bedienungsanleitung
Inhaltsverzeichnis
1. Einführung....................................................................................................................5
2. Sicherheitshinweise ....................................................................................................5
3. Bestimmungsgemäße Verwendung ...........................................................................6
4. Gerätebeschreibung ....................................................................................................6
4.1 Features ....................................................................................................................6
4.2 Geräteübersicht .........................................................................................................7
5. Setup.............................................................................................................................8
5.1 Installation .................................................................................................................8
5.2 Musiksteuerung .........................................................................................................8
5.3 Anschluss an den Projektor .......................................................................................9
6. Bedienung ....................................................................................................................10
6.1 Festlegung der zu verwendenden Projektoren ........................................................10
6.1.1 Anlegen eines Projektors aus der Bibliothek
6.1.2 Anlegen eines anderen Projektors
6.1.3 Anlegen einer Gruppe von Projektoren
10
11
11
6.2 Manual-Modus.........................................................................................................12
6.2.1 Projektoren manuell aufrufen:
6.2.2 Einen Projektor aus einem laufenden Programm nehmen:
12
13
6.3 Preset Scenes (voreingestellte Bühnenbilder).........................................................13
6.3.1 Programmierung einer Preset Scene
6.3.2 Aufrufen einer Preset Scene
6.3.3 Editieren einer Preset Scene
13
13
13
6.4 Preset Macros (voreingestellte Kanaleinstellungen) ................................................13
6.4.1 Programmierung eines Preset Macros
6.4.2 Aufrufen eines Preset Macros
6.4.3 Editieren eines Preset Macros
14
14
14
6.5 Programmierung......................................................................................................14
3
6.5.1 Programmierung eines Programms
6.5.2 Aufrufen eines Programms
6.5.3 Überprüfen eines Programms
6.5.4 Editieren eines Programms
6.5.5 Auswahl der Projektoren im Programm
6.5.6 Invertieren der Pan/Tilt Bewegungsrichtung
14
14
15
15
15
15
6.6 Records ...................................................................................................................15
6.6.1 Programmierung eines Records
6.6.2 Aufrufen eines Records
6.6.3 Editieren eines Records
16
16
16
6.7 Kopieren von Szenen, Programmen und Records ..................................................16
6.8 Musiksteuerung .......................................................................................................16
6.9 Chaser .....................................................................................................................16
6.9.1 Aufrufen eines Chasers
6.9.2 Ein Programm mit einem Chaser verknüpfen
6.9.3 Eine Preset Scene mit einem Chaser verknüpfen
6.9.4 Einen Chaser editieren
17
17
17
17
6.10 Grundeinstellungen................................................................................................17
6.10.1 Projektor umbenennen
6.10.2 Effekt umbenennen
6.10.3 Typ umbenennen
6.10.4 Projektor einstellen
6.10.5 Eigenschaften einstellen
6.10.6 Encoder-Empfindlichkeit einstellen
6.10.7 Betriebsstundenzähler
18
18
18
18
18
19
19
7. Problembehebung .......................................................................................................19
8. Reinigung und Wartung ..............................................................................................20
9. Technische Daten ........................................................................................................20
4
ACHTUNG!
Gerät vor Feuchtigkeit und Nässe schützen!
Vor Öffnen des Gerätes Netzstecker ziehen!
LESEN SIE VOR DER ERSTEN INBETRIEBNAHME ZUR EIGENEN SICHERHEIT
DIESE BEDIENUNGSANLEITUNG SORGFÄLTIG DURCH!
1. Einführung
Wir freuen uns, dass Sie sich für einen CP-256/32 Controller entschieden haben. Wenn Sie nachfolgende
Hinweise beachten, sind wir sicher, dass Sie lange Zeit Freude an Ihrem Kauf haben werden.
Nehmen Sie den CP-256/32 aus der Verpackung.
Bitte überprüfen Sie vor der ersten Inbetriebnahme, ob kein offensichtlicher Transportschaden vorliegt.
Sollten Sie Schäden an der Netzleitung oder am Gehäuse entdecken, nehmen Sie das Gerät nicht in Betrieb
und setzen sich bitte mit Ihrem Fachhändler in Verbindung.
2. Sicherheitshinweise
ACHTUNG!
Seien Sie besonders vorsichtig beim Umgang mit gefährlicher Netzspannung. Bei dieser Spannung können Sie einen lebensgefährlichen elektrischen Schlag erhalten!
Dieses Gerät hat das Werk in sicherheitstechnisch einwandfreiem Zustand verlassen. Um diesen Zustand zu
erhalten und einen gefahrlosen Betrieb sicherzustellen, muss der Anwender unbedingt die Sicherheitshinweise und die Warnvermerke beachten, die in dieser Bedienungsanleitung enthalten sind.
Unbedingt lesen:
Bei Schäden, die durch Nichtbeachtung dieser Bedienungsanleitung verursacht werden, erlischt der
Garantieanspruch. Für daraus resultierende Folgeschäden übernimmt der Hersteller keine Haftung.
Das Netzteil immer als letztes einstecken. Vergewissern Sie sich, dass der Netzschalter auf „OFF“ steht,
wenn Sie das Gerät ans Netz anschließen.
Halten Sie das Gerät von Hitzequellen wie Heizkörpern oder Heizlüftern fern.
Das Gerät darf nicht in Betrieb genommen werden, nachdem es von einem kalten in einen warmen Raum
gebracht wurde. Das dabei entstehende Kondenswasser kann unter Umständen Ihr Gerät zerstören. Lassen
Sie das Gerät solange uneingeschaltet, bis es Zimmertemperatur erreicht hat!
Der Aufbau entspricht der Schutzklasse III. Das Gerät darf niemals ohne Transformator betrieben werden.
Gerät bei Nichtbenutzung und vor jeder Reinigung vom Netz trennen.
Beachten Sie bitte, dass Schäden, die durch manuelle Veränderungen an diesem Gerät verursacht werden,
nicht unter den Garantieanspruch fallen.
Kinder und Laien vom Gerät fern halten!
Im Geräteinneren befinden sich keine zu wartenden Teile. Eventuelle Servicearbeiten sind ausschließlich
dem autorisierten Fachhandel vorbehalten!
5
3. Bestimmungsgemäße Verwendung
Bei diesem Gerät handelt es sich um einen DMX-Controller, mit dem sich DMX-gesteuerte Lichteffekte
steuern lassen. Dieses Produkt ist nur für den Anschluss an 230 V, 50 Hz Wechselspannung zugelassen
und wurde ausschließlich zur Verwendung in Innenräumen konzipiert.
Vermeiden Sie Erschütterungen und jegliche Gewaltanwendung bei der Installation oder Inbetriebnahme des
Gerätes.
Achten Sie bei der Wahl des Installationsortes darauf, dass das Gerät nicht zu großer Hitze, Feuchtigkeit
und Staub ausgesetzt wird. Vergewissern Sie sich, dass keine Kabel frei herumliegen. Sie gefährden Ihre
eigene und die Sicherheit Dritter!
Nehmen Sie das Gerät erst in Betrieb, nachdem Sie sich mit seinen Funkionen vertraut gemacht haben.
Lassen Sie das Gerät nicht von Personen bedienen, die sich nicht mit dem Gerät auskennen. Wenn Geräte
nicht mehr korrekt funktionieren, ist das meist das Ergebnis von unfachmännischer Bedienung!
Soll das Gerät transportiert werden, verwenden Sie bitte die Originalverpackung, um Transportschäden zu
vermeiden.
Beachten Sie bitte, dass eigenmächtige Veränderungen an dem Gerät aus Sicherheitsgründen verboten
sind.
Der Serienbarcode darf niemals vom Gerät entfernt werden, da ansonsten der Garantieanspruch erlischt.
Wird das Gerät anders verwendet als in dieser Bedienungsanleitung beschrieben, kann dies zu Schäden am
Produkt führen und der Garantieanspruch erlischt. Außerdem ist jede andere Verwendung mit Gefahren, wie
z. B. Kurzschluss, Brand, elektrischem Schlag, etc. verbunden.
Bitte bewahren Sie den Umschlag mit dem Master Code an einem sicheren Ort auf.
4. Gerätebeschreibung
4.1 Features
Universaler DMX-Controller
256 Steuerkanäle für 16 Projektoren mit je 16 DMX Kanälen • 16 Bit Auflösung für feine Pan- und TiltBewegungen • Umfangreiche Projektoren-Bibliothek • 32 Programme mit bis zu 16 Szenen programmierbar •
16 Preset Scenes, 16 Preset Makros • 5 wählbare Sprachen • Spiegelbewegung umkehrbar • Kopierfunktion
der Programme und Records • 99 Chaser definierbar, zu jedem Programm ein Chaser • Blackout-Funktion •
Musiksteuerung über Audio-Buchse oder eingebautes Mikrofon • Zugriffschutz durch Passwort •
Betriebstundenzähler • 19"-Einbaumaße mit 4 Höheneinheiten
6
4.2 Geräteübersicht
Übersicht über die Bedienelemente
1) KANALFADER
Zur Einstellung der verschiedenen DMX-Werte. Die Kanäle 1-8 lassen sich nach Drücken der
entsprechenden Projektorwahltaste durch Schieben des entsprechenden Faders direkt einstellen. Die
Kanäle 9-16 lassen sich einstellen, nachdem die Auswahl durch Drücken der Menu-Taste auf CH 9-16
umgestellt wurde.
2) PROJEKTORWAHLTASTEN
Zur Auswahl des gewünschten Projektors. Auf jede Taste kann ein beliebiger Projektor gelegt werden.
3) MANUAL-TASTE
Durch Drücken der Manual-Taste können Sie einen Projektor manuell ansteuern.
4) RECALL-TASTE
Durch Drücken der Recall-Taste wird der Manuell-Modus aufgehoben.
5) SEQUENCE-TASTE
6) UP/DOWN-TASTEN
Durch Drücken der entsprechenden Taste ändern Sie die Einstellungen schrittweise. Wenn Sie die
Taste halten, läuft die Anzeige nach oben bzw. unten.
7) MENU-TASTE
Durch Drücken der Menu-Taste können Sie sich im Hauptmenü bewegen.
Im Manual-Modus können Sie durch Drücken der Menu-Taste die Kanalfader von CH 1-8 auf CH 9-16
umstellen.
8) DISPLAY
9) LEFT/RIGHT-TASTEN
10) ESC-TASTE
Über die Escape-Taste können Sie das aktive Menü verlassen. Wurden Änderungen ausgeführt, können
Sie diese über die Enter-Taste abspeichern oder über die Esc-Taste verwerfen.
11) ENTER-TASTE
Zur Bestätigung der Eingabe.
12) SCENE-TASTE
13) PROGRAM-TASTE
14) RECORD-TASTE
15) COPY-TASTE
16) ENCODER
Zur manuellen Steuerung des Ablenkspiegels.
17) SPEED-REGLER
18) RATE-REGLER
19) DATA ENTRY FADER
20) MUSIC-TASTE
Wenn diese LED blinkt, befindet sich der Controller im Audio-Modus (Betrieb mit Musiksteuerung).
21) POWER/BLACKOUT-TASTE
Mit dem Netzschalter können Sie das Gerät einschalten.
Die Blackout-Funktion verriegelt den Lichtaustritt aller angeschlossenen Geräte über den Shutter und
stoppt das Programm.
Achtung: Die Blackout-Taste muss gedrückt werden (LED leuchtet nicht), sobald ein Programm aufgerufen wird, da sonst kein Lichtaustritt sichbar wird.
7
Rückseite:
22) DMX-Ausgangsbuchse
23) Netzanschlussbuchse
24) Audio-Eingangsbuchse
5. Setup
5.1 Installation
Stellen Sie das Gerät auf einer ebenen Fläche auf oder installieren Sie es in Ihrem Rack.
Rackinstallation: Dieses Gerät ist für ein 19"-Rack (483 mm) vorgesehen. Bei dem Rack sollte es sich um
ein „Double-Door-Rack“ handeln, an dem sich sowohl die Vorder- als auch die Rückseite öffnen lassen. Das
Rackgehäuse sollte mit einem Lüfter versehen sein. Achten Sie bei der Standortwahl des Controllers darauf,
dass die warme Luft aus dem Rack entweichen kann und genügend Abstand zu anderen Geräten
vorhanden ist. Dauerhafte Überhitzung kann zu Schäden an dem Gerät führen.
Sie können den Controller mit vier Schrauben M6 im Rack befestigen.
Stecken Sie die Anschlussleitung des Netzteils in die DC IN-Buchse ein. Stecken Sie das Netzteil in die
Steckdose ein.
5.2 Musiksteuerung
Die Musiksteuerung kann entweder über die 6,3 mm Stereo-Klinkenbuchse oder das eingebaute Mikrofon
erfolgen.
Wenn der CP-256/32 über ein Musiksignal an der Audio-Buchse arbeiten soll, verbinden Sie die
Klinkenbuchse mit dem Audiosignal des Kopfhörerausganges bzw. des zweiten regelbaren Ausganges (falls
vorhanden) des Mixers oder mit einem Lautsprecherausgang des Verstärkers.
Tip:
Sleeve:
Data +
Masse
ACHTUNG: Verbinden Sie niemals den Audio-Eingang mit dem DMX-Output, da ansonsten die Elektronik
(DMX-Treiber) zerstört werden würde.
8
5.3 Anschluss an den Projektor
Projector 1
Starting address 1
Projector 2
Starting address 17
Projector 3
Starting address 33
Achten Sie darauf, dass die Adern der Datenleitung an keiner
Stelle miteinander in Kontakt treten. Die Geräte werden
ansonsten nicht bzw. nicht korrekt funktionieren.
Die Verbindung zwischen Controller und Projektor sowie zwischen den einzelnen Geräten muss mit einem
zweipoligen geschirmten Kabel erfolgen. Die Steckverbindung geht über 3-polige XLR-Stecker und -Kupplungen.
Belegung der XLR-Verbindung:
Wenn Sie die empfohlenen FUTURELIGHT-Projektoren verwenden, können Sie den DMX-Ausgang des
Controllers direkt mit dem DMX-Eingang des ersten Gerätes der DMX-Kette verbinden. Sollen Projektoren
mit anderen DMX-Ausgängen angeschlossen werden, müssen Adapterkabel verwendet werden.
Aufbau einer seriellen DMX-Kette:
Verbinden Sie den DMX-Ausgang des CP-256/32 mit dem DMX-Eingang des nächsten Gerätes. Verbinden
Sie immer einen Ausgang mit dem Eingang des nächsten Gerätes bis alle Geräte angeschlossen sind.
Achtung: Am letzten Projektor muss die DMX-Leitung durch einen Abschlusswiderstand abgeschlossen
werden. Dazu wird ein 120 Ω Widerstand in einen XLR-Stecker zwischen Signal (–) und Signal (+) eingelötet
und in den DMX-Ausgang am letzten Gerät gesteckt.
Kodierung der Projektoren
Bitte beachten Sie, dass der CP-256/32 die DMX-Startadressen in 16er-Schritten zuweist. Sie müssen den
entsprechenden Projektor auf die gewünschte Startadresse kodieren, weil sonst die Kanalzuweisung nicht
stimmt. Alle Projektoren, die gleich addressiert werden, arbeiten synchron.
Projektor
Startadresse
Projektor
Startadresse
Projektor
Startadresse
Projektor 1
1
Projektor 3
33
Projektor 5
65
Projektor 2
17
Projektor 4
49
Projektor 6
81
9
6. Bedienung
Über die Power-Taste lässt sich das Gerät ein- bzw. ausschalten.
Nach Drücken der Power-Taste beginnen die LEDs zu blinken und auf dem Display erscheint der
Begrüßungstext. Drücken Sie eine beliebige Taste und auf dem Display erscheint "Code____". Geben Sie
den Code 1111 ein und drücken Sie die Enter-Taste.
SCENE:-- PROG:-REC:-- CHASER:--
Nun befinden Sie sich im Haupmenü. Sie können jederzeit
ins Hauptmenü zurückkehren, indem Sie die Esc-Taste
drücken (bitte beachten Sie die Option "Speichern") oder
die Recall-Taste (im Manual-Modus) drücken.
Bitte beachten Sie, dass die Power-Taste ca. 5 Sekunden lang gehalten werden muss, bis das Gerät
abschaltet.
6.1 Festlegung der zu verwendenden Projektoren
Ab Werk sind die Projektortasten wie folgt belegt:
1
2
3
4
5
6
7
8
SC-240
SC-240
SC-240
SC-240
SC-370
SC-370
SC-370
SC-370
9
10
11
12
13
14
15
16
SC-570
SC-570
SC-570
SC-570
SC-780
SC-780
SC-780
SC-780
Um eine Projektortaste mit einem anderen Gerät zu belegen, gehen Sie wie folgt vor:
6.1.1 Anlegen eines Projektors aus der Bibliothek
Drücken Sie die Menu-Taste und wählen Sie über die Up/Down-Tasten oder den Data Entry Fader "Menu 4
DMX Addresse" aus. Drücken Sie die Enter-Taste. Wählen Sie für Projektortaste 1 das gewünschte Gerät
über die Up/Down-Tasten oder den Data Entry Fader aus.
Drücken Sie Projektortaste 2 und wählen Sie das gewünschte Gerät aus. Belegen Sie alle 32 Tasten mit den
gewünschten Geräten.
Drücken Sie die Esc-Taste und speichern Sie die Änderungen über die Enter-Taste.
Übersicht über die verfügbaren Projektoren:
Nr.
1
2
3
4
5
6
7
8
9
10
11
12
13
CP-256 Name
AS-200
CC-200
CLAYPHPE
CLAYP MS
DIM-12
DIM-8
DOMIN II
DRAGON-3
DRAGON-2
HURRICAN
IMAGE
INSTALL
MAC 250
Hersteller
Futurelight
Futurelight
Clay Paky
Clay Paky
Futurelight
Pako Kft.
Pako Kft.
F.A.L.
Martin
Martin
Bezeichnung
Advertising SCAN AS-200
CC-200
Clay Paky HPE
CLAY Paky Mini Scan
Dim-12
Dim-8
DOMINATOR II
Dragon-3
Dragon-2
Hurrican
Image Scan
Install
Mac-250
10
Kanäle
11
4
7
4
12
8
12
8
8
4
7
16
11
14
15
16
17
18
19
20
21
22
23
24
25
26
27
28
29
30
31
32
33
34
35
36
37
38
39
40
41
42
43
44
45
46
47
48
49
50
51
52
53
54
55
56
57
58
59
60
61
62
63
64
MAC 300
MAC 500
MAC 600
MACPROF
MACWASH
MH-640
MH-660
MH-680
MH-860
M.HEAD
MINISCAN
MIRACLE
Mpro 2000
M.ULTRA1
M.ULTRA2
MX-1
MX-4
PRO1220
PRO 218
PRO 400
PRO 518
PRO 918
PROMO3
PS/D-200
ROBCOL-2
ROUL-575
SATSCAN2
SATSCAN3
SC-240
SC-250
SC-370
SC-570
SC-740
SC-780
SC-980
SCAN2pro
SCAN3rot
SCAN-3
SCAN2rot
SCAN-2
SHARK
SHOWMON2
STRATOS
TB-3
TC-3
TG-3
TORLIGHT
TORNDIGI
TS-3
TSIXTY
WARRIOR2
Martin
Martin
Martin
Martin
Martin
Futurelight
Futurelight
Futurelight
Futurelight
Gemini
SHOW 99' Kft.
Futurelight
Martin
TAS
TAS
Martin
Martin
Martin
Martin
Martin
Martin
Martin
Martin
Futurelight
Martin
F.A.L.
Saturn Kft.
Saturn Kft.
Futurelight
Futurelight
Futurelight
Futurelight
Futurelight
Futurelight
Futurelight
SHOW 99' Kft.
SHOW 99' Kft.
SHOW 99' Kft.
SHOW 99' Kft.
SHOW 99' Kft.
F.A.L.
SHOW 99' Kft.
F.A.L.
Eurolite
Eurolite
Eurolite
Saturn Kft.
Saturn Kft.
Eurolite
F.A.L.
SHOW 2000
Mac-300
Mac-500
Mac-600
Mini MAC Profiler
MAC Washer
MH-640
MH-660
MH-680
MH-860 Spotlight
Motor Head
Miniscan
Miracle
Magnum Pro 2000
Mini Ultra Scan-1
Mini Ultra Scan-2
MX-1
MX-4
Robo Scan Pro 1220
Robo Scan Pro 218
Robo Color Pro 400
Robo Scan Pro 518
Robo Scan Pro 918
Promo-3
Promotion SCAN PS/D-200
Robo Color 2
Roulette 575
Saturn Scan 2
Saturn Scan 3
SC-240
SC-250
SC-370
SC-570
SC-740
SC-780
SC-980
Scan-2 pro
Scan-3 rot
Scan-3
Scan-2 rot
Scan-2
SHARK
Showmoon-2
Stratos Scan
Eurolite TB-3
Eurolite TC-3
Eurolite TG-3
Tornado Light
Tornado Digi
Eurolite TS-3
Three Sixty
Warrior-2
11
14
12
10
8
16
14
16
16
5
10
4
1
6
8
7
7
15
7
7
9
14
6
11
6
8
10
10
4
6
4
8
13
14
4
8
6
6
6
6
9
6
14
4
1
1
10
14
4
8
6
6.1.2 Anlegen eines anderen Projektors
Wenn Sie einen anderen Projektor anlegen möchten, wählen Sie eine Projektorbezeichnung wie z. B.
"Install" oder nehmen Sie den SC-780 oder ein anderes FUTURELIGHT Gerät als Vorlage und ändern Sie
die Einstellungen. Dabei ist es sinnvoll, für ein Gerät mit 4 DMX-Kanälen (z. B. Eurolite TS-3 Scanner) eine
Vorlage mit 4 DMX-Kanälen (z. B. Futurelight SC-240) zu verwenden. Bitte beachten Sie, dass die Vorlage
11
nicht mehr verfügbar ist, sobald Sie den Projektornamen geändert haben.
Die Kanäle müssen so belegt werden, dass die Funktionsangabe im Controller mit den tatsächlichen
Funktionen des Projektors übereinstimmt. Bitte entnehmen Sie die DMX-Steuerkanäle und ihre Funktionen
der Bedienungsanleitung Ihres Projektors.
Projektor umbenennen
Bitte beachten Sie die Hinweise unter 6.10.1 Projektor umbenennen.
Projektor einstellen
Bitte beachten Sie die Hinweise unter 6.10.4 Projektor einstellen.
6.1.3 Anlegen einer Gruppe von Projektoren
Mit dem CP-256/32 können Sie 4 verschiedene Gruppen von Projektoren anlegen. Für jede der 4 Gruppen
kann ein anderes Programm aufgerufen werden. Alle Projektoren einer Gruppe durchlaufen das gewählte
Programm mit der gleichen Geschwindigkeit. Zur gleichen Zeit kann eine andere Gruppe ein anderes
Programm mit einer anderen Geschwindigkeit durchlaufen.
Wählen Sie über die Up/Down-Tasten oder den Data Entry Fader "Menu 2. Programm erstellen" aus.
Drücken Sie die Enter-Taste. Wählen Sie "Gruppe erstellen" über die Up/Down-Tasten oder den Data Entry
Fader aus und drücken Sie die Enter-Taste.
In der ersten Reihe des Displays erscheint hinter "Gruppe:" die aktuelle Gruppe. Die untere Reihe zeigt an,
welche Projektoren in dieser Gruppe enthalten sind. Alle mit * gekennzeichneten Plätze sind die in dieser
Gruppe enthaltenen Projektoren. Ist ein Projektor nicht in dieser Gruppe enthalten, erscheint in der unteren
Reihe "-".
Die aktuelle Gruppe lässt sich durch Drücken der Up/Down-Tasten verändern. Die gewünschten Projektoren
lassen sich durch Drücken der entsprechenden Projektorwahltaste in die aktuelle Gruppe aufnehmen.
Bitte beachten Sie: ein Projektor kann nicht in mehreren Gruppen enthalten sein. In Gruppe 1 sind alle
Projektoren enthalten. Sobald Sie einen Projektor in Gruppe 2, 3 oder 4 aufnehmen, wird er in Gruppe 1
deaktiviert.
6.2 Manual-Modus
6.2.1 Projektoren manuell aufrufen:
Im Manual-Modus können Sie die angelegten Projektoren manuell aufrufen und über die Kanalfader und die
Encoder ansteuern.
Drücken Sie die Manual-Taste und wählen Sie den gewünschten Projektor über die entsprechende
Projektorwahltaste aus. Sie können alle Projektoren auf einmal anwählen, indem Sie die Manual-Taste ca. 2
Sekunden lang halten.
Stellen Sie die gewünschte Funktion über die Kanalfader ein und wählen Sie die gewünschte Position über
die Encoder aus.
Menu-Taste:
Im Manual-Modus können Sie über die Menu-Taste die Auswahl der Kanalfader von CH 1-8 auf CH 9-16
umschalten.
Data Entry Fader:
Im Manual-Modus können Sie über den Data Entry Fader das Ansprechverhalten der Encoder verändern. Je
niedriger der eingestellte Wert, desto langsamer reagieren die Encoder und damit die Ablenkung des
Projektors.
All Mirror-Funktion:
Über die All Mirror-Funktion können Sie während des Programmablaufs die Pan- und Tilt-Bewegungen aller
im Programm enthaltenen Projektoren gleichzeitig steuern. Drücken Sie dazu die Left- und Right-Taste
gleichzeitig. Die Left/Right-Tasten beginnen zu blinken und auf dem Display erscheint "All Mirror". Wenn Sie
jetzt die Encoder bewegen, bewegen sich alle Projektoren gleichzeitig. Um den All Mirror-Modus zu
verlassen drücken Sie eine der Left/Right-Tasten.
12
6.2.2 Einen Projektor aus einem laufenden Programm nehmen:
Bei einem manuellen Eingriff in ein Programm können alle Werte eines Programms für den angewählten
Projektor geändert werden (z. B. Spiegelposition, Farbe, Gobo, etc.). Bitte beachten Sie, dass nur die
Funktion aus dem Programm genommen wird, die manuell verändert wird. Wenn Sie z. B. die Farbe manuell
ändern, bewegt sich der Ablenkspiegel weiter wie im Programm. Wenn Sie die Spiegelposition verändern,
ändern sich die Gobos weiterhin wie im Programm.
Drücken Sie die Manual-Taste und wählen Sie den gewünschten Projektor über die entsprechende
Projektorwahltaste aus. Sie können alle Projektoren auf einmal anwählen, indem Sie die Manual-Taste ca. 2
Sekunden lang halten. Dabei können Sie mehrere Projektoren anwählen, die dann synchron arbeiten.
Das Programm läuft weiter, bis Sie eine manuelle Veränderung vornehmen.
Wenn Sie nun die Position des Ablenkspiegels verändern, wird die Spiegelbewegung aus dem Programm
genommen und der Spiegel bleibt an der von Ihnen gesetzten Stelle stehen.
Wenn Sie andere Funktionen ändern wollen, müssen Sie die DMX-Werte des entsprechenden Kanal
manuell verändern. Ändern Sie den DMX-Wert über die Kanalfader.
Wenn Sie während des Programmablaufes einen Projektor aus dem Programm genommen haben, können
Sie ihn durch Drücken der Recall-Taste wieder ins Programm eingliedern.
6.3 Preset Scenes (voreingestellte Bühnenbilder)
Eine Preset Scene ist ein voreingestelltes Bühnenbild, das immer wieder aufgerufen werden kann. Mit dem
CP-256/32 lassen sich bis zu 16 verschiedene Preset Scenes programmieren, die dann auf die
Projektorwahltasten 1-16 gelegt werden.
6.3.1 Programmierung einer Preset Scene
Drücken Sie die Manual-Taste und wählen Sie den gewünschten Projektor über die entsprechende
Projektorwahltaste aus. Sie können alle Projektoren auf einmal anwählen, indem Sie die Manual-Taste ca. 2
Sekunden lang halten.
Drücken Sie die Scene-Taste und auf dem Display erscheint "Preset Scene". Wählen Sie die gewünschte
Preset-Scene über die entsprechende Projektorwahltaste aus. Wurde bereits eine Preset-Scene auf diese
Taste gelegt, erscheint der Projektorname im Display. Wählen Sie eine freie Taste aus, auf der kein
Projektorname erscheint.
Drücken Sie die Edit-Taste und auf dem Display erscheint "Preset Mask Leer". Drücken Sie die Mask-Taste
und wählen Sie den gewünschten Projektor über die entsprechende Projektorwahltaste aus. Drücken Sie die
Edit-Taste, um in den Editiermodus zurückzukehren. Nehmen Sie die gewünschten Einstellungen vor und
speichern Sie diese über die Enter-Taste ab. Auf dem Display erscheint "Speichern" und die Preset Scene
ist jetzt auf der entsprechenden Taste abgespeichert. Drücken Sie die Recall-Taste, um in das Hauptmenü
zurückzukehren.
6.3.2 Aufrufen einer Preset Scene
Drücken Sie die Manual-Taste und wählen Sie den gewünschten Projektor über die entsprechende
Projektorwahltaste aus. Sie können alle Projektoren auf einmal anwählen, indem Sie die Manual-Taste ca. 2
Sekunden lang halten.
Drücken Sie die Scene-Taste und auf dem Display erscheint "Preset Scene". Wählen Sie die gewünschte
Preset-Scene über die entsprechende Projektorwahltaste aus. Der Projektor bewegt sich zur definierten
Position und projiziert die entsprechenden Einstellungen.
6.3.3 Editieren einer Preset Scene
Drücken Sie die Manual-Taste und wählen Sie den gewünschten Projektor über die entsprechende
Projektorwahltaste aus. Sie können alle Projektoren auf einmal anwählen, indem Sie die Manual-Taste ca. 2
Sekunden lang halten.
Drücken Sie die Scene-Taste und auf dem Display erscheint "Preset Scene". Wählen Sie die gewünschte
Preset-Scene über die entsprechende Projektorwahltaste aus. Der Projektor bewegt sich zur definierten
Position und projiziert die entsprechenden Einstellungen. Drücken Sie die Edit-Taste, nehmen Sie die
gewünschten Veränderungen vor und speichern Sie diese über die Enter-Taste ab.
6.4 Preset Macros (voreingestellte Kanaleinstellungen)
Ein Preset Macro ist eine voreingestellte Kanaleinstellung, das immer wieder aufgerufen werden kann. Mit
13
dem CP-256/32 lassen sich bis zu 16 verschiedene Preset Macros programmieren, die auf den
Projektorwahltasten 1-16 liegen. Die Tasten 1-8 beziehen sich auf Einstellungen des ersten DMX-Kanals, die
Tasten 9-16 auf die von DMX-Kanal 2. Makros sind sinnvoll, um bestimmte Funktionen, die bei
verschiedenen Projektoren auf unterschiedlichen DMX-Werten liegen, über eine Taste aufzurufen. Wenn z.
B. die Farbe grün bei einem Projektor auf dem DMX-Wert 20 liegt und bei einem anderen auf 40, können Sie
über das Makro "Grün" die gleiche Farbe bei beiden Projektoren aufrufen.
6.4.1 Programmierung eines Preset Macros
Drücken Sie die Manual-Taste und wählen Sie den gewünschten Projektor über die entsprechende
Projektorwahltaste aus.
Drücken Sie die Macro-Taste und wählen Sie die gewünschte Projektorwahltaste zur Belegung des Makros
aus (z. B. Projektorwahltaste 1 - Makro Grün). Stellen Sie die gewünschte Farbe (z. B. Grün) über
Kanalfader 1 ein. Drücken Sie die Enter-Taste, um die Einstellung abzuspeichern. Drücken Sie die MacroTaste, um den Macro-Modus zu verlassen.
Wählen Sie jetzt den nächsten Projektor über die entsprechende Projektorwahltaste aus. Drücken Sie die
Macro-Taste und die gleiche Projektorwahltaste wie bei Projektor 1 (z. B. Projektorwahltaste 1 - Makro
Grün). Stellen Sie die gewünschte Farbe (z. B. Grün) über Kanalfader 1 ein. Drücken Sie die Enter-Taste,
um die Einstellung abzuspeichern. Drücken Sie die Macro-Taste, um den Makro-Modus zu verlassen.
6.4.2 Aufrufen eines Preset Macros
Drücken Sie die Manual-Taste und wählen Sie die gewünschten Projektoren über die entsprechende
Projektorwahltaste aus.
Drücken Sie die Macro-Taste und wählen Sie die gewünschte Projektorwahltaste aus (z. B.
Projektorwahltaste 1 - Makro Grün). Bei allen angewählten Projektoren erscheint die gewählte Farbe (z. B.
Grün). Drücken Sie die Macro-Taste, um den Macro-Modus zu verlassen.
6.4.3 Editieren eines Preset Macros
Drücken Sie die Manual-Taste und wählen Sie den gewünschten Projektor über die entsprechende
Projektorwahltaste aus.
Drücken Sie die Macro-Taste und wählen Sie die gewünschte Projektorwahltaste zum Editieren des Makros
aus (z. B. Projektorwahltaste 1 - Makro Grün). Stellen Sie die gewünschte Farbe (z. B. Grün) über
Kanalfader 1 ein. Drücken Sie die Enter-Taste, um die Einstellung abzuspeichern. Drücken Sie die MacroTaste, um den Macro-Modus zu verlassen.
Wählen Sie jetzt den nächsten Projektor über die entsprechende Projektorwahltaste aus. Drücken Sie die
Macro-Taste und die gleiche Projektorwahltaste wie bei Projektor 1 (z. B. Projektorwahltaste 1 - Makro
Grün). Stellen Sie die gewünschte Farbe (z. B. Grün) über Kanalfader 1 ein. Drücken Sie die Enter-Taste,
um die Einstellung abzuspeichern. Drücken Sie die Macro-Taste, um den Makro-Modus zu verlassen.
6.5 Programmierung
Ein Programm ist eine Aneinanderreihung von verschiedenen Szenen, die nacheinander abgespielt werden.
Mit dem CP-256/32 lassen sich bis zu 32 verschiedene Programme programmieren, die dann auf die
Projektorwahltasten 1-32 gelegt werden.
6.5.1 Programmierung eines Programms
Drücken Sie die Menu-Taste und wählen Sie über die Up/Down-Tasten oder den Data Entry Fader "Menu 2
Prog. erstellen" aus. Drücken Sie zweimal die Enter-Taste. Wählen Sie das gewünschte Programm über die
Projektorwahltasten aus.
Wählen Sie den gewünschten Projektor über die Projektorwahltasten aus. Nehmen Sie die Einstellungen
über die Encoder und die entsprechenden Kanalfader vor. Wählen Sie den nächsten Projektor über die
Projektorwahltasten aus und nehmen Sie die Einstellungen vor. Drücken Sie die Enter-Taste, um den ersten
Step abzuspeichern. Programmieren Sie die nächsten Schritte, bis das Programm beendet ist oder die
maximale Anzahl der Steps - 16 - erreicht wurde. Drücken Sie die Escape-Taste und die Enter-Taste, um
das Programm abzuspeichern.
6.5.2 Aufrufen eines Programms
Drücken Sie die Program-Taste und wählen Sie das gewünschte Programm über die Projektorwahltasten
14
aus. Stellen Sie die Programmablaufgeschwindigkeit und die Wiederholfrequenz über den Speed- bzw.
Rate-Regler ein.
Um die Programme 17-32 zu wählen, müssen Sie zuerst die Up-Taste drücken.
6.5.3 Überprüfen eines Programms
Drücken Sie die Program-Taste und wählen Sie das gewünschte Programm über die Projektorwahltasten
aus. Drücken Sie die Scene-Taste und überprüfen Sie jede einzelne Szene durch Drücken der
entsprechenden Projektorwahltaste.
6.5.4 Editieren eines Programms
Sollten Sie feststellen, dass eine Szene nicht Ihren Vorstellungen entspricht, oder wenn Programme für eine
neue Bühne editiert werden müssen, ist es nötig, eine Szene manuell zu verändern.
Ermitteln Sie zunächst die Gesamtzahl der Steps. Drücken Sie die Menu-Taste und wählen Sie über die
Up/Down-Tasten oder den Data Entry Fader "Menu 2 Prog. erstellen" aus. Drücken Sie zweimal die EnterTaste. Wählen Sie das gewünschte Programm über die Projektorwahltasten aus.
Wählen Sie die gewünschte Szene über die Up/Down-Tasten aus. Wenn Sie die Recall-Taste halten und
gleichzeitig die Up/Down-Taste drücken, wird die aktuelle Szene angezeigt. Wählen Sie den gewünschten
Projektor über die Projektorwahltasten aus. Nehmen Sie die Einstellungen über die Encoder und die
entsprechenden Kanalfader vor. Wählen Sie den nächsten Projektor über die Projektorwahltasten aus und
nehmen Sie die Einstellungen vor. Drücken Sie die Enter-Taste, um den editierten Step abzuspeichern.
Editieren Sie die nächsten Schritte, bis das Programm korrigiert ist.
Achtung: Vor Verlassen des Editier-Modus muss unbedingt der letzte Step des Programms erneut abgespeichert werden. Andernfalls wird das Programm nicht mehr ordnungsgemäß ablaufen.
Wählen Sie dazu die letzte Szene über die Up/Down-Tasten aus. Drücken Sie die Recall-Taste, um die
gespeicherte Szene anzeigen zu lassen. Speichern Sie diese Szene durch Drücken der Enter-Taste.
Drücken Sie die Escape-Taste und die Enter-Taste, um das edititierte Programm abzuspeichern.
6.5.5 Auswahl der Projektoren im Programm
Die Anzahl der Projektoren im Programm lässt sich für jedes Programm individuell festlegen.
Drücken Sie die Menu-Taste und wählen Sie über die Up/Down-Tasten oder den Data Entry Fader "Menu 2
Prog. erstellen" aus. Drücken Sie die Enter-Taste. Wählen Sie den Unterpunkt "Program Erstellen Maske"
über die Up/Down-Tasten aus. Drücken Sie die Enter-Taste.
Wählen Sie den gewünschten Projektor über die Projektorwahltasten aus. Alle mit "*" gekennzeichneten
Projektornummern sind im Programm aktiviert und die entsprechenden Projektorwahltasten blinkt. Wenn Sie
bestimmte Projektoren aus dem Programm entfernen möchten, drücken Sie die entsprechende
Projektorwahltaste. Die LED erlischt und im Display erscheint "X".
Drücken Sie zweimal die Enter-Taste, um die Einstellungen abzuspeichern.
6.5.6 Invertieren der Pan/Tilt Bewegungsrichtung
Die Pan- und Tilt-Bewegung eines Scanners lässt sich für jedes Programm invertieren. Diese Funktion ist
besonders dann sinnvoll, wenn Scanner gegenüberliegend im Raum installiert sind und ein synchroner
Bewegungsablauf erwünscht ist.
Achtung: Bitte beachten Sie, dass die Invertierung der Bewegungsrichtung eingestellt werden muss, bevor
Sie mit der Programmierung beginnen.
Drücken Sie die Menu-Taste und wählen Sie über die Up/Down-Tasten oder den Data Entry Fader "Menu 2
Prog. erstellen" aus. Drücken Sie die Enter-Taste. Wählen Sie den Unterpunkt "Program Erstell Mirror
Direction" über die Up/Down-Tasten aus. Drücken Sie die Enter-Taste.
Wählen Sie den gewünschten Projektor über die Projektorwahltasten aus. Alle mit "->" gekennzeichneten
Projektornummern verfügen über die normale Pan-Richtung. Wenn Sie für bestimmte Projektoren die PanRichtung umkehren möchten, drücken Sie die entsprechende Projektorwahltaste. Auf dem Display erscheint
"<-" für den Projektor mit invertierter Pan-Bewegung.
Drücken Sie die Down-Taste, um die Tilt-Bewegung zu invertieren.
Drücken Sie die Escape-Taste, um zum Menü "Programm erstellen" zurückzukehren. Programmieren Sie
jetzt Ihr Programm.
6.6 Records
Ein Record ist eine Aneinanderreihung von verschiedenen Programmen, die nacheinander abgespielt
15
werden. Mit dem CP-256/32 lassen sich bis zu 32 verschiedene Records mit bis zu 85 Steps
programmieren, die dann auf die Projektorwahltasten 1-32 gelegt werden.
6.6.1 Programmierung eines Records
Drücken Sie die Menu-Taste und wählen Sie über die Up/Down-Tasten oder den Data Entry Fader "Menu 1
Rec. erstellen" aus. Drücken Sie die Enter-Taste. Wählen Sie das gewünschte Record über die
Projektorwahltasten aus. Auf dem Display erscheint die Step-Nummer und das dazugehörige Programm, die
Programmablaufgeschwindigkeit und die Wiederholfrequenz bzw. die Auswahl Musiksteuerung.
Wählen Sie das gewünschte Programm über die Projektorwahltasten aus. Stellen Sie die
Programmablaufgeschwindigkeit und die Wiederholfrequenz über den Speed- bzw. Rate-Regler ein bzw.
aktivierten Sie die Musiksteuerung über die Music-Taste.
Wählen Sie den nächsten Step über die Up/Down-Tasten oder den Data Entry Fader aus und geben Sie das
gewünschte Programm über die Projektorwahltasten ein. Programmieren Sie die nächsten Schritte, bis das
Record beendet ist oder die maximale Anzahl der Steps - 99 - erreicht wurde. Drücken Sie die Escape-Taste
und die Enter-Taste, um das Record abzuspeichern.
6.6.2 Aufrufen eines Records
Drücken Sie die Record-Taste und wählen Sie das gewünschte Record über die Projektorwahltasten aus.
6.6.3 Editieren eines Records
Sollten Sie feststellen, dass ein Record nicht Ihren Vorstellungen entspricht, können Sie ihn editieren.
Ermitteln Sie zunächst die Gesamtzahl der Steps. Drücken Sie die Menu-Taste und wählen Sie über die
Up/Down-Tasten oder den Data Entry Fader " Menu 1 Rec. erstellen " aus. Drücken Sie die Enter-Taste.
Wählen Sie das gewünschte Record über die Projektorwahltasten aus.
Wählen Sie den gewünschten Step über die Up/Down-Tasten oder den Data Entry Fader aus und geben Sie
das gewünschte Programm über die Projektorwahltasten ein. Editieren Sie die nächsten Schritte, bis das
Record korrigiert ist. Drücken Sie die Escape-Taste und die Enter-Taste, um das editierte Record
abzuspeichern.
6.7 Kopieren von Szenen, Programmen und Records
Mit der Kopierfunktion können Sie sich das Erstellen von Programmen und Records erleichtern, indem Sie z.
B. bereits vorhandene Szenen in ein Programm einfügen.
Drücken Sie die Menu-Taste und wählen Sie über die Up/Down-Tasten oder den Data Entry Fader "Menu 2.
Make Program" aus. Drücken Sie die Enter-Taste. Wählen Sie über die Up/Down-Tasten "Copy" aus und
drücken Sie die Enter-Taste.
Scene: Geben Sie an, von welchem Programm Sie welche Szene kopieren möchten. Geben Sie an, in
welches Programm und an welche Szene Sie kopieren möchten. Drücken Sie zweimal die Enter-Taste.
Prog: Geben Sie an, welches Programm Sie wohin kopieren möchten. Drücken Sie zweimal die Enter-Taste.
Rec: Geben Sie an, welches Record Sie wohin kopieren möchten. Drücken Sie zweimal die Enter-Taste.
6.8 Musiksteuerung
Durch Drücken der Music-Taste aktivieren Sie die Musiksteuerung (LED blinkt). Bitte beachten Sie, dass
Programme und Records in diesem Modus nur aktiv sind, wenn der Controller ein Musiksignal empfängt (sei
es über das Mikrofon oder die Audio-Buchse). Liegt keine Musik an, steht das Programm oder der Record.
Bei der Programmierung von Records können Sie bereits dort für jedes Programm festlegen, ob die
Musiksteuerung aktiv sein soll oder nicht.
6.9 Chaser
Ein Chaser ist eine Aneinanderreihung von verschiedenen Bildern, die nacheinander abgespielt werden.
Dabei wird der Lichtaustritt des Projektors geöffnet und wieder verschlossen, so dass eine lebhafte
Bewegung entsteht. Mit dem CP-256/32 lassen sich bis zu 99 verschiedene Chaser programmieren, von
denen dann 16 auf die Projektorwahltasten 1-16 gelegt werden können. Chaser können mit Programmen
16
oder Szenen verknüpft werden.
6.9.1 Aufrufen eines Chasers
Drücken Sie die Sequence-Taste und der entsprechende Chaser wird aufgerufen. Durch Halten der
Sequence-Taste gelangen Sie in den Chaser Edit-Modus. Wurde die Taste aus einem Programm heraus
gedrückt, erscheinen hier die Chaser, die bei der Programmierung festgelegt wurden. Hier können Sie einen
gewünschten Chaser manuell über die Projector Select-Tasten auswählen und die Chaser-Geschwindigkeit
über den Data Entry Fader einstellen. Alternativ können Sie über die Music-Taste die Musiksteuerung
aktivieren.
Wenn Sie zu den Chasern des Programms zurückkehren möchten, drücken Sie erneut die aktive Projector
Select-Taste, so dass die LED erlischt.
6.9.2 Ein Programm mit einem Chaser verknüpfen
Beim CP-256/32 lassen sich Programme und Szenen eines Programmes mit einem individuellen Chaser
verknüpfen.
Drücken Sie die Menu-Taste und wählen Sie über die Up/Down-Tasten oder den Data Entry Fader "Menu 3
Chaser erstellen" aus. Drücken Sie die Enter-Taste. Wählen Sie "Chaser verknüpfen" über die Up/DownTasten oder den Data Entry Fader aus und drücken Sie die Enter-Taste. Wählen Sie das gewünschte
Programm über die Projektorwahltasten aus.
Wählen Sie für Szene 1 den gewünschten Chaser über die Left/Right-Tasten aus. Wählen Sie die nächsten
Szenen über die entsprechende Projektorwahltaste aus und geben Sie den gewüschten Chaser ein.
Drücken Sie zweimal die Enter-Taste, um das Programm abzuspeichern.
6.9.3 Eine Preset Scene mit einem Chaser verknüpfen
Drücken Sie die Menu-Taste und wählen Sie über die Up/Down-Tasten oder den Data Entry Fader "Menu 3
Chaser erstellen" aus. Drücken Sie die Enter-Taste. Wählen Sie "Chaser Preset verknüpfen" über die
Up/Down-Tasten oder den Data Entry Fader aus und drücken Sie die Enter-Taste.
Wählen Sie für Preset Scene 1 den gewünschten Chaser über die Left/Right-Tasten aus. Wählen Sie die
nächsten Preset Scenes über die entsprechende Projektorwahltaste aus und geben Sie den gewüschten
Chaser ein. Drücken Sie zweimal die Enter-Taste, um die Einstellungen abzuspeichern.
Die Belegung der Projector Select-Tasten aus dem Menü "Chaser Preset verknüpfen" entspricht der
Belegung, die über die Sequence-Taste aufgerufen werden kann. Wenn Sie also einen anderen der 99
verfügbaren Chaser auf eine Projector Select-Taste legen möchten gehen Sie wie oben beschrieben vor.
6.9.4 Einen Chaser editieren
Drücken Sie die Menu-Taste und wählen Sie über die Up/Down-Tasten oder den Data Entry Fader "Menu 3
Chaser erstellen" aus. Drücken Sie die Enter-Taste. Wählen Sie "Chaser editieren" über die Up/DownTasten oder den Data Entry Fader aus und drücken Sie die Enter-Taste. Wählen Sie den gewünschten
Chaser über die Up/Down-Tasten oder den Data Entry Fader aus.
Drücken Sie die Enter-Taste, um Zug 1 zu editieren. Geben Sie das gewünschte Bild über die Projector
Select Tasten ein (z. B. Taste 1, 2, 3 und 4) und drücken Sie die Enter-Taste. Geben Sie die ChaserGeschwindigkeit über die Up/Down-Tasten oder den Data Entry Fader ein und drücken Sie die Enter-Taste.
Drücken Sie die Right-Taste und editieren Sie Zug 2. Editieren Sie alle gewünschten Züge und speichern Sie
die Änderungen über die Escape- und Enter-Taste.
6.10 Grundeinstellungen
Beim CP-256/32 lassen sich verschiedene Grundeinstellungen wie Projektor- und Effektnamen, Sprachwahl,
Begrüßungstext etc. an die Benutzeranforderungen anpassen.
Drücken Sie die Menu-Taste und wählen Sie über die Up/Down-Tasten oder den Data Entry Fader "Menu 5
Setup" aus. Drücken Sie die Enter-Taste und auf dem Display erscheint "Code____". Geben Sie den Code
2222 ein und drücken Sie die Enter-Taste.
17
6.10.1 Projektor umbenennen
Wählen Sie "'Setup 1. Proj. umbenennen" über die Up/Down-Tasten oder den Data Entry Fader aus und
drücken Sie die Enter-Taste. Wählen Sie das gewünschte Gerät über die Up/Down-Tasten oder den Data
Entry Fader aus und drücken Sie die Enter-Taste. Der Cursor des zweiten Feldes beginnt zu blinken und Sie
können den gewünschten Buchstaben über die Up/Down-Tasten oder den Data Entry Fader ändern. Über
die Left/Right-Tasten können Sie sich von Feld zu Feld bewegen. Sobald Sie die Eingabe beendet haben,
drücken Sie die Enter-Taste und speichern durch nochmaliges Drücken der Enter-Taste.
6.10.2 Effekt umbenennen
Wählen Sie "'Setup 2. Effekt umbenennen" über die Up/Down-Tasten oder den Data Entry Fader aus und
drücken Sie die Enter-Taste. Wählen Sie den gewünschten Effekt über die Up/Down-Tasten oder den Data
Entry Fader aus und drücken Sie die Enter-Taste. Der Cursor des zweiten Feldes beginnt zu blinken und Sie
können den gewünschten Buchstaben über die Up/Down-Tasten oder den Data Entry Fader ändern. Über
die Left/Right-Tasten können Sie sich von Feld zu Feld bewegen. Sobald Sie die Eingabe beendet haben,
drücken Sie die Enter-Taste und speichern durch nochmaliges Drücken der Enter-Taste.
6.10.3 Typ umbenennen
Wählen Sie "'Setup 3. Typ umbenennen" über die Up/Down-Tasten oder den Data Entry Fader aus und
drücken Sie die Enter-Taste. Wählen Sie den gewünschten Typ über die Up/Down-Tasten oder den Data
Entry Fader aus und drücken Sie die Enter-Taste. Der Cursor des zweiten Feldes beginnt zu blinken und Sie
können den gewünschten Buchstaben über die Up/Down-Tasten oder den Data Entry Fader ändern. Über
die Left/Right-Tasten können Sie sich von Feld zu Feld bewegen. Sobald Sie die Eingabe beendet haben,
drücken Sie die Enter-Taste und speichern durch nochmaliges Drücken der Enter-Taste.
6.10.4 Projektor einstellen
Wählen Sie nun "'Setup 4. Proj. einstellen" über die Up/Down-Tasten oder den Data Entry Fader aus und
drücken Sie die Enter-Taste. Wählen Sie den gewünschten Projektor über die Up/Down-Tasten oder den
Data Entry Fader aus und drücken Sie die Enter-Taste. Geben Sie die Anzahl der DMX-Steuerkanäle des
Gerätes über den Data Entry Fader ein oder bestätigen Sie die Auswahl "16" mit der Enter-Taste. Geben Sie
hinter "Pot:" den gewünschten Kanalfader ein und bestätigen Sie mit der Enter-Taste. Wählen Sie nun die
gewünschte Funktion aus und bestätigen Sie mit der Enter-Taste. Geben Sie jetzt den entsprechenden
Kanal des Projektors ein und bestätigen Sie mit der Enter-Taste. Wählen Sie nun den gewünschten Effekt
aus und bestätigen Sie mit der Enter-Taste. Geben Sie nun den entsprechenden DMX-Wert ein und
bestätigen Sie mit der Enter-Taste.
Wenn Sie keine Effekte eingeben wollen, drücken Sie die Esc-Taste und geben den nächsten Kanal ein.
Bitte beachten Sie, dass in diesem Fall jedoch keine Anzeige der Funktion im Display erscheint.
Wenn auf dem Display "Besetzt" erscheint, können Sie die Belegung überschreiben, indem Sie die EnterTaste drücken.
Wenn alle Effekte eingegeben wurden, drücken Sie die Esc-Taste und auf der Anzeige erscheint "B.Out:
Scan?Dim?". Wählen Sie mit den Left/Right-Tasten "Scan" für Scanner und Moving Heads und "Dim" für
Dimmer aus und bestätigen Sie mit der Enter-Taste. Auf dem Display erscheint "Änderung speich?".
Drücken Sie die Enter-Taste zur Bestätigung. Über die Esc-Taste können Sie in das Hauptmenü
zurückkehren.
6.10.5 Eigenschaften einstellen
Wählen Sie "Setup 5 Neu Charakt." über die Up/Down-Tasten oder den Data Entry Fader aus und drücken
Sie die Enter-Taste. Wählen Sie das gewünschte Untermenü über die Up/Down-Tasten oder den Data Entry
Fader aus und drücken Sie die Enter-Taste.
Sprache wählen
Wählen Sie die gewünschte Sprache über die die Up/Down-Tasten aus und drücken Sie die Enter-Taste.
Code wählen
Über das Untermenü "Code ändern" lässt sich die voreingestellte PIN (Passwort-Code) für das Hauptmenü
und für das Setup-Menü abändern.
Wählen Sie Neu Menu Code, um die PIN für das Hauptmenü oder Neu Setup Code, um die PIN für das
Setup-Menü abzuändern und drücken Sie die Enter-Taste.
18
Geben Sie den neuen Code über Projektorwahltasten ein und drücken Sie die Enter-Taste. Wenn Sie den
Passwort-Schutz für das jeweilige Menü abschalten möchten, drücken Sie nur die Enter-Taste ohne eine
Zahl einzugeben.
Adressmodus
Über dieses Untermenü können Sie einstellen, wie der CP-256/32 bei der Vergabe der DMX-Adressen
vorgehen soll. Die Standard-Einstellung lautet auf "Automat mit 16", d.h. jedem Projektor werden
automatisch 16 DMX-Kanäle zugewiesen. Die Einstellung "Autom. anreihen" bedeutet, dass die DMXAdressen in Übereinstimmung mit den tatsächlich benötigten DMX-Kanälen eines Projektors angelegt
werden (z. B. 4 Kanäle für Futurelight SC-240). Die Einstellung "Manuelle Steuerung" bedeutet, dass der
Benutzer die DMX-Adressen frei zuweisen kann.
Wählen Sie die gewünschte Einstellung über die Up/Down-Tasten oder den Data Entry Fader aus und
drücken Sie die Enter-Taste.
Begrüßungstext
Über dieses Untermenü können Sie den Begrüßungstext abändern. Bitte beachten Sie, dass der
Begrüßungstext nur einmal abgeändert werden kann und maximal 64 Zeichen enthalten kann.
Drücken Sie die Enter-Taste. Der Cursor des zweiten Feldes beginnt zu blinken und Sie können den
gewünschten Buchstaben über die Up/Down-Tasten oder den Data Entry Fader ändern. Über die Left/RightTasten können Sie sich von Feld zu Feld bewegen. Sobald Sie die Eingabe beendet haben, drücken Sie die
ESC-Taste und speichern durch Drücken der Enter-Taste.
6.10.6 Encoder-Empfindlichkeit einstellen
Beim CP-256/32 können Sie die Encoder-Empfindlichkeit stufenlos zwischen 0 % (niedrigste
Empfindlichkeit) und 100 % (höchste Empfindlichkeit) einstellen.
Wählen Sie "'Setup 6. Joy einstellen" über die Up/Down-Tasten oder den Data Entry Fader aus und drücken
Sie die Enter-Taste. Stellen Sie die gewünschte Encoder-Empfindlichkeit über die Up/Down-Tasten oder den
Data Entry Fader aus und drücken Sie zweimal die Enter-Taste.
6.10.7 Betriebsstundenzähler
Wählen Sie "'Setup 7. Betriebsstunden" über die Up/Down-Tasten oder den Data Entry Fader aus und
drücken Sie die Enter-Taste. Auf der Anzeige erscheinen die Betriebsstunden des Geräts.
7. Problembehebung
PROBLEM:
Gerät lässt sich nicht anschalten.
Hauptmenü lässt sich nicht
aufrufen.
Beim Preset Macro wird die Farbe
bzw. das Gobo nicht gespeichert.
Programm
editieren.
lässt
sich
nicht
Beim Programm editieren werden
die einzelnen Szenen nicht
angezeigt.
URSACHE:
Die Anschlussleitung des Netzteils
ist nicht angeschlossen.
LÖSUNG:
Überprüfen Sie die
Anschlussleitung und eventuelle
Verlängerungsleitungen.
Code vergessen oder falsche
Öffnen Sie den Umschlag mit dem
Eingabe.
Master Code und folgen Sie den
dort beschriebenen Schritten.
Der Controller hat die Eingaben Bitte nehmen Sie die Einstellungen
nicht abgespeichert.
noch einmal vor und speichern Sie
jeden Projektor einzeln ab.
Die letzte Szene wurde nicht Überprüfen Sie, ob alle Szenen
abgespeichert.
des Programms vorhanden sind.
Editieren Sie das Programm erneut
und speichern Sie die letzte Szene
durch Drücken der Enter-Taste ab.
Die Recall-Taste wurde nicht Drücken Sie die Recall-Taste, um
gedrückt.
die gespeicherte Szene anzeigen
zu lassen.
19
8. Reinigung und Wartung
LEBENSGEFAHR!
Vor Wartungsarbeiten unbedingt allpolig vom Netz trennen!
Das Gerät sollte regelmäßig von Verunreinigungen wie Staub usw. gereinigt werden. Verwenden Sie zur
Reinigung ein fusselfreies, angefeuchtetes Tuch. Auf keinen Fall Alkohol oder irgendwelche Lösungsmittel
zur Reinigung verwenden!
Im Geräteinneren befinden sich keine zu wartenden Teile. Wartungs- und Servicearbeiten sind ausschließlich dem autorisierten Fachhandel vorbehalten!
Sollten einmal Ersatzteile benötigt werden, verwenden Sie bitte nur Originalersatzteile.
Sollten Sie noch weitere Fragen haben, steht Ihnen Ihr Fachhändler jederzeit gerne zur Verfügung.
9. Technische Daten
Spannungsversorgung:
230 V AC, 50 Hz ~
über mitgeliefertes 12-15 V DC, 500 mA Netzteil
Gesamtanschlusswert:
6W
Anzahl Steuerkanäle:
256
Musiksteuerung:
entweder über Klinkenbuchse oder eingebautes Mikrofon
Audioeingang:
6,3 mm Stereoklinke
Audio-Eingangsempfindlichkeit: 0,3 - 1 V
DMX 512-Ausgang:
3-polige XLR-Einbaukupplung
Freie Programme:
32
Maße (LxBxH):
483 x 176 x 105 mm
19"-Einbaumaße mit 4 HE
Mindesteinbautiefe:
90 mm
Gewicht:
4 kg
Alle Rechte einschließlich Übersetzung vorbehalten. Kein Teil dieser Bedienungsanleitung darf ohne
schriftliche Genehmigung des Herausgebers reproduziert oder verändert werden.
Bitte beachten Sie: Technische Änderungen ohne vorherige Ankündigung und Irrtum vorbehalten.
09/02 ©
20
CP-256/32 DMX-Controller
User manual
Table of contents
1. Introduction..................................................................................................................23
4. Description of the device ............................................................................................24
4.1 Features ..................................................................................................................24
4.2 Overview..................................................................................................................25
5. Setup.............................................................................................................................26
5.1 Installation ...............................................................................................................26
5.2 Sound-control ..........................................................................................................26
5.3 DMX-512 connection with the projector ...................................................................26
6. Operation......................................................................................................................28
6.1 Defining the projectors.............................................................................................28
6.1.1 Selecting a projector from the library
6.1.2 Defining another projector
6.1.3 Defining a group of projectors
28
30
30
6.2 Manual-mode...........................................................................................................30
6.2.1 Call up projectors manually
6.2.2 Take a projector out of the program
30
31
6.3 Preset Scenes .........................................................................................................31
6.3.1 Programming a Preset Scene
6.3.2 Recalling a Preset Scene
6.3.3 Editing a Preset Scene
31
31
31
6.4 Preset Macros .........................................................................................................32
6.4.1 Programming a Preset Macros
6.4.2 Recalling a Preset Macro
6.4.3 Editing a Preset Macro
32
32
32
6.5 Programming ...........................................................................................................32
6.5.1 Programming a program
6.5.2 Running a program
6.5.3 Checking a program
32
32
32
21
6.5.4 Editing a program
6.5.5 Selecting the projectors in the program
6.5.6 Inverting the Pan/Tilt movement
33
33
33
6.6 Records ...................................................................................................................33
6.5.1 Programming a Record
6.6.2 Running a Record
6.6.3 Editing a Record
33
34
34
6.7 Copying scenes, programs and records ..................................................................34
6.8 Sound-control ..........................................................................................................34
6.9 Chaser .....................................................................................................................34
6.9.1 Running a chaser
6.9.2 Link a program with a chaser
6.9.3 Link a Preset Scene with a chaser
6.9.4 Edit a chaser
34
34
35
35
6.10 Basic settings ........................................................................................................35
6.10.1 Rename unit
6.10.2 Rename effect
6.10.3 Rename type
6.10.4 Configure unit
6.10.5 New typical
6.10.6 Adjust the Encoder-sensitivity
6.10.7 Operating hour meter
35
35
35
36
36
36
36
7. Problem chart...............................................................................................................37
8. Cleaning and maintenance .........................................................................................18
9. Technical specifications .............................................................................................37
22
CAUTION!
Keep this device away from rain and moisture!
Unplug mains lead before opening the housing!
FOR YOUR OWN SAFETY, PLEASE READ THIS USER MANUAL CAREFULLY
BEFORE YOU INITIAL START - UP!
1. Introduction
Thank you for having chosen a FUTURELIGHT CP-256/32 controller. If you follow the instructions given in
this manual, we can assure you that you will enjoy this device for many years.
Unpack your FUTURELIGHT CP-256/32.
Please make sure that there are no obvious transport damages. Should you notice any damages on the A/C
connection cable or on the casing, do not take the device into operation and immediately consult your local
dealer.
2. Safety instructions
CAUTION!
Be careful with your operations. With a dangerous voltage you can suffer a dangerous
electric shock when touching the wires!
This device has left our premises in absolutely perfect condition. In order to maintain this condition and to
ensure a safe operation, it is absolutely necessary for the user to follow the safety instructions and warning
notes written in this user manual.
Important:
Damages caused by the disregard of this user manual are not subject to warranty. The dealer will
not accept liability for any resulting defects or problems.
Always plug in the power unit least. Make sure that the power-switch is set to OFF position before you
connect the device to the mains.
Keep away from heaters and other heating sources!
If the device has been exposed to drastic temperature fluctuation (e.g. after transportation), do not switch it
on immediately. The arising condensation water might damage your device. Leave the device switched off
until it has reached room temperature.
This device falls under protection-class III. The device always has to be operated with an appropriate
transformer.
Always disconnect from the mains, when the device is not in use or before cleaning it.
Please note that damages caused by manual modifications on the device or unauthorized operation by
unqualified persons are not subject to warranty.
Keep away children and amateurs from the device!
There are no serviceable parts inside the device. Maintenance and service operations are only to be carried
out by authorized dealers.
23
3. Operating determinations
This device is a DMX-controller for controlling DMX-effects. This product is only allowed to be operated with
an alternating current of 230 V, 50 Hz and was designed for indoor use only.
Do not shake the device. Avoid brute force when installing or operating the device.
When choosing the installation-spot, please make sure that the device is not exposed to extreme heat,
moisture or dust. There should not be any cables lying around. You endanger your own and the safety of
others!
Operate the device only after having familiarized with its functions. Do not permit operation by persons not
qualified for operating the device. Most damages are the result of unprofessional operation!
Please use the original packaging if the device is to be transported.
Please consider that unauthorized modifications on the device are forbidden due to safety reasons!
Never remove the serial barcode from the device as this would make the guarantee void.
If this device will be operated in any way different to the one described in this manual, the product may suffer
damages and the guarantee becomes void. Furthermore, any other operation may lead to dangers like shortcircuit, burns, electric shock, etc.
Please keep the envelope with the Master Code at a safe place.
4. Description of the device
4.1 Features
Universal DMX-controller
256 control channel for 16 projectors with up to 16 channels • 16 bit resolution for fine Pan/Tilt movements •
Comprehensive projector library • 32 programs with up to 16 scenes can be programmed • 16 Preset Scenes
and 16 Preset Macros • 5 selectable languages • Mirror-movement direction can be inverted • Copy-function
for the scenes, programs and records • 99 programmable Chasers • Blackout-function • Sound control via
built-in microphone or Audio-socket • Security code operation • Operating hour meter • 19" mounting
dimensions with 4 units
24
4.2 Overview
Overview on the control elements
1) CHANNEL FADERS
For adjusting the different DMX-values. The channels 1-8 can be adjusted directly after pressing the
respective projector select button. The channels 9-16 can be adjusted after pressing the Menu-button.
2) PROJECTOR SELECT BUTTONS
With the Projector select buttons you can choose the desired projector.
3) MANUAL BUTTON
By pressing the Manual button, you can adjust the projector manually.
4) RECALL BUTTON
By pressing the Recall button, the manual mode is deactivated.
5) SEQUENCE BUTTON
6) UP/DOWN BUTTONS
By pressing the respective button, you can adjust the settings stepwise. If you hold the respective button,
the display moves upwards or downwards, respectively.
7) MENU BUTTON
By pressing the Menu button, you can move within the main menu.
In the manual mode, you can switch the channel faders from CH 1-8 to CH 9-16 by pressing the Menu
button.
8) DISPLAY
9) LEFT/RIGHT BUTTONS
10) ESC BUTTON
Via the Escape button, you can exit the active menu. If there are any changes, you can save them via
the Enter button or cancel them via the Esc button.
11) ENTER BUTTON
For confirming the adjustments.
12) SCENE BUTTON
13) PROGRAM BUTTON
14) RECORD BUTTON
15) COPY BUTTON
16) ENCODER
With the encoders you can move the light beam manually.
17) SPEED-CONTROL
18) RATE-CONTROL
19) DATA ENTRY FADER
20) MUSIC TRIG BUTTON
If this LED flashes, the controller is in Audio-mode (operation with sound-control).
21) POWER/BLACKOUT BUTTON
With the power switch, you can take the controller into operation.
The Blackout-function closes the light output of all connected projectors via the shutter.
Caution: The Blackout-key has to be pressed (LED is off), as soon as a program is called up. Otherwise
there will not be any light output.
25
Rear panel:
22) DMX output socket
23) Power supply socket
24) Audio input socket
5. Setup
5.1 Installation
Install the device on a plane surface.
Rack-installation: This device is built for 19" racks (483 mm). The rack you use should be a Double-DoorRack where you can open the frontpanel and the rear panel. The rack should be provided with a cooling fan.
When mounting the controller into the rack, please make sure that there is enough space around the device
so that the heated air can be passed on. Steady overheating will damage your device.
You can fix the controller with four screws M6 in the rack.
Connect the connection cable of the power-unit with the DC IN-socket. Plug the power unit into your outlet.
5.2 Sound-control
The sound-control either works via the ¼” mono jack-socket or the built-in microphone.
If the CP-256/32 is supposed to work via a soundsignal at the Audio In-socket, connect the ¼" jack socket
with the soundsignal of your headphones output or a second adjustable output (if existing) of your mixer, or
with the loud-speaker output of your amplifier.
Tip:
Data +
Sleeve: Ground
Caution: Never connect the sound input with the DMX-output, as this will destroy the electric (DMX-driver).
5.3 DMX-512 connection with the projector
Projector 1
Starting address 1
Projector 2
Starting address 17
26
Projector 3
Starting address 33
The wires must not come into contact with each other, otherwise
the fixtures will not work at all, or will not work properly.
Only use a stereo shielded cable and 3-pin XLR-plugs and connectors in order to connect the controller with
the fixture or one fixture with another.
Occupation of the XLR-connection:
If you are using the recommended FUTURELIGHT-controllers, you can connect the DMX-output of the
controller directly with the DMX-input of the first fixture in the DMX-chain. If you wish to connect DMXcontrollers with other DMX-outputs, you need to use adapter-cables.
Building a serial DMX-chain:
Connect the DMX-output of the CP-256/32 with the DMX-input of the nearest projector. Always connect one
output with the input of the next fixture until all fixtures are connected.
Caution: At the last fixture, the DMX-cable has to be terminated with a terminator. Solder a 120 Ω resistor
between Signal (–) and Signal (+) into a 3-pin XLR-plug and plug it in the DMX-output of the last fixture.
Projector addressing
Please note that the CP-256/32 assigns the DMX-starting addresses every 16 steps. You have to address
every projector to the respective starting address. Otherwise, the channel assignment will not be correct. All
projectors with the same starting address work synchronically.
Projector
Starting address
Projector
Starting address
Projector
Starting address
Projector 1
1
Projector 3
33
Projector 5
65
Projector 2
17
Projector 4
49
Projector 6
81
27
6. Operation
With the Power-button, you can switch the device on and off.
After pressing the Power-button, the LEDs start flashing and the display shows the greeting text. Press any
button and the display shows "Code____". Enter the Code 1111 and press the Enter-button.
SCENE:-- PROG:-REC:-- CHASER:--
Now you are in the main menu. You can return to the main
menu at any time by pressing the Esc-button (please save
if necessary) or the Recall-button (in Manual-mode).
Press the Menu-button and select "Menu 5 Setup" via the Up/Down-buttons or the Data Entry fader. Press
the Enter-button and the display shows "Code____". Enter the Code 2222 and press the Enter-button.
Select " Setup 5. New typical" via the Up/Down-buttons or the Data Entry fader. Press the Enter-button.
Select the menu "Select Language" via the Up/Down-buttons or the Data Entry fader and press the Enterbutton. Select the desired language via the Up/Down-buttons or the Data Entry fader and press the Enterbutton.
Please note that you have to hold the Power button for approx. 5 seconds in order to switch the unit off.
6.1 Defining the projectors
The projector select buttons are occupied as follows:
1
2
3
4
5
6
7
8
SC-240
SC-240
SC-240
SC-240
SC-370
SC-370
SC-370
SC-370
9
10
11
12
13
14
15
16
SC-570
SC-570
SC-570
SC-570
SC-780
SC-780
SC-780
SC-780
In order to define a projector select button with another device, please proceed as follows:
6.1.1 Selecting a projector from the library
Press the Menu-button and select "Menu 4 Soft Patch" via the Up/Down-buttons or the Data Entry Fader.
Press the Enter-button. Select the desired projector for projector select button 1 das gewünschte Gerät über
via the Up/Down-buttons or the Data Entry Fader.
Press projector select button 2 and select the desired projector. Occupy all 32 buttons with the desired
projectors.
Press the Esc-button and save the changes via the Enter-button.
Overview on the available projectors:
No.
1
2
3
4
5
6
7
CP-256 name
AS-200
CC-200
CLAYPHPE
CLAYP MS
DIM-12
DIM-8
DOMIN II
Manufacturer
Futurelight
Futurelight
Clay Paky
Clay Paky
Futurelight
Designation
Advertising SCAN AS-200
CC-200
Clay Paky HPE
CLAY Paky Mini Scan
Dim-12
Dim-8
DOMINATOR II
28
Channels
11
4
7
4
12
8
12
8
9
10
11
12
13
14
15
16
17
18
19
20
21
22
23
24
25
26
27
28
29
30
31
32
33
34
35
36
37
38
39
40
41
42
43
44
45
46
47
48
49
50
51
52
53
54
55
56
57
58
59
60
61
62
63
64
DRAGON-3
DRAGON-2
HURRICAN
IMAGE
INSTALL
MAC 250
MAC 300
MAC 500
MAC 600
MACPROF
MACWASH
MH-640
MH-660
MH-680
MH-860
M.HEAD
MINISCAN
MIRACLE
Mpro 2000
M.ULTRA1
M.ULTRA2
MX-1
MX-4
PRO1220
PRO 218
PRO 400
PRO 518
PRO 918
PROMO3
PS/D-200
ROBCOL-2
ROUL-575
SATSCAN2
SATSCAN3
SC-240
SC-250
SC-370
SC-570
SC-740
SC-780
SC-980
SCAN2pro
SCAN3rot
SCAN-3
SCAN2rot
SCAN-2
SHARK
SHOWMON2
STRATOS
TB-3
TC-3
TG-3
TORLIGHT
TORNDIGI
TS-3
TSIXTY
WARRIOR2
Pako Kft.
Pako Kft.
F.A.L.
Martin
Martin
Martin
Martin
Martin
Martin
Martin
Futurelight
Futurelight
Futurelight
Futurelight
Gemini
SHOW 99' Kft.
Futurelight
Martin
TAS
TAS
Martin
Martin
Martin
Martin
Martin
Martin
Martin
Martin
Futurelight
Martin
F.A.L.
Saturn Kft.
Saturn Kft.
Futurelight
Futurelight
Futurelight
Futurelight
Futurelight
Futurelight
Futurelight
SHOW 99' Kft.
SHOW 99' Kft.
SHOW 99' Kft.
SHOW 99' Kft.
SHOW 99' Kft.
F.A.L.
SHOW 99' Kft.
F.A.L.
Eurolite
Eurolite
Eurolite
Saturn Kft.
Saturn Kft.
Eurolite
F.A.L.
SHOW 2000
Dragon-3
Dragon-2
Hurrican
Image Scan
Install
Mac-250
Mac-300
Mac-500
Mac-600
Mini MAC Profiler
MAC Washer
MH-640
MH-660
MH-680
MH-860 Spotlight
Motor Head
Miniscan
Miracle
Magnum Pro 2000
Mini Ultra Scan-1
Mini Ultra Scan-2
MX-1
MX-4
Robo Scan Pro 1220
Robo Scan Pro 218
Robo Color Pro 400
Robo Scan Pro 518
Robo Scan Pro 918
Promo-3
Promotion SCAN PS/D-200
Robo Color 2
Roulette 575
Saturn Scan 2
Saturn Scan 3
SC-240
SC-250
SC-370
SC-570
SC-740
SC-780
SC-980
Scan-2 pro
Scan-3 rot
Scan-3
Scan-2 rot
Scan-2
SHARK
Showmoon-2
Stratos Scan
Eurolite TB-3
Eurolite TC-3
Eurolite TG-3
Tornado Light
Tornado Digi
Eurolite TS-3
Three Sixty
Warrior-2
29
8
8
4
7
16
11
11
14
12
10
8
16
14
16
16
5
10
4
1
6
8
7
7
15
7
7
9
14
6
11
6
8
10
10
4
6
4
8
13
14
4
8
6
6
6
6
9
6
14
4
1
1
10
14
4
8
6
6.1.2 Defining another projector
If you wish to define another projector, select the unit name "Install" or select a SC-780 or other
FUTURELIGHT projector as template and adjust the settings. It is very useful to choose a template with 4
DMX-channels (e.g. Futurelight SC-240) for a projector with 4 DMX-channels (e.g. Eurolite TS-3). Please
note that the template is no longer available as soon as you have modified the projector name.
the channels have to be occupied in a way that the functions shown in the controller display correspond to
the actual functions of the projector. Please take the DMX control channels and their functions from the user
manual of your projector.
Rename unit
Please refer to the explanations under 6.10.1 Rename unit.
Configure unit
Please refer to the explanations under 6.10.4 Configure unit.
6.1.3 Defining a group of projectors
With the CP-256/32 you can define 4 different groups of projectors. For every of the 4 groups, you can call a
different program. All projectors of one group run through the selected program with the same speed. At the
same time, another group can run through another program with another speed.
Press the Menu-button and select "Menu 2. Make Program" via the Up/Down-buttons or the Data Entry
Fader. Press the Enter-button. Select the "Make Group" via the Up/Down-buttons or the Data Entry Fader
and press the Enter-button.
The upper line of the display shows "Group:" and the current group number. The lower line shows which
projectors are included in this group. All places marked with "*" are the projectors included in this group. If a
projector is not included in this group, the lower line shows "-".
The current group can be changed by pressing the Up/Down-buttons. The desired projectors can be
included in the current group by pressing the respective Projector Select-button.
Please note: a projector cannot be included in several groups. All projectors are included in group 1. As
soon as you will include a projector in group 2, 3 or 4, it will be deactived in group 1.
6.2 Manual-mode
6.2.1 Call up projectors manually
In the Manual-mode, you can call up the defined projectors manually and control them via the channel faders
and the encoders.
Press the Manual-button and select the desired projector via the respective projector select button. You can
choose all projectors at once if you hold the Manual-button for approx. 2 seconds.
Adust the desired function via the channel faders and choose the desired position via the encoders.
Menu-button:
In the Manual-mode, you can switch the channel faders from CH 1-8 to CH 9-16 via the Menu-button.
Data Entry Fader:
In the Manual-mode, you can adjust the sensitivity of the encoders via the Data Entry Fader. The lower the
adjusted value, the slower the encoders reacts and the finer the movement of the projector.
Encoders:
In the ’Manual’ mode and in the ’Create Program’ mode you have the possibility to lock the encoders
movement in one direction. In this way, it is easier to control the scanners and Moving-Heads.
You can change between the modes by pressing the encoders.
Mode 1 : Only PAN controllable. The display shows: PAN CONTROL.
Mode 2 : Only TILT controllable. The display shows: TILT CONTROL.
Mode 3 : PAN and TILT controllable at once. The display shows: PAN-TILT CONTROL.
In the All Mirror-mode, both directions can be controlled at once.
30
All Mirror-function:
Via the All Mirror-function, you can control the Pan/Tilt-movement of all projectors during the program run.
Press the Left/Right-button at the same time. The Left/Right-buttons start flashing and the display shows "All
Mirror". When you move the Encoders now, all projectors included in the program move at the same time. In
order to leave the All Mirror-mode press the Left/Right-button.
6.2.2 Take a projector out of the program
By intervening into a program, all values of a program can be adjusted for the selected projectors (e.g.
mirror-position, colour, gobo, etc.). Please note that only this function will be taken out of the program which
is manually adjusted. If you adjust the colour manually, the mirror continues moving like in the program. If
you adjust the mirror-position, the gobos change like in the program.
Press the Manual-button and select the desired projector via the respective projector select button. You can
choose all projectors at once if you hold the Manual-button for approx. 2 seconds. You can also choose
several projectors which will work synchronically then.
The program continues until you adjust anything manually.
If you adjust the mirror-position now, the mirror-movement will be taken out of the program and the mirror
stops at the position you entered.
If you wish to adjust another function, you have to adjust the DMX-value of the respective channel. Adjust the
DMX-value via the channel faders.
If you have taken a projector out of the program, you can insert the projector back in the program by pressing
the Recall-button.
6.3 Preset Scenes
A Preset Scene is a pre-adjusted stage memory which can be recalled at any time. With the CP-256/32, you
can program up to 16 different Preset Scenes which can be assigned to the projector select buttons 1-16.
6.3.1 Programming a Preset Scene
Press the Manual-button and select the desired projector via the respective projector select button. You can
choose all projectors at once if you hold the Manual-button for approx. 2 seconds.
Press the Scene-button and the display shows "Preset Scene". Select the desired Preset Scene via the
respective projector select button. If a Preset Scene has already been assigned to this button, the respective
projector name is shown in the display. Select a free button where no projector name appears.
Press the Edit-button and the display shows "Preset Mask Empty". Press the Mask-button and select the
desired projector via the respective projector select button. Press the Edit-button in order to return to the editmode. Adjust the desired settings and save them via the Enter-button. The display shows "Saving" and the
Preset Scene is now saved on the respective button. Press the Recall-button in order to return to the main
menu.
6.3.2 Recalling a Preset Scene
Press the Manual-button and select the desired projector via the respective projector select button. You can
choose all projectors at once if you hold the Manual-button for approx. 2 seconds.
Press the Scene-button and the display shows "Preset Scene". Select the desired Preset Scene via the
respective projector select button. The projector moves to the defined position and projects the respective
settings.
6.3.3 Editing a Preset Scene
Press the Manual-button and select the desired projector via the respective projector select button. You can
choose all projectors at once if you hold the Manual-button for approx. 2 seconds.
Press the Scene-button and the display shows "Preset Scene". Select the desired Preset Scene via the
respective projector select button. The projector moves to the defined position and projects the respective
settings. Press the Edit-button in order to adjust the desired settings and save them via the Enter-button.
31
6.4 Preset Macros
A Preset Macro is a pre-adjusted channel setting which can be recalled at any time. With the CP-256/32, you
can program up to 16 different Preset Macros which can be assigned to the projector select buttons 1-16.
The buttons 1-8 refer to the settings of the first DMX-channel, the buttons 9-16 to those of DMX-channel 2.
Macros are useful for using one button in order to call up certain functions that are on different DMXchannels of the projectors. If, for example, the colour green can be found on DMX-value 20 of one projector
and on 40 of another, you can call up the same colour of both projectors via the macro "green".
6.4.1 Programming a Preset Macros
Press the Manual-button and select the desired projector via the respective projector select button.
Press the Macro-button and choose the desired projector select button (e.g. projector select button 1 - macro
green). Adjust the desired colour (e.g. green) via channel fader 1. Press the Enter-button in order to save the
setting. Press the Macro-button in order to leave the Macro-mode.
Select the next projector via the respective projector select button. Press the Macro-button and choose the
same projector select button as for projector 1 (e.g. projector select button 1 - macro green). Adjust the
desired colour (e.g. green) via channel fader 1. Press the Enter-button in order to save the setting. Press the
Macro-button in order to leave the Macro-mode.
6.4.2 Recalling a Preset Macro
Press the Manual-button and select the desired projectors via the respective projector select buttons.
Press the Macro-button and choose the desired projector select button (e.g. projector select button 1 - macro
green). All selected projectors show the chosen colour (e.g. green). Press the Macro-button in order to leave
the Macro-mode.
6.4.3 Editing a Preset Macro
Press the Manual-button and select the desired projector via the respective projector select button.
Press the Macro-button and choose the desired projector select button for editing the macro (e.g. projector
select button 1 - macro green). Adjust the desired colour (e.g. green) via channel fader 1. Press the Enterbutton in order to save the setting. Press the Macro-button in order to leave the Macro-mode.
Select the next projector via the respective projector select button. Press the Macro-button and choose the
same projector select button as for projector 1 (e.g. projector select button 1 - macro green). Adjust the
desired colour (e.g. green) via channel fader 1. Press the Enter-button in order to save the setting. Press the
Macro-button in order to leave the Macro-mode.
6.5 Programming
A program is a sequence of different scenes that will be called up one after another. With the CP-256/32, you
can program up to 32 different programs which can be assigned to the projector select buttons 1-32.
6.5.1 Programming a program
Press the Menu-button and select "Menu 2 Make Prog." via the Up/Down-buttons or the Data Entry fader.
Press the Enter-button twice. Select the desired program via the projector select buttons. Adjust the desired
settings via the encoders and the respective channel faders. Select the next projector via the projector select
buttons and adjust the settings. Press the Enter-button in order to save the first step. Program the next steps
until the program is finished or the maximum number of steps - 16 has been reached. Press the Escapebutton and the Enter-button in order to save the program.
6.5.2 Running a program
Press the Program-button and select the desired program via the projector select buttons. Adjust the
program speed via the Speed-control and the repitition rate via the Rate-control.
In order to selecth the programs 17-32 you first have to press the Up-button.
6.5.3 Checking a program
Press the Program-button and select the desired program via the projector select buttons. Press the Scene32
button and check every scene individually by pressing the respective projector select button.
6.5.4 Editing a program
Should you notice that a scene does not correspond to your imagination or when programs have to be edited
for a new stage, it is necessary to modify a scene manually.
First note the total number of steps. Press the Menu-button and and select "Menu 2 Make Prog." via the
Up/Down-buttons or the Data Entry fader. Press the Enter-button twice. Select the desired program via the
projector select buttons.
Select the desired scene via the Up/Down-buttons. If you hold the Recall-button and press the Up/Downbutton at the same time, the current scene is shown. Select the desired projector via the projector select
buttons. Adjust the desired settings via the encoders and the respective channel faders. Select the next
projector via the projector select buttons and adjust the settings. Press the Enter-button in order to save the
edited step. Edit the next steps until the program is finished.
Caution: Before leaving the Edit-Mode, the last step of the program has to be saved another time.
Otherwise, the program will not run correctly.
Select the last scene via the Up/Down-buttons. Press the Recall-button in order to show the memorized
scene. Save this scene by pressing the Enter-button. Press the Escape-button and the Enter-button in order
to save the edited program.
6.5.5 Selecting the projectors in the program
The number of projectors to be used in a program can be individually adjusted for every program.
Press the Menu-button and and select "Menu 2 Make Prog." via the Up/Down-buttons or the Data Entry
fader. Press the Enter-button. Select the menu "Edit Mask" via the Up/Down-buttons and press the Enterbutton.
Select the desired projector via the Projector Select button. All project numbers marked with "*" are activated
in the program and the respective Projector Select button flashes. If you wish to remove certain projectors
from the program, press the respective Projector Select button. The LED turns off and the display shows "X".
Press the Enter-button twice in order to save the settings.
6.5.6 Inverting the Pan/Tilt movement
The Pan and Tilt movement of a scanner can be inverted for every program. This function is particularly
useful if scanners are installed face to face in the room and a synchronic movement is desired.
Caution: Please note that the inverting of the Pan/Tilt movement has to be adjusted before you start
programming.
Press the Menu-button and and select "Menu 2 Make Prog." via the Up/Down-buttons or the Data Entry
fader. Press the Enter-button. Select the menu "Make Program Mirror Direction" via the Up/Down-buttons
and press the Enter-button.
Select the desired projector via the Projector Select button. All project numbers marked with "->" have the
normal Pan-direction. If you wish to invert the Pan-movement for certain projectors, press the respective
Projector Select button. The display shows "<-" for the projector with inverted Pan-movement.
Press the Down-button in order to invert the Tilt-movement.
Press the Escape-button in order to return to the menu "Make Program2. Program your program now.
6.6 Records
A record is a sequence of different programs that will be called up one after another. With the CP-256/32,
you can program up to 32 different records which can be assigned to the projector select buttons 1-32.
6.5.1 Programming a Record
Press the Menu-button and select "Menu 1 Make Record" via the Up/Down-buttons or the Data Entry fader.
Press the Enter-button. Select the desired record via the projector select buttons. The display shows the
Step-number and the respective program, the program speed and the repition rate or sound-control.
Adjust the desired program via the projector select buttons. Adjust the program speed and the repition rate
via the Speed-control or Rate-control or activate the sound-control via the Music-button.
Select the next step via the Up/Down-buttons or the Data Entry fader and enter the desired program via the
projector select buttons. Program the next steps until the record is finished or the maximum number of steps
- 99 - has been reached. Press the Escape-button and the Enter-button in order to save the record.
33
6.6.2 Running a Record
Press the Record-button and select the desired record via the projector select buttons.
6.6.3 Editing a Record
Should you notice that a record does not correspond to your imagination you can edit it.
First note the total number of steps. Press the Menu-button and select "Menu 1 Make Record" via the
Up/Down-buttons or the Data Entry fader. Press the Enter-button. Select the desired record via the projector
select buttons.
Select the desired step via the Up/Down-buttons or the Data Entry fader and enter the desired program via
the projector select buttons. Edit the next steps until the record is corrected. Press the Escape-button and
the Enter-button in order to save the edited record.
6.7 Copying scenes, programs and records
With the Copy-function, you can make programming of programs and records easier by copying already
existent scenes into a program.
Press the Menu-button and select "Menu 2. Make Program" via the Up/Down-buttons or the Data Entry
fader. Press the Enter-button. Select "Copy" via the Up/Down-buttons and press the Enter-button.
Scene: Enter from which program you want to copy which scene. Enter to which program you want to copy
which scene. Press the Enter-button twice.
Program: Enter from which program you want to copy where. Press the Enter-button twice.
Record: Enter from which record you want to copy where. Press the Enter-button twice.
6.8 Sound-control
You can activate the sound-control by pressing the Music-button (LED flashes). Please note that programs
and records are only active in this mode when the controller receives a music-signal (whether via the
microphone or the Audio-socket). If there is no music present, the program or record stops.
When programming records, you can determine the sound-control to be active or not for every program.
6.9 Chaser
A chaser is a sequence of different pictures that will be called up one after another. The light output of the
projector will be opened and closed again so that a very vivid movement appears. With the CP-256/32, you
can program up to 99 different records of which 32 can be assigned to the projector select buttons 1-32.
Chaser can be linked with programs or scenes.
6.9.1 Running a chaser
Press the Sequence-button and the current chaser will be run. By holding the Sequence-button, you can
enter the Chaser Edit-mode. If this mode is selected from a program, the chasers are shown that have been
defined during the programming. Here, you can manually select a chaser via the Projector Select-buttons
and adjust the Chaser-speed via the Data Entry Fader. As an alternative, you can activate the sound-control
via the Music-button.
If you wish to return to the chasers of the program, press the active Projector Select-button once more so
that the LED turns off.
6.9.2 Link a program with a chaser
With the CP-256/32, you can link programs and scenes of a program with an individual chaser.
Press the Menu-button and select "Menu 3 Make Chaser" via the Up/Down-buttons or the Data Entry fader.
34
Press the Enter-button. Select the menu "Chaser Link" via the Up/Down-buttons or the Data Entry fader and
press the Enter-button. Select the desired program via the projector select buttons.
Select the desired chaser for scene 1 via the Left/Right-button. Select the next scenes via the respective
Projector Select-button and enter the desired chaser. Press the Enter-button twice in order to save the
program.
6.9.3 Link a Preset Scene with a chaser
Press the Menu-button and select "Menu 3 Make Chaser" via the Up/Down-buttons or the Data Entry fader.
Press the Enter-button. Select the menu "Chaser Preset Link" via the Up/Down-buttons or the Data Entry
fader and press the Enter-button.
Select the desired chaser for Preset Scene 1 via the Left/Right-button. Select the next Preset Scenes via the
respective Projector Select-button and enter the desired chaser. Press the Enter-button twice in order to
save the Preset Scenes.
The occupation of the Projector Select-buttons in the menu "Link Chaser Preset" corresponds to the
occupation that can be recalled via the Sequence-button. If you wish to link another of the 99 available
chaser to a Projector Select-button, please proceed as described above.
6.9.4 Edit a chaser
Press the Menu-button and select "Menu 3 Make Chaser" via the Up/Down-buttons or the Data Entry fader.
Press the Enter-button. Select the menu "Chaser Edit" via the Up/Down-buttons or the Data Entry fader and
press the Enter-button. Select the desired chaser via the Up/Down-buttons or the Data Entry fader.
Press the Enter-button in order to edit step 1. Enter the desired picture via the Projector Select-buttons (e.g.
button 1, 2, 3 and 4 on) and press the Enter-button. Enter the Chaser-speed via the Up/Down-buttons or the
Data Entry fader and press the Enter-button.
Press the Right-button and edit step 2. Edit all desired steps and save the changes via the Escape and
Enter-button.
6.10 Basic settings
With the CP-256/32, you can adjust different basic settings like projector names, effect names, greeting text
etc. to the user's requirements.
Press the Menu-button and select "Menu 5 Setup" via the Up/Down-buttons or the Data Entry fader. Press
the Enter-button and the display shows "Code____". Enter the Code 2222 and press the Enter-button.
6.10.1 Rename unit
Select " Setup 1. Rename unit" via the Up/Down-buttons or the Data Entry fader and press the Enter-button.
Select the desired projector via the Up/Down-buttons or the Data Entry fader and press the Enter-button. The
cursor of the second field starts flashing and you can change the letters via the Up/Down-buttons or the Data
Entry fader. You can jump from one field to another using the Left/Right-buttons. As soon as you have
finished your inputs, press the Enter-button twice in order to save the settings.
6.10.2 Rename effect
Select " Setup 2. Rename effect" via the Up/Down-buttons or the Data Entry fader and press the Enterbutton. Select the desired effect via the Up/Down-buttons or the Data Entry fader and press the Enter-button.
The cursor of the second field starts flashing and you can change the letters via the Up/Down-buttons or the
Data Entry fader. You can jump from one field to another using the Left/Right-buttons. As soon as you have
finished your inputs, press the Enter-button twice in order to save the settings.
6.10.3 Rename type
Select " Setup 3. Rename type" via the Up/Down-buttons or the Data Entry fader and press the Enter-button.
Select the desired projector via the Up/Down-buttons or the Data Entry fader and press the Enter-button. The
cursor of the second field starts flashing and you can change the letters via the Up/Down-buttons or the Data
Entry fader. You can jump from one field to another using the Left/Right-buttons. As soon as you have
35
finished your inputs, press the Enter-button twice in order to save the settings.
6.10.4 Configure unit
Select "Setup 4. Configure unit" via the Up/Down-buttons or the Data Entry fader and press the Enter-button.
Select the desired projector via the Up/Down-buttons or the Data Entry fader and press the Enter-button.
Enter the number of DMX-channels via the Data Entry fader or confirm the selection "16" with the Enterbutton. Enter the desired channel fader behind "Pot:" and confirm with the Enter-button. Select the desired
function and confirm with the Enter-button. Enter the respective channel of the projector and confirm with the
Enter-button. Select the desired effect and confirm with the Enter-button. Enter the respective DMX-value
and confirm with the Enter-button.
If you do not want to enter any more effects, press the Esc-button and enter the next channel. Please note
that the display does not show any function afterwards.
If the display says occupied, you can overwrite the occupation with the Enter-button.
After all effects have been entered, press the Escape-button and the display shows "B.Out: Scan?Dim?".
Select "Scan" for scanners and Moving Heads and "Dim" for dimmers via the Left/Right-buttons and confirm
with the Enter-button. The display shows "Save changes?". Press the Enter-button in order to save the
settings or the Escape-button in order to return to the main menu.
6.10.5 New typical
Select " Setup 5. New typical" via the Up/Down-buttons or the Data Entry fader. Press the Enter-button.
Select the desired menu via the Up/Down-buttons or the Data Entry fader and press the Enter-button.
Select language
Within the menu "Select Language", you can change the desired language. Select the desired language via
the Up/Down-buttons or the Data Entry fader and press the Enter-button.
Select code
Within the menu "Select Code", you can change the preset code for the main menu and for the Setup-menu.
Select New Menu Code in order to change the code for the main menu or New Setup Code in order to
change the code for the setup menu and press the Enter-button.
Enter the new code via the Projector Select buttons and press the Enter-button. If you want to unlock the
respective menu, only press the Enter-button without entering any number.
Addressing mode
Within this menu, you can adjust how the CP-256/32 shall assign the DMX-addresses. The standard setting
is "Automat 16", i.e. the CP-256/32 will automatically assign 16 DMX-channels to every projector. The setting
"Automat in Row" means that the DMX-adresses will be assigned in accordance with the actually required
DMX-channels of a projector (e. g. 4 channels for Futurelight SC-240). The setting "Manually" means that the
user can freely assign the DMX-adresses.
Select the desired setting via the Up/Down-buttons or the Data Entry fader and press the Enter-button.
Greeting text
Within this menu, you can change the greeting text. Please note that the greeting text can only be changed
once and contain a maximum of 64 letters.
Press the Enter-button. The cursor of the second field starts flashing and you can change the letters via the
Up/Down-buttons or the Data Entry fader. You can jump from one field to another using the Left/Rightbuttons. As soon as you have finished your inputs, press the Escape-button and the Enter-button in order to
save the settings.
6.10.6 Adjust the encoders-sensitivity
With the CP-256/32 you can adjust the encoders-sensitivity steplessly between 0 % (lowest sensitivity) and
100 % (highest sensitivity).
Select "Setup 6. Joy Config" via the Up/Down-buttons or the Data Entry fader. Press the Enter-button. Select
the desired encoders-sensitivity via the Up/Down-buttons or the Data Entry fader and press the Enter-button
twice.
6.10.7 Operating hour meter
Select " Setup 7. Worked time" via the Up/Down-buttons or the Data Entry fader and press the Enter-button.
The display shows the operating hours of the device.
36
7. Problem chart
PROBLEM:
No power.
CAUSE:
The power unit is not connected.
Cannot enter main menu.
Forgot code or wrong input.
The colour or gobo cannot
be saved in the Preset
Macro.
The program cannot be
edited.
The controller could not save the
settings.
The individual scenes are
not displayed when editing
a program.
The Recall-button has not been
pressed.
The last scene has not been saved.
REMEDY:
Check the connection cable of the
power unit and any extension-cables.
Open the envelope with the Master
Code and follow the instructions.
Please enter the settings again and
save every projector individually.
Check if all scenes of the program are
available. Edit the program again and
save the last scene by pressing the
Enter-button.
Press the Recall-button in order to
display the saved scene.
8. Cleaning and maintenance
DANGER TO LIFE!
Disconnect from mains before starting maintenance operation!
We recommend a frequent cleaning of the device. Please use a soft lint-free and moistened cloth. Never use
alcohol or solvents!
There are no servicable parts inside the device. Maintenance and service operations are only to be carried
out by authorized dealers.
Should you need any spare parts, please use genuine parts.
Should you have further questions, please contact your dealer.
9. Technical specifications
Power supply:
230 V AC, 50 Hz ~
via 12-15 V DC, 500 mA power unit included in the delivery
Power consumption:
6W
Number of control-channels: 256
Sound-control:
either via ¼” Jack or built-in microphone
Sound-input:
¼” stereo Jack
Audio-sensitivity:
0.3 - 1 V
DMX 512-output:
3-pin XLR-connector
Free chasers:
32
Dimensions (LxWxH):
483 x 176 x 105 mm
19" mounting dimensions with 4 u
Minimum mounting depth:
90 mm
Weight:
4 kg
All rights reserved (including those of translations in other languages). No part of this user manual
may be reproduced or changed without written permission from the publisher.
Please note: Every information is subject to change without prior notice. 09/02 ©
37
CP-256/32 Contrôleur DMX
Mode d'emploi
Sommaire
1. Introduction..................................................................................................................40
2. Instructions de sécurité ..............................................................................................40
3. Emploi selon les prescriptions...................................................................................41
4. Description de l'appareil .............................................................................................41
4.1 Features ..................................................................................................................41
4.2 Aperçu de l'appareil .................................................................................................42
5. Setup.............................................................................................................................43
5.1 Montage...................................................................................................................43
5.2 Contrôle par le son ..................................................................................................43
5.3 Connexion au projecteur..........................................................................................43
6. Maniement ....................................................................................................................45
6.1 Détermination des projecteurs à utiliser...................................................................45
6.1.1 Enregistrer un projecteur de la bibliothèque
6.1.2 Enregistrer un autre appareil
6.1.3 Enregistrer une groupe de projecteurs
45
47
48
6.2 Mode manuel...........................................................................................................47
6.2.1 Appeler un projecteur manuellement
6.2.2 Eliminer un projecteur du programme
47
48
6.3 Preset Scene ...........................................................................................................48
6.3.1 Programmer une Preset Scene
6.3.2 Appeler une Preset Scene
6.3.3 Éditer une Preset Scene
48
48
48
6.4 Preset Macro ...........................................................................................................49
6.4.1 Programmer un Preset Macro
6.4.2 Appeler un Preset Macro
6.4.3 Éditer un Preset Macro
49
49
49
6.5 Programmation ........................................................................................................49
6.5.1 Programmation d' un programme
49
38
6.5.2 Appeler un programme
6.5.3 Vérifier un programme
6.5.4 Éditer un programme
6.5.5 Sélection des projecteurs dans le programme
6.5.6 Inverser le mouvement Pan/Tilt
50
50
50
50
50
6.6 Records ...................................................................................................................50
6.6.1 Programmation d' un record
6.6.2 Appeler un record
6.6.3 Éditer un record
51
51
51
6.7 Copier des scènes, des programmes et des records ..............................................51
6.8 Activation du contrôle par le son..............................................................................51
6.9 Chaser .....................................................................................................................51
6.9.1 Appeler un chaser
6.9.2 Lier un programme avec un chaser
6.9.3 Lier une Preset Scene avec un chaser
6.9.4 Éditer un chaser
52
52
52
52
6.10 Réglages de base..................................................................................................52
6.10.1 Renommer un projecteur
6.10.2 Renommer un effet
6.10.3 Renommer un type
6.10.4 Ajuster un projecteur
6.10.5 Ajuster les caractéristiques
6.10.6 Ajuster la sénsibilité des encoders
6.10.7 Compteur d’heures de service
53
53
53
53
53
54
54
7. Problèmes ....................................................................................................................54
8. Nettoyage et maintenance ..........................................................................................54
9. Caractéristiques techniques.......................................................................................55
39
ATTENTION!
Protéger de l‘humidité!
Débrancher avant toute manipulation!
POUR VOTRE PROPRE SÉCURITÉ, VEUILLEZ LIRE CE MODE D‘EMPLOI
ATTENTIVEMENT AVANT LA PREMIÈRE MISE EN SERVICE!
1. Introduction
Nous vous remercions d'avoir choisi un contrôleur CP-256/32. Si vous respectez les instructions de service
suivantes, vous allez profiter longtemps de votre achat.
Sortez le CP-256/32 de son emballage.
Avant la première mise en service, assurez vous que l'appareil n'a pas subi de dommages évidents lors de
son transport. Si vous devriez détecter des dommages au câble de secteur ou au boîtier, ne mettez pas
l’appareil en service, mais contactez immédiatement votre revendeur.
2. Instructions de sécurité
ATTENTION!
Soyez prudent, lors de manipulations électriques avec une tension dangereuse vous
êtes soumis à des risques d'électrocution!
Cet appareil a quitté les ateliers dans un état irréprochable. Pour assurer un bon fonctionnement, sans
danger, l'utilisateur doit suivre les instructions contenues dans ce mode d'emploi.
Attention:
Tout dommage occasionné par la non observation des instructions de montage ou d'utilisation n'est
pas couvert par la garantie.
Le bloc d'alimentation doit toujours être branché en dernier lieu. Assurez-vous que l'interrupteur ON/OFF de
l'appareil est en position OFF avant d'effectuer ce branchement.
Tenez l'appareil éloigné de toute source de chaleur.
Lorsque l'appareil est transporté d'un endroit froid à un endroit chaud, il se forme de la condensation
susceptible d'endommager les modules électroniques. Ne pas brancher l'appareil avant qu'il ait atteint la
température ambiante.
La construction de l'appareil est conforme aux normes de sécurité de catégorie III. On doit toujours utiliser l'
appareil avec un transformateur.
Débranchez l'appareil lorsque vous ne l'utilisez pas et avant de le nettoyer.
Tout dommage résultant d'une modification sur l'appareil n'est pas couvert par la garantie.
Tenir les enfants et les novices éloignées de l'appareil.
L'intérieur de l'appareil ne contient pas de partys nécessitant un entretien. L'entretien et les réparations
doivent être effectuées par un technicien compétent!
40
3. Emploi selon les prescriptions
Cet appareil est un contrôleur DMX pour contrôler des effets lumineux DMX. Ce produit doit seulement être
connecté avec une tension alternative de 230 V, 50 Hz et a été conçu uniquement pour un usage dans des
locaux clos.
Eviter les secousses et l'emploi de force lors de l’installation ou l'utilisation de l'appareil.
Quand choisir le lieu d'installation, évitez toutefois les endroits humides, poussiéreux ou trop chauds.
Assurez-vous que les câbles ne traînent pas au sol. Il en va de votre propre sécurité et de celle d'autrui.
N'utilisez l'appareil qu'après avoir pris connaissance de ses fonctions et possibilités. Ne laissez pas des
personnes incompétentes utiliser cet appareil. La plupart des pannes survenant sur cet appareil sont dues à
une utilisation inappropriée par des personnes incompétentes.
Si vous deviez transporter l'appareil, utilisez l'emballage d'origine pour éviter tout dommage.
Notez que pour des raisons de sécurité, il est interdit d'entreprendre toutes modifications sur l'appareil.
Il est interdit de retirer le code barre de l'appareil. Ceci annulerait toute garantie.
Si l'appareil est utilisé autrement que décrit dans ce mode d'emploi, ceci peut causer des dommages au
produit et la garantie cesse alors. Par ailleurs, chaque autre utilisation est liée à des dangers, comme par ex.
court circuit, incendie, électrocution, etc.
Garder sûrement l'enveloppe avec le Master Code.
4. Description de l'appareil
4.1 Features
Contrôleur DMX programmable
256 canaux de contrôle pour 16 projecteurs avec jusqu’à 16 canaux DMX • Résolution 16 bit pour un
mouvement Pan/Tilt doux • Ample bibliothèque de projecteurs • 32 programmes avec jusqu’à 16 scènes
programmables • 16 Preset Scenes, 16 Preset Macros • 5 langues différents • Inverser le mouvement
Pan/Tilt possible • Fonction de copie pour programme et records • 99 chasers peuvent être assignés pour
chaque programme • Fonction Blackout • Contrôle par le son grâce au Jack 6,3 mm mono ou microphone
intégré • Protection grâce au password • Compteur d’heures de service • 19" dimensions de montage avec 4
unités
41
4.2 Aperçu de l'appareil
Aperçu des éléments de manipulation
1) FADERS CANAUX
Pour ajuster les valeurs DMX. Pressez la touche sélecteurs de projecteur respective et ajuster les
canaux 1-8 en mouver le fader réspectif. Vous pouvez ajustez les canaux 9-16 en changer la selection
en CH 9-16 avec la touche Menu.
2) TOUCHES SELECTEURS DE PROJECTEUR
Pour la sélection du projecteur désiré.
3) TOUCHE MANUAL
En pressant la touche Manual, vous pouvez ajuster un projecteur manuellement.
4) TOUCHE RECALL
En pressant la touche Recall, vous pouvez canceller le mode manuel.
5) TOUCHE SEQUENCE
6) TOUCHES UP/DOWN
En appuyant sur la touche correspondante, vous changez les réglages pas à pas. Si vous tenez la
touche, l’affichage se mouve vers le haut ou vers le bas.
7) TOUCHE MENU
En pressant la touche Menu, vous pouvez mouver dans le menu principal.
Dans le mode manuel, vous pouvez commuter les faders canaux de CH 1-8 à CH 9-16 en pressant la
touche Menu.
8) DISPLAY
9) TOUCHES LEFT/RIGHT
10) TOUCHE ESC
En pressant la touche Escape, vous pouvez exiter le menu actuel. Quand vous avez effectués des
changes, vous pouvez les mémoriser avec la touche Enter ou canceller avec la touche Esc.
11) TOUCHE ENTER
Pour la confirmation de votre entree.
12) TOUCHE SCENE
13) TOUCHE PROGRAM
14) TOUCHE RECORD
15) TOUCHE COPY
16) ENCODER
Pour le contrôle manuel de la miroir de déflexion.
17) REGULATEUR SPEED
18) REGULATEUR RATE
19) DATA ENTRY FADER
20) TOUCHE MUSIC
Si cette DEL clignote, le contrôleur se trouve en mode Audio (fonctionnement avec contrôle par le son).
21) TOUCHE POWER/BLACKOUT
Pour mettre l'appareil en service.
La fonction Blackout bloque la sortie de lumière de tous les appareils raccordés via le Shutter et arrête le
programme.
Attention: Il faut appuyer sur la touche Blackout (DEL n'est pas illuminée), aussitôt qu'un programme est
appelé, comme autrement aucune sortie de lumière sera visible.
42
Panneau arrière:
22) Douille de sortie DMX
23) Douille d’alimentation
24) Douille d’entrée audio
5. Setup
5.1 Montage
Installez l'appareil sur une surface plane.
Montage du rack: Cet appareil est prévu pour un 19“ rack (483 mm). Le rack devrait être un modèle „DoubleDoor“ avec la possibilité d’ouvir la face avant, ainsi que la face arrière. Le boîtier du rack devrait être équipé
d’un ventilateur. Faites attention à ce que l’air chaude puisse s’échapper du rack et qu’il y ait suffisamment
de distance vers les autres appareils.
Vous pouvez fixer le contrôleur avec quatre vis M6 au rack.
Connectez le cable de connexion avec la douille DC IN. Branchez le bloc d'alimentation.
5.2 Contrôle par le son
Le contrôle par le son est possible grâce au Jack 6,3 mm mono ou microphone intégré.
Si l’CP-256/32 doit travailler avec un signal de son à la douille Audio In, connectez la douille Jack au signal
son de la sortie du casque d’écoute ou la seconde sortie réglable de la table de mixage (si disponible) ou
avec une sortie haut-parleur de l’amplificateur.
Tip:
Sleeve:
Data +
Corps
ATTENTION: Ne connectez jamais l’entrée Audio à la sortie DMX. Cela peut détruire l'électronique
(translateurs DMX).
5.3 Connexion au projecteur
Projector 1
Starting address 1
Projector 2
Starting address 17
43
Projector 3
Starting address 33
Faites attention que les fils du câble de données n'ont pas de contact entre eux.
Il se peut autrement que les appareils ne
fonctionneront pas correctement.
Le raccord entre le contrôleur et le projecteur ainsi qu’entre les appareils individuels doit être effectué avec
un câble gainé bipolare. La connexion à fiches est effectuée par une fiche XLR à 3 pôles et des couplages.
Occupation de la connexion XLR:
Quand vous utilisez les projecteurs recommandés de FUTURELIGHT, vous pouvez directement connecter la
sortie DMX du contrôleur avec l'entrée DMX du premier appareil de la chaîne DMX. Quand vous voulez
connecter des contrôleurs DMX avec des sorties DMX différentes, il est nécéssaire d'utiliser des câbles
d'adaptation.
Connecter une chaîne DMX serielle:
Connectez la sortie DMX du CP-256/32 à l’entrée DMX de l'appareil le plus proche. Toujours connectez une
sortie avec une entrée de l'appareil prochain jusqu'à ce que tous les appareils soient connectés.
Attention: Au projecteur ultérieur, le câble DMX doit être obturé par une résistance de termination. Braser
une résistance de 120 Ω sur la prise XLR entre Signal (-) et Signal (+) et l’attacher dans la sortie DMX de
l’appareil ultérieur.
Codage des projecteurs
S'il-vous-plaît considérez que le CP-256/32 assigne les adresses DMX start en pas de 16. Vous devez coder
le projecteur correspondant à l'adresse start désirée, sinon, l'assignement des canaux n'est pas correcte.
Tous les projecteurs adressés avec une même adresse, fonctionnent de manière synchronisée.
Projecteur
Adresse start
Projecteur
Adresse start
Projecteur
Adresse start
Projecteur 1
1
Projecteur 3
33
Projecteur 5
65
Projecteur 2
17
Projecteur 4
49
Projecteur 6
81
44
6. Maniement
Avec la touche Power, vous pouvez mettre l'appareil sous/hors ténsion.
Après d'appuyer la touche Power, les DELs commencent à clignoter et le texte de salutation apparaît dans
l'affichage. Appuyez une touche arbitraire et l'affichage indique "Code____". Entrez le code 1111 et appuyez
sur la touche Enter.
SCENE:-- PROG:-REC:-- CHASER:--
Maintenant, vous êtes au menu principal. Vous pouvez
toujour retourner au menu principal en appuyant la touche
Escape (veuillez réspecter la option "Memorizer") ou la
touche Recall (en mode manuel).
Appuyer sur la touche Menu et choisissez "Menu 5 Make Setup" grâce aux touches Up/Down ou le fader
Data Entry. Appuyez sur la touche Enter et l'affichage indique "Code____". Entrez le code 2222 et appuyez
sur la touche Enter.
Choisissez "Setup 5. New Typical" grâce aux touches Up/Down ou le fader Data Entry et appuyez sur la
touche Enter. Sélectionnez le menu "Select Language" grâce aux touches Up/Down ou le fader Data Entry
et appuyez sur la touche Enter. Choisissez la langue souhaitée grâce aux touches Up/Down et confirmez la
sélection avec la touche Enter.
Veuillez réspecter que vous deviez presser la touche Power pour c. 5 secondes jusqu'à l'appareil est mis
hors de service.
6.1 Détermination des projecteurs à utiliser
L'occupation des touches Projecoor Select à partir de l'usine est:
1
2
3
4
5
6
7
8
SC-240
SC-240
SC-240
SC-240
SC-370
SC-370
SC-370
SC-370
9
10
11
12
13
14
15
16
SC-570
SC-570
SC-570
SC-570
SC-780
SC-780
SC-780
SC-780
Pour occuper une touche de projecteur avec un autre appareil, vous procédez comme suit:
6.1.1 Enregistrer un projecteur de la bibliothèque
Appuyer sur la touche Menu et choisissez "Menu 4 Soft Patch" grâce aux touches Up/Down ou le fader Data
Entry. Appuyez sur la touche Enter. Choisissez le projecteur désiré pour la touche Projector Select 1 grâce
aux touches Up/Down ou le fader Data Entry.
Appuyez la touche Projector Select 2 et choisissez le projecteur désiré. Enregistrez toutes les 32 touches
avec les projecteurs désirés.
Appuyez sur la touche Escape et mémorisez les changements grâce à la touche Enter.
Résumé des projecteurs disponibles:
N°.
1
2
3
4
5
6
7
CP-256 nom
AS-200
CC-200
CLAYPHPE
CLAYP MS
DIM-12
DIM-8
DOMIN II
Fabricant
Futurelight
Futurelight
Clay Paky
Clay Paky
Futurelight
Designation
Advertising SCAN AS-200
CC-200
Clay Paky HPE
CLAY Paky Mini Scan
Dim-12
Dim-8
DOMINATOR II
45
Canaux
11
4
7
4
12
8
12
8
9
10
11
12
13
14
15
16
17
18
19
20
21
22
23
24
25
26
27
28
29
30
31
32
33
34
35
36
37
38
39
40
41
42
43
44
45
46
47
48
49
50
51
52
53
54
55
56
57
58
59
60
61
62
63
64
DRAGON-3
DRAGON-2
HURRICAN
IMAGE
INSTALL
MAC 250
MAC 300
MAC 500
MAC 600
MACPROF
MACWASH
MH-640
MH-660
MH-680
MH-860
M.HEAD
MINISCAN
MIRACLE
Mpro 2000
M.ULTRA1
M.ULTRA2
MX-1
MX-4
PRO1220
PRO 218
PRO 400
PRO 518
PRO 918
PROMO3
PS/D-200
ROBCOL-2
ROUL-575
SATSCAN2
SATSCAN3
SC-240
SC-250
SC-370
SC-570
SC-740
SC-780
SC-980
SCAN2pro
SCAN3rot
SCAN-3
SCAN2rot
SCAN-2
SHARK
SHOWMON2
STRATOS
TB-3
TC-3
TG-3
TORLIGHT
TORNDIGI
TS-3
TSIXTY
WARRIOR2
Pako Kft.
Pako Kft.
F.A.L.
Martin
Martin
Martin
Martin
Martin
Martin
Martin
Futurelight
Futurelight
Futurelight
Futurelight
Gemini
SHOW 99' Kft.
Futurelight
Martin
TAS
TAS
Martin
Martin
Martin
Martin
Martin
Martin
Martin
Martin
Futurelight
Martin
F.A.L.
Saturn Kft.
Saturn Kft.
Futurelight
Futurelight
Futurelight
Futurelight
Futurelight
Futurelight
Futurelight
SHOW 99' Kft.
SHOW 99' Kft.
SHOW 99' Kft.
SHOW 99' Kft.
SHOW 99' Kft.
F.A.L.
SHOW 99' Kft.
F.A.L.
Eurolite
Eurolite
Eurolite
Saturn Kft.
Saturn Kft.
Eurolite
F.A.L.
SHOW 2000
Dragon-3
Dragon-2
Hurrican
Image Scan
Install
Mac-250
Mac-300
Mac-500
Mac-600
Mini MAC Profiler
MAC Washer
MH-640
MH-660
MH-680
MH-860 Spotlight
Motor Head
Miniscan
Miracle
Magnum Pro 2000
Mini Ultra Scan-1
Mini Ultra Scan-2
MX-1
MX-4
Robo Scan Pro 1220
Robo Scan Pro 218
Robo Color Pro 400
Robo Scan Pro 518
Robo Scan Pro 918
Promo-3
Promotion SCAN PS/D-200
Robo Color 2
Roulette 575
Saturn Scan 2
Saturn Scan 3
SC-240
SC-250
SC-370
SC-570
SC-740
SC-780
SC-980
Scan-2 pro
Scan-3 rot
Scan-3
Scan-2 rot
Scan-2
SHARK
Showmoon-2
Stratos Scan
Eurolite TB-3
Eurolite TC-3
Eurolite TG-3
Tornado Light
Tornado Digi
Eurolite TS-3
Three Sixty
Warrior-2
46
8
8
4
7
16
11
11
14
12
10
8
16
14
16
16
5
10
4
1
6
8
7
7
15
7
7
9
14
6
11
6
8
10
10
4
6
4
8
13
14
4
8
6
6
6
6
9
6
14
4
1
1
10
14
4
8
6
6.1.2 Enregistrer un autre appareil
Quand vous voulez enregistrer un autre projecteur, sélectionnez la désignation de projecteur "Install" ou
prenez le SC-780 ou un autre appareil FUTURELIGHT comme modèle et changez les réglages.
Il est judicieux de prendre un modèle avec 4 canaux DMX (p.ex. Futurelight SC-240) pour un appareil avec 4
canaux DMX (p.ex. Eurolite TS-3). Veuillez réspecter que le modèle n'est plus disponible quand vous avez
changé l'appelation de projecteur.
Les canaux doivent être occupé de telle manière que l'indication de fonction dans le contrôleur correspond
avec les fonctions réelles du projecteur. S'il vous-plaît prenez les informations concernant les canaux de
commande DMX et leurs fonctions du mode d'emploi de votre projecteur.
Renommer un projecteur
Veuillez faire attention aux instructions sous 6.10.1 Renommer un projecteur.
Ajuster un projecteur
Veuillez faire attention aux instructions sous 6.10.4 Ajuster un projecteur.
6.1.3 Enregistrer une groupe de projecteurs
Avec le CP-256/32, vous pouvez enregistrer 4 groupes de projecteurs différentes. Pour chaque groupe, vous
pouvez jouer un programme différent. Tous projecteurs d'une groupe joue le programme sélectionné avec la
même vitesse. Au même moment, une autre groupe peut jouer un programme différent avec une vitesse
différente.
Appuyer sur la touche Menu et choisissez "Menu 2. Make Program" grâce aux touches Up/Down ou le fader
Data Entry. Appuyez sur la touche Enter. Choisissez "Make Group" grâce aux touches Up/Down ou le fader
Data Entry et appuyez sur la touche Enter.
La ligne supérieure indique "Group:" et le no. de la groupe. La ligne inférieure indique tous les projecteurs
inclus dans ce groupe. Tous les place avec "*" sont les projecteurs inclus dans ce groupe. Quand un
projecteur n'est pas inclus dans ce groupe, la ligne inférieure indique "-".
La groupe actuelle peut être changée grâce aux touches Up/Down. Les projecteurs désirés peuvent être
inclus dans la groupe actuelle en pressant la touche Projector Select réspective.
Veuillez réspecter: un projecteur ne peut pas être inclus dans plusieurs groupes. Tous les projecteurs sont
inclus dans groupe 1. Quand vous incluyez un projecteur dans la groupe 2, 3 ou 4, ce projecteur sera
déactivé de groupe 1.
6.2 Mode manuel
6.2.1 Appeler un projecteur manuellement
En mode manuel, vous pouvez appeler les projecteurs définés manuellement grâce aux faders canaux et les
encoders.
Appuyez la touche Manuel et sélectionnez le projecteur désiré grâce à la touche Projector Select réspective.
Vous pouvez sélectionner tous les projecteurs tout d'un coup en maintener la touche Manual pour c. 2
secondes.
Ajustez la fonction désirée grâce aux faders canaux et ajustez la position désirée grâce aux encoders.
Touche Menu
En mode manuel, vous pouvez commuter la séléction des faders canaux de CH 1-8 à CH 9-16 grâce à la
touche Menu.
Data Entry Fader:
En mode manuel, vous pouvez ajuster la sénsibilité des encoders grâce au Data Entry Fader. Quand vous
ajustez un valeur bas, les encoders et aussi le mouvement du projecteur reactionne lentement.
Fonction All Mirror:
Avec la fonction All Mirror, vous pouvez contrôler les mouvements Pan/Tilt de tous projecteurs pendant le
déroulement d'un programme. Appuyez la touche Left et Right ensemble et les DELs commencent à
47
clignoter y l'affichage indique "All Mirror". Quand vous mouvez les encoders maintenant, tous les projecteurs
inclus dans le programme mouvent ensemble. Pour quitter le mode All Mirror, appuyez une des touches
Left/Right.
6.2.2 Eliminer un projecteur du programme
Lors d'une intervention manuelle dans un programme, toutes les valeurs d'un programme pour le projecteur
sélectionné peuvent être changés (par ex. position du miroir, couleur, gobo etc.). S'il vous-plaît considérez
qu'uniquement la fonction changée de manière manuelle est éliminée du programme. Si vous changez la
position du miroir, les gobos continuent à changer comme dans le programme.
Appuyez sur la touche Manuel et sélectionnez le projecteur désiré grâce à la touche Projector Select
réspective. Vous pouvez sélectionner tous les projecteurs tout d'un coup en maintener la touche Manual
pour c. 2 secondes. Vous pouvez sélectionner plusieurs projecteurs qui alors fonctionneront de manière
synchronisée.
Le programme continue, jusqu'à ce que vous procédez à un changement manuel.
Si ensuite vous changez la position du miroir de déflexion, le mouvement du miroir est éliminé du
programme et le miroir reste à la place déterminée par vous.
Si vous voulez changer d'autres fonctions, il faut changer les valeurs DMX du canal correspondant de
manière manuelle. Changez la valeur DMX grâce au fader canaux.
Si vous avez éliminé un projecteur d'un programme pendant le déroulement de programme, vous pouvez-le
réintégrer dans le programme en appuyant la touche Recall.
6.3 Preset Scene
Une Preset Scene est une scène préajustée que peut toujours être appelée. Avec le CP-256/32, vous
pouvez programmer jusqu'à 16 Preset Scenes différentes qui peuvent être assignées aux touches Projector
Select 1 à 16.
6.3.1 Programmer une Preset Scene
Appuyez sur la touche Manuel et sélectionnez le projecteur désiré grâce à la touche Projector Select
réspective. Vous pouvez sélectionner tous les projecteurs tout d'un coup en maintener la touche Manual
pour c. 2 secondes.
Appuyez sur la touche Scene et l'affichage indique "Preset Scene". Sélectionnez la Preset Scene désirée
grâce à la touche Projector Select réspective. En cas que une Preset Scene a déjà été mémorisée sur cette
touche, la désignation du projecteur apparaît dans l'affichage. Sélectionnez une touche libre ou il n'y a pas
de désignation de projecteur.
Appuyez sur la touche Edit et sur l'affichage apparaît "Preset Mask empty". Appuyez sur la touche Mask et
sélectionnez le projecteur souhaité grâce à la touche Projector Select réspective. Appuyez sur la touche Edit
pour retourner au menu Edit. Réglez l'ajustage désiré et appuyez sur la touche Enter. L'affichage indique
"Saving" et la Preset Scene est mémorisée sur la touche réspective. Appuyez sur la touche Recall pour
retourner au menu principal.
6.3.2 Appeler une Preset Scene
Appuyez sur la touche Manuel et sélectionnez le projecteur désiré grâce à la touche Projector Select
réspective. Vous pouvez sélectionner tous les projecteurs tout d'un coup en maintener la touche Manual
pour c. 2 secondes.
Appuyez sur la touche Scene et l'affichage indique "Preset Scene". Sélectionnez la Preset Scene désirée
grâce à la touche Projector Select réspective. Le projecteur se déplace à la position définie et projette les
réglages corespondants.
6.3.3 Éditer une Preset Scene
Appuyez sur la touche Manuel et sélectionnez le projecteur désiré grâce à la touche Projector Select
réspective. Vous pouvez sélectionner tous les projecteurs tout d'un coup en maintener la touche Manual
pour c. 2 secondes.
Appuyez sur la touche Scene et l'affichage indique "Preset Scene". Sélectionnez la Preset Scene désirée
grâce à la touche Projector Select réspective. Le projecteur se déplace à la position définie et projette les
réglages corespondants. Appuyez sur la touche Edit, réglez l'ajustage désiré et appuyez sur la touche Enter.
48
6.4 Preset Macro
Un Preset Macro est un réglage préajusté que peut toujours être appelé. Avec le CP-256/32, vous pouvez
programmer jusqu'à 16 Preset Macros différents qui peuvent être assignés aux touches Projector Select 1 à
16. Les touches 1 à 8 se réfèrent à des réglages du premier canal DMX, les touches 9 à 16 à des réglages
du deuxième canal DMX.
Des macros sont judicieux pour appeler certaines fonctions qui se trouvent sur des valeurs DMX différentes
de différents projecteurs sur une touche. Si p. ex. la couleur verte se trouve chez un projecteur sur la valeur
DMX 20 et chez l'autre sur 40, vous pouvez appeler la même couleur chez les deux projecteurs grâce au
macro "vert".
6.4.1 Programmer un Preset Macro
Appuyez sur la touche Manual et sélectionnez le projecteur désiré grâce à la touche Projector Select
réspective.
Appuyez sur la touche Macro et l'affichage indique "Macro". Sélectionnez la touche Projector Select le Macro
désiré pour programmer le Macro (p. ex. touche Projector Select 1 - Macro vert). Ajustez la couleur
souhaitée (p. ex. vert) sur le fader canal 1. Appuyez sur la touche Enter pour mémoriser le réglage. Appuyez
sur la touche Macro pour quitter le mode Macro.
Choisissez maintenant le prochain projecteur grâce à la touche Projector Select réspective. Appuyez sur la
touche Macro et sélectionnez la même touche Projector Select comme pour projecteur 1 (p. ex. touche
Projector Select 1 - Macro vert). Ajustez la couleur souhaitée (p. ex. vert) sur le fader canal 1. Appuyez sur la
touche Enter pour mémoriser le réglage. Appuyez sur la touche Macro pour quitter le mode Macro.
6.4.2 Appeler un Preset Macro
Appuyez sur la touche Manuel et sélectionnez le projecteur désiré grâce à la touche Projector Select
réspective.
Appuyez sur la touche Macro et sélectionnez la touche Projector Select désiré (p. ex. touche Projector
Select 1 - Macro vert). Ajustez la couleur souhaitée (p. ex. vert) sur le fader canal 1. Appuyez sur la touche
Enter pour mémoriser le réglage. Appuyez sur la touche Macro, pour quitter le mode Macro.
6.4.3 Éditer un Preset Macro
Appuyez sur la touche Manual et sélectionnez le projecteur désiré grâce à la touche Projector Select
réspective.
Appuyez sur la touche Macro et l'affichage indique "Macro". Sélectionnez la touche Projector Select le Macro
désiré pour éditer le Macro (p. ex. touche Projector Select 1 - Macro vert). Ajustez la couleur souhaitée (p.
ex. vert) sur le fader canal 1. Appuyez sur la touche Enter pour mémoriser le réglage. Appuyez sur la touche
Macro pour quitter le mode Macro.
Choisissez maintenant le prochain projecteur grâce à la touche Projector Select réspective. Appuyez sur la
touche Macro et sélectionnez la même touche Projector Select comme pour projecteur 1 (p. ex. touche
Projector Select 1 - Macro vert). Ajustez la couleur souhaitée (p. ex. vert) sur le fader canal 1. Appuyez sur la
touche Enter pour mémoriser le réglage. Appuyez sur la touche Macro pour quitter le mode Macro.
6.5 Programmation
Un programme est aligner de différentes scènes qui sont jouées successivement. Avec le CP-256/32, vous
pouvez programmer jusqu'à 32 programmes différents qui peuvent être assignés aux touches Projector
Select 1 à 32.
6.5.1 Programmation d' un programme
Appuyer sur la touche Menu et choisissez "Menu 2 Make Program" grâce aux touches Up/Down ou le fader
Data Entry. Appuyez deux fois sur la touche Enter. Choisissez le programme désiré grâce aux touches
Projector Select.
Choisissez le projecteur désiré grâce aux touches Projector Select. Réglez l'ajustage désiré grâce aux
encoders et les faders canaux réspectifs. Choisissez le prochaine projecteur grâce aux touches Projector
Select et réglez l'ajustage désiré. Appuyez sur la touche Enter pour mémoriser le premier step. Programmez
les prochains steps jusqu'à ce que le programme soit terminé ou le nombre maximal de steps - 16- a été
atteint. Appuyez sur la touche Escape et la touche Enter pour mémoriser le programme.
49
6.5.2 Appeler un programme
Appuyez la touche Program et sélectionnez le programme désiré grâce aux touches Projector Select.
Ajustez la vitesse du programme et la fréquence de repitition grâce au fader Speed et Rate.
Pour sélectionner les programmes 17 à 32, vous deviez appuyez la touche UP avant.,
6.5.3 Vérifier un programme
Appuyez la touche Program et sélectionnez le programme désiré grâce aux touches Projector Select.
Appuyez la touche Scene et vérfifiez chaque scène en pressant la touche Projector Select réspective.
6.5.4 Éditer un programme
Si vous constatez qu'une scène ne correspond pas à vos présentations, ou si des programmes doivent être
édités pour une nouveau scène, il est nécessaire de modifier une scène manuellement.
Déterminez d'abord le nombre total de steps. Appuyer sur la touche Menu et choisissez "Menu 2 Make
Program" grâce aux touches Up/Down ou le fader Data Entry. Appuyez deux fois sur la touche Enter.
Choisissez le programme désiré grâce aux touches Projector Select.
Choisissez le projecteur désiré grâce aux touches Projector Select. Choisissez la scène désirée grâce aux
touches Up/Down. Si vous maintenez la touche Recall et appuyez la touche Up ou Down, la scène actuelle
soit indiquée. Réglez l'ajustage désiré grâce aux encoders et les faders canaux réspectifs. Choisissez le
prochaine projecteur grâce aux touches Projector Select et réglez l'ajustage désiré. Appuyez sur la touche
Enter pour mémoriser le step édité. Éditez les prochains steps jusqu'à ce que le programme soit modifié.
Attention: Après de quitter le mode Edit, vous deviez mémoriser le dernier step encore une fois. Autre fois,
le programme ne fonctionnera correctement.
Choisissez la dernière scène grâce aux touches Up/Down. Maintenez la touche Recall pour indiquer la
scène mémorisée. Mémorisez cette scène en appuyant la touche Enter. Appuyez sur la touche Escape et la
touche Enter pour mémoriser le programme édité.
6.5.5 Sélection des projecteurs dans le programme
Le nombre des projecteurs dans le programme peut être définie individuellement pour chaque programme.
Appuyer sur la touche Menu et choisissez "Menu 2 Make Program" grâce aux touches Up/Down ou le fader
Data Entry. Appuyez sur la touche Enter. Choisissez le menu "Edit Mask" grâce aux touches Up/Down.
Appuyez sur la touche Enter.
Sélectionnez le projecteur désiré grâce aux touches Projector Select. Tous les projecteurs marqués avec "*"
sont activés dans le programme et la touche Projector Select réspective clignote. Si vous voulez rémover un
projecteur du programme, appuyez sur la touche Projector Select réspective. La DEL éteint et l'affichage
indique "X".
Appuyez deux fois sur la touche Enter pour mémoriser l'ajustage.
6.5.6 Inverser le mouvement Pan/Tilt
Le mouvement Pan/Tilt de chaque scanner peut être inverti pour chaque programme. Cette fonction est
particulièrement judicieux lorsque des scanners sont installés opposé dans le place et un mouvement
synchrone est souhaité.
Attention: S'il vous plaît considérez que l'inversion du mouvement Pan/Tilt doit être ajustée avant que vous
commenciez avec la programmation.
Appuyer sur la touche Menu et choisissez "Menu 2 Make Program" grâce aux touches Up/Down ou le fader
Data Entry. Appuyez sur la touche Enter. Choisissez le menu "Mirror Direction" grâce aux touches Up/Down.
Appuyez sur la touche Enter.
Sélectionnez le projecteur désiré grâce aux touches Projector Select. Tous les projecteurs marqués avec
"->" ont le mouvement Pan normale. Si vous voulez inverser le mouvement Pan un projecteur du
programme, appuyez sur la touche Projector Select réspective. L'affichage indique "<-" pour un mouvement
Pan inversé.
Appuyez sur la touche Down pour inverser le mouvement Tilt.
Appuyez sur la touche Escape pour retourner au menu "Make Program". Programmez votre programme
maintenant.
6.6 Records
Un record est aligner de différents programmes qui sont joués successivement. Avec le CP-256/32, vous
50
pouvez programmer jusqu'à 32 records différents avec jusqu'à 99 steps qui peuvent être assignés aux
touches Projector Select 1 à 32.
6.6.1 Programmation d' un record
Appuyer sur la touche Menu et choisissez "Menu 1 Make Record" grâce aux touches Up/Down ou le fader
Data Entry. Appuyez sur la touche Enter. Choisissez le record désiré grâce aux touches Projector Select.
L'affichage indique le nombre du step et le programme réspective, la vitesse du programme et la fréquence
de répitition ou la sélection "Bass Sync".
Choisissez le programme désiré grâce aux touches Projector Select. Ajustez la vitesse du programme et la
fréquence de repitition grâce au fader Speed et Rate ou activéz le contrôle par le son grâce à la touche
Music.
Choisissez le prochaine step grâce aux touches Up/Down ou le fader Data Entry et entrez le programme
désiré grâce aux touches Projector Select. Programmez les prochains steps jusqu'à ce que le record soit
terminé ou le nombre maximal de steps - 99- a été atteint. Appuyez sur la touche Escape et la touche Enter
pour mémoriser le record.
6.6.2 Appeler un record
Appuyez la touche Record et sélectionnez le record désiré grâce aux touches Projector Select.
6.6.3 Éditer un record
Si vous constatez qu'un record ne correspond pas à vos présentations, il est nécessaire de modifier-le.
Déterminez d'abord le nombre total de steps. Appuyer sur la touche Menu et choisissez "Menu 1 Make
Record" grâce aux touches Up/Down ou le fader Data Entry. Appuyez sur la touche Enter. Choisissez le
record désiré grâce aux touches Projector Select.
Choisissez le step désiré grâce aux touches Up/Down ou le fader Data Entry et entrez le programme désiré
grâce aux touches Projector Select. Éditez les prochains steps jusqu'à ce que le programme soit modifié.
Appuyez sur la touche Escape et la touche Enter pour mémoriser le record edité.
6.7 Copier des scènes, des programmes et des records
Avec la fonction de copie vous pouvez faciliter la programmation des programmes et des records, en
insérant p. ex. des scènes déjà existantes dans un programme.
Appuyer sur la touche Menu et choisissez "Menu 2. Make Program" grâce aux touches Up/Down ou le fader
Data Entry. Appuyez sur la touche Enter. Choisissez "Copy" grâce aux touches Up/Down ou le fader Data
Entry et appuyez sur la touche Enter.
Scene:Indiquez, de quel programme vous voudriez copier quelle scène. Indiquez, dans quel programme et à
quelle scène vous voudriez copier. Appuyez deux fois sur la touche Enter.
Program: Indiquez, quel programme vous voudriez copier dans quel programme. Appuyez deux fois sur la
touche Enter.
Record: Indiquez, quel record vous voudriez copier dans quel record. Appuyez deux fois sur la touche Enter.
6.8 Activation du contrôle par le son
Appuyez sur la touche Music pour activer le contrôle par le son (DEL clignote). Veuillez réspecter que les
programmes et records sont seulement actifs en ce mode quand le contrôleur reçoit un signal de musique
(soit par le microphone ou la douille Audio).
S'il n'y a pas de signal de musique, le programme ou record arrêt.
Lors de la programmation des records, vous pouvez fixer déjà là pour chaque programme si le contrôle par
le son doit être active ou pas.
6.9 Chaser
Un chaser est aligner de différentes images qui sont jouées successivement. La sortie de lumière du
51
projecteur est ouvert et fermé à nouveau, de sorte qu'un mouvement animé est produit. Avec le CP-256/32,
vous pouvez programmer jusqu'à 99 chaser différents de qui 32 peuvent être assignés aux touches
Projector Select 1 à 32.
6.9.1 Appeler un chaser
Appuyez sur la touche Sequence et le chaser correspondant est appelé. Maintenez la touche Sequence et
vous changez en mode Chaser Edit. Si la touche a été pressée d'un programme, les Chaser qui ont été fixés
lors de la programmation apparaîent ici. Vous pouvez choisir un chaser souhaité manuellement grâce aux
touches Projector Select et ajuster la vitesse du chaser grâce au fader Data Entry. Comme alternative, vous
pouvez activer le contrôle par la musique grâce à la touche Music.
Quand vous voulez retourner aux chaser du programme, appuyez la touche Projector Select active encore
une fois et la DEL éteint.
6.9.2 Lier un programme avec un chaser
Avec le CP-256/32, vous pouvez lier programmes et scènes d'un programme avec un chaser individuel.
Appuyer sur la touche Menu et choisissez "Menu 3 Make Chaser" grâce aux touches Up/Down ou le fader
Data Entry. Appuyez sur la touche Enter. Choisissez le menu "Link chaser" désiré grâce aux touches
Up/Down ou le fader Data Entry. Appuyer sur la touche Enter. Choisissez le programme souhaité grâce aux
touches Projector Select.
Choisissez le chaser souhaité pour scène 1 grâce aux touches Left/Right. Choisissez les prochaines scènes
grâce aux touches Up/Down ou le fader Data Entry et entrez le chaser désiré. Appuyez deux fois sur la
touche Enter pour mémoriser le programme.
6.9.3 Lier une Preset Scene avec un chaser
Appuyer sur la touche Menu et choisissez "Menu 3 Make Chaser" grâce aux touches Up/Down ou le fader
Data Entry. Appuyez sur la touche Enter. Choisissez le menu "Link Chaser Preset" grâce aux touches
Up/Down ou le fader Data Entry. Appuyer sur la touche Enter.
Choisissez le chaser souhaité pour Preset Scene 1 grâce aux touches Left/Right. Choisissez les prochaines
Preset Scenes grâce aux touches Up/Down ou le fader Data Entry et entrez le chaser désiré. Appuyez deux
fois sur la touche Enter pour mémoriser les Preset Scenes.
L'occupation des touches Projector Select du menu "Link Chaser Preset" correspond à l'occupation qui peut
être appelé grâce à la touche Sequence. Si vous voulez asigner un des 99 chasers disponibles sur une
touche Projector Select, procédez comme décrit sous-dessus.
6.9.4 Éditer un chaser
Appuyer sur la touche Menu et choisissez "Menu 3 Make Chaser" grâce aux touches Up/Down ou le fader
Data Entry. Appuyez sur la touche Enter. Choisissez le menu "Edit Chaser" grâce aux touches Up/Down ou
le fader Data Entry. Appuyer sur la touche Enter. Choisissez le chaser désiré grâce aux touches Up/Down
ou le fader Data Entry
Appuyer sur la touche Enter pour éditer step 1. Entrez l'image désiré grâce aux touches Projector Select
(p.ex. touche 1, 2, 3 et 4) et appuyez sur la touche Enter. Entrez la vitesse du chaser grâce aux touches
Up/Down ou le fader Data Entry et appuyez sur la touche Enter. Appuyez sur la touche Right et éditez le
step 2. Éditez tous les steps et mémorisez les changes grâce à la touche Escape et Enter.
6.10 Réglages de base
Avec le CP-256/32, vous pouvez ajuster les réglages de base comme désignation du projecteur ou d'effet,
choix de langue, texte de salutation etc.
Appuyer sur la touche Menu et choisissez "Menu 5 Make Setup" grâce aux touches Up/Down ou le fader
Data Entry. Appuyez sur la touche Enter et l'affichage indique "Code____". Entrez le code 2222 et appuyez
sur la touche Enter.
52
6.10.1 Renommer un projecteur
Choisissez "Setup 1. Rename Unit" grâce aux touches Up/Down ou le fader Data Entry et appuyez sur la
touche Enter. Sélectionnez le projecteur désiré grâce aux touches Up/Down ou le fader Data Entry et
appuyez sur la touche Enter. Le curseur du deuxième champ commence à clignoter et vous pouvez entrer la
lettre souhaitée grâce aux touches Up/Down ou le fader Data Entry. Vous pouvez mouver de champ à
champ grâce aux touches Left/Right. Aussitôt que vous avez terminé l' entrée, appuyez deux fois sur la
touche Enter pour mémoriser les ajustes.
6.10.2 Renommer un effet
Choisissez "Setup 2. Rename Effect" grâce aux touches Up/Down ou le fader Data Entry et appuyez sur la
touche Enter. Sélectionnez l'effet désiré grâce aux touches Up/Down ou le fader Data Entry et appuyez sur
la touche Enter. Le curseur du deuxième champ commence à clignoter et vous pouvez entrer la lettre
souhaitée grâce aux touches Up/Down ou le fader Data Entry. Vous pouvez mouver de champ à champ
grâce aux touches Left/Right. Aussitôt que vous avez terminé l' entrée, appuyez deux fois sur la touche
Enter pour mémoriser les ajustes.
6.10.3 Renommer un type
Choisissez "Setup 3. Rename Type" grâce aux touches Up/Down ou le fader Data Entry et appuyez sur la
touche Enter. Sélectionnez le type désiré grâce aux touches Up/Down ou le fader Data Entry et appuyez sur
la touche Enter. Le curseur du deuxième champ commence à clignoter et vous pouvez entrer la lettre
souhaitée grâce aux touches Up/Down ou le fader Data Entry. Vous pouvez mouver de champ à champ
grâce aux touches Left/Right. Aussitôt que vous avez terminé l' entrée, appuyez deux fois sur la touche
Enter pour mémoriser les ajustes.
6.10.4 Ajuster un projecteur
Choisissez "Setup 4. Config Unit" grâce aux touches Up/Down ou le fader Data Entry et appuyez sur la
touche Enter. Sélectionnez le projecteur désiré grâce aux touches Up/Down ou le fader Data Entry et
appuyez sur la touche Enter. Entrez le nombre de canaux DMX du projecteur grâce au fader Data Entry ou
confirmez la sélection "16" avec la touche Enter. Entrez le fader canal désiré derrière de "Pot:" et confirmez
la sélection avec la touche Enter.
Choisissez maintenant la fonction souhaitée et confirmez la sélection avec la touche Enter. Entrez
maintenant le canal correspondant du projecteur et confirmez la sélection avec la touche Enter. Choisissez
maintenant l'effet souhaité et confirmez la sélection avec la touche Enter. Entrez la valeur DMX
correspondante et confirmez la sélection avec la touche Enter.
Si vous ne voulez pas entrer d'effets, appuyez sur la touche Escape et entrez le prochaine canal. Veuillez
considérer que dans ce cas, aucune annonce de la fonction n'apparaît toutefois dans l' affichage.
Si "Occupied" apparaît sur l'affichage, vous pouvez recouvrir l'occupation en appuyant sur la touche Enter.
Si vous avez entrés tous les effets, appuyez sur la touche Escape et l'affichage indique "B.Out: Scan?Dim?".
Choisissez "Scan" pour scanners et Moving Heads et "Dim" pour dimmeurs grâce aux touches Left/Right et
appuyez deux fois sur la touche Enter pour mémoriser l'ajustes.
6.10.5 Ajuster les caractéristiques
Choisissez "Setup 5. New Typical" grâce aux touches Up/Down ou le fader Data Entry et appuyez sur la
touche Enter. Sélectionnez le menu désiré grâce aux touches Up/Down ou le fader Data Entry et appuyez
sur la touche Enter.
Ajuster la langue
Grâce au menu "Select Language", vous pouvez ajuster la langue souhaitée. Choisissez la langue souhaitée
grâce aux touches Up/Down et confirmez la sélection avec la touche Enter.
Ajuster le code
Grâce au menu "Select Code", vous pouvez ajuster le code préajusté pour le menu prinicipal et pour le
menu Setup.
Sélectionnez "New Menu Code" pour ajuster le code pour le menu prinicipal et "New Setup Code" pour le
menu Setup et appuyez sur la touche Enter.
Entrez le nouveau code grâce aux touches Projector Select et appuyez sur la touche Enter. Si vous voulez
déactiver la code pour le menu réspectif, seulement appuyez sur la touche Enter sans entrer un numéro.
Modes d'adresses
53
Grâce au menu "Adressing mode", vous pouvez ajuster comme le CP-256/32 assigne les adresses DMX. Le
réglage standard et "Automat 16" et signifie que le CP-256/32 automatiquement assigne 16 canaux DMX à
chaque projecteur. Le réglage "Automat in Row" signifie que le CP-256/32 automatiquement assigne les
canaux DMX comme le numéro exact de chaque projecteur (p. ex. 4 canaux pour le Futurelight SC-240). Le
réglage "Manually" signifie que l'utilisateur peut assigner librement les adresses DMX.
Choisissez le réglage désiré grâce aux touches Up/Down ou le fader Data Entry et appuyez sur la touche
Enter.
Texte de salutation
Grâce au menu "Greeting Text", vous pouvez ajuster le texte de salutation. Veuillez réspecter que vous
pouvez seulement changer le texte de salutation une fois et qu'il peut comprendre 64 lettres.
Appuyez sur la touche Enter. Le curseur du deuxième champ commence à clignoter et vous pouvez entrer la
lettre souhaitée grâce aux touches Up/Down ou le fader Data Entry. Vous pouvez mouver de champ à
champ grâce aux touches Left/Right. Aussitôt que vous avez terminé l' entrée, appuyez sur la touche
Escape et Enter pour mémoriser les ajustes.
6.10.6 Ajuster la sénsibilité des encoders
Avec le CP-256/32, vous pouvez ajuster la sénsibilité des encoders entre 0 % et 100 %.
Choisissez "Setup 6. Joy Config" grâce aux touches Up/Down ou le fader Data Entry et appuyez sur la
touche Enter. Ajustez la sénsibilité désirée grâce aux touches Up/Down ou le fader Data Entry et appuyez
deux fois sur la touche Enter.
6.10.7 Compteur d’heures de service
Choisissez "Setup 7. Worked Time" grâce aux touches Up/Down ou le fader Data Entry et appuyez sur la
touche Enter. L'affichage indique les heures de service de l'appareil.
7. Problèmes
PROBLEME:
CAUSE:
L'alimentation ne s'enclenche pas. Le bloc d'alimentation n'est pas
branché.
Impossible d'entrer le menu Code oublié.
principal.
Le Preset Macro ne peut pas Le contrôleur n'a pas mémorisé
mémoriser la couleur.
l'ajuste.
SOLUTION:
Contrôler le câble de connexion et
les rallonges.
Ouvriez l'enveloppe avec le Master
Code et suivre les instructions.
Veuillez entrez les ajustes autre
fois s.v.p. et mémorisez chaque
projecteur individuellement.
Le programme ne peut pas être La dernière scène n'était pas Assurez-vous, que toutes les
édité.
mémorisée.
scènes du programme sond
disponibles. Éditez le programme
de nouveau et mémorisez la
dérnière scène en appuyant la
touche Enter.
En mode éditer un programme, Vous n'avez pas appuyez la touche Appuyez sur la touche Recall pour
les scènes ne sont pas indiquées. Recall.
indiquer la scène mémorisée.
8. Nettoyage et maintenance
DANGER DE MORT!
Toujours débrancher avant de proceder à l'entretien!
L'appareil doit être nettoyée régulièrement. Utilisez un torchon non pelucheux humide. Ne pas utiliser de
l’alcool ou des détergents pour le nettoyage!
L'intérieur de l'appareil ne contient pas de partys nécéssitant un entretien. L'entretien et les réparations
doivent être effectuées par un technicien compétent!
54
Si des pièces de rechange sont nécéssaires, toujours utiliser des pièces d'origine.
Pour tout renseignement complémentaire, n'hésitez pas à nous contacter téléphoniquement. Notre
spécialiste se tient à votre entière disposition pour répondre à toutes les questions que vous pourriez vous
poser.
9. Caractéristiques techniques
Alimentation:
230 V AC, 50 Hz ~
grâce au bloc d’alimentation 12-15 V DC, 500 mA inclus
Puissance de rendement:
6W
Nombre de canaux de contrôle:
256
Contrôle par le son:
grâce au Jack 6,3 mm ou microphone intégré<r>Entrée du son:
Jack 6,3 mm stéreo
Sensibilité d’entrée son:
0.3 - 1 V
Sortie DMX 512:
Connecteur XLR 3 pôles
Emplacements programmables: 32
Dimensions (LxlxH):
483 x 176 x 105 mm
19" dimensions de montage avec 4 u
Profondeur de montage minimale: 90 mm
Poids:
4 kg
Attention! Les donnés imprimée dans ce mode d’emploi sont susceptibles d’être modifiées sans
préavis. 09/02 ©
55
CP-256/32 Controlador DMX
Manual del usuario
Contenido
1. Introducción .................................................................................................................58
2. Instrucciones de seguridad ........................................................................................58
3. Instrucciones de manejo.............................................................................................59
4. Descripción del aparato ..............................................................................................59
4.1 Características.........................................................................................................59
4.2 Sobrevista................................................................................................................60
5. Setup.............................................................................................................................61
5.1 Instalación ...............................................................................................................61
5.2 Control por el sonido................................................................................................61
5.3 Conexión al proyector..............................................................................................61
6. Operación .....................................................................................................................63
6.1 Selección de los proyectores a controlar .................................................................63
6.1.1 Selección de un proyector de la biblioteca
6.1.2 Definir otro proyector
6.1.3 Definir un grupo de proyectores
63
65
65
6.2 Modo manual...........................................................................................................65
6.2.1 Llamar proyectores manualmente
6.2.2 Tomar un proyector de un programa activo
65
66
6.3 Preset Scenes .........................................................................................................66
6.3.1 Programar una Preset Scene
6.3.2 Llamar una Preset Scene
6.3.1 Editar una Preset Scene
66
66
66
6.4 Preset Macros .........................................................................................................67
6.4.1 Programar un Preset Macro
6.4.2 Llamar un Preset Macro
6.4.3 Editar un Preset Macro
67
67
67
6.5 Programación ..........................................................................................................67
56
6.5.1 Programar un programa
6.5.2 Llamar un programa
6.5.3 Verificar un programa
6.5.4 Editar un programa
6.5.5 Selección de los proyectores en un programa
6.5.6 Inversión de los movimientos Pan/Tilt
67
68
68
68
68
68
6.6 Records ...................................................................................................................69
6.6.1 Programar un record
6.6.2 Llamar un record
6.6.3 Editar un record
69
69
69
6.7 Copiar escenas, programs y records.......................................................................69
6.8 Control por sonido ...................................................................................................69
6.9 Chaser .....................................................................................................................70
6.9.1 Programar un chaser
6.9.2 Conectar un programa con un chaser
6.9.3 Conectar una Preset Scene con un chaser
6.9.4 Editar un chaser
70
70
70
70
6.10 Ajustes de base .....................................................................................................70
6.10.1 Retitular un proyector
6.10.2 Retitular un efecto
6.10.3 Retitular un tipo
6.10.4 Configurar un proyector
6.10.5 Ajustar las características
6.10.6 Ajustar la sensibilidad de los encoders
6.10.7 Contador de las horas de servicio
71
71
71
71
71
72
72
7. Solución de problemas ...............................................................................................72
8. Limpieza y mantenimiento ..........................................................................................73
9. Especificaciones técnicas ..........................................................................................73
57
¡PRECAUCION!
¡Evite el contacto de este aparato con la lluvia y la humedad!
¡Desconectar de la corriente antes de abrir la caja!
¡POR SU PROPIA SEGURIDAD, POR FAVOR LEA ESTE MANUAL DEL USUARIO
DETENIDAMENTE ANTES DE LA CONEXIÓN INICIAL!
1. Introducción
Gracias por haber elegido un controlador FUTURELIGHT CP-256/32.
Desembale su CP-256/32.
Antes de la puesta en marcha inicial, por favor asegurese de que no hay daños causados durante el
transporte. Si los hubiese, consulte a su proveedor y no use el aparato.
2. Instrucciones de seguridad
¡PRECAUCIÓN!
¡Tenga cuidado cuando opere con este aparato. Con un voltaje peligroso puede sufrir
una peligrosa descarga eléctrica al tocar los cables!
Este aparato ha salido de nuestro establecimiento en absolutas perfectas condiciones. Para mantener esta
condición y asegurar un manejo seguro, es absolutamente necesario para el usuario seguir las instrucciones
de seguridad y notas de advertencia escritas en este manual del usuario.
Importante:
Los daños causados por no hacer caso de las instrucciones de este manual del usuario
no están sujetos a garantía. El proveedor no aceptará responsabilidad por ningún
defecto o problema resultante.
Siempre conectar la unidad de alimentación al final. Asegúrese de que el conmutador de alimentación está
en la posición “OFF” antes de conectar el aparato a la red.
¡Manténgalo alejado de estufas o de cualquier fuente de calor!
Si el aparato se ha visto expuesto a fluctuaciones drásticas de temperatura (p.e. tras el transporte) no lo
ponga en marcha inmediatamente. La condensación de agua podría causarle daños. Deje el aparato
desconectado hasta que llegue a la temperatura ambiente.
Este aparato pertenece a la clase de protección III.
Desconecte el aparato de la red cuando no vaya a ser utilizado y antes de limpiarlo.
Por favor tenga en cuenta que los daños causados por modificaciones manuales del aparato no están
sujetas a garantía.
Manténga el aparato lejo del alcance de los niños y de personal no profesional.
No hay piezas que requieran servicio dentro del aparato. Las operaciones de mantenimiento y servicio
deben ser llavadas a cabo únicamente por concesionarios autorizados.
58
3. Instrucciones de manejo
Este aparato es un controlador DMX para controlar los efectos de luz DMX. El aparato sólo es permitido
para una conexión con una tensión alternativa de 230 V, 50 Hz y ha sido diseñado para ser usado en
interiores.
No coloque líquidos sobre el aparato o en sus cercanías. Si de todas formas entra líquido en el aparato
desconéctelo inmediatamente de la corriente. Haga que el aparato sea comprobado por un técnico
cualificado antes de volver a ponerlo en funcionamiento. ¡Cualquier desperfecto ocasionado por líquido que
haya entrado en el aparato no está sujeto a garantía!
No agite el aparato. Evite hacer excésiva fuerza durante el manejo del aparato.
Cuando buscar el sitio de instalación, por favor asegúrese de que el aparato no está expuesto a calor
extremo, humedad o polvo. No debe haber cables mal instalados o no fijados correctamente. ¡Se pone
usted en peligro y pone en peligro a otros!
No ponga el aparato en funcionamiento en ambientes con calor (más de 30° C) o frío (menos de 5° C)
extremos. Mantenga el aparato alejado del sol directo (especialmente en el coche) y de fuentes de calor.
No permita el manejo a personas que no conocen el aparato lo suficientemente bien. La mayoría de los
daños son causados por manejo inadecuado de inexpertos.
No utilice disolventes o detergentes agresivos para limpiar el aparato. Utilice mejor un paño suave y
húmedo.
¡Por favor tenga en cuenta que por razones de seguridad las modificaciones no autorizadas del aparato
están prohibidas!
Cuando el aparato será utilizado de un modo diferente como describido en este manual, ésto puede causar
daños en el producto y la garantía expira.
Cuando el aparato será utilizado de un modo diferente como describido en este manual, ésto puede causar
daños en el producto y la garantía expira. Además todos usos diferentes pueden causar peligros come p. ej.
cortocircuito, quema, descarga eléctrica, etc.
Mantiene el sobre con el Master Code en un lugar seguro.
4. Descripción del aparato
4.1 Características
Controlador DMX programable
256 canales de control para 16 proyectores con 16 canales DMX • Resolución 16 Bit para movimientos Pan
y Tilt finos • Biblioteca de proyectores amplia • 32 programas programables con hasta 16 escenas • 16
Preset Scenes, 16 Preset Macros • 5 lenguas diferentes • Movimiento de los espejos puede ser invertido •
Función de copiar de los programas y records • 99 chasers disponible, un chaser para cada programa •
Función Black-Out • Control por el sonido mediante casquillo jack mono o mediante micrófono incorporado •
Protección del controlador mediante password • Contador de horas de servicio
59
4.2 Sobrevista
Vista de los elementos de control
1) FADERS DE CANAL
Para ajustar los valores DMX. Los canales 1-8 pueden ser ajustados en mover el fader respectivo
después de haber presionado la tecla del proyector. Los canales 9-16 pueden ser ajustados después de
conmutar la selección a CH-9-16 mediante la tecla Menu.
2) TECLA DEL PROYECTOR
Para seleccionar el proyector deaseado.
3) TECLA MANUAL
En presionar la tecla Manual, Vd. puede controlar un proyector manualmente.
4) TECLA RECALL
En presionar la tecla Recall, Vd. puede cancelar el modo manual.
5) TECLA SEQUENCE
6) TECLAS UP/DOWN
Para ajustar el valor.
7) TECLA MENU
En presionar la tecla Menu, Vd. puede moverse en el menu principal.
En el modo manual, Vd. puede conmutar los faders de canal de CH 1-8 en CH 9-16 en presionar la tecla
Menu.
8) DISPLAY
9) TECLAS LEFT/RIGHT
10) TECLA ESC
En presionar la tecla Escape, Vd. puede salir el menu activo. Quando Vd. ha efectado cambios, puede
memorizar éstos mediante la tecla Enter o cancelarlos mediante la tecla Esc.
11) TECLA ENTER
Para confirmar la selección.
12) TECLA SCENE
13) TECLA PROGRAM
14) TECLA RECORD
15) TECLA COPY
16) ENCODERS
Para un control manual del espejo.
17) REGULADOR SPEED
18) REGULADOR RATE
19) DATA ENTRY FADER
20) TECLA MUSIC
Cuando este LED parpadea, el controlador se encuentra en el modo Audio (modo con control por el
sonido).
21) TECLA POWER/BLACKOUT
Con la tecla Power, Vd. puede poner el aparato en servicio.
La función Blackout cierra la salida de luz de todos los aparatos conectados mediante el shutter y para
el programa.
Atención: La tecla Blackout debe ser presionada (LED no brilla) cuando quire llamar un programa,
porque no haya de la luz con el función Blackout activada.
60
Panel posterior
22) Salida DMX
23) Conexion a la red
24) Entrada Audio
5. Setup
5.1 Instalación
Instale el aparato en una superficie plana.
Instalación en Rack: Este aparato está construido para racks de 19" (483 mm). El rack que usted use debe
ser un rack de doble puerta donde usted pueda abrir el panel frontal y el panel trasero. El rack debe
disponer de un ventilador para la refrigeración. Cuando monte el controlador en el rack, por favor asegúrese
de que hay suficiente espacio alrededor del aparato para que pueda circular el aire caliente. El
sobrecalentamiento continuo puede dañar su aparato.
Puede fijar el controlador en el rack con cuatro tornillos M6.
Conectar el cable de conexión del transformador en el casquillo DC IN. Conecte el transformador a la red.
5.2 Control por el sonido
El control por el sonido se hace mediante el casquillo jack mono o mediante el micrófono incorporado.
Cuando quiere utilizar su CP-256/32 con la señal de música transmitida en el casquillo Audio, conectar el
casquillo jack mono con el casquillo de la sortida de auriculares o la segunda ajustable salida del mezclador
o con una salida del amplificador.
Tip:
Sleeve:
Data +
Tierra
ATENCIÓN: Nunca conectar la entrada de son con la salida DMX, porque puede rotar la electrónica interna.
5.3 Conexión al proyector
Projector 1
Starting address 1
Projector 2
Starting address 17
61
Projector 3
Starting address 33
Asegúrese de que los conductores del cable de datos no hagan
contacto entre si. Los aparatos no van a funcionar o no van
a funcionar correctamente.
La conexión entre controlador y proyector y entre proyector y proyector se tiene que efectuar con un cable
de dos polos con blindaje. La conexión se efectua mediante clavijas y conectores XLR tripolares.
La ocupación de la conexión XLR es:
Cuando Vd. utilice los controladores de FUTURELIGHT recomendados, puede conectar la salida DMX del
controlador directamente con la entrada DMX del primer aparato de la cadena DMX. Cuando Vd. quiere
conectar controladores DMX con otros salidas DMX, se tiene que utilizar cables de adaptación.
Instalación de una cadena DMX:
Conecte la salida DMX del controlador con la entrada DMX del próximo aparato. Siempre conecte una salida
con una entrada del próximo aparato hasta que todos los aparatos están conectados.
Atención: En el ultimo proyector, la conexión DMX tiene que ser terminada con un resistor de terminación.
Solde un resistor de 120 ohmios en una clavija XLR entre la señal (-) y la señal (+) y enchufe-la en la salida
DMX del ulterior aparato.
Codificación de los proyectores
Por favor, tome nota que el CP-256/32 asigna las direcciones de comienzo en 16 pasos. Tiene que codificar
el proyector respectivo en la dirección de comienzo deseado. Los proyectores con la misma dirección de
comienzo funcionarán sincronizadamente.
Proyector
Dirección de
comienzo
Proyector
Dirección de
comienzo
Proyector
Dirección de
comienzo
Proyector 1 1
Proyector 3
33
Proyector 5
65
Proyector 2 17
Proyector 4
49
Proyector 6
81
62
6. Operación
Puede apagar o desapagar el aparato mediante la tecla Power.
Después de presionar la tecla Power, los LEDs comienzan a palpadear y la pantalla muestra el texto de
saludo. Presione cualquiera tecla y la pantalla muestra "Code____". Entre el código 1111 y presione la tecla
Enter.
SCENE:-- PROG:-REC:-- CHASER:--
Ahora usted está en el menú principal. Usted puede
regresar al menú principal presionando la tecla Escape (por
favor note la opcon "Memorizar") o mediante la tecla Recall
(modo manual).
Presione la tecla Menu y seleccione "Menu 5 Setup" mediante las teclas Up/Down o el Data Entry fader.
Presione la tecla Enter y la pantalla muestra "Code____". Entre el código 2222 y presione la tecla Enter.
Seleccione el menu "Setup 5. New typical" mediante las teclas Up/Down o el Data Entry fader. Presione la
tecla Enter. Seleccione el menu "Select Language" mediante las teclas Up/Down o el Data Entry fader y
presione la tecla Enter. Seleccione la lengua deseada mediante las teclas Up/Down. Presione la tecla Enter.
Note por favor que Vd. tiene que mantener presionado la tecla Power por aproximadamente 5 segundos
hasta que el aparato este desconectado.
6.1 Selección de los proyectores a controlar
La ocupación de las teclas Projector Select es:
1
2
3
4
5
6
7
8
SC-240
SC-240
SC-240
SC-240
SC-370
SC-370
SC-370
SC-370
9
10
11
12
13
14
15
16
SC-570
SC-570
SC-570
SC-570
SC-780
SC-780
SC-780
SC-780
Para ocupar una tecla Projector Select con otro proyector sigue las instrucciones siguientes:
6.1.1 Selección de un proyector de la biblioteca
Presione la tecla Menu y seleccione el menu "Menu 4. Soft Patch" mediante las teclas Up/Down o el Data
Entry fader. Presione la tecla Enter. Seleccione el proyector deseado mediante las teclas Up/Down o el Data
Entry fader para la tecla Projector Select 1.
Presione la tecla Projector Select 2 y seleccione el proyector deseado. Asigne todas las 32 teclas con los
proyectores deseados.
Presione la tecla Escape y memorice los cambios mediante la tecla Enter.
Vista general de los proyectores disponibles:
No.
1
2
3
4
5
6
7
CP-256 nombre
AS-200
CC-200
CLAYPHPE
CLAYP MS
DIM-12
DIM-8
DOMIN II
Fabricante
Futurelight
Futurelight
Clay Paky
Clay Paky
Futurelight
Descripción
Advertising SCAN AS-200
CC-200
Clay Paky HPE
CLAY Paky Mini Scan
Dim-12
Dim-8
DOMINATOR II
63
Canales
11
4
7
4
12
8
12
8
9
10
11
12
13
14
15
16
17
18
19
20
21
22
23
24
25
26
27
28
29
30
31
32
33
34
35
36
37
38
39
40
41
42
43
44
45
46
47
48
49
50
51
52
53
54
55
56
57
58
59
60
61
62
63
64
DRAGON-3
DRAGON-2
HURRICAN
IMAGE
INSTALL
MAC 250
MAC 300
MAC 500
MAC 600
MACPROF
MACWASH
MH-640
MH-660
MH-680
MH-860
M.HEAD
MINISCAN
MIRACLE
Mpro 2000
M.ULTRA1
M.ULTRA2
MX-1
MX-4
PRO1220
PRO 218
PRO 400
PRO 518
PRO 918
PROMO3
PS/D-200
ROBCOL-2
ROUL-575
SATSCAN2
SATSCAN3
SC-240
SC-250
SC-370
SC-570
SC-740
SC-780
SC-980
SCAN2pro
SCAN3rot
SCAN-3
SCAN2rot
SCAN-2
SHARK
SHOWMON2
STRATOS
TB-3
TC-3
TG-3
TORLIGHT
TORNDIGI
TS-3
TSIXTY
WARRIOR2
Pako Kft.
Pako Kft.
F.A.L.
Martin
Martin
Martin
Martin
Martin
Martin
Martin
Futurelight
Futurelight
Futurelight
Futurelight
Gemini
SHOW 99' Kft.
Futurelight
Martin
TAS
TAS
Martin
Martin
Martin
Martin
Martin
Martin
Martin
Martin
Futurelight
Martin
F.A.L.
Saturn Kft.
Saturn Kft.
Futurelight
Futurelight
Futurelight
Futurelight
Futurelight
Futurelight
Futurelight
SHOW 99' Kft.
SHOW 99' Kft.
SHOW 99' Kft.
SHOW 99' Kft.
SHOW 99' Kft.
F.A.L.
SHOW 99' Kft.
F.A.L.
Eurolite
Eurolite
Eurolite
Saturn Kft.
Saturn Kft.
Eurolite
F.A.L.
SHOW 2000
Dragon-3
Dragon-2
Hurrican
Image Scan
Install
Mac-250
Mac-300
Mac-500
Mac-600
Mini MAC Profiler
MAC Washer
MH-640
MH-660
MH-680
MH-860 Spotlight
Motor Head
Miniscan
Miracle
Magnum Pro 2000
Mini Ultra Scan-1
Mini Ultra Scan-2
MX-1
MX-4
Robo Scan Pro 1220
Robo Scan Pro 218
Robo Color Pro 400
Robo Scan Pro 518
Robo Scan Pro 918
Promo-3
Promotion SCAN PS/D-200
Robo Color 2
Roulette 575
Saturn Scan 2
Saturn Scan 3
SC-240
SC-250
SC-370
SC-570
SC-740
SC-780
SC-980
Scan-2 pro
Scan-3 rot
Scan-3
Scan-2 rot
Scan-2
SHARK
Showmoon-2
Stratos Scan
Eurolite TB-3
Eurolite TC-3
Eurolite TG-3
Tornado Light
Tornado Digi
Eurolite TS-3
Three Sixty
Warrior-2
64
8
8
4
7
16
11
11
14
12
10
8
16
14
16
16
5
10
4
1
6
8
7
7
15
7
7
9
14
6
11
6
8
10
10
4
6
4
8
13
14
4
8
6
6
6
6
9
6
14
4
1
1
10
14
4
8
6
6.1.2 Definir otro proyector
Si Vd. desea definir otro proyector, selecciona un nombre de proyector como "Install" o selecciona el SC-780
u otro proyector FUTURELIGHT como modelo y ajusta las configuraciones. Es muy útil elegir un modelo con
4 DMX-canales (p. ej. Futurelight SC-240) para un proyector con 4 DMX-canales (p. ej. Eurolite TS-3).
Observe por favor que el modelo no está mas disponible tan pronto como Vd. haya modificado el nombre
del proyector.
Los canales tienen que ser ocupados de una manera que las funciones mostradas en la pantalla del
controlador correspondan a las funciones reales del proyector. Tome por favor los canales de control DMX y
sus funciones del manual del usuario de su proyector.
Retitular un proyector
Por favor se refiere a las explicaciones bajo 6.10.1 Retitular un proyector.
Configurar un proyector
Por favor se refiere a las explicaciones bajo 6.10.4 Configurar un proyector.
6.1.3 Definir un grupo de proyectores
Con el CP-256/32, Vd. puede definir 4 grupos de proyectores diferentes. Puede llamar un programa
diferente para cada de los 4 grupos. Todos los proyectores de un grupo juegan el programa seleccionado a
la misma velocidad. Al mismo tiempo, otro grupo puede jugar otro program a una velocidad diferente.
Presione la tecla Menu y seleccione el menu "Menu 2. Make Program" mediante las teclas Up/Down o el
Data Entry fader. Presione la tecla Enter. Seleccione "Make Group" mediante las teclas Up/Down o el Data
Entry fader.
La línea superior de la pantalla indica "Group:" y el no. del grupo actual. La línea inferior indica que
proyectores están incluidos en este grupo. Todas posiciones con "*" son los proyectores incluidos en este
grupo. Cuando un proyector no está en este grupo, la línea inferior indica "-".
Vd. puede cambiar el grupo actual mediante las teclas Up/Down. Los proyectores deseados pueden ser
incluidos en el grupo actual en presionar la tecla Projector Select respectiva.
Note: un proyector no puede ser incluido en mas de un grupo. Todos los proyectores están incluidos en
grupo 1. Cuando Vd. incluye un proyector en grupo 2, 3 o 4, está desactivado en grupo 1.
6.2 Modo manual
6.2.1 Llamar proyectores manualmente
En el modo manual, Vd. puede llamar los proyectores definidos manualmente y controlarlos mediante los
faders de canal y los encoders.
Presione la tecla Manual y seleccione el proyector deseado mediante la tecla Projector Select respectiva.
Vd. puede seleccionar todos los proyectores inmediatamente si usted mantiene la tecla Manual por
aproximadamente. 2 segundos.
Ajuste la función deseada mediante los faders de canal y seleccione la posición deseada mediante los
encoders.
Tecla Menu:
En el modo Manual, Vd. puede conmutar la selección de los faders de canal de CH 1-8 a CH 9-16.
Data Entry Fader:
En el modo Manual, Vd. puede cambiar la sensibilidad de los encoders mediante el Data Entry Fader. Un
valor bajo produce una sensibilidad baja.
Función All Mirror:
Durante el funcionamiento de un programa, Vd. puede controlar los movimientos Pan y Tilt mediante la
functión ’All mirror’. Presione las teclas Left/Right al mismo tiempo y los LEDs comienzan a parpadear y la
pantalla muestra "All Mirror". Cuando mueve los encoders ahora, todos los proyectores incluído en el
65
programa se mueven al mismo tiempo. Para cancelar el modo All Mirror, presione una de las teclas
Left/Right.
6.2.2 Tomar un proyector de un programa activo
Cuando intervinir en un programa, todos los valores de un programa (p. ej. posición, color, gobo, etc.)
pueden ser ajustados para el proyector selectado. Note por favor, que sólo éstas funciones están tomado
del programa que se ajusta manualmente. Si usted ajuste p. ej. la posición del espejo manualmente, los
gobos continuan cambiarse como en el programa y el espejo para en la posición ajustado por Vd.
Presione la tecla Manual y seleccione el proyector deseado mediante la tecla Projector Select respectiva.
Vd. puede seleccionar todos los proyectores inmediatamente si usted mantiene la tecla Manual por
aproximadamente. 2 segundos. Cuando seleccione dos o mas proyectores, éstos trabajan sincrónicamente.
El programa continua funcionar hasta que Vd. haga un ajuste manual.
Si usted ajuste la posición del espejo manualmente, el espejo se toma del programa y para en la posición
ajustado por Vd.
Cuando quiere cambiar otras funciones, Vd. debe cambiar los valores DMX del canal respectivo
manualmente mediante los faders de canal.
Vd. puede reintegrar el proyector en el programa mediante la tecla Recall.
6.3 Preset Scenes
Una Preset Scene es un imagen de escena preajustado que puede siempre ser llamado. Con el CP-256/32,
Vd. puede programar hasta 16 Preset Scenes diferentes que pueden ser asignadas en las teclas Projector
Select 1-16.
6.3.1 Programar una Preset Scene
Presione la tecla Manual y seleccione el proyector deseado mediante la tecla Projector Select respectiva.
Vd. puede seleccionar todos los proyectores inmediatamente si usted mantiene la tecla Manual por
aproximadamente. 2 segundos.
Presione la tecla Scene y la pantalla muestra "Preset Scene". Seleccione la Preset Scene deseada
mediante la tecla Projector Select respectiva. Cuando ya hay una Preset Scene en esta tecla, el nombre del
proyector aparece en la pantalla. Seleccione una tecla libre dónde no hay ningun nombre.
Presione la tecla Edit y la pantalla muestra "Preset Mask Empty". Presione la tecla Mask y seleccione el
proyector deseado mediante la tecla Projector Select respectiva. Presione la tecla Edit para regresar al
modo Edit. Haga los ajustes deseados y memorízalos mediante la tecla Enter. La pantalla muestra "Saving"
y la Preset Scene es ahora memorizada en la tecla respectiva. Presione la tecla Recall para regrasar en el
menu prinicpal.
6.3.2 Llamar una Preset Scene
Presione la tecla Manual y seleccione el proyector deseado mediante la tecla Projector Select respectiva.
Vd. puede seleccionar todos los proyectores inmediatamente si usted mantiene la tecla Manual por
aproximadamente. 2 segundos.
Presione la tecla Scene y la pantalla muestra "Preset Scene". Seleccione la Preset Scene deseada
mediante la tecla Projector Select respectiva. El proyector se mueve a la posición definada y proyecta los
ajustes determinados.
6.3.1 Editar una Preset Scene
Presione la tecla Manual y seleccione el proyector deseado mediante la tecla Projector Select respectiva.
Vd. puede seleccionar todos los proyectores inmediatamente si usted mantiene la tecla Manual por
aproximadamente. 2 segundos.
Presione la tecla Scene y la pantalla muestra "Preset Scene". Seleccione la Preset Scene deseada
mediante la tecla Projector Select respectiva. El proyector se mueve a la posición definada y proyecta los
ajustes determinados. Presione la tecla Edit y haga los cambios deseados y memorízalos mediante la tecla
Enter.
66
6.4 Preset Macros
Un Preset Macro es un ajuste de canal preajustado que puede siempre ser llamado. Con el CP-256/32, Vd.
puede programar hasta 16 Preset Macros diferentes que pueden ser asignadas en las teclas Projector
Select 1-16. Las teclas 1-8 se refieren a los ajustes del primero canal DMX (colores), las teclas 9-16 a los
del segundo canal DMX (gobos). Macros son utiles para llamar funciones que se encuentran en valores
DMX diferentes de los proyectores diferentes mediante una tecla. Si p.ej. el color verde se encuentra en el
valor DMX 20 de un proyector y en 40 del otro, Vd. puede llamar el mismo color en los dos proyectores
mediante el macro "verde".
6.4.1 Programar un Preset Macro
Presione la tecla Manual y seleccione el proyector deseado mediante la tecla Projector Select respectiva.
Presione la tecla Macro y la pantalla muestra "Macro". Seleccione el Preset Macro deseado mediante la
tecla Projector Select respectiva (p.ej. tecla Projector Select 1 - macro verde). Ajuste el color deseado (p.ej.
verde) mediante el fader canal 1. Presione la tecla Enter para memorizar los ajustes. Presione la tecla
Macro para quitar el modo Macro.
Seleccione el próximo proyector deseado mediante la tecla Projector Select respectiva.
Presione la tecla Macro y la pantalla muestra "Macro". Seleccione el mismo Preset Macro como antes (p.ej.
tecla Projector Select 1 - macro verde). Ajuste el color deseado (p.ej. verde) mediante el fader canal 1.
Presione la tecla Enter para memorizar los ajustes. Presione la tecla Macro para quitar el modo Macro.
6.4.2 Llamar un Preset Macro
Presione la tecla Manual y seleccione los proyectores deseados mediante las teclas Projector Select
respectivas.
Presione la tecla Macro y la pantalla muestra "Macro". Seleccione el Preset Macro deseado mediante la
tecla Projector Select respectiva (p.ej. tecla Projector Select 1 - macro verde). Todos los proyectores
seleccionados muestran el mismo color (p.ej. verde). Presione la tecla Macro para quitar el modo Macro.
6.4.3 Editar un Preset Macro
Presione la tecla Manual y seleccione el proyector deseado mediante la tecla Projector Select respectiva.
Presione la tecla Macro y la pantalla muestra "Macro". Seleccione el Preset Macro deseado mediante la
tecla Projector Select respectiva (p.ej. tecla Projector Select 1 - macro verde). Ajuste el color deseado (p.ej.
verde) mediante el fader canal 1. Presione la tecla Enter para memorizar los ajustes. Presione la tecla
Macro para quitar el modo Macro.
Seleccione el próximo proyector deseado mediante la tecla Projector Select respectiva.
Presione la tecla Macro y la pantalla muestra "Macro". Seleccione el mismo Preset Macro como antes (p.ej.
tecla Projector Select 1 - macro verde). Ajuste el color deseado (p.ej. verde) mediante el fader canal 1.
Presione la tecla Enter para memorizar los ajustes. Presione la tecla Macro para quitar el modo Macro.
6.5 Programación
Un programa es una combinación de escenas diferentes que son llamdos una por otra. Con el CP-256/32,
Vd. puede programar hasta 32 programas diferentes que pueden ser asignados en las teclas Projector
Select 1-32.
6.5.1 Programar un programa
Presione la tecla Menu y seleccione "Menu 2 Make Prog." mediante las teclas Up/Down o el Data Entry
fader. Presione dos veces la tecla Enter. Seleccione el programa deseado mediante la tecla Projector Select
respectiva.
Seleccione el proyector deseado mediante la tecla Projector Select respectiva y haga los ajustes deseados
mediante los encoders y los faders canal respectivos. Seleccione el próximo proyector deseado mediante la
tecla Projector Select respectiva y haga los ajustes deseados. Presione la tecla Enter para memorizar el
primero step. Programe los steps siguientes hasta que el programa sea terminado o el numero máximo de
steps - 16 - haya llegado. Presione la tecla Escape y Enter para memorizar el programa.
67
6.5.2 Llamar un programa
Presione la tecla Program y seleccione el programa deseado mediante la tecla Projector Select respectiva.
Ajuste la velocidad del program y la frecuencia de repitición mediante el regulador Speed y Regulador Rate.
Para seleccionar los programas 17 hasta 32, Vd. debe presionar la tecla UP antes.
6.5.3 Verificar un programa
Presione la tecla Program y seleccione el programa deseado mediante la tecla Projector Select respectiva.
Presione la tecla Scene y verifique cada escena mediante la tecla Projector Select respectiva.
6.5.4 Editar un programa
Si Vd. nota que una escena no corresponde a sus concepciones o si programas tienen que ser editados
para una nueva escena, es necesario de modificar una escena manualmente.
Primero note el número total de steps . Presione la tecla Menu y seleccione "Menu 2 Make Prog." mediante
las teclas Up/Down o el Data Entry fader. Presione dos veces la tecla Enter. Seleccione el programa
deseado mediante la tecla Projector Select respectiva.
Seleccione la escena deseada mediante las teclas Up/Down. Cuando mantiene la tecla Recall y presione la
tecla Up/Down, la escena actual se muestra. Seleccione el proyector deseado mediante la tecla Projector
Select respectiva y haga los ajustes deseados mediante los encoders y los faders canal respectivos.
Seleccione el próximo proyector deseado mediante la tecla Projector Select respectiva y haga los ajustes
deseados. Presione la tecla Enter para memorizar el step editado. Edite los steps siguientes hasta que el
programa sea corrigido.
Atención: Antes de quitar el modo Edit, Vd. debe memorizar el último step otra vez. Si no, el programa no
va funcionar correctamente.
Seleccione la última escena mediante las teclas Up/Down. Mantiene la tecla Recall para que la escena
actual se muestre. Presione la tecla Enter para memorizar la escena. Presione la tecla Escape y Enter para
memorizar el programa editado.
6.5.5 Selección de los proyectores en un programa
El nombre de proyectores en el program puede ser ajustado individualmente para cada programa.
Presione la tecla Menu y seleccione "Menu 2 Make Prog." mediante las teclas Up/Down o el Data Entry
fader. Presione la tecla Enter. Seleccione el menu "Edit Mask" mediante las teclas Up/Down. Presione la
tecla Enter.
Seleccione el proyector deseado mediante la tecla Projector Select respectiva. Todos los proyectores
marcado con "*" son activados en el programa y el LED respectivo perpeada. Cuando quire eliminar ciertos
proyectores del programa, presione la tecla Projector Select respectiva. El LED se apaga y la pantalla
muestra "X".
Presione dos veces la tecla Enter para memorizar los ajustes.
6.5.6 Inversión de los movimientos Pan/Tilt
Los movimientos Pan/Tilt de un scanner pueden ser invertidos para cada programa. Esta función es útil
cuando scanneres están instalados opuestos en un lugar y Vd. desea un movimiento sincrónico.
Atencion: Note por favor que la inversión de los movimientos debe ser ajustada antes de comenzar con la
programación.
Presione la tecla Menu y seleccione "Menu 2 Make Prog." mediante las teclas Up/Down o el Data Entry
fader. Presione la tecla Enter. Seleccione el menu "Mirror direction" mediante las teclas Up/Down. Presione
la tecla Enter.
Seleccione el proyector deseado mediante la tecla Projector Select respectiva. Todos los proyectores
marcado con "->" tienen un movimiento Pan normal. Si Vd. quiere invertir el movimiento Pan para ciertos
proyectores, presione la tecla Projector Select respectiva. La pantalla muestra "<-" para los proyectores con
un movimiento Pan invertido.
Presione la tecla Down para invertir el movimiento Tilt.
Presione la tecla Escape para regresar al menu "Make menu". Ahora programa su programa.
68
6.6 Records
Un record es una combinación de programas diferentes que son llamdos uno por otro. Con el CP-256/32,
Vd. puede programar hasta 32 records diferentes con hasta 99 steps que pueden ser asignados en las
teclas Projector Select 1-32.
6.6.1 Programar un record
Presione la tecla Menu y seleccione "Menu 1 Make Record" mediante las teclas Up/Down o el Data Entry
fader. Presione la tecla Enter. Seleccione el record deseado mediante la tecla Projector Select respectiva.
La pantalla muestra el número del step y el programa respectivo, la velocidad del programa y la frecuencia
de repitición o la selección "controlado por el sonido".
Seleccione el programa deseado mediante la tecla Projector Select respectiva. Ajuste la velocidad del
programa y la frecuencia de repitición mediante el Regulador Speed o Regulador Rate o ajuste la selección
"controlado por el sonido" mediante la tecla Music.
Seleccione el próximo step mediante las teclas Up/Down o el Data Entry fader y entre el programa deseado
mediante la tecla Projector Select respectiva. Programe los steps siguientes hasta que el record sea
terminado o el numero máximo de steps - 99 - haya llegado. Presione la tecla Escape y Enter para
memorizar el record.
6.6.2 Llamar un record
Presione la tecla Record y seleccione el record deseado mediante la tecla Projector Select respectiva.
6.6.3 Editar un record
Si Vd. nota que un record no corresponde a sus concepciones Vd. puede editarlo.
Primero note el número total de steps. Presione la tecla Menu y seleccione "Menu 1 Make Chaser" mediante
las teclas Up/Down o el Data Entry fader. Presione la tecla Enter. Seleccione el record deseado mediante la
tecla Projector Select respectiva.
Seleccione el step deseado mediante las teclas Up/Down o el Data Entry fader y entre el programa deseado
mediante la tecla Projector Select respectiva. Edite los steps siguientes hasta que el record sea corrigido.
Presione la tecla Escape y Enter para memorizar el record editado.
6.7 Copiar escenas, programs y records
Con la función de copiar, Vd. puede facilitarse la programación de programas y records en insertar escenas
ya existentes en un programa p.ej.
Presione la tecla Menu y seleccione "Menu 2. Make Program" mediante las teclas Up/Down o el Data Entry
fader. Presione la tecla Enter. Seleccione "Copy" mediante las teclas Up/Down o el Data Entry fader y
presione la tecla Enter.
Scene: Entre de que programa Vd. quiere copiar que escena. Entre en que programa y a que posición Vd.
quire copiar. Presione dos veces la tecla Enter.
Program: Entre que programa Vd. quiere copiar adónde. Presione dos veces la tecla Enter.
Record: Entre que record Vd. quiere copiar adónde. Presione dos veces la tecla Enter.
6.8 Control por sonido
Activar el control por sonido
Presione la tecla Music Taste para activar el control por sonido (LED parpadea). Note por favor que
programas y records son sólo activos en este modo, si el controlador reciba una señal de sonido (sea
mediante el micrófono o el casquillo Audio). Si no hay música, el programa o record para.
Cuando programar records, Vd. puede ajustar para cada programa si el control por sonido debe ser activo o
no.
69
6.9 Chaser
Un chaser es una combinación de imagenes diferentes que son llamdos uno por otro. De tanto, la salida de
luz se abre y cierre - creando un movimiento muy vivo. Con el CP-256/32, Vd. puede programar hasta 99
chasers diferentes de cuales 32 pueden ser asignados en las teclas Projector Select 1-32. Vd. puede
conectar chasers con programas o escenas.
6.9.1 Programar un chaser
Presione la tecla Sequence y el chaser respectivo está llamado. Mantiene la tecla Sequence para entrar en
el modo Chaser Edit. Si Vd. ha presionado esta tecla desde un programa aparecen los chasers definidos
durante la programación. Aquí puede seleccionar un chaser deseado manualmente mediante las teclas
Projector Select y ajustar la velocidad de chaser mediante el Data Entry fader. Como alternativa Vd. puede
activar el control por sonido.
Cuando Vd. quiere regrasar a los chasers del programa, presione otra vez la tecla Projector Select activa y
el LED se apaga.
6.9.2 Conectar un programa con un chaser
Con el CP-256/32, Vd. puede conectar programas o escenas de un programa con un chaser individual.
Presione la tecla Menu y seleccione "Menu 3 Make Chaser" mediante las teclas Up/Down o el Data Entry
fader. Presione la tecla Enter. Seleccione el menu "Link chaser" mediante las teclas Up/Down o el Data
Entry fader. Presione la tecla Enter. Seleccione el programa deseado mediante la tecla Projector Select
respectiva.
Seleccione el chaser deseado para escena 1 mediante las teclas Left/Right. Seleccione las próximas
escenas mediante la tecla Projector Select respectiva y entre el chaser deseado.
Presione dos veces la tecla Enter para memorizar el programa.
6.9.3 Conectar una Preset Scene con un chaser
Presione la tecla Menu y seleccione "Menu 3 Make Chaser" mediante las teclas Up/Down o el Data Entry
fader. Presione la tecla Enter. Seleccione el menu "Chaser Preset Link" mediante las teclas Up/Down o el
Data Entry fader. Presione la tecla Enter.
Seleccione el chaser deseado para Preset Scene 1 mediante las teclas Left/Right. Seleccione las próximas
Preset Scenes mediante la tecla Projector Select respectiva y entre el chaser deseado. Presione dos veces
la tecla Enter para memorizar los ajustes.
La ocupación de las teclas Projector Select del menu "Chaser Preset Link" corresponde a la ocupación que
puede ser llamada mediante la tecla Sequence. Si quire asignar otro chaser de los 99 chaser diferentes en
una tecla Projector Select, sigue la descripción arriba mencionada.
6.9.4 Editar un chaser
Presione la tecla Menu y seleccione "Menu 3 Make Chaser" mediante las teclas Up/Down o el Data Entry
fader. Presione la tecla Enter. Seleccione el menu "Chaser Edit" mediante las teclas Up/Down o el Data
Entry fader. Presione la tecla Enter. Seleccione el chaser deseado mediante las teclas Up/Down o el Data
Entry fader.
Presione la tecla Enter para editar step 1. Entre el imagen deseado mediante las teclas Projector Select
(p.ej. teclas 1, 2, 3 y 4) y presione la tecla Enter. Ajuste la velocidad de chaser mediante las teclas Up/Down
o el Data Entry fader y presione la tecla Enter.
Presione la tecla Right y edite step 2. Edite todos los steps deseados y presione la tecla Escape y Enter
para memorizar los ajustes.
6.10 Ajustes de base
Con el CP-256/32, Vd. puede cambiar diferentes ajustes de base como nombres de proyector y de efectos,
selección de lengua, texto de saludo.
70
Presione la tecla Menu y seleccione "Menu 5 Setup" mediante las teclas Up/Down o el Data Entry fader.
Presione la tecla Enter y la pantalla muestra "Code____". Entre el código 2222 y presione la tecla Enter.
6.10.1 Retitular un proyector
Seleccione el menu "Setup 1. Rename Unit" mediante las teclas Up/Down o el Data Entry fader. Presione la
tecla Enter. Seleccione el proyector deseado mediante las teclas Up/Down o el Data Entry fader y presione
la tecla Enter. El cursor del segundo campo comienza a parpadear y Vd. puede cambiar la letra deseada
mediante las teclas Up/Down o el Data Entry fader. Puede moverse de campo a campo mediante las teclas
Left/Right. Tan pronto como haya terminado su entrada, presione dos veces la tecla Enter para memorizar
los ajustes.
6.10.2 Retitular un efecto
Seleccione el menu "Setup 2. Rename Effect" mediante las teclas Up/Down o el Data Entry fader. Presione
la tecla Enter. Seleccione el efecto deseado mediante las teclas Up/Down o el Data Entry fader y presione la
tecla Enter. El cursor del segundo campo comienza a parpadear y Vd. puede cambiar la letra deseada
mediante las teclas Up/Down o el Data Entry fader. Puede moverse de campo a campo mediante las teclas
Left/Right. Tan pronto como haya terminado su entrada, presione dos veces la tecla Enter para memorizar
los ajustes.
6.10.3 Retitular un tipo
Seleccione el menu "Setup 3. Rename Type" mediante las teclas Up/Down o el Data Entry fader. Presione
la tecla Enter. Seleccione el tipo deseado mediante las teclas Up/Down o el Data Entry fader y presione la
tecla Enter. El cursor del segundo campo comienza a parpadear y Vd. puede cambiar la letra deseada
mediante las teclas Up/Down o el Data Entry fader. Puede moverse de campo a campo mediante las teclas
Left/Right. Tan pronto como haya terminado su entrada, presione dos veces la tecla Enter para memorizar
los ajustes.
6.10.4 Configurar un proyector
Seleccione el menu "Setup 4. Configue Unit" mediante las teclas Up/Down o el Data Entry fader. Presione la
tecla Enter. Seleccione el proyector deseado mediante las teclas Up/Down o el Data Entry fader y presione
la tecla Enter. Entre el número de canales DMX del proyector mediante el Data Entry fader o confirme la
selección "16" mediante la tecla Enter. Seleccione la función deseada y confirmela mediante la tecla Enter.
Entre el canal respectivo canal del proyector y confirmelo mediante la tecla Enter. Seleccione el efecto
deseado y confirmelo mediante la tecla Enter. Entre el valor DMX respectivo y confirmelo mediante la tecla
Enter.
Si no quiere entrar efectos, presione la tecla Escape y entre el próximo canal. Note, por favor, que en este
caso la pantalla no muestra ningun función.
Si la pantalla muestra "Occupied", puede escribir cuando presione la tecla Enter.
Cuando ha entrado todos los efectos, presione la tecla Escape y la pantalla muestra "B.Out: Scan?Dim?".
Seleccione "Scan" para scanners y Moving Heads y "Dim" para dimmers mediante las teclas Left/Right y
confirme mediante la tecla Enter. La pantalla muestra "Save changes?". Presione la tecla Enter para
confirmar. Puede regresar al menu prinicipal mediante la tecla Escape.
6.10.5 Ajustar las características
Seleccione el menu "Setup 5. New typical" mediante las teclas Up/Down o el Data Entry fader. Presione la
tecla Enter. Seleccione el menu deseado mediante las teclas Up/Down o el Data Entry fader y presione la
tecla Enter.
Seleccionar la lengua
Mediante el menu "Select Language", Vd. puede seleccioner la lengua deseada mediante las teclas
Up/Down. Presione la tecla Enter.
Seleccionar el código
Mediante el menu "Select Code", Vd. puede cambiar el código de protección para el menu principal y el
menu Setup.
Selecciona "New Menu Code" para cambiar el código de protección para el menu principal o "New Setup
Code" para el menu Setup. Presione la tecla Enter.
71
Entre el nuevo código mediante las teclas Projector Select y presione la tecla Enter. Si Vd. quiere cancelar
el código de estos menus, sólo presione la tecla Enter sin entrar una cifra.
Modo de direcciones
Mediante el menu "Addressing Mode", Vd. puede determinar como el CP-256/32 debe asignar las
direcciones DMX. El ajuste estandard es "Automat. 16" que significa que el CP-256/32 asigna
automaticamente 16 canales a cada proyector. El ajuste "Automat. In Row" significa que el CP-256/32
asigna automaticamente los canales necesitados realmente a cada proyector (p.ej. 4 canales para
Futurelight SC-240). El ajuste "Manually" significa que el utilisador puede asignar las direcciones DMX
libremente.
Seleccione el ajuste deseado mediante las teclas Up/Down o el Data Entry fader y presione la tecla Enter.
Texto de saludo
Mediante el menu "Greeting Text", Vd. puede cambiar el texto de saludo. Note por favor que el texto de
saludo puede solo ser cambiado una vez y puede solo contener 64 letras.
Presione la tecla Enter. El cursor del segundo campo comienza a parpadear y Vd. puede cambiar la letra
deseada mediante las teclas Up/Down o el Data Entry fader. Puede moverse de campo a campo mediante
las teclas Left/Right. Tan pronto como haya terminado su entrada, presione la tecla Escape y Enter para
memorizar los ajustes.
6.10.6 Ajustar la sensibilidad de los encoders
Con el CP-256/32, Vd. puede ajustar la sensibilidad de los encoders entre 0 % (baja sensibilidad) y 100 %
(alta sensibilidad) einstellen.
Seleccione el menu "Setup 6. Joy Config" mediante las teclas Up/Down o el Data Entry fader. Presione la
tecla Enter. Ajuste la sensibilidad deseada mediante las teclas Up/Down o el Data Entry fader y presione
dos veces la tecla Enter.
6.10.7 Contador de las horas de servicio
Seleccione el menu "Setup 7. Worked Time" mediante las teclas Up/Down o el Data Entry fader. Presione la
tecla Enter. La pantalla muestra las horas de servicio.
7. Solución de problemas
PROBLEMA:
CAUSA:
La alimentación no se conecta. La unidad de alimentación no está
conectado.
No se puede memorizar el
El controlador no ha memorizado los
color o gobo del Preset Macro. ajustes.
No se puede editar el
programa.
No se muestran las escenas
individuales en el modo
Program Edit.
No se puede entrar el menu
principal.
SOLUCION:
Compruebe el cable de conexión y
cables de extension.
Entre los ajustes otra vez y
memorice cada proyector
individualmente.
No ha memorizado la última escena. Asegúrese de que todas las escenas
están disponibles. Edite el program
de nuevo y memorice la última
escena en presionar la tecla Enter.
No ha presionado la tecla Recall.
Presione la tecla Recall para mostrar
la escena memorizada.
Ha olvidado el código.
72
Abre el sobre con el Master Code y
seguir las instrucciones allí.
8. Limpieza y mantenimiento
¡PELIGRO DE MUERTE!
¡Siempre desenchufe el aparato antes de comenzar con el mantenimiento!
Recomendamos una limpieza frecuente del aparato. Por favor utilice un paño suave que no suelte pelusa
humedecido. ¡No utilizar nunca alcohol o disolventes!
No hay piezas que necesiten de servicio dentro del aparato. Las operaciones de mantenimiento y servicio
deben ser llevadas a cabo únicamente por distribuidores autorizados.
En caso de que necesite piezas de repuesto, utilice piezas originales.
Si tiene alguna pregunta más, póngase en contacto con su distribuidor.
9. Especificaciones técnicas
Alimentación:
Consumo:
Número de canales:
Control por sonido:
Entrada de son:
Sensibilidad de la entrada de son:
Salida DMX 512:
Programas libres:
Dimensiones (La.xAn.xAl.):
Profundidad de montaje:
Peso:
230 V AC, 50 Hz ~
mediante transformador 12-15 V, 500 mA incluido en el envío
6W
256
casquillo jack mono o mediante micrófono incorporado
6,3 mm jack estereo
0.3 - 1 V
XLR tripolar
32
483 x 176 x 105 mm
Dimensión de montaje 19" con 4 u
90 mm
4 kg
Todos los derechos (en especial los de traducción) quedan reservados. No parte de este manual
puede ser reproducida o cambiada sin permisión en escrito del editor.
Nota: Todas las especificaciones dadas en este manual están sujetas a modificación sin previo
aviso. 09/02 ©
73