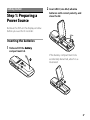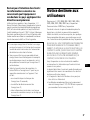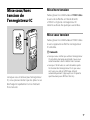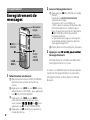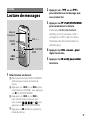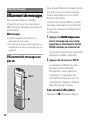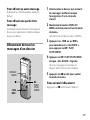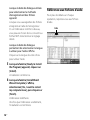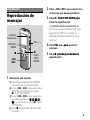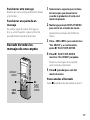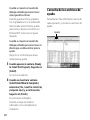
1
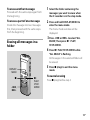
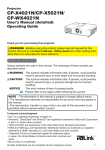
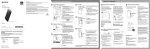
This Quick Start Guide describes only basic operations, such as how to record, play back, or erase messages. The operating instructions explaining all the features and functions are supplied with the IC recorder as PDF files in 19 languages stored on the supplied CD-ROM. You can copy the PDF files of the operating instructions to your computer. Insert the supplied CDROM into the CD-ROM drive of your computer, and just follow the instructions shown on the screen. If the instructions are not shown on the screen, rightclick the CD-ROM on Windows Explorer to open, and double-click [SetupLauncher.exe]. The English edition of the operating instructions is supplied as a booklet as well. For customers in Europe Disposal of Old Electrical & Electronic Equipment (Applicable in the European Union and other European countries with separate collection systems) This symbol on the product or on its packaging indicates that this product shall not be treated as household waste. Instead it shall be handed over to the applicable collection point for the recycling of electrical and electronic equipment. By ensuring this product is disposed of correctly, you will help prevent potential negative consequences for the environment and human health, which could otherwise be caused by inappropriate waste handling of this product. The recycling of materials will help to conserve natural resources. For more detailed information about recycling of this product, please contact your local Civic Office, your household waste disposal service or the shop where you purchased the product. GB Applicable accessory: USB connecting cable Disposal of waste batteries (applicable in the European Union and other European countries with separate collection systems) This symbol on the battery or on the packaging indicates that the battery provided with this product shall not be treated as household waste. By ensuring these batteries are disposed of correctly, you will help prevent potentially negative consequences for the environment and human health which could otherwise be caused by inappropriate waste handling of the battery. The recycling of the materials will help to conserve natural resources. In case of products that for safety, performance or data integrity reasons require a permanent connection with an incorporated battery, this battery should be replaced by qualified service staff only. To ensure that the battery will be treated properly, hand over the product at end-of-life to the applicable collection point for the recycling of electrical and electronic equipment. For all other batteries, please view the section on how to remove the battery from the product safely. Hand the battery over to the applicable collection point for the recycling of waste batteries. For more detailed information about recycling of this product or battery, please contact your local Civic Office, your household waste disposal service or the shop where you purchased the product. Notice for the customers: the following information is only applicable to equipment sold in the countries applying EU directives The manufacturer of this product is Sony Corporation, 1-7-1 Konan, Minato-ku, Tokyo, Japan. The Authorized Representative for EMC and product safety is Sony Deutschland GmbH, Hedelfinger Strasse 61, 70327 Stuttgart, Germany. For any service or guarantee matters please refer to the addresses given in separate service or guarantee documents. The recorded music is limited to private use only. Use of the music beyond this limit requires permission of the copyright holders. Sony is not responsible for incomplete recording/downloading or damaged data due to problems of the IC recorder or computer. Depending on the types of the text and characters, the text shown on the IC recorder may not be displayed properly on device. This is due to: The capacity of the connected IC recorder. The IC recorder is not functioning normally. Content information is written in the language or the character that is not supported by the IC recorder. Notice for users Program © 1999, 2000, 2001, 2002, 2003, 2004, 2005, 2006, 2007, 2008, 2009 Sony Corporation Documentation ©2009 Sony Corporation All rights reserved. This manual or the software described herein, in whole or in part, may not be reproduced, translated or reduced to any machine readable form without prior written approval from Sony Corporation. IN NO EVENT SHALL SONY CORPORATION BE LIABLE FOR ANY INCIDENTAL, CONSEQUENTIAL OR SPECIAL DAMAGES, WHETHER BASED ON TORT, CONTRACT, OR OTHERWISE, ARISING OUT OF OR IN CONNECTION WITH THIS MANUAL, THE SOFTWARE OR OTHER INFORMATION CONTAINED HEREIN OR THE USE THEREOF. Sony Corporation reserves the right to make any modification to this manual or the information contained herein at any time without notice. The software described herein may also be governed by the terms of a separate user license agreement. This software is for Windows and cannot be used for Macintosh. The supplied connecting cable is for the IC recorder ICD-PX720. You cannot connect other IC recorders. GB Table of Contents Checking the Contents of the Package........................................................... 4 Getting Started Step 1: Preparing a Power Source........... 5 Step 2: Setting the Clock............................... 6 Turning the IC Recorder On or Off.......... 7 Recording Recording Messages....................................... 8 Playback Playing Back Messages................................... 9 Editing Messages Erasing Messages............................................10 Erasing messages one by one............10 Erasing all messages in a folder.........11 Checking the Contents of the Package IC Recorder (1) Remove the film on the display window before you use the IC recorder. LR03 (size AAA) alkaline batteries (2) USB connecting cable (1) CD-ROM(1) Application Software, Digital Voice Editor Operating instructions (PDF files) Stereo headphones* (1) Carrying pouch* (1) Operating Instructions * The stereo headphones, carrying pouch are supplied with some models in some regions only. Utilizing Your Computer Using the Supplied Digital Voice Editor Software................................................................12 Additional Information Precautions..........................................................15 GB You are cautioned that any changes or modifications not expressly approved in this manual could void your authority to operate this equipment. Getting Started Step 1: Preparing a Power Source 2 Insert LR03 (size AAA) alkaline batteries with correct polarity, and close the lid. Remove the film on the display window before you use the IC recorder. Inserting the batteries 1 Slide and lift the ��������� battery compartment lid. If the battery compartment lid is accidentally detached, attach it as illustrated. GB Step 2: Setting the Clock Continued directly from “Step 1: Preparing a Power Source” 1 Press – or + to set the year, month, day, hour, and minute in sequence, then press PLAY/ STOP•ENTER. DISPLAY/ MENU –, + PLAY/ STOP• ENTER 2 Press (stop) to return to the display of the stop mode. You need to set the clock to use the alarm function or record the date and time. Clock setting display appears when you insert batteries for the first time, or when you insert batteries after the IC recorder has been without batteries for a certain period of time the year section flashes in the display window. GB Turning the IC Recorder On or Off Turning the power off Slide the ������������������������������ HOLD switch in the direction of the arrow in the stop mode. “HOLD” flashes. The IC recorder turns off within a few seconds. Turning the power on Slide the HOLD switch in the opposite direction from that of the arrow. The IC recorder turnes on. When you are not using the IC recorder, you can prevent the batteries from getting weak quickly by turning the power off. Tips When you are not going to use the IC recorder for a long time, we recommend to turn off the IC recorder. When 10 minutes have passed after you have turned on the IC recorder and leave it without doing anything, the display goes off automatically. (Press any button to show the display.) GB 2 Start recording. Recording Recording Messages Built-in microphones Operation indicator REC/ PAUSE –, + PLAY/ STOP• ENTER 1 Select a folder. Press and hold DISPLAY/MENU to enter the menu mode. Press – or + to select “FOLDER,” then press PLAY/ STOP•ENTER. Press – or + to select the folder you want ( , , , , or ), then press PLAY/STOP•ENTER. Press (stop) to exit the menu mode. GB Press � REC/PAUSE in the stop mode. The ������������������������������������ operation indicator lights in red. (When “LED” is set to “OFF” in the menu, the operation indicator does not light.) You do not need to press and hold REC/PAUSE while recording. The new message will be automatically recorded after the last recorded message. Speak into the built-in microphones. 3 Press (������������������������� stop) to stop recording. The IC recorder stops at the beginning of the current recording. If you do not change the folder after you stop recording, the next time you record you will record in the same folder. Playback 2 Press ��– or �+ to select the Playing Back Messages 3 Press �������������������������� PLAY/STOP•ENTER to start message you want to play. playback. operation indicator lights in green. The �������������������������������������� (When “LED” is set to “OFF” in the menu, the operation indicator does not light.) Operation indicator DISPLAY/ MENU –, + VOL +, – 4 Press �VOL �������������� + or – to adjust the volume. 5 Press (������������������������ stop) to stop playback. PLAY/ STOP• ENTER 1 Select a folder. Press and hold DISPLAY/MENU to enter the menu mode. Press – or + to select “FOLDER,” then press PLAY/ STOP•ENTER. Press – or + to select the folder you want ( , , , , or ), then press PLAY/STOP•ENTER. Press (stop) to exit the menu mode. GB You can erase the recorded messages one by one or all messages in a folder at a time. You can erase unwanted messages, retaining all other messages when the IC recorder is in the stop or playback mode. When a message is erased, the remaining messages will advance and be renumbered so that there will be no space between messages. Notes 1 Press ����������������������������� ERASE while you are playing Editing Messages Erasing Messages Once a recording has been erased, you cannot retrieve it. If the message you want to erase is locked in the menu, the message is not erased. Erasing messages one by one ERASE back the message you want to erase or press and hold ERASE during the stop mode. A beep will sound and the message number and “ERASE” will flash. 2 Press ERASE again. The message is erased and the remaining messages will be renumbered. (For example, if you erase Message 3, Message 4 will be renumbered as Message 3. When erasing is completed, the unit will stop at the beginning of the following message.) To cancel erasing 10 GB Press (stop) before step 2. To erase another message Proceed with the same steps again from the beginning. To erase a part of one message Divide the message into two messages first, then proceed with the same steps from the beginning. Erasing all messages in a folder 1 Select the folder containing the messages you want to erase when the IC recorder is in the stop mode. 2 Press and hold DISPLAY/MENU to enter the menu mode. The menu mode window will be displayed. 3Press – or + to select “ALL ERASE,” then press PLAY/ STOP•ENTER. 4 Press PLAY/STOP•ENTER while “ALL ERASE” is flashing. All messages in the selected folder will be erased. 5 Press (stop) to exit the menu DISPLAY/ MENU –, + mode. PLAY/ STOP• ENTER To cancel erasing Press (stop) before step 3. 11 GB Utilizing Your Computer Using the Supplied Digital Voice Editor Software System requirements Operating Systems: Windows Vista® Ultimate Windows Vista® Business Windows Vista® Home Premium Windows Vista® Home Basic Windows® XP Media Center Edition 2005 Service Pack 2 or higher Windows® XP Media Center Edition 2004 Service Pack 2 or higher Windows® XP Media Center Edition Service Pack 2 or higher Windows® XP Professional Service Pack 2 or higher Windows® XP Home Edition Service Pack 2 or higher Windows® 2000 Professional Service Pack 4 or higher Pre-Installed Note 64bit OS is not supported. 12 GB Hardware Environment: Computer: IBM PC/AT or compatible CPU : 266 MHz Pentium® II processor or higher (For Windows Vista®, 800MHz Pentium® III processor or higher) RAM: 128MB or more (For Windows Vista®, 512MB or more) Hard disk space: 150MB or more CD-ROM drive (When creating an audio CD or data CD, a CD-R/RW drive is needed) Port: USB port Sound board: Sound cards compatible with any of the supported Microsoft® Windows® operating systems Display: High color (16bit) or more and 800x480 dots or more Internet access for Voice Mail function and CD database service Note The following systems are not supported: Any operating system other than the ones indicated above Personally assembled PCs or operating systems Upgraded operating systems Multi-boot environment Multi-monitor environment Installing the software Install the Digital Voice Editor software on your computer’s hard disk. 1 Make sure that the IC recorder is not connected, then turn on your computer and start up Windows. 2 Insert the supplied CD-ROM into the CD-ROM drive. The [IC Recorder Software Setup] menu starts up automatically and the [Welcome to IC Recorder Software Setup] window appears. If the [Welcome to IC Recorder Software Setup] menu does not start up, open the [DVE] folder in the [Setup] folder on the CD-ROM, then double click [setup.exe]. 3 Make sure that you accept the terms of the license agreement, select [I accept the terms of the license agreement], then click [Next]. 4 Select [Digital Voice Editor], then click [Install]. Follow the instructions on the screen to make the settings required for installation. If you have already installed a previous version of the Digital Voice Editor or any version of the “Memory Stick Voice Editor” The dialog box used to uninstall a previous version of the Digital Voice Editor or any version of the “Memory Stick Voice Editor” will be displayed. Follow the instructions on the screen to uninstall the software. The message files are not removed. Note If any illegal data modification is attempted, or a file is used for other than private purposes, the file may become unplayable or the Digital Voice Editor may become inoperable. The [Software Install] window appears. 13 GB When the dialog box used to select how to save files is displayed When you save files recorded using the IC recorder onto the computer named above, you can select whether you wish to convert them into the MP3 format. Select the desired setting. When the dialog box used to select the language to be used for the help is displayed Click the language you want to use for the help. 5 When the [Ready to Install the Program] window appears, click [Install]. The installation starts. 6 When the [InstallShield Wizard Complete] window appears, select [Yes, I want to restart my computer now], then click [Finish]. The computer will be restarted. When the computer has been restarted, installation is completed. 14 GB Referring to the help files For details on each operation, refer to the help files. Help Additional Information On noise Precautions On power Operate the unit only on 3.0 V or 2.4 V DC. Use two LR03 (size AAA) alkaline batteries or two NH-AAA rechargeable batteries. On safety Do not operate the unit while driving, cycling or operating any motorized vehicle. On handling Do not leave the unit in a location near heat sources, or in a place subject to direct sunlight, excessive dust or mechanical shock. Should any solid object or liquid fall into the unit, remove the batteries and have the unit checked by qualified personnel before operating it any further. Noise may be heard when the unit is placed near an AC power source, a fluorescent lamp or a mobile phone during recording or playback. Noise may be recorded when an object, such as your finger, etc., rubs or scratches the unit during recording. On maintenance To clean the exterior, use a soft cloth slightly moistened in water. Do not use alcohol, benzine or thinner. If you have any questions or problems concerning your unit, please consult your nearest Sony dealer. Backup recommendations To avoid potential risk of data loss caused by accidental operation or malfunction of the IC recorder, we recommend that you save a backup copy of your recorded messages on a tape recorder or to a computer, etc. 15 GB Ce guide de démarrage rapide décrit uniquement les opérations de base, telles l’enregistrement, la lecture ou l’eff acement de messages. Le mode d’emploi décrivant toutes les caractéristiques et fonctions est fourni avec l’enregistreur IC sous la forme d’un fi chier PDF en 19 langues et enregistré sur le CD-ROM fourni. Vous pouvez copier les fi chiers PDF du mode d’emploi sur votre ordinateur. Insérez le CD-ROM fourni dans le lecteur de CD-ROM de votre ordinateur, puis suivez les instructions à l’écran. Si les instructions ne s’affi chent pas à l’écran, faites un clic droit sur le CD-ROM sous Windows Explorer pour l’ouvrir, puis double-cliquez sur [SetupLauncher.exe]. L’édition anglaise du mode d’emploi est aussi fournie sous la forme d’un livret. Modèle européen seulement Traitement des appareils électriques et électroniques en fin de vie (Applicable dans les pays de l’Union Européenne et aux autres pays européens disposant de systèmes de collecte sélective) FR Ce symbole, apposé sur le produit ou sur son emballage, indique que ce produit ne doit pas être traité avec les déchets ménagers. Il doit être remis à un point de collecte approprié pour le recyclage des équipements électriques et électroniques. En s’assurant que ce produit est bien mis au rebut de manière appropriée, vous aiderez à prévenir les conséquences négatives potentielles pour l’environnement et la santé humaine. Le recyclage des matériaux aidera à préserver les ressources naturelles. Pour toute information supplémentaire au sujet du recyclage de ce produit, vous pouvez contacter votre municipalité, votre déchetterie ou le magasin où vous avez acheté le produit. Ceci s’applique à l’accessoire suivant : Câble de raccordement USB Elimination des piles et accumulateurs usagés (Applicable dans les pays de l’Union Européenne et aux autres pays européens disposant de systèmes de collecte sélective) Ce symbole, apposé sur les piles et accumulateurs ou sur les emballages, indique que les piles et accumulateurs fournis avec ce produit ne doivent pas être traités comme de simples déchets ménagers. En vous assurant que ces piles et accumulateurs sont mis au rebut de façon appropriée, vous participez activement à la prévention des conséquences négatives que leur mauvais traitement pourrait provoquer sur l’environnement et sur la santé humaine. Le recyclage des matériaux contribue par ailleurs à la préservation des ressources naturelles. Pour les produits qui pour des raisons de sécurité, de performance ou d’intégrité de données nécessitent une connexion permanente à une pile ou à un accumulateur, il conviendra de vous rapprocher d’un service technique qualifié pour effectuer son remplacement. En rapportant votre appareil électrique en fin de vie à un point de collecte approprié vous vous assurez que la pile ou l’accumulateur incorporé sera traitée correctement. Pour tous les autres cas de figure et afin d’enlever les piles ou accumulateurs en toute sécurité de votre appareil, reportez-vous au manuel d’utilisation. Rapporter les piles ou accumulateurs usagés au point de collecte approprié pour le recyclage. Pour toute information complémentaire au sujet du recyclage de ce produit ou des piles et accumulateurs, vous pouvez contacter votre municipalité, votre déchetterie locale ou le point de vente où vous avez acheté ce produit. Remarque à l’intention des clients : les informations suivantes ne concernent que l’équipement vendu dans les pays appliquant les directives européennes Le fabricant de ce produit est Sony Corporation, 1-7-1 Konan, Minato-ku, Tokyo, Japon. Le représentant autorisé pour les questions de compatibilité électromagnétique (EMC) et la sécurité des produits est Sony Deutschland GmbH, Hedelfinger Strasse 61, 70327 Stuttgart, Allemagne. Pour toute question relative au SAV ou à la garantie, merci de bien vouloir vous référer aux coordonnées contenues dans les documents relatifs au SAV ou la garantie. La musique enregistrée est limitée à un usage privé exclusivement. L’utilisation de la musique au-delà de cette limite nécessite l’autorisation des détenteurs des droits d’auteur. Sony ne peut être tenu responsable de tout enregistrement ou téléchargement incomplet ou de dommages causés aux données suite à des problèmes rencontrés par l’enregistreur IC ou l’ordinateur. Selon le type de texte et de caractères, le texte affiché sur l’enregistreur IC peut ne pas apparaître correctement sur l’appareil. Ceci est dû : aux caractéristiques techniques de l’enregistreur IC raccordé ; à un défaut de fonctionnement de l’enregistreur IC ; à des informations écrites dans une langue ou avec des caractères non pris en charge par l’enregistreur IC. Notice destinée aux utilisateurs Programme © 1999, 2000, 2001, 2002, 2003, 2004, 2005, 2006, 2007, 2008, 2009 Sony Corporation Documentation ©2009 Sony Corporation Tous droits réservés. Le présent mode d’emploi et le logiciel qui y est décrit ne peuvent être reproduits, traduits ou réduits, en tout ou en partie, sous quelque forme compréhensible pour une machine que ce soit sans l’autorisation écrite préalable de Sony Corporation. EN AUCUN CAS, SONY CORPORATION NE POURRA ETRE TENUE RESPONSABLE DE TOUT DOMMAGE DIRECT, INDIRECT, OU SPECIAL LIE A UN ACTE DELICTUEUX, UN CONTRAT OU AUTRE, QUI DECOULE OU EST A METTRE EN RELATION AVEC LE PRESENT MODE D’EMPLOI, LE LOGICIEL OU TOUT AUTRE INFORMATION QU’IL CONTIENT, OU ENCORE DE SON UTILISATION. GB Sony Corporation se réserve le droit de modifier ce manuel ou les informations qu’il contient à tout moment sans préavis. Le logiciel décrit dans le présent mode d’emploi peut également être soumis aux conditions d’un contrat de licence utilisateur séparé. Ce logiciel est destiné à Windows et ne peut pas être utilisé sur Macintosh. Le câble de raccordement fourni est uniquement réservé à l’enregistreur IC ICD-PX720 Vous ne pouvez pas raccorder d’autres enregistreurs IC. FR ES NL FR Table des matières Vérification du contenu de l’emballage..... 4 Préparation Etape 1 : Préparation d’une source d’alimentation..................................................... 5 Etape 2 : Réglage de l’horloge................... 6 Mise sous/hors tension de l’enregistreur IC................................................... 7 Enregistrement Enregistrement de messages.................... 8 Lecture Lecture de messages...................................... 9 Edition de messages Effacement de messages............................10 Effacement de messages un par un.....10 Effacement de tous les messages d’un dossier....................................................11 Utilisation de l’ordinateur Utilisation du logiciel Digital Voice Editor fourni........................................................12 Informations complémentaires Précautions..........................................................15 FR Vérification du contenu de l’emballage Enregistreur IC (1) Retirez le film de la fenêtre d’affichage avant d’utiliser l’enregistreur IC. Piles alcalines LR03 (AAA) (2) Câble de raccordement USB (1) CD-ROM (1) Logiciel d’application, Digital Voice Editor Mode d’emploi (fichiers PDF) Casque stéréo* (1) Etui* (1) Mode d’emploi * Le casque stéréo et l’étui sont fournis avec certains modèles dans certaines régions uniquement. Vous êtes informé que toute modification qui n’est pas expressément approuvée dans ce mode d’emploi peut annuler votre autorisation à faire fonctionner cet appareil. Préparation Etape 1 : Préparation d’une source d’alimentation 2 Introduisez les piles alcalines LR03 (AAA) en respectant la polarité et refermez le couvercle. Retirez le film de la fenêtre d’affichage avant d’utiliser l’enregistreur IC. Insertion des piles 1 Faites glisser et soulevez le couvercle du compartiment des piles. Si le couvercle du compartiment des piles se détache accidentellement, fixez-le comme illustré. FR Etape 2 : Réglage de l’horloge Suite de l’« Etape 1 : Préparation d’une source d’alimentation » 1 Appuyez sur – ou sur + pour régler l’année, le mois, le jour, l’heure et la minute dans l’ordre, puis appuyez sur PLAY/ STOP•ENTER. DISPLAY/ MENU –, + PLAY/ STOP• ENTER 2 Appuyez sur (arrêt) pour revenir à l’affichage en mode d’arrêt. Vous devez régler l’horloge pour utiliser la fonction de réglage de l’alarme ou enregistrer la date et l’heure. L’écran de réglage de l’horloge apparaît lorsque vous introduisez des piles pour la première fois ou lorsque l’enregistreur IC est resté sans piles pendant un certain temps et la section de l’année clignote dans la fenêtre d’affichage. FR Mise sous/hors tension de l’enregistreur IC Mise hors tension Faites glisser le commutateur ����������� HOLD dans le sens de la flèche en mode d’arrêt. « HOLD » clignote. L’enregistreur IC s’éteint au bout de quelques secondes. Mise sous tension Faites glisser le commutateur HOLD dans le sens opposé à la flèche. L’enregistreur IC s’allume. Lorsque vous n’utilisez pas l’enregistreur IC, vous pouvez éviter que les piles ne se déchargent rapidement en le mettant hors tension. Conseils Lorsque vous n’allez pas utiliser l’enregistreur IC pendant une longue période, nous vous recommandons de le mettre hors tension. Lorsque 10 minutes se sont écoulées après l’activation de l’enregistreur IC et que vous ne l’avez pas utilisé, l’affichage s’éteint automatiquement. (Appuyez sur n’importe quel bouton pour afficher l’écran.) FR 2 Lancez l’enregistrement. Enregistrement Enregistrement de messages Microphones intégrés Indicateur de fonctionnement REC/ PAUSE –, + PLAY/ STOP• ENTER 1 Sélectionnez un dossier. Maintenez le bouton DISPLAY/MENU FR enfoncé pour activer le mode de menu. Appuyez sur – ou sur + pour sélectionner « FOLDER », puis appuyez sur PLAY/STOP•ENTER. Appuyez sur – ou sur + pour sélectionner le dossier que vous voulez ( , , , ou ), puis appuyez sur PLAY/STOP•ENTER. Appuyez sur (arrêt) pour quitter le mode de menu. Appuyez sur � REC/PAUSE en mode d’arrêt. L’indicateur ������������������� de fonctionnement s’allume en rouge. (Lorsque « LED » est réglé sur « OFF » dans le menu, l’indicateur de fonctionnement ne s’allume pas.) Vous n’avez pas besoin de maintenir REC/PAUSE enfoncé pendant l’enregistrement. Le nouveau message est enregistré automatiquement après le dernier message enregistré. Parlez dans les microphones intégrés. 3 Appuyez sur (��������������������� arrêt) pour arrêter l’enregistrement. L’enregistreur IC s’arrête au début de l’enregistrement en cours. Si vous ne modifiez pas le dossier après l’arrêt de l’enregistrement, le prochain enregistrement se fera dans le même dossier. 2 Appuyez sur – ou sur �+ Lecture Lecture de messages pour sélectionner le message que vous voulez lire. 3 Appuyez sur ����������������� PLAY/STOP•ENTER Indicateur de fonctionnement DISPLAY/ MENU VOL +, – PLAY/STOP• ENTER –, + pour commencer la lecture. L’indicateur ������������������� de fonctionnement s’allume en vert. (Lorsque « LED » est réglé sur « OFF » dans le menu, l’indicateur de fonctionnement ne s’allume pas.) 4 Appuyez sur �VOL �������������������� + ou sur – pour régler le volume. 5 Appuyez sur (��������������������� arrêt) pour arrêter la lecture. 1 Sélectionnez un dossier. Maintenez le bouton DISPLAY/MENU enfoncé pour activer le mode de menu. Appuyez sur – ou sur + pour sélectionner « FOLDER », puis appuyez sur PLAY/STOP•ENTER. Appuyez sur – ou sur + pour sélectionner le dossier que vous voulez ( , , , ou ), puis appuyez sur PLAY/STOP•ENTER. Appuyez sur (arrêt) pour quitter le mode de menu. FR Edition de messages Effacement de messages Vous pouvez effacer les messages enregistrés un par un ou vous pouvez effacer tous les messages d’un dossier en même temps. Remarques Une fois l’enregistrement effacé, il est impossible de le récupérer. Si le message que vous voulez supprimer est verrouillé dans le menu, le message n’est pas supprimé. Effacement de messages un par un ERASE Vous pouvez effacer les messages inutiles et conserver tous les autres messages lorsque l’enregistreur IC est en mode d’arrêt ou de lecture. Lorsqu’un message est effacé, les autres messages sont avancés et renumérotés de façon à ne pas laisser d’espace entre les messages. 1 Appuyez sur �������������������� ERASE lorsque vous lisez le message que vous voulez supprimer ou maintenez la touche ERASE enfoncée en mode d’arrêt. Un bip sonore retentit et le numéro de message et « ERASE » clignotent. 2 Appuyez de nouveau sur ERASE. Le message est effacé et les autres messages sont renumérotés. (Par exemple, si vous supprimez le message 3, le message 4 sera renuméroté message 3. A la fin de la suppression, l’appareil s’arrête au début du message suivant.) Pour annuler l’effacement Appuyez sur (arrêt) avant l’étape 2. 10 FR Pour effacer un autre message Reprenez les mêmes étapes depuis le début. Pour effacer une partie d’un message Commencez par diviser le message en deux, puis reprenez les mêmes étapes depuis le début. Effacement de tous les messages d’un dossier 1 Sélectionnez le dossier qui contient les messages à effacer lorsque l’enregistreur IC est en mode d’arrêt. 2 Maintenez le bouton DISPLAY/ MENU enfoncé pour activer le mode de menu. La fenêtre du mode de menu s’affiche. 3 Appuyez sur – ou sur + pour sélectionner « ALL ERASE », puis appuyez sur PLAY/ STOP•ENTER. 4 Appuyez sur PLAY/STOP•ENTER lorsque « ALL ERASE » clignote. Tous les messages situés dans le dossier sélectionné seront effacés. 5 Appuyez sur (arrêt) pour quitter DISPLAY/ MENU –, + le mode de menu. PLAY/ STOP• ENTER Pour annuler l’effacement Appuyez sur (arrêt) avant l’étape 3. 11 FR Utilisation de l’ordinateur Utilisation du logiciel Digital Voice Editor fourni Configuration système requise Systèmes d’exploitation : Windows Vista® Ultimate Windows Vista® Business Windows Vista® Home Premium Windows Vista® Home Basic Windows® XP Media Center Edition 2005 Service Pack 2 ou version supérieure Windows® XP Media Center Edition 2004 Service Pack 2 ou version supérieure Windows® XP Media Center Edition Service Pack 2 ou supérieur Windows® XP Professional Service Pack 2 ou version supérieure Windows® XP Home Edition Service Pack 2 ou version supérieure Windows® 2000 Professional Service Pack 4 ou version supérieure Pré-installé Remarque 64bit OS n’est pas pris en charge. 12 FR Environnement matériel : Ordinateur : PC/AT IBM ou compatible Unité centrale : processeur 266 MHz Pentium® II ou version supérieure (pour Windows Vista®, processeur 800 MHz Pentium® III ou version supérieure) Mémoire vive : 128 Mo ou plus (pour Windows Vista®, 512 Mo ou plus) Espace mémoire disponible sur le disque dur : 150 Mo ou plus Lecteur de CD-ROM (lors de la création d’un CD audio ou d’un CD de données, un lecteur CD-R/RW est requis) Port : port USB Carte son : cartes son compatibles avec n’importe quel système d’exploitation Microsoft® Windows® pris en charge Ecran : couleur (16 bits) ou plus et 800x480 points ou plus Accès Internet pour la fonction Voice Mail et le service de base de données CD Remarque Les systèmes suivants ne sont pas pris en charge : Tous les systèmes d’exploitation autres que ceux indiqués ci-dessus Les ordinateurs ou systèmes d’exploitation assemblés par vous-même Les systèmes d’exploitation mis à niveau L’environnement à amorçage double L’environnement à moniteur multiple Installation du logiciel Installez le logiciel Digital Voice Editor sur le disque dur de votre ordinateur. 1 Assurez-vous que l’enregistreur IC n’est pas raccordé, puis mettez votre ordinateur sous tension et lancez Windows. 2 Insérez le CD-ROM fourni dans le lecteur de CD-ROM. Le menu [IC Recorder Software Setup] s’ouvre automatiquement et la fenêtre [Welcome to IC Recorder Software Setup] apparaît. Si le menu [Welcome to IC Recorder Software Setup] ne se lance pas, ouvrez le dossier [DVE] dans le dossier [Setup] du CD-ROM puis double-cliquez sur [setup.exe]. 3 Acceptez les termes du contrat de licence, sélectionnez [I accept the terms of the license agreement], puis cliquez sur [Next]. 4 Sélectionnez [Digital Voice Editor], puis cliquez sur [Install]. Suivez les instructions à l’écran pour effectuer les réglages nécessaires à l’installation. Si vous avez déjà installé une version précédente de Digital Voice Editor ou n'importe quelle version du « Memory Stick Voice Editor ». La boîte de dialogue utilisée pour désinstaller une version précédente de Digital Voice Editor ou n’importe quelle version du « Memory Stick Voice Editor » s’affiche. Suivez les instructions à l’écran pour désinstaller le logiciel. Les fichiers de messages ne sont pas supprimés. Remarque En cas de tentative de modification illégale des données ou d’exploitation des données à des fins autres que privées, le fichier peut devenir illisible ou Digital Voice Editor peut devenir inexploitable. La fenêtre [Software Install] apparaît. 13 FR Lorsque la boîte de dialogue utilisée pour sélectionner la méthode d’enregistrement des fichiers apparaît Lorsque vous sauvegardez des fichiers enregistrés à l’aide de l’enregistreur IC sur l’ordinateur nommé ci-dessus, vous pouvez choisir de les convertir au format MP3. Sélectionnez le réglage désiré. Lorsque la boîte de dialogue permettant de sélectionner la langue à utiliser pour l’aide s’affiche Cliquez sur la langue de votre choix pour utiliser l’aide. 5 Lorsque la fenêtre [Ready to Install the Program] apparaît, cliquez sur [Install]. L’installation commence. 6 Lorsque la fenêtre [InstallShield Wizard Complete] s’affiche, sélectionnez [Yes, I want to restart my computer now], puis cliquez sur [Finish]. L’ordinateur redémarre. Une fois que l’ordinateur a redémarré, l’installation est terminée. 14 FR Référence aux fichiers d’aide Pour plus de détails sur chaque opération, reportez-vous aux fichiers d’aide. Aide Informations complémentaires Bruits Précautions Alimentation Faites uniquement fonctionner l’appareil sur une tension de 3,0 V ou 2,4 V CC. Utilisez deux piles alcalines LR03 (AAA) ou deux piles rechargeables NH-AAA. Sécurité Ne faites pas fonctionner l’appareil en conduisant une voiture, une bicyclette ou tout autre véhicule motorisé. Manipulation Ne laissez pas l’appareil à proximité d’une source de chaleur ou dans un endroit exposé au rayonnement direct du soleil, à une poussière excessive ou à des chocs mécaniques. Si des solides ou des liquides venaient à pénétrer à l’intérieur de l’appareil, retirez les piles et faites-le vérifier par un technicien qualifié avant de le remettre en service. Des bruits parasites peuvent se faire entendre si l’appareil est placé à proximité d’une source d’alimentation secteur, d’une lampe fluorescente ou d’un téléphone mobile durant l’enregistrement ou la lecture. Il se peut que des bruits parasites soient enregistrés si quelque chose comme votre doigt par exemple, touche ou frotte accidentellement l’appareil pendant l’enregistrement. Entretien Pour nettoyer l’extérieur, utilisez un chiffon doux légèrement imprégné d’eau. N’utilisez pas d’alcool, d’essence ou de diluant. Si vous avez des questions ou des problèmes concernant cet appareil, consultez votre revendeur Sony. Sauvegardes recommandées Pour éviter tout risque de perte de données à la suite d’une opération accidentelle ou d’un problème de fonctionnement de l’enregistreur IC, nous vous conseillons d’enregistrer une copie de sauvegarde de vos messages sur un magnétophone ou sur un ordinateur, etc. 15 FR Esta Guía de inicio rápido describe sólo las operaciones básicas, tales como la grabación, reproducción o eliminación de mensajes. Las manual de instrucciones que explican todas las características y funciones se proporcionan con la grabadora IC como archivos PDF en 19 idiomas almacenados en el CD-ROM suministrado. Puede copiar los archivos PDF del manual de instrucciones a su ordenador. Introduzca el CD-ROM suministrado en la unidad de CD-ROM del ordenador y simplemente siga las instrucciones mostradas en pantalla. Si no se muestran las instrucciones en la pantalla, haga clic con el botón derecho del ratón en el CDROM en Windows Explorer para abrirlo y haga doble clic en [SetupLauncher.exe]. La edición en inglés de las manual de instrucciones también se proporciona como folleto. Grabadora IC POR FAVOR LEA DETALLADAMENTE ESTE MANUAL DE INSTRUCCIONES ANTES DE CONECTAR Y OPERAR ESTE EQUIPO. RECUERDE QUE UN MAL USO DE SU APARATO PODRÍA ANULAR LA GARANTÍA. Atención para los clientes en Europa Tratamiento de los equipos eléctricos y electrónicos al final de su vida útil (aplicable en la Unión Europea y en países europeos con sistemas de recogida selectiva de residuos) Este símbolo en el equipo o el embalaje indica que el presente producto no puede ser tratado como residuos domésticos normales, sino que debe entregarse en el correspondiente punto de recogida de equipos eléctricos y electrónicos. Al asegurarse de que este producto se ES desecha correctamente, Ud. ayuda a prevenir las consecuencias negativas para el medio ambiente y la salud humana que podrían derivarse de la incorrecta manipulación en el momento de deshacerse de este producto. El reciclaje de materiales ayuda a conservar los recursos naturales. Para recibir información detallada sobre el reciclaje de este producto, póngase en contacto con el ayuntamiento, el punto de recogida más cercano o el establecimiento donde ha adquirido el producto. Accesorio al que se aplica: Cable de conexión USB Tratamiento de las baterías al final de su vida útil (aplicable en la Unión Europea y en países europeos con sistemas de recogida selectiva de residuos) Este símbolo en la batería o en el embalaje indica que la batería proporcionada con este producto no puede ser tratada como un residuo doméstico normal. Al asegurarse de que estas baterías se desechan correctamente, Ud. ayuda a prevenir las consecuencias negativas para el medio ambiente y la salud humana que podrían derivarse de la incorrecta manipulación en el momento de deshacerse de la batería. El reciclaje de materiales ayuda a conservar los recursos naturales. En el caso de productos que por razones de seguridad, rendimiento o mantenimiento de datos, sea necesaria una conexión permanente con la batería incorporada, esta batería solo deberá ser reemplazada por personal técnico cualificado para ello. Para asegurarse de que la batería será tratada correctamente, entregue el producto al final de su vida útil en un punto de recogida para el reciclado de aparatos eléctricos y electrónicos. Para las demás baterías, vea la sección donde se indica cómo quitar la batería del producto de forma segura. Deposite la batería en el correspondiente punto de recogida para el reciclado. Para recibir información detallada sobre el reciclaje de este producto o de la batería, póngase en contacto con el ayuntamiento, el punto de recogida más cercano o el establecimiento donde ha adquirido el producto. Aviso para los clientes: la siguiente información sólo es pertinente para los equipos vendidos en países que aplican las directivas de la UE. El fabricante de este producto es Sony Corporation, 1-7-1 Konan, Minato-ku, Tokyo, Japón. El representante autorizado para EMC y seguridad en el producto es Sony Deutschland GmbH, Hedelfinger Strasse 61, 70327 Stuttgart, Alemania. Para cualquier asunto relacionado con servicio o garantía por favor diríjase a la dirección indicada en los documentos de servicio o garantía adjuntados con el producto. La música grabada es sólo para uso privado. Su uso fuera de esta limitación requiere el permiso de los propietarios de los derechos de autor. Sony no se hace responsable de grabaciones/ descargas incompletas o de datos dañados debido a problemas de la grabadora IC o del equipo. Según el tipo de texto y caracteres, es posible que el texto que se muestra en la grabadora IC no se visualice correctamente en el dispositivo. Esto se debe a: La capacidad de la grabadora IC conectado. Un funcionamiento anormal de la grabadora IC. La grabadora IC no es compatible con el idioma o los caracteres con los que se ha escrito la información de contenido. Aviso a los usuarios Programa © 1999, 2000, 2001, 2002, 2003, 2004, 2005, 2006, 2007, 2008, 2009 Sony Corporation Documentación ©2009 Sony Corporation Todos los derechos reservados. Queda prohibida la reproducción, traducción y reducción a cualquier formato legible con máquina de este manual y del software descrito en éste, tanto en parte como en su totalidad, sin el consentimiento escrito de Sony Corporation. SONY CORPORATION NO SE RESPONSABILIZA BAJO NINGÚN CONCEPTO DE CUALQUIER DAÑO INCIDENTAL, CONSECUENCIAL O ESPECIAL, YA SEA BASADO EN AGRAVIO, CONTRATO U OTRA CAUSA, EN RELACIÓN CON ESTE MANUAL, EL SOFTWARE U OTRA INFORMACIÓN CONTENIDA EN EL MISMO O EL USO DE DICHA INFORMACIÓN. GB Sony Corporation se reserva el derecho de realizar cualquier modificación en este manual o en la información que contiene en cualquier momento y sin previo aviso. El software descrito en este manual también puede regirse por los términos de un acuerdo de licencia de usuario. Este software es para Windows y no puede utilizarse con Macintosh. El cable de conexión suministrado es sólo para la grabadora IC ICD-PX720. No es posible conectar otras grabadoras IC. FR ES NL ES Índice Comprobación del contenido del paquete................................................................... 4 Procedimientos iniciales Paso 1: Preparación de una fuente de alimentación......................................................... 5 Paso 2: Ajuste del reloj.................................... 6 Cómo encender o apagar la grabadora IC.... 7 Grabación Grabación de mensajes................................. 8 Reproducción Grabadora IC (1) Retire el plástico protector del visor antes de usar la grabadora IC. Pilas alcalinas LR03 (tamaño AAA) (2) Cable de conexión USB (1) CD-ROM (1) Software de aplicación, Digital Voice Editor Manual de instrucciones (formato PDF) Reproducción de mensajes........................ 9 Auriculares estéreo* (1) Edición de mensajes Bolsa de transporte* (1) Borrado de mensajes....................................10 Borrado de mensajes uno por uno.....10 Borrado de todos los mensajes de una carpeta.....................................................11 Utilización con el ordenador Utilización del software Digital Voice Editor suministrado........................................12 Información complementaria Precauciones......................................................15 Comprobación del contenido del paquete ES Manual de instrucciones * Los auriculares estéreo y la bolsa de transporte se suministran únicamente con determinados modelos en algunas regiones. Tenga en cuenta que cualquier cambio o modificación que no se haya aprobado expresamente en este manual puede anular su autoridad para utilizar este equipo. Procedimientos iniciales Paso 1: Preparación de una fuente de alimentación 2 Inserte pilas alcalinas LR03 (tamaño AAA) con la polaridad correcta y cierre la tapa. Retire el plástico protector del visor antes de usar la grabadora IC. Inserción de las pilas 1 Deslice y levante la ���������� tapa del compartimiento de las pilas. Si la tapa del compartimiento de las pilas se suelta accidentalmente, colóquela de la manera indicada. ES Paso 2: Ajuste del reloj Continuación directa desde “Paso 1: Preparación de una fuente de alimentación” 1 Pulse – o + para ajustar el año, el mes, el día, la hora y los minutos en este orden y, a continuación, pulse PLAY/ STOP•ENTER. DISPLAY/ MENU –, + PLAY/ STOP• ENTER 2 Pulse (parada) para volver al visor del modo de parada. Es necesario ajustar el reloj para utilizar la función de alarma o para grabar la fecha y la hora. Aparece la pantalla de ajuste del reloj al insertar las pilas por primera vez, o bien, al insertar las pilas después de que la grabadora IC haya permanecido sin pilas durante un período de tiempo determinado, la sección del año parpadea en el visor. ES Cómo encender o apagar la grabadora IC Para apagarla Deslice el interruptor �������������������� HOLD en el sentido de la flecha durante el modo de parada. “HOLD” parpadea. La grabadora IC se apaga unos segundos después. Para encenderla Deslice el interruptor HOLD en el sentido opuesto al que indica la flecha. La grabadora IC se enciende. Sugerencias Si no va a utilizar la grabadora IC durante un período de tiempo prolongado, se recomienda apagar la grabadora IC. Si se enciende la grabadora IC y transcurren 10 minutos sin haber realizado ninguna acción, el visor se apaga automáticamente. (Pulse cualquier botón para mostrar el visor.) Si no utiliza la grabadora IC, puede apagarla para evitar que las pilas se agoten rápidamente. ES 2 Inicie la grabación. Grabación Grabación de mensajes Micrófonos incorporados Indicador de funcionamiento REC/ PAUSE –, + PLAY/ STOP• ENTER 1 Seleccione una carpeta. Mantenga pulsado DISPLAY/MENU para entrar en el modo de menú. Pulse – o + para seleccionar “FOLDER” y, a continuación, pulse PLAY/STOP•ENTER. Pulse – o + para seleccionar la carpeta que desea ( , , , , o ) y, a continuación, pulse PLAY/ STOP•ENTER. Pulse (parada) para salir del modo de menú. ES Pulse � REC/PAUSE en el modo de parada. El �������������������������������� indicador de funcionamiento se ilumina en rojo. (Cuando “LED” está ajustado en “OFF” en el menú, el indicador de funcionamiento no se ilumina.) No es necesario mantener pulsado REC/PAUSE durante la grabación. El nuevo mensaje se grabará automáticamente después del último mensaje grabado. Hable a través de los micrófonos incorporados. 3 Pulse (������������������������� parada) para detener la grabación. La grabadora IC se detiene al principio de la grabación actual. Si no cambia de carpeta tras detener la grabación, la próxima grabación se realizará en la misma carpeta. Reproducción 2 Pulse ��– o �+ para seleccionar Reproducción de mensajes 3 Pulse ���������������������� PLAY/STOP•ENTER para Indicador de funcionamiento DISPLAY/ MENU –, + VOL +, – el mensaje que desea reproducir. iniciar la reproducción. indicador de funcionamiento se El �������������������������������� ilumina en verde. (Cuando “LED” está ajustado en “OFF” en el menú, el indicador de funcionamiento no se ilumina.) 4 Pulse �VOL ��������������� + o – para ajustar el volumen. PLAY/ STOP• ENTER 5 Pulse (������������������������� parada) para detener la reproducción. 1 Seleccione una carpeta. Mantenga pulsado DISPLAY/MENU para entrar en el modo de menú. Pulse – o + para seleccionar “FOLDER” y, a continuación, pulse PLAY/STOP•ENTER. Pulse – o + para seleccionar la carpeta que desea ( , , , , o ) y, a continuación, pulse PLAY/ STOP•ENTER. Pulse (parada) para salir del modo de menú. ES Es posible borrar los mensajes grabados de uno en uno o todos los mensajes de una carpeta a la vez. Puede borrar los mensajes no deseados y conservar el resto cuando la grabadora IC se encuentre en el modo de parada o de reproducción. Si borra un mensaje, los restantes avanzarán y se cambiará su numeración para que no quede espacio entre éstos. Notas 1 Pulse �������������������������� ERASE mientras reproduce Edición de mensajes Borrado de mensajes Después de borrar una grabación, no podrá recuperarla. Si el mensaje que desea borrar está bloqueado en el menú, no se borrará. Borrado de mensajes uno por uno ERASE el mensaje que desea borrar o mantenga pulsado ERASE durante el modo de parada. Sonará un pitido y parpadearán el número del mensaje y “ERASE”. 2 Pulse ERASE de nuevo. El mensaje se borra y se cambia la numeración de los mensajes restantes. (Por ejemplo, si borra el mensaje 3, el mensaje 4 pasará a ser el mensaje 3. Una vez completada la operación de borrado, la unidad se detendrá al principio del siguiente mensaje.) Para cancelar el borrado Pulse (parada) antes de realizar el paso 2. 10 ES Para borrar otro mensaje Realice de nuevo el procedimiento desde el principio. Para borrar una parte de un mensaje En primer lugar, divida el mensaje en dos y, a continuación, realice el mismo procedimiento desde el principio. Borrado de todos los mensajes de una carpeta 1 Seleccione la carpeta que contiene los mensajes que desea borrar cuando la grabadora IC esté en el modo de parada. 2 Mantenga pulsado DISPLAY/MENU para entrar en el modo de menú. Aparecerá la ventana del modo de menú. 3 Pulse – o + para seleccionar “ALL ERASE” y, a continuación, pulse PLAY/STOP•ENTER. 4 Pulse PLAY/STOP•ENTER mientras “ALL ERASE” parpadea. Todos los mensajes de la carpeta seleccionada se borrarán. 5 Pulse (parada) para salir del DISPLAY/ MENU –, + modo de menú. PLAY/ STOP• ENTER Para cancelar el borrado Pulse (parada) antes de realizar el paso 3. 11 ES Utilización con el ordenador Utilización del software Digital Voice Editor suministrado Requisitos del sistema Sistemas operativos: Windows Vista® Ultimate Windows Vista® Business Windows Vista® Home Premium Windows Vista® Home Basic Windows® XP Media Center Edition 2005 Service Pack 2 o superior Windows® XP Media Center Edition 2004 Service Pack 2 o superior Windows® XP Media Center Edition Service Pack 2 o superior Windows® XP Professional Service Pack 2 o superior Windows® XP Home Edition Service Pack 2 o superior Windows® 2000 Professional Service Pack 4 o superior Pre-instalado Nota No se admiten sistemas operativos de 64 bits. 12 ES Entorno de Hardware: Ordenador: PC/AT IBM o compatible CPU: Procesador Pentium® II 266 MHz o superior (Para Windows Vista®, procesador Pentium® III 800MHz o superior) RAM: 128 MB o más (Para Windows Vista®, 512 MB o más) Espacio en disco duro: 150 MB o más Unidad de CD-ROM (cuando se crea un CD de audio o CD de datos, es necesaria una unidad CD-R/RW) Puerto: puerto USB Tarjeta de sonido: tarjetas de sonido compatibles con cualquiera de los sistemas operativos Microsoft® Windows admitidos Pantalla: color de alta densidad (16 bits) o más y resolución de 800x480 puntos o más Acceso a Internet para la función de Voice Mail y servicio de base de datos de CD Nota Los siguientes sistemas no son compatibles: Sistemas operativos distintos de los indicados anteriormente Ordenadores o sistemas operativos construidos personalmente Sistemas operativos actualizados Entorno operativo multiarranque Entorno con múltiples monitores Instalación del software Instale el software Digital Voice Editor en el disco duro del ordenador. 1 Asegúrese de que la grabadora IC no está conectada y, a continuación, arranque el equipo e inicie Windows. 2 Inserte el CD-ROM suministrado en la unidad de CD-ROM. El menú [IC Recorder Software Setup] se inicia automáticamente y se muestra la ventana [Welcome to IC Recorder Software Setup]. Si no se inicia el menú [Welcome to IC Recorder Software Setup], haga clic con el botón derecho del ratón en el CD-ROM en el Explorador de Windows para abrirlo y, a continuación, haga doble clic en [setup.exe]. 3 Asegúrese de que acepta los términos del acuerdo de licencia, seleccione [I accept the terms of the license agreement] y, a continuación, haga clic en [Next]. 4 Seleccione [Digital Voice Editor] y, a continuación, haga clic en [Install]. Siga las instrucciones de pantalla para realizar los ajustes requeridos para la instalación. Si tiene instalada una versión anterior de Digital Voice Editor o cualquier versión de “Memory Stick Voice Editor” Se mostrará el cuadro de diálogo utilizado para desinstalar una versión anterior de Digital Voice Editor o cualquier versión de “Memory Stick Voice Editor”. Siga las instrucciones en pantalla para desinstalar el software. Los archivos de mensajes no se eliminarán. Nota Si se ha intentado realizar una modificación ilegal de datos, o bien, si se utiliza un archivo para fines distintos de los privados, es posible que el archivo no pueda volver a reproducirse, o que el software Digital Voice Editor deje de funcionar. Aparecerá la ventana [Software Install]. 13 ES Cuando se muestra el cuadro de diálogo utilizado para seleccionar cómo guardar archivos Cuando guarda archivos grabados con la grabadora IC en el ordenador mencionado anteriormente, puede seleccionar si desea convertirlos en formato MP3. Seleccione el ajuste deseado. Cuando se muestra el cuadro de diálogo utilizado para seleccionar el idioma que se debe utilizar para la ayuda Haga clic en el idioma que desea utilizar para la ayuda. 5 Cuando aparece la ventana [Ready to Install the Program], haga clic en [Install]. Se inicia la instalación. 6 Cuando se muestra la ventana [InstallShield Wizard Complete], seleccione [Yes, I want to restart my computer now] y, a continuación, haga clic en [Finish]. Se reiniciará el ordenador. Cuando se haya reiniciado el ordenador, se ha completado la instalación. 14 ES Consulta de los archivos de ayuda Para obtener más información acerca de cada operación, consulte los archivos de ayuda. Ayuda Información complementaria Ruido Precauciones Alimentación Utilice la unidad sólo con CC de 3,0 V o 2,4 V. Utilice dos pilas alcalinas LR03 (tamaño AAA) o dos pilas recargables NH-AAA. Seguridad No utilice la unidad mientras conduce, va en bicicleta o utiliza cualquier vehículo motorizado. Manejo No deje la unidad cerca de fuentes de calor, ni en lugares expuestos a la luz solar directa, polvo excesivo o golpes mecánicos. Si se introduce algún objeto sólido o líquido en la unidad, extraiga las pilas y hágala revisar por personal cualificado antes de seguir utilizándola. Si se coloca la unidad cerca de una fuente de alimentación de CA, una lámpara fluorescente o un teléfono móvil durante la reproducción o la grabación, es posible que oiga ruido. Si algún objeto, como su dedo, frota o araña la superficie de la unidad durante la grabación, es posible que se grabe ruido. Mantenimiento Para limpiar el exterior, utilice un paño suave ligeramente humedecido con agua. No emplee alcohol, bencina ni diluyente. Si tiene problemas o preguntas acerca de esta unidad, consulte al distribuidor Sony más cercano. Recomendaciones sobre copias de seguridad Para evitar el posible riesgo de pérdida de datos debido a un uso accidental o a un fallo de funcionamiento de la grabadora IC, se recomienda guardar una copia de seguridad de los mensajes grabados en una grabadora de cintas o en un ordenador, etc. 15 ES In deze introductiehandleiding worden alleen basishandelingen, bijvoorbeeld opnemen, afspelen of berichten wissen, beschreven. In de gebruiksaanwijzing worden alle functies en de werking uitgelegd. Deze gebruiksaanwijzing wordt op de CD-ROM als PDF-bestand in 19 talen geleverd bij de IC-recorder. U kunt de PDF-bestanden van de gebruiksaanwijzing naar uw computer kopiëren. Plaats de bijgeleverde CDROM in het CD-ROM-station van uw computer en volg de aanwijzingen die op het scherm worden getoond. Als de aanwijzingen niet op het scherm worden afgebeeld, klikt u met de rechtermuisknop op de CD-ROM in Windows Explorer om deze te openen, en dubbelklikt u daarna op [SetupLauncher.exe]. De Engelse versie van de gebruiksaanwijzing wordt eveneens als boekje geleverd. Voor klanten in Europa Verwijdering van oude elektrische en elektronische apparaten (Toepasbaar in de Europese Unie en andere Europese landen met gescheiden ophaalsystemen) Het symbool op het product of op de verpakking wijst erop dat dit product niet als huishoudelijk afval mag worden behandeld. Het moet echter naar een plaats worden gebracht waar elektrische en elektronische apparatuur wordt gerecycled. Als u ervoor zorgt dat dit product op de correcte manier wordt verwijderd, voorkomt u voor mens en milieu negatieve gevolgen die zich zouden kunnen voordoen in geval van verkeerde afvalbehandeling. De recycling van materialen draagt bij tot het vrijwaren van natuurlijke bronnen. Voor meer details in verband met het recyclen van dit product, neemt u contact op met de gemeentelijke instanties, het bedrijf of de dienst belast met de verwijdering van huishoudafval of de winkel waar u het product hebt gekocht. NL Dit betreft de accessoire: USB-kabel Verwijdering van oude batterijen (in de Europese Unie en andere Europese landen met afzonderlijke inzamelingssystemen) Dit symbool op de batterij of verpakking wijst erop dat de meegeleverde batterij van dit product niet als huishoudelijk afval behandeld mag worden. Door deze batterijen op juiste wijze af te voeren, voorkomt u voor mens en milieu negatieve gevolgen die zich zouden kunnen voordoen in geval van verkeerde afvalbehandeling. Het recycleren van materialen draagt bij tot het vrijwaren van natuurlijke bronnen. In het geval dat de producten om redenen van veiligheid, prestaties dan wel in verband met dataintegriteit een permanente verbinding met batterij vereisen, dient deze batterij enkel door gekwalificeerd servicepersoneel vervangen te worden. Om ervoor te zorgen dat de batterij op een juiste wijze zal worden behandeld, dient het product aan het eind van zijn levenscyclus overhandigd te worden aan het desbetreffende inzamelingspunt voor de recyclage van elektrisch en elektronisch materiaal. Voor alle andere batterijen verwijzen we u naar het gedeelte over hoe de batterij veilig uit het product te verwijderen. Overhandig de batterij bij het desbetreffende inzamelingspunt voor de recyclage van batterijen. Voor meer details in verband met het recyclen van dit product of batterij, neemt u contact op met de gemeentelijke instanties, het bedrijf of de dienst belast met de verwijdering van huishoudafval of de winkel waar u het product hebt gekocht. Mededeling voor de klant: de volgende informatie is uitsluitend van toepassing op apparatuur verkocht in landen waar EU-richtlijnen gelden. De fabrikant van dit product is Sony Corporation, 1-71 Konan, Minato-ku, Tokyo, Japan. De geautoriseerde vertegenwoordiging voor EMC en produkt veiligheid is Sony Deutschland GmbH, Hedelfinger Strasse 61, 70327 Stuttgart, Duitsland. Voor service- of garantiezaken verwijzen wij u graag naar de adressen in de afzonderlijke service/garantie documenten. De opgenomen muziek mag alleen voor particuliere doeleinden worden gebruikt. Voor elk ander gebruik van de muziek is toestemming van de copyrighthouders vereist. Sony is niet aansprakelijk voor incomplete opnamen/downloads of beschadigde gegevens door problemen met de IC-recorder of computer. Afhankelijk van de soort tekst en tekens, wordt de tekst mogelijk niet altijd goed weergegeven op de IC-recorder. Dit is te wijten aan: De capaciteit van de aangesloten IC-recorder. De IC-recorder werkt niet zoals het hoort. Inhoudgegevens zijn geschreven in een taal of in tekens die niet door de IC-recorder worden ondersteund. Gebruikersinformatie Programma © 1999, 2000, 2001, 2002, 2003, 2004, 2005, 2006, 2007, 2008, 2009 Sony Corporation Documentatie © 2009 Sony Corporation Alle rechten voorbehouden. Deze gebruiksaanwijzing en de software die hierin wordt beschreven, mogen niet, volledig of gedeeltelijk, worden gereproduceerd, vertaald of omgezet zonder voorafgaande schriftelijke toestemming van Sony Corporation. SONY CORPORATION KAN IN GEEN GEVAL AANSPRAKELIJK WORDEN GESTELD VOOR ENIGE SCHADE DIE HET GEVOLG IS VAN OF VERBAND HOUDT MET DEZE GEBRUIKSAANWIJZING, SOFTWARE OF ANDERE INFORMATIE DAN WEL HET GEBRUIK ERVAN. Sony Corporation behoudt zich het recht voor deze gebruiksaanwijzing of de informatie erin te allen tijde en zonder voorafgaande kennisgeving te wijzigen. Voor de beschreven software kan ook een afzonderlijke gebruikerslicentieovereenkomst gelden. Deze software is ontwikkeld voor Windows en is niet geschikt voor Macintosh. De bijgeleverde verbindingskabel is alleen bedoeld voor de IC-recorder ICD-PX720. U kunt geen andere IC-recorders aansluiten. GB FR ES NL NL Inhoudsopgave De inhoud van de verpakking controleren............................................................ 4 Aan de slag Stap 1: Een stroombron voorbereiden..... 5 Stap 2: Klok instellen........................................ 6 De IC-recorder in- of uitschakelen.......... 7 Opnemen Berichten opnemen......................................... 8 Afspelen Berichten afspelen............................................ 9 IC-recorder (1) Verwijder de folie van het display voordat u de IC-recorder gebruikt. LR03-alkalinebatterijen (AAAformaat) (2) USB-kabel (1) CD-ROM (1) Toepassingssoftware, Digital Voice Editor Gebruiksaanwijzing (PDF-bestand) Stereohoofdtelefoon* (1) Berichten bewerken Draagtas* (1) Berichten wissen..............................................10 Gebruiksaanwijzing Berichten afzonderlijk wissen..............10 Alle berichten in een map wissen....11 Uw computer gebruiken De bijgeleverde Digital Voice Editorsoftware gebruiken........................................12 Aanvullende informatie Voorzorgsmaatregelen................................ 15 De inhoud van de verpakking controleren NL * De draagtas voor de stereohoofdtelefoon is alleen meegeleverd bij bepaalde modellen in bepaalde regio's. We wijzen u erop dat elke wijziging of aanpassing die niet uitdrukkelijk wordt goedgekeurd in deze gebruiksaanwijzing u onbevoegd kan maken voor de bediening van dit apparaat. Aan de slag Stap 1: Een stroombron voorbereiden 2 Plaats LR03-alkalinebatterijen (AAA-formaat) met de polen in de juiste richting in de houder en sluit het deksel. Verwijder de folie van het display voordat u de IC-recorder gebruikt. De batterijen plaatsen 1 Verschuif en open het deksel van ���� de batterijhouder. Als de batterijhouder per ongeluk losraakt, maak het dan weer vast zoals is afgebeeld. NL Stap 2: Klok instellen Vervolg direct na "Stap 1: Een stroombron voorbereiden" 1 Druk op – of + om het jaar, de maand, de dag, het uur en de minuten in volgorde in te stellen en druk dan op PLAY/STOP•ENTER. DISPLAY/ MENU –, + PLAY/ STOP• ENTER 2 Druk op (stoppen) om naar het U moet de klok instellen als u de alarmfunctie wilt gebruiken of de datum en tijd wilt opnemen. Het klokinstelvenster verschijnt als u voor het eerst de batterijen plaatst, of als u de batterijen in de IC-recorder plaatst nadat deze langere tijd waren verwijderd, knippert het jaar in het weergavevenster. NL display in de stopstand terug te keren. De IC-recorder in- of uitschakelen De stroom uitschakelen Schuif de �������������������������������� HOLD-schakelaar in de richting van de pijl in de stopstand. "HOLD" knippert. De IC-recorder schakelt na enkele seconden uit. De stroom inschakelen Schuif de HOLD-schakelaar in de tegengestelde richting van de pijl. De IC-recorder gaat aan. Als u de IC-recorder niet gebruikt, kunt u voorkomen dat de batterijen snel op raken door de stroom uit te schakelen. Tips We raden aan om de IC-recorder uit te schakelen wanneer u hem lange tijd niet gaat gebruiken. Wanneer 10 minuten verstrijken nadat u de IC-recorder hebt ingeschakeld zonder er iets mee te doen, schakelt het display automatisch uit. (Druk op een willekeurige toets om het display weer te geven.) NL 2 Start de opname. Opnemen Berichten opnemen Ingebouwde microfoons De werkingsaanduiding REC/ PAUSE –, + PLAY/ STOP• ENTER 1 Selecteer een map. Houd DISPLAY/MENU ingedrukt om naar de menustand te gaan. Druk op – of + om "FOLDER" te selecteren, en druk dan op PLAY/STOP•ENTER. Druk op – of + om de map te selecteren die u wenst ( , , , , of ), en druk dan op PLAY/STOP•ENTER. Druk op (stoppen) om de menustand te verlaten. NL Druk op � REC/PAUSE in de stopstand. ������������������������ De �������������������� werkingsaanduiding gaat rood branden. (Wanneer "LED" in het menu is ingesteld op "OFF", gaat de werkingsaanduiding niet branden.) U hoeft REC/PAUSE niet ingedrukt te houden tijdens de opname. Het nieuwe bericht wordt automatisch opgenomen na het laatst opgenomen bericht. Praat in de ingebouwde microfoons. 3 Druk op ����������������� (stoppen) om de opname te stoppen. De IC-recorder stopt bij het begin van de huidige opname. Als u de map niet wijzigt nadat u de opname hebt gestopt, dan zal u de volgende opname in dezelfde map opnemen. 2 Druk op ��– of �+ om het Afspelen Berichten afspelen bericht te selectern dat u wilt afspelen. 3 Druk op �������������������� PLAY/STOP•ENTER om het afspelen te starten. De werkingsaanduiding DISPLAY/ MENU –, + VOL +, – PLAY/ STOP• ENTER De werkingsaanduiding gaat groen branden. (Wanneer "LED" in het menu is ingesteld op "OFF", gaat de werkingsaanduiding niet branden.) 4 Druk op �������������������������� VOL + of – om het volume af te stellen. 5 Druk op (�������������������������� stoppen) om het afspelen te stoppen. 1 Selecteer een map. Houd DISPLAY/MENU ingedrukt om naar de menustand te gaan. Druk op – of + om "FOLDER" te selecteren, en druk dan op PLAY/STOP•ENTER. Druk op – of + om de map te selecteren die u wenst ( , , , , of ), en druk dan op PLAY/STOP•ENTER. Druk op (stoppen) om de menustand te verlaten. NL Berichten bewerken Berichten wissen U kunt opgenomen berichten afzonderlijk of alle berichten in een map tegelijkertijd wissen. Opmerkingen Als een opname is gewist, kunt u deze niet meer herstellen. Als het bericht dat u wilt wissen is vergrendeld in het menu, dan kan het bericht niet worden gewist. Berichten afzonderlijk wissen U kunt ongewenste berichten verwijderen en alle andere berichten bewaren wanneer de IC-recorder zich in de stop- of afspeelstand bevindt. Als een bericht wordt gewist, schuiven de resterende berichten op en worden deze opnieuw genummerd zodat er geen ruimte tussen de berichten ontstaat. 1 Druk op ���������������������������� ERASE tijdens het afspelen van het bericht dat u wilt wissen of houd ERASE ingedrukt in de stopstand. U hoort een piepje en het berichtnummer en "ERASE" beginnen te knipperen. 2 Druk nogmaals op ERASE. ERASE 10 NL Het bericht wordt gewist en de resterende berichten worden opnieuw genummerd. (Indien u bijvoorbeeld bericht 3 wist, dan zal bericht 4 opnieuw worden genummerd als bericht 3. Als het wissen is voltooid, dan stopt het apparaat bij het begin van het volgende bericht.) Wissen annuleren Druk vóór stap 2 op (stoppen). Nog een bericht wissen Voer dezelfde stappen nogmaals vanaf het begin uit. Een deel van één bericht wissen Splits het bericht eerst in twee berichten, en voer vervolgens dezelfde stappen vanaf het begin uit. Alle berichten in een map wissen 1 Selecteer de map met de berichten die u wilt wissen wanneer de ICrecorder in de stopstand staat. 2 Houd DISPLAY/MENU ingedrukt om naar de menustand te gaan. Het venster met de menustand wordt weergegeven. 3 Druk op – of + om "ALL ERASE" te selecteren, en druk dan op PLAY/STOP•ENTER. 4 Druk op PLAY/STOP•ENTER terwijl "ALL ERASE" knippert. Alle berichten in de geselecteerde map worden gewist. 5 Druk op (stoppen) om de DISPLAY/ MENU –, + menustand af te sluiten. PLAY/ STOP• ENTER Wissen annuleren Druk vóór stap 3 op (stoppen). 11 NL Uw computer gebruiken De bijgeleverde Digital Voice Editorsoftware gebruiken Systeemvereisten Besturingssystemen: Windows Vista® Ultimate Windows Vista® Business Windows Vista® Home Premium Windows Vista® Home Basic Windows® XP Media Center Edition 2005 Service Pack 2 of hoger Windows® XP Media Center Edition 2004 Service Pack 2 of hoger Windows® XP Media Center Edition Service Pack 2 of hoger Windows® XP Professional Service Pack 2 of hoger Windows® XP Home Edition Service Pack 2 of hoger Windows® 2000 Professional Service Pack 4 of hoger Vooraf geïnstalleerd Opmerking 64bit besturingssysteem wordt niet ondersteund. 12 NL Hardware-omgeving: Computer: IBM PC/AT of compatibele computer Processor: 266 MHz Pentium® II processor of hoger (Voor Windows Vista®, 800MHz Pentium® III processor of hoger) RAM: 128MB of meer (Voor Windows Vista®, 512MB of meer) Beschikbare schijfruimte: 150MB of meer CD-ROM-station (Wanneer u een audioCD of gegevens-CD wilt maken, hebt u een CD-R/RW-station nodig) Poort: USB-poort Geluidskaart: Geluidskaarten die compatibel zijn met één van de Microsoft® Windows®besturingssystemen Beeldscherm: Hoge kleuren (16bit) of meer en 800x480 punten of meer Toegang tot Internet voor Voice Mailfunctie en CD-database-service Opmerking De volgende systemen worden niet ondersteund: Andere besturingssystemen dan de hierboven genoemde Door de gebruiker zelf geconstrueerde PC's of besturingssystemen Geüpgrade besturingssystemen Multi-boot besturingsomgeving Multi-monitor besturingsomgeving De software installeren Installeer de Digital Voice Editor-software op de vaste schijf van de computer. 1 Controleer of de IC-recorder niet is aangesloten. Schakel de computer in en start Windows. 2 Plaats de bijgeleverde CD-ROM in het CD-ROM-station. Het menu [IC Recorder Software Setup] wordt automatisch gestart en het venster [Welcome to IC Recorder Software Setup] verschijnt. Als het menu [IC Recorder Software Setup] niet wordt gestart, open dan de [DVE]-map in de [Setup]-map op de CD-ROM, en dubbelklikt u daarna op [setup.exe]. 3 Het is belangrijk dat u akkoord gaat met de voorwaarden van de licentieovereenkomst, selecteer [I accept the terms of the license agreement] en klik daarna op [Next]. Het venster [Software Install] verschijnt. 4 Selecteer [Digital Voice Editor], en klik daarna op [Install]. Volg de instructies op het scherm en geef de instellingen op die nodig zijn voor de installatie. Als u al een eerdere versie van de Digital Voice Editor of een versie van "Memory Stick Voice Editor" hebt geïnstalleerd Het dialoogvenster dat wordt gebruikt voor het ongedaan maken van de installatie van de vorige versie van Digital Voice Editor of een versie van de "Memory Stick Voice Editor" wordt weergegeven. Volg de instructies op het scherm en maak de installatie van de software ongedaan. De berichtenbestanden worden niet verwijderd. Opmerking Als op onrechtmatige wijze wordt geprobeerd gegevens te wijzigen, of als een bestand voor andere dan privé-doeleinden wordt gebruikt, kan het bestand of de Digital Voice Editor onbruikbaar worden. 13 NL Wanneer het dialoogvenster dat wordt gebruikt om te selecteren hoe bestanden worden opgeslagen, wordt weergegeven Wanneer u bestanden opslaat die zijn vastgelegd met de IC-recorder op de hierboven genoemde computer, kunt u kiezen of u de bestanden wilt converteren naar de MP3-indeling. Selecteer de instelling van uw keuze. Wanneer het dialoogvenster dat wordt gebruikt voor het selecteren van de taal voor de Help, wordt weergegeven Klik op de taal die u voor de Help wilt gebruiken. 5 Wanneer het venster [Ready to Install the Program] verschijnt, klikt u op [Install]. De installatie wordt gestart. 6 Wanneer het venster [InstallShield Wizard Complete] verschijnt, selecteert u [Yes, I want to restart my computer now] en klikt u op [Finish]. De computer wordt opnieuw gestart. Wanneer de computer opnieuw is gestart, is de installatie voltooid. 14 NL De Help-bestanden raadplegen Voor meer informatie over de bewerkingen kunt u de Help-bestanden raadplegen. Help Aanvullende informatie Aan ruis Voorzorgsmaatregelen Stroom Gebruik het apparaat alleen op 3,0 V of 2,4 V gelijkstroom. Gebruik twee LR03-alkalinebatterijen (AAA-formaat) of twee oplaadbare NH-AAA-batterijen. Veiligheid Gebruik het apparaat niet terwijl u autorijdt, fietst of een gemotoriseerd voertuig bedient. Gebruik Laat het apparaat niet liggen in de buurt van een warmtebron of op een plaats waar dit wordt blootgesteld aan direct zonlicht, overmatig veel stof of mechanische schokken. Als er een object of vloeistof in het apparaat terechtkomt, moet u de batterijen verwijderen en het apparaat laten nakijken door een ervaren servicetechnicus voordat u het weer gebruikt. Als u het apparaat naast een stopcontact, een tl-lamp of een mobiele telefoon plaatst tijdens het opnemen of afspelen, kan dit ruis veroorzaken. Als u met een object, zoals uw vinger, tegen het apparaat schuurt tijdens een opname, kan er ruis in de opname terechtkomen. Aan onderhoud Maak de buitenkant schoon met een zachte doek die enigszins is bevochtigd met water. Gebruik geen alcohol, wasbenzine of thinner. Neem contact op met de dichtstbijzijnde Sony-handelaar voor vragen of problemen met het apparaat. Reservekopieën Het wordt aangeraden een reservekopie van de opgenomen berichten op te slaan op een cassetterecorder of een computer om te voorkomen dat er gegevens verloren gaan door een bedieningsfout of een defect aan de IC-recorder. 15 NL Trademarks Microsoft, Windows, Windows Vista, Windows Media, Outlook, DirectX and logos are trademarks or registered trademarks of Microsoft Corporation in the United States and/or other countries. Apple and Macintosh are trademarks of Apple Inc., registered in the USA and other countries. Pentium is a registered trademark of Intel Corporation. Nuance, the Nuance logo, Dragon NaturallySpeaking, and RealSpeak are trademarks and/or registered trademarks of Nuance Communications, Inc., and/or its affiliates in the United States and/or other countries. © 2007 - 2008 Nuance Communications, Inc. All rights reserved. MPEG Layer-3 audio coding technology and patents licensed from Fraunhofer IIS and Thomson. “Memory Stick” and are trademarks of Sony Corporation. “LPEC” and are registered trademarks of Sony Corporation. US and foreign patents licensed from Dolby Laboratories. Marques commerciales All other trademarks and registered trademarks are trademarks or registered trademarks of their respective holders. Furthermore, “ ™ ” and “ ® ” are not mentioned in each case in this manual. The “Digital Voice Editor” uses software modules as shown below: Microsoft DirectX Runtime 9.0c ©2004 Microsoft Corporation. All Rights Reserved. 16 Microsoft, Windows, Windows Vista, Windows Media, Outlook, DirectX et leurs logos sont des marques commerciales ou des marques déposées de Microsoft Corporation aux Etats-Unis et/ou dans d’autres pays ou régions. Apple et Macintosh sont des marques commerciales de Apple Inc., déposées aux EtatsUnis et dans d’autres pays ou régions. Pentium est une marque déposée de Intel Corporation. Nuance, le logo de Nuance, Dragon Naturally Speaking ainsi que RealSpeak sont des marques et/ou marques déposées de Nuance Communications Inc. et/ou de ses filiales aux États-Unis et dans d’autres pays. © 2007 - 2008 Nuance Communications, Inc. Tous droits réservés. Technologie d’encodage audio MPEG Layer-3 et brevets sous licence de Fraunhofer IIS et Thomson. « Memory Stick » et ont des marques commerciales de Sony Corporation. « LPEC » et sont des marques déposées de Sony Corporation. Brevets américains et étrangers sous licence de Dolby Laboratories. Les autres marques commerciales et marques déposées apparaissant dans le présent document sont des marques commerciales ou des marques déposées de leurs propriétaires respectifs. En outre, « ™ » et « ® » ne sont pas mentionnés systématiquement dans ce mode d’emploi. Le logiciel « Digital Voice Editor » utilise les modules des logiciels suivants : Microsoft DirectX Runtime 9.0c ©2004 Microsoft Corporation. Tous droits réservés. Marcas comerciales Microsoft, Windows, Windows Vista, Windows Media, Outlook, DirectX y los logotipos son marcas comerciales registradas o marcas comerciales de Microsoft Corporation en los Estados Unidos y/o en otros países. Apple Inc., registradas en los EE. UU. y en otros países. Pentium es una marca registrada de Intel Corporation. Nuance, el logotipo de Nuance, Dragon NaturallySpeaking y RealSpeak son marcas y/o marcas registradas de Nuance Communications Inc., y/o de sus empresas afiliadas en Estados Unidos y/o en otros países. © 2007- 2008 Nuance Communications, Inc. Todos los derechos reservados. Tecnología de codificación de audio MPEG Layer-3 y patentes con licencia de Fraunhofer IIS y Thomson. “Memory Stick” y son marcas comerciales de Sony Corporation. “LPEC” y son marcas comerciales registradas de Sony Corporation. Patentes en EE. UU. y otros países con licencia de Dolby Laboratories. Todas las demás marcas comerciales y marcas comerciales registradas son marcas comerciales o marcas comerciales registradas de sus respectivos propietarios. Además, “ ™ ” y “ ® ” no se mencionan en cada caso en este manual. “Digital Voice Editor” emplea los módulos de software siguientes: Microsoft DirectX Runtime 9.0c ©2004 Microsoft Corporation. Todos los derechos reservados. Handelsmerken Microsoft, Windows, Windows Vista, Windows Media, Outlook, DirectX en logo’s zijn handelsmerken of gedeponeerde handelsmerken van Microsoft Corporation in de Verenigde Staten en/of andere landen. Apple en Macintosh zijn handelsmerken van Apple Inc., gedeponeerd in de Verenigde Staten en andere landen. Pentium is een gedeponeerd handelsmerk van Intel Corporation. Nuance, the Nuance logo, Dragon NaturallySpeaking, and RealSpeak are trademarks and/or registered trademarks of Nuance Communications, Inc., and/or its affiliates in the United States and/or other countries. © 2007 - 2008 Nuance Communications, Inc. All rights reserved. MPEG Layer-3-audiocoderingstechnologie en -octrooien zijn in licentie gegeven door Fraunhofer IIS en Thomson. "Memory Stick" en zijn handelsmerken van Sony Corporation. "LPEC" en zijn gedeponeerde handelsmerken van Sony Corporation. Octrooien in de Verenigde Staten en in andere landen vallen onder de licentie van Dolby Laboratories. Alle andere handelsmerken en gedeponeerde handelsmerken zijn handelsmerken of gedeponeerde handelsmerken van hun respectieve eigenaren. Bovendien worden " ™ " en " ® " niet elke keer vermeld in deze gebruiksaanwijzing. De "Digital Voice Editor" gebruikt de volgende softwaremodules: Microsoft DirectX Runtime 9.0c ©2004 Microsoft Corporation. Alle rechten voorbehouden. 17