1
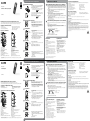
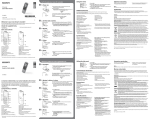
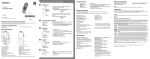
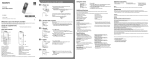
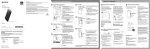
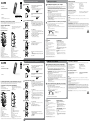
GB ES FR NL IC Recorder Quick Start Guide Let’s try out your new IC recorder Utilizing Your Computer Additional features Details of these additional features for recording, playback, and editing are included in the help guide. 1. Power on. Installing the help guide on your computer Slide and lift the battery compartment lid, then insert By installing the help guide on your computer from the built-in memory of the IC recorder, you can search for detailed operations and possible solutions when a problem occurs. batteries with the correct polarity. Turn the power on. Connect the (USB) port of the IC recorder with the USB port of a running computer with the Slide and hold the HOLD•POWER ON/OFF switch in the direction of “POWER ON/OFF” until the window display appears. supplied USB connecting cable inserted into the ports securely until each plug stops to the end. In Windows: Click [Computer] (or [My Computer]), then double-click [IC RECORDER] [FOR WINDOWS]. In Mac: Double-click [IC RECORDER] on the desktop. ICD-PX232 To turn the power off, slide and hold the HOLD•POWER ON/ OFF switch in the direction of “POWER ON/OFF” until “OFF” is displayed. Install the help guide. To prevent unintentional operations (HOLD) After the installation completes, double-click the [icdp23_ce_HelpGuide] icon in the desktop for In Windows: Double-click [Help_Guide_Installer] (or [Help_Guide_Installer.exe]). In Mac: Double-click [Help_Guide_Installer_for_mac.app]. (v10.5.8 or higher) Follow the instructions that appear on the screen to proceed with installation. 4-527-113-11(1) Windows (or in Finder for Mac). The help guide is displayed. You can also view the help guide on the following Sony IC Recorder customer support home page: http://rd1.sony.net/help/icd/p23/ce/ © 2013 Sony Corporation Printed in China 2. Set the date and time. Welcome to your new Sony IC recorder! This is the Quick Start Guide, which provides you with instructions on the basic operations of the IC recorder. Please read it carefully. We hope you enjoy using your new Sony IC recorder. Press or to set the year (the last two digits of the Check the supplied items. ˎˎIC Recorder (1) ˎˎUSB connecting cable (1) ˎˎLR03 (size AAA) alkaline batteries (2) ˎˎHelp Guide (HTML file stored in the built-in memory so it can easily be copied to your computer.) ˎˎQuick Start Guide When you insert batteries and turn the power on, “SET DATE” appears on the display, and then the year section begins to flash. ˎˎCompact charger & 2‑pc AAA Multi‑Use Premium batteries BCG‑34HS2KAN, BCG-34HW2KAN Note Depending on the country or region, some of the models or optional accessories are not available. WARNING Do not expose the batteries (battery pack or batteries installed) to excessive heat such as sunshine, fire or the like for a long time. CAUTION Notice for the customers: the following information is only applicable to equipment sold in the countries applying EU directives Drag and drop the files or folders you want to copy from “IC RECORDER” to the local disk on your computer. Press REC/PAUSE. This product has been manufactured by or on behalf of Sony Corporation, 1-7-1 Konan Minato-ku Tokyo, 108-0075 Japan. Inquiries related to product compliance based on European Union legislation shall be addressed to the authorized representative, Sony Deutschland GmbH, Hedelfinger Strasse 61, 70327 Stuttgart, Germany. For any service or guarantee matters, please refer to the addresses provided in the separate service or guarantee documents. To prevent possible hearing damage, do not listen at high volume levels for long periods. To copy a file or folder (Drag and drop) Click and hold, drag, and then drop. ¼¼ You can pause recording by pressing REC/PAUSE. Press REC/ PAUSE again to restart recording. Place the IC recorder so that the built-in microphone face the IC RECORDER direction of the source to be recorded. ˎˎElectret condenser microphone ECM‑CS3 ˎˎRechargeable battery NH‑AAA‑B2KN ˎˎUSB AC adaptor AC‑U50AG You can copy the files and folders from the IC recorder to your computer to store them. Recording starts and the operation indicator lights in red. Operation indicator Optional accessories Risk of explosion if battery is replaced by an incorrect type. Dispose of used batteries according to the instructions. 3. Record. Parts and controls ˎˎN-CUT (Noise cut) ˎˎEASY-S (Easy search) ˎˎCONT (Continuous play) ˎˎLOCK (Protecting a file) ˎˎALARM ˎˎDIVIDE (Dividing a file) Copying files from the IC recorder to your computer Connect the IC recorder to your computer. Copy files or folders you want to transfer to your computer. year), and then press PLAY/ENTER. Repeat this procedure to set month, day, hour, and minute in sequence. ˎˎMODE (Recording mode) ˎˎSENS (Microphone sensitivity) ˎˎLCF (Low cut filter) ˎˎVOR (Voice Operated Recording) ˎˎREC-OP (Adding a recording) ˎˎDPC (Digital Pitch Control) Press (stop) to stop recording. Your computer Disconnect the IC recorder from your computer. “ACCESS” appears and the recording stops. 4. Listen. Press PLAY/ENTER. Operation indicator Built-in microphone VOL (volume) –/+ button (*) (headphone) jack DIVIDE button Operation indicator ERASE button Display window REC/PAUSE (record/pause) button FOLDER button (cue/fast forward) button MENU button Speaker PLAY/ENTER button (*) HOLD•POWER ON/OFF switch (review/fast backward) button (USB) connector (stop) button Battery compartment (microphone) jack (PLUG IN POWER) (*) Strap hole (A strap is not supplied.) Playback starts and the operation indicator lights in green. Adjust the volume by pressing VOL –/+. Press (stop) to stop playback. Precautions Specifications On power Capacity (User available capacity *1*2) Operate the unit only on 3.0 V or 2.4 V DC. Use two LR03 (size AAA) alkaline batteries or two NH‑AAA rechargeable batteries. 2 GB (approx. 1.75 GB = 1,879,048,192 Byte) *1 A small amount of the built‑in memory is used for file management and therefore not available for user storage. *2When the built‑in memory is formatted with the IC recorder. On safety Do not operate the unit while driving, cycling or operating any motorized vehicle. Dimensions (w/h/d) (not incl. projecting parts and controls) (JEITA)*3 On handling 5. Erase. When the IC recorder is in the stop mode, press and hold ERASE. When the IC recorder is in the playback mode, press ERASE. “ERASE” is displayed. Press ERASE. Approx. 38.5 mm × 115.2 mm × 21.3 mm ˎˎDo not leave the unit in a location near heat sources, or in a place subject to direct sunlight, excessive dust or mechanical shock. ˎˎShould any solid object or liquid fall into the unit, remove the battery and have the unit checked by qualified personnel before operating it any further. Mass (JEITA)*3 Approx. 72 g including two LR03 (size AAA) alkaline batteries *3Measured value by the standard of JEITA (Japan Electronics and Information Technology Industries Association) If you have any questions or problems concerning your unit, please consult your nearest Sony dealer. * These buttons and the jack have a tactile dot. Use it as a reference point for operations, or to identify each terminal. GB ES FR NL IC Recorder Guía de inicio rápido Vamos a probar la nueva grabadora IC Utilización con el ordenador La guía de ayuda contiene información sobre las funciones adicionales de grabación, reproducción y edición. Instalación de la guía de ayuda en el ordenador 1. Encender. La instalación de la guía de ayuda en el ordenador desde la memoria interna de la grabadora IC le permitirá buscar detalles de las operaciones y encontrar soluciones para los problemas que puedan surgir. Deslice y levante la tapa del compartimiento de las pilas e inserte pilas con la polaridad correcta. Encienda la grabadora. Conecte el puerto (USB) de la grabadora IC al puerto USB de un ordenador que esté Deslice y no suelte el interruptor HOLD•POWER ON/OFF en el sentido de “POWER ON/OFF” hasta que se muestre el visor. ICD-PX232 encendido con el cable de conexión USB suministrado insertado en los puertos con firmeza hasta que cada una de las clavijas quede insertada hasta el fondo. Accesorios opcionales Instale la guía de ayuda. ˎˎMicrófono de condensador de electreto ECM‑CS3 ˎˎPila recargable NH‑AAA‑B2KN ˎˎAdaptador de ca AC‑U50AG [FOR WINDOWS]. En Mac: haga doble clic en [IC RECORDER] en el escritorio. Para apagar la grabadora, deslice y no suelte el interruptor HOLD•POWER ON/OFF en el sentido de “POWER ON/OFF” hasta que se muestre “OFF”. En Windows: haga doble clic en [Help_Guide_Installer] (o [Help_Guide_Installer.exe]). En Mac: haga doble clic en [Help_Guide_Installer_for_mac.app]. (v10.5.8 o superior) Para continuar con la instalación, siga las instrucciones que aparecen en pantalla. Cuando la instalación se haya completado, haga doble clic en el icono [icdp23_ce_HelpGuide] del escritorio para Windows (o en el Finder para Mac). Componentes y controles ˎˎGuía de ayuda (archivo HTML almacenado en la memoria interna, por lo que es muy sencillo copiar al ordenador.) ˎˎGuía de inicio rápido Tras insertar las pilas y encender el dispositivo, “SET DATE” aparece en el visor y la sección del año comienza a parpadear. Copia de archivos desde la grabadora IC al ordenador Pulse o para ajustar el año (los dos últimos dígitos Compruebe los componentes suministrados. ˎˎGrabadora IC (1) ˎˎCable de conexión USB (1) ˎˎPilas alcalinas LR03 (tamaño AAA) (2) La guía de ayuda se visualiza. La guía de ayuda también se puede consultar en la siguiente página de soporte técnico para clientes de la Grabadora IC de Sony: http://rd1.sony.net/help/icd/p23/ce/ 2. Ajustar la fecha y la hora. Esta es la Guía de inicio rápido en la cual se ofrecen instrucciones sobre las operaciones básicas de la grabadora IC. Léala detenidamente. Esperamos que disfrute utilizando su nueva grabadora IC de Sony. Puede copiar los archivos y las carpetas desde la grabadora IC al ordenador para su almacenamiento. del año) y, a continuación, pulse PLAY/ENTER. Repita este proceso para ajustar el mes, el día, la hora y los minutos en este orden. Conecte la grabadora IC al ordenador. Copie los archivos o carpetas que desee transferir al ordenador. Arrastre y coloque los archivos o carpetas que desee copiar desde “IC RECORDER” al disco local del ordenador. 3. Grabar. Indicador de funcionamiento Para copiar un archivo o una carpeta (Arrastrar y colocar) Pulse REC/PAUSE. La grabación comienza y el indicador de funcionamiento se ilumina en rojo. Haga clic y, sin soltar el ratón, arrastre, y luego coloque. ¼¼ Puede poner en pausa la grabación pulsando REC/PAUSE. Pulse REC/PAUSE de nuevo para volver a iniciar la grabación. Coloque la grabadora IC de forma que el micrófono Micrófono incorporado Botón VOL (volumen) –/+ (*) Toma (auriculares) Botón DIVIDE Indicador de funcionamiento Botón ERASE Visor Botón REC/PAUSE (grabación/pausa) Botón FOLDER Botón (búsqueda/avance rápido) Botón MENU Altavoz Botón PLAY/ENTER (*) Interruptor HOLD•POWER ON/OFF Botón (revisión/retroceso rápido) Conector (USB) Botón (parada) Compartimiento de las pilas Toma (micrófono) (PLUG IN POWER) (*) Orificio para la correa de mano (correa de mano no suministrada.) * Estos botones y la toma tienen un punto táctil. Úselo como punto de referencia para las operaciones o para identificar cada terminal. Disconnect the IC recorder from your computer. Aparece “ACCESS” y la grabación se detiene. Pulse PLAY/ENTER. Ordenador Pulse (detener) para detener la grabación. 4. Escuchar. Indicador de funcionamiento IC RECORDER incorporado apunte en la dirección de la fuente que se va a grabar. La reproducción comienza y el indicador de funcionamiento se ilumina en verde. Ajuste el volumen pulsando VOL –/+. Pulse (detener) para detener la grabación. Precauciones Especificaciones Alimentación Capacidad (capacidad disponible para el usuario*1*2) Utilice la unidad solo con cc de 3,0 V o 2,4 V. Utilice dos pilas alcalinas LR03 (tamaño AAA) o dos pilas recargables NH‑AAA. Seguridad No utilice la unidad mientras conduce, va en bicicleta o utiliza cualquier vehículo motorizado. Manejo 5. Borrar. Cuando la grabadora IC esté en el modo de parada, mantenga pulsado ERASE. Cuando la grabadora IC esté en el modo de reproducción, pulse ERASE. Aparece “ERASE”. Pulse ERASE. ˎˎMODE (modo de grabación) ˎˎSENS (sensibilidad del micrófono) ˎˎLCF (Low Cut Filter) ˎˎVOR (Voice Operated Recording) ˎˎREC-OP (adición de una grabación) ˎˎDPC (Digital Pitch Control) En Windows: haga clic en [Equipo] (o [Mi PC]) y, acto seguido, haga doble clic en [IC RECORDER] Para evitar el funcionamiento no intencionado (HOLD) Le damos la bienvenida a su nueva Grabadora IC de Sony! Características adicionales ˎˎNo deje la unidad cerca de fuentes de calor, ni en lugares expuestos a la luz solar directa, polvo excesivo o golpes mecánicos. ˎˎSi se introduce algún objeto sólido o líquido en la unidad, extraiga la pila y hágala revisar por personal cualificado antes de seguir utilizándola. Si tiene problemas o preguntas acerca de esta unidad, consulte al distribuidor más cercano. 2 GB (aprox. 1,75 GB = 1.879.048.192 bytes) *1 Una pequeña parte de la memoria interna se utiliza para la gestión de archivos, por lo que no está disponible para el almacenamiento. 2 * Cuando la memoria interna se formatea con la grabadora IC. Dimensiones (an/al/prf) (sin incluir las partes ni controles salientes) (JEITA)*3 Aprox. 38,5 mm × 115,2 mm × 21,3 mm Peso (JEITA)*3 Aprox. 72 g incluidas dos pilas alcalinas LR03 (tamaño AAA) *3Valor medido utilizando el estándar JEITA (Japan Electronics and Information Technology Industries Association) ˎˎN-CUT (corte de ruido) ˎˎEASY-S (búsqueda fácil) ˎˎCONT (reproducción continua) ˎˎLOCK (protección de un archivo) ˎˎALARM ˎˎDIVIDE (división de un archivo) ˎˎCargador compacto y 2 pilas AAA de primera calidad para usos múltiples BCG‑34HS2KAN, BCG-34HW2KAN Nota Dependiendo del país o la región, algunos de los modelos o accesorios opcionales podrían no estar disponibles. ADVERTENCIA No exponga las pilas (el cartucho de pilas o las pilas instaladas) a un calor excesivo tal como la luz del sol, fuego o algo similar durante un periodo largo de tiempo. PRECAUCIÓN Riesgo de explosión si la pila se sustituye por un tipo incorrecto. Deseche las pilas usadas de acuerdo con las instrucciones. Aviso para los clientes:la siguiente información sólo es pertinente para los equipos vendidos en países que aplican las directivas de la UE. Este producto ha sido fabricado por, o en nombre de Sony Corporation, 1-7-1 Konan Minato-ku Tokyo, 108-0075 Japón. Las consultas relacionadas con la conformidad del producto basadas en la legislación de la Unión Europea deben dirigirse al representante autorizado, Sony Deutschland GmbH, Hedelfinger Strasse 61, 70327 Stuttgart, Alemania. Para cualquier asunto relacionado con el servicio o la garantía, por favor diríjase a la dirección indicada en los documentos de servicio o garantía adjuntados con el producto. Para evitar un posible daño del sistema auditivo, no escuche con niveles de volumen altos durante largos periodos de tiempo. GB ES FR NL IC Recorder Guide de démarrage rapide Essayez votre nouvel enregistreur IC Utilisation de l’ordinateur Installation du manuel d’aide sur votre ordinateur 1. Mettez sous tension. En installant le manuel d’aide sur votre ordinateur à partir de la mémoire intégrée de l’enregistreur IC, vous pouvez rechercher des opérations détaillées et de possibles solutions en cas de problème. Faites glisser et soulevez le couvercle du compartiment des piles, puis insérez les piles en respectant la polarité. Connectez le port (USB) de l’enregistreur IC sur le port USB d’un ordinateur en marche à l’aide Mettez l’appareil sous tension. du câble de connexion USB fourni fermement inséré dans les ports jusqu’à ce que la fiche soit bloquée. Faites glisser et maintenez le commutateur HOLD•POWER ON/OFF vers « POWER ON/OFF » jusqu’à ce que la fenêtre s’affiche. Sous Windows : Cliquez sur [Ordinateur] (ou [Poste de travail]), puis double-cliquez sur [IC RECORDER] [FOR WINDOWS]. Sous Mac : Double-cliquez sur [IC RECORDER], sur le bureau. ICD-PX232 Pour mettre l’appareil hors tension, faites glisser et maintenez le commutateur HOLD•POWER ON/OFF vers « POWER ON/OFF » jusqu’à ce que « OFF » s’affiche. Installez le manuel d’aide. Pour prévenir les opérations involontaires (HOLD) Une fois l’installation terminée, double-cliquez sur l’icône [icdp23_ce_HelpGuide] sur le bureau Sous Windows : Double-cliquez sur [Help_Guide_Installer] (ou [Help_Guide_Installer.exe]). Sous Mac : Double-cliquez sur [Help_Guide_Installer_for_mac.app]. (v10.5.8 ou supérieure) Suivez les instructions qui s’affichent à l’écran pour effectuer l’installation. pour Windows (ou le Finder pour Mac). Le manuel d’aide s’affiche. Vous pouvez également consulter le manuel d’aide sur la page d’accueil suivante d’assistance à la clientèle de l’enregistreur IC Sony : http://rd1.sony.net/help/icd/p23/ce/ 2. Réglez la date et l’heure. Bienvenue sur votre nouvel enregistreur IC Sony ! Ceci est le guide de démarrage rapide qui vous fournit les instructions des opérations de base du l’enregistreur IC. Veuillez le lire attentivement. Nous espérons que apprécierez d’utiliser votre nouvel enregistreur IC Sony. Vérifiez les éléments fournis. ˎˎEnregistreur IC (1) ˎˎCâble de connexion USB (1) ˎˎPiles alcalines LR03 (format AAA) (2) Pièces et commandes ˎˎManuel d’aide (Fichier HTML stocké dans la mémoire intégrée afin de pouvoir le copier facilement sur votre ordinateur.) ˎˎGuide de démarrage rapide Appuyez sur ou pour régler l’année (les deux derniers chiffres de l’année), puis appuyez sur PLAY/ ENTER. Répétez cette opération pour régler dans l’ordre le mois, le jour, l’heure et les minutes. Appuyez sur (stop) pour arrêter l’enregistrement. « ACCESS » s’affiche et l’enregistrement s’arrête. Appuyez sur PLAY/ENTER. IC RECORDER touche ERASE et maintenez-la enfoncée. Lorsque l’enregistreur IC est en mode lecture, appuyez sur la touche ERASE. « ERASE » s’affiche. Précautions Spécifications Alimentation Capacité (capacité utilisateur disponible *1*2) Utilisez l’appareil uniquement sous 3,0 V ou 2,4 V c.c. Utilisez deux piles alcalines LR03 (format AAA) ou deux piles rechargeables NH‑AAA. 2 Go (env. 1,75 Go = 1 879 048 192 octets) *1 Une petite quantité de mémoire interne est utilisée pour la gestion des fichiers et n’est donc pas disponible pour le stockage utilisateur. 2 * Lorsque la mémoire interne est formatée à l’aide de l’enregistreur IC. Sécurité Ne faites pas fonctionner l’appareil en conduisant une voiture, une bicyclette ou tout autre véhicule motorisé. Appuyez sur ERASE. De Help-gids op uw computer installeren 1. Inschakelen. Schuif het deksel van de batterijhouder en til het op en plaats Door de Help-gids vanuit het interne geheugen van de IC-recorder op de computer te installeren, kunt u zoeken naar gedetailleerde bewerkingen en mogelijke oplossingen in geval van een probleem. vervolgens batterijen met de juiste polariteit. Schakel de stroom in. Sluit de -poort (USB) van de IC-recorder op de USB-poort van een ingeschakelde computer aan met de bijgeleverde USB-kabel die stevig op de poorten is aangesloten totdat elke stekker niet verder in de aansluiting kan worden gestoken. RECORDER] [FOR WINDOWS]. In Mac: Dubbelklik op [IC RECORDER] op het bureaublad. Als u de stroom wilt uitschakelen, schuift en houdt u de HOLD•POWER ON/OFF-schakelaar in de richting van "POWER ON/ OFF" totdat "OFF" wordt weergegeven. Installeer de Help-gids. In Windows: Dubbelklik op [Help_Guide_Installer] (of [Help_Guide_Installer.exe]). In Mac: Dubbelklik op [Help_Guide_Installer_for_mac.app]. (v10.5.8 of hoger) Volg de instructies die op het scherm verschijnen om verder te gaan met de installatie. Onbedoelde bediening voorkomen (HOLD) De Help-gids wordt weergegeven. U kunt de Help-gids ook bekijken op de volgende klantenservicehomepage van de Sony IC-recorder: http://rd1.sony.net/help/icd/p23/ce/ ˎˎElectret condensatormicrofoon ECM‑CS3 ˎˎOplaadbare batterij NH-AAA-B2KN ˎˎUSB-netspanningsadapter AC‑U50AG ˎˎCompacte lader & 2-pc AAA Multi-Use Premium batterijen BCG‑34HS2KAN, BCG-34HW2KAN Opmerking Afhankelijk van het land of de regio zijn sommige modellen of optionele accessoires niet beschikbaar. WAARSCHUWING Stel de batterijen (accu of geplaatste batterijen) niet langdurig bloot aan oververhitting zoals zonlicht, vuur of iets dergelijks. VOORZICHTIG U kunt de bestanden en mappen van de IC-recorder naar de computer kopiëren en ze opslaan. Mededeling voor de klant: de volgende informatie is uitsluitend van toepassing op apparatuur verkocht in landen waar EU-richtlijnen gelden. het jaar) in te stellen en druk op PLAY/ENTER. Herhaal deze procedure voor het achtereenvolgens instellen van de maand, de dag, het uur en de minuten. Sluit de IC-recorder aan op de computer. Kopieer bestanden of mappen die u naar de computer wilt overdragen. Sleep de gewenste bestanden of mappen van "IC RECORDER" naar de lokale schijf van uw computer. Een bestand of map kopiëren (slepen en neerzetten) Druk op REC/PAUSE. Klikken en vasthouden, slepen, en dan neerzetten. Het opnemen wordt gestart en de werkingsaanduiding gaat rood branden. ¼¼ U kunt de opname onderbreken door op REC/PAUSE te drukken. Druk nogmaals op REC/PAUSE om het opnemen opnieuw te starten. Druk op (stop) om het opnemen te stoppen. IC RECORDER Uw computer Koppel de IC-recorder los van de computer. de richting is gedraaid van de bron die u wilt opnemen. "ACCESS" verschijnt en het opnemen stopt. Druk op PLAY/ENTER. Het afspelen wordt gestart en de werkingsaanduiding gaat groen branden. Pas het volume aan door op VOL –/+ te drukken. Druk op (stop) om het afspelen te stoppen. Voorzorgsmaatregelen Technische gegevens Stroom Capaciteit (voor de gebruiker beschikbare capaciteit *1*2) Gebruik het toestel alleen op 3,0 V of 2,4 V gelijkstroom. Gebruik twee LR03 (AAA) alkalinebatterijen of twee oplaadbare NH-AAA-batterijen. Veiligheid Gebruik het apparaat niet terwijl u autorijdt, fietst of een gemotoriseerd voertuig bedient. Gebruik 5. Wissen. Wanneer de IC-recorder in de stopstand staat, drukt u op Optionele accessoires Druk op of om het jaar (de laatste twee cijfers van Leg de IC-recorder zo neer dat de ingebouwde microfoon in ˎˎN-CUT (ruisonderdrukking) ˎˎEASY-S (gemakkelijk zoeken) ˎˎCONT (continu afspelen) ˎˎLOCK (een bestand beveiligen) ˎˎALARM ˎˎDIVIDE (een bestand splitsen) Explosiegevaar indien batterij door onjuist type wordt vervangen. Werp de batterijen weg volgens de aanwijzingen. De aan/ uit-aanduiding ˎˎMODE (opnamestand) ˎˎSENS (microfoongevoeligheid) ˎˎLCF (Low Cut Filter) ˎˎVOR (Voice Operated Recording) ˎˎREC-OP (een opname toevoegen) ˎˎDPC (Digital Pitch Control) Bestanden van de IC-recorder naar uw computer kopiëren 4. Luisteren. * Deze toetsen en de aansluiting hebben een voelbaar puntje. Gebruik dit als oriëntatiepunt tijdens de bediening of ter herkenning van de aansluiting. Extra functies Wanneer u batterijen in het apparaat plaatst en het apparaat inschakelt, verschijnt "SET DATE" op de display, en vervolgens begint het gedeelte met het jaartal te knipperen. 3. Opnemen. De aan/ uit-aanduiding VOL (volume)-toets –/+ (*) DIVIDE-toets ERASE-toets REC/PAUSE (opnemen/pauzeren)-toets (cue/snel vooruitspoelen)-toets Luidspreker HOLD•POWER ON/OFF-schakelaar (USB)-aansluiting Batterijhouder Opening voor polsriem (Er wordt geen polsriem meegeleverd.) Pour éviter toute diminution de l’acuité auditive, n’écoutez pas le son à un volume élevé pendant de longues périodes. Details van deze extra functies voor opnemen, afspelen en bewerken vindt u in de Help-gids. Dit is de Snelstartgids, die instructies bevat voor de basisbewerkingen van de IC-recorder. Lees dit document zorgvuldig door. We hopen dat u uw nieuwe Sony IC-recorder met veel plezier zult gebruiken. Ingebouwde microfoon (hoofdtelefoon)-aansluiting De aan/uit-aanduiding Display FOLDER-toets MENU-toets PLAY/ENTER-toets (*) (review/snel terugspoelen)-toets (stop)-toets (microfoon)-aansluiting (PLUG IN POWER) (*) Ce produit a été fabriqué par ou pour le compte de Sony Corporation, 1-7-1 Konan Minato-ku Tokyo, 108-0075 Japon. Toutes les questions relatives à la conformité des produits basées sur la législation européenne doivent être adressées à son représentant, Sony Deutschland GmbH, Hedelfinger Strasse 61, 70327 Stuttgart, Allemagne. Pour toute question relative au Service Après-Vente ou à la Garantie, merci de bien vouloir vous référer aux coordonnées qui vous sont communiquées dans les documents « Service (SAV) » ou Garantie. Env. 72 g deux piles alcalines LR03 (format AAA) comprises *3Valeur mesurée d’après la norme JEITA (Japan Electronics and Information Technology Industries Association). Uw computer gebruiken 2. De datum en tijd instellen. Onderdelen en bedieningselementen ATTENTION Poids (JEITA)*3 bureaublad voor Windows (of in Finder voor Mac). ˎˎHelp-gids (HTML-bestand dat in het interne geheugen is opgeslagen, zodat het gemakkelijk naar uw computer kan worden gekopieerd.) ˎˎSnelstartgids Ne pas exposer les piles (pack de piles ou piles installées) à de fortes chaleurs (rayons du soleil, feu, etc.) pendant une période prolongée. Si vous avez des questions ou des problèmes concernant cet appareil, consultez votre revendeur Sony. Uw nieuwe IC-recorder uitproberen Controleer de bijgeleverde items. AVERTISSEMENT Env. 38,5 mm × 115,2 mm × 21,3 mm ˎˎNe laissez pas l’appareil à proximité d’une source de chaleur ou dans un endroit exposé au rayonnement direct du soleil, à une poussière excessive ou à des chocs mécaniques. ˎˎSi des éléments solides ou liquides venaient à pénétrer à l’intérieur de l’appareil, retirez la pile et faites-le vérifier par un technicien qualifié avant de le remettre en service. Dubbelklik na voltooiing van de installatie op het pictogram [icdp23_ce_HelpGuide] in het ˎˎIC-recorder (1) ˎˎUSB-aansluitkabel (1) ˎˎLR03 alkalinebatterijen (AAA) (2) Certains modèles ou accessoires en option ne sont pas disponibles selon le pays ou la région. Dimensions (l/h/p) (parties saillantes et commandes non comprises) (JEITA)*3 In Windows: Klik op [Computer] (of [Deze computer]) en dubbelklik vervolgens op [IC Welkom bij uw nieuwe Sony IC-recorder! Remarque Déconnectez l’enregistreur IC de votre ordinateur. Schuif en houd de HOLD•POWER ON/OFF-schakelaar in de richting van "POWER ON/OFF" totdat de vensterweergave verschijnt. ICD-PX232 ˎˎChargeur compact & 2 piles premium multiutilisation AAA BCG‑34HS2KAN, BCG-34HW2KAN Votre ordinateur Manipulation Lorsque l’enregistreur IC est en mode stop, appuyez sur la GB ES FR NL Snelstartgids Réglez le volume en appuyant sur VOL –/+. Appuyez sur (stop) pour arrêter la lecture. 5. Effacez. * Ces touches et la prise possèdent un point tactile. Utilisez-le comme référence pour les opérations, ou pour identifier chaque terminal. IC Recorder La lecture commence et l’indicateur de fonctionnement s’allume en vert. Touche VOL (volume) –/+ (*) Touche DIVIDE Touche ERASE Touche REC/PAUSE (lecture/pause) Touche (avance/avance rapide) Haut-parleur Commutateur HOLD•POWER ON/OFF Connecteur (USB) Compartiment des piles Orifice de dragonne (dragonne non fournie.) ˎˎMicrophone condensateur à électret ECM‑CS3 ˎˎBatterie rechargeable NH‑AAA‑B2KN ˎˎAdaptateur secteur USB AC‑U50AG intégré soit orienté vers la source à enregistrer. 4. Écoutez. Indicateur de fonctionnement Cliquez et maintenez, faites glisser, puis déposez. L’enregistrement commence et l’indicateur de fonctionnement s’allume en rouge. Accessoires en option Remarque à l’intention des clients : les informations suivantes ne concernent que l’équipement vendu dans les pays appliquant les directives européennes Appuyez sur REC/PAUSE. Tournez l’enregistreur IC de manière à ce que le microphone ˎˎN-CUT (réduction du bruit) ˎˎEASY-S (recherche facile) ˎˎCONT (lecture en continu) ˎˎLOCK (protection d’un fichier) ˎˎALARM ˎˎDIVIDE (division d’un fichier) Raccordez l’enregistreur IC à votre ordinateur. Copiez les fichiers ou les dossiers que vous souhaitez transférer sur votre ordinateur. Pour copier un fichier ou un dossier (glisser et déposer) ˎˎMODE (mode d’enregistrement) ˎˎSENS (sensibilité du microphone) ˎˎLCF (filtre passe-bas) ˎˎVOR (Voice Operated Recording) ˎˎREC-OP (ajout d’un enregistrement) ˎˎDPC (Digital Pitch Control) Risque d’explosion en cas de remplacement de la pile par un type incorrect. Mettez les piles usagées au rebut conformément aux instructions. Glissez et déposez les fichiers ou dossiers que vous voulez copier depuis « IC RECORDER » vers le disque local de votre ordinateur. ¼¼ Vous pouvez mettre l’enregistrement en pause en appuyant sur REC/PAUSE. Appuyez à nouveau sur REC/PAUSE pour redémarrer l’enregistrement. Les détails de ces fonctions supplémentaires pour l’enregistrement, la lecture et l’édition sont inclus dans le manuel d’aide. Vous pouvez copier des fichiers ou des dossiers depuis l’enregistreur IC vers votre ordinateur pour les stocker. 3. Enregistrez. Indicateur de fonctionnement Microphone intégré Prise (casque) Indicateur de fonctionnement Fenêtre d’affichage Touche FOLDER Touche MENU Touche PLAY/ENTER (*) Touche (révision/retour rapide) Touche (stop) Prise (microphone) (PLUG IN POWER) (*) Copie de fichiers depuis l’enregistreur IC vers votre ordinateur Lorsque vous allumez l’appareil après avoir inséré des piles, « SET DATE » s’affiche à l’écran, puis la section de l’année commence à clignoter. Fonctions complémentaires ERASE en houdt u deze toets ingedrukt. Wanneer de IC-recorder in de afspeelstand staat, drukt u op ERASE. "ERASE" wordt weergegeven. Druk op ERASE. ˎˎLaat het apparaat niet liggen in de buurt van een warmtebron of op een plaats waar dit wordt blootgesteld aan direct zonlicht, overmatig veel stof of mechanische schokken. ˎˎAls er een object of vloeistof in het apparaat terechtkomt, moet u de batterij verwijderen en het apparaat laten nakijken door een ervaren servicetechnicus voordat u het weer gebruikt. Neem contact op met de dichtstbijzijnde Sony-handelaar voor vragen of problemen met het apparaat. 2 GB (ongeveer 1,75 GB = 1.879.048.192 byte) *1 Een klein deel van het ingebouwde geheugen wordt gebruikt voor bestandsbeheer en is zodoende niet beschikbaar voor opslag door de gebruiker. 2 * Wanneer het ingebouwde geheugen met de ICrecorder wordt geformatteerd. Afmetingen (b/h/d) (exclusief uitstekende delen en bedieningselementen) (JEITA)*3 Ca. 38,5 mm × 115,2 mm × 21,3 mm Gewicht (JEITA)*3 Ca. 72 g inclusief twee LR03 (AAA) alkalinebatterijen *3Meetwaarde conform JEITA (Japan Electronics and Information Technology Industries Association) normen Dit product werd geproduceerd door of in opdracht van Sony Corporation, 1-7-1 Konan Minato-ku Tokyo, 108-0075 Japan. Vragen met betrekking tot product conformiteit gebaseerd op EU-wetgeving kunnen worden gericht aan de gemachtigde vertegenwoordiger, Sony Deutschland GmbH, Hedelfinger Strasse 61, 70327 Stuttgart, Duitsland. Voor service- of garantiezaken verwijzen wij u door naar de adressen in de afzonderlijke service of garantie documenten. Voorkom mogelijke gehoorschade door niet gedurende langere tijd naar harde geluidsniveaus te luisteren.