1
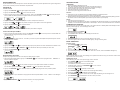
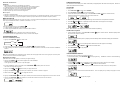
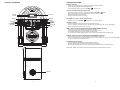
WARNING: TO PREVENT FIRE OR SHOCK HAZARD, DO NOT EXPOSE THIS APPLIANCE TO RAIN OR MOISTURE. DO NOT REMOVE COVER. PILOT LAMPS SOLDERED IN PLACE. NO USER SERVICEABLE PARTS INSIDE. REFER SERVICING TO QUALIFIED SERVICE PERSONNEL. CAUTION RISK OF ELECTRIC SHOCK DO NOT OPEN The lighting flash with arrowhead symbol, within an equilateral triangle, is intended to alert user to the presence of uninsulated "dangerous voltage" within the product's enclosure that may be of sufficient magnitude to constitute risk of electric shock to persons. CAUTION: TO REDUCE THE RISK OF ELECTRIC SHOCK, DO NOT REMOVE COVER (OR BACK). NO USER - SERVICEABLE PARTS INSIDE. REFER SERVICING TO QUALIFIED SERVICE PERSONNEL. The exclamation point within an equilateral triangle is intended to alert user to the presence of important operating and maintenance (servicing) instruction in the literature accompanying the appliance. STAND BY SENSOR Specification Frequency Range USB Port 2.0 Power Consumption Antennas Power Source Speaker Size Speaker Wattage USB/SD Aux-In Subwoofer Jack Accessories Supplied : : : : : : : : : : : : : : AM 522 - 1620 KHz FM 87.5 - 108 MHz Full Speed 512MB - 4GB (Support FAT16, FAT32) 32W External FM antenna wire Built-in ferrite AM bar AC 230V ~ 50Hz 4 4 OhmDynamic type x 2 2 x 5W pmpo up to 4GB Flash Memory 3.5mm dia 3.5mm dia / 56K resistor Remote Control Aux Cable (3.5mm dia. Jack Plug) *DESIGN AND SPECIFICATIONS SUBJECT TO CHANGE WITHOUT NOTICE. MODEL NO: JBX2905 INSTRUCTION MANUAL 910-290500-0050-100 GUIDE DES PANNES CONTROL LOCATORS Pas dalimentation. · · · Assurez vous que lappareil est correctement branché. Vérifier que lindicateur lumineux STAND BY est bien rouge. Si lindicateur est rouge, appuyer sur POWER / pour allumer lappareil. Aucun son ne sort de lappareil · · · Vérifier que le volume est audible en appuyant sur le bouton VOLUME + / Note: Sur certains appareils le volume commence au niveau 15 et sarrête au niveau 40 Assurez vous que lappareil ne soit pas en position MUTE. Assurez vous que lappareil est correctement branché et que la prise de courant est bien alimentée. Léclairage est éteint / ne change pas de couleur · Assurez vous que POWER / est allumé depuis le mode STAND BY. Le CD nest pas lu · · · Vérifier que le CD soit correctement inséré (face imprimée (titres) vers le haut) Vérifier que la surface du CD soit propre. Assurez vous que le mode FUNCTION soit sur CD STAND BY LCD DISPLAY SENSOR SD CARD USB PORT PROG/CLOCK VOLUME+ REPEAT/STEREO VOLUMEPOWER OPEN/CLOSE UP/FF FUNCTION DOWN/FB PLAY/PAUSE STOP/BAND REC/ERASE CD DOOR USB Il ny a pas de musique qui vient de lUSB lorsque jappuie sur PLAY/PAUSE · · · · Assurez vous que votre clé USB contienne bien des pistes MP3. Lappareil ne peut lire que les clés USB ayant une capacité de 512Ko à 4Go Redémarrer le mode USB en éteignant lappareil ou en changeant de mode. Vérifier si les fichiers ne sont pas au format WMA, lappareil ne peut lire que les MP3. AUX-IN Aucune musique nest lue lorsque jappuie sur PLAY/PAUSE · · Assurez vous que la source audio est bien connectée. Le contrôle de la source audio se fait depuis la source elle meme, toutefois, il est possible dajuster le volume de la source audio depuis le réglage volume de lappareil La télécommande ne fonctionne pas. · · · Remplacer les piles Assurez vous de pointer la télécommande vers le capteur situé sur la face avant de lappareil. Déplacer les éventuels obstacles qui pourraient se trouver dans le champ de visée de la télécommande. Trademarks MPEG Layer-3 audio coding technology licensed from Fraunhofer IIS and Thomson SPEAKER 21 2 PRISE SUBWOOFER GETTING STARTED La prise subwoofer vous permet dajouter un caisson de basses (non inclus) et ainsi optimiser les sons graves. Rapprochez vous de votre revendeur pour toute information complémentaire. UNPACKING LECTEUR CD Lecture dun CD 1. Appuyer sur FUNCTION / pour régler lappareil en mode CD. 2. Appuyer sur CD OPEN / CLOSE / pour ouvrir le tiroir du CD. 3. Insérer un disque avec la partie imprimée vers le haut. Appuyer sur CD OPEN / CLOSE / le tiroir. READ est affiché pendant que lappareil scanne le contenu du disque. à nouveau pour fermer ou FB/ 6. Appuyer sur STOP/BAND / Remarks: a) ESD remark: In case of malfunction due to electrostatic discharge, just reset the product (reconnect of power source may be required) to resume normal operation. b) Electrical Fast Transient (Burst) Remark (I2): In case of malfunction due to electrical fast transient (Burst), just reset the product to resume normal operation (re-connection of power source may be required). une ou plusieurs fois jusqua que la piste de votre choix apparaisse. SET UP 1. Untie the wire on the AC power cord 2. Untie the FM antenna and allow it to hang down in a straight line for optimum FM reception. If you have trouble tuning into an FM station, move the external wire FM antenna for best reception. Do not connect the FM antenna to an outside antenna. pour arrêter la lecture. POWERING UP YOUR UNIT 4. La piste 1 est lue automatiquement après que le contenu du disque est été scanné. 5. Appuyer sur FF/ 1. Remove all packing materials from the unit. Note: Save all packing materials just in case the unit needs future servicing. 2. The Remote Control is located in the outside of the Polystyrene packaging 3. Remove the plastic bag covering the unit and remote control. 4. Untie the wire antenna on the back of the unit. 5. Remove the 3-pin AC plug from the back of the unit. Plug the AC power cord plug into the wall socket. This system switches to Standby Mode automatically and the red Standby Indicator lights up. The LCD Display shows 0:00. Note: ESP clignote sur lafficheur pendant 40 secondes puis sarrête de clignoter. Lecture dun disque CD-MP3 1. Insérer un disque au format CD-MP3. Appuyer sur CD OPEN / CLOSE / affiché pendant que lappareil scanne le contenu du disque. à nouveau pour fermer le tiroirREAD est 2. La piste n°1 du dossier racine (Track no. 1 of Folder 1) commence à jouer automatiquement après lanalyse du contenu du périphérique du CD-MP3 To switch the unit on, press POWER / 1. The LCD backlight will light up. 2. The STANDBY LED is turned off and the display shows HELLO. 3. The LED tubes will light up and cycle through different colour LEDs. 4. The circular light on the front of the unit will also light up, the light remaining static. BASIC OPERATION Function select 3. Appuyer sur FF/ ou FB/ 4. Appuyer sur PRESET + / une ou plusieurs fois jusquà que la piste de votre choix soit affichée sur lafficheur LCD. ou PRESET / 5. Appuyer sur STOP/BAND / pour sélectionner lalbum (sous dossier) de votre choix. pour arrêter la lecture. 1. Press FUNCTION / to select among: TUNER AUX CD CARD USB to switch the unit off. 2. When the set is on, press POWER / 3. The LCD backlight will go off and GOOD BYE shows for 2 seconds, then the STANDBY LED lights up. Programmation des pistes Vous pouvez programmer une lecture dune séquence allant jusquà 20 pistes. 1. Depuis la position STOP position, Appuyer sur PROGRAM / P0-01 se mettent à clignoter. pour commencer la programmation. MEMORY et Note: In Standby Mode, the tone, sound settings, tuner presets and volume level (up to a maximum volume level of 30) will be stored in the units memory. Setting the clock After connecting the system to the power supply, set the clock first. 1. Press POWER / to switch the unit to Standby Mode - The display shows the time - 0:00 flashes by default if you have not set the clock 2. Appuyer sur FF/ ou FB/ une ou plusieurs fois jusquà que la piste désirée saffiche sur lafficheur. Pour les MP3: Appuyer sur PRESET + / 3. Appuyer sur PROGRAM / denregistrement. ou PRESET / pour sélectionner lalbum désiré. pour confirmer, lafficheur indique la piste programmée et la prochaine position 2 In Standby Mode, press and hold PROGRAM / - The hours digit starts flashing 3. Press the FF/ or FB/ 4. Press PROGRAM / 5. Hold down FF/ 4. Répeter les étapes 2-3 pour sélectionner et programmer toutes les pistes désirées. FULL saffiche si vous atteignez les 20 pistes. 5. Appuyer sur PLAY/PAUSE / for over 1 second. repeatedly to set the hours. again to confirm.The minutes digit starts flashing or FB/ repeatedly to set the Minutes. 6. Press PROGRAM / again to confirm.The minutes digits stop flashing, the clock begins to run. 7. Press PROGRAM / to select between 12 and 24 hours, as below: pour commencer la lecture de votre programmation. 19 4 SILENCE MUTE Vous pouvez mettre lappareil en mode SILENCE temporairement sans avoir besoin de léteindre. You can temporarily switch off the sound without switching off the unit. 1. Appuyer sur MUTE / sur la télécommande to pour couper le son, la lecture continue en silence. 2. Pour remettre le son vous pouvez : 1. Press MUTE / on the remote control to switch the sound off, playback continues without sound. 2. To switch the sound back on, you can: - Appuyer sur MUTE / ajuster le volume changer la source - à nouveau again press MUTE / adjust the volume control change the source EQ Egaliseur de son (EQ) Appuyer sur EQ / sur la télécommande pour sélectionner le mode dégaliseur de son. Lappareil possède 5 réglages dégaliseur : Press EQ / on the remote control to select the desired EQ mode. The unit has 5 preset EQ modes: RADIO RADIO AM-FM Tuning AM-FM 1. Press FUNCTION / 1. Appuyer sur FUNCTION / pour régler lappareil en mode TUNER. 2. Appuyer sur STOP/BAND / 4. Réglage manuel Appuyer sur FF/ ou FB/ brièvement et plusieurs fois jusquà la station désirée. Programmation des stations Vous pouvez programmer jusquà 40 stations (FM et AM) dans la mémoire interne de lappareil, manuellement ou automatiquement (autostore) 1. Positionnez vous sur la station de votre choix or FB/ to scroll through the frequencies - the radio automatically tunes into a station 3. Auto Tuning Press and hold FF/ with good reception. If a station in received in Stereo, (ST) is shown. Repeat step 3 until you find the desired station. 4. Manual Tuning Press FF/ ou PRESET / You can store up to a total of 40 radio stations (FM and AM) into memory, manually or automatically (Autostore) 1. Tune into your desired station 2. Press PROGRAM / to activate programming, MEMORY and P01 will start flashing on the display. ou PRESET / or PRESET / to allocate a number from 1 to 20 stations. pour allouer un numéro de station compris entre 1 et 20 4. Press PROGRAM / to confirm, the display shows the preset waveband number and the frequency of the preset station. 5. Repeat steps 1-4 to store other stations into memory. To listen to a Preset Station Press PRESET + / Ecoute dune station préprogrammée. une ou plusieurs fois jusquà que la station de votre choix soit affichée. Programmation automatique des stations. La programmation automatique commence avec la piste 1, toutes les stations enregistrées auparavant seront alors effacées. 1. Appuyer et garder enfoncer le bouton PROGRAM / - Memory commence à clignoter sur lafficheur. or PRESET / once or repeatedly until the desired preset station in displayed. Automatic Programming of Radio Stations Automatic programming will start with preset 1, from this pre-set number onwards, former programmed Radio stations will be erased. button until Auto appears on the display. 1. Press and hold the PROGRAM / - Memory will start flashing on the display. jusquà ce qu Auto apparaisse sur lafficheur. - - briefly and repeatedly until a station is found. pour activer la programmation, MEMORY et P01 se met à clignoter sur lafficheur pour confirmer, lafficheur affiche la bande préprogrammée et la fréquence de la station 4. Appuyer sur PROGRAM / préprogrammée. 5. Répéter les étapes 1 à 4 pour programmer dauyres stations dans la mémoire interne. Appuyer sur PRESET + / or FB/ Programming Radio Stations 3. Press PRESET + / 3. Appuyer sur PRESET + / repeatedly to select your desired waveband - FM or AM (= MW). plusieurs fois pour sélectionner la bande découte - FM ou AM (= MW). 3. Réglage auto Appuyer et garder enfoncé FF/ ou FB/ pour faire défiler les fréquences la radio sarr^te automatiquement sur les stations avec une bonne réception. Si une station est reçue en STEREO, le sympbole (ST) est affiché. Répéter cette étape jusquà ce que vous trouviez la station de votre choix. 2. Appuyer sur PROGRAM / 2. Press STOP/BAND / to set the unit to TUNER mode. Any available stations are programmed Toutes les stations disponibles sont programmées. After all stations are stored, the last preset station will then play. Après que toutes les stations soient programmées, la dernière station enregistrée est diffusée. 17 6 Avant de commencer : SUBWOOFER SOCKET Déballage The subwoofer socket enables you to attach a subwoofer (not supplied) which will enhance bass response. Please contact your retailer for suitable subwoofer models. 1. Retirer tous les éléments de lemballage de lappareil. Note: Conserver tous les éléments demballage en cas de besoin ultérieur. 2. La télécommande se trouve à lextérieur du polystyrène demballage. 3. Retirer les plastiques qui recouvrent lappareil et la télécommande. 4. Détacher lantenne qui se trouve à larrière de lappareil. 5. Retirer la prise qui se trouve au dos de lappareil. Mise en place. 1. Dérouler le fil dalimentation 2. Dérouler le fil dAntenne FM et laisser le pendre en ligne droite pour une réception FM optimale. Si vous rencontrez des problèmes de réception, vous pouvez déplacer lantenne jusquà lobtention de la meilleure réception possible. MISE EN MARCHE Brancher la prise de lappareil dans une prise de courant. Le système passe automatiquement en mode STAND BY et la LED rouge de STAND BY sallume. Lafficheur LCD affiche : « 0 :00 » CD PLAYER Playing a CD 1. Press FUNCTION / to set the unit to CD MODE. 2. Press CD OPEN / CLOSE / 3. Insert a disc with the printed side facing up. Press CD OPEN / CLOSE / READ is displayed as the CD player scans the contents of the disc. again to close the drawer, 4. Track no. 1 will play back automatically after scanning of the contents of the Compact Disc has finished. 5. Press FF/ or FB/ once or repeatedly until the desired track number appears on the display. 6. Press STOP/BAND / Pour allumer lappareil appuyer sur POWER / 1. Le retro éclairage de lafficheur LCD sallume. 2. La LED rouge de STAND BY seteind et lafficheur affiche HELLO. to open the CD Drawer. to stop playback. Note: ESP will flash on the display for 40 seconds and will then stop flashing. CD-MP3 Disc Playback 3. Les Tubes LED des côtés s allument et les couleurs senchainent. 4. Le centre circulaire de lappareil illumine aussi, la couleur reste statique.. 1. Insert a CD-MP3 format disc. Press CD OPEN / CLOSE / player scans the contents of the disc. again to close the drawer. READ is displayed as the CD UTILISATION DE BASE Selection du MODE (Function) 1. Appuyer sur FUNCTION / TUNER AUX 2. Track no. 1 of the Root folder (Folder 1) will play back automatically after it has finished reading the CD-MP3 disc. pour choisir entre : CD CARD 3. Press FF/ USB 2. Lorsqu des modes est sélectionné appuyer sur POWER / pour éteindre lappareil. 3. le rétro éclairage de lafficheur séteind et GOOD BYE est affiché pendant 2 secondes, ensuite la LED de STAND BY sallume. Note: En mode STAND BY, les réglages sonoues, stations de radio programmées et le volume (jusquau niveau 30) sont conservés dans la mémoire interne de lappareil. or FB/ 4. Press PRESET + / 5. Press STOP/BAND / once or repeatedly until the desired track number appears on the display. or PRESET / to stop playback. PROGRAMMING TRACKS You may store up to 20 tracks in the desired sequence. 1. In the STOP position, press PROGRAM / Réglage de lhorloge to select the desired album. to start programming. MEMORY and P0-01 will start flashing. Après avoir branché votre appareil, commencer par régler lhouloge. 1. Appuyer sur POWER / pour passer lappareil en mode STAND BY - Lafficheur indique lheure - 0:00 clignote par défaut si lheure na pas été réglée. 2 En mode STAND BY, appuyer et garder enfoncé PROGRAM / - Les heures commencent à clignoter. 3. Appuyer sur FF/ ou FB/ 4. Appuyer sur PROGRAM / 5. Garder enfoncé FF/ 7. Appuyer sur PROGRAM / or FB/ once or repeatedly until the desired track number appears on the display. For MP3: press PRESET + / or PRESET / to select the desired Album. 3. Press PROGRAM / to confirm, the display shows the stored track number and the next store position. plusieurs fois pour régler les heures. à nouveau pour confirmer, les minutes se mettent à clignoter. ou FB/ 6. Appuyer sur PROGRAM / pendant plus dune seconde. 2. Press FF/ 4. Repeat steps 2-3 to select and store all desired tracks. FULL is displayed if you attempt to program more than 20 tracks. pour régler les minutes. à nouveau pour confirmer, les minutes sarrêtent de clignoter et lheure se met en marche. pour sélectionner le mode de fonctionnement entre 12 et 24 heures. 15 5. Press PLAY/PAUSE / to play the program. 8 CONTROL LOCATORS TROUBLESHOOTING There is no Power · · Make sure the plug of the power cord is plugged in properly into the wall outlet. Check if the red STAND BY INDICATOR light is still on. · If the red Standby Light is on, press the POWER / to turn the unit on. There is No Sound coming from the unit · STAND BY LCD DISPLAY SENSOR SD CARD USB PORT PROG/CLOCK VOLUME+ REPEAT/STEREO VOLUMEPOWER OPEN/CLOSE UP/FF FUNCTION DOWN/FB PLAY/PAUSE STOP/BAND REC/ERASE CD DOOR · · Check that the Volume is turned up enough by pressing the VOLUME + / Note: Volume range on some units starts at level 15 and ends at level 40 Make sure the Mute function is turned off. Check to make sure the Power is turned on. button. The lights are not on / do not change colour · Check to make sure the POWER / is switched on from Standby Mode. CD does not play · · · Check to make sure the CD is inserted correctly (label side facing up). Check to see that the CD surface is clean. Only wipe with a soft lint free dry cloth. Do not use detergents. Make sure the Function Switch is set to CD mode. USB - There is no music playing when PLAY/PAUSE (USB) is pressed · · · · Make sure the MP3 device/Flash Drive contains MP3 music files. The unit will only play Flash Drives with 512MB up to 4 GB flash memory Reset USB by switching the unit off or switching to another Mode. Check if the device contains WMA music files. The unit does not play WMA format, only MP3 format. AUX-IN - There is no music playing when PLAY/PAUSE is pressed · · Make sure the MP3 device or other Audio Unit connected has been switched on. The connected unit will only play when operated by its own controls, although the Volume can be controlled by adjusting the volume on the main unit or the Remote control. The Remote is not working · · · Check the battery charge level and replace the battery if necessary. Be sure to point the remote towards the remote sensor when operating. Remove obstacles in the path of the remote and the unit so the remote signal has a straight path to it. Trademarks MPEG Layer-3 audio coding technology licensed from Fraunhofer IIS and Thomson SPEAKER 13 10 IMPORTANT SAFEGUARDS FOR AUDIO PRODUCTS PLEASE READ CAREFULLY THE FOLLOWING IMPORTANT SAFEGUARDS THAT ARE APPLICABLE TO YOUR EQUIPMENT. 1. Read Instructions - All the safety and operating instructions should be read before the appliance is operated. 2. Retain Instructions - The safety and operating instructions should be retained for future reference. 3. Heed Warnings - All warnings on the appliance and in the operating instructions should be adhered to. 4. Follow Instructions - All operating and use instructions should be followed. 5. Water and Moisture - The appliance should not be used near water-for example, near a bathtub, washbowl, kitchen sink, laundry tub, in a wet basement, or near a swimming pool and the like. 6. Carts and Stands - The appliance should be used only with a cart or stand that is recommended by the manufacturer. 6A.An appliance and cart combination should be moved with care. Quick stops, excessive force, and uneven surfaces may cause the appliance and cart combination to overturn. 7. Wall or Ceiling Mounting - The appliance should be mounted to a wall or ceiling only as recommended by the manufacturer. 8. Ventilation - The appliance should be situated so that its location or position does not interfere with-its proper ventilation. For example, the appliance should not be situated on a bed, sofa, rug, or similar surface that may block the ventilation openings; or, placed in a built-in installation, such as a bookcase or cabinet that may impede the flow of air through the ventilation openings. 9. Heat - The appliance should be situated away from heat sources such as radiators, heat registers, stoves, or other appliances (including amplifiers) that produce heat. 10.Power Sources - The appliance should be connected to a power supply only of the type described in the operating instructions or as marked on the appliance. 11.Grounding or Polarization - Precautions should be taken so that the grounding or polarization means of an appliance is not impeded. 12.Power - Cord Protection - Power-supply cords should be routed so that they are not likely to be walked on or pinched by items placed upon or against them, paying particular attention to cords at plugs, and the point where they exit from the appliance. 13.Cleaning - The appliance should be cleaned only as recommended by the manufacturer. 14.This product is designed for use with the antenna attached and should not be connected to any other external antennas. 15.Non-use Periods - The power cord of the appliance should be unplugged from the outlet when left unused for a long period of time. 16.Object and Liquid Entry - Care should be taken so objects do not fall and liquids are not spilled into the enclosure through openings 17.Damage Requiring Service - The appliance should be serviced by qualified service personnel when: A. The power-supply cord of the plug has been damaged; or B. Objects have fallen, or liquid has been spilled into the appliance; or C. The appliance has been exposed to rain; or D. The appliance does not appear to operate normally or exhibits a marked change inperformance; or E. The appliance has been dropped, or the enclosure damaged. 18. Servicing - The user should not attempt to service the appliance beyond that described in the operating instructions. All other servicing should be referred to qualified service personnel. 1 Effacer la programmation CONTROL LOCATORS Le contenu de la mémoire de programmation peut être effacé comme suit : - Depuis la position STOP , appuyer sur REC/ERASE / - Appuyer sur POWER / Sélectionner une autre source de lecture. Ouvrir le tiroir de CD une fois; pendant la lecture, appuyer deux fois. ENREGISTREMENT Depuis le CD vers la carte SD ou Support USB. Le système peut convertir un CD complet au format MP3 et le copier sur un périphérique de stockage USB ou une carte SD (non inclus) Il est également possible de copier une piste MP3 depuis un support USB/Carte SD ou depuis un support USB/Carte SD vers un USB/Carte SD EXTERNAL ANTENNA pour commencer lencodage vers un USB/Carte SD (par défaut sur 1. En mode CD, Appuyer sur REC/ERASE / USB si les deux formats sont détectés), la lecture sarrête et retourne au début de la piste en cours de lecture, le système scanne alors le contenu de du USB/Carte SD et créé un dossier pour enregistrer les pistes MP3. Reprend la lecture du CD et commence lencodage à partir de ce moment. Le symbole de destination des enregistrements « USB » ou « CARD » commence à clignoter sur lafficheur. 2. Appuyer sur STOP/BAND / pour sortir de lencodage. Copie de MP3 SUBWOOFER OUTPUT JACK AUX.IN JACK SUBWOOFER OUTPUT AUX. IN 1. En mode lecture CD-MP3, USB ou SD, appuyer sur REC/ERASE / pour commencer la copie de MP3 dun CD à une USB ou Carte SD , ou dun USB à une carte SD ou vice versa. La lecture sarrête et le système scan le contenu de lUSB ou Carte SD et créé un dossier pour enregistrer la piste MP3. 2. Licône REC est affichée 3. Le message COPY 01 saffichera, le pourcentage proportionnel à lavancement de la copie est affiché de manière décimale. 4. Licône du support de destination USB or CARD commence à clignoter le nombre décimal commence à augmenter pendant la copie de la piste, la copie sarrête lorsque le nombre atteint 100. 5. La piste MP3 est alors lue depuis le début. Depuis une source AUX à une carte SD ou un périphérique de stockage USB Le système est capable de convertir en MP3 un flux audio depuis une source AUX et de lenregistrer sur une carte SD ou un périphérique de stockage USB (par défaut en USB si les deux formats sont détectés). 1. Appuyer sur FUNCTION / AC POWER CORD 2 3 4 POWER / STAND BY EQ EQ PRESET + REC PRESET - OPEN/ CLOSE CD OPEN / CLOSE Appuyer sur REC/ERASE / pour commencer lencodage, le système scan le contenu de lUSB ou Carte SD et créé un dossier pour enregistrer les pistes MP3. Licône REC et le message RIPP TO saffichent et licône AUX commence à clignoter. Le support de destination « USB » / « CARD » se met à clignoter et lencodage commence. Lancer la lecture depuis la source AUX MUTE REC SLEEP SLEEP VOLUME + FUNC FUNCTION VOL PRESET PLAY / PAUSE SKIP BACKWARD RANDOM ID3 MUTE pour passer en mode AUX VOLUME RANDOM SKIP FORWARD / + ID3 BAND REPEAT PROG MEM CLOCK PROGRAM pour arrêter lencodage AUX. 5 Appuyer sur STOP/BAND / NB: Le message : · NO FUNCT est affiché si un bouton est appuyé pendant le processus dencodage AUX. · NO DEV est affiché si aucun support USB ou carte SD nest détecté. Le message · FULL est affiché si le support de destination ne contient pas assez despace. REPEAT STOP / BAND 0 1 2 TIMER 3 4 5 MONO STEREO 6 7 8 9 0-9 TIMER MONO/STEREO Effacer des pistes MP3 Le système peut effacer des pistes enregistrées précédemment ou des MP3 existants. 1. En mode de lecture USB ou carte SD, garder enfoncé le bouton REC/ERASE / cours lecture sarrête et est automatiquement effacée. 2. Le message «DELETE» est affiché. 3 20 pendant 2 secondes, la piste en Setting the Timer ANTENNE The unit can be used as an Alarm Clock, whereby the selected source (CD, TUNER, USB, SD CARD OR PHONO) starts playback at a preset time. Make sure the clock is set before using the Timer. Pour la réception FM, lappareil est doté dune antenne externe sous forme de fil, bouger le fil jusquà la réception optimale de la station que vous souhaitez écouter. Pour la réception AM, lappareil est doté dune antenne directionnelle interne en ferrite. Faites pivoter votre appareil pour obtenir la meilleure réception possible. Attention: Ne pas connecter lantenne externe à une antenne externe domestique. 1. In Standby Mode, press and hold TIMER / flashing on the display. Press TIMER / on the remote over 1 second, icon " " and the words TURN ON start again on the Remote Control to begin the SYSTEM POWER ON Timer setting. UTILISATION DE LUSB ET DE LA CARTE SD Utilisation de lUSB: 2. Press FF/ or FB/ 3. Press TIMER / 4. Press FF/ 1. Appuyer sur FUNCTION / pour régler lappareil en mode USB. 2. Insérer un périphérique de stockage USB (non inclus) dans le port USB READ est affiché pendant que le système scanne le contenu du périphérique de stockage USB repeatedly to set the Hours. on the remote to enter the Minutes setting mode. or FB/ repeatedly to set the Minutes. 3. La piste n°1 du dossier racine (Track no. 1 of Folder 1) commence à jouer automatiquement après lanalyse du contenu du périphérique de stockage USB on the remote again to begin SYSTEM POWER OFF Timer Setting. 5. Press TIMER / Icon " " and TURN OFF starts flashing on the display. 4. Appuyer sur FF/ ou FB/ 5. Appuyer sur PRESET + / 6. Press TIMER / 7. Press FF/ on the Remote Control again to begin the Timer setting. or FB/ 8. Press TIMER / 9. Press FF/ 6. Appuyer sur STOP/BAND / ou PRESET / pour sélectionner lalbum (sous dossier) de votre choix. pour arrêter la lecture. repeatedly to set the Hours. Utilisation de la carte SD: on the Remote Control to enter the Minutes setting mode. or FB/ une ou plusieurs fois jusquà que la piste de votre choix soit affichée sur lafficheur LCD. 1. Appuyer sur FUNCTION / repeatedly to set the Minutes. pour régler lappareil en mode CARTE SD. on the remote again to begin SETTING THE SOURCE to wake up from. 10. Press TIMER / The default is set at TUNER mode. TUNER will start flashing on the display. 2. Insérer une carte SD. (non incluse) dans le lecteur de carte SD READ est affiché pendant que le système scanne le contenu de la carte SD. 3. La piste n°1 du dossier racine (Track no. 1 of Folder 1) commence à jouer automatiquement après lanalyse du contenu du périphérique de la carte SD to select the wake up source. 11. Press FUNCTION / The unit will wake you up with the last tuned in station if TUNER mode is selected. TUNER CD USB 4. Appuyer sur FF/ ou FB/ AUX 5. Appuyer sur PRESET + / CARD 6. Appuyer sur STOP/BAND / une ou plusieurs fois jusquà que la piste de votre choix soit affichée sur lafficheur LCD. ou PRESET / pour sélectionner lalbum (sous dossier) de votre choix. pour arrêter la lecture. Notes: 12. Press TIMER / on the remote again to complete the Timer On/Off setting. The following icon " to show the Timer is set. Note: The wake up sound level will get progressively louder to the preset volume level. 13. Press TIMER / on the remote control to turn the Timer on or off. The icon " " " will stay on the LCD display will be on or off each time you press. SLEEP You can set a certain period of time after which the set will switch off to Standby Mode. On the remote control, press SLEEP / repeatedly to select the desired time period options (in minutes): Display shows in sequence: SLEEP 90, 80, 70, 60, 50, 40, 30, 20, 10 Display shows the selected option briefly and returns to its previous status. To de-activate the Sleep Timer, press SLEEP / again to 00 or Press POWER / VOLUME CONTROL Press VOLUME + / or VOLUME - / on the Remote Control to adjust the volume. 5 to switch the unit to Standby Mode. 1. Le port USB nest pas compatible avec les périphériques nécessitant un câble rallonge USB 2. Lappareil nest pas conçu pour se connecter à un ordinateur. 3. Il nest pas garanti que toutes les périphériques de stockage USB et toutes les cartes SD soient compatibles avec lappareil. 4. Le système est compatible avec des Périphérique USB et cartes SD allant de 512MB et jusquà 4GB de mémoire flash. IMPORTANT: Ne pas déconnecter le périphérique de stockage USB pendant que lappareil se trouve sur le mode USB, cela pourrait endommager le périphérique ou les fichiers qui sy trouvent. Vous devez dabord éteindre votre appareil et ensuite retirer le périphérique de stockage USB. Caractéristiques USB Compatibilité USB : Interface - USB 2.0 Full speed, HOST (Les HUB USB ne sont pas compatibles) Corresponding Flash memory - Compatible avec MPEG Audio 1, 2, 2.5 - Compatible avec les couches 1, 2, 3 - Compatible avec un taux dencodage allant de 128 à 320 Kbps - Sous dossiers : 8 niveaux - Nombre de pistes / titres max 999 - Support ID3 tag V2.0 18 ANTENNA Réglage du réveil (Timer) For FM reception, the unit is provided with an external FM WIRE ANTENNA, move the wire until reception is clear and there is no interference. For AM reception, the unit is provided with a directional built-in ferrite antenna. Rotate the set to find the position in which the best reception can be obtained. Caution: Do not connect the external FM WIRE ANTENNA to an outside antenna. Lappareil peut être utilisé comme un réveil, alous la source (CD, TUNER, USB, SD CARD) prédéfinie se met à jouer à lheure programmée. Assurez vous davoir réglé lheure auparavant. USB & SD-CARD OPERATION 1. En mode STAND BY, appuyer et garder enfoncé TIMER / sur la télécommande pendant plus dune seconde. Le symbole " " et le mot TURN ON se met à clignoter sur lafficheur. Appuyer sur TIMER / télécommande pour commencer le régalge de la MISE EN MARCHE » (TURN ON). à nouveau sur la USB operation: 1. Press FUNCTION / to set the unit to USB mode. 2. Plug-in a USB mass storage device (not supplied) into the USB Port. READ is displayed whilst the system scans the contents of USB device. ou FB/ 2. Appuyer sur FF/ 3. Appuyer sur TIMER / 4. Appuyer sur FF/ 3. Track no. 1 of Root folder (Folder 1) will automatically play back after the USB device contents has been read. 4. Press FF/ or FB/ 5. Press PRESET + / 6. Press STOP/BAND / sur la télécommande dans le mode de réglage des minutes ou FB/ plusieurs fois pour régler les Minutes. 5. Appuyer sur TIMER / sur la télécommande à nouveau to commencer le réglage LEXTINCTION DU SYSTEME (System power off). Le symbole " " et TURN OFF clignotent sur lafficheur. once or repeatedly until the desired track number appears on the display. or PRESET / to select the desired album. to stop playback. 6. Appuyer sur TIMER / 7. Appuyer sur FF/ to set the unit to CARD mode. sur la télécommande à nouveau to commencer le réglage du Timer. ou FB/ 8. Appuyer sur TIMER / SD-Card operation: 1. Press FUNCTION / plusieurs fois pour régler les Heures. 9. Appuyer sur FF/ plusieurs fois pour régler les heures. sur la télécommande pour entrer dans le réglage des minutes. ou FB/ plusieurs fois pour régler les minutes 10.Appuyer sur TIMER / sur la télécommande à nouveau pour commencer à régler la source depuis laquelle vous souhaitez être réveillé. La radio est le mode par défaut.TUNER clignote alors sur lafficheur. 2. Insert the SD Card (not supplied) into the card slot. READ is displayed as the system scans the contents of the card. 3. Track no. 1 of Root folder (Folder 1) will automatically play back after the SD card contents has been read. 4. Press FF/ or FB/ 5. Press PRESET + / 6. Press STOP/BAND / once or repeatedly until the desired track number appears on the display. or PRESET / to select the desired album. to stop playback. TUNER Notes: 1. 2. 3. 4. pour sélectionner la source de réveil. 11.Appuyer sur FUNCTION / Lappareil vous réveillera avec la dernière station écoutée The USB Port does not support connection with a USB extension cable. This unit is not designed for communication with a computer directly. It is not guaranteed that all USB memory devices and SD cards will work on this audio system. The system supports USB devices/SD Cards of 512MB and up to 4GB Flash memory. IMPORTANT: Do not disconnect the USB device during USB mode, as this may damage the device or its files. Please power off first or press to select another Mode before safely disconnecting the USB device. CD USB AUX CARD 12.Appuyer sur TIMER / sur la télécommande à nouveau pour compléter le reglage On/Off du timer. Le symbole suivant " " reste affiché sur lafficheur pour montrer que le timer est activé. Note: Le volume augmentera progressivement pour atteindre le volume prédéfini. 13.Appuyer sur TIMER / sur la télécommande pour mettre le timer sur ON ou OFF. Le symbole " disparaitra à chaque fois que vous appuyez dessus. " s affichera ou SLEEP (Extinction Auto) USB Specification: Vous pouvez définir une certaine durée après laquelle lappareil passera en mode STAND BY. Interface - USB 2.0 Full speed, HOST (USB HUB is not supported) Corresponding Flash memory Compatible with MPEG Audio 1, 2, 2.5 Compatible with Layer 1, 2, 3 Compatible with Bit rate: 128 320 Kbps Subfolder nest : 8 levels Number of track / titles max 999 Support ID3 tag V2.0 Sur la télécommande, Appuyer sur SLEEP / plusieurs fois pour sélectionner la durée de votre choix (en minutes): Lafficheur indique des séquence : SLEEP 90, 80, 70, 60, 50, 40, 30, 20, 10 Lafficheur affiche brièvement la durée choisie et revient au mode précédent. Pour désactiber le mode Sleep Timer, Appuyer sur SLEEP / mettre lappareil en mode STAND BY. à nouveau jusquà 00 ou Appuyer sur POWER / to CONTROLE DU VOLUME Appuyer sur VOLUME + / 7 ou VOLUME - / sur la télécommande pour régler le volume. 16 Erasing the Program CONTROL LOCATORS The contents of the Program Memory can be erased as follows: - In STOP position, press REC/ERASE / - Press POWER / Select another sound source. Open the CD drawer. once; during Playback, press twice. RECORDING From CD to SD/USB The system can convert a complete CD into MP3 format and copy it to a USB mass storage device (or Flash Drive) or SD card (not supplied). It is also possible to copy a single MP3 track to USB/SD card or from USB /SD card to USB/SD card. 1. In CD playback mode, press REC/ERASE / to start ripping to USB/SD card (the default is to USB if both devices are detected), playback will stop and skip back to the beginning of the current track, the system will scan the contents of the USB device/SD card and create a folder to store the MP3 track(s). Resume CD playback and start ripping from that moment. The corresponding target device icon USB / CARD will start flashing on the display. 2. Press STOP/BAND / to exit CD ripping. EXTERNAL ANTENNA MP3 Copying 1. In CD-MP3, USB or SD card playback mode, press REC/ERASE / to start MP3 copying from CD to USB/SD card, or USB to SD card or vice versa. Playback will stop and the system will scan the contents of the USB/SD card and create a folder to store the MP3 track(s). 2. REC will show on the display. 3. COPY 01 will show on the display, the proportional copied percentage will be shown on the decimal number. 4. The target device icon USB or CARD will start flashing, the decimal number will be increment from 01 as MP3 copying starts; the process will stop when it has reached 100. 5. The current MP3 track will start playing back from the beginning. SUBWOOFER OUTPUT JACK AUX.IN JACK SUBWOOFER OUTPUT AUX. IN Encoding/Recording from AUX to SD/USB The system is capable to convert an audio signal from AUX input to MP3 format and store on a USB mass storage device or SD card (the default is to USB if both devices are detected). 1. Press FUNCTION / once or repeatedly to select AUX mode. to start ripping, the system will scan the contents of the USB / SD card and create a folder to 2. Press REC/ERASE / store MP3 tracks. 3. REC and RIPP TO are displayed, AUX will start flashing on the display. 4. The target device icon USB or CARD starts flashing as ripping begins. AC POWER CORD 5. Press STOP/BAND / to exit AUX ripping. Notes: · The message NO FUNCT will be displayed if any key is pressed during the AUX ripping process. · The message NO DEV will be shown if neither USB or SD card not detected. · The message FULL will be displayed if not enough memory is left on the device. POWER / STAND BY EQ EQ PRESET + REC PRESET - RANDOM ID3 Delete MP3 tracks for 2 seconds, the track that is currently playing is stopped SLEEP VOLUME + FUNC FUNCTION VOL PRESET VOLUME RANDOM SKIP FORWARD / + ID3 BAND REPEAT PROG MEM CLOCK PROGRAM REPEAT 0 1 2 TIMER 3 4 5 MONO STEREO 6 7 8 9 0-9 9 CD OPEN / CLOSE SLEEP STOP / BAND The system can delete previously recorded MP3 or existing files. 1. In USB or SD card playback mode, press and hold REC/ERASE / and will be deleted. 2. The message delete will be displayed. OPEN/ CLOSE MUTE REC PLAY / PAUSE SKIP BACKWARD - DELETE FUNCTION MUTE 14 TIMER MONO/STEREO IMPORTANTE MESURES DE PRECAUTION VEUILLEZ LIRE ATTENTIVEMENT TOUTES LES MESURES DE PRECAUTION SUIVANTES QUI SAPPLIQUENT A VOTRE APPAREIL. 1 Lire le mode demploi. Tous les conseils de sécurité et de fonctionnement doivent être lus avant de faire fonctionner lappareil. 2 Le mode demploi et les conseils de sécurité doivent être conservés pour un usage futur. 3 Tenir compte des avertissements. Et suivre toutes les indications du mode demploi. 4 Eau et humidité : Lappareil ne doit pas être utilisé à proximité dune source deau, par exemple près dune baignoire, dun lavabo, dun évier, dune piscine ou dans une cave humide ou tout endroit de ce type. 5 Toujours placer lappareil sur une surface stable, plane afin de lui assurer une stabilité maximale. 6 Lappareil doit être situé de soute que son emplacement ou sa position nempêche pas une bonne ventilation. Par exemple, il ne faut pas placer lappareil sur un lit, un canapé, un tapis ou une surface similaire,ce qui risquerait dobstruer les ouvertures de ventilation; ni lintégrer dans un meuble bibliothèque ou dans une vitrine de telle soute que lair ne puisse pas circuler dans les ouvertures de ventilation.. 7 Lappareil doit être placé à lécart de sources de chaleurs telles que radiateurs ou autres appareils produisant de la chaleur. 8 Lappareil doit être uniquement relié à une prise électrique du type décrit dans le mode demploi ou indiqué sur lappareil. 9 Lappareil peut être muni dune fiche protégée contre la surtension. Il sagit dun dispositif de sécurité. Sil est nécessaire de changer la fiche, sassurer que le dépanneur a utilisé une fiche courespondant aux recommandations du fabricant et qui est, comme la fiche douigine, protégée contre la surtension. 10 Lappareil doit uniquement être nettoyé confoumément aux recommandations du fabricant. 11 Il faut placer lantenne extérieure éloignée des lignes à haute tension. 12 Le coudon dalimentation de lappareil doit être débranché de la prise quand lappareil reste inutilisé pendant une période prolongée. 13 Il faut éviter de faire tomber des objets ou de verser des liquides dans les ouvertures de lappareil. 14 La réparation de lappareil doit être confiée à un personnel technique qualifié lousque : A. le coudon électrique de la fiche a été endommagé ; ou B. des objets sont tombés ou un liquide a été déversé dans lappareil ; ou C. lappareil a été exposé à la pluie ; ou D. lappareil ne semble pas fonctionner noumalement ou fonctionne nettement moins bien; ou E. lappareil est tombé ou son boîtier a été endommagé. 15 Lutilisateur ne doit pas essayer de se charger de lentretien au-delà de ce qui est spécifié dans le mode demploi. Toutes les autres manipulations doivent être confiées à un personnel qualifié. 11 AVERTISSEMENT POUR PREVENIR LES RISQUES DINCENDIE OU DELECTROCUTION, NE PAS EXPOSER CET APPAREIL A LA PLUIE OU A LHUMIDITE. NE PAS ENLEVER SON BOITIER. TEMOIN LUMINEUX SOUDES. LAPPAREIL NE CONTIENT AUCUNE PIECE UTILE POUR LUTILISATEUR. CONFIER LENTRETIEN ET LES REPARATION A UN PERSONNEL QUALIFIE. ATTENTION RISQUE D ELECTROCUTION Le symbole de leclair terminé par une flèche dans un triangle isocèle avertit lutillsateur de la présence dun voltage dangereux non isolé à linterieur de lappareil qui peur etre assez puissant pour constituer un risque delectrocution AVERTISSEMENT : POUR PREVENIR LES RISQUES DINCENDIE OU DELECTROCUTION, NE PAS EXPOSER CET APPAREIL A LA PLUIE OU A LHUMIDITE.NE PAS ENLEVER SON BOITIER. TEMOIN LUMINEUX SOUDES. LAPPAREIL NE CONTIENT AUCUNE PIECE UTILE POUR LUTILISATEUR. CONFIER LENTRETIEN ET LES REPARATION A UN PERSONNEL QUALIFIE. Le point dexclamation dans un triangle isocèle avertit lutilisateur de la présence dinstructions importantes pour le fonctionnement et lentretien dans la documentation accompagnant lappareil. Caracteristiques Frequences radio USB Pout 2.0 Consommation Antennes Alimentation Taille des HP Wattage des HP USB/SD Aux-In Subwoofer Jack Accessouies inclus : : : : : : : : : : : : : : AM 522 - 1620 KHz FM 87.5 - 108 MHz Full Speed 512MB - 4GB (Suppout FAT16, FAT32) 32W FM Antenne Externe AM Antenne en ferrite intégrée AC 230V ~ 50Hz 4 4 OhmDynamic type x 2 2 x 5W pmpo Jusquà 4GB de mémoire flash 3.5mm dia 3.5mm dia / 56K resistou Télécommande Câble Aux (3.5mm dia. Jack Plug) *Le design et les caractéristiques peuvent changer sans notification préalable. 12